

Windows 10 may not include a native feature to pick colors, but you can use the tool built into PowerToys to add a system-wide color picker. The Color Picker included with PowerToys allows you to quickly find the technical information for any color on the screen.
Once you install the application and enable the tool, you can use a keyboard shortcut to launch the experience. Then you can use the mouse pointer to identify the color of a particular element in various formats (including HEX, RGB, HSL, CMYK, and more) and copy it to the clipboard. The tool even includes an editor to modify and create a new color from the original pick.
Although most users usually do not need to worry about knowing the color information of an element on the screen, this is an essential feature for many web and app developers, photo and video editors, and anyone who works with colors.
In this guide, you will learn the steps to use the PowerToys’ Color Picker tool to find the color information in different formats on Windows 10.
- Enable PowerToys Color Picker on Windows 10
- Use PowerToys Color Picker on Windows 10
Enable PowerToys Color Picker on Windows 10
To enable the Color Picker tool on PowerToys, use these steps:
-
Open PowerToys on Windows 10.
-
Click on Color Picker.
-
Turn on the Enable Color Picker toggle switch.
-
(Optional) Under the “Shortcuts” section, use the Activate Color Picker option to create a custom keyboard shortcut to open the tool.
-
Under the Activation behavior section, select the behavior when using the tool:
- Color Picker with editor mode enabled: When opening the tool, you can pick a color, and the editor will appear to copy the color in HEX, RGB, or any other format.
- Editor: When opening the tool, only the editor will open, and you will need to click the Pick button to select a color.
- Copy Picker only: When opening the tool, you will be able to choose the color, and the code will be copied to the clipboard automatically without opening the editor.

PowerToys Color Picker settings -
Under the “Picker behavior” section, you can use the drop-down menu to select the default format that will be copied to the clipboard.
-
Under the “Editor” section, choose the color format you want to use. For example, Hex, RGB, HSL, and CMYK.

Color Picker formats -
Click on General.
-
Under the “Appearance & behavior” section, turn on the Run at startup toggle switch.


Once you complete the steps, you can proceed to use the tool to pick colors.
Use PowerToys Color Picker on Windows 10
To pick a color from an image on Windows 10, use these steps:
-
Open PowerToys.
Quick note: You can always close the application as it will keep running in the background.
-
Use the Windows key + Shift + C keyboard shortcut. (Or the shortcut you assigned for the tool.)
-
Hover and click with the mouse the color you want.

Pick color with mouse hover -
In the Color Picker editor, click the Copy button for the color format you want to use.

Copy color to clipboard -
(Optional) Select one of the alternative colors provided by the editor.
-
(Optional) Click on the middle of the color suggestion to open the interface to adjust the color.
-
Click the OK button.
Color Picker editor -
Click the Copy button again (if applicable).
-
Click the Close (x) button.


After you complete the steps, you can use the color in your application, picture, or any other project.
Mauro Huculak is a
Windows How-To Expert and founder of
Pureinfotech
(est. 2010). With over 21 years as a technology writer and IT Specialist,
Mauro specializes in Windows, software, and cross-platform systems such as Linux, Android, and macOS.
Certifications:
Microsoft Certified Solutions Associate (MCSA),
Cisco Certified Network Professional (CCNP),
VMware Certified Professional (VCP),
and
CompTIA A+ and Network+.
Mauro is a recognized Microsoft MVP and has also been a long-time contributor to Windows Central.
You can follow him on
YouTube,
Threads,
BlueSky,
X (Twitter),
LinkedIn and
About.me.
Email him at [email protected].
порекомендуйте новичку нормальную пипетку, пожалуйста! раньше пользовалась pixie, теперь не могу найти ничего годного, главные критерии:
1) чтобы работал в фоновом режиме поверх остальных окон
2) постоянно мониторил цвета
3) чтобы была горячая клавиша, дабы моментально копировать # цвета без надобности кликать на пипетку в окне приложения, переносить ее на нужную область, и не надо было нажимать на окошко с # цвета, чтобы его скопировать.
а может есть какие-то альтернативные методы считывать цвета откуда бы то ни было?
-
Вопрос задан
-
16708 просмотров
Have you ever wanted to copy a color from your screen and use it for your projects? Whether designing a website, editing an image, or creating a presentation, you might need to find the exact shade of a color that catches your eye. But how do you do that without guessing or through trial and error?
That’s where the Windows Color Picker comes in handy. It’s a free utility tool from Microsoft that lets you pick any color from any application on your Windows 10 PC. You can then copy the color code in different formats and use it according to your needs.
We’ll show you how to install and use the Windows Color Picker on your Windows PC below.

What Is the Windows Color Picker and What Is it Used For?
The Windows Color Picker is a tool that lets you pick any color from your screen and copy its code in different formats. It’s useful for anyone who works with colors, such as designers, developers, artists, or educators.

The color picker works with any application on your Windows PC. You can use it to find out what colors are used in a logo, an image, or in the app you’re using. You can also use it to create custom themes, palettes, or gradients for your projects.
Once you’ve picked a color, you can copy the color code in different formats, such as HEX, RGB, HSL, or CMYK. Next, you can adjust the color value with sliders or enter values with your keyboard. Finally, you can save the colors you picked to a palette and export them as a text file.
The Windows Color Picker is part of the PowerToys suite, a collection of useful tools for Windows 10 and Windows 11 users. You can download PowerToys from Microsoft’s website or via the Microsoft Store for free.
After the installation is complete, launch the PowerToys app from the Start menu.

In the PowerToys Settings window, press Color Picker in the menu on the left. On the right, ensure the Enable Color Picker slider is switched to On.

Once Windows Color Picker is enabled, you can start using it immediately.
How to Use the Windows Color Picker
Once you’ve enabled the color picker, you can use it anytime by pressing the keyboard shortcut (Windows key + Shift + C by default) on your keyboard.
Once you activate the shortcut, a small pop-up box will appear next to your mouse cursor. This box will display a preview of the color you are pointing to in the form of a square and its corresponding hexadecimal (hex) code.
You can point your mouse cursor at any on-screen item to find the color at that position. For instance, you could point it at an image you’ve opened or an application’s user interface element (such as a button or sidebar).
To see additional information about a color on-screen, simply hover over it and press the left mouse button. This action will prompt a window to appear, providing you with the hex color code, RGB (red, green, blue) value, and HSL (hue, saturation, lightness) value of the selected color.
To copy one of these values as a text string to your clipboard, hover over it and select the Copy icon.

The color value you have chosen can be further customized within the color picker by clicking in the center of the large color bar at the top of the window. This action will take you to a new menu with values you can adjust with either your mouse or manually using your keyboard.
When you’re done, click Select. The color will be added to the menu on the left for you to use or export later.

If you need to remove a color from the palette on the side of the window, right-click the color square and select Remove. To export the palette as a text file, right-click any color square and select Export instead.

If you choose to Export, you can select Grouped by color or Grouped by format, depending on how you’d like the file to be exported.
How to Customize the Windows Color Picker
The Windows Color Picker also allows you to customize some of its settings and features. For example, you can change the behavior of the activation shortcut, the default format of the copied color, and the appearance of the editor window.
To customize the Windows Color Picker, open PowerToys Settings and select Color Picker in the sidebar. You’ll see a list of options you can tweak according to your preferences.

Here are some of the settings that you can currently customize:
- Activation keyboard shortcut: You can change the keyboard shortcut that activates the color picker. By default, it’s Windows key + Shift + C, but you can choose any combination of keys that works for you.

- Behavior of the activation shortcut: You can choose what happens when you press the activation shortcut. You can either open the color picker with the editor or without it.

- Default format of a copied color: You can choose which format of the color code you want to copy to your clipboard by default. You can choose from HEX, RGB, HSL, CMYK, and more.

- Visible color formats in the editor window: You can choose which color formats are visible in the editor window and in what order they appear. You can also change the size and opacity of the editor window.

You can experiment with different settings and see what works best for you. Any changes you make aren’t permanent—you can repeat these steps to restore them afterward.
Using the Windows Color Picker
If you’re a graphics designer or media creator, using the Window Color Picker is a great way to quickly identify colors (and their representative color codes) in different formats and use them in future projects.
However, there are other tools you can use to help you pick out colors. For instance, you could use a color picker extension in Chrome to identify colors you like in Google Chrome (or Microsoft Edge. Also, try inverting colors in pictures to find striking colors for a more dramatic effect in your images.
Are you a graphics designer looking to make a professional document? Then, explore some free tools to make amazing infographics.
Related Posts
- How to Fix a “This file does not have an app associated with it” Error on Windows
- How to Add OneDrive to Windows File Explorer
- How to Fix an Update Error 0x800705b4 on Windows
- How to Resolve “A JavaScript error occured in the main process” Error on Windows
- How to Fix the Network Discovery Is Turned Off Error on Windows
A color picker is a tool that you can use to find the exact color that’s used in an image. The colors you see on your desktop or on a website all have a particular number that you can use to reference them. Of course, no one can actually remember the color code for a color except for maybe white which is FFFFFF or black which is 000000. If you like the color in an image and want to use it as an accent color, or use it for graphs you’re creating in Microsoft Word, you need to find the exact code for it. There are a lot of free apps that let you pick a color from an image but Windows 10 comes with one out of the box that can pick colors.
Paint has a color picker tool. You might not use the app for much but it’s still a very capable one and it’s already installed on your system making it the perfect solution for when you’re in a pinch.
Open the image in Paint. Look for the little eye dropper tool on the Home tab on the ribbon. It’s next to the eraser tool. Select it and click the part of the image you want to pick the color for. The color will be selected for the Color 1 swatch.
Once the color has been picked, you need to find its code. Click the Edit Colors button next to the Edit with Paint 3D button. This will open the Edit Colors window with the color in Color 1 already selected.
Be careful you do not accidentally change the color on this window. Take note of the values in the Red, Green, and Blue fields. These three values give you the RGB value of the color.
Color codes are either in HEX values or RGB values. You can convert one to the other. If you intend to enter the color in a different app, check if it takes HEX values or RGB values.
You can use Google to convert codes from RGB to HEX. Simply enter RGB to HEX in Google search and a little app will open on the Google search results page. Edit the RGB values to match the ones from the Paint app and the HEX value will update in real time.
You can then copy the HEX value and paste it in an app, or share it with someone. There are a lot of apps that can convert between RGB and HEX values and no app is better than the other at converting it.

Fatima Wahab
Fatima has been writing for AddictiveTips for six years. She began as a junior writer and has been working as the Editor in Chief since 2014.
Fatima gets an adrenaline rush from figuring out how technology works, and how to manipulate it. A well-designed app, something that solves a common everyday problem and looks
Quick Links
-
Install PowerToys and Enable Color Picker
-
Activate Color Picker With a Keyboard Shortcut
Summary
- Install Microsoft’s PowerToys utility to quickly bring up a color picker and identify any color on screen in hex, RGB, or HSL format.
- Press Windows+Shift+C to copy color values, adjust colors, and add them to your saved color palette using the color picker window.
- You can change the Color Picker hotkey by navigating to PowerToys Settings > Color Picker, and setting a new hotkey.
Need to figure out a color quickly? Using Microsoft’s free PowerToys utility for Windows 10, you can instantly bring up a color picker with a keyboard shortcut and use your mouse cursor to identify any color on screen in hex, RGB, or HSL format. Here’s how to do it.
Install PowerToys and Enable Color Picker
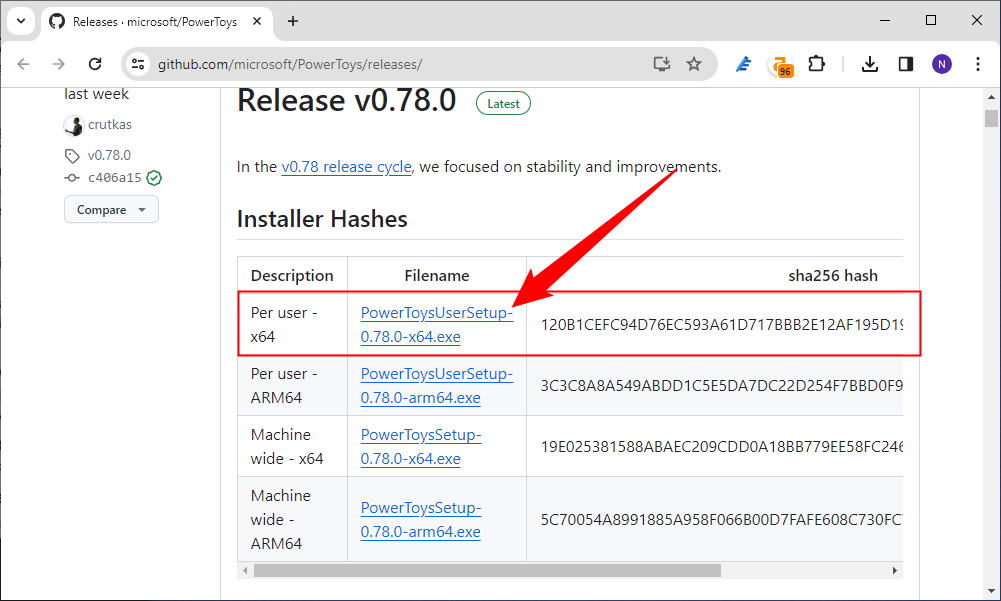
To use Microsoft’s handy system-wide color picker, you’ll need to download PowerToys from Microsoft’s website first. You’ll find the latest release listed toward the top of the download page linked above. Download an EXE file such as «PowerToysSetup-0.78-x64.exe» (The name will vary based on the latest release.) and run it.
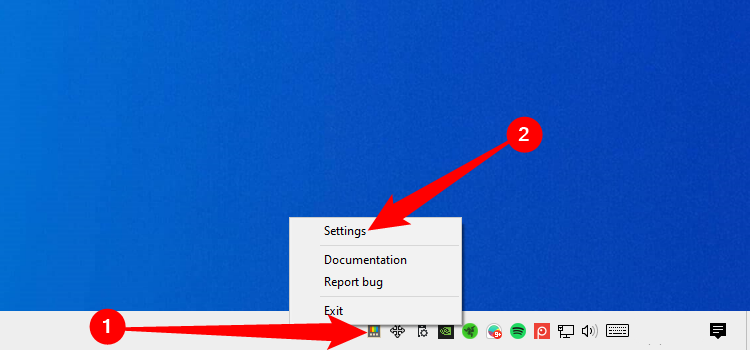
After the installation process is complete, launch PowerToys Settings by right-clicking the icon on your taskbar, or from your desktop or the Start menu.
Click «Color Picker» in the sidebar, then make sure that the «Enable Color Picker» switch is in the «On» position.
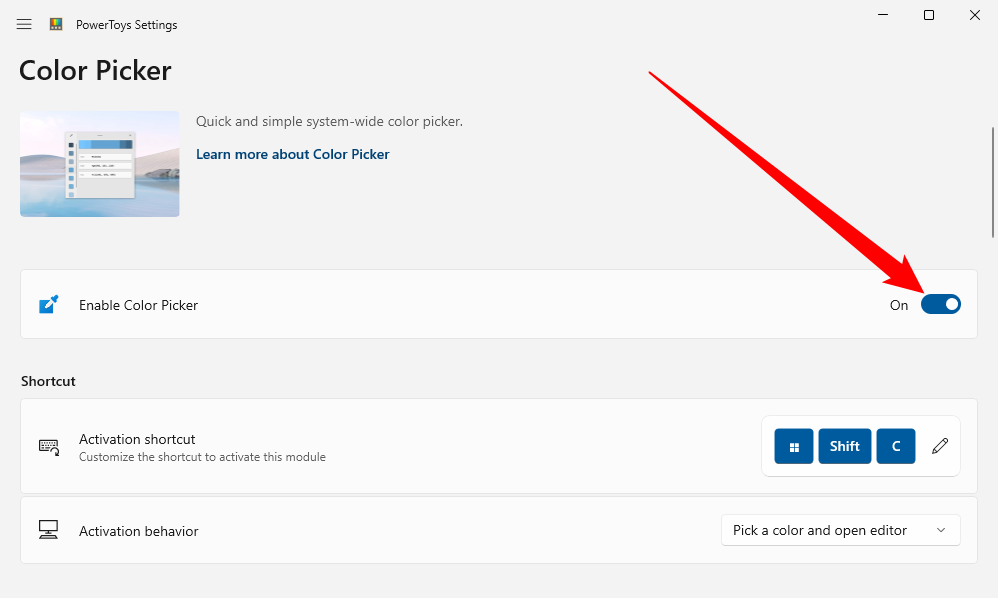
By default, you’ll use Windows+Shift+C to activate the color picker. You can change this keyboard shortcut to your preferred one from this screen, if you like.
Next, close PowerToys and get ready to grab some colors. The PowerToys Settings app does not need to be running for Color Picker to work.
Activate Color Picker With a Keyboard Shortcut
Once Color Picker is enabled, you can use it at any time by pressing Windows+Shift+C (or whatever keyboard shortcut you chose) on your keyboard. After pressing the shortcut, you’ll see a small pop-up box beside your mouse cursor that shows a square preview of the color you’re pointing to and the hexadecimal code (often called «hex» for short) for that color.

You can point your cursor at any color on screen that you want, including icons, applications, images, desktop backgrounds, the taskbar, and more. If you want more info on the color, click the left mouse button while hovering over it, and a window will pop up.
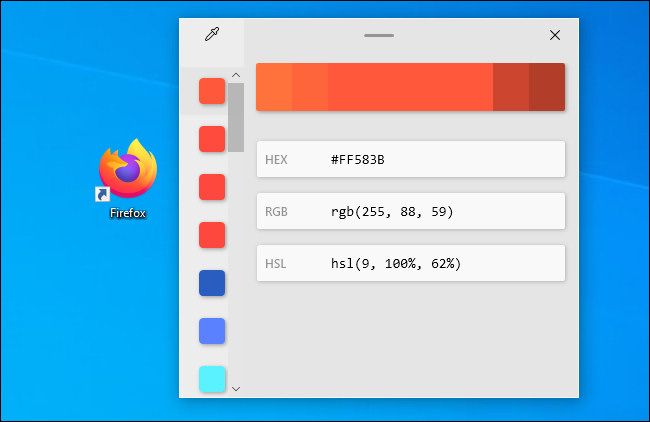
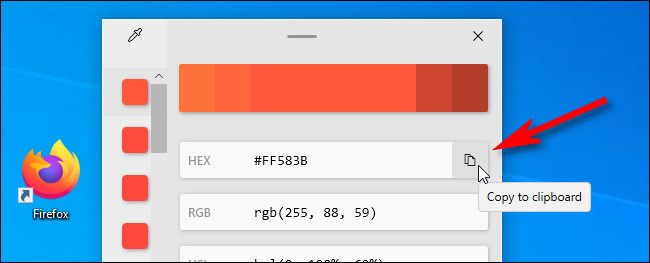
This window displays the hex color code, the RGB (red, green, blue) value, and the HSL (hue, saturation, lightness) value of the color you just selected. If you’d like to copy one of those values (as a text string) to the clipboard, hover over it and click the «copy» icon that appears.
Also, you can adjust the color value you just selected within Color Picker by clicking the center of the large color bar near the top of the window.
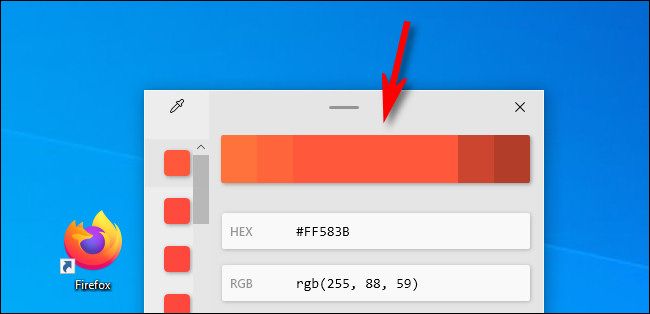
After clicking the color bar, you’ll see another screen with sliders that allow you to adjust the color with your mouse or by entering values with your keyboard.
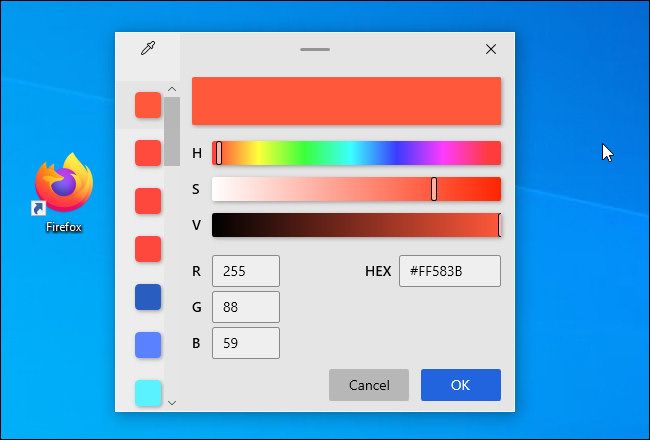
When you’re done, click «OK,» and then the color will be added to your saved color palette, which is the vertical column of boxes along the left side of the window. If you need to remove a color from the palette on the side of the window, right-click the color square and select «Remove.»
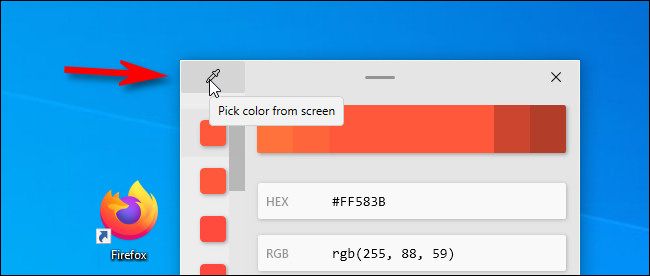
If you’d like to leave this window and pick another color, click the eyedropper icon in the upper-left corner of the window.
The detail window will close and you can repeat the process again, selecting any color you’d like.
To leave Color Picker at any time, press Escape on your keyboard or click somewhere to call up the detail window again and click the «X» button in the upper-right corner to close the window. Whenever you need Color Picker again, just hit Windows+Shift+C from anywhere and you’ll be back to picking colors in no time.
It’s a colorful world out there, so have fun!