
Symptoms
Note This article replaces Knowledge Base article 976902.
Important This article describes a hotfix that prevents the following issue. For more information about how to recover from this issue after it has already occurred, click the following article number to view the article in the Microsoft Knowledge Base:
975484 Your computer may freeze or restart to a black screen that has a «0xc0000034» error message after you install Service Pack 1 on Windows 7 or Windows 2008 R2For consumer friendly steps on how to recover from this issue after it has already occurred, see the following article on the Microsoft website.
-
You install Windows 7 Service Pack 1 (SP1), Windows 2008 R2 Service Pack 1 (SP1), or Windows Embedded Standard 7 SP1 on a computer.
-
You install some other updates before you restart the computer to complete the installation process. Or, the service pack is installed at the same time as other updates by using Windows Server Update Services (WSUS).
In this scenario, the computer may stop responding or restart. If the computer restarts, you receive an error message that resembles the following on a black screen:
0xC0000034
Note If the computer stops responding and you restart the computer, you receive the same error message.
Cause
This issue occurs because Windows tries to perform operations in the Primitive Operation Queue (POQ) two times during the service pack installation process. The second attempt to perform these operations fails (because the operations have already been performed). Therefore, Windows generates a «0xc0000034» error.
Resolution
This update should be installed to resolve this issue with Windows 7 SP1, Windows Server 2008 R2 SP1, and Windows Embedded Standard 7 SP1, and to help avoid this issue with future updates.
Update information
How to obtain this update
Windows Update
To resolve this issue in Windows 7 SP1, Windows Server 2008 R2 SP1, and Windows Embedded Standard 7 SP1, install this update from Windows Update.
Microsoft Update Catalog
The files are available for download from the Microsoft Update Catalog.
For more information about how to download Microsoft support files, click the following article number to view the article in the Microsoft Knowledge Base:
119591 How to obtain Microsoft support files from online services
Microsoft scanned this file for viruses. Microsoft used the most current virus-detection software that was available on the date that the file was posted. The file is stored on security-enhanced servers that help prevent any unauthorized changes to the file.
Notes
-
You must install this update package on a computer that is running Windows 7 or Windows Server 2008 R2 operating system. You cannot install this update on an offline image.
-
In a Windows Server Update Services (WSUS) environment, this update is marked as «Exclusive.» You will only be offered this update if you have installed all other updates that are marked as «Important.»
Prerequisites
To apply this update, you must be running one of the following operating systems:
-
Windows 7
-
Windows 7 Service Pack 1 (SP1)
-
Windows Server 2008 R2
-
Windows Server 2008 R2 Service Pack 1 (SP1)
-
Windows Embedded Standard 7 SP1
Registry information
To use the update in this package, you do not have to make any changes to the registry.
Restart requirement
You do not have to restart the computer after you apply this update.
Update replacement information
This update does not replace a previously released update.
Update removal information
You cannot remove this update.
File information
The global version of this hotfix installs files that have the attributes that are listed in the following tables. The dates and the times for these files are listed in Coordinated Universal Time (UTC). The dates and the times for these files on your local computer are displayed in your local time together with your current daylight saving time (DST) bias. Additionally, the dates and the times may change when you perform certain operations on the files.
Note The files in the update package may be added to the %windir%\WinSxS\ folder instead of the %windir%\System32\ folder.
Windows 7 and Windows Server 2008 R2 file information notes
-
The files that apply to a specific product, SR_Level (RTM, SPn), and service branch (LDR, GDR) can be identified by examining the file version numbers as shown in the following table.
Version
Product
SR_Level
Service branch
6.1.760
1.
17xxxWindows 7 and Windows Server 2008 R2
SP1
GDR
-
GDR service branches contain only those fixes that are widely released to address widespread, extremely important issues. LDR service branches contain hotfixes in addition to widely released fixes.
-
The MANIFEST files (.manifest) and the MUM files (.mum) that are installed for each environment are listed separately in the «Additional file information for Windows Server 2008 R2 and for Windows 7» section. MUM and MANIFEST files, and the associated security catalog (.cat) files, are extremely important to maintain the state of the updated components. The security catalog files, for which the attributes are not listed, are signed with a Microsoft digital signature.
For all supported x86-based versions of Windows 7
|
File name |
File version |
File size |
Date |
Time |
Platform |
|---|---|---|---|---|---|
|
Apds.dll |
6.1.7600.16385 |
1,798,144 |
14-Jul-2009 |
01:16 |
x86 |
|
Apircl.dll |
6.1.7601.17592 |
223,744 |
09-Apr-2011 |
05:57 |
x86 |
|
Apss.dll |
6.1.7600.16385 |
201,216 |
14-Jul-2009 |
01:16 |
x86 |
|
Cbscore.dll |
6.1.7601.17592 |
845,312 |
09-Apr-2011 |
05:57 |
x86 |
|
Cbsmsg.dll |
6.1.7600.16385 |
28,672 |
14-Jul-2009 |
01:15 |
x86 |
|
Cmiadapter.dll |
6.1.7601.17592 |
120,832 |
09-Apr-2011 |
05:57 |
x86 |
|
Cmitrust.dll |
6.1.7600.16385 |
296,448 |
14-Jul-2009 |
01:15 |
x86 |
|
Cmiv2.dll |
6.1.7601.17592 |
2,041,344 |
09-Apr-2011 |
05:57 |
x86 |
|
Cntrtextinstaller.dll |
6.1.7601.17592 |
143,872 |
09-Apr-2011 |
05:57 |
x86 |
|
Dpx.dll |
6.1.7601.17592 |
257,024 |
09-Apr-2011 |
05:57 |
x86 |
|
Drupdate.dll |
6.1.7600.16385 |
173,568 |
14-Jul-2009 |
01:15 |
x86 |
|
Drvstore.dll |
6.1.7601.17592 |
323,072 |
09-Apr-2011 |
05:57 |
x86 |
|
Esscli.dll |
6.1.7600.16385 |
266,240 |
14-Jul-2009 |
01:15 |
x86 |
|
Fastprox.dll |
6.1.7601.17514 |
606,208 |
20-Nov-2010 |
12:19 |
x86 |
|
Globalinstallorder.xml |
Not applicable |
1,973,556 |
05-Nov-2010 |
01:52 |
Not applicable |
|
Helpcins.dll |
6.1.7601.17514 |
105,472 |
20-Nov-2010 |
12:19 |
x86 |
|
Locdrv.dll |
6.1.7600.16385 |
229,888 |
14-Jul-2009 |
01:16 |
x86 |
|
Mofd.dll |
6.1.7600.16385 |
192,000 |
14-Jul-2009 |
01:15 |
x86 |
|
Mofinstall.dll |
6.1.7600.16385 |
58,880 |
14-Jul-2009 |
01:15 |
x86 |
|
Msdelta.dll |
6.1.7600.16385 |
305,152 |
14-Jul-2009 |
01:15 |
x86 |
|
Mspatcha.dll |
6.1.7600.16385 |
35,328 |
14-Jul-2009 |
01:15 |
x86 |
|
Oemhelpins.dll |
6.1.7600.16385 |
151,040 |
14-Jul-2009 |
01:16 |
x86 |
|
Pkgmgr.exe |
6.1.7601.17592 |
209,920 |
09-Apr-2011 |
05:56 |
x86 |
|
Poqexec.exe |
6.1.7601.17592 |
123,904 |
09-Apr-2011 |
05:56 |
x86 |
|
Repdrvfs.dll |
6.1.7600.16385 |
300,544 |
14-Jul-2009 |
01:16 |
x86 |
|
Smiengine.dll |
6.1.7601.17592 |
697,856 |
09-Apr-2011 |
05:57 |
x86 |
|
Smipi.dll |
6.1.7601.17592 |
98,816 |
09-Apr-2011 |
05:57 |
x86 |
|
Svcini.exe |
6.1.7600.16385 |
16,384 |
14-Jul-2009 |
01:14 |
x86 |
|
Wbemcomn.dll |
6.1.7601.17514 |
363,008 |
20-Nov-2010 |
12:21 |
x86 |
|
Wbemcore.dll |
6.1.7601.17592 |
780,288 |
09-Apr-2011 |
05:57 |
x86 |
|
Wbemprox.dll |
6.1.7600.16385 |
29,184 |
14-Jul-2009 |
01:16 |
x86 |
|
Wcmtypes.xsd |
Not applicable |
1,047 |
10-Jun-2009 |
21:46 |
Not applicable |
|
Wcp.dll |
6.1.7601.17592 |
1,910,784 |
09-Apr-2011 |
05:57 |
x86 |
|
Wdscore.dll |
6.1.7601.17592 |
189,952 |
09-Apr-2011 |
05:57 |
x86 |
|
Wmicmiplugin.dll |
6.1.7601.17592 |
351,232 |
09-Apr-2011 |
05:57 |
x86 |
|
Wmiutils.dll |
6.1.7600.16385 |
85,504 |
14-Jul-2009 |
01:16 |
x86 |
|
Wrpint.dll |
6.1.7601.17592 |
54,272 |
09-Apr-2011 |
05:57 |
x86 |
|
X86_installed |
Not applicable |
9 |
10-Jun-2009 |
21:19 |
Not applicable |
|
Xmllite.dll |
1.3.1000.0 |
180,224 |
14-Jul-2009 |
01:16 |
x86 |
For all supported x64-based versions of Windows 7 and of Windows Server 2008 R2
|
File name |
File version |
File size |
Date |
Time |
Platform |
|---|---|---|---|---|---|
|
Amd64_installed |
Not applicable |
9 |
10-Jun-2009 |
20:36 |
Not applicable |
|
Apds.dll |
6.1.7600.16385 |
2,172,928 |
14-Jul-2009 |
01:41 |
x64 |
|
Apircl.dll |
6.1.7601.17592 |
276,480 |
09-Apr-2011 |
07:00 |
x64 |
|
Apss.dll |
6.1.7600.16385 |
235,008 |
14-Jul-2009 |
01:41 |
x64 |
|
Cbscore.dll |
6.1.7601.17592 |
976,384 |
09-Apr-2011 |
06:59 |
x64 |
|
Cbsmsg.dll |
6.1.7600.16385 |
28,672 |
14-Jul-2009 |
01:40 |
x64 |
|
Cmiadapter.dll |
6.1.7601.17592 |
125,952 |
09-Apr-2011 |
06:59 |
x64 |
|
Cmitrust.dll |
6.1.7600.16385 |
477,696 |
14-Jul-2009 |
01:40 |
x64 |
|
Cmiv2.dll |
6.1.7601.17592 |
3,739,136 |
09-Apr-2011 |
06:59 |
x64 |
|
Cntrtextinstaller.dll |
6.1.7601.17592 |
171,008 |
09-Apr-2011 |
06:59 |
x64 |
|
Dpx.dll |
6.1.7601.17592 |
399,872 |
09-Apr-2011 |
07:00 |
x64 |
|
Drupdate.dll |
6.1.7600.16385 |
203,776 |
14-Jul-2009 |
01:40 |
x64 |
|
Drvstore.dll |
6.1.7601.17592 |
423,424 |
09-Apr-2011 |
07:00 |
x64 |
|
Esscli.dll |
6.1.7600.16385 |
440,320 |
14-Jul-2009 |
01:40 |
x64 |
|
Fastprox.dll |
6.1.7600.16385 |
909,312 |
14-Jul-2009 |
01:40 |
x64 |
|
Globalinstallorder.xml |
Not applicable |
1,973,556 |
05-Nov-2010 |
01:52 |
Not applicable |
|
Helpcins.dll |
6.1.7601.17514 |
142,336 |
20-Nov-2010 |
13:26 |
x64 |
|
Locdrv.dll |
6.1.7600.16385 |
370,176 |
14-Jul-2009 |
01:41 |
x64 |
|
Mofd.dll |
6.1.7600.16385 |
278,528 |
14-Jul-2009 |
01:41 |
x64 |
|
Mofinstall.dll |
6.1.7600.16385 |
76,288 |
14-Jul-2009 |
01:41 |
x64 |
|
Msdelta.dll |
6.1.7600.16385 |
451,584 |
14-Jul-2009 |
01:41 |
x64 |
|
Mspatcha.dll |
6.1.7600.16385 |
46,592 |
14-Jul-2009 |
01:41 |
x64 |
|
Oemhelpins.dll |
6.1.7600.16385 |
222,208 |
14-Jul-2009 |
01:41 |
x64 |
|
Pkgmgr.exe |
6.1.7601.17592 |
199,168 |
09-Apr-2011 |
06:58 |
x64 |
|
Poqexec.exe |
6.1.7601.17592 |
142,336 |
09-Apr-2011 |
06:58 |
x64 |
|
Repdrvfs.dll |
6.1.7600.16385 |
451,584 |
14-Jul-2009 |
01:41 |
x64 |
|
Smiengine.dll |
6.1.7601.17592 |
933,376 |
09-Apr-2011 |
07:00 |
x64 |
|
Smipi.dll |
6.1.7601.17592 |
104,448 |
09-Apr-2011 |
07:00 |
x64 |
|
Svcini.exe |
6.1.7600.16385 |
17,920 |
14-Jul-2009 |
01:39 |
x64 |
|
Wbemcomn.dll |
6.1.7601.17514 |
529,408 |
20-Nov-2010 |
13:27 |
x64 |
|
Wbemcore.dll |
6.1.7601.17592 |
1,225,216 |
09-Apr-2011 |
07:00 |
x64 |
|
Wbemprox.dll |
6.1.7600.16385 |
43,520 |
14-Jul-2009 |
01:41 |
x64 |
|
Wcmtypes.xsd |
Not applicable |
1,047 |
10-Jun-2009 |
21:08 |
Not applicable |
|
Wcp.dll |
6.1.7601.17592 |
2,760,704 |
09-Apr-2011 |
07:00 |
x64 |
|
Wdscore.dll |
6.1.7601.17592 |
271,360 |
09-Apr-2011 |
07:00 |
x64 |
|
Wmicmiplugin.dll |
6.1.7601.17592 |
524,288 |
09-Apr-2011 |
07:00 |
x64 |
|
Wmiutils.dll |
6.1.7600.16385 |
137,216 |
14-Jul-2009 |
01:41 |
x64 |
|
Wrpint.dll |
6.1.7601.17592 |
60,928 |
09-Apr-2011 |
07:00 |
x64 |
|
Xmllite.dll |
1.3.1000.0 |
199,680 |
14-Jul-2009 |
01:41 |
x64 |
|
Globalinstallorder.xml |
Not applicable |
1,973,556 |
05-Nov-2010 |
01:52 |
Not applicable |
|
Wcmtypes.xsd |
Not applicable |
1,047 |
10-Jun-2009 |
21:46 |
Not applicable |
|
X86_installed |
Not applicable |
9 |
10-Jun-2009 |
21:19 |
Not applicable |
For all supported IA-64-based versions of Windows Server 2008 R2
|
File name |
File version |
File size |
Date |
Time |
Platform |
|---|---|---|---|---|---|
|
Apds.dll |
6.1.7601.17592 |
3,342,848 |
09-Apr-2011 |
05:39 |
IA-64 |
|
Apircl.dll |
6.1.7601.17592 |
752,128 |
09-Apr-2011 |
05:39 |
IA-64 |
|
Apss.dll |
6.1.7601.17592 |
560,128 |
09-Apr-2011 |
05:39 |
IA-64 |
|
Cbscore.dll |
6.1.7601.17592 |
1,835,520 |
09-Apr-2011 |
05:34 |
IA-64 |
|
Cbsmsg.dll |
6.1.7600.16385 |
40,448 |
14-Jul-2009 |
01:45 |
IA-64 |
|
Cmiadapter.dll |
6.1.7601.17592 |
284,672 |
09-Apr-2011 |
05:35 |
IA-64 |
|
Cmitrust.dll |
6.1.7600.16385 |
984,576 |
14-Jul-2009 |
01:45 |
IA-64 |
|
Cmiv2.dll |
6.1.7601.17592 |
6,536,192 |
09-Apr-2011 |
05:35 |
IA-64 |
|
Cntrtextinstaller.dll |
6.1.7601.17592 |
356,864 |
09-Apr-2011 |
05:35 |
IA-64 |
|
Dpx.dll |
6.1.7601.17592 |
770,560 |
09-Apr-2011 |
05:35 |
IA-64 |
|
Drupdate.dll |
6.1.7600.16385 |
390,144 |
14-Jul-2009 |
01:46 |
IA-64 |
|
Drvstore.dll |
6.1.7601.17592 |
742,400 |
09-Apr-2011 |
05:35 |
IA-64 |
|
Esscli.dll |
6.1.7600.16385 |
1,011,200 |
14-Jul-2009 |
01:46 |
IA-64 |
|
Fastprox.dll |
6.1.7600.16385 |
2,099,712 |
14-Jul-2009 |
01:46 |
IA-64 |
|
Globalinstallorder.xml |
Not applicable |
1,973,556 |
05-Nov-2010 |
01:51 |
Not applicable |
|
Helpcins.dll |
6.1.7601.17592 |
187,904 |
09-Apr-2011 |
05:36 |
IA-64 |
|
Ia64_installed |
Not applicable |
9 |
10-Jun-2009 |
20:39 |
Not applicable |
|
Locdrv.dll |
6.1.7600.16385 |
803,328 |
14-Jul-2009 |
01:48 |
IA-64 |
|
Mofd.dll |
6.1.7600.16385 |
643,584 |
14-Jul-2009 |
01:47 |
IA-64 |
|
Mofinstall.dll |
6.1.7600.16385 |
192,512 |
14-Jul-2009 |
01:47 |
IA-64 |
|
Msdelta.dll |
6.1.7600.16385 |
890,368 |
14-Jul-2009 |
01:47 |
IA-64 |
|
Mspatcha.dll |
6.1.7600.16385 |
111,104 |
14-Jul-2009 |
01:47 |
IA-64 |
|
Oemhelpins.dll |
6.1.7600.16385 |
420,352 |
14-Jul-2009 |
01:48 |
IA-64 |
|
Pkgmgr.exe |
6.1.7601.17592 |
334,848 |
09-Apr-2011 |
05:34 |
IA-64 |
|
Poqexec.exe |
6.1.7601.17592 |
272,384 |
09-Apr-2011 |
05:34 |
IA-64 |
|
Repdrvfs.dll |
6.1.7600.16385 |
1,063,936 |
14-Jul-2009 |
01:48 |
IA-64 |
|
Smiengine.dll |
6.1.7601.17592 |
1,953,792 |
09-Apr-2011 |
05:39 |
IA-64 |
|
Smipi.dll |
6.1.7601.17592 |
186,880 |
09-Apr-2011 |
05:39 |
IA-64 |
|
Svcini.exe |
6.1.7600.16385 |
41,984 |
14-Jul-2009 |
01:45 |
IA-64 |
|
Wbemcomn.dll |
6.1.7601.17514 |
1,005,056 |
20-Nov-2010 |
10:28 |
IA-64 |
|
Wbemcore.dll |
6.1.7601.17592 |
2,959,872 |
09-Apr-2011 |
05:40 |
IA-64 |
|
Wbemprox.dll |
6.1.7600.16385 |
102,912 |
14-Jul-2009 |
01:49 |
IA-64 |
|
Wcmtypes.xsd |
Not applicable |
1,047 |
10-Jun-2009 |
21:13 |
Not applicable |
|
Wcp.dll |
6.1.7601.17592 |
5,130,752 |
09-Apr-2011 |
05:40 |
IA-64 |
|
Wdscore.dll |
6.1.7601.17592 |
600,064 |
09-Apr-2011 |
05:40 |
IA-64 |
|
Wmicmiplugin.dll |
6.1.7601.17592 |
939,520 |
09-Apr-2011 |
05:40 |
IA-64 |
|
Wmiutils.dll |
6.1.7600.16385 |
273,408 |
14-Jul-2009 |
01:50 |
IA-64 |
|
Wrpint.dll |
6.1.7601.17592 |
128,000 |
09-Apr-2011 |
05:40 |
IA-64 |
|
Xmllite.dll |
1.3.1000.0 |
446,976 |
14-Jul-2009 |
01:50 |
IA-64 |
|
Globalinstallorder.xml |
Not applicable |
1,973,556 |
05-Nov-2010 |
01:52 |
Not applicable |
|
Wcmtypes.xsd |
Not applicable |
1,047 |
10-Jun-2009 |
21:46 |
Not applicable |
|
X86_installed |
Not applicable |
9 |
10-Jun-2009 |
21:19 |
Not applicable |
For all supported x86-based versions of Windows Embedded Standard 7
|
File name |
File version |
File size |
Date |
Time |
Platform |
|
Apds.dll |
6.1.7600.16385 |
1,798,144 |
14-Jul-09 |
1:16 |
x86 |
|
Apircl.dll |
6.1.7601.17592 |
223,744 |
9-Apr-11 |
5:57 |
x86 |
|
Apss.dll |
6.1.7600.16385 |
201,216 |
14-Jul-09 |
1:16 |
x86 |
|
Cbscore.dll |
6.1.7601.17592 |
845,312 |
9-Apr-11 |
5:57 |
x86 |
|
Cbsmsg.dll |
6.1.7600.16385 |
28,672 |
14-Jul-09 |
1:15 |
x86 |
|
Cmiadapter.dll |
6.1.7601.17592 |
120,832 |
9-Apr-11 |
5:57 |
x86 |
|
Cmitrust.dll |
6.1.7600.16385 |
296,448 |
14-Jul-09 |
1:15 |
x86 |
|
Cmiv2.dll |
6.1.7601.17592 |
2,041,344 |
9-Apr-11 |
5:57 |
x86 |
|
Cntrtextinstaller.dll |
6.1.7601.17592 |
143,872 |
9-Apr-11 |
5:57 |
x86 |
|
Dpx.dll |
6.1.7601.17592 |
257,024 |
9-Apr-11 |
5:57 |
x86 |
|
Drupdate.dll |
6.1.7600.16385 |
173,568 |
14-Jul-09 |
1:15 |
x86 |
|
Drvstore.dll |
6.1.7601.17592 |
323,072 |
9-Apr-11 |
5:57 |
x86 |
|
Esscli.dll |
6.1.7600.16385 |
266,240 |
14-Jul-09 |
1:15 |
x86 |
|
Fastprox.dll |
6.1.7601.17514 |
606,208 |
20-Nov-10 |
12:19 |
x86 |
|
Globalinstallorder.xml |
Not Applicable |
1,973,556 |
5-Nov-10 |
1:52 |
Not Applicable |
|
Helpcins.dll |
6.1.7601.17514 |
105,472 |
20-Nov-10 |
12:19 |
x86 |
|
Locdrv.dll |
6.1.7600.16385 |
229,888 |
14-Jul-09 |
1:16 |
x86 |
|
Mofd.dll |
6.1.7600.16385 |
192,000 |
14-Jul-09 |
1:15 |
x86 |
|
Mofinstall.dll |
6.1.7600.16385 |
58,880 |
14-Jul-09 |
1:15 |
x86 |
|
Msdelta.dll |
6.1.7600.16385 |
305,152 |
14-Jul-09 |
1:15 |
x86 |
|
Mspatcha.dll |
6.1.7600.16385 |
35,328 |
14-Jul-09 |
1:15 |
x86 |
|
Oemhelpins.dll |
6.1.7600.16385 |
151,040 |
14-Jul-09 |
1:16 |
x86 |
|
Pkgmgr.exe |
6.1.7601.17592 |
209,920 |
9-Apr-11 |
5:56 |
x86 |
|
Poqexec.exe |
6.1.7601.17592 |
123,904 |
9-Apr-11 |
5:56 |
x86 |
|
Repdrvfs.dll |
6.1.7600.16385 |
300,544 |
14-Jul-09 |
1:16 |
x86 |
|
Smiengine.dll |
6.1.7601.17592 |
697,856 |
9-Apr-11 |
5:57 |
x86 |
|
Smipi.dll |
6.1.7601.17592 |
98,816 |
9-Apr-11 |
5:57 |
x86 |
|
Svcini.exe |
6.1.7600.16385 |
16,384 |
14-Jul-09 |
1:14 |
x86 |
|
Wbemcomn.dll |
6.1.7601.17514 |
363,008 |
20-Nov-10 |
12:21 |
x86 |
|
Wbemcore.dll |
6.1.7601.17592 |
780,288 |
9-Apr-11 |
5:57 |
x86 |
|
Wbemprox.dll |
6.1.7600.16385 |
29,184 |
14-Jul-09 |
1:16 |
x86 |
|
Wcmtypes.xsd |
Not Applicable |
1,047 |
10-Jun-09 |
21:46 |
Not Applicable |
|
Wcp.dll |
6.1.7601.17592 |
1,910,784 |
9-Apr-11 |
5:57 |
x86 |
|
Wdscore.dll |
6.1.7601.17592 |
189,952 |
9-Apr-11 |
5:57 |
x86 |
|
Wmicmiplugin.dll |
6.1.7601.17592 |
351,232 |
9-Apr-11 |
5:57 |
x86 |
|
Wmiutils.dll |
6.1.7600.16385 |
85,504 |
14-Jul-09 |
1:16 |
x86 |
|
Wrpint.dll |
6.1.7601.17592 |
54,272 |
9-Apr-11 |
5:57 |
x86 |
|
X86_installed |
Not Applicable |
9 |
10-Jun-09 |
21:19 |
Not Applicable |
|
Xmllite.dll |
1.3.1000.0 |
180,224 |
14-Jul-09 |
1:16 |
x86 |
For all supported x64-based versions of Windows Embedded Standard 7
|
File name |
File version |
File size |
Date |
Time |
Platform |
|
Amd64_installed |
Not Applicable |
9 |
10-Jun-09 |
20:36 |
Not Applicable |
|
Apds.dll |
6.1.7600.16385 |
2,172,928 |
14-Jul-09 |
1:41 |
x64 |
|
Apircl.dll |
6.1.7601.17592 |
276,480 |
9-Apr-11 |
7:00 |
x64 |
|
Apss.dll |
6.1.7600.16385 |
235,008 |
14-Jul-09 |
1:41 |
x64 |
|
Cbscore.dll |
6.1.7601.17592 |
976,384 |
9-Apr-11 |
6:59 |
x64 |
|
Cbsmsg.dll |
6.1.7600.16385 |
28,672 |
14-Jul-09 |
1:40 |
x64 |
|
Cmiadapter.dll |
6.1.7601.17592 |
125,952 |
9-Apr-11 |
6:59 |
x64 |
|
Cmitrust.dll |
6.1.7600.16385 |
477,696 |
14-Jul-09 |
1:40 |
x64 |
|
Cmiv2.dll |
6.1.7601.17592 |
3,739,136 |
9-Apr-11 |
6:59 |
x64 |
|
Cntrtextinstaller.dll |
6.1.7601.17592 |
171,008 |
9-Apr-11 |
6:59 |
x64 |
|
Dpx.dll |
6.1.7601.17592 |
399,872 |
9-Apr-11 |
7:00 |
x64 |
|
Drupdate.dll |
6.1.7600.16385 |
203,776 |
14-Jul-09 |
1:40 |
x64 |
|
Drvstore.dll |
6.1.7601.17592 |
423,424 |
9-Apr-11 |
7:00 |
x64 |
|
Esscli.dll |
6.1.7600.16385 |
440,320 |
14-Jul-09 |
1:40 |
x64 |
|
Fastprox.dll |
6.1.7600.16385 |
909,312 |
14-Jul-09 |
1:40 |
x64 |
|
Globalinstallorder.xml |
Not Applicable |
1,973,556 |
5-Nov-10 |
1:52 |
Not Applicable |
|
Helpcins.dll |
6.1.7601.17514 |
142,336 |
20-Nov-10 |
13:26 |
x64 |
|
Locdrv.dll |
6.1.7600.16385 |
370,176 |
14-Jul-09 |
1:41 |
x64 |
|
Mofd.dll |
6.1.7600.16385 |
278,528 |
14-Jul-09 |
1:41 |
x64 |
|
Mofinstall.dll |
6.1.7600.16385 |
76,288 |
14-Jul-09 |
1:41 |
x64 |
|
Msdelta.dll |
6.1.7600.16385 |
451,584 |
14-Jul-09 |
1:41 |
x64 |
|
Mspatcha.dll |
6.1.7600.16385 |
46,592 |
14-Jul-09 |
1:41 |
x64 |
|
Oemhelpins.dll |
6.1.7600.16385 |
222,208 |
14-Jul-09 |
1:41 |
x64 |
|
Pkgmgr.exe |
6.1.7601.17592 |
199,168 |
9-Apr-11 |
6:58 |
x64 |
|
Poqexec.exe |
6.1.7601.17592 |
142,336 |
9-Apr-11 |
6:58 |
x64 |
|
Repdrvfs.dll |
6.1.7600.16385 |
451,584 |
14-Jul-09 |
1:41 |
x64 |
|
Smiengine.dll |
6.1.7601.17592 |
933,376 |
9-Apr-11 |
7:00 |
x64 |
|
Smipi.dll |
6.1.7601.17592 |
104,448 |
9-Apr-11 |
7:00 |
x64 |
|
Svcini.exe |
6.1.7600.16385 |
17,920 |
14-Jul-09 |
1:39 |
x64 |
|
Wbemcomn.dll |
6.1.7601.17514 |
529,408 |
20-Nov-10 |
13:27 |
x64 |
|
Wbemcore.dll |
6.1.7601.17592 |
1,225,216 |
9-Apr-11 |
7:00 |
x64 |
|
Wbemprox.dll |
6.1.7600.16385 |
43,520 |
14-Jul-09 |
1:41 |
x64 |
|
Wcmtypes.xsd |
Not Applicable |
1,047 |
10-Jun-09 |
21:08 |
Not Applicable |
|
Wcp.dll |
6.1.7601.17592 |
2,760,704 |
9-Apr-11 |
7:00 |
x64 |
|
Wdscore.dll |
6.1.7601.17592 |
271,360 |
9-Apr-11 |
7:00 |
x64 |
|
Wmicmiplugin.dll |
6.1.7601.17592 |
524,288 |
9-Apr-11 |
7:00 |
x64 |
|
Wmiutils.dll |
6.1.7600.16385 |
137,216 |
14-Jul-09 |
1:41 |
x64 |
|
Wrpint.dll |
6.1.7601.17592 |
60,928 |
9-Apr-11 |
7:00 |
x64 |
|
Xmllite.dll |
1.3.1000.0 |
199,680 |
14-Jul-09 |
1:41 |
x64 |
Status
Microsoft has confirmed that this is a problem in the Microsoft products that are listed in the «Applies to» section.
More Information
For more information about software update terminology, click the following article number to view the article in the Microsoft Knowledge Base:
824684 Description of the standard terminology that is used to describe Microsoft software updates
Additional file information
Additional file information for Windows 7, for Windows Server 2008 R2 and for Windows Embedded Standard 7
Additional files for all supported x86-based versions of Windows 7
|
File name |
X86_fc1bde87f5bc34c852e947acaa841765_31bf3856ad364e35_6.1.7601.17592_none_f13980e1640510d5.manifest |
|
File version |
Not applicable |
|
File size |
702 |
|
Date (UTC) |
11-Apr-2011 |
|
Time (UTC) |
16:02 |
|
Platform |
Not applicable |
|
File name |
X86_microsoft-windows-servicingstack_31bf3856ad364e35_6.1.7601.17592_none_0b0e4b4025cf4049.manifest |
|
File version |
Not applicable |
|
File size |
26,537 |
|
Date (UTC) |
11-Apr-2011 |
|
Time (UTC) |
16:05 |
|
Platform |
Not applicable |
Additional files for all supported x64-based versions of Windows 7 and of Windows Server 2008 R2
|
File name |
Amd64_41132c9135820a69ab9fcde658ad1324_31bf3856ad364e35_6.1.7601.17592_none_66b394c89e0fceda.manifest |
|
File version |
Not applicable |
|
File size |
706 |
|
Date (UTC) |
11-Apr-2011 |
|
Time (UTC) |
16:02 |
|
Platform |
Not applicable |
|
File name |
Amd64_fc1bde87f5bc34c852e947acaa841765_31bf3856ad364e35_6.1.7601.17592_none_4d581c651c62820b.manifest |
|
File version |
Not applicable |
|
File size |
704 |
|
Date (UTC) |
11-Apr-2011 |
|
Time (UTC) |
16:02 |
|
Platform |
Not applicable |
|
File name |
Amd64_microsoft-windows-servicingstack_31bf3856ad364e35_6.1.7601.17592_none_672ce6c3de2cb17f.manifest |
|
File version |
Not applicable |
|
File size |
26,545 |
|
Date (UTC) |
11-Apr-2011 |
|
Time (UTC) |
16:09 |
|
Platform |
Not applicable |
|
File name |
X86_microsoft-windows-servicingstack_31bf3856ad364e35_6.1.7601.17592_none_0b0e4b4025cf4049.manifest |
|
File version |
Not applicable |
|
File size |
26,537 |
|
Date (UTC) |
11-Apr-2011 |
|
Time (UTC) |
16:09 |
|
Platform |
Not applicable |
Additional files for all supported IA-64-based versions of Windows Server 2008 R2
|
File name |
Ia64_e4b485d17f1a3bd62a24d944fdf8d7cc_31bf3856ad364e35_6.1.7601.17592_none_7c3a10661e271b46.manifest |
|
File version |
Not applicable |
|
File size |
704 |
|
Date (UTC) |
11-Apr-2011 |
|
Time (UTC) |
16:02 |
|
Platform |
Not applicable |
|
File name |
Ia64_fc1bde87f5bc34c852e947acaa841765_31bf3856ad364e35_6.1.7601.17592_none_f13b24d7640319d1.manifest |
|
File version |
Not applicable |
|
File size |
703 |
|
Date (UTC) |
11-Apr-2011 |
|
Time (UTC) |
16:02 |
|
Platform |
Not applicable |
|
File name |
Ia64_microsoft-windows-servicingstack_31bf3856ad364e35_6.1.7601.17592_none_0b0fef3625cd4945.manifest |
|
File version |
Not applicable |
|
File size |
26,541 |
|
Date (UTC) |
11-Apr-2011 |
|
Time (UTC) |
16:02 |
|
Platform |
Not applicable |
|
File name |
X86_microsoft-windows-servicingstack_31bf3856ad364e35_6.1.7601.17592_none_0b0e4b4025cf4049.manifest |
|
File version |
Not applicable |
|
File size |
26,537 |
|
Date (UTC) |
11-Apr-2011 |
|
Time (UTC) |
16:02 |
|
Platform |
Not applicable |
Additional files for all supported x86-based versions of Windows Embedded Standard 7
|
File name |
X86_fc1bde87f5bc34c852e947acaa841765_31bf3856ad364e35_6.1.7601.17592_none_f13980e1640510d5.manifest |
|
File version |
Not Applicable |
|
File size |
702 |
|
Date |
11-Apr-11 |
|
Time |
16:02 |
|
Platform |
Not Applicable |
|
File name |
X86_microsoft-windows-servicingstack_31bf3856ad364e35_6.1.7601.17592_none_0b0e4b4025cf4049.manifest |
|
File version |
Not Applicable |
|
File size |
26,537 |
|
Date |
11-Apr-11 |
|
Time |
16:05 |
|
Platform |
Not Applicable |
Additional files for all supported x64-based versions of Windows Embedded Standard 7
|
File name |
Amd64_41132c9135820a69ab9fcde658ad1324_31bf3856ad364e35_6.1.7601.17592_none_66b394c89e0fceda.manifest |
|
File version |
Not Applicable |
|
File size |
706 |
|
Date |
11-Apr-11 |
|
Time |
16:02 |
|
Platform |
Not Applicable |
|
File name |
Amd64_fc1bde87f5bc34c852e947acaa841765_31bf3856ad364e35_6.1.7601.17592_none_4d581c651c62820b.manifest |
|
File version |
Not Applicable |
|
File size |
704 |
|
Date |
11-Apr-11 |
|
Time |
16:02 |
|
Platform |
Not Applicable |
|
File name |
Amd64_microsoft-windows-servicingstack_31bf3856ad364e35_6.1.7601.17592_none_672ce6c3de2cb17f.manifest |
|
File version |
Not Applicable |
|
File size |
26,545 |
|
Date |
11-Apr-11 |
|
Time |
16:09 |
|
Platform |
Not Applicable |
|
File name |
X86_microsoft-windows-servicingstack_31bf3856ad364e35_6.1.7601.17592_none_0b0e4b4025cf4049.manifest |
|
File version |
Not Applicable |
|
File size |
26,537 |
|
Date |
11-Apr-11 |
|
Time |
16:09 |
|
Platform |
Not Applicable |
The Problem:

The computer cannot boot, and it displays the blue screen above instead. It says:
Your PC needs to be repaired. The Boot Configuration Data file is missing some required information.
File: BCD
Error code: 0xc0000034
The Explanation:
The Boot Configuration Data, or BCD, got corrupted. The BCD is a bootloader file essential for loading up the Windows OS. I honestly don’t know the cause of my particular situation, which randomly occurred, but I suspect Windows Update screwed it up.
The Solution:
1. Force the computer to shut down by long-pressing the power button.
2. Get a Windows install disk. Mine was a bootable USB drive created with the Windows 10 ISO.
3. Boot from the install disk. To do this on my Yoga 2 Pro, I pressed the Novo button, selected “Boot Menu”, and chose to boot from my USB drive.

- When you see the language options, choose your language and click next.
- Click on “Repair your computer“.
- Click on “Troubleshoot“.
- Click on “Advanced options“.
- Click on “Command Prompt“.
- Enter command “diskpart“
- Enter command “list volume“
- There should be a 100MB volume. Find its volume #. Mine was 2.
- Enter command “select volume 2“. Replace 2 with your volume #.
- Enter command “assign letter k“.
- Enter command “exit“
- Enter command “rename k:efimicrosoftbootBCD BCD.bak“.
- Assuming that Windows is installed in the C partition, enter command “bcdboot c:windows /s k: /f ALL“.
- Close the Command Prompt.
- Click on “Turn off your PC“.
- Turn your computer back on.
- Booting may take a bit longer than usual, but your computer should now successfully start! If this guide helped you, please tell me in the comments and share the post!
Boot Error 0xC0000034 (The Windows Boot Configuration Data file is missing required information) is caused by missing self-referencing Boot Manager entry in the BCD registry hive.
Error 0xC0000034 (status 0xC0000034) can be fixed by rebuilding Boot Configuration Data registry hive from scratch using Emergency Boot Kit.
| Contents |
|
1. Symptoms of the problem
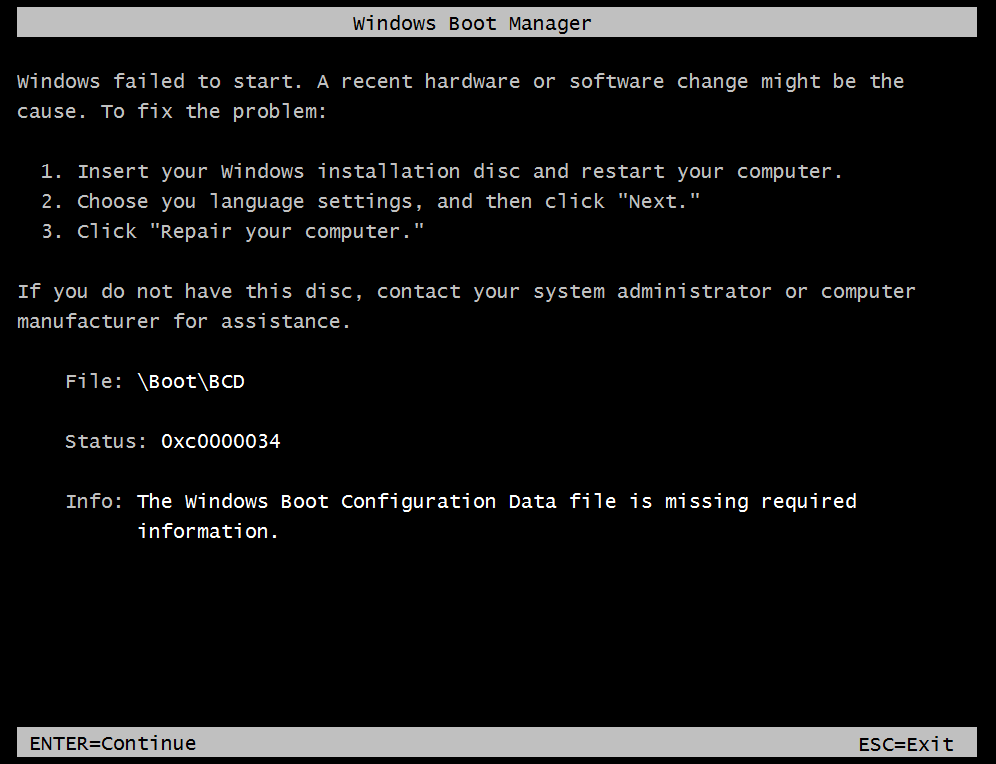
When computer is powered up, the following error message appears:
File: \Boot\BCD
Status: 0xC0000034
Info: The Windows Boot Configuration Data file is missing required information
2. Cause of the problem
The rest of this article refers to Windows 7, but all information below
applies to Windows 10/11 as well.
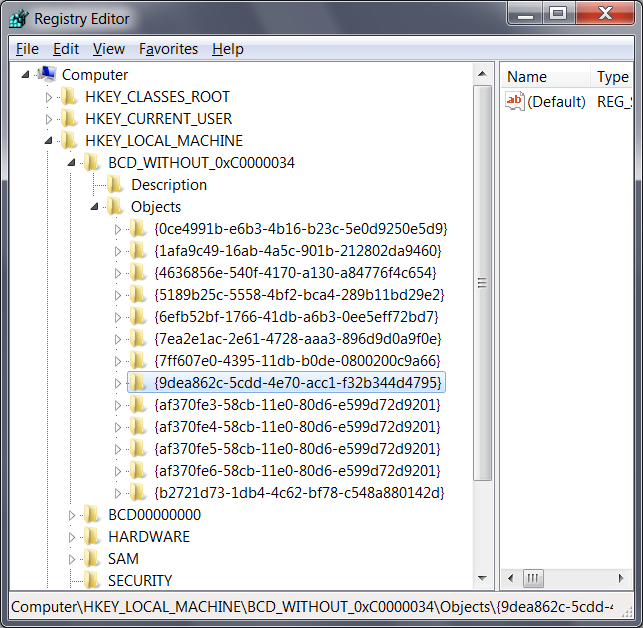
BCD hive with status 0xC0000034 differs from BCD hive without status 0xC0000034 in one subtle detail:
it has no {bootmgr} entry
(which is stored as raw BCD object with constant GUID {9dea862c-5cdd-4e70-acc1-f32b344d4795}).
Raw BCD hive with status 0xC0000034:

Raw BCD hive without status 0xC0000034:
Windows Boot Manager
———————
identifier {9dea862c-5cdd-4e70-acc1-f32b344d4795}
device partition=\Device\HarddiskVolume1
description Windows Boot Manager
locale en-US
inherit {7ea2e1ac-2e61-4728-aaa3-896d9d0a9f0e}
default {af370fe4-58cb-11e0-80d6-e599d72d9201}
resumeobject {af370fe3-58cb-11e0-80d6-e599d72d9201}
displayorder {af370fe4-58cb-11e0-80d6-e599d72d9201}
toolsdisplayorder {b2721d73-1db4-4c62-bf78-c548a880142d}
timeout 30
Windows Boot Loader
——————-
identifier {af370fe4-58cb-11e0-80d6-e599d72d9201}
device partition=C:
path \Windows\system32\winload.exe
description Windows 7
locale en-US
inherit {6efb52bf-1766-41db-a6b3-0ee5eff72bd7}
recoverysequence {af370fe5-58cb-11e0-80d6-e599d72d9201}
recoveryenabled Yes
osdevice partition=C:
systemroot \Windows
resumeobject {af370fe3-58cb-11e0-80d6-e599d72d9201}
nx OptIn
Windows Boot Manager
———————
identifier {9dea862c-5cdd-4e70-acc1-f32b344d4795}
Windows Boot Loader
——————-
identifier {af370fe4-58cb-11e0-80d6-e599d72d9201}
device partition=C:
path \Windows\system32\winload.exe
description Windows 7
locale en-US
inherit {6efb52bf-1766-41db-a6b3-0ee5eff72bd7}
recoverysequence {af370fe5-58cb-11e0-80d6-e599d72d9201}
recoveryenabled Yes
osdevice partition=C:
systemroot \Windows
resumeobject {af370fe3-58cb-11e0-80d6-e599d72d9201}
nx OptIn
3. How to fix status 0xC0000034
1) Download Emergency Boot Kit and
deploy it to USB thumbdrive according to the instructions,
then set up your BIOS to boot from USB thumbdrive. You need full version of Emergency Boot Kit
to actually write changes to the disk, but it’s recommended to try demo version to make
sure there are no hardware incompatibilities.
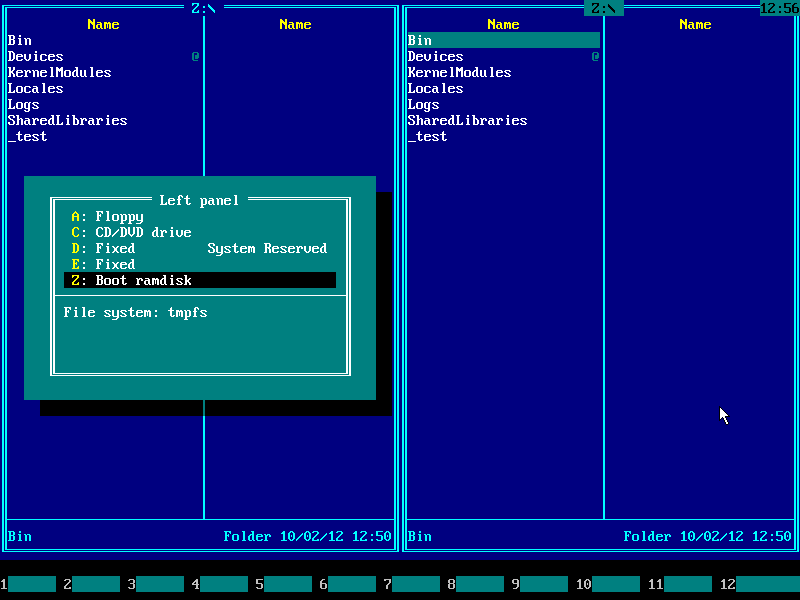
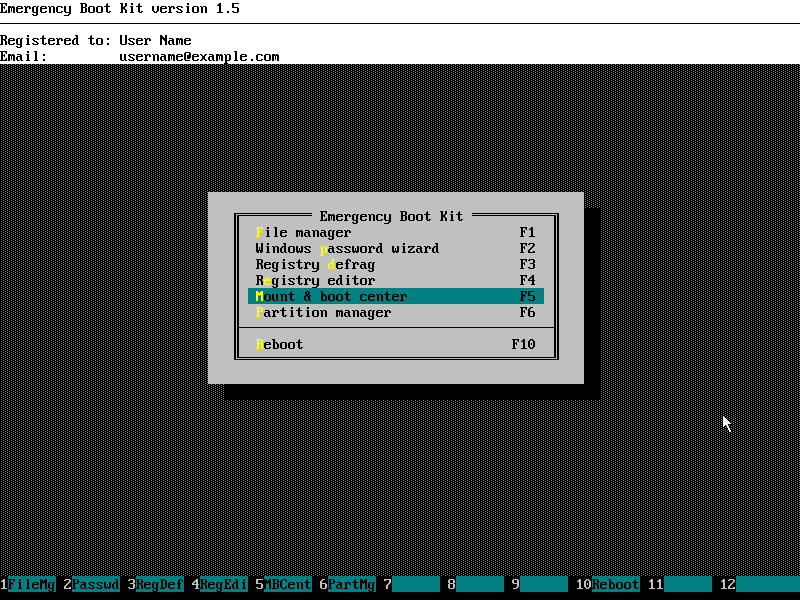
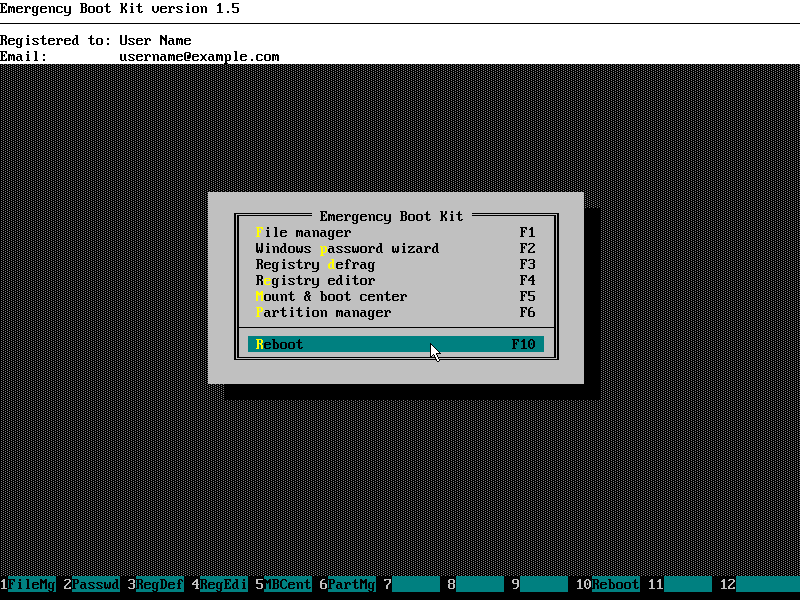
2) Boot into Emergency Boot Kit:
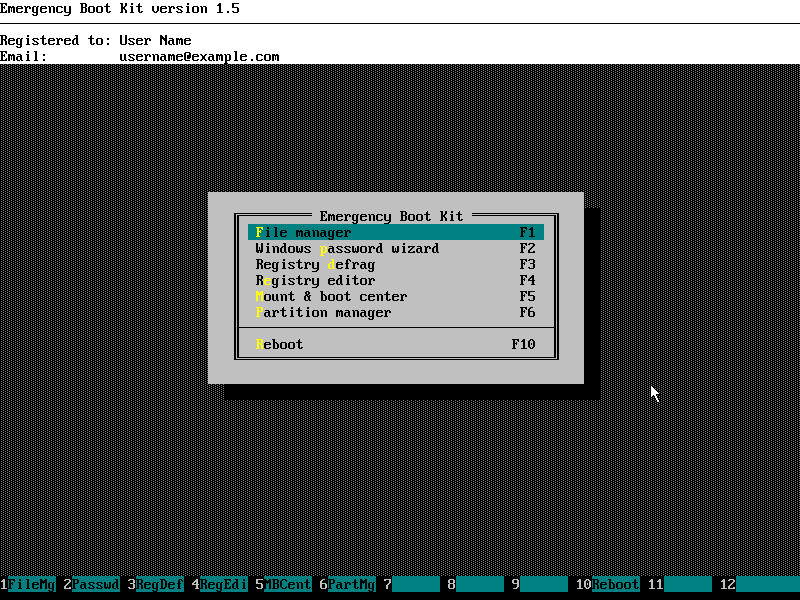
3) Run File Manager from the main menu:
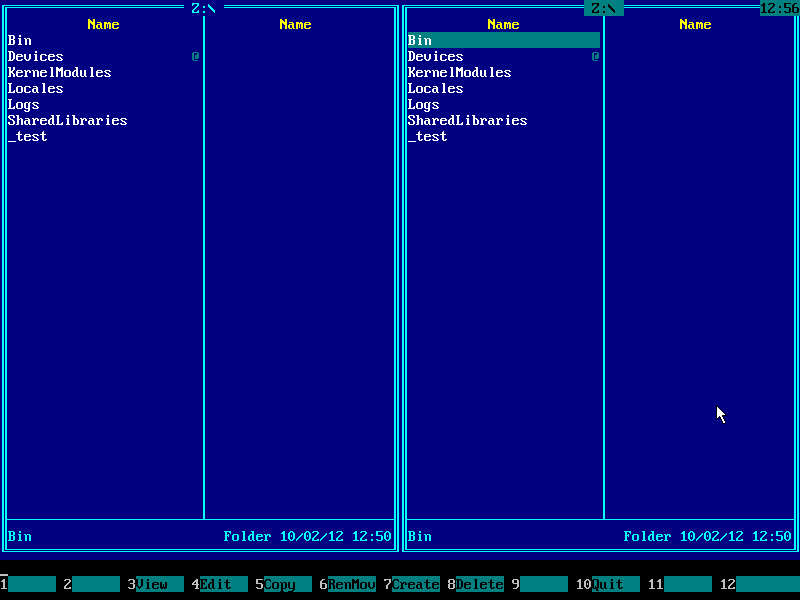
4) Press Alt+F1 and choose your boot partition from the menu. In Windows 7 and Windows 8 boot
partition has size about 100MB in size and «System Reserved» volume label. In Windows Vista
separate boot partition does not exist, computer boots from system disk where Windows OS
files are installed (use UP and DOWN arrow keys and ENTER to navigate the menu):
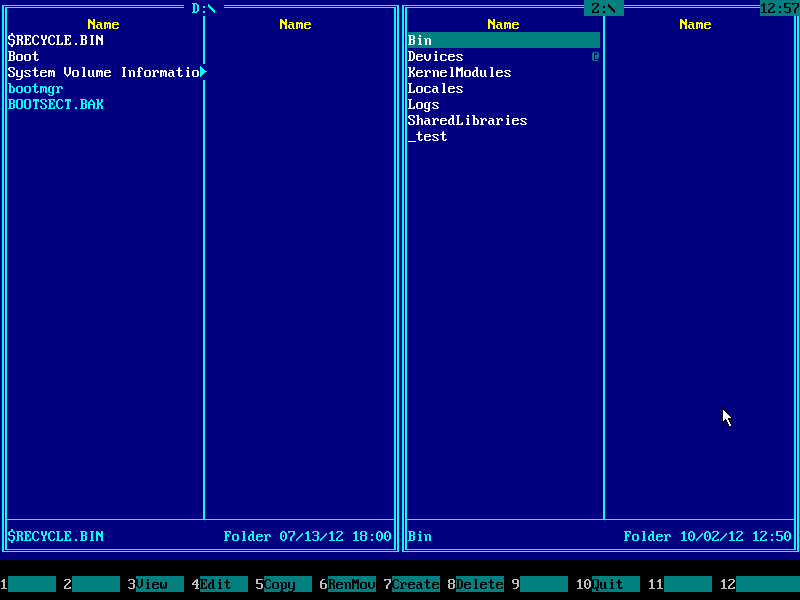
5) Now you need to enter either Boot folder (on BIOS-based computers)
or EFI\Microsoft\Boot (on UEFI-based computers). Only one of these
folders exists on any particular computer, so choose whatever exists.
Press TAB to switch input focus to the left panel, then navigate folders using arrow keys UP
and DOWN and ENTER. (This example shows entering Boot folder.)
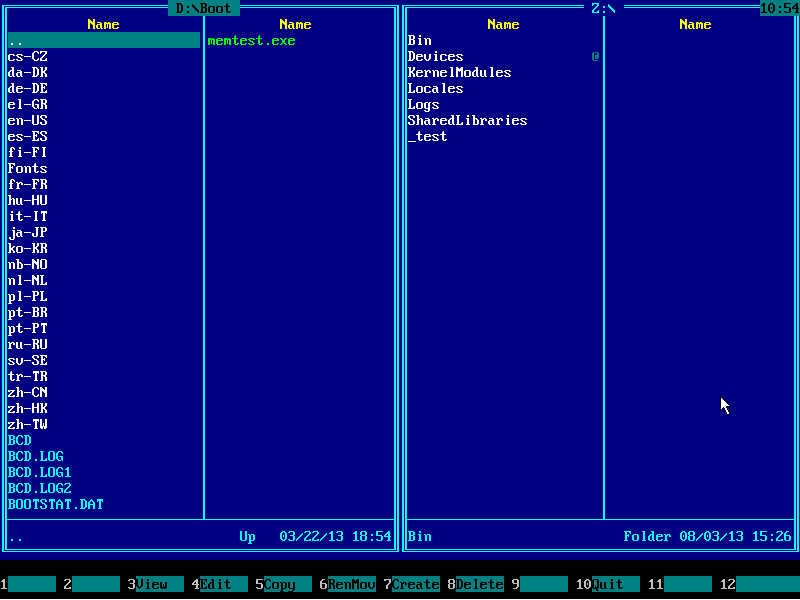
6) List of files should appear on the left panel. BCD file should be
in the list, BCD.LOG, BCD.LOG1 and
BCD.LOG2 may also appear in the list. Navigate to those files
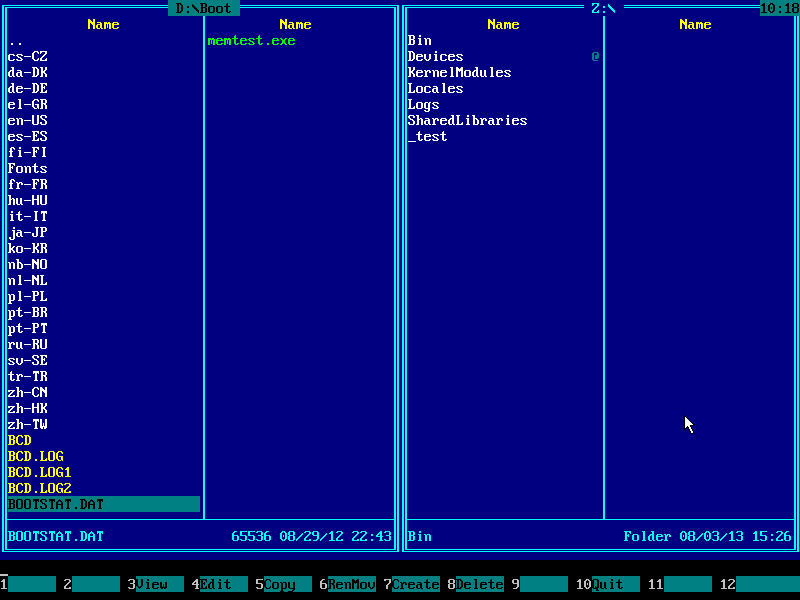
using arrow keys, then select them INSERT key:
7) After selection:
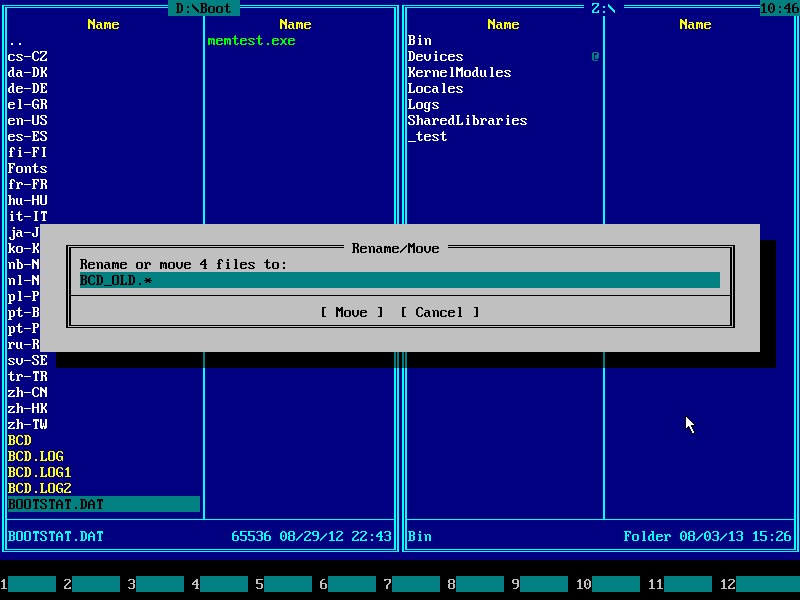
 Press F6. File rename dialog will pop up:

9) Type BCD_OLD.* on keyboard and press ENTER:
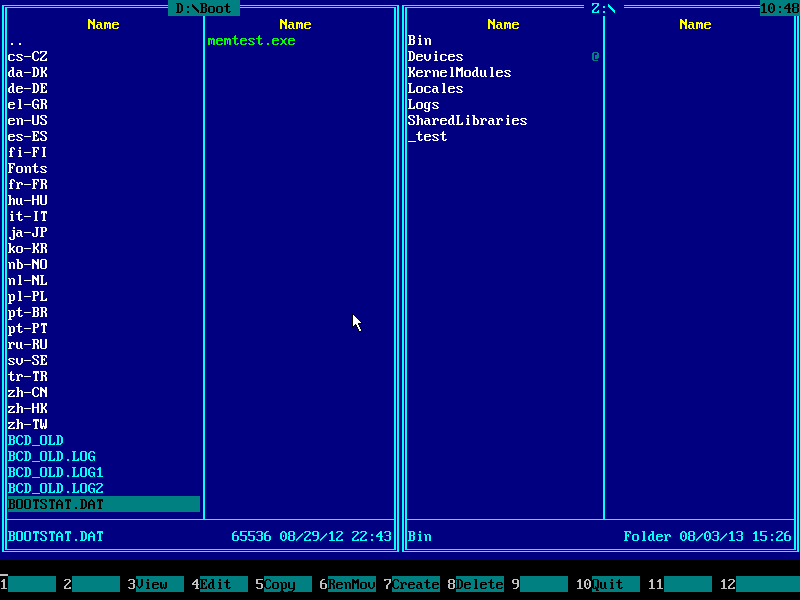
10) Make sure BCD files were renamed successfully to
BCD_OLD files, then press F10 and ENTER keys to exit
the Emergency Boot Kit File Manager:
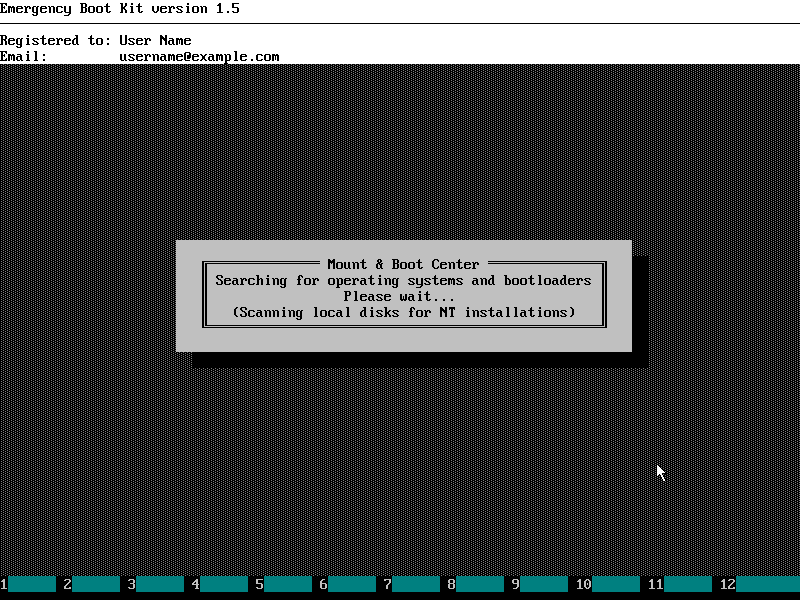
11) Choose Mount & Boot Center in the main menu:
12) Wait:
13) Enable checkbox (checkboxes) on the intersection of the bootloader and operating system
(operating systems) it should load:
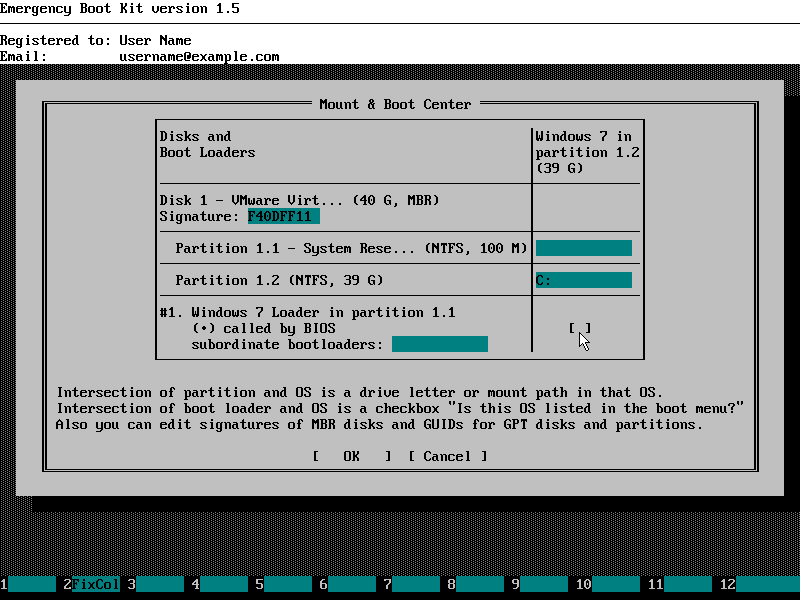
14) Mount & Boot Center should look like below. Press OK to commit changes
(BCD registry hive and corresponding log will be created from scratch at this point):

15) «Status 0xC0000034» boot problem should be fixed now. Choose ‘Reboot’ in the main menu of Emergency Boot Kit:
Please note: Because BCD (Boot Configuration Data) was recreated from scratch, you may need
to adjust boot timeout, menu order etc from within Windows when it boots successfully.
,
This article contains instructions fix the Blue Screen Error: «File: \BCD, Error code: 0xc0000034 in Windows 10: «Your PC/Device needs to be repaired. The Boot Configuration Data file is missing some required information. File:\BCD» Error code: 0xc0000034″.

How to fix: BSOD Error 0xc0000034, Boot Configuration Data File is Missing required information in Windows 10.
The solution to resolve the «Boot Configuration Data file is missing some required information. File:\BCD» Error code: 0xc0000034″, is to repair the boot configuration data (BCD) on the OS disk. For that task, follow the instructions below according your system architecture (UEFI or Legacy).
Requirements: A Windows Installation Media on a USB disk.
In order to fix the «Boot Configuration Data Missing, 0xc0000034» problem, you will need to boot your computer from a USB Windows installation media. If you don’t own a Windows 10/11 USB Media, you can create one using these instructions:
- How to Create a Windows 10 USB Installation Media.
- How to Create a Windows 11 USB Installation Media.
How to resolve the Boot error 0xc0000034 on a UEFI based system.*
* Note: The below steps, to repair the boot configuration data, usually works on UEFI based systems, with Windows 10, 8 or 8.1 OS installed. If your system doesn’t support UEFI, or this method does not work for you, then follow the steps for LEGACY based systems (below).
How to resolve the error 0xc0000034 on a UEFI based system:
1. Boot your computer from a USB Windows installation media.
2. Press Next at Language options screen.
3. Choose Repair your computer.
4. Then choose Troubleshoot -> Advanced Options –> Command Prompt.
5. In command prompt type: diskpart & press Enter.
6. In «DISKPART» prompt, type: list volume & press Enter.
7. Now find out the Volume number of the FAT32 * partition and the drive letter of the OS volume.
* Notes:
1. The FAT32 partition, with size 100-500MB, is also known as «EFI» volume (System Volume) because it contains the Boot Configuration Data on UEFI based systems.
2. If you own a legacy based system, then find out the Volume number of the «System Reserved» volume (FS=NTFS & Size=100–500MB).
3. The OS (Operating System) Volume is usually the biggest in size (GB) and contains the Windows folder.e.g. From the picture below, we can understand that the FAT32 partition located at «Volume 1» and the OS volume has the drive letter «D«.

8. Now select the ‘System Volume’, by typing the following command:
- select volume 1
* Note: Replace «1» with whatever volume number is your ‘System Volume’ (aka ‘System drive’).
9. Then assign the drive letter «Z» at the selected volume by typing the following command and press Enter:
- assign letter=Z
10. Now type exit & press Enter, to close the DISKPART utility.
![image_thumb[3]](https://www.repairwin.com/wp-content/uploads/2018/01/image_thumb3_thumb.png "image_thumb[3]")
</p)
11. At command prompt give the following command to repair the BCD and press Enter:
- bcdboot D:\windows /s Z: /f ALL
* Note: Replace the letter «D» with whatever drive letter it is your OS Volume.
![image_thumb[7]](https://www.repairwin.com/wp-content/uploads/2018/01/image_thumb7_thumb.png "image_thumb[7]")
12. Type exit & press Enter to close command prompt.
13. Remove the recovery media and Restart your PC.
14. Leave Windows to boot normally.
How to resolve the error BCD Error 0xc0000034 on a LEGACY Based System *
* Note: The below steps to repair the boot configuration data, commonly works on oldest PC’s, that don’t support UEFI. (e.g. PC’s with Windows Vista or Windows 7 OS) and some newer PC’s with Windows 8, 8.1 or 10 OS that installed in Legacy Mode. If your system supports UEFI, then read the instructions for UEFI based systems above.
1. Boot your computer from the Windows recovery media.
2. Press Next at Language options screen.
3. Choose Repair your computer.
4. Then choose Troubleshoot -> Advanced Options –> Command Prompt.
5. In command prompt give the following commands in order:
- bootrec /fixmbr
- bootrec /fixboot
- bootrec /rebuildbcd
6. If after executing the last command, you receive that «Total Windows installations: 0» then continue to the next step, otherwise skip to step 8.

7. If you receive: «Total Windows Installations=0«, then give the following commands in order:
-
- bcdedit /export C:\bcdbackup
- C:
- cd boot
- attrib bcd -s -h –r
- ren C:\boot\bcd bcd.old
- bootrec /rebuildbcd
8. Press «A» to add the installation to boot list and press Enter.

9. Close the command prompt window.
10. Restart your computer and boot to Windows 10 normally.
That’s all folks! Did it work for you? Please leave a comment in the comment section below or even better: like and share this blog post in the social networks to help spread the word about this solution.
If this article was useful for you, please consider supporting us by making a donation. Even $1 can a make a huge difference for us.
- Author
- Recent Posts
Konstantinos is the founder and administrator of Repairwin.com. Since 1995 he works and provides IT support as a computer and network expert to individuals and large companies. He is specialized in solving problems related to Windows or other Microsoft products (Windows Server, Office, Microsoft 365, etc.).
Get the fix for the error 0xc0000034 on Windows XP, Windows Vista, Windows 7, Windows 8 and Windows 10.
About “0xc0000034“
The following information on this error has been compiled by NeoSmart Technologies, based on the information gathered and reported by our global network of engineers, developers, and technicians or partner organizations.
Description and Symptoms
The error messages, alerts, warnings, and symptoms below are tied to this error.
Symptom 1: “0xc0000034” error screen on startup
On Windows 7 systems, the error is usually displayed with a simpler error text:
!! 0xc0000034 !!
But this type of error screen is also common on Windows Vista and 7 systems:

The text reads:
Windows failed to start. A recent hardware or software change might be the
cause. To fix the problem:

  1. Insert your Windows installation disc and restart your computer.
  2. Choose your language settings, and then click "Next."
  3. Click "Repair your computer."

If you do not have this disc, contact your system administrator or computer
manufacturer for assistance.

  File: \Boot\BCD

  Status: 0xc0000034

  Info: The Windows Boot Configuration Data file does not contain a valid
        OS entry.
On Windows 8, Windows 8.1 and Windows 10 systems, the error code text would be this:

Recovery

Your PC needs to be repaired

The Boot Configuration Data file is missing some required information.

File: \BCD

Error code: 0xc0000034

You'll need to use the recovery tools on your installation media. If you don't have any installation media (like a disc or USB device), contact your system administrator or PC manufacturer.

Press ESC for UEFI Firmware settings.
You can prevent the 0xc0000034 error by installing KB 2533552 update.
Causes of this Error
This error has been known to occur as a result of one of the following causes:
Cause 1: Bootloader files are missing or corrupt
One of the most common causes of this error is the boot-related files that became either missing, corrupt, or misconfigured. That could happen because of disk write errors, power outages, boot sector viruses, or errors made while configuring these files manually.
Fixing “0xc0000034” on Windows
Windows Setup CD/DVD Required!
Some of the solutions below require the use of the Microsoft Windows setup CD or DVD. If your PC did not come with a Windows installation disc or if you no longer have your Windows setup media, you can use Easy Recovery Essentials for Windows instead. EasyRE will automatically find and fix many problems, and can also be used to solve this problem with the directions below.
Fix 0xc0000034 with Easy Recovery Essentials
Easy Recovery Essentials is guaranteed to fix the “0xc0000034” error automatically using its built-in Automated Repair option. EasyRE is currently available for Windows XP, Vista, 7, 8, Windows 10, and Windows 11 and can be downloaded and created on any PC.
- Download Easy Recovery Essentials. Make sure to note your Windows version (XP, Vista, 7, 8, 10, or Windows 11) before you download EasyRE. This guide can help you identify what version of Windows you have installed.
- Burn the image. Follow these instructions on how to burn the bootable ISO image very carefully, as making a bootable CD can be tricky! Alternatively, these instructions explain how to create a bootable EasyRE recovery USB stick/drive.
- Boot up your PC from the Easy Recovery Essentials CD or USB you created.
- Once EasyRE is running, choose the “Automated Repair” option and click Continue.

Choose “Automated Repair” in Easy Recovery Essentials
- After EasyRE scans your computer’s drives, identify and select the drive letter for your Windows installation from the list, and then click on the Automated Repair button to begin.
Choose the drive associated with the Windows installation you’re trying to repair.
- Easy Recovery Essentials will start analyzing the selected drive for problems. EasyRE will test for and attempt to automatically correct errors with the disk, partition, bootsector, filesystem, bootloader, and registry. No intervention is required, as EasyRE’s repair is fully automated:
Easy Recovery Essentials searches for errors and makes corrections to the selected Windows installation.
- Once the process is complete, EasyRE will report its findings. Click on the Restart button to reboot your PC and test the changes.
- The “0xc0000034” error should now be fixed as your PC begins to load:


You can download Easy Recovery Essentials from here.
Fix 0xc0000034 in Windows Vista
Fix #1: Is SP1 Installed
If you installed SP1 for Windows 7, follow the instructions from the 0xc0000034 appears after I install Service Pack 1 chapter below.
If you don’t have SP1 installed or haven’t installed it recently, go to Fix #2 below.
Fix #2: Run chkdsk
To run chkdsk on your Windows Vista computer in an attempt to fix this boot error, follow these steps:
- Reboot your computer with the original Windows Vista installation disc and boot from the disc
If you don’t have your original Windows Vista installation disc, go to Fix 0xc0000034 with Easy Recovery Essentials
- Click Repair your computer
- Click Command Prompt
- Type this command:
chkdsk c: /r
Replace
c:with the letter of the drive where your Windows Vista is installed on.
Press Enter - Restart the computer

chkdsk utility results screen
Fix #3: Run Startup Repair
Follow the same steps from Fix #2: Run chkdsk until you boot into the Windows Vista installation disc:
- Click Repair your computer
- Click Startup Repair
Fix #4: Restore
If Startup Repair didn’t work to fix the 0xc0000034 error, you can also try to restore your Windows Vista to a date before the boot error appeared.
Follow the same steps from Fix #2: Run chkdsk until you boot into the Windows Vista installation disc:
- Click Repair your computer
- At the System Recovery Options screen, click System Restore
Fix 0xc0000034 in Windows 7
Fix #1: Is SP1 Installed
These steps apply only to Windows 7 systems who recently installed Service Pack 1 (SP1).
If you installed the SP1 for your Windows 7 system, follow the instructions from the 0xc0000034 appears after I install Service Pack 1 chapter below.
If you don’t have SP1 installed or haven’t installed it recently, go to Fix #2 below.
Fix #2: Run bootrec
You can run the bootrec utility to rebuild the BCD:
- Boot from the Windows 7 DVD
- Click Repair your computer or press R
- At the System Recovery Options window, click Command Prompt
- When Command Prompt loads, type this command:
bootrec /rebuildbcd
- Press Enter


bootrec utility results screen
Most Windows 7 systems have the System Recovery Options installed which can be accessed without the installation DVD:
- Restart the computer
- Press F8. You need to press the F8 key before the Windows 7 logo appears
- Select Repair Your Computer
- Press Enter
Fix #3: Startup Repair
If bootrec doesn’t work, you can try to run the Startup Repair utility:
- Boot from the installation disc (CD or DVD) and click Repair your computer or press R
- System Recovery Options should now be available
- Click Startup Repair
Fix 0xc0000034 in Windows 8
Fix #1: Run Automatic Repair
Windows 8/8.1 comes buit-in with the Automatic Repair that will attempt to find and fix various errors that prevents your computer to load. On Windows Vista and 7 it was called Startup Repair.
To run Automatic Repair, follow these steps:
- Insert the Windows 8 or Windows 8.1 DVD/USB and reboot your system
If you don’t have your original Windows 8 installation media, go to Fix 0xc0000034 with Easy Recovery Essentials
- Boot from the media
- Click Repair your computer at the Install now screen
- Select Troubleshoot
- Select Automatic Repair
- Follow the wizard instructions to complete the process

Fix #2: Run bootrec
If Automatic Repair didn’t fixed the 0xc0000034 error, try running bootrec to rebuild the BCD:
You need to have the original Windows 8/8.1 install media. If you don’t have it, go to Fix 0xc0000034 Easy Recovery Essentials
- Restart your computer and boot from the DVD/USB
- Click Repair your computer
- Select Troubleshoot and then select Command Prompt
- Type these commands in Command Prompt:
bootrec /FixMbr
bootrec /FixBoot
bootrec /ScanOs
bootrec /RebuildBcd
- Once the last bootrec finished, type:
exit
- Press Enter
- Restart your computer

bootrec utility results screen
Fix #3: Refresh
Performing a refresh of your Windows 8 or Windows 8.1 would not affect your personal files. To run the refresh operating, follow these steps:
- Restart your computer
- Press the F8 key or the F11 key
- Click Troubleshoot
- Click Refresh your PC
- Follow the instructions to complete the process
Fix 0xc0000034 in Windows 10
Fix #1: Run Automatic Repair
Windows 10 comes buit-in with the Automatic Repair that will attempt to find and fix various errors that prevents your computer to load.
To run Automatic Repair, follow these steps:
- Insert the Windows 10 DVD/USB and reboot your system
If you don’t have your original Windows 10 installation media, go to Fix 0xc0000034 with Easy Recovery Essentials
- Boot from the media
- Click Repair your computer at the Install now screen
- Select Troubleshoot
- Select Automatic Repair
- Follow the wizard instructions to complete the process

Fix #2: Run bootrec
If Automatic Repair didn’t fixed the 0xc0000034 error, try running bootrec to rebuild the BCD:
You need to have the original Windows 10 install media. If you don’t have it, go to Fix 0xc0000034 Easy Recovery Essentials
- Restart your computer and boot from the DVD/USB
- Click Repair your computer
- Select Troubleshoot and then select Command Prompt
- Type these commands in Command Prompt:
bootrec /FixMbr
bootrec /FixBoot
bootrec /ScanOs
bootrec /RebuildBcd
- Once the last bootrec finished, type:
exit
- Press Enter
- Restart your computer
bootrec utility results screen
Fix #3: Refresh
Performing a refresh of your Windows 10 would not affect your personal files. To run the refresh operating, follow these steps:
- Restart your computer
- Press the F8 key or the F11 key
- Click Troubleshoot
- Click Refresh your PC
- Follow the instructions to complete the process
Troubleshooting
0xc0000034 appears after I install Service Pack 1
The 0xc0000034 error code can appear on Windows 7 or Server 2008 systems as a black screen error after installing Service Pack (SP1).
The usually error text is:
!! 0xc0000034 !! 142/53007 (_0000000000000000.cdf-ms)
Depending if you can boot into Windows, you have the following options available:
- Restart the computer using the original installation disc
- Run a VBS script from Command Prompt using the original installation disc
- Install the KB 2533552 update
- Reinstall the Windows Service Pack
If you can boot into Windows and the 0xc0000034 error isn’t preventing you from using your computer:
- Install KB 2533552
- Reinstall SP1
If you can’t boot into Windows, follow these 2 fixes:
Fix #1: Restore your computer
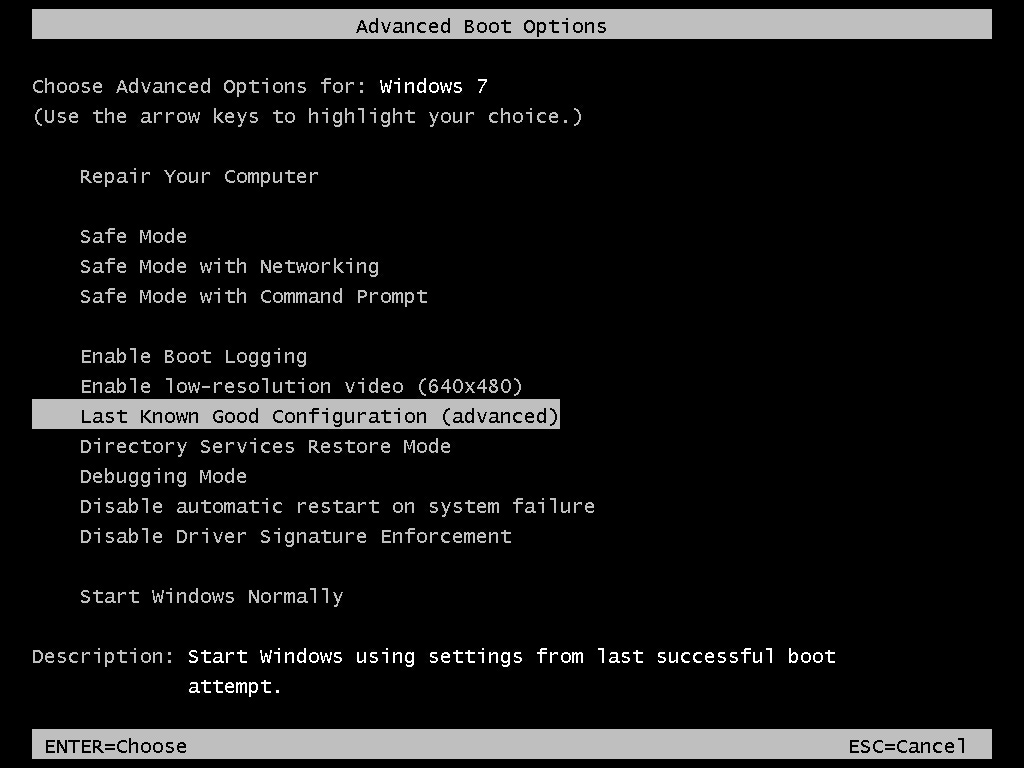
- Restart your computer and press the F8 key to boot into the Advanced Boot Options
- Select Repair your computer
- Press Enter
- Select a language, keyboard and click Next
- Enter the Administrator password
- Click OK
- At the System Recovery Options screen, select System Restore
- Click Next
- Browse the available restore points and select the restore point titled as Windows 7 Service Pack 1.If there is no such restore point, select a restore point dated before the date when you installed Service Pack 1.
- Click Next
- Click Finish at the Confirm your restore point screen
- Click Yes
- Click Restart to restart the computer


Fix #2: Run a VBS script
This method is recommended for advanced users. Go to Fix 0xc0000034 with Easy Recovery Essentials for a quick and easy way to fix this error.
- Save the following text as
Script.vbson a USB flash drive:Dim xmlDoc, node, nodeList, fileName, backupFileName, numberOfPOQNodes Set xmlDoc = CreateObject("Microsoft.XMLDOM") If Wscript.Arguments.Count = 0 Then WScript.echo("Error! No XML file specified.") Wscript.quit End If fileName = WScript.Arguments(0) backupFileName = Left(fileName, InStrRev(fileName, ".") - 1) & "_backup.xml" If Not xmlDoc.load(fileName) Then WScript.echo("Failure loading XML file " & fileName & ".") Wscript.quit End If xmlDoc.save(backupFileName) Set nodeList = xmlDoc.documentElement.selectNodes("POQ") numberOfPOQNodes = nodeList.Length For Each node in nodeList xmlDoc.documentElement.removeChild(node) Next xmlDoc.save(fileName) Set xmlDoc = Nothing WScript.echo(numberOfPOQNodes & " POQ nodes removed. Script completed.") - Restart the computer
- Press F8
- Boot into the Advanced Boot Options menu and select Repair your computer
- Press Enter
- Select a language and keyboard and enter the Administrator password, if prompted
- Insert the USB flash drive with the
Script.vsfile - Select Command Prompt, at the System Recovery Options screen
- Navigate to the USB flash drive by typing the letter of the drive:
F:
F:is the USB flash drive - Then type this command:
Cscript Script.vbs C:\Windows\winsxs\pending.xml
Replace
C:with the letter of the drive where your Windows 7 is installed. - Press Enter
- You should see a confirmation message:
2 POQ nodes removed. Script Completed
- Type
exit - Press Enter
- Restart your computer
More Information
Linked Entries
- bootrec
- chkdsk
Support Links
- Easy Recovery Essentials for Windows – our repair and recovery disk.
It’s an easy-to-use and automated diagnostics disk. It’s available for Windows 8, Windows 7 and Windows Vista. It’s also available for Windows XP and Windows Server.
Read more at Windows Recovery Disks.
- The NeoSmart Support Forums, member-to-member technical support and troubleshooting.
- Get a discounted price on replacement setup and installation discs: Windows Vista, Windows 7, Windows 8, Windows 10.
Applicable Systems
This Windows-related knowledgebase article applies to the following operating systems:
- Windows Vista (all editions)
- Windows 7 (all editions)
- Windows 8 (all editions)
- Windows 8.1 (all editions)
- Windows 10 (all editions)
Propose an edit