
Windows provide the users with various options of system power settings for customization according to specific tasks. Users then can utilize the system power at a pace they want to use. Sometimes it is best to plan out the system power utilization with the change power plan feature provided by Windows. It makes your tasks more meaningful and productive rather than just dragging. Read on further to explore this element made available by Windows to edit power plan and make your system experience more personalized.

You might want to utilise different power plans to perform different tasks on your Windows 10 computer:
- Power saver mode when you are not performing heavy tasks and want to save system power for an elongated time.
- While gaming, you need to have the Windows power options high performance set to play the games at a smooth and lag-free speed.
- And then the balanced mode when you want decent speed with less power consumption during moderate tasks on the system.
You can opt for any of the mentioned power plans with customized inputs and the name of the plan. In this article, we have drafted the change power plan method with the steps to use and customize it. Follow the upcoming steps of this method to reimagine your system experience to get the best out of it.
1. Hit the Windows key and click the gear icon to open Settings.
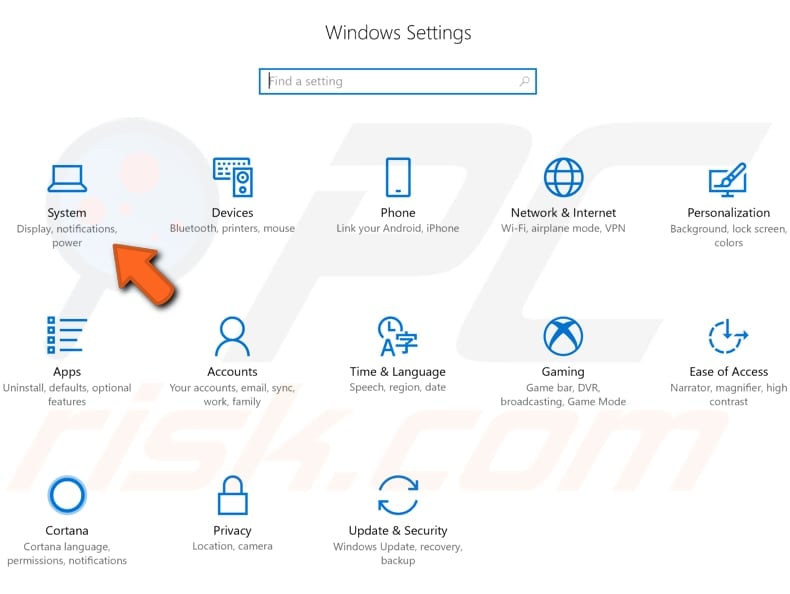
2. Locate and select the System option as highlighted on the Settings window.

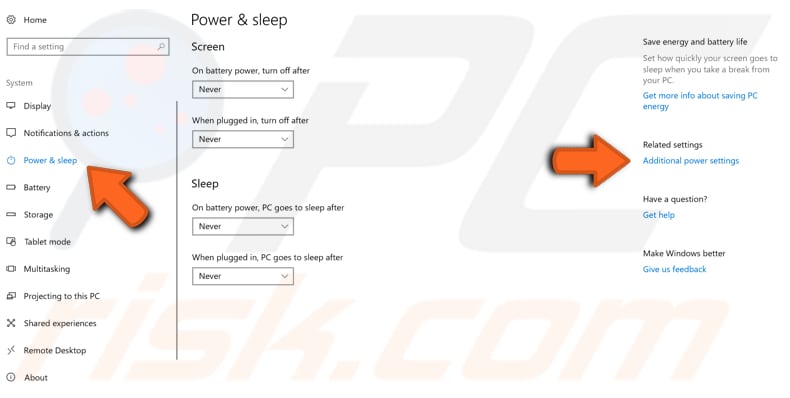
3. Select the Power & Sleep option in the left pane.

4. To change power plan, click on the Additional power settings as shown under Related settings.

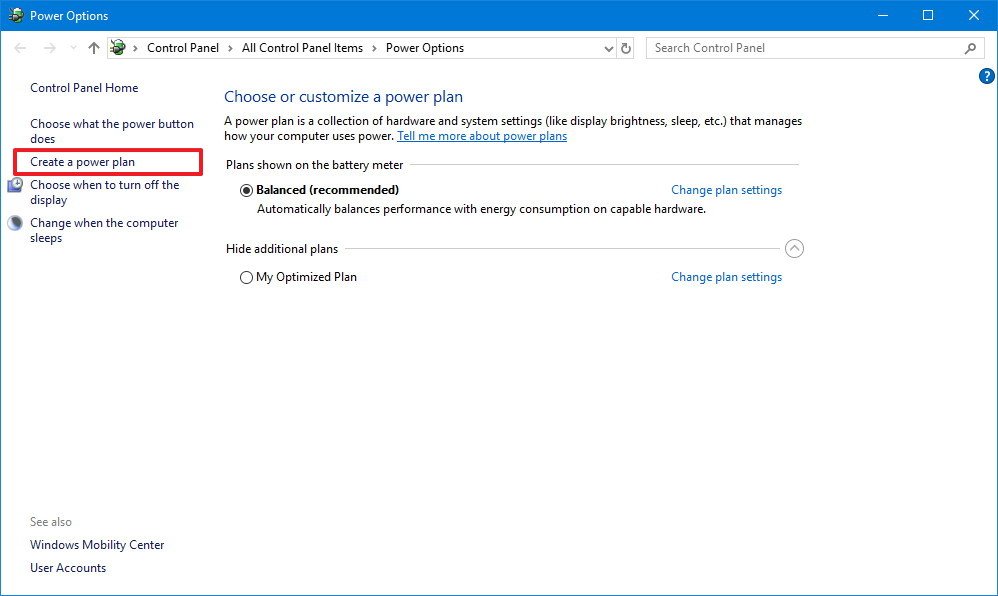
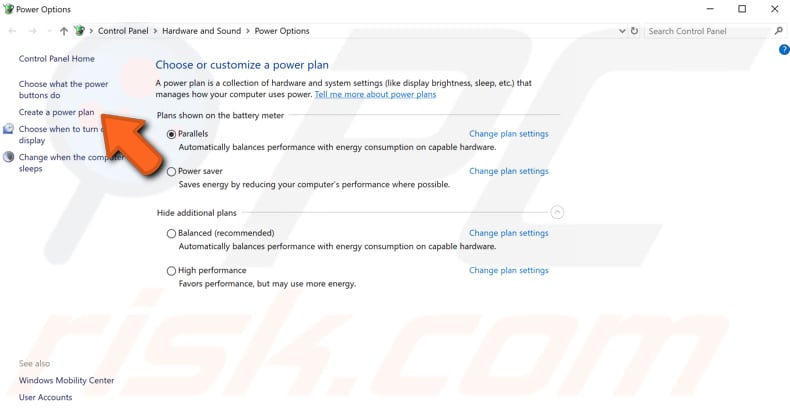
5. Then, select Create a power plan option as illustrated on the Power Options window.

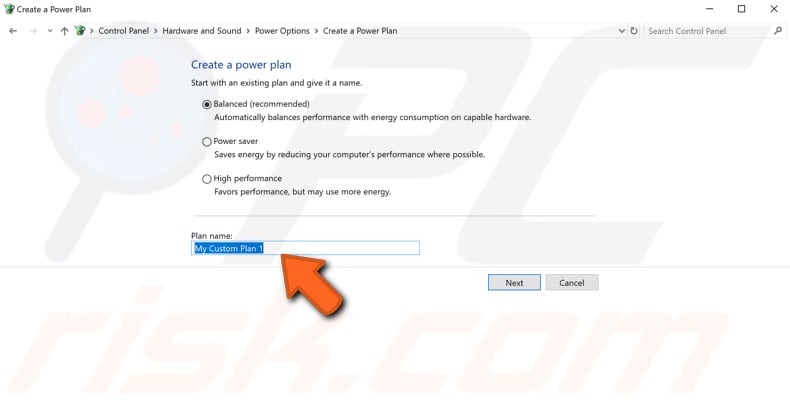
6. Now, select the High performance option on the Create a power plan page and click Next to proceed further.

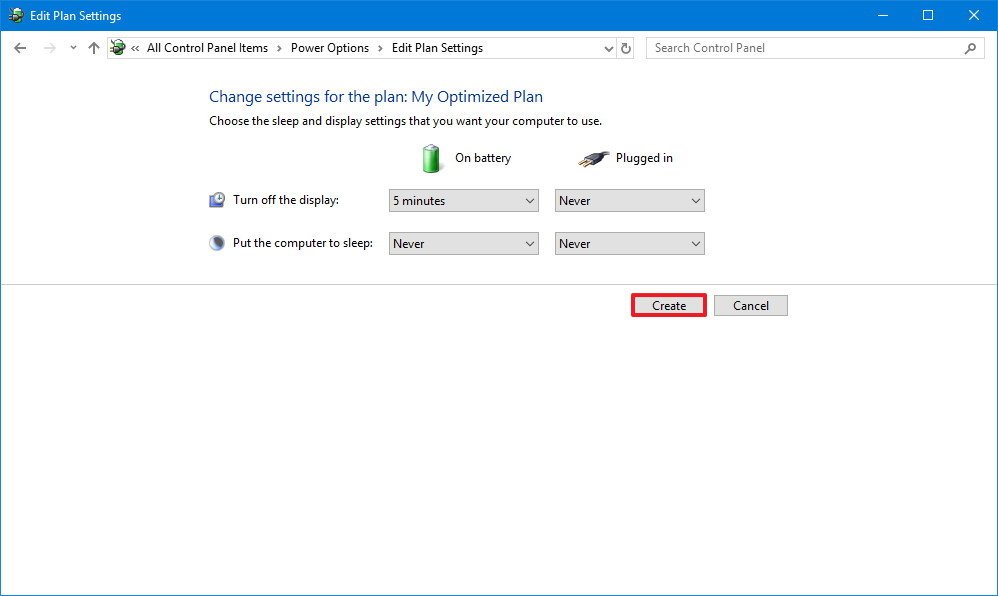
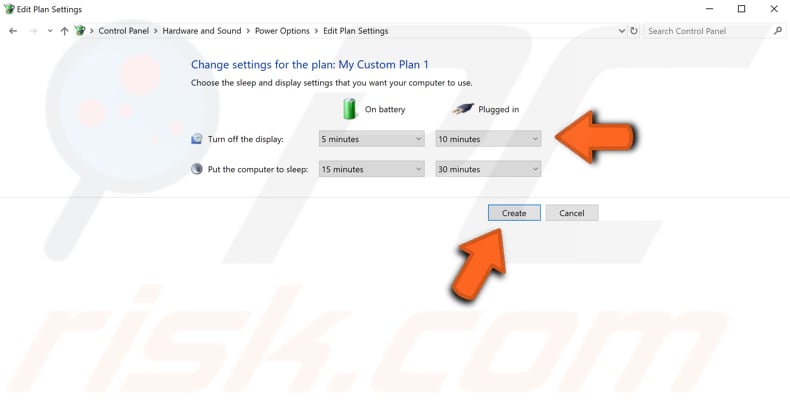
7. Choose the required options on the Edit Plan Settings screen and click the Create button to complete the changes to boost the performance.

After following these steps, you have learned to change power plan along with how to edit power plan as per your preferences. Now you can continue to enjoy any tasks on your system with utmost efficiency.
Frequently Asked Questions (FAQs)
Q1. What is the difference between high performance, power saver, and balanced power plans?
Ans. You may use the power saver plan when saving system power is the priority over performance. On the contrary, choose high performance when you need to have the smoothest of the performance. You can opt for the balanced power plan when both the other mentioned plans are not suited.
Q2. Can there be any harm to the device with the change power plan feature use?
Ans. There is no harm to your device if you use this feature. It is recommended to use the device in the apt power plan mode for better results. And this feature is available for optimizing the device performance according to the task being performed on the system itself.
Recommended:
- 15 Best Virtual Mailbox Free Service
- How to Enable or Disable Battery Saver In Windows 10
- How to Choose Power Supply for PC
- Fix There Are Currently No Power Options Available
So this was the method to learn how to change Power plan on Windows 10. We hope you found this article useful and were able to change and edit power plan as you wanted. Please let us know if this method worked the best for you. And leave any questions or comments in the space below for us.
-
Home
-
News
- Optimize Windows 10 Power Settings for Higher Performance
By Alisa |
Last Updated
In Windows 10 computer, you can optimize power settings to get higher performance. This post provides a detailed guide for how to optimize Windows 10 power settings. For other Windows issues, MiniTool software helps you recover lost data on PC, manage disk partition management, backup and restore system, etc.
How to Optimize Windows 10 Power Settings
Step 1. Open Control Panel
You can press Windows + R, type control panel in Run dialog, and press Enter to open Control Panel in Windows 10.
Step 2. Open Power Options Window
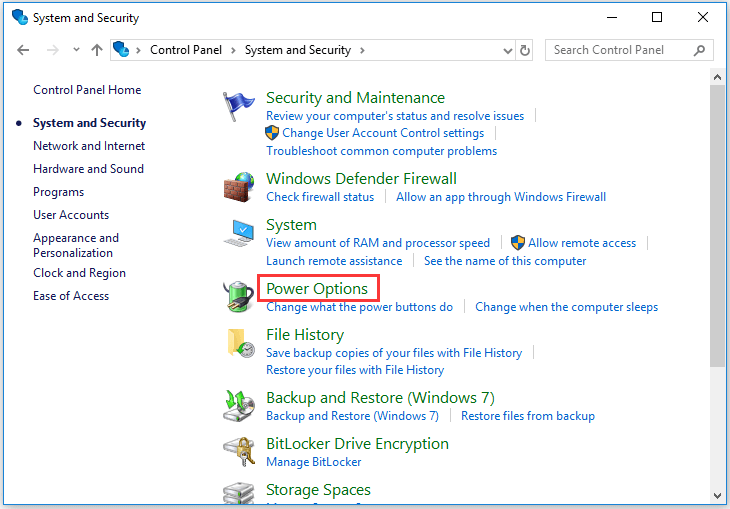
Next you can click System and Security in Control Panel, and click Power Options in the next window.
Step 3. Open Power Plan Settings Window
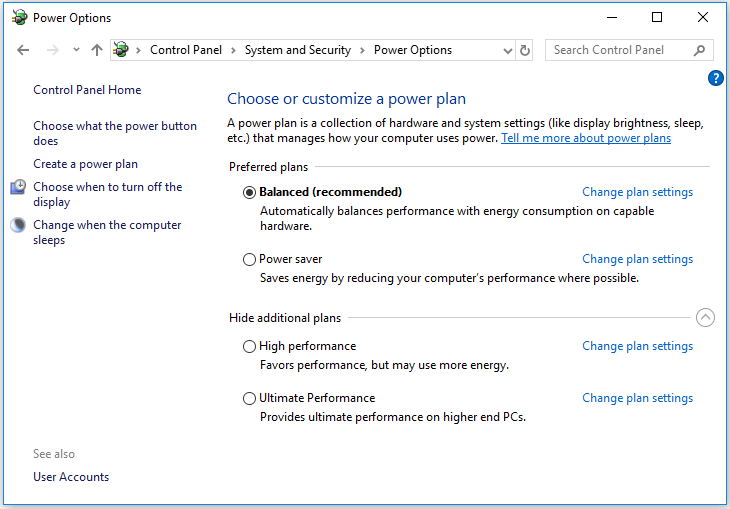
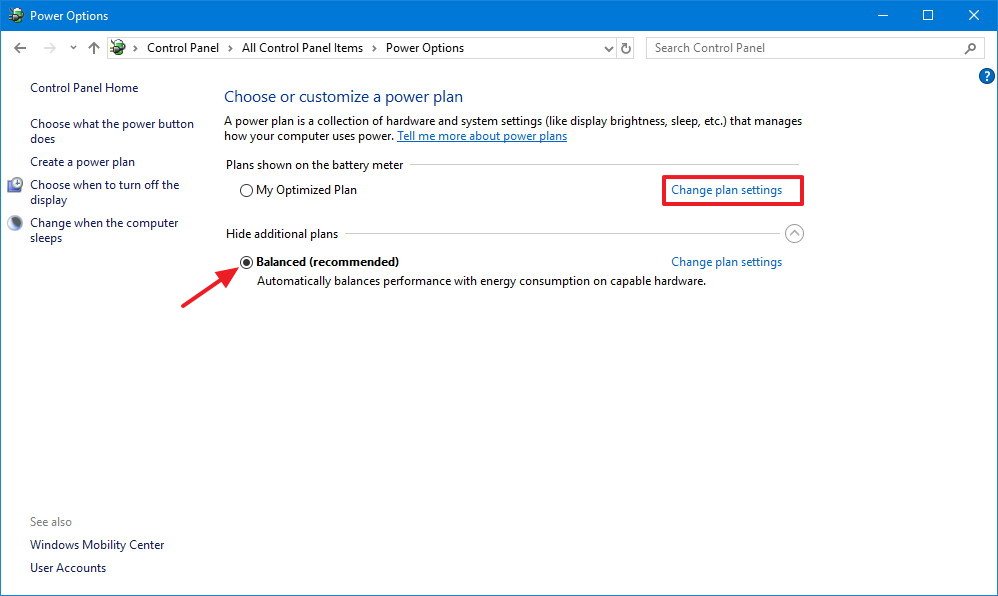
Generally you can see several power plans in this window: Balanced, Power saver, High performance, Ultimate performance. Normally most of us select Balanced plan. You can click Change plan settings link next to the current power plan to check the current Windows 10 power settings.
Step 4. Edit Power Plan Settings
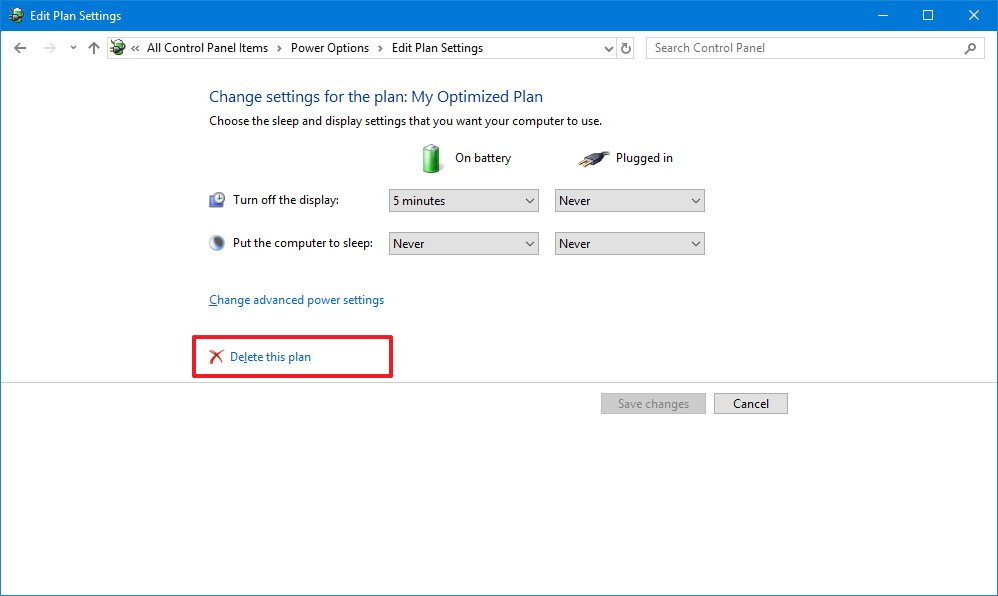
Here you can choose the sleep and display settings that you want your computer to use. You can set the preferred time length to turn off the display or put the computer to sleep.
You can also click Change advanced power settings link to customize advanced settings for the power plan.
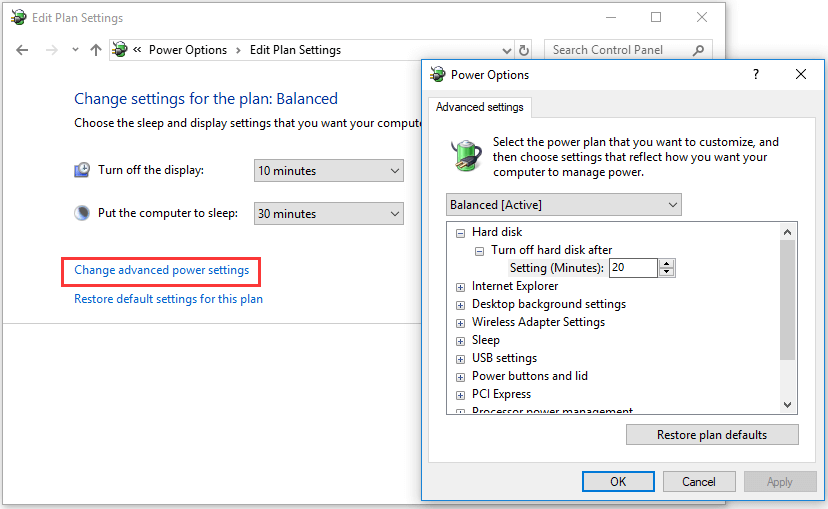
For example, you can expand USB settings, and set Disabled for Plugged in option. When you record video and audio with external USB devices on your Windows 10 computer, this could help solve some problems.
You can expand Processor power management and expand Minimum processor state to change to 100% in Plugged in option. This could tweak Windows 10 computer performance.
After you edit the power plan settings in Windows 10, click Apply and click OK to save the settings.
To reset the settings for the power plan to default, you can click the “Restore default settings for this plan” link in Edit Plan Settings window.
Best Free Disk Partition Manager for Windows 10 Users
MiniTool Partition Wizard is a professional disk partition manager for Windows. You can use it to fully manage your hard drive partitions, e.g. create/delete/extend/resize/format/wipe partition. You can also use it to convert partition format, check and fix disk errors, test hard drive speed, analyze disk space to speed up Windows 10, etc.
Useful PC Data and System Backup Software
MiniTool ShadowMaker is a professional PC backup software. You can use this program to easily back up Windows OS and restore your computer system when needed. It is also a data backup tool that lets you choose files, folders, partitions or whole disk to back up content to external hard drive, USB, network drive, etc. File sync and schedule automatic file backup are also supported.
To Recover Lost Data from Windows 10 PC
If you mistakenly deleted some files and emptied the Recycle Bin on Windows 10, you can easily retrieve deleted files with MiniTool Power Data Recovery.
MiniTool Power Data Recovery is a top free data recovery software for Windows 10. You can use it to easily recover any deleted/lost files from Windows 10 computer, external hard drive, SSD, USB, SD card, memory card, etc. Corrupt or formatted drive data recovery is also supported. If your computer won’t boot, you can use MiniTool Power Data Recovery to create a bootable USB drive to recover data when PC won’t boot.
About The Author
Position: Columnist
Alisa is a professional English editor with 4-year experience. She loves writing and focuses on sharing detailed solutions and thoughts for computer problems, data recovery & backup, digital gadgets, tech news, etc. Through her articles, users can always easily get related problems solved and find what they want. In spare time, she likes basketball, badminton, tennis, cycling, running, and singing. She is very funny and energetic in life, and always brings friends lots of laughs.
On Windows 10, a power plan is nothing more than a set of system and hardware settings to manage how your device consumes and conserves power. By default, you can pick from three predefined plans (or schemes), including Balanced, Power saver, and High performance.
Although you can modify each plan with your preferences, you can also create custom power plans with specific settings that are optimized for your particular computer configuration.
In this Windows 10 guide, we’ll walk you through the steps to create, customize, and delete a custom power plan on your computer.
- How to create a power plan
- How to customize a power plan
- How to delete a power plan
How to create a power plan
In order to create a new custom power plan, you can use the following steps on Windows 10:
- Open Settings.
- Click on System.
- Click on Power & sleep.
- Click the Additional power settings link.

- On the left pane, click the Create a power plan button.
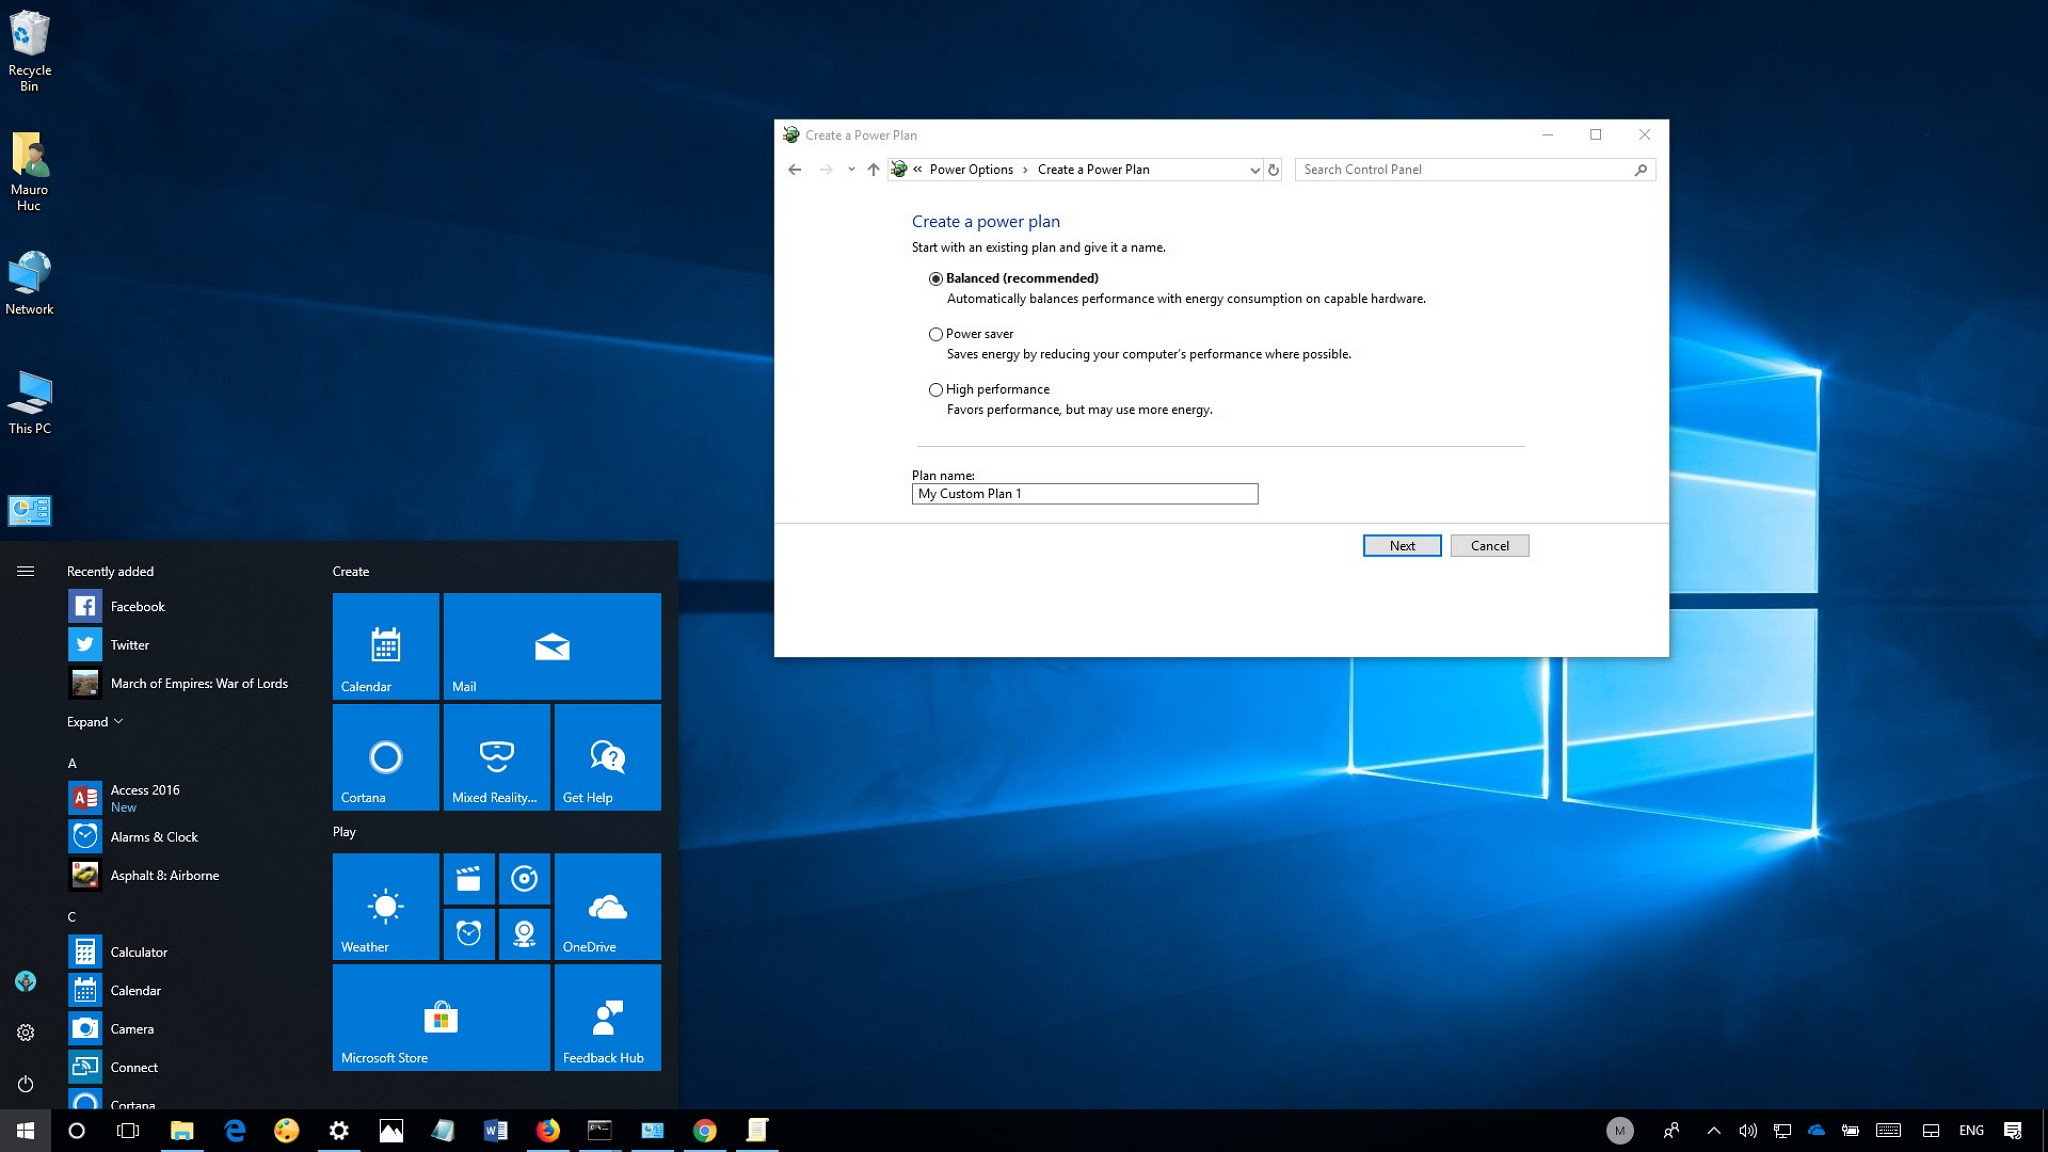
- Select a power plan with the settings you want to start.
- Under «Plan name,» type a descriptive name for the new power scheme.
- Click the Next button.

- Using the drop-down menus, select when your computer should turn off the display and when it should go to sleep.
- Click the Create button.
Once you’ve completed the steps, your new custom plan will be applied to your device.
How to customize a power plan
Although during the creation process you’ll be able to select a set of predefined settings and change when the display should turn off and when your device should go to sleep, there are a number of additional settings you can customize in your newly created plan.
- Open Settings.
- Click on System.
- Click on Power & sleep.
- Click the Additional power settings link.
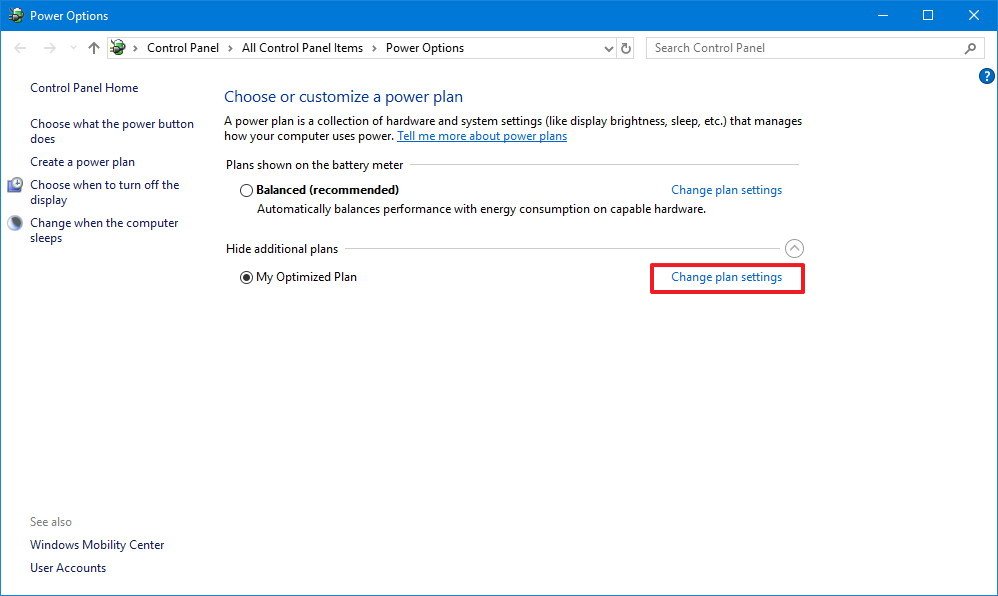
- Click the Change plan settings link next to your custom power plan.
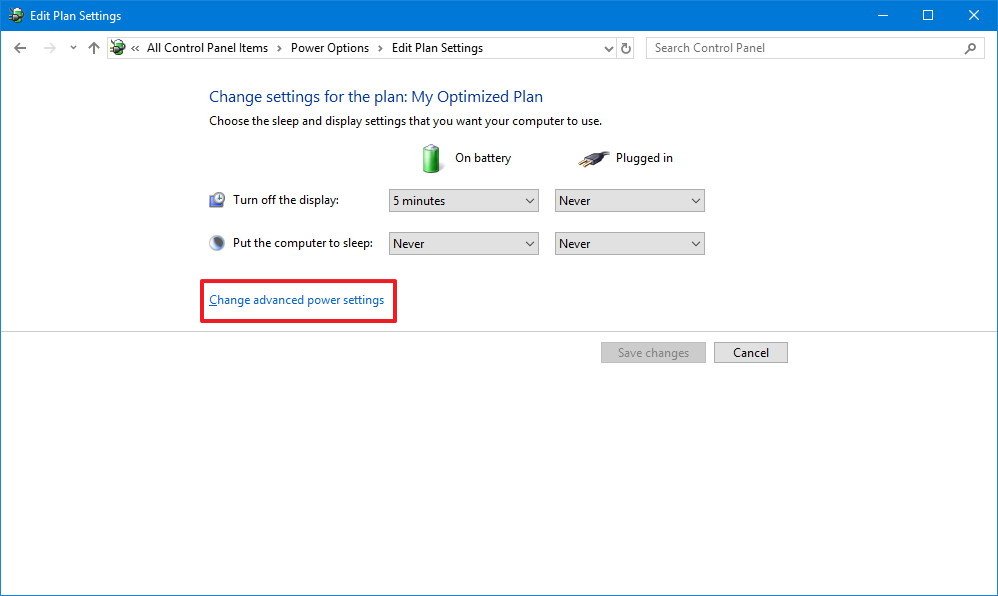
- Click the Change advanced power settings link.
In the «Advanced settings» tab, you’ll find a list of settings you can configure in your scheme.
All the latest news, reviews, and guides for Windows and Xbox diehards.
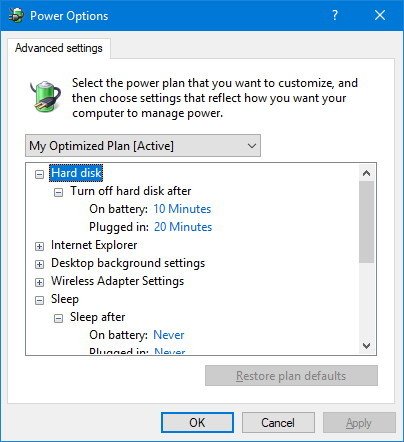
If you’re looking to create a power plan to optimize battery life, you should consider changing the settings that can impact battery, including the brightness, dimming, and timeout under the Display settings.
In the case your laptop is using a traditional hard drive. You may want to specify when to turn off the drive to conserve battery using the Hard disk settings.
Usually, when you’re not actively using your device, it’ll automatically go into a low-power sleep or hibernation state. Depending on how you use your computer, to reduce power usage, you can set exactly when your computer should go to sleep or hibernate using the Sleep settings.
Wi-Fi adapters can use a significant amount of battery, as such it’s also a good idea to check the Wireless Adapter Settings to make sure «Power Saving Mode» is set at least to Medium Power Saving.
It’s worth noting that not every computer has the same available settings, it’ll depend on your hardware configuration and device category. For example, on laptops, you can change the advanced settings when your device is running on battery or plugged in, but on desktop PCs, you can only configure settings when your device is connected to AC power (for obvious reasons).
Quick Tip: If you want to start over, you can always reset the settings by clicking the Restore plan defaults button in the «Advanced settings» tab for Power Options.
How to delete a power plan
In the case you no longer need a custom power plan, you can quickly delete it using the following steps:
- Open Settings.
- Click on System.
- Click on Power & sleep.
- Click the Additional power settings link.
- Click the Change plan settings link for the power plan you want to delete. Quick Tip: If you’re trying to delete a power plan you’re currently using, make sure to switch to another scheme before trying to remove it. Otherwise, the delete option won’t be available.
- Click the Delete this plan link.
- Click OK to confirm.
After completing the steps, the custom power plan will no longer be available on your device.
Wrapping things up
Alongside «power plan,» you’ll also hear about «power mode,» but even though both features are related, you shouldn’t confuse them. Power mode is a feature on Windows 10 to optimize battery life on laptops and tablets, while power plan is available on desktops, laptops, and tablets, and it’s a feature that you can customize any way you want to let Windows know exactly how it should manage power on your PC.
More Windows 10 resources
For more helpful articles, coverage, and answers to common questions about Windows 10, visit the following resources:
- Windows 10 on Windows Central – All you need to know
- Windows 10 help, tips, and tricks
- Windows 10 forums on Windows Central
Mauro Huculak has been a Windows How-To Expert contributor for WindowsCentral.com for nearly a decade and has over 15 years of experience writing comprehensive guides. He also has an IT background and has achieved different professional certifications from Microsoft, Cisco, VMware, and CompTIA. He has been recognized as a Microsoft MVP for many years.
With Windows 11/10, Microsoft offers a wide variety of power options and sleep settings to help your laptop get a balanced battery life and performance. While The power and sleep settings on Windows are similar to operating with the previous versions of Windows, in case one wants to access them a bit differently, and with a few more options. In this post, I will guide you on how to change power and sleep settings in Windows 11/10.

The article below guides on all the available methods to manage Power and Sleep.
- Change Power Settings in Windows
- Adjust Sleep Settings in Windows
You do not need admin permission to change any of these.
1] Change Power Settings in Windows

Windows by default ships with three power plans; you can choose based on your usage scenario. Here’s everything about the Power Plans:
- Balanced – The best power plan for most users; This option automatically balances system performance and power usage by improving to full performance when needed and power-saving mode when you don’t.
- High performance – It is, for professionals, the best plan for maximizing screen brightness and increasing system performance. It uses more energy, and in turn, it will drain your battery the quickest.
- Power saver – It is the best plan to extend battery life. This option saves energy by reducing computer performance and screen brightness to give you the most juice from your current battery charge.
Here’s how you can adjust it:

- Open the Control Panel on Windows 10 by searching for the same in the Start Search Box and selecting the main listed result.
- Navigate to Hardware and Sound -> Power Options -> Change Plan Settings.
- Here change the settings based on your preference or create a new power plan based on your choices by following the guide mentioned below.
How to Create a Power Plan in Windows 11/10
Battery Power Plan is a key feature in Windows 11/10, which is incredibly useful for Laptop users. It allows them to set up a configuration that can not only deliver performance but also save battery in the long term.
- Open the Control Panel on Windows, as we did above.
- Navigate to Hardware and Sound > Power Options
- Now, navigate to the Additional Power Settings link (Right side)
- Click on Create a Power Plan available on the left panel.
- Select a template, and then choose a name for the custom power plan
- Finally, click on Create, and you’re good to go.
Power Plan can be a little complex if you deep dive into detailed settings. However, if you know what you are doing, you can get the best out of it. Read the post to learn how you can create a new Power Plan in Windows 10.
2] Adjust Sleep Settings in Windows

For users who don’t know about what Sleep Mode does, Sleep mode conserves energy by putting the computer into a low-power mode and turning off your display automatically when you’re not using it. Instead of completely shutting down your computer and later restarting it, you can put it in sleep mode so that when it wakes up, it will resume where you left off.
- Open Settings in Windows (Win+I)
- Navigate to System > Power and Sleep
- Here you’ll find various options to adjust the power and sleep options for, varying from, On battery power, On plugged in, and more.
- Adjust it based on your preferences using the dropdown.
The same could be customized using the Control Panel as well, here’s how:
- Open Windows Search using Win + S
- Type Control Panel and open when it appears in the list
- Navigate to Hardware and Sound > Power Options > Change Plan Settings > Changed Advanced Settings
- Here from the various dropdown menu’s one can adjust the timings after one wants the screen to go into sleep mode.
How to use Battery Saver Mode on Windows 10
Battery Saver on Windows is pretty similar to the ones we have seen on Android devices and the low power mode of the iPhone. When this mode gets activated, it makes a few changes in the settings of your operating system to extend the battery life further. It automatically reduces the brightness of the display, which is an effective way to reduce battery consumption in any device. Here’s How you can use the battery saver mode in Windows 11/10
I hope this post was useful, and you were able to change the power and sleep settings in Windows 11/10. With that said, Which power plan do you prefer? Do drop a comment down below.
How Do I Change My Power Settings to Never Sleep?
- Press the Start button, and search Edit Power Plan. Click to launch when it appears in the search result.
- Then click on Change advanced power settings
- Select the Power Plan from the drop-down
- Change settings to the maximum for Turn off Hard Disk and Sleep sections.
You can also use Microsoft Power Toys, which comes with the Awake feature to keep your PC always on.
How Do I Reset the Power and Sleep Settings in Windows 11/10?
Go to Power Settings > Edit Power Plan > Advanced Power Settings. Select the power plan from the drop-down, and click on Restore plan defaults. This will reset both power and sleep settings.
How Do I Fix Power Settings in Windows 11/10?
- Open Run prompt and type PowerShell. Then Use Shift + Enter to launch with admin permission.
- Type powercfg-restoredefaultschemes and press the Enter key
- Once reset completes, close the window.
Why Does Windows Change My Power Settings?
When you Plugin the laptop, the Power Plan switches so, it can get into performance mode. It allows the laptop to use more resources and not worry about the battery. The opposite happens when you disconnect the power cord—Windows changes or switches to power-saving mode.
A long-standing Windows fan, Photographer, and Tech Enthusiast who loves to write about Smartphones and Technology.
How to Change Power Plan Settings in Windows 10
Power Plan is a collection of hardware and system settings that manage how your computer uses power and also helps you to manage your laptop’s battery life. In this article, we show how to create plans, make adjustments, and delete them.

If you are not happy with how your plan manages power, you can customize it by creating custom power plans with specific settings to suit your needs and computer configuration.
There are three main plans: «Balanced,» «Power saver,» and «High performance.» Each has different uses and settings to adapt to varying situations. Switching between plans makes changes that impact performance and power consumption.
- The Balanced plan is set by default and optimized for most users. The Balanced power plan automatically increases and decreases your Central Processing Unit (CPU) speed. This setting is the default, and it should be fine for most users.
- The Power saver plan saves power by reducing constant CPU speed, lowering screen brightness, and similar settings.
- The High performance plan favors performance as it sets CPU speed at higher levels for longer intervals. It also sets higher screen brightness levels.
Generally, there is little need to switch between plans since you can customize your preferred one.
Video Guide on How to Change Power Plan Settings in Windows 10
Table of Contents:
- Introduction
- How to Create a Power Plan
- How to Customize a Power Plan
- How to Delete a Power Plan
- Video Guide on How to Change Power Plan Settings in Windows 10
Download Computer Malware Repair Tool
It is recommended to run a free scan with Combo Cleaner — a tool to detect viruses and malware on your device. You will need to purchase the full version to remove infections. Free trial available. Combo Cleaner is owned and operated by Rcs Lt, the parent company of PCRisk.com read more.
How to Create a Power Plan
To create a new power plan, go to Settings and click «System.»
In the System window, click «Power & Sleep» (you will find it below «Notifications & actions» on the left). In «Power & Sleep» options, click «Additional power settings».
This will launch the Power Options window. To create a power plan, click «Create a power plan» on the left pane.
Select an existing plan or give your new plan a name. Then, click «Next.»
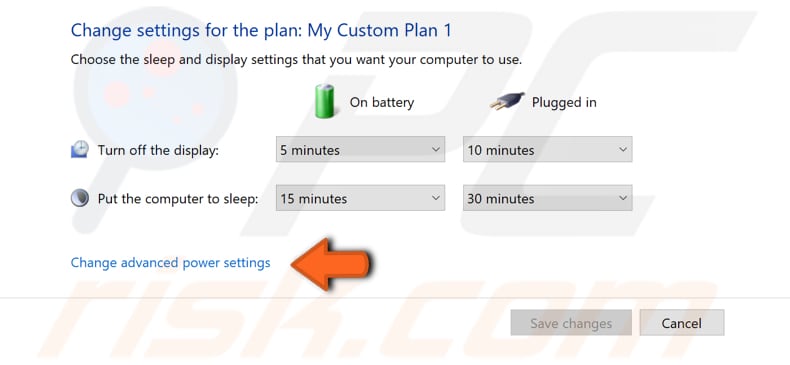
Choose the sleep and display settings that you want your computer to use. Use the drop-down menu to adjust the settings and click «Create.» Your custom plan will be created and applied to your device.
[Back to Table of Contents]
How to Customize a Power Plan
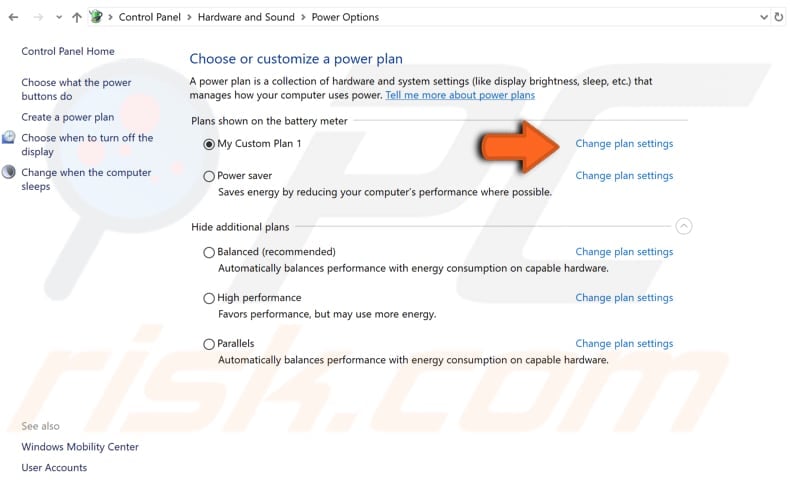
When creating a new power plan, you can only select and adjust basic settings. However, once created, additional settings are available. To adjust them, return to the Power & Sleep window and choose «Additional power settings» as before. Select the new power plan (or another existing power plan) and click «Change plan settings.»
Then click «Change advanced power settings.»
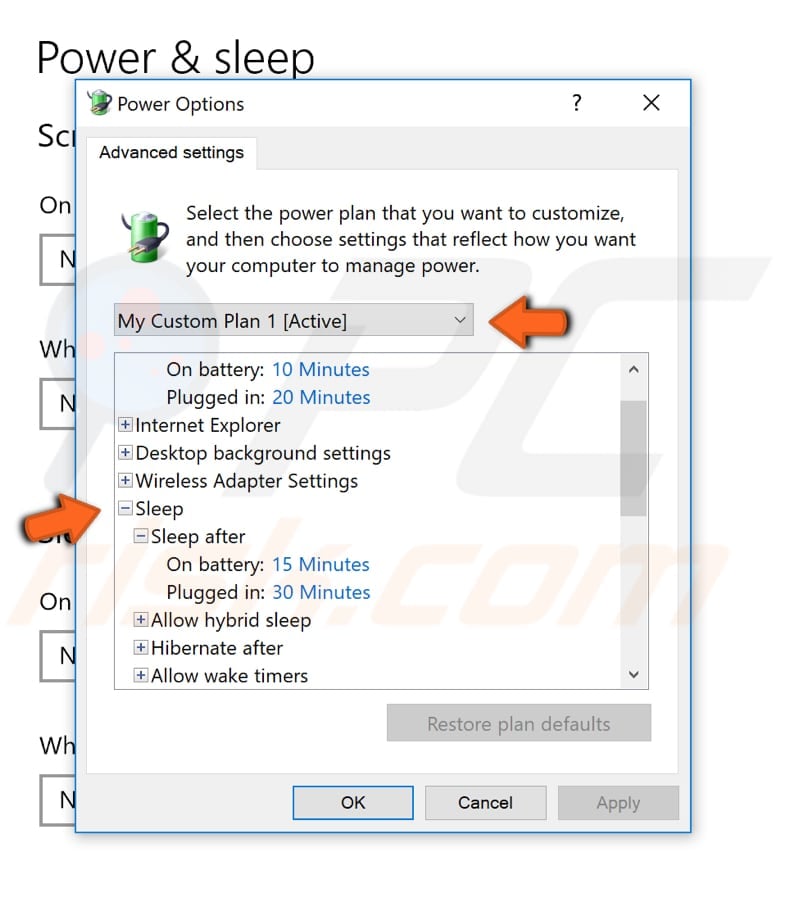
Here, you can access more settings for each power plan created by default and power plan (or plans) created by you. Select which plan you want to customize and adjust other available settings if necessary. To access settings of different areas, click «+» and available options will appear. You can control how Windows uses power to suspend disk drives, USB devices, and your Wi-Fi hardware. This makes these components use less power when Windows is not actively using them. Not every computer has the same available settings — these will depend on your device category and hardware configuration. You can always restore default settings by clicking «Restore plan defaults.»
[Back to Table of Contents]
How to Delete a Power Plan
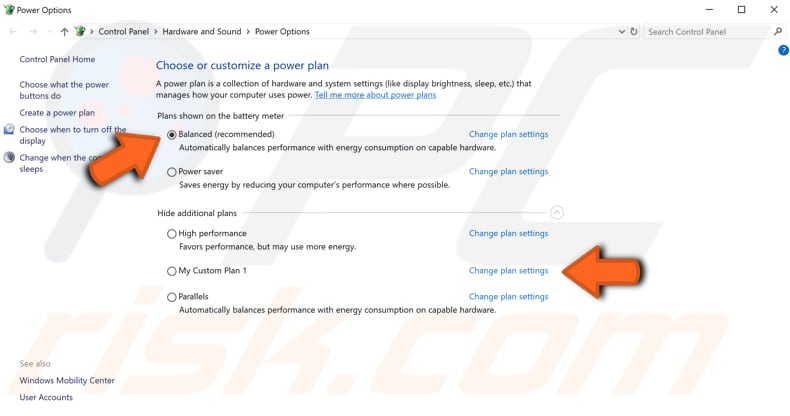
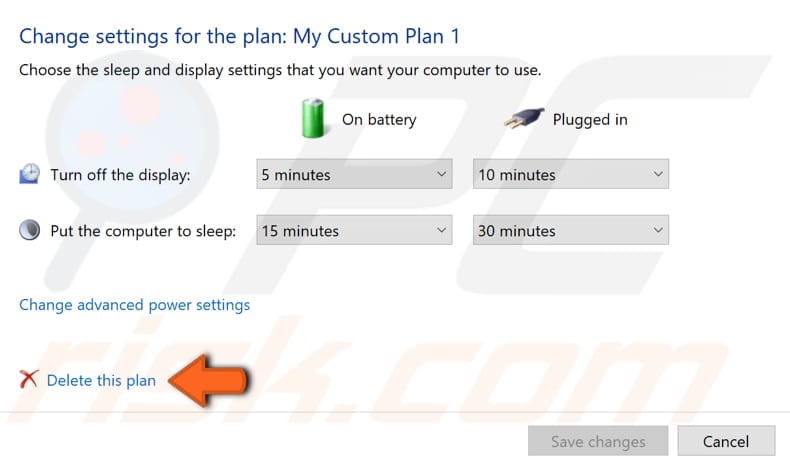
If you want to delete a power plan you have created, go to «Power & sleep» in System settings and click «Additional power settings» on the right side. Note that you cannot delete the power plan currently in use, so choose another (in our example, we use «Balanced») and then click «Change plan settings» next to the plan you wish to delete.
Click «Delete this plan.» The plan cannot be restored after deletion. Click «Ok.»
[Back to Top]