
To turn on acoustic echo cancellation in Windows 10:
1. Open the Control Panel.
2. Click on Sound.
3. Under the «Playback» tab, find your speakers and click on the Properties button.
4. Under the «Advanced» tab, find the «Acoustic Echo Cancellation» option and check the box next to it.
5. Click OK to save your changes.
Does Windows 10 have noise cancellation?
How do I enable noise cancellation on my laptop?
There is no one-size-fits-all answer to this question, as the process for enabling noise cancellation on a laptop can vary depending on the make and model of the device. However, some tips on how to enable noise cancellation on a laptop include:
– Checking the device’s settings to see if there is a dedicated noise cancellation feature that can be enabled.
– Adjusting the device’s audio settings to see if there is an option to reduce or eliminate background noise.
– Installing third-party software that is designed to cancel out background noise on a laptop.
If you are unsure of how to enable noise cancellation on your specific laptop, you may want to consult the device’s user manual or contact the manufacturer for assistance.
How do I stop Windows 10 from echoing?
There are a few things you can do to stop Windows 10 from echoing. First, try adjusting the volume levels in the sound settings. If that doesn’t work, you can try using a different audio output device. Finally, if you’re still having trouble, you can try disabling audio enhancements.
How do I turn on noise cancellation?
There are a few different ways to turn on noise cancellation, depending on the type of device you’re using.
If you’re using headphones or earbuds with noise cancellation built in, there is usually a physical switch on the device that you can toggle to turn the feature on or off.
Some devices also have noise cancellation settings in the software. For example, on iPhones, you can go to Settings > General > Accessibility > Hearing and toggle the «Phone Noise Cancellation» setting.
If you’re using a device that doesn’t have noise cancellation built in, you can try using a third-party app like White Noise or Noizio.
Does Realtek have Noise Suppression?
Yes, Realtek does have noise suppression. To reduce noise, you can follow these steps:
1. Go to the Realtek HD Audio Manager.
2. Click on the Advanced tab.
3. Under Advanced Settings, select the Enable Noise Suppression checkbox.
4. Click Apply and then OK.
How do I stop background noise on my computer?
There are a few things you can do to stop background noise on your computer:
1. Use headphones or earbuds. This will help to isolate the sound coming from your computer and block out any external noise.
2. Adjust the audio settings on your computer. You can usually find these in the sound control panel. Here you can adjust the volume and equalizer to try and reduce the amount of background noise.
3. Use a noise-cancelling program. There are a few different programs available that can help to cancel out background noise.
4. Move to a quiet location. If you can’t seem to reduce the background noise, try moving to a different room or even outside. Sometimes this can make a big difference.
Does Realtek have noise suppression?
Yes, Realtek has noise suppression. To reduce noise, you can:
1. Make sure your audio drivers are up to date.
2. Use a noise-cancelling microphone.
3. Use headphones or earbuds instead of speakers.
4. Move your computer away from noisy sources.
5. Adjust your computer’s audio settings.
How do I stop my microphone from picking up background noise Windows 10?
There are a few things you can do to reduce or eliminate background noise from your microphone on Windows 10:
1. Use a headset instead of a microphone and speakers. This will help to isolate your voice and reduce ambient noise.
2. If you must use a microphone and speakers, make sure they are of high quality and positioned properly. Poor quality audio equipment can amplify background noise.
3. Use noise-cancelling headphones or earbuds. These can help to block out ambient noise and allow you to hear your own voice more clearly.
4. Adjust your microphone’s sensitivity. In Windows 10, you can do this by going to Start > Settings > Sound > Input and selecting the Microphone tab. From here, you can adjust the sensitivity of your microphone to reduce background noise.
5. Use a software noise gate. A noise gate is a software program that can be used to reduce or eliminate background noise from your microphone. There are many different noise gate programs available, so be sure to do some research to find one that best suits your needs.
Why is my PC audio echoing?
There are several potential reasons why your PC audio might be echoing. One possibility is that you have your microphone volume turned up too high, which is causing your voice to be amplified and create an echo. Another possibility is that you have speaker volume turned up too high, which is causing the sound to bounce off walls and create an echo. Finally, it’s also possible that there is a problem with your sound card or audio drivers, which is causing the echo.
To fix this problem, you will need to adjust your microphone and speaker volumes. Start by turning down your microphone volume and see if that eliminates the echo. If not, try turning down your speaker volume. If the echo persists, you may need to update your sound card drivers or contact your sound card manufacturer for further assistance.
Why is my Windows 10 echoing?
There could be a number of reasons why your Windows 10 is echoing. One possibility is that your computer’s audio settings are configured to amplify sound, which can cause echoing. Another possibility is that you have a problem with your audio drivers. To troubleshoot this issue, you can try adjusting your computer’s audio settings or updating your audio drivers.
Why does my noise cancellation not work?
There could be a few reasons why your noise cancellation is not working. First, make sure that the feature is turned on in your settings. If it is, and you’re still not seeing results, try restarting your device. If that doesn’t work, the issue could be with your headphones or earbuds. Make sure that they are clean and free of debris, as this can sometimes interfere with the noise cancellation feature. If you’re still having trouble, you may need to consult your device’s manual or contact the manufacturer for further assistance.
How do I get rid of background noise in audio?
There are a few things you can do to reduce or eliminate background noise in your audio recordings:
1. Use a directional microphone: A directional microphone will pick up sound from the direction it is pointing, and will be less sensitive to background noise.
2. Move the microphone closer to the source: The closer the microphone is to the source, the less background noise will be picked up.
3. Use acoustic treatment: Soundproofing your recording space will help to reduce the amount of background noise that is picked up by the microphone.
4. Use noise reduction software: There are a number of software programs available that can help to reduce or eliminate background noise from your audio recordings.
How do I know if my headphones are noise Cancelling?
There are a few ways to tell if your headphones are noise cancelling. One way is to look for a noise cancelling indicator on the headphones themselves. Another way is to listen to see if there is a significant difference in sound quality when the noise cancelling feature is turned on or off. Finally, you can ask someone else to listen to see if they can hear a difference when the noise cancelling feature is turned on or off.
How do I mute background noise?
There are a few things you can do to mute background noise:
1. Use noise-cancelling headphones or earbuds.
2. If you’re using a microphone, use a pop filter to reduce plosives.
3. Find a quiet place to record.
4. Use a soundproofing foam or blanket to help absorb sound.
5. Use a noise gate to reduce background noise in your recording.
При использовании микрофона некоторые пользователи могут столкнуться с тем, что на колонках или в наушниках слышно эхо. Проблема может возникать со встроенным микрофоном ноутбука или веб-камеры, микрофоном наушников или отдельным USB-микрофоном.
В этой инструкции подробно о том, как убрать эхо микрофона в Windows 11/10 и чем оно может быть вызвано.
Отключение прослушивания с микрофона
Первое, на что следует обратить внимание, если вы столкнулись с проблемой — опция «Прослушивать с данного устройства» в настройках микрофона. Чаще всего причина оказывается именно в ней. Необходимые действия:
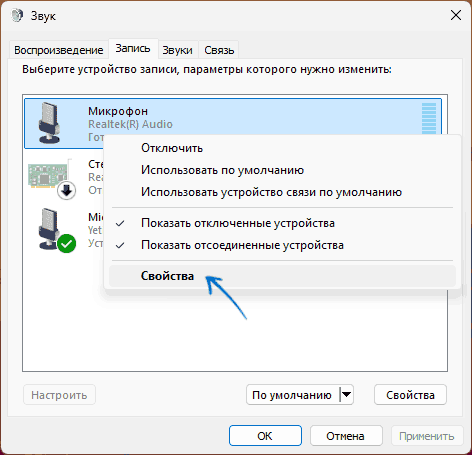
- Нажмите правой кнопкой мыши по кнопке «Пуск», выберите пункт «Выполнить», введите mmsys.cpl и нажмите «Enter».
- Перейдите на вкладку «Запись», нажмите правой кнопкой мыши по нужному микрофону и выберите пункт «Свойства».

- Перейдите на вкладку «Прослушать» и, если там включена отметка «Прослушивать с данного устройства», снимите её, а затем примените настройки.


Важная деталь: если у вас более одного микрофона, например, один встроенный, другой — в наушниках, рекомендую проверить опцию «Прослушивать с данного устройства» для всех доступных в списке устройств записи микрофонов: если она включена даже для микрофона, не используемого по умолчанию, это может привести к эффекту эхо.
Учитывайте, что, если задача — как раз вывод звука с микрофона на колонки, то есть опция «Прослушивать с данного устройства» включена целенаправленно, избавиться от эха и наводок получится лишь сделав так, чтобы микрофон не мог уловить звук с колонок путём уменьшения их громкости, расположении на расстоянии, снижения чувствительности микрофона.
Эхо при онлайн общении в мессенджерах, конференциях и играх
Если вы слышите эхо, когда общаетесь с кем-то через Интернет в приложениях для общения или играх, либо другая сторона жалуется на эхо, с большой вероятность проблема заключается в одном из или сочетании факторов:
- Близкое расположение микрофона и колонок у одного из участников (не обязательно у вас, при этом эхо можете слышать именно вы).
- Высокая громкость колонок или высокая чувствительность микрофона у одного из участников.
В этой ситуации проблема может быть как на вашей стороне, так и на стороне собеседника или собеседников. Пример того, что может происходить:
- Вы что-то говорите в микрофон, звук с задержкой (кодирование и передача) воспроизводится на колонках собеседника.
- Если громкость воспроизведения высокая, либо микрофон достаточно чувствителен и расположен рядом с колонкой, звук «отправляется обратно» вам — вы слышите эхо.
Основное решение — изменение расположения микрофона, снижение громкости колонок, использование наушников вместо колонок, либо использование опции «Mute» на микрофоне участников, которые сейчас не говорят.
Отключение усиления и дополнительных эффектов микрофона
Следующее, что следует попробовать, если предыдущий вариант не помог — попробовать отключить усиление микрофона (при наличии опции), а также дополнительные эффекты звука для него как в интерфейсе Windows, так и в фирменном ПО:
- Нажмите клавиши Win+R, введите mmsys.cpl и нажмите Enter
- Перейдите на вкладку «Запись», нажмите правой кнопкой мыши по нужному микрофону и выберите пункт «Свойства».
- Попробуйте отключить «Усиление микрофона на вкладке «Уровни» и применить настройки. Опция доступна не для всех микрофонов и не с любыми драйверами звуковой карты.
- Перейдите на вкладку «Дополнительно» и отключите опцию «Включить дополнительные средства звука» (опция также может отсутствовать).
- В случае если для вашего микрофона есть другие вкладки с эффектами, помимо тех, что представлены на скриншотах, перейдите на них и попробуйте также выключить все доступные эффекты.
- Если для вашего микрофона доступно какое-то фирменное ПО, есть предустановленные программы (например, Nahimic), проверьте, чтобы никакие дополнительные эффекты эха или нахождения в определенном типе помещения не были включены, попробуйте поэкспериментировать с доступными настройками.
- Также имеет смысл заглянуть в приложение Realtek Audio Console (обычно устанавливается автоматически с драйверами звуковой карты и найти его можно через поиск на панели задач) и попробовать поэкспериментировать с настройками — включить или отключить систему устранения акустического эха, систему подавления шума и другие доступны параметры.


Возможно, что-то из предложенного поможет разобраться в причинах ситуации и решить проблему с эхом микрофона.
Некоторые дополнительные возможные решения при проблемах с эхом во время использования микрофона в Windows 11/10:
- Попробуйте переустановить драйверы звуковой карты, причем использовать не те драйверы, которые предлагает Windows, а те, что представлены на официальном сайте производителя вашего ноутбука или материнской платы ПК, именно для вашей модели устройства: достаточно найти страницу поддержки вашего устройства, а на ней — раздел загрузок.
- Если проблема возникает только в конкретной программе, например, при трансляциях или записи в OBS или общении в конкретном ПО, внимательно изучите настройки этой программы, чтобы не было включено прослушивание с микрофона, какие-то дополнительные фильтры и эффекты.
- Для устройств, подключаемых с использование коннекторов звуковой карты проблема иногда оказывается в плохом подключении (достаточно переподключить микрофон или гарнитуру) или в повреждённых кабелях.
- Если вы слышите эхо на записи, причина может быть и в акустических свойствах комнаты (например, эффект будет заметен в почти пустой комнате с голыми стенами), месте расположения микрофона, иногда — свойствами самого микрофона (например, на некоторых встроенных микрофонах ноутбуков присутствует такой эффект).
Надеюсь, предложенные способы помогли разобраться с эхом микрофона. Если один из вариантов помог — поделитесь в комментариях, какой именно. Если же нет — опишите вашу ситуацию в деталях и, возможно, мне удастся предложить дополнительные решения для вашего случая.
Все способы:
- Убираем эхо в микрофоне на Windows 10
- Способ 1: Настройки микрофона
- Способ 2: Настройки звука
- Способ 3: Параметры софта
- Способ 4: Устранение неисправностей
- Вопросы и ответы: 10
Микрофон, подключенный к компьютеру на Windows 10, может быть необходим для реализации различных задач, будь то звукозапись или управление голосом. Однако иногда в процессе его использования возникают трудности в виде ненужного эффекта эхо. Мы далее расскажем о методах устранения данной проблемы.
Убираем эхо в микрофоне на Windows 10
Существует немало способов устранения неполадок, связанных с эхо в микрофоне. Нами будет рассмотрено только несколько общих вариантов решений, в то время как в некоторых отдельных случаях для корректировки звука может потребоваться детальный разбор параметров сторонних программ.
Читайте также: Включение микрофона на ноутбуке с Windows 10
Способ 1: Настройки микрофона
Любая версия операционной системы Windows по умолчанию предоставляет ряд параметров и вспомогательных фильтров для регулировки микрофона.
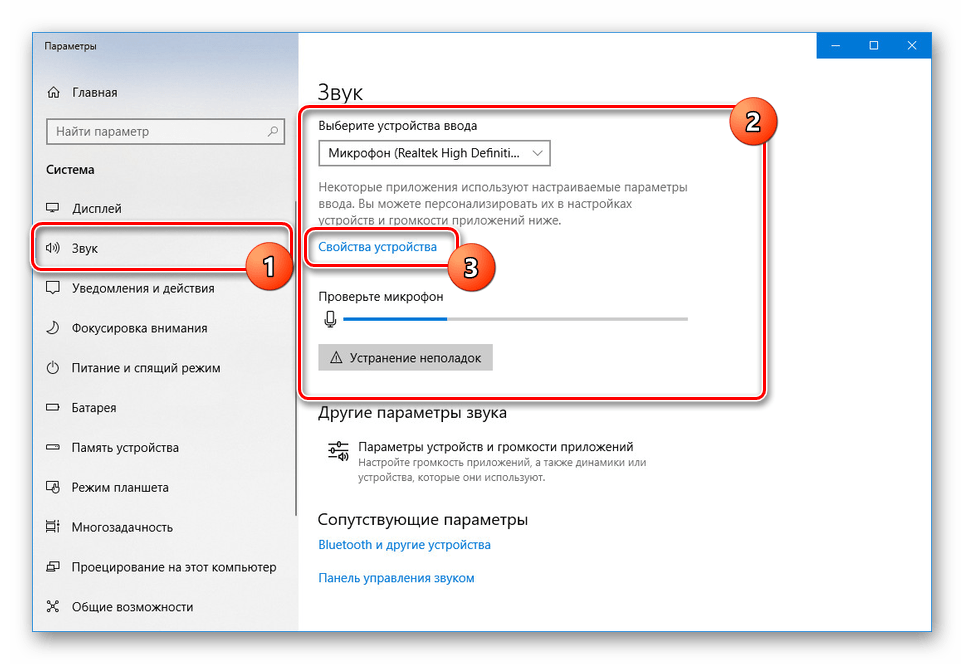
- На панели задач кликните правой кнопкой мыши по иконке звука и в открывшемся списке выберите пункт «Открыть параметры звука».
- В окне «Параметры» на странице «Звук» найдите блок «Ввод». Здесь необходимо щелкнуть по ссылке «Свойства устройства».
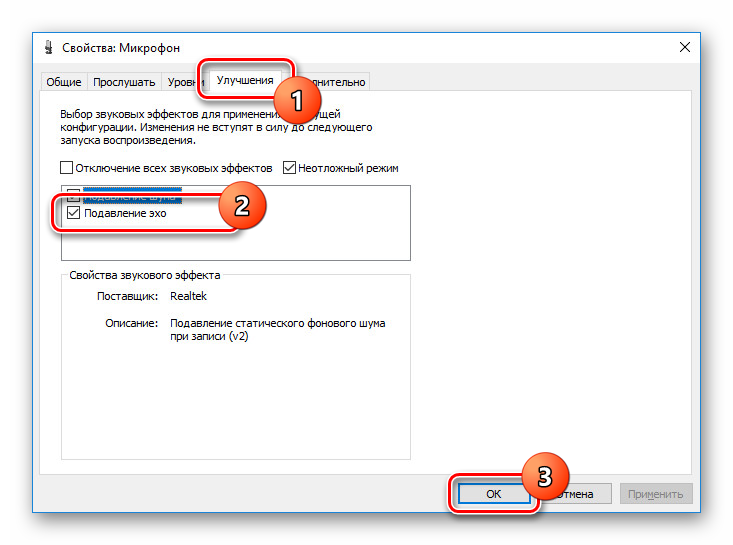
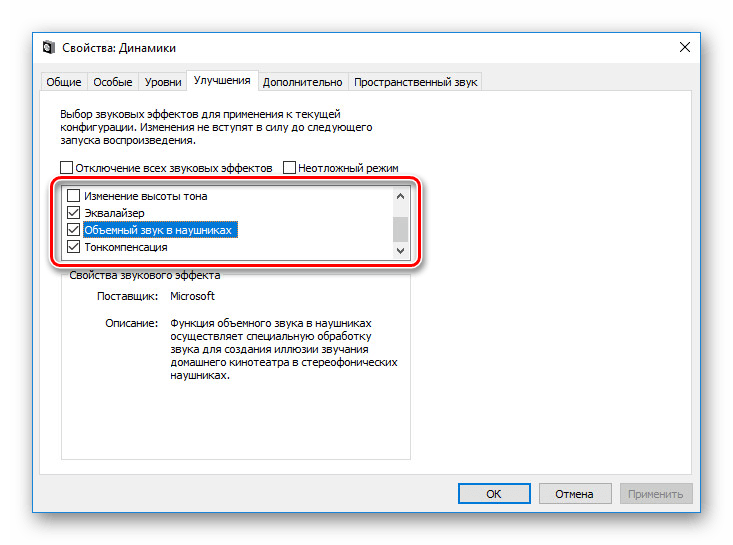
- Перейдите на вкладку «Улучшения» и установите галочку «Подавление эхо». Обратите внимание, данная функция доступна только при наличии актуального и, что немаловажно, совместимого драйвера для звуковой карты.

Желательно также активировать некоторые другие фильтры вроде подавления шума. Для сохранения параметров нажмите кнопку «ОК».
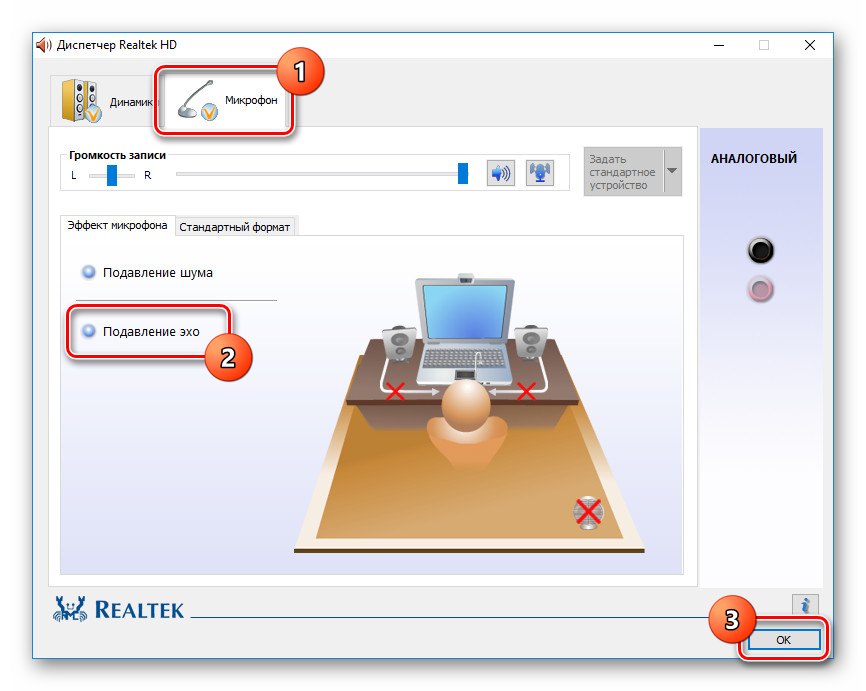
- Аналогичную процедуру, как было сказано ранее, можно произвести в диспетчере Realtek. Для этого откройте соответствующее окно через «Панель управления».
Читайте также: Как открыть «Панель управления» в Windows 10

Перейдите на вкладку «Микрофон» и установите маркер рядом с «Подавление эхо». Сохранение новых параметров не требуется, а закрыть окно можно с помощью кнопки «ОК».

Описанных действий вполне достаточно для устранения эффекта эхо от микрофона. Не забудьте произвести проверку звука после внесения изменений в параметры.
Читайте также: Как проверить микрофон в Windows 10
Способ 2: Настройки звука
Проблема появления эхо может заключаться не только в микрофоне или его неправильных настройках, но и вследствие искаженных параметров устройства вывода. В таком случае следует внимательно проверить все настройки, включая колонки или наушники. Особое внимание надо уделить системным параметрам в следующей статье. К примеру, фильтр «Объемный звук в наушниках» создает эффект эхо, распространяющийся на любые звуки компьютера.
Подробнее: Настройки звука на компьютере с Windows 10
Способ 3: Параметры софта
Если вы используете какие-либо сторонние средства передачи или записи звука с микрофона, имеющие собственные настройки, необходимо также их перепроверить и отключить ненужные эффекты.
Способ 4: Устранение неисправностей
Нередко причина возникновения эхо сводится к неправильному функционированию микрофона без влияния каких-либо сторонних фильтров. В связи с этим устройство необходимо проверить и по возможности заменить. О некоторых вариантах устранения неисправностей вы можете узнать из соответствующей инструкции у нас на сайте.
Подробнее: Устранение проблем с микрофоном на Windows 10
В большинстве ситуаций при возникновении описываемой проблемы для устранения эффекта эхо достаточно выполнить действия из первого раздела, особенно если ситуация наблюдается только на Windows 10. При этом ввиду существования большого количества моделей устройств звукозаписи, бесполезными могут оказаться и все наши рекомендации. Этот аспект стоит учитывать и брать во внимание не только проблемы операционной системы, но и, к примеру, драйверов производителя микрофона.
Наша группа в TelegramПолезные советы и помощь
When it comes to listening to music and other audio, nothing beats a good pair of headphones—they provide greater sound control as well as clarity than having your speakers at full blast. But if your headphones have been making sounds that feel overly echoing, bereft of the usual crispness, it can make listening to tunes an irritating and overall less enjoyable experience.
Poor acoustic design and improper sound settings produce overlapping frequencies or audio feedback, which generate reverb and echo or sound reflection (sound repercussions).
Fortunately, you don’t have to put up with the echo in your headphones and disturbing sounds. We’ll provide practical solutions you can apply to fix the headphone echo issue on Windows 10 or 11.
By understanding why headphones sound echoey and taking the necessary steps to fix them, you ensure that your audio device continues to perform at its best.
So keep on reading!
Table of Contents
- Reasons why headphones sound echoey
- Damaged or defective headset
- Audio feedback & microphone loopback
- How to fix echo in headphones
- Troubleshooting Windows 10 & 11 audio echo problems
- Perform an Audio Troubleshooter
- Update the Audio Drivers
- Turning off Windows Sonic
- Adjusting microphone settings
- Disable microphone feedback from third-party apps
- Disabling Audio Enhancements
- Troubleshooting Windows 10 & 11 audio echo problems
- Fixing echo in wired and wireless headphones
- Check the connection to the headphones
- Ensure both earbuds are in the correct ear
- Resetting your personal listening settings
- Solutions for Wireless Headphones
- Reactivate Bluetooth pairing
- Reduce wireless interference
- FAQ
- What is an echo and how does it occur?
- Why does music sound echoey?
- How can I fix echoing headphones on Xbox?
Reasons why headphones sound echoey
Headphones that experience a persistent echo—a reverberating sound that is of annoyance to the listener—are subject to a variety of causes.
How does echo occur in headphones, you ask? Below are some potential ways:
- Damaged or defective headset/earbuds
- Issues with the audio driver or microphone
- Incorrect microphone settings or increased sensitivity
- Audio device settings (audio feedback/microphone playback settings enabled)
- Reverberation and incorrect EQ settings
- Electromagnetic interference
- Slow internet
These potential problems should be explored and addressed to resolve the echo in your headphones that impairs your music listening enjoyment.
Thus far, it is important to check your headset microphones, headphone firmware, and audio drivers when experiencing headphone echo, as these can be the cause of the problem.
Windows 10 and 11 users might want to disable the microphone boost or other features that can contribute to the problem.
Damaged or defective headset
A defective headset is rarely the problem behind headphones sounding echoey. This may manifest in the same manner on various devices — notably a computer, smartphone, tablet, or MP3 player.
Thus, if one is looking to solve this issue, purchase new headphones or contact a service center that may be able to replace the defective ones under warranty.
Audio feedback & microphone loopback
Loopback is an audio feature that feeds your audio to other voice chat participants that can create an echoey effect in certain instances.
This echo occurs when a headset’s microphone has loopback enabled, allowing the audio to be heard by the voice chat participants and recorded by the microphone. The interlocutor’s microphone picks up these sounds, which are played back in your headset, creating an echo effect.
There is plenty you can do to get rid of the echo in your headphones. First off, a basic troubleshooting of the audio issues in your Win 10/11 PC is necessary to identify any system flaws that may cause your headphones to sound echoey and weird.
Thus far, audio troubleshooting is the first step in fixing your echoey headphones, but not the last. Other solutions to fix the headset’s echo include:
- Reinstalling the audio drivers
- Turning off Spatial Sound (Windows Sonic for headphones)
- Adjusting the microphone settings
- Disabling microphone playback
- Disabling audio enhancements.
To fix echo problems in office headsets, one can turn down the volume of the microphone or speaker, improve internet speed, move the VoIP headset to another location, or contact a specialist.
Troubleshooting Windows 10 & 11 audio echo problems
Audio echoing can be quite irritating, especially in Windows 10 & 11. This issue can be caused by the following:
- Out-of-date audio drivers
- Audio enhancements enabled by default
- Improper microphone settings
Fortunately, there are a few troubleshooting methods that can be used to resolve the echo issue.
Perform an Audio Troubleshooter
If you are experiencing echo in your headphones in Windows 10, use the Windows audio troubleshooter—designed to quickly identify, diagnose, and resolve common problems with audio. To perform an audio troubleshooter:
- Go to the “Start Menu“, then select the gear icon to open “Settings“.
- Click on “Sound“, and select “Troubleshoot“.
- The “Find and fix problems with playing sound” is selected by default. Click “Next” and choose which device you want to troubleshoot.
- Follow the on-screen directions.
You can get your sound back with the Windows 10 Audio troubleshooter in just a few steps by identifying and correcting the audio issues.
You can also right-click the audio icon in the taskbar and choose “Troubleshoot sound problems” to resolve the echo issue faster. Once the troubleshooting is completed, it will either fix the headphone’s echo or tell you what is causing it.
To perform an audio troubleshooter on Windows 11, the steps are as follows:
- Right-click the Windows icon and select “Settings.”
- Select “System” from the list of settings.
- Select “Sound” from the list of options on the left.
- Click on the “Troubleshoot” button.
- Follow the on-screen instructions and select the audio devices you wish to troubleshoot.
Update the Audio Drivers
If the audio troubleshooter does not fix the issue, ensure you use the latest audio driver. Updates for the available audio drivers are posted on the manufacturer’s website or through Windows Update.
To manually update the audio driver in Windows 10:
- Click the Search icon and type in “Device Manager” and select it from the list.
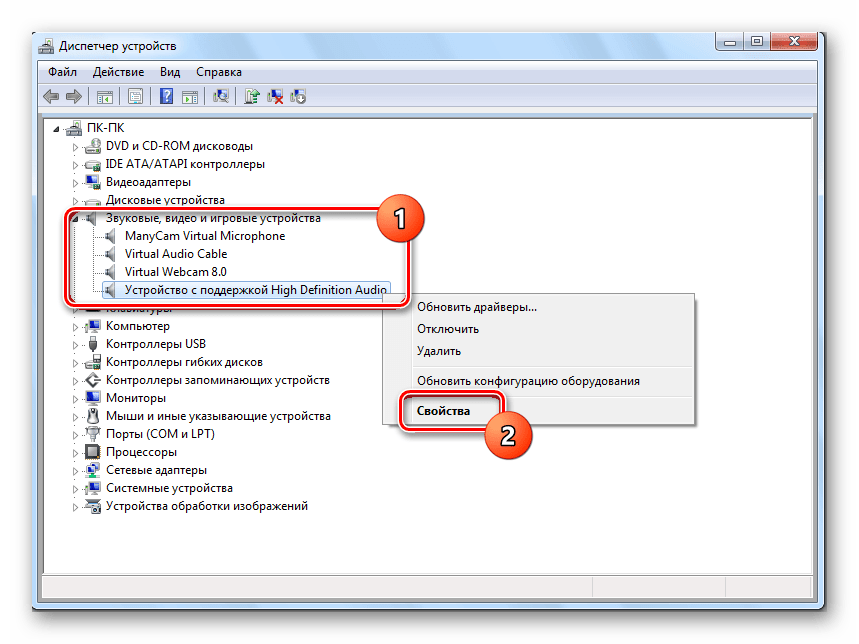
- Expand the “Sound, video and game controllers” section and right-click on your audio device.
- If your drivers are outdated, select “Update Driver” from the dropdown menu or “Reinstall Drivers.”
In Windows 11, updates can be installed automatically or manually. Here’s how to update the audio driver manually:
- Right-click the Windows icon and select “Settings.”
- Select “Update & Security” from the list of settings.
- Select “Check for updates“.
Turning off Windows Sonic
Next up, turn off the spatial sound. This setting is usually off by default, but when enabled, it can cause an echo in audio. To turn it off, right-click on the volume icon in your taskbar and select “Spatial Sound (Windows Sonic for Headphones).” Once here, select the “Off” option to disable Spatial Sound – this should do the trick.
Another way to disable surround sound on Windows 10 is to:
- Go to the Control Panel.
- Select “Sound” and open the “Speakers” or “Headphones” properties window.
- Go to the “Spatial Sound” tab and switch spatial sound format to Off.
For Windows 11 systems:
- Go to the Search menu and type “Settings.”
- Select the “Sound” tab and scroll down to the “All sound devices” option within the “Advanced” section.
- Click on your audio output device, and under the “Spatial sound” section, switch the “Type” to Off
Adjusting microphone settings
Disabling your microphone playback can reduce echoes and feedback in your headphones.
Here are the steps you need to follow:
- Right-click the audio icon in the system tray and click “Open Sound Settings.”
- Select “Sound Control Panel” in the “Related Settings” section on the right.
- Go to the “Recording” tab.
- Open your Microphone device properties window by double-clicking it.
- From there, in the “Listen” tab, uncheck the “Listen to this device” option, and apply changes.
- Go to “Levels” and reduce the volume of your microphone or slide down the “Microphone Boost” control.
- Go to the “Enhancements” tab and and enable the options “Noises Suppression” and “Acoustic Echo Cancellation”.
- Lastly, click OK to save the changes.
Disable microphone feedback from third-party apps
Echoing in headsets can be an baffling issue, with many microphone feedback and loopback culprits to investigate—especially when running a gaming audio software like iCue or Razer Synapse:
- Mic feedback: which typically occurs when the sounds from the headphone drivers are picked up by the mic.
- Loopback: the combination of multiple audio sources/apps which are sent to voice chat for all participants to hear.
To troubleshoot these issues, try adjusting the mic gain level, using mic noise cancellation, and reducing the microphone sensitivity within the audio software interface. Furthermore, disable mic feedback or sidetone from third-party applications such as iCue or Razer Synapse. Restart your computer and test the audio again to guarantee the echo has been eliminated.
If these steps are upheld, you should be able to listen to audio without enduring any further echoes in your gaming headsets.
Disabling Audio Enhancements
You can disable any audio enhancements to fix echo issues, as these can be a cause of reverberating sound.
To disable audio enhancements on Windows 10:
- Right-click the audio icon in the system tray and click “Open Sound Settings.”
- Select “Sound Control Panel” in the “Related Settings” section on the right.
- Open your “Speakers” or your default Audio device properties window by double-clicking it.
- Go to the “Enhancements” tab and uncheck the option “Disable all sound effects”.
- You can also go to “Realtek Digital Output“, then into the “Advanced” tab where you can uncheck the “Enable audio enhancements” option.
Alternatively, you can press Windows + R key, type “mmsys.cpl” in the dialogue box, and press Enter. Then follow steps 3-5.
To disable audio enhancements on Windows 11:
- Go into System, select “Sound” and then underneath the “Advanced” section click on “All sound devices“
- Select your output device. This is generally “Speakers.”
- Switch the “Enhance Audio” control to Off
Another method to disable audio enhancements in Win 11 is by going into Control Panel. There, type “Sound” and click on “Change sound card settings.” Now double-click “Speakers” or your default audio device to open the Properties section. The “Enhancements” tab should be present. Click on it, and tick “Disable all enhancements.”
After all these steps, click “OK” to confirm and save changes.
Following these steps should get rid of the echo in your headset on Win 10/11 and help you enjoy the music without any feedback loop!
Fixing echo in wired and wireless headphones
Whether you’re dealing with wired or wireless headphones, there are some solutions to fix the echoing and reverberation issue.
Check the connection to the headphones
Checking the connection and sound settings of wired and wireless headphones can help fix echoing problems. Follow these steps to troubleshoot:
- Make sure your headphones are properly connected to the source.
- Disconnect and reconnect the headphones—turning the headphones off and on again can help address feedback loops, ultimately eliminating the echo.
- Verify the sound settings in Control Panel to make sure the headphones are set as the default device
These quick methods may appear inconsequential, but they can be surprisingly beneficial in many cases. Particularly, if the issue is related to the output port or the system audio settings.
Ensure both earbuds are in the correct ear
It’s possible that the echo you hear may be due to one of the earbuds not being correctly seated or in the correct ear.
The left and right earphones are designed to be placed in the correct ears for a proper stereo experience, thus wearing both earbuds in the opposite ear of what’s intended could lead to a distorted audio or echoing sound.
Look at your headphones to ensure both earbuds are in their designated auditory canal:
- If the right earbud is in the left ear
- If the left earbud is in the right ear
Remove the earbuds and insert them again.
If that doesn’t help, then consider the possibility of the earbud itself not being properly inserted into the ear (the ear tips may be too large or too small.
Also, try cleaning out the earbuds and the inside of your ears to make sure there is no debris blocking the sound, creating a reflective echo effect.
Resetting your personal listening settings
Your true wireless earbuds may have a feature that analyzes your ear shape to provide a personalized listening experience which is not viable anymore due to different parameters that changed, so you may need to recheck and reset the personalized settings.
Sony wireless headphones, for instance, have a feature—360 Reality Audio, which scans and adjusts the sound settings according to your individual ear shape when you’re wearing them—allowing you to enjoy a personalized sound quality.
However, the following may affect the accuracy of the audio settings of your earbuds:
- Earbuds getting dirty
- Debris obstructing the drivers
- Changing the earbud tips
- Excessive sound pressure levels (SPL)
- Physiological parameters changing
These can result in inferior sound performance and echoey earbuds; hence, it is recommended you clean your earbuds and periodically reset the personalized settings:
- Access the dedicated mobile app of your true wireless earbuds.
- Locate and reset the personalized audio settings.
- Redo the personalization process for optimal sound performance.
Solutions for Wireless Headphones
Wireless headphones can produce an echo, often leading to annoying and substandard sound quality.
To effectively address this and get rid of the echo, you must understand the causes—uncleared Bluetooth cache, too many Bluetooth pairings, wireless interference from other devices, and low network speed—and take necessary steps to fix it, which include:
- Reactivate Bluetooth pairing
- Reduce wireless interference
To achieve a substantial reduction in echoing and improved sound quality, these steps must be taken.
Reactivate Bluetooth pairing
Reactivating the Bluetooth pairing is a key step towards eliminating echoing and restoring sound quality in wireless headphones.
Disabling any unnecessary Bluetooth pairings can improve the connection between the wireless headphones and the device they are paired with.
Equally important is to disconnect your Bluetooth headphones and reconnect them to clear connectivity issues caused by Bluetooth cache. It also helps to ensure you don’t use multiple Bluetooth devices simultaneously.
Too many connected devices can easily lower the sound quality and, sometimes, you may experience echo in your wireless headsets due to signal delay.
Reduce wireless interference
To reduce the wireless interference, ensure no obstacles such as walls or water interfere (this can incur a reduction in signal strength).
The number of Wi-Fi devices nearby should also be limited. Also, ensure there is minimal to no distance between the Bluetooth headphones and the sound source.
Here’s a summary of tips to boost your network speed:
- Limit connected devices in the same area
- Avoid obstructions such as walls, water, or heavy furniture
- Keep Bluetooth devices as close together as possible
- Move Bluetooth devices from 2.4 GHz to 5 GHz
FAQ
What is an echo and how does it occur?
An echo is an acoustic phenomenon that occurs when the sound produced by a source reaches the listener with a delay—usually greater than 55 milliseconds. Essentially, this reflects the sound or overlapping frequencies that arrive after some time interval after the sound was produced and interacts with other sound waves in the environment.
Why does music sound echoey?
The echoes you hear in your music are produced by the earcup acoustic, namely: the sound reflects off of different surfaces before reaching your ears. Changing the ear cushions or ensuring a tight seal can improve acoustics and reduce echo.
This phenomenon is the most pronounced in closed-back headphones and is further increased by wrong EQ settings, exaggerated reverb, poor recording, improper fit, and other audio settings.
As the reflected sound travels within the earcup, it results in an echoey sound, noise, and distortions.
How can I fix echoing headphones on Xbox?
Echoing headphones on Xbox can be an annoying issue. To fix the annoying issue of echoing headphones when playing on Xbox, there are a few troubleshooting steps:
- Ensure that everyone in Party Chat has their volume correctly adjusted—others’ high volume can cause echoes.
- Reduce your headset boom microphone’s sensitivity (a higher microphone sensitivity leads to echoing).
For more control over your audio settings, refer to the “Xbox One Volume & Audio Output” menu, select “Party Chat output” and choose headset.
Are you getting an echo effect in the sound recorded by your microphone? If yes, here are some suggestions for you. Due to the echo effect, users are not getting the desired quality in the recorded audio. In this article, we will see some solutions to fix the MIC echo effect on Windows 11/10.

You can try the following suggestions to fix the MIC echo effect on WIndows 11/10. Before you proceed, check where you have placed your microphone to record the audio. If it is placed near a wall or another reflective surface, you will experience the echo effect in the audio output. Also, increase the distance between your speakers and the microphone if you have kept your microphone near the speakers. This is because the output sound from speakers may feed into the microphone and generate the echo effect.
- Run the Recording Audio troubleshooter
- Disable Microphone Boost
- Disable the Listen to this device option
- Disable Stereo Mix
- Disable all sound effects in Enhancements
- Update or reinstall your mic driver
Below, we have explained all these fixes in detail.
1] Run the Recording Audio troubleshooter
Troubleshooters are the automated tools in Windows operating system that help users fix some common problems on their devices. You are experiencing issues with your microphone. Therefore, running the Recording Audio troubleshooter can fix the problem. The steps to run the Recording Audio troubleshooter are as follows:

- Click on Windows Search and type Control Panel.
- Select the Control Panel from the search results.
- In the search bar of the Control Panel, type troubleshooting.
- Click Troubleshooting.
- Now, click Hardware and Sound.
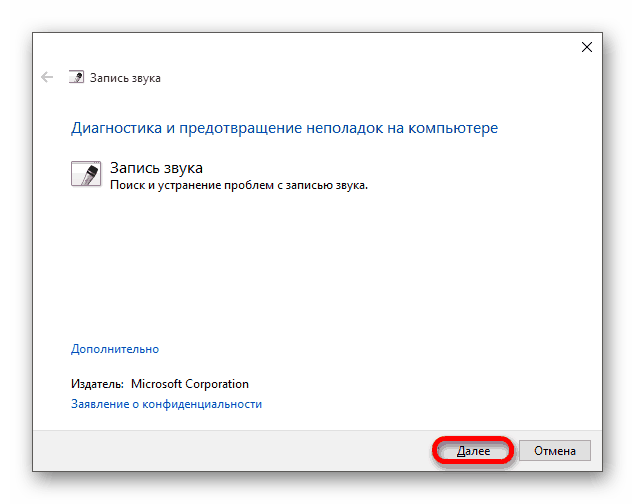
- Click Recording Audio to launch the Recording Audio troubleshooter.
- Click Next and let the troubleshooter detect and fix the problems.
2] Disable Microphone Boost
If the sound card installed on your laptop supports Microphone Boost, disabling it may help you fix the problem. The steps for the same are written below:

- Click on Windows Search and type control panel. Select the Control Panel from the search results.
- In the Control Panel, make sure that the View by mode is set to Category.
- Click Hardware and Sound.
- Now, click Sound. The Sound dialog box will appear.
- Select the Recording tab and right-click on your Microphone.
- Select Properties.
- Select the Levels tab and uncheck the Microphone Boost checkbox (if available). If there is a slider instead of the checkbox, move the slider to the point where it shows 0 dB.
Check if the issue is fixed. If not, try the next solution.
3] Disable the Listen to this device feature
If the problem still persists, disabling the Listen to this device feature may help. A lot of users found this method effective to fix the echo effect on their microphones. You should also try this. The steps to disable the Listen to this device feature are written below.

- Open the Sound dialog box by following the steps described in the previous method.
- Click on the Recording tab and then select your Microphone.
- Click on the Properties button on the bottom right side.
- In the Microphone Properties window, select the Listen tab.
- Uncheck the Listen to this device checkbox.
- Click Apply and then click OK to save the changes.
Read: Microphone not working on Windows
4] Disable Stereo Mix
If you still experience the same issue on your microphone, disable the Stereo Mix feature. Some sound cards support the Stereo Mix feature. Check if this feature is enabled. If you find it enabled, disable it and check if this fixes the mic echo effect. The steps to disable Stereo Mix are written below:

- Open the Control Panel.
- Type Sound in the search field and click on Sound.
- Click on the Recording tab and see if the Stereo Mix feature is enabled. If yes, right-click on it and select Disable.
Read: Microphone not working in Microsoft Teams
5] Disable all sound effects in Enhancements
Audio Enhancement or Sound Enhancement is a feature in Windows 11/10 devices that help improve the sound or audio quality. Users who are not happy with the current audio quality can enable this feature. If you are experiencing the echo effect in the sound recorded by your microphone, disabling all sound effects in Enhancements for your microphone can fix the issue. The steps for the same are listed below:

- Open the Control Panel.
- Type Sound in the search field and click on Sound.
- When the Sound dialog box appears, click on the Recording tab.
- Right-click on your microphone and select Properties.
- Under the Enhancements tab, select the Disable all sound enhancements checkbox.
- Click Apply and then click OK.
Read: How to fix Echo in Headphones in Windows.
6] Update or reinstall your MIC driver
The problem may also be associated with your microphone driver. If a driver is outdated or corrupted, the respective device does not work properly. Such types of issues can be fixed by updating or reinstalling the device driver.

- You can use the Windows Optional Update feature to update the driver of your microphone.
- You can update your microphone driver from the Device Manager. After opening the Device Manager, expand the Audio inputs and outputs node. You will find your microphone driver there.
If the above methods did not help, uninstall your microphone driver from the Device Manager. After that, visit the official website of your microphone manufacturer and download the latest version of your mic driver. Double-click on the installer file to run it. Follow the on-screen wizard to install the mic driver manually.
Read: Fix Discord Mic not working in Windows 11/10.
How do I stop Mic from echoing in Windows 11?
To stop your mic from echoing on Windows 11, check if the Microphone Boost feature for your microphone is enabled. If you find this feature enabled, disable it. If your computer does not have an option to disable the Microphone Boost, move the slider to 0 dB. This will disable the Microphone Boost.
Other effective ways to stop the mic from echoing are to disable the following features:
- Listen to this Device
- Stereo Mix
- All sound effects in Enhancements
Can you remove echo from the audio?
While recording the audio, we may not always get a silent place. Due to this, the recorded audio contains some disturbance in the form of background noise. If your recorded audio has background noise or an echoing effect, you can remove it with some free noise cancellation software. If you search online, you will find a lot of free noise cancellation software and online tools.
Hope this helps.
Read next: Fix Bluetooth sound delay in Windows 11/10.