
What will I lose when upgrading Windows 7 to Windows 11/10?
I’ve been learning about those good new features of Windows 11/10. If I decide to upgrade, what will I lose? I’m willing to follow the Windows 11/10 trend, but at the same time, I have been used to playing with my current Windows 7 computer which holds all the data, my favorites, photos, music, applications, email and many things I feel reluctant to abandon. So what’s the best solution for me?
This article provides two transfer utilities for you, and there is a table to help you learn more about the two ways:
| Comparison |
Windows Easy Transfer |
EaseUS Todo PCTrans |
| 📝File types | Files, folders, app settings |
✅Files, folders, app settings, ✅Apps, games, operating systems, and other data |
| 💻Operating system | Windows 7/8, Windows XP/Vista |
✅Windows 11/10 ✅Windows 8/7, Windows XP/Vista, and ever earlier versions |
| 🔢Operation difficulty | Relatively high | ✅Low |
| ⏱️Duration | 3-5 minutes | ✅1-3 minutes |
Windows Easy Transfer may not help you if you are a Windows 11/10 user.
Using Windows 11/10 Easy Transfer Wizard
The direct upgrade of Windows 7/8 to Windows 11/10 will somehow miscarry many of the existing data, files, email, and settings. But you can choose to save them by using EaseUS Todo PCTrans Free, which is the most useful and efficient tool to migrate items from one Windows-based system to Windows 11/10. This tool can transfer all applications (as well as the app settings), games, files, folders, photos, and videos from Windows 7 to Windows 10/11. What’s more, you don’t need to reinstall them on the new PC. Download it to try.
How to Migrate Data and Applications Along with Settings from One Windows-Based System to Windows 11/10
No matter whether the item transfer happens on one computer or two machines, EaseUS Todo PCTrans is capable of handling the process easily. There are two options designed for different demands, which can be realized through a connected network or by creating an image file.
1. Transfer via the Network
Run Todo PCTrans on both of the two PCs and choose «PC to PC». The programs will detect another PC or through clicking «+» icon and input IP address to connect another PC. After successful connecting two PCs, we could select the specific data, folders, applications to transfer.
Step 1. Set Up the Old PC
- First, install and launch EaseUS Todo PCTrans and select Data Transfer on the left panel of the main interface.
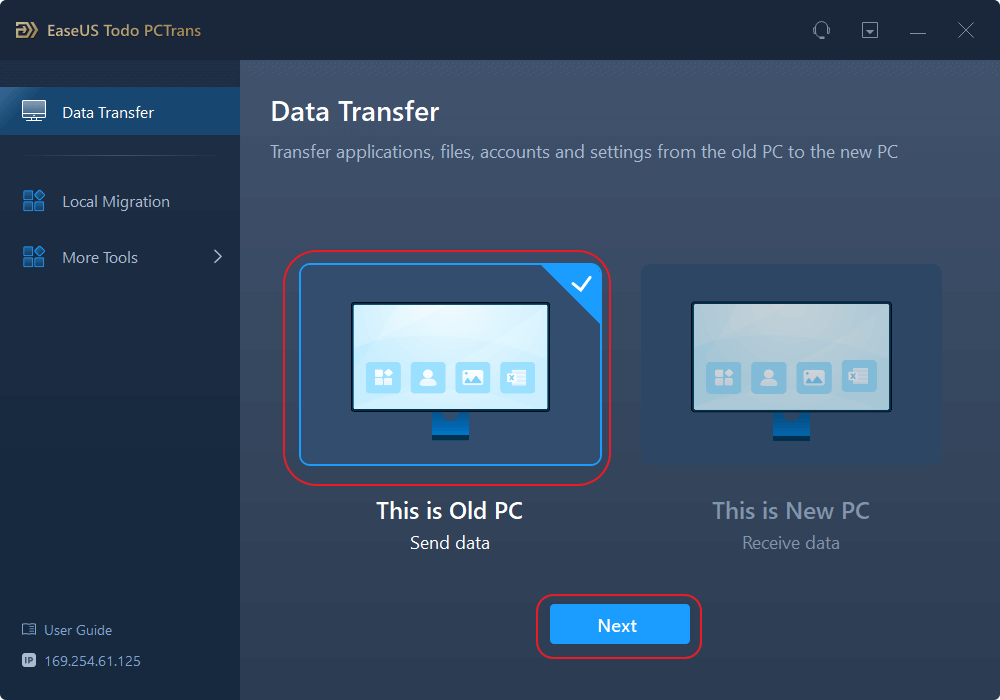
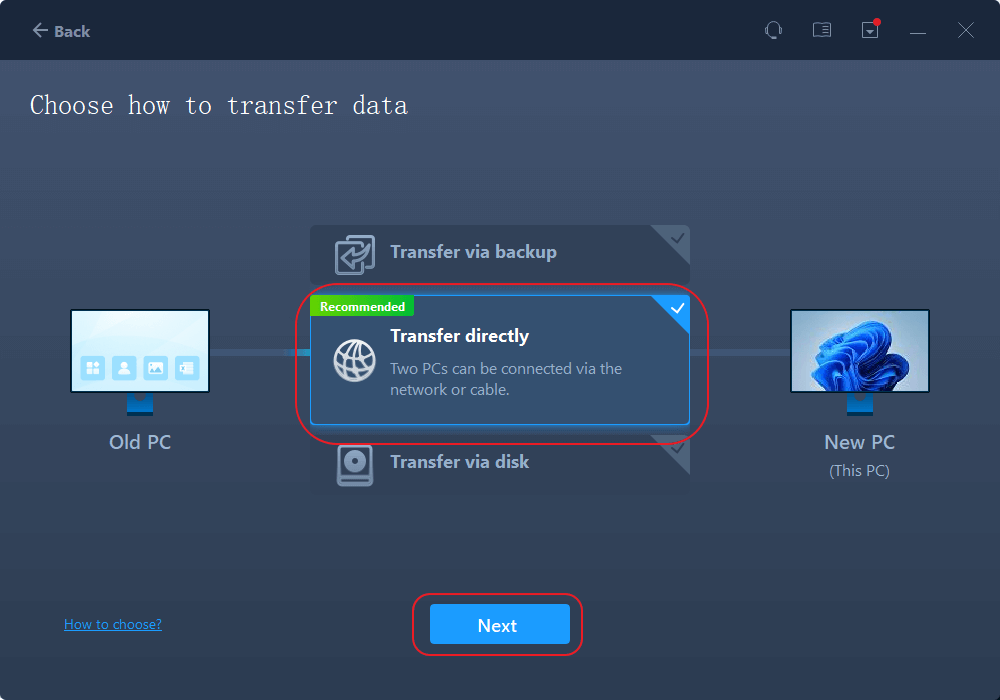
- Select «Transfer Directly» and click «Next» to continue.
Step 2. Set Up the New PC
- Download and launch EaseUS Todo PCTrans on the new computer; select «This is New PC» and click «Next».
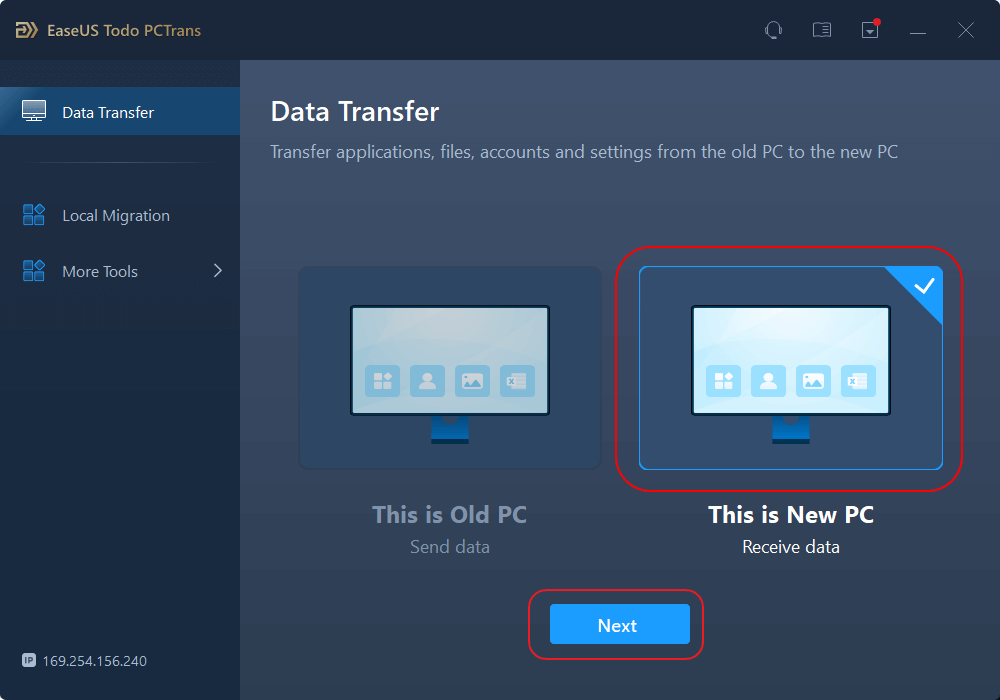
- Select «Transfer directly» and click «Next» to continue.
- Select «Network» and click Next to continue. This will automatically scan the old PC. (Make sure the two PCs are connected to the same LAN.)
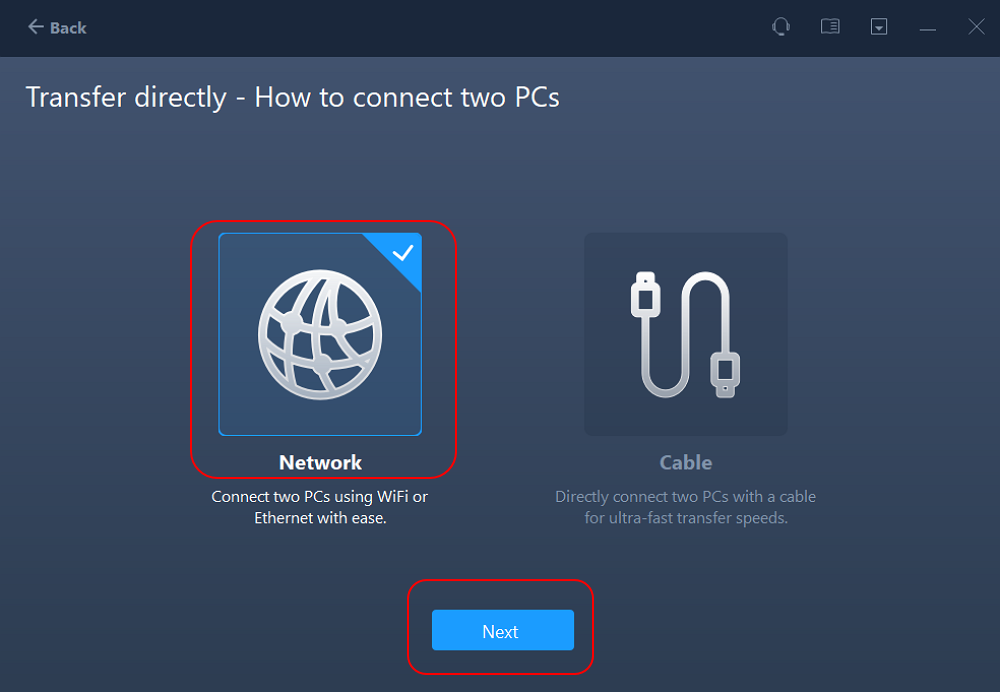
- Select the target PC and click Connect. Then, it will take some time to scan and analyze the data in old PC.
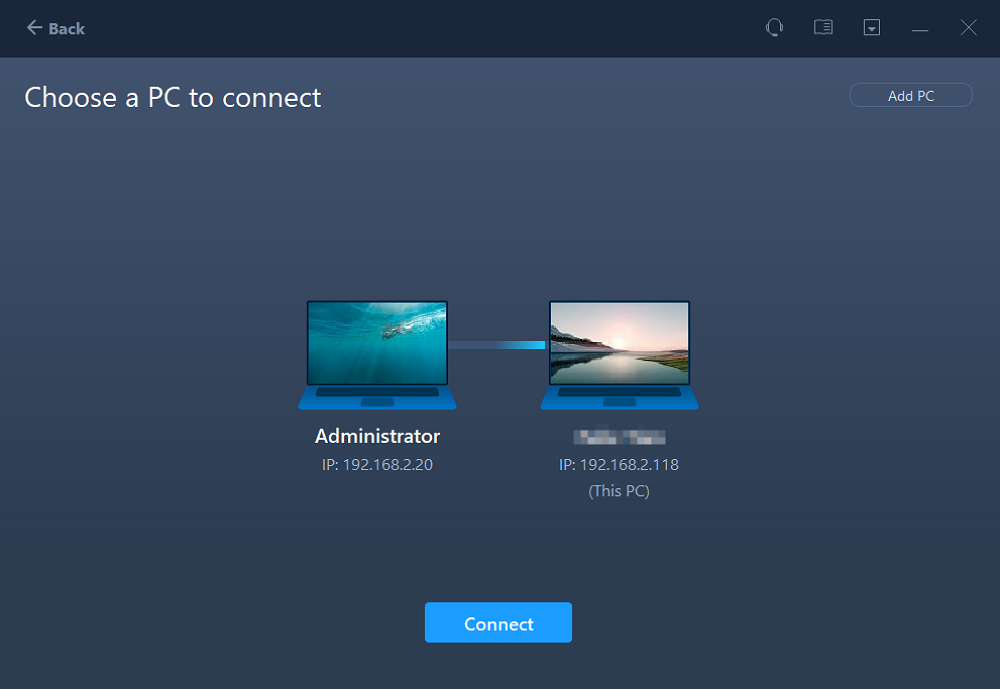
Step 3. Select the Data to Transfer
- On the new PC, select the applications, files, and accounts that you want to transfer. Then, click «Transfer» to start.

2. Transfer via the Backup File
Launch Todo PCTrans, click «Backup & Restore» and «Data Backup», choose the folders, programs to create the image. Then copy the image to the targeted computer, run Todo PCTrans on the new system, choose «Data Restore «.
Learn from the video tutorial of transferring files, software to Windows 11/10 by using EaseUS Todo PCTrans:
Do you like this multifunctional tool? Share this article on your social media and let more users know about it.
Using Windows Easy Transfer to Migrate Windows Files and Program Settings
Windows Easy Transfer is a powerful file transfer program developed by Microsoft, which allows you to transfer files and settings from the old computer version to the new one on Windows 7/8/8.1.
How to use Windows easy transfer
1. On the local computer:
- Input Windows Easy Transfer on the Start screen > Click Windows Easy Transfer
- Welcome to Windows Easy Transfer > Next > Select An external hard disk or USB flash drive > plug in your external devices
- Choose This is my old PC > Customize > Advanced > Save > Next > Save files to the external hard drive
2. Input the files and settings on the new computer:
- Run Windows Easy Transfer on the new pc.
- Welcome to Windows Easy Transfer > Next > Select An external hard disk or USB flash drive > Choose This is my new pc
- plug in your external devices > Select Yes > Open the Easy Transfer file location > enter the password > Next
- Customize > Advanced > Save > Click Transfer > Close Windows Easy Transfer > Restart your computer
Does Windows easy transfer work from Windows 7 to Windows 11/10
Windows Easy Transfer is not available in Windows 11/10. But it still works to transfer data among Windows 7, Windows 8, Windows 8.1, Windows XP, and Windows Vista.
Can I transfer programs via Windows Easy Transfer
Unfortunately, the answer is No. Windows Easy Transfer transfers only move program settings, not the applications themselves.
- Notice:
- If you want to transfer programs or more data from Windows 7/8 to Windows 11/10, we will recommend a Windows easy transfer tool — EaseUS Todo PCTrans for transferring selected data from your old Windows pc to new Windows 11/10 pc.
The next part lists some common issues related to Windows Easy Transfer. Continue to read if you are interested.
Click the following link to learn more about the file transfer software for Windows 11.10.
As we mentioned above, Windows Easy Transfer is not available in Windows 11 and Windows 10. So here are some questions to help with the transfer issues in Windows 11/10.
1. Is there any Windows 10 Easy Transfer alternative?
Yes, of course. Windows Easy Transfer is not available in Windows 10, so there are many alternatives in the market. EaseUS Todo PCTrans is a nice one. Compared to Windows Easy Transfer, EaseUS Todo PCTrans is multifunctional and can transfer programs/apps to another PC or another drive.
2. How to use Windows Easy Transfer?
Just follow the guide below to try:
- Type Windows Easy Transfer on the search box > Click Windows Easy Transfer.
- Enter Windows Easy Transfer interface > Next > Select your external hard drive/USB > Plug in your external devices.
- Select This is my old PC > Customize > Click Advanced > Save.
- Click Next > Save files to the external hard drive.
3. Is Windows Easy Transfer available in Windows 10?
No, Windows Easy Transfer can only work on Windows 8/7 or Windows Vista, or Windows XP. It is not available in Windows 10 or Windows 11.
Текущая версия страницы пока не проверялась опытными участниками и может значительно отличаться от версии, проверенной 10 февраля 2014;
проверки требуют 7 правок.
Средство переноса данных Windows
| Тип |
Передача данных |
|---|---|
| Разработчик |
Microsoft |
| Операционная система |
Windows XP, Windows Vista, Windows 7, Windows 8.1 |
| Первый выпуск |
8 ноября 2006 года |
| Последняя версия |
6.3.9600.17031[источник не указан 1628 дней] (08 апреля 2014 года) |
| Лицензия |
Проприетарное программное обеспечение (EULA) |
| Сайт |
microsoft.com/windows/windows-7/features/windows-easy-transfer.aspx |
Средство переноса данных Windows (англ. Windows Easy Transfer) — программа, поставляемая с новыми версиями операционных систем Microsoft Windows. Средство переноса данных Windows может помочь пользователям переместить файлы и настройки, которые содержатся на компьютерах с операционными системами Windows XP, Windows Vista и Windows 7.
Для использования Средства переноса данных Windows из Windows XP в Windows 7, для исходного компьютера его необходимо предварительно скачать с сайта Microsoft.
Компоненты передачи[править | править вики-текст]
Средство переноса данных Windows может передавать:
- Файлы и папки, включая фотографии, музыку, видео, документы, сообщения и контакты электронной почты.
- Пользовательские учетные записи, а также параметры учетных записей пользователей.
- Файлы настроек и параметров приложений.
- Некоторые параметры настроек Windows, хранящиеся в реестре.
Программа не поддерживает полную передачу приложений и системных файлов, наподобие шрифтов и драйверов. Для передачи приложений, которые точно поддерживаются, Microsoft планировала выпустить Windows Easy Transfer Companion, но так и не выпустила финальную версию. Для опытных пользователей, администраторов и компьютеров на базе операционных систем Windows также доступен инструмент User State Migration Tool (USMT).
Поддерживаемые способы работы[править | править вики-текст]
Существует несколько способов, которые могут быть использованы при передаче информации:
- Easy Transfer Cable. Это специальный кабель с USB-разъёмами, который можно приобрести у вендоров аппаратного обеспечения. Один конец кабеля подключается к компьютеру-источнику, второй — к компьютеру-приёмнику. Оба компьютера должны быть включены во время переноса данных, а также на них должно быть запущено Средство переноса данных Windows. С помощью такого метода можно выполнять перенос данных только вида side-by-side.
- Сеть. Чтобы выполнить перенос данных по сети, необходимы два компьютера, на которых запущено Средство переноса данных Windows и которые подключены к одной сети. Оба компьютера должны быть включены во время переноса данных. Таким способом можно выполнять перенос данных только вида side-by-side. При переносе данных через сеть на компьютере-источнике задается пароль, который затем нужно ввести на компьютере-приёмнике.
- Внешний жесткий диск или USB-флеш-устройство. Возможно подключить внешний жёсткий диск или USB-флеш-устройство, также можно использовать внутренний жёсткий диск или общую папку в сети. Таким способом можно выполнять миграцию как типа side-by-side, так и типа wipe-and-restore. Ваши данные защищаются вводом пароля на компьютере-источнике, который затем нужно ввести перед импортом данных на компьютере-приёмнике.
Передача по прямому кабельному соединению, используя параллельные или последовательные кабели и используя флоппи-диски, не поддерживается. Эти способы поддерживались Мастером переноса файлов и данных в Windows XP.
Текущие проблемы[править | править вики-текст]
В настоящее время существуют проблемы передачи данных с операционных систем на различных языках. Файлы могут быть не восстановлены в подобных ситуациях, а архивные копии могут быть открыты только на операционной системе с исходным языком. Также Средство переноса данных Windows не поддерживает передачу информации из 64-битных операционных систем в 32-битные.
Ссылки[править | править вики-текст]
- Windows 7: Windows Easy Transfer
- Explore the features: Windows Easy Transfer
- Страница загрузки
| Компоненты Microsoft Windows | |
|---|---|
| Основные |
Aero • ClearType • Диспетчер рабочего стола • DirectX • Панель задач (Пуск • Область уведомлений) • Проводник (Пространство имён • Специальные папки • Ассоциации файлов) • Windows Search (Smart folders • iFilters) • GDI • WIM • SMB • .NET Framework • XPS • Active Scripting (WSH • VBScript • JScript) • COM (OLE • DCOM • ActiveX • Структурированное хранилище • Сервер транзакций) • Теневая копия • WDDM • UAA • Консоль Win32 |
| Службы управления |
Архивация и восстановление • COMMAND.COM • cmd.exe • Средство переноса данных • Просмотр событий • Установщик • netsh.exe • PowerShell • Отчёты о проблемах • rundll32.exe • Программа подготовки системы (Sysprep) • Настройка системы (MSConfig) • Проверка системных файлов • Индекс производительности • Центр обновления • Восстановление системы • Дефрагментация диска • Диспетчер задач • Диспетчер устройств • Консоль управления • Очистка диска • Панель управления (элементы) |
| Приложения |
Контакты • DVD Maker • Факсы и сканирование • Internet Explorer • Журнал • Экранная лупа • Media Center • Проигрыватель Windows Media • Программа совместной работы • Центр устройств Windows Mobile • Центр мобильности • Экранный диктор • Paint • Редактор личных символов • Удалённый помощник • Распознавание речи • WordPad • Блокнот • Боковая панель • Звукозапись • Календарь • Калькулятор • Ножницы • Почта • Таблица символов • Исторические: Movie Maker • NetMeeting • Outlook Express • Диспетчер программ • Диспетчер файлов • Фотоальбом • Windows To Go |
| Игры |
Chess Titans • Mahjong Titans • Purble Place • Пасьянсы (Косынка • Паук • Солитер) • Сапёр • Пинбол • Червы |
| Ядро ОС |
Ntoskrnl.exe • Слой аппаратных абстракций (hal.dll) • Бездействие системы • svchost.exe • Реестр • Службы • Диспетчер управления сервисами • DLL (формат модулей) • PE • NTLDR • Диспетчер загрузки • Программа входа в систему (winlogon.exe) • Консоль восстановления • Windows RE • Windows PE • Защита ядра от изменений |
| Службы |
Autorun.inf • Фоновая интеллектуальная служба передачи • Файловая система стандартного журналирования • Отчёты об ошибках • Планировщик классов мультимедиа • Теневая копия • Планировщик задач • Беспроводная настройка |
| Файловые системы |
ReFS • NTFS (Жёсткая ссылка • Точка соединения • Точка монтирования • Точка повторной обработки • Символьная ссылка • TxF • EFS) • WinFS • FAT • exFAT • CDFS • UDF • DFS • IFS |
| Сервер |
Active Directory • Службы развёртывания • Служба репликации файлов • DNS • Домены • Перенаправление папок • Hyper-V • IIS • Media Services • MSMQ • Защита доступа к сети (NAP) • Службы печати для UNIX • Удалённое разностное сжатие • Службы удаленной установки • Служба управления правами • Перемещаемые профили пользователей • SharePoint • Диспетчер системных ресурсов • Удаленный рабочий стол • WSUS • Групповая политика • Координатор распределённых транзакций |
| Архитектура |
NT • Диспетчер объектов • Пакеты запроса ввода/вывода • Диспетчер транзакций ядра • Диспетчер логических дисков • Диспетчер учетных записей безопасности • Защита ресурсов • lsass.exe • csrss.exe • smss.exe • spoolsv.exe • Запуск |
| Безопасность |
BitLocker • Защитник • Предотвращение выполнения данных • Обязательный контроль целостности • Защищённый канал данных • UAC • UIPI • Брандмауэр • Центр обеспечения безопасности • Защита файлов |
| Совместимость |
Подсистема UNIX (Interix) • Виртуальная машина DOS • Windows on Windows • WOW64 |
Содержание
- Перенос данных с помощью внешнего накопителя
- Перенос данных с помощью Android-смартфона
- Перенос данных через Wi-Fi или LAN-соединение
- Перенос через облачное хранилище
- Что делать не надо
Существует несколько способов перенести данные со старого ПК на новый. Отметим сразу, что с помощью собственной программы от Microsoft — Windows Easy Transfer — это сделать уже не получится, так как она не поддерживает Windows 10 и 11, которые с вероятностью 99,9% будут установлены на вашем новом ПК.
Перенос данных с помощью внешнего накопителя
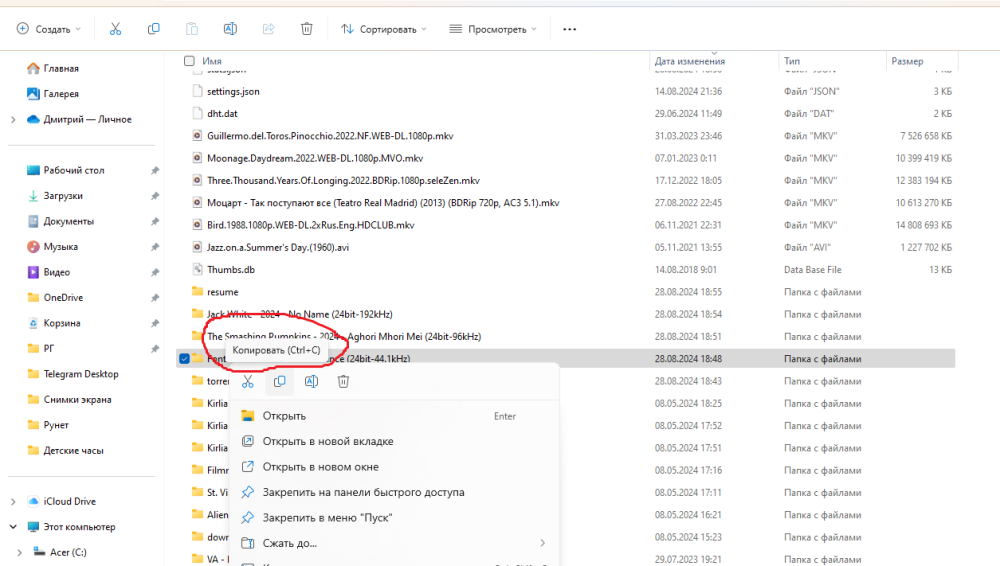
Перенос данных с помощью внешнего накопителя — HDD, SSD или просто флешки. В этом случае вы просто подключаете накопитель к USB-порту компьютера, выделяете мышкой нужные файлы и папки, затем правой кнопкой мышки выбираете в контекстном меню опцию «Копировать», выбираете внешний накопитель и также правой кнопкой мыши кликаете на опцию «Вставить». Не стоит для переноса файлов и папок использовать опцию «Вырезать», так как, если при переносе что-то пойдет не так, лучше подстраховаться: пусть необходимая информация сохранится на старом компьютере.
Перенос данных с помощью внешнего накопителя — HDD, SSD или просто флешки. Фото: Дмитрий Бевза/РГ
Когда копирование закончится, следует открыть внешний накопитель в «Проводнике» и проверить, все ли необходимые файлы на месте.
Затем необходимо безопасно извлечь диск или флешку, чтобы быть уверенным, что данные не будут повреждены. Для этого перед тем, как вынуть устройство из USB-порта, выберите в «Проводнике» напротив внешнего накопителя опцию «Извлечь» и затем отключите его от старого ПК.
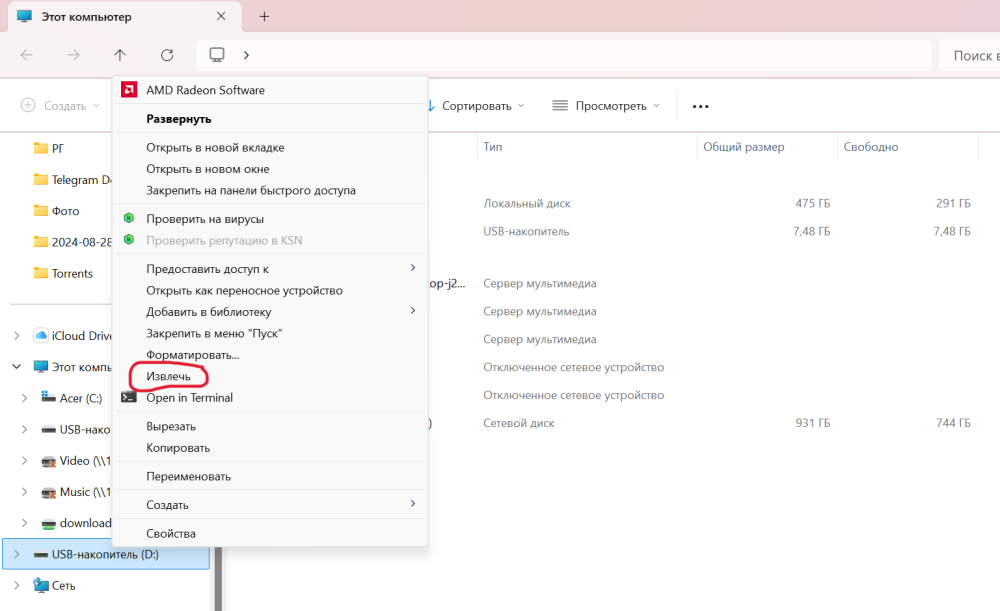
Перед тем, как вынуть устройство из USB-порта, выберите в «Проводнике» напротив внешнего накопителя опцию «Извлечь». Фото: Дмитрий Бевза / РГ
Затем остается только подключить накопитель к новому компьютеру и скопировать на него данные. Для удобства лучше расположить их в том же порядке, что и на старом.
Учтите, что флешки используют по умолчанию формат FAT32, где есть ограничение на размеры файлов до 4ГБ, поэтому для того, чтобы перенести файлы большого размера, нужно использовать внешние HDD- или SSD-накопители, у которых нет таких ограничений, или отформатировать флешку в формат exFAT перед переносом данных.
Для этого нужно правой кнопкой мыши выбрать на значке флешки «Дополнительные параметры», затем «Форматирование» и отформатировать флешку в файловую систему exFAT.
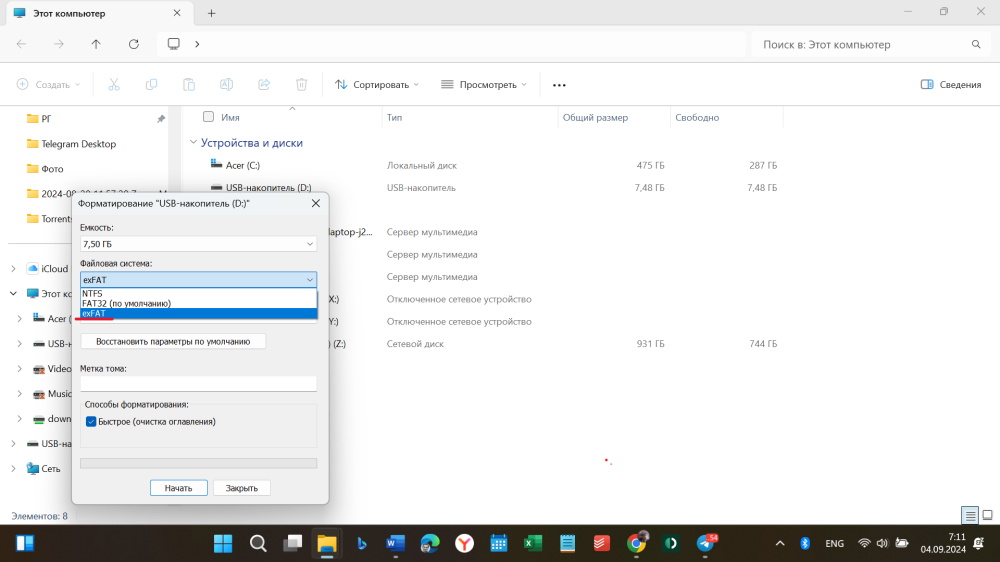
Подготовка форматирования флешки. Фото: Дмитрий Бевза \ РГ
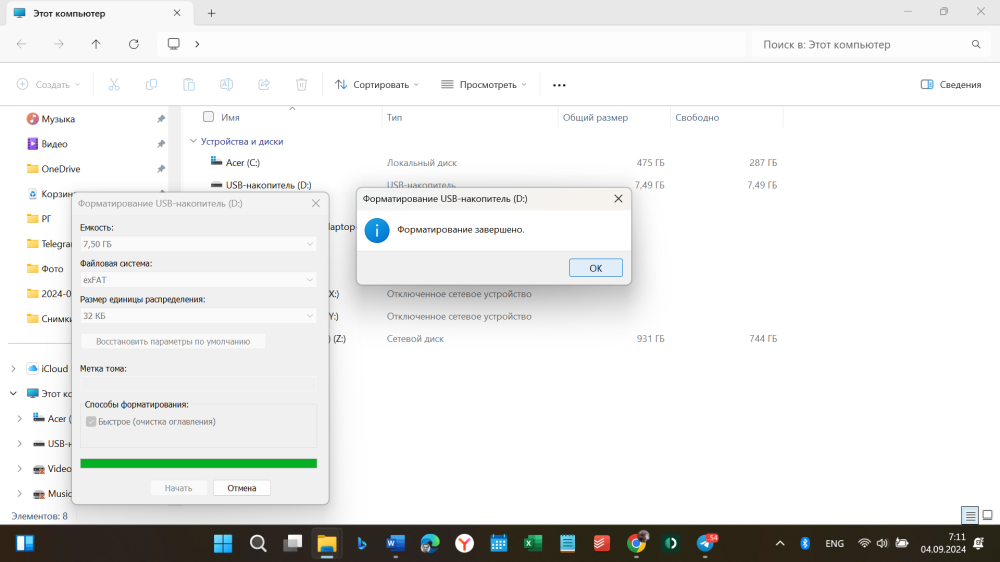
Завершение форматирования флешки. Фото: Дмитрий Бевза / РГ
Перенос данных с помощью Android-смартфона
Но что делать, если у вас нет емкого внешнего накопителя? Покупка займет время, и надо учитывать, что цена самой дешевой флешки или SSD-накопителя емкостью 512 ГБ и выше начинается примерно от 3,5 тыс. рублей.
Необходимо подключить смартфон к USB-порту ПК и выбрать на смартфоне режим «Передача файлов». Фото: Дмитрий Бевза / РГ
В этом случае можно перенести данные с помощью Android-смартфона или планшета, если там достаточно свободного пространства. Для этого нужно подключить смартфон к USB-порту ПК и выбрать на смартфоне режим «Передача файлов».
Затем в проводнике Windows необходимо создать на смартфоне папку для трансфера данных.
Скопировать туда нужные файлы и папки, отключить устройство от старого ПК, аналогичным образом подключить к новому и перенести данные со смартфона на новый ПК. Перенос данных полностью идентичен процессу переноса данных с ПК на смартфон

В проводнике Windows необходимо создать на смартфоне папку для трансфера данных. Фото: Дмитрий Бевза / РГ
Перенос данных через Wi-Fi или LAN-соединение
Возможно также перенести данные со старого ПК на новый через Wi-Fi или LAN-соединение, если они подключены к одному Wi-Fi-роутеру или находятся в одной локальной сети.
Для этого на старом и новом компьютерах нужно последовательно выбрать «Пуск» > «Параметры» > «Система» > «Обмен с устройствами поблизости» > «Все устройства».
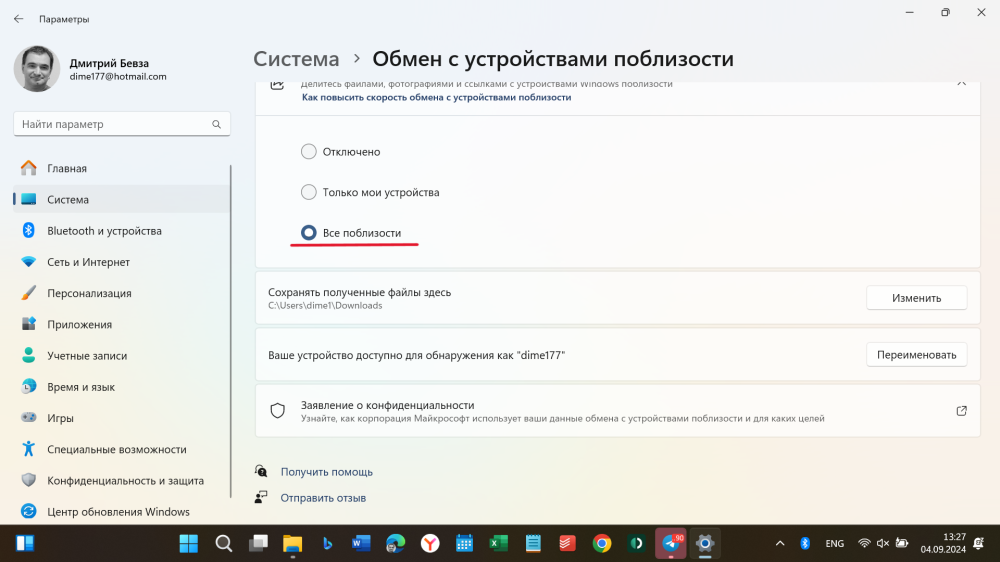
На старом и новом компьютерах нужно выбрать «Все устройства». Фото: Дмитрий Бевза / РГ
Затем на старом ПК нужно перейти к местоположению файла и, нажав на правую кнопку мыши, выбрать опцию «Поделиться».
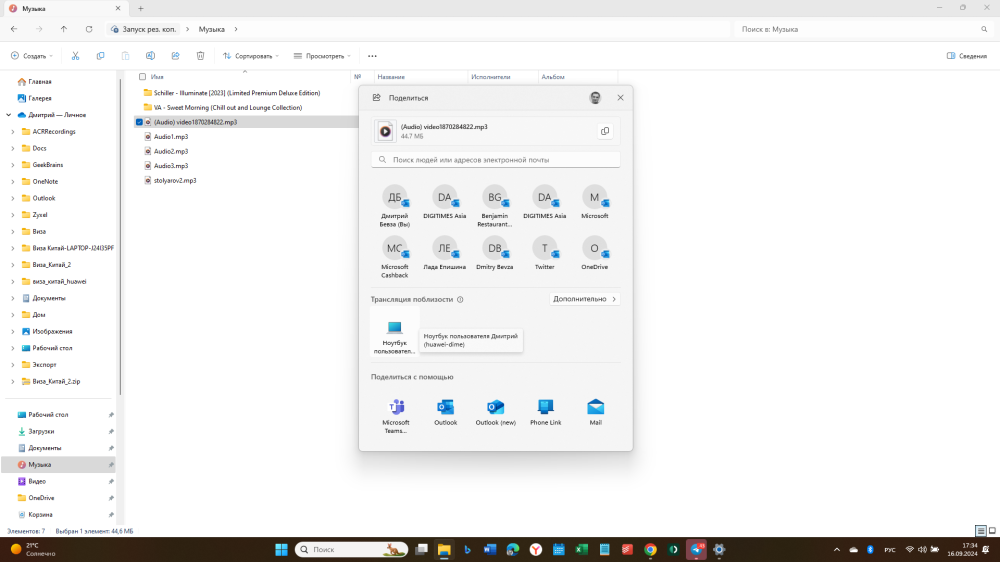
Перейдите к местоположению файла и, нажав на правую кнопку мыши, выберите опцию «Поделиться». Фото: Дмитрий Бевза / РГ
Во всплывающем окне нужно нажать на значок нового ПК, чтобы передать файл. Новый ПК запросит разрешение на опции «Сохранить» или «Отклонить». Нажмите «Сохранить», чтобы передать файл. Он будет сохранен в том месте, которое вы задали ранее.
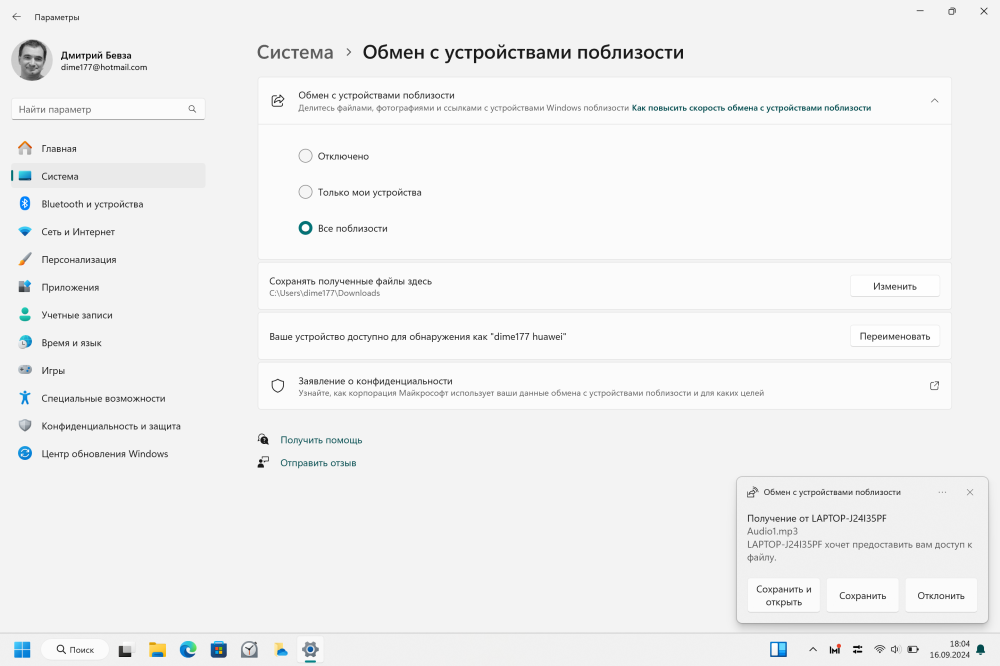
Во всплывающем окне нужно нажать на значок нового ПК, чтобы передать файл. Фото: Дмитрий Бевза / РГ
Так как эта технология поддерживает только передачу файлов, то для передачи папки нужно ее сначала заархивировать (то есть превратить в архивный файл) и уже затем передать и разархивировать в новом ПК. Все это можно сделать штатными средствами Windows.
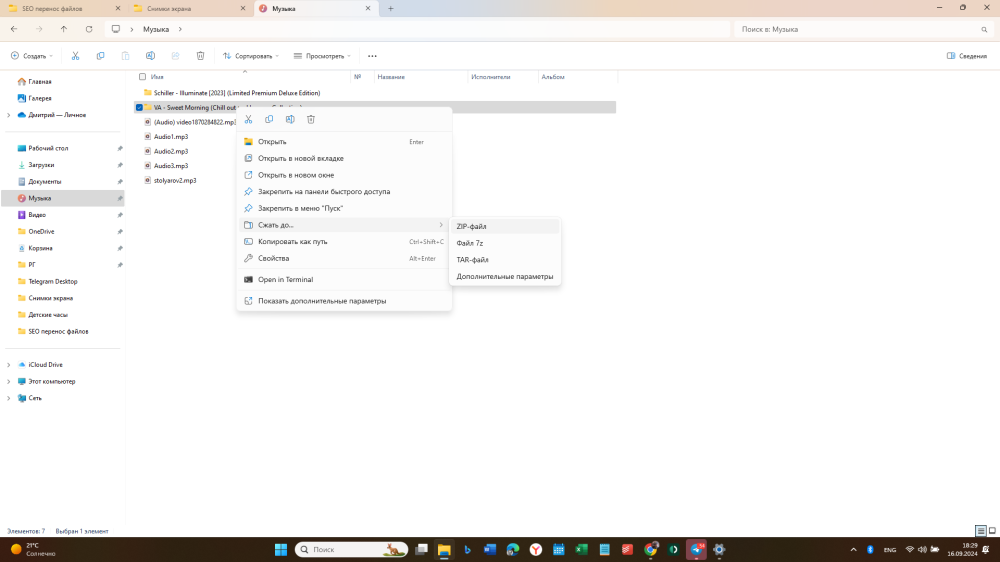
Для передачи папки нужно ее сначала заархивировать. Фото: Дмитрий Бевза / РГ
Передача файлов через облачное хранилище
Помимо опции «Обмен с устройствами поблизости» избежать использования проводов и флешек помогут облачные сервисы.
Начнем с интегрированного в Windows облака OneDrive. Оплата российскими картами сервисов Microsoft сейчас невозможна, но по умолчанию каждый пользователь Windows получает 5 ГБ бесплатного пространства в облаке OneDrive. Этого количества вполне хватит для переноса текстовых документов, таблиц и презентаций. OneDrive входит в состав операционных систем Windows 8/10/11, но если по каким-то причинам его у вас нет, то приложение можно скачать с сайта Microsoft.
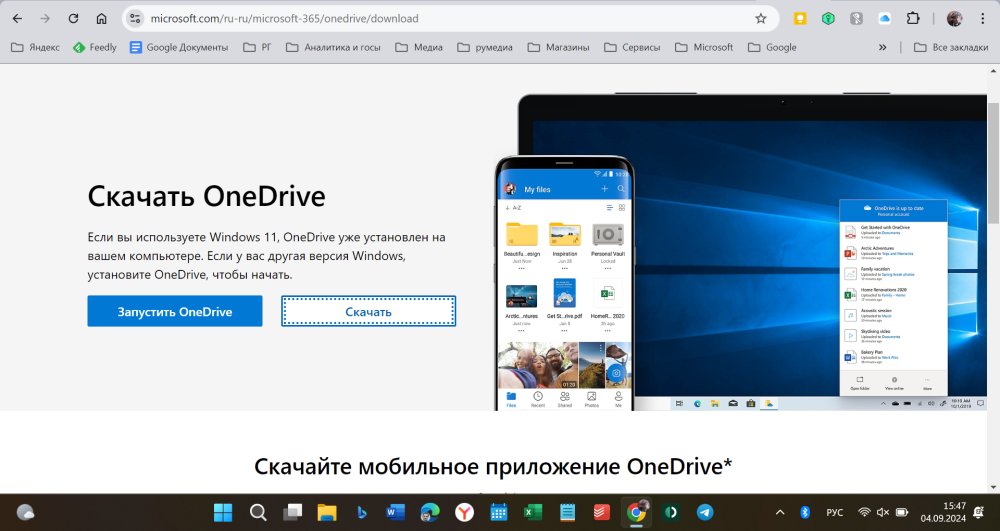
OneDrive входит в состав операционных систем Windows 8/10/11, но если по каким-то причинам его у вас нет, то приложение можно скачать с сайта Microsoft. Фото: Дмитрий Бевза / РГ
Для того чтобы воспользоваться OneDrive, нужно войти в свою учетную запись Microsoft, если такой учетной записи нет, то завести ее можно прямо в приложении. Затем стоит открыть приложение OneDrive, выбрать папки, которые вы хотите перенести на новый ПК, и отметить их.
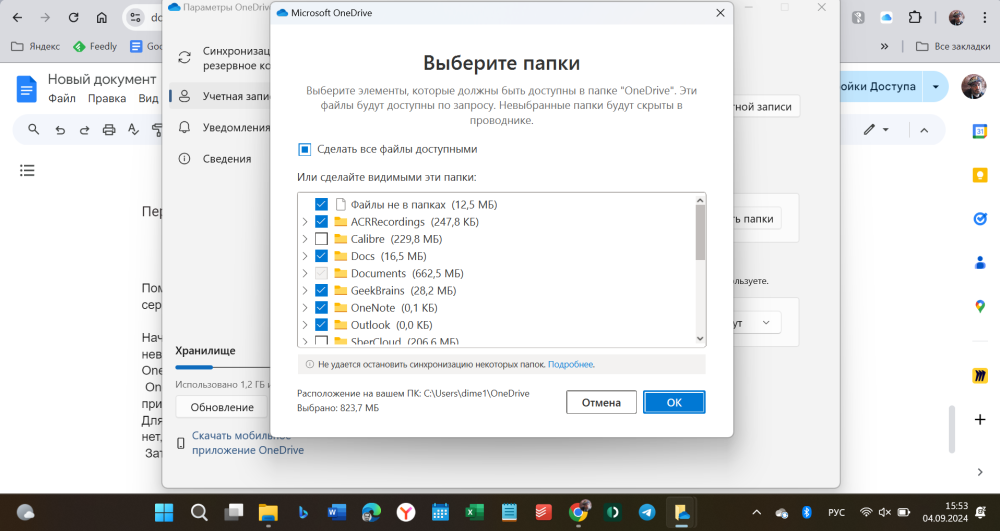
Выберите папки, которые вы хотите перенести на новый ПК. Фото: Дмитрий Беваз / РГ
Все выбранные файлы, папки и фотографии будут синхронизированы с OneDrive, и вы сможете получить к ним доступ на новом устройстве.
Для этого на новом компьютере нужно войти в OneDrive с помощью той же учетной записи Microsoft, что и на старом. Выбранные на старом компьютере файлы и папки автоматически синхронизируются. Их можно увидеть, открыв проводник или выбрав значок OneDrive в разделе уведомлений Windows на панели задач.
В новых установках Windows 10 или 11 для многих соответствующих пользователей файлы сохраняются в OneDrive, хотя и видны на компьютере. Для загрузки папки или файла на компьютер нужно установить значение «Всегда сохранять на это устройство».
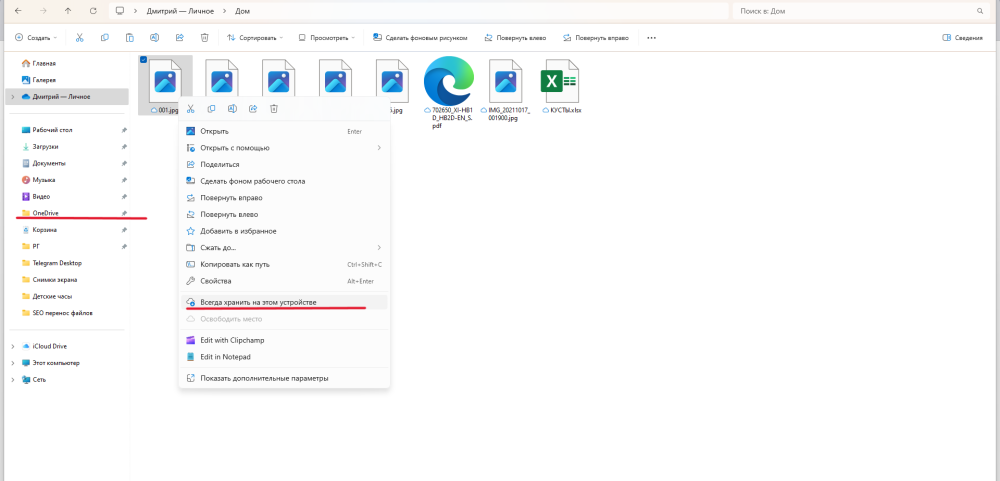
Для загрузки папки или файла на компьютер нужно установить значение «Всегда сохранять на это устройство@. Фото: Дмитрий Бевза / РГ
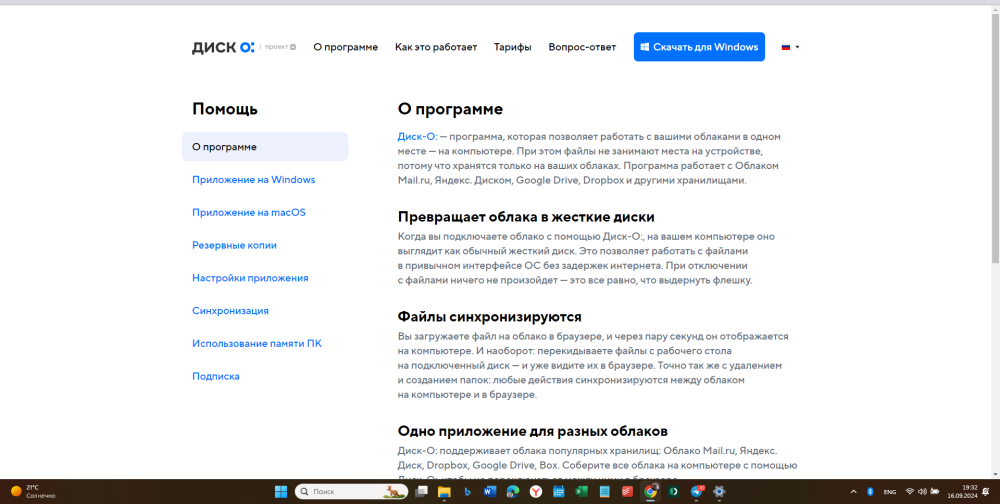
Помимо OneDrive для переноса данных можно использовать российские облачные сервисы «Яндекс Диск», Облако Mail (от VK) или «СберДиск». Минус по сравнению с OneDrive в том, что придется установить самостоятельно «Яндекс Диск», или программу «Диск-О:» от VK на старый и новый ПК и зарегистрироваться в соответствующих облачных сервисах. Плюс же в том, что это российские сервисы, там можно оплатить российской банковской картой более терабайта в облаке и перенести такой объем данных со старого ПК на новый. Причем оплату можно произвести разово, к примеру, на месяц, только для переноса данных.
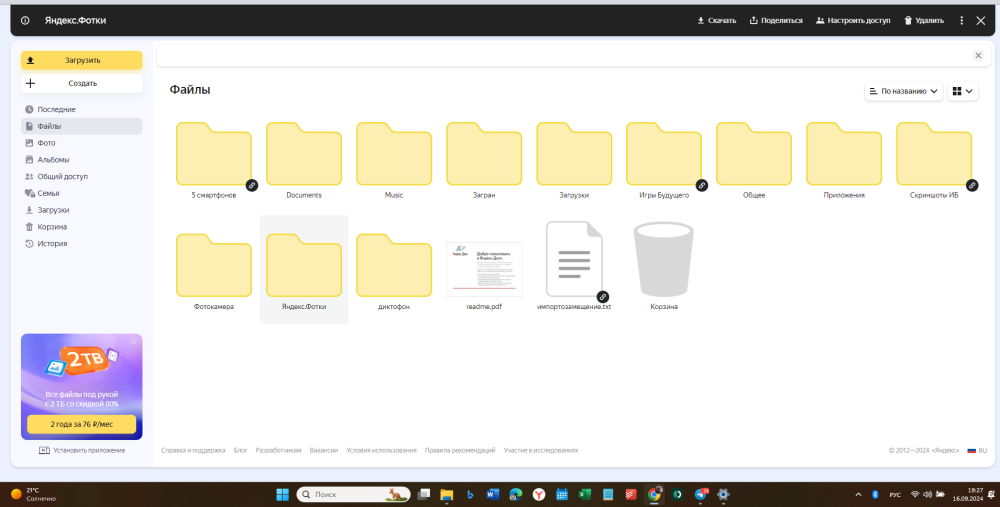
Помимо OneDrive для переноса данных можно использовать российские облачные сервисы «Яндекс Диск», Облако Mail (от VK), «СберДиск». Фото: Дмитрий Бевза / РГ
В российских облачных сервисах можно оплатить российской картой объем более терабайта. Фото: Дмитрий Бевза / РГ
Если использовать «СберДиск» (для него нет ПО для Windows), то придется самостоятельно загрузить данные в облако «СберДиск» и затем скачать их из облака на новый ПК. Такой же способ подойдет для «Яндекс Диска» и Облака Mail, если вы не хотите устанавливать дополнительные программы.
Чего делать не надо
Перенос программ, настроек и файлов можно реализовать с помощью специального ПО. В этом случае в идеале вы получаете точную копию своего старого компьютера, но на новом «железе». Звучит красиво, но мы не рекомендуем использовать этот способ, потому что:
- во-первых, эти программы довольно дорогие;
- во-вторых, это зарубежное ПО, которое невозможно оплатить с помощью российских банковских карт;
- в-третьих, это сложное профессиональное ПО, предназначенное для системных администраторов, и для того, чтобы его освоить, понадобится немало времени;
- в-четвертых, не факт, что установленные на старом компьютере программы и игры заработают на новом без установки драйверов библиотек и другого дополнительного софта;
- в-пятых, вы перенесете на новый остатки удаленных программ и игр, ненужные драйверы и пр. Перенос всего «мусора» со старого ПК на новый — не лучшая идея. Он занимает место на диске и может замедлить работу нового ПК.
Гораздо эффективнее провести ревизию установленного ПО и игр и заново установить на новый ПК то, что действительно необходимо.
Мы также не рекомендуем соединять два ПК или ноутбука через USB-кабель. Для этого потребуется приобрести специальный USB-кабель и произвести настройку нового сетевого соединения на каждом компьютере.

In this article, we will see how to perform an Easy Transfer to a new computer: copy files, accounts, documents, pictures, music, movies, favorites, profiles, settings and your personalization from an old PC to a new PC with Windows 11 or Windows 10.
Windows Easy Transfer has always been one of the simplest ways to transfer files to a new Windows PC. True, the original Microsoft’s Easy Transfer tool in Windows 7 could not transfer everything you’ve had under your profile, and could not transfer your programs, but it did the job for *most* of your content. In Windows 11 or Windows 10, however, the original Easy Transfer is no longer available. Fortunately, Microsoft community has already created a 3rd-party Windows Easy Transfer alternative, which is what we will use here.
The process we will use does not require special cables, can be done without prior computer knowledge, and – if you use an upgraded transfer product – can even transfer your programs to new PC. Let’s dive in.
How to use Windows Easy Transfer to transfer files to new computer with Windows 11 or Windows 10
- Run Zinstall Windows Easy Transfer on your current computer (the one you are transferring from).
Note: You can get the transfer software here. It transfers your files, documents, profiles and settings, similar to the original Easy Transfer. If you also want to transfer applications and programs to your new PC, you should use Zinstall WinWin instead, which transfers everything you have, including programs. - Run Zinstall Windows Easy Transfer on the new Windows 11 or Windows 10 computer.
- Note that no special cables or configurations are required – connection is performed automatically. All you have to do is connect the computers to same internet connection, router or wifi.
- If you’d like to select which files you want to transfer, press the Advanced menu. If you just want to transfer everything, you don’t need to go to the Advanced menu.
- Press “Go” on the new PC to start the Easy Transfer process.
- That’s it!
Depending on the amount of data you have, and your connection speed, the transfer may take a couple of hours – but you don’t have to “sit and stare” at it, as it will complete automatically. Just let it run.
IMPORTANT: If you want not only your files, but also your programs, you can transfer programs as well. For that, use Zinstall WinWin.
Ready to do an Easy Transfer to your new computer?
Get Zinstall Easy Transfer here
Video tutorial – Windows Easy Transfer
Note on cables
You might have heard the term “Easy Transfer Cable” in relation to the Windows Easy Transfer tool from Windows 7. These cables were a type of specialized USB cable, which allowed to simplify the connection process, which in the Windows 7 version of Easy Transfer was, well, not very easy.
You do not need to buy any special cables for the Windows 11 or Windows 10 version used in this tutorial! The transfer automatically uses existing connections that your computers already have, and does not require special cables – and you get to save some extra cash on the purchase.
Ready to Easy Transfer your files to new PC?
Get Easy Transfer for Windows 11 or Windows 10 here, and finish your transfer today!
Windows Easy Transfer is a built-in tool in Windows operating systems that allows users to transfer files, settings, and user accounts from one computer to another. It can be a useful tool when you’re upgrading to a new computer or reinstalling your operating system. In this tutorial, we’ll guide you through the steps to open Windows Easy Transfer on Windows 10.
Step 1: Click on the «Start» button located on the taskbar to open the Start Menu.
Step 2: In the search box, type «Windows Easy Transfer» and click on the search result.
Step 3: The Windows Easy Transfer window will open, displaying the available transfer methods.
Step 4: Choose the transfer method that suits your needs. You can transfer files and settings using a USB drive, a network connection, or an Easy Transfer Cable.
Step 5: Follow the on-screen instructions to complete the transfer process. You may be asked to select the items you want to transfer and specify the destination on the new computer.
Step 6: Once the transfer is complete, you can review the transferred files and settings on the new computer.
Step 7: If you encounter any issues during the transfer process, you can refer to the Windows Easy Transfer troubleshooting guide or seek assistance from the Microsoft support website.
| Pros | Cons |
|---|---|
| 1. Simple and straightforward tool for transferring files, settings, and user accounts. | 1. Limited to Windows operating systems and may not be compatible with other platforms. |
| 2. Offers multiple transfer methods, including USB drives, network connections, and Easy Transfer Cables. | 2. Not all applications or settings may be transferred successfully and may require additional configuration. |
| 3. Saves time and effort when migrating to a new computer or reinstalling the operating system. | 3. May not support some advanced settings or customizations. |
Opening Windows Easy Transfer on Windows 10 is a straightforward process that can simplify the migration of files, settings, and user accounts. By following the steps outlined in this tutorial, you can take advantage of this built-in tool and ensure a smooth transition to your new computer or operating system.
Video Tutorial:How do I access Windows Easy Transfer?
Yes, Windows Easy Transfer is not available in Windows 10. Windows Easy Transfer was a tool introduced by Microsoft to help users easily transfer files, settings, and user accounts from an old computer to a new one. It was often used when upgrading from an older version of Windows to a newer one.
However, starting with Windows 8, Microsoft discontinued the Windows Easy Transfer tool and introduced different methods for transferring files and settings. In Windows 10, there is no native tool provided by Microsoft that directly replicates the functionality of Windows Easy Transfer.
Instead, there are alternative methods for transferring files and settings when upgrading to a new computer or a new operating system. Some of the common methods include:
1. Using External Storage: You can manually copy your files to an external hard drive, USB flash drive, or a network location and then transfer them to the new computer.
2. Cloud Storage: If you have an internet connection, you can upload your files to cloud storage services like OneDrive, Google Drive, or Dropbox and then access them from the new computer.
3. Migration Tools: Some third-party migration tools are available in the market that can help transfer files, settings, and user accounts from one computer to another. These tools often provide more advanced and comprehensive features than the older Windows Easy Transfer tool.
While Windows Easy Transfer may not be available in Windows 10, using these alternative methods can still help you successfully transfer your files and settings to a new computer.
What is the alternative to Windows Easy Transfer in Windows 10?
For users looking to transfer files and settings from an older Windows version to Windows 10, the alternative to Windows Easy Transfer is the built-in feature called «Windows Migration Assistant«. This tool is specifically designed for transferring data from a Windows PC to a Mac, but it can also be used for migrating data and settings from an older Windows version to Windows 10.
Here are the steps to use Windows Migration Assistant:
1. Ensure that both the old Windows PC and the new Windows 10 PC are connected to the same network.
2. On the new Windows 10 PC, download and install the «Windows Migration Assistant» from the Microsoft website.
3. On the old Windows PC, search for «Windows Migration Assistant» in the Start Menu and open it.
4. Follow the on-screen instructions to generate a security code on the old Windows PC.
5. Enter that security code on the new Windows 10 PC.
6. Select the data and settings you want to transfer from the old Windows PC to the new Windows 10 PC.
7. Click the «Transfer» button and wait for the transfer process to complete.
It is important to note that while Windows Migration Assistant can transfer files and settings, it may not transfer certain applications or programs. You may need to reinstall those on the new Windows 10 PC manually.
By using the Windows Migration Assistant, users can easily transfer their files and settings from an older Windows version to Windows 10, ensuring a seamless transition to the new operating system without the need to manually copy files or reconfigure settings.
What replaces easy transfer?
In the tech world, advancements and updates often lead to the replacement of older technologies or features. When it comes to the replacement of «easy transfer,» there have been several developments in recent years. Here are the most notable alternatives that have emerged:
1. Cloud Storage and Syncing: Cloud storage services like Google Drive, Dropbox, and Microsoft OneDrive have become popular choices for transferring and syncing files between devices. These services provide seamless integration across various platforms and devices, allowing users to store and access their files from anywhere. Users can simply upload their files to the cloud and then download them on another device, eliminating the need for physical transfer methods.
2. File Transfer Apps: Apps specifically designed for file transfer have gained traction as well. Applications like Shareit, Xender, and Send Anywhere enable users to transfer files directly between devices using Wi-Fi or mobile data. These apps often provide high-speed transfers and support various file types, making them convenient alternatives to traditional transfer methods.
3. Near Field Communication (NFC): NFC is a technology that enables short-range wireless communication between devices. Many modern smartphones support NFC, allowing users to transfer files by bringing their devices in close proximity. This method is efficient for transferring small files and is commonly used for sharing contacts, media files, or URLs between devices.
4. Airdrop (iOS) and Nearby Share (Android): For Apple users, Airdrop has been a popular feature for transferring files, photos, and other content seamlessly between iOS devices. Similarly, Android devices have introduced a similar feature called Nearby Share, which enables quick and secure file sharing between Android devices.
5. USB-C and Thunderbolt: With the increasing prevalence of USB-C and Thunderbolt ports on modern devices, transferring files through physical connections has become faster and more efficient. USB-C provides faster data transfer speeds and is now widely adopted across various brands and devices. Thunderbolt, on the other hand, offers even higher speeds and can support high-resolution displays and daisy-chaining multiple devices.
It is important to note that these alternatives may vary depending on the specific devices and operating systems being used. However, the aforementioned options represent some of the most common and widely adopted methods for replacing «easy transfer» in recent years.
How do I open a file transfer window?
To open a file transfer window, follow these steps:
1. Connect the device: Ensure that the device you want to transfer files from or to is properly connected to your computer. This could be done via a USB cable, Wi-Fi, or Bluetooth, depending on the devices involved.
2. Explore the file system: Once the device is connected, open the file explorer on your computer. In Windows, you can do this by pressing the Windows key + E, or by clicking on the file explorer icon in the taskbar. On macOS, click on the Finder icon in the dock.
3. Locate the device: In the file explorer, you should see a list of available drives and devices on the left-hand side. Look for the connected device and click on it to display its file system and contents.
4. Access the files: Navigate through the folders of the connected device until you find the files you want to transfer. You can typically double-click on a folder to open it and view its contents.
5. Copy or move files: Once you’ve located the file you wish to transfer, you have a couple of options. You can either drag and drop the file from the device’s file system to a desired location on your computer, or you can right-click on the file, select Copy (or Cut), navigate to the destination folder on your computer, and then right-click and choose Paste to transfer the file.
6. Monitor the transfer: Depending on the file size and the speed of the connection, the transfer may take some time. You can monitor the progress of the transfer by observing the file transfer dialog box or progress bar that may appear during the process.
7. Safely eject the device: After you have completed the file transfer, it is essential to safely disconnect the device to avoid any potential data loss or corruption. In Windows, you can do this by right-clicking on the device in the file explorer’s sidebar and choosing Eject or Safely Remove Hardware. On macOS, you can drag the device icon from the desktop to the Trash bin or use the Eject button next to the device name in the Finder sidebar.
Remember to disconnect the device only when you’re certain that the transfer is complete and it is safe to do so.
How to transfer data from old computer to new computer Windows 10?
Transferring data from an old computer to a new one can be a crucial step when upgrading your system. To transfer data from an old computer to a new computer running Windows 10, you can follow these steps:
1. External storage device: Prepare an external storage device, such as a USB flash drive, external hard drive, or cloud storage service, to temporarily store your files and transfer them to the new computer.
2. Backup important files: Before transferring any files, make sure to create a backup of your important data. This ensures that you have a copy of your files in case anything goes wrong during the transfer process.
3. Connect the storage device: Connect your external storage device to the old computer. If you’re using a USB flash drive or an external hard drive, just plug it into an available USB port. If you prefer using a cloud storage service, upload your files to your account.
4. Copy your files: Locate the files you want to transfer on your old computer and start copying them to the external storage device. You can simply drag and drop the files or use the copy-paste function. Make sure to organize your files in a way that makes them easily accessible once transferred to the new computer.
5. Eject the storage device: Safely eject the external storage device from the old computer to avoid any data corruption or loss.
6. Connect the storage device to the new computer: Take your external storage device and connect it to the new computer. Again, if using a USB device, plug it into an available USB port. If you’re using a cloud storage service, sign in to your account and locate your files.
7. Copy files to the new computer: Now, copy and paste or drag and drop the files from the external storage device to the desired location on your new computer. Ensure that you maintain a similar file organization structure as on the old computer for ease of access.
8. Verify transferred files: Once the data transfer is complete, it’s crucial to double-check and verify that all your files have been successfully transferred. Open files, folders, and applications to confirm that everything is intact and functioning as expected.
Remember, transferring data from an old computer to a new one doesn’t transfer installed programs or settings. Ensure you have installation files or licenses readily available to reinstall any necessary software on the new computer, and configure settings to your preferences.
Please note that these steps are provided for informational purposes and your specific transfer process might vary based on your preferences and available resources.
How to transfer files from one Windows 10 computer to another Windows 10 computer?
Transferring files from one Windows 10 computer to another Windows 10 computer can be done efficiently using a variety of methods. Here’s a step-by-step guide to help you accomplish this:
1. Use a USB Flash Drive:
– Insert a USB flash drive into the source computer.
– Copy the desired files or folders from your source computer and paste them onto the USB drive.
– Safely remove the USB drive from the source computer and insert it into the destination computer.
– Copy the files from the USB drive and paste them into the desired location on the destination computer.
2. Use an External Hard Drive:
– Connect an external hard drive to the source computer using a USB cable.
– Copy the files or folders from your source computer and paste them onto the external hard drive.
– Disconnect the external hard drive from the source computer and connect it to the destination computer.
– Copy the files from the external hard drive and paste them into the desired location on the destination computer.
3. Use Network File Sharing:
– Ensure both computers are connected to the same network (either wired or wireless).
– On the source computer, right-click on the files or folders you wish to transfer, select «Properties,» and go to the «Sharing» tab.
– Click on «Advanced Sharing» and check the box that says «Share this folder.«
– Specify the permissions you want to provide to other users, and click «OK» to save the changes.
– On the destination computer, open File Explorer and click on the «Network» tab in the left sidebar.
– You should see the name of the source computer. Double-click on it to access the shared files and folders. Copy and paste the desired files to the destination computer.
4. Use OneDrive or Cloud Storage:
– If you have a cloud storage service like OneDrive, Dropbox, or Google Drive, upload the files from your source computer to the cloud storage service.
– Access the same cloud storage service on the destination computer and download the files to the desired location.
5. Use a Direct Transfer Cable:
– If both computers have an Ethernet port, you can use a direct transfer cable (also called a crossover cable) to connect them.
– Connect one end of the cable to the Ethernet port of the source computer and the other end to the Ethernet port of the destination computer.
– On both computers, open File Explorer, and in the address bar, type «Control Panel\Network and Internet\Network Connections» and press Enter.
– Right-click on the network connection, select «Properties,» click on «Internet Protocol Version 4 (TCP/IPv4),» and then click on «Properties.«
– Set the IP address and subnet mask manually on both computers.
– After configuring the IP addresses, you should be able to access the files on each computer by typing the IP address of the other computer in the File Explorer address bar.
These methods should provide you with multiple options for transferring files between Windows 10 computers. Choose the option that best suits your needs and available resources.