
Personal buyers and computer manufacturers are likely to set SSD as the system disk or boot drive as it’s thinner, lighter, and faster compared to HDD in recent years. However, it’s a challenge for normal users to transfer operating systems from HDD to SSD.
Here, as a sophisticated software manufacturer, EaseUS will provide you with a quick guide for you to learn how to transfer your Windows 7,8,10,11 to an SSD instead of taking time to reinstall or fresh install OS:
- #1. Preparation: install SSD, clean system junk files on the OS disk, and download OS migration software.
- #2. Procedure: migrate and transfer OS from HDD to SSD or transfer OS to a new SSD.
- #3. Follow Up: boot PC from SSD after operating system migration
Most people are interested in finding OS migration software to directly move OS from HDD to SSD or vice versa. EaseUS Partition Master is a reliable and convenient choice for transferring OS from HDD/SSD to SSD without reinstalling Windows. It takes only a few steps but saves a great amount of time.
Stay calm if you are sticking with a similar issue as the case listed from Microsoft here:
Best way to transfer OS to new SSD? I am running out of hard drive space due to installing too many games from various giveaways over the last two years. I went to install a second hard drive, only to find that there is no bay for a second conventional hard drive and no place to put/mount the second drive even though there are two free SATA ports and an extra SATA power port…The operating system is on the OEM 1.5 TB drive, but the SSD is much faster. What’s the best way to transfer my copy of Windows 10 Pro to the new hard drive? From Microsoft Community
Follow the listed procedures with detailed guidelines to learn how to successfully migrate your operating system to a new SSD disk like an expert.
#1. Preparation — Transfer OS to New SSD
- ⏱️Duration: 10-15 minutes
- 🧰Tools: Windows PC, screwdriver, new SSD, connection cable or M.2 SSD slot, backup software or tool, OS migration software.
To ensure a secure and smooth OS transfer procedure, please make sure that you follow our tips here to get everything ready. Before we start officially, let’s check some preparatory works.
1. Connect or Install New SSD to PC
If you’re using a desktop, you have many ways to connect a second solid-state drive to your computer.
- Install the SSD alongside your old hard drive in the same machine.
- Connect the SSD to your computer via a SATA-to-USB cable.
- Use an external hard drive enclosure for a connection.
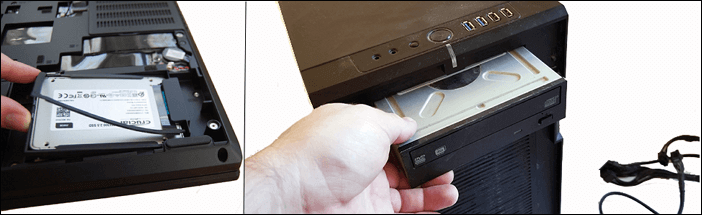
Normally, laptop users prefer to use the two latter ways.
2. Clean Useless Large Files on the SSD
SSD is generally smaller than HDD, so it’s a great idea to release some disk space by clearing up some system junk files before migrating the operating system to a new SSD. Ensure the SSD storage capacity is equal to or larger than the system C drive data usage on the source hard drive.
EaseUS Partition Master, with its CleanGenius tool, is easy and light for Windows beginners to clean computer junk files & large files with the following tutorial guide.
Guide: Locate, Remove and Delete Large Files in Windows.
3. Back Up C Drive Data
It’s wise to back up C drive data before OS migration. We can’t expect everything to go safe and sound all the time, but we can arm ourselves with a complete backup.
A simple Ctrl C + V or Windows backup software can both work for C drive data backup.
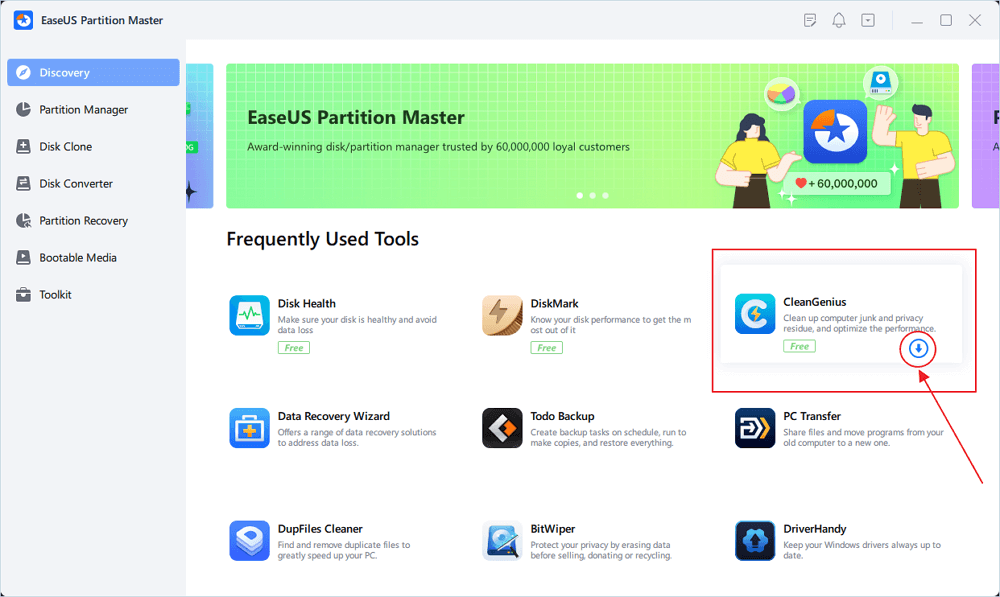
4. Download the OS Migration Tool
This is the key step. Simply click the download button here, and it only takes a few seconds to download the OS migration tool — EaseUS Partition Master. Its Migrate OS to SSD feature enables all levels of Windows owners to effortlessly switch their operating systems to a new disk without OS reinstallation.
This software also allows you to initialize SSD to the same system disk type as the OS drive to ensure a smooth operating system transfer procedure. You may also read: How to Initialize SSD in Windows 10/8/7.
After getting ready with all the mentioned points, begin right away with the procedure and learn how to transfer OS from HDD to SSD immediately.
#2. Procedure: How to Move or Transfer OS to New SSD
- ⏱️Duration: 5-15 munites or longer
- 🧰Tools: Windows PC, new SSD, EaseUS Partition Master
3 Tips for Transferring OS to SSD with EaseUS Partition Master:
- ✔️Select the new SSD as the destination disk.
- ✔️All data on the SSD will be erased while moving the operating system to the SSD.
- ✔️The SSD must contain equal to or larger space than the used space in system C drive.
Now, let’s have a look at how to migrate your Windows OS from HDD to SSD with all system files:
Note: The operation of migrating OS to SSD or HDD will delete and remove existing partitions and data on your target disk when there is not enough unallocated space on the target disk. If you saved important data there, back up them to an external hard drive in advance.
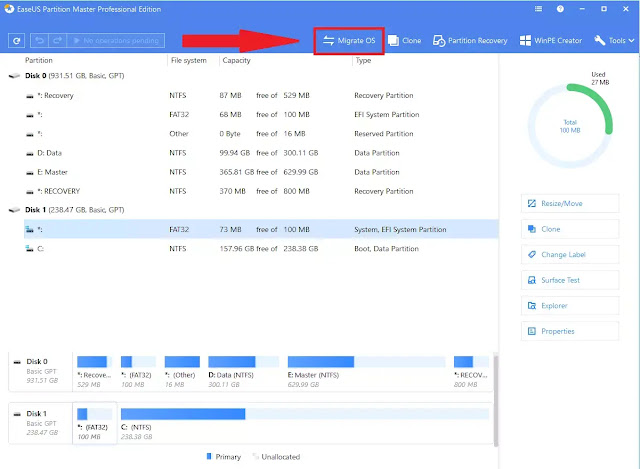
Step 1. Select «Clone» from the left menu. Select the «Migrate OS» and click «Next» to continue..
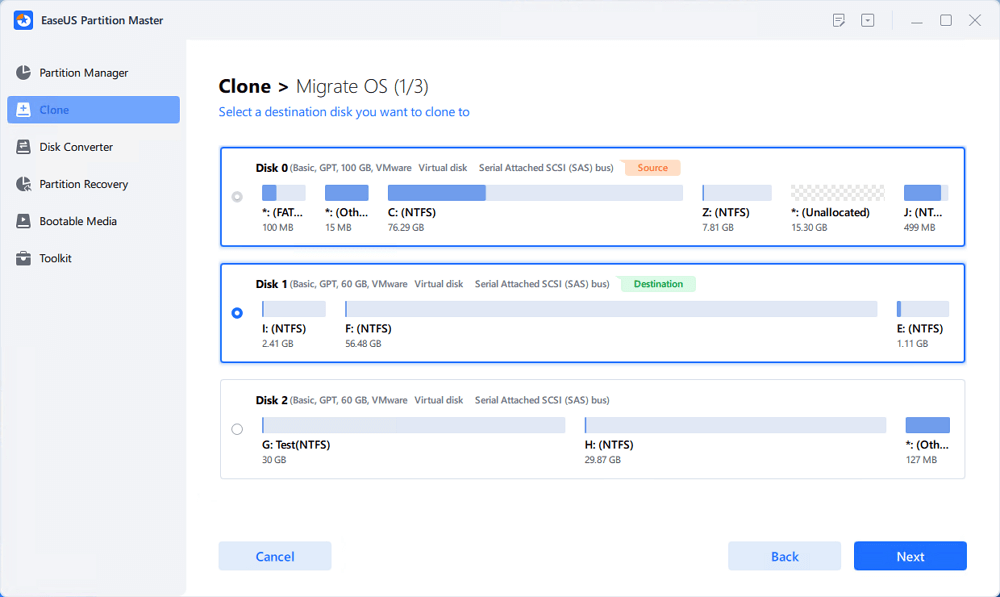
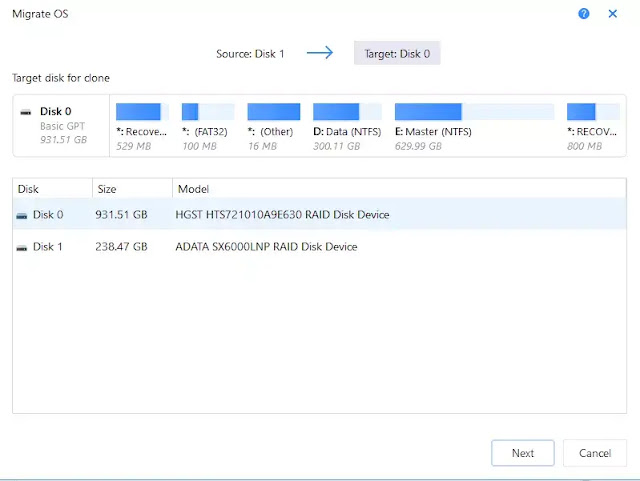
Step 2. Select the target disk you want to clone. Click «Next».
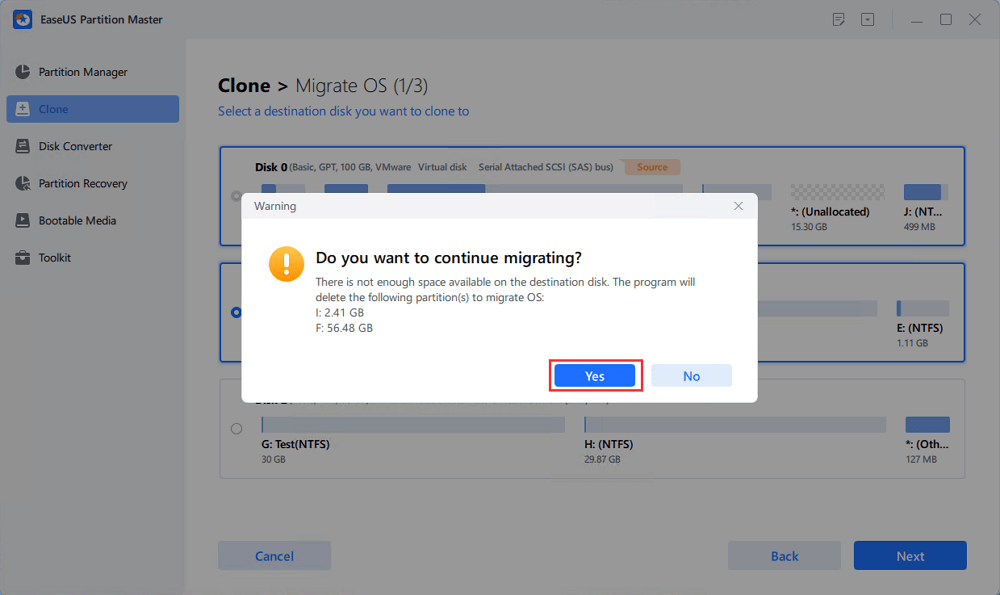
Step 3. Click «Yes» after checking the warning message. The data and partitions on the target disk will be deleted. Make sure that you’ve backed up important data in advance. If not, do it now.
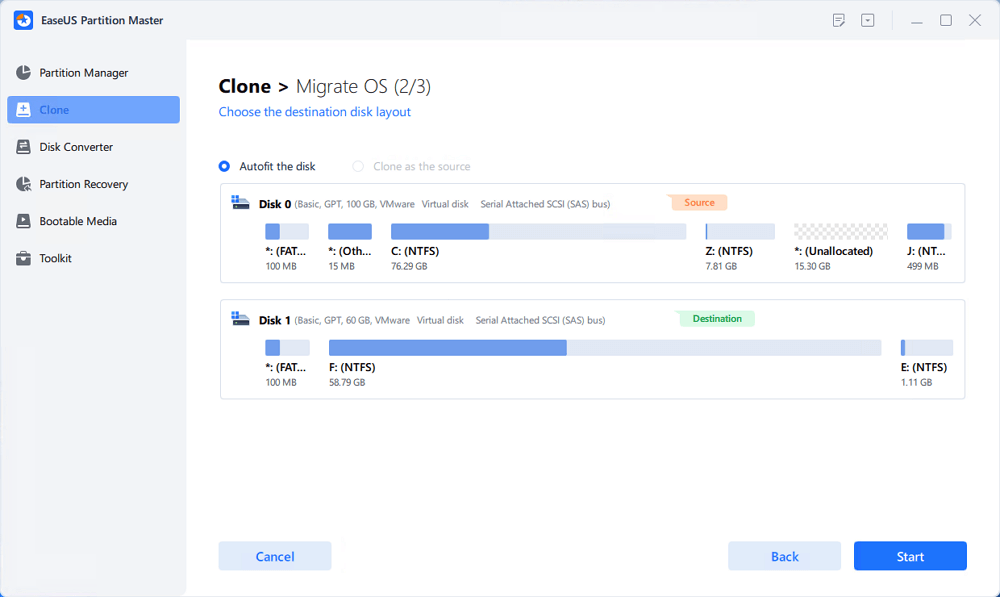
Step 4. Preview the layout of your target disk. You can also click the disk layout options to customize the layout of your target disk as you want. Then click «Start» to start migrating your OS to a new disk

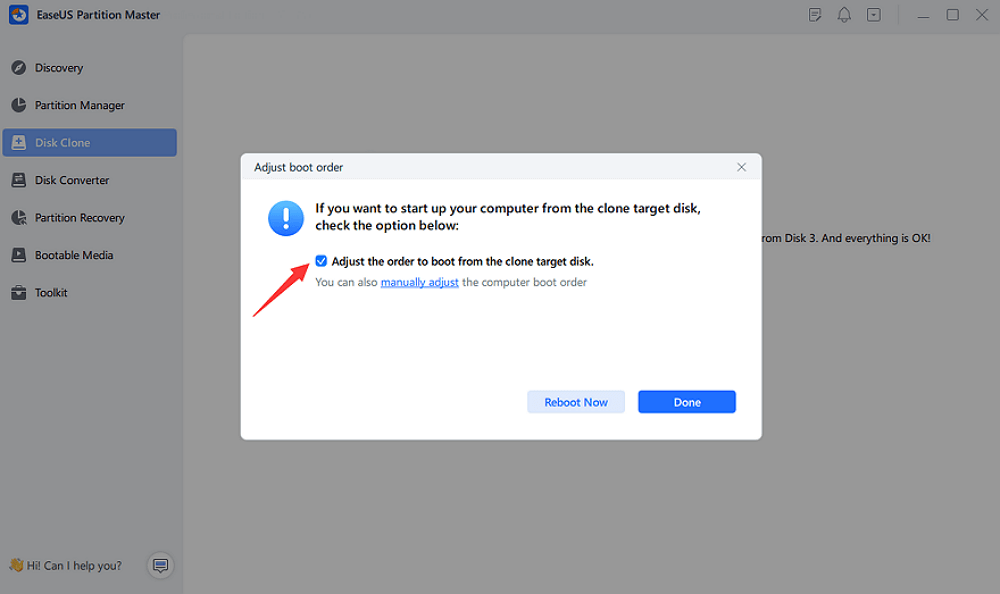
Step 5. When you see a confirming message, asking «If you want to start up computer from the clone target disk», tick «Adjust the order to boot from the clone target disk» and click the respective button through your demands.
- Reboot Now: it means to reboot the PC and boot OS from the new disk immediately.
- Done: it means to make the changes later.

If you like this tool to transfer OS to SSD, you can also click the button below to share it with other people in need.
#3. Follow Up: Boot PC from New SSD after OS Migration
- ⏱️Duration: 2-5 minutes
- 🧰Tools: Windows PC, SSD, BIOS settings
IMPORTANT: Once you complete the OS migration process, remember to set new SSD as the boot drive. Here are two ways you can follow either to handle PC booting from the SSD after the OS transfer:
1. Remove Old OS HDD, Use SSD as Boot Drive on the PC
This is an easy case. After migrating the OS from the old drive to the new one, you can directly use the SSD as the boot drive by doing so:
- Shut down your computer.
- Take out the OS HDD and leave the cloned SSD inside the PC.
- Then, reboot the PC, and the computer will automatically take SSD with migrated OS as the boot drive.
- Log in with your Windows password and let your PC boot up normally.
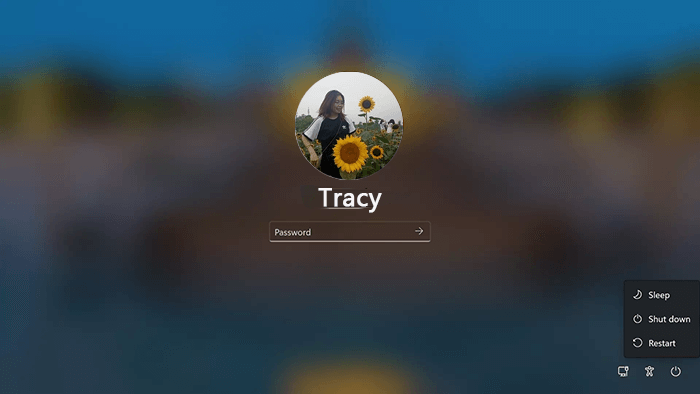
2. Set SSD as Boot Drive
Most PCs and laptops all contain two disk slots — one hard drive slot and one SSD slot. Therefore, you can choose to use the SSD as a boot drive on your computer.
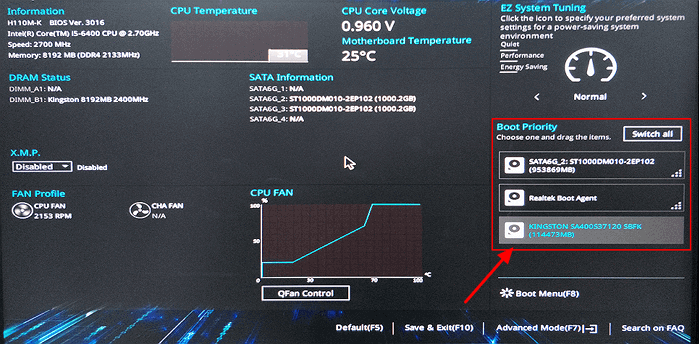
Step 1. Restart the PC and press F2/F8 or Del to enter BIOS.
Step 2. Move to the Boot section. At the Boot Priority section, select and set the new SSD as the boot drive.
Step 3. Press F10 to save the changes and restart the PC.
After this, your OS will automatically run from the new SSD, and you’ll experience a faster computer with better performance then.
Conclusion
On this page, we covered the whole process of how to migrate or transfer Windows OS from HDD to SSD without reinstalling Windows OS. EaseUS Partition Master, with its Migrate OS to SSD feature, makes OS migration easy.
Don’t forget to set the new SSD as the boot drive after moving OS. After transferring OS to SSD, you can also use EaseUS Partition Master to adjust and improve SSD performance with other features, like:
- Resize/move partition on SSD.
- 4K align SSD
- Check SSD disk speed
- Test SSD S.M.A.R.T status
- Check file system and fix bad sectors on SSD, etc.
If you need further disk management, turn to EaseUS Partition Master for help. It’s also a professional disk cloning software. Don’t miss it.
FAQs About Transfer OS from HDD to SSD
If you have further more questions on how to transfer OS from HDD to SSD, follow and find answers to these listed questions here:
1. Can I transfer Windows from the HDD to new SSD?
To move the OS to another drive, primarily, you can follow three approaches:
- Use a cloning tool to copy the operating system from an HDD to an SSD
- Create a system image of your PC and later recover it to an SSD
- Download an ISO file of your Windows operating system and install it fresh on a new SSD
If you want to use native Windows options, the safest method is to create a system image of the primary drive. Let’s explore how to do it below.
2. How do I move my Windows 10 OS from HDD to SSD?
- Install SSD to Windows 10 and initialize SSD to the same disk type as the Windows 10 HDD — MBR or GPT.
- Launch EaseUS Partition Master, go to the «Clone» section, and select «Migrate OS.»
- Select the SSD as the destination disk and click «Next.»
- Click «Yes» and «Execute Task.»
- Once done, reboot the PC and set the new SSD as a boot drive in BIOS.
- Reboot the PC to boot Windows 10 from the new SSD.
3. How to transfer OS from HDD to SSD free?
- Install the new SSD to the PC and initialize it to the same disk type as the source OS disk.
- Create at least two volumes on the SSD, and make sure the volume size is equal to or larger than the used space on the OS and system partitions.
- Launch EaseUS Partition Free, go to the Clone section, and select «Copy partition.»
- Select the System partition, select the new SSD as a destination, and start cloning.
- Select the OS partition and select another volume on SSD as the destination and clone.
- Then, set the new SSD as the boot drive.
4. What is system image recovery?
System image recovery is restoring your computer from a system image. A system image is a complete copy of your computer, including your operating system, applications, settings, and all other files. You can perform system image recovery to restore your PC.
Если вам потребовалось перенести установленную Windows 10 на SSD (или просто на другой жесткий диск) при покупке твердотельного накопителя или в другой ситуации, сделать это можно несколькими способами, все они подразумевают использование стороннего ПО и далее будут рассмотрены бесплатные программы, позволяющие перенести систему на твердотельный накопитель, а также пошагово показано, как именно это сделать.
В статье продемонстрированы бесплатные средства, которые позволяют без ошибок скопировать Windows 10 на SSD на современных компьютерах и ноутбуках с загрузкой UEFI или Legacy (BIOS) и системой, установленной на GPT или MBR диск. После переноса системы не забудьте установить загрузку компьютера или ноутбука с нового накопителя.
Примечание: если вам не требуется переносить все ваши программы и данные со старого жесткого диска, вы также можете просто выполнить чистую установку Windows 10, заранее создав дистрибутив, например, загрузочную флешку. Ключ при установке не потребуется — если вы устанавливаете ту же редакцию системы (Домашняя, Профессиональная), которая была на данном компьютере, нажмите при установке «У меня нет ключа» и уже после подключения к Интернету система активируется автоматически, несмотря на то, что теперь установлена на SSD. См. также: Настройка SSD в Windows 10.
- Перенос на SSD в бесплатной Acronis True Image
- Samsung Data Migration
- Macrium Reflect
- Другие программы для переноса Windows 10 на SSD
Перенос Windows 10 на SSD в бесплатной версии Acronis True Image
Многие производители SSD в качестве программы для переноса установленной системы на свои твердотельные накопители предлагают использовать бесплатную упрощенную версию Acronis True Image, доступную на официальном сайте производителя. Такая бесплатная версия доступна для SSD следующих марок:
- WD (Western Digital)
- SanDisk
- Kingston
- Crucial
- A-Data
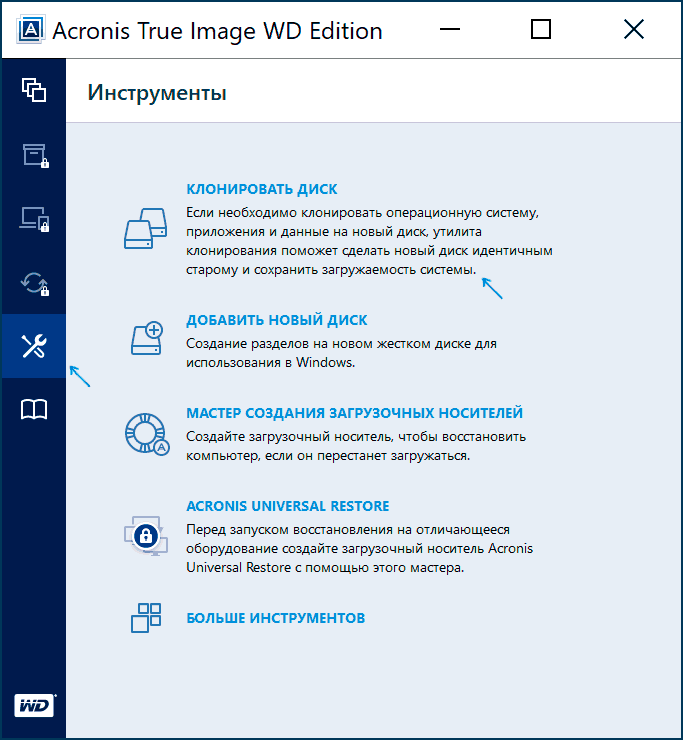
Программа полностью на русском языке, а сам процесс переноса не должен быть сложным даже для начинающего пользователя: весь процесс осуществляется с помощью мастера в простом или ручном режиме, позволяющем исключить отдельные папки из переноса или настроить переносимые разделы.
Подробная инструкция о программе, видео демонстрация процесса и ссылки на загрузку доступны в статье Как перенести Windows 10, 8.1 и Windows 7 с HDD на SSD с помощью Acronis True Image.
Samsung Data Migration
Диски SSD от Samsung — одни из самых популярных, а официальная программа Samsung Data Migration для переноса системы с жесткого диска или другого SSD на накопители Samsung — одна из самых простых в использовании. Обычно всё, что потребуется — указать исходный и целевой диски и начать перенос.
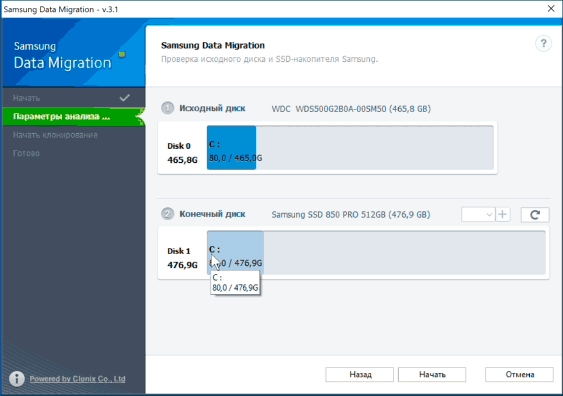
По завершении останется установить загрузку с нового SSD в системе и использовать старый диск для любых иных задач. Инструкция и загрузка программы доступны на официальном сайте Samsung — https://www.samsung.com/ru/support/mobile-devices/how-can-i-transfer-windows-to-my-new-ssd-samsung/
Клонирование дисков (перенос Windows 10 на другой диск) в бесплатной версии Macrium Reflect
Macrium Reflect — отличная программа для работы с резервными копиями системы, которая, помимо прочего, позволяет сравнительно легко перенести Windows 10 на диск SSD. Единственный возможный недостаток для начинающего пользователя — отсутствие русского языка интерфейса.
Однако, разобраться будет не сложно, на сайте доступна отдельная подробная пошаговая инструкция, информация об установке программы и видео, где весь процесс переноса показан наглядно и со всеми необходимыми пояснениями: Перенос Windows 10 на SSD или другой жесткий диск в Macrium Reflect Free.
Другие программы для переноса Windows 10 на SSD и особенности их использования
Есть масса других программ, позволяющих перенести Windows 10 на SSD. Но при их использовании есть существуют некоторые нюансы. Например, Intel Data Migration больше не поддерживается и не находится на официальном сайте: придется использовать другие источники программы для простого переноса системы на SSD от Intel (сам процесс переноса полностью тот же, что и при использовании Acronis True Image).
Что касается следующих программ, в них существовала возможность бесплатного переноса системы в ранних версиях, а в последних она стала доступной только после приобретения лицензии. Но: загрузив старую версию программы (нужные версии я укажу ниже, о том как это сделать в инструкции: Как скачать оригинальные старые версии программ), а иногда — слегка иную программу того же разработчика, вы можете выполнить перенос бесплатно.
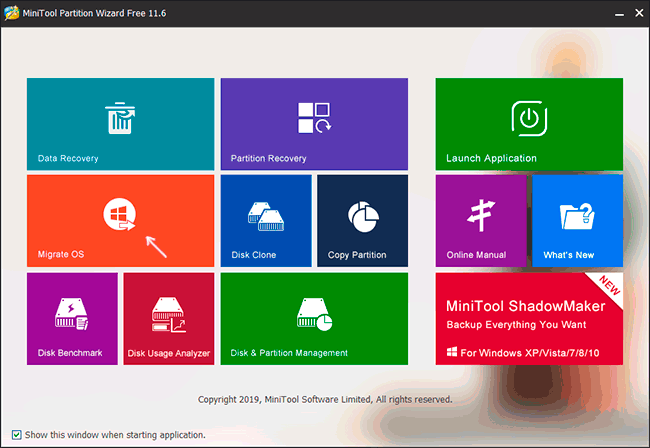
MiniTool Partition Wizard Free
Функции переноса ОС на SSD в программе MiniTool Partition Wizard Free были бесплатными до определенной версии программы, в последних же обновлениях их заблокировали и перенос недоступен без приобретения лицензии. Однако, если вы найдете старую версию программы (например, 11.6), то в ней такая функция присутствует бесплатно и работает исправно.
Подробно о шагах, необходимых для миграции Windows 10 на SSD в этой программе: Как перенести Windows 10 на SSD или другой диск в MiniTool Partition Wizard Free.
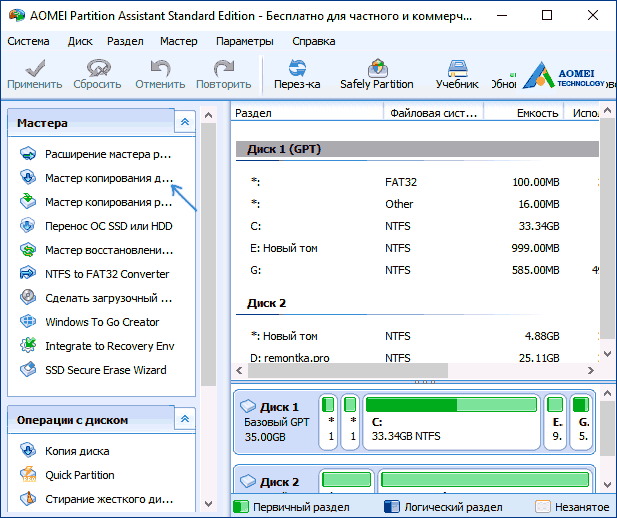
Aomei Partition Assistant Standard Edition
Aomei Partition Assistant Standard — удобная программа на русском языке для работы с дисками, в сегодняшней бесплатной версии которой функция «Перенос ОС на SSD или HDD» недоступна. Другая функция — «Копия диска» тоже отказывается работать. Однако, эта же функция (Копия диска) исправно работает в версии 6.6 программы (для дисков MBR будет работать и пункт «Перенос ОС на SSD или HDD).
- Перед выполнением указанных действ
- Запустите «Мастер копирования дисков» и выберите пункт «Быстро скопировать диск».

- Укажите исходный, а затем — целевой диск (диск назначения).
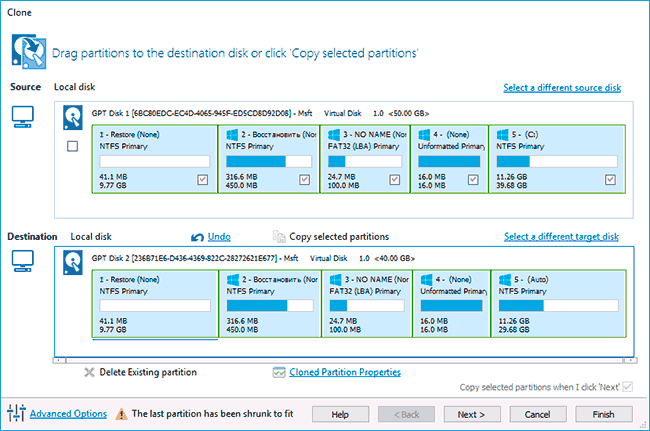
- Укажите, следует ли изменить размеры разделов или подогнать их под размеры целевого диска.
- Нажмите «Готово», а затем — кнопку «Применить» в главном окне программы.
- Будет выполнена перезагрузка компьютера и начнется процесс клонирования дисков (может занять продолжительное время).
- Компьютер автоматически перезагрузится, и вы получите два идентичных диска. Останется вручную перезагрузить компьютер еще раз и установить загрузку с нужного вам диска.
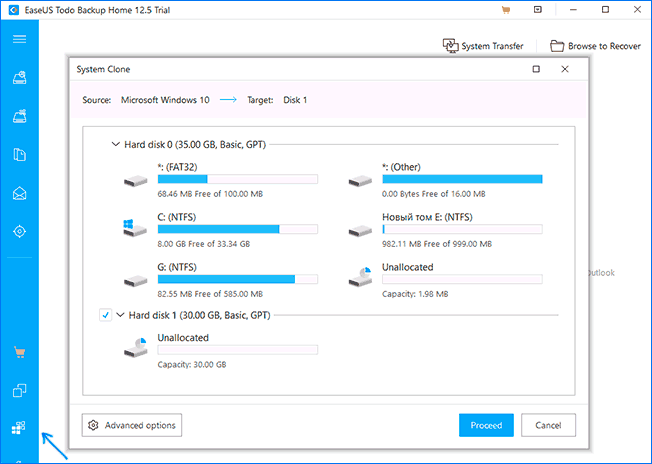
EaseUS ToDo Backup Free
У разработчика EaseUS есть бесплатная версия программы для работы с разделами дисков — Partition Master, но в ней функции переноса системы на SSD недоступны без лицензии. Однако, если с официального сайта easeus.com загрузить другую программу, EaseUS ToDo Backup Free, то в процессе установки вы увидите предложение на один месяц включить полную версию Home.
А эта версия уже позволяет не только делать резервные копии системы, но и выполнить перенос системы:
- В главном окне программы выберите кнопку клонирования системы (два значка Windows справа внизу), а затем укажите целевой диск, отметив его галочкой.

- Нажмите кнопку «Proceed». Если вам сообщат о невозможности клонирования GPT диска или наоборот, конвертируйте целевой диск таким образом, чтобы он имел нужную таблицу разделов (Как конвертировать GPT в MBR или наоборот).
- Клонирование дисков автоматически будет запущено, а по завершении система будет перенесена на другой диск, останется настроить БИОС/UEFI таким образом, чтобы загрузка происходила с нужного диска.
Надеюсь, описанных методов окажется достаточно для ваших целей. Если вы можете предложить свои варианты, буду рад прочесть о них в комментариях.
Home / Instagram / Migrate Windows 10 To Solid State Drive (SSD), Using The EaseUS Partition Master
How to Migrate Windows 10 to a Solid State Drive (SSD). EaseUS Partition Magic software can help you to migrate Windows 10 to SSD, without data loss.
EaseUS Partition Master is a free disk management software for Windows Systems. Besides the usual Disk Partition tasks the EaseUS disk partition software can be used to extend system partition (C:/ drive) or manage low disk space problem, copy or merge or split partition, recover partition and redistribute free space.
The partition manager supports various OS – Windows 10/8.1/8/7/Vista/XP and various languages – English, Deutsch, Español, Français, Português, Polski and Chinese.
It is a powerful Partition Magic alternative whose features can be divided into three broad categories:
- Partition Manager
- Partition Recovery Wizard
- Disk & Partition Copy
And here are the most exciting features of the software:
- Resize/Move partitions without data loss, like extending NTFS system partition without reboot to maximize PC performance.
- Safely merge two adjacent partitions into a bigger one without data loss.
- Convert FAT to NTFS file system.
- Copy entire hard disk to another or migrate OS from HDD to SSD without Windows reinstallation.
- Partition Recovery Wizard allows you to recover deleted or lost partitions from unallocated space.
- Convert primary partition to logical partition and vice versa: convert a primary volume to logical to create a fifth volume on a disk with 4 existed primary volumes.
- Convert MBR to GPT disk, and convert GPT to MBR disk without data loss.
- Wipe disk or wipe partition to permanently wipe sensitive data on disk.
- Support up to 16TB GPT disk.
The software also comes with an inbuilt Wizard that helps to migrate your OS to an ultra-fast SSD or a new HDD without any worry. The wizard comes handy when one wants to clone or copy a partition in a hassle free manner.
Resize or Move Partition
Users can resize partitions with EaseUS Partition Master Software. The best part about the program is that it supports drag and drop function. Which means users can upgrade system disk to a bigger one with one-click. Let us see how to resize partitions using the software:
1. Open EaseUS Partition Master.
2. Right click the D: partition that you want to resize.
3. Select “Resize/Move partition”.
4. Hover the mouse on the left partition bar and simply drag the handle to the partition size you want.
5. Now point the mouse on the right partition handle and again drag the handle to cover all free space until the handle can’t move.
6. If you are satisfied, click “Apply” to save changes.
Linux EXT2/EXT3 partition management
Fox Linux users the software can be helpful for Linux EXT2/EXT3 partition management. The EaseUS partition manager software supports ext2 and ext3 file systems under Windows Operating System. Which means it can easily be used to create, format, delete, wipe ext2/ext3 partition and recover lost ext2/ext3 partition. Besides ext2/ext3 partition management, EaseUS Partition Master can aslo manage FAT and NTFS partitions.
To create a Linux ext2/ext3 partition:
1. Open EaseUS Partition Master.
2. Select the unallocated space.
3. Right click it and select Create partition.
4. Select ext2/ext3 file system from the drop-down menu of file system and click OK.
5. Apply Changes.
Likewise, you can also format a ext2/ext3 partition or delete a ext2/ext3 partition. Not only this, you can recover a deleted or lost ext2/ext3 partition using the Partition Recovery Wizard.
Convert FAT/FAT32 to NTFS Partition
The software can be used to convert FAT/FAT32 to NTFS partition without data loss. Besides converting FAT to NTFS, EaseUS Partition Master also allows users to resize/move partition, copy partition, copy disk, explore partition, merge partition, split partition, etc.
To convert FAT/FAT32 to NTFS partition without data loss, open EaseUS Partition Master and then select a FAT12/16/32 partition. Now simply right click the partition and then select Convert to NTFS. Follow the on-screen instructions and you are done.
Convert Primary Partition To Logical Partition
As we all know that there are four primary partitions in the hard disk drive. Normally the fifth partition cannot be created. The only way to create a fifth partition is by converting the primary partition to logical partition (any one of the four primary partitions).
In such situation, the software can be of great help. The partition manager software converts primary partition to logical partition without any kind of data loss.
EaseUS Partition Master
EaseUS Partition Master software is available in five variants. You can download the software from Partition Magic Free Download page.
- Partition Master
Free
Single license - Partition Master Professional
$39.95
Single license - Partition Master Server
$159
Single license - Partition Master Unlimited
$399
Unlimited license - Partition Master Technician
$699
Technician license
How to Migrate OS to SSD using EaseUS Partition Master — EaseUS Partition Master software is a software released by EaseUS and is helpful for the management of storage systems on our computers. We can easily set up storage partitions on our computers, change the MBR or GPT format of our HDDs, and move the operating system to a new storage area, just like the SSD we will do today.
|
| How to Migrate OS to SSD using EaseUS Partition Master |
How to Use EaseUS Partition Master to Move OS to SSD
Once the SSD is installed and detected in Disk Management on your computer, you can migrate by running the steps below:
1. Buka aplikasi EaseUS Partition Master.
2. Automatically, when the application opens, you will be directly directed to the OS migration menu. But if nothing appears, you can click the migrate OS button.
|
| Click Migrate OS |
3. Next, select the OS storage and OS migration target (SSD), click next and proceed.
|
| Choose SSD as a target to migrate the OS |
4. Next, EaseUS will do the process of moving the OS to SSD. It may take about 10-20 minutes (or even more) to complete moving the OS to an SSD (depending on the specification of each computer).
5. After the process is complete, click the Finish button, and exit the EaseUS application.
6. Restart your computer and immediately log into the BIOS. Set the boot priority on your BIOS to an SSD to boot the OS using an SSD.
7. If the computer successfully boots using an SSD, you can delete your OS files in the old storage area to not meet the storage system.
That’s all a tutorial on How to Migrate OS to SSD using EaseUS Partition Master. I hope you can find this tutorial helpful. Thank you for reading.
HDD has dominated computer hardware over the decades. Given the excellent performance of SSDs, shifts from an HDD to an SSD surge. Many users are attempting to switch from an HDD to an SSD, expecting enhanced computer performance. Here is a typical case of this situation:
Why doesn’t my hard drive show New Simple Volume clickable? It’s greyed out. If I initialize the disk, I get an I/O error. — from Twitter
However, since the capacity of an HDD is much bigger than that of an SSD in general, many users determine to clone OS to SSD only instead of cloning the whole HDD to the SSD. It’s not a difficult task. This tutorial will provide detailed information on how to clone OS from HDD to SSD.
View the necessary information for cloning OS to SSD:
| ⏱️ Duration | 3-6 minutes |
| ⛑️ Preparations | Windows PC, SATA cable, SSD |
| ⛏️ Tools | Download the professional tool — EaseUS Partition Master |
| 👣 Steps |
1️⃣3 procedures to clone OS to SSD…Full steps 2️⃣2 steps to make the cloned SSD as boot drive…Full steps |
How to Clone OS to SSD with Partition Management Software
To clone OS to SSD smoothly, the better solution is to use the professional Windows partition manager — EaseUS Partition Master. Because manually copying the files from the system partition to the SSD will surely cause boot issues in the future.
EaseUS Partition Master is a tested and proven way to copy the OS to an SSD successfully. Download the software in a second and run with 3 procedures to copy the operating system to SSD.
Procedure 1. Prepare the Tools
- Download the partition tool — EaseUS Partition Master
- A SATA cable used to connect the SSD to the computer
- An SSD
Make sure you get a working cable, or you will encounter hardware recognition problems. Besides, download and install EaseUS Partition Master on the computer where the HDD is installed.
Procedure 2. Prepare the SSD
To clone OS to SSD without boot issues or other problems, you need to make the SSD meet the requirements below.
#1. Initialize the SSD
- Plug your SSD into the SATA-to-USB adapter, then plug that into your computer. If it’s a brand-new drive, you need to initialize it first.
- Right-click the Start menu, and open Disk Management. It’ll prompt you to initialize the SSD using either the GPT or MBR partition table.
#2. About the Partition Style:
Different partition styles (MBR and GPT) use different boot modes (BIOS and UEFI). To avoid the boot issue, you should keep the SSD partition style identical to the source disk before cloning.
You can check the partition style of your SSD in this way: right-click the HDD in Disk Management, choose «Properties» > click the «Volumes» tab, then you can see the partition style.
You can use EaseUS Partition Master to convert MBR to GPT or vice versa when necessary.
#3. About the Capacity:
- The SSD capacity should exceed the used space on your system and boot partition(s).
- If there is enough unallocated space in the front of the SSD, you don’t need to delete any existing partition.
- If there is enough unallocated space but not in the front of the SSD, you can use EaseUS Partition Master to move partition forward.
- If there isn’t enough unallocated space, EaseUS Partition Master will delete the existing partition(s) to ensure sufficient space for the operating system to be cloned. In such a case, you should back up your files in advance.
It’s worth emphasizing that you should ensure the SSD capacity is larger than the used space on the system and boot partition(s). Even if the capacity is equal in size, you will receive a prompt saying, «The destination disk is too small.»
Procedure 3. Clone OS to SSD with EaseUS Partition Master Step-by-Step
Note: The operation of migrating OS to SSD or HDD will delete and remove existing partitions and data on your target disk when there is not enough unallocated space on the target disk. If you saved important data there, back up them to an external hard drive in advance.
Step 1. Select «Clone» from the left menu. Select the «Migrate OS» and click «Next» to continue..

Step 2. Select the target disk you want to clone. Click «Next».
Step 3. Click «Yes» after checking the warning message. The data and partitions on the target disk will be deleted. Make sure that you’ve backed up important data in advance. If not, do it now.

Step 4. Preview the layout of your target disk. You can also click the disk layout options to customize the layout of your target disk as you want. Then click «Start» to start migrating your OS to a new disk
Step 5. When you see a confirming message, asking «If you want to start up computer from the clone target disk», tick «Adjust the order to boot from the clone target disk» and click the respective button through your demands.
- Reboot Now: it means to reboot the PC and boot OS from the new disk immediately.
- Done: it means to make the changes later.
Do you like using EaseUS Partition Master to clone OS to SSD? This tool provides a simple and quick solution. If you think it’s helpful, you can also click the social buttons and share them with others in need.
What to Do After Cloning OS to SSD?
After successful operating system migration, you need to change the boot order in BIOS and set the installed SSD as the boot drive so as to boot up the PC from the SSD.
Here are the steps to make cloned SSD as the boot drive on Windows OS:
Step 1. Restart PC and press F2/F12/Del keys to enter BIOS.
Step 2. Go to the boot option, change the boot order, setting OS to boot from the new SSD.

Step 3. Save the changes, exit BIOS, and restart your PC.
Wait patiently to let the computer boot up. After this, you can use the new SSD as your OS disk. Have any problem with this issue? Click the link below to get professional tips.
EaseUS experts are available to provide you with one-on-one manual services (24*7) and help solve system or disk cloning startup issues. Our experts will offer you free evaluation services and efficiently diagnose and resolve disk cloning or system disk boot problems using their decades of experiences.
- 1. Target disk becomes unbootable or SSD won’t boot after clone.
- 2. Target disk is unable to boot after performing customized partition operations.
- 3. To seamlessly clone OS disk to new drive and boot PC without any issues.
FAQs You May Have About Cloning OS to SSD
Based on the feedback given by our Customer Service Department, you may have the following questions after cloning the OS to an SSD.
1. How to clone only Windows to SSD? How do I clone just my OS to SSD?
The «Migrate OS» feature in EaseUS Partition Master will help you efficiently transfer OS from HDD to SSD by cloning all the content on the system and boot partition(s). Thus, if you have installed programs or saved files on these partitions, they will also be copied to the SSD.
For your information, both system partition and boot partition are necessary for Windows to boot properly. They could be the same partition or two different partitions.
2. Why can’t I boot my computer from the SSD?
Generally, if you followed the preparations strictly, there will be no boot issues. Yet, there are expectations. Various reasons may cause boot failure from the SSD. To solve the problem effectively, you are recommended to contact our support team (techsupport@easeus.com) for remote assistance.
3. The destination disk is too small
When there is insufficient disk space on the SSD, you will receive the message saying the destination disk is too small. You have two solutions in such a case: transfer some applications and files to another drive or switch to a larger SSD.
4. Some errors are occurring while reading/writing sector on the disk
- If you see a message indicating some errors occurring while reading/writing sector on the disk, there are highly likely bad sectors on the source/target disk.
To check for bad sectors, select the disk or partition and choose «More» > «Surface Test» in EaseUS Partition Master.
- If there are bad sectors on the disk, remove bad sectors first and then clone the OS to the SSD.
- If you fail to repair these bad sectors, you can use EaseUS Disk Copy to clone the HDD to the SSD. Disk Copy will skip these bad sectors while cloning.
5. Can I use a free tool to clone OS to SSD?
Sure, you can. You can try to search the «best free SSD cloning software», «clone Windows to SSD free», or «Clone HDD to SSD for free» to get a reliable OS cloning tool and follow a respective guide to efficiently clone OS to a new SSD.
The Bottom Line
It could be simple to clone OS from HDD to SSD with the help of third-party software. But do make sure the SSD meets the requirements of a successful cloning process. If unexpected errors occur, don’t worry. The most frequent problems that may arise and the solutions to them are also provided. If you encounter any issues you can’t solve, you are always welcome to contact our support team via email or live chat for help.