
Jun. 23, 2022 / Updated by
Bessie Shaw to
Gaming Solutions
Many gamers may encounter micro stuttering when they are playing games like Fortnite, Dauntless and Rainbow Six Siege. Micro stuttering is a quality defect which manifests as irregular delays between GPU frames. It is associated with the frame rate (frames per second or FPS), hardware or driver corruption and graphics performance. If you also encounter micro stuttering in games on Windows 10, here is a guide telling you how to fix it.
According to the causes of game’s micro stuttering, several methods are described below. Read on to learn them.
Method 1. Disable Dynamic Tick to Troubleshoot Micro Stuttering Issue
Dynamic Tick, a system feature which allows Windows stopping the system timer to save power when nothing is running, is reported to affect the gaming experience. To fix micro stuttering in games on Windows 10, the first method you can try is to disable the Dynamic Tick. Take the following steps:
Step 1. Right click the Start button and choose Windows PowerShell (Admin) to open the Windows PowerShell as administrator.
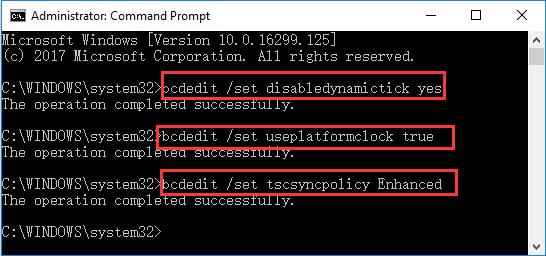
Step 2. Type “bcdedit /set disabledynamictick yes” into the Windows PowerShell and hit the Enter button to run it. Then the Dynamic Tick will be disabled.

Step 3. To resolve the micro stuttering issue completely, you can also run the two commands below:
-
bcdedit /set useplatformclock true
-
bcdedit /set tscsyncpolicy Enhanced

Step 4. Reboot your computer to have the change take effect.
Method 2. Update Graphics Driver/Video Card Driver to Fix the Issue
Outdated graphics driver/video card driver may also cause micro stuttering in games. Therefore, updating graphics driver/video card driver is another workaround to troubleshoot the micro stuttering issue.
Refer to the articles below:
-
2 Ways to Update Outdated Drivers in Windows 10
-
Free Download/Update Graphics Driver, Video Card Driver, Monitor Driver, Display Card Driver
Updating drivers manually may cost much time, so it is highly recommended to pick a reliable free driver update utility like Driver Talent. It can automatically update your drivers to the latest or best-matched version quickly.
Click the download button below to get Driver Talent and follow the steps to resolve micro stuttering issue immediately.
Download Now
Step 1. Start Driver Talent and click the Scan button to perform a full scan on your computer.
Step 2. After the full scan, the drivers which need to be repaired or updated will be listed. Find the graphics driver/video card driver in the driver list and click “Update” to update them.

Step 3. Restart your computer to have the update take effect.
Method 3. End Explorer.exe Task to Resolve Micro Stuttering in Games
Explorer.exe is a Microsoft Windows system process that provides the graphical interface you use to interact with most of programs. According to the research, Explorer.exe is also one of the culprits to cause micro stuttering when playing games. So you can also try to end Explorer.exe task to fix the issue. Do as follows:
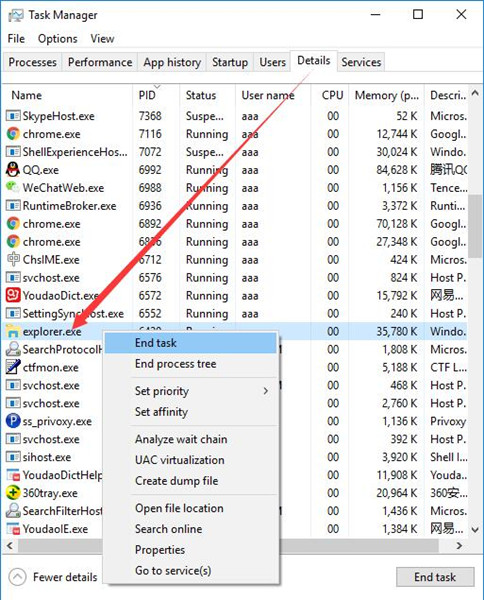
Step 1. Right click the Start button and choose Task Manager to open the Task Manager.
Step 2. Go to the Details section and find explorer.exe.
Step 3. Right click the explorer.exe and select End task.

Method 4. Run Hardware and Devices Troubleshooter to Fix the Issue
As we know, hardware corruption can cause many computer issues, including the micro stuttering issue in games. Run Hardware and Devices troubleshooter to repair hardware issues, then the micro stuttering issue may also be troubleshot. The steps are as follows.
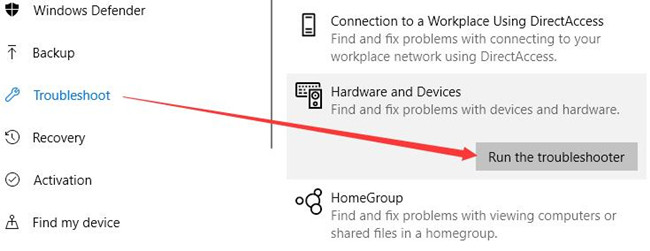
Step 1. Type “troubleshoot” in the search bar and choose Troubleshoot among the search result.
Step 2. Scroll down to find Hardware and Devices and click it, then select Run the troubleshooter.

Hope the micro stuttering issue in games on Windows 10 could be fixed after you try the above methods. Welcome to leave comments below if you need other help. More solutions to other stuttering issues can be accessed below:
-
How to Fix Video Stuttering after Windows 10 Upgrade
-
Fix: Windows 10 Mouse Lagging/Freezing/Stuttering
Recommended Download
|
ExplorerMax |
Driver Talent for Network Card | |||
| Smart and advanced file explorer tool for Windows platforms | Download & Install Network Drivers without Internet Connection | |||
|
30-day Free Trial |
Free Download |
Dynamic Ticks are a feature that lets windows stop the system timer when nothing is happening in order to conserve power.
Is it good to disable dynamic tick?
Turning it off does affect mouse latency, but on systems newer than 1803 with useplatformtick yes causes a large dpc delay and jitter lag. All you have to do is disable the dynamic tick, deletevalue clock, and test the useplatformtick yes/no.
How do I enable dynamic ticks?
HOW DO I TURN DYNAMIC TICK BACK ON?
- Run commandprompt as administrator.
- Type “bcdedit /deletevalue disabledynamictick” and hit enter.
- Type “bcdedit /deletevalue useplatformclock” and hit enter.
- Type “bcdedit /deletevalue tscsyncpolicy” and hit enter.
- Reboot your system.
What is dynamic tick in Windows?
Dynamic tick is a power-saving feature enabled on laptops that helps them preserve battery life. If you are aiming for the best possible performance and inputs such a feature being enabled is counterproductive.
What is ticks in CPU?
A tick is measured in milliseconds; its initial length is determined by the clock rate of your processor: If your CPU is 40 MHz or better, a tick is 1 ms. For slower processors, a tick represents 10 ms.
What is the purpose of Dynamic Tick in Windows?
What is the system tick time?
The System Tick Time (SysTick) generates interrupt requests on a regular basis. This allows an OS to carry out context switching to support multiple tasking.
What happens if you disable high precision event timer?
Disabling HPET gave me around 10%-20% FPS Boost. Input also felt better, because I got far less Stutters and the Game was smoother. Enabling HPET seemed to have a negative impact on my CPU Utilization, while my GPU Utilization got lower, which is bad.
Does disabling HPET increase FPS?
However, although HPET can increase the performance of your PC, it triggers FPS loss and latency & freezes in games. If you encounter low FPS or stuttering when gaming, you can try to disable HPET to get better game performance.
How do I disable dynamic tick command?
Disable Dynamic Tick
- Run Command Prompt as administrator.
- Copy the Disable command between the arrows.
- Paste the value into Command Prompt and hit Enter/Return.
- Quit out of Command Prompt.
- Restart your computer.
How do I turn off synthetic timer?
# Method 1 (Using Device Manager)
- From search, type Device Manager and press Enter to open settings.
- Locate System devices.
- Right click on High Precision Event Timer and select Disable to stop the HPET service.
What is synthetic timer?
A synthetic timer sends a message to a specified SynIC SINTx (synthetic interrupt source) upon expiration, or asserts an interrupt, depending on how it is configured. The hypervisor guarantees that a timer expiration signal will never be delivered before the expiration time.
What are the benefits of HPET?
The HPET can produce periodic interrupts at a much higher resolution than the RTC and is often used to synchronize multimedia streams, providing smooth playback and reducing the need to use other timestamp calculations such as an x86-based CPU’s RDTSC instruction.
What is BCD edit?
Boot Configuration Data (BCD) files provide a store that is used to describe boot applications and boot application settings. BCDEdit is a command-line tool for managing BCD. It can be used for a variety of purposes, including creating new stores, modifying existing stores, and adding boot menu options.
How do I stop Tickspeed?
Random ticks can also be switched off completely by simply setting a 0 instead of the default setting of 3. However, this only applies to the Java version, in the Bedrock version the default is already 1.
How do I set my random tick speed back to normal?
The only way to change the tick speed in minecraft is by using the command “/gamerule randomTickSpeed”. 0 disables random ticks all together, while higher numbers increase random ticks. This is useful if you want plants to grow fast, but as a consequence some plants might decay faster if the count is set too high.
What raises FPS?
Increase RAM
If the RAM is lower, such as 4GB or less, it can bottleneck the processor’s performance graphics and other components. By upgrading the RAM to 8GB, the FPS will improve for most games. Few games require as much as 16GB so consider that while upgrading.
Does limiting FPS make it more stable?
Though it may seem counterintuitive, limiting FPS can provide numerous advantages for your gaming PC, laptop, or custom PC. These benefits include reduced power consumption and heat generation, optimized system resource allocation, and enhanced stability and performance.
Should I disable HPET or enable reddit?
Disabling HPET is generally regarded as safe, and should not impact system performance in any way. However if you notice something wrong after changing it, it’s simple and quick to re-enable – do your own research if your skeptical. But for me, it was 100% worth it given the impact on my loading times.
Does HPET increase FPS?
You can sense around 0.1 to 0.15ms delay with HPET on while turning it off can gain you around 3-4 FPS. This may not seem much for day to day use. But with gaming, imagine the FPS drop for every action piling up; this leads to micro-stuttering that is observed during gameplay.
How do I know if my HPET is on or off?
Firstly to check if u have HPET enabled or disabled in windows: 1) – Run command prompt as Administrator and type: “bcdedit /enum” without quotes and press enter. 2) – You will see a list show up – look for “useplatformclock”.
How many seconds is 1 tick?
A single tick represents one hundred nanoseconds or one ten-millionth of a second. There are 10,000 ticks in a millisecond (see TicksPerMillisecond) and 10 million ticks in a second.
How many ticks in 24 hours?
A little more insightful than we were the day before… 24 hours. 1,440 minutes. 86,400 ticks on that clock called LIFE.
How do I change the tick time?
Speed in Minecraft is controlled by a measurement known as ticks. The command we input increases how often the ticks happen and therefore increases the speed. The command to type in is /gamerule randomTickSpeed #.
What is the forbidden code in BCD?
You should note that the codes 1010 (1010) to 1111 (1510) are forbidden in BCD because each single decimal digit must be represented by a four bit BCD code. Thus 1210 is not 1100 as it would be natural binary but 0001 0010bcd.
Here’s another post about disabling a Windows feature. The first question, why would you want to? Dynamic Ticks are a feature that lets windows stop the system timer when nothing is happening in order to conserve power. This is nice for portable and battery systems but can be a problem for desktops, especially since the tickless mode has been known to cause strange issues on some systems; especially when gaming or engaged in other media related tasks.
Fortunately, disabling Dynamic Ticks is a one step process. Open up an instance of Power Shell as an administrator and type in the following…
bcdedit /set disabledynamictick yes
Then reboot. This setting is permanent until disabled with it’s opposite, simply replace “yes” with “no”. This feature doesn’t cause issues on every system, but it does cause issues on enough machines that it’s worth keeping the fix in mind.
Upgrade GPU Drivers and Disable Dynamic Ticking.
This is an addendum to the original article on this subject – What Is DPC Latency, How To Fix It. For the full skinny on DPC Latency, you should really read that article before continuing with this one.
This will turn out to be an ongoing set of articles supporting the original. Each will offer one or more possible solutions for DPC latency problems.
Before making changes to your computer, it is strongly recommended that you make a full backup. That way, if things go south, you’ll have a way to get back home.
Read this Simple Guide To Creating & Restoring System Images – Part 1 to learn how.
Update Your GPU Drivers
Before I tell you where to get your drivers, let’s get one thing very clear. Proper installation of graphics drivers requires that you uninstall the old driver before installing the new one. Faulty graphics drivers can be the source for all sorts of hideous computer problems and it is important that you install a fresh copy. It must not be possibly corrupted by a previous installation. Heed this advice.
AMD
You can get the latest and greatest AMD drivers for your graphics cards and chips at this AMD Support page. Scroll down the page a bit and you will see this:
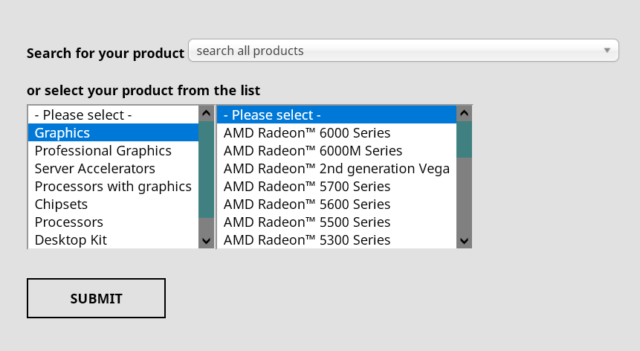
Pick the items that match your hardware. When you’re done, click the Submit button.
Nvidia
You can get the latest and greatest Nvidia drivers for your graphics cards and chips at this Nvidia Support page. Scroll down the page a bit and you will see this:

Pick the items that match your hardware. When you’re done, click the Start Search button.
More on AMD
I don’t think I’ve ever owned an Nvidia card so I won’t be of much help there. AMD’s download will be a healthy EXE file. I usually run it as an administrator. I also choose a temporary folder to store the considerable number of files it generates. That way, I can delete them afterward and not have them taking up space on my system drive. They are not needed after the drivers are updated and so become dead weight.
In fact, you don’t need that huge file you downloaded, either.
Disable Dynamic Ticking, HPET, Platform Clock
Note: These instructions apply to and have been tested on Windows 10. I believe they can be used on Windows 8.1 and newer but I have no way to test that.
Dynamic Ticking is another power-saving feature. These features can sometimes cause hiccups when you are running your computer.
HPET is a timer the computer uses. If it is enabled, then most likely Windows is using it, too. That’s where Platform Clock comes in.
Command Prompt
The most straightforward way to open an Administrative Command Prompt is to do this:
- Open the Windows Start Menu
- Type cmd
- In the right-hand panel, choose Run as administrator
Dynamic Ticking
Open an Administrative Command Prompt.
To disable Dynamic Ticking, run the command bcdedit /set disabledynamictick yes
To enable Dynamic Ticking, run the command bcdedit /set disabledynamictick no
Reboot your computer to apply the changes.
Platform Clock
Open an Administrative Command Prompt.
To enable the Platform Clock, run the command bcdedit /set useplatformclock true
To disable the Platform Clock, run the command bcdedit /deletevalue useplatformclock
Reboot your computer to apply the changes.
HPET (High Precision Event Timer)
The HPET timer setting will be located in your BIOS/UEFI. Every motherboard is different and the settings are all over the place. Once you find it, disable it. It is now time to break out your computer user manual so you know where to look for it.
Note: I read somewhere that the HPET setting no longer exists on Asus motherboards. Maybe that’s true and I do know I can’t find it on my Asus TUF Gaming X570 board.
Testing The Results
The simplest form of testing is to start using your computer as you normally would. Also, you can run LatencyMon again to see if the results have improved. LatencyMon was discussed in full in the What Is DPC Latency, How To Fix It article.
If the lagging/stuttering problem has gone away, then you’re done. If not, then there are more things you can try and we will be discussing those options in future articles. Stay tuned…
As always, if you have any helpful suggestions, comments or questions, please share them with us,
Richard
—
For gamers, it is extremely annoying that when you are playing games, such as Rainbow Six Siege, Counter Strike Global Offensive, and BeamNG drive, your PC gets micro stuttering or lagging on Windows 10 or Windows 11. And if all your game stuttering, see here: all games stuttering with FPS drops after creators update.
To walk you through this game frame skipping problem on Windows 10 or Windows 11, read on to learn more.
Contents:
What is Micro Stuttering in Games?
What Causes Micro Stuttering in All Games?
6 Ways to Fix Micro Stuttering in Game
What is Micro Stuttering in Games?
Micro stuttering (a quality defect) means the irregular delays between GPU frames, which causes the frame rate of the longest delay to be much lower than that of benchmarking applications.
So when you are playing games, if your PC is at the low frame rate, the gameplay performance on Windows 11/10 can be largely degraded. Thus lead to micro stuttering in games.
Tips: What is the Frame and Frame Rate?
As you can see from the analysis above, the frame rate is significant in games, so what is frame and frame rate on Windows system?
Frames are the still images that compose the moving picture. Accordingly, the frame rate (frames per seconds or FPS) is the frequency at which the frames or still images display on your PC.
What Causes Micro Stuttering in All Games?
If your PC ran into games micro stuttering or lagging on Windows 10, it denotes your bad gaming actions.
Commonly, Games performance and stability are closely related to several factors. The first is what we have discussed – the frame rate.
The second one is the graphics performance. As for this part, SLI and Crossfire are indispensable, for they are used to allow the video card to be connected in parallel so as to improve the graphics performance on Windows 10.
The third factor is the hardware corruption, you are required to check it if the micro stuttering or freezing happens.
How to Fix the Micro Stuttering in Windows 11/10 Games?
Depending on the causes of this gaming issue, you better take various and concert measures to fix it.
And on another hand, updating graphics and audio card drivers are necessary in order to fix the micro stuttering.
Solutions:
- 1: Disable Dynamic Tick
- 2: Update Graphics and Audio Card drivers
- 3: End Explorer.exe Task
- 4: Plug out External Devices
- 5: Check Hardware
- 6: Run Hardware and Devices Troubleshooter
Solution 1: Disable Dynamic Tick
Dynamic tick is a system feature that allows Windows 10 stops timer when nothing is running in order to save power.
It has long been reported that power supply issue can affect gaming, now to avoid it causing micro stuttering on Windows 10, you may as well try to disable it.
1. Click Start and type in Command Prompt.
2. Right click the best-matched result to Run as administrator.
3. Input follow command at the Command Prompt and hit Enter to run it.
bcdedit /set disabledynamictick yes
Or to completely fix this games micro stuttering problem, you can choose to execute the two commands below as well.
bcdedit /set useplatformclock true
bcdedit /set tscsyncpolicy Enhanced
4. Restart your PC.
When you play games again on Windows 10, you will not meet with this micro stuttering in all games issue, for you have done anything to fix the power issues.
Solution 2: Update Graphics and Audio Card drivers
To enjoy games, you need to be equipped with the latest drivers for related devices, especially the graphics card and video card. Only in this way can you escape the micro stuttering or freezing in games on Windows 10.
1. Go to Device Manager.
2. Expand Display adapters and right click the graphics driver to Update driver.
Here apart from updating the graphics card driver, you are supposed to update the audio card driver in the same way.
3. Choose Search automatically for updated driver software.
Then Windows 10 would be allowed to search online for up-to-date video or audio card drivers for you.
In this process, to date, if you have not downloaded the updated drivers for Windows 10 in device manager, Driver Booster can compensate for it. Driver Booster, an automatically drivers download and update tool, can help users to get the latest graphic driver, audio driver, USB driver, mouse driver etc with one click. And as the best driver scanner, it can detect the most outdated and missing drivers for your computer.
Besides the driver function, it supports to download and update the game components such as Microsoft Visual C++ Redistributable, Microsoft XNA Framework Redistributable, OpenAL, etc.
1. Download, install and run Driver Booster on your computer.
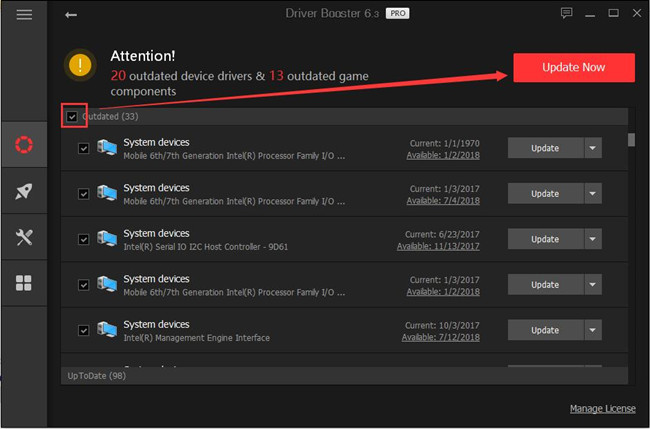
2. Click Scan. After that, Driver Booster will scan all the drivers including graphic and audio driver. Of course, if there are game components missing or outdated, it will be detected.

3. Click Update Now. with this click, all the outdated, missing drivers and game components will be updated to the latest version.
With the newest display adapter driver and audio drivers, you may have properly solved the game micro stuttering or lagging or freezing on Windows 10.
Related: Screen Tearing on Games and Videos on Windows 11/10
Solution 3: End Explorer.exe Task
Unlike other programs or software, explorers are still running in the background even when you have turned them off on Windows 10.
Under this circumstance, your PC can easily come across the micro stuttering on Windows 10 when you are playing some games.
Therefore, you are recommended to end task for Explorer.exe in task manager.
1. Right click Start to select Task Manager from the list.
2. Navigate to Details tab, scroll down to find out explorer.exe and right click it to End task.
3. Reboot your PC to take effect.
Now without the interruption of various explorers, your games can make full use of Windows 10. Consequently, your PC will no longer in micro stuttering in games.
Now that you have exerted efforts to resolve the game’s micro stuttering issue in regard to software or drivers, let’s get down to fix the hardware problems causing this gaming troubles on Windows 10.
Solution 4: Plug out External Devices
Sometimes, if your computer has plugged in too many external devices, such as USB webcam, USB flash drive, and card reader, you are able to stumble on the micro stuttering issues in games on Windows 10.

To figure out whether your stuttering or freezing game is caused by the external device, you are to unplug them except the mouse and keyboard.
Solution 5: Check Hardware
When you are confusing how to fix this all games micro stuttering problem and have tried some ways, but to no avail, hardware checking is also unavoidable for Windows 10 users.
Every gamer knows for sure that playing games on Windows 10 can cause overheating issue easily. Hence, you are requested to check if your PC has been ventilated.
Just to make sure if there is anything obstructing your computer from ventilating. If any, remove it.
Here you can also check system requirement for your motherboard. To finish that, you should know your motherboard serial number at first.
Solution 6: Run Hardware and Devices Troubleshooter
To exclude the risk that the hardware leads to micro stuttering in games, you can use the inbox tool to troubleshoot this issue with Windows 11/10.
Go to Start > Settings > Update & Security > Troubleshoot > Hardware and Devices > Run the troubleshooter.
After Windows 10 searched for the problems, if possible, it would also fix it for you. Maybe after for a while, you will not stutters in games.
Regarding this post, you can quickly find solutions towards games micro stuttering issue on Windows 10.
If there are any other stuttering problems on your computer, such as Realtek audio stuttering, or you need to fix NVIDIA micro stuttering on Windows 10, you are enabled to refer to these methods to see if they work well.
More Articles:
16 Ways to Fix Steam Disk Write Error on Windows 11/10
Fix Xbox 360 Wireless Controller Not Working on Windows 11/10
Fixed: PVP.net Patcher Kernel Stopped Working
Brian Peng
Brian Peng is a PC technician and network engineer with over 13 years of IT experience. He has worked in the IT industry for a long time, providing IT support and network service support for various companies. Currently, he has written over 1000 articles about computers, games, and mobile.