
Все способы:
- Способ 1: Настройки DirectX
- Способ 2: Проверка системных файлов
- Способ 3: Переустановка Microsoft Visual C++
- Способ 4: Переустановка драйвера видеокарты
- Способ 5: Отключение SLI и Surround в NVIDIA
- Способ 6: Откат видеодрайвера
- Вопросы и ответы: 0
Основной причиной ошибки dxgkrnl.sys являются проблемы с ядром DirectX и драйвером видеокарты, но она также может быть вызвана повреждением реестра и системных файлов.
Способ 1: Настройки DirectX
Так как ошибка синего экрана dxgkrnl.sys нередко указывает на проблемы с DirectX, первым делом стоит проверить работу этого компонента.
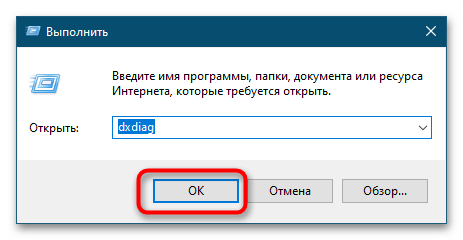
- Откройте «Средство диагностики DirectX», для чего выполните команду
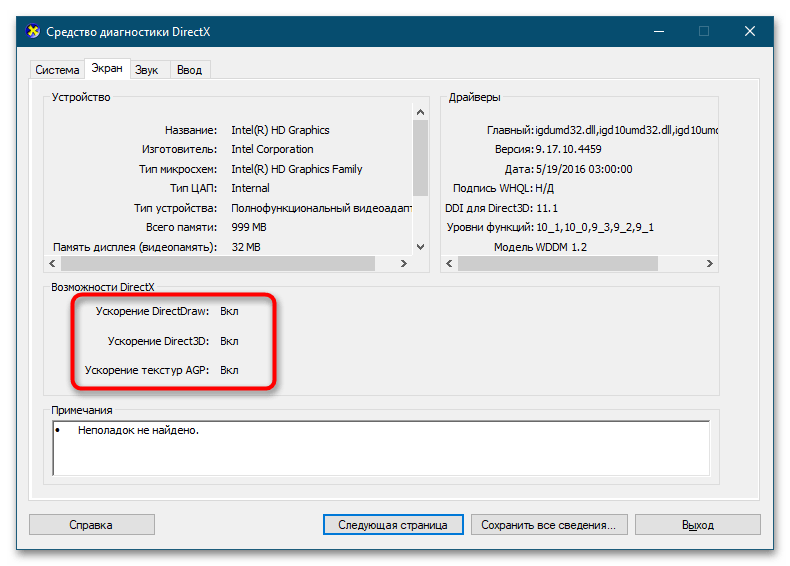
dxdiagв вызванном нажатием клавиш Win + R диалоговом окошке. - Переключитесь на вкладку «Экран» и убедитесь, что функции «Ускорение DirectDraw», «Ускорение Direct3D» и «Ускорение текстур AGP» включены.
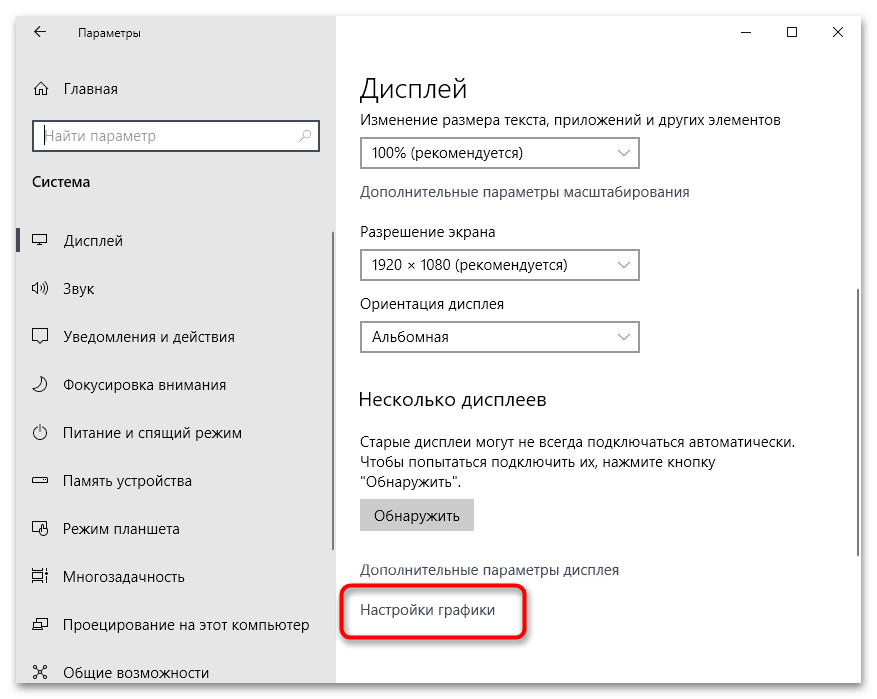
- В противном случае откройте приложение «Параметры», перейдите в раздел «Дисплей» и кликните по ссылке «Настройки графики».
- Установите переключатель «Планирование графического процессора с аппаратным ускорением» в положение «Вкл.».
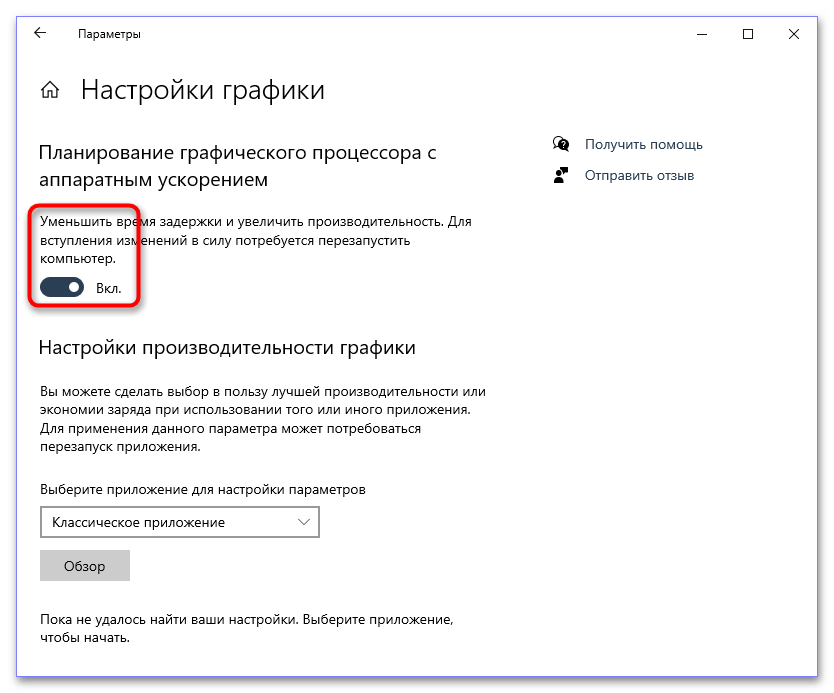
Чтобы настройки вступили в силу, надо будет перезагрузить компьютер.
Способ 2: Проверка системных файлов
Исключите повреждение системных файлов, воспользовавшись встроенной в Windows 10 утилитой «SFC». Если повреждения будут найдены, утилита исправит их, заменив поврежденные файлы оригинальными файлами из хранилища компонентов.
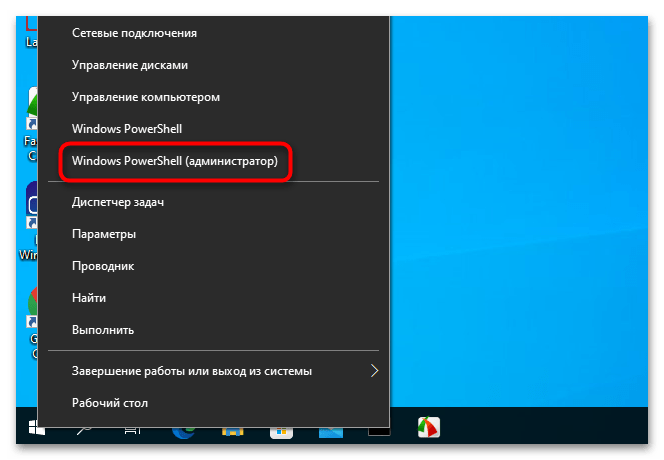
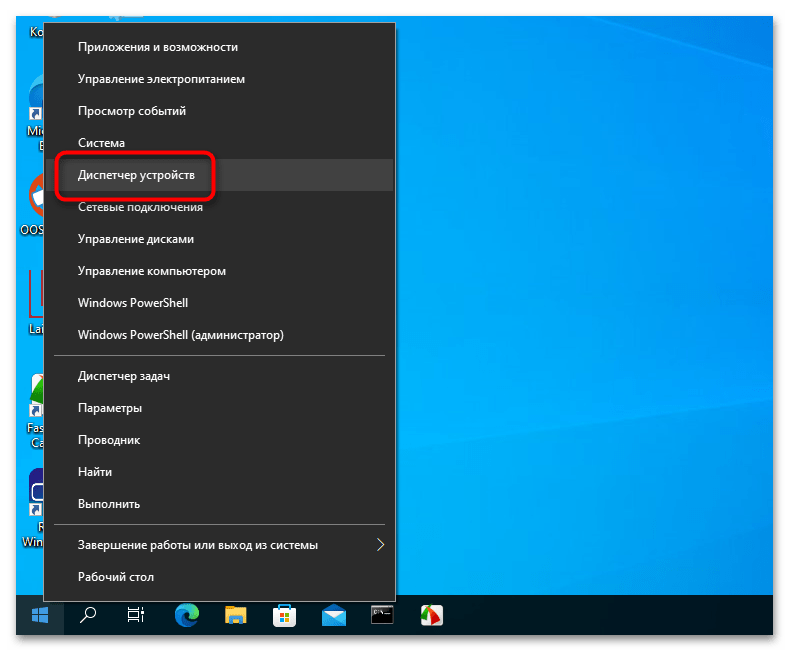
- Запустите «PowerShell» из контекстного меню кнопки «Пуск» или другим известным вам способом.
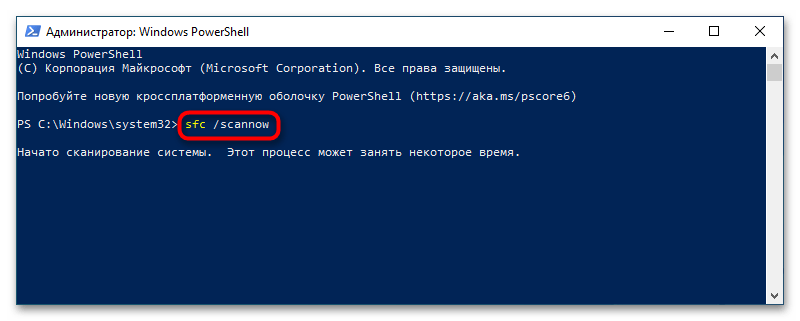
- Выполните в запустившейся консоли команду
sfc /scannowи дождитесь результатов сканирования.
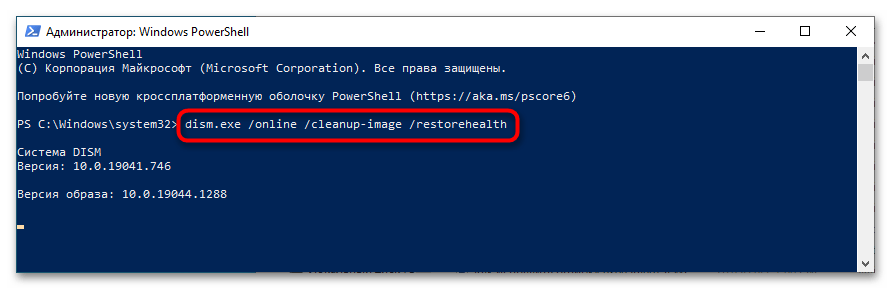
Если указанная команда вернет ошибку, потребуется восстановление самого хранилища компонентов. Для этого тут же в консоли выполните команду Dism /Online /Cleanup-Image /RestoreHealth, после чего повторите сканирование средствами «SFC».
Способ 3: Переустановка Microsoft Visual C++
Столкнувшиеся с неполадкой пользователи отмечали, что в ряде случаев им удавалось устранить ошибку путем переустановки распространяемых компонентов Visual C++, которые, по всей видимости, были повреждены.
Скачать Microsoft Visual C++
- Загрузите с официального сайта Microsoft последний пакет Visual C++, включающий в себя версии библиотек 2015, 2017, 2019 и 2022. Рекомендуем скачивать пакеты обеих разрядностей: и 32-битный, и 64-битный.
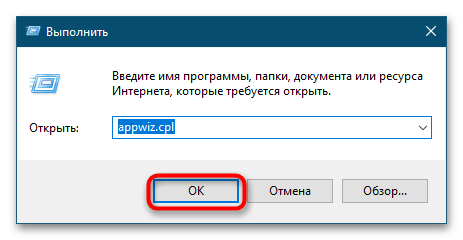
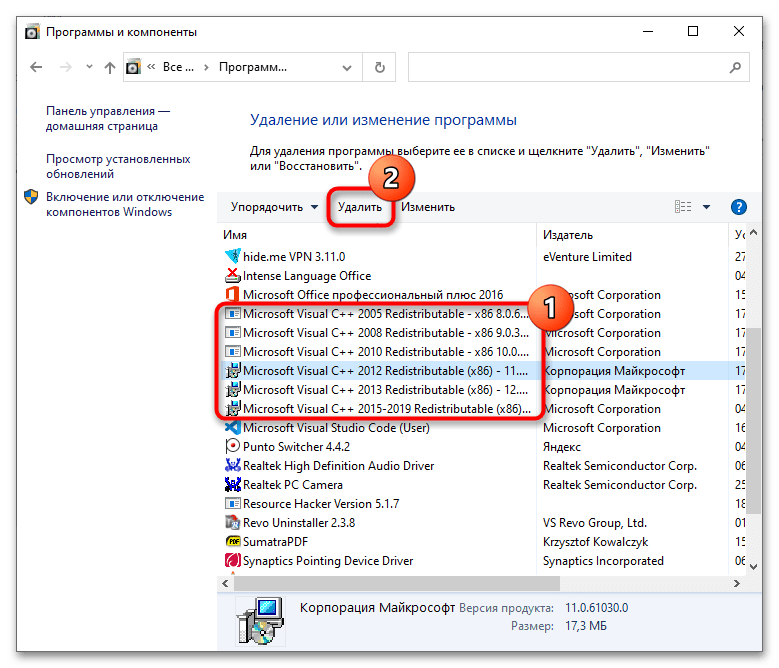
- Откройте диалоговое окошко «Выполнить» нажатием комбинации клавиш Win + R, введите в него команду
appwiz.cplи нажмите клавишу ввода. Это запустит апплет «Программы и компоненты». - Удалите все найденные в списке компоненты Visual C++.
- Запустите исполняемый файл загруженного ранее компонента и следуйте подсказкам мастера.

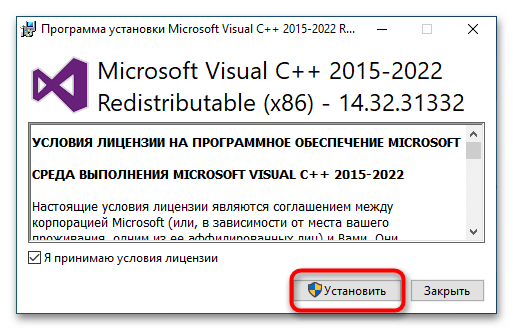
По завершении установки нужно будет перезагрузить компьютер.
Способ 4: Переустановка драйвера видеокарты
Наиболее эффективным способом исправления ошибки dxgkrnl.sys на синем экране является переустановка/обновление драйвера графической карты. Данная процедура включает в себя три основных шага:
- поиск и скачивание драйвера с официального сайта производителя видеокарты;
- удаление видеодрайвера с компьютера;
- установка скачанной актуальной версии драйвера.
Процедура переустановки драйвера в Windows 10 может немного отличаться, так как зависит она от типа устройства. Также для удаления и поиска драйвера могут быть использованы как встроенные, так и сторонние инструменты. Ознакомиться с этими решениями вы можете по ссылкам ниже.
Подробнее:
Обновление драйвера видеокарты в Windows 10
Программы для обновления / удаления драйверов
Способ 5: Отключение SLI и Surround в NVIDIA
Если у вас видеокарта NVIDIA, попробуйте отключить в ее настройках технологию SLI, позволяющую использовать несколько графических процессоров для улучшения рендеринга кадров.
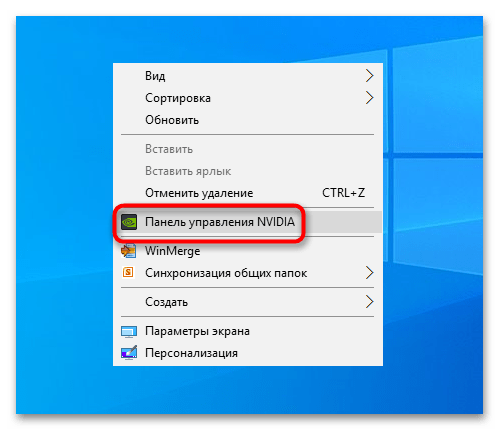
- Кликните по рабочему столу правой кнопкой мыши и вызовите через контекстное меню «Панель управления NVIDIA».
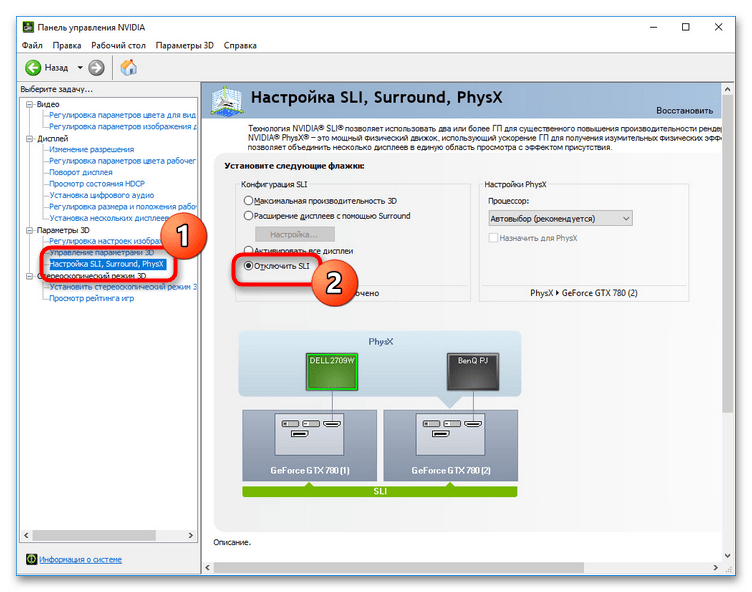
- В меню слева выберите опцию «Параметры 3D» → «Настройка SLI, Surround, PsyhsX». Справа активируйте радиокнопку «Отключить SLI» и перезагрузите компьютер.
Способ 6: Откат видеодрайвера
Если ошибка стала беспокоить после обновления видеодрайвера, выполните его откат к предыдущей версии.
- Запустите «Диспетчер устройств» из контекстного меню кнопки «Пуск».
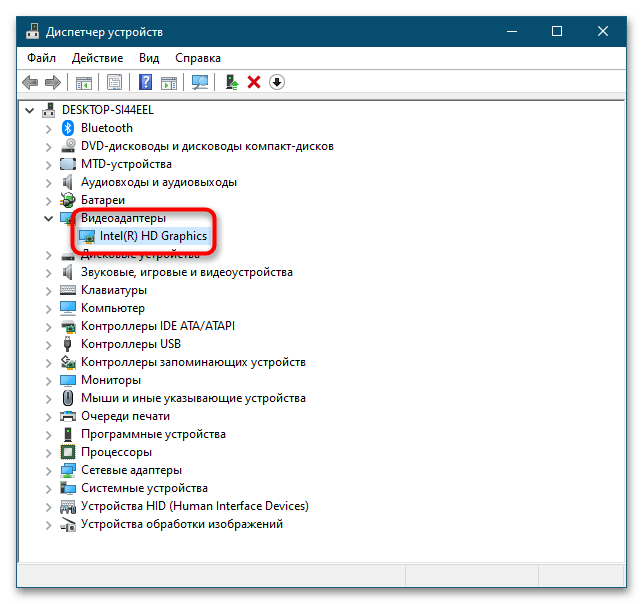
- Разверните пункт «Видеоадаптеры» и откройте свойства вашего видеоустройства двойным по нему кликом.
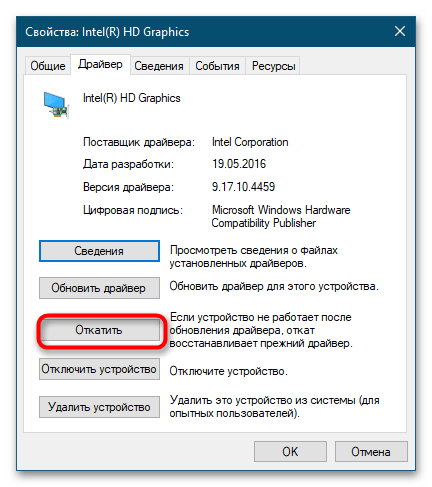
- В открывшемся окошке свойств переключитесь на вкладку «Драйвер» и нажмите кнопку «Откатить».
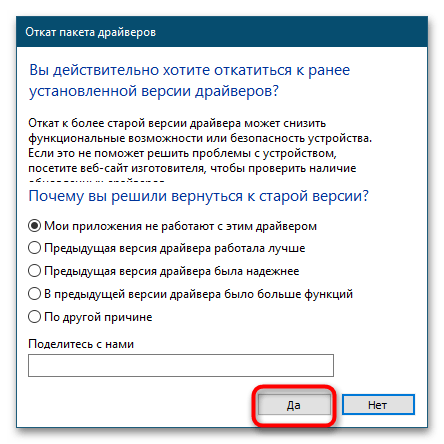
- Выберите любую причину для отката, нажмите «Да» и проследуйте указаниям мастера.
По завершении процедуры отката потребуется перезагрузка компьютера. Если устранить неполадку не удается, попробуйте сначала откатить систему к ближайшей точке восстановления, а если это не поможет, выполните сброс системы к заводскому состоянию.
Подробнее:
Откат к точке восстановления в Windows 10
Восстановление Windows 10 к исходному состоянию
Наша группа в TelegramПолезные советы и помощь
Windows PCs are quite prone to various BSOD (Blue Screen of Death) errors. The BSOD errors appear with hundreds of different stop codes. One of the most common BSOD errors Windows 10/11 users face is dxgkrnl.sys. There could be several causes for this error, but it is mainly caused due to a graphics driver-related issue. Luckily, it is possible to fix the dxgkrnl.sys error easily. This article lists all the working fixes to eliminate the error.
What Causes the dxgkrnl.sys Error?
The most common cause of dxgkrnl.sys error is a problematic graphics card driver. Some other reasons are also listed below.
- Outdated or corrupt drivers
- Outdated Windows 10
- Problematic software
- Hardware problems
- Memory Leak in the VRAM
Fix dxgkrnl.sys BSOD Error in Windows 10/11
There are several solutions that you can try to fix this error. We will show you some of the most effective ones below.
1. Update Windows
Microsoft keeps fixing potential bugs and issues with Windows updates. Not installing these updates may lead to errors like dxgkrnl.sys. Below are the steps to check for updates on your Windows 10 PC.
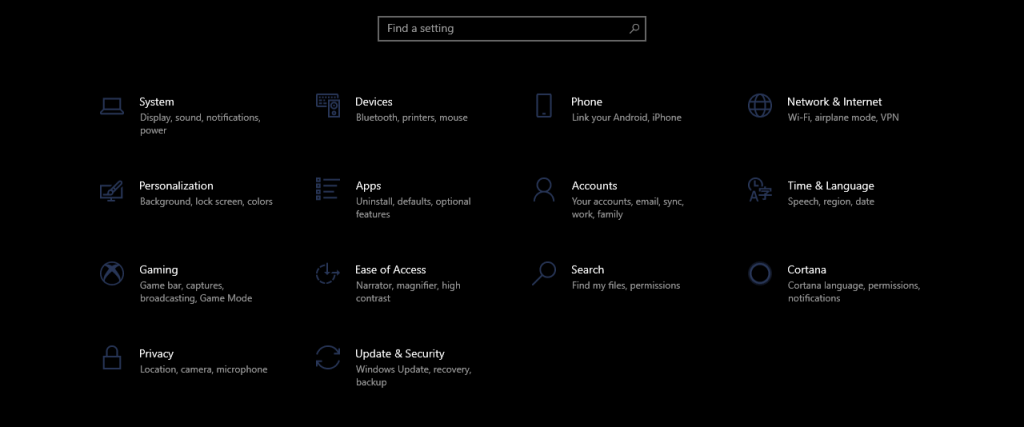
a. Press the Windows + I key to open Settings.
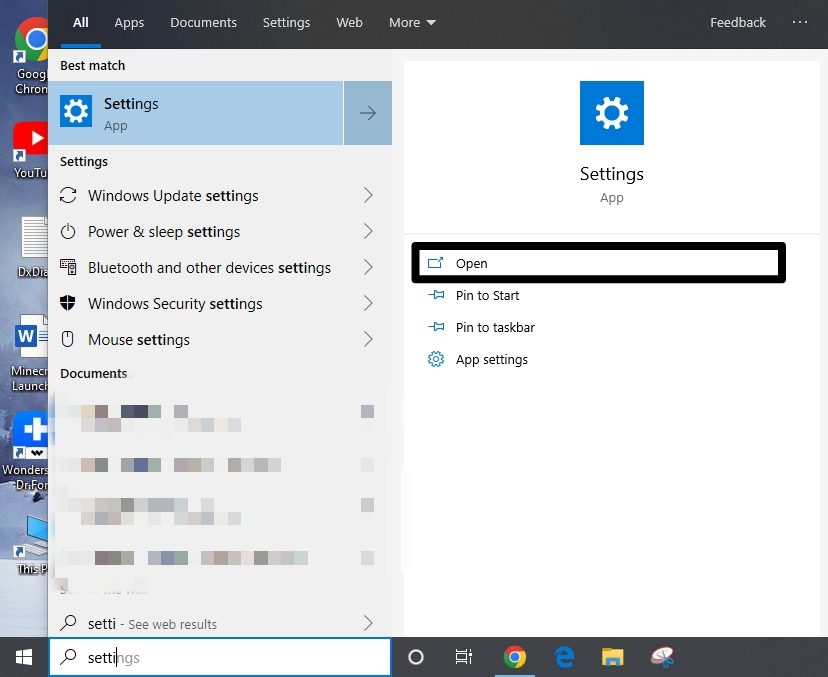
b. In Settings, click on Update & Security.
c. Click on Check for updates.
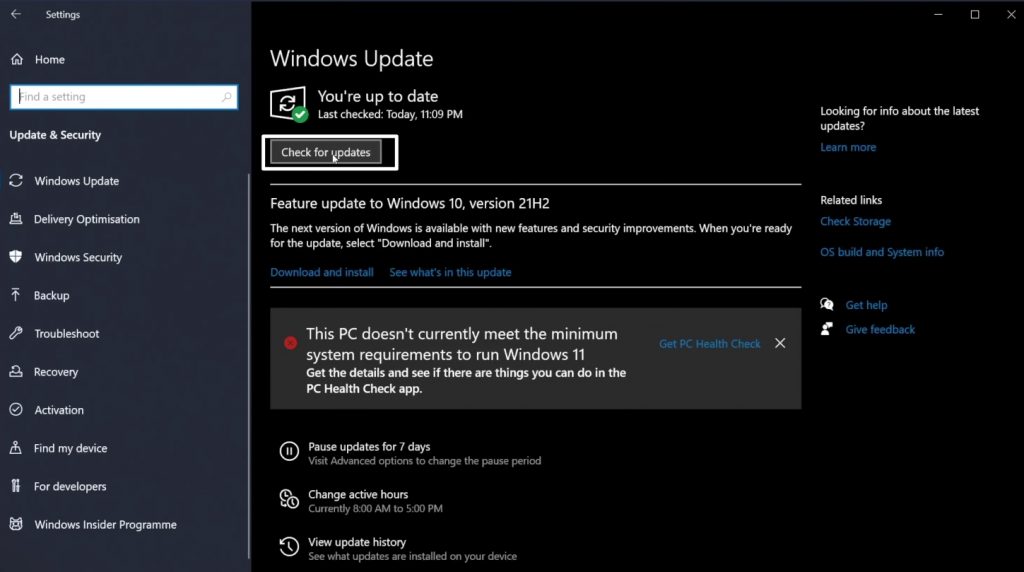
d. If a Windows update is available, download and install it.
2. Disable SLI
With SLI, you can use two graphics cards on your Windows 10 PC and get better graphics performance. However, as good as it may sound, reports suggest that SLI often causes the dxgkrnl.sys error. SLI may cause a potential memory leak in the VRAM (GPU memory), causing the error. You can disable SLI with the help of the below steps.
a. Open NVIDIA Control Panel and go to 3D Settings.
b. Click on Set SLI Configuration or Configure SLI, Surround, PhysX option.
c. Select Disable SLI under the Set the following section.
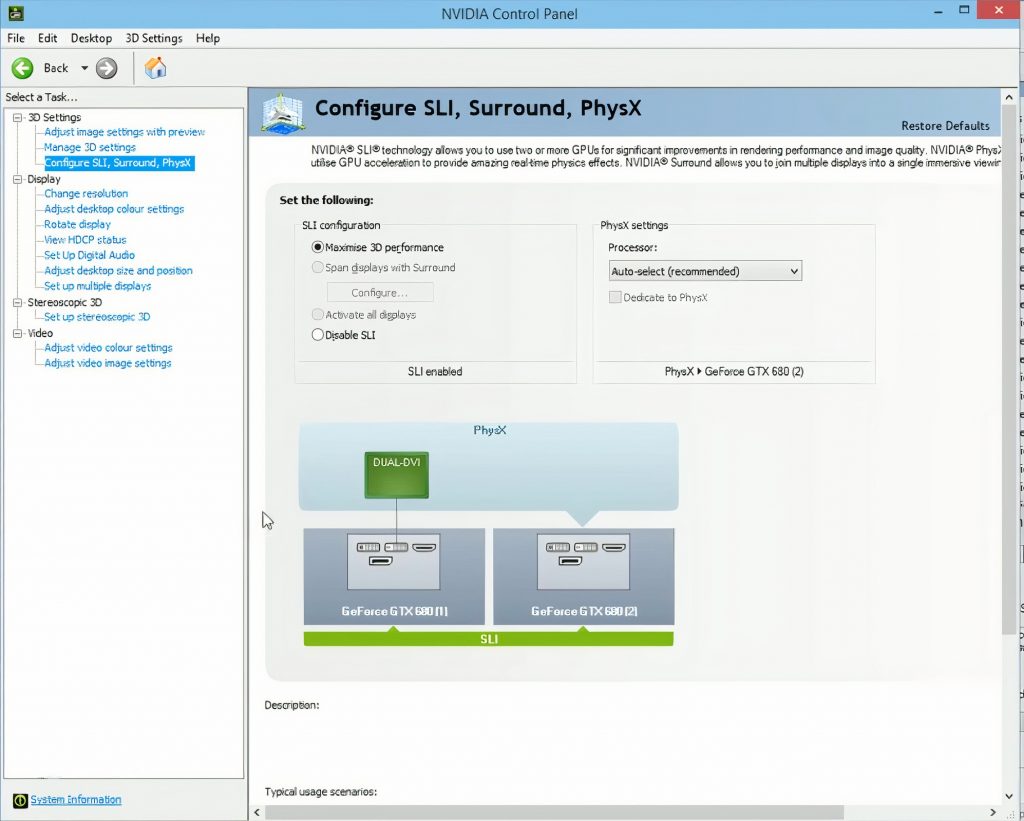
d. Click Apply to save the changes and restart your computer.
Hopefully, the dxgkrnl.sys error should be fixed.
3. Turn Off NVIDIA Surround
NVIDIA Surround is a feature that allows you to use multiple monitors with your NVIDIA graphics card. However, this feature is known to cause the dxgkrnl.sys error. You can easily fix this error by turning off NVIDIA Surround. Press Ctrl + Alt + S or Ctrl + Alt + R on your keyboard, and you should be up and running in no time. If this shortcut isn’t working, unplug all the connected monitors and restart with a single monitor.
4. Change the Graphics Memory Size to 128MB in BIOS
A decent number of users have successfully resolved the dxgkrnl.sys error by changing their graphics memory size to 128MB in BIOS settings. This solution is more effective if you have an integrated graphics card on your system. Follow the below steps to change the graphics memory size in BIOS.
a. Restart your computer while continuously pressing the F2 key on your keyboard until you are greeted with the Setup screen.
b. Once you are there, find the Advanced menu.
c. Find the Graphics Settings or Video Settings entry and change the memory size to 128MB or more.
5. Run SFC Scan
Corrupted system files can often result in BSOD errors like the dxgkrnl.sys error. SFC or System File Checker is a Windows utility that scans and fixes any corrupted system files on your computer. Follow these steps below if you don’t know how to run an SFC scan.
a. Search for cmd in the search bar and run it as administrator.

b. Type sfc /scannow and hit Enter.
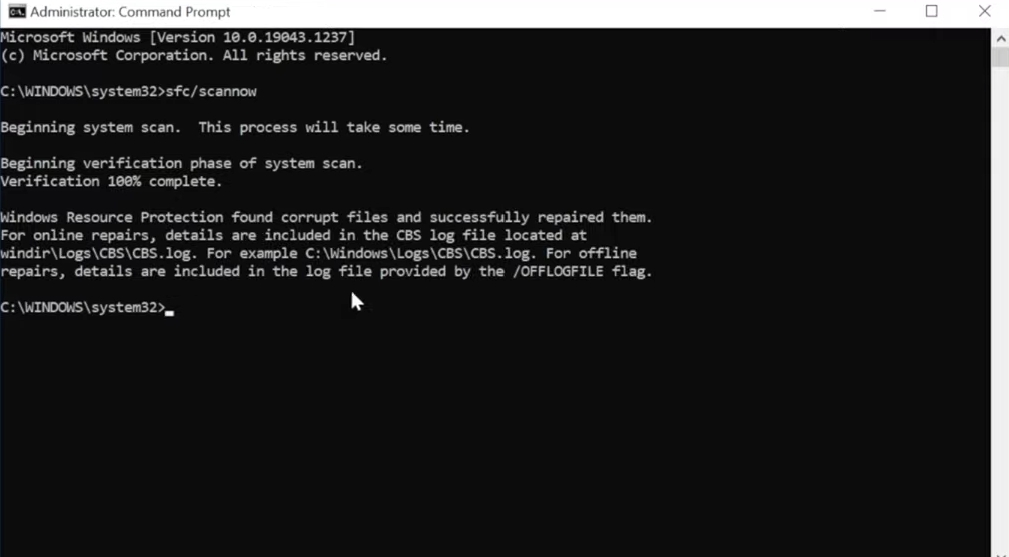
Your system will start checking the integrity of your system files and fix any associated issues. Wait patiently until the verification is done and the dxgkrnl.sys error should be fixed.
6. Run DISM Command
If an SFC scan does not resolve the dxgkrnl.sys issue, try running a DISM command. Deployment Image Servicing and Management tool, or DISM, is a program that scans your machine and corrects any problems.
a. Press Windows + X shortcut key to open the Quick Access Menu.
b. Click on Command Prompt (Admin).
c. Enter the following command and press Enter.
Cleanup-image DISM.exe /Online /Restorehealth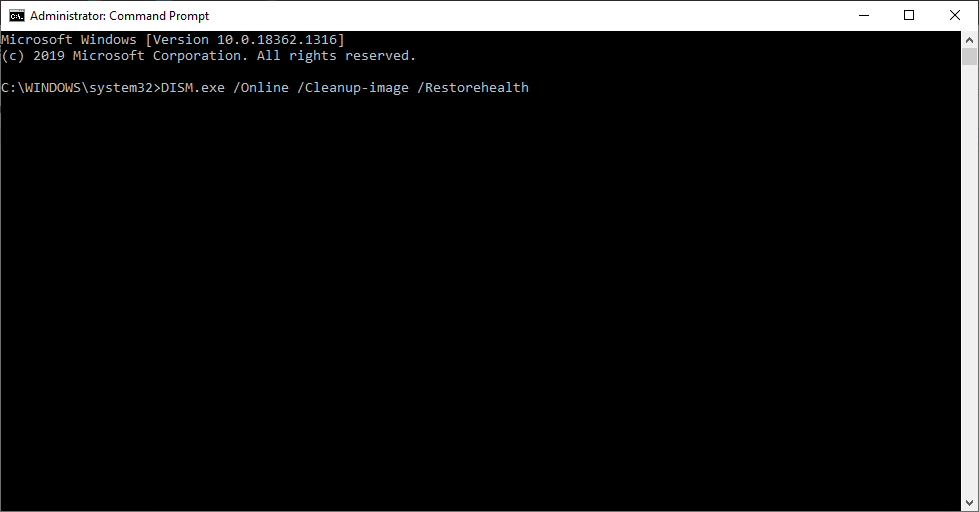
d. Restart your computer after the scan is finished.
Hopefully, your computer will boot normally, and the “dxgkrnl.sys” error will be gone.
7. Reinstall Your Graphics Driver Manually
An outdated or corrupt graphics driver is one of the most common causes of the dxgkrnl.sys error. You can reinstall your graphics driver manually to fix the error.
Uninstall the Graphics Driver
a. Right-click on the Start button and select Device Manager.
b. Click on Display Adapters.
c. Right-click on your graphics card and select Uninstall device.
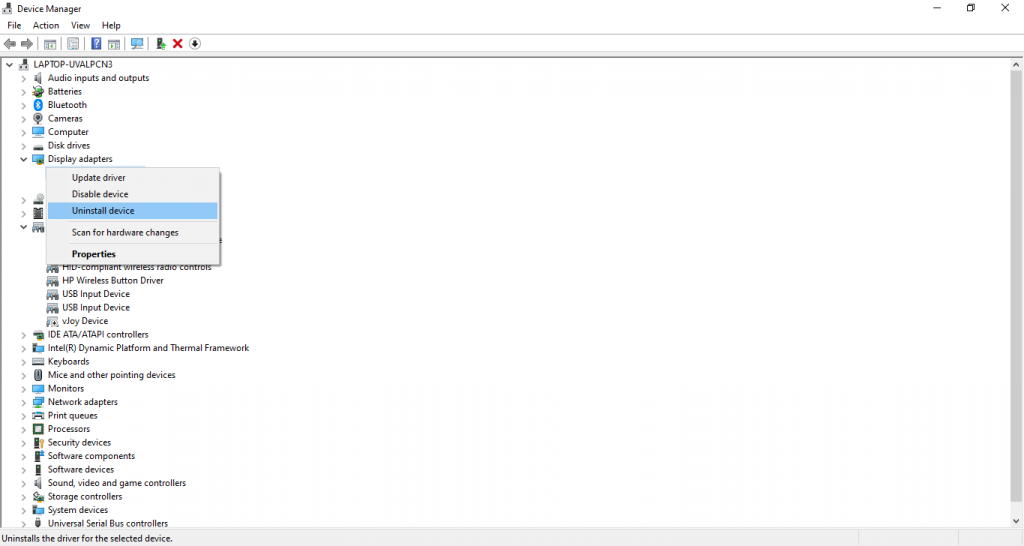
d. Once done, restart your computer.
Reinstall the Graphics Driver
a. Visit the official website of your Graphics maker.
b. Enter the important details, such as GPU type, series, operating system, and language, and click Search to download the latest graphics driver available for your GPU configuration.

c. Once the file is downloaded, right-click on it and select Run as administrator.
d. Follow the on-screen instructions to install the driver.
e. Restart your PC for the changes to take effect.
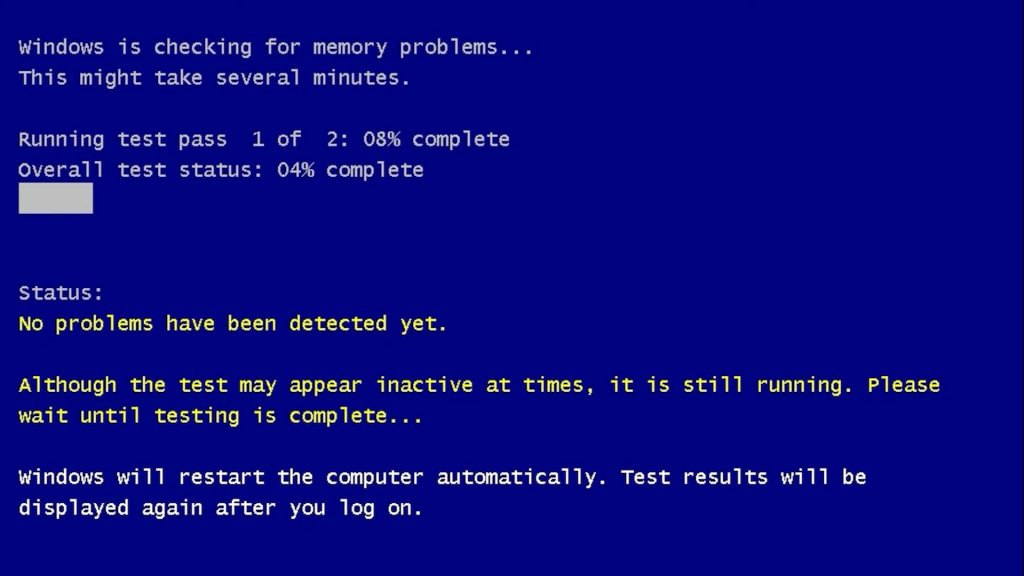
If you are still unable to bypass the dxgkrnl.sys error, you should check for damaged or faulty RAM on your computer. To assist you with this, Windows offers a built-in utility called Windows Memory Diagnostic. It is designed to diagnose your RAM and check for any associated faults. To run the Memory Diagnostic Tool on your computer, follow these steps.
a. Search for Windows Memory Diagnostic and open it.
8. Run Windows Memory Diagnostic Tool
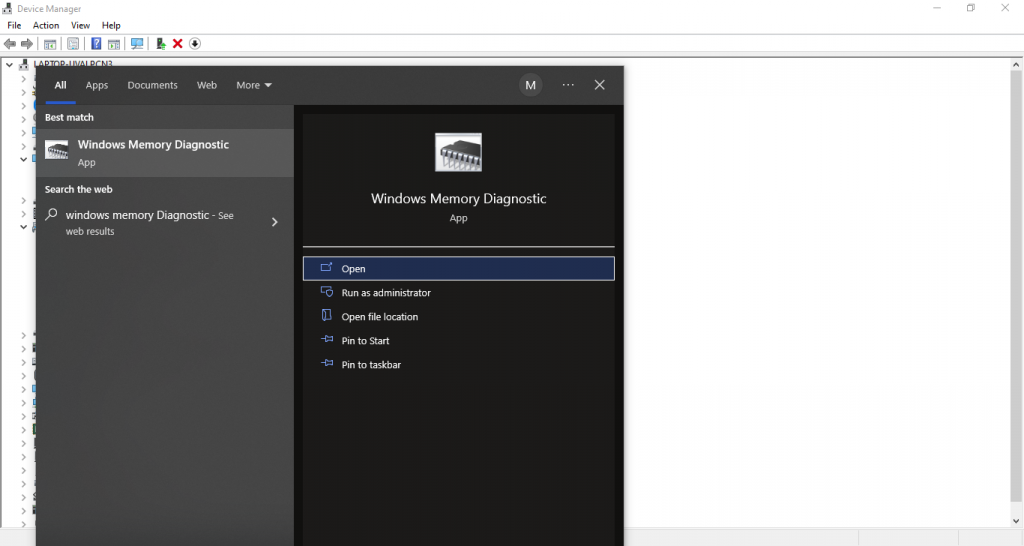
b. Select the Restart now and check for problems (recommended) option. The diagnostic tool will start checking for any issues with your RAM.
c. If the diagnostic tool suggests faulty RAM, you must replace it with a new one.
9. Uninstall Problematic Software
If you have recently installed new software, that might be causing the dxgkrnl.sys error. You should uninstall that problematic software.
a. Press Windows + R key to open the Run dialog box.
b. Type appwiz.cpl and click OK.
c. Find that software and click Uninstall.
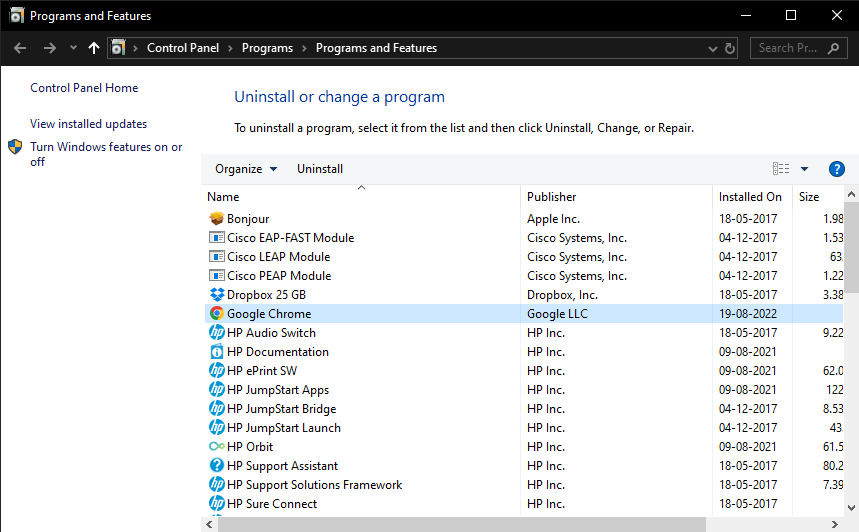
d. Restart your computer.
10. Run the Blue Screen Troubleshooter
Windows PCs come with different built-in troubleshooters. These are designed to find and fix issues on your computer. One such troubleshooter is a blue screen troubleshooter. Here’s how you can run it on your computer.
a. Press Windows + I to open Settings.
b. Click on Update & Security and select Troubleshoot from the left sidebar.
c. On the right screen, find Blue Screen under Find and fix other problems entry.
d. Click on Blue Screen, and then Run the troubleshooter.
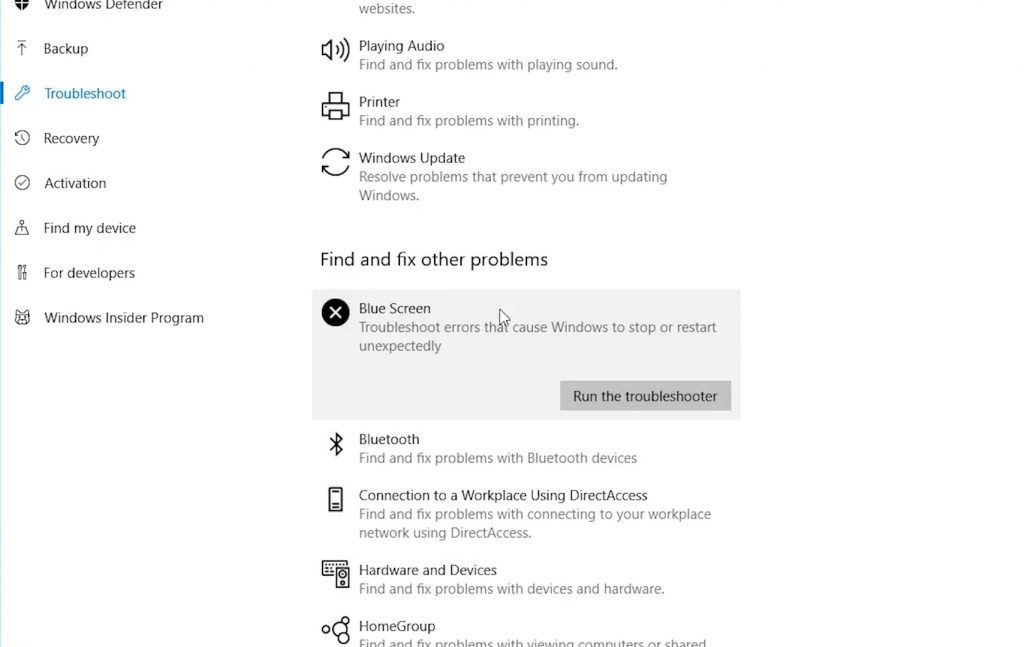
e. Once done, Restart your computer.
11. Perform a System Restore
Suppose you have tried all the above fixes but the dxgkrnl.sys error persists, try performing a System Restore. A System Restore restores your computer to a previously saved restore point when everything was fine with your PC. Below are the steps to perform a System Restore.
a. Restart your PC while holding down the Shift key until the Automatic Repair option appears on the screen.
b. Once it does, Click Restore and then Troubleshoot.
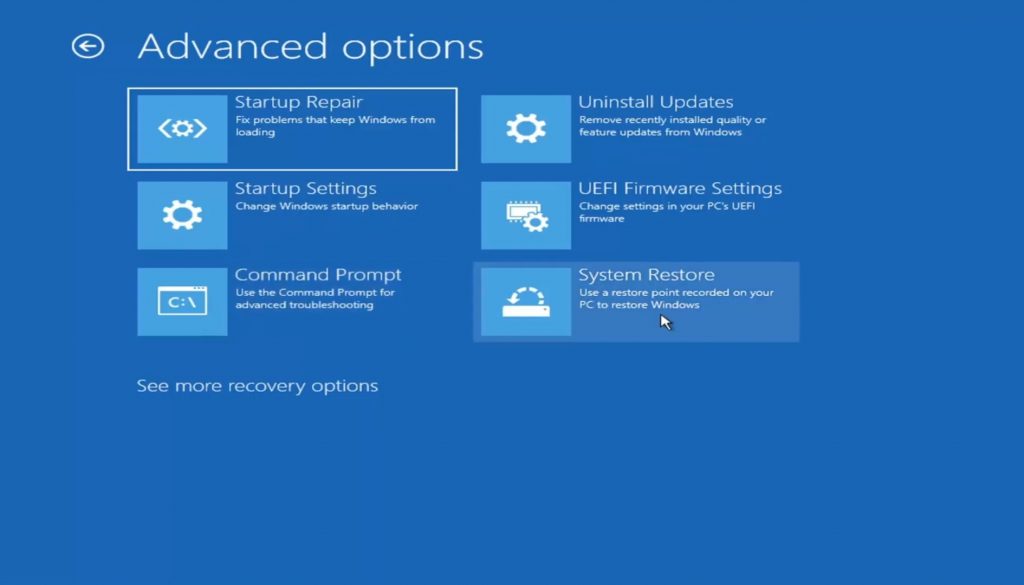
c. Select Advanced options and then System Restore.
d. Finally, choose the restore point and click Next.
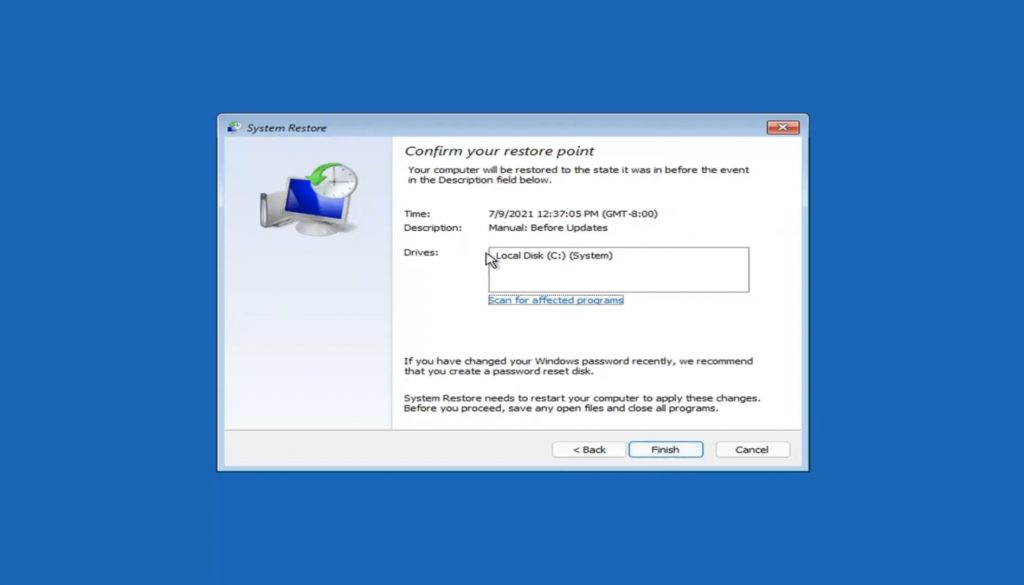
E. Restart your PC.
Recover Lost Files Due To dxgkrnl.sys Error
When dxgkrnl.sys error occurs, your Windows PC suddenly shuts down. All you see is a blue screen with the error stop code. After a few minutes, your system Restarts automatically. Suppose you are working on something important on your PC and the dxgkrnl.sys error occurs. Your PC will shut down and restart after a few minutes. But in all this mess, you may lose the data you were working on. Thankfully, it is possible to recover lost data with the help of data recovery software.
Your next question will be which software I should use. Our recommendation is Stellar Data Recovery Professional. There are dozens of data recovery software claiming to be the best, but you should always go with a reliable solution. Stellar has been in the data recovery business for more than two decades now, with millions of happy customers. You can’t go wrong with it.
Coming to Stellar Data Recovery Professional’s features, the software recovers deleted documents, photos, videos, and other files. You can recover data from a completely crashed and unbootable system, as may be the case with you. The software can recover data from formatted or corrupted drives. It supports the most common File Systems such as NTFS, exFAT, and FAT (FAT16/FAT32). You can take a preview of the data before actually saving it on your computer.
Needless to say, all these features sound interesting, and now you have the data recovery software you will use to recover your lost data due to dxgkrnl.sys” error. If you are worried about how you will use Stellar Data Recovery Professional, don’t worry. The software comes with a famous three-step data recovery process. Below are the exact steps you need to follow to get your data back.
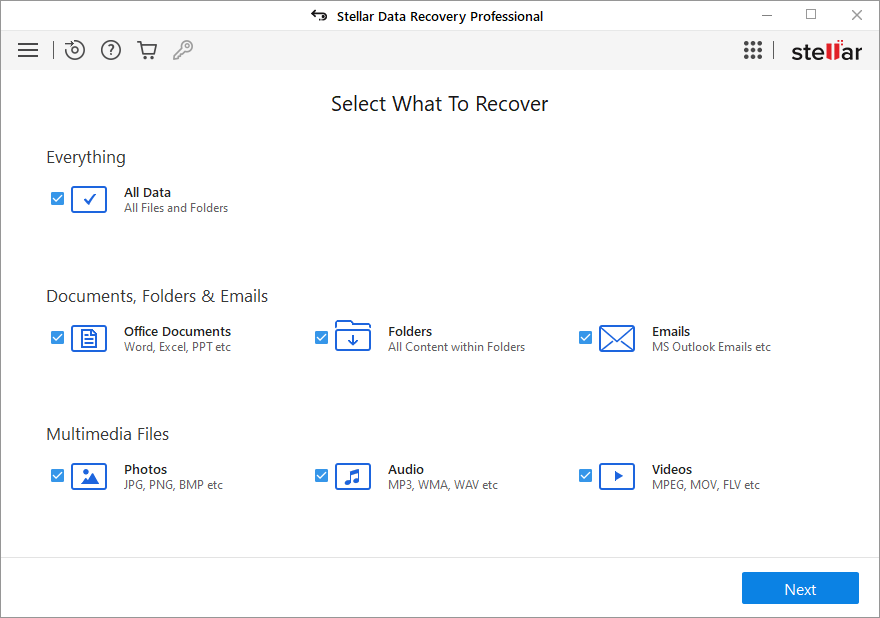
Step 1: Open Stellar Data Recovery Professional on your Windows 10 PC. On the very first screen, select what you want to recover. You can choose Photos, Audio, Videos, Documents, or Emails. If you’re going to restore everything, select the All Data option and click Next.
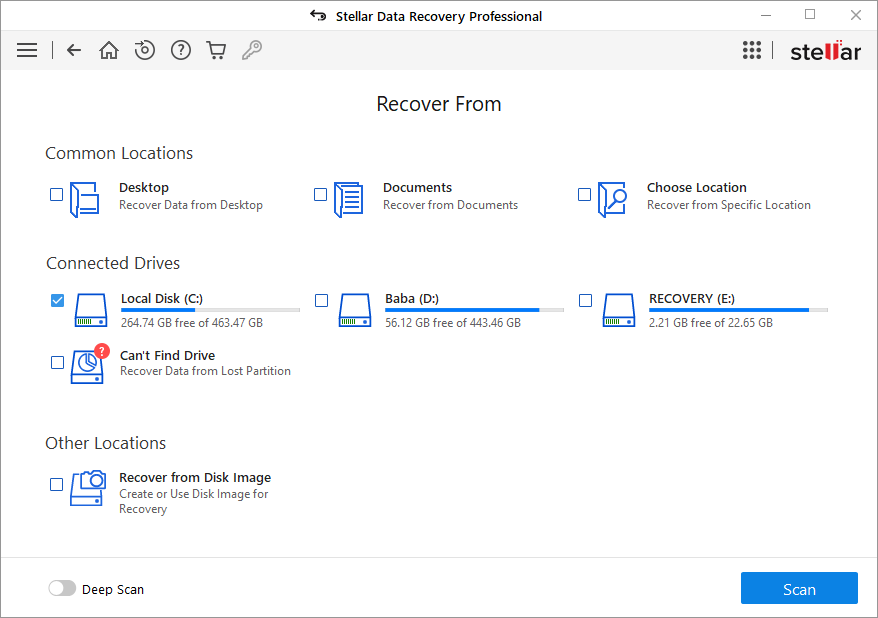
Step 2: In the next step, select the drive from which you want to recover your data and click Scan. The software will start scanning the selected drive. Depending upon the size of the data, it may take a few minutes to complete the scan.
Step 3: Once the scan is complete, you will see all the recoverable data. Go through all the folders and select the files you want to recover. Lastly, click Recover to save the data on your computer.
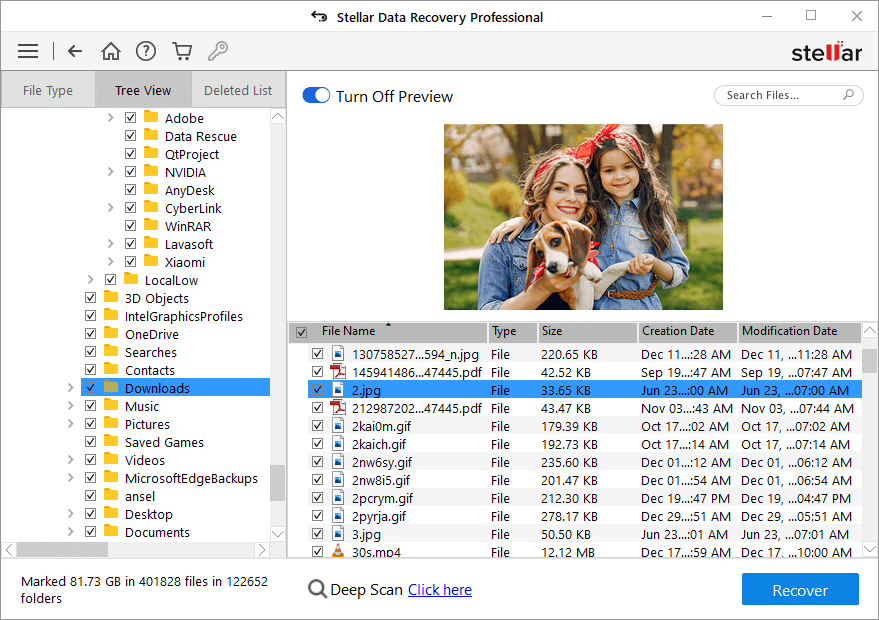
That’s it. With these three simple steps, you should be able to restore the data you had lost due to the dxgkrnl.sys error.
Final Verdict
The dxgkrnl.sys BSOD error is a common problem for Windows 10 users. The most effective solution to fix the error is reinstalling the graphics driver. Some other working solutions are disabling SLI, turning off NVIDIA Surround, running SFC/DISM scan, and performing a system restore. Hopefully, trying one of the fixes should solve the error for you.
Frequently Asked Questions
What is the “dxgkrnl.sys” error in Windows 10?
dxgkrnl.sys is one of the BSOD (Blue Screen of Death) errors in Windows 10. It is triggered due to issues in the graphics driver. However, it can also occur due to other software and hardware issues on your system.
How to fix “dxgkrnl.sys” BSOD error in Windows 10?
You can try several fixes to fix the dxgkrnl.sys BSOD error in Windows 10. We have explained eleven such fixes in this article. You can check them out.
Was this article helpful?
YES3
NO
The Blue Screen of Death (BSOD) is a highly troubling issue for Windows users, and one particular error that can be especially frustrating is the “dxgkrnl.sys” BSOD error. When this error occurs, your computer crashes, displaying a blue screen with the “dxgkrnl.sys” error message. This error is related to the DirectX graphics kernel subsystem and is usually triggered by issues with your graphics hardware, drivers, or software conflicts. In this guide, we’ll show you how to fix Dxgkrnl.sys BSOD Error in Windows 11/10, so your computer runs without any hiccups.
Page Contents
The “dxgkrnl.sys” BSOD (Blue Screen of Death) error is a Windows system error related to the DirectX graphics kernel subsystem. DirectX is a collection of APIs (Application Programming Interfaces) developed by Microsoft for handling multimedia tasks, including graphics and gaming on Windows operating systems.
The “dxgkrnl.sys” file is a critical component of this system and is responsible for managing graphical functions, such as rendering graphics and handling communication between the graphics hardware and software.
Common causes of this error include:
- Outdated or corrupted graphics drivers.
- Hardware issues with the graphics card.
- Overclocking the GPU.
- Software conflicts, like third-party applications.
- Malware or virus infections.
- Operating system problems, such as missing or corrupted files.
Fix: Dxgkrnl.sys BSOD Error in Windows 11/10
Here are the top 5 solutions to fix the Dxgkrnl.sys BSOD Error problem.
Fix 1: Run System File Checker
To address this issue, you can use the System File Checker (SFC) tool. SFC scans your system for damaged or missing files and attempts to repair them. Here’s how to use this tool to help resolve the error.
1. Open the Command prompt and run as administrator.
2. Copy and paste the below command:
sfc /scannow

Press Enter.
3. Wait until the scanning is complete. This will scan and repair the corrupted system files.
After that, check whether the issue is resolved or not.
Fix 2: Run DISM Commands
Deployment Image Service and Management Tool (DISM) is a Windows utility that can help repair the Windows image and resolve issues related to system files. By following these steps, you can use DISM to check and repair your system’s health, potentially addressing the error.
1. Open the Command prompt and run as administrator.
2. Copy and paste the below commands one by one. Press Enter after each command to execute the command.
DISM /Online /Cleanup-Image /CheckHealth

DISM /Online /Cleanup-Image /ScanHealth

DISM /Online /Cleanup-Image /RestoreHealth

3. Wait until the scanning and preparation of the corrupted system files is done on your PC.
Fix 3: Run DirectX Diagnostic Tool
The DirectX Diagnostic Tool is a useful utility for diagnosing and troubleshooting graphics and sound-related issues. Follow the below steps to run DirectX Diagnostic Tool:
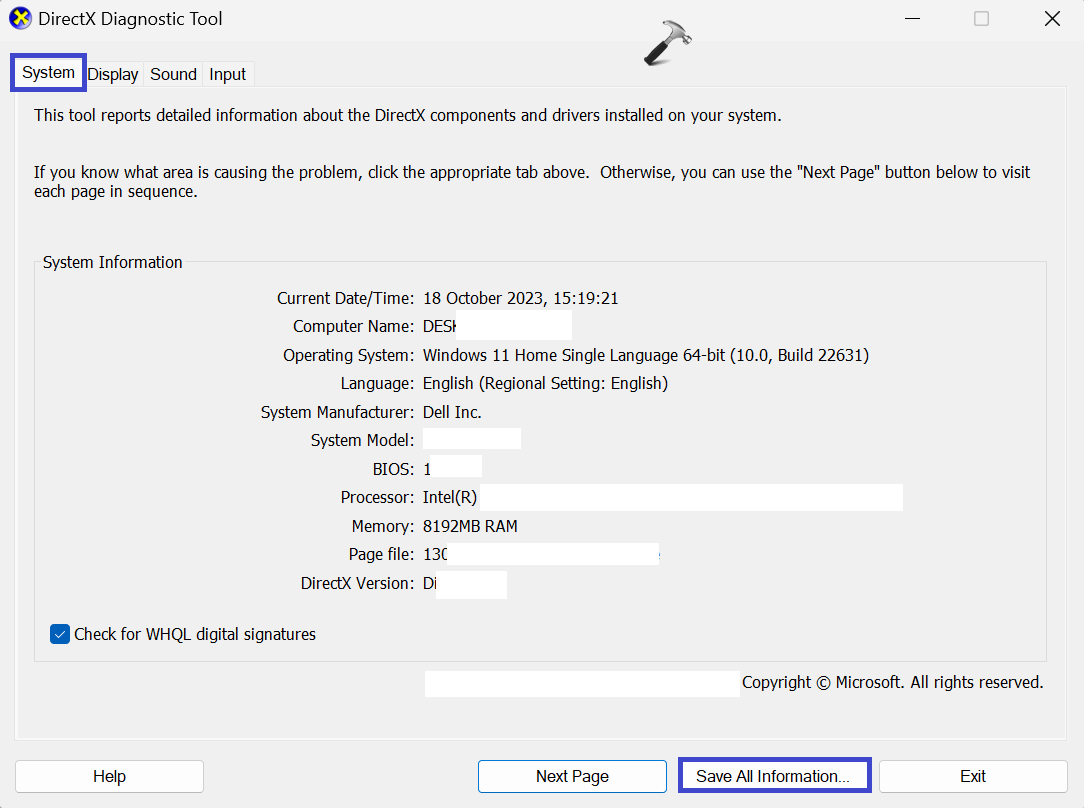
1. Press the Windows key + R. Type “dxdiag” and click OK.
Alternatively, you can use Windows PowerShell to open the tool. Open Windows PowerShell, type “dxdiag,” and press Enter.
2. Wait for the DirectX Diagnostic Tool to scan your system. When it’s finished, you’ll see the system information page, similar to the one shown in the image below.
4. Now, navigate to the Display, Sound, and Input tabs one by one to check for any problem detected by the DirectX Diagnostic tool.
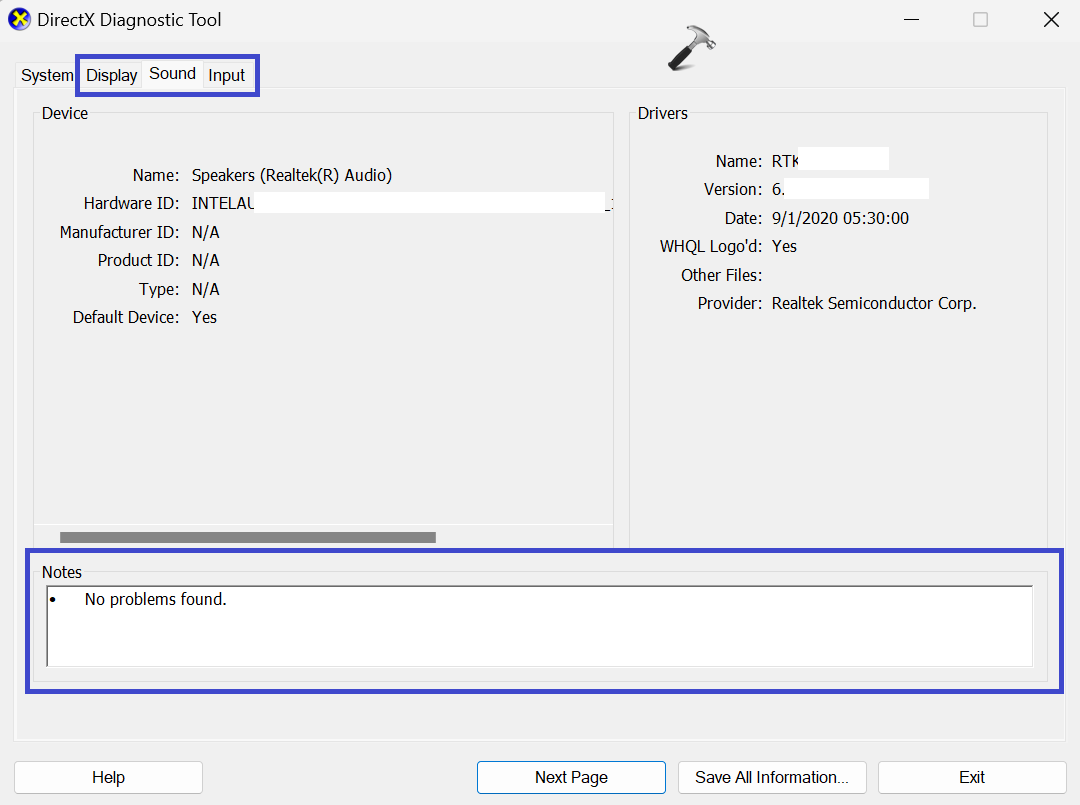
5. At the bottom of the tool, you’ll find “Notes” that provide detailed information about any problems identified.
Fix 4: Check Hardware Failure
The dxgkrnl.sys BSOD error may be attributed to potential hardware issues, such as a malfunctioning motherboard or faulty RAM module. If your computer is still within its warranty period, it is advisable to bring it to the store for a thorough hardware diagnostics check. If any hardware failures are identified during the inspection, it is recommended to have them replaced promptly.
Fix 5: Re-install Graphics Driver
Reinstalling the graphics driver can help resolve compatibility and corruption problems. Below are the steps to guide you through the process of uninstalling and reinstalling your graphics driver.
1. Press the Windows key + X and select “Device Manager“.
2. Expand the “Display adapters” option.

3. Now, right-click on the Graphics driver and click “Uninstall device“.
4. A prompt box will appear to confirm to uninstall the driver. Click OK.
5. After that, go to your graphics card driver download and install the latest graphics card driver.
That’s It!
RELATED ARTICLES
Чаще всего, указанная ошибка возникает в следующем порядке: экран гаснет, появляется синий экран смерти с сообщением, что ошибка произошла где-то в nvlddmkm.sys, код ошибки stop 0x00000116. Бывает, что в сообщении на синем экране указывается не nvlddmkm.sys, а файлы dxgmms1.sys или dxgkrnl.sys — что является симптомом той же ошибки и решается аналогичным образом. Типичное сообщение также: драйвер перестал отвечать и был восстановлен.
Ошибка nvlddmkm.sys проявляет себя в Windows 7 x64 и, как оказалось, Windows 8 64-бит тоже не защищена от этой ошибки. Проблема связана с драйверами видеокарты NVidia. Итак, разбираемся, как решить проблему.
На различных форумах присутствуют разные способы решения ошибки nvlddmkm.sys, dxgkrnl.sys и dxgmms1.sys, которые в общих чертах сводятся к совету переустановить драйвера NVidia GeForce или подменить файл nvlddmkm.sys в папке System32. Я опишу эти способы ближе к концу инструкции по решению проблемы, но начну с чуть другого, работающего способа.
Исправляем ошибку nvlddmkm.sys

Синий экран смерти BSOD nvlddmkm.sys
Итак, начнем. Инструкция подходит при возникновении синего экрана смерти (BSOD) в Windows 7 и Windows 8 и появлении ошибки 0x00000116 VIDEO_TDR_ERROR (код может отличаться) с указанием одного из файлов:
- Nvlddmkm.sys
- Dxgkrnl.sys
- Dxgmms1.sys

Скачать драйвера NVidia
Первое, что следует сделать — скачать бесплатную программу DriverSweeper (найти в Google, предназначена для полного удаления любых драйверов из системы и всех файлов, с них связанных), а также последние драйвера WHQL для видеокарты NVidia с официального сайта http://nvidia.ru и программу для очистки реестра CCleaner. Установить DriverSweeper. Далее выполняем следующие действия:
- Зайдите в безопасный режим (в Windows 7 — по клавише F8 при включении компьютера, или: Как зайти в безопасный режим Windows 8).
- С помощью программы DriverSweeper удалите все файлы видеокарты (и не только) NVidia из системы — любые драйвера NVidia, включая звук HDMI и т.д.
- Также, пока вы еще находитесь в безопасном режиме, запустите CCleaner для очистки реестра в автоматическом режиме.
- Перезагрузитесь в нормальном режиме.
- Теперь два варианта. Первый: зайдите в диспетчер устройств, кликните правой кнопкой мыши по видеокарте NVidia GeForce и выберите «Обновить драйвер…», после этого, позвольте Windows найти последние драйвера для видеокарты. Или же Вы можете запустить установщик NVidia, который скачали до этого.
После того, как драйверы будут установлены, перезагрузите компьютер. Возможно также потребуется установить драйверы на HD Audio и, если нужно скачать PhysX с сайта NVidia.
Вот и все, начиная с версии драйверов NVidia WHQL 310.09 (а актуальная на момент написания инструкции версия 320.18), синий экран смерти не появляется, и, после выполнения вышеописанных действий, ошибка «драйвер перестал отвечать и был успешно восстановлен», связанная с файлом nvlddmkm.sys, появляться не будет.
Другие способы исправления ошибки
Итак, у вас установлены последние драйвера, Windows 7 или Windows 8 x64, вы играете какое-то время, экран становится черным, система сообщает, что драйвер перестал отвечать и был восстановлен, звук в игре продолжает играть или стал заикаться, появляется синий экран смерти и ошибка nvlddmkm.sys. Это может происходить и не во время игры. Вот какие решения предлагаются на различных форумах. По моему опыту, они не работают, но приведу их здесь:
- Переустановить драйвера для видеокарты NVidia GeForce с официального сайта
- Распаковать файл-установщик с сайта NVidia архиватором, предварительно сменив ему расширение на zip или rar, извлечь файл nvlddmkm.sy_ (или взять его в папке C:\NVIDIA\), распаковать его командой expand.exe nvlddmkm.sy_ nvlddmkm.sys и перенести получившийся файл в папку C:\windows\system32\drivers, затем перезагрузить компьютер.
Также возможными причинами появления данной ошибки могут быть:
- Разогнанная видеокарта (память или GPU)
- Несколько приложений, одновременно использующих GPU (например, майнинг Биткойнов и игра)
Надеюсь, я помог решить Вам проблему и избавиться от ошибок, связанных с файлами nvlddmkm.sys, dxgkrnl.sys и dxgmms1.sys.
Большинство BSOD содержат несколько аргументов: строка с ошибкой и ссылка на файл или код. Например, SYSTEM_SERVICE_EXCEPTION (dxgkrnl.sys). Как первая, так и вторая часть могут меняться. Таким образом с данным файлом могут наблюдаться разные комбинации сбоев. Самые частые из них:
BOOTLOG_NOT_LOADED \SystemRoot\System32\drivers\dxgkrnl.sys
Latency issue caused by dxgkrnl.sys
dxgkrnl.sys (DirectX Graphics Kernel)
Stop code: CRITIRAL_PROCESS_DIED (dxgkrnl.sys)
Причины BSOD
Существует всего несколько известных причин, которые вызывают данный BSOD:
- повреждение драйвера DirectX, так как файл dxgkrnl.sys как раз к нему и относится;
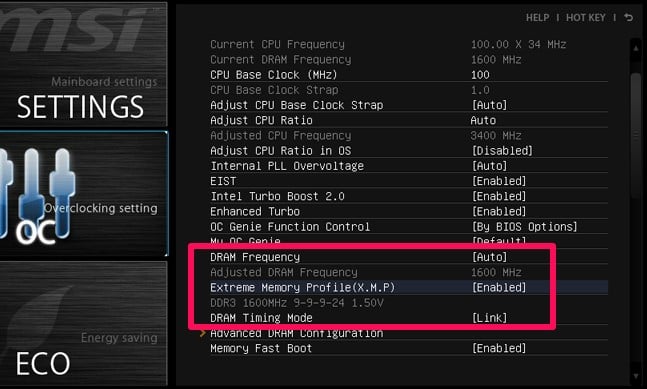
- неправильно настроенный профиль XMP, DOCP;
- устаревшие драйвера;
- плохая совместимость с некоторым софтом.
Как исправить BSOD dxgkrnl.sys в Windows 10?
Обработав десятки сообщений об ошибке, нам удалось выяснить ряд способов решения проблемы, которые дали положительные результаты другим пользователям. Это лучшее, что сейчас мы можем вам предложить. Намного лучшее, чем то, что предлагают эксперты на форуме Microsoft и т. п.
Что нужно сделать:
- Обновить драйвера DirectX. Сначала стоит их просто обновить. Если не сработает, то следует удалить, а потом установить заново.
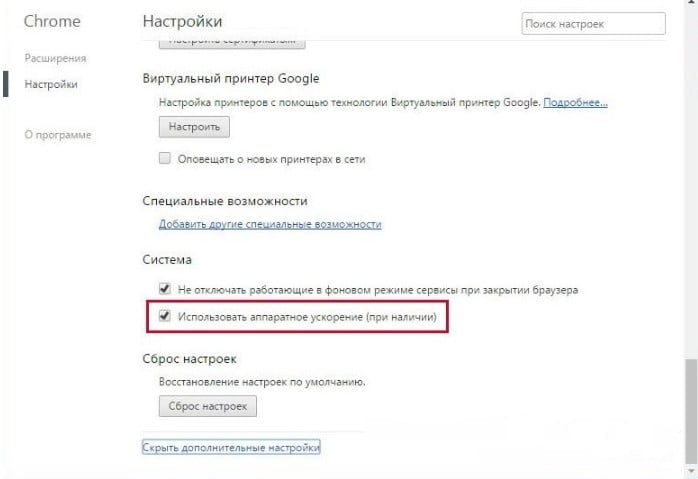
- Отключить аппаратное ускорение в браузерах. Многие пишут, что у них BSOD появляется при просмотре видео в браузере. Следует зайти в настройки веб-обозревателя и деактивировать аппаратное ускорение.
- Использовать Intel® Driver & Support Assistant. Это официальная программа от Intel, которая позволяет обновить драйвера для всех комплектующих от Intel. Ее очень хвалят пользователи, многим помогает.
- Отключить SLI. Актуально для тех, у кого синий экран появляется в играх. Следует зайти в «Панель управления Nvidia» — «Настройки 3D» и отключить параметр SLI.
- Настроить XMP и DOCP. Это может быть связано с неправильной ручной или автоматической настройкой, а также с разгоном системы. Следует поиграться со значениями тактовой частоты, понемногу снижая ее. Есть хорошие шансы, что на одном из значений Windows 10 будет работать более стабильно и не покажет ошибку.
- Устранение задержки. Если неполадка связана с большими задержками DPC Latency, Latencymon, то стоит искать проблему в настройках сети. Хотя это звучит странно, но нестабильный пинг до роутера могут быть проблемой. Также можно в свойствах 802.11 USB Wireless Lan Card выбрать вкладку «Дополнительно» и отключить Selective Suspend.
К сожалению, есть риск, что BSOD с указанием на файл dxgkrnl.sys является следствием аппаратных неполадок. То, что касается задержек на видеокартах Nvidia, не всегда просто исправить. Больше информации можно найти в этой ветке форума.
Какие процедуры вы выполнили и насколько эффективными они оказались? Может вы обладаете еще какими-то сведениями о синем экране – в любом случае, мы ждем ваших комментариев.