
В этой статье мы покажем, как внедрить двухфакторную аутентификацию пользователей в домене Windows с помощью open source продукта multiOTP. MultiOTP эта набор php скриптов и утилит, который реализует протокол OATH для HOTP/TOTP (Time-based One Time Password). Возможно использовать как в Windows, так и через RADIUS для реализации 2FA практически в чем угодно.
После внедрения multiOTP для входа пользователя Windows будет запрашивать дополнительный одноразовый пароль (OTP – one time password), который пользователь должен получить со своего мобильного устройства (приложение Microsoft или Google Authenticator, или другого генератора OTP). Вы можете настроить двухфакторную аутенфтикацию для входа на рабочие станции Windows, или для удаленного RDP доступа к хостам RDS на Windows Server.
Основные преимущества multiOTP — ему не нужен доступ в интернет, и можно использовать для внедрения двухфакторной аутентификации пользователей в изолированных сетях. Большинство аналогов платные или требуют прямого доступа к интернету.
Содержание:
- Установка и настройка MultiOTP в домене Active Directory
- Настройка двухфакторной аутентификации MultiOTP для пользователя домена
- Установка multiOTP CredentialProvider в Windows
Установка и настройка MultiOTP в домене Active Directory
В этом разделе мы покажем, как установить MultiOTP в Windows Server 2019 и настроить синхронизацию пользователей из Active Directory.
Также вы можете развернуть MultiOTP с помощью готового образа OVA для VMware, виртуальной машины Hyper-V или Docker контейнера.
Начнем с настройки сервера MultiOTP, который будет получать пользователей из Active Directory, генерировать уникальные QR коды для пользователей и проверять правильность второго фактора.
Создадим в Active Directory отдельную группу и добавим в нее пользователей, для которых мы будет требовать проверку второго фактора при входе в Windows. Создадим группу с помощью PowerShell:
New-ADGroup 2FAVPNUsers -path 'OU=Groups,OU=Moscow,dc=winitpro,DC=ru' -GroupScope Global -PassThru –Verbose
Добавьте пользователей в группу:
Add-AdGroupMember -Identity 2FAVPNUsers -Members kbuldogov, user1, user2
Создайте в AD нового пользователя multiotp_srv, который будет использоваться multiotp для доступа к AD (с минимальными привилегиями).
$passwd = ConvertTo-SecureString -String "P@ssw0rd!" -AsPlainText -Force
New-ADUser -Name "multiotp_srv" -SamAccountName "multiotp_srv" -UserPrincipalName "[email protected]" -Path "OU=ServiceAccounts,OU=Moscow,DC=winitpro,DC=ru" –AccountPassword $passwd -Enabled $true
Скачайте архив с файлами MultiOTP с сайта разработчиков https://download.multiotp.net/.
Откройте архив multiotp_5.8.2.9.zip и извлеките из него каталог windows в папку на локальном диске (C:\MultiOTP).
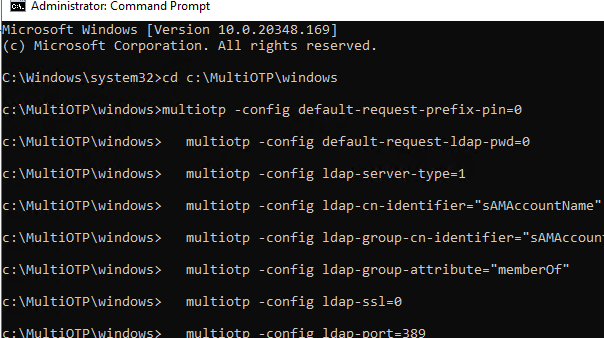
Откройте командную строку и перейдите в каталог с утилитой multiotp.exe:
CD C:\MultiOTP\windows
Следующими командами мы настроим MultiOTP для получения пользователей из LDAP каталога Active Directory.
multiotp -config default-request-prefix-pin=0
multiotp -config default-request-ldap-pwd=0
multiotp -config ldap-server-type=1
multiotp -config ldap-cn-identifier="sAMAccountName"
multiotp -config ldap-group-cn-identifier="sAMAccountName"
multiotp -config ldap-group-attribute="memberOf"
multiotp -config ldap-ssl=0
multiotp -config ldap-port=389
REM Адрес контроллера домена
multiotp -config ldap-domain-controllers=msk-dc03.winitpro.ru,ldap://192.168.13.10:389
multiotp -config ldap-base-dn="DC=winitpro,DC=ru"
REM Учетная запись для аутентификации multiotp в AD:
multiotp -config ldap-bind-dn="CN=multiotp_srv,OU=ServiceAccounts,OU=Moscow,DC=winitpro,DC=ru"
multiotp -config ldap-server-password="P@ssw0rd!"
REM группа пользователей, для которых нужно включить OTP
multiotp -config ldap-in-group="2FAVPNUsers"
multiotp -config ldap-network-timeout=10
multiotp -config ldap-time-limit=30
multiotp -config ldap-activated=1
REM ключ для доступа к MultiOTP серверу
multiotp -config server-secret=secretOTP
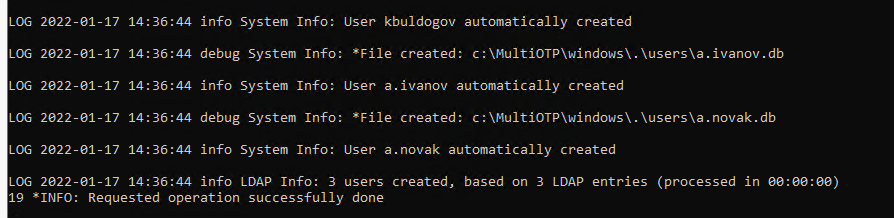
Ранее мы создали группу 2FAVPNUsers и добавили в нее 3 пользователей. Выполните синхронизацию пользователей AD в MultiOTP.
multiotp -debug -display-log -ldap-users-sync
OG 2022-01-17 14:36:44 info LDAP Info: 3 users created, based on 3 LDAP entries (processed in 00:00:00)
LOG 2022-01-17 14:36:44 debug System Info: *File created: c:\MultiOTP\windows\.\users\a.ivanov.db
В данном случае MultiOTP обнаружила трех пользователей и синхронизировала их.
Для регулярной синхронизации новых учетных записей в Active Directory, нужно создать задание планировщика с командой:
multiotp -debug -display-log -ldap-users-sync
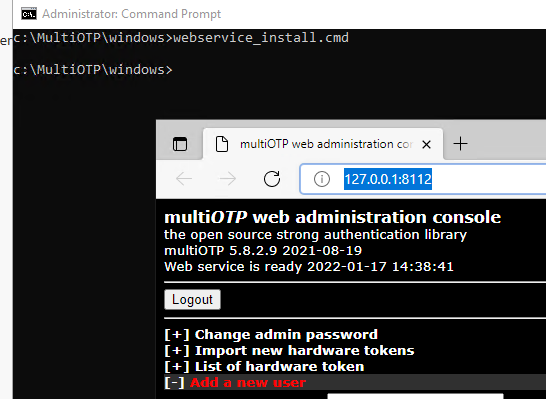
Запустите с правами администратора файл webservice_install.cmd. Это установит веб интерфейс управления MultiOTP.
Зайдите на веб-интерфейс
_http://127.0.0.1:8112/
под учётной запись admin с паролем 1234 (желательно сменить при входе).
Настройка двухфакторной аутентификации MultiOTP для пользователя домена
В разделе List of users будет доступен список пользователей домена, которые были синхронизированы ранее (источник AD/LDAP).
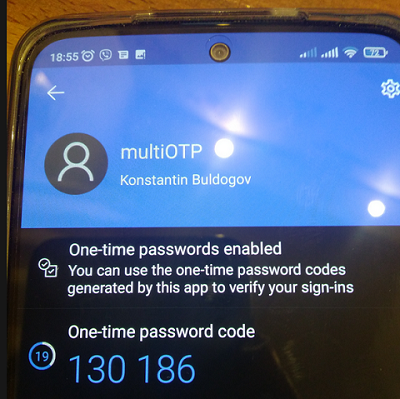
Выберите пользователя и нажмите Print. Перед вами появится QR код пользователя, который нужно добавить в приложение-аутентфикатор.

Установите на смартфон пользователя приложение Microsoft Authenticator (или Google Authenticator) из Google Play или App Store. Запустите его и отсканируйте QR код пользователя.
В результате в приложении появится учетная запись пользователя, в которой каждые 30 секунд генерируется новый шестизначный цифровой пароль (тот самый второй фактор).
Из командной строки можно проверить, что MultiOTP позволяет аутентифицировать данного пользователя с помощью OTP:
multiotp.exe -display-log kbuldogov 719854
где
719854
– одноразовый пароль, полученный из приложения.
LOG 2022-01-17 15:13:11 notice (user kbuldogov) User OK: User kbuldogov successfully logged in with TOTP token
Filter-Id += "2FAVPNUsers"

Также можно проверить корректность работы OTP из веб-интерфейса. Перейдите в раздел Check a user, введите имя пользователя и одноразовый пароль.
Установка multiOTP CredentialProvider в Windows
Следующий этап – установка multiOTP-CredentialProvider на компьютеры Windows, на которых вы хотите внедрить двухфакторную аутентификацию пользователей с помощью MultiOTP. CredentialProvider можно установить на все версии Windows 7/8/8.1/10/11 и Windows Server 2012(R2)/2016/2019/2022.
В это примере мы настроим двухфакторную аутентификацию для RDP входа пользователей на RDSH сервер на Windows Server 2019.
Скачайте и установите multiOTP CredentialProvider с GitHub https://github.com/multiOTP/multiOTPCredentialProvider/releases. На момент написания статьи эта версия
5.8.4.0
.
Запустите установку:
- Укажите IP сервера, на котором был установлен multiOTP
- В нижнее поле укажите секретное слово из конфигурации multiOTP (
в нашем конфиге);

- Выберите тип входа в Windows, для которых нужно применять аутентфикацию через OTP. В нашем примере мы ограничимся 2FA только для RDP входов (OTP authentication mandatory for remote desktop only).

Можно включить использование OTP аутенфтикации как для RDP так и для локальных входов.
MultiOTP CredentialProvider хранит настройки в реестре HKEY_CLASSES_ROOT\CLSID\{FCEFDFAB-B0A1-4C4D-8B2B-4FF4E0A3D978}. Если нужно, вы здесь можете изменить настройки CredentialProvider без переустановки.

Перезагрузите Windows Server RDS и попробуйте через RDP подключиться к нему. Теперь после отправки имени и пароля пользователя появляется дополнительное окно one-time password. Здесь пользователь должен ввести одноразовый пароль из приложения Authenticator на своем смартфоне.
Если на RDS хосте отключен NLA для RDP, пользователь просто увидит три поля для ввода (имя учетной записи, пароль и OTP).
На севере MultiOTP можно включить ведение логов, это полезно при отладке:
multiotp -config debug=1
multiotp -config display-log=1
Your script is running from C:\MultiOTP\windows\
2022-01-17 15:21:07 debug CredentialProviderRequest Info: *Value for IsCredentialProviderRequest: 1 0 SPB-SRV01
2022-01-17 15:21:07 debug Server-Client Info: *CheckUserToken server request. 0 SPB-SRV01
2022-01-17 15:21:07 notice kbuldogov User OK: User kbuldogov successfully logged in (using Credential Provider) with TOTP token 0 SPB-SRV01
2022-01-17 15:21:07 debug Server-Client Info: *Cache level is set to 1 0 SPB-SRV01
2022-01-17 15:21:07 debug Server-Client Info: *Server secret used for command CheckUserToken with error code result 0: secretOTP 0 SPB-SRV01
Не забудьте убедиться, что ваш домен синхронизирует время с тайм-серверами в интернете и время на клиентах не разбегается. Эти критично для работы OTP.
В любом случае перед массовым внедрением 2FA на базе MultiOTP в вашей сети рекомендуем в течении пары недель протестировать все режимы работы и нештатные ситуации (недоступность сервера MultiOTP, DC, ошибки в CredentialProvider и т.д.). Если возникли существенные проблемы со входом через MultiOTP, вы можете удалить CredentialProvider в безопасном режиме.
На этом настройка двухфакторной аутентификации в Windows Server с помощью MultiOTP закончена. Доступны сценарии использования MultiOTP с RADIUS сервером, для аутентификации практически любых типов клиентов через OTP. Также вы можете использовать OTP для дополнительной зашиты RDP серверов в интернете от брутфорса в дополнении к https://winitpro.ru/index.php/2019/10/02/blokirovka-rdp-atak-firewall-powershell/.
С момента написания прошлой заметки Двухфакторная аутентификация на Windows Server 2012 процедуру установки и настройки упростили, теперь все можно делать быстрее и проще.
Открывать RDP для всего мира довольно чревато — какая-нибудь зараза вполне может подобрать пароль. С другой стороны, использовать VPN тоже далеко не всегда удобно или возможно по разным причинам.
Одно из решений — двухфакторная аутентификация.
Мне нравится multiOTP — это крайне мощная штука, много чего умеет — Windows, Hyper-V, VMWare, RADIUS и совместима практически со всем.
Настройки времени
Время на сервере и вашем устройстве (телефон, компьютер) должно совпадать, иначе ключи будут генерироваться неверно!
Внимание
При установке необходимо все сделать аккуратно и внимательно, в противном случае придется подключаться локально консолью или загружаться в безопасный режим!
Примечание: продукт очень быстро допиливают, в более новых версиях процедура установки может немного различаться
На этом установка закончена. На это этапе желательно НЕ ПЕРЕЗАГРУЖАТЬ сервер, требуется добавить хотя бы одного пользователя с административными правами.
Далее добавляем ВСЕХ пользователей, которым нужен доступ по RDP по описанной выше процедуре. Если пользователь присутствует в системе но не добавлен в multiOTP — он не сможет удаленно подключиться. При настройке OTP authentication mandarity for remote desktop only пользователи могут входит в систему локально с консоли.
При добавлении пользователя создается персональный файл настроек (в моем случае это C:\Program Files (x86)\multiOTP\users\) с расширением db, представляющий обычный текстовый файл в формате «ключ/значение». Если пользователь многократно неверно вводит пароль и ключ авторизации, то блокируется не windows-пользователь, а именно аккаунт multiOTP (параметр locked). Вручную его можно разблокировать изменив locked=1 на locked=0
multiotp -[des]activate user
multiotp -[un]lock user
multiotp -delete user
multiotp -user-info user
Для генерации OTP-паролей необходимо установить аутентификатор — это может быть плагин для браузера (Google Chrome: Authenticator) или отдельное приложение на Android (приложение «Google Authenticator») или iOS.
Запускаем аутентикатор, создаем новый аккаунт: нажимаем «Добавить», выбраем QR-код, сканируем полученный код
Тестируем вход под добавленными пользователями, все должно быть Ок.
Примечание: если компьютер не в домене, указывайте имя пользователя в формате SERVER\Username
Для логотипа используется файл loginLogo.bmp в папке с multiOTP (в моем случае это C:\Program Files (x86)\multiOTP)
Разрешение: 128х128, формат bmp
Two-factor authentication (2FA) is a security measure that provides an additional layer of protection to your Windows server login credentials. In this blog post, we will guide you on how to setup 2FA on your Windows server 2019.
Step 1: To set up 2FA on your Windows server, you need to install a 2FA provider. There are several options available, such as Google Authenticator, Microsoft Authenticator, and Duo. For this guide, we will be using Google Authenticator.
To install Google Authenticator on your Windows server, download and install the Google Authenticator app on your mobile device.
Step 2: Next, you need to install and configure the Google Authenticator extension for Windows Server 2019. This extension will enable you to use Google Authenticator as your 2FA provider.
- To install the Google Authenticator extension for Windows Server, follow these steps:
- Download the Google Authenticator extension for Windows Server from the Google Authenticator website.
- Extract the files from the downloaded ZIP file.
- Copy the extracted files to the Windows Server.
- Open a command prompt with administrator privileges and navigate to the directory where you copied the extracted files.
- Run the command GoogleAuthenticatorInstall.exe /install.
- Follow the instructions to complete the installation process.
Step 3: Once the Google Authenticator extension is installed and configured, you can enable 2FA for Windows Server. To enable 2FA, follow these steps:
- Open the Control Panel on your Windows Server.
- Click on “User Accounts” and then “Manage User Accounts.”
- Select the user account that you want to enable 2FA for and click “Properties.”
- Click on the “Two-factor authentication” tab.
- Check the box next to “Enable two-factor authentication.”
- Click “OK” to save the changes.
- Open the Google Authenticator app on your mobile device and scan the QR code displayed on the screen.
- Enter the verification code from the Google Authenticator app in the “Verification Code” field.
- Click “OK” to save the changes.
Conclusion In this blog post, we’ve shown you how to setup 2FA on your Windows server using Google Authenticator. 2FA is an essential security measure that provides an additional layer of protection to your Windows server login credentials. By following the simple steps outlined above, you can easily setup 2FA on your Windows server and ensure that your server is secure.
Buy Cheap Dedicated Server
Windows Server 2019 Multi Factor Authentication is the ultimate security tool for any business. It is designed to ensure that any potential breaches can be prevented and that any worker accessing a company’s computer systems or applications are safe from malicious intent. With Windows Server 2019 Multi Factor Authentication, a user must provide two or more authentication factors before they can access applications or systems or make changes. These factors can be passwords, PINs, Security Questions or biometric authentication, such as fingerprints or iris scans. With this highly secure multi-factor authentication in place, businesses can protect their sensitive data and ensure that employees only have access to applications and systems that they need. This makes Windows Server 2019 Multi Factor Authentication the perfect solution for any business looking to secure its data.
1. Securing Your Data with Windows Server 2019 Multi Factor Authentication
Nowadays, malicious third-parties are more determined than ever to breach weak and vulnerable accounts on the internet. To protect critical data and systems from unauthorised access, Windows Server 2019 Multi Factor Authentication (MFA) is the security solution of choice. It adds an extra layer of protection, ensuring that user authentication is both secure and reliable.
Windows Server 2019 Multi Factor Authentication provides three distinct advantages:
- Multi factor authentication enables a second layer of authentication, in addition to the regular username/password combination.
- It relies on the user’s existing devices, allowing increased flexibility and convenient access to resources.
- It enhances the security of the user’s data by preventing unauthorised access.
Data is one of the most valuable assets for any organisation. That’s why Windows Server 2019 Multi Factor Authentication is such an excellent choice for keeping it secure and protected. It offers users a comprehensive security feature that allows access control through MFA authentication, enabling them to rest easy knowing that their data is in safe hands.
2. Understanding How Windows Server 2019 MFA Works
Windows Server 2019 introduces Multi Factor Authentication (MFA) as an additional layer of security for your business. MFA provides comprehensive identity and verification management by requiring additional forms of authentication like biometrics or PIN codes. With MFA enabled, admins can ensure that users accessing sensitive corporate information are who they claim to be. Here are some important points to understand about how MFA works:
- Multi Factor Authentication requires that a user provide additional forms of security such as fingerprints, voice recognition or PIN codes.
- Once MFA is enabled, the user must supply the additional security measures each time he or she accesses a protected system.
- Any process that requires multiple authentication steps is more effective in thwarting attacks as compared to single sign-on methods.
- MFA is more reliable thanusername/password combinations as it offers a more secure two-factor authentication process.
When you set up the Windows Server 2019 MFA for users, you can choose from multiple authentication methods and configure a policy that determines when the MFA should be used. You can set requirements like the number of authentication steps required for each session, how often authentication should be required, and when additional security measures must be provided. The Windows Server 2019 MFA is designed to be easy to use, and its intuitive interface makes managing authentication safe and straightforward.
3. Benefits of MFA for Windows Server 2019
Multi-factor Authentication (MFA) is quickly becoming a standard security measure for businesses around the world. It requires multiple types of authentication, such as biometrics or passwords, to provide an extra layer of protection when accessing networks, systems, and other sensitive information. With the release of Windows Server 2019, MFA is now available for businesses in need of top-notch security. Here are a few of the key benefits of using MFA for Windows Server 2019:
- Increased Security: MFA helps protect information and system access from hackers by verifying that users are who they say they are. The added layer of protection helps reduce the chances of a successful hack.
- Enhanced User Experience: With MFA, users experience a smoother authentication process than with traditional methods, as they can use biometrics like fingerprints and facial recognition. This makes for a more positive experience whenever they need to access system resources.
- Reduced False Positives: MFA reduces the chance of false positives in authentication by adding an extra layer of verification. This decreases the chances of an unauthorized user successfully accessing your systems.
MFA for Windows Server 2019 is a highly secure and efficient way to protect your business. The extra layer of security that MFA adds makes it a perfect solution for businesses that require top-notch security for their sensitive systems and data.
4. Setting up Multi Factor Authentication for Windows Server 2019
Keeping your Windows Server 2019 secure is essential. To do so, incorporating multi-factor authentication into your system is of utmost importance. By providing additional layers of protection, you are able to ward off any potential attackers.
Setting up multi-factor authentication for Windows Server 2019 is relatively simple and follows the same steps nearby other versions of Windows. Follow these steps to add the extra layer of security:
- Download and install Windows Server 2019.
- Install the Multi-Factor Authentication Manager.
- Set the ports that are in use.
- Create a Directory Services Restore Mode password.
- Add users, groups and credentials.
- Setup the authentication policies.
- Enable the Multi-Factor Authentication Server.
- Set request and authentication timeouts.
- Configure the authentication methods.
From here, all that’s left is to test the configuration. This will keep threats at bay from accessing your valuable Windows Server 2019. Security is crucial, no matter the operating system, making the extra effort to set this up is worth the time and peace of mind.
Q&A
Q: What is Multi-Factor Authentication in Windows Server 2019?
A: Multi-Factor Authentication in Windows Server 2019 is a security feature that requires users to provide two or more pieces of evidence (or “factors”) to verify their identity before logging in to the system. This can include things like a password, a code sent to a cell phone or a smart card.
Conclusion
Don’t wait any longer—secure your data and system access with LogMeOnce Multi-Factor Authentication for Windows Server 2019. Create a FREE account today and get the protection and peace of mind you need. LogMeOnce is the perfect Multi-Factor Authentication solution, utilizing the latest security technologies to safeguard your Windows Server 2019 environment.
Sadia, with her Master of Computer Applications, stands at the intersection of technology and communication. Her academic background has endowed her with a deep understanding of complex technical concepts, which she skillfully simplifies for diverse audiences. Sadia’s extensive experience in both technical realms and writing enables her to translate intricate technical ideas into clear, engaging, and accessible content.
In this article, we will show how to implement two-factor authentication (2FA) for users on a Windows domain using the free open-source multiOTP package. MultiOTP is a set of PHP classes and tools that allows you to implement an on-premises strong authentication server for HOTP and TOTP (Time-based One Time Password). You can use it both in Windows and in any other operating system (via RADIUS) to enable 2FA with a one-time password.
Once multiOTP is deployed, Windows prompts a user to enter a one-time password (OTP) that they receive from their mobile device/smartphone (from Microsoft or Google Authenticator, or another OTP generator). You can enable two-factor authentication for users to log in to Windows workstations or to access RDS hosts on Windows Server over RDP.
MultiOTP offers offline operation (doesn’t need Internet access), so you can use it to configure multi-factor authentication in disconnected environments. Most similar apps are commercial or require direct Internet access.
Contents:
- Installing MultiOTP in Active Directory Domain
- Configuring MultiOTP Two-Factor Authentication for Domain Users
- How to install and Configure MultiOTP CredentialProvider on Windows?
Installing MultiOTP in Active Directory Domain
In this section, we’ll show how to install multiOTP on Windows Server 2019 and configure user synchronization from Active Directory.
You can also deploy multiOTP using an OVA image for a VMware/Hyper-V virtual machine, or a Docker container.
Let’s start with the configuration of a multiOTP server that will get users from Active Directory, generate unique QR codes for users, and validate the second factor.
Create a security group in Active Directory and add users to it who will be required to pass the second-factor verification when logging into Windows. Create a group using PowerShell:
New-ADGroup 2FAVPNUsers -path 'OU=Groups,OU=Munich,dc=woshub,DC=com' -GroupScope Global -PassThru –Verbose
Add users to the group:
Add-AdGroupMember -Identity 2FAVPNUsers -Members j.smith, k.berg, m.bakarlin
Create a new user in AD multiOTP that will be used to access the AD catalog (with minimal privileges):
$passwd = ConvertTo-SecureString -String "Paa32ssw0rd!" -AsPlainText -Force
 New-ADUser -Name "multiotp_srv" -SamAccountName "multiotp_srv" -UserPrincipalName "[email protected]" -Path "OU=ServiceAccounts,OU=Munich,DC=woshub,DC=com" –AccountPassword $passwd -Enabled $true
Download the multiOTP archive – https://download.multiotp.net/.
Open the multiotp_5.9.2.1.zip archive and extract the windows directory from it to a folder on your local drive (C:\MultiOTP).
Open the command prompt and go to the directory containing multiotp.exe:
CD C:\MultiOTP\windows
Using the commands below, we will configure MultiOTP LDAP settings to get users from the Active Directory database.
multiotp -config default-request-prefix-pin=0
 multiotp -config default-request-ldap-pwd=0
 multiotp -config ldap-server-type=1
 multiotp -config ldap-cn-identifier="sAMAccountName"
 multiotp -config ldap-group-cn-identifier="sAMAccountName"
 multiotp -config ldap-group-attribute="memberOf"
 multiotp -config ldap-ssl=0
 multiotp -config ldap-port=389
REM Domain controller IP address:
multiotp -config ldap-domain-controllers=mun-dc1.woshub.com,ldap://192.168.15.15:389
 multiotp -config ldap-base-dn="DC=woshub,DC=com"
REM Account for multiOTP authentication in AD:
multiotp -config ldap-bind-dn="CN=multiotp_srv,OU=ServiceAccounts,OU=Munich,DC=woshub,DC=com"
 multiotp -config ldap-server-password="Paa32ssw0rd!"
REM Group of users you want to enable OTP for:
multiotp -config ldap-in-group="2FAVPNUsers"
 multiotp -config ldap-network-timeout=10
 multiotp -config ldap-time-limit=30
 multiotp -config ldap-activated=1
REM Key to access a MultiOTP server:
multiotp -config server-secret=secret2OTP

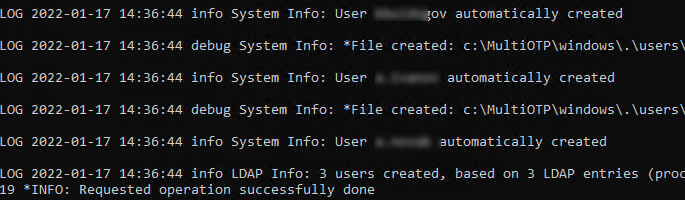
Earlier we created the 2FAVPNUsers group and added 3 users to it. Synchronize AD users with multiOTP.
multiotp -debug -display-log -ldap-users-sync
LOG 2022-09-17 14:36:44 info LDAP Info: 3 users created, based on 3 LDAP entries (processed in 00:00:00)
LOG 2022-09-17 14:36:44 debug System Info: *File created: c:\MultiOTP\windows\.\users\j.smith.db
In this case, multiOTP has found 3 users and synchronized them.
To regularly synchronize new Active Directory accounts, create a Task Scheduler job using the command below:
multiotp -debug -display-log -ldap-users-sync
Run webservice_install.cmd as administrator. It will install multiOTP web management interface.
Sign-in MUltiOTP web interface (http://127.0.0.1:8112/) using default credentials (user: admin, password: 1234). Then it is recommended to change it.
Configuring MultiOTP Two-Factor Authentication for Domain Users
In the List of users section, you will see a list of domain users synchronized earlier (AD/LDAP source).
Select a user and click Print. You will see a user QR code to add to the authentication app.
Install the Microsoft Authenticator (or Google Authenticator) from Google Play or App Store on the user’s smartphone. Open it and scan the user’s QR code.
Then a new user account appears in the Authenticator app, which generates a new six-digit password (the second factor) every 30 seconds.
In the command prompt, you can make sure that multiOTP allows authenticating this user with OTP:
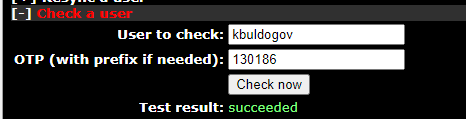
multiotp.exe -display-log j.smith 130186
where 130186 is a one-time password you get from the app.
LOG 2022-09-17 15:13:11 notice (user j.smith) User OK: User j.smith successfully logged in with TOTP token
Filter-Id += "2FAVPNUsers"

You can also make sure that OTP is working correctly through the web interface. Go to Check a user section, enter a user name and a one-time password.

How to install and Configure MultiOTP CredentialProvider on Windows?
The next step is to install multiOTP-CredentialProvider on Windows computers you want to implement two-factor authentication using multiOTP. You can install CredentialProvider on any Windows 7/8/8.1/10/11 or Windows Server 2012(R2)/2016/2019/2022 host.
In this example, we will enable 2FA for RDP users to log in to an RDSH server running Windows Server 2019.
Download and install multiOTP CredentialProvider from GitHub https://github.com/multiOTP/multiOTPCredentialProvider/releases. The last available version is 5.9.2.1.
Run the installation:
- Specify the IP address of the server multiOTP is installed on.
Remember to open a firewall port on the multiOTP server and client. You can open a port in Windows Firewall on a server using PowerShell:
New-NetFirewallRule -DisplayName "AllowMultiOTP" -Direction Inbound -Protocol TCP –LocalPort 8112 -Action Allow - Enter the secret key from the multiOTP configuration ( server-secret) in the field Secret shared with multiOTP server;
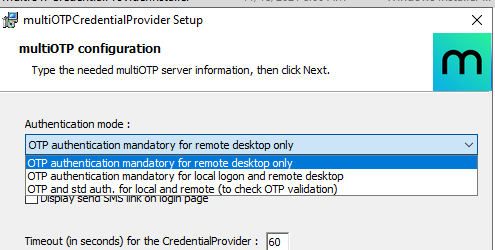
- Select Windows logon type to apply OTP authentication. In our example, we will use 2FA for RDP logins only (OTP authentication mandatory for remote desktop only).
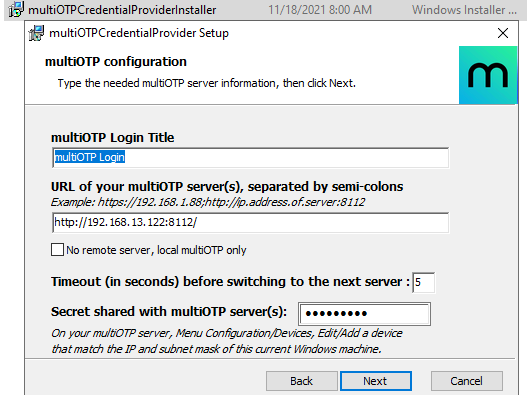
You can enable OTP authentication both for RDP and local logons.
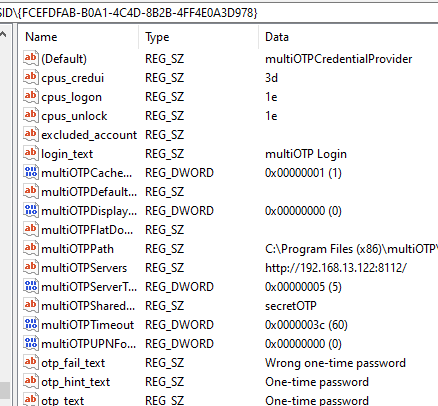
MultiOTP CredentialProvider keeps its settings in the registry: HKEY_CLASSES_ROOT\CLSID\{FCEFDFAB-B0A1-4C4D-8B2B-4FF4E0A3D978}. If you want, you can change CredentialProvider settings here without reinstalling agent.
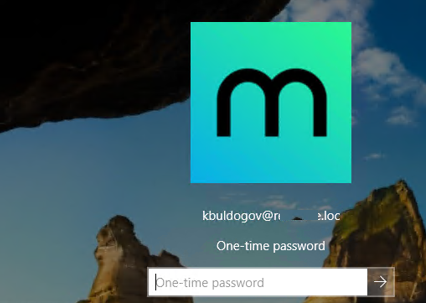
Restart the Windows Server RDS host and try to connect to it via RDP. After you enter your user credentials, a new one-time password window appears. Here you must enter a one-time password from your Authenticator app on your smartphone.
If NLA for RDP is disabled on the RDS host, a user will just see three fields (username, password, and OTP).
You can enable logging on your multiOTP server, it is useful for debugging:
multiotp -config debug=1
 multiotp -config display-log=1
Your script is running from C:\MultiOTP\windows\
2022-09-17 15:21:07 debug CredentialProviderRequest Info: *Value for IsCredentialProviderRequest: 1 0 MUN-SRVOTP1
2022-09-17 15:21:07 debug Server-Client Info: *CheckUserToken server request. 0 MUN-SRVOTP1
2022-09-17 15:21:07 notice j.smith User OK: User j.smith successfully logged in (using Credential Provider) with TOTP token 0 MUN-SRVOTP1
2022-09-17 15:21:07 debug Server-Client Info: *Cache level is set to 1 0 MUN-SRVOTP1
2022-09-17 15:21:07 debug Server-Client Info: *Server secret used for command CheckUserToken with error code result 0: secret2OTP 0 MUN-SRVOTP1
Remember to make sure that your AD domain synchronizes time with a reliable time source and client devices have the correct time. These are critical to the operation of OTP.
Anyway, before bulk multiOTP-based 2FA implementation in your network, we recommend testing all operation modes and emergencies (multiOTP server or DC unavailability, CredentialProvider errors, etc.) within a couple of weeks. If any serious issues with multiOTP logon occur, you can uninstall CredentialProvider in the Safe Mode.
So, the configuration of multiOTP two-factor authentication in Windows Server is over. There are also scenarios of using multiOTP with a RADIUS server to authenticate almost any type of client using OTP. You can use OTP for extra protection of the RDP server against brute force attacks together with Windows Firewall rules.