
Распределенное обучение с TensorFlow и Python
AI_Generated 05.05.2025
В машинном обучении размер имеет значение. С ростом сложности моделей и объема данных одиночный процессор или даже мощная видеокарта уже не справляются с задачей обучения за разумное время. Когда. . .
CRUD API на C# и GraphQL
stackOverflow 05.05.2025
В бэкенд-разработке постоянно возникают новые технологии, призванные решить актуальные проблемы и упростить жизнь программистам. Одной из таких технологий стал GraphQL — язык запросов для API,. . .
Распознавание голоса и речи на C#
UnmanagedCoder 05.05.2025
Интеграция голосового управления в приложения на C# стала намного доступнее благодаря развитию специализированных библиотек и API. При этом многие разработчики до сих пор считают голосовое управление. . .
Реализация своих итераторов в C++
NullReferenced 05.05.2025
Итераторы в C++ — это абстракция, которая связывает весь экосистему Стандартной Библиотеки Шаблонов (STL) в единое целое, позволяя алгоритмам работать с разнородными структурами данных без знания их. . .
Разработка собственного фреймворка для тестирования в C#
UnmanagedCoder 04.05.2025
C# довольно богат готовыми решениями – NUnit, xUnit, MSTest уже давно стали своеобразными динозаврами индустрии. Однако, как и любой динозавр, они не всегда могут протиснуться в узкие коридоры. . .
Распределенная трассировка в Java с помощью OpenTelemetry
Javaican 04.05.2025
Микросервисная архитектура стала краеугольным камнем современной разработки, но вместе с ней пришла и головная боль, знакомая многим — отслеживание прохождения запросов через лабиринт взаимосвязанных. . .
Шаблоны обнаружения сервисов в Kubernetes
Mr. Docker 04.05.2025
Современные Kubernetes-инфраструктуры сталкиваются с серьёзными вызовами. Развертывание в нескольких регионах и облаках одновременно, необходимость обеспечения низкой задержки для глобально. . .
Создаем SPA на C# и Blazor
stackOverflow 04.05.2025
Мир веб-разработки за последние десять лет претерпел коллосальные изменения. Переход от традиционных многостраничных сайтов к одностраничным приложениям (Single Page Applications, SPA) — это. . .
Реализация шаблонов проектирования GoF на C++
NullReferenced 04.05.2025
«Банда четырёх» (Gang of Four или GoF) — Эрих Гамма, Ричард Хелм, Ральф Джонсон и Джон Влиссидес — в 1994 году сформировали канон шаблонов, который выдержал проверку временем. И хотя C++ претерпел. . .
C# и сети: Сокеты, gRPC и SignalR
UnmanagedCoder 04.05.2025
Сетевые технологии не стоят на месте, а вместе с ними эволюционируют и инструменты разработки. В . NET появилось множество решений — от низкоуровневых сокетов, позволяющих управлять каждым байтом. . .
-
Home
-
News
- BIOS Show Two Boot Manager: Reduce the Unnecessary One
BIOS Show Two Boot Manager: Reduce the Unnecessary One
By Amy | Follow |
Last Updated
Sometimes, you may find that BIOS show two Boot Manager. Actually, this is a common issue that can occur in many situations. Here, Partition Magic explores the reasons behind the issue and provides troubleshooting methods.
The “Windows Boot Manager showing two” issue can occur from time to time. Sometimes, you can even see multiple Windows Boot Manager entries in BIOS. You will see various complaints about the issue while browsing forums and communities. Here is a true example from Dell.com.
I made an unsuccessful attempt to clone my HDD onto an SSD so the SSD would become my boot drive. In my botched attempts to try to get the SSD to boot I’ve somehow ended up with two ‘Windows Boot Manager’ entries under ‘UEFI Boot’ in the BIOS. I can still boot into Windows OK using my original drive but how can I delete this new BIOS entry and how do I know which entry is the original and which is the new?Dell.com
Causes of Two Boot Manager Problems
Why are there two Windows Boot Manager entries in BIOS? The issue can be caused by various factors. Some known reasons are listed as follows.
- Bootable external devices: As Windows installation media, bootable external devices have their own bootable systems, creating entries in the Boot Manager.
- Misconfigured BIOS/UEFI settings: Improper BIOS/UEFI settings can cause the system to create additional entries, leading to two Boot Manager problems. If the boot order is configured to prioritize different drives during different boot attempts, it may generate multiple Windows Boot Manager entries in BIOS.
- Multiple Windows installations: If there are multiple Windows installations on different drives, BIOS may detect two separate Boot Manager.
- Disk imaging or cloning: Cloning or imaging disk is the process to transfer data to a new drive or create a backup. This operation can generate duplicate boot entries. Once the cloned or image drive is connected to the system, BIOS can recognize the Boot Manager from the source disk and the cloned one. Hence, it’s important to set the desired disk as the first boot device after cloning.
- Bootloader errors: The “Windows Boot Manager showing two” issue can be triggered by software conflicts or errors occurring during the Windows update process.
- Installation or restoration failure: If the Windows installation or system restoration process fails or interrupts, it may leave behind additional entries in the Boot Manager.
Based on the above reasons, I collect some solutions to “two/multiple Windows Boot Manager entries in BIOS” issue.
Tips:
If you encounter errors like BOOTMGR is missing, you can fix them by using MiniTool Partition Wizard. This software helps you resolve errors related to hard disks, such as external hard drive not showing up Windows 11, Steam not recognizing external hard drive, hard drive failure, missing operating system, etc.
MiniTool Partition Wizard DemoClick to Download100%Clean & Safe
Solution 1: Unplug the Bootable External Device
Unplugging the bootable external device is a simple way to fix the “Windows Boot Manager showing two” issue. You can have a try! For instance, you should unplug the connected bootable USB drive, external hard drive, or the cloned disk.
Then restart the computer and access BIOS to check if BIOS show two Boot Manager still. If two Boot Manager problems persist, try the rest solutions immediately.
Solution 2: Check If BIOS/UEFI Settings Are Right
Since improper BIOS/UEFI settings are responsible for multiple Windows Boot Manager entries in BIOS, it is necessary to check the BIOS/UEFI settings when the discussed issue occurs. You can follow these steps to perform the operation.
Step 1: Restart the computer keep pressing the BIOS key while the PC loads up to enter BIOS setup.
Step 2: Navigate to the Boot tab by using the arrow keys on the keyboard.
Step 3: Check if the first boot option is set correctly.
Step 4: If not, setting the right boot device as the first boot by changing the boot order.
Step 5: Press F10 > Enter to save changes and exit BIOS.
Solution 3: Delete Unnecessary Boot Manager
If there are multiple Windows Boot Manager entries in BIOS, you should delete unnecessary Boot Manager manually. Here’s how to do that.
Step 1: Enter the BIOS setup screen of your computer.
Step 2: Find the two Windows Boot Manager entries in BIOS and remember their locations or labels.
Step 3: Boot into one of the Windows installations associated with the duplicate boot manager entries.
Step 4: Type cmd in the search box and then click Run as administrator under the searched Command Prompt app.
Step 5: In the User Account Control window, click Yes to allow the operation.
Step 6: Type bcdedit and hit Enter to execute the command. It displays the boot configuration data. View and remember the identifiers for the duplicate boot manager entries.
Step 7: To delete the duplicate Boot Manager entry, type bcdedit /delete {identifier} and hit Enter. You should replace {identifier} with the specific identifier for the duplicate entry.
Step 8: Verify the changes and exit the Command Prompt. Then restart the computer and check if BIOS show two Boot Manager.
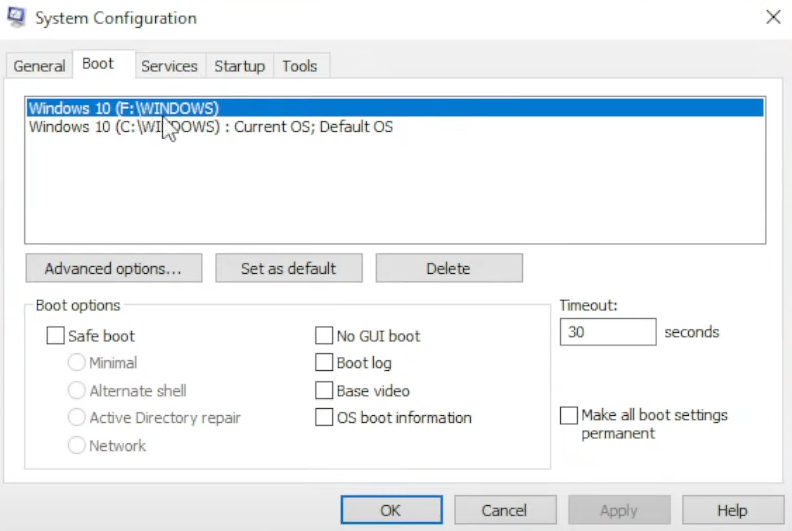
Solution 4: Remove Multiple Boot Option in System Configuration
If there are multiple Windows Boot Manager entries in BIOS, you can remove multiple boot option in System Configuration using the steps below.
Step 1: Open the Run window by pressing Windows and R keys.
Step 2: Type msconfig in the Run window and click OK to save changes.
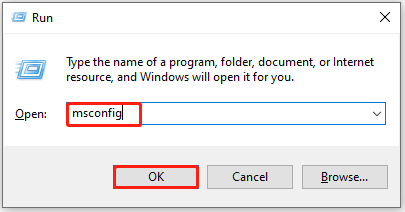
Step 3: Switch to the Boot tab. Then you will see all the boot options available on the PC.
Step 4: Click on the boot option to remove and click Delete. Unnecessary options can be duplicates or leftovers from previous OS or installations.
Step 5: Follow the on-screen instructions to complete the operation.
The End
Does BIOS show two Boot Manager on your computer? This post summarizes the possible reasons and offers troubleshooting methods. You can fix two/multiple Windows Boot Manager entries in BIOS with the given methods.
About The Author
Position: Columnist
Having writing articles about computer tech for a long time, I am rather experienced especially on the aspect of computer optimization, PC enhancement, as well as tech terms explanation. The habit of looking through tech forums makes me a great computer issues collector. And then, many articles related to these issues are released, which benefit plenty of users. Professional, effective, and innovative are always the pursuit of an editing worker.
Unraveling the Enigma: The Mystery of Two Windows Boot Manager Entries in BIOS
May 2025: Enhance your computer’s performance and eliminate errors with this cutting-edge optimization software. Download it at this link
- Click here to download and install the optimization software.
- Initiate a comprehensive system scan.
- Allow the software to automatically fix and repair your system.
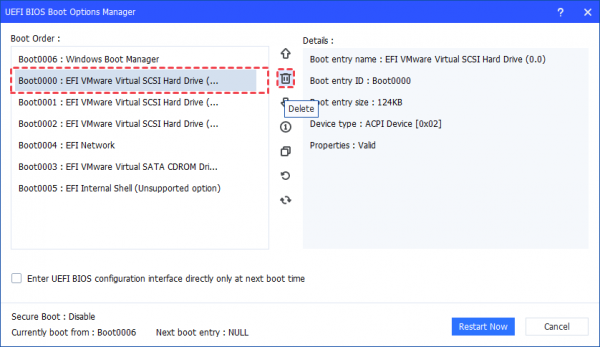
Troubleshooting Windows Boot Manager in BIOS
If you are experiencing the issue of having two Windows Boot Manager entries in the BIOS, follow these troubleshooting steps to resolve the problem.
1. Restart your computer and enter the BIOS settings by pressing the designated key (usually F2 or Delete) during startup.
2. Navigate to the Boot section in the BIOS menu.
3. Look for duplicate entries under the UEFI Boot Entries.
4. Identify the duplicate entry related to Windows Boot Manager.
5. Select the duplicate entry and press the Delete key to remove it.
6. Save the changes and exit the BIOS settings.
7. Restart your computer and check if the issue is resolved.
Updated: May 2025
Fortect provides solutions for various Windows issues, including those related to the Windows Boot Manager in BIOS. If you are experiencing errors or confusion messages related to the Boot Manager, Fortect can help by repairing damaged system files and faulty settings that may be causing the issue.
While we cannot guarantee that Fortect will fix every specific Boot Manager error, it can address common underlying causes such as damaged DLL files, incompatible drivers, and Windows bugs.
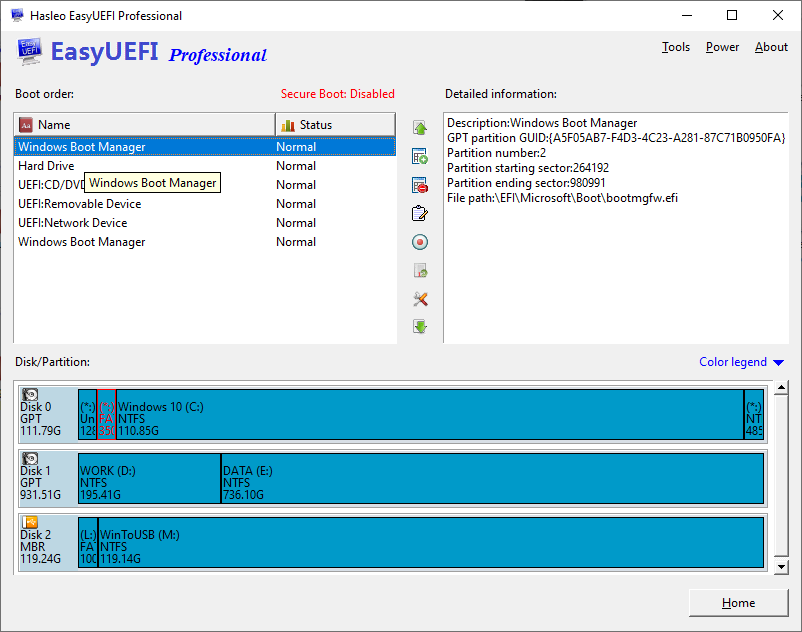
Removing Multiple “Windows Boot Manager” Entries with EasyUEFI
- Download and install EasyUEFI from the official website.
- Launch EasyUEFI and click on the “Manage EFI Boot Option” button.

- Locate the “Windows Boot Manager” entries that you want to remove.
- Select each unwanted entry and click on the “Delete” button.
- Confirm the deletion when prompted.
- Restart your computer to check if the “Windows Boot Manager” entries have been successfully removed from the BIOS.
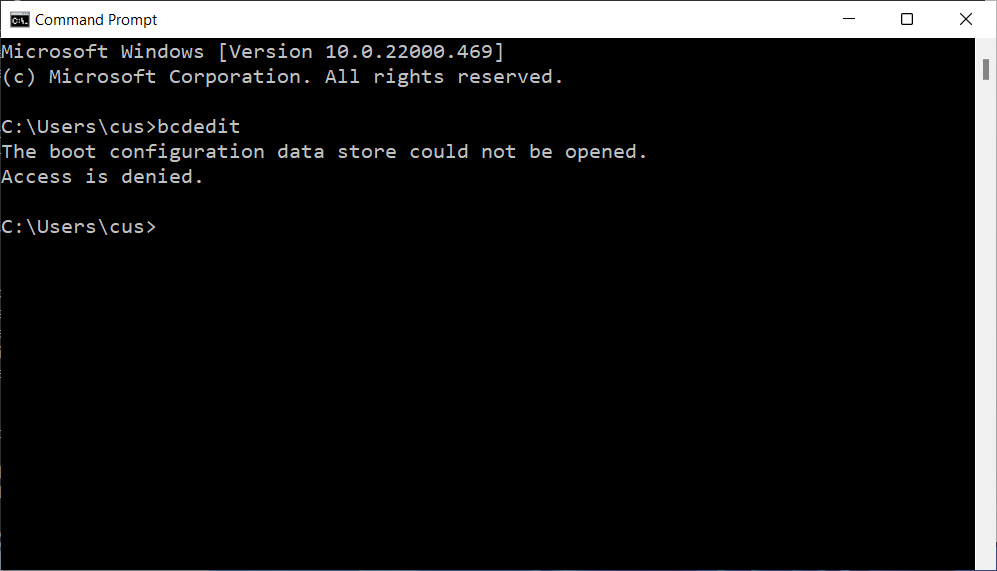
Method 2: Using Command Prompt
- Press the Windows key + X and select “Command Prompt (Admin)” to open an elevated Command Prompt.
- Type the command bcdedit and press Enter to view the boot entries.
- Identify the unwanted “Windows Boot Manager” entries by their identifiers.
- Type the command bcdedit /delete {identifier} for each unwanted entry, replacing “{identifier}” with the actual identifier of the entry.
- Press Enter to execute the command and confirm the deletion when prompted.
- Restart your computer to check if the unwanted “Windows Boot Manager” entries have been removed from the BIOS.
Method 3: Using System Configuration
- Press the Windows key + R to open the Run dialog box.
- Type msconfig and press Enter to open the System Configuration utility.
- Go to the “Boot” tab.
- Under the “Boot options” section, locate the unwanted “Windows Boot Manager” entries.
- Select each unwanted entry and click on the “Delete” button.
- Click on “Apply” and then “OK” to save the changes.
- Restart your computer to check if the unwanted “Windows Boot Manager” entries have been removed from the BIOS.

Resolving Access Issues on Tenforums.com
If you are experiencing access issues on Tenforums.com related to having two Windows Boot Manager entries in your BIOS, follow these steps to resolve the problem:
1. Restart your computer and access your BIOS settings. This is typically done by pressing a specific key (e.g., F2 or DEL) during startup. Consult your computer or motherboard’s documentation for the exact key.
2. Once in the BIOS, navigate to the Boot section or a similar menu.
3. Look for the UEFI Boot Entries or Boot Priority options.
4. Locate the duplicate Windows Boot Manager entry and select it.
5. Use the appropriate key (e.g., – or +) to move it down or up in the boot order until it is below the desired Windows Boot Manager entry.
6. Save the changes and exit the BIOS.
7. Restart your computer and check if the access issues have been resolved.
If you continue to experience issues, it may be helpful to consult the Tenforums community for further assistance.
python

import os
def display_menu():

    print("Select boot manager:")

    print("1. Windows Boot Manager 1")

    print("2. Windows Boot Manager 2")

    print("3. Exit")
def set_boot_manager(selection):
if selection == 1:
# Set BIOS settings to boot from Windows Boot Manager 1
print("Setting boot manager to Windows Boot Manager 1...")
elif selection == 2:
# Set BIOS settings to boot from Windows Boot Manager 2
print("Setting boot manager to Windows Boot Manager 2...")
elif selection == 3:
print("Exiting...")
exit()
else:
print("Invalid selection. Please try again.")
def main():
while True:
display_menu()
selection = input("Enter your choice: ")
try:
selection = int(selection)
set_boot_manager(selection)
break
except ValueError:
print("Invalid input. Please enter a number.")
if __name__ == "__main__":

    main()
Using msconfig and EasyBCD for Boot Manager Fixes
To fix the issue of having two Windows Boot Manager entries in BIOS, you can use msconfig and EasyBCD. First, open the Run dialog by pressing Windows key + R, then type “msconfig” and hit Enter. In the System Configuration window, go to the Boot tab. Here, you can see the boot entries and select the one you want to remove. Check the box next to the unwanted entry and click “Delete”. Confirm the action and restart your computer.
If the above method doesn’t work, you can try using EasyBCD. Download and install EasyBCD from the official website. Launch the program and go to the “Edit Boot Menu” section. Select the unwanted entry and click “Delete”. Apply the changes and restart your computer.
By using either msconfig or EasyBCD, you can easily fix the issue of having two Windows Boot Manager entries in BIOS.
Example Message
?
It is advisable to check your BIOS settings to ensure that there is only one Windows Boot Manager listed, as having two may cause conflicts and hinder the proper booting of your system. Download this tool to run a scan
Post Views: 1,288
Was this article helpful?
YesNo
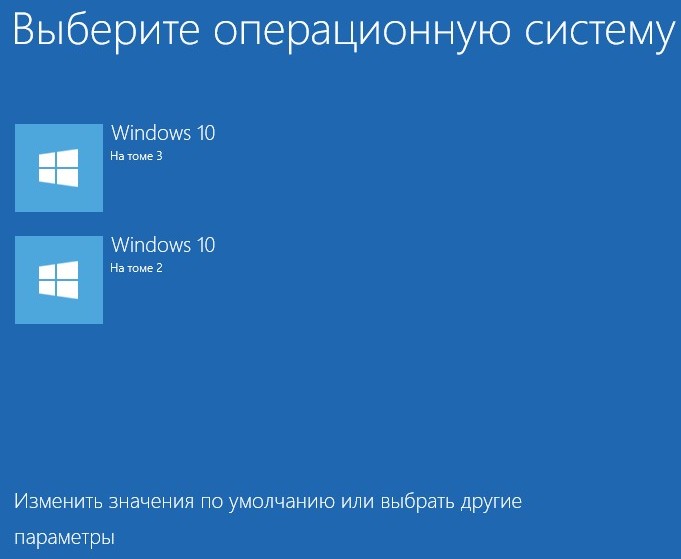
Здравствуйте! Вопрос. В моём компьютере был один жёсткий диск с установленной Windows 10, затем я установил в компьютер ещё один жёсткий диск и также установил на него Windows 10, после этого при включении стало появляться меню загрузки с выбором «Windows 10 На томе 3» и «Windows 10 На томе 2». Как мне избавиться от этого меню и создать файлы загрузки на каждом жёстком диске отдельно?
Мне не нравится то, что если убрать первый жёсткий диск, то ни одна Windows 10 не загружается, выходит ошибка:
Windows failed to start 0xc00000f…
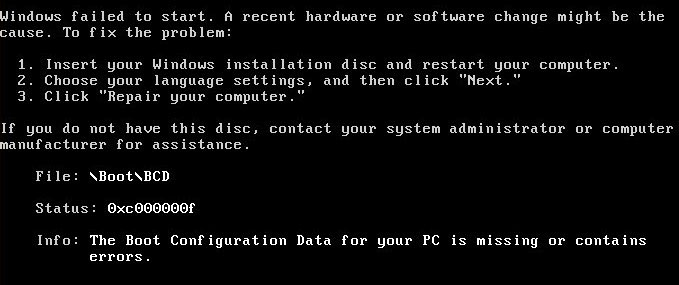
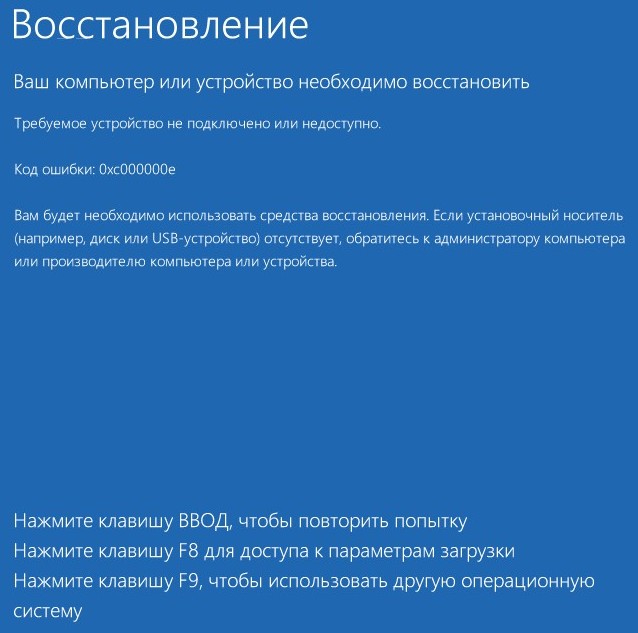
Если убрать второй жёсткий диск, то опять ничего не грузится, выходит другая ошибка:
Ваш компьютер или устройство необходимо восстановить…
Код ошибки 0xc000000e
{banner_google1}
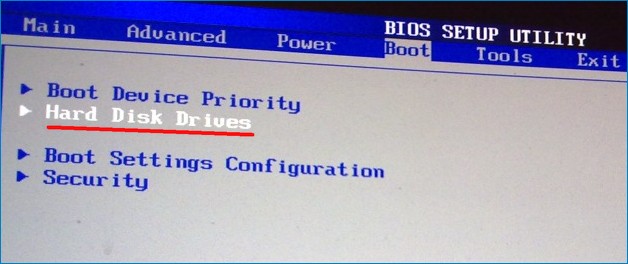
Если я создам два независимых загрузчика, то регулировать загрузку буду при помощи пункта в БИОС — Hard Disk Drives, данный пункт даёт возможность указать жёсткий диск, на котором следует искать операционную систему для загрузки.
Автор Владимир.
Привет друзья! Смоделируем на моём компьютере похожую ситуацию и установим на один жёсткий диск Windows 10 (данная статья также подойдёт для Windows 8.1).
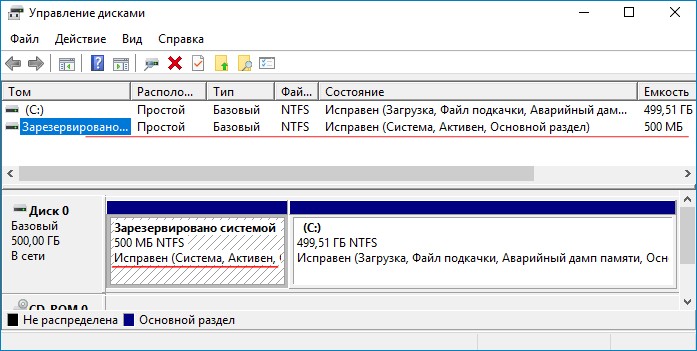
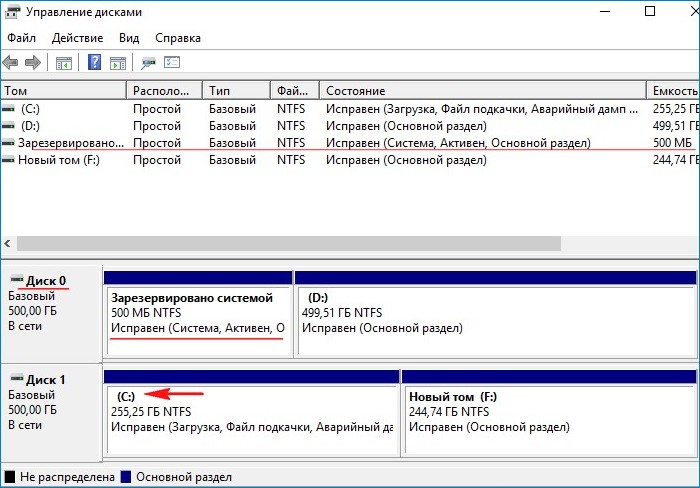
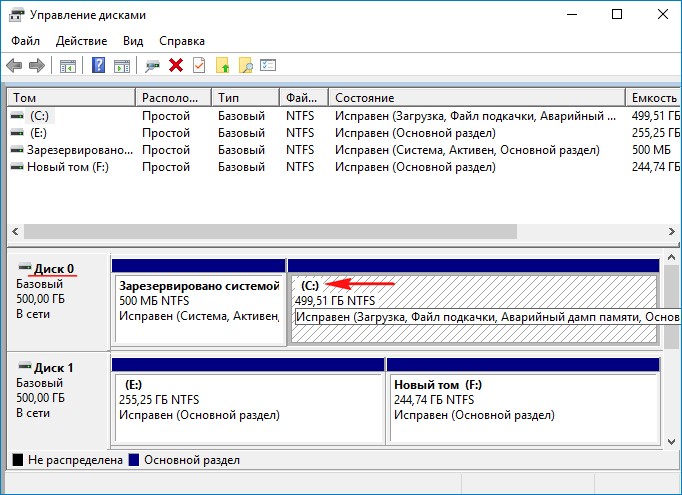
Как видим, в Управлении дисками первый раздел на Диске 0 имеет атрибуты: Исправен (Система, Активен, Основной раздел, объём 500 МБ), и на этом разделе находятся файлы загрузки Windows 10. Второй раздел, это диск (C:) с файлами операционной системы Windows 10.
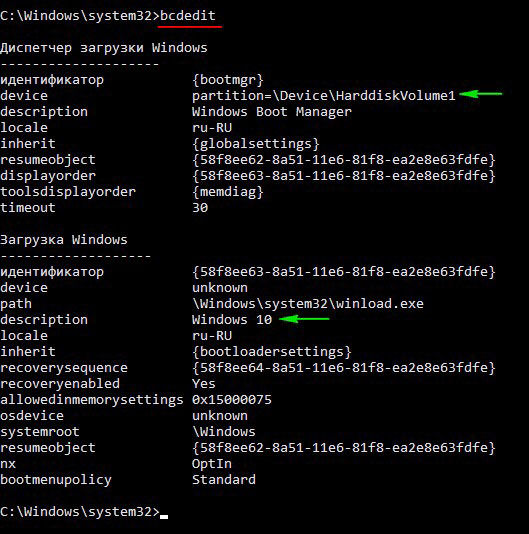
Если ввести в командной строке администратора команду bcdedit, то всё подтвердится — загрузчик системы (файл bootmgr) находится на первом разделе жёсткого диска HarddiskVolume1.
Подсоединяем второй жёсткий диск и устанавливаем на него тоже Windows 10.
После установки системы идём в Управлении дисками и видим, что активен всё тот же первый раздел (Диск 0), атрибуты: Исправен (Система, Активен, Основной раздел, объём 500 МБ), и на этом разделе находятся файлы загрузки обоих Windows 10. Простыми словами, установленная во вторую очередь Windows 10 (Диск 1) прописалась в загрузчик первой Windows 10, находящейся на Диске 0 (есть правило — установщик Windows всегда создаёт загрузчик на Диске 0, даже если на Диске 0 отсутствует операционная система и нет активного раздела, то установщик создаст активный раздел и там разместит файлы загрузки, а операционную систему разместит на том диске, который Вы укажете),
проверить это можно всё той же командой bcdedit.
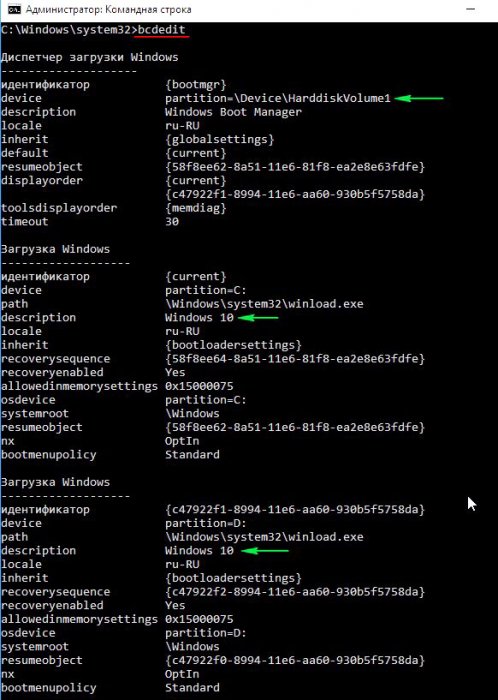
На диске (C:) с установленной во вторую очередь Windows 10 создался только диспетчер загрузки Win 10 (файл bootmgr).
Теперь об ошибках. Если сейчас форматировать или отсоединить любой жёсткий диск, то ни одна Windows 10 не загрузится, обе системы выдадут ошибки, про которые написал наш читатель и вот почему.
Если отсоединить из системного блока Диск 0, то Windows 10 на Диске 1 не загрузится, так как на Диске 0 находится общий для двух операционных систем загрузчик.
Если отсоединить из системного блока Диск 1, то Windows 10 на Диске 0 тоже не загрузится, так как на Диске 1 находится диспетчер загрузки Win 10 (файл bootmgr). Для того, чтобы загрузить Windows 10 на Диске 0, нужно будет нажать клавишу F9.

Наш читатель хочет создать независимые отдельные загрузчики на обоих жёстких дисках и сделать это можно так.
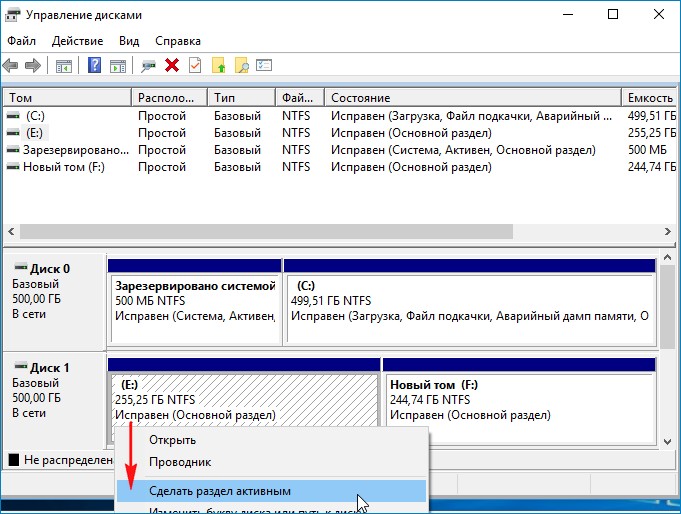
Загружаемся в Windows 10, установленную в первую очередь (Диск 0),
в Управлении дисками щёлкаем правой мышью на разделе (E:), на котором установлена вторая Windows 10 и выбираем в выпадающем меню «Сделать раздел активным».
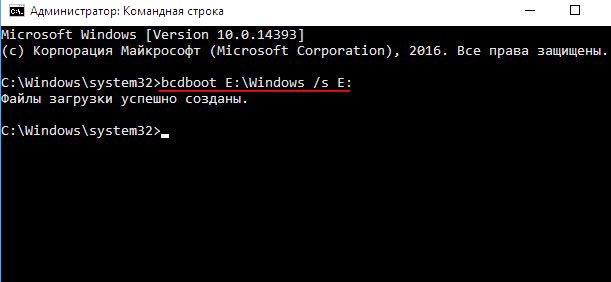
Затем открываем командную строку администратора и вводим команду:
bcdboot E:\Windows /s E:
данная команда обозначает, что мы хотим создать отдельный независимый загрузчик для Windows 10, которая находится разделе (E:) (Диске 1). Загрузчик будет расположен также на разделе (E:).
Файлы загрузки успешно созданы.
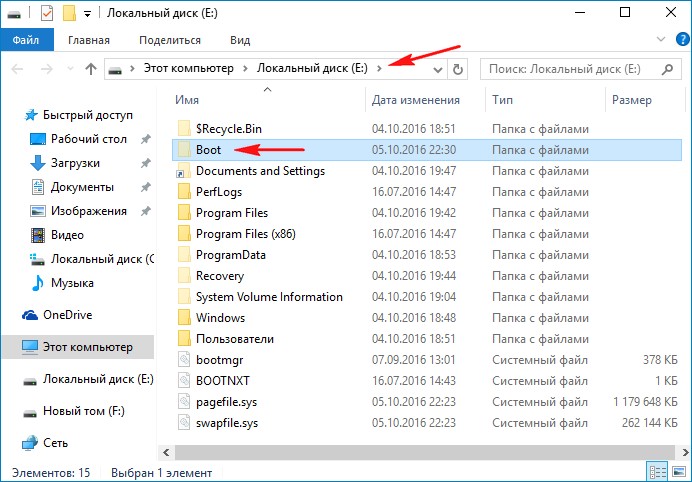
На разделе (E:) создаётся папка Boot с файлом данных конфигурации загрузки BCD), то есть с данного момента, установленная на Диск 1 — Windows 10 имеет отдельный загрузчик и если отсоединить Диск 0, то Windows 10 на Диске 1 всё равно загрузится.
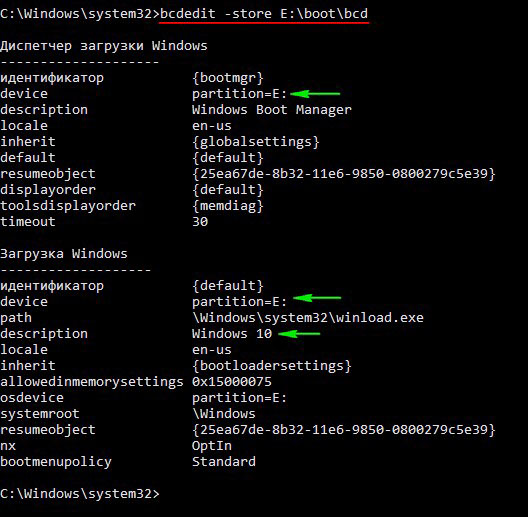
Убедимся в этом и откроем данные конфигурации загрузки (BCD) на разделе (E:).
В командной строке администратора введём команду:
bcdedit -store E:\boot\bcd
Ну а теперь избавляемся от меню загрузки
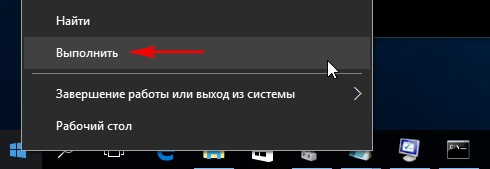
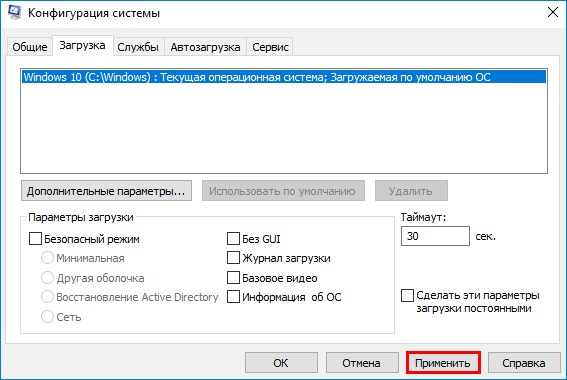
Пуск—>Выполнить
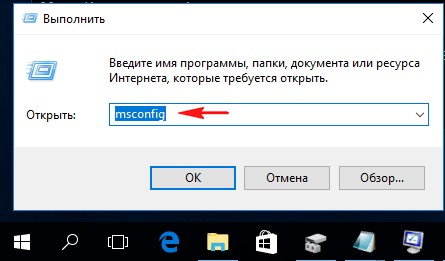
Вводим в поле ввода команду msconfig
Открывается окно Конфигурация системы.
Идём в пункт Загрузка и удаляем запись о Windows 10 установленной на разделе (E:).
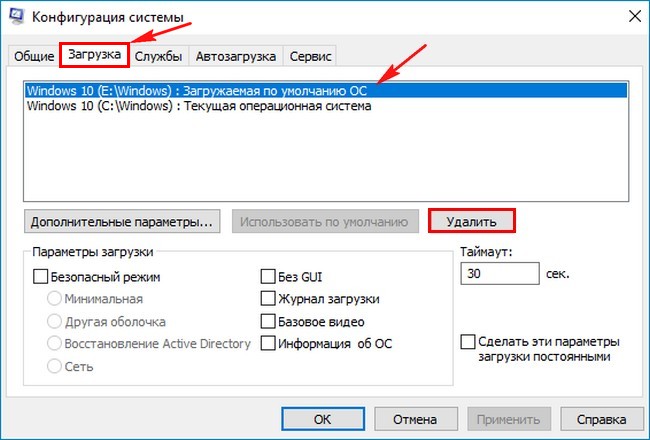
Применить и ОК.
Проверяем хранилище загрузки командой bcdedit

Вот и всё! Теперь у нас две операционные системы Windows 10 с двумя независимыми друг от друга загрузчиками.
1. На моём компьютере была установлена Windows 7, я купил второй жёсткий диск и установил на него Windows 10, затем форматировал жёсткий диск с Windows 7, теперь Windows 10 не загружается. Почему?
2. Как установить на разные жёсткие диски несколько операционных систем с независимыми друг от друга загрузчиками