
Windows позволяет назначить несколько IP адресов (алиасов, псевдонимов) на один физический сетевой адаптер. Это может пригодиться, когда вы хотите запустить несколько веб сайтов с уникальными IP адресами на одном сервере IIS, хотите привязать приложение к определенному IP или готовитесь к смене IP адресации. В Windows можно назначить дополнительные статический адрес на сетевой интерфейс через графический интерфейс или из командной строки.
Содержание:
- Добавить дополнительный IP адрес через панель управления Windows
- Параметр SkipAsSource и основной IP адрес сетевого адаптера
- Назначить второй IP адрес сетевому интерфейсу из командной строки/PowerShell
Добавить дополнительный IP адрес через панель управления Windows
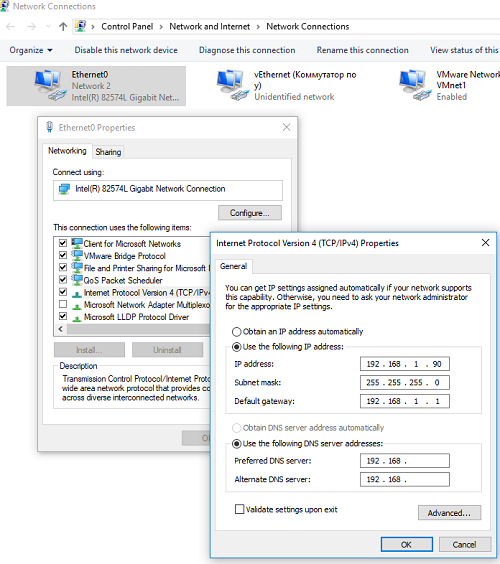
Дополнительный IP адрес можно назначить на сетевой интерфейс через графический интерфейс панели управления Windows.
- Откройте панель управления сетевыми подключениями (выполните команду
ncpa.cpl
). - Откройте свойства вашего сетевого интерфейса.
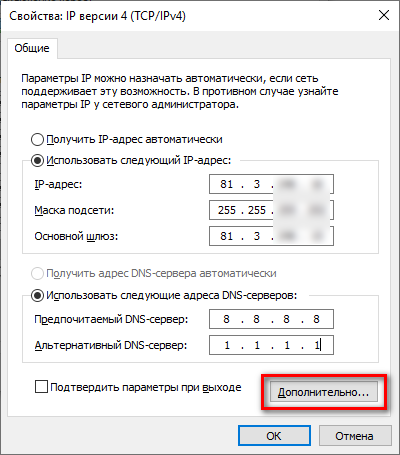
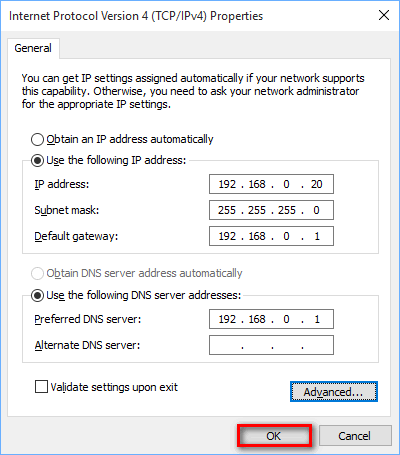
- В списке протоколов выберите TCP/IP v4 и нажмите Свойства.

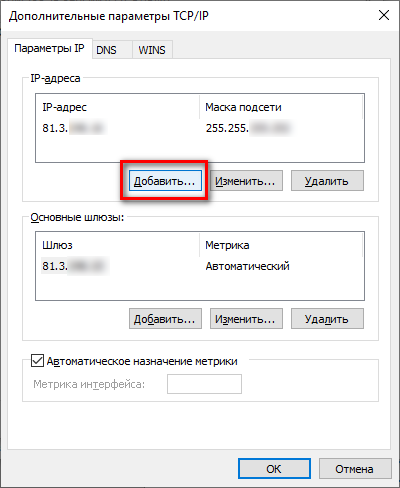
- Нажмите на кнопку Advanced (Дополнительно) и в секции «IP адреса» нажмите кнопку Добавить.
- Укажите дополнительный IP адрес и маску подсети и нажмите Добавить.
- Сохраните изменения.
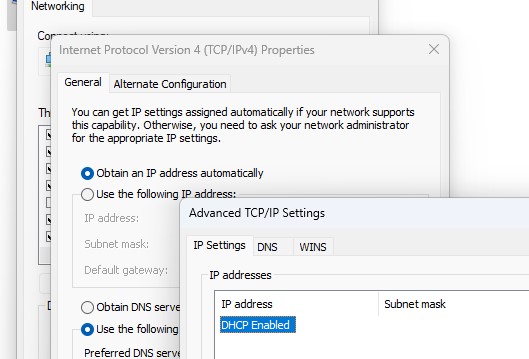
Дополнительный IP адрес можно добавить только для сетевого адаптера, для которого первый IP адрес настроен вручную, а не получен от DHCP сервера. Если для интерфейса включено автоматическое получения IP адреса (DHCP enabled), вам не удастся добавить дополнительный IP.
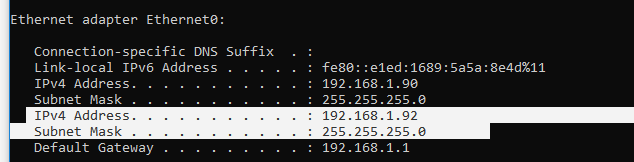
Выполните команду
ipconfig
и проверьте, у интерфейса появился второй IP адрес.
Проверьте доступность второго IP адреса по сети с других компьютеров командой ping. Он должен отвечать.
Параметр SkipAsSource и основной IP адрес сетевого адаптера
Когда вы назначаете дополнительный IP из панели управления, такой IP адрес будет использоваться для исходящих соединений. Дело в том, что в современных версиях Windows отсутствует понятие основного IP адреса. Если вы хотите запретить отправку исходящего трафика со всех дополнительных IP адресов, нужно включить для них опцию SkipAsSource.
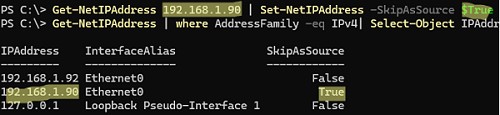
С помощью PowerShell выведите список IPv4 адресов, назначенных сетевым адаптерам:
Get-NetIPAddress | where AddressFamily -eq IPv4| Select-Object IPAddress, InterfaceAlias, SkipAsSource
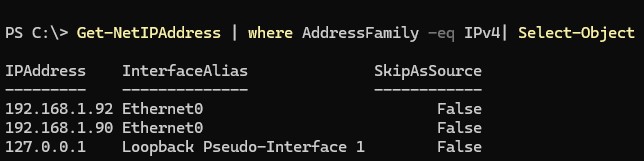
В этом примере SkipAsSource =False установлен для всех IP адресов компьютера. Если вы хотите сделать определенный IP адрес основным, выполните команду:
Get-NetIPAddress 192.168.1.90 | Set-NetIPAddress -SkipAsSource $True
Теперь указанный IP не будет использоваться в качестве источника исходящих подключений, кроме случаев его явного задействования определенным приложением. Так же при включенном флаге второй IP адрес не регистрируется в DNS (при включенной динамической регистрации).
Назначить второй IP адрес сетевому интерфейсу из командной строки/PowerShell
При добавлении дополнительного IP адреса из командной строки вы можете сразу включить для него флаг SkipAsSource. Например, с помощью netsh:
Netsh int ipv4 add address name="Local Area Connection" 192.168.1.92 255.255.255.0 SkipAsSource=True
Вывести список назначенных IP адресов и значение опции SkipAsSource:
netsh int ipv4 show ipaddresses level=verbose
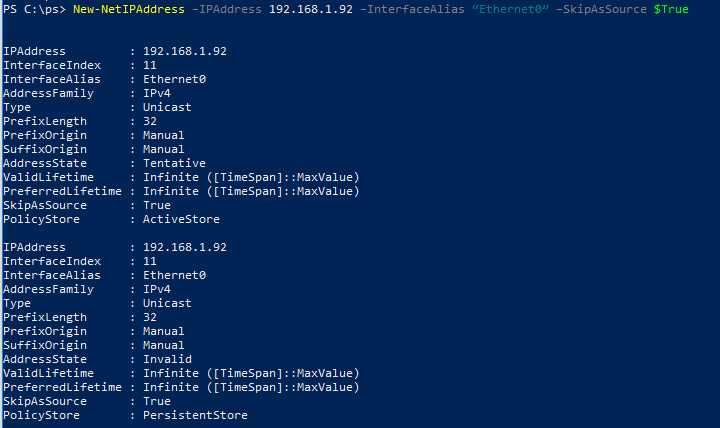
Также можно настроить второй IP для сетевого интерфейса с именем Ethernet0 с помощью PowerShell:
New-NetIPAddress –IPAddress 192.168.1.92 –PrefixLength 24 –InterfaceAlias “Ethernet0” –SkipAsSource $True
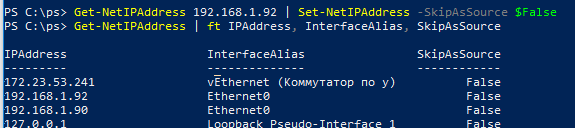
Чтобы разрешить исходящий трафик с данного IP адреса сетевого интерфейса воспользуйтесь командой:
Get-NetIPAddress 192.168.1.92 | Set-NetIPAddress -SkipAsSource $False
Удалить дополнительный IP:
Get-NetIPAddress 192.168.1.92| Remove-NetIPAddress
Обратите внимание. В мае 2025 года существенное снизились цены на вечные виртуальные серверы VPS/VDS в России и Нидерландах. Для читателей блога дополнительная скидка 10%. Подробнее.
Когда-то я уже писал как настроить два IP адреса на сетевой карте в Linux — https://moonback.ru/page/2ip-linux. И не справедливо обошел вниманием пользователей Windows. Эта статья исправляет указанный недостаток, я подробно напишу как настроить 2 IP адреса на одном сетевом интерфейсе в операционных системах семейства Windows. Статья справедлива для Windows 7, 8, 8.1 и 10.
Необходимость в подобной настроке у меня возникла совсем недавно, когда один знакомый попросил подключить IP камеру видеонаблюдения (RVi-IPC11S). Но в его «сети» не было ни коммутатора, ни маршрутизатора. А единственный сетевой порт компьютера был занят кабелем провайдера Интернет.
Чтобы минимизировать затраты было решено приобрести самый дешевый коммутатор на 5 портов (TP-LINK TL-SF1005D). После чего кабель провайдера перекочевал из компьютера в коммутатор, в который так же была подключена камера, ну а сам коммутатор был подключен патч-кордом к компьютеру. Камеру я запитал через блок питания 12В (АТ-12/10).
2 IP адреса на одной сетевой карте в Windows
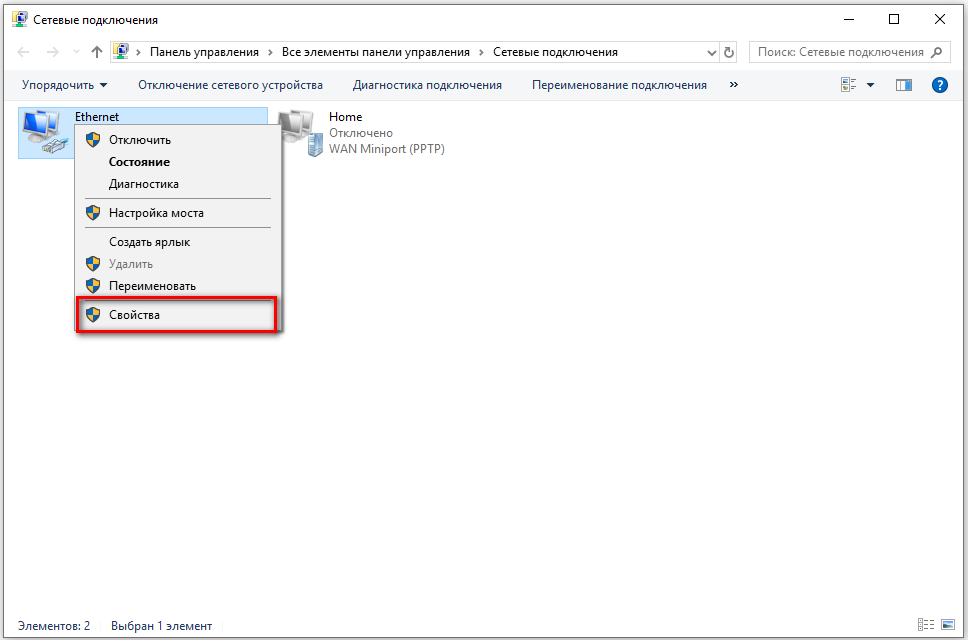
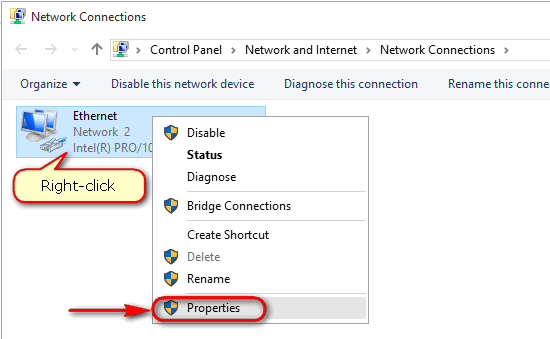
Теперь перейдем непосредственно к самим настройкам. В панели управления необходимо изменить свойства сетевого адаптера, для этого нажимаем правую клавишу мыши и в контекстном меню выбираем «Свойства»:
Далее в списке ищем пункт связанный с протоколом Ipv4 и нажимаем кнопку «Свойства»:
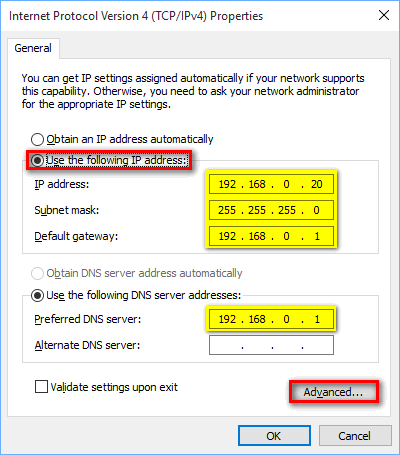
В моем примере уже прописан статический адрес (настройки провайдера интернет). Если у вас используется пункт «Получить IP-адрес автоматически», то вам придется перейти в режим «Использовать следующий IP-адрес». Затем нужно нажать кнопку «Дополнительно»:
В появившемся окне мы видим существующий IP адрес, чтобы добавить еще один нажмите «Добавить»:
Здесь введите необходимый вам новый IP-адрес, я использовал подсеть IP-видеокамеры по-умолчанию и нажать клавишу «Добавить».
Мы автоматически возвращаемся в предыдущее окно и видим, что теперь у нас настроено 2 IP адреса:
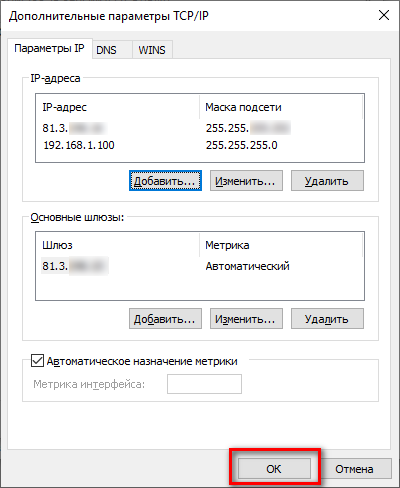
Для сохранения всех настроек нажмите «ОК».
Как найти панель управления в Windows 10
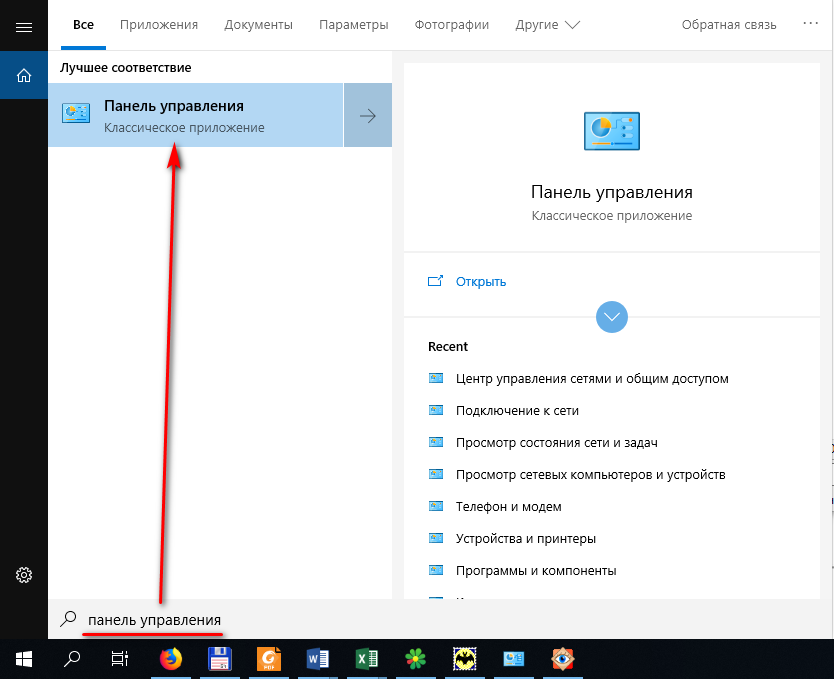
В новых сборках Windows 10 добраться до классического приложения «Панель управления», известного на нам со времен Windows 7, стало намного сложнее. Чтобы ее найти нужно нажать иконку поиска возле кнопки «Пуск»:

И в поисковой строке ввести «Панель управления». Далее щелкнуть мышкой по «Панель управления — Классическое приложение»:
Как найти настройки сетевого адаптера в панели управления
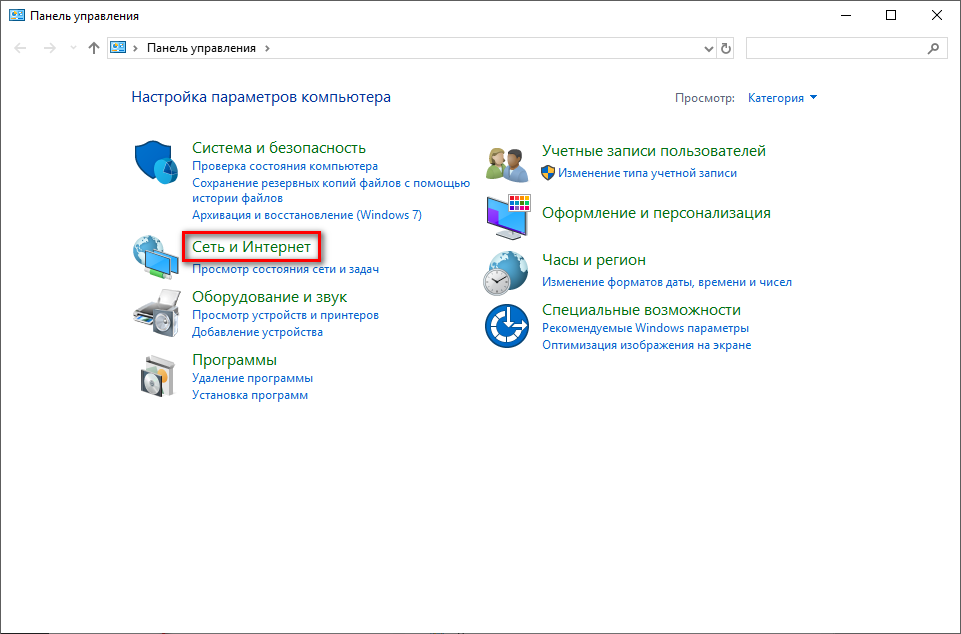
В классической панели управления необходимо выбрать «Сеть Интернет»:
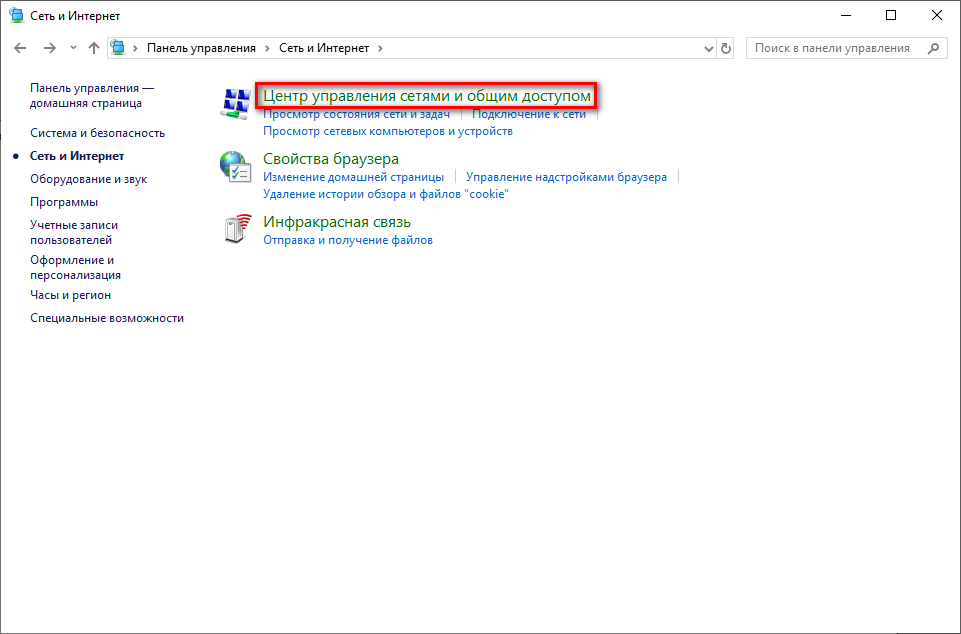
Далее «Центр управления сетями и общим доступом»:
И наконец выбрать пункт «Изменение параметров адаптера»:
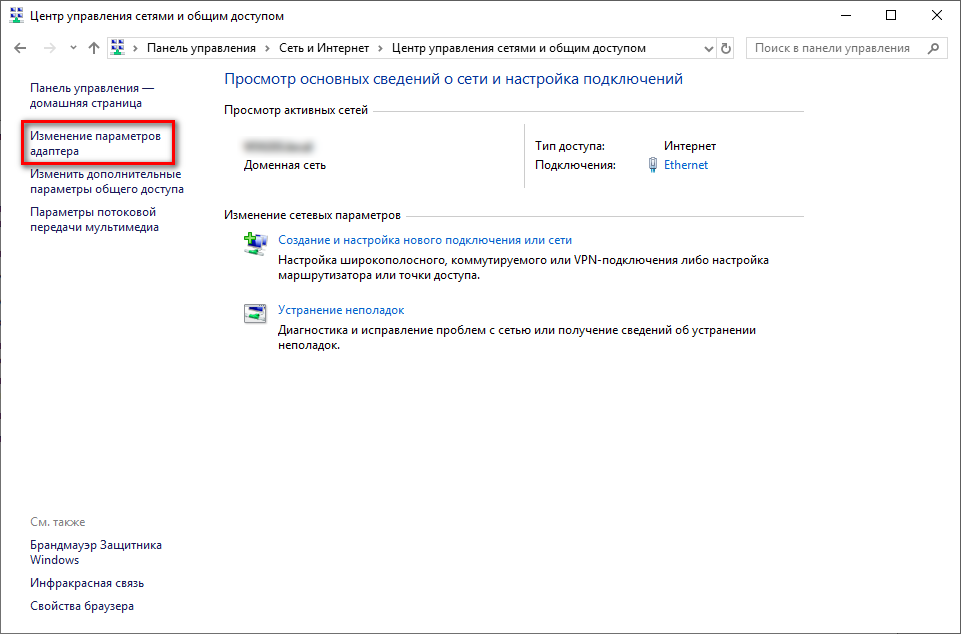
После чего вы должны увидеть список сетевых адаптеров вашего компьютера (первое изображение этой статьи).
Как быстро зайти в настройки параметров сетевого адаптера в Windows 10
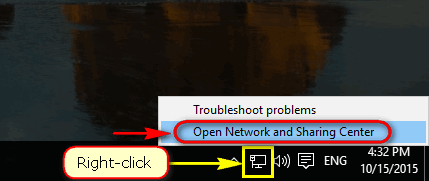
Чтобы не искать Панель управления и не рыскать по пунктам его меню нужно щелкнуть правой клавишей мыши на иконке сети в панели задач в правом углу рядом с часами и выбрать пункт «Открыть параметры сети и Интернет»:
Затем выбираем пункт «Ethernet»:
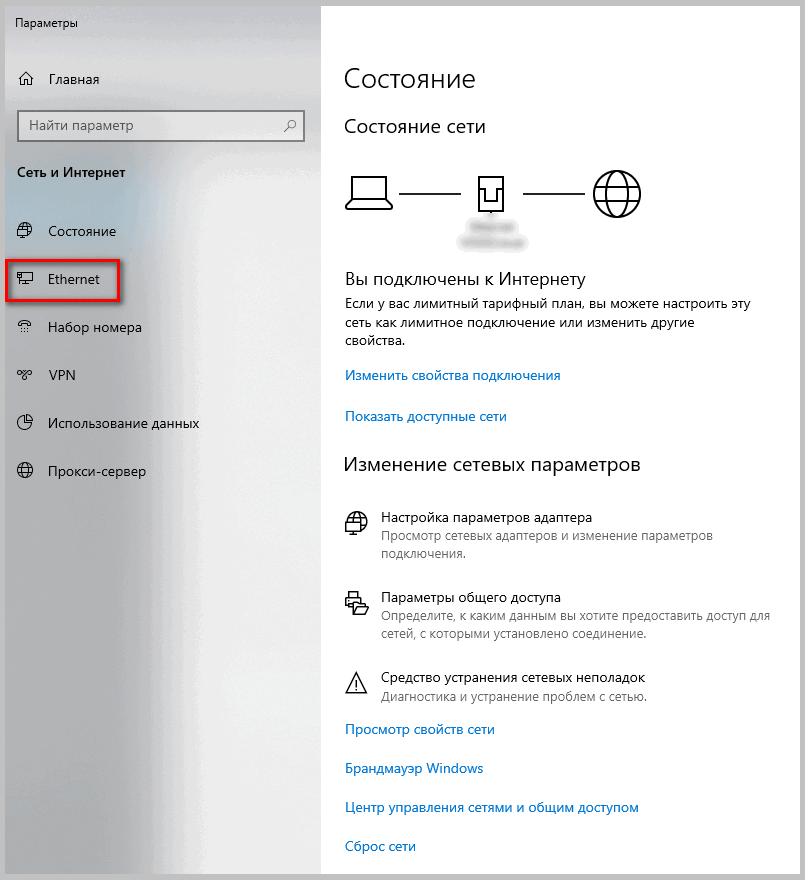
После чего выбираем пункт «Изменение параметров адаптера»:
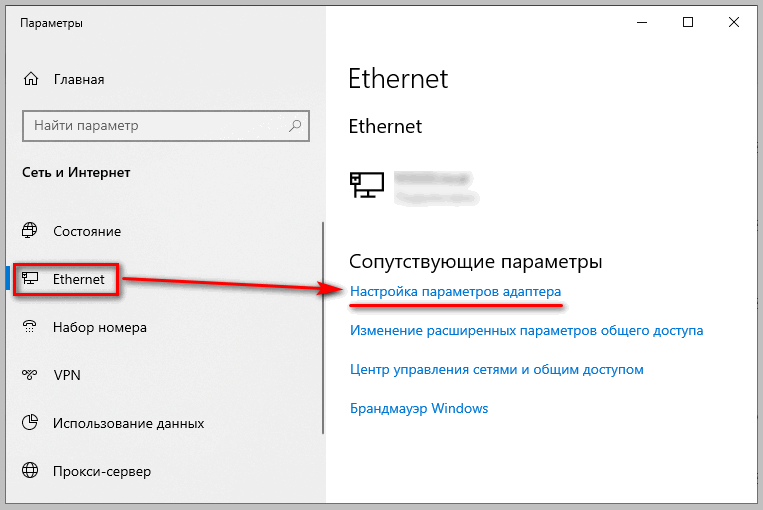
Далее мы увидим первую картинку из этой статьи. Что говорит о том, что можно приступать к настройкам сетевого адаптера.
Multiple IP Addresses on a NIC
This tutorial shows you how to assign multiple IP addresses to the same Network Interface Card (NIC) on Windows 10
There are a few situations where you want/need to assign more than one IP Address to a single Network Interface. A couple of examples are:
-
Binding to the same port on two different applications
-
Connecting to different network ranges with a single interface
Example Scenario — Two Art-Net Applications
Lets take the first example above and say you have two applications running on the same computer and you need both of them to receive Art-Net.
The Art-Net UDP port (6454) is defined by the standard, and it is highly unlikely that you will be able to change it on these applications. The issue here will be how can they both receive from the same UDP port, since a port can only be opened by a single application at a time (or not… keep reading… 😁 ).
In the most usual scenario, after the first application «binds» to that port (meaning, it will ask the Operating System to receive any incoming data for that port), subsequent bind attempts to the same port will fail, because the port will be already «in use» by the first application.
Except… There are two types of port binds:
-
Global Port Bind — bind to the port only (incoming data can arrive from ANY network interface)
-
The port must be exclusive within the system
-
-
IP/Port Pair Bind — bind to a port on a certain (local) IP address (any incoming data that arrives with a different destination IP address than the one bound will be ignored)
-
The IP+Port pair must be exclusive within the system
-
So, naturally, if the applications provide a way to bind to a IP+Port pair, we can use this «trick» to bind the same port on multiple applications. The very first step to do that is to assign multiple IP addresses to your interface.
Tip: this works for regular Network Interfaces, as well as for Loopback Interfaces
Assign Multiple IP Addresses (Windows 10)
Step 1 — Open the Network Adapters window
-
Win+R opens the «Run» dialog
-
Type «ncpa.cpl» and click OK
Step 2 — Open your adapter properties
-
Right-click the adapter and click on Properties
Step 3 — Open the IPV4 Properties
-
Select «Internet Protocol Version 4 (TCP/IPv4)» in the list
-
Click the «Properties» button below the list
This will bring up the regular IPv4 settings dialog:
In the example above, we have already set this adapter to use the IP/Mask 2.0.0.1/8.
Step 4 — Advanced Properties
If you click the «Advanced…» button on the bottom, you will be shown a new dialog, as the one below.
Step 5 — Adding New IP Addresses
Under the «IP Settings», «IP Addresses» group, if you click on the «Add…» button, you will be able to enter a new IP address (and mask) for this interface.
Make sure your IP Addresses are unique in the network (i.e. within the network, an IP address cannot be used by more than one computer)
Adding the IP address above, will make it appear on the list.
You can add as many IP addresses as you need
Step 6 — Apply the settings
Once you’re satisfied, click «OK» on all the dialogs to apply the new settings.
From this point on, with the configuration above, you can reach this computer via two different IP addresses: 2.0.0.1 and 2.0.0.101.
Sending data to the same port, different applications
Now that we have configured two IP addresses for the same interface, we can configure our ArtNet applications from the example above:
-
Application 1: bind to IP 2.0.0.1, UDP port 6454 (Art-Net)
-
Application 2: bind to IP 2.0.0.101, UDP port 6454 (Art-Net)
If you want to send Art-Net data to Application 1, send it to IP 2.0.0.1. In the same way, if you want to send Art-Net data to Application 2, send it to IP 2.0.0.101.
This is how two different applications that bind to the same port can coexist in the same system.


There are times when an IT admin has to set up multiple IP addresses to the same network adapter. Setting up multiple IP addresses in scenarios like hosting various SSL sites, speed up traffic exchanges can help in avoiding being blacklisted in the SPAM filters, and so on. So in this post, you will be guided on how exactly you can assign multiple IP addresses to the network adapter in your Windows 10 computer.
There are several ways to assign multiple IP addresses in a network adapter. You can do it using the Network Adapter settings or using the Netsh utility, as well as the Windows PowerShell utility. To get started, refer to each one of the options provided below.
Option 1 – Assign multiple IP addresses via Network Adapter settings
- Go to Settings first and from there, select Network & Internet, and then click on the Change adapter options. This will show you a list of both the physical and virtual network adapters in your computer.
- Next, double click on the Ethernet adapter where you want to assign the multiple IP addresses and then click on the Properties button.
- After that, you should see the Ethernet properties where you have to select the “TCP/IPv4” or “TCP/IPv6”.
- Once done, click on the Properties button and then select the “Use the following IP address” option under the General tab.
- Now you have to add an IP address, subnet, and default gateway to the network adapter and then click on the Advanced button.
- This will open the Advanced TCP/IP settings where you have to click on the Add button so you can add an IP address. From here, you can keep adding multiple IP addresses to the network adapter. You also have the option to add multiple gateways or DNS IP addresses.
- Once done, if you execute the “ipconfig” command, you should see all the secondary IP addresses listed.
Option 2 – Assign multiple IP addresses using the Netsh command
Another way to assign multiple IP addresses to your network adapter is via the Netsh command.
- In the Start Search, type “command prompt” and from the search results that appear, right-click on Command Prompt and then select the “Run as administrator” to open it with admin privileges.
- If a User Account Control or UAC prompt pops up, just click on Yes.
- After that, run this command: Netsh int ipv4 add address name=»Local Area Connection» 192.168.100.100 255.255.255.0 SkipAsSource=True
Note: You have the option to set “SkepAsSource” since it depends on your needs using the Netsh command. When it is configured as true, the IP address won’t be used by the OS for outbound connections.
Option 3 – Assign multiple IP addresses via Windows PowerShell
- Tap the Win + X key combination and click on the “Windows PowerShell (Admin)” option.
- After opening Windows PowerShell as admin, use the NetIPAddress command so you can add more IP addresses. Execute this command: Get-NetIPAddress | ft IPAddress, InterfaceAlias, SkipAsSource
- Next, assign an IP address to a network adapter by executing this command: New-NetIPAddress –IPAddress 192.168.100.100 –PrefixLength 24 –InterfaceAlias “vEthernet” –SkipAsSource $True
- Now to modify the “SkipAsSource” parameter, use this command: Get-NetIPAddress 192.168.100.100 | Set-NetIPAddress -SkipAsSource $False
Do You Need Help with Your Device?
Our Team of Experts May Help
Troubleshoot.Tech Experts are There for You!
GET HELP
Troubleshoot.Tech experts work with all versions of Microsoft Windows including Windows 11, with Android, Mac, and more.
Share this article:
You might also like
Error Code 45 – What is it?
Error Code 45 is a common device manager problem that users encounter on any Windows 2000 and later operating system versions.
The error occurs when your Windows system fails to acknowledge the connected device by either stating that the device is not present or that it was previously attached to a computer.
The error pops up and appears on your computer screen with the following message:
“Currently, this hardware device is not connected to the computer” (Code 45)
Solution
Error Causes
The error is prompted either due to a temporary system file malfunction or a problem in the Windows registry system files. In the latter case, it could be due to a damaged or corrupted Windows registry.
Further Information and Manual Repair
While it may appear that Error Code 45 is a serious threat to your computer, it cannot be farther from the truth. Error Code 45, unlike other error codes, is the easiest one to fix. Here is how you can do it.
Method 1 – Reconnect the device to your computer
Unplugging and plugging the USB cable of the device into the computer is the easiest way to solve the error.
Doing this will help refresh the system and increase the likelihood of the device driver files loading and function properly.
It is often only a case of reconnecting the device back to your computer which helps eliminate the error and does not require any particular resolution other than this.
Method 2 – Install DriverFIX
Although reconnecting the disconnected device is all you need to fix the error code, it is always safer to fix your Windows registry system files by using a program like DriverFIX.
DriverFIX, with its user-friendly approach to help you fix your PC issues, comes with an integrated database that detects which drivers you need to reconfigure within just a few seconds and downloads it automatically.
It further ensures that your drivers are installed in their entirety leaving no room for any corrupted or damaged registry.
It also has the added advantage of being able to backup and restores your files should there be the slightest possibility of system file damage.
Thus, registry damage can be averted by letting the software roll back the system files to an earlier healthy checkpoint. DriverFIX is the answer to fixing your PC error codes accurately and quickly.
Click here to download DriverFIX now!
Read More
What is Out of Memory error while copying files? As you know, both the hard drive and RAM play a major role in performing any operation on a computer since every process or task that takes place in the system requires some RAM storage as well as hard drive storage to be executed. However, there are times when you may receive the following error messages when you try to copy files from one location to another:
“Out of memory or system resources, Close some windows or programs and try again.”
“There is not enough memory to complete this operation – copying files.”
These errors are caused by the Desktop Heap limitation when there is no longer enough memory to complete the operation while copying the files. If you encounter any of these errors, you will be guided in this post with the help of some potential fixes that can increase its limit and will hopefully fix this error on your Windows 10 computer.
You may try to close all the open windows and programs and then try copying the file again and see if that helps. If not, then proceed to the instructions given below. But before you do that, make sure that you create a System Restore point first. This way, you can undo the changes you’ve made any time in case there are some unwanted changes you want to reverse. After you create a System Restore point, refer to the steps provided below.
Step 1: Tap the Win + R keys to open the Run utility and type “Regedit” in the field and tap Enter to open the Registry Editor.
Step 2: Next, navigate to this registry key: ComputerHKEY_LOCAL_MACHINESYSTEMCurrentControlSetControlSession ManagerSubSystems
Step 3: Now double click on the DWORD named Windows to modify it.
Step 4: Change the values for SharedSection in the Value Data field. It should be in the format of “SharedSection=aaaa,bbbb,cccc”. Note that you have to change the value of “bbbb” and “cccc”. So in case you are using an x86 operating system, set the value of bbbb to 12288 and then set the value for cccc to 1024. On the other hand, if you are using an x64 operating system, set the bbbb value to 20480 and the cccc value to 1024.
Step 5: Exit the Registry Editor and restart your computer to successfully apply the changes made.
Note: The bbbb value in the SharedSection registry is the size of the desktop heap for each interactive window station while the cccc section of the SharedSection value is the size of the desktop heap for each non-interactive window station. In addition, you must keep in mind that setting the value of bbbb to more than 20480 KB is not really recommended.
On the other hand, there is another tool that could help in resolving the Out of Memory error. This tool is called the Memory Diagnostic tool in windows can help resolve the Out of Memory error by checking and automatically fixing any memory-based issues. To run it, refer to these steps:
- Tap the Win + R keys to open Run and type mdsched.exe and hit Enter to open the Windows Memory Diagnostic Tool.
- After that, it will give two options such as:
- Restart now and check for problems (Recommended)
- Check for problems the next time I start my computer
- Once your computer has restarted, perform a basic scan or you could also go for the “Advanced” options such as “Test mix” or “Pass count”. Simply tap the F10 key to start the test.
Note: After you select your preferred option, your computer will restart and check for memory-based issues. If it finds any issues, it will automatically fix them.
Read More
In every task carried out in the Windows 10 operating system, some of them don’t go smoothly and it could encounter a couple of errors along the way. One of these errors you could encounter is the Windows Update error code 0x8007000e. This particular error was reported to occur a lot when downloading and installing a Feature update via Windows Updates. And recently, it has been reported to occur a couple of times for the Windows 10 1903 May 2019 update. According to security experts, this error could be caused by a lack of memory or disk space as well as issues in the Windows Update mechanism. Whatever the cause is, troubleshooting this problem shouldn’t be hard as this post will give you some potential fixes you can check out.
To fix this error, here are some options you need to consider:
Option 1 – Clear up temporary or junk files
The error could be caused by some temporary or junk files in your computer and so you need to clear them up to fix the problem. You can achieve that using the Storage Sense feature.
- Open Setting > System > Storage from the WinX Menu.
- From there, you will see a list of all the local and connected storage devices along with the details on the free space. Make sure that Storage Sense is on.
- Next, find a link that says “Free Up Space” and click it to open.
- After that, a screen which is the built-in program in Windows 10 will appear and will scan your computer for the following junk files so you can free up disk space:
- Windows Upgrade Log Files
- System created Windows Error Reporting Files
- Thumbnails
- Temporary Internet Files
- Previous Windows Installation Files
- Delivery Optimisation Files
- DirectX Shader Cache
- Choose the files you want to get rid of and then click on the remove files option. Note that you’ll have an idea of the total size as you select any of the junk files listed above.
- Now go to the “Free Up Space Now” section and click the Clear Now button. This will get rid of all the temporary or junk files in your computer and should hopefully fix the Windows Update error 0x8007000e.
Option 2 – Reset the Windows Update components
If by any chance that the second option didn’t work, resetting the Windows Update components could also help you resolve the problem. How? Refer to the following steps:
- Open Command Prompt with admin privileges.
- After that, type each one of the following commands and hit Enter after you key in one after the other.
- net stop wuauserv
- net stop cryptsvc
- net stop bits
- net stop msiserver
Note: The commands you entered will stop the Windows Update components such as Windows Update service, Cryptographic services, BITS and MSI Installer.
- After disabling WU components, you need to rename both the SoftwareDistribution and Catroot2 folders. To do that, type each one of the following commands below and don’t forget to hit Enter after you type one command after the other.
- ren C:/Windows/SoftwareDistribution/SoftwareDistribution.old
- ren C:/Windows/System32/catroot2/Catroot2.old
- Next, restart the services you’ve stopped by entering another series of commands. Don’t forget to hit Enter after you key in one command after the other.
- net start wuauserv
- net start cryptsvc
- net start bits
- net start msiserver
- Close Command Prompt and reboot your PC.
Option 3 – Try configuring the Windows Update-related Services
- Tap the Win + R keys to open the Run dialog box.
- Then type “cmd” in the field and tap Enter to open an elevated Command Prompt.
- Next, execute the following commands. Note that you have to type and enter each the command one after the other.
- SC config wuauserv start= auto
- SC config bits start= auto
- SC config cryptsvc start= auto
- SC config trustedinstaller start= auto
- The commands you executed will make sure that the Windows Update-related services are available. Once it’s done, restart your computer and see if the Windows Update error is now fixed.
Option 4 – Try running the Windows Update troubleshooter
Windows 10 have various troubleshooters that can help you resolve many system issues. So if you’re dealing with Windows Update errors like Error 0x8007000e, you can run the Windows Update troubleshooter to resolve it.
To run it, go to Settings and then select Troubleshoot from the options. From there, click on Windows Update and then click the “Run the troubleshooter” button. After that, follow the next on-screen instructions and you should be good to go.
Option 5 – Try to use the Media Creation tool
The Media Creation tool in Windows allows you to use the ISO installation file to make a bootable device that you can use to install Windows on your PC. Note that this is kind of different from the usual installation process as it could erase your computer’s current settings and data on the primary drive. Thus, before you proceed, you need to backup all your data into some removable drive and then use the Media Creation tool to make a bootable drive.
- After making the bootable drive, you need to plug it in your computer and then reboot.
- Next, tap the F10 or Esc key to open the boot options.
- Now set the boot priority of the removable drive the highest. Once the setup comes forth, follow the next onscreen instructions and install Windows without any problems.
Read More
We have often talked about the security of your computer, we have been giving you tips and tried to explain how to best protect your computer from various attacks and malicious software. Today we will be talking about antivirus applications.

Antivirus software has become the kind of a must-have in every computer in this day and age. When you think about it, our systems are connected to the internet most of the time if not always, and therefore kind placed in from the line of various cyber-attacks. Here antivirus software comes into focus, especially because it has evolved long from just a simple virus removal tool to full security suites.
We will be going through the best of these applications in order to present both their good and bad sides and hope that we will help you in picking the right one for you. Remember, picking either one of the presented solutions is way better than not having one at all. The list is made from best down in our opinion so number one is highly recommended.
List of Best antivirus applications of 2021
-
BitDefender
In our opinion the best overall security protection suite for this age and time. Bitdefender has cemented itself as number one a few years back and it holds that status even today. It has top-of-the-game virus protection, an incredible amount of features, safepay banking online protection and it is amazingly cheap. Its downside we could say is that it can be annoying sometimes, especially if you set it to maximum protection and paranoid mode. In this case, it will often ask what to do and how to behave leading to minor annoyances.
-
Norton antivirus
Norton antivirus is well known to older computer users, this package has been around a long time and it is our pick for closest one to challenge top place because of its packed features. The number of features it has are really stunning and it comes also with great and maybe best-browsing protection of all candidates. It also has a backup tool bundled with it but the reason why it is in the second place is that it is taxing to the system and can have a real impact on computer performance. Great protection is important, but so it is working on it without slowdowns.
-
Kaspersky
Another one of the old antivirus software on the list. Kaspersky Lab was once top tier antivirus software but it dropped down due to its high prices, later they have changed their pricing to be more in trend with other rival companies but many have switched to something else. Today it still packs one of the best antivirus engines with fast and configurable scans. It also has very impressive anti-ransomware features but sadly most of the things it just simply does for you leaving you to fully trust it since you cannot really configure much. It is not in step with new technologies and it is lacking some features like support for the Chrome browser that places it lower in our ranking.
-
Trend Micro antivirus
The biggest sell point for this antivirus application is probably its ease of use and user-friendliness. It also packs a great antivirus engine and impressive anti-ransomware performance but sadly it comes with very limited configurability and somewhat lack of features comparing it with the top three entries. Never the less a very user-friendly application that you can configure without knowing any kind of tech talk, everything is laid out in simple English.
-
Avira
Perhaps best known for its free version, Avira has a premium one that is well better worth than the free version. Strong suites of this software are mostly aimed at the internet with its great anti-phishing and web protection along with a low price for all of its features. Sadly in the domain of virus protection, there are some reports from independent websites that its antivirus engine is not so great, it will offer you moderate protection but not the best.
-
Webroot Secure Anywhere
If you are on the lookout for software that has a great virus database and plenty of features but is also incredibly light weighted and fast then look no further, Webroot Secure Anywhere is an application for you, incredibly fast and incredibly small is a great solution for older machines. It keeps all of its databases up in the cloud and this feature among its great advantages is also its greatest disadvantage since if you are out of the internet you will not be able to have the latest virus definitions available to you making this tool very situational.
-
Avast
Avast has many great protection features and it is very highly configurable. The firewall comes also in its premium edition and it offers great virus protection including a file shredder and awesome WI-FI inspector for an extra layer of security. This package would be higher on the list if it was not for its lack of WEB protection and its tool on the system resources.
-
Sophos home antivirus
Lack of features and somewhat strange user interface are downsides of this software but on its positive side it has good antivirus engine and its user interface is very friendly. Where it shines though is in its price, for one affordable price you get protection for 10 devices making this option a great choice for anyone wanting to protect more devices or just use a single license for the whole family.
-
ESET antivirus
Greatly configurable antivirus software with tons of options and very light on system resources makes ESET one of the best out there. Virus engine and database is also top tier but some testing labs have reported that protection offering is not really what it is advertised and if we talk about its strong suite of a great many options and configurations it is at the same moment its downside since it is not very friendly to novice and beginner users.
-
McAfee antivirus
McAfee antivirus comes in its package with unlimited VPN service and if we take look at the top tier pricing plan it is a great investment. Sadly for its entry-level price, it covers only a single device and it was reported that it packs little outdated virus engine if we compare it with its rivals. Nevertheless, it still offers good virus protection and if you take into account the VPN that comes with it, it can find its users.
Conclusion
No matter which antivirus you choose you will not go wrong, after all any protection is way better than none.
Read More
As you know, each one of the applications that you use in your Windows 10 computer has its own set of permissions by default. These applications either allows or denies the interactions between a few other applications, depending on their own needs. This is why you might suddenly encounter a message that says,
“This app wants to access your pictures”
or
“This app wants to access your account info”
both of which are followed by two buttons that will ask you to Allow or Deny the action. You can always click on any of the given options. This will determine the permission of the application.
Users in Windows 10 are given the option to either allow or deny applications in accessing their account information like name, picture and other account information. Thus, in this post, you will be guided on how you can change the Privacy settings of these apps to allow or deny them permission to access not just your account info but for all users, as well as specific apps in Windows 10.
The user account information is part of the Privacy data in Windows 10 that you can control easily using the Settings app. In fact, you can revoke or grant access permission for your account information, all the users and specific applications to do that, follow each one of the instructions provided below carefully.
Allow or deny apps permission to account info for yourself:
Step_1: The first thing you have to do is open Settings. From there, select Privacy.
Step_2: After that, scroll and look for Account info and select it.
Step_3: Now turn off the toggle button for the “Allow apps to access your account info” option if you want to deny apps permission to your account info. But if you want to allow them access, simply turn the toggle button on. Keep in mind that when you allow access or permission, you can select which apps can access your picture, name, and other account info by simply using the settings on the page you’re currently in.
Now if you want to allow or deny apps to access your account info for all the users, here’s what you have to do:
Step_1: First, open Settings and click on the icon for Privacy.
Step_2: Next, scroll down until you see the Account info located on the left side and then click on it.
Step_3: After that, click on the Change button under the “Allow access to account info on this device” section. If you want to deny account info access for all other users, then turn the toggle button off. Doing so will automatically disable not just the account info access for all users but also for all the apps as well.
On the other hand, if you want to allow or deny account info access to specific apps, you can do so by following these steps:
Step_1: As you did earlier, go to Settings and click on the Privacy icon.
Step_2: After that, scroll down and select Account info located on the left side.
Step_3: Now turn on or off the toggle button under the “Choose which apps can access your account info” section if you want to deny or allow specific apps permission to access Account Info. If you’ve turned on the toggle button under the “Allow apps to access your account info”, all the apps get access permissions by default.
Read More
The screen flickers into black, it comes back and on-screen there is a message Driver stopped responding and has recovered. If you have been through this you are aware that the issue is not serious but it can get pretty annoying fast since you are not aware when will it happen again, and it will happen again.
In this guide, we will go through the usual reasons for this error and offer solutions to them. Follow the guide step by step in order to resolve the problem.
- Clean your PC
Dirt and dust are your enemy no1, dirty graphic card can not be properly called and can cause overheating which can result in this particular error, make sure that your PC is clean and tidy in order to eliminate dust and dirt as a cause for malfunction. - Turn off multiple applications and try running just one at a time
Overburdening GPU can cause this error to appear since the graphic card can not handle all requests it gets from multiple active applications. Try to run just one application at a time for some time period to see if the error will appear again. - Update driver
Update your GPU driver to the latest version from the manufacturer’s website, Display Driver Stopped Responding and Has Recovered Error in Windows 10 can be from outdated drivers not able to handle modern tasks - Get newer GPU
As hard as this advice is, sometimes the reason is an old graphic card that simply can not keep up with modern games and applications, upgrade it to a more modern GPU and watch errors go away.
Read More
Recently, a number of Windows 10 users reported that they were not able to use Cortana properly because it wasn’t able to connect to the internet. According to these users, Cortana won’t connect to the internet even when their internet connection is stable. According to security experts, this issue is confirmed to occur only with Microsoft accounts.
This problem might have something to do with a proxy server that interferes with Cortana. There were reports that this issue was caused by a proxy that was filtering the network connection which also happens to interfere with Cortana’s ability to adapt search results and queries based on the user’s location. It could also be caused by some glitch in the home network or your Microsoft account information is inconsistent or your Microsoft account has to be verified.
Here are some suggestions that could help fix the connection issue in Cortana, just start with the first one and work your way down until you encounter an option that fixes the problem.
Option 1 – Restart or reset your modem or router
The first thing you can try is restarting or resetting your modem or router. All you have to do is unplug the power cable of the modem and then plug it back in after a few seconds. You could also use the reset button of the modem at the back if it is one. But before you press the reset button, keep in mind that it will erase all the connection credentials and it will be set back to its default settings. After rebooting the network, you can restart your computer to force your modem or router to reassign an IP address to your computer.
Option 2 – Restart Cortana
Restarting Cortana can help you resolve the issue.
- To restart Cortana, open the Task Manager, right-click on Cortana and select the “End process” option.
- Then go to the File tab and select “Run new task”.
- After that, type in “cortana.exe” and press Enter to restart the process.
Option 3 – Try to remove Proxy
Removing the Proxy might also help you in fixing the connection issue in Cortana. Here’s how you can do it:
- Tap the Win + R keys to open the Run dialog box.
- Then type “inetcpl.cpl” in the field and hit Enter to pull up the Internet Properties.
- After that, go to the Connections tab and select the LAN settings.
- From there. Uncheck the “Use a Proxy Server” option for your LAN and then make sure that the “Automatically detect settings” option is checked.
- Now click the OK and the Apply buttons.
- Restart your PC.
Note: If you are using a third-party proxy service, you have to disable it.
Option 4 – Open another app that uses a Microsoft account
This might seem like an odd fix, however, a couple of users tried doing this and it worked for them as it allowed Cortana to connect to the internet again. In this option, you just have to launch another app that uses your Microsoft account information in the same way as Cortana, for instance, the Store app. Once you open the app, a prompt should appear along with a dialog box that allows you to update your Microsoft account with the information required. After that, restart your computer and check if Cortana is now able to connect to the internet or not.
Option 5 – Verify your Microsoft account
In some cases, Cortana might not be able to connect to the internet because your Microsoft account is no longer verified. This usually happens when you use a two-step authentication system with your Microsoft account. To verify it, just open Settings and click on Accounts. After that, check if you have a Verify hyperlink under your Microsoft account or not then click on Verify. Afterward, follow the next on-screen prompts to verify your Microsoft account. Once your account is verified, restart your computer.
Option 6 – Reset Cortana settings
- Open Cortana and go to the Settings section where you’ll see the “Turning off Cortana clears what Cortana knows on this device, but won’t delete anything from the Notebook. After Cortana is off, you can decide what you’d like to do with anything still stored in the cloud” option. Turn this option off.
- Restart your PC.
- After your computer boots, launch Cortana again and check.
Read More
Each time we turn ON our computer or wake it from hibernation we are greeted with a Windows login screen where we need to provide login credentials in order to get into Windows itself and start working. This method of preserving data and privacy is perfectly fine and as a matter of fact, it is recommended for mobile computers but if you have a home computer in a safe environment where no one will try to look at your data or rummage through your personal stuff then removing login screen is safe enough action and can cause you a lot piece, from time-saving to less frustration on every restart or sleep action.
In previous Windows versions, it was much easier to turn off this feature but it seems Microsoft has determined that our privacy and security are important and somewhat removed the ability to turn OFF the lock screen. In this guide, we will show you how you can still remove the lock screen and automatically log in with your account like in the good old days.
The first thing you need to do is to press ⊞ WINDOWS + R to bring up the Run dialog

In the dialog, type in netplwiz and press ENTER.
You will find yourself in the User Accounts window, inside deselect Users must enter a user name and password to use this computer. Press OK

Sign in the window will pop up where you will have to type in your password and confirm it in order to start the feature.

After typing in your password and confirming it, press OK. That’s it, next time you wake your computer from hibernation or turn it ON, you will automatically be greeted with a desktop instead of a Windows login screen.
Read More
Recently, a number of users reported an error while trying to update their computers. This particular Windows Update error has an error code of 0x80073701. If you are one of the users who encounter this error, then read on as this post will guide you on how exactly you can fix it.
Here’s the exact context of the error:
“Updates failed. There were problems installing some updates, but we’ll try again later.
2019-07 Cumulative Update for Windows 10 Version 1903 for x86-based Systems (KB4507453) – Error 0x80073701”
The Windows Update Error 0x80073701 also comes with a code “ERROR_SXS_ASSEMBLY_MISSING” which indicates that some system files are missing on your computer that caused the update installation failure error. Although this Windows Update error does not cause any severe issues, it is still being reported in the section of Windows Update where it is marked as “Update failed”. There are several potential solutions you can check out to resolve this error. You can try to run the DISM tool or the SFC or System File Checker scan. You could also try to run the Windows Update troubleshooter. For more information, make sure to follow the options given below.
Option 1 – Restart your computer and try installing the Updates again
Restarting your computer can also help in fixing the Windows Update failed to install error 0x80073701. There are cases where the issue resolves on its own as it could just be some simple network or PC error.
Option 2 – Try to run the DISM tool
Running the DISM Tool helps in repairing the Windows System Image as well as the Windows Component Store in Windows 10. Using this built-in tool, you have various options such as the “/ScanHealth”, “/CheckHealth”, and “/RestoreHealth”.
- Open the Command Prompt as admin.
- Then type in this command: exe /Online /Cleanup-image /Restorehealth
- Do not close the window if the process takes a while as it will probably take a few minutes to finish.
After you run this tool, a log file is created at C:WindowsLogsCBSCBS.log. On the other hand, if the Windows Update client is already broken, you will be prompted to use a running Windows installation as the repair source or use a Windows side-by-side folder from a network share, as the source of the files. Although the chances of this happening is less, if it turns out to be the case, you need to run an advanced command in the DISM tool to repair a broken Windows Update. Just repeat the process above but use the following command instead:
DISM.exe /Online /Cleanup-Image /RestoreHealth /Source:C:RepairSourceWindows /LimitAccess
Option 3 – Try to run the System File Checker
System File Checker or SFC is a built-in command utility that helps in restoring corrupted files as well as missing files. It replaces bad and corrupted system files to good system files that might be causing the error 0x80073701. To run the SFC command, follow the steps given below.
- Tap Win + R to launch Run.
- Type in cmd in the field and tap Enter.
- After opening Command Prompt, type in sfc /scannow
- The command will start a system scan which will take a few whiles before it finishes. Once it’s done, you could get the following results:
- Windows Resource Protection did not find any integrity violations.
- Windows Resource Protection found corrupt files and successfully repaired them.
- Windows Resource Protection found corrupt files but was unable to fix some of them.
- Restart your computer.
Option 4 – Try running the Windows Update Troubleshooter
Running the built-in Windows Update troubleshooter could also help you resolve the Windows Update error 0x80073701. To run it, go to Settings and then select Troubleshoot from the options. From there, click on Windows Update and then click the “Run the troubleshooter” button. After that, follow the next on-screen instructions and you should be good to go.
Read More
System image backup error 0x807800A1 & 0x800423F3 appears when you are trying to create a system image backup and the operation fails to do so.
If you’re faced with any of these error codes, try our recommended solutions in the order presented below and resolve the issue.
Check Volume Shadow Copy & Software Protection Services
To restart the Volume Shadow Copy Service (VSS) on Windows 10, do the following:
- Press ⊞ Windows + X to bring up the Windows menu.
- Click on command prompt (admin)
- In the command prompt window, type the commands below and hit Enter after each line:
net stop vss
net start vss
Once the commands execute successfully, try the system image backup again. The operation should complete successfully.
You need to also check if the Software Protection Service is disabled. If it is, then Start it and ensure that it is set to default which is Automatic (Delayed Started).
Create System Image using PowerShell
Command lines are less prone to errors provided the syntax is correct, unlike GUIs that can suffer a glitch every now and then.
To create a system image with PowerShell do the following:
- Open the Windows PowerShell as administrator. To create a System Image in Windows 10 using PowerShell, you will have to run the Wbadmin command.
- Inside the Powershell window type, then press Enter: wbadmin start backup-backup target: E:-include: C:-quiet-allCritical
E: is the target drive where you’re going to save the system image, and C: is the system root drive where Windows is currently installed
- To extract the created system image, starting over from Windows 10 USB installation media, select advanced startup or open run and type: C: \ Windows \ System32 \ Shutdown.exe / r / o
Use third-party imaging software
If the previous two solutions have not managed to solve the issue there is always an option to use a third-party imaging solution. There are free open source and buying options offering various advantages each. Find out which one works best for you and use it.
Read More
Copyright © 2023, ErrorTools. All Rights Reserved
Trademark: Microsoft Windows logos are registered trademarks of Microsoft. Disclaimer: ErrorTools.com is not affiliated with Microsoft, nor claims direct affiliation.
The information on this page is provided for information purposes only.
In some situations you may want to specify several IP addresses at once on a single network interface. For example, you can assign addresses from different subnets with different masks. Thus it will be possible to access your PC using any of those addresses.
How to assign multiple IP addresses to network adapter in Windows 10, 8, 7
Right-click the network icon in the Taskbar and click Open Network and Sharing Center:
Double click the Ethernet or Wi-Fi connection:
In the status windows press Properties:
Select Internet Protocol Version 4 (TCP\IPv4) in the list and press Properties:
Switch the selector to Use the following IP address.
Manually specify IP, Subnet mask, Default gateway and Preferred DNS server.
Then press Advanced:
Click Add… button:
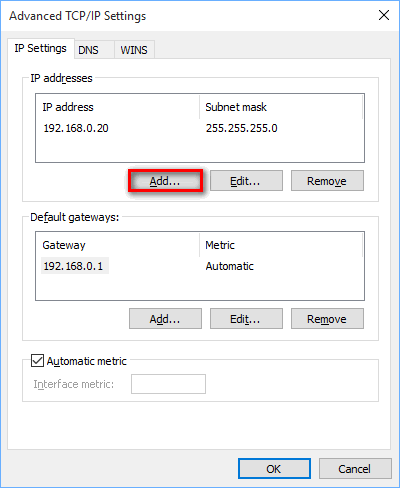
Specify additional IP addresses with subnet masks and press Add:
Press OK:

Press OK once more:
Press Close:
In such a way you can add a bunch of IP addresses to a single Network Interface Card (NIC) in Windows 10, 8.1 or 7.