
Windows позволяет назначить несколько IP адресов (алиасов, псевдонимов) на один физический сетевой адаптер. Это может пригодиться, когда вы хотите запустить несколько веб сайтов с уникальными IP адресами на одном сервере IIS, хотите привязать приложение к определенному IP или готовитесь к смене IP адресации. В Windows можно назначить дополнительные статический адрес на сетевой интерфейс через графический интерфейс или из командной строки.
Содержание:
- Добавить дополнительный IP адрес через панель управления Windows
- Параметр SkipAsSource и основной IP адрес сетевого адаптера
- Назначить второй IP адрес сетевому интерфейсу из командной строки/PowerShell
Добавить дополнительный IP адрес через панель управления Windows
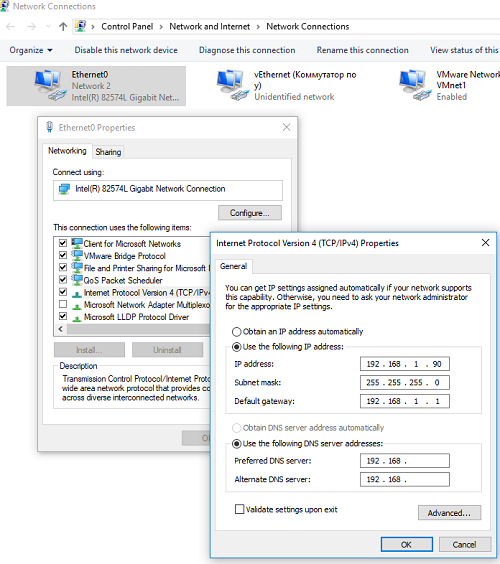
Дополнительный IP адрес можно назначить на сетевой интерфейс через графический интерфейс панели управления Windows.
- Откройте панель управления сетевыми подключениями (выполните команду
ncpa.cpl
). - Откройте свойства вашего сетевого интерфейса.
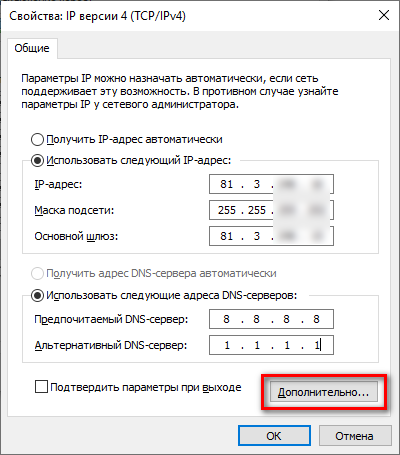
- В списке протоколов выберите TCP/IP v4 и нажмите Свойства.

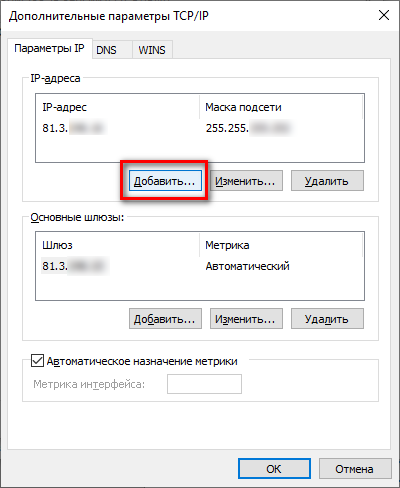
- Нажмите на кнопку Advanced (Дополнительно) и в секции «IP адреса» нажмите кнопку Добавить.
- Укажите дополнительный IP адрес и маску подсети и нажмите Добавить.
- Сохраните изменения.
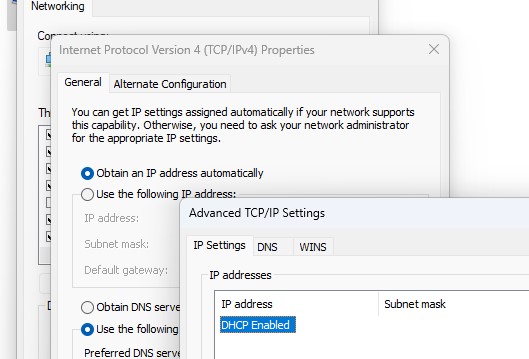
Дополнительный IP адрес можно добавить только для сетевого адаптера, для которого первый IP адрес настроен вручную, а не получен от DHCP сервера. Если для интерфейса включено автоматическое получения IP адреса (DHCP enabled), вам не удастся добавить дополнительный IP.
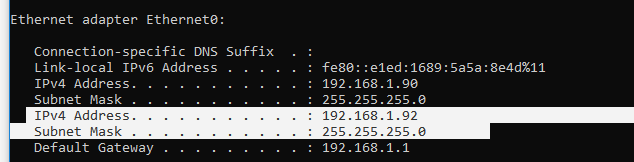
Выполните команду
ipconfig
и проверьте, у интерфейса появился второй IP адрес.
Проверьте доступность второго IP адреса по сети с других компьютеров командой ping. Он должен отвечать.
Параметр SkipAsSource и основной IP адрес сетевого адаптера
Когда вы назначаете дополнительный IP из панели управления, такой IP адрес будет использоваться для исходящих соединений. Дело в том, что в современных версиях Windows отсутствует понятие основного IP адреса. Если вы хотите запретить отправку исходящего трафика со всех дополнительных IP адресов, нужно включить для них опцию SkipAsSource.
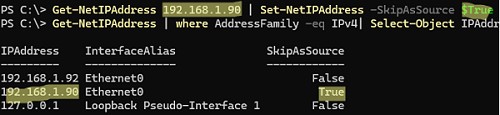
С помощью PowerShell выведите список IPv4 адресов, назначенных сетевым адаптерам:
Get-NetIPAddress | where AddressFamily -eq IPv4| Select-Object IPAddress, InterfaceAlias, SkipAsSource
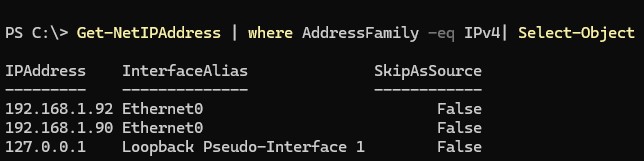
В этом примере SkipAsSource =False установлен для всех IP адресов компьютера. Если вы хотите сделать определенный IP адрес основным, выполните команду:
Get-NetIPAddress 192.168.1.90 | Set-NetIPAddress -SkipAsSource $True
Теперь указанный IP не будет использоваться в качестве источника исходящих подключений, кроме случаев его явного задействования определенным приложением. Так же при включенном флаге второй IP адрес не регистрируется в DNS (при включенной динамической регистрации).
Назначить второй IP адрес сетевому интерфейсу из командной строки/PowerShell
При добавлении дополнительного IP адреса из командной строки вы можете сразу включить для него флаг SkipAsSource. Например, с помощью netsh:
Netsh int ipv4 add address name="Local Area Connection" 192.168.1.92 255.255.255.0 SkipAsSource=True
Вывести список назначенных IP адресов и значение опции SkipAsSource:
netsh int ipv4 show ipaddresses level=verbose
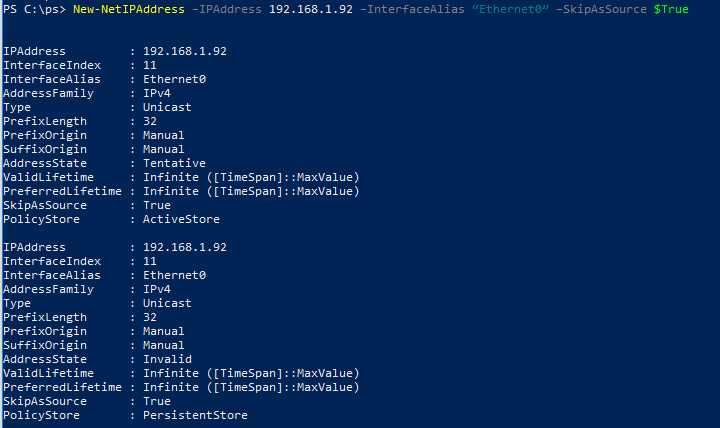
Также можно настроить второй IP для сетевого интерфейса с именем Ethernet0 с помощью PowerShell:
New-NetIPAddress –IPAddress 192.168.1.92 –PrefixLength 24 –InterfaceAlias “Ethernet0” –SkipAsSource $True
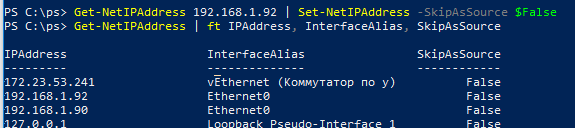
Чтобы разрешить исходящий трафик с данного IP адреса сетевого интерфейса воспользуйтесь командой:
Get-NetIPAddress 192.168.1.92 | Set-NetIPAddress -SkipAsSource $False
Удалить дополнительный IP:
Get-NetIPAddress 192.168.1.92| Remove-NetIPAddress
Обратите внимание. В мае 2025 года существенное снизились цены на вечные виртуальные серверы VPS/VDS в России и Нидерландах. Для читателей блога дополнительная скидка 10%. Подробнее.
Когда-то я уже писал как настроить два IP адреса на сетевой карте в Linux — https://moonback.ru/page/2ip-linux. И не справедливо обошел вниманием пользователей Windows. Эта статья исправляет указанный недостаток, я подробно напишу как настроить 2 IP адреса на одном сетевом интерфейсе в операционных системах семейства Windows. Статья справедлива для Windows 7, 8, 8.1 и 10.
Необходимость в подобной настроке у меня возникла совсем недавно, когда один знакомый попросил подключить IP камеру видеонаблюдения (RVi-IPC11S). Но в его «сети» не было ни коммутатора, ни маршрутизатора. А единственный сетевой порт компьютера был занят кабелем провайдера Интернет.
Чтобы минимизировать затраты было решено приобрести самый дешевый коммутатор на 5 портов (TP-LINK TL-SF1005D). После чего кабель провайдера перекочевал из компьютера в коммутатор, в который так же была подключена камера, ну а сам коммутатор был подключен патч-кордом к компьютеру. Камеру я запитал через блок питания 12В (АТ-12/10).
2 IP адреса на одной сетевой карте в Windows
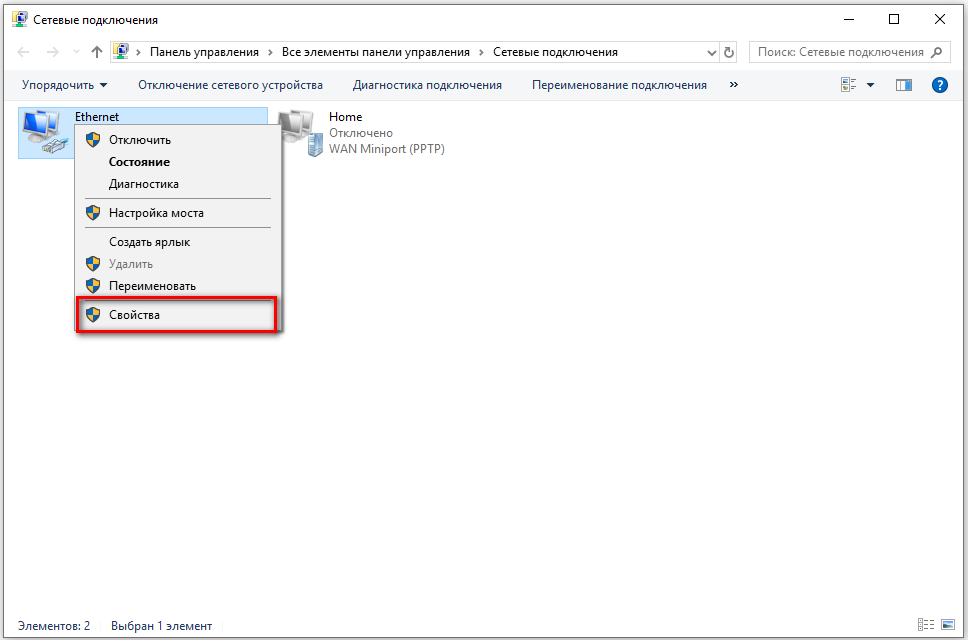
Теперь перейдем непосредственно к самим настройкам. В панели управления необходимо изменить свойства сетевого адаптера, для этого нажимаем правую клавишу мыши и в контекстном меню выбираем «Свойства»:
Далее в списке ищем пункт связанный с протоколом Ipv4 и нажимаем кнопку «Свойства»:
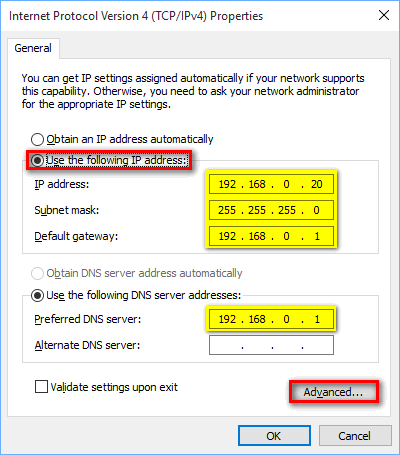
В моем примере уже прописан статический адрес (настройки провайдера интернет). Если у вас используется пункт «Получить IP-адрес автоматически», то вам придется перейти в режим «Использовать следующий IP-адрес». Затем нужно нажать кнопку «Дополнительно»:
В появившемся окне мы видим существующий IP адрес, чтобы добавить еще один нажмите «Добавить»:
Здесь введите необходимый вам новый IP-адрес, я использовал подсеть IP-видеокамеры по-умолчанию и нажать клавишу «Добавить».
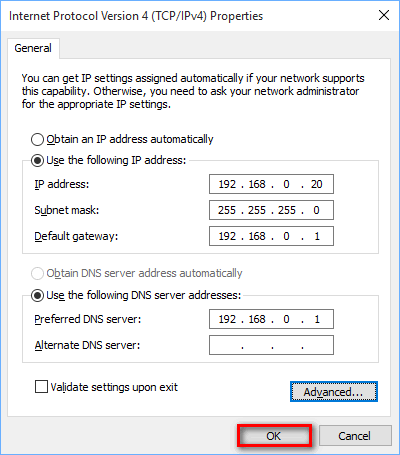
Мы автоматически возвращаемся в предыдущее окно и видим, что теперь у нас настроено 2 IP адреса:
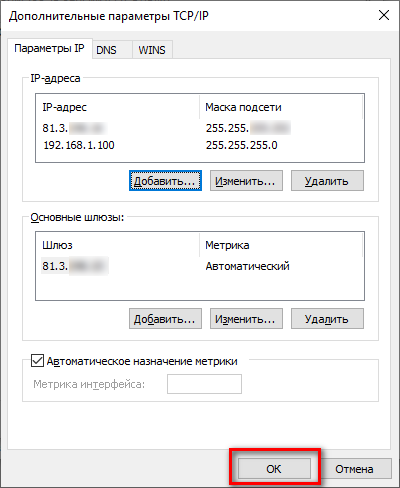
Для сохранения всех настроек нажмите «ОК».
Как найти панель управления в Windows 10
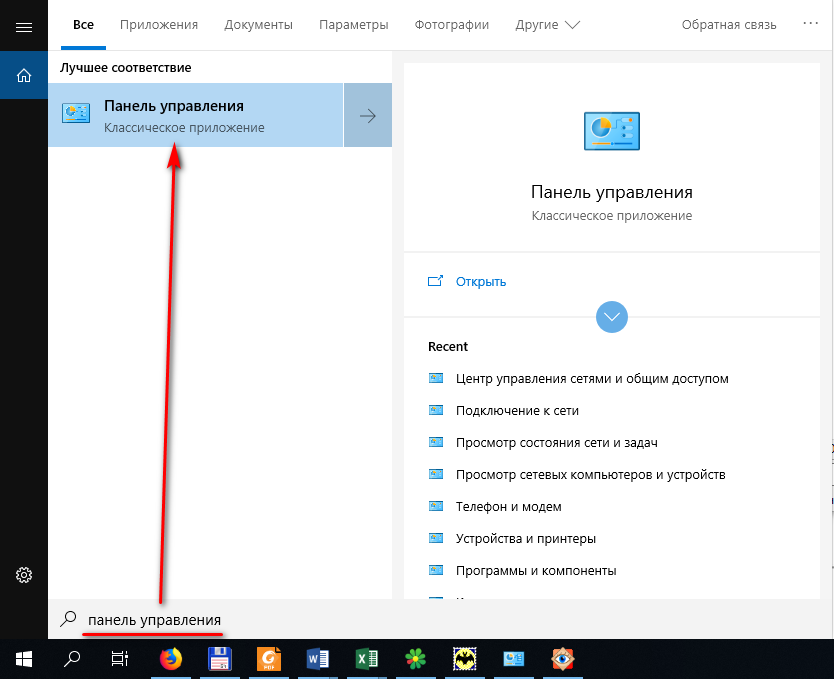
В новых сборках Windows 10 добраться до классического приложения «Панель управления», известного на нам со времен Windows 7, стало намного сложнее. Чтобы ее найти нужно нажать иконку поиска возле кнопки «Пуск»:
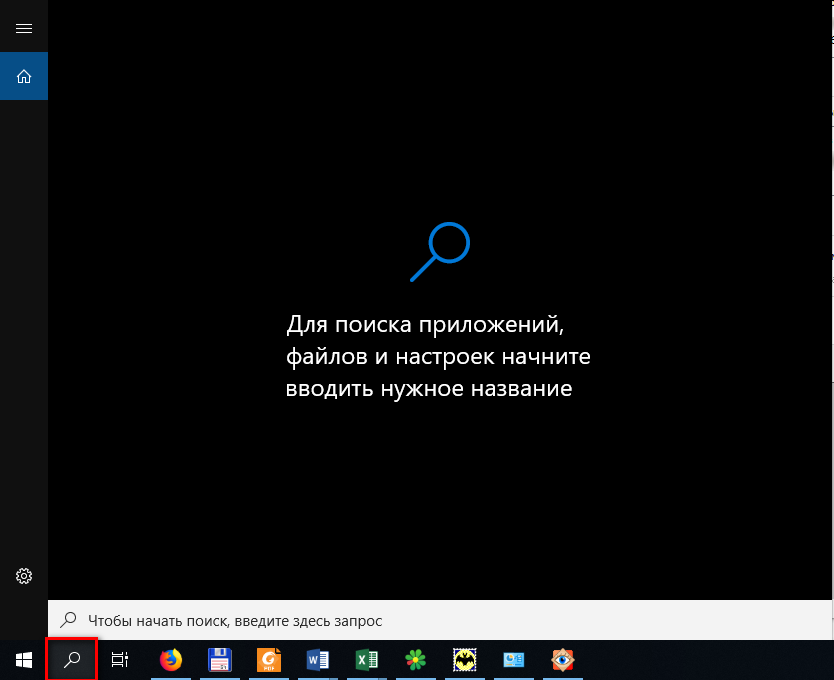
И в поисковой строке ввести «Панель управления». Далее щелкнуть мышкой по «Панель управления — Классическое приложение»:
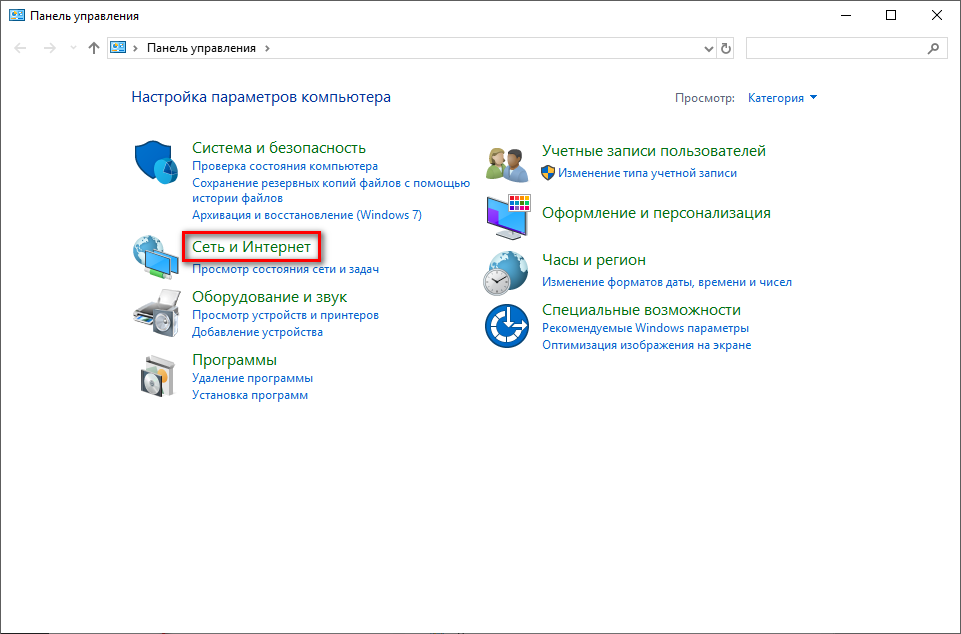
Как найти настройки сетевого адаптера в панели управления
В классической панели управления необходимо выбрать «Сеть Интернет»:
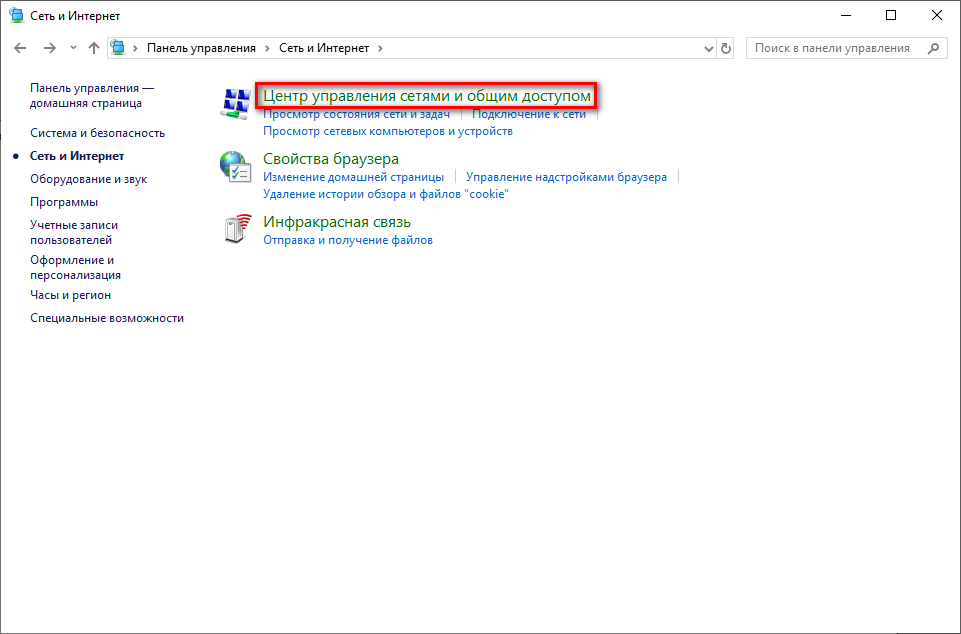
Далее «Центр управления сетями и общим доступом»:
И наконец выбрать пункт «Изменение параметров адаптера»:
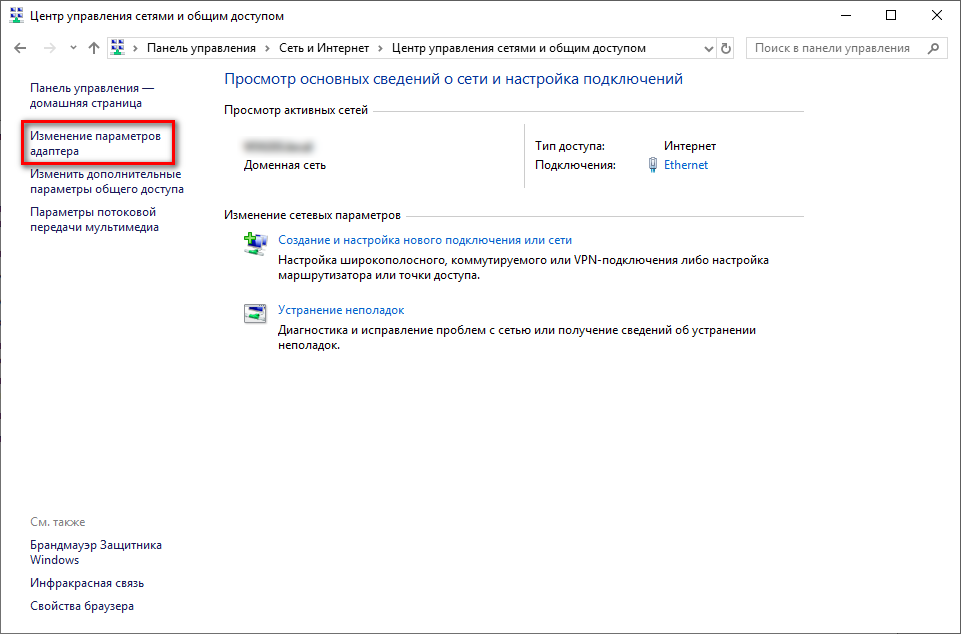
После чего вы должны увидеть список сетевых адаптеров вашего компьютера (первое изображение этой статьи).
Как быстро зайти в настройки параметров сетевого адаптера в Windows 10
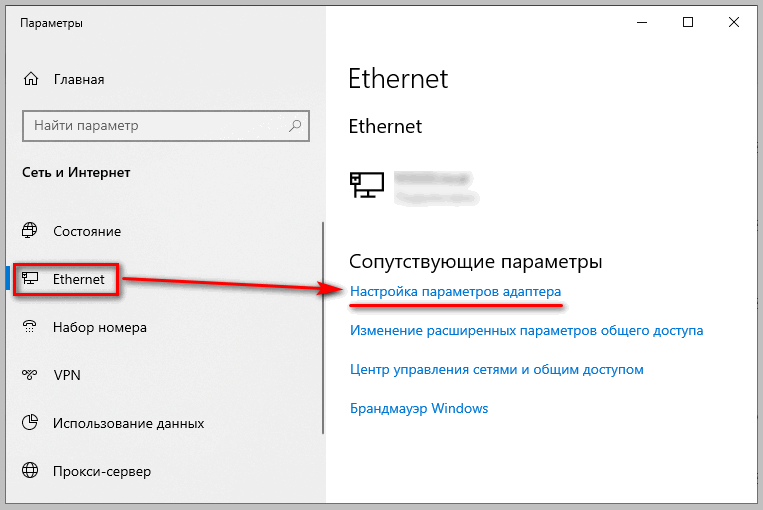
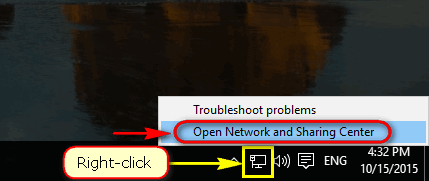
Чтобы не искать Панель управления и не рыскать по пунктам его меню нужно щелкнуть правой клавишей мыши на иконке сети в панели задач в правом углу рядом с часами и выбрать пункт «Открыть параметры сети и Интернет»:
Затем выбираем пункт «Ethernet»:
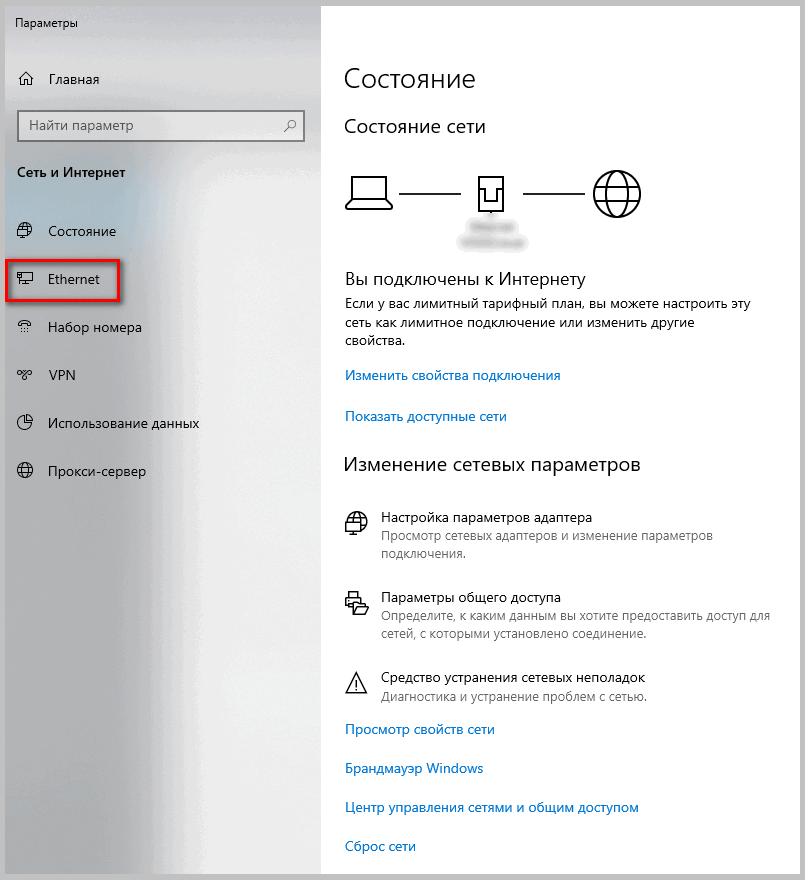
После чего выбираем пункт «Изменение параметров адаптера»:
Далее мы увидим первую картинку из этой статьи. Что говорит о том, что можно приступать к настройкам сетевого адаптера.
Multiple IP Addresses on a NIC
This tutorial shows you how to assign multiple IP addresses to the same Network Interface Card (NIC) on Windows 10
There are a few situations where you want/need to assign more than one IP Address to a single Network Interface. A couple of examples are:
-
Binding to the same port on two different applications
-
Connecting to different network ranges with a single interface
Example Scenario — Two Art-Net Applications
Lets take the first example above and say you have two applications running on the same computer and you need both of them to receive Art-Net.
The Art-Net UDP port (6454) is defined by the standard, and it is highly unlikely that you will be able to change it on these applications. The issue here will be how can they both receive from the same UDP port, since a port can only be opened by a single application at a time (or not… keep reading… 😁 ).
In the most usual scenario, after the first application «binds» to that port (meaning, it will ask the Operating System to receive any incoming data for that port), subsequent bind attempts to the same port will fail, because the port will be already «in use» by the first application.
Except… There are two types of port binds:
-
Global Port Bind — bind to the port only (incoming data can arrive from ANY network interface)
-
The port must be exclusive within the system
-
-
IP/Port Pair Bind — bind to a port on a certain (local) IP address (any incoming data that arrives with a different destination IP address than the one bound will be ignored)
-
The IP+Port pair must be exclusive within the system
-
So, naturally, if the applications provide a way to bind to a IP+Port pair, we can use this «trick» to bind the same port on multiple applications. The very first step to do that is to assign multiple IP addresses to your interface.
Tip: this works for regular Network Interfaces, as well as for Loopback Interfaces
Assign Multiple IP Addresses (Windows 10)
Step 1 — Open the Network Adapters window
-
Win+R opens the «Run» dialog
-
Type «ncpa.cpl» and click OK
Step 2 — Open your adapter properties
-
Right-click the adapter and click on Properties
Step 3 — Open the IPV4 Properties
-
Select «Internet Protocol Version 4 (TCP/IPv4)» in the list
-
Click the «Properties» button below the list
This will bring up the regular IPv4 settings dialog:
In the example above, we have already set this adapter to use the IP/Mask 2.0.0.1/8.
Step 4 — Advanced Properties
If you click the «Advanced…» button on the bottom, you will be shown a new dialog, as the one below.
Step 5 — Adding New IP Addresses
Under the «IP Settings», «IP Addresses» group, if you click on the «Add…» button, you will be able to enter a new IP address (and mask) for this interface.
Make sure your IP Addresses are unique in the network (i.e. within the network, an IP address cannot be used by more than one computer)
Adding the IP address above, will make it appear on the list.
You can add as many IP addresses as you need
Step 6 — Apply the settings
Once you’re satisfied, click «OK» on all the dialogs to apply the new settings.
From this point on, with the configuration above, you can reach this computer via two different IP addresses: 2.0.0.1 and 2.0.0.101.
Sending data to the same port, different applications
Now that we have configured two IP addresses for the same interface, we can configure our ArtNet applications from the example above:
-
Application 1: bind to IP 2.0.0.1, UDP port 6454 (Art-Net)
-
Application 2: bind to IP 2.0.0.101, UDP port 6454 (Art-Net)
If you want to send Art-Net data to Application 1, send it to IP 2.0.0.1. In the same way, if you want to send Art-Net data to Application 2, send it to IP 2.0.0.101.
This is how two different applications that bind to the same port can coexist in the same system.


There are times when an IT admin has to set up multiple IP addresses to the same network adapter. Setting up multiple IP addresses in scenarios like hosting various SSL sites, speed up traffic exchanges can help in avoiding being blacklisted in the SPAM filters, and so on. So in this post, you will be guided on how exactly you can assign multiple IP addresses to the network adapter in your Windows 10 computer.
There are several ways to assign multiple IP addresses in a network adapter. You can do it using the Network Adapter settings or using the Netsh utility, as well as the Windows PowerShell utility. To get started, refer to each one of the options provided below.
Option 1 – Assign multiple IP addresses via Network Adapter settings
- Go to Settings first and from there, select Network & Internet, and then click on the Change adapter options. This will show you a list of both the physical and virtual network adapters in your computer.
- Next, double click on the Ethernet adapter where you want to assign the multiple IP addresses and then click on the Properties button.
- After that, you should see the Ethernet properties where you have to select the “TCP/IPv4” or “TCP/IPv6”.
- Once done, click on the Properties button and then select the “Use the following IP address” option under the General tab.
- Now you have to add an IP address, subnet, and default gateway to the network adapter and then click on the Advanced button.
- This will open the Advanced TCP/IP settings where you have to click on the Add button so you can add an IP address. From here, you can keep adding multiple IP addresses to the network adapter. You also have the option to add multiple gateways or DNS IP addresses.
- Once done, if you execute the “ipconfig” command, you should see all the secondary IP addresses listed.
Option 2 – Assign multiple IP addresses using the Netsh command
Another way to assign multiple IP addresses to your network adapter is via the Netsh command.
- In the Start Search, type “command prompt” and from the search results that appear, right-click on Command Prompt and then select the “Run as administrator” to open it with admin privileges.
- If a User Account Control or UAC prompt pops up, just click on Yes.
- After that, run this command: Netsh int ipv4 add address name=»Local Area Connection» 192.168.100.100 255.255.255.0 SkipAsSource=True
Note: You have the option to set “SkepAsSource” since it depends on your needs using the Netsh command. When it is configured as true, the IP address won’t be used by the OS for outbound connections.
Option 3 – Assign multiple IP addresses via Windows PowerShell
- Tap the Win + X key combination and click on the “Windows PowerShell (Admin)” option.
- After opening Windows PowerShell as admin, use the NetIPAddress command so you can add more IP addresses. Execute this command: Get-NetIPAddress | ft IPAddress, InterfaceAlias, SkipAsSource
- Next, assign an IP address to a network adapter by executing this command: New-NetIPAddress –IPAddress 192.168.100.100 –PrefixLength 24 –InterfaceAlias “vEthernet” –SkipAsSource $True
- Now to modify the “SkipAsSource” parameter, use this command: Get-NetIPAddress 192.168.100.100 | Set-NetIPAddress -SkipAsSource $False
Do You Need Help with Your Device?
Our Team of Experts May Help
Troubleshoot.Tech Experts are There for You!
GET HELP
Troubleshoot.Tech experts work with all versions of Microsoft Windows including Windows 11, with Android, Mac, and more.
Share this article:
You might also like
Many Windows 10 users often change the IP addresses of their computers’ network adapter in order to connect to the internet or network they belong to in times when there is no automatic connection for their computers. In most cases, access to modifying this setting is restricted for some odd reason even if you are an administrator. So if you are one of the users whose Windows 10 VPN IPv4 Properties are not working, this post can help you remedy that so that you can open and edit the IPv4 Properties on your Windows 10 PC.
The common way to change IP settings is by going to Settings > Network and then to Internet > Change adapter options > Select Network adapter > right click and open Properties. From there, you can select TCP/IP 4 and modify it. If you aren’t able to do this, refer to the instructions laid out below to troubleshoot the problem in accessing the IPv4 Properties.
Option 1 – Try using PowerShell to manually set the IPv4 properties
As you are not able to set it using the interface, you can do so using PowerShell instead. Note that this option will only work for you if you run PowerShell with administrator privileges.
After opening PowerShell, according to many users, you have to run the this command – set-DnsClientServerAddress -InterfaceAlias “Ethernet” -ServerAddresses xxx.xx.xxx.xxx,x.x.x.x,xxx.xx.xxx.xxx,x.x.x.x
Usually, Ethernet is the name of your network adapter which is set by default. If you want to see the actual name of your network adapter, you can just type this command and tap Enter after doing so – Get-NetAdapter -physical | where status -eq ‘up’
After entering the given command, you will see a list of active Ethernet adapter in your computer as you can see on the image above. Note that the 4 sets of X like the one on the image below should match with the sequence:
Option 2 – Try editing the rasphone.pbk files
The rasphone.pbk files stores property for the connections and since you are not able to access the IPv4 properties, it is most likely that it has been disabled here. The good thing is that you can open these files and edit them using Notepad. Refer to the steps below to do so.
- Open the Windows Explorer and then enable the show hidden files option.
- After that, look for the files at this location – C:Users <username>AppDataRoamingMicrosoftNetworkConnectionsPbk_hiddenPbkrasphone.pbk
- Then right-click on it and select the “Open with” option and choose the Notepad app.
- After opening the file, look for “IpPrioritizeRemote” from the long list.
- Once you found it, set its value from “1” to “0”.
- After that, look for “IPInterfaceMetric” and set its value to “1” and tap Ctrl + S to save the changes you’ve made, and then exit and try accessing the IPv4 properties again. It should work, but if you’re still unable to access it, try the next option below.
Option 3 – Enable the Split Tunneling if you use VPN
All data goes back and forth when you are using a VPN service on your computer. And since you are using VPN, it could be that it disables the IPv4 interface. If that’s the case, you need to stay connected with both the local network and VPN and to do so, you have to enable Split Tunneling. How? Follow these steps:
- Open PowerShell with administrator privileges.
- Next, type in “Get-VpnConnection” and tap Enter. After doing so, it will give you the exact name of your VPN.
- After that, type in “Set-VpnConnection -Name “yourVPNName” -SplitTunneling $True” and tap Enter. Once you enter the command, it will free your IPv5 settings so that you can change it to connect with your local network if you prefer it to.
Read More
High Dynamic Range or HDR is a technique that’s used to create lifelike videos which have improved and better dynamic range, especially when it comes to details. And as you know, Windows 10 supports the steaming of HDR videos as long as the display supports it and it comes with the option to enable the HDR Playback for Windows 10 Video Streaming apps. However, before you can get the best viewing experience, you need to calibrate the display further for HDR video on your Windows 10 PC.
Take note that even when you have the HDR Playback feature enabled on your computer, you still need a display that supports it. To make sure that your display supports this feature, you can use the DirectX Diagnostic Tool to have the display correctly wired and have the latest WDDM 2.4 drivers installed as well as set the other settings properly.
Once you’ve made sure that your computer’s display really supports HDR and you’ve already enabled the HDR Playback feature, now it’s time for you to calibrate. Remember that when you calibrate the display, you should make an external monitor your primary display if you are using it for HDR and then adjust the settings to your liking. And if you are calibrating for primary display, you need to disconnect all other displays.
Follow the given steps below to calibrate the display of your PC.
- Step 1: You need to open the Video Playback first. To do so, navigate to Settings > Apps > Video Playback.
- Step 2: Under the Video Playback settings, uncheck the “Don’t increase display brightness when watching HDR video on battery” checkbox or plug in your PC.
- Step 3: Next, click the “Change calibration settings for HDR video on my built-in display” link located on the right side.
- Step 4: After that, click on the Play button located on the left side to play the video. Then move the sliders to the left or right so you can start to calibrate. Once you see that the quality of the image is to your preference, stop.
Note: Just a tip when calibrating – you just have to find the right balance between the details in the darker parts of a scene. For instance, you have Mountains in the background and buildings in the front – you need to drag the slider to the right to add more details to the snow on the mountain or drag the slider to the left to add more details to the buildings. After that, you can pause the video and exit the full-screen mode. Keep in mind that the quality of HDR depends on you as it is a personal choice. Some users might like a brighter shade while other ones want the darker shade so it really depends on your taste. If you are not satisfied with how your HDR turned out, you can just try calibrating the display again. Simply go back to the default HDR video calibration and click or tap the Reset calibration button.
Another thing to remember. First, you can only see HDR content on the full screen and if you’re using a laptop, you need to make sure to watch videos when plugged in and check that the battery settings won’t’ lower the brightness.
Read More
What is Ammyy Admin
AmmyyAdmin is a software developed by Ammy. This software allows you to manage network computers and servers remotely without complicated NAT settings adjustments or Firewall problems. The program is similar in marketed function to TeamViewer or LogMeIn. This software does not require installation and it lets you control other computers or share files over the software. It usually comes bundled with other software.
This software copes files into your computer and sometimes creates new startup keys that allow it to start each time your computer is restarted. AmmyAdmin might display additional ads in your browser as well as pop-up ads. Due to its ability to silently install and run remote administration, it could be used maliciously by those who intend to damage your computer or steal data. AmmyyAdmin is flagged for optional removal, and if you did not intentionally install it, removal is highly recommended
What is a Potentially Unwanted Program (PUP)?
If you’ve ever downloaded freeware or shareware, odds are high that your computer can get installed with a bunch of unwanted programs. A PUA / PUP (potentially unwanted application / potentially unwanted program) is a software program that comes bundled with freeware/shareware and you agree to install it on your computer system. These are programs you definitely don’t want on your system simply because it does not give any beneficial service.
PUP doesn’t involve malware in the traditional sense. One simple difference between malware and PUP is distribution. Malware is typically dropped through vulnerability exploitation and in contrast, PUP gets installed with the consent of the end-user, who consciously or unknowingly authorizes the PUP installation on their computer. A PUP might not be viewed as malicious or harmful but nonetheless, it is a common cause of clunky operating systems; some PUPs are a lot more aggressive by deliberately slowing down your PC.
How PUPs affect you?
Potentially Unwanted Programs appear in different forms and varieties, but most times, they are adware programs that exhibit irritating pop-up adverts and advertisements on web pages you explore. In addition, most free software nowadays comes with quite a few unwanted add-ons; in many instances a web browser toolbar or browser modification like a homepage hijacker. They’ll modify browser settings, change default search provider, substitute the default home page with their very own websites, decelerate internet speed, and will damage your computer as well.
They could look harmless but PUPs are usually spyware. Some might carry dialers, keyloggers, web browser hijackers, and tracking components that will collect system details, or tracks customer habits and relays these records to third-party organizations. Because of this unwanted program, your application might freeze, your security protections could get disabled which may leave the computer susceptible, your system may get damaged, and the list goes on and on.
Tips on protecting yourself from unwanted software
• When installing anything on your PC, always read the fine print, including the EULA. Do not accept terms of use that are for bundled programs.
• Select the “custom” install whenever downloading a software program. Particularly, pay attention to those small boxes which have been checked as default, where you might ‘agree’ to receive advertisements or install software bundlers.
• Use anti-PUP software. Security applications like Safebytes Anti-Malware offer the very best real-time protection from PUPs and also other malware.
• Be alert if you download and install freeware, open-source programs, or shareware. Avoid downloading and installing browser extensions and programs you are not knowledgeable about.
• Use only official product sites for downloading applications. Avoid download websites completely since the majority of websites force users to download the software using their own download manager, which is often bundled with some kind of unwanted program.
Safebytes Anti-Malware scans and detects malware for free. To complete removal, and ensure full PC protections, a paid license key is required.
Malware could potentially cause a lot of damage to your computer. Some malware sits in between the computer and the net connection and blocks a few or all internet sites that you would like to check out. It could also block you from installing anything on your computer, particularly anti-virus programs. If you are reading this article now, you’ve perhaps recognized that a malware infection is a reason behind your blocked net connectivity. So what do if you need to download and install an anti-virus application like Safebytes? There are a few solutions you can attempt to get around with this issue.
Boot Windows in Safe Mode
The Windows-based PC includes a special mode called “Safe Mode” where only the minimum required programs and services are loaded. In the event the malware is blocking internet connection and affecting your PC, running it in Safe Mode enables you to download antivirus and run a scan while limiting potential damage. To enter into Safe Mode or Safe Mode with Networking, press F8 while the system is booting up or run MSCONFIG and locate the “Safe Boot” options in the “Boot” tab. Once you’re in Safe Mode, you can try to download and install your anti-malware software program without the hindrance of the malicious software. Following installation, run the malware scanner to eliminate most standard infections.
Obtain the security program in an alternate web browser
Certain malware may target vulnerabilities of a specific web browser that obstruct the downloading process. If you seem to have a virus attached to Internet Explorer, then switch over to an alternate browser with built-in security features, such as Firefox or Chrome, to download your favorite antivirus program – Safebytes.
Create a portable anti-malware for removing malware
Here’s another solution which is utilizing a portable USB antivirus software that can check your system for malicious software without the need for installation. Adopt these measures to run the anti-malware on the infected computer system.
1) On a clean computer, install Safebytes Anti-Malware.
2) Plug the Thumb drive into the uninfected computer.
3) Double-click the exe file to run the installation wizard.
4) Pick a USB flash drive as the location when the wizard asks you where you want to install the program. Follow the on-screen instructions to finish the installation process.
5) Remove the flash drive. Now you can utilize this portable anti-virus on the affected computer system.
6) Double-click the anti-malware program EXE file on the flash drive.
7) Run Full System Scan to identify and clean-up up all sorts of malware.
These days, an anti-malware program can protect your computer from different forms of online threats. But how to select the right one amongst countless malware protection software that is available in the market? As you might be aware, there are numerous anti-malware companies and products for you to consider. Some of them are great, some are ok types, while some will ruin your computer themselves! You have to choose one that is reliable, practical, and has a strong reputation for its malware source protection. One of the strongly recommended software is SafeBytes AntiMalware. SafeBytes has a superb reputation for quality service, and customers appear to be very happy with it.
SafeBytes can be described as a highly effective, real-time anti-malware application that is created to assist everyday computer users in safeguarding their computers from malicious internet threats. Using its cutting-edge technology, this application will assist you to eradicate multiples types of malware like computer viruses, PUPs, trojans, worms, ransomware, adware, and browser hijackers.
There are many wonderful features you will get with this security product. Below are some typical features found in this software:
Robust, Anti-malware Protection: Built on a highly acclaimed anti-virus engine, this malware removal application has the capacity to find and get rid of various obstinate malware threats like browser hijackers, PUPs, and ransomware that other common antivirus software will miss.
Real-time Protection: Malware programs attempting to get into the system are identified and stopped as and when detected by the SafeBytes active protection shields. They are very effective in screening and eliminating different threats because they’re constantly improved with the latest updates and alerts.
Internet Security: Safebytes assigns all sites a unique safety score that helps you to get an idea of whether the webpage you’re going to visit is safe to browse or known to be a phishing site.
Light-weight: This software program is not “heavy” on the computer’s resources, so you’ll not notice any performance problems when SafeBytes is working in the background.
24/7 Online Support: Skilled technicians are at your disposal 24/7! They will promptly resolve any technical issues you might be experiencing with your security software.
SafeBytes has come up with a wonderful anti-malware solution that can help you conquer the latest malware threats and virus attacks. Once you’ve installed SafeBytes Anti-Malware, you will no longer need to bother about malware or other security worries. To ensure the complete removal, manually check your hard drive and registry for all of the following and remove or reset the values accordingly. Please note that this is for advanced users only and may be difficult, with incorrect file removal causing additional PC errors. In addition, some malware is capable of replicating or preventing deletion. Doing this in Safe Mode is advised.
Files:
%APPDATA%AMMYY
C:%DOCUMENTS%%%USER%%LocalTemp$inst.tmp
C:%DOCUMENTS%%%USER%%LocalTemp$insttemp_0.tmp
C:%DOCUMENTS%%%USER%%LocalTempAA_v3.exe
C:%DOCUMENTS%%%USER%%LocalTempencrypted.exe
C:Documents and Settings%USER%Application DataCasablanca
C:Documents and Settings%USER%Application DataBl 430 493 557.ADO
C:Documents and Settings%USER%Application DataDakar
C:Documents and Settings%USER%Application DataMegaloblast.a
C:Documents and Settings%USER%Application DataCrypto.dll
C:%DOCUMENTS%%%USER%%LocalTempnsh2.tmpSystem.dll
Key: HKUS-1-5-21-1801674531-413027322-2147225017-500SoftwareAmmyy
Key: HKLMSOFTWAREAmmyy
Read More
If you suddenly see a black border in your computer’s display then you might be wondering how come this happened but worry not for this post will give you a couple of suggestions that could help you resolve the problem.
The black bar could appear at the bottom or just the sides of the screen. Whichever it may be, there are options you can check out. Refer to the options givens below and make sure to follow them carefully.
Option 1 – Try checking the screen resolution
You might want to try checking the resolution of your screen.
- Open the Windows 10 Settings and go to Display.
- Next, go for the “100% (Recommended)” option under Scale and layout for the size of the text, apps, and other items.
- After that, select the Recommended setting again under Resolution.
Now check to see if the black bars are still there. They should be gone at this point, but if for some strange reason nothing has changed, then attempt the steps below.
Option 2 – Try updating Graphics & Monitor drivers
You might want to try updating your graphics and monitor drivers if you haven’t updated them for some time now. To do that, refer to these steps:
- First, boot your computer into Safe Mode.
- After that, tap the Win + R keys to launch Run.
- Type in devmgmt.msc into the box and tap Enter or click OK to open the Device Manager.
- After that, a list of device drivers will be displayed. From there, look for the Graphics drivers or the Monitor drivers and then click each one of them.
- After that, right-click on each entry and select the “Uninstall Device” option from the menu.
- Now restart your computer.
- After restarting your computer, go to the Settings app and Check for Updates in the Windows Update section.
Note: You can also try to roll back the graphics and monitor drivers back to their previous versions if updating them didn’t work. You can also try visiting the manufacturer’s website and download the graphics or monitor driver setup for your operating system.
Option 3 – Try to run the DISM tool
You can also run the DISM Tool as it might also help in getting rid of the black border or bar on your Windows 10 computer. Using this built-in tool, you have various options such as the “/ScanHealth”, “/CheckHealth”, and “/RestoreHealth” which could help you resolve the problem.
- Open the Command Prompt with admin privileges.
- Then type in the following commands and make sure to hit Enter right after you type each one of them:
- Dism /Online /Cleanup-Image /CheckHealth
- Dism /Online /Cleanup-Image /ScanHealth
- exe /Online /Cleanup-image /Restorehealth
- Do not close the window if the process takes a while as it will probably take a few minutes to finish.
Option 4 – Troubleshot the problem in a Clean Boot State
There are some instances that some conflicting programs installed in your computer might be the one that’s causing the Black border issue. To identify which program is causing the problem, you need to put your computer in a Clean Boot State. To do so, follow the steps below.
- Log onto your PC as an administrator.
- Type in MSConfig in the Start Search to open the System Configuration utility.
- From there, go to the General tab and click “Selective startup”.
- Clear the “Load Startup items” check box and make sure that the “Load System Services” and “Use Original boot configuration” options are checked.
- Next, click the Services tab and select the “Hide All Microsoft Services” check box.
- Click Disable all.
- Click on Apply/OK and restart your PC. (This will put your PC into a Clean Boot State. And configure Windows to use the usual startup, just simply undo the changes.)
- From there, start to isolate the problem by checking which one of the programs you installed recently is the root cause of the problem.
Read More
Socket Error 10060 — What is it?
Socket Error 10060 is basically a connection time-out error. This error occurs when the remote FTP server does not respond to CuteFTP.
This time-out error occurs after an FTP session is established but even the server doesn’t respond. The error message is displayed in the following format:
‘Connection timed out. A connection attempt failed because the connected party did not properly respond after a period of time, or established connection failed because connected host failed to respond.’
Solution
Error Causes
Socket Error 10060 may occur due to multiple reasons including:
- Blocked port
- Data connection incorrect settings
- When the web proxy connection setting does not allow enough time to receive a response from the destination website and therefore the connection is timed-out.
- Registry issues
- Viral infection
Further Information and Manual Repair
Here are some of the best and quick DIY methods to resolve Socket Error 10060 on your PC.
Method 1: Troubleshoot the Web Proxy Connection
This method is workable and effective if Socket Error 10060 occurs only when the web proxy service is used. To execute it, here’s what you need to do: install the Winsock Proxy Client on your PC.
Disable the web proxy settings under the LAN settings on the Connections tab of the internet options. Once you disable the settings, then try to go to the website that you giving you the error. If the site is accessible, the error is resolved.
Method 2: Increase Web Proxy Time out Settings
If disabling the web proxy settings doesn’t work, then try increasing time-out settings. To do so, you will also have to modify the registry.
Remember serious problems may occur if you modify the registry incorrectly.
- Here’s what you need to do, click start, run and then type Regedit in the dialogue box.
- Navigate to the following registry subkey: HKEY_LOCAL_MACHINESYSTEMCurrentControlSetServicesW3ProxyParameters.
- On the right side of the Registry Editor, right-click Request TimeoutSecs and then click Modify.
- Click decimal, they type the number of seconds that you want the proxy service to wait until the session times out.
- To confirm changes, click OK.
- Now restart WWW publishing service by going to start, run and type cmd. Click OK to continue.
- Type net stop iisadmin/y and then press enter. After that type net start iisadmin /y and then press enter. Test the new settings by going to the website that displayed the Socket Error 10060 message.
Method 3: Switch from Passive Mode to Active Port Mode
This method is effective if the error occurs due to incorrect data connection settings.
CuteFTP uses passive mode by default so to ensure the error is resolved, you may have to switch from passive mode to active port mode. To make this switch, open the site manager and then click once on the name of the problem website.
Now on the Type tab change the data connection type to use the port.
Method 4: Configure Firewall Settings
Sometimes the error may also occur due to Firewall. To resolve, configure Firewall settings to allow FTP protocol.
Method 5: Download Restoro
Whether the error occurs due to viral infection or registry issues, it is advisable to download Restoro.
This is an advanced and multi-functional PC fixer embedded with multiple utilities like antivirus and a registry cleaner. The registry cleaning utility removes junk files, cookies, and invalid entries damaging the registry.
It cleans, repairs, and restores the registry while the antivirus removes all types of viruses like spyware and Trojans in seconds thereby resolving socket error code 10060.
It is safe, user-friendly, and compatible with all Windows versions. Click here to download Restoro today.
Read More

Windows 11 will bring some old applications in new looks and some will get additional features as well. One of the old apps that will get new stuff is a calculator.
The calculator was always a way to go application for quick calculations but Microsoft aims to expand on that and make the calculator a little more useful.
The first thing that you will notice is the calculator look, the calculator has now an application theme setting that allows you to change the look of the application. It comes in standard and professional mode as usual but this time calculator will come with features that will enable it to handle some programming and engineering tasks.
The new calculator features a full graphing mode that lets you visually analyze a graph to identify key features. It also packs a deep converter that can switch between more than 100 units and currencies.
Other Windows 11 apps
A new snipping tool will be delivered with this latest update as well packed with new functionality. We have covered new features of the snipping tool in another article, if you are interested you can find the article here: https://errortools.com/windows/new-snipping-tool-redesigned-in-windows-11/
Mail and Calendar apps will also get a redesign, sadly all redesign that they will include will be of visual nature to fit in the overall Windows 11 theme, functionality will remain the same.
Read More
Hello and welcome everyone. In today’s article, you will learn how to lock folder and content in it.
Please be aware of few things:
- The method is shown here works, but you need to be careful and follow step by step or you will damage your files permanently,
- If you forget your password, you can not access your files anymore
- Your files altho protected can still show up in recent files of some applications
All of that being said, let us start with locking the local folder on the computer with the password.
Go to the folder where you have files that you would like to hide and lock with a password. Enter the folder and create the new text file inside it. Skip the name for now and go inside it. Copy and paste the following code inside the file:
cls
@ECHO OFF
title Folder Locker
if EXIST «Control Panel.{21EC2020-3AEA-1069-A2DD-08002B30309D}» goto UNLOCK
if NOT EXIST Locker goto MDLOCKER
:CONFIRM
echo Are you sure u want to Lock the folder(Y/N)
set/p «cho=>»
if %cho%==Y goto LOCK
if %cho%==y goto LOCK
if %cho%==n goto END
if %cho%==N goto END
echo Invalid choice.
goto CONFIRM
:LOCK
ren Locker «Control Panel.{21EC2020-3AEA-1069-A2DD-08002B30309D}»
attrib +h +s «Control Panel.{21EC2020-3AEA-1069-A2DD-08002B30309D}»
echo Folder locked
goto End
:UNLOCK
echo Enter password to Unlock folder
set/p «pass=>»
if NOT %pass%==Your-Password-Here goto FAIL
attrib -h -s «Control Panel.{21EC2020-3AEA-1069-A2DD-08002B30309D}»
ren «Control Panel.{21EC2020-3AEA-1069-A2DD-08002B30309D}» Locker
echo Folder Unlocked successfully
goto End
:FAIL
echo Invalid password
goto end
:MDLOCKER
md Locker
echo Locker created successfully
goto End
:End
Now locate this line of code in the document: if NOT %pass%==Your-Password-Here goto FAIL and replace Your-Password-Here with your password.
!!! Write down somewhere your password, if you lose it you will lock the folder even for you !!!
Save the file as FolderLocker.bat and double-click on it to execute it.
If everything was done correctly, a new folder with the name: Locker
Move files that you want to hide and protect inside that folder.
Double click again on FolderLocker.bat
The command prompt will appear with the question do you want to lock the folder, press Y, and press ENTER. The command prompt will close and the Locker folder will disappear.
In order to unhide and access the folder, you will need to double click on FolderLocker.bat again but this time command prompt with ENTER your password will appear. Type in your chosen password and the folder is back. If you wish to hide and lock it again just double click on FolderLocker.bat again, confirm with Y and it is hidden again.
Read More
Error Code 32 — What is it?
Code 32, a Device Manager error, pops up when a device driver and other required services related to the driver are disabled.
The error code 32 is usually displayed in the following format:
“A driver (service) for this device has been disabled. An alternate driver may be providing this functionality. Code 32”
When a driver experiences a problem, it is reported to the Device Manager. Though error Code 32 does not cause detrimental damage to your system, it can cause the loss of functionality of the hardware device whose driver is disabled.
Solution
Error Causes
Error 32 may be generated due to several reasons. However, the most common causes include:
- The device driver is outdated
- The device is not configured as the default
- Some other device is providing default functionality
- The device driver is disabled in the registry
- Corruption of registry values in the CD ROM Drive Class registry key
Further Information and Manual Repair
If you come across error code 32 on your PC, then repair it immediately to ensure optimum PC performance. To resolve this error code, try the methods listed below. If you are not a computer programmer, don’t worry!
The listed solutions are easy to perform, require no technical background or expertise and more importantly, these solutions are very effective.
Simply follow the instructions to repair error code 32 on your system in just a few minutes.
Method 1 — Reboot Your PC
Sometimes Device Manager error codes may appear due to temporary issues, which may be resolved simply by rebooting your system. If you are lucky, this might actually work.
By restarting your PC, you might be able to get rid of error code 32. However, if the error still persists, then try other methods given below.
Method 2 — Uninstall and Reinstall the Driver
To resolve error code 32, uninstall and then reinstall the driver. To uninstall the driver, simply follow these steps:
- Go to the start menu
- Type Device Manager in the search bar and then press enter
- Now in the Device Manager, find and then double-click the category of device that you wish to uninstall, for example, click on the Display Adapter to uninstall the graphics card.
- Once you have located the device and the driver you wish to uninstall, simply right click on it and then click ‘uninstall’
- Windows will prompt you to confirm device removal changes.
- Click OK to confirm and proceed.
- After that, simply restart your system to activate changes
- To reinstall, go to the control panel and choose Add/Remove Hardware and add a new device. Follow all prompts to reinstall the device.
Method 3 — Delete Both the Upper Filters and Lower Filters Registry Values
As discussed above, sometimes error code 32 may be triggered due to corruption of registry values.
If this is the underlying cause, then delete both the upper filters and lower filters registry values from the registry. This will take about 5 to 7 minutes. Here’s what you have to do:
- Go to the start menu
- Type Regedit in the search box and then press enter
- Now locate the HKEY_LOCAL_MACHINE folder under ‘My Computer’
- Click the |> or (+) icon next to the folder name to expand
- Here you will see a long list of subkeys
- Locate the correct class GUID for the problematic device
- Now click the registry subkey that corresponds to the device class GUID
- Locate the Upper Filters and Lower Filter values and delete
- Close the registry editor
- Restart your PC to activate changes
This will hopefully resolve error code 32 on your system if the error was generated due to registry value corruption. However, if the error continues to appear, then resort to method 4.
Method 4 — Update the Problematic Driver
Locate the problematic drivers and update them with the latest versions. This procedure is effective but time-consuming if performed manually.
It takes several minutes to identify problematic drivers and find the latest and compatible versions for each driver on the manufacturers’ website. And besides, you will have to perform updates continuously to ensure the error doesn’t occur again.
Method 5 — Download DriverFIX to Update Drivers Automatically
To avoid the hassle, download DriverFIX.
This is a cutting-edge and user-friendly software program embedded with intelligent system programming and intuitive technology that identifies problematic drivers and updates them with the latest and compatible driver versions in seconds, automatically and on a regular basis.
By installing it on your PC, you can update all the drivers and repair code 32 in no time.
Click here to download DriverFIX to resolve Device Manager error code 32 today!
Read More
Code 0x800488AB – What is it?
The Error Code 0x800488AB will appear when a user is in the Windows 10 Mail app and has provided an Outlook.com e-mail address. The mail app will give a message that the “account information is out of date” and it does provide an option to fix the issue. After clicking the Fix button, this error code will show up to the user.
Common symptoms include:
- A dialog box will appear with the Error Code 0x800488AB
- Microsoft Windows 10 Mail App will not retrieve (or subsequently send) mail
- User cannot delete and re-add the Outlook email account in the Windows 10 Mail app
- User can still access and log in to various Microsoft websites, including logging into the Outlook Mail website
Solution
Error Causes
This error can be caused by a few different actions of the user when they have changed a password or a PIN number to access their Outlook mail. This error does have a relatively easy fix after the cause is determined and where the break-in information has occurred. A few of the causes may be:
- If the user changes their password on the Microsoft website and uses the alternative PIN login method to access the Mail App.
- The log-in information on the Microsoft website does not match the login information on the Windows 10 App.
- The login information was changed on the Microsoft website and was not updated to reflect on the Windows 10 Mail app.
The Microsoft website and Microsoft Mail app do not share the knowledge of the change in login credentials, therefore the log-in credentials appear to be incorrect when trying to access the Microsoft Mail app. It should be noted that a user may bypass the password option if they log in to the Microsoft Mail app while using the alternative PIN log-in method, thus still leaving the password undetected.
Further Information and Manual Repair
As is the case with all new technology and having a few wrinkles, the release of Microsoft Windows 10 is not left out. There have been a few discussions of errors and bugs, including Error Code 0x800488AB. As of right now, there are three different methods that can be utilized by any at-home user. These methods are rather simple and make sense when the problem has been identified.
Method 1:
Run the built-in Windows Store Apps troubleshooter:
- Press the Windows Key and then type ‘troubleshoot’ and hit Enter
- Select “View all” on the left panel and run the “Windows Store Apps” troubleshooter from the list displayed and see if it works.
Method 2:
Use the System File Checker tool to repair corrupted or missing system files:
- Click Start.
- Type cmd, and then press CTRL+SHIFT+ENTER to open the elevated command prompt (I.e. Command prompt with administrative rights).
- The User Account Control window should appear, be sure that the action it exhibits is correct, and then press the Continue button.
- Type or copy-paste the below command line into it without quotes:
“Sfc /scannow”
Method 3:
- Press the Windows Key
- Search for «Credentials Manager»
- Click on Windows Credentials
- Look for any reference to your windows account (generally your @outlook.com is listed)
- Delete them.
- Then select your account at the top of the start menu and select Log Out.
- If using a Pin Code, switch to type input and put your password into the box.
When you go to Mail, and select «Fix Issues» it will detect your password and your account should sync with new emails. In some cases, depending on why this particular error code was caused, you may have to use a powerful automated tool to have it resolved.
Read More
Error Code 0x80070490 — What is it?
When downloading a Windows update, it is important to remember that these updates are what keeps your computer safe. Some users have reported seeing error code 0x80070490 when allowing updates for their Windows PC. This error code may appear when the user is trying to connect to the update site for Windows and maybe a result of a corrupted CBS manifest. Having this error code will not only stop the update of the system, but it will also certainly halt any work being done with the computer. Quite a few Windows users have written in complaints about this error while updating from any prior Windows update to Windows 10.
Common symptoms include:
- While a user is performing the updates, the Windows computer will stop running the updates, and it will show the error code 0x80070490.
- Windows updates will not install any new features and will not install security patches.
- The computer will not continue with the Windows update, and it may revert back to the previous state that the computer was in, prior to attempting the updates.
Error Causes
There is not a lot known about what exactly causes the error code 0x80070490, but it is something critical that makes Windows abruptly stop its updates. It could be caused by a simple glitch in the computer system, or it could be caused by a larger problem. One thought is that the CBS (Component-Based Servicing) manifest can be corrupt. Another thought is that the computer’s anti-virus software may be interfering with the computer’s ability to perform the necessary updates.
Further Information and Manual Repair
There is very little information known about error code 0x80070490 and why it exists, but there are a few methods in which to correct it. Users should be careful when trying to fix this error themselves. If the user feels that the methods are too complicated or they are uncomfortable taking it on themselves, they should contact a Windows repair technician to fix the problem. Not all methods listed will suit the user’s needs, but it is dependent upon the problem at hand as to which method will be the best fit to fix the error code. If these steps are taken and the error is not corrected, it is vital to contact the Windows repair technician.
Method One: Creating a new local account
Create a new local account on the computer, and allow administrator privileges on it. Next, move all of your documents and personal files to the new account. Delete the old account (you will no longer be using this) and switch over to the new one. After switching to the new local account, add the Microsoft account to it.
Method Two: Delete user ID, Store cache from the registry
- You will need to open the Registry Editor. Do this by pressing the Windows Key and R, then typing in “Regedit”. After this is typed in, press Enter or click the OK button to start the registry editor.
- When this starts, you will need to navigate all the way to the following key on the left pane:
- HKEY_LOCAL_MACHINESOFTWAREMicrosoftWindowsCurrentVersionAppxAppxAllUserStore
After this, find the key that is similar to this: S-1-5-21-1505978256-3813739684-4272618129-1016 - NOTE: this is just an example. The keys will be in a similar format but will not look exactly like this.
- Select all the keys that look like this, and then delete them. After these keys are deleted, close the Registry Editor and restart the computer.
Method Three: Check to see if BITS, MSI Installer, Cryptographic, and Windows Update Services are running
Press the Windows key and R. Then, type in services.msc. After the Services window starts up, find the following services: BITS, MSI Installer, Cryptographic, and Windows Update Services. When these services are found, make sure that they are up and running. If one or more of these services is not running, make sure that they are started. To do this, select the service and then click on Start the Service.
Method Four: Windows Update Troubleshooting
Press the Windows key plus W and then type in “troubleshooting”. Select Troubleshooting. On the top left corner, select View All. Click on Windows Update troubleshooter. After this, follow the on-screen instructions in order to run the troubleshooter. After the troubleshooter has run, the issue should be fixed.
Read More
Copyright © 2023, ErrorTools. All Rights Reserved
Trademark: Microsoft Windows logos are registered trademarks of Microsoft. Disclaimer: ErrorTools.com is not affiliated with Microsoft, nor claims direct affiliation.
The information on this page is provided for information purposes only.
In some situations you may want to specify several IP addresses at once on a single network interface. For example, you can assign addresses from different subnets with different masks. Thus it will be possible to access your PC using any of those addresses.
How to assign multiple IP addresses to network adapter in Windows 10, 8, 7
Right-click the network icon in the Taskbar and click Open Network and Sharing Center:
Double click the Ethernet or Wi-Fi connection:
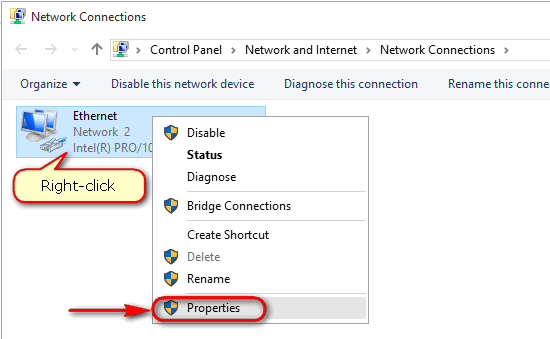
In the status windows press Properties:
Select Internet Protocol Version 4 (TCP\IPv4) in the list and press Properties:
Switch the selector to Use the following IP address.
Manually specify IP, Subnet mask, Default gateway and Preferred DNS server.
Then press Advanced:
Click Add… button:
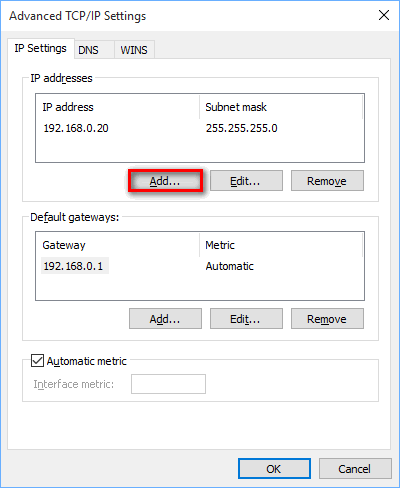
Specify additional IP addresses with subnet masks and press Add:
Press OK:

Press OK once more:
Press Close:
In such a way you can add a bunch of IP addresses to a single Network Interface Card (NIC) in Windows 10, 8.1 or 7.