
Недаром в народе критическую ошибку (BSOD) в виде синего экрана с «какими-то цифрами и буквами» называют «Синий экран смерти».
Действительно, любого рядового пользователя (а порой, и закалённого системного администратора с многолетним опытом работы) подобная критическая ошибка может поставить в тупик, и тогда без посторонней помощи или взгляда со стороны просто не обойтись.
И в данной статье мы рассмотрим одного из представителей категории критических ошибок — «Dumping physical memory to disk», а также обозначим основные причины появления системного сбоя, и предложим наиболее эффективные методы борьбы с ним.
Сразу же стоит отметить, что в подавляющем большинстве случаев данная ошибка является следствием реакции операционной системы на обнаружение аппаратных неполадок (или же иными словами — физической неисправности).
Поэтому для начала следует остановиться на решении основных аппаратных проблем.
«Оперативная память»
Довольно часто «Dumping physical memory to disk» возникает после физического вмешательства в компоненты компьютера (чистка пыли, апгрейд, замена термопасты) или после скачков напряжения и перегрева компонентов.
Соответственно, от этого и стоит отталкиваться в решении ошибки:
- Извлеките планки оперативной памяти и протрите медные контакты обычным канцелярским ластиком. Делать это нужно аккуратно и без фанатизма.
- По возможности замените слот для оперативной памяти, или просто поменяйте их местами.
- При наличии нескольких активных планок отключите одну из них и проверьте работоспособность системы.
«Видеокарта»
Если ошибка возникает при загрузке операционной системы, то вполне вероятно, что сбоит видеокарта.
Следовательно, необходимо осмотреть её (а также материнскую плату) на наличие явных физических неисправностей — вздутие, погорение, потёртости и т. п.
Если что-либо из перечисленного было вами выявлено в своём компьютере, то следует или заменить проблемные компоненты, или воспользоваться услугами сервисного центра и по возможности продлить им «жизнь».
Программные неполадки
Cразу же после столкновения с ошибкой «Dumping physical memory to disk» (как и с любой другой формой «BSOD») следует внимательно проанализировать отчёт по возникшей критической ошибке.
Для этого следует перейти в «С:\windows\minidump» (она же может именоваться «Memory.dmp»).
В данной папке будут находиться отчёты операционной системы, записанные непосредственно перед возникновением ошибки, что позволяет определить, какой процесс является виновником ее появления.
Однако самостоятельный анализ такого отчета принесёт положительный результат только при наличии у пользователя определённых технических познаний в работе операционной системы в целом.
Поэтому — при отсутствии таких навыков — можно загрузить отчёты (дампы) на любое файловое хранилище, предоставить открытый доступ (личной информации в отчёте нет) и создать соответствующую тему на любом тематическом техническом форуме.
А также можно попробовать воспользоваться общими рекомендациями, которые будут предоставлены ниже.
Что делать при появлении ошибки «dumping physical memory to disk»
Проверка целостности системных файлов и корректности работы жёсткого диска
Это стандартный алгоритм проверки работы системы, который даже если не решит основную проблему, то поможет избавиться от мелких системных сбоев.
Утилита «sfc/scannow» предназначена для выявления повреждённых и отсутствующих системных файлов, с их последующим восстановлением.
Для её активации сделайте следующее:
- Нажмите «Пуск» и в строке поиска введите «cmd.exe».
- Кликните правой кнопкой мышки по найденному результату и выберите «Запустить от имени администратора».
- В открывшейся консоли командной строки введите и выполните команду «sfc/scannow».
- Дождитесь завершения сканирования и просмотрите отчёт утилиты.

Утилита «CHKDSK» предназначена для проверки физических носителей на наличие имеющихся ошибок и их автоматического исправления:
- Аналогичным образом запустите консоль командной строки.
- Введите и выполните команду «CHKDSK f/ r/» — параметр «f/» указывает на автоматический поиск и исправление ошибок, параметр «r/» — сканирует жёсткий диск на наличие повреждённых секторов и автоматически их исправляет.
- Процесс может занять длительное время, поэтому наберитесь терпения и не прерывайте работу утилиты.
Анализ и переустановка графического драйвера
В продолжение темы физической неисправности видеокарты, следует проверить её работу на наличие программных ошибок (в виде некорректно работающих драйверов программного обеспечения).
Для проверки актуальности установленных драйверов программного обеспечения графического адаптера зайдите на официальный сайт производителя и проверьте, какие последние редакции получило ваше оборудование (с учётом используемой операционной системы).
Если версия драйвера актуальна, то, возможно, причиной возникновения сбоя «dumping physical memory to disk» стала его некорректная установка.
Проверить это можно следующим образом:
- Нажмите комбинацию клавиш «WIN+R» и выполните «devmgmt.msc».
- В открывшемся окне «Диспетчер устройств» разверните строку/раздел «Видеоадаптеры».
- Кликните правой кнопкой мышки по найденному устройству и выберите «Свойства».
- Перейдите на вкладку «Драйвер» и нажмите на кнопку «Удалить».
Здесь возможно два варианта дальнейших действий:
- Перезагрузить компьютер и предоставить операционной системе «карт бланш» на самостоятельную установку драйвера графического адаптера.
- Воспользоваться специализированным программным обеспечением (DriverPack или Driver Booster) для самостоятельной полуавтоматической установки необходимых драйверов.
Анализ работы оперативной памяти
Как и с работой графического адаптера, так и в работе оперативной памяти возможны ошибки, которые также необходимо выявить на программном уровне.
Делается это достаточно просто:
- Наиболее популярная и качественная программа для диагностики работы оперативной памяти является «Memtest». Для работы вам потребуется скачать и записать образ программы на загрузочный носитель, с которого и будет осуществляться тестирование.
- Далее потребуется просто загрузиться с носителя (используя «Boot Menu» или установив соответствующий приоритет загрузки в BIOS) и начать работу с «Memtest».
- После загрузки с носителя сканирование и тестирование начнётся автоматически.
- Остаётся набраться терпения, так как сканирование займёт длительное время (это часы тестирования для каждой планки оперативной памяти).
Если по завершению работы «Memtest» внизу активного окна будет предоставлено уведомление «Pass complete, no errors, press Esc to Exit», то программа не обнаружила неисправных блоков.
Если же они присутствуют, то будут наглядно выделены красным цветом, соответственно, вам придется заменить оперативную память.
Заключение
В заключение стоит ещё раз повторить, что самый верный путь в решении рассматриваемого вопроса — это исследование и анализ отчёта о возникшей ошибке.
Как перейти от Waterfall к Agile
EggHead 06.05.2025
Каскадная модель разработки Waterfall — классический пример того, как благие намерения превращаются в организационный кошмар. Изначально созданная для упорядочивания хаоса и внесения предсказуемости. . .
Оптимизация SQL запросов — Продвинутые техники
Codd 06.05.2025
Интересно наблюдать эволюцию подходов к оптимизации. Двадцать лет назад всё сводилось к нескольким простым правилам: «Избегайте SELECT *», «Используйте индексы», «Не джойните слишком много таблиц». . . .
Создание микросервисов с gRPC и Protobuf в C++
bytestream 06.05.2025
Монолитные приложения, которые ещё недавно считались стандартом индустрии, уступают место микросервисной архитектуре — подходу, при котором система разбивается на небольшие автономные сервисы, каждый. . .
Многопоточность и параллелизм в Python: потоки, процессы и гринлеты
py-thonny 06.05.2025
Параллелизм и конкурентность — две стороны многопоточной медали, которые постоянно путают даже бывалые разработчики.
Конкурентность (concurrency) — это когда ваша программа умеет жонглировать. . .
Распределенное обучение с TensorFlow и Python
AI_Generated 05.05.2025
В машинном обучении размер имеет значение. С ростом сложности моделей и объема данных одиночный процессор или даже мощная видеокарта уже не справляются с задачей обучения за разумное время. Когда. . .
CRUD API на C# и GraphQL
stackOverflow 05.05.2025
В бэкенд-разработке постоянно возникают новые технологии, призванные решить актуальные проблемы и упростить жизнь программистам. Одной из таких технологий стал GraphQL — язык запросов для API,. . .
Распознавание голоса и речи на C#
UnmanagedCoder 05.05.2025
Интеграция голосового управления в приложения на C# стала намного доступнее благодаря развитию специализированных библиотек и API. При этом многие разработчики до сих пор считают голосовое управление. . .
Реализация своих итераторов в C++
NullReferenced 05.05.2025
Итераторы в C++ — это абстракция, которая связывает весь экосистему Стандартной Библиотеки Шаблонов (STL) в единое целое, позволяя алгоритмам работать с разнородными структурами данных без знания их. . .
Разработка собственного фреймворка для тестирования в C#
UnmanagedCoder 04.05.2025
C# довольно богат готовыми решениями – NUnit, xUnit, MSTest уже давно стали своеобразными динозаврами индустрии. Однако, как и любой динозавр, они не всегда могут протиснуться в узкие коридоры. . .
Распределенная трассировка в Java с помощью OpenTelemetry
Javaican 04.05.2025
Микросервисная архитектура стала краеугольным камнем современной разработки, но вместе с ней пришла и головная боль, знакомая многим — отслеживание прохождения запросов через лабиринт взаимосвязанных. . .
RushInformation recommends Hello Ivy for automating your workflow and project management for free. Learn More
How to fix Blue Screen Physical memory Dump Error in Windows 7/XP: Windows 7 was the successor of Windows XP and both had great success in the market since the release. Even though, these OS were quite successful yet they were not immune to errors. Once such error in Windows 7 and XP is blues screen physical memory dump error. This error usually occurs where you try to install software or while playing games on your PC. Today, we will try to fix blue screen physical memory dump error in Windows XP and Windows 7.

The blue screen physical memory dump error makes your PC shut down unexpectedly or will make your PC stuck or hang it. This is indeed one of the most annoying error. There are several reasons why this error can occur in your PC. You can check out the complete list of errors below.
What causes blue screen physical memory dump error?
To view this video please enable JavaScript, and consider upgrading to a web browser that supports HTML5 video
The error can occure because of multiple reasons including, Windows corrupted because of a virus, corruption of Windows registry, outdated Windows drivers, problem in your Random Access Memory (RAM) etc.
These fixes would also allow you to fix below-given errors:
- Collection data for crash dump
- Initializing disk for crash dump …
- Beginning dump of physical memory.
- Dumping physical memory to disk 100
How to fix Blue Screen Physical memory Dump Error Windows 7/XP : Best Methods
Method 1: Repair or Update Windows Registry and Drivers
Most of the time reason for this error is corrupted registry and drivers in your Windows computer. Repair Windows Registry: Repairing your windows registry can fix this error in your computer. You can repair your registry using any good registry cleaner available on the internet.
Check for Virus: If cleaning and repairing of registry didn’t work then you can try to scan your PC for virus. Perform a full scan using your Anti-virus software and remove virus if found any.
Run Sfc /Scannow command: Sfc scan do wonder at times. All you have to do is open command prompt window and type the following command. Make sure you run Command prompt as administrator.
Sfc /Scannow
Wait till you get a message saying scan is complete and see if the error has gone away.
Updates your Drivers: At times the real culprit could be the driver in your PC. When a driver becomes corrupted or outdated, it can make hardware malfunction resulting in BSOD. So, check for all the available updates from device manager.
Method 2: Check if your RAM strip is faulty
A faulty RAM strip can also cause this error in Windows 7 or XP computer. What you can do is, try to replace the RAM strip with another RAM, which you can borrow temporarily and see if it resolves the error. If replacing the RAM strip resolves it, then you might need to change your RAM to fix this error.
Method 3: Find and search for Specific Error Code
If nothing seems to work then you can specifically search for the fixes for your error using the error code. Whenever Blue screen of death appear, it throws an error code. You can make use of that error code to find fix for your computer’s problem. A simple Google search with the error code would fetch the available fixes.
So, this was about how to fix blue screen physical memory dump error in Windows XP and Windows 7. If you have any queries ask it in the comment section below.
RushInformation recommends Hello Ivy for automating your workflow and project management for free. Learn More
Windows users commonly face these issues where they experience dumping physical memory errors. Irrespective of the Windows version, users get this error while performing any action on Windows system like installation of software, running any application or doing some other work. In few situations, users might experience that the error appears and computer restarts automatically or error will hang your computer screen unless you restart your system. This dumping error will appear like below:

“Dumping physical memory to disk” error is a blue screen of death (BSOD) error this error can be caused because of several reasons and whenever this error is prompted, the files and programs running in the backend have risk. It means that the programs running that time are put onto a hidden file for analysis later.
Reasons Behind Physical Memory Dump Error
- RAM issues of Windows system.
- Windows was corrupted by Virus Intrusion.
- Windows drivers are corrupted or outdated.
- Registries of Windows have been corrupted.
- Inappropriate handling of Windows system.
Different Workaround Methods to Resolve The Error
#Check What is Causing This Error:
- Make sure that the power supply is appropriate.
- Check if any overheating issues are not the problem.
- Clean of any dust or debris from the computer system.
#Reset Your System Page File
- Right click on My Computer.
- Choose Properties>>Advanced tab.
- Click Settings under Performance.
- Now, click on Advanced Tab>>Change button.
- Here click on Custom Size button and click in Initial Size box.
- Make the page file’s size 0.
- And, in maximum size box make it 0.
- Click set and restart your computer and run a defrag.
- Once defrag is done, go to file settings and click on Change button.
- Provide initial and maximum page file size as 1.5 times the RAM amount.
- Click on Set Button.
- Reboot the system.
- This can provide you a new page file resolving the error.
# Windows, Registry, Drivers or RAM” Repair and Update
When the reason behind the error is Windows registry or driver corruption, it is suggested to repair or clean the registries or drivers. If this is not the problem, RAM can have the issue. There are many reasons, which can affect the RAM, and it can cause the memory dump error and hence repairing RAM can troubleshoot the error.
#Antivirus Program to Scan Virus
As virus intrusion can affect the Windows system, an advance antivirus can be utilized to remove any virus from the system. It is always recommended to have a latest antivirus program installed in the system so that the virus is eliminated before it creates any further issue.
Conclusion
There can be different reasons for this physical memory dump issues and for these varied reason, different solution will work. Users can try the above-mentioned methods to resolve this issue. Users can also use Hotfix for Windows 7 system and check the updates and recently installed hardware and other drivers regularly. Also, check for faulty ports and RAM if it is causing any issue in order to fix Windows 7 physical memory dump error.
Fix Physical Memory Dump Error: Beginning Dump of Physical Memory is a Blue Screen Of Death (BSOD) Error which is a Stop error meaning you won’t be able to access your system. Every time your restart your PC you will be in this BSOD error loop and the main problem is that you won’t be able to access any data or files present on the system.

Physical Memory Dump Error looks something like this:
Beginning dump of physical memory
Physical memory dump complete.
Contact your system administrator or technical support group for further
assistance.

OR

Collecting data for crash dump
Initializing disk for crash dump
Beginning dump of physical memory
Dumping physical memory to disk: 5
A memory dump is a process in which the contents of memory are displayed and stored in case of an application or system crash. These are the possible reasons for Physical Memory Dump error: corrupted system files, damaged hard disk, corrupted RAM, compatibility of hardware and software.
Table of Contents
Method 1: Run Windows Diagnostics
You need to run Windows Diagnostic in order to ensure that you’re hardware isn’t faulty. There is a chance that your hard disk might be damaged or corrupted and if that’s the case then you need to replace your previous HDD or SSD with a new one and install Windows again. But before running to any conclusion, you must run a Diagnostic tool to check if you really need to replace HDD/SSD.

To run Diagnostics restart your PC and as the computer starts (before the boot screen), press F12 key and when the Boot menu appears, highlight the Boot to Utility Partition option or the Diagnostics option and press enter to start the Diagnostics. This will automatically check all the hardware of your system and will report back if any issue is found.
Method 2: Run System File Checker (SFC) and Check Disk (CHKDSK)
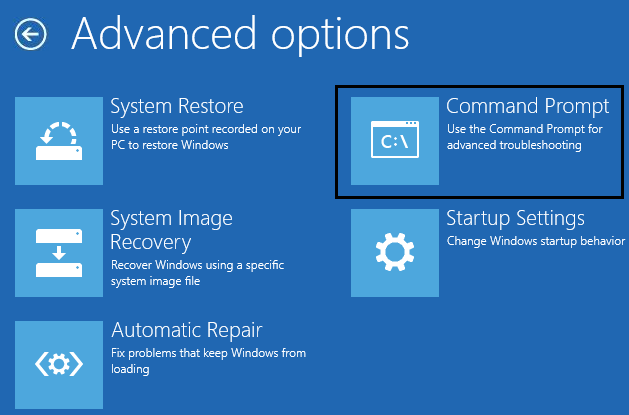
1.Again go to command prompt using the method 1, just click on command prompt in the Advanced options screen.
2.Type the following command in cmd and hit enter after each one:
sfc /scannow /offbootdir=c:\ /offwindir=c:\windows
chkdsk c: /r
Note: Make sure you use the drive letter where Windows is currently installed

3.Exit the command prompt and restart your PC.
Method 3: Run Memtest86+
Now run the Memtest86+ which is a 3rd party software but it eliminates all the possible exceptions of memory errors as it runs outside of the Windows environment.
Note: Before starting, make sure you have access to another computer as you will need to download and burn the software to the disc or USB flash drive. It’s best to leave the computer overnight when running Memtest as it sure likely to takes some time.
1.Connect a USB flash drive to your system.
2.Download and install Windows Memtest86 Auto-installer for USB Key.
3.Right-click on the image file which you just downloaded and select “Extract here” option.
4.Once extracted, open the folder and run the Memtest86+ USB Installer.
5.Choose your plugged in USB drive to burn the MemTest86 software (This will format your USB drive).

6.Once the above process is finished, insert the USB to the PC which is giving the Physical Memory Dump Error.
7.Restart your PC and make sure that boot from the USB flash drive is selected.
8.Memtest86 will begin testing for memory corruption in your system.

9.If you have passed all the test then you can be sure that your memory is working correctly.
10.If some of the steps were unsuccessful then Memtest86 will find memory corruption which means that your Physical Memory Dump Error blue screen of death error is because of bad/corrupt memory.
11.In order to Fix Physical Memory Dump Error, you will need to replace your RAM if bad memory sectors are found.
Method 4: Run Startup/Automatic Repair
1.Insert the Windows 10 bootable installation DVD and restart your PC.
2.When prompted to Press any key to boot from CD or DVD, press any key to continue.

3.Select your language preferences, and click Next. Click Repair your computer in the bottom-left.

4.On choose an option screen, click Troubleshoot.

5.On Troubleshoot screen, click Advanced option.

6.On the Advanced options screen, click Automatic Repair or Startup Repair.

7.Wait til the Windows Automatic/Startup Repairs complete.
8.Restart and you have successfully Fix Physical Memory Dump Error, if not, continue.
Also, read How to fix Automatic Repair couldn’t repair your PC.
Method 5: Run CCleaner to fix Registry errors
1.Download and install CCleaner.
2.Now run CCleaner and in the “Cleaner” section, under the Windows tab, we suggest checking the following selections to be cleaned:
3.Once you’ve made certain the proper points are checked, simply click Run Cleaner, and let CCleaner run its course.
4.To clean your system further select the Registry tab and ensure the following are checked:
7.Select Scan for Issue and allow CCleaner to scan, then click Fix Selected Issues.
8.When CCleaner asks “Do you want backup changes to the registry?” select Yes.
9.Once your backup has completed, select Fix All Selected Issues.
10.Restart your PC and you may be able to Fix Physical Memory Dump Error.
Method 6: Repair Install Windows 10
This method is the last resort because if nothing works out then this method will surely repair all problems with your PC. Repair Install just using an in-place upgrade to repair issues with the system without deleting user data present on the system. So follow this article to see How to Repair Install Windows 10 Easily.
Recommended for you:
- Fix Unmountable Boot Volume Stop Error 0x000000ED
- Reboot and Select Proper Boot Device Issue
- Fix Antimalware Service Executable High CPU Usage
- Fix KMODE Exception not handled Error
That’s it, you have successfully Fix Physical Memory Dump Error but if you still have any queries regarding this guide then feel free to ask them in the comment’s section.