По умолчанию, Windows 10 создает дампы памяти и минидампы при сбоях системы — синих экранах BSoD. Эти файлы могут быть полезны для диагностики проблемы, но занимают место на диске, которое, особенно в случае небольших SSD может быть критичным. Можно ли удалить дампы памяти? — да, сделать это можно и к каким-либо последствиям не приведёт.
В этой простой инструкции подробно о способах удалить файлы дампов памяти Windows 10 и минидампы. При желании вы можете отключить создание дампов памяти при сбоях, используйте инструкцию Как включить создание дампа памяти в Windows 10, но установите «Нет» в параметрах записи отладочной информации.
Ручное удаление файлов из их расположения
Дамп памяти Windows 10 по умолчанию — это файл C:\Windows\Memory.dmp, размер которого может превышать 800 Мб, минидампы хранятся в виде файлов папке C:\Windows\Minidump.

Если у вас есть права администратора на вашем компьютере, вы можете удалить эти файлы средствами Windows 10 также, как и любой другой файл (используйте Shift+удаление, чтобы файл не был помещен в корзину).
Удаление возможно и другими методами, в частности — с помощью встроенных инструментов очистки диска Windows 10 от ненужных файлов.
Удаление дампов памяти в Параметрах Windows 10
Для того, чтобы удалить дампы памяти в параметрах, выполните следующие шаги:
- Откройте параметры Windows 10 (для этого можно нажать клавиши Win+I на клавиатуре).
- Перейдите в раздел «Система» — «Память», а затем откройте пункт «Временные файлы».
- Отметьте пункты «Файлы дампа памяти для системных ошибок» и, при желании — «Файлы мини-дампа для системных ошибок».
- Нажмите кнопку «Удалить файлы» вверху окна.
Файлы дампа памяти и остальные отмеченные вами элементы будут удалены с диска компьютера.
Использование утилиты «Очистка диска» для удаления дампов памяти
Также можно использовать классическую утилиту очистки диска для удаления рассматриваемых файлов:
- Нажмите клавиши Win+R на клавиатуре, введите cleanmgr и нажмите Enter.
- После запуска утилиты очистки диска нажмите по кнопке «Очистить системные файлы».
- Отметьте пункты для удаления дампов памяти и нажмите кнопку «Ок».
- Дождитесь завершения очистки.
И в завершение ещё один момент — по умолчанию в Windows 10 включена опция автоматического удаления дампов памяти при нехватке места на диске (настраивается в параметрах загрузки и восстановления системы, Win+R — sysdm.cpl), причём под «нехваткой» по умолчанию считается менее 25 Гб свободного места на диске. Если на вашем диске объём свободного пространства меньше, не исключено, что вы и не увидите полных дампов памяти (а лишь небольшие файлы минидампов). Возможно, в контексте рассматриваемой темы вас заинтересует статья Лучшие программы для очистки диска Windows.
Все способы:
- Что это такое
- Вариант 1: Удаление мусорных файлов
- Вариант 2: Отключение дампа памяти
- Вариант 3: Исправление ошибки дампа памяти
- Способ 1: Восстановление системных файлов
- Способ 2: Проверка диска
- Способ 3: Автоматическое восстановление
- Анализ дампа памяти
- Вопросы и ответы: 0
Что это такое
Для начала следует разобраться, что такое дамп памяти и в каких ситуациях пользователи сталкиваются с ним. В зависимости от этого и применяются различные способы устранения неполадки. Дамп памяти – это файл, который автоматически создается при возникновении критических ошибок в работе операционной системы.
Если вкратце, наверняка каждый юзер Windows получал «синий экран смерти» (BSOD), который по своей сути является результатом различных сбоев. Он появляется на любой стадии использования ОС, а сама система при возникновении такого экрана автоматически создает один или несколько файлов. Они содержат в себе отладочную информацию о компьютере, включая данные, которые при критической ошибке, повлекшей BSOD, находились в ОЗУ. Такие сведения позволяют понять причину проблемы, которая вызывает «синий экран смерти». То есть система генерирует дамп, а аварийным он называется, потому что формируется при возникновении аварий в работе ОС.
Теперь стоит понять, как нужно действовать при появлении дампа памяти. Например, если рядом с названием диска в утилите «Управление дисками» появляется надпись «Аварийный дамп памяти», тогда это не является ошибкой. Тут указана информация о том, что файлы со сведениями о системной проблеме попросту хранятся на этом томе. Соответственно, исправлений никаких не требуется, но можно убрать данную надпись, о чем мы написали в Вариантах 1 и 2.
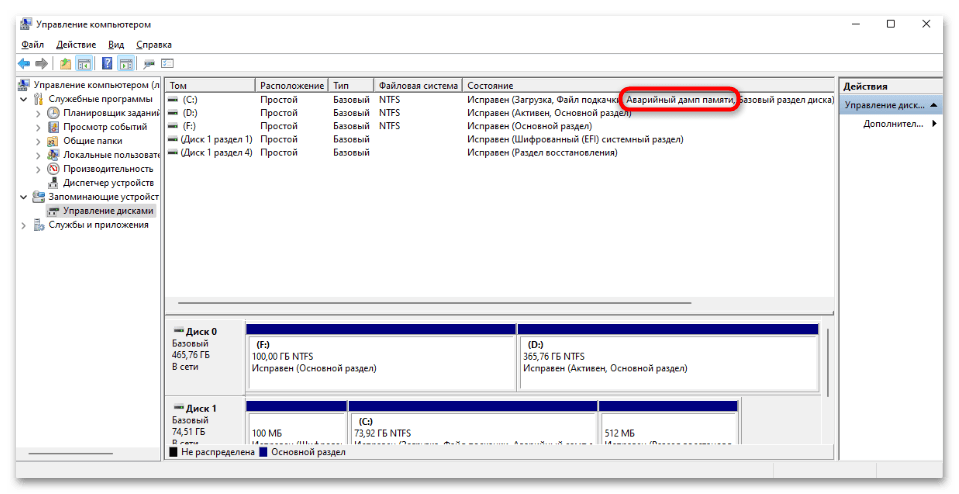
В случае если BSOD появляется периодически, тогда может потребоваться решение проблемы на системном уровне, а дамп памяти лишь поможет выяснить, что случилось. В Варианте 3 мы рассмотрели наиболее распространенные пути решения (даже когда Windows 10 не запускается), а также привели несколько специализированных программных средств, с помощью которых можно проанализировать дамп памяти.
Вариант 1: Удаление мусорных файлов
Как уже говорилось, при появлении сообщений о дампе памяти, касающихся локального диска, беспокоиться не стоит – это не проблема накопителя, а лишь информация о том, что файлы были созданы именно на этом разделе. Но можно убрать дамп памяти, очистив данный диск.
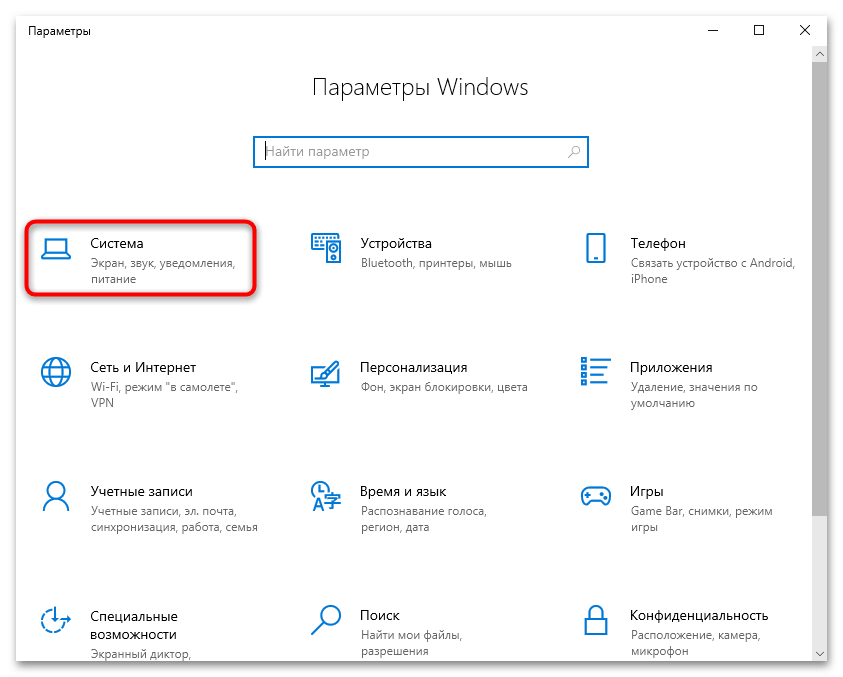
- Нажмите на кнопку «Пуск» и выберите запуск штатных «Параметров».
- Перейдите в раздел «Система».
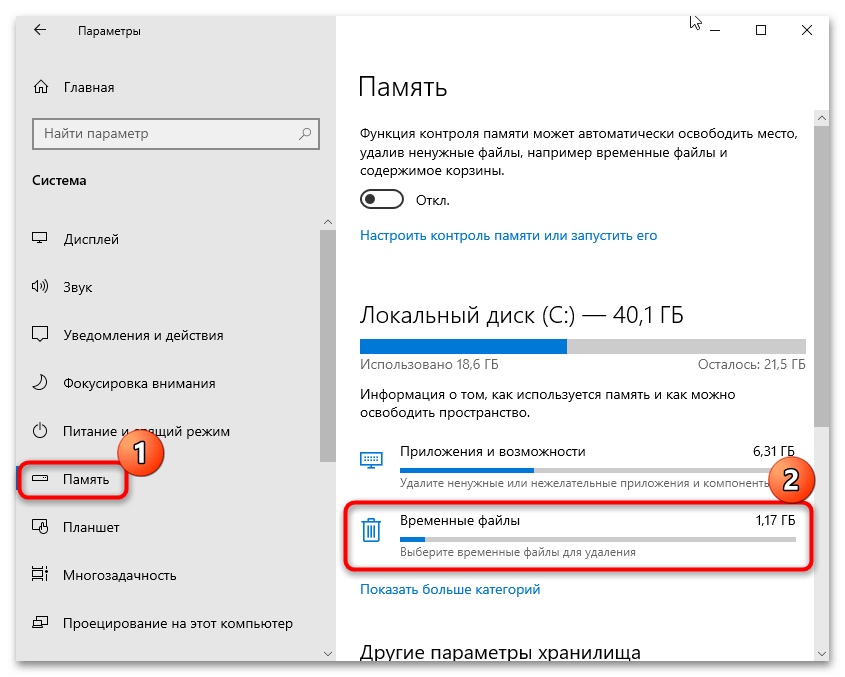
- Через левую панель переключитесь на вкладку «Память», затем в центральной части окна найдите локальный диск, у которого появилось сообщение об аварийном дампе памяти, и нажмите по «Временные файлы».
- После сканирования системы отобразятся различные временные файлы. Снимите галочки у всех пунктов, кроме «Файлы дампа памяти для системных ошибок» (впрочем, по желанию можно очистить и другие категории), затем нажмите на кнопку «Удалить файлы», расположенную вверху.

Удалить дампы памяти с локального диска можно и другим способом – вручную через файловую систему. Достаточно запустить «Проводник» и перейти к корневой директории диска. Если это системный раздел, то откройте папку «Windows», где должен располагаться файл под названием «MEMORY.DMP» (это основной дамп памяти), а в каталоге «Minidump» можно найти малые дампы (их размер, как правило, составляет около 1 МБ). Удалите эти данные, но для процедуры потребуются права администратора.
Читайте также: Получение прав Администратора на компьютере с Windows 10
Вариант 2: Отключение дампа памяти
В Windows 10 можно отключить автоматическое создание файла с данными об ошибке – то есть дампа памяти. Конечно, это позволит избежать появления различных предупреждающих надписей и иногда BSOD, но при этом системная ошибка, вызывающая это, исправлена не будет, и, возможно, узнать потом причину ее появления без дампа памяти окажется довольно проблематично.
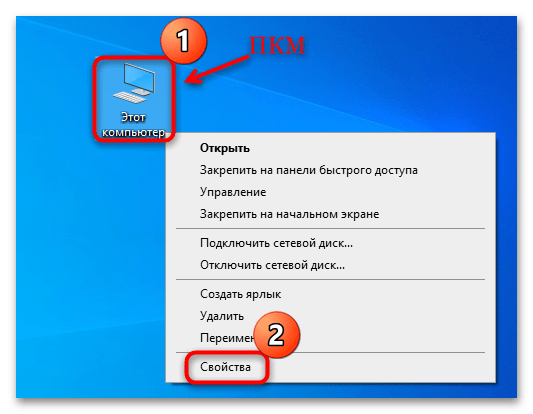
- Кликните правой кнопкой мыши по иконке «Этот компьютер» на рабочем столе и из контекстного меню выберите пункт «Свойства».
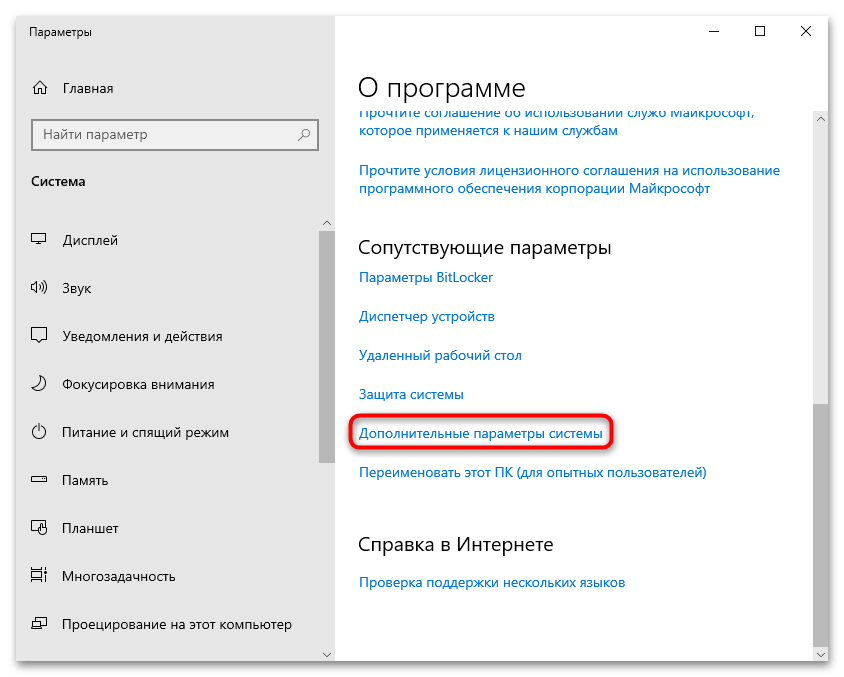
- В открывшемся окне штатных «Параметров» кликните по строке «Дополнительные параметры системы» в блоке «Сопутствующие параметры».
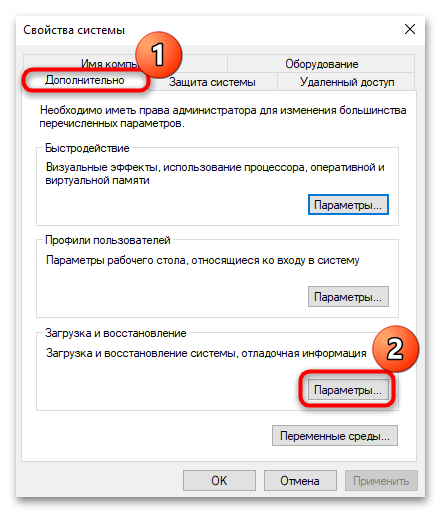
- На вкладке «Дополнительно» в разделе «Загрузка и восстановление» щелкните по кнопке «Параметры».
- Из выпадающего меню «Запись отладочной информации» выберите пункт «Нет», чтобы отключить аварийный дамп памяти. Нажмите на «ОК» для сохранения настроек.
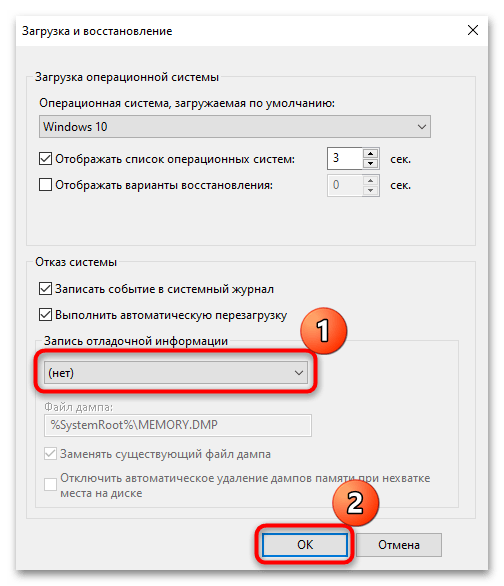
Кстати, изменить путь сохранения для дампа памяти можно здесь же: в текстовом поле «Файл дампа» пропишите нужный адрес.
Вариант 3: Исправление ошибки дампа памяти
Аварийный дамп памяти может быть создан по различным причинам, в частности из-за системных ошибок любого характера. Мы рассмотрим несколько универсальных способов, позволяющих решить многие распространенные неполадки в работе ОС.
Способ 1: Восстановление системных файлов
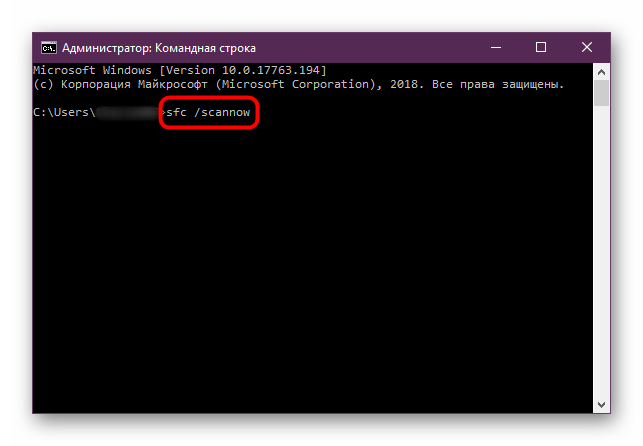
В первую очередь стоит проверить целостность системных файлов, поскольку синий экран и, соответственно, запись дампа памяти часто возникают именно по этой причине. Системные компоненты повреждаются вследствие разных неполадок в работе ОС, а также в результате вирусных атак, но в «десятке» предусматривается специальное средство для сканирования и восстановления поврежденных файлов Windows. О применении такой утилиты мы писали в отдельном материале.
Подробнее: Как проверить целостность системных файлов в Windows 10
Способ 2: Проверка диска
Также не лишним будет проверить накопитель на наличие ошибок, которые могут стать причиной создания дампа памяти. Для этого предназначен специальный инструмент, который встроен в операционную систему. Можно еще воспользоваться средствами от сторонних разработчиков. Переходите по ссылке ниже, чтобы узнать, как правильно выполнить диагностику диска на компьютере с Windows 10.
Подробнее:
Выполнение диагностики жесткого диска в Windows 10
Проверка работоспособности SSD
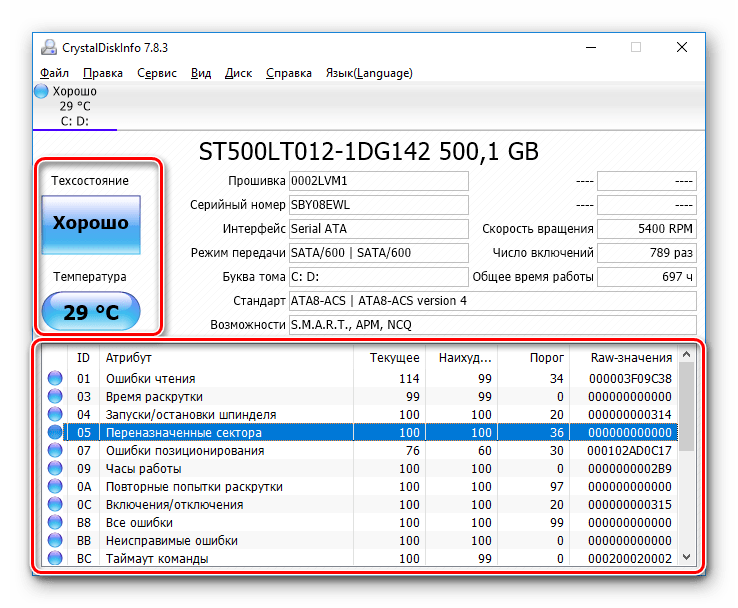
Способ 3: Автоматическое восстановление
Если после появления BSOD система не стартует, скорее всего, придется запустить автоматическое восстановление. В Windows 10 реализована специальная среда (WinRE), с помощью которой выполняются различные манипуляции по восстановлению работы ОС, диагностики и использование системных средств, например «Командной строки». Вероятно, важные файлы оказались повреждены, отчего и не получается полноценно пользоваться ОС.
Подробнее: Запускаем автоматическое восстановление в Windows 10
Анализ дампа памяти
Различные ошибки в работе операционной системы требуют правильного подбора методов решения. При создании аварийного дампа памяти важно корректно его проанализировать и найти нужный способ исправления неполадки. Для анализа файла дампа существуют специализированные программы, как правило, устанавливаемые отдельно. Одним из таких инструментов является фирменная утилита от компании Microsoft – WinDbg. С ее помощью можно посмотреть информацию, которая содержится в файле с расширением DMP, созданного после появления BSOD.
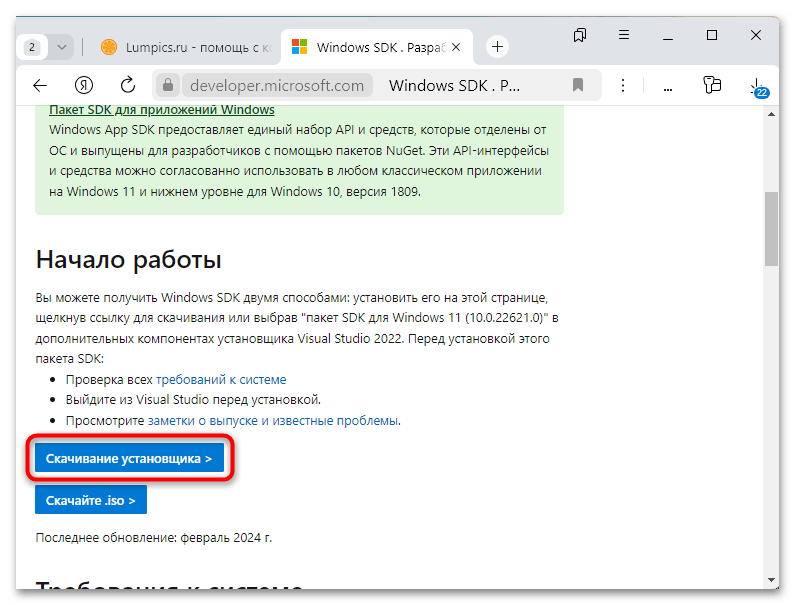
Скачать WinDbg с официального сайта
- Перейдите по ссылке выше и скачайте инсталляционный файл программы, нажав на кнопку «Скачивание установщика».
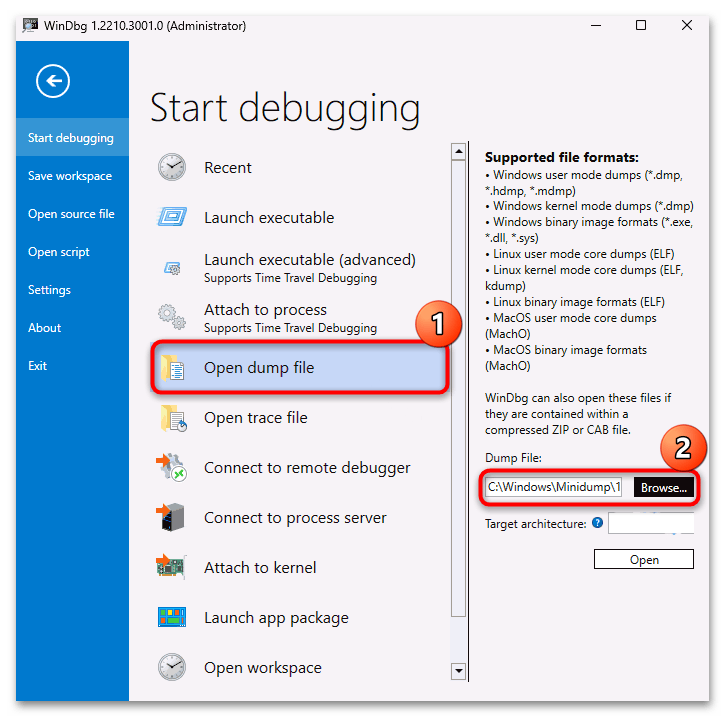
- Далее запустите сохраненный файл и выполните установку на локальный диск. Откройте установленную программу от имени администратора, кликнув правой кнопкой мыши по ярлыку и выбрав нужный тип запуска. В главном окне кликните по строке «Open dump file» и укажите к нему путь (как мы уже упоминали в Варианте 1, он хранится на системном диске в папке «Windows»).
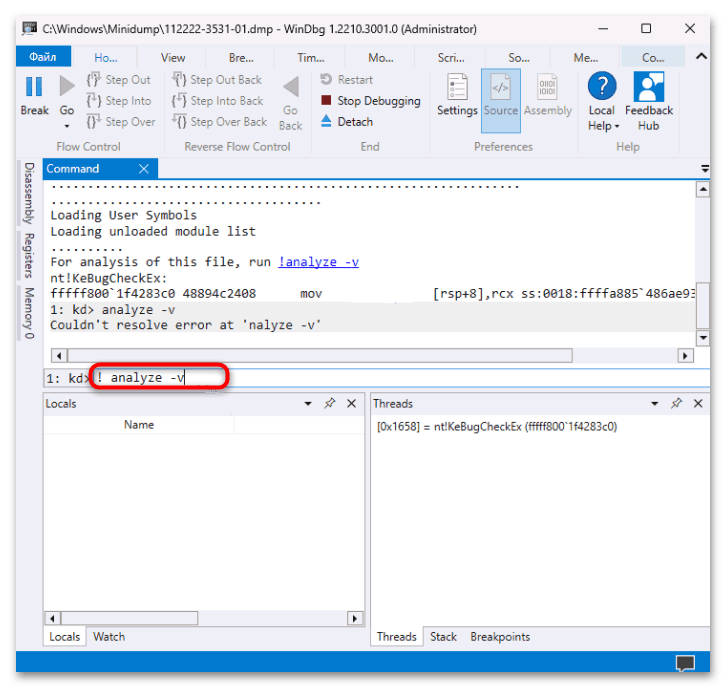
- В текстовом поле панели «Command» введите команду
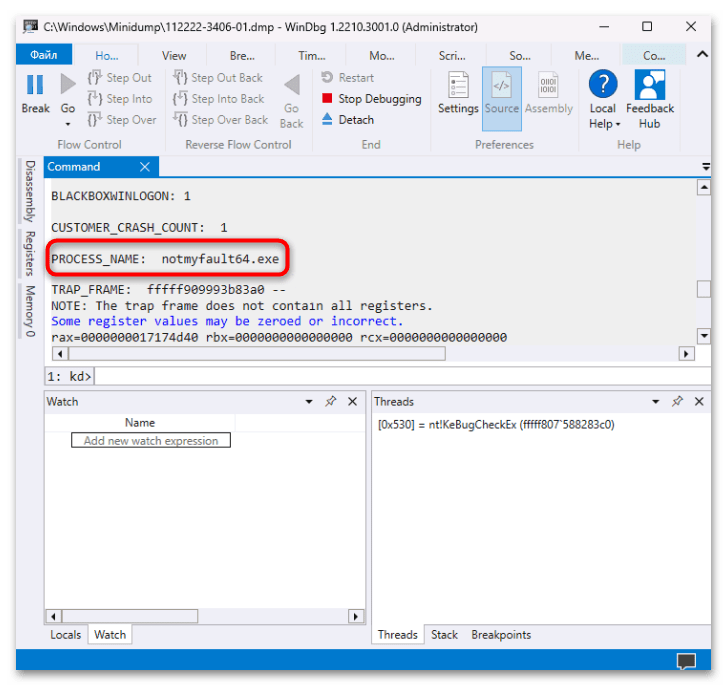
!analyze -vи нажмите на «Enter» для ее выполнения. - После в основной части окна появится информация об ошибке, вызывавшей сбой. Обратите внимание на строку «PROCESS_NAME», где указано название программы, являющейся причиной появления BSOD и записи дампа памяти.
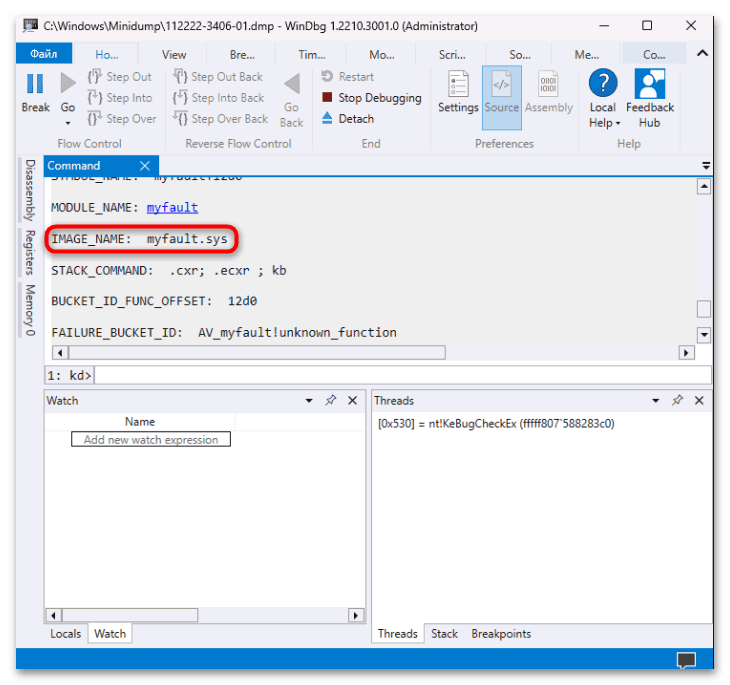
- Также нужные сведения могут быть связаны с файлом драйвера с расширением SYS (строка «IMAGE_NAME»).
После того как причина создания дампа памяти станет известна, более детальные сведения можно найти в интернете. Например, вы сможете узнать, каким устройствам соответствуют проблемные драйверы, или выяснить назначение процессов, вызвавших сбой в работе ОС.
К примеру, если стало понятно, что проблема кроется в конкретном программном обеспечении, то его может потребоваться переустановить или вовсе удалить и заменить на аналогичный софт. Если же дамп был создан вследствие неполадок с драйвером, его, может быть, понадобится обновить или выполнить переустановку ПО на текущую либо предыдущую версию.
Также для анализа ошибок BSOD есть и другие программы от сторонних разработчиков, например BlueScreenView. Как пользоваться этим софтом, мы писали ранее в отдельном руководстве.
Подробнее: Как пользоваться BlueScreenView в Windows 10
Наша группа в TelegramПолезные советы и помощь
Windows 11 (including earlier version), when, encounter a Blue Screen of Death (or BSOD), accumulates all the memory information into a file. Holding Dump file as name it further helps users to identify and debug the cause of the crashes. The files also allow writing the debugging details in different file formats in order to simplify the readability of the data.
Dump file may be of various types depending on the nature of crash and bug check values. These are “Small memory dump (Minidump)”, “Kernel memory dump”, “Complete memory dump”, “Automatic memory dump”, and “Active memory dump”. However, among all these, Windows 10/11 generates Automatic memory dump all by itself as its name suggests. The following section will deal with everything related to Dump File Location Windows 11 or 10.
Dump File Location Windows 10 or 11
Here is the Dump File Location Windows 11 or 10 –
Dump File Location
Instead, you can say Dump file locations so see the following paths to find out the data –
%SystemRoot%memory.dmp which means
C:\Windows\memory.dmp
This is the default location and here, C: refers to the system drive where Windows is installed.
Windows 11/10 can also capture memory dumps that consume a small amount of space. These are created at –
%SystemRoot%Minidump.dmp i.e.,
C:\Window\Minidump.dump
Change Dump File Location Windows 11 or 10
- Go to desktop and right-click on This PC icon. From the available options, choose Properties.
- Click Advanced system settings link that shows up on the top left of the subsequent window.
- Click Settings beneath Startup and Recovery section.
- Locate the Dump File text field and insert the location of the file.
Configure the Type of Memory Dump File
As aforementioned, Windows generates Automatic memory dump files but users can choose to configure the settings as per need. Thankfully, there are certain ways using which a user can change the type of memory dump file that Windows creates.
1]Through Startup and Recovery
- Press “Win logo+R” hotkey to open Run dialog box. System properties wizard will become visible, switch to Advanced tab.
- Here, click Settings just below Startup and Recovery section.
- Click the drop-down under Write debugging information. From the list of dump file types, choose the type that you wish Windows to generate when Windows crashes.
- To apply the changes, click OK.
Note – In case the system crashes a lot, it’s better to deselect the checkbox against the option Overwrite any existing file. Doing this will eventually create incremental dump files that will have a memory dump file for each crash that occurs.
2] Use Elevated Command Prompt
- Fire up taskbar search using Win+S combination of keys. Type in cmd.exe, right-click ok Command Prompt and choose Run as administrator.
- Click Yes on the prompt of UAC to access elevated Command Prompt.
- Once into the black window, insert the applicable command from the list below to change the type of dump file and hit Enter.
| Memory Type | Command Line |
| No memory | wmic RECOVEROS set DebugInfoType = 0 |
| Small memory dump | wmic RECOVEROS set DebugInfoType = 3 |
| Kernel memory dump | wmic RECOVEROS set DebugInfoType = 2 |
| Complete memory dump | wmic RECOVEROS set DebugInfoType = 1 |
| Automatic memory dump | wmic RECOVEROS set DebugInfoType = 7 |
| Active memory dump | wmic RECOVEROS set DebugInfoType = 1 |
- Finally, close the prompt window and Restart Windows 10 PC to make the changes effective.
Note – The Command Prompt also lets you view the current memory dump file. Just open Command Prompt as Administrator and run the following command-line –
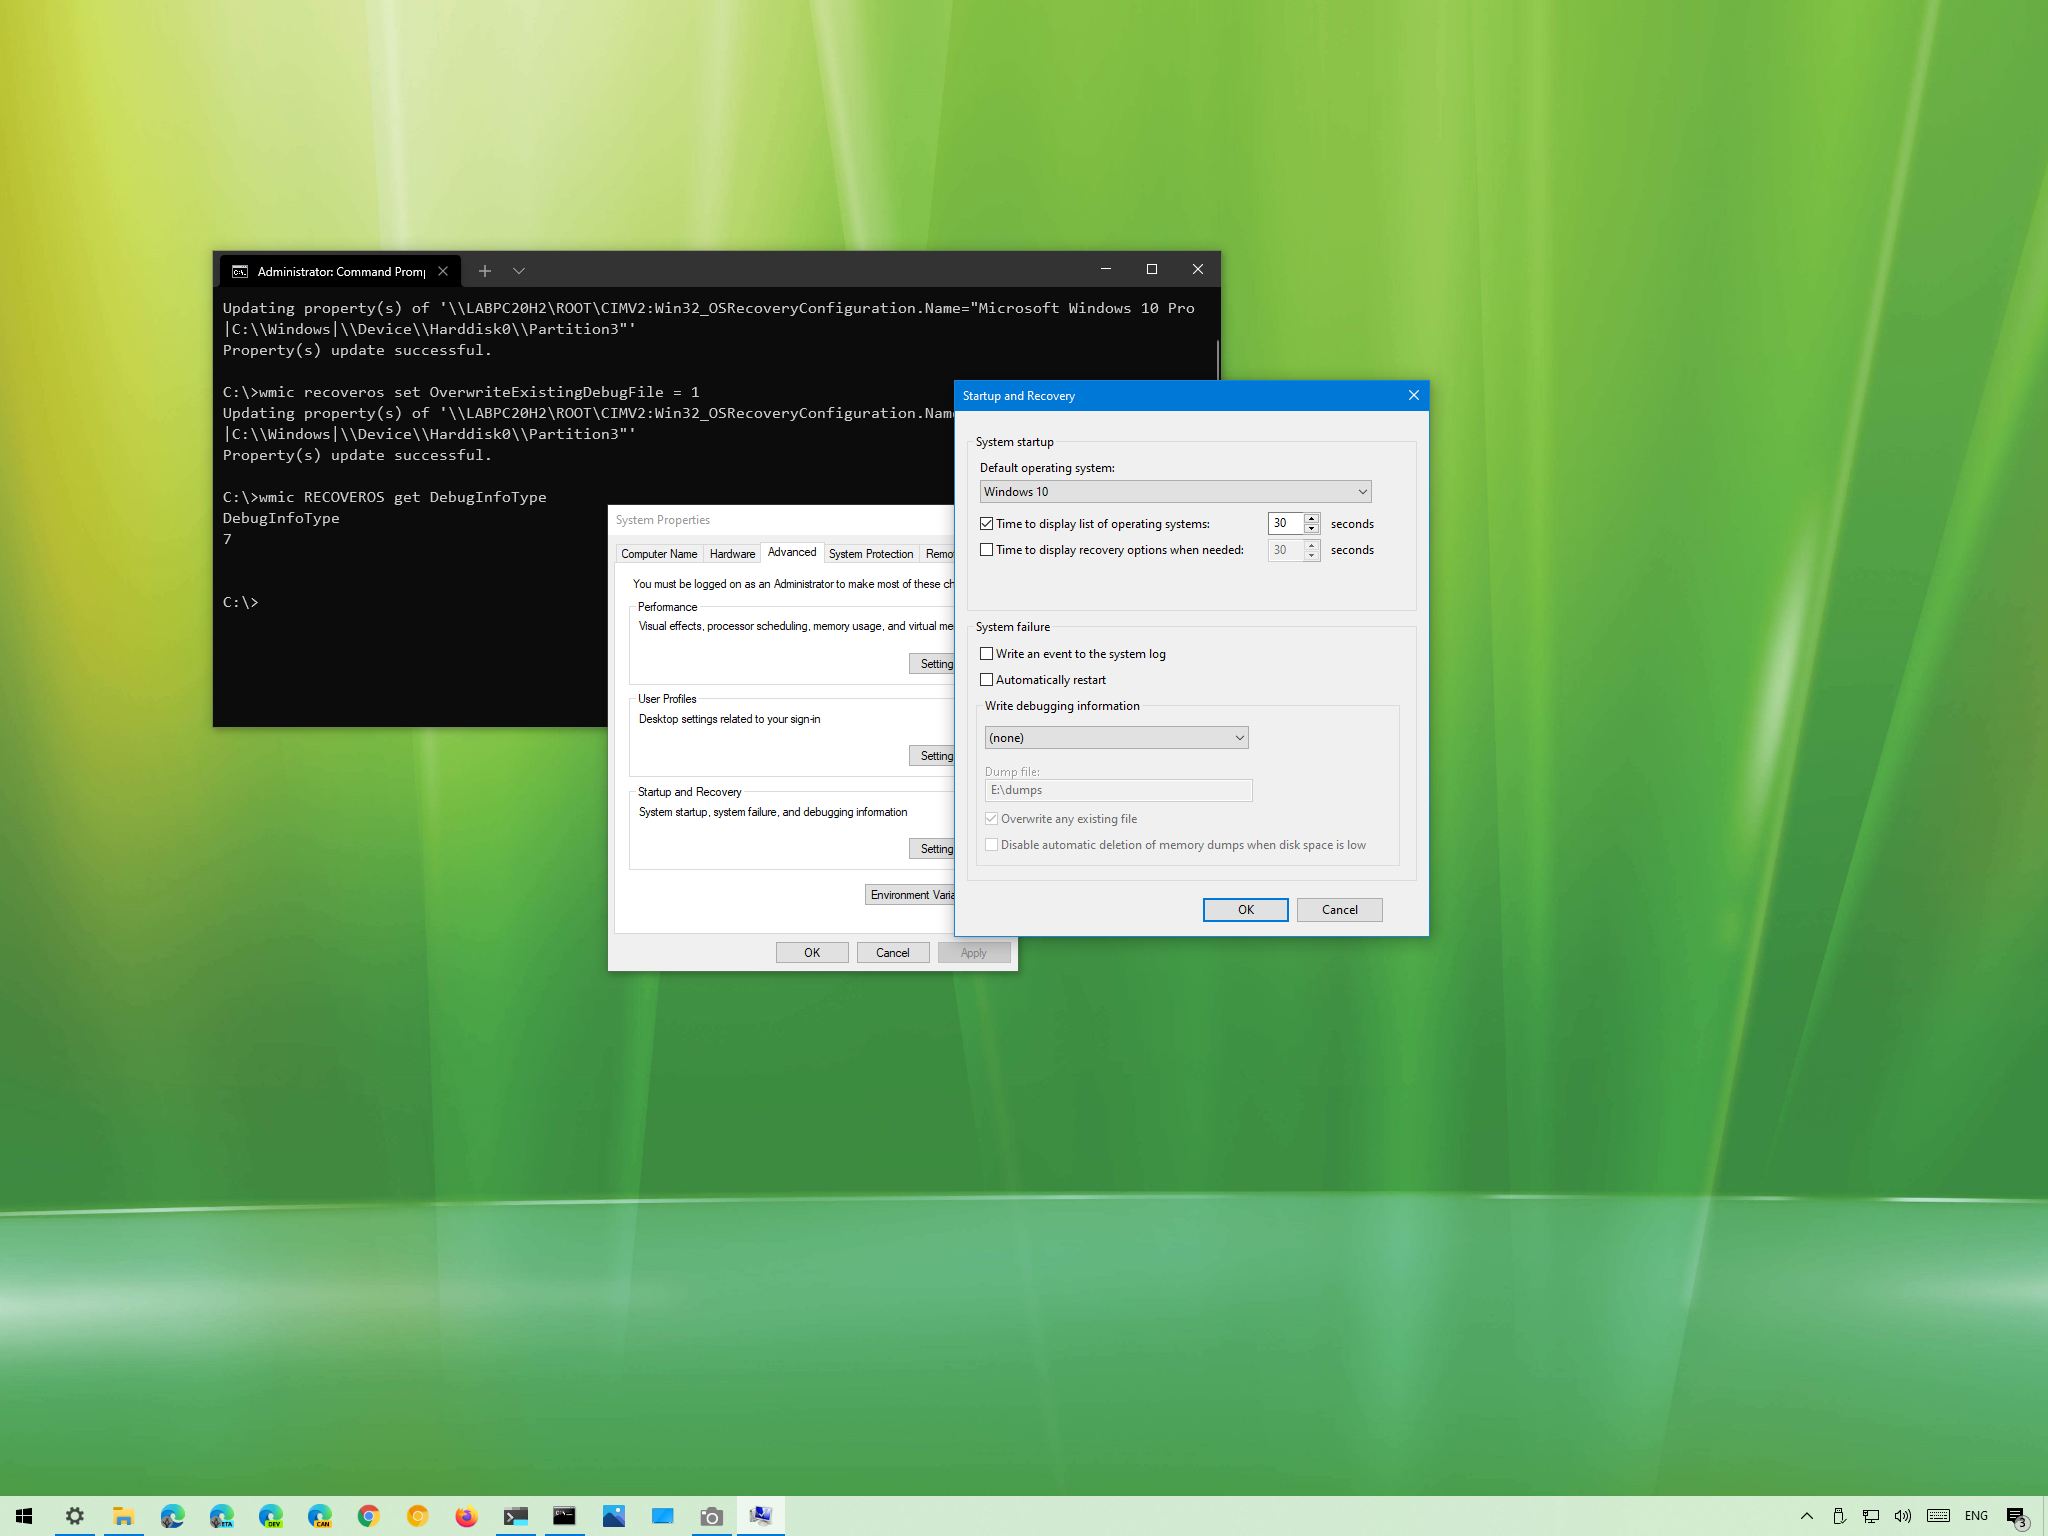
wmic RECOVEROS get DebugInfoType
Types of Memory Dump Files
It is important to know the types after finding Dump File Location Windows 11 or 10 –
Small memory dump – It is the type that contains a minimal amount of details. Basically, the file includes the stop code, list of device drivers, parameters. Furthermore, it also contains the current process and informs which kernel thread or process crashed.
Kernel memory dump – This is the most useful and comprehensive one with respect to the kernel. Moreover, this type contains information in connection with programs and drivers in kernel mode. However, the dimension of this dump file completely depends on the amount of kernel-mode memory specified by Windows and drivers. Now, in case a second crash occurs and a kernel memory dump file is generated, the earlier content gets overwritten.
Complete memory dump – A remarkably large file type which is equal to the RAM of the system. It incorporates physical memory allocation that is basically left out in other kernel dumps.
Automatic memory dump – When compared to the kernel memory option, this is quite similar to it in terms of information. The only difference between them is the size of the paging file that Windows sets for them.
Active memory dump – It is comparatively smaller than complete memory dump. This type refines the items that are not influential in spotting the cause of a crash.
That’s all!!!
(Image credit: Windows Central)
Windows 10 comes with predefined settings to create crash dump files and take specific actions automatically during a critical error. However, you can customize the experience to tell the system how you want to record the data and what action to take.
A dump file is a special type of file that is created automatically when the system experiences a Blue Screen of Death (BSoD) — commonly known as a «bug check,» «stop error,» or «system error» — and suddenly reboots or shuts down. There are various types of dump files, but one thing they have in common is that they all contain information about the resources loaded in memory at the time of the crash.
Usually, these files are essential for debugging and troubleshooting purposes, and while Windows 10 comes with the optimal settings for the most case, the system comes with settings to enable or disable the creation of dump files, and actions like writing the event in the System log, restart the computer automatically and choose the type of crash dump you want to create based on the information you need.
In this Windows 10 guide, we will show you the steps of managing dump file configuration options using the Settings app and Command Prompt.
- How to change crash dump settings using Settings app
- How to change crash dump settings using Command Prompt
How to change crash dump settings using Settings app
To change how Windows 10 creates dumps files during a critical error, use these steps:
- Open Settings.
- Click on System.
- Click on About.
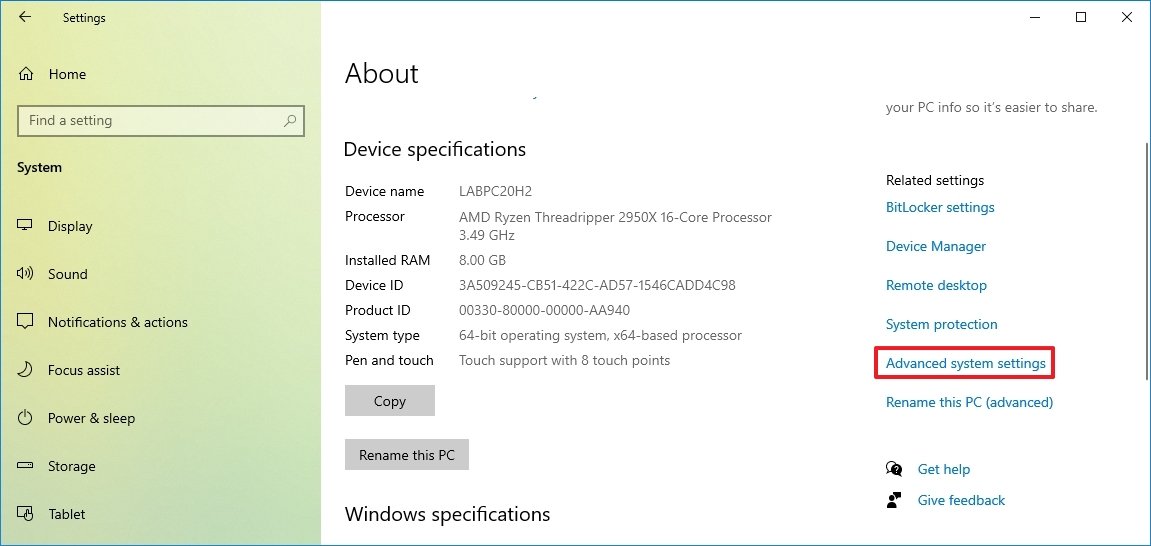
- Under the «Related settings» section, click the Advanced system settings option.
- Click the Advanced tab.
- Under the «Startup and Recovery» section, click the Settings button.
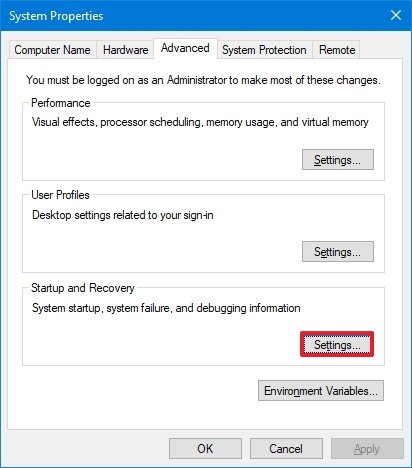
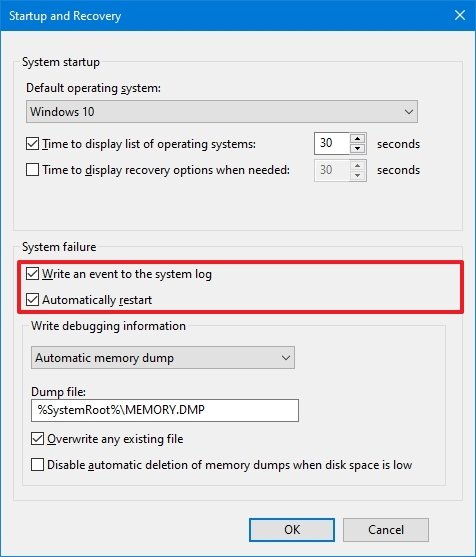
- Check or clear the Write an event to the system log option.Quick note: When a crash occurs, Windows 10 can write the event in the system logs, which you can review in the Event Viewer. If you do not need this information, you can disable the action by clearing the option.
- Check or clear the Automatically restart option.Quick note: During a critical error, the system restarts automatically by default, but if you want to prevent this from happening, you can disable the option.
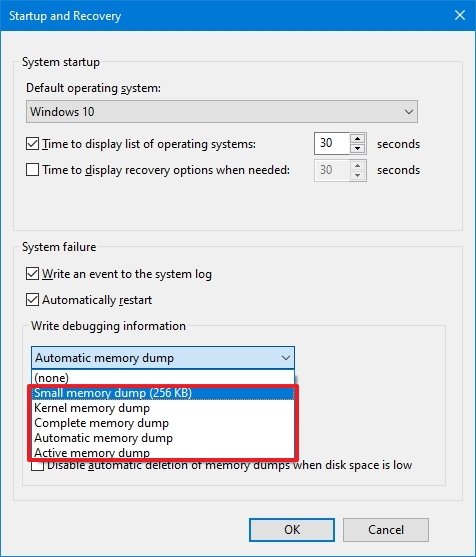
- Under the «Write debugging information» section, use the drop-down menu and select the kind of file you want the system to create during a system crash:
- Small memory dump (minidump): This option collects the smallest amount of data about the problem, such as the stop code for the Blue Screen of Death (BSoD), the list of all the loaded drivers, and some processor and kernel information. The dump history is usually saved in the
%SystemRoot%\Minidumpfolder. Although this is an excellent option to save memory, it’s limited since a lot of information that might help to find out the problem won’t be included. During a second error, the previous file won’t be overwritten. - Kernel memory dump: This option records only the information allocated for the system kernel, hardware abstraction layer (HAL), kernel-mode drivers, and other kernel-mode programs. This error dump file is usually less than half of amount of the total physical memory. In most cases, this is the recommended option since it does not take a lot of space and it includes most of the information involved in the crash. The data is saved into the
%SystemRoot%\Memory.dmpfile by default. - Complete memory dump: This option includes everything loaded into the physical memory, except the space used by the device firmware. Since this could be a large file, it requires a «pagefile» that is the total physical memory size. The crash is saved into the
%SystemRoot%\Memory.dmpfile by default. - Automatic memory dump: This option collects the information allocated in memory like the «kernel memory dump,» but if the virtual memory is set to «system managed size,» Windows 10 can automatically configure the file size to capture the data required to analyze the problem. The crash is saved into the
%SystemRoot%\Memory.dmpfile by default. - Active memory dump: This option collects the same information as the «Complete memory dump.» The difference is that it discards information that may not be relevant to troubleshoot the issue. The crash is saved into the
%SystemRoot%\Memory.dmpfile by default.
- Small memory dump (minidump): This option collects the smallest amount of data about the problem, such as the stop code for the Blue Screen of Death (BSoD), the list of all the loaded drivers, and some processor and kernel information. The dump history is usually saved in the
- Under the «Dump file» box, you can specify an alternative location to save the file. (This option requires restarts.)
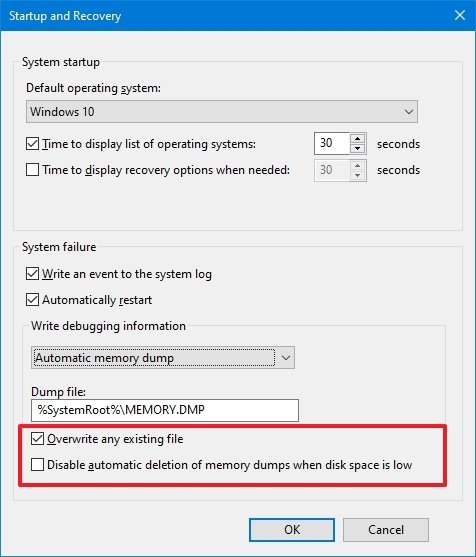
- Check or clear the Overwrite any existing file option.Quick note: When this option is enabled, follow-up dumps using the «kernel memory dump» or «complete memory dump» option will be overwritten.
- Check or clear the Disable automatic deletion of memory dumps when disk space is low option.
- Click the OK button.
Once you complete the steps, the system will create dumps files depending on your configuration.
Disable crash dumps creation on Windows 10
To prevent Windows 10 from creating dump files during a blue screen, use these steps:
All the latest news, reviews, and guides for Windows and Xbox diehards.
- Open Settings.
- Click on System.
- Click on About.
- Under the «Related settings» section, click the Advanced system settings option.

- Click the Advanced tab.
- Under the «Startup and Recovery» section, click the Settings button.

- Under the «Write debugging information» section, use the drop-down menu and select the (none) option.
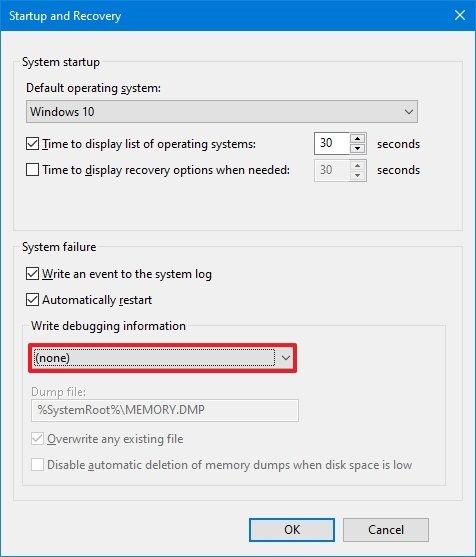
- Click the OK button.
After you complete the steps, the system will no longer create error files.
If you change your mind, you can always revert the settings using the instructions outlined above and selecting the option that suits your situation.
How to change crash dump settings using Command Prompt
Windows 10 also allows you to configure the settings for dump files and actions during system failures using commands, which you can run with Command Prompt or PowerShell.
Command to enable or disable System log events and auto-restart
To enable or disable Windows 10 from writing a System log event or automatically restarting the device upon crash with Command Prompt, use these steps:
- Open Start.
- Search for Command Prompt, right-click the top result, and select the Run as administrator option.
- Type the following command to disable the system from writing event crashes logs and press Enter:
wmic recoveros set WriteToSystemLog = FalseIn the command, you can replace False for True to re-enable the option.
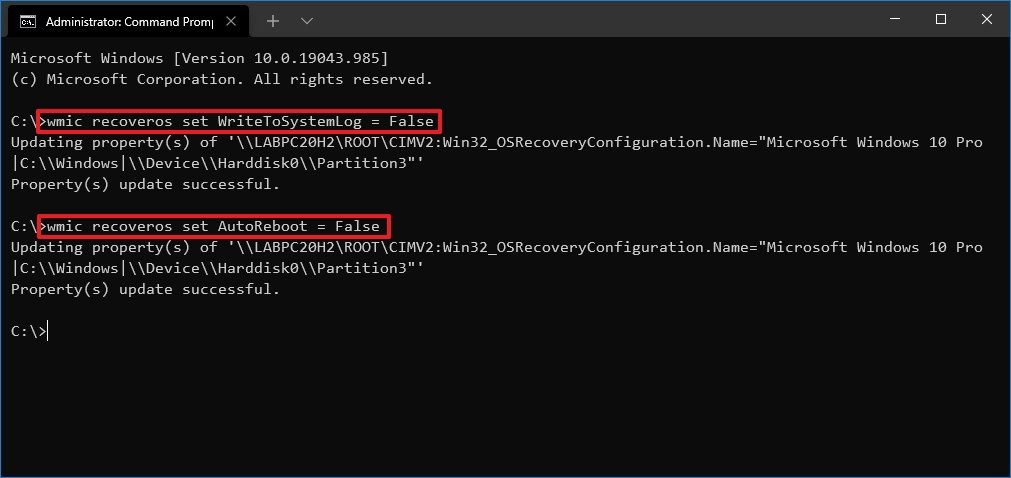
- Type the following command to disable automatic restarts after a blue screen and press Enter:
wmic recoveros set AutoReboot = FalseIn the command, you can replace False for True to re-enable the option.
Once you complete the steps, the system will write logs and restart automatically upon crash according to your configuration.
Command to disable crash dumps on Windows 10
To stop creating dump files after a crash with a command, use these steps:
- Open Start.
- Search for Command Prompt, right-click the top result, and select the Run as administrator option.
- Type the following command to disable the system from creating crash dump files and press Enter:
wmic recoveros set DebugInfoType = 0
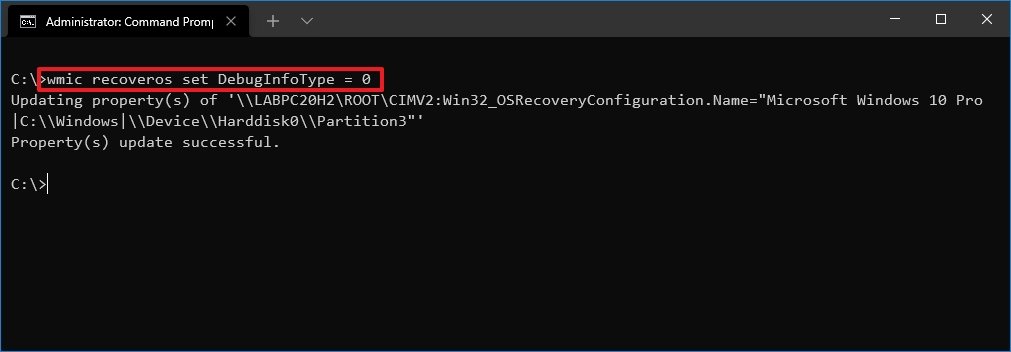
After you complete the steps, Windows 10 will no longer create dumps files during a bug check. If you want to enable the feature again, configure the type of file you want to create with the instructions below.
Command to enable small memory dumps
To enable and set up the system to create small memory dumps with a command, use these steps:
- Open Start.
- Search for Command Prompt, right-click the top result, and select the Run as administrator option.
- Type the following command to specify the system to create small memory dumps and press Enter:
wmic recoveros set DebugInfoType = 3
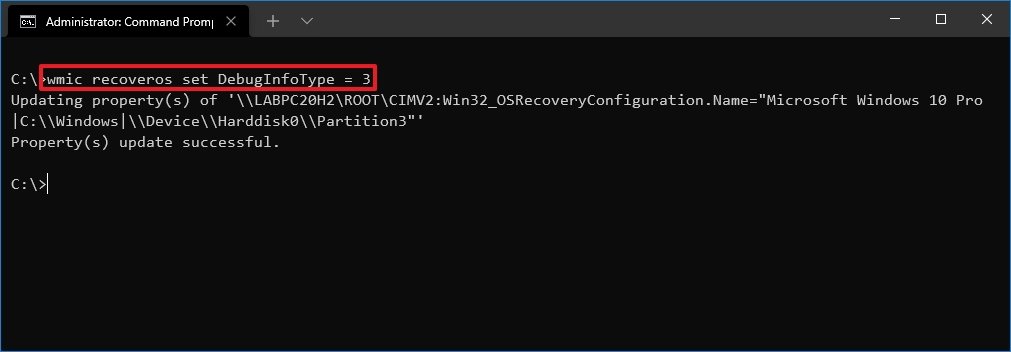
Once you complete the steps, the system will collect the smallest amount of information about the crash in a file no larger than 64KB.
Command to enable kernel memory dumps
To enable and configure the system to create kernel memory dumps, use these steps:
- Open Start.
- Search for Command Prompt, right-click the top result, and select the Run as administrator option.
- Type the following command to specify the system to create small memory dumps and press Enter:
wmic recoveros set DebugInfoType = 2
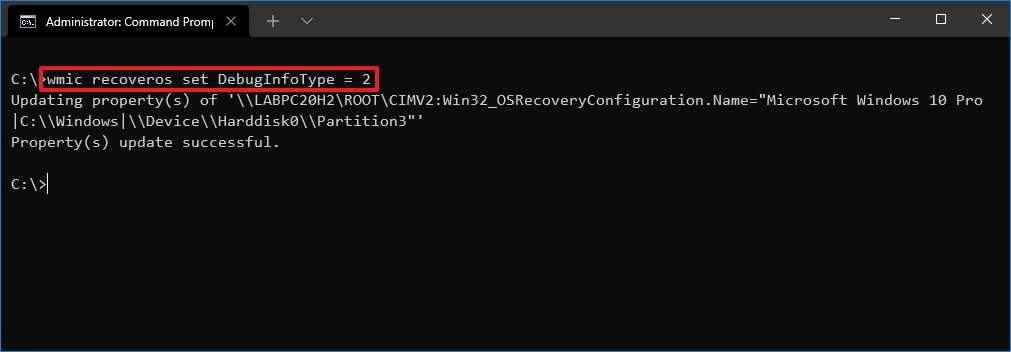
After you complete the steps, Windows 10 will create a file smaller than the complete option with system kernel allocated information, hardware abstraction layer (HAL), kernel-mode drivers, and other kernel-mode programs.
Command to enable complete memory dumps
To enable and configure complete memory dumps creation, use these steps:
- Open Start.
- Search for Command Prompt, right-click the top result, and select the Run as administrator option.
- Type the following command to specify the system to create complete memory dumps and press Enter:
wmic recoveros set DebugInfoType = 1
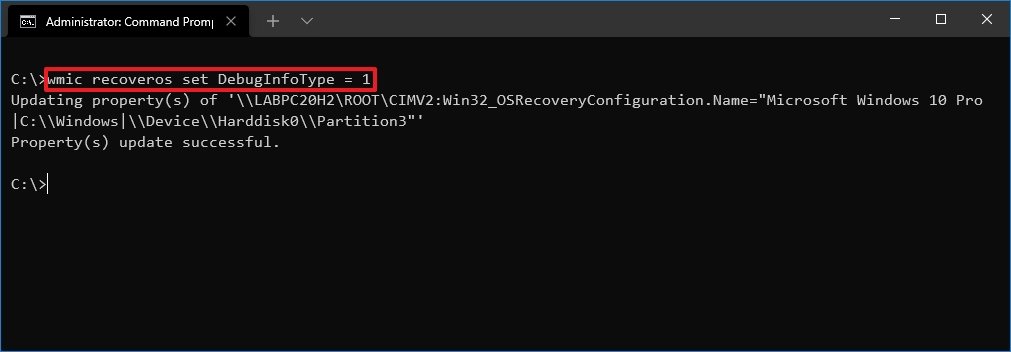
Once you complete the steps, during a Blue Screen of Death error, a file with everything loaded in memory will be created for debugging and troubleshooting.
Command to enable automatic memory dumps
To enable and set up the system to create automatic memory dumps, use these steps:
- Open Start.
- Search for Command Prompt, right-click the top result, and select the Run as administrator option.
- Type the following command to specify the system to create automatic memory dumps and press Enter:
wmic recoveros set DebugInfoType = 7
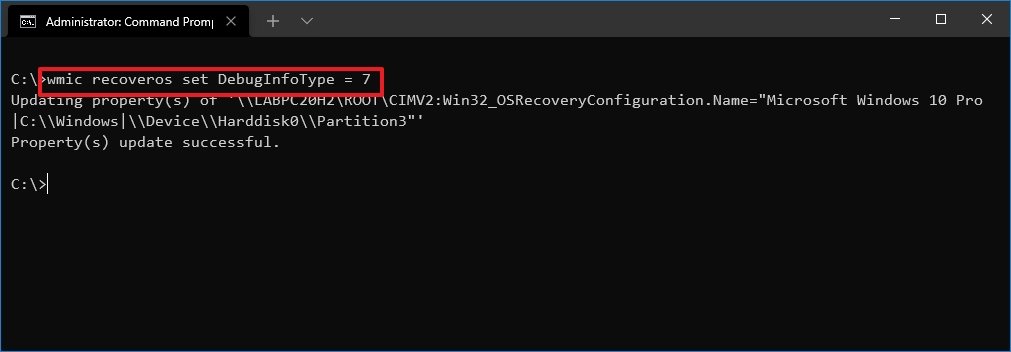
After you complete the steps, the system will create a dump file similar to the one from when using the «kernel memory dump» option, but the system will automatically manage the file’s size.
Command to change default dump store location
To change the default folder location to store dumps with commands, use these steps:
- Open Start.
- Search for Command Prompt, right-click the top result, and select the Run as administrator option.
- Type the following command to specify the folder location to store the dumps and press Enter:
wmic recoveros set DebugFilePath = PATH\TO\FOLDERIn the command, replace PATH\TO\FOLDER with the path to the folder location.This example tells Windows 10 to store the «dumps» in the dumps folder inside the «E:» drive.wmic recoveros set DebugFilePath = E:\dumps
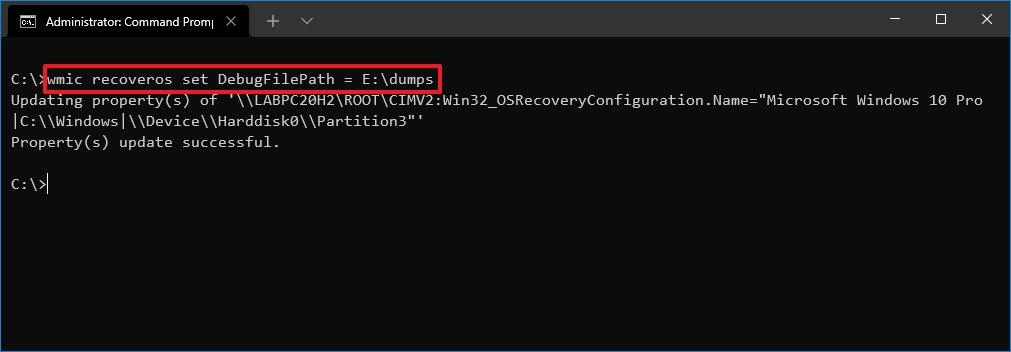
Once you complete the steps, the dump file will be saved in the location you specified in the command during a critical error.
Command to enable or disable overwrite existing files
To enable or disable the ability to overwrite older files, use these steps:
- Open Start.
- Search for Command Prompt, right-click the top result, and select the Run as administrator option.
- Type the following command to disable the ability to overwrite previously created dumps after a new error needs to be written to file and press Enter:
wmic recoveros set OverwriteExistingDebugFile = 0
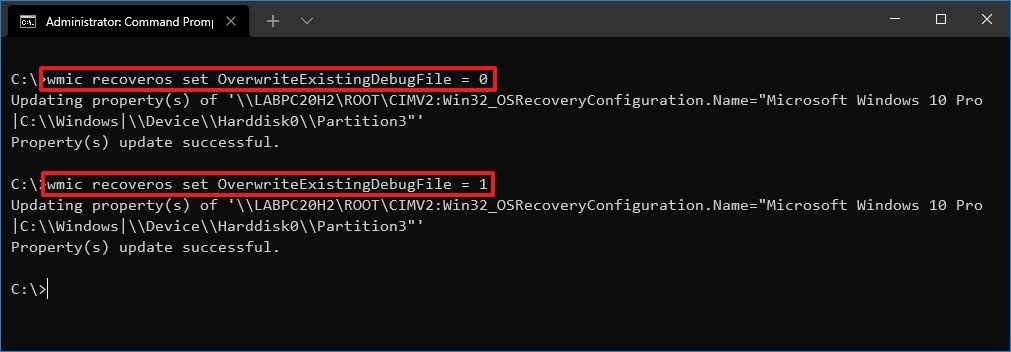
- Type the following command to enable the ability to overwrite previously created dumps after a new error needs to be written to file and press Enter:
wmic recoveros set OverwriteExistingDebugFile = 1
After you complete the steps, depending on the system failure configuration, the previous file will be overwritten, according to your settings, when a second dump file needs to be created.
More Windows 10 resources
For more helpful articles, coverage, and answers to common questions about Windows 10, visit the following resources:
- Windows 10 on Windows Central — All you need to know
- Windows 10 help, tips, and tricks
- Windows 10 forums on Windows Central
Mauro Huculak has been a Windows How-To Expert contributor for WindowsCentral.com for nearly a decade and has over 15 years of experience writing comprehensive guides. He also has an IT background and has achieved different professional certifications from Microsoft, Cisco, VMware, and CompTIA. He has been recognized as a Microsoft MVP for many years.
Как отключить автоматическое удаление дампов памяти при недостатке места на диске в Windows 10
Как включить или отключить автоматическое удаление дампов памяти BSOD при низком дисковом пространстве в Windows 10
Ошибка синего экрана (она же BSOD) (также называемая ошибкой остановки) может возникнуть, если из-за какой-то проблемы ваш компьютер неожиданно выключается или перезагружается. При возникновении этого типа ошибки вы не сможете увидеть на экране при включении компьютера такие элементы, как меню «Пуск» или панель задач. Вместо этого вы увидите синий экран с сообщением о том, что ваш компьютер столкнулся с проблемой и нуждается в перезагрузке.
В случае, если ваш компьютер столкнулся с BSOD (синим экраном смерти), файл дампа потребуется для отладки аналитики BSOD. По умолчанию Windows 10 настроена на автоматическую запись дампов памяти.
Когда места на жестком диске становится мало, система автоматически удаляет дампы, как мини-дампы в C:\Windows\minidump, так и полный дамп системы в C:\Windows\MEMORY.DMP.
Это типичная запись в средстве просмотра событий, когда дамп удаляется из-за нехватки места на диске:
Идентификатор события: 1018 Файл дампа по адресу: C:\windows\memory.dump был удален, потому что на диске было менее 25 ГБ свободного места.
Эти дампы очень важны для целей отладки. Это руководство поможет вам избавиться от необходимости удаления дампов в большинстве, но не во всех случаях.
ВАРИАНТ ПЕРВЫЙ
Предотвратите удаление дампов из-за нехватки места на диске через Свойства системы
1 Нажмите Windows key+R, введите SYSDM.CPL и нажмите Enter.
2 В окне Свойства системы перейдите на вкладку Дополнительно. В разделе Запуск и восстановление нажмите Настройки.

3 В окне Запуск и восстановление в разделе Сбой системы выберите опцию Отключить автоматическое удаление дампов памяти при нехватке места на диске и нажмите OK.

4 Закройте окно Свойства системы и вернитесь на Рабочий стол.
Если это не решит проблему потери дампов, попробуйте вариант два или три ниже.
Рекомендуется создать точку восстановления системы перед внесением изменений в реестр в варианте два или три.
ВАРИАНТ ВТОРОЙ
Предотвратить удаление дампов из-за нехватки места на диске с помощью REG-файла
Загружаемые ниже файлы .reg добавят или изменят значение DWORD в указанном ниже ключе реестра.
[HKEY_LOCAL_MACHINE\SYSTEM\CurrentControlSet\Control\CrashControl]
AlwaysKeepMemoryDump DWORD (32 бита)
0 = Отключить
1 = Включить
Обычно этот ключ не существует, поэтому значение по умолчанию — Disabled. Если ключ добавлен, применяются значения 0 и 1, как показано выше.
1 Выполните шаг 2 (включить) или шаг 3 (выключить) ниже в зависимости от того, что вы хотите сделать.
2 Включение функции AlwaysKeepMemoryDump
A) Нажмите на кнопку ниже, чтобы загрузить файл, и перейдите к шагу 4 ниже.
Enable_AlwaysKeepMemoryDump.reg
3 Отключить AlwaysKeepMemoryDump
Это настройка по умолчанию.
A) Нажмите на кнопку ниже, чтобы загрузить файл, и перейдите к шагу 4 ниже.
Disable_AlwaysKeepMemoryDump.reg
4 Сохраните файл .reg на рабочем столе.
5 Дважды щелкните на загруженный .reg-файл, чтобы объединить его.
6 При появлении запроса щелкните на Run, Yes (UAC), Yes и OK, чтобы одобрить объединение.
7 Перезагрузите компьютер для применения.
8 Теперь вы можете удалить загруженный .reg-файл, если хотите.
ВАРИАНТ ТРЕТИЙ
Предотвращение удаления дампов из-за нехватки места на диске с помощью редактора реестра
Этот метод предполагает внесение изменений вручную через редактор реестра. Ошибки при работе с реестром могут негативно повлиять на систему. Поэтому будьте осторожны при редактировании записей реестра и, как говорилось ранее, сначала создайте точку восстановления системы.
1 Нажмите Windows+R, введите regedit и нажмите Enter, чтобы открыть редактор реестра.
2 Выберите и скопируйте следующий ключ реестра:
HKEY_LOCAL_MACHINE\SYSTEM\CurrentControlSet\Control\CrashControl
3 Вставьте ключ (Ctrl+V или щелкните правой кнопкой мыши и Вставить) в адресную строку в верхней части окна редактора реестра, затем нажмите Enter.
Также в левой рамке вы можете развернуть каждый ключевой узел до CrashControl включительно.
HKEY_LOCAL_MACHINE\SYSTEM\CurrentControlSet\Control\CrashControl

4 В правой панели ключа CrashControl ниже дважды щелкните на ключе реестра AlwaysKeepMemoryDump, чтобы открыть его для редактирования.
Если значение AlwaysKeepMemoryDump не существует, добавьте его, щелкнув правой кнопкой мыши в правой панели, выбрав New, затем DWORD (32-битное значение).
Назовите его AlwaysKeepMemoryDump.

5 Установите для параметра Value data значение 1 и нажмите OK.
6 Закройте редактор реестра, перезагрузитесь, чтобы изменения вступили в силу.


