
Want to run Windows on your Mac? You can — it’s called dual-booting, and it’s easier than ever these days.
Dual-booting Windows 11 on your Mac opens up a whole new world of possibilities, allowing you to run Windows-exclusive software, play high-end games, and enjoy the best of both operating systems on a single device.
In this comprehensive guide to dual-booting, we’ll walk you through two easy methods to get Windows 11 up and running on your Mac. The first is for older Intel-based Macs, the second is for newer Macs with Apple’s M-series chips inside like the MacBook Air 13-inch M3.
- Using the Boot Camp Assistant on Intel Macs
- Using third-party software like Parallels Desktop
No matter which path you choose, by the end of this guide you should feel ready to confidently set up a dual-boot environment tailored to your needs. Let’s dive in!
Using the Boot Camp Assistant on Intel Macs

Boot Camp Assistant is a built-in utility on Intel-based Macs that allows you to easily install Windows alongside macOS. It guides you through the process of creating a Windows partition, installing Windows from an ISO file, and installing necessary drivers.
This is the safest way to dual-boot Windows 11 on an Intel-based Mac. It’s also the one recommended by Apple. Here’s a step-by-step guide:
Prerequisites
- An Intel-based Mac with at least 64GB of free storage space (128GB recommended for the best experience)
- A USB flash drive with at least 16GB of storage capacity
- A 64-bit version of the Windows 11 ISO file, which can be downloaded from Microsoft’s website
1. Prepare your Mac
(Image: © Future)
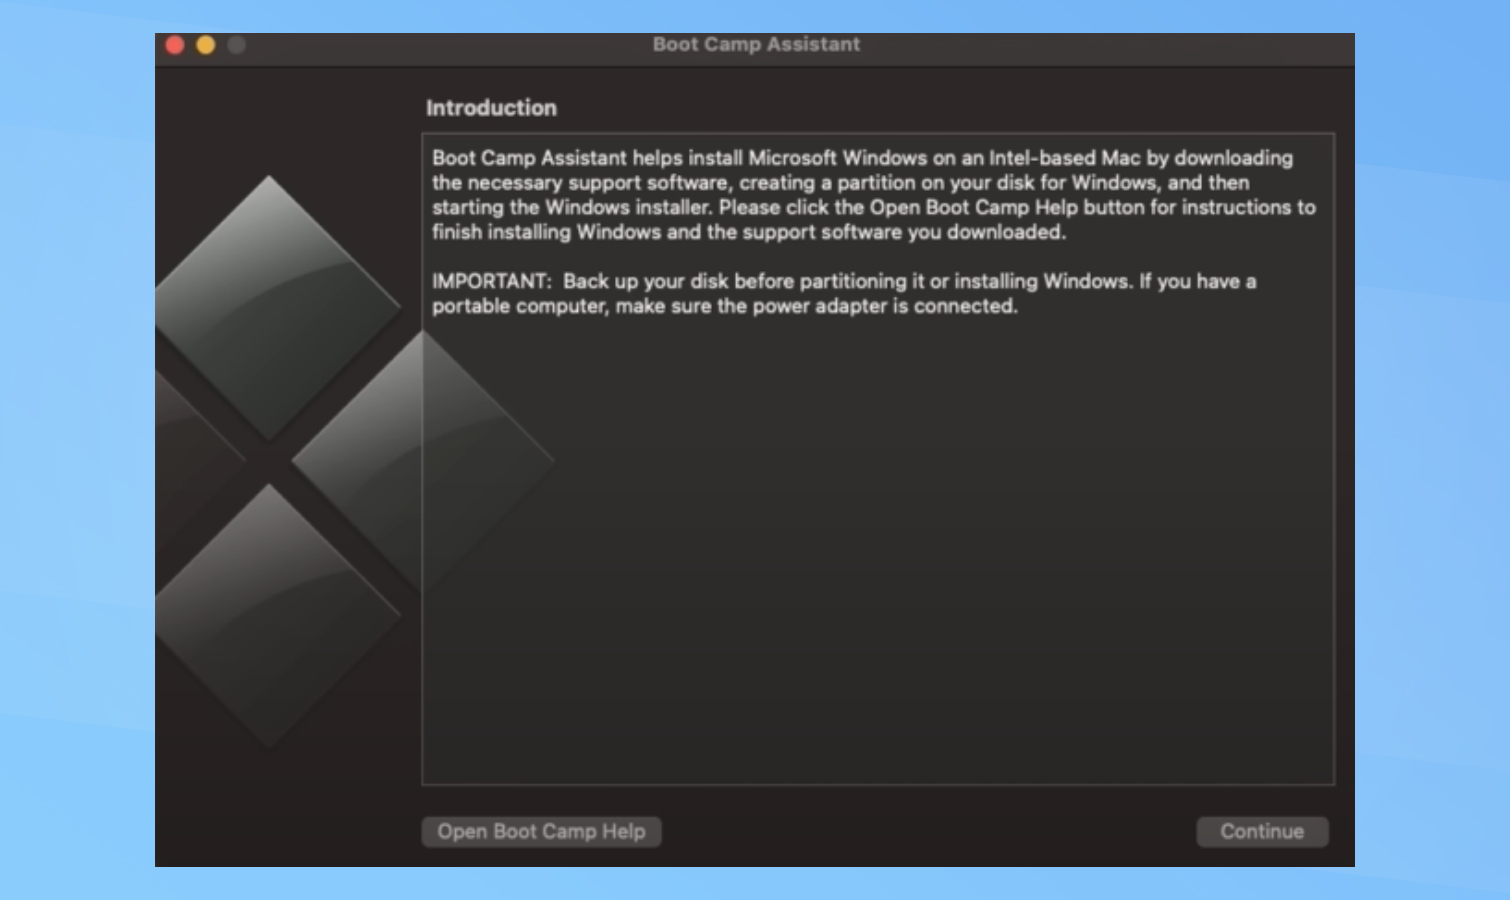
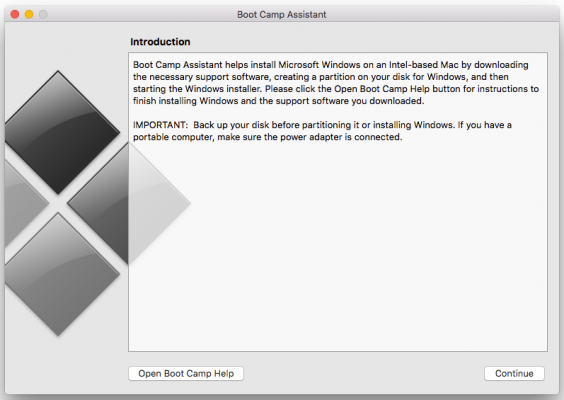
Make sure your Mac is connected to the internet, then open the Boot Camp Assistant app (located in the “Utilities” folder within “Applications” on your Dock) and click Continue.
2. Create a Windows 11 installation drive
(Image: © Future)
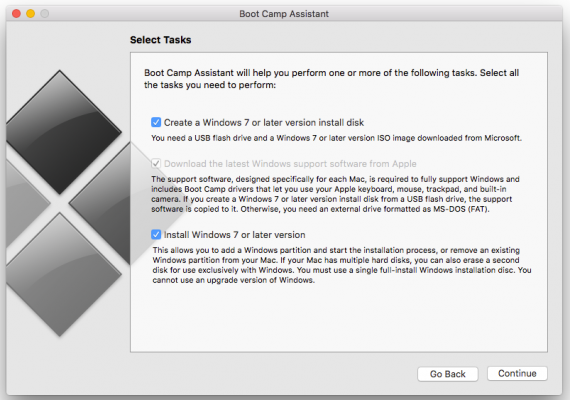
Select the options to create a Windows 11 install disk and install Windows. Click «Continue» and select the Windows 11 ISO file you downloaded. Insert your USB flash drive and select it as the destination disk. Click «Continue» to create the Windows 11 installation drive.
3. Partition your Mac’s hard drive
(Image: © Future)
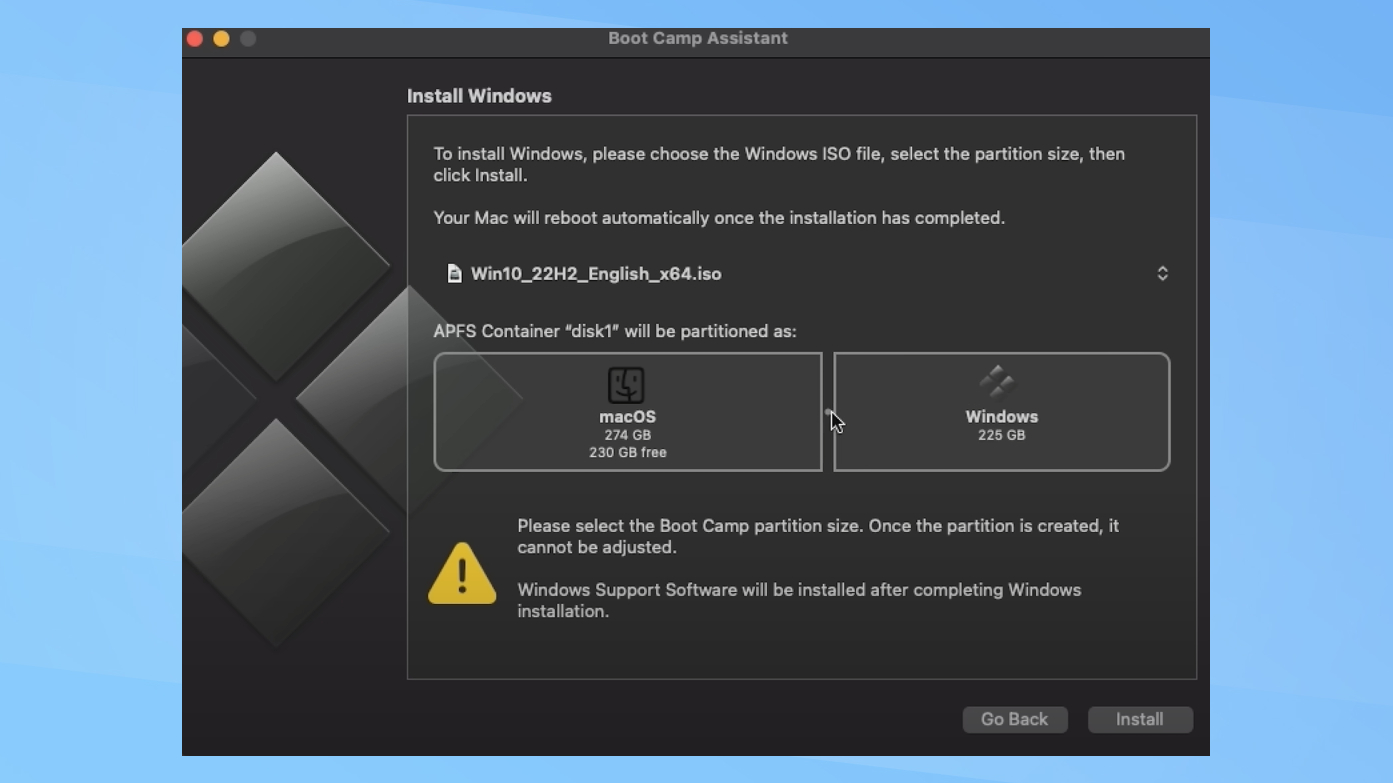
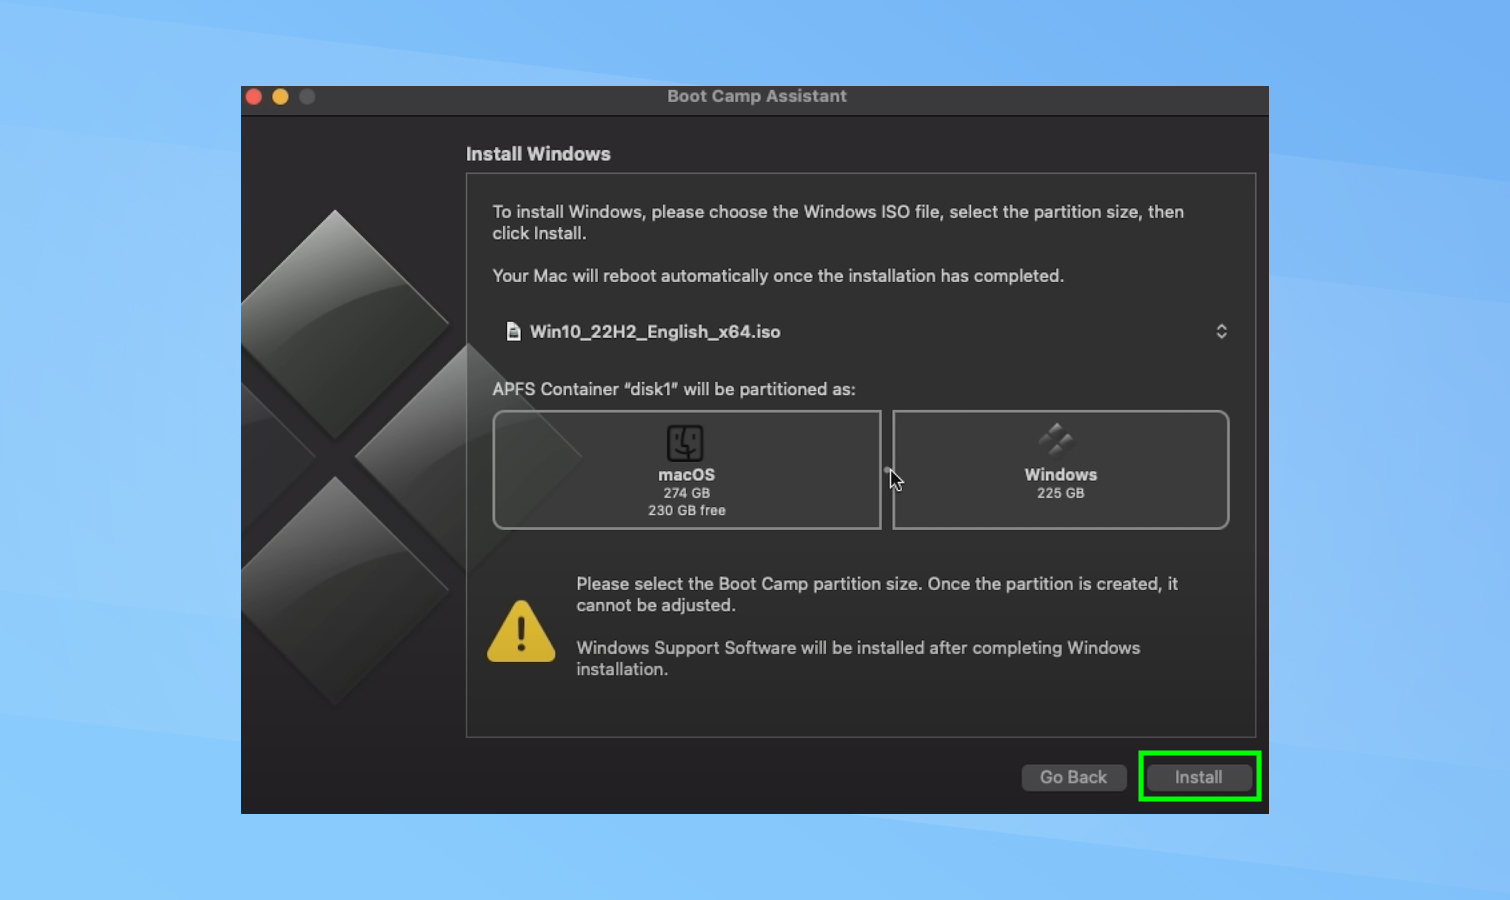
Set the desired size for the Windows partition using the slider when prompted. Apple recommends at least 64GB for Windows, but 128GB provides the best experience. Click «Install» to begin creating the Windows partition. Your Mac will restart to the Windows installer once the partitioning process is complete.
4. Install the Windows OS
(Image: © Future)
Set the desired size for the Windows partition using the slider when prompted. Apple recommends at least 64GB for Windows but 128GB provides the best experience. Click «Install» to begin creating the Windows partition. Your Mac will restart to the Windows installer once the partitioning process is complete.
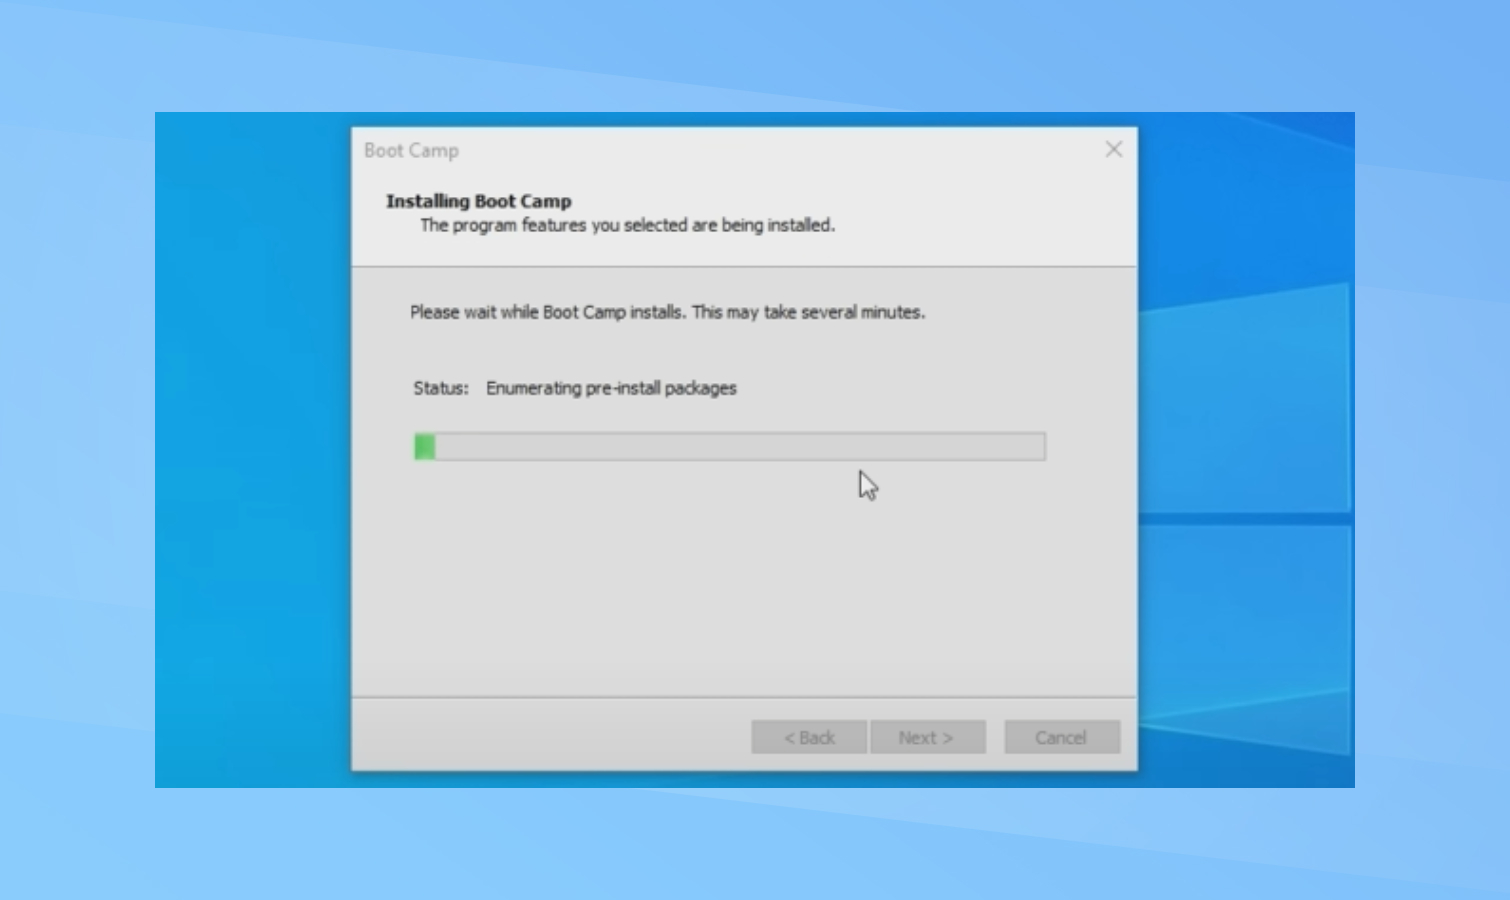
5. Install the Boot Camp drivers
(Image: © Future)
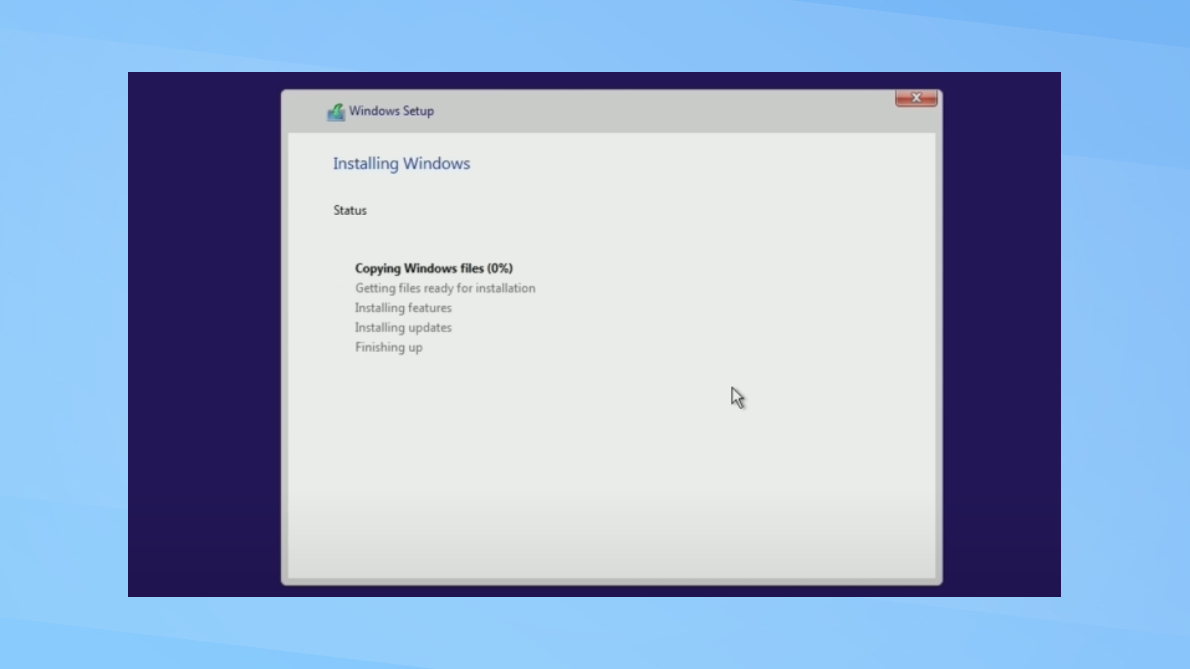
After it’s finished, your Mac will automatically boot into Windows and open the Boot Camp installer. Follow the on-screen instructions to install the necessary drivers and software and restart your Mac when prompted.
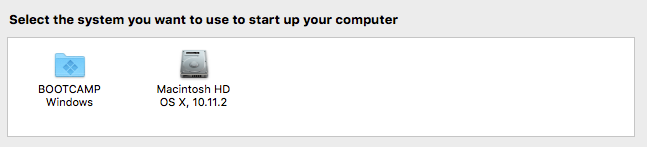
You can now switch between macOS and Windows by restarting your Mac and holding the Option (Alt) key during startup, allowing you to select your desired operating system!
Using third-party software Parallels Desktop
You can also use third-party software like Parallels Desktop to dual-boot Windows 11 on your Mac.
Get instant access to breaking news, the hottest reviews, great deals and helpful tips.
Parallels is a popular piece of virtualization software that offers a seamless experience, letting you use Windows apps and macOS apps side-by-side without rebooting. While it does cost money to use, you can use the free trial to try it free for two weeks.
Here’s how to install Windows 11 using Parallels Desktop:
Prerequisites
- A Mac with an Intel or Apple M1/M2 processor
- At least 8 GB of RAM (16 GB or more recommended)
- At least 256 GB of storage space
- Parallels Desktop 18 or newer
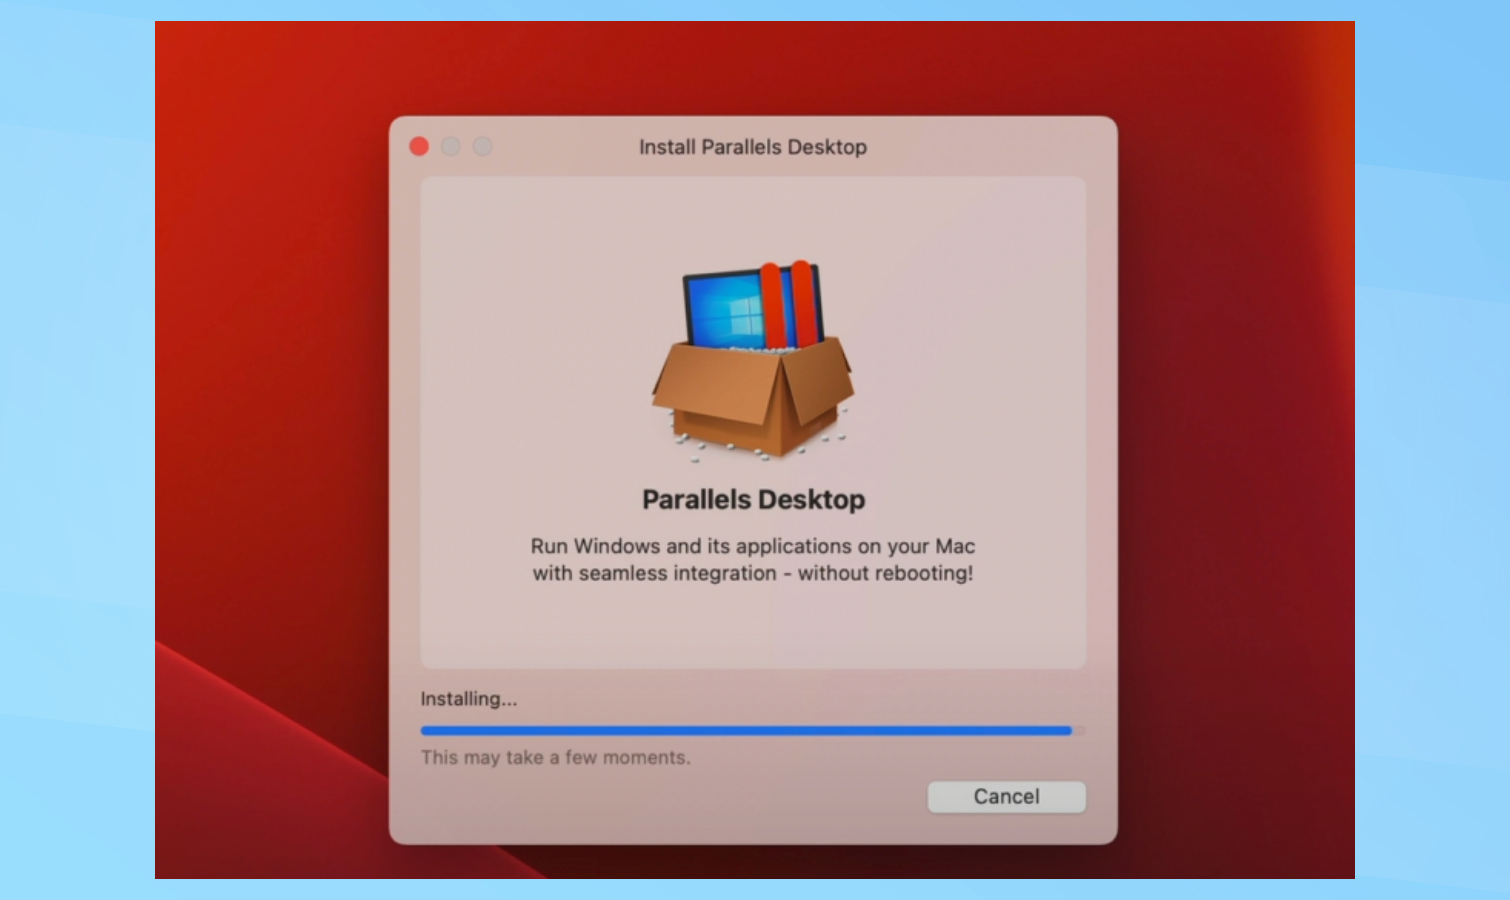
1. Download and install Parallels Desktop
(Image: © Future)
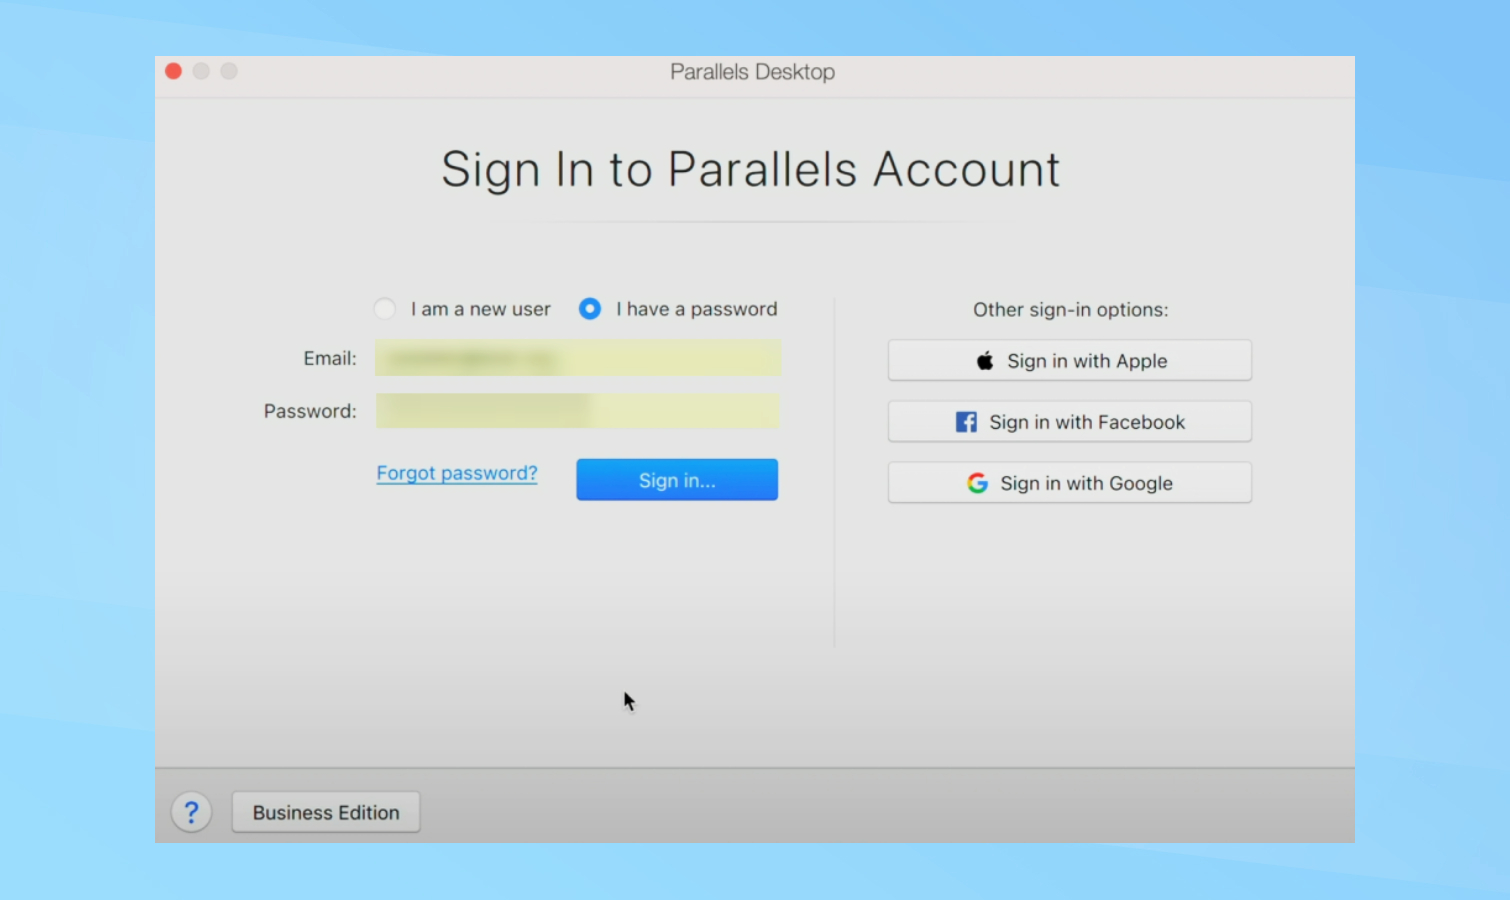
Visit the Parallels Desktop website and click on the «Try Free» button, then follow the prompts to download Parallels. Then, open the downloaded .dmg file and double-click on «Install Parallels Desktop.app» — follow the on-screen instructions to complete the installation process.
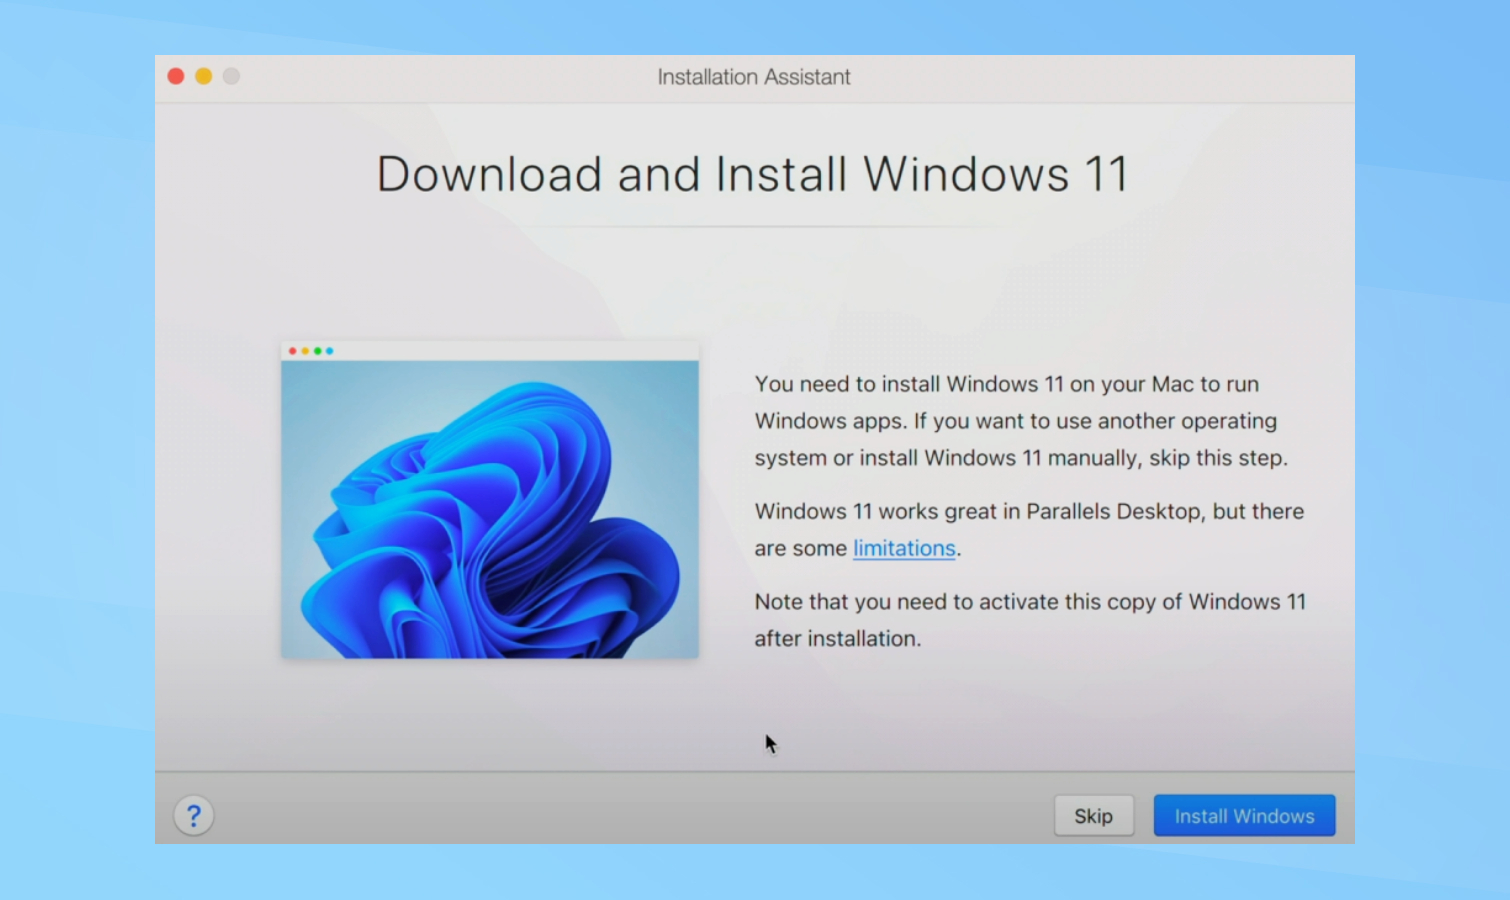
2. Create a new virtual machine
(Image: © Future)
Launch Parallels Desktop and click on the «+» button in the top right corner, then select «Get Windows 11 from Microsoft» and click «Continue». Click «Install Windows» to begin downloading and installing Windows 11.
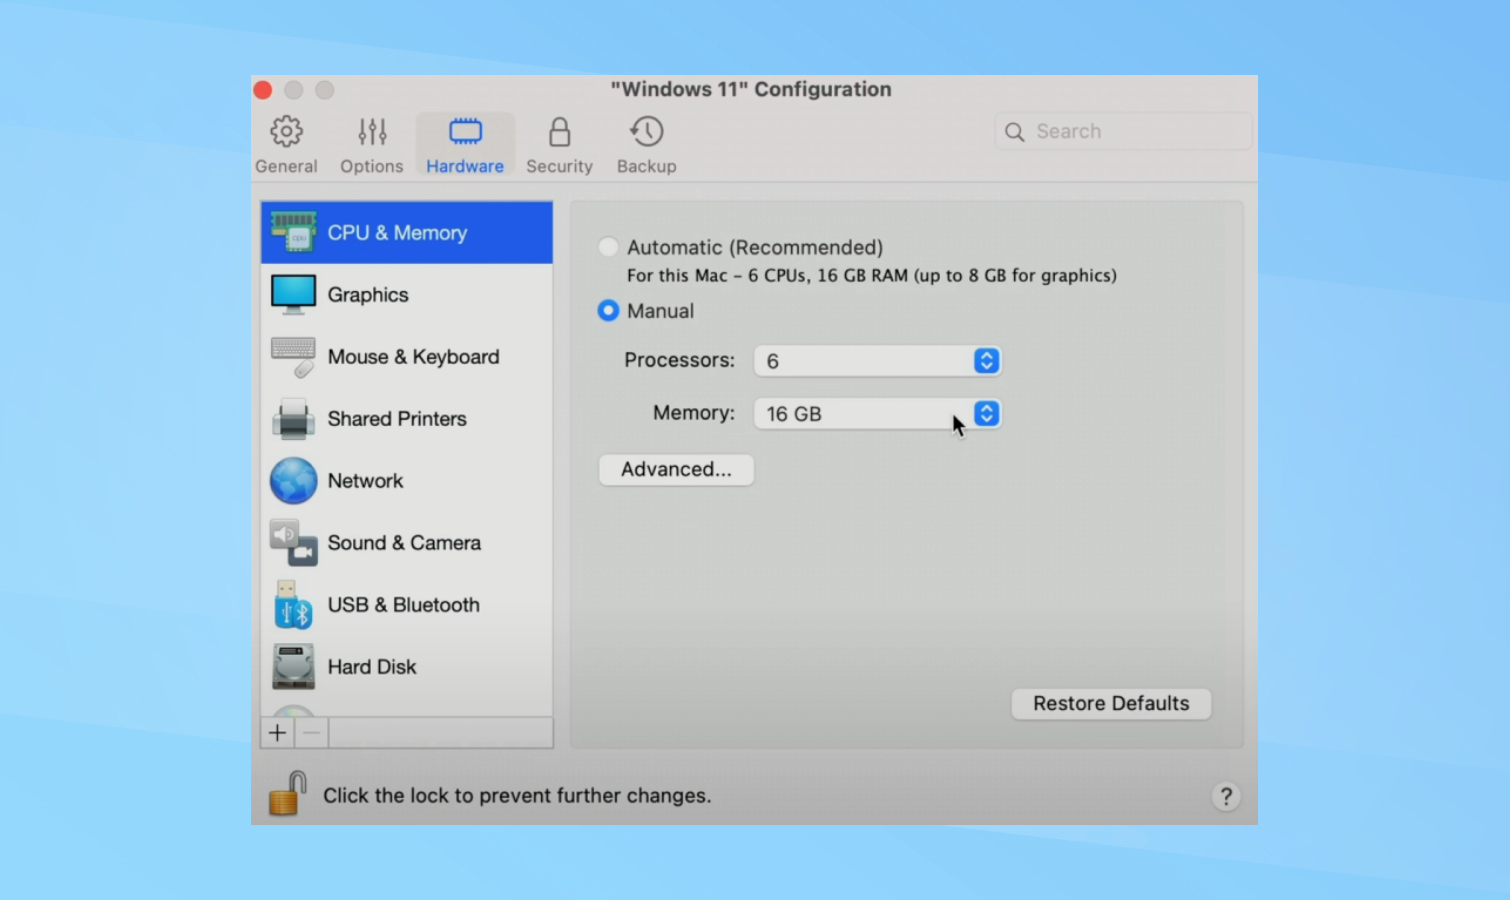
3. Configure your virtual machine
(Image: © Future)
Once the installation is complete, click on «Configuration» to customize your virtual machine settings on the Mac. Adjust the amount of RAM and CPU cores allocated to your virtual machine based on your needs. Configure other settings like graphics, network, and shared folders as desired.
4. Install Parallels Tools to start using Windows 11
(Image: © Future)
When Windows 11 setup is finished, Parallels Tools will install automatically. Restart your virtual machine when prompted to complete the installation.
You can now use Windows 11 in a window alongside your macOS apps or in full-screen mode! To switch between macOS and Windows 11, use the Parallels menu in the macOS menu bar.
That’s all there is to it! Take some time to get comfortable with what it’s like to switch between Windows and macOS, because there’s definitely an adjustment period.
For more tips on using your Mac to its full potential, check out our step-by-step guides on how to password protect a folder on Mac how to show the hidden files in Mac. And if your MacBook Pro is feeling a little sluggish, check out our rundown of how to clear cache on Mac to try and speed things up!
Mac vs. Windows. Windows vs. Mac. Why choose when you can get the best of both worlds by dual-booting? Here’s how to install Windows on your Mac using Boot Camp so you can jump back and forth between the two operating systems on the same computer.
What You’ll Need
Before you start, make sure you have enough space on your hard drive for both Windows and Mac. We recommend at least 30GB for each, but the more space you have, the better. You’ll also need a USB flash drive (4GB or larger) and a Windows 10 ISO disk image, which you can download here from Microsoft, and a valid Windows 10 license. Finally, make sure your Mac model can support Windows 10 in Boot Camp—check this list to find out.
Install Windows 10 on Your Mac
In the steps below, we’ll use Boot Camp Assistant to create a bootable USB drive and install Windows 10 on a new partition. Then you’ll be able to choose which OS you want to use whenever you start the Mac up.
1. Download the Windows 10 ISO disk image from Microsoft using this link. Choose the 64-bit version of Windows. Also, some people, including myself, have gotten an error message if the ISO image is saved to your default Downloads folder, so save the ISO image to your Documents folder or somewhere else to avoid problems.
2. Open Boot Camp Assistant. You’ll find this in the Utilities folder or you can hit CMD + Spacebar to search for «Boot Camp Assistant.»

3. Click Continue at the Introduction screen.
4. Click Continue again at the Select Tasks screen.
Sign up to receive The Snapshot, a free special dispatch from Laptop Mag, in your inbox.
5. Choose the Windows ISO image and select the destination USB drive. Note that the USB drive will be reformatted, so make sure you have a copy of any of the files on it somewhere else before proceeding.
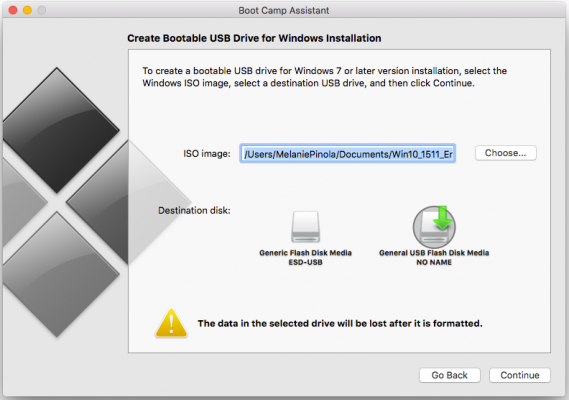
6. Click Continue and then Continue again. Your Mac will format the USB drive and create the Windows installation media.
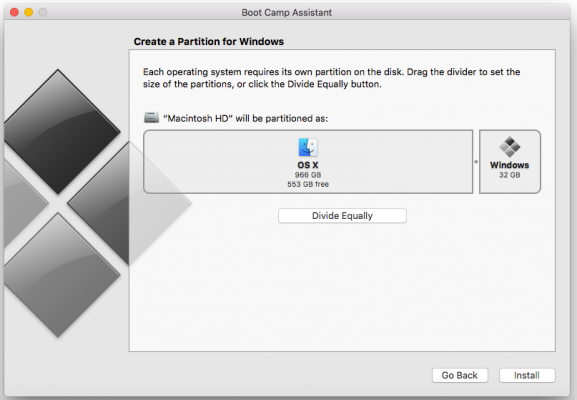
7. Click Install to accept the partition size for each OS. By default, Windows will have a 32GB partition, but you could also click the Divide Equally button to divide your Mac’s hard drive space equally between OS X and Windows.
7. Follow the prompts to finish installing Windows. The Mac will need to restart to complete the process and will automatically boot into Windows 10 when it’s done.
Set the Default Startup OS or Toggle Between OS X and Windows
Once you have Windows installed, you can set the default OS that will start each time you boot your Mac. To do this, head to the Startup Disk preference setting in Settings.
Every time the Mac starts, you can also toggle between OS X and Windows by holding down the Option (Alt) key immediately upon startup.
Mac to PC Guide: How to Make the Switch
- Previous Tip
- Next Tip
- Create a Microsoft Account
- Set Up and Use iCloud on Windows
- Format a Hard Drive For Both Windows and Mac
- Move Your Mac files to a Windows PC
- Convert Mac-Specific Files To Work on Windows 10
- Authorize Your New PC with Your iTunes Account
- How to Import iPhone Photos to Windows 10
- A Guide to Windows 10 Touchpad Gestures for Mac Users
- A Mac User’s Guide to Windows 10 Keyboard Shortcuts
- Sign Into Facebook and Twitter in Windows 10
- Set Up iCloud Email and Calendars on Windows 10
- How to Force Quit in Windows 10
- How to Install Apps in Windows 10
- Make Desktop Shortcuts in Windows 10
- Snap 4 Windows at Once in Windows 10
- How to Use Cortana in Windows 10: Tips and How-Tos
- Install QuickTime on Windows 10
In this article, I am going to show you how to dual boot Windows 10 and macOS Sierra on PC. Apple has already released the Macintosh operating system on 20 September of 2016, and if you want to give a try to this OS, then you are in the right place because here you will learn the complete process of how to dual boot Windows 10 and macOS Sierra 10.12, Hackintosh on PC. Since the Apple’s new operating system for Macintosh has been released, the Hackintosh experts are busy to create and manage to make easy tools like Unibeast and Multibeast to build a Hackintosh on PC and easy way to dual boot macOS Sierra and Windows 10. So follow below step by step guide to dual boot Windows 10 and macOS Sierra on PC but first need to know what’s dual boot.
What is a Dual Boot?
Dual-booting is the act of installing multiple operating systems on a computer and being able to choose which one to boot. The term dual-booting refers to the standard configuration of precisely two operating systems. It means when we install two operating systems on a single Machine. Sometimes it’s called Multi-boot or dual boot as well. If you install and use three operating systems like Mac, Windows, and Kali Linux on a single machine then in this case, it called triple boot. Now that you have understood what is dual boot, so let dual boot Windows 10 and macOS Sierra 10.12 on PC.
Dual boot Windows 10 and macOS Sierra on PC
- Create Bootable USB Installer For macOS Sierra
- Setup Parts of Your Motherboard’s BIOS or UEFI
- Boot into Bootable USB Installer of macOS Sierra
- Choose Your Language for macOS Sierra
- Create Partition For macOS Sierra with Disk Utility
- Install macOS Sierra on Created Partition
- Boot into macOS Sierra Partition or Disk (HFS)
- Perform a clean Installation of macOS Sierra
- Finish Installation of macOS Sierra
Before to start dual booting, you must know about this article, that from where you have to start, how you should do the steps, and how to finish. Firstly you should have the requirement that mentioned below then you have to install macOS Sierra first and then Windows 10. Please remember about partitioning the Hard disk drive. You have to partition it for Mac and Windows in the duration of installing macOS Sierra. So don’t forget to backup your file before formatting your HDD or SSD.
Requirement
- Bootable USB Installer for macOS Sierra. If you don’t have one, then follow the article to create a USB Installer for macOS Sierra using Unibeast or A method in Windows 10.
- Bootable USB or CD/DVD For Windows 10. Follow the article on how to create a bootable USB for Windows 10.
- Two free empty Partitions for macOS Sierra & Windows 10.
- A PC (Laptop or Desktop) with full Intel supported to install and support macOS Sierra and Windows 10.
- Extra accessories such as a mouse, keyboard and much more. Because of macOS Sierra may not identify your laptop’s keyboard or mouse until you didn’t install the drive Separately.
Installing macOS Sierra 10.12
To dual boot Windows 10 and macOS Sierra on PC, it is better to install macOS Sierra first. If you install Windows 10 first then while installing macOS Sierra, it might create a problem for you and you will be a little in trouble. If you have installed macOS Sierra on your PC, then that’s okay skip this and try to install Windows 10. Also if you have installed Windows 10 already then follow the steps below or check this article:
- How to Install macOS Sierra on PC
Step #1. Create Bootable USB Installer For macOS Sierra
In this step, you have to download and create a bootable USB installer for macOS Sierra using UniBeast. This move will help you to Boot with the USB installer and create a partition for Mac and finally, install the Mac from the USB Installer to OS X Extended (Journaled) partition. It’s a bit long, so due to this, we have managed two articles and different methods for it. Check the guide and follow step by step to bootable create USB Installer. Also linked in the requirement section.
- How to Create Bootable USB Installer for macOS Sierra Using UniBeast?
- How to Create macOS Sierra Bootable USB Installer on Windows 10?
Step #2. Setup Parts of Your Motherboard’s BIOS or UEFI
Now after downloading and creating bootable USB installer for macOS Sierra 10.12. Then here you will need to set up parts of your motherboard’s BIOS or UEFI. This step will let and make the USB installer to boot into clover menu. It’s so important to do this step correctly and carefully because if no then without doing this stuff, you won’t be able to go forward and install macOS Sierra 10.12.
#1. Press the BIOS Menu Button from your keyboard(F12, F10, F8, F2) depending on your system if can’t find then do a google search or comment us below the details of your computer. For Lenovo laptops, press Novo button or one key recovery then select BIOS Setup and hit enter from your keyboard.
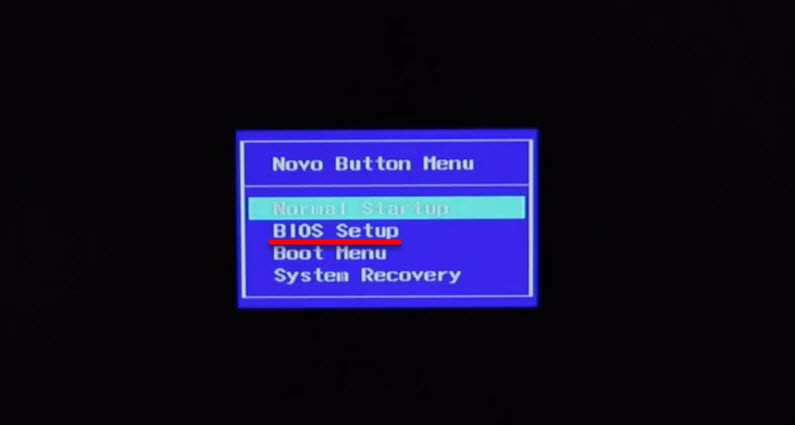
Go to BIOS Setup
#2. Now from BIOS, Set The SATA Controller Mode to (AHCI).
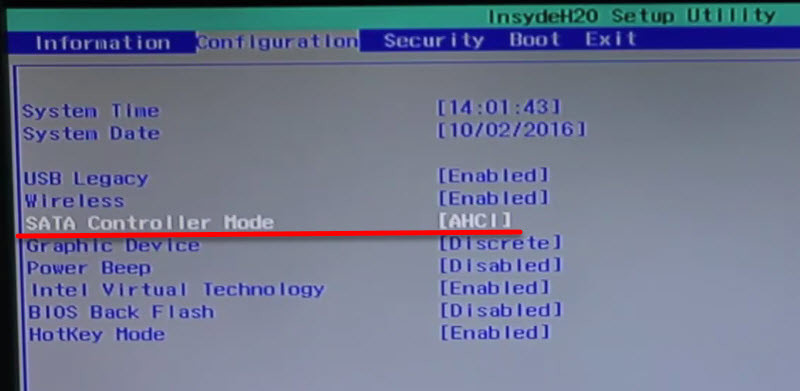
Change the SATA Controller
#3. Then go to the boot tab and set the Boot Mode to (Legacy Support) and set the Boot Priority to (UEFI First).
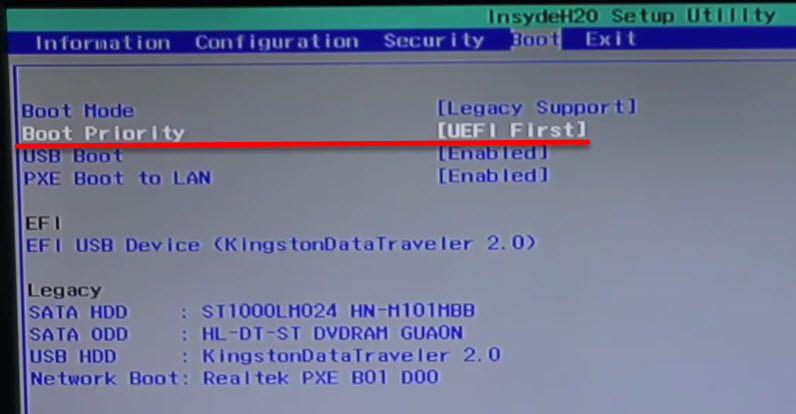
Change Boot Mode
#4. Exit and Save Changes.

Exit Save Changes
Note: This works great on Lenovo based computer. And this may not work for any other systems. So due to this, we highly recommend you to do the below guides for your machine.
- Load Optimized Defaults
- Set the SATA Controller Mode to AHCI
- Set the Boot Priority to UEFI
- Set OS Type to Other OS
- If your CPU supports VT-d, disable it
- If your system has CFG-Lock, disable it
- If your system has Secure Boot Mode, disable it
- If you have six series or x58 system with AWARD BIOS, disable USB 3.0
- Save and exit.
- If your system didn’t boot automatically, then go to Boot Manager and select the Bootable USB Installer that you create in step 1, Manually.
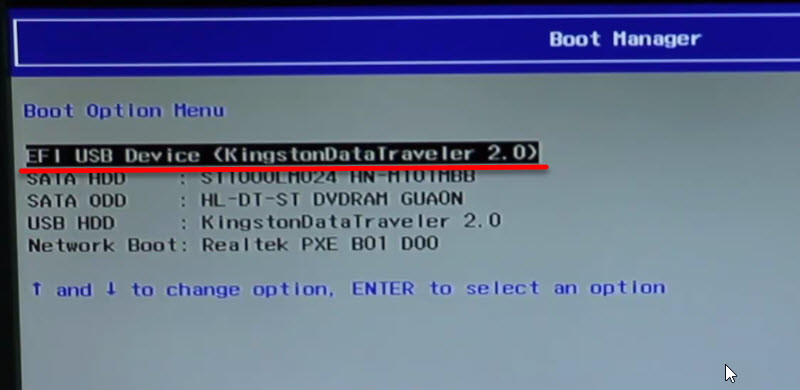
Boot From EFI USB Device
Step #3. Boot into Bootable USB Installer of macOS Sierra
After you get into Clover Menu then if your system has full intel supported then select the Bootable USB Installer. But if that didn’t work, then you need to enter boot flag for your system to boot into USB Installer. If you have trouble to boot from USB Installer, then comment us your problem below in the comment section and also check this article, to know how to boot correctly.
- How to Boot Correctly into Bootable USB Installer of macOS Sierra?
Now from Clover boot menu, select the bootable USB Installer (External) and hit enter.
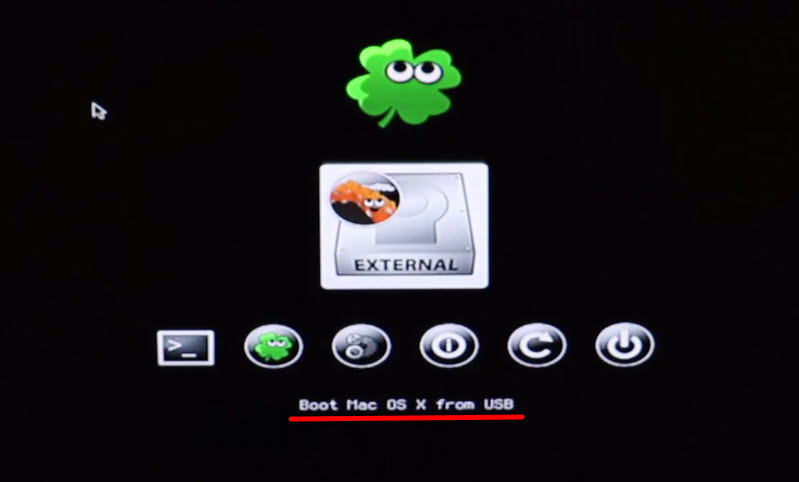
Boot into USB Installer
Step #4. Choose Your Language for macOS Sierra
Now after Booting successfully with the boot flag or without, then the USB installer should take you to Language chooser page. Select your Language for macOS Sierra and click on the arrow button to go forward.
Step #5. Create Partition For macOS Sierra with Disk Utility
So after you have chosen your language, then you should partition the disk for macOS Sierra 10.12. This step will help you to install macOS Sierra from the USB installer to the drive that you are going to create in this step.
#1. To partition the Disk for macOS. Now click on Utilities > Disk Utility.
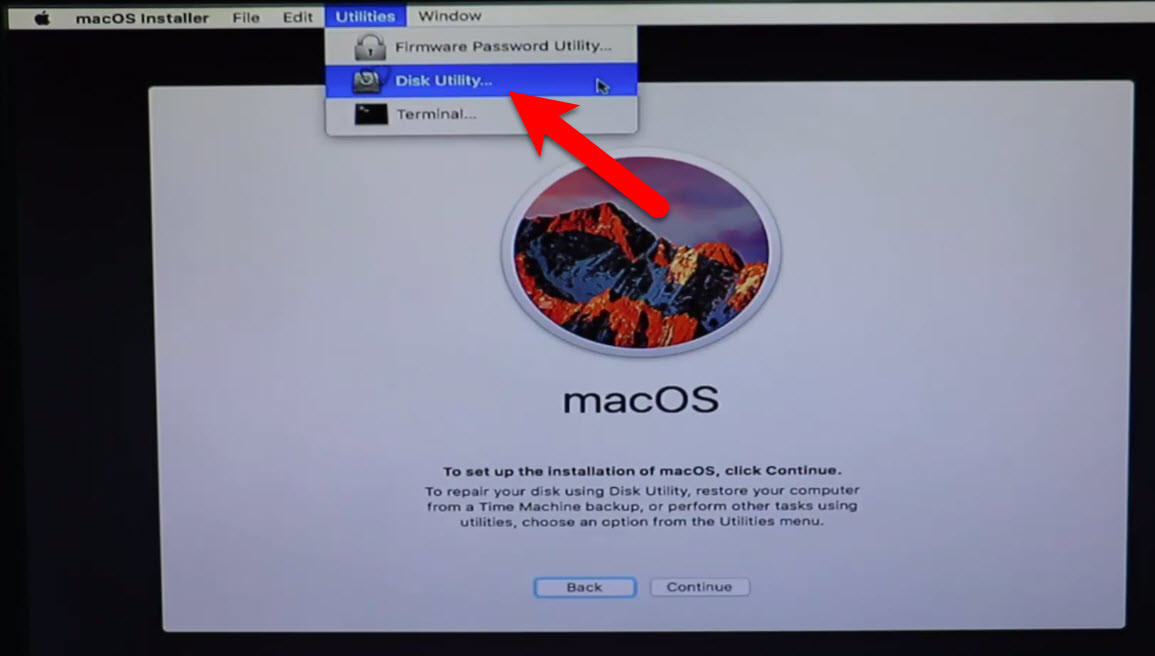
Open Disk Utility
#2. Now select your free hard disk drive and click on Erase tab. Be sure to choose a free empty partition that the partition is going to be cleaned and formatted for macOS Sierra.
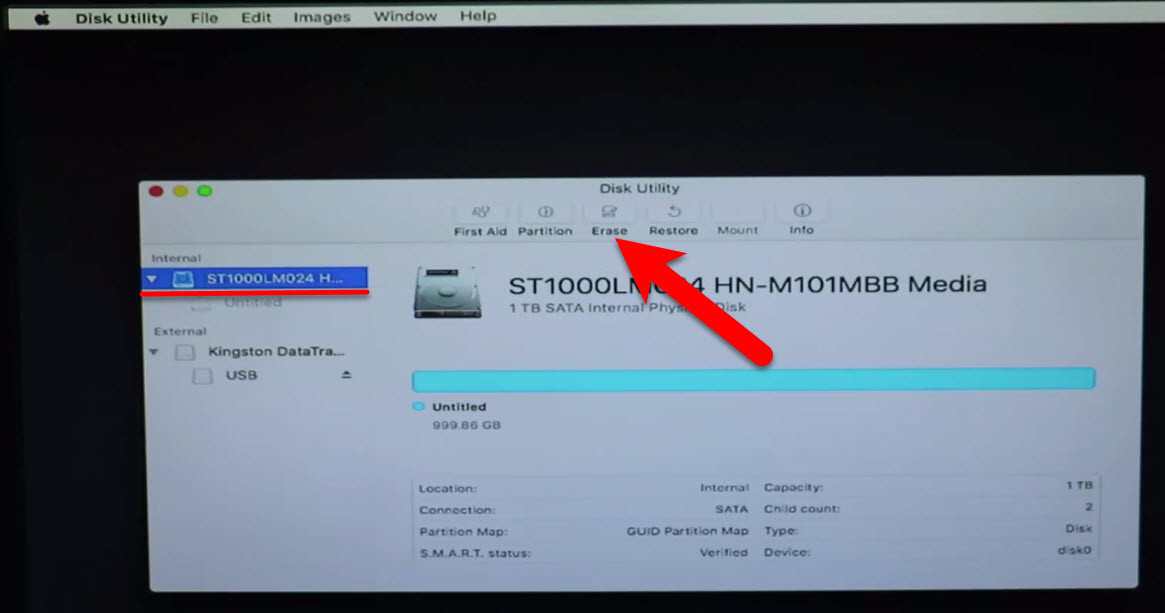
Go to Erase Tab
#3. Name the disk then choose the format to “OS X Extended (Journaled) “ and click on Erase button. If you are partitioning the entire hard drive, then be sure to select the Schema to “GUID Partition Map.” Then your hard disk or drive will be cleaned and partitioned to OS X Extended Journaled.
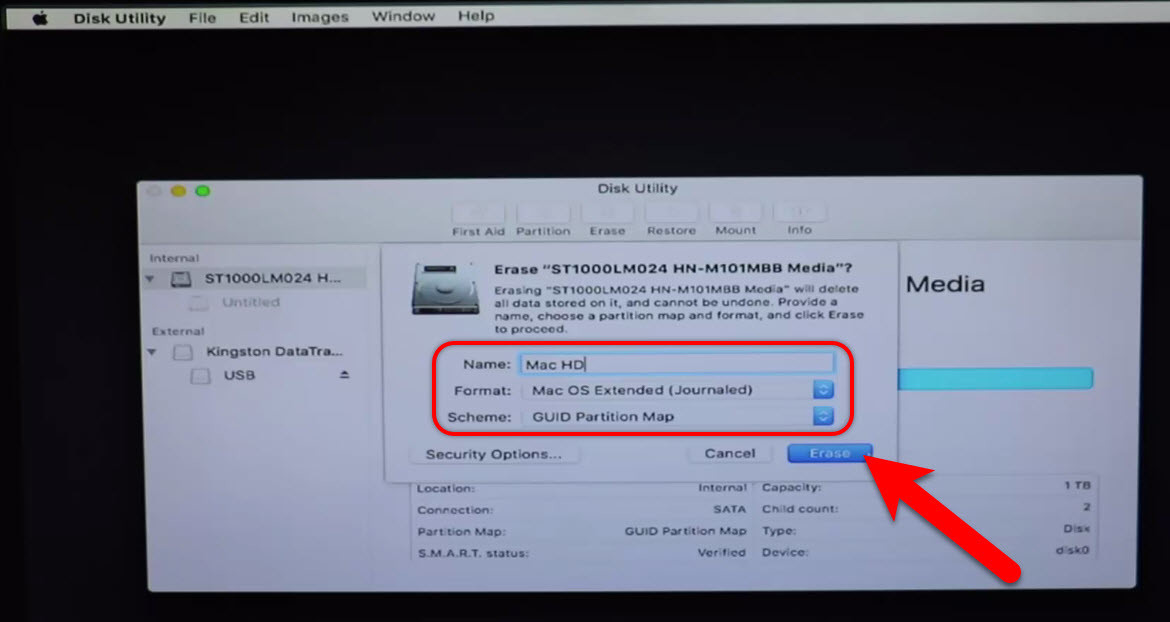
Partitioning the Disk
#4. Make yourself sure that you get the message that erasing disk process completed successfully. Click Done. If you were facing any errors, then I highly recommend you to visit the link below.
- Fix “Erase Process has Failed” While Erasing Partition for Mac OS on Disk Utility
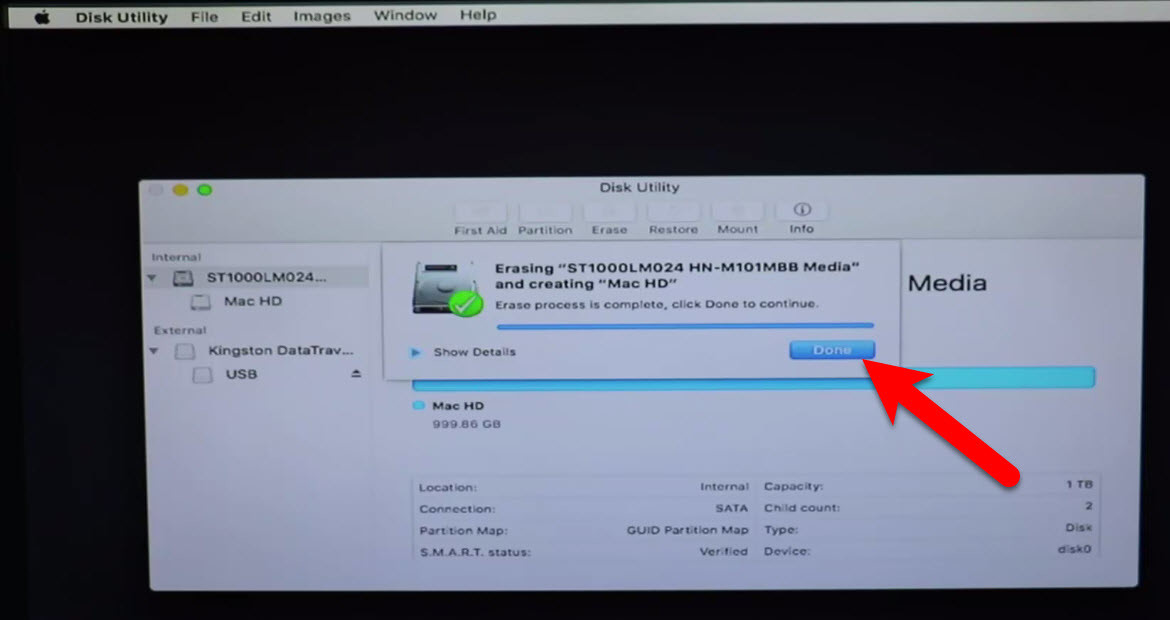
Erase Process Successful
#5. To create more partitions, now again select your machine’s hard disk and this time, click on partition tab.
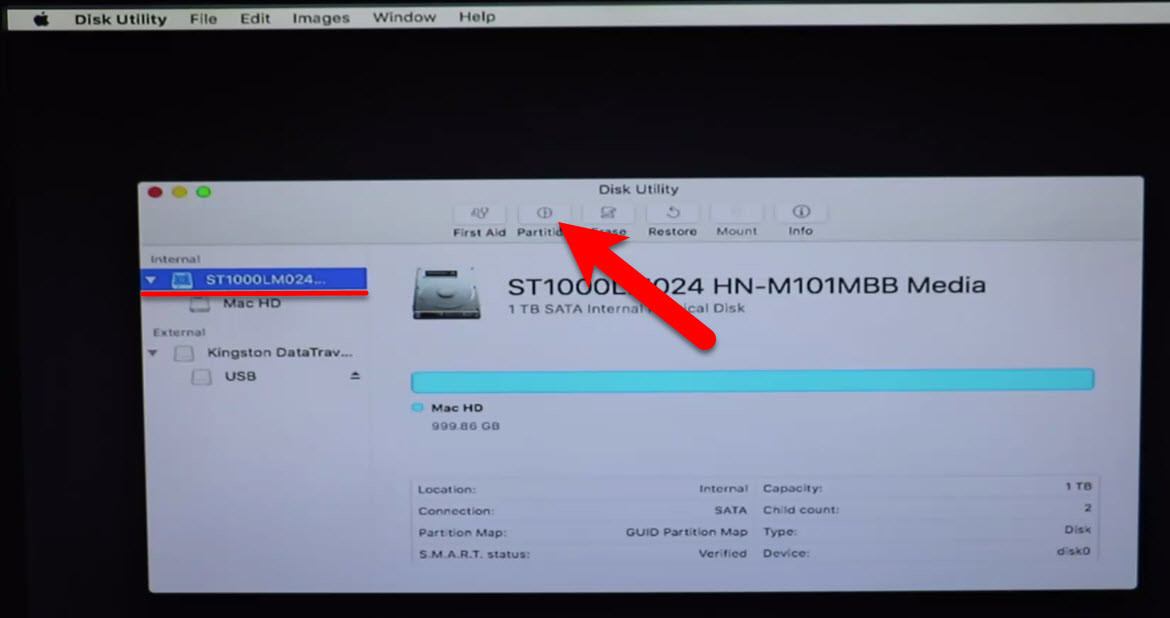
Go to Partition Tab
#6. Click on the (+) button to create two partitions. Specify the disk size for Windows 10 then Name the Partition and choose the Format type as MS-DOS (FAT) then click Apply button.
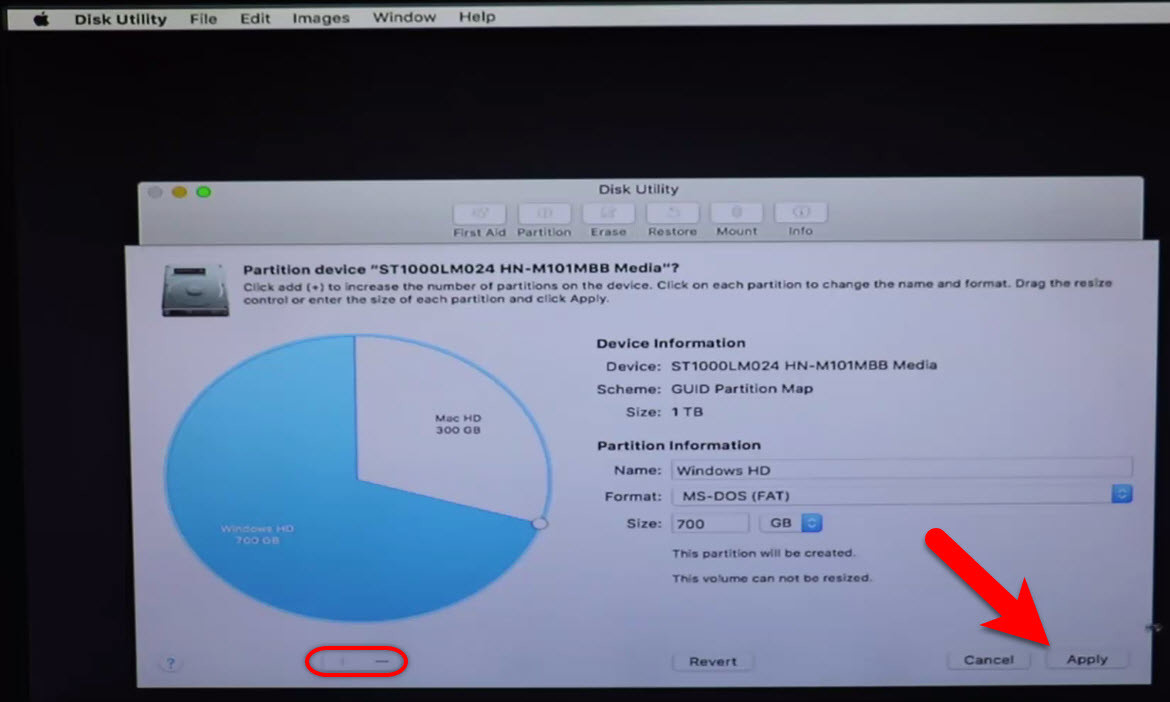
Windows Partition
#7. Here the utility alert you that two partitions will be created, so finally click on Partition to confirm it.
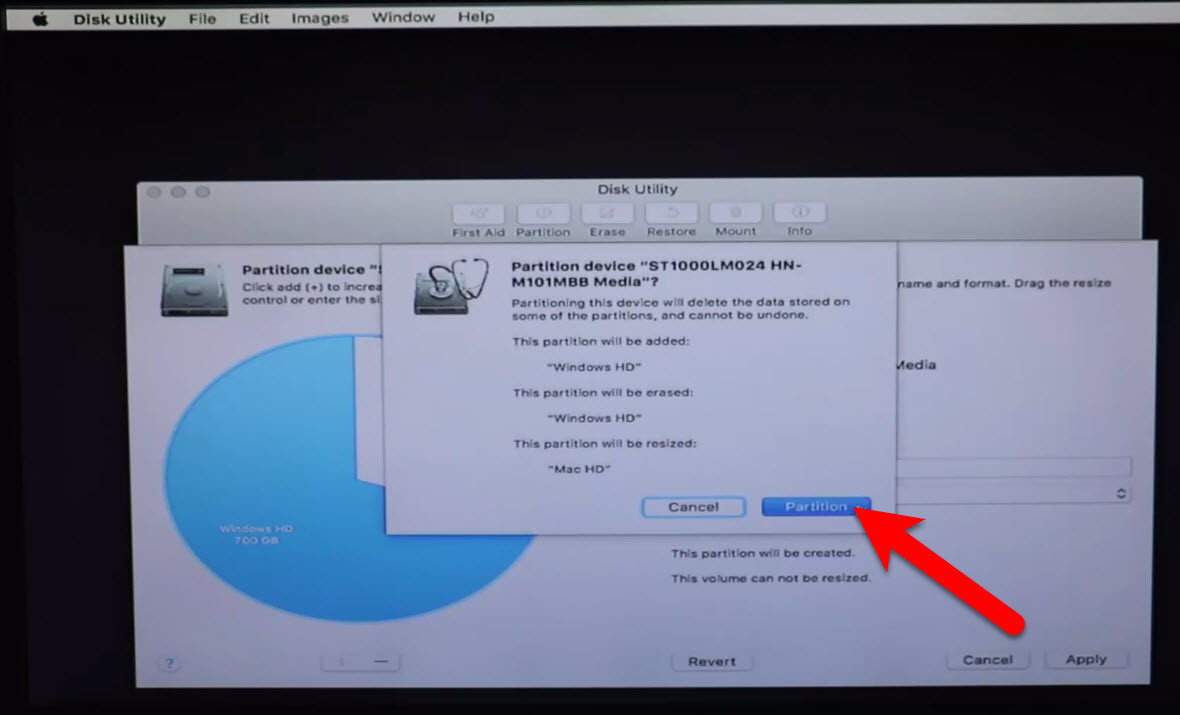
Confirm Partition
#8. Make yourself sure that you get the message that erasing disk process completed successfully. Click Done and close disk utility.

Done Partition Windows HD
Step #6. Install macOS Sierra on Created Partition
#1. To set up the installation of macOS, Click on Continue.

Setup the Installation of macOS Sierra
#2. Now, click Continue, then Agree with the I have read and agreed to the terms of the software license agreement.

Accept the Terms of the Software License Agreement
#3. On the Install macOS page, select the partition that you created for macOS Sierra while partitioning the disk with disk utility and finally click Continue.
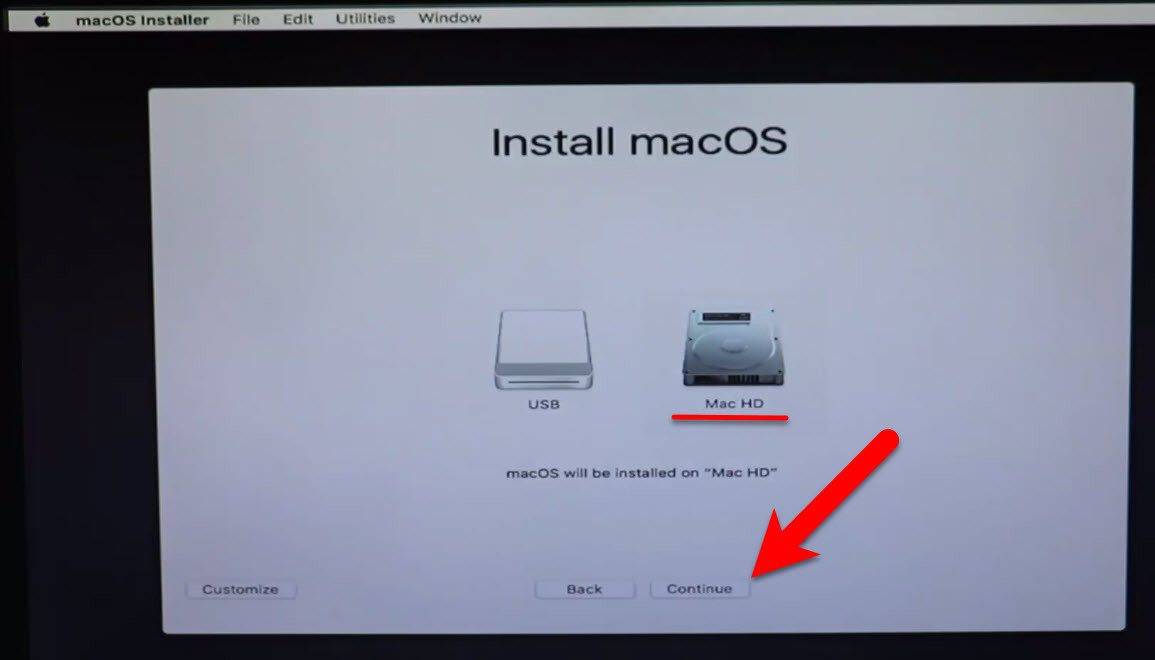
Install Mac OS
#4. Now, wait for USB installer to install macOS Sierra from it to the disk that you selected. It will take some time to complete, depends on your system. After it is finished, it will restart automatically after 10 seconds.
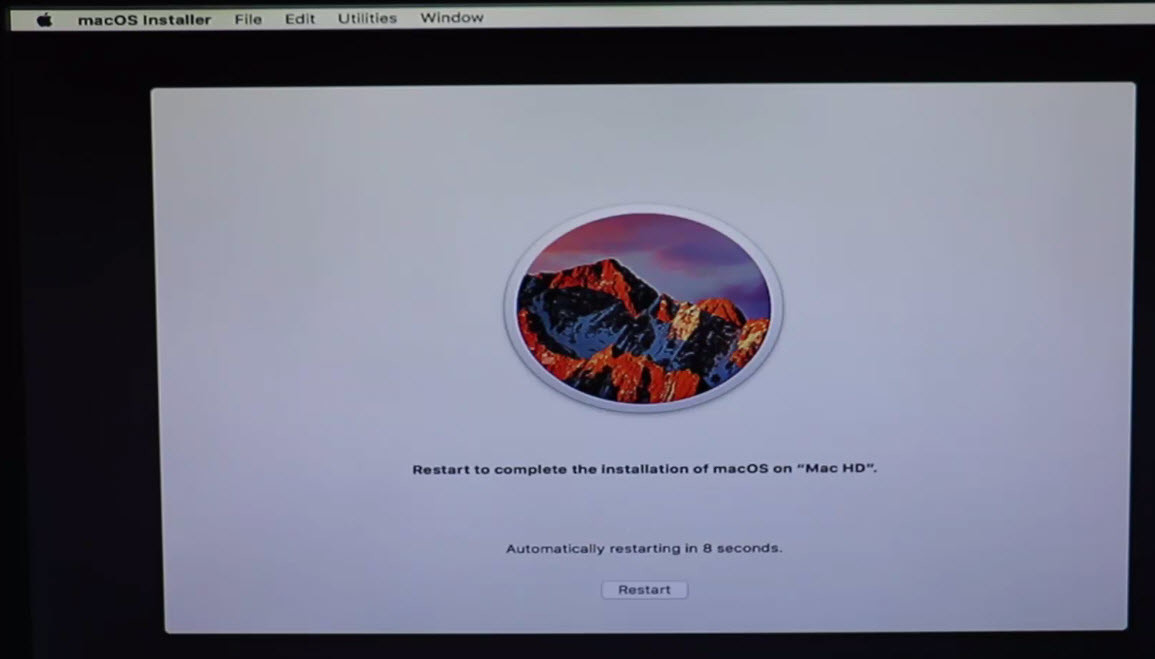
Restart to Complete the Installation of macOS Sierra on Mac HD
Step #7. Boot into macOS Sierra Partition or Disk (HFS)
When your computer rebooted, then it must automatically take you to the USB installer Clover menu. If no then boot yourself from Boot Manager, the EFI USB installer that created in step 1. After that on the clover menu, don’t make any changes because it will automatically boot into the disk that Mac OS is newly installed. If no then select HFS disk icon that named your Mac HD and hit enter from your keyboard.
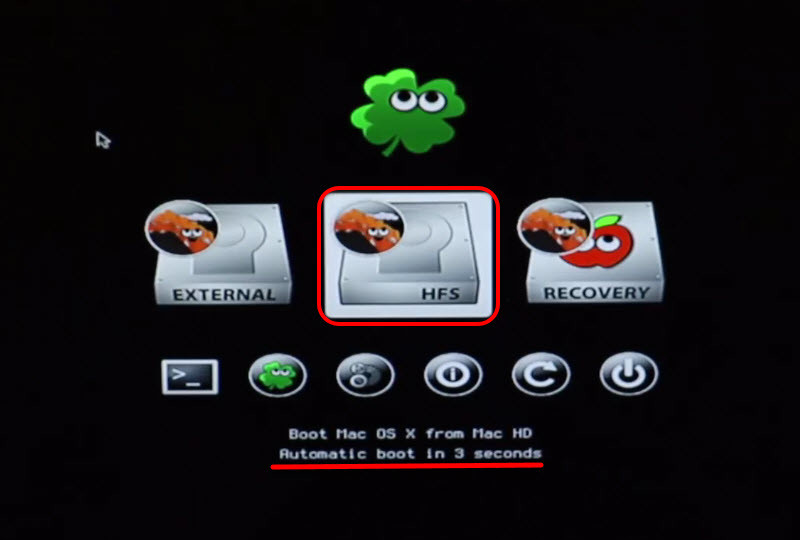
Boot From Mac HD
Note: If you have booted USB Installer with boot flags then, this time, use the same boot flag to boot from macOS Sierra partition or HFS disk.
Step #8. Perform a clean Installation of macOS Sierra
In the previous actions, if you have installed macOS Sierra from the USB Installer to the partition that you created for macOS Sierra 10.12, then after booting from that partition that macOS Sierra is installed on it. Here it’s time to set up and performing a clean installation of macOS Sierra. Well, we have another article also for further information with the shots visit the link below to perform a clean installation of macOS Sierra or keep following this article below.
- How to perform a clean installation of macOS Sierra? (With Shots)
#1. Choose your Country and click on Continue.

Choose Language
#2. Pick a keyboard Layout and click on Continue.
#3. Now select your method to transfer information to this mac and click on Continue.
#4. Enable location services and click on Continue.
#5. In this step, you have to Sign in with your Apple ID. If you don’t have, then create a free Apple ID “how to create an Apple ID on iPhone, iPad or iPod Touch”. If you don’t want to sign in with Apple ID or don’t want to create Apple ID, then Choose Don’t Sign in and click on Continue.
#6. Agree to the Terms and Conditions.
#7. Fill out the Full name, Account name, Password, Hint and check the box of Set time zone based on Current location. Finally click on Continue to create your user account for macOS Sierra, that will be installed on your PC.
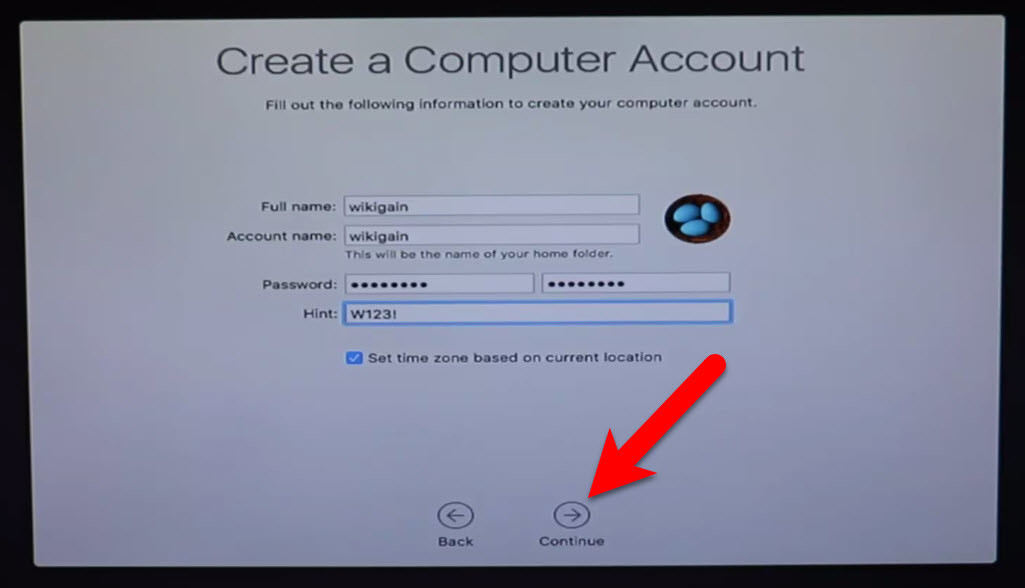
Create a Computer Account
#8. Select the options for Diagnostics & Usage and click on Continue.
#9. Wait a little while to Setting Up Your Mac. It will run on the desktop of macOS Sierra.
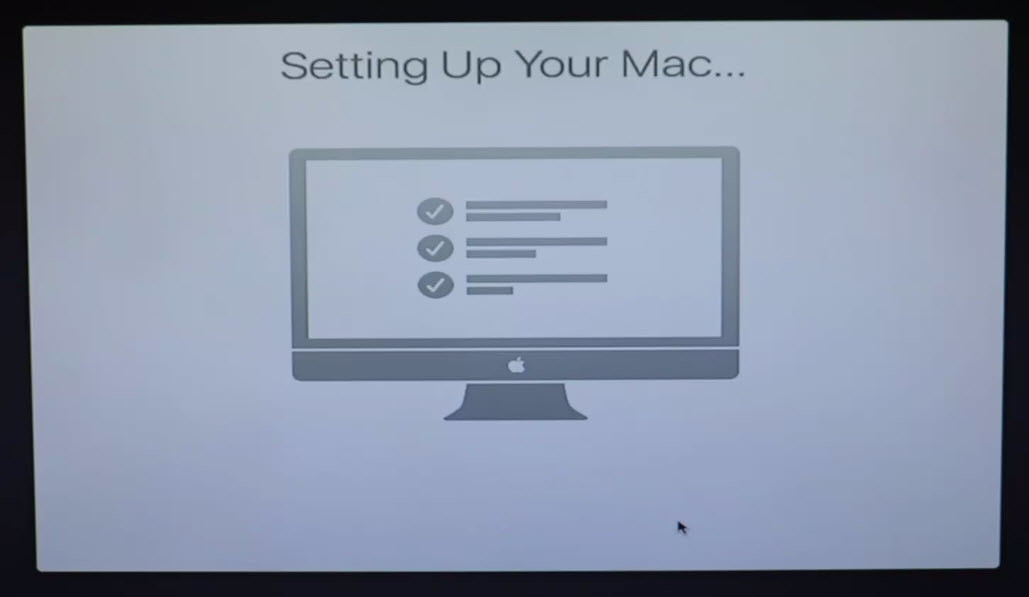
Setting up macOS Sierra
Finish Installation of macOS Sierra
After performing a clean installation and Set upping your macOS Sierra on PC. You should see your final result that macOS Sierra has successfully installed on PC and enjoy using it.
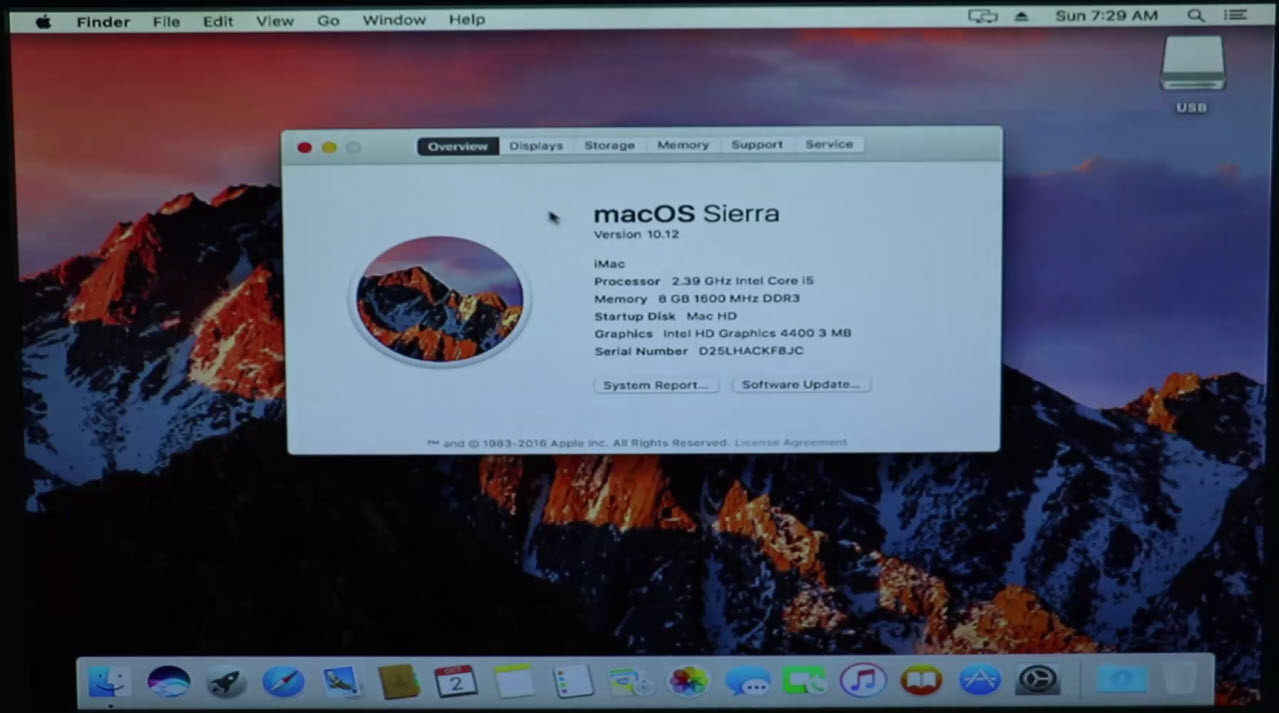
macOS Sierra Installed on PC
Installing Windows 10
Now after installing macOS Sierra on your PC and now you if you have installed it successfully then you’re almost 50% done. Because your PC may support window 10 and it’s easy to install windows. So to complete dual boot Windows 10 and macOS Sierra on PC then keep following here step by step.
Step #1. Create Bootable USB for Windows 10
As I mentioned in at the requirement section, that you need a bootable USB of Windows 10 or a Windows 10 CD\DVD, to install Windows 10 on your PC and complete your dual booting. If you don’t have Bootable USB of Windows 10 or Windows 10 CD\DVD, then buy one or create a bootable USB for Windows 10 with the help of the article below.
- How to Create Bootable USB for Windows 10
Step #2. Perform a Clean Installation of Windows 10
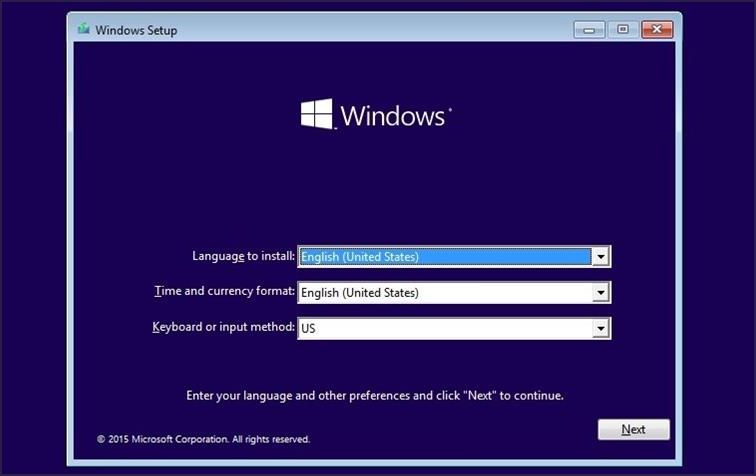
#1. Insert the Bootable USB or the Windows 10 CD\DVD to your PC and Boot your PC with that whether it’s a bootable USB or Windows 10 CD\DVD. When the system booted, enter your language, and other preferences then click Next.
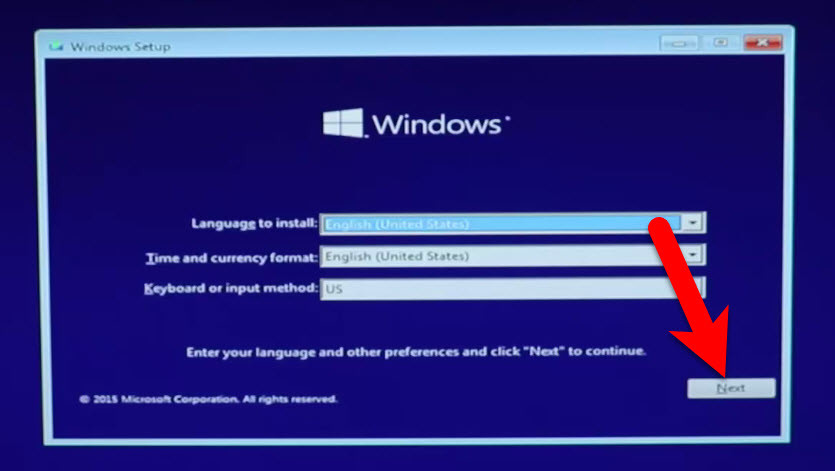
Select your Language and other
#2. Now click Install Now.
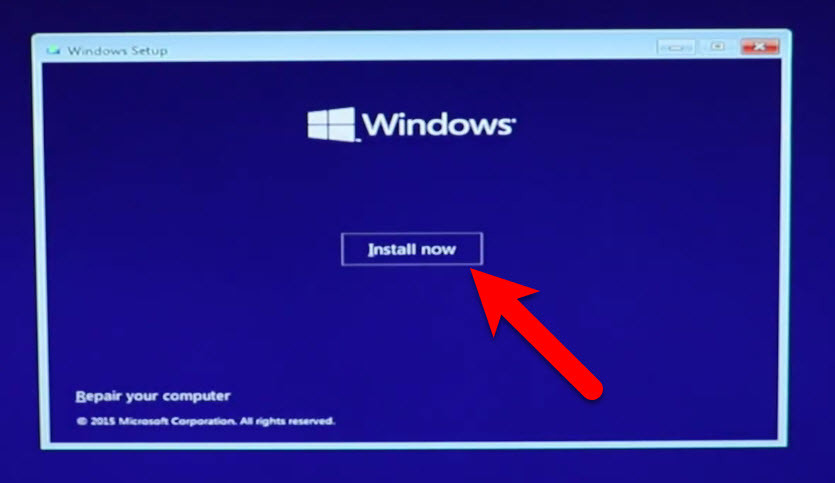
Install Windows
#3. If the system asked you to enter the Product Key then if you have bought the key from Microsoft, enter the product key otherwise click Skip.
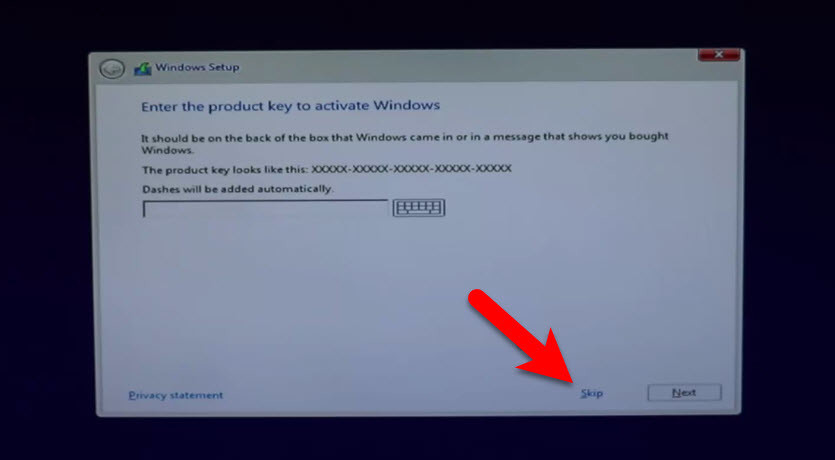
Enter Product Key or Skip
#4. Agree, I accept the terms and click Next.
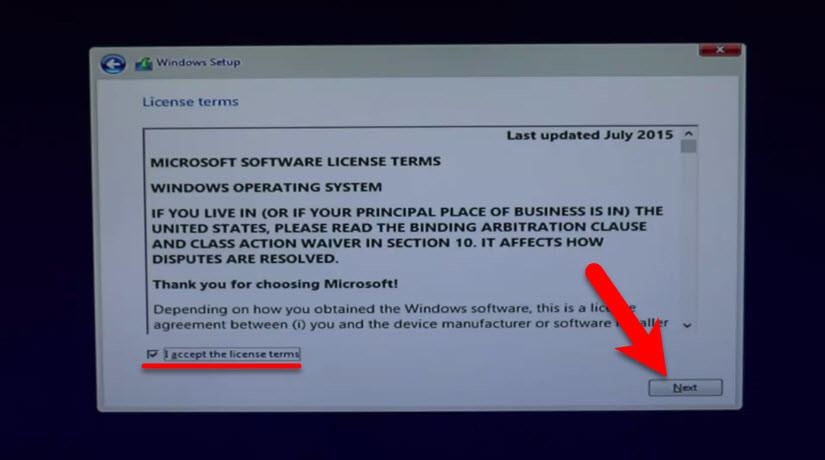
License Terms
#5. On the type of windows installation click Custom: Install Windows only ( advanced) because we have to install it newly, and there are no windows to upgrade it.
Select Installation Type
#6. Now on the “Where do you want to install Windows?” page, you have to select the partition that you create while installing of macOS Sierra. After selecting the disk click Next. If you’re unable to click the Next button then once format the same partition that you created for Windows while installing macOS Sierra, and try again. If still a problem then lets us know by comment.
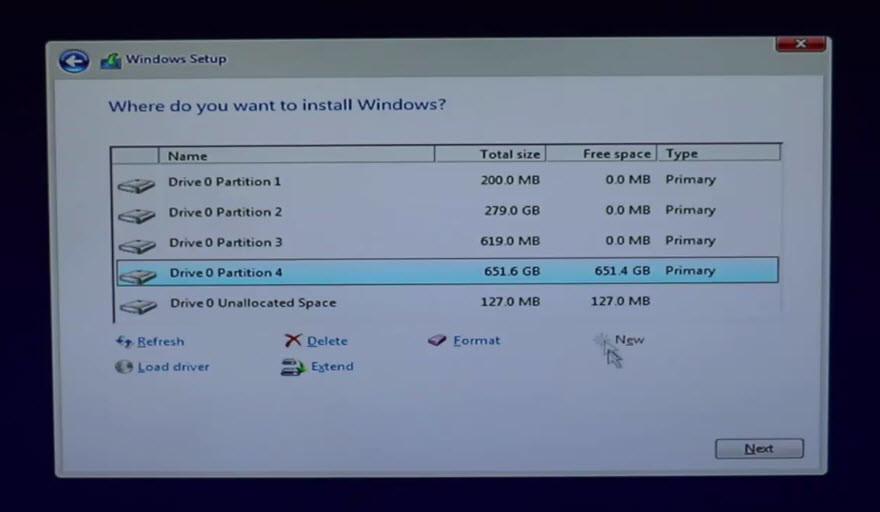
Where to Install Windows
Note: Be careful in the selection because if you select the wrong partition, then you might format and install windows on the macOS Sierra partition.
#7. Wait now and let the windows be installed (Depending on your system) and when the installation finishes then your PC will restart automatically after 10 Seconds.
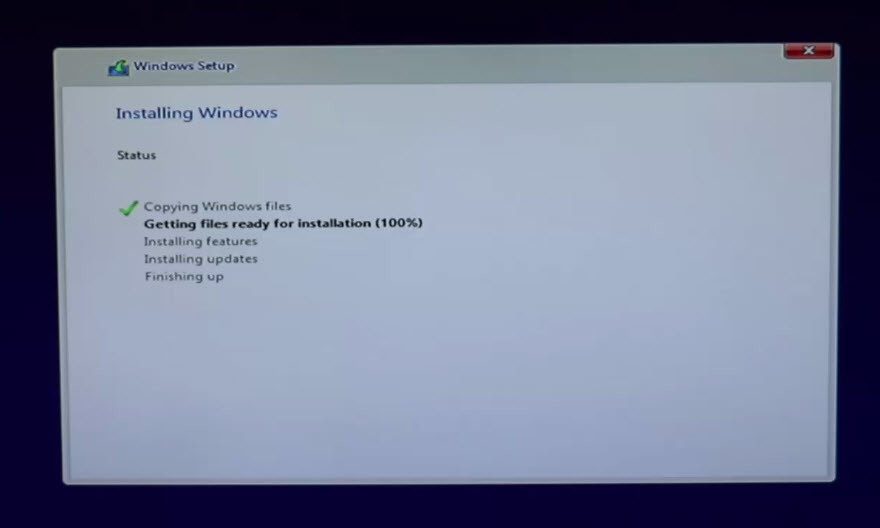
Installing Windows
#8. If the Windows asked again for the Product Key, then click Do this later.
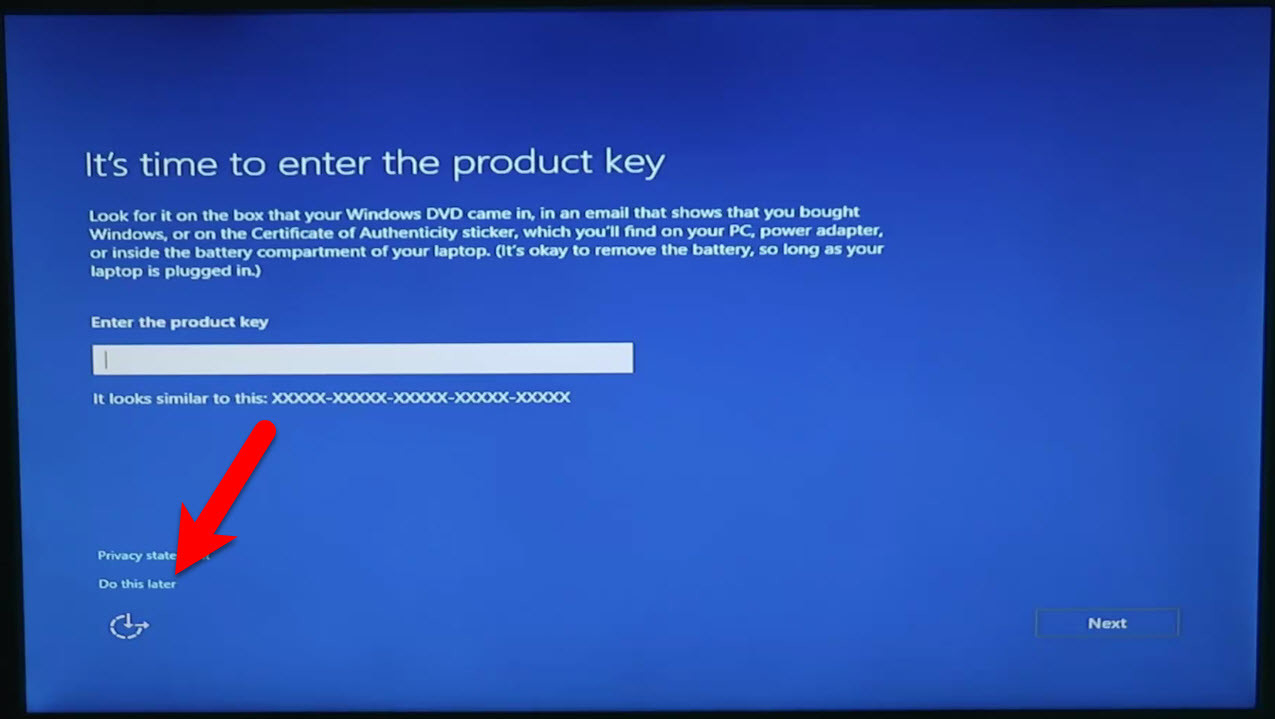
Enter the Product Key
#9. When the Window asks to Let’s Get connected, then connect to your Wireless access point or click Skip this Step.
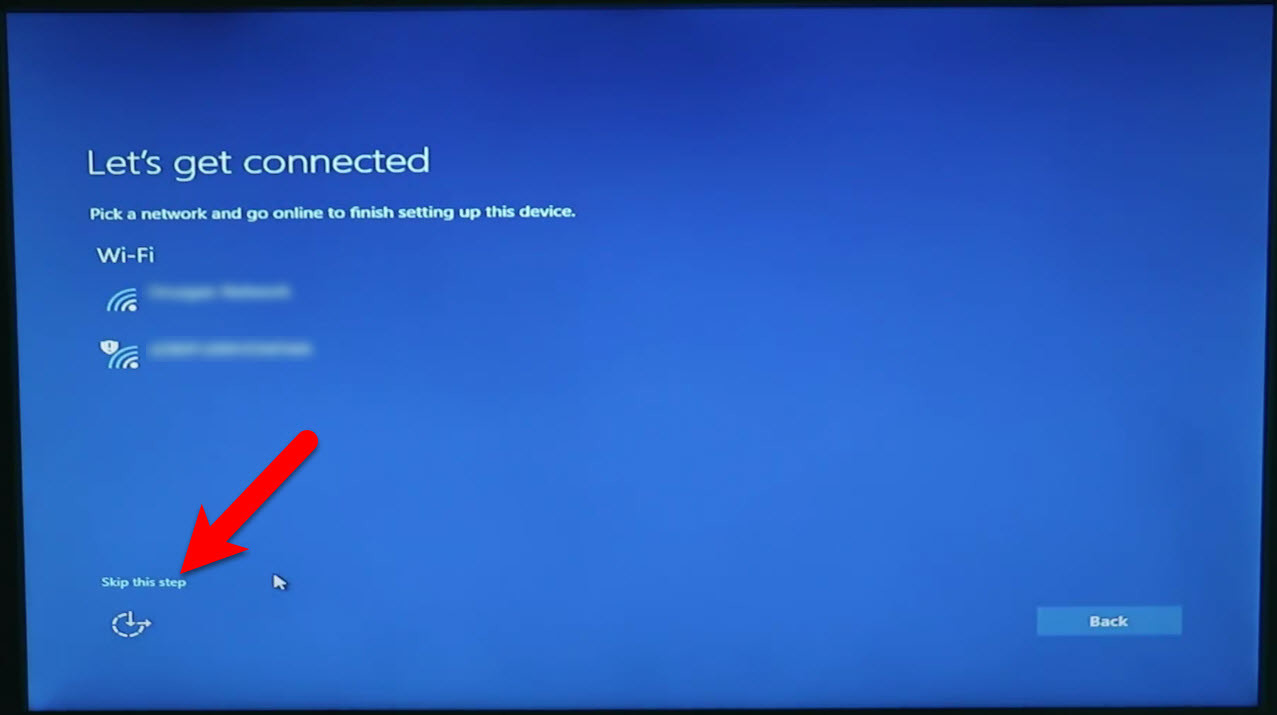
Get Connected
#10. On the Get going fast Page, click Use Express Settings.
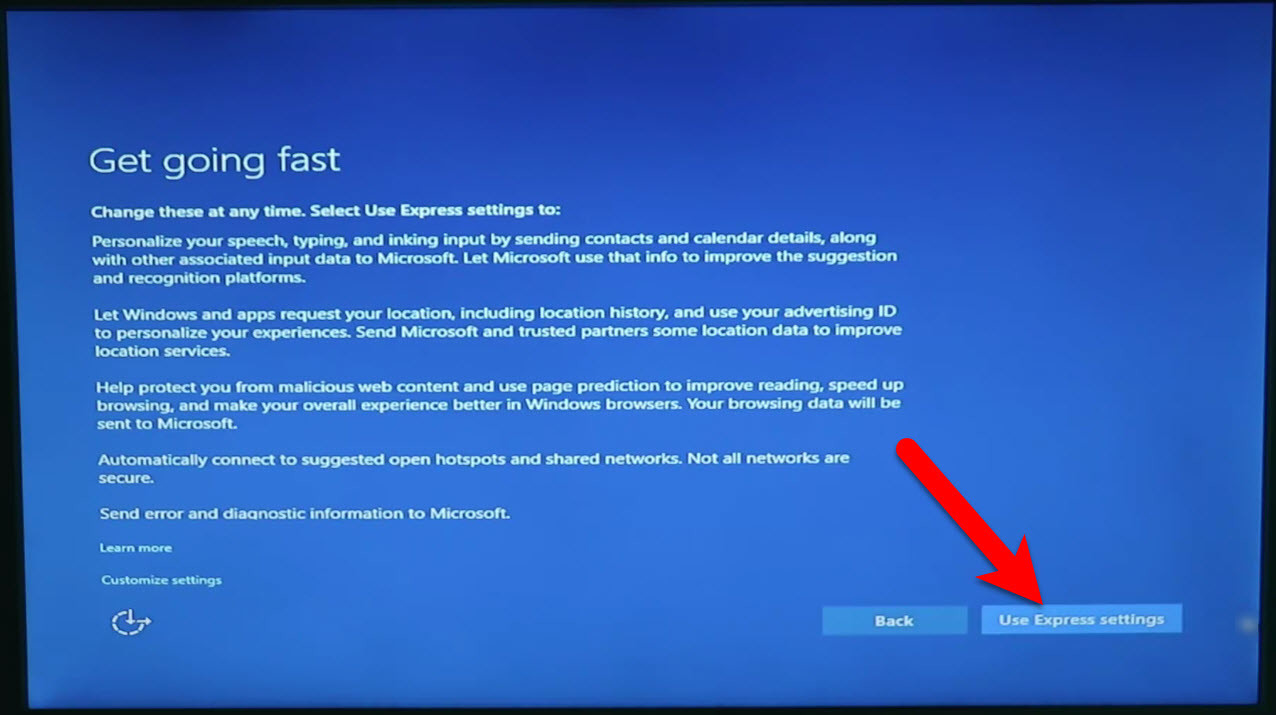
Get Going Fast
#11. On the “Create an account for this PC” page fill the requirements that asked or skip that options that are optional, after that click Next.
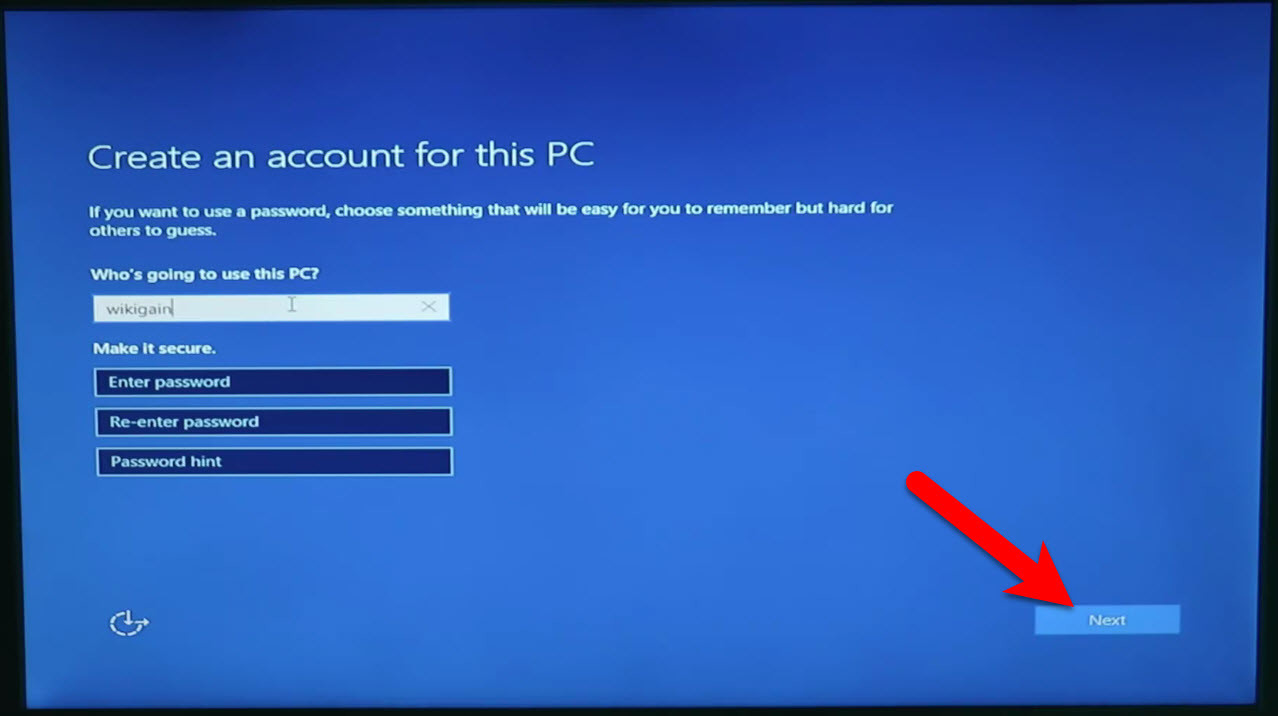
Create an Account For This PC
#12. Wait a while for windows to Setting things up for you.

Setting Things up For you
Finish Installation
After performing a clean installation and Set up your Windows 10 then you should see your final result.

Windows 10 Installed
Post Installation of macOS Sierra to Complete Dual Boot Process
So now if you have successfully installed macOS Sierra and Windows 10 on PC. You might get some problems after the installation of macOS Sierra. Like sound and Wi-Fi doesn’t work. You can’t boot into macOS Sierra without the USB Installer. Bootloader, the Internet connection won’t work. And the most important, if you cant’ boot into macOS Sierra without the USB Installer, then you need a post-installation. Follow the step by step guide below.
- Install & Fix macOS Sierra Bootloader, Ethernet, Audio Problem & Post Installation of Hackintosh
If you want to get notified about the post-installation of macOS Sierra full step by step guide with pictures and other upcoming articles to solve error while installing macOS Sierra on PC, then enter your email address below and get notified. Thanks for being with us.
It was all about, how to dual boot Windows 10 and macOS Sierra on PC. If you faced any problem, share us in the comment section below. We appreciate your suggestion and comments.
You can dual boot Windows 11 and macOS to enjoy the best of both worlds. Many users try options like dual booting with Windows 10 or Linux, but macOS is a popular choice too.
It’s not the simplest setup, but we’ll guide you through the steps to make it happen.
How can I dual boot Windows 11 and macOS?
You can do dual booting either by installing Windows 11 on a Mac PC or by installing macOS on a Windows PC. Here’s how:
NOTE
Dual booting Windows 11 and macOS is not possible on M1 or M2 Macs because Apple discontinued Boot Camp for those processors.
Install Windows 11 on Mac with BootCamp
1. Download Windows 10 ISO and create a Windows partition
- Download Windows 10 ISO.

- Once the download is finished, go to Utilities and select Boot Camp Assistant.
- Optional: Back up your data before proceeding.
- Click on Continue.

- Click the Choose button and locate the Windows 10 ISO file that you downloaded.
- Select the desired size for the Windows partition. About 50GB should be a minimum, but if possible, make it larger.
- Now click the Install button.
- Enter your administrative password, and your Mac will restart.


NOTE
We used Windows 10 ISO since Windows 11 ISO isn’t officially available for download yet.
2. Install Windows 10
- Your Mac will now boot from the Windows 10 ISO.
- Select the desired language and the version of Windows that you want to install.

- Follow the instruction until you reach Which type of installation do you want screen. Select Custom: Install Window only (advanced).

- Select the BOOTCAMP partition and format it if needed.

- Wait for the installation to finish.


During the installation, it’s advised to disconnect all nonessential external devices.
3. Install the necessary Windows drivers
- You’ll now boot to Windows 10 and the Boot Camp Assistant will appear.

- Click on Next to proceed. Now click Install to download the necessary Windows drivers.
- Once the drivers are downloaded, click on Finish.

4. Join the Windows Insiders Program
- Your Mac should boot back to Windows. If it doesn’t hold the Option key (Alt) during the boot and select the desired operating system.
- Navigate to Settings.
- Head to the Update & Security section.

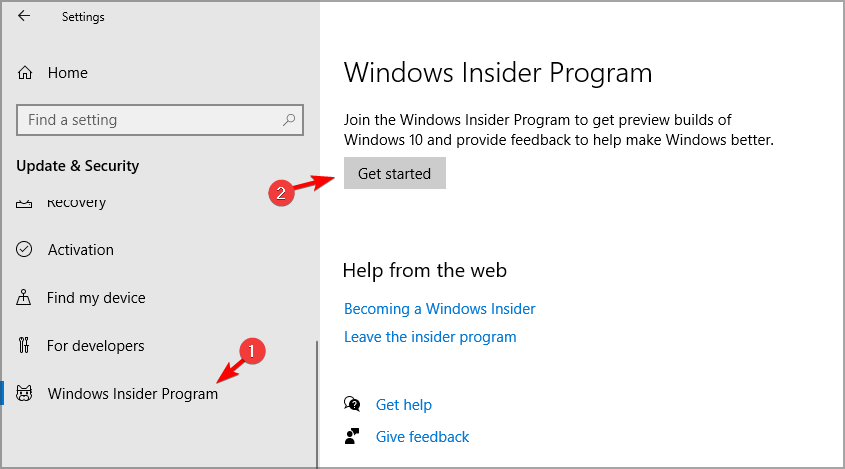
- In the left pane, select Windows Insider Program. In the right pane, click on Get started button.

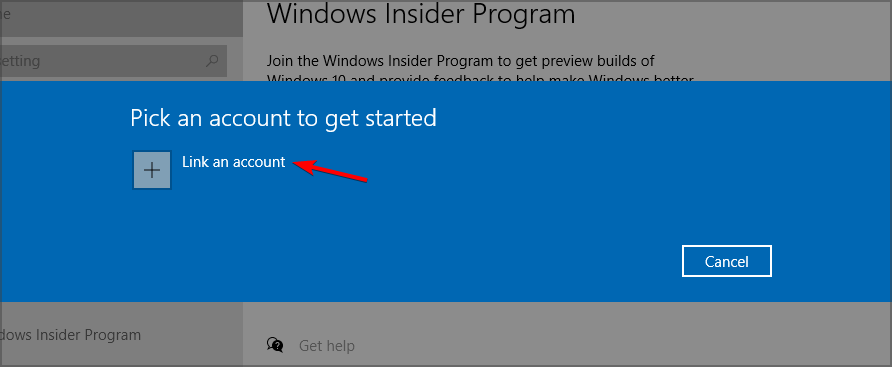
- Select Link an account and enter your Microsoft account credentials.

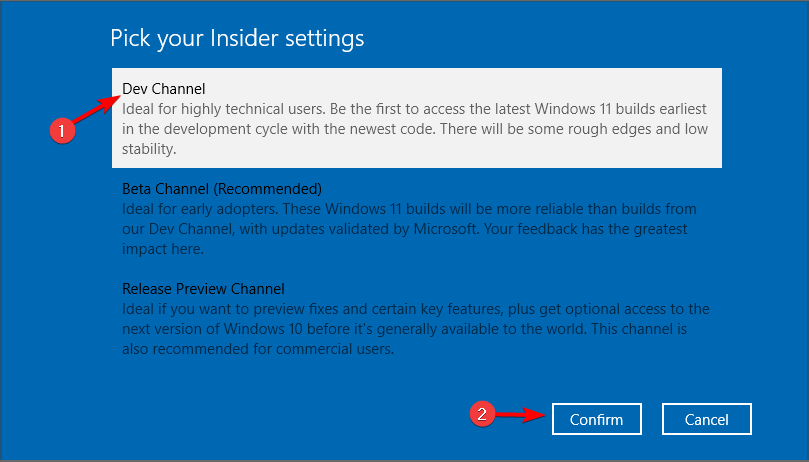
- Select Dev Channel and click on Confirm.

- Click the Restart Now button.
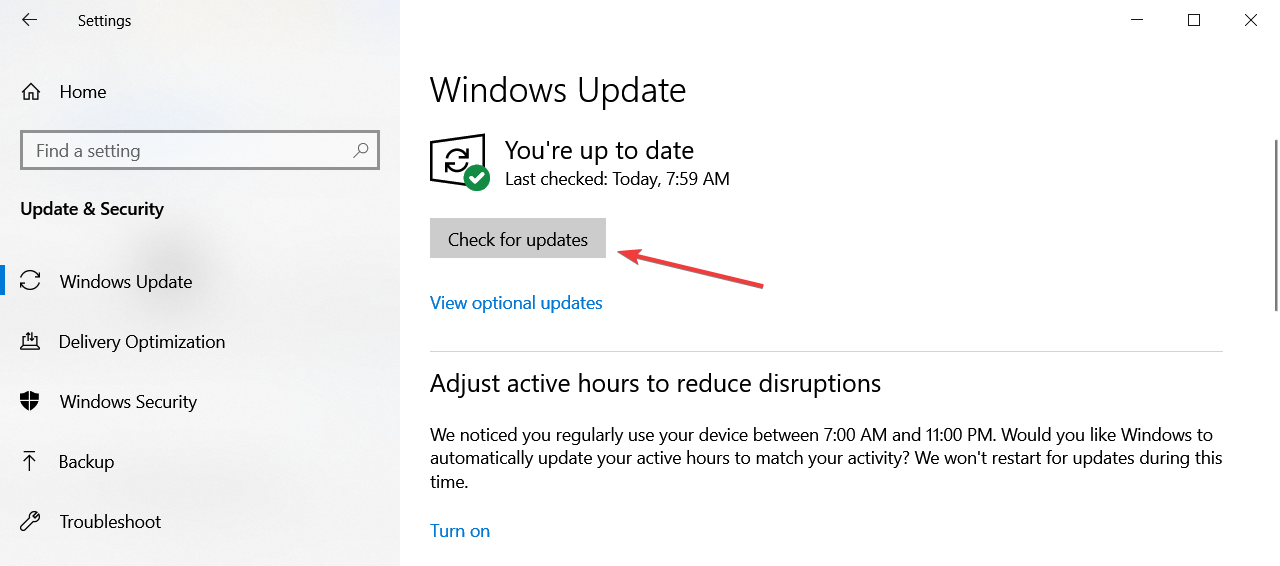
- After you boot to Windows 10 again, open the Settings app and head to the Update & Security section.
- Click the Check for updates button.

- Windows will now download Windows 11 upgrade.
- Once the upgrade is downloaded, restart your Mac and follow the instructions on the screen to upgrade to Windows 11.

After the process is finished, you’ll dual boot Windows 11 and macOS on your Mac computer without any issues. You must now realize how easy it is to dual boot Windows and macOS on PC.
- Download and install Microsoft Money on Windows 10/11
- Recent Windows 11 update lets you disable profanity filter in voice typing
- Microsoft wants Windows 10 users to upgrade to Windows 11 or Copilot + PCs
- Windows 11 KB5055627 update makes File Explorer more fluid
- A few keyboard settings are moving from Control Panel to Settings app in Windows 11
Install macOS on PC after Windows 11
1. Check GPT
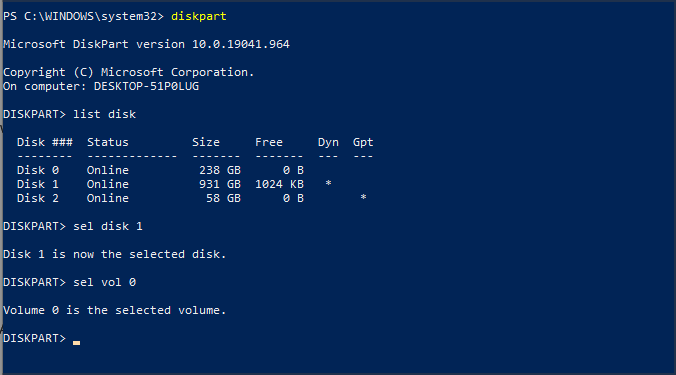
- Open PowerShell or Command Prompt. Type the following command and press Enter:
diskpart - When diskpart opens, execute this command:
list disk - Check if your hard drives are using GPT. If they don’t have a star in the GPT column, it means that your drives aren’t using GPT.


Before you proceed, you’ll need to convert MBR to GPT, and we have a special guide on how to convert MBR to GPT without file loss. Once your drives are using the GPT format, you can move to the next step.
2. Create the partition for macOS, format the flash drive
- Connect at least a 4GB flash drive to your PC.
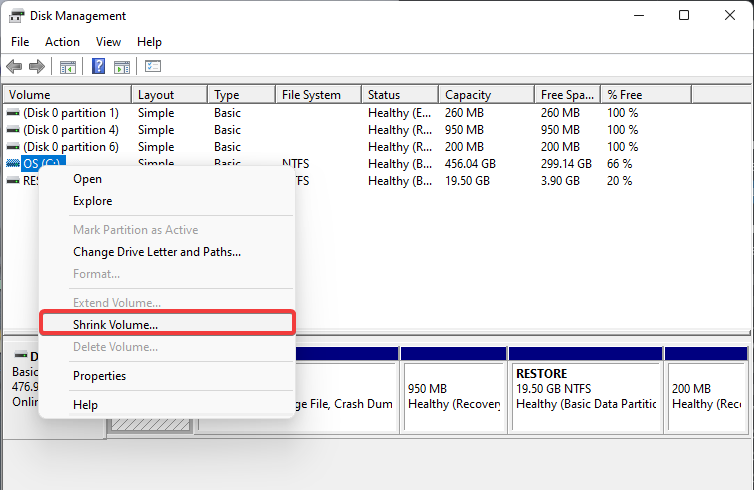
- Now press Windows Key + X and choose Disk Management from the list.
- Locate your flash drive on the list, right-click it and choose Format.
- Make sure to use the exFAT or FAT32 file system.
- Now select the partition that you want to shrink, right-click it and choose Shrink volume from the menu.

- Set the Enter the amount of space to shrink in MB to 50000 or more and click Shrink.

- Unallocated space will now appear. Right-click it and choose New Simple Volume.
- Set the Simple volume size in MB to the maximum value.
- Now set the File system to exFAT and the volume label to macOS.
- Follow the instructions on the screen to complete the process.

After you’re done, you should have the macOS partition ready on your PC.
3. Change the EFI partition
- Press Windows + X and choose PowerShell (Admin).
- Execute this command:
diskpart - Now run the following command:
list disk - Run the following command while replacing X with the number of your hard drive:
sel disk X - Now execute this command while replacing X with the number that represents the partition that you want to shrink:
sel vol X
- Enter the following commands:
Shrink desired=300
Create partition efi size=200
Format quick fs=fat32 label=“system”
Assign letter z
exit - Once you’ve exited diskpart, run the following command:
bcdboot c:\windows /s z: /f ALL
4. Create macOS ISO
- Install Python.

- Download OpenCore. Be sure to use the latest version. You can use Debug or the Release version. The Release version is faster, so it might be a better choice for you.

- Extract the file to the desired location. This location is important so be sure to memorize it. On our PC we extracted it to:
C:\Users\WindowsReport\Desktop\OpenCore
- Go to the extraction directory. Now navigate to the
Utilities\macrecovery\
- Copy the folder path to the macrecovery directory. Keep in mind that this path will look different on your PC. On our PC it was:
C:\Users\WindowsReport\Desktop\OpenCore\Utilities\macrecovery\ - Open PowerShell as administrator.
- Run the following command:
cd C:\Users\WindowsReport\Desktop\OpenCore\Utilities\macrecovery\
- Now run the following command:
python macrecovery.py -b Mac-E43C1C25D4880AD6 -m 00000000000000000 download
- You’ll now begin downloading macOS BigSur. This process can take a while, so be sure to be patient and don’t interrupt it.
- Once the process is finished, two BaseSystem or RecoveryImage files should appear.
- Select BaseSystem.chunklist and BaseSystem.dmg or RecoveryImage.chunklist and BaseSystem.dmg files and copy them.
- Connect your USB flash drive, and in the root directory create a folder called com.apple.recovery.boot
- Move to the com.apple.recovery.boot directory. Paste the two BaseSystem or RecoveryImage files from Step 11.
- Go to the
C:\Users\WindowsReport\Desktop\OpenCore - Copy X64 directory. If you’re on a 32-bit system copy IA32.
- Go to the USB flash drive root directory and paste the X64 directory there.


The next part will differ greatly depending on your hardware configuration, so you’ll have to follow the instructions on your own depending on your hardware.
Luckily, a lot of useful information is available on the OpenCore GitHub page. To continue, follow the instructions for your type of hardware. Be sure to follow each of the links mentioned below:
- Adding The Base OpenCore Files
- Gathering Files
- Getting started with ACPI
5. Configure your BIOS
NOTE
This is an extremely technical process, and if you don’t perform it properly, your bootable drive won’t work, so be sure to follow the instructions from the OpenCore GitHub closely.
- Access BIOS.
- Go to Advanced, and set Above 4G Decoding to Enabled.

- Navigate to the Serial Port Configuration and set Serial Port to Off.

- Go back to the Advanced section and navigate to USB Configuration. Set XHCI Hand-off to Enabled.

- Head to the Boot section and go to Boot Configuration. Set Fast Boot to Disabled.
- Now go back to Boot and go to Secure Boot. Set OS Type to Windows UEFI.

- Now go to Key Management and select Clear Secure Boot Keys.
- Save changes.


Keep in mind that some of these options might not be available or they might be on different locations on your version of BIOS.
6. Install macOS
- Restart your PC and keep pressing the boot menu key. By default, it should be F12 or F10, but it might be different on your PC.
- Select your flash drive as the boot device.

- Choose Disk Utility.

- Select All Devices.
- Locate the partition that you created for Mac and format it to APFS.

- Make sure that the format is set to Mac OS Extended (Journaled) and the Scheme is set to GUID Partition Map.
- Install macOS to that drive.
- Follow the instructions on the screen to complete the setup.


7. Boot to Mac and configure your EFI
- On macOS, open the Terminal.

- Enter diskutil list

- Locate the EFI partition named system.
- Mount it by running diskutil mount disk0sx command. Replace X with the EFI partition number.
- Now insert your macOS boot media.
- Copy BOOT and OC folders to the EFI folder.
- Open config.plist and set value non for the following:
Misc/Security/BootProtect - Restart your PC.
- Windows should now automatically start.
- Open the PowerShell as administrator.
- Run the following command:
bcdedit /set {bootmgr} path \EFI\OC\OpenCore.efi


After making these changes, you can choose between macOS and Windows when you boot. Also, remember that the same approach will help dual boot Windows 11 and macOS Monterey.
macOS system requirements for PC
To use macOS on your PC with OpenCore, you’ll need to make sure that your PC meets the hardware requirements:
- CPU: Intel or AMD CPU with SSE4.2 support
- Firmware: EFI64
- Kernel: 64-bit kexts
macOS is designed to work only with specific hardware, so it might not work properly with your custom-built PC. For more information about hardware requirements, check the OpenCore guide.
Can Secure Boot interfere with macOS?
Yes, Secure Boot can interfere with macOS. It verifies software that attempts to load during startup, and if it doesn’t recognize the macOS operating system as secure and trusted, it can block it. While this feature helps protect against rootkits and malware, you can disable Secure Boot since it’s not required for Windows 11 to run.
Although your PC needs to support Secure Boot to install Windows 11, it doesn’t need to have it enabled. Users have reported TPM 2.0 errors that can prevent the upgrade and lead to issues when dual booting.
How do I switch between Windows and Mac with Boot Camp?
Switching between Windows and Mac is pretty simple when using Boot Camp. If you’ve already booted to Windows, do the following:
- Click the Boot Camp icon in the system tray.
- Now choose the Restart in macOS option from the menu.


Once your Mac restarts, you’ll boot to the macOS.
To change the operating system during the boot, do the following:
- Restart your Mac.
- Now press and hold the Option (or Alt) key as your Mac restarts.
- You’ll be presented with a list of startup volumes.

- Select the desired volume to boot to the appropriate operating system.

As you can see, switching between operating systems with Boot Camp is incredibly simple, and it can be done in a matter of seconds.
Is it better to dual boot on Mac or PC?
macOS has built-in dual boot support with the Boot Camp software, which makes dual-booting simpler and free from any issues.
Dual-booting macOS and Windows on a PC is not as simple, and macOS isn’t intended to run on PC hardware, so dual-booting can be harder to set up, and you might encounter various boot issues.
You can also use these methods to run GarageBand for Windows 10, so you might want to give them a try.
Remember, you can similarly triple boot Windows 11, Windows 7, and Linux.
Have you ever used dual boot or tried running macOS on your PC? Let us know in the comments below.
Milan Stanojevic
Windows Toubleshooting Expert
Milan has been enthusiastic about technology ever since his childhood days, and this led him to take interest in all PC-related technologies. He’s a PC enthusiast and he spends most of his time learning about computers and technology.
Before joining WindowsReport, he worked as a front-end web developer. Now, he’s one of the Troubleshooting experts in our worldwide team, specializing in Windows errors & software issues.
Для тех, кто хочет использовать мощь Windows на своем Mac, двойная загрузка стала все более доступным решением. Настроив среду двойной загрузки, пользователи могут без проблем переключаться между macOS и Windows 11, получая доступ к множеству эксклюзивных приложений Windows и высокопроизводительным игровым возможностям — все это с одного устройства.
Использование Boot Camp Assistant на Intel Mac
Boot Camp Assistant, встроенная утилита на Mac с процессорами Intel, упрощает процесс установки Windows наряду с macOS. Этот инструмент проводит пользователей через создание раздела для Windows, установку операционной системы из ISO-файла и обеспечение всех необходимых драйверов. Apple рекомендует этот метод как самый безопасный способ двойной загрузки Windows 11 на Intel Mac. Вот как начать:
Необходимые условия:
- Mac с процессором Intel и минимум 64 ГБ свободного места (128 ГБ идеальны для оптимальной производительности)
- USB-накопитель объемом не менее 16 ГБ
- 64-битная версия ISO-файла Windows 11, доступная для загрузки с сайта Microsoft
- Подготовьте свой Mac
Убедитесь, что ваш Mac подключен к интернету, затем откройте приложение Boot Camp Assistant, расположенное в папке «Утилиты» в «Программах» на вашем Dock. Нажмите «Продолжить», чтобы продолжить. - Создайте установочный диск Windows 11
Выберите опции для создания установочного диска Windows 11 и установки Windows. Нажмите «Продолжить», выберите загруженный ISO-файл Windows 11, вставьте USB-накопитель и выберите его в качестве целевого диска. Нажмите «Продолжить», чтобы создать установочный диск. - Разделите жесткий диск вашего Mac
Когда будет предложено, установите желаемый размер раздела для Windows с помощью ползунка. Хотя Apple рекомендует минимум 64 ГБ, 128 ГБ предпочтительны для более плавной работы. Нажмите «Установить», чтобы начать процесс разделения, который перезапустит ваш Mac в установщик Windows после завершения. - Установите операционную систему Windows
Следуйте инструкциям на экране для установки Windows. После установки ваш Mac автоматически загрузится в Windows и откроет установщик Boot Camp. - Установите драйверы Boot Camp
Завершите установку, следуя подсказкам на экране для установки необходимых драйверов и программного обеспечения. Перезапустите Mac по запросу. Чтобы переключаться между macOS и Windows, просто перезапустите Mac и удерживайте клавишу Option (Alt) во время запуска, чтобы выбрать желаемую операционную систему.
Использование стороннего программного обеспечения: Parallels Desktop
В качестве альтернативы пользователи могут выбрать стороннее программное обеспечение, такое как Parallels Desktop, для запуска Windows 11 на своем Mac. Это программное обеспечение виртуализации обеспечивает бесшовный опыт, позволяя использовать приложения Windows и macOS бок о бок без необходимости перезагрузки. Хотя использование Parallels требует затрат, доступна бесплатная пробная версия для тех, кто хочет изучить его возможности.
Необходимые условия:
- Mac с процессором Intel или Apple M1/M2
- Минимум 8 ГБ оперативной памяти (рекомендуется 16 ГБ или больше)
- Минимум 256 ГБ свободного места
- Parallels Desktop версии 18 или новее
- Загрузите и установите Parallels Desktop
Посетите сайт Parallels Desktop и нажмите кнопку «Попробовать бесплатно». Следуйте подсказкам для загрузки Parallels. Откройте загруженный файл .dmg и дважды щелкните «Install Parallels Desktop.app», чтобы завершить процесс установки. - Создайте новую виртуальную машину
Запустите Parallels Desktop и нажмите кнопку «+» в правом верхнем углу. Выберите «Получить Windows 11»…