

You don’t have to have two different computers to use Linux and Windows 10. It’s possible to have a Linux distro installed on a computer with Windows 10 preinstalled.
In this article, I will show you how to dual boot Windows 10 and the popular Ubuntu Linux distro. But before that, you have to install Ubuntu on your Windows 10 PC.
Before you go through this process, you must backup your files. That’s because installing an OS is a risky process. Sometimes it can overwrite the existing OS and delete all your files.
N.B.: Most of the processes in this article take time to get done, so you need to be patient.
What We’ll Cover – A step-by-step Guide to Dual-Booting Windows 10 and Linux
- Prerequisites
- How to Partition your Hard Drive for Ubuntu
- How to Optimize your Hard Drive for More Partition Space (Optional)
- How to Download Ubuntu in ISO Image Format
- How to Make an Ubuntu (Linux) Bootable USB Drive
- How to Install Ubuntu Linux Distro along with Windows 10
- Now You Can Dual Boot Ubuntu and Windows 10
- Conclusion
Prerequisites
Most importantly, there are some things you must have in place if you want to use (and dual boot) Ubuntu and Windows 10 on the same PC:
- A computer preinstalled with Windows 10
- A partitioned hard drive
- A BIOS in UEFI mode (Unified Extensible Firmware Interface)
- An empty USB drive of at least 4Gig for creating a bootable disk
- An internet connection to download Ubuntu ISO image (the Linux distro) and Rufus (a bootable drive creation tool)
How to Check If Your PC BIOS is in UEFI Mode
To check if your PC BIOS comes in UEFI mode, search for “system information” and hit ENTER.
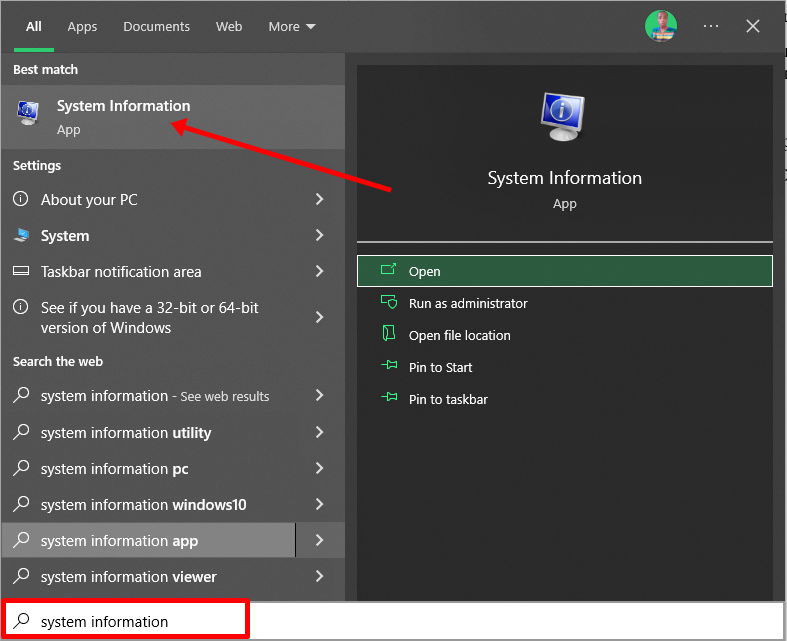
Look under BIOS mode to confirm that your PC BIOS mode comes as UEFI.
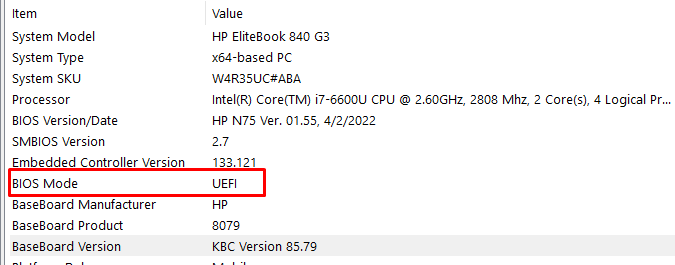
If your PC BIOS is not in UEFI mode, the two operating systems won’t see each other. You can learn more about the difference between these two modes here.
How to Partition your Hard Drive for Ubuntu
You have to partition your hard drive because you must set aside at least 20Gig for Ubuntu to live in and boot from.
To partition your hard drive, follow the steps below:
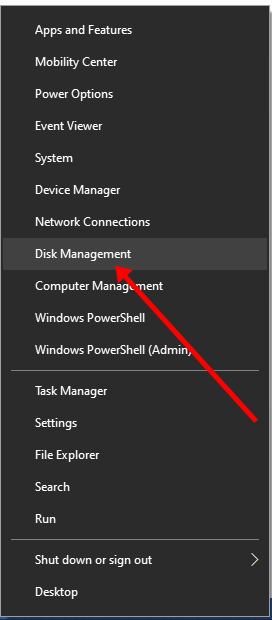
Step 1: Right-click on Start and select “Disk Management”.
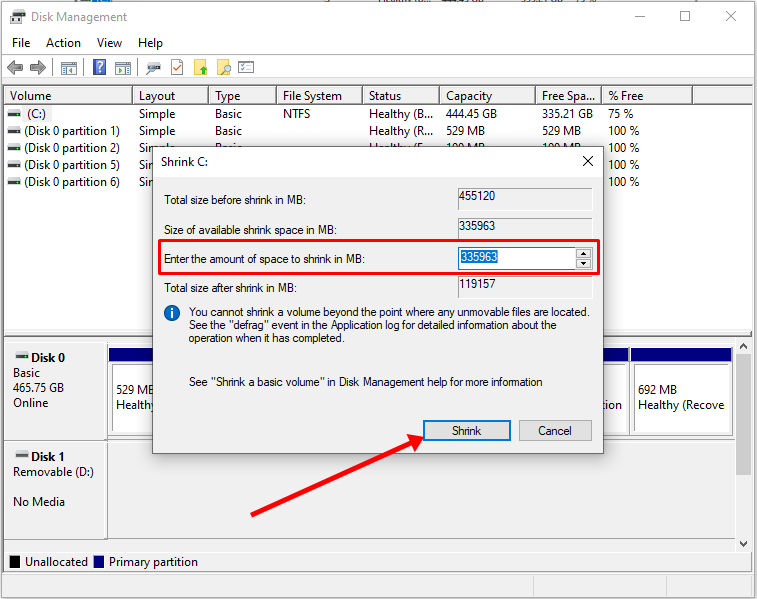
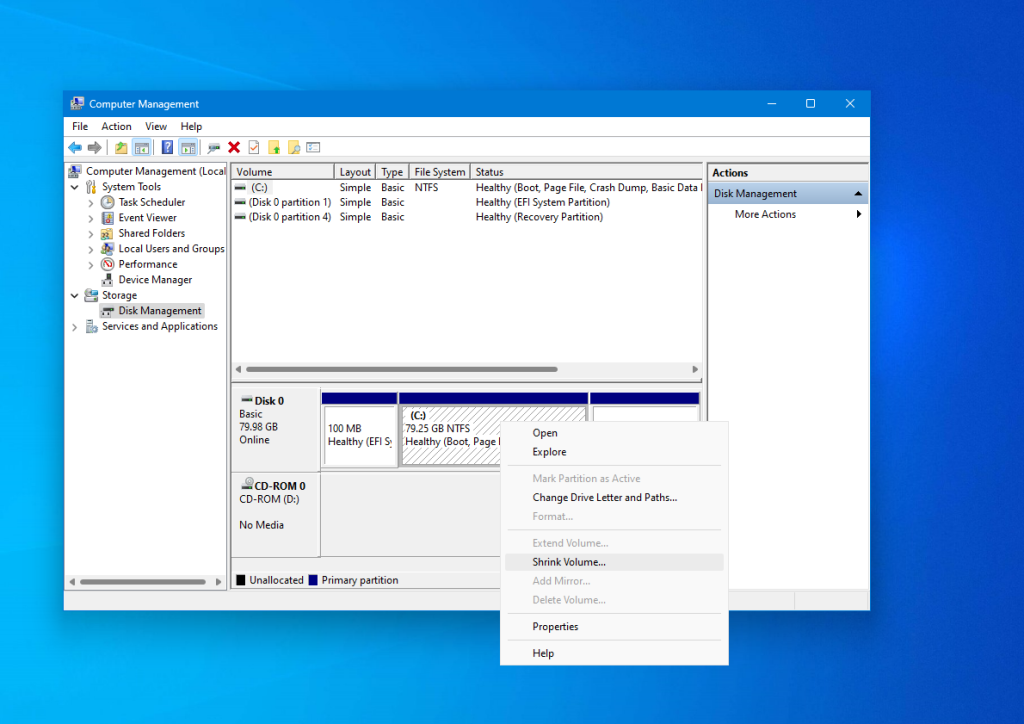
Step 2: Right-click on your C drive and select shrink volume.
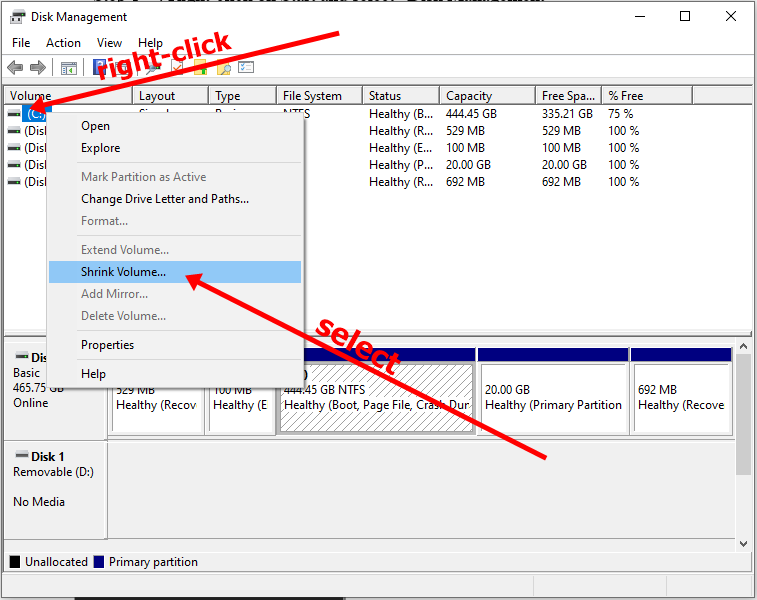
Step 3: Select at least (20000) 20Gig for Ubuntu and click “Shrink”. IT can take some time to complete, so be patient.
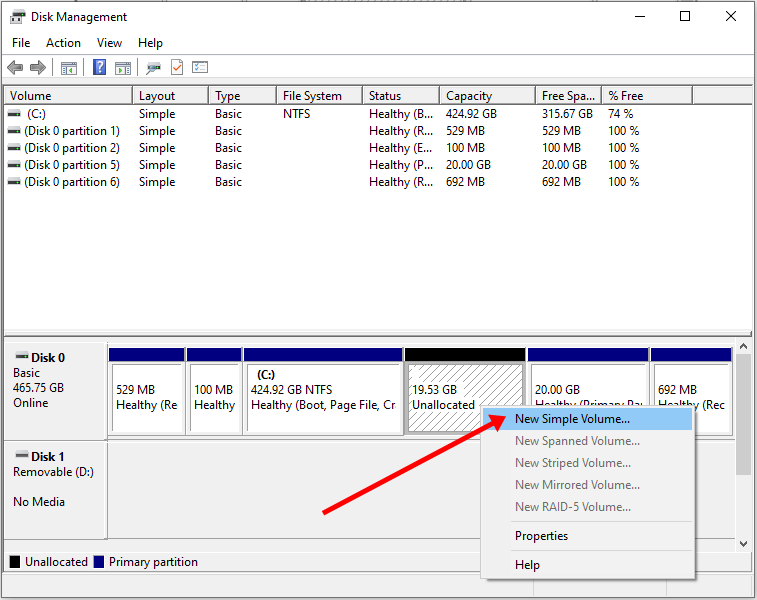
Step 4 (optional): You can go ahead and assign a letter to the new volume. Right-click on the unallocated space and select “New Simple Volume”.
Step 5: Follow the wizard and assign a letter to the drive, then follow the rest of it.
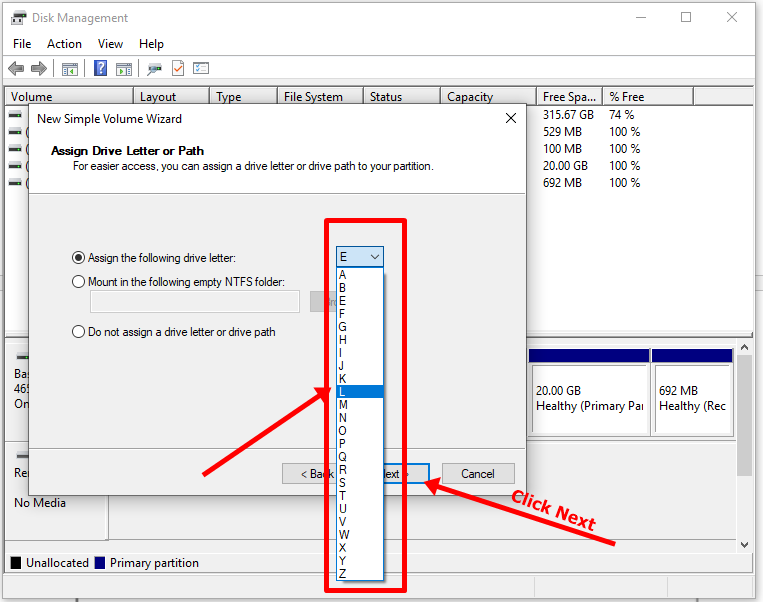
After completing the wizard, the drive should be listed on your computer.
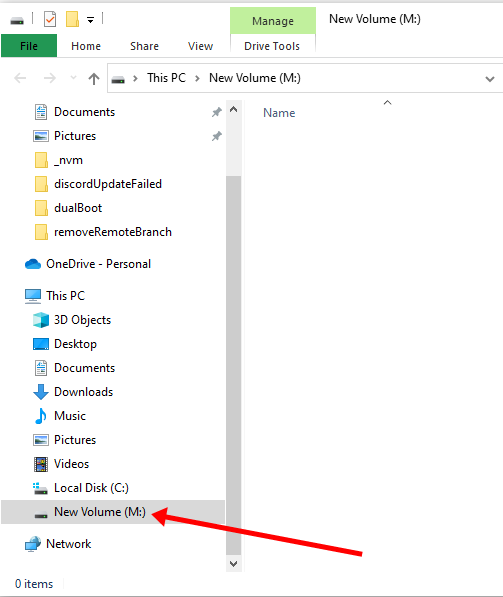
Congrats! You’ve successfully partitioned your hard drive.
N.B.: If you have a lot of free space in your hard drive but your PC still didn’t give you up to 20Gig partition space, then you need to optimize your PC’s hard drive. Proceed to the next section of this article to do that.
How to Optimize your Hard Drive for More Partition Space (Optional)
The common purpose of hard disk optimization is to speed up your computer during boot time and make it run smoother.
At the same time, the process will defragment the hard disk and make free space more available for partitioning.
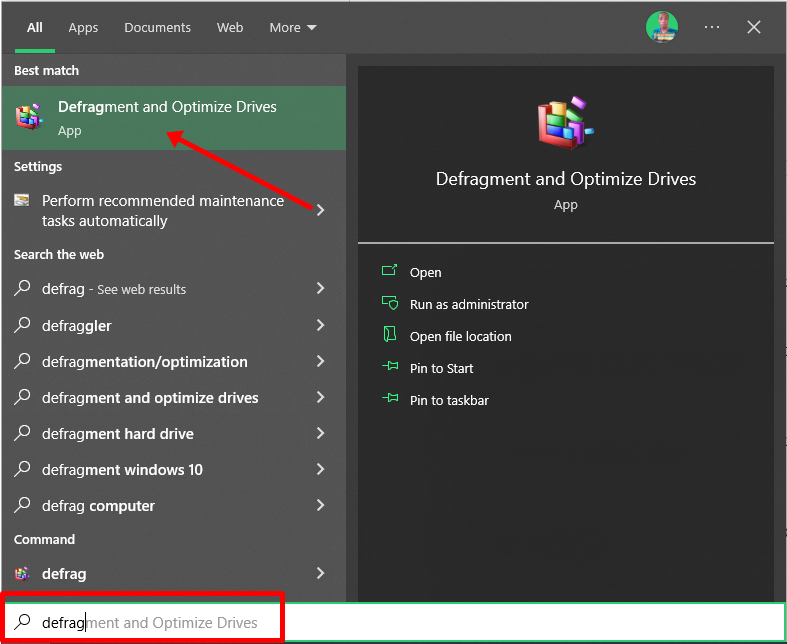
To optimize your hard drive, click Start (Windows logo key), search for “defrag” and select “Defragment and Optimize Drives”.
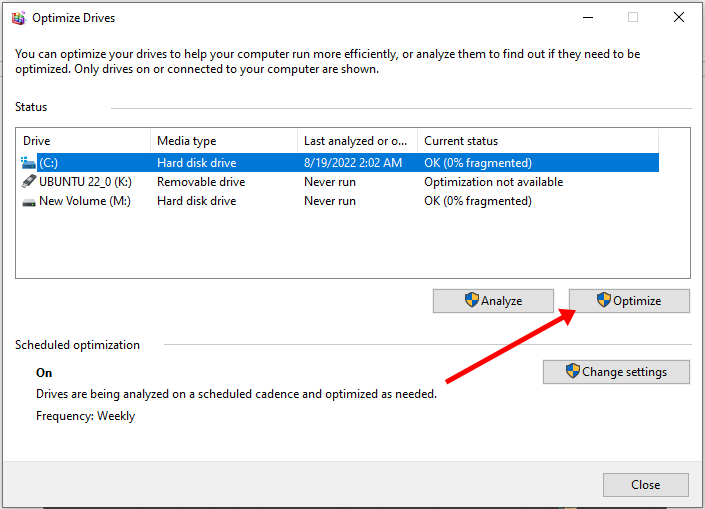
Make sure your C drive is highlighted, then click “Optimize”.
After you’ve been able to set aside at least 20Gig for Ubuntu by partitioning your hard drive, then it’s time to download Ubuntu and make a bootable USB.
How to Download Ubuntu in ISO Image Format
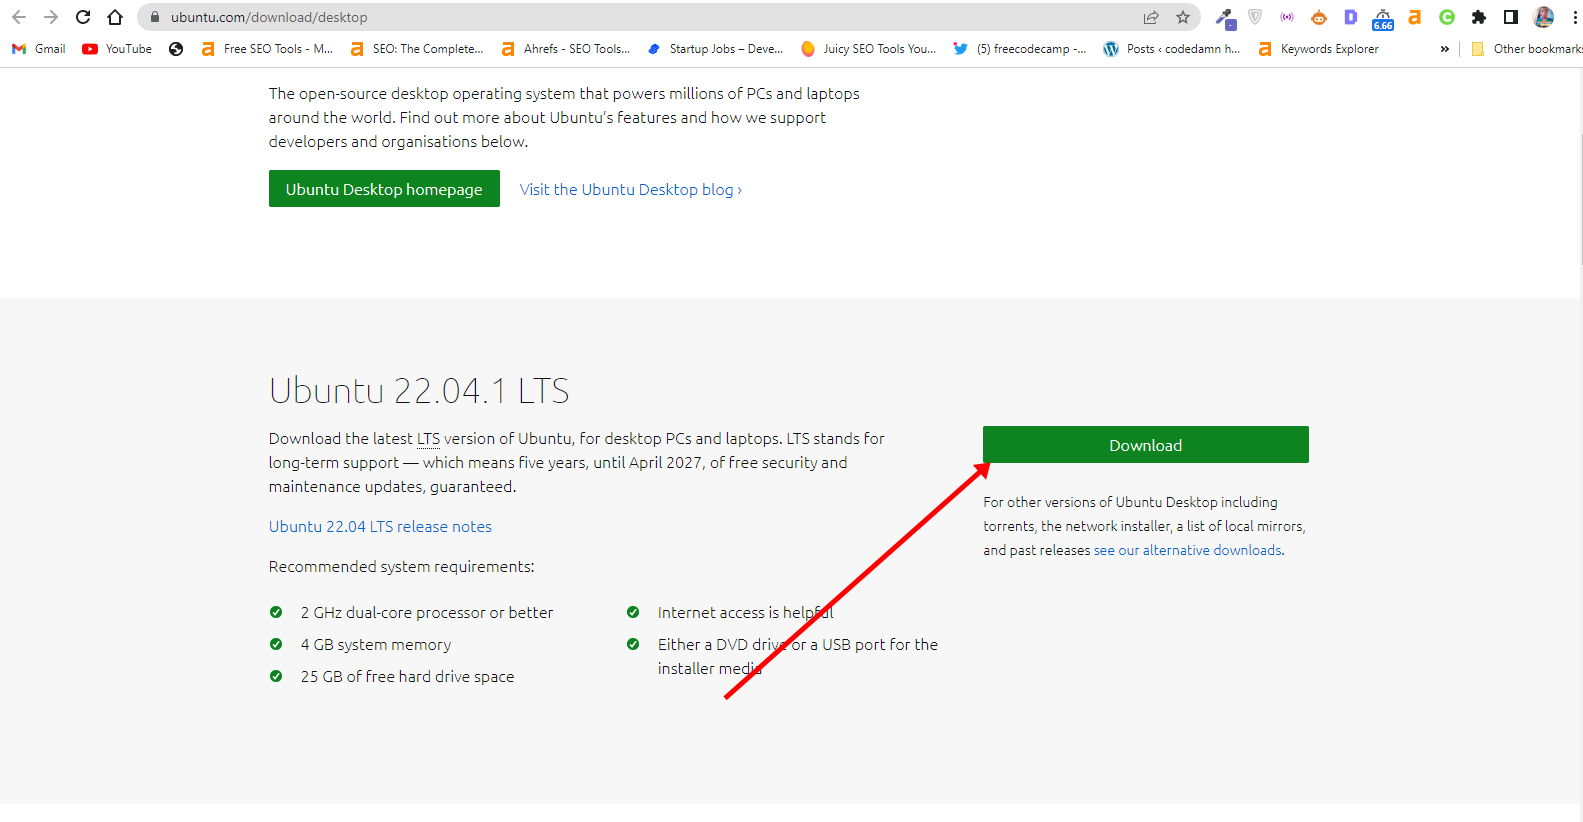
The next thing is to download Ubuntu in ISO image format so you can install Ubuntu. You can download it from the Ubuntu distro website.
After downloading Ubuntu, don’t do anything with it yet. You need to make a bootable USB and put it in there. That’s how you’ll be able to use it.
The reason you can’t install Ubuntu just like that is that it doesn’t come as an executable. It comes in form of ISO (optical disk image). That means you have to find a disk to put it in before it can work.
The next part of this guide shows how you can put the downloaded Ubuntu ISO on a USB stick.
How to Make an Ubuntu (Linux) Bootable USB Drive
You won’t be able to make a bootable USB drive for Ubuntu by just placing the downloaded ISO image in it. Follow these steps to get it done:
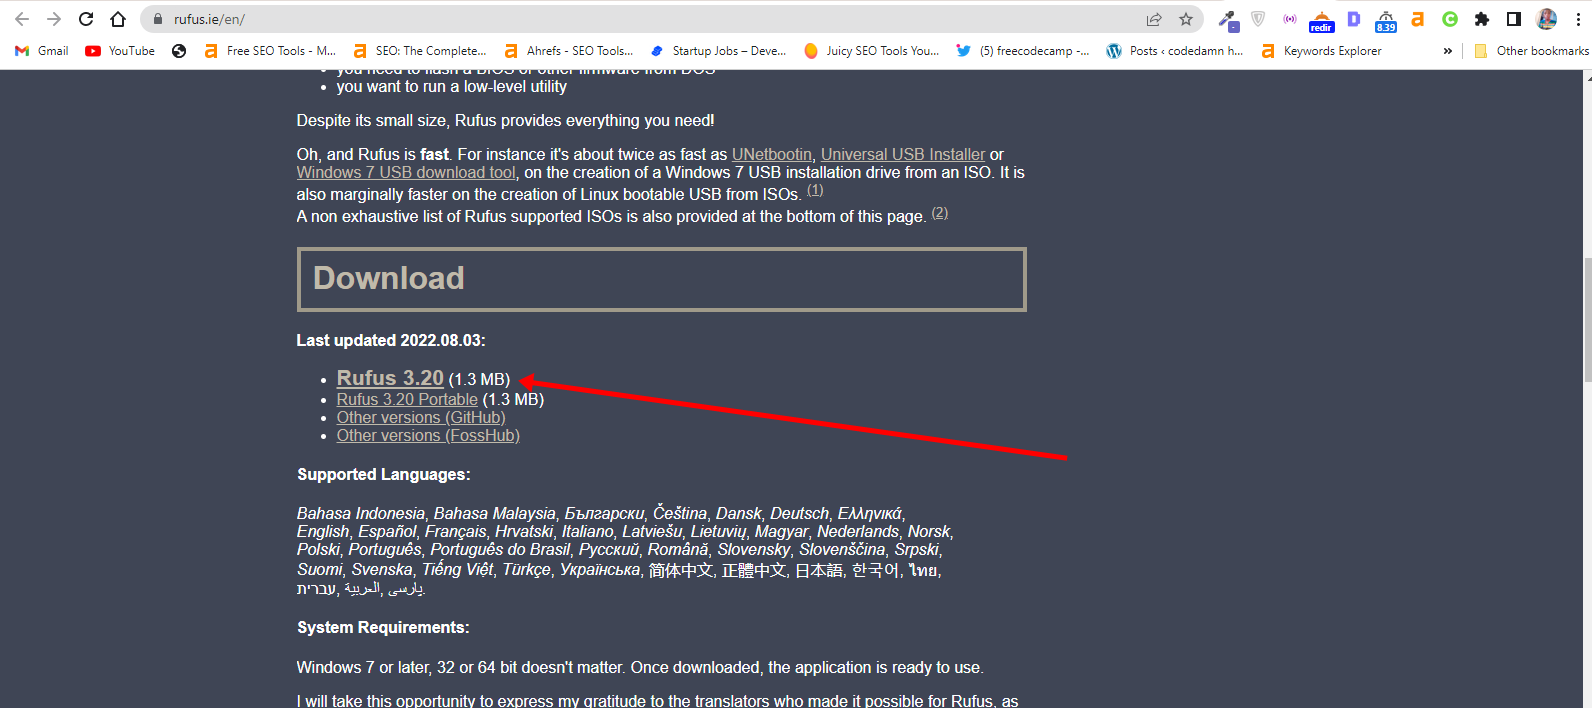
Step 1: You need to download a bootable USB drive creation tool like Rufus. You can download Rufus from their website.
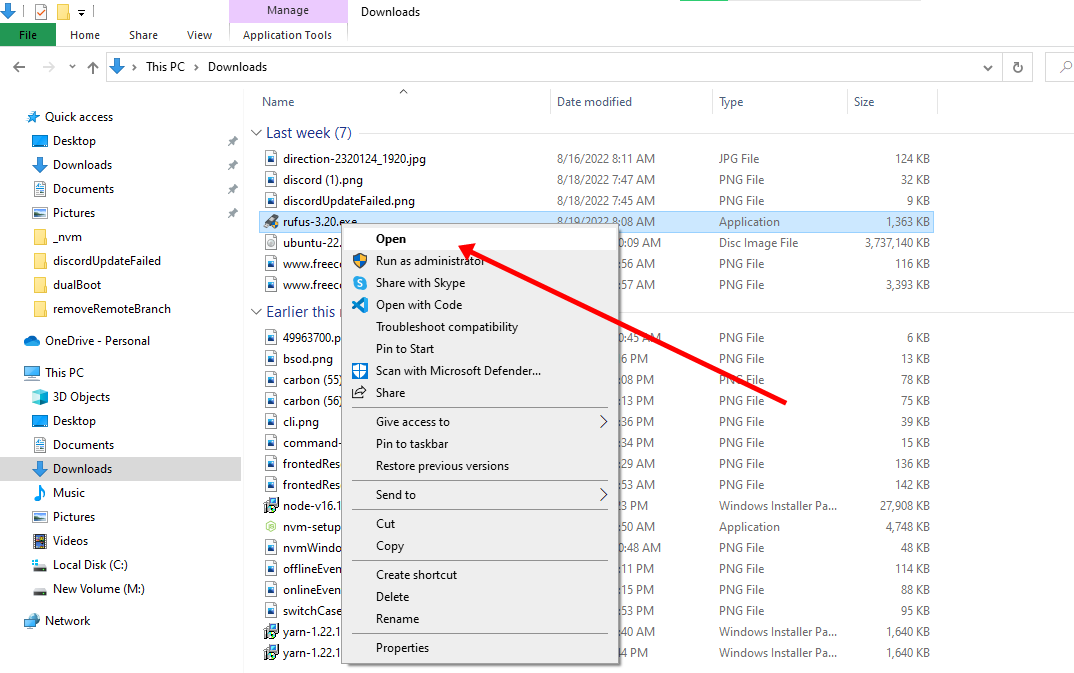
Step 2: Insert the empty USB drive into your Windows 10 PC. Right-click on Rufus and select “Open”.
Step 3: Under “Device”, select your USB drive. And under “Boot selection”, click the “Select” button and select the Ubuntu ISO file you downloaded
Step 4: Leave every other thing as default and click the “START” button to start burning the Ubuntu distro to the drive.

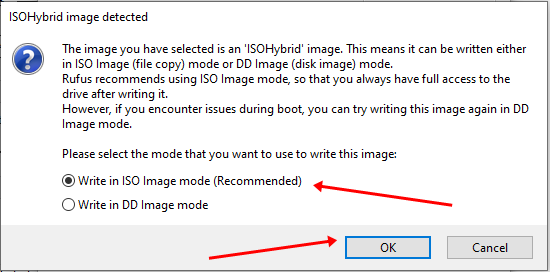
Step 5: Click OK to start the process.
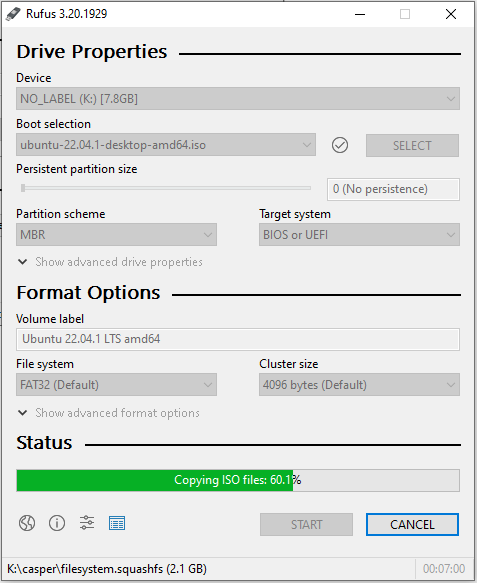
Once the process is done, you should see “READY” on a green background. Click the Close button. Its time to install Ubuntu.
Congrats! Now you have a bootable drive with which you can install Linux.
The next step is to install the Ubuntu distro on your Windows 10 PC. To do this, you have to boot your PC from the bootable USB drive you created.
How to Install Ubuntu Linux Distro along with Windows 10
Step 1: Ensure the bootable drive is inserted into your Windows 10 PC
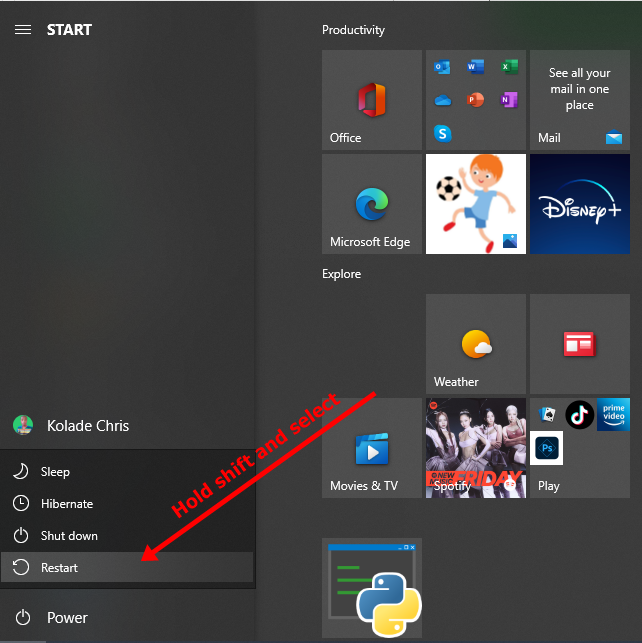
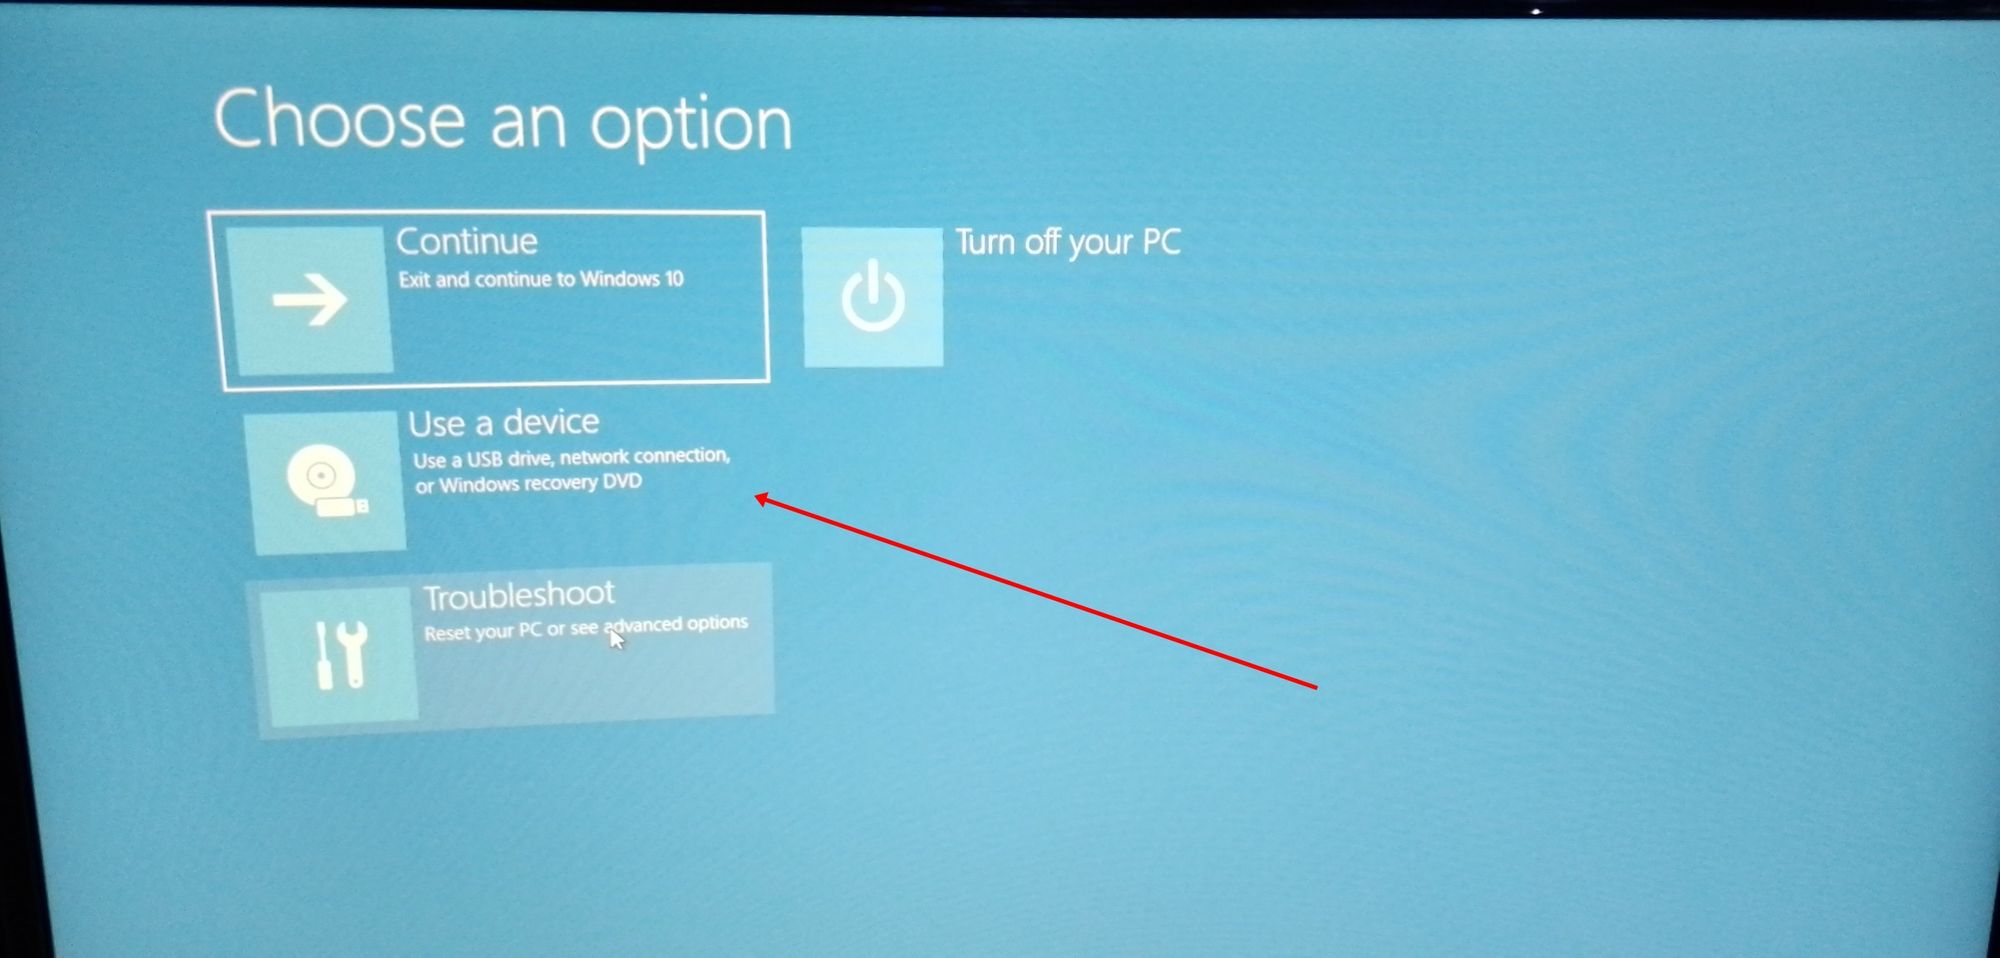
Step 2: Right-click on Start, hold SHIFT, and select Restart.
Step 2: Select “Use a Device”.
Step 3: On the next screen, you should see several devices you can boot from.
You may see the bootable drive as the name of the USB brand.
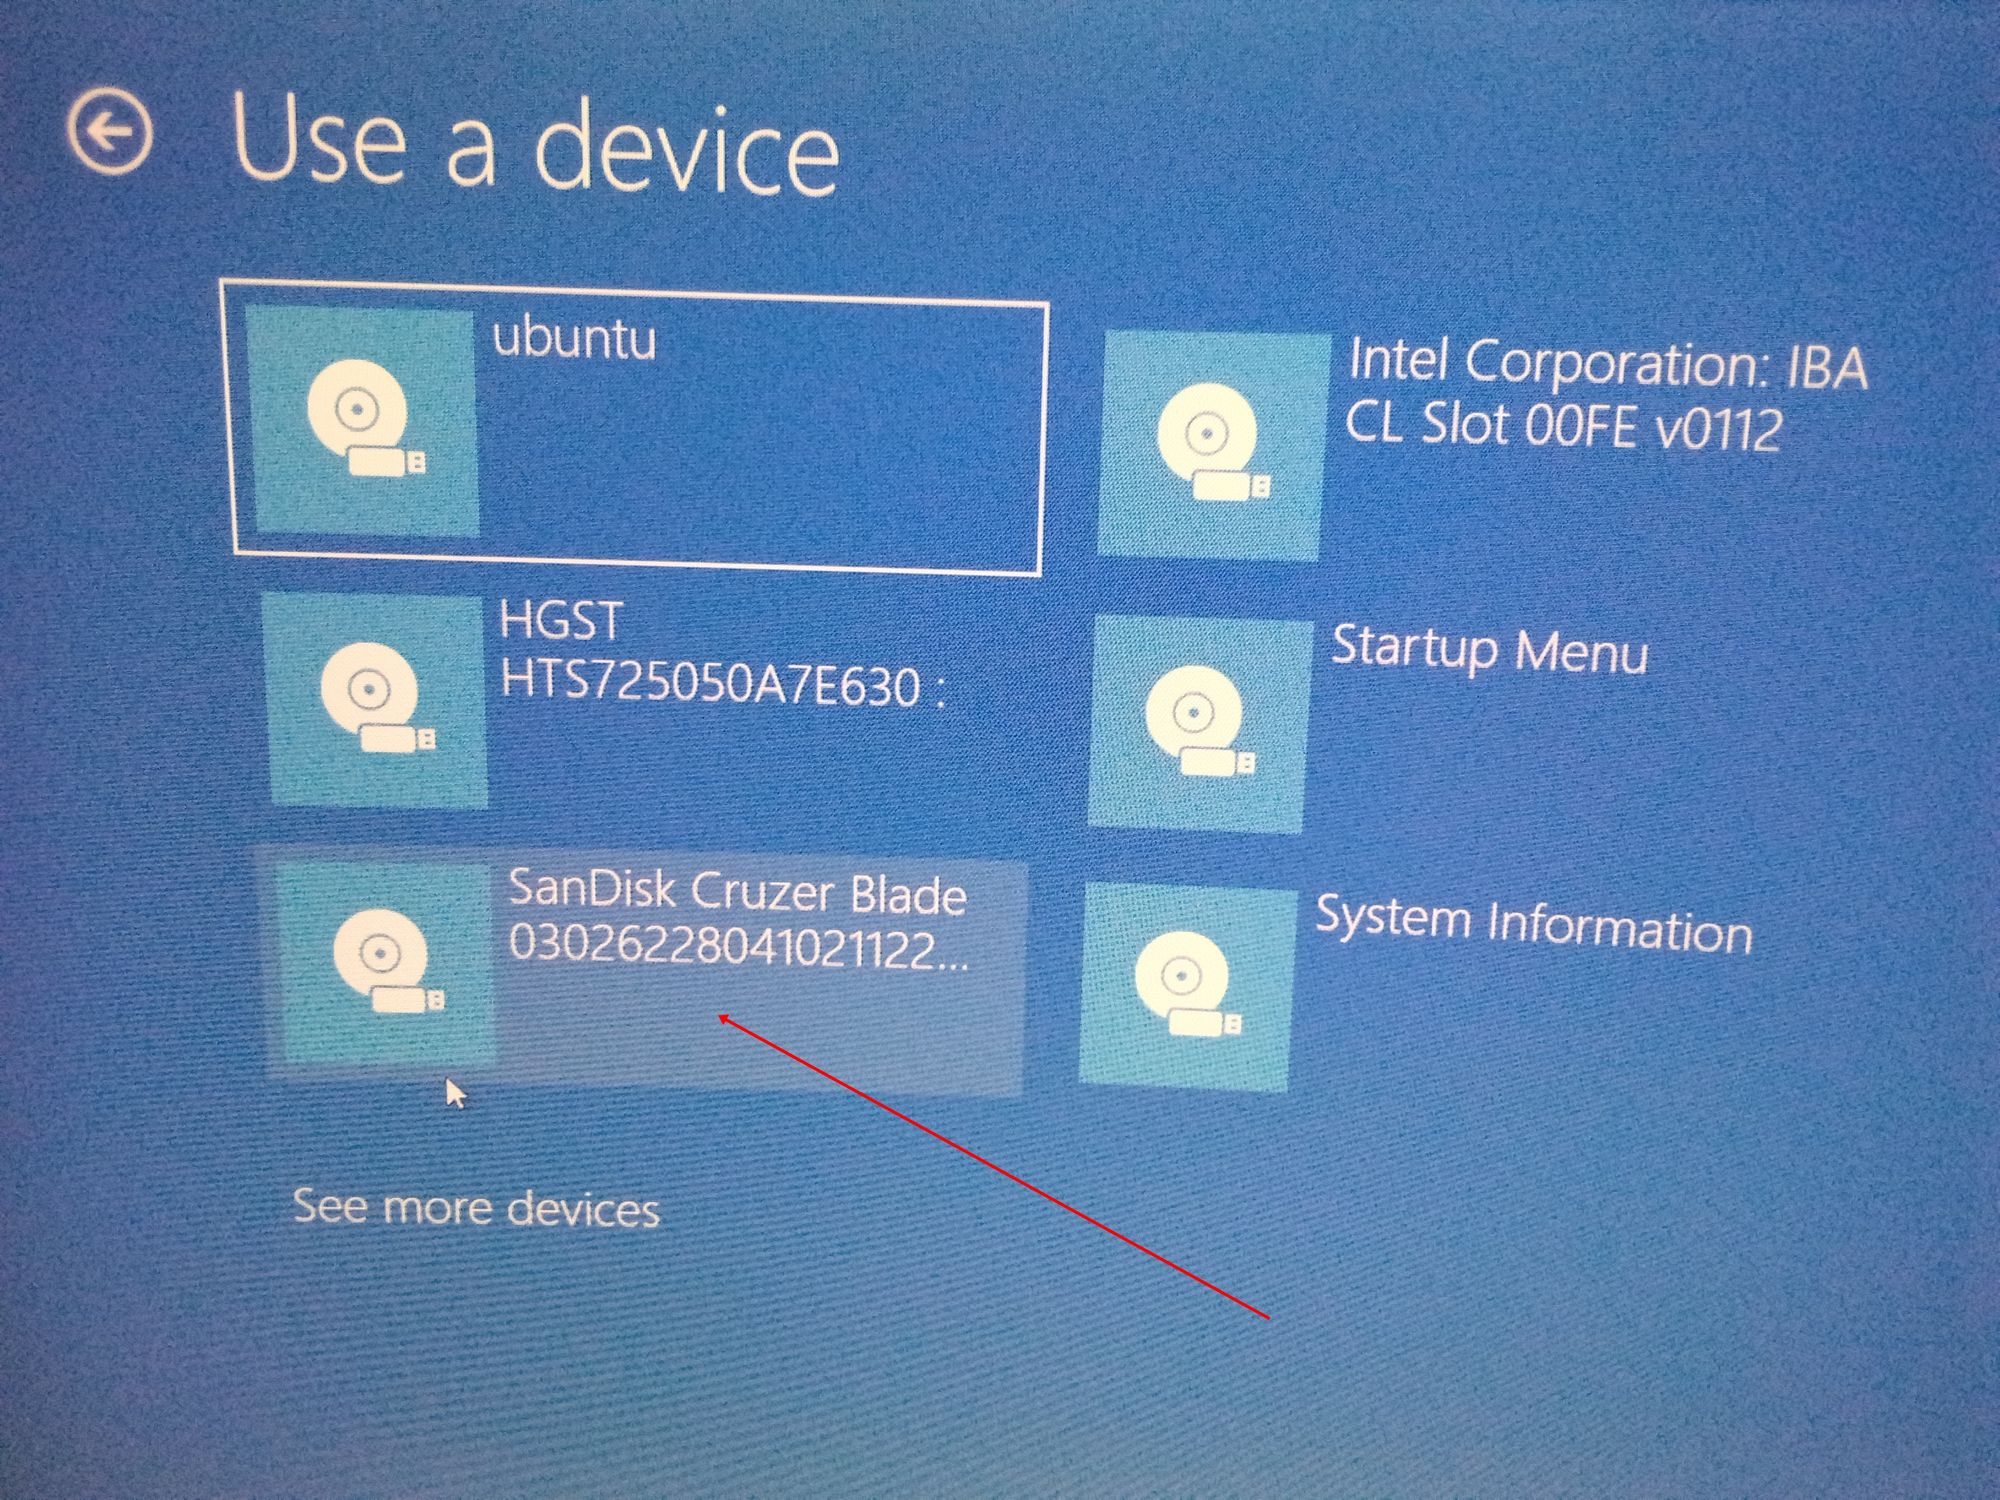
It’s possible to see it as “Ubuntu” too. Some other times, you might not see it, so you need to click on “See more devices».
If you still cannot see your bootable drive, head over to your boot menu by getting into BIOS. You will see it there.
N.B.: You should be very careful while making changes in BIOS. Whatever you do there has a lasting effect on your computer. If you are not sure of what you’re doing there, you should contact an IT professional.
Step 4: Choose «Install Ubuntu». You can also try it before installing it.
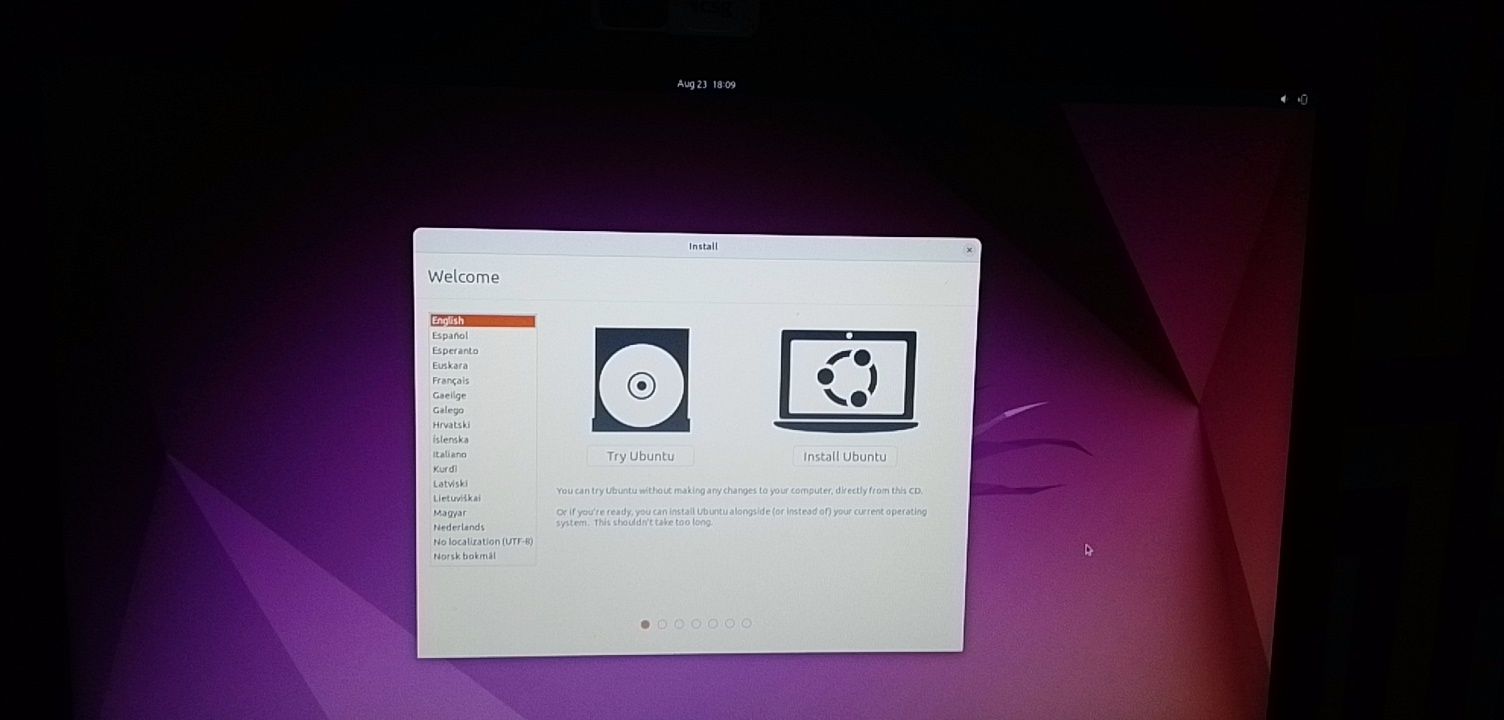
Follow other prompts of the installation wizard and make sure you don’t replace your Windows 10 OS installation with Ubuntu. This is why I suggested you back up all your files.
When you get to the point to select the partition you made, scroll to the partition you made earlier and press ENTER.
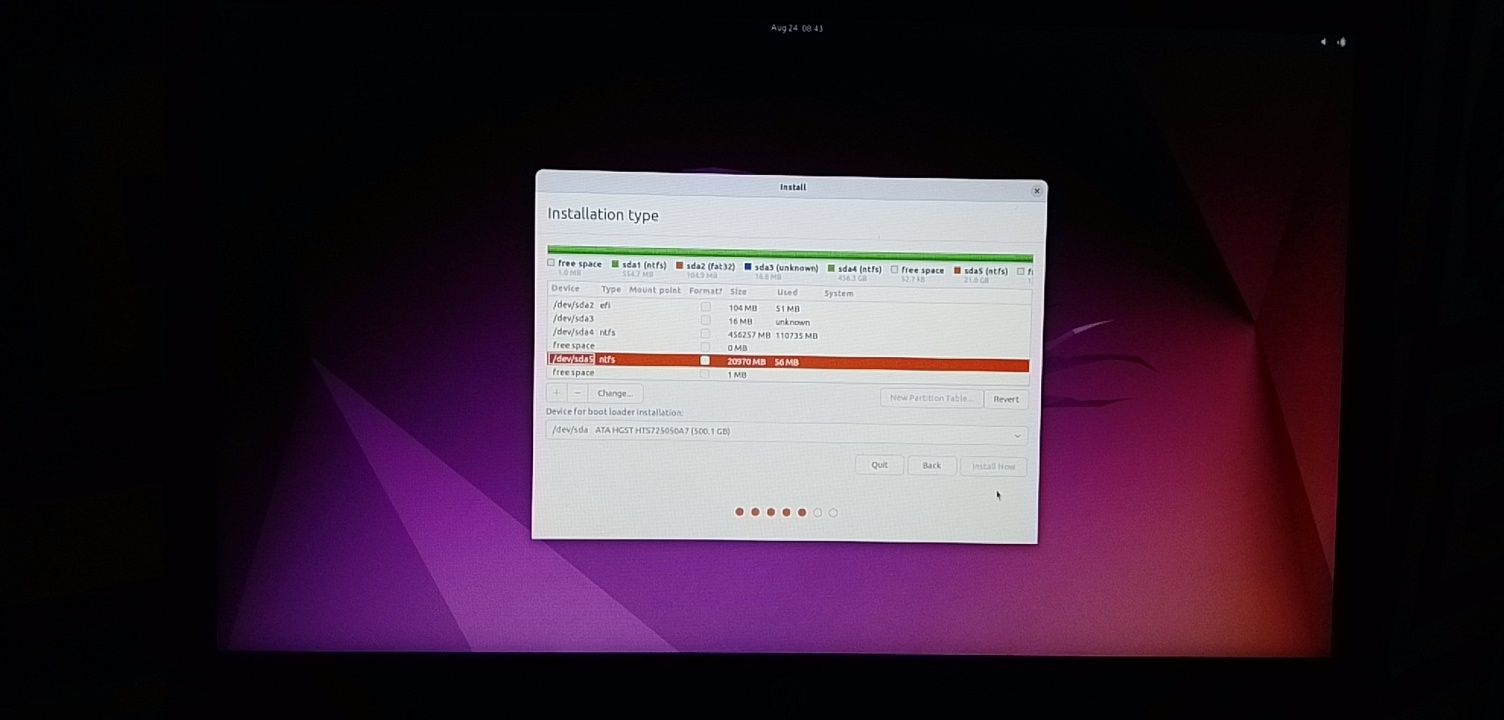
Click OK to select all the space in the partition.
This time around, the “Install now” button will not be greyed out anymore.
Follow other prompts until Ubuntu starts installing.
After the installation is done, Ubuntu will prompt you to remove the bootable drive and press ENTER to reboot your Computer.
Now You Can Dual Boot Ubuntu and Windows 10
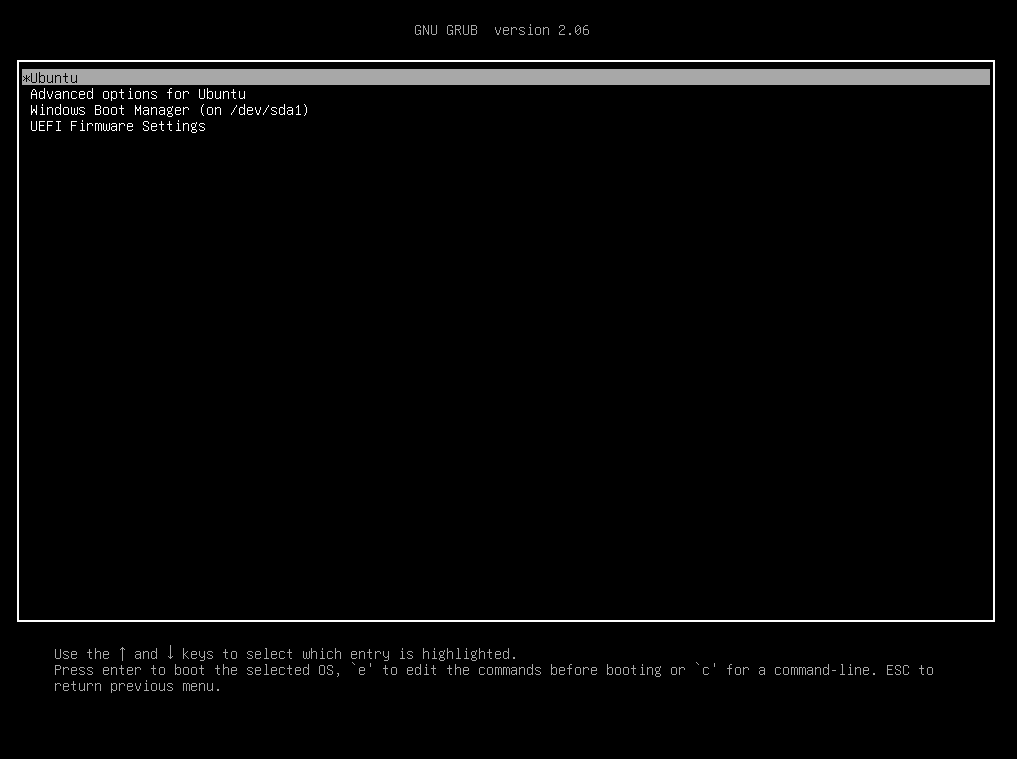
Immediately after you reboot the computer, you should see a screen that looks as shown below:
Now, you can select which one to boot into between Ubuntu and Windows 10.
To boot into Ubuntu, select Ubuntu. And to boot into Windows 10, select Windows boot manager.
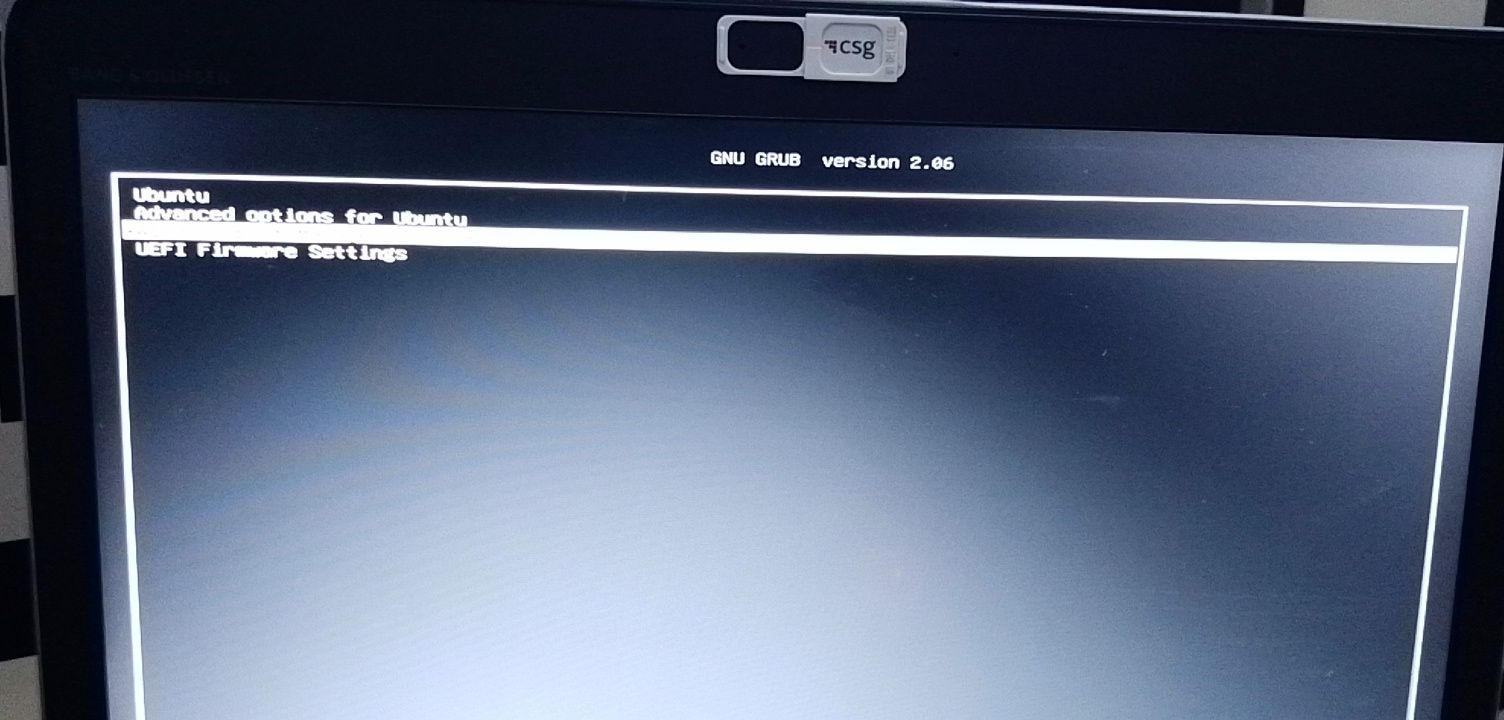
You can also get into your BIOS from the same place by choosing UEFI Firmware Settings.
Conclusion
I hope this article helps you dual boot Ubuntu and Windows 10 on your computer.
The ultimate aim of this article was to show you how to dual boot Ubuntu and Windows 10.
But the article went beyond that to show you how to:
- check if your PC’s BIOS is in UEFI mode
- partition your hard drive
- optimize your hard drive
- make a bootable USB drive
- install Ubuntu Linux Distro along with Windows on your Windows 10 PC.
If you find this article helpful, kindly share it with your friends and family.
Learn to code for free. freeCodeCamp’s open source curriculum has helped more than 40,000 people get jobs as developers. Get started
This tutorial gives a step-by-step guide on how to dual-boot Linux Mint 22 (Wilma) and Windows 11, with the Linux distro installed on an external drive and GRUB, the Linux boot manager, installed on the same drive that the distro is installed on. You’ll learn how to manually partition the external hard drive for the Linux Mint installation and how to make sure that GRUB is installed on that external hard drive, so there will be no interference between Windows 11 boot manager and GRUB.
If your computer has 2 internal drives, a better approach is to install Windows 11 and Linux Mint 22 on separate drives.
Before you proceed, make sure that you have completed the following preliminary tasks:
- Disable Secure Boot, Fast Boot, and Fast Startup in Windows 11.
- Download the installation ISO image of Linux Mint 22. All three desktop environment variants (Cinnamon, Mate, and Xfce) supported by Linux Mint use the same installer, so the steps in this tutorial apply to any ISO image you download, regardless of the variant you choose.
- Flashing the ISO image to a USB stick in Windows 11 or flashing the ISO image to a USB stick in Linux is the final preliminary task you need to complete.
Pre-Disk partitioning installation steps
The computer used for this tutorial is a store-bought Lenovo IdeaPad, so it came with Windows 11 pre-installed on an NVMe (M.2) drive. The external hard drive for the installation of Linux Mint 22 is an SSD, but you could use any storage drive that you have, like an HDD or even the same type of M.2 drive that Windows 11 was installed in.
When you have the installation USB stick ready, shut the PC down, then insert both the installation USB stick and the target external drive into available USB ports.
Now, reboot the PC, pressing the F12 key repeatedly as the computer boots up until the boot menu appears. If the F12 key does not bring up the boot menu, consult your computer’s documentation to find the key that does. As shown in Figure 1, you should see an entry for Windows 11 boot manager and an entry for the installation USB stick. Use the down arrow key to select the latter, than press the Enter button.
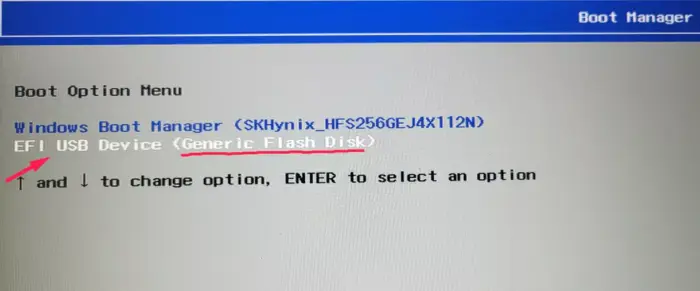
Figure 1: The boot menu on the Lenovo IdeaPad laptop used for this tutorial showing entries for the Windows 11 boot manager and the installation USB stick.
The computer should reboot into the Linux Mint live desktop. Then double-click on the Install Linux Mint icon on the desktop to launch the installer. Your language should be automatically selected in the first installation window shown in Figure 2. Otherwise, select, then click Continue.
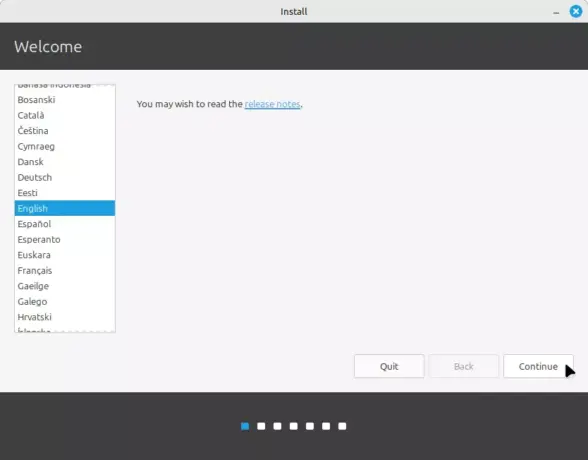
Figure 2: Linux Mint 11 installation
In the next window, shown in Figure 3, the installer should auto-detect your keyboard layout. If not, click the Detect Keyboard Layout button, then on Continue.
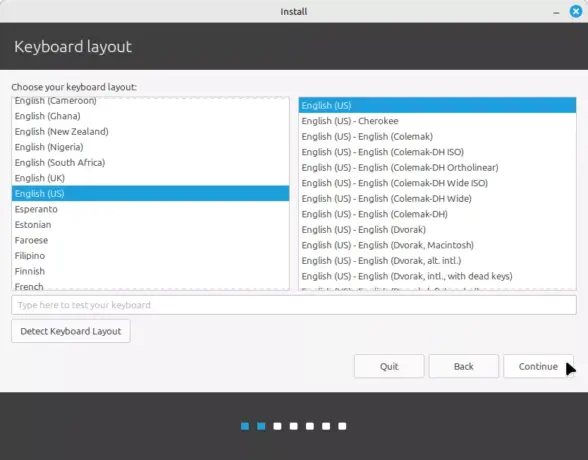
Figure 3: Linux Mint 22 installation keyboard
Installing non-free (proprietary) multimedia codecs makes it possible to use those after installation, so it’s always a good idea to install them by selecting Install multimedia codecs. Continue.
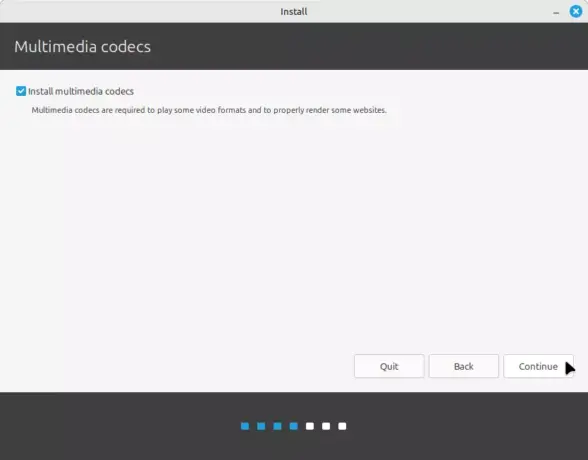
Figure 4: Install multimedia codecs.
Whether you see the message window shown in Figure 5 depends on whether you did or did not shutdown your computer before connecting the external hard drive that Linux Mint 22 will be installed on. You’ll see the message window if you did not shut the computer down before attaching the external hard drive. Click Yes to let the installer unmount the drive’s partitions.
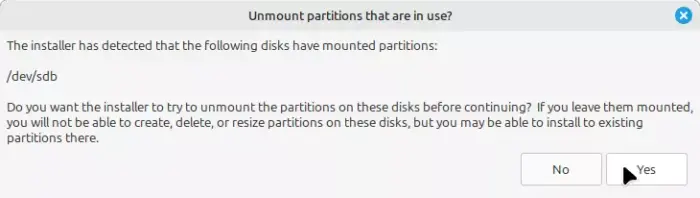
Figure 5: Unmount external hard drive’s partitions.
Disk partitioning installation steps
The next window you see in the installation process lets you choose how the installer should install Linux Mint on the detected hard drives. Because you want to install Linux Mint 22 on the external hard drive, the option to select in this step of the installation process shown in Figure 6 is Something else. That should make it possible for you to manually partition the external hard drive. Continue.
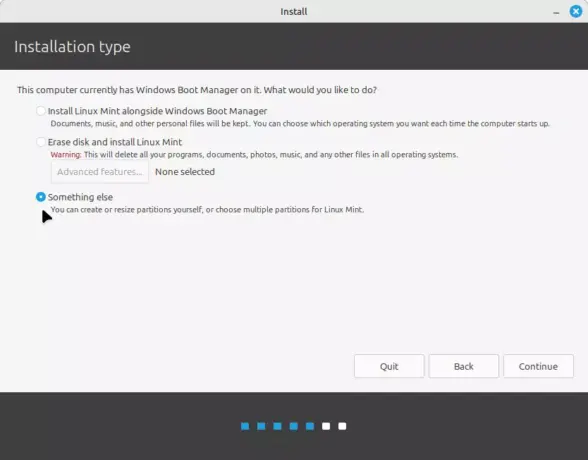
Figure 6: Selecting the right installation type.
In the next window shown in Figure 7, you’ll see all the disks and disk partitions detected by the installer, except for those of the USB stick that the installer is running on. You can see that Windows 11 is installed in the NVMe drive (/dev/nvme0n1). Because of the limitations of the window, you’ll have to scroll down to see the external hard drive (/dev/sdb) and its partitions (see Figure 8 after this).

Figure 7: Windows 11 partitions as seen by the Linux Mint 22 installer.
As shown in Figure 8, the external hard drive used for this tutorial had existing partitions on it.

Figure 8: Existing partitions on the external drive on which Linux Mint 22 will be installed on.
If yours is the same, select each partition and delete it by pressing the – button. Do that until only a free space is left.
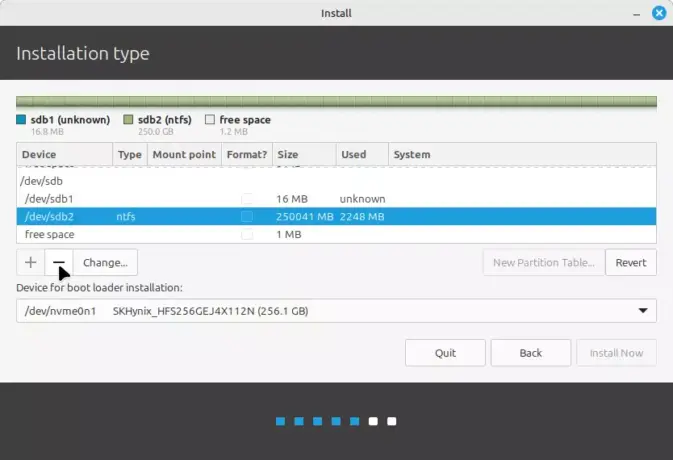
Figure 9: Deleting existing partitions from the external hard drive.
Now you can start creating partitions. To do that, select the free space and click on the + button. (Do this for each partition you want to create.)
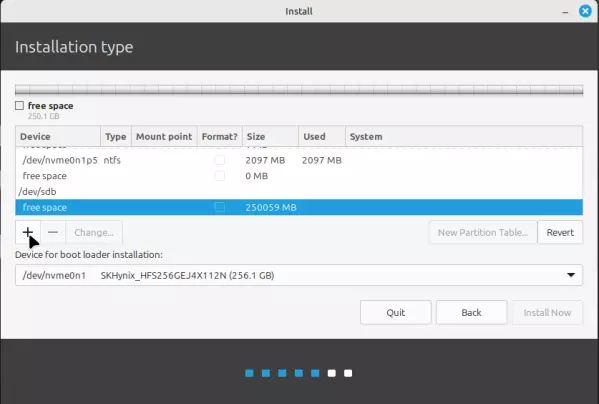
Figure 10: Free space for creating partitions for installing Linux Mint 22.
That will open a window where you can create the first partition, which will be used to install the boot manager (GRUB) files. The EFI System Partition automatically created on Windows 11 and Linux distros is usually about 270 MB in size, so assigning that amount of disk space to this partition should do just fine. Keep other options as shown and select EFI System Partition from the Use as dropdown. Click OK.
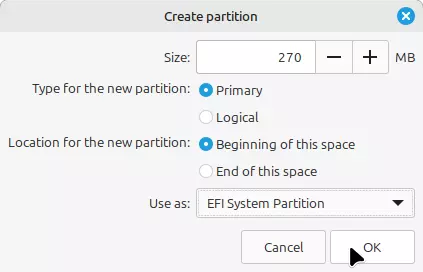
Figure 11: Creating the Linux Mint 22 EFI System Partition
The next partition created for the system used in this tutorial was assigned the rest of the disk space available on the external drive. Again, leave other options as shown and select Ext4 journaling file system from Use as and / from Mount point. OK.
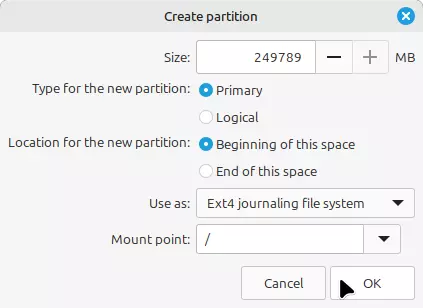
Figure 12: Creating the root partition for the installation of Linux Mint 22.
After creating all the partitions you need, the next task is to tell the installer where to install the boot loader (GRUB) files. By default, it will want to install it in the EFI System Partition of the internal drive, the one where Windows 11 is installed on. That’s not a good idea, so the recommended place to install GRUB is in the EFI System Partition you created earlier. You do that by selecting the device where that partition is from the Device for boot loader installation dropdown. In this case, it’s /dev/sdb. Click Continue after selecting the equivalent device for your installation.
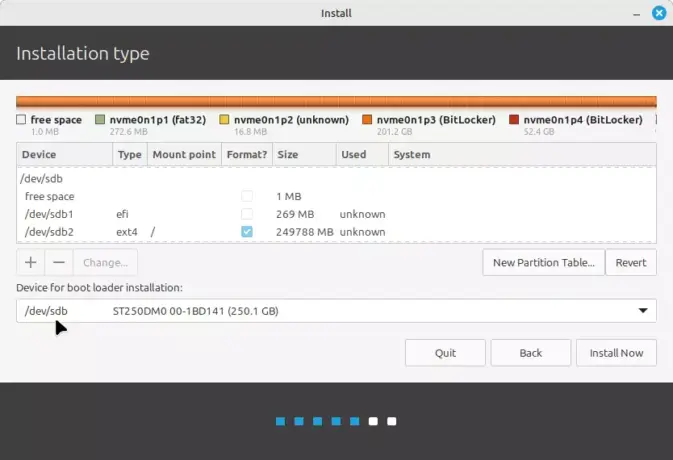
Figure 13: Choosing where to install the boot loader files for Linux Mint 22.
This is just the installer informing you what it’s going to do, which is, format the partitions you created earlier. Continue to begin installing the system.
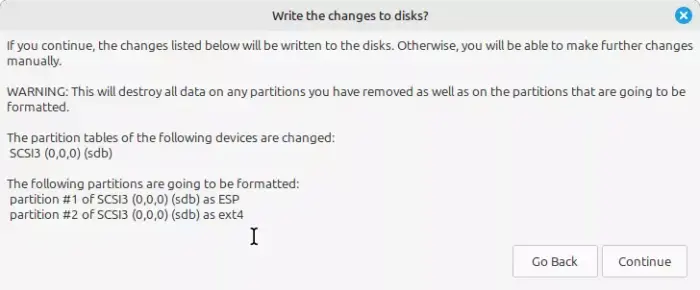
Figure 14: Partitions to be formatted by the Linux Mint 22 installer.
Post-disk partitioning installation steps
If you computer is connected to the Internet, the installer will detect your timezone automatically. Otherwise, select it by clicking on the timezone map. Continue.
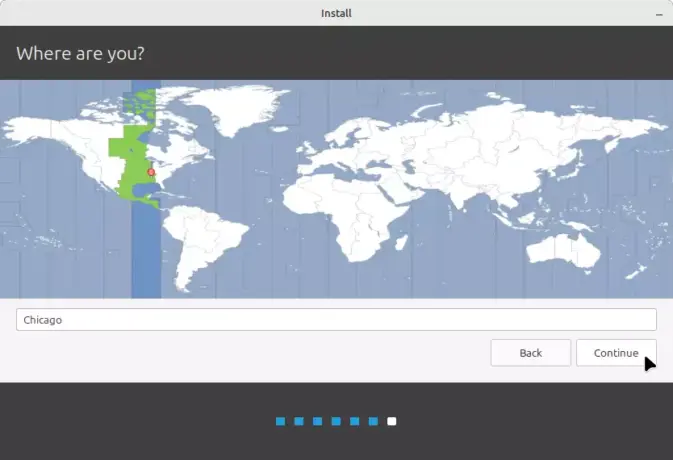
Figure 15: Timezone setting during the installation of Linux Ming 22.
The final task to do while the installer is still installing software is to create the user account you’ll use on the system. It’s always a good security practice to require a password to log in. And you may opt to encrypt your home folder. Continue.
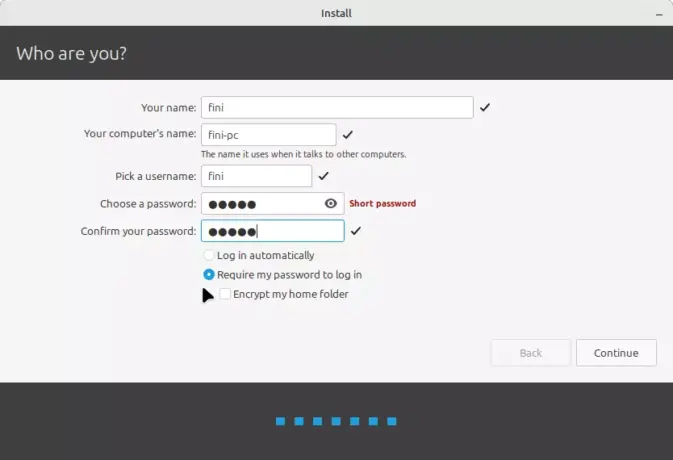
Figure 16. Creating a user account for Linux Mint 22.
Once installation is completed, the installer will prompt you to either continue using the live system or restart the computer. Unless there’s something else you want to do on the live system, choose Restart Now to reboot into your new installation of Linux Mint 22 Wilma.
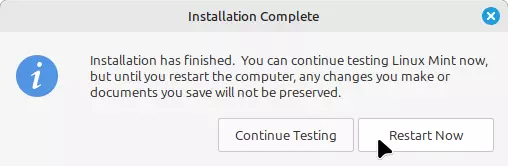
Figure 17: A prompt from the Linux Mint 22 installer.
Finally, you’ll be prompted to “Please remove the installation medium, then press Enter:” Pressing Enter after removing the installation medium should trigger a reboot. If it does not, press or press and hold the power button to shut the computer down, then press the power button again to restart. If all went well, you should see a GRUB menu similar to the one shown in Figure 18, with an entry for Linux Mint 22 and also for Windows 11, so you can choose what OS to boot into.
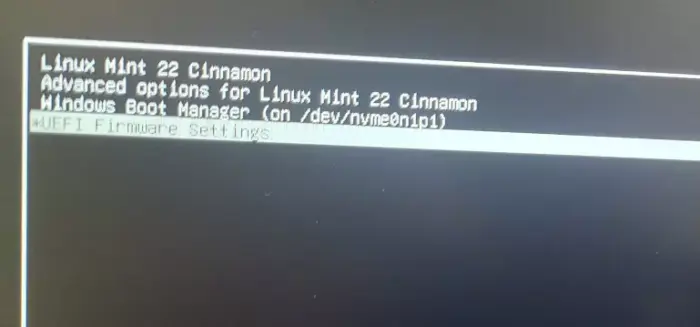
Figure 18: Linux Mint 22 GRUB boot menu
Miscellaneous items
If you press the F12 key as the computer reboots, the boot menu shown should now contain and entry for Linux Mint 22 and the Windows Boot Manager entry.
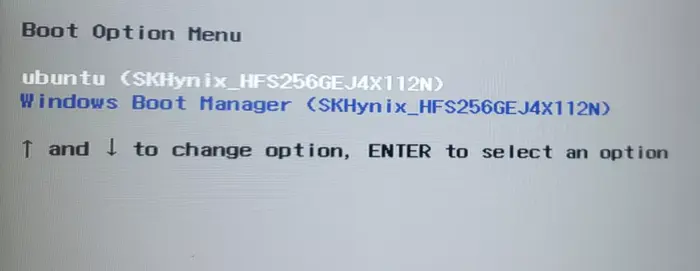
Figure 19: Lenovo IdeaPad boot menu showing Windows 11 and Linux Mint 22 boot manager entries.
If at any time you’re dropped to a grub prompt as you attempt to reboot the computer after selecting the Linux option from the boot menu, pressing the Ctrl-Alt-Delete key combination should prompt another reboot and bring up a proper GRUB boot menu.
Maybe you have already read a lot of articles on the Internet and are interested in the open-source operating system that is called Linux. Maybe you even have installed it on VirtualBox or run in Live mode and learned how it looks and works. But now, you can have a question «How to install it on my computer and start using it every day?». If you are a beginner, you probably don’t want to lose Windows, because when something goes wrong you always can switch to Windows and continue work. And, of course, all your applications and games are installed on Windows. You can install Linux with Windows for Dualboot. It was an ideal option for me a few years ago.
In this guide, I will explain how to install Linux on Windows 10 or 11. Everything will be performed in Windows 11, but it should work in Windows 10, 8 and 7 too.
I assume that you already have installed Windows and you already have decided where to get disk space for the Linux installation but don’t know how to do it. Here you will get a detailed explanation of this. Most of PC and notebooks with Windows 10 or 11 have UEFI instead of regular BIOS nowadays, so I will use it in this article. But if you have an old BIOS, there will not be many differences during the installation process.
Table of Contents
- Basics
- Prepare the Partition for Installing in Windows
- Boot from USB in Windows
- Prepare the Partition for Installing in Windows
- How to Install Linux on Windows 10
- Wrapping Up
Basics
If you want to install Linux on the same drive as Windows, you have to create a few additional partitions. At least one, preferably two. Linux users do not install Linux on one partition like Windows, although this option is possible. Linux is very flexible, so it allows to place system and user files on different partitions. It gives a big benefit for system reinstallation. You can reinstall the system on the system partition independently from your home partition and your files will not be deleted.
Here are these partitions:
- Root — for system files;
- Home — for your own files;
Minimum system requirements for storage size are different for various distributions. Usually, it is between 10 and 30 GB. But it is only enough for installing the operating system and multiple additional applications. If you want to install a lot of applications and games you should add extra 30-60 GB. I recommend using for Linux root partition 50-100 GB, as same as for drive C for Windows. A home partition must be as large as possible.
Previously, I recommended making a swap partition as well. But in modern distributions, a file is usually used for this purpose instead of a separate partition. So if you are a beginner, you can leave it as is by default.
Prepare the Partition for Installing in Windows
1. Backup Important Data
You must free up some space near existing Windows 10 or 11 before you be able to install Linux there. If you don’t want to lose your data, you should create a backup for important data before you start doing something. If everything goes well, your system and files will be fine. But the filesystem may be corrupted by any sudden failure, for example, a power cut or you can do something wrong. So, make sure that you have copied your important files to an external drive and created a system restore the image using Control Panel or Settings utility:
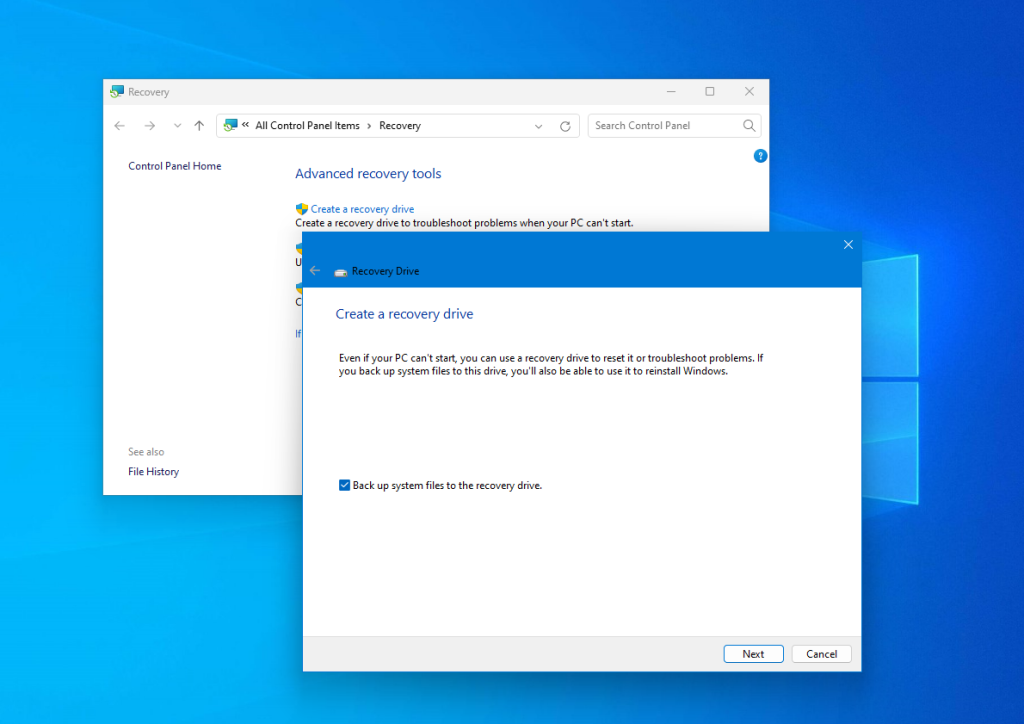
You also can use third-party tools, for example, Acronis or Clonezilla. If you want to shrink not a system partition, you can just copy important files from there.
2. Shrink a Windows Partition
Now, let’s prepare the partition for installing Windows and Linux. The simplest way to do this — use the default Disk Management tool in Windows.
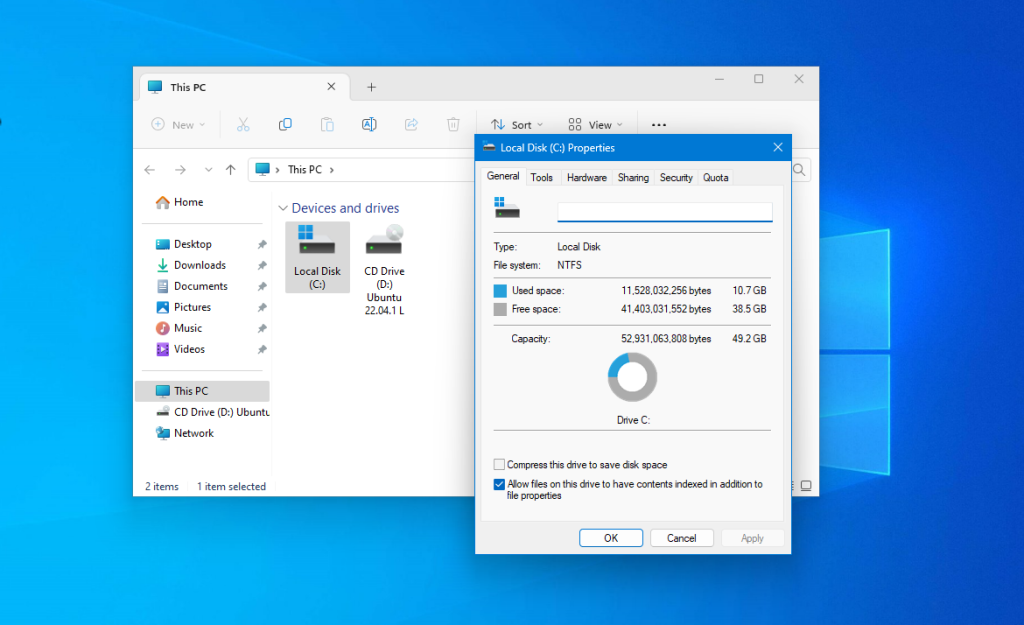
First of all, you can open This PC and view information about the drive, which you want to use for installing Linux:
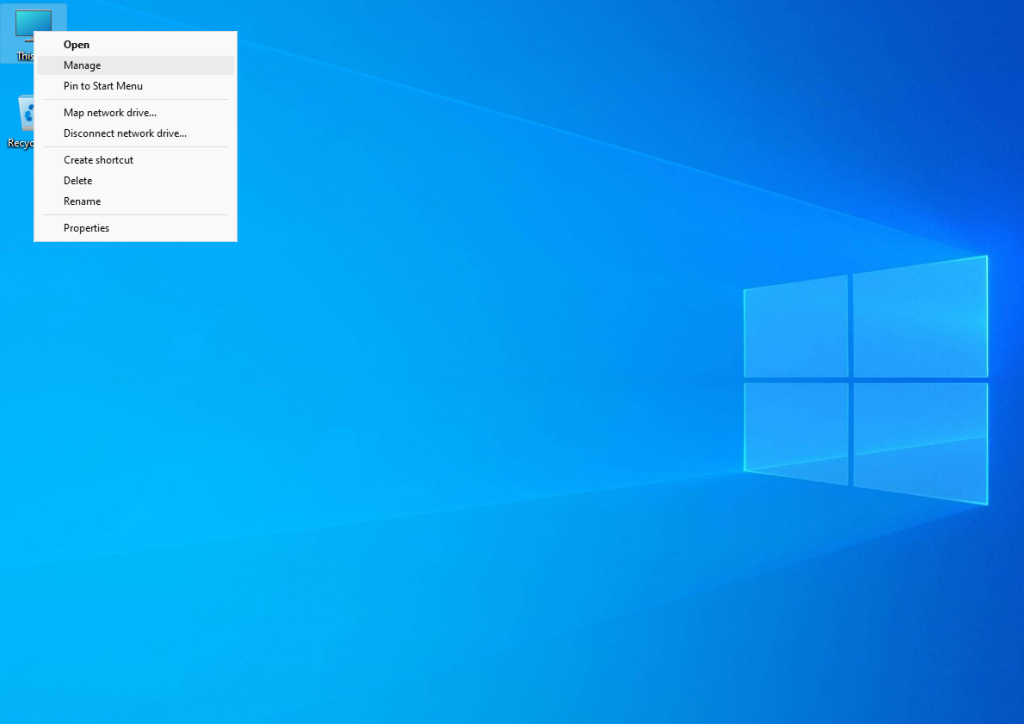
Then, open the contextual menu for the This PC shortcut and click on Manage:
Then, open the Disk Management tool:
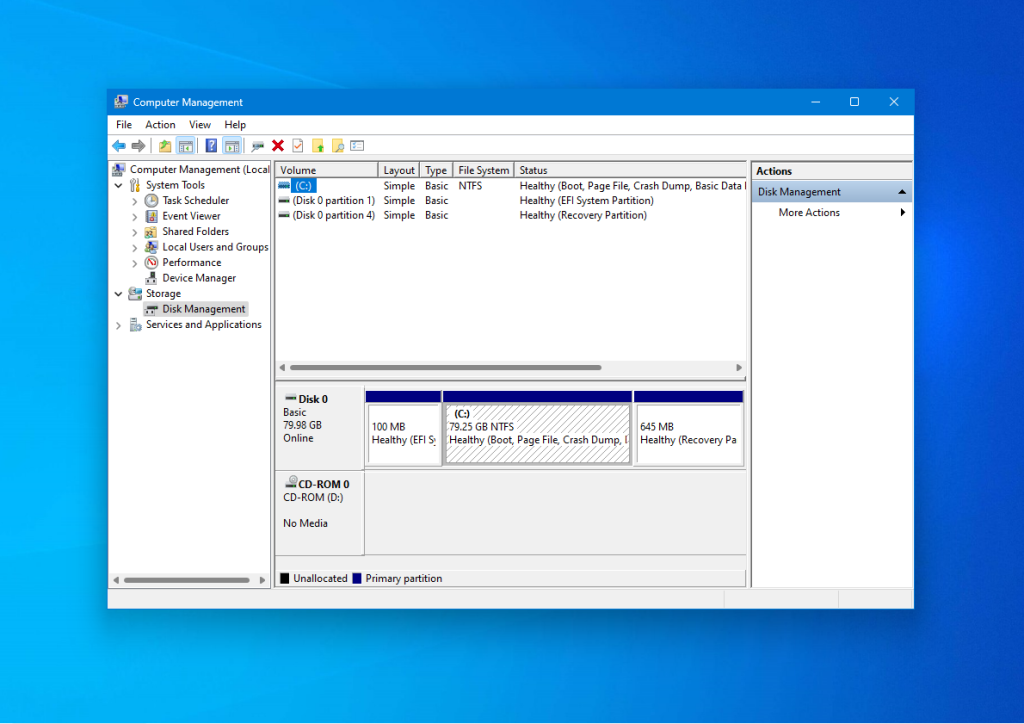
Here you can see the disks list, and system drive C: on Disk 0. If you have an additional drive for files it will be marked by D or E letter. I will explain how to shrink the system drive C: to get a free space. For other drives, everything is similar.
Open the contextual menu for the selected drive and choose the Shrink Volume option:
Enter how many megabytes to reduce the volume in the Enter the amount of space to shrink in MB field and press the Shrink button.
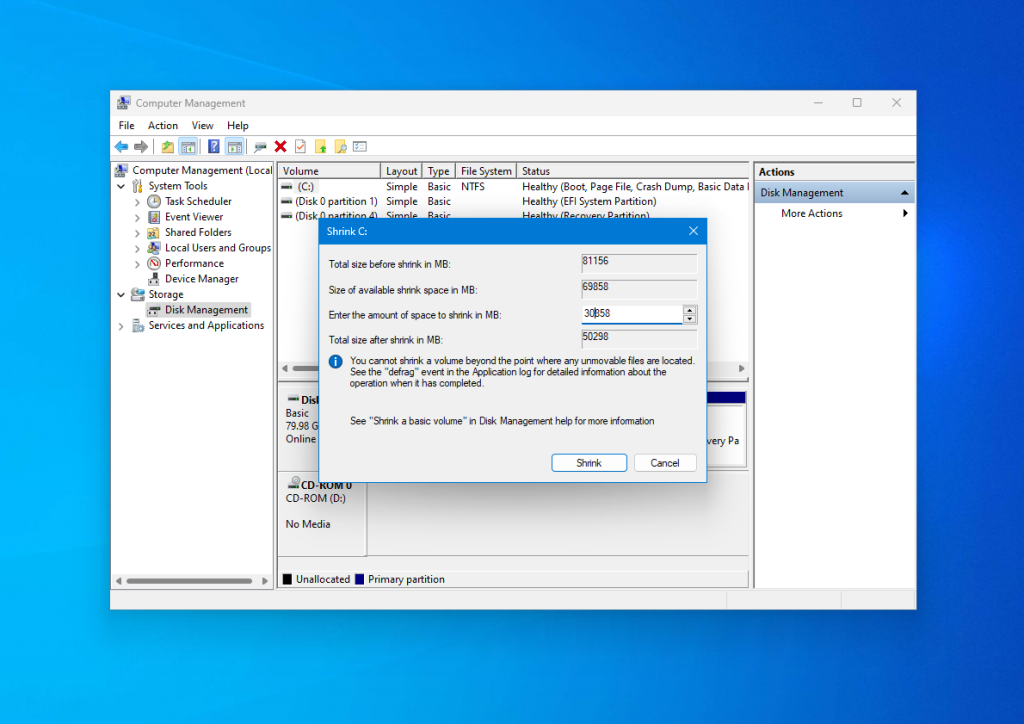
Pay attention, that you can’t enter a value that is larger than the amount of free space on the drive. So free up some space if you haven’t already. After this, you will see Unallocated Space which can be used for creating required partitions.
That’s it. Now you have space to install Linux with Windows. There is no sense to create Linux partitions in the Disk Management utility. We have done all operations which probably can corrupt Windows, and can continue creating Linux partitions using Linux tools.
Boot from USB in Windows
Most computers with Windows 10 and 11 have UEFI. This means that you can have trouble entering to BIOS setup interface and choosing the right device for booting. But you can reboot into the BIOS interface directly from Windows. Just open Settings, then System, and Recovery. Find there the Advanced Setup and press Restart Now:

Then, click on Troubleshoot -> Advanced Options -> EFI Firmware Settings after reboot:
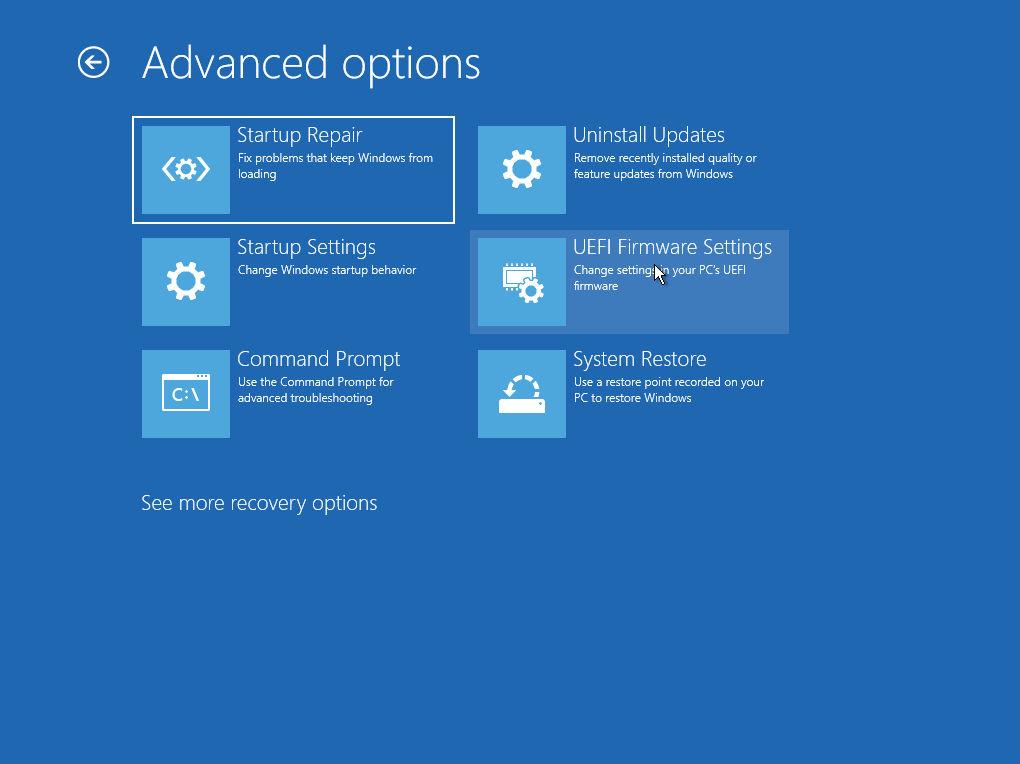
Here you can configure which device will be used for booting and boot your Linux USB drive.
Prepare the Partition for Installing in Windows
It is not the next step of this guide but an alternative option for how to shrink Windows partitions in Linux. If you don’t want to use the Disk Management tool in Windows, you can do the same thing using any LiveCD Linux distribution and the application for disk management that is called Gparted.
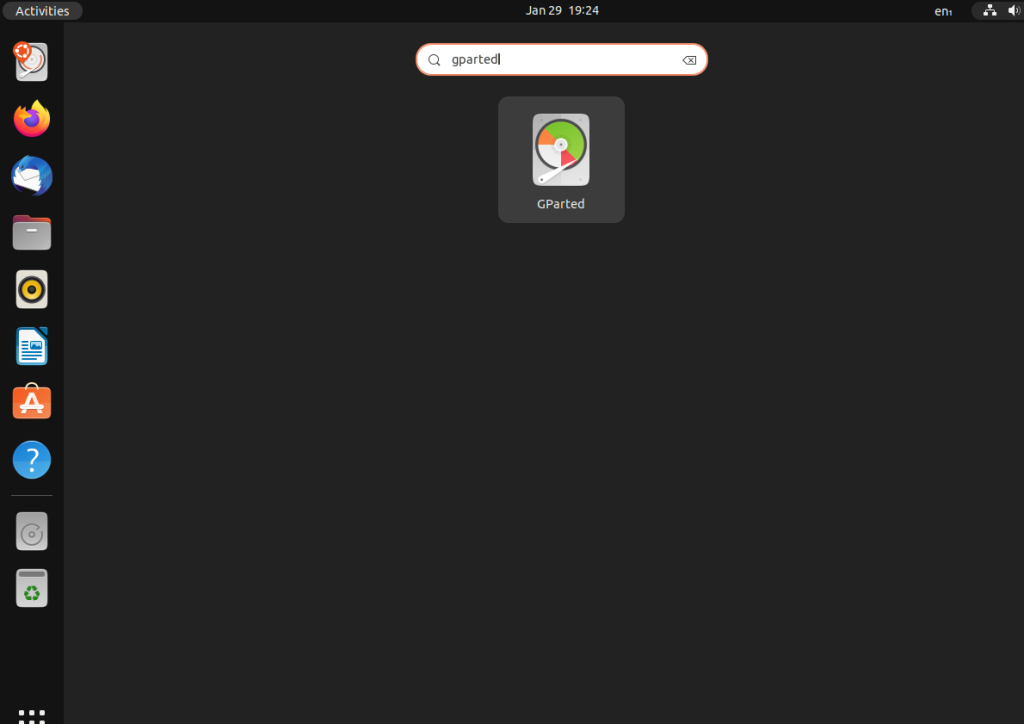
For example, you can do it in Ubuntu. Boot into LiveCD, open the Activities menu, and type Gparted there:
The main window of the application will look like this:
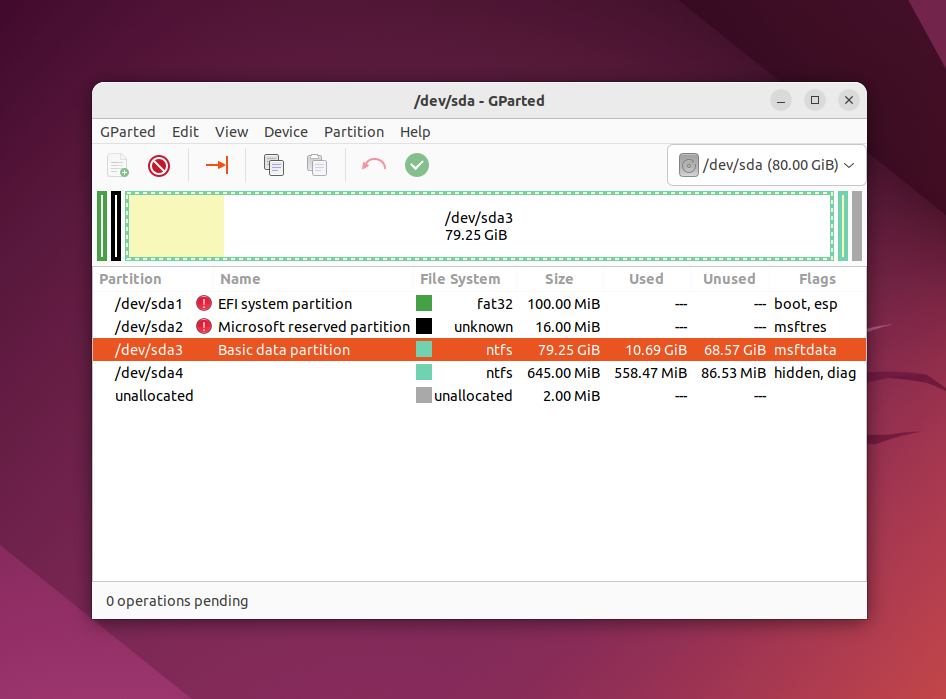
Note, that the Linux partition naming strategy differs from Windows. Partitions are just files in the special dev filesystem in Linux. You will understand later how it works, but at this moment you should know that each partition has a name that is started from /dev/sd. Then, you can see a letter which reflects a physical drive (sda, sdb, sdc, sdd, etc). At the end of the disk name, a decimal number is appended which reflects the partition number. For example, sda1, sda2.
You can see not only the drive name but also the filesystem, size, and free space for each disk in Gparted. Use this information to find out which name has your Windows partition. In this example, you can see a lot of partitions but you shouldn’t delete them if you don’t want to break your system. Here is their description:
- /dev/sda1 — EFI partition with bootloader files;
- /dev/sda2 — a partition reserved by Windows;
- /dev/sda3 — a system partition with Windows installed, drive C;
- /dev/sda4 — a recovery partition for Windows.
Here the /dev/sda3 partition has NTFS filesystem and took 79 Gb as same as the system Windows partition, so that’s what we need.
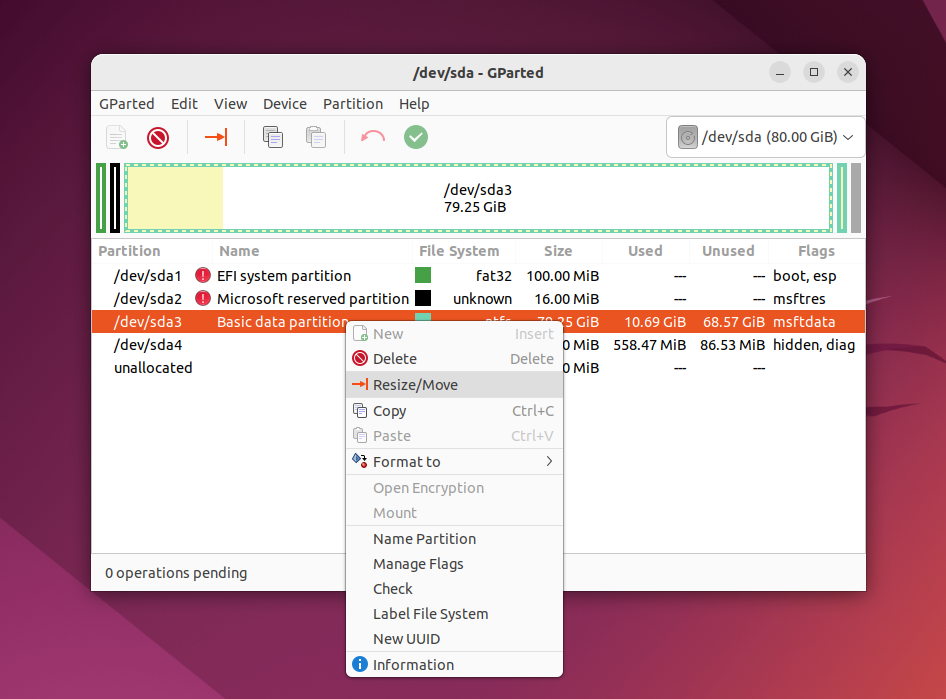
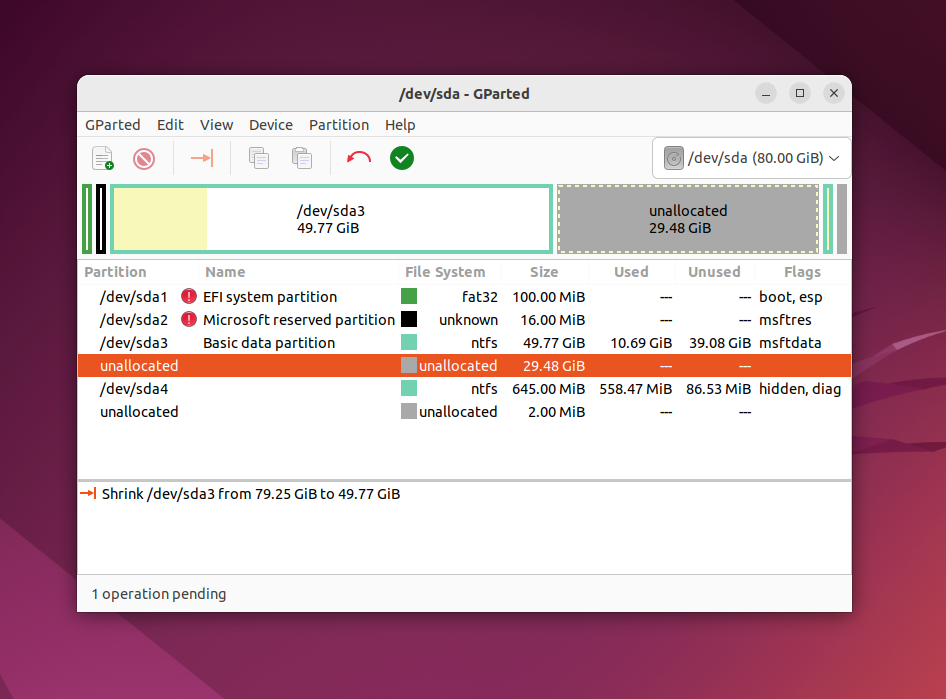
Let’s do the same thing as in the previous example — shrink the partition size for /dev/sda3 (C) to 50 Gb to install Linux on Windows. Make right-click on the /dev/sda3 partition and select the Resize/Move section:
In the next window, you can enter the wanted size manually in the New size field or use the slider:
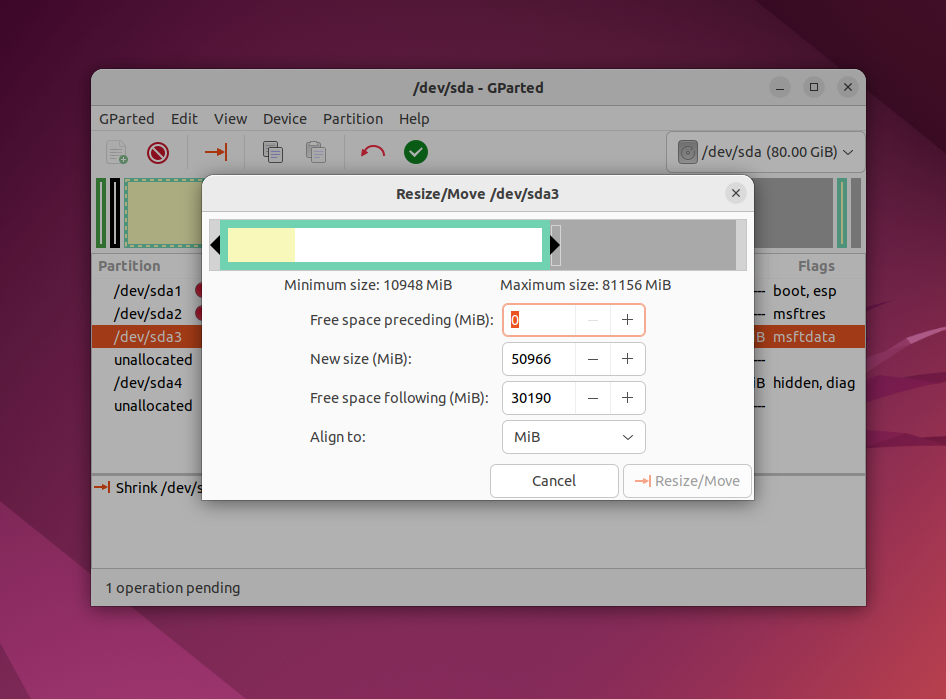
After this, press Resize/Move. You will see freed space but there are no real changes on the physical drive.
Pay attention, that you shouldn’t move the start of a system partition. You can carefully shrink a partition size by adding free space after it, but don’t try to get free space before it like this:
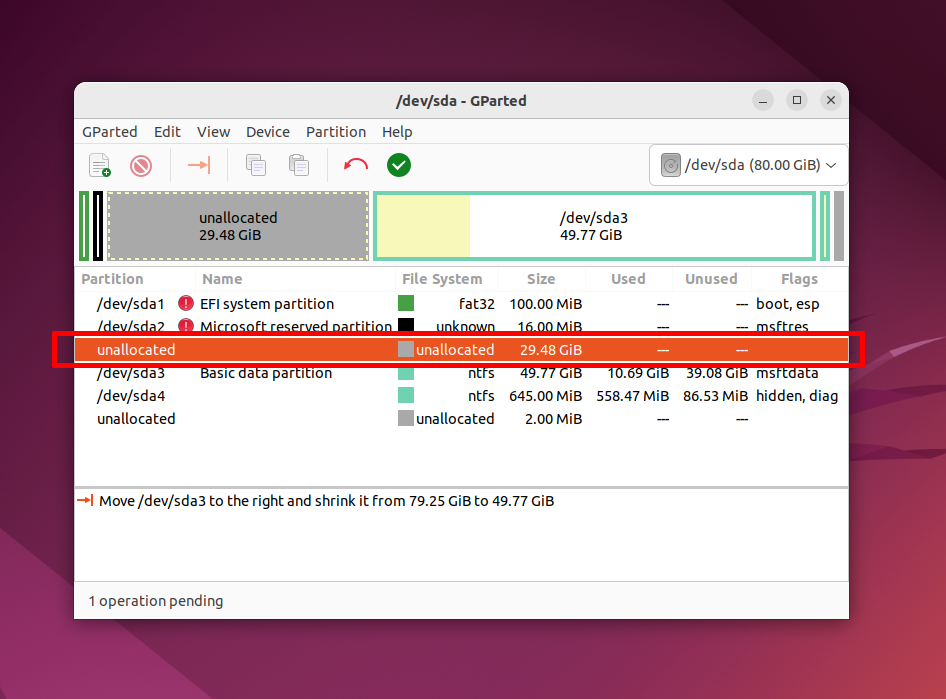
In this case, the Windows bootloader can be corrupted. It can be restored easily but I think you don’t want extra trouble.
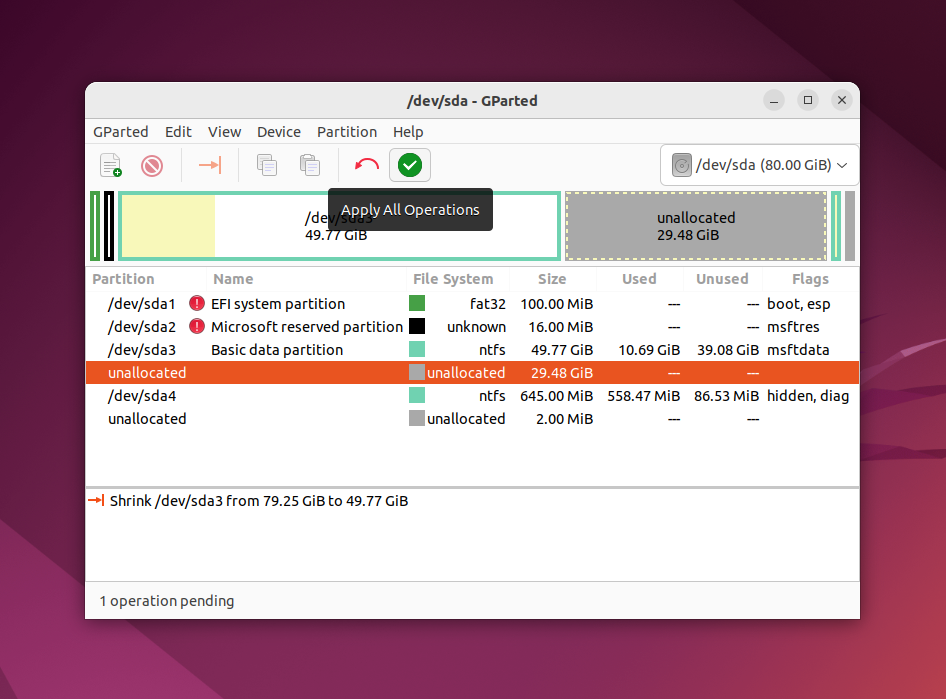
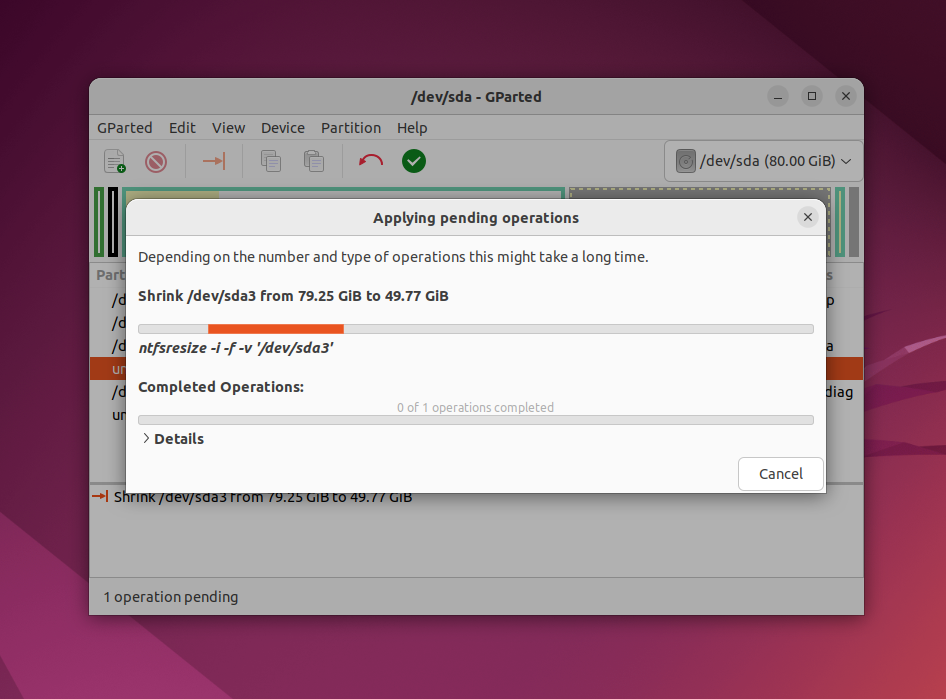
When you are done with this, press the green button or select Apply All Operations in the Edit menu.
The application will ask for confirmation. Ensure that the confirmation alert looks the same as in the following screenshot:
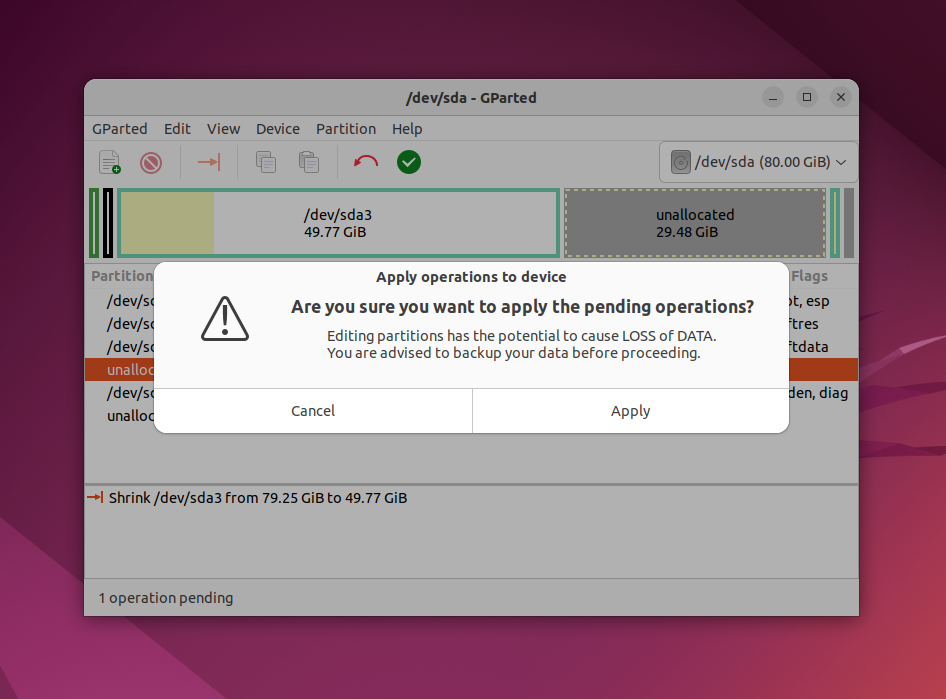
If the application warns that you are trying to move the start sector of the partition, you have done something wrong and you should cancel all and try again. Reducing the size of the filesystem can take a few minutes:
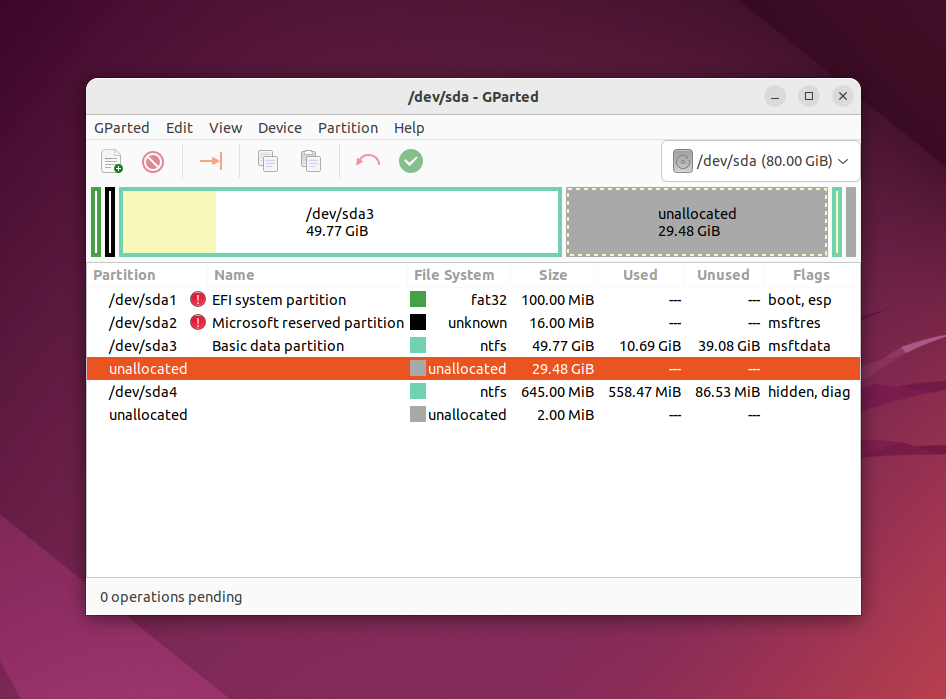
After this, you will see that the /dev/sda3 partition was reduced and free space appeared after it.
That’s it. I will not explain how to create Linux partitions here, let’s do it in the Linux installation tool.
I will not explain in detail how to install Ubuntu or any other distribution. It already has been explained in a lot of articles on the Internet or this site. Let’s have a look at how to do disk partitioning. You can use any distribution, actions will be pretty same. But I will use Ubuntu as an example in this article because it is the most popular Linux distribution for beginners.
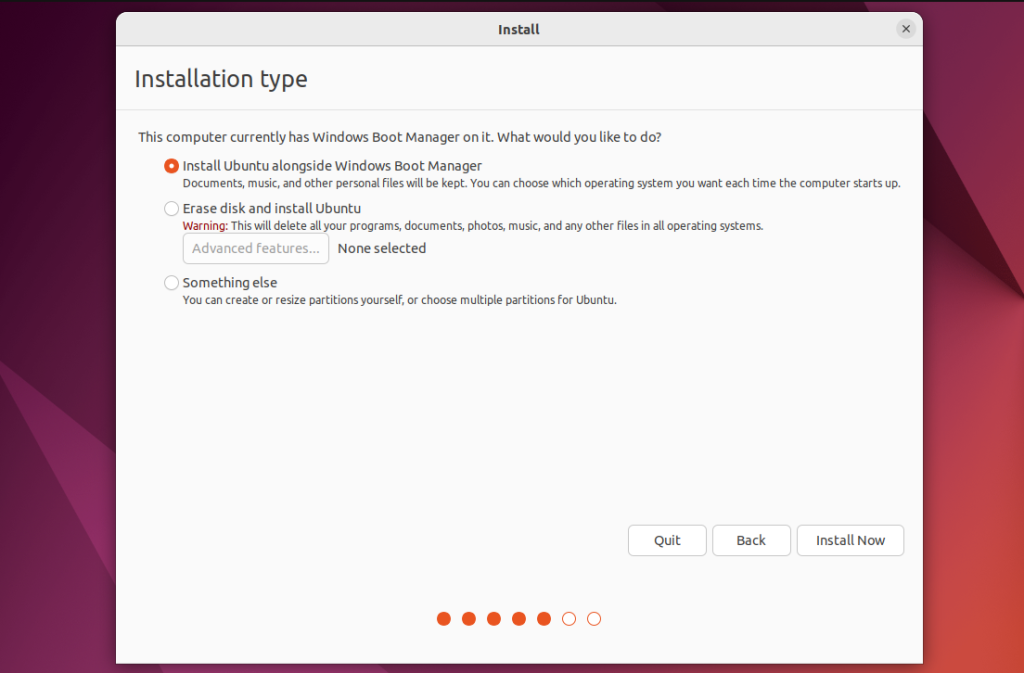
1. Choose a partitioning method
You can choose the partitioning method in the Installation type step. By default Install Ubuntu alongside Windows Boot Manager option will be selected. In this case, Ubuntu will be installed in the free space automatically:
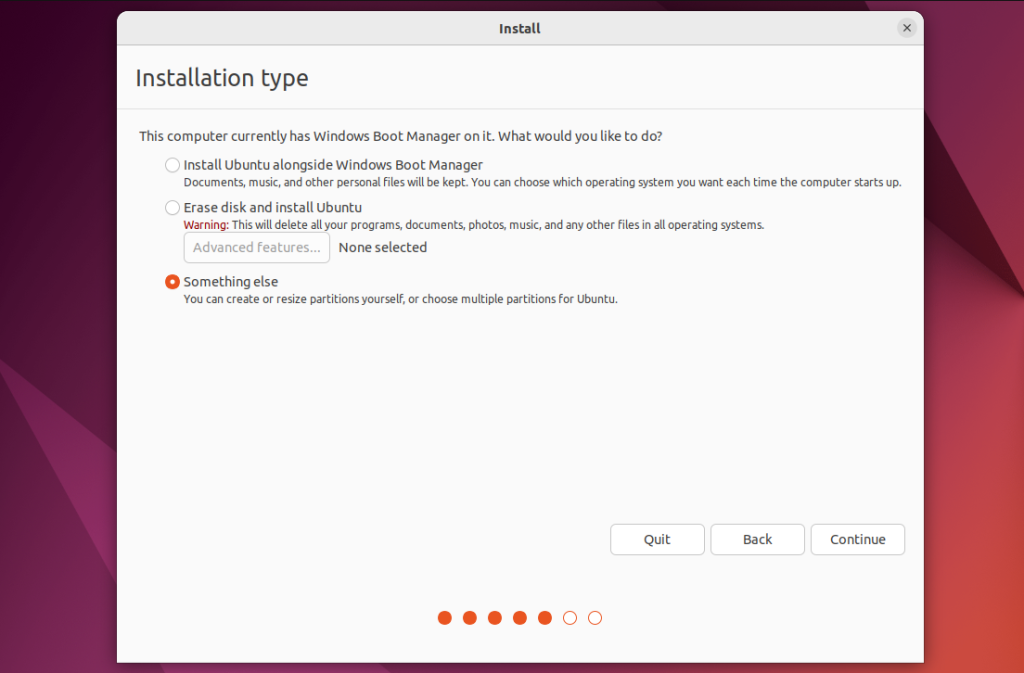
But I recommend choosing the manual method. Select Something else option for this. In this case, you will have more control over the installation process:
2. Create Partitions
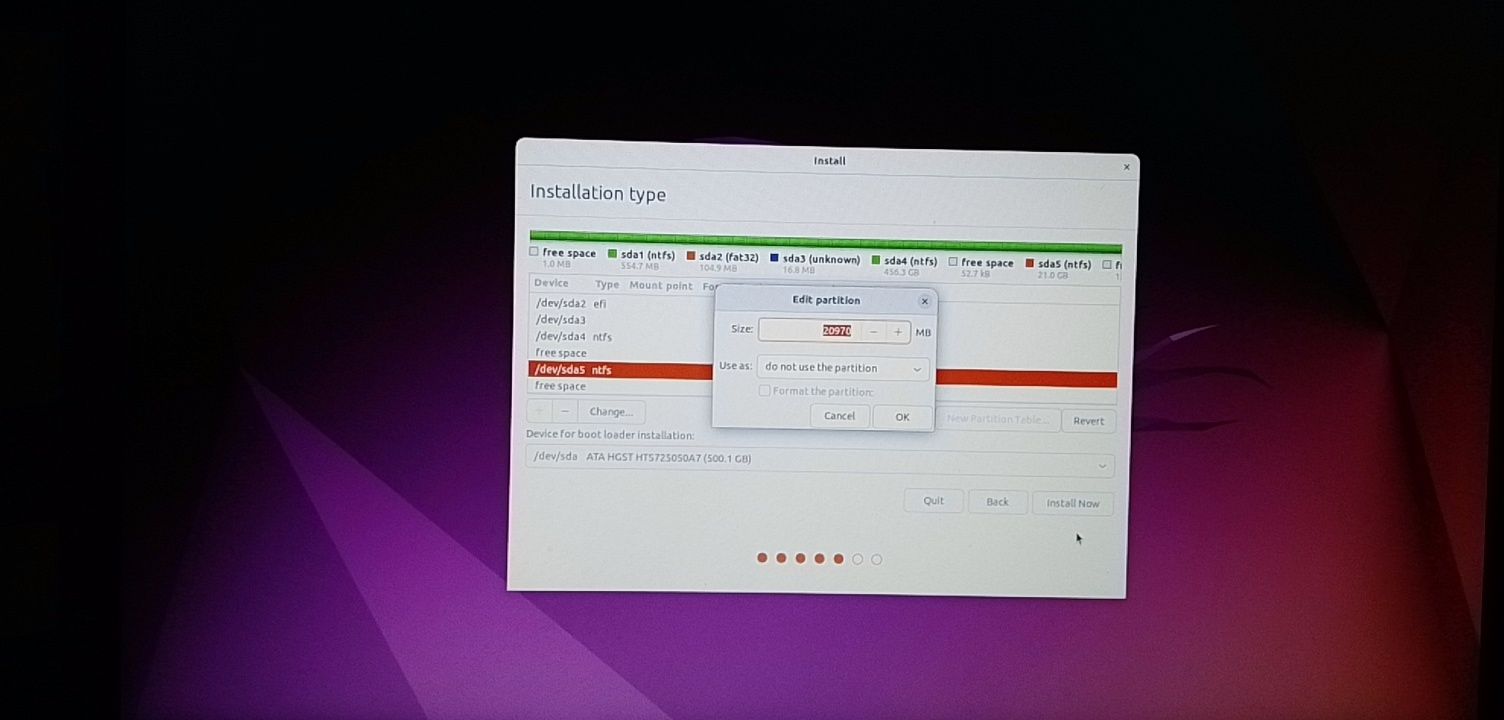
If you choose the manual partitioning method, you will see this window on the next step:
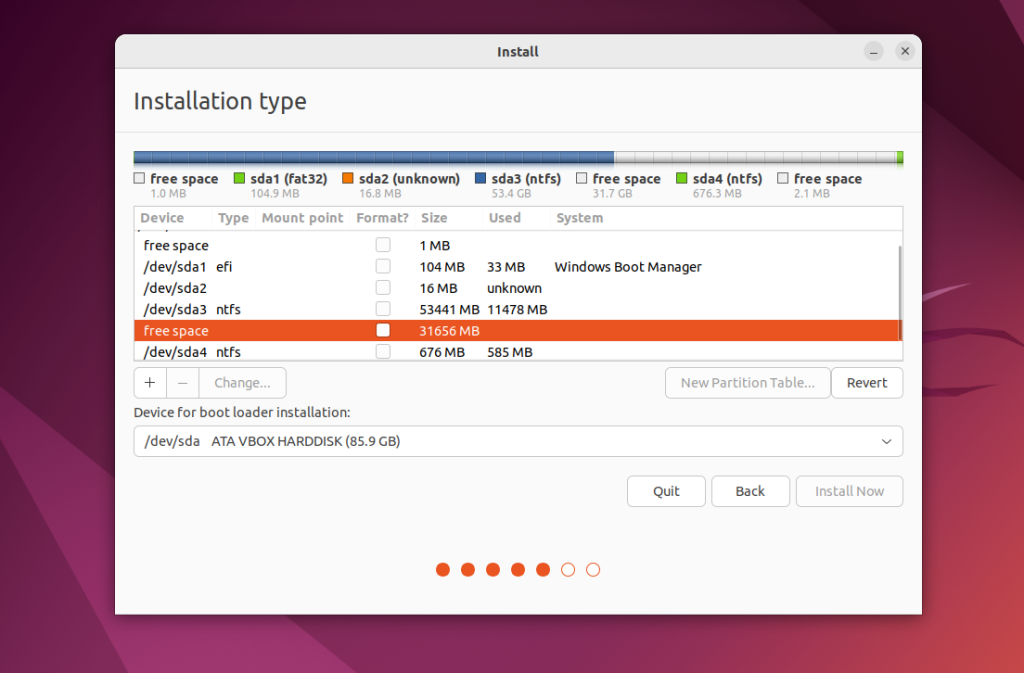
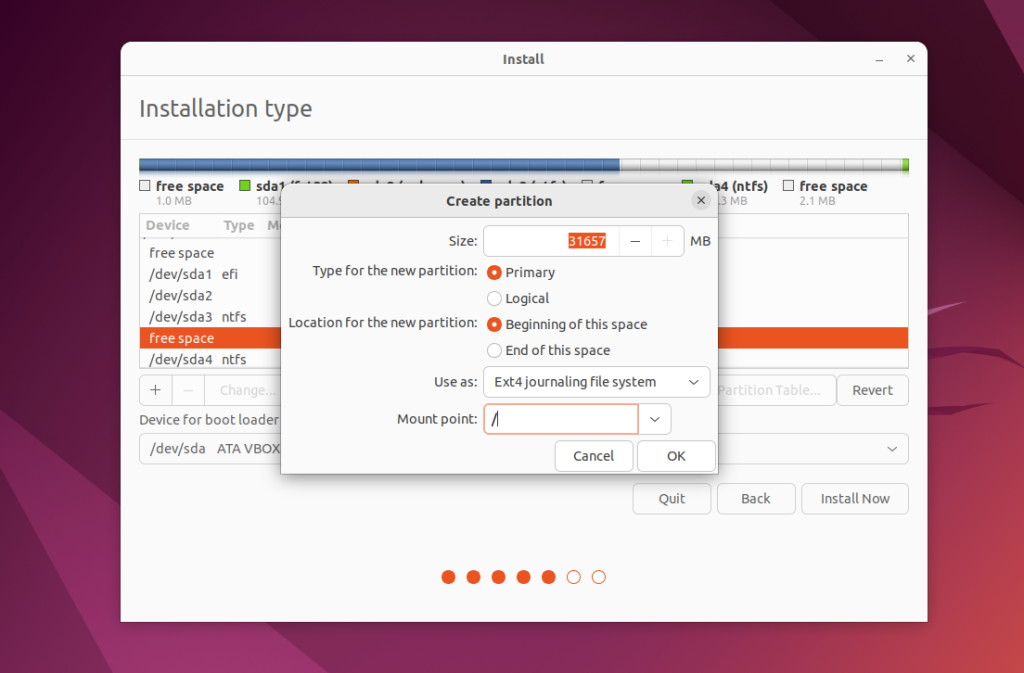
Click on Free space and then click on the plus button to create a new partition. Then enter a size for a new partition and mountpoint. You must create at least a root partition. It must be not less than 25 GB. But I recommend allocating for this partition 50 — 100 GB. Then, specify / as the mountpoint.
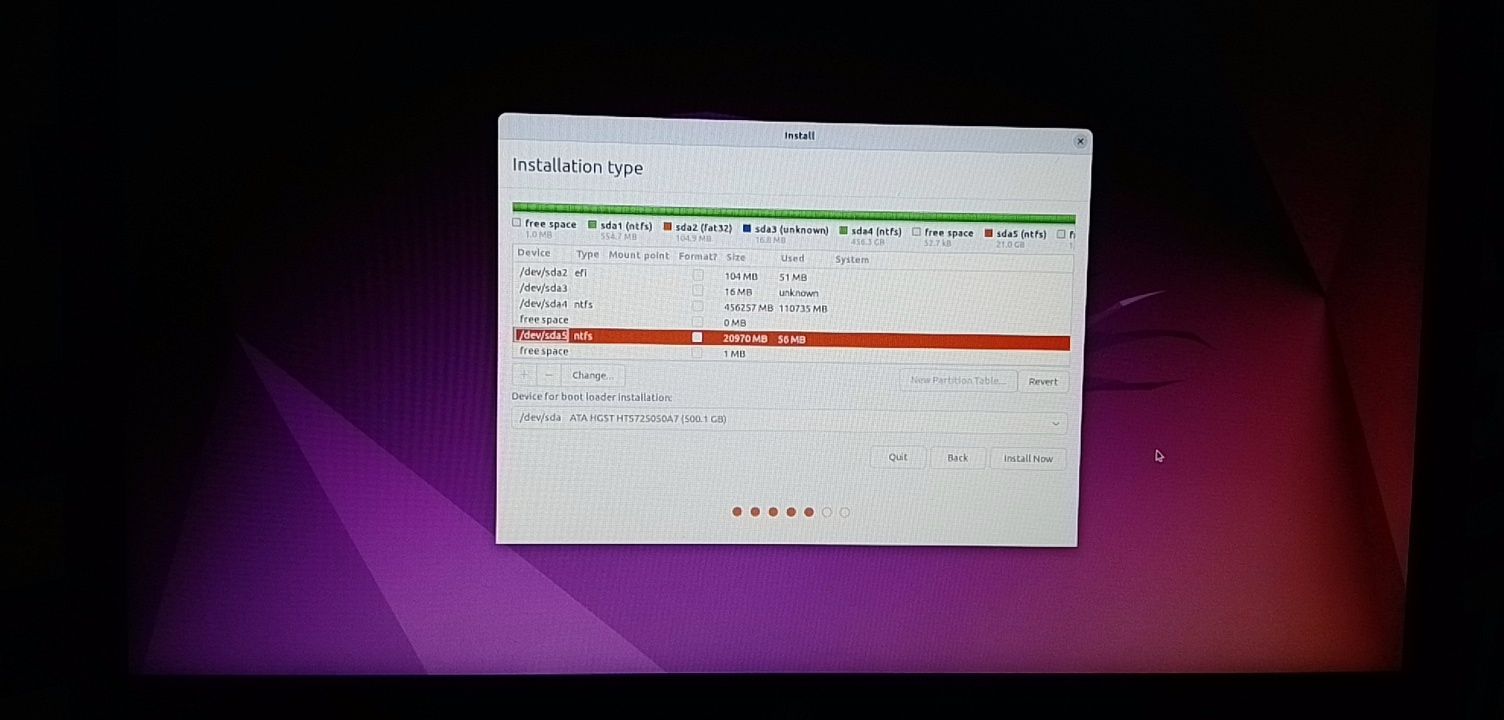
After this, the partition will appear in the list:
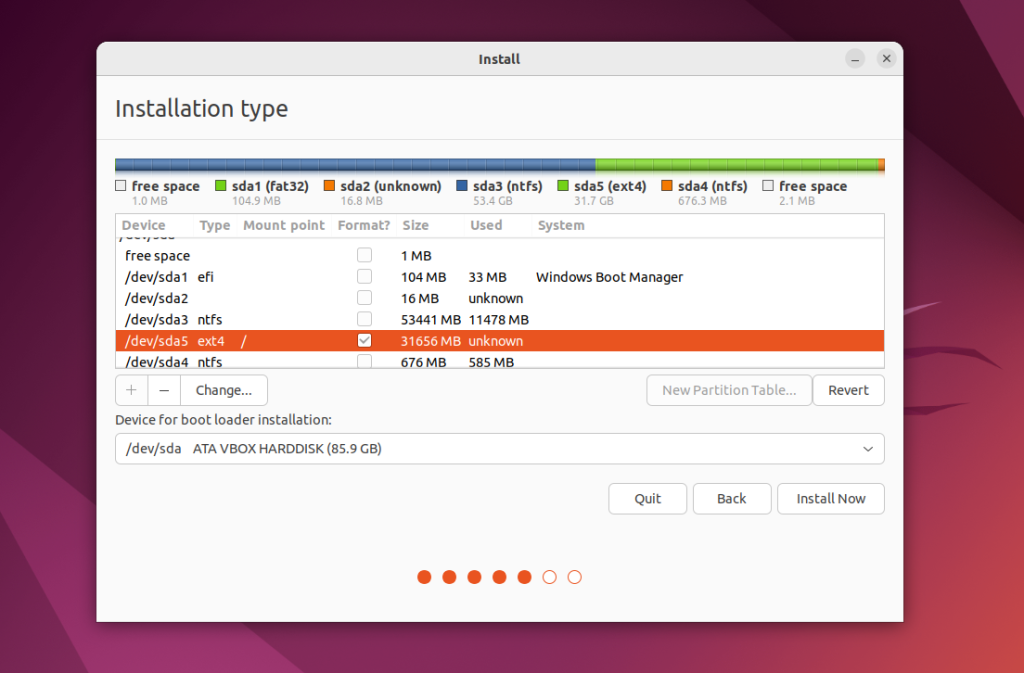
You can create a home partition in the same way if you have space for it. But use /home as the mountpoint.
2. Install Bootloader
In UEFI systems bootloader should be installed on the EFI partition. So it is important to choose this partition or even a drive which has this partition for installing a bootloader. In this case, this is /dev/sda1. You can configure it using the Device for bootloader installation section at the bottom of the window:
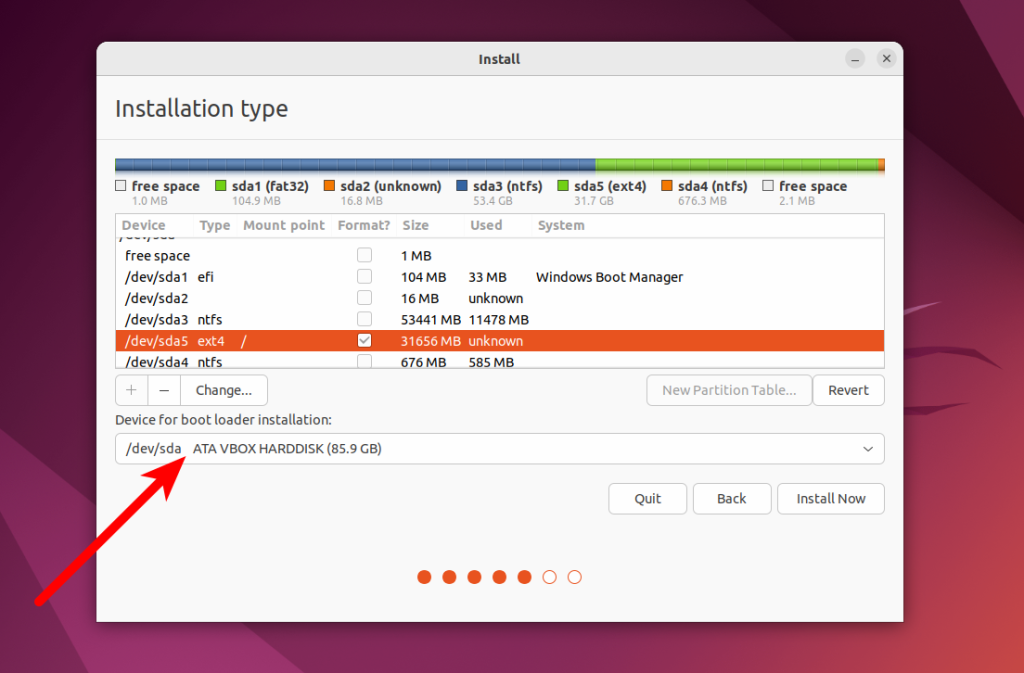
Systemd mounts this partition automatically, so you don’t have to specify mountpoint for it. If everything is done correctly, you will see the Grub bootloader after installing, and there you will be able to select a operating system for booting.
If you are installing Linux on a non-UEFI system, you can leave the default value for bootloader configuration. There are multiple ways to install a bootloader and they depend on the partition table. It will be described in another article.
Then, you can continue the installation process as usual, and installing Linux with Windows 10 or 11 will be completed successfully.
3. Complete Installation
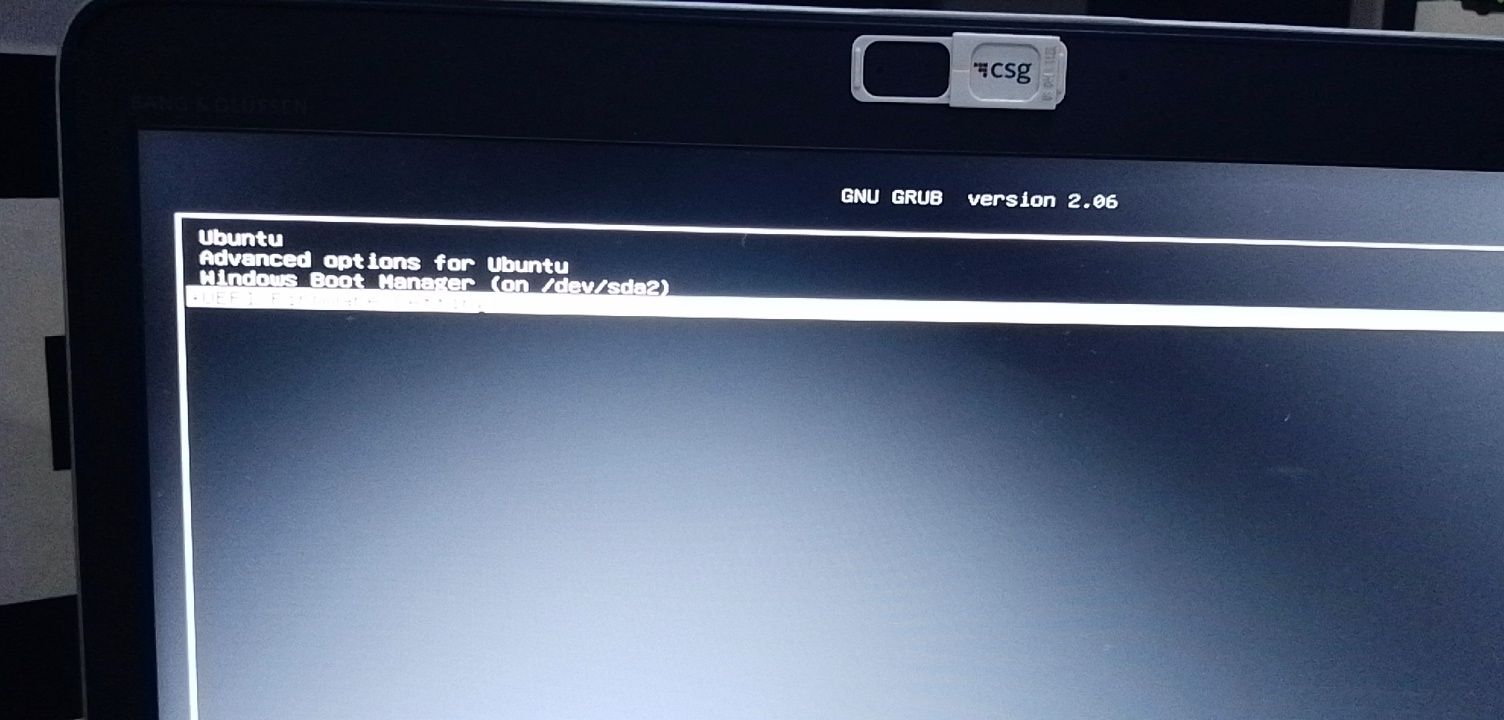
Many users want to know: «How to boot into my Windows after all of this?» Don’t worry, the Grub bootloader will find the Windows bootloader and will output the menu where you can select a operating system for booting:
So dual-booting for Windows and Linux will be configured automatically. If everything goes wrong and you don’t see the Grub bootloader, you always can repair the Windows bootloader or reinstall Grub using LiveCD. If everything is done correctly, you will be able to access your Windows.
Wrapping Up
In this article, we have explained how to install Linux on Windows 10 or 11, how to resize and create partitions on the Windows drive and specify those partitions for Linux installation. There is no sense to explain how to install each Linux distribution. There are dozens of different distributions and all actions will be pretty same. If you have any questions or suggestions on how to improve the article, use the comments form below!
The article is distributed under Creative Commons ShareAlike 4.0 license. Link to the source is required .
Dual booting is a popular method for running two operating systems on the same machine, allowing users to switch between different environments without needing separate hardware. For those who want to enjoy the flexibility and open-source nature of Linux while still retaining access to Windows for work, gaming, or software compatibility, dual booting offers the best of both worlds.
In this article, we’ll explore the pros and cons of dual booting Windows and Linux and provide a step-by-step guide on how to set it up on your computer.
Dual Booting Windows and Linux: A Quick Comparison
Here’s a comparison of the pros and cons of dual booting, highlighting some key differences between running two operating systems on one machine.
| Aspect | Pros of Dual Booting | Cons of Dual Booting |
|---|---|---|
| Access to Both OSes | Access to both Windows and Linux on the same system | Requires rebooting to switch between operating systems |
| Performance | Full performance for each OS (no resource sharing) | Complex setup and potential for mistakes during partitioning |
| Cost | Cost-effective (no need for additional hardware) | Requires more disk space for both OS installations |
| Ease of Use | Use Linux for development, Windows for gaming or work | Managing files across two systems can be cumbersome |
| Customization | Separate environments tailored to different tasks | Risk of compatibility issues with drivers and hardware |
Now, let’s explore in more detail the advantages and disadvantages of dual booting and how you can set it up on your system.
Pros:
1. Access to Both Operating Systems
The biggest advantage of dual booting is that you can access both Windows and Linux on the same machine. This is ideal for users who rely on certain Windows-only software or games, but also want to explore Linux for development, security, or other tasks.
2. Maximized Performance
With dual booting, you allocate system resources (RAM, CPU, storage) exclusively to whichever operating system is in use. This means both Windows and Linux can run at full performance, unlike virtualization, which splits resources between the host and guest systems.
3. Separate Environments
Having two separate environments lets you isolate tasks. For instance, you can use Linux for programming, security testing, or server management while keeping Windows for gaming, media, or work-related applications. This isolation can improve workflow and security.
4. Cost-Effective
Dual booting allows you to use Linux, which is free, alongside Windows without needing to invest in additional hardware like a separate machine. It’s a cost-effective solution for exploring Linux without giving up your current Windows system.
Cons:
1. Complex Setup
Setting up a dual-boot system requires some technical knowledge, especially when it comes to partitioning your hard drive and managing bootloaders. Mistakes during setup could lead to data loss or a misconfigured system.
2. Storage Management
You’ll need to allocate storage space for both operating systems, which can be challenging if you have limited hard drive space. Additionally, managing files across two operating systems can be cumbersome, as Linux and Windows use different file systems.
3. Rebooting to Switch OS
Unlike virtualization, where you can switch between operating systems on the fly, dual booting requires you to reboot the system every time you want to switch between Windows and Linux. This can disrupt your workflow if you need to frequently switch between the two.
4. Potential for Compatibility Issues
There’s a potential for hardware or driver issues with Linux, depending on your system configuration. Some hardware components (such as Wi-Fi cards, graphics cards, or touchpads) may require additional setup or may not be fully supported by Linux out of the box.
How to Set Up a Dual Boot System
Setting up a dual-boot system involves installing both Windows and Linux on the same hard drive or SSD, with each operating system occupying its own partition. Here’s a step-by-step guide to help you get started:
Step 1: Prepare Your System
1. Back Up Your Data
Before making any changes to your system, it’s crucial to back up your important data. Creating a backup ensures that you won’t lose files in case something goes wrong during the installation process.
2. Check Your Storage
Make sure you have enough free space on your hard drive for both operating systems. Ideally, allocate at least 20-50 GB for Linux, depending on how you intend to use it. You can shrink the existing Windows partition to make room for Linux using the Disk Management tool in Windows.
Step 2: Create a Bootable Linux USB Drive
To install Linux, you’ll need to create a bootable USB drive with the Linux distribution of your choice. Here’s how:
- Download a Linux Distribution: Visit the official website of your preferred Linux distribution (e.g., Ubuntu, Linux Mint, Fedora) and download the ISO file.
- Create a Bootable USB Drive: Use a tool like Rufus (Windows) or Etcher (cross-platform) to create a bootable USB drive from the ISO file. Insert your USB drive, open the tool, select the ISO file, and follow the prompts.
Step 3: Partition Your Hard Drive
Now that you have a bootable USB drive, you’ll need to partition your hard drive to create space for Linux. Follow these steps:
- Open Disk Management in Windows: Press Windows + X and select Disk Management.
- Shrink the Windows Partition: Right-click the primary Windows partition (usually C:) and choose Shrink Volume. Enter the amount of space you want to allocate to Linux and confirm the operation. This will create unallocated space on the drive.
- Leave Space Unallocated: Do not create a new partition in this space—Linux will handle this during installation.
Step 4: Install Linux Alongside Windows
- Boot from the USB Drive: Restart your computer and boot from the USB drive by pressing a key to access the boot menu (usually F12, ESC, or F2 depending on your system). Select the USB drive from the list.
- Start the Linux Installer: Once Linux boots, you’ll see an option to try Linux or install it. Choose Install to start the process.
- Select Installation Type: During the installation, choose the option to install Linux alongside Windows. The installer will automatically detect your existing Windows installation and help you partition the disk accordingly.
- Create Partitions: The installer will guide you through creating partitions for Linux. It will typically create a root partition (
/) and a swap partition. You can manually adjust partition sizes if needed. - Complete Installation: Follow the on-screen instructions to complete the installation. Once finished, you’ll be prompted to reboot your system.
Step 5: Bootloader and Dual Boot Setup
After installation, the system will reboot, and you’ll be greeted by the GRUB bootloader. This is a menu that lets you choose whether to boot into Linux or Windows.
- Select Operating System: Use the arrow keys to choose which operating system you want to boot into. Linux will be the default option, but you can select Windows from the list when needed.
- Boot into Linux: If you want to switch between operating systems, simply reboot and choose the desired OS from the GRUB menu.
Step 6: Final Adjustments
- Update Both Systems: Once both operating systems are installed, make sure to update them. In Linux, open the terminal and run the appropriate update command (e.g.,
sudo apt update && sudo apt upgradefor Ubuntu). In Windows, check for updates through the Windows Update settings. - Install Necessary Drivers: Depending on your hardware, you may need to install additional drivers in Linux for things like Wi-Fi or graphics cards. Many Linux distributions automatically detect hardware, but you may need to install proprietary drivers from the system settings.
Conclusion
Dual booting Windows and Linux is a powerful way to enjoy the best of both worlds. Whether you need Linux for development, security, or open-source applications, or Windows for work, gaming, or specific software, dual booting allows you to switch between operating systems as needed without sacrificing performance.
While the setup can be a bit complex and requires careful planning, dual booting is a cost-effective solution for exploring Linux while still retaining the familiarity and functionality of Windows. Once set up, you’ll be able to enjoy both environments, making your system more versatile and capable of handling a variety of tasks.