
Loading
Article: 100008039
Last Published: 2022-11-02
Ratings: 3 4
Problem
This article provides instructions for installing the Backup Exec Agent for Windows on a remote machine.
The Remote Agent for Windows Servers (RAWS) has been renamed to Agent for Windows (AWS) in Backup Exec 15 and above.
Error Message
UMI Code: V-225-285
Solution
Click on the desired method to see the installation instructions for the Agent for Windows Systems (AWS):
Automated (Push) Installation (to be performed from the Backup Exec media server).
Local (manual) installation (to be performed on each remote machine).
In Backup Exec, it is possible to install the Agent for Windows locally with a Graphical User Interface (GUI).
Silent (command line) installation (to be performed on each remote machine).
Command line scripts setupaa.cmd (OS 32-bit) and setupaax64.cmd (OS 64-bit) for a command line installation.
Automated (Push) Installation of Backup Exec Agent for Windows
There are two methods to perform an Automated (Push) installation of the Agent for Windows:
From the Backup and Restore tab (recommended):
- Open the Backup Exec console — go to the Backup and Restore tab.
- Select Add (from the ribbon menu) — select Microsoft Windows computer — click Next.
- Select ‘Allow Backup Exec to establish a trust with the servers.’ — click Next.
- Browse / Add a server name(s) — then click Next.
- Select/Add a System logon account — click Next.
- Select «Upgrade the Veritas Backup Exec Agent for windows to the current version automatically» (if Agent for Windows is not installed/up to date).
Note: ‘Restart the remote computer automatically after installing the Veritas Backup Exec Agent for Windows when a restart is required’ should only be selected if down time has been planned or is not problematic for the target server(s).
- Click Install to begin setup.
- Click Finish to complete the installation..
By clicking on the Backup Exec button:
- Open the Backup Exec console on the media server.
- Click on the round Backup Exec button which is located to the left of the Home tab.
- Go to Installation and Licensing — select Install Agents and Backup Exec Servers on Other Servers.
- On the Remote Computers section — select Add
- Choose Add a Single Computer (if remote agent needs to be installed on only one machine).
OR
- Choose Add Multiple Computers with the Same Settings (to select multiple servers for remote agent installation).
Note: The box Save the server list for future remote install sessions enables the names of all of the remote computers and their credentials to be added automatically the next time Backup Exec or any of its options need to be installed to these remote computers.
- Choose Add a Single Computer (if remote agent needs to be installed on only one machine).
- On the Select the Remote Product screen — select Agent for Windows and click Next.
- On the Add Single Computer / Choose Remote Computers screen:
- When selecting Add a Single Computer:
- Enter the Remote Computer name / select Browse Remote Computers to select a remote machine.
- Enter the Remote computer credentials (type the user name and password of an account that has administrative rights on the server).
- Click Next.
OR
- Enter the Remote Computer name / select Browse Remote Computers to select a remote machine.
- When Selecting Add Multiple Computers with the Same Settings
- Enter the Remote computer name / Browse to select a remote computer — click on Add to List
NOTE: Repeat the above steps to select multiple servers for remote agent installation.
- Enter the Remote Install Credentials (type the user name and password of the account that has administrative rights on the servers).
- Click Next.
- Enter the Remote computer name / Browse to select a remote computer — click on Add to List
- When selecting Add a Single Computer:
- The destination location for Remote Agent install files can be changed under the Destination Folder section if required.
- On the Remote Agent Publishing screen:
- Check the box which says ‘Enable remote agent to publish the IP address and name of the remote computer and the version of the Remote Agent to media server’.
- Click Add and enter the Media Server name or IP address (or both) and press OK.
- Click Next.
- Check the box which says ‘Enable remote agent to publish the IP address and name of the remote computer and the version of the Remote Agent to media server’.
- Click Next when the screen shows Ready to install the Agent for Windows beside the server name(s).
- Click Install to begin the installation.
- Wait for the installation to complete and click Finish.
- An SSL trust relationship will need to be established after a manual installation of the Agent for Windows. This is explained in the following article:
How to establish trust for remote servers in Backup Exec 15 and above
Click here to go back to the top of this article.
Local (manual) installation using the GUI method
When automated (push) installation of the AWS fails it may be necessary to perform a local installation.
Listed below are two methods to perform a Local (manual) installation of Agent for Windows:
Using the RAWS32/RAWSX64 folder located on Backup Exec media server (recommended):
- Copy the Agents folder which includes the «RAWS32 or RAWSX64″, DotNetFx, VCRedist, and MSXML (if it exists) folders, from the Media Server to a drive on a remote computer.
NOTE: The default path for the above mentioned folder is ‘X:\Program Files\Symantec\Backup Exec\Agents’ or ‘X:\Program Files\Veritas\Backup Exec\Agents» (‘X’ is the drive letter where Backup Exec is installed.)
For Remote Agent installation on:
- 32-bit system: Use the RAWS32 folder.
- 64-bit system: Use the RAWSX64 folder.
- Go to the remote computer and open the RAWS32 or RAWSX64 directory which was copied from the media server.
- Run Setup.exe
Note: It is also recommended to right-click on the Setup.exe file and select ‘Run as Administrator‘ to avoid any access issues during the installation process. Turn off User Access Control (UAC) for Windows 2008, Vista or 7. - Click Next on the Welcome screen.
- Select Local Install and click Next.
- Select ‘Agent for Windows’ — click Next.
Note: The destination location for the Remote Agent install files can be changed if desired by clicking on the ‘Change’ button.
- On the Remote Agent publishing screen:
- Check the box which says ‘Enable remote agent to publish the IP address and name of the remote computer and the version of the Remote Agent to media server’.
- Click Add and enter the Media Server name or IP address (or both) and press OK.
- Click Next.
- Check the box which says ‘Enable remote agent to publish the IP address and name of the remote computer and the version of the Remote Agent to media server’.
- Click Install to begin the installation.
- Wait for the Installation to complete and click Finish.
- An SSL trust will need to be established after a manual installation of Agent for Windows. This is explained in the article below:
How to establish trust for remote servers in Backup Exec 15 and above
Click here to go back to top.
Silent (command line) Installation
- Copy the Agents folder from the Backup Exec media server’s installation folder (by default located in C:\Program Files\Symantec\Backup Exec\Agents on the media server or C:/Program Files/Veritas/Backup Exec/Agents) to the root of the C: drive on the remote server. Verify it contains the folders «RAWS32 or RAWSX64″, DotNetFx, VCRedist, and MSXML (if it exists). To perform the steps below, you will be using these following folders:
- RAWS32: For a 32-bit (x86) Windows System.
- RAWSX64: For a 64-bit Windows System.
- On the remote server, go to the command prompt (click Start — Run — cmd):
- Browse to the RAWS folder which was copied on the local drive using DOS commands.
- In the command prompt window type setupaa.cmd (for 32-bit OS) or setupaax64.cmd (for 64-bit OS) and press enter to install Agent for Windows.
Note: Installation of AOFO is no longer required. If the operating system is Windows Server 2003 or above, it will use the Microsoft VSS provider for the Advanced Open File Option.
OR
- Browse to the RAWS folder which was copied on the local drive using DOS commands.
- On the remote server, open the RAWS folder which was copied on the local drive:
- Double-click on setupaa.cmd (for 32-bit OS) or setupaax64.cmd (for 64-bit OS) to install Agent for Windows.
Note: On Windows Server 2008, Windows Vista or Windows 7, right-click on Setupaa.cmd and select Run as administrator.
Installation of AOFO is no longer required. If the operating system is Windows Server 2003 or above, it will use the Microsoft VSS provider for the Advanced Option File Option.
- The command prompt will appear blank for a period between a few seconds and a couple of minutes while the remote agent installs.
- Once completed, the command prompt cursor will appear awaiting further input.
- To check if the Agent for Windows was installed: Go to the Windows services console (Start — Run — Services.msc), and see if the Backup Exec Remote Agent for Windows service is present and started.
- An SSL trust will need to be established after a manual installation of the Agent for Windows. This is explained in the article below:
How to establish trust for remote servers in Backup Exec 15 and above
- To check if the Agent for Windows was installed: Go to the Windows services console (Start — Run — Services.msc), and see if the Backup Exec Remote Agent for Windows service is present and started.
- Double-click on setupaa.cmd (for 32-bit OS) or setupaax64.cmd (for 64-bit OS) to install Agent for Windows.
Click here to go back to top.

This tutorial is for pc with preinstalled Windows 10 using EFI/UEFI. A few steps will be taken to ensure success in dual boot :
Check Partition Style of Disk : GPT or MBR?
To check it, click the windows button and type “create and format hard disk partition.” right-click on Disk 0 > Properties > and go to Volumes tab. You’ll see in the partition style, in this case, is GPT. If GPT, you can proceed with this tutorial.
If MBR, I suggest you reinstall Windows with GPT partition style to easily dual boot with Manjaro Linux and make sure your PC Support UEFI. Because MBR only limit four partitions. I still can’t find the best way to dual boot Manjaro with MBR partition.

I made this step by step from experience and forum discussion to simplify Installing Dual Boot Manjaro along with Windows.
Preparation
What you need to do before installing Dual Boot Manjaro :
- Have USB Disk at least 4gb.
- Download Manjaro Iso from Official here. I’m using xfce 18.1.5 64bit (Recommended Using 64bit architecture if your PC support EFI/UEFI).
- Download Latest Version of Rufus here I’m using v3.8.
- Turn Off Secure boot in bios.
- Turn Off Fast Boot in bios.
- Coffee to chill.
Strongly Recommended to backup your data to External Drives or Cloud to preventing any unexpected reason when installing Manjaro dual boot within Windows.
Step 1 – Make Manjaro Bootable ISO
First, Make Bootable Manjaro ISO.
On Rufus v3.8, select Manjaro ISO that you have downloaded it will automatically lock the option like : Partition scheme, Target system, File system and Cluster size and click start to process.
Warning if you use the older version of Rufus, pop up option will display to write in ISO or DD mode, choose DD mode.

Step 2 – Shrink the Volume
Click the Windows Button on the left bottom, and type “create and format hard disk partition.” Shrink the volume for the Manjaro file system. e.g. On my Data (D:) is 735GB. right click on Data (D:) > Shrink.

Shrink it at least 30gb. When it finished, you see will see Unallocated space for Manjaro Installation later.

Step 3 – Turn off Windows Fast Startup
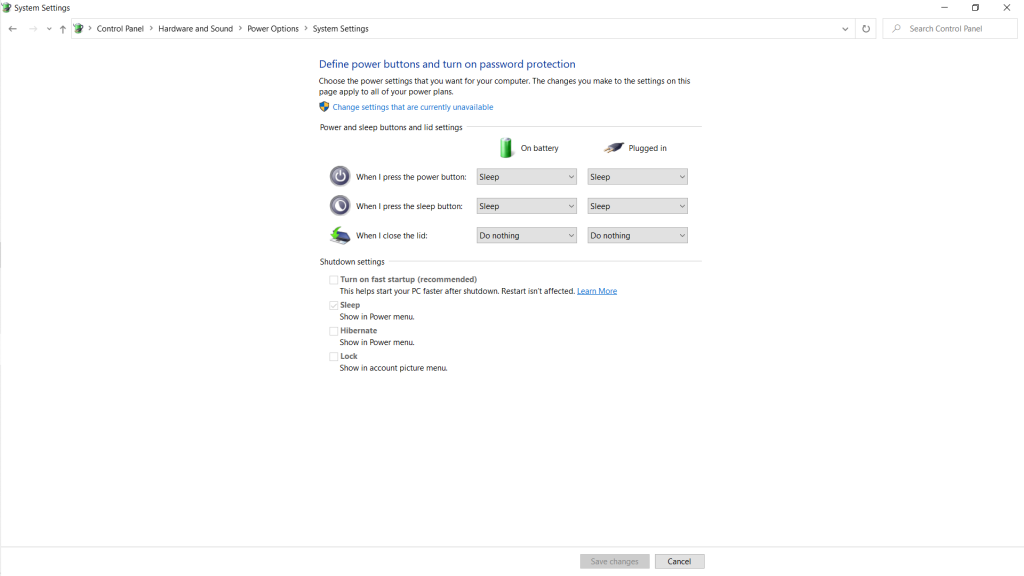
Before we begin installing Manjaro, turn off Windows fast startup to active the read/write file on Linux later. in the Control Panel, System and Security > Power Option > Choose what power buttons do > Change setting that are currently unavailable (shield icon) > click to remove check mark turn on fast startup > Save Changes. it should be like this :
Okay, proceed to next step.
-
Melita
Registered Member- Joined:
- Nov 20, 2014
- Posts:
- 138
- Location:
-
Spain
What is the best way to backup a laptop HDD configured to dual boot Windows and Linux?
-
shmu26
Registered Member- Joined:
- Jul 9, 2015
- Posts:
- 1,550
I do this with Macrium Reflect, it works fine, but you can use another imaging solution as well.
You won’t be able to mount and browse the linux partition, but you can restore it.
Reflect takes the image of the linux partition rather slowly, but it works. -
sm1
Registered Member- Joined:
- Jan 1, 2011
- Posts:
- 572
It is preferable to perform backup using a boot media since a backup software running under windows may not see the linux partitions and do sector by sector backups of linux partitions which will be slow and backup file will be large.
A live boot media based on linux is better since it will see both windows and linux partitions. Clonezilla alternative stable version supports uefi boot but it is very descriptive and not simple GUI. Terabyte unlimited Image for Linux is also a good choice.
-
Melita
Registered Member- Joined:
- Nov 20, 2014
- Posts:
- 138
- Location:
-
Spain
I am not able to handle a complicated GUI. I thought any linux live CD will be suitable for what you recommend.
-
Give «Paragon Backup and recovery free» a try
https://www.paragon-software.com/free/br-free/ -
shmu26
Registered Member- Joined:
- Jul 9, 2015
- Posts:
- 1,550
Can Clonezilla add an entry to the boot menu, similar to Macrium Reflect?
Or do you need to make a flash drive or CD? -
sm1
Registered Member- Joined:
- Jan 1, 2011
- Posts:
- 572
@Melita as suggested by @pandlouk you can try paragon. I did a backup of windows and linux dual boot from boot media.
@shmu26 to use clonezilla you need to create a flash drive or cd bootable media.
I did find tutorials to add clonezilla to boot menu:
For gpt partitions: https://www.rmprepusb.com/tutorials/142—windows-restore-uefi
For mbr partitions: https://www.rmprepusb.com/tutorials/clonezilla -
Melita
Registered Member- Joined:
- Nov 20, 2014
- Posts:
- 138
- Location:
-
Spain
-
shmu26
Registered Member- Joined:
- Jul 9, 2015
- Posts:
- 1,550
Thanks. Clonezilla can’t do incremental and differential backups, correct?
-
Gorkster
Registered Member- Joined:
- Aug 26, 2011
- Posts:
- 147
I’m a bit late to the table but did want to add that Reflect should handle this just fine without the need for a sector by sector backup while booted into Win10 if one of the «normal» Linux file systems is used on the Linux partition.
«Imaging clusters in use and changed clusters (intelligent copy) is supported by FAT16, FAT32, NTFS and Ext 2,3,4 file systems. All other file systems and unformatted partitions will be imaged on a sector by sector basis, i.e, every sector in the partition will be copied.»
https://forum.macrium.com/Topic13439.aspx
http://knowledgebase.macrium.com/display/KNOW7/Minimum System Requirements -
Melita
Registered Member- Joined:
- Nov 20, 2014
- Posts:
- 138
- Location:
-
Spain
I am really not knowledgeable on the subject of ‘sector by sector’ backup. I always had the impression that it is the best way to backup — I mean ‘sector by sector backup’, which solve the problem of corrupted sectors on a disk or am I displaying my ignorance here
-
It’s the worst way to backup as it backs up sectors that contain no relevant data in the partition. So a standard backup might be 20 GB and a ‘sector by sector backup’ of the same partition might be 100 GB.
‘Sector by sector backup’ is called «Backup Unused Sectors» in IFW. This is from the IFW userguide…
Gorkster has a similar quote for Macrium.
Last edited: Jan 28, 2019
-
Melita
Registered Member- Joined:
- Nov 20, 2014
- Posts:
- 138
- Location:
-
Spain
Just so that I get this right. Why is that option ‘sector by sector backup’ available at all. It wouldn’t be there if it is not used by some users. Pardon the ignorance please
-
It’s mainly used for non recognized file systems.
-
I just imaged a non recognized file system. The file system was NEXTSTEP in a 5 GB partition and contained no data. The image was 5 GB.
An image of a 5 GB NTFS partition containing no data was 148 KB.
Last edited: Jan 28, 2019
-
Late to reply, but I use Clonezilla for the Linux partitions in my dual-boot w/Windows 10 system, using basically all defaults, and for the Windows partitions I use IFW. I both cases I use pendrive boot media. I don’t do a lot of backups, maybe once/month on average, so it’s not very time-consuming for me.
-
It also may be used for computer forensic purposes. But I don’t know whether all these programs that can do these are certified to be used by computer forensic specialists to gather evidence in criminal cases.
Manjaro is a desktop Linux distribution that’s based on Arch Linux. In this article, you’ll learn how to install it alongside Windows 10 on a computer with UEFI firmware and a single hard drive. In other words, this article shows how to dual-boot Manjaro Linux and Windows 10 on a computer with UEFI firmware.
At the end, GRUB, the Manjaro boot manager/boot loader, will be the default boot manager of the computer, which will give you the option of booting into Manjaro or Windows 10 whenever you (re)boot the computer.
First Step – Get Your Windows 10 Computer Ready
1. For a pain-free and successful operation of the sort that, it is recommended that you disable Secure Boot. How this is done depends on your computer, but if you have the same Lenovo laptop I used for this tutorial, see How to disable Secure Boot on a Lenovo G50 laptop. On an HP 250 G5 laptop, see this guide.
2. From the BIOS or UEFI setup utility, configure the computer to boot from external media.
3. After that, you need to free up disk space from your computer by shrinking the C drive or other partition with enough free space on it. Getting that done is fairly simple by using the Windows 10 partition manager. When completed, the partition should show partitions and a free disk space similar to the one in Figure 1.

Figure 1: Free space recovered from Windows 10 C drive
Create a Bootable USB Stick of Manjaro
The next step in this operation is to download an installation image of the latest Manjaro Linux. The distribution comes in several desktop flavors, but for this article, I used an installation image of the KDE edition – Manjaro KDE 16.10. It and other desktop editions of the distribution are available for download at the project’s download page.
After the download has completed, you may now use it to create a bootable USB stick. To accomplish that on Windows 10, use this article as a guide. On any Linux distribution, the simplest method is to use the following command:
# This command assumes that you're executing it from your Download directory
# If you're using the same edition as used here, you may just copy and paste.
# Otherwise, change the edition of Manjaro to match the one you downloaded
# /dev/sdb is the target USB stick. Yours might not be sdb, so verify before copying and pasting

sudo dd if=manjaro-kde-16.10-stable-x86_64.iso of=/dev/sdb bs=1M conv=sync

#
In the next step, you’ll use that bootable USB stick to install your favorite desktop flavor of Manjaro alongside Windows 10.
Dual-boot Manjaro Linux With Windows 10
If you need to encrypt the Manjaro 16.10 side of this setup, see Disk encryption with Calamares, the Linux installer for assistance in using the installer’s disk encryption feature.
If you follow the steps as given here, you should have yourself a dual-boot system running your favorite desktop flavor of Manjaro Linux and Windows 10 in about 12 minutes. So if you’ve not done so already, insert the bootable USB stick you created in the previous step in a free USB port and reboot the computer. If it’s been configured in the BIOS or UEFI setup utility, it should boot into the USB stick. If it does not, access the computer’s boot menu and select the appropriate entry. In Figure 2, that entry is EFI USB Device (USB Flash Disk), and it should be the same on your computer.
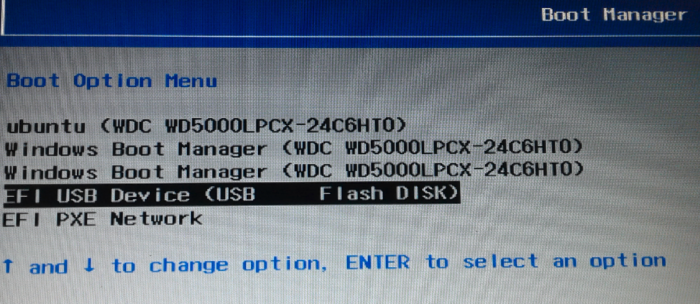
Figure 2: Computer boot menu showing the boot options
Let the computer boot into the Manjaro Live desktop. While on there, launch Calamares, the distribution’s graphical installation program. The step after the first step, should look just like the one shown in Figure 2, which gives you several disk partitioning options.
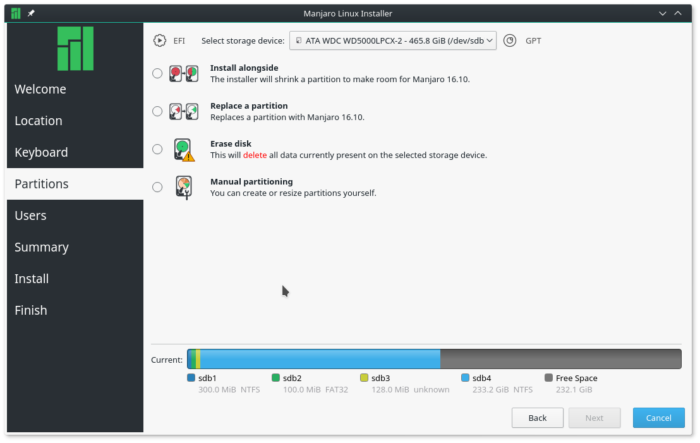
Figure 2: Disk partitioning options of Calamares
The Replace a partition option will take any existing partition and repartition it for Manjaro. So if you select the free space that you recovered from your C drive, it will partition it for Manjaro. However, the installer will create just one partition if you select that option.
What we want to do here, is create three partitions, mounted at / (root), /home and swap. And the option that will make that possible is Manual partitioning.
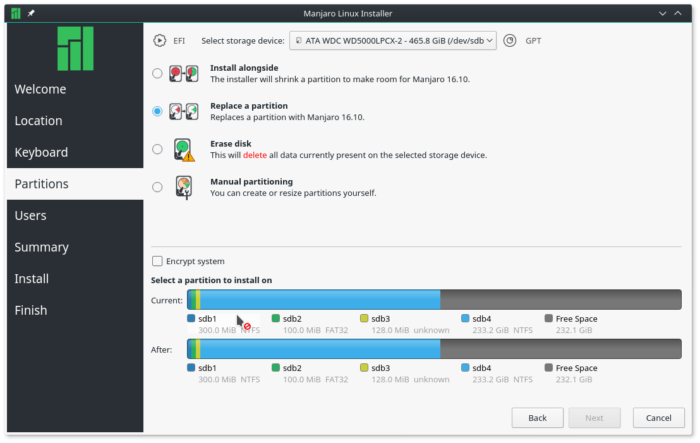
Figure 3: Replace disk partitioning option of Calamares
So select it and click the Next button.
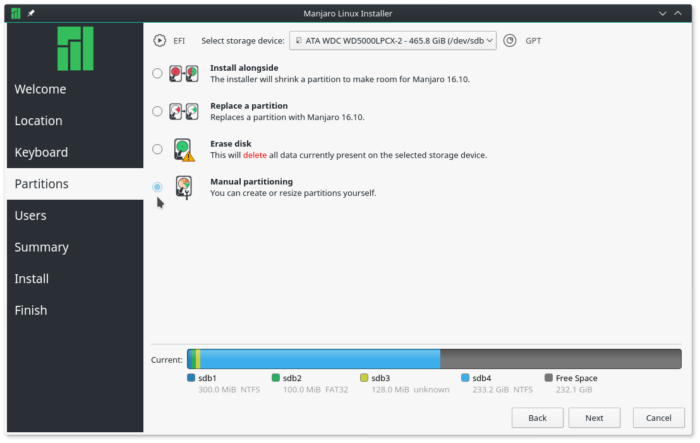
Figure 4: Manual disk partitioning option of Calamares
That will take you to the manual disk partitioning interface, where all existing partitions and the free space, will be listed. In Figure 5, partitions 1 to 4 are the Windows 10 partitions. Though it’s not indicated as such, partition 2 (/dev/sdb2), is the EFI System Partition (ESP). That’s where Windows 10’s boot loader is installed, and where GRUB, the (Manjaro) Linux boot loader, will also be installed. To start creating partitions, select the free space as shown in Figure 5, then click the Create button. That procedure has to be repeated for all the partitions you’ll be creating.
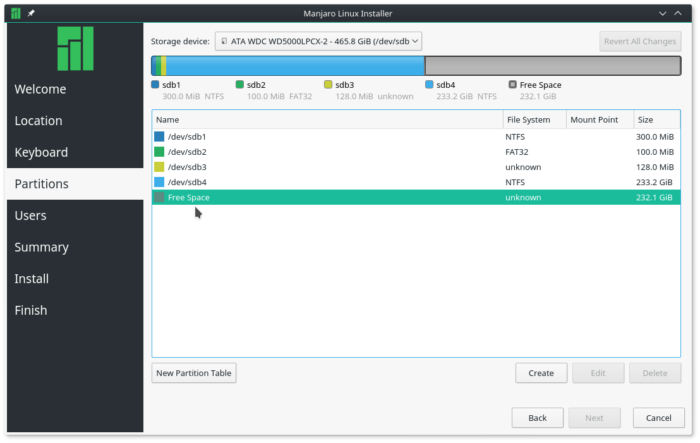
Figure 5: Manual disk partitioning interface of Calamares
That should open the installer’s partition editing window, shown in Figure 6. The only options we’ll need to modify are Size, File System, and Mount Point. For the root and /home partitions, we’ll be using the default file system, so there will no need to modify that when creating those partitions. Note that the installer does have support for disk encryption, but for this setup, we’ll not be using that feature.
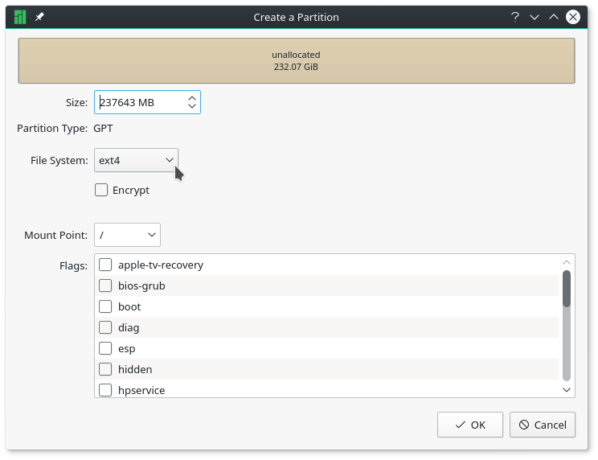
Figure 6: Disk partition editor of Calamares
The first partition we’ll be creating will be mounted at /, and you can assign from 20,000 MB (20 GB) to 50.000 MB (50 GB) to it. A default installation of Manjaro 16.10 KDE takes up less than 7 GB of disk space, so if you don’t have that much free disk space to spare, less will do, provided it’s not less than 7 GB. For the File System option, leave it at ext4. Click OK when you’re finished setting the options.
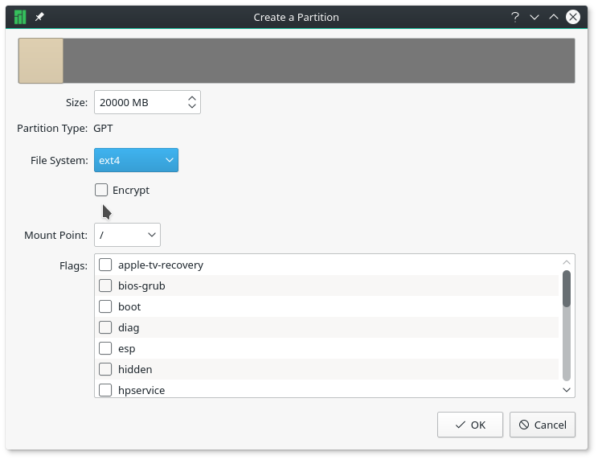
Figure 7: Creating root partition for Manjaro 16.10 on Calamares
For the next partition, which will be mounted at /home, assign as much disk space as you can afford to spare, and leave the File System at the default. OK.
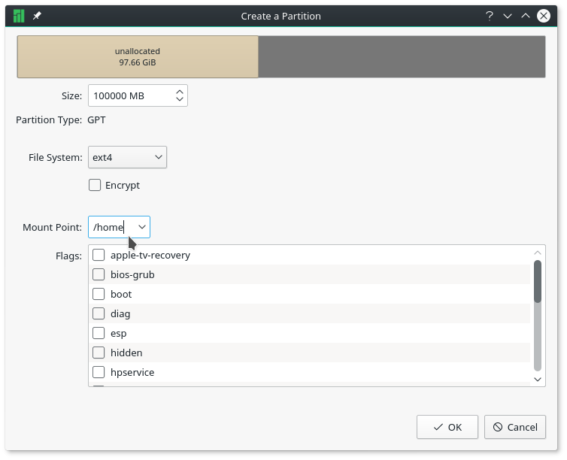
Figure 8: Creating home partition for Manjaro 16.10 on Calamares
The last partition will be for swap, disk space that the system may use as (virtual) memory. From Use as, select linuxswap, then assign some disk space to it. About 2000 MB (2GB) to 4000 MB (4 GB) should do. Less if you don’t have that much disk space to spare. OK.
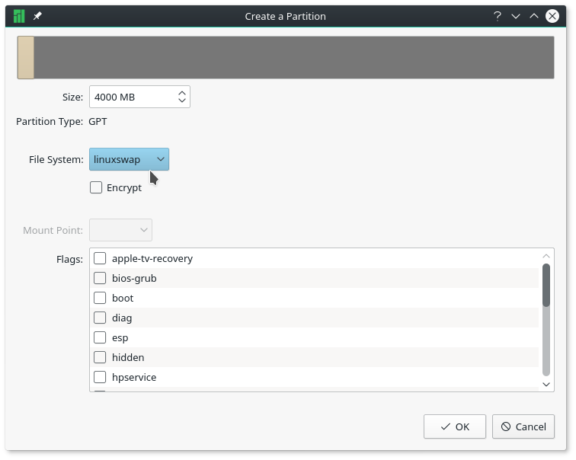
Figure 9: Creating swap partition for Manjaro 16.10 on Calamares
Back to the manual partitioning window for the last time, the partitions you just created will be listed under the existing (Windows 10) partitions. One last task that needs to be completed here before moving to the next step, is specify the ESP. That should be /dev/sdb2, so click on it.
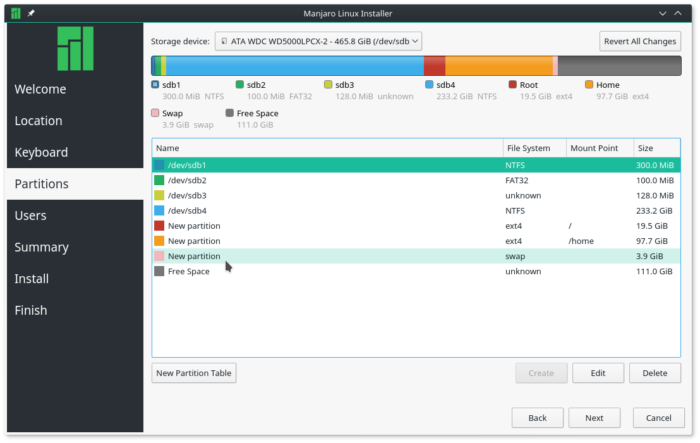
Figure 10: Complete partitions for Manjaro 16.10 on Calamares
In the partition editor’s window that opens, set the Mount Point to /boot/efi, then click OK. Do not modify any other option in this window.
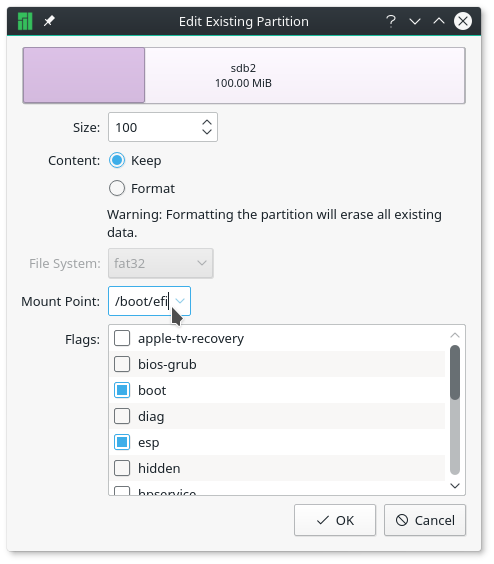
Figure 11: Configure System EFI partition for dual-booting Windows 10 and Manjaro 16.10
All should now be set, and you may click Next.
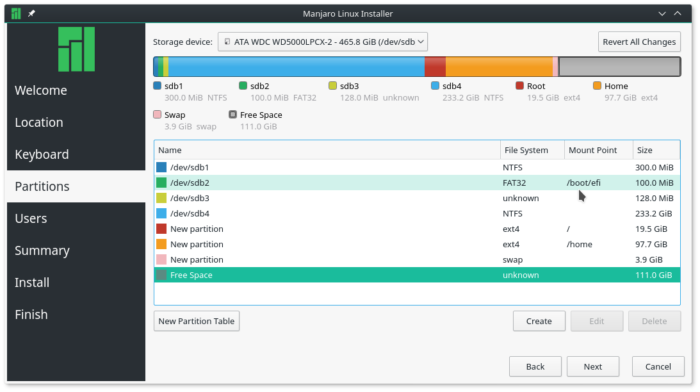
Figure 12: Completed System EFI partition for dual-booting Windows 10 and Manjaro 16.10
This shows you a summary of all the tasks the installer is going to perform. If you agree, click Next.
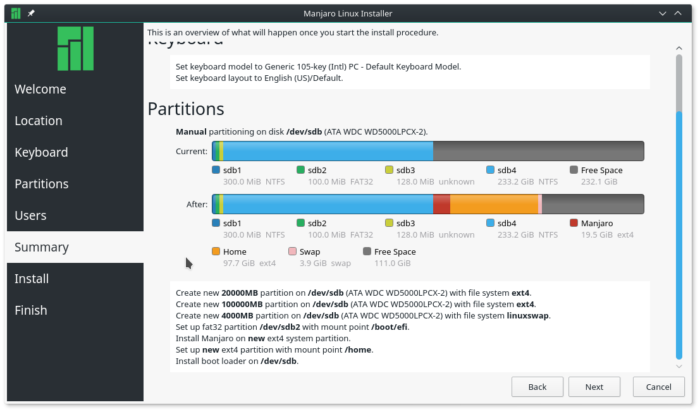
Figure 13: Summary of installation options for dual-booting Windows 10 and Manjaro 16.10
Boot Into Your New Dual-boot System And Update GRUB
After installation has completed, attempting to reboot into your new dual-boot system will first take you to the GRUB menu, which will be just like the one in Figure 14. Notice that there’s no entry for the Windows 10 boot manager, so it won’t be possible to boot into Windows 10 from here.
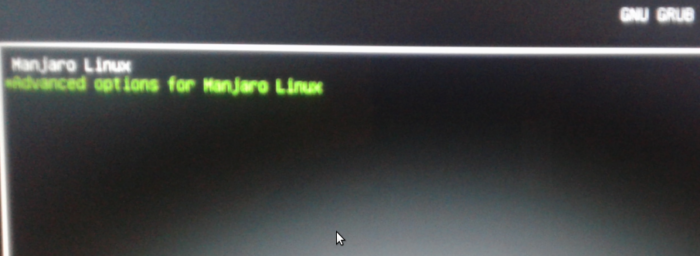
Figure 14: GRUB menu of Manjaro after installing Manjaro alongside Windows 10
We’ll correct that in a moment. Right now, boot into your new installation of Manjaro. Once logged in, open the terminal application, then type sudo update-grub. The output should match that shown below.
Generating grub configuration file ...
Found background: /usr/share/grub/background.png
Found Intel Microcode image
Found linux image: /boot/vmlinuz-4.4-x86_64
Found initrd image: /boot/initramfs-4.4-x86_64.img
Found initrd fallback image: /boot/initramfs-4.4-x86_64-fallback.img
Found Windows Boot Manager on /dev/sda2@/EFI/Microsoft/Boot/bootmgfw.efi
Found memtest86+ image: /boot/memtest86+/memtest.bin
done
After that, rebooting the computer will show a GRUB boot manager interface with an entry for Windows 10, besides the entries for Manjaro Linux. And GRUB will still remain the default boot manager. After making sure that you can still boot into Manjaro, boot into Windows 10 also. If you did all as specified in this article, you should be able to boot into both systems. Enjoy your dual-boot system running Manjaro 16.10 and Windows 10.
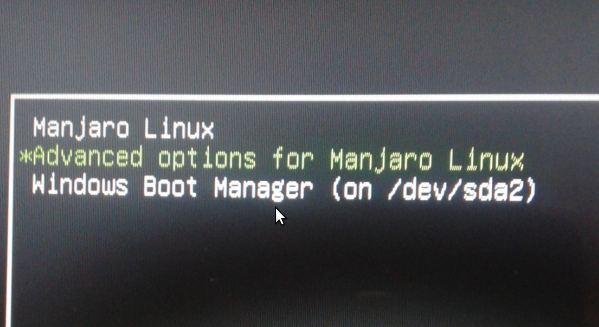
Figure 15: GRUB menu of Manjaro after updating GRUB on a dual-boot system between Manjaro and Windows 10