
Уровень сложностиСредний
Время на прочтение3 мин
Количество просмотров64K
Всех приветствую. В свое время намучался с установкой Убунты в дуал буте с Виндой, переустановкой Винды в такой схемы, переустановкой Убунты и т.д. Недавно снова столкнулся с задачей установки Убунты в дуал буте с Виндой, решил написать краткий гайд, т.к. информация в интернете, кажется, в основном на английском языке и где-то устаревшая. Итак, что для этого потребуется:
-
Скачайте образ с оф. сайта и создайте загрузочную флешку.
Думаю здесь все понятно, подробно можно не описывать и есть информация в интернете, rufus в помощь.
-
Запуститесь с флешки и выберите try ubuntu.
Для чего? Здесь нам нужно найти в приложениях Gparted, найти диск с нашей Виндой, найти EFI раздел, нажать ПКМ -> «Manage flags» и отключить у него
bootиespфлаги. Для того, чтобы Убунта не установилась в EFI раздел Винды. Т.к.в будущем вам это доставило бы только проблем, да и в целом, лучше когда все раздельно.
Не серчайте за качество, все-таки особо не позаписываешь экран при установке -
После этого продолжите установку нажав «Install Ubuntu» или перезагрузившись и нажав то же самое.
Думаю подробно процесс можно не описывать, введите своё имя, имя юзера, и т.д.
-
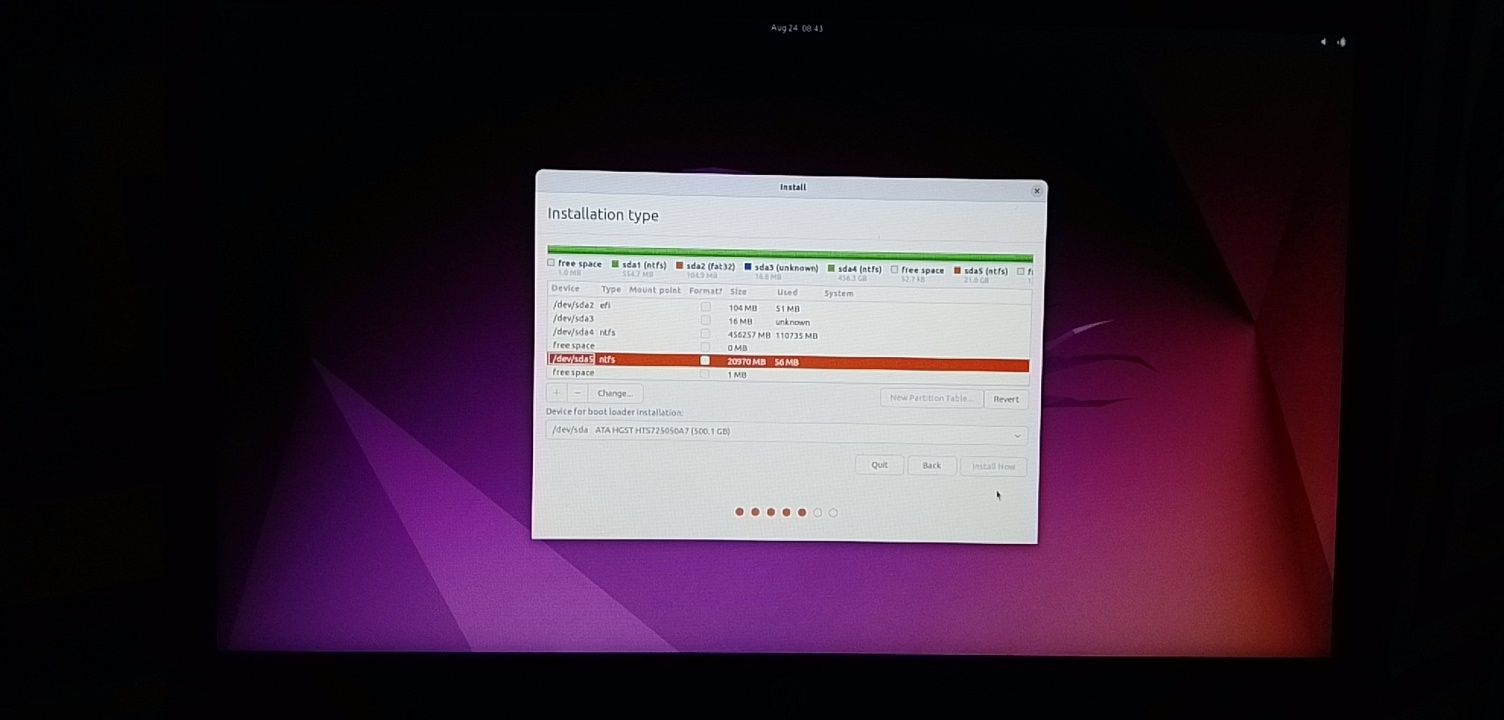
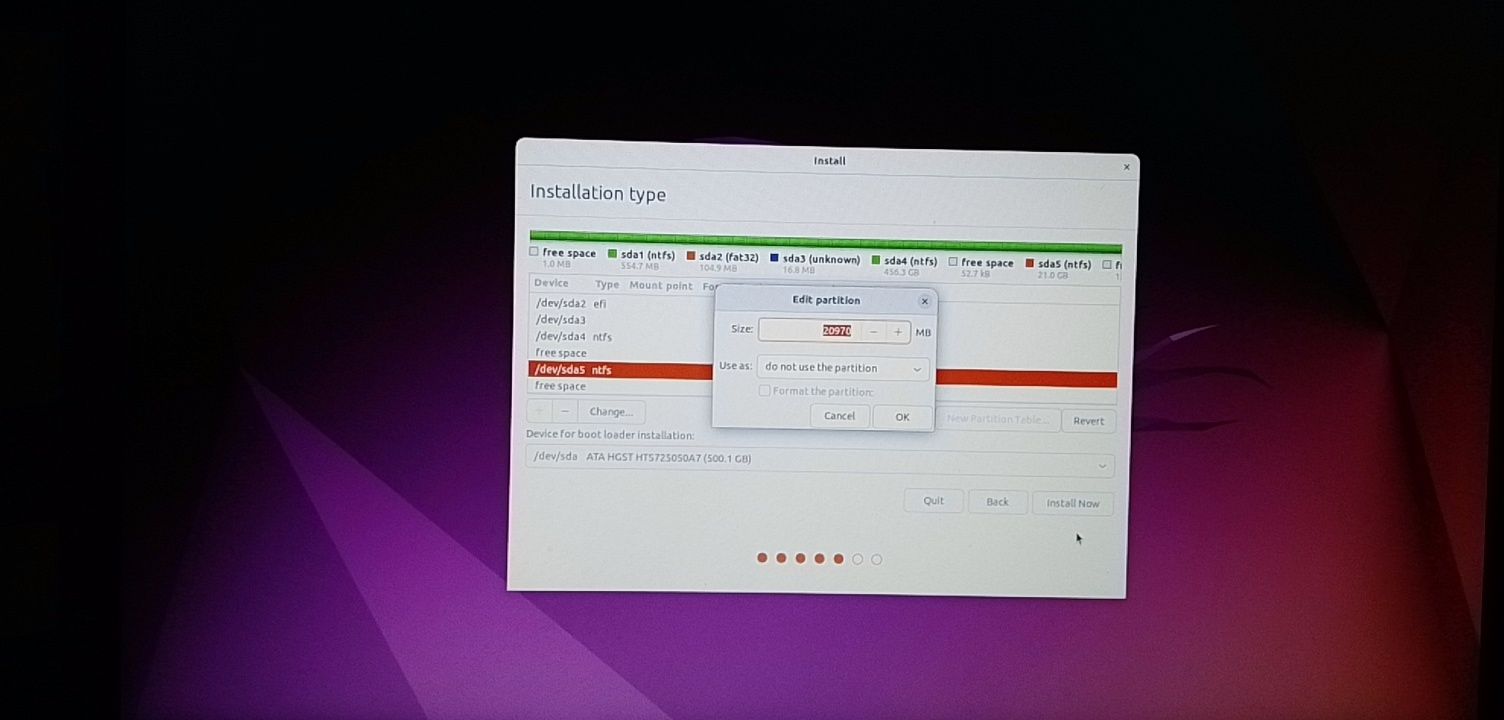
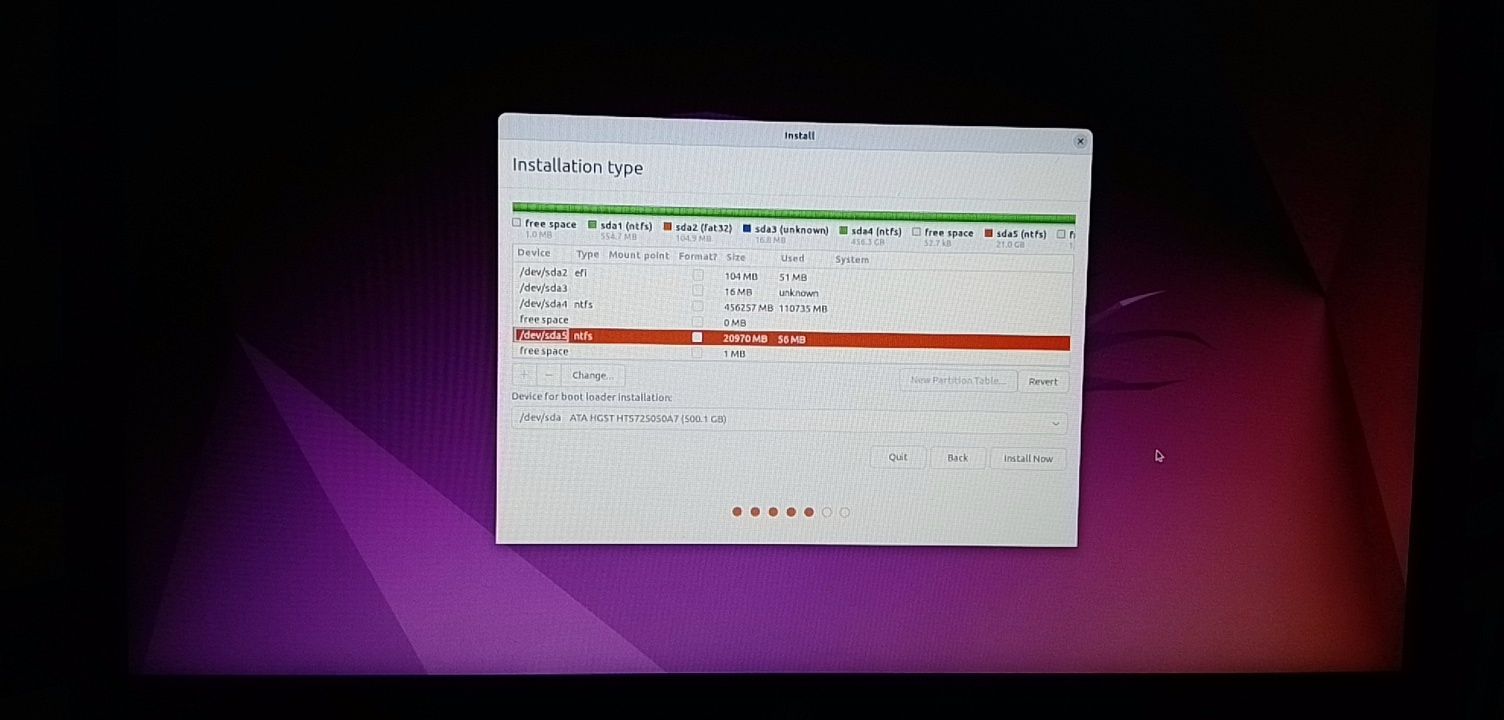
Разбейте свой диск, куда хотите установить Убунту, на разделы.
Здесь каждый делает как хочет и по своему опыту, поэтому это не ультимативный гайд, но если вы не знаете, то выбираете нужный диск (поймете по размеру), удаляете у него все разделы (нажимаете на «-«), если они есть, создаете новые («+»), а именно:
4.1. Swap — раздел подкачки, если хотите режим гибернации, то таблица сколько нужно выделить здесь. Выбираем как на картинке (далее буду говорить лишь тип и поле «use as»/»mount point», т.к. «Location» всегда «Beginning»)
4.2. Boot — раздел загрузчика. Рекомендуемый размер 500мб-1гб. Ставим
Primary,use as Ext4иmount point /boot
4.3 Efi — тот самый раздел, из-за которого весь сыр-бор. У Винды по дефолту 100мб, где-то рекомендуют ставить 300 на Убунте. ТипPrimary,use as Efi system partition
4.4. Home — ваша личная папка, как users на Винде. Рекомендуют создавать отдельно, чтобы было больше вариации (можно зашифровать отдельно, можно забекапить отдельно, и т.д.). Размер по вашему усмотрению, типLogical,use as Ext4иmount point /home
4.5. Root — корень всего,/проще говоря. На него весь оставшийся размер./tmpи/varне рекомендую создавать отдельно, т.к. если не угадаете с размером, постоянно придется чистить вручную. Ставим также, как и/homeили тип можно поставитьprimary(но оба варианта рабочие). -
Дальше продолжаете установку как обычно, вытаскиваете флешку, перезагружаетесь.
Зайдя в Убунту качайте
gparted(почему-то у меня его не было по дефолту):sudo apt install gparted -y, находите снова диск с Виндой и включаете обратно флаги, закрываете (если галочка не нажимается, ничего страшного, так и должно быть, эти флаги сразу применяются) -
Дальше самое интересное.
6.1. Если вы ставите Ubuntu <22.04, то можете сразу написать
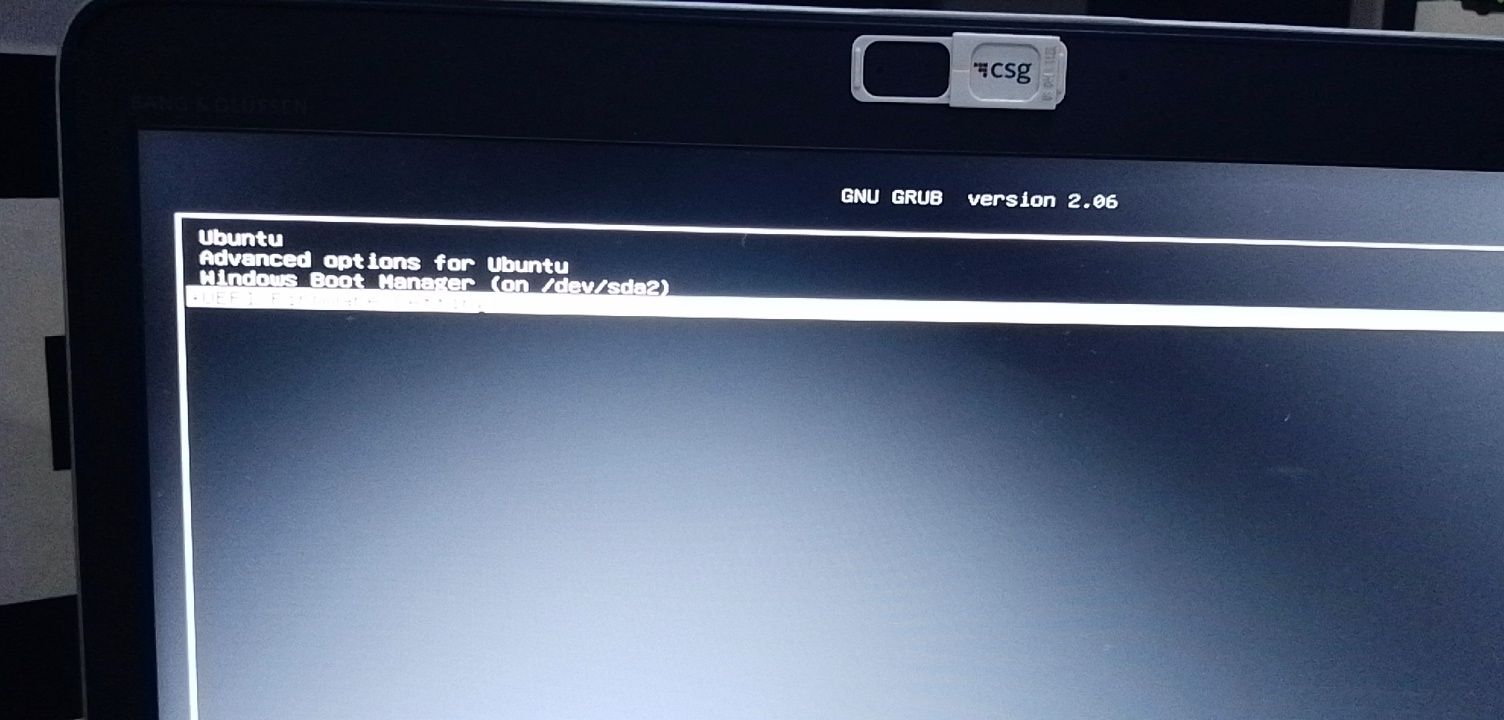
sudo update-grub, перезагрузиться и у вас благополучно появится меню с выбором ОС и Windows в качестве опции, наряду с Убунту. (Ах да, в любом случае на Windows желательно отключитьFast boot, т.к. говорят он мешает, так же легко найти, как это сделать в гугле).
6.2. Если же вы ставите 22.04 (и выше), то нужно потанцевать с бубном:
Откройте файл/etc/default/grubи добавьте туда строчкуGRUB_DISABLE_OS_PROBER=false. Это связано с тем, что по дефолту теперь GRUB не используетos_proberдля определения ОС, а значит нашу Винду без этого он не определит. -
Перезагружайтесь, смотрите меню, радуйтесь легкости бытия.


На этом у меня все. Надеюсь статья была полезной, наверное она подойдет и для других Linux систем. В любом случае, если вздумаете после этого переустанавливать Windows, то не торопитесь, возможно, вам стоит подождать нового гайда… (ну или можно просто отключить диск с Убунтой, так тоже сработает. Вообще-то говоря танцы с флагами можно было также избежать, отключив диск с Виндой, но кому не лень открывать корпус, отключать кабели, мыжпрограммисты).
Want to use Linux but can’t fully abandon the Windows ship? Here’s how to dual boot on Ubuntu Linux and Windows 10 in your modern machine with two disk drives (C:\ and D:\).
Step 0: Safety pre-requisites
Before you go ahead and tinker with your devices, it is always a good idea to create recovery drives and backups. Here are some of the things that you should consider before doing the next steps.
- Windows 10 recovery drive
This will be very helpful if something if at some point you cannot boot to Windows. Here’s a guide from Windows. - Full data backup
Your important files should be copied to a different storage (external drives or thumb drives or cloud) to avoid data loss if something goes wrong. - Full disk image
You can also opt to create a full disk image to help you go back to the same state before you decided to tinker with your device. Macrium is the recommended software over the internet. It’s free but I never used it so use it with caution.
Step 1: Prepare the platform
If you have successfully considered and made your backups, we can now proceed with preparing our machines for the dual boot. We’ll have to change some settings in BIOS and in Windows Advanced Power Options.
BIOS
You can access the BIOS by pressing a key combination during bootup repeatedly. Mine is “F2” but the hotkey depends on the manufacturer of your PC.
- Disable Secure boot
- Disable Intel Rapid Start (if available)
- Disable Fast boot
Windows: Advanced Power Options
Windows Fast boot (Fast Startup) is different from the BIOS Fast boot option. This too should be disabled to avoid problems during bootup. You can access this option in Advanced Power Options in Windows 8/10. Here’s a guide on how to disable it.
- Disable Fast Startup
Workaround on Fast Startup
If so happens you cannot see the Fast Startup option and wanted to make sure that it is off, you can disable the hibernate file via Command Prompt. This will subsequently disable Fast Startup as it uses the same hibernate file for its operations. To do this,
Click start > Type CMD > right-click on Command Prompt > Run as Administrator
Then type the following:
powercfg -h off
These are all the platform preparation pre-requisites that you need if you are to use the entire second hard disk (D:\) for Ubuntu. However, if you are planning to put it in a partition on the second driver (D:\), you need to perform additional steps below.

Additional steps: For those willing to install Ubuntu on a separate partition of the second disk drive
We need to prepare the partition first before running the installation. We must shrink and create an unallocated space on the second drive for our partition. To do this,
Open Disk Management > Right click the second disk drive > Shrink
You can put your desired “Shrink space” in the next window that will appear.

Troubleshooting

If for some reason you cannot shrink the disk space further, you need to do a disk defragmentation first before doing the shrinking. I highly recommend to use either Defraggler or PerfectDisk for this task instead of the default built in Windows defragmenter.

After defragmenting the system files found in the second disk drive (boot-up defrag) together with defraging non-system files, you can now proceed to shrink the free space in the second disk drive.
Step 2: Prepare the installation media
Now its time to prepare the installation media that we are going to use to install Ubuntu. To do this you need the following:
- Minimum 8GB thumb drive with 8GB unused space or more
- Ubuntu ISO
- Rufus or any other bootable media creator
Create bootable media using Rufus
We’ll be using Rufus to create the bootable media. To do this,
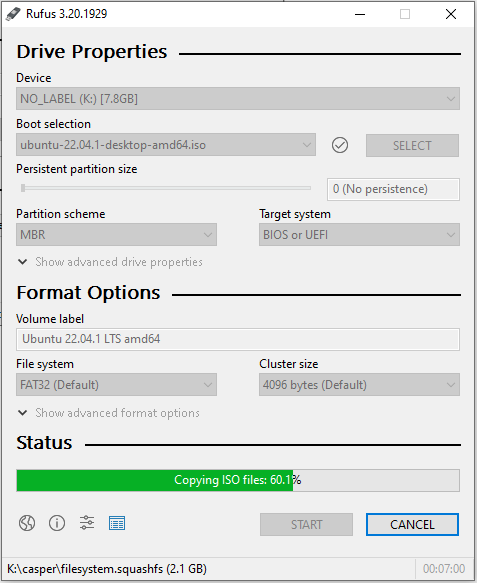
Open Rufus > Select Device / Drive > Select ISO > Set Partition scheme to MBR and Target system to BIOS or UEFI > Start
This will create the bootable media in your thumb drive using the ISO provided. For reference here is what I used in my thumb drive.

Step 3: Boot to USB
This can be achieved by changing the boot order in your machine’s BIOS. This differs per manufacturer to its best consult your product manual on how to do this.
Step 4: Install Ubuntu
Follow on screen instructions to install Ubuntu. If you want to put Ubuntu in a partition on the second disk drive, best create your own partitions just like below.
Otherwise, you can use the whole second disk drive for Ubuntu installation.
Create partitions (for those who are going to install Ubuntu on a partition)
In my case, I partitioned the second disk drive to two since I plan to put Ubuntu on and it functions as my data repository. Using the Ubuntu setup partition tool, I divided my second hard disk as follows:
NVME (main disk drive - SSD) <- Windows OS

SDA (second disk drive)
/sda1/ <- This is where my data are located. This is in NTFS
/sda2/ <- this is where Ubuntu will reside
    - Formatted this in ext4 and mount as "/"
Step 5: Install bootloader the root location of the second hard disk
Install the Grub bootloaded to /sda/ (not /sda1/ or /sda2/). Installing in /sda/ will avoid overwriting the default Windows bootloader located in the first disk drive.
Don’t worry about putting the bootloader in the second hard disk. Grub bootloader is intelligent enough to pick up other resident OS so you won’t have any problems booting to Windows afterwards
Step 6: Finish installation and reboot
And last but not the least, finish installing Ubuntu. Afterwards you can reboot and you will be greeted by Grub bootloader with entries automatically populated to include your Windows 10 installation.
Cheers!
Можешь освоить EasyBCD под Win, далее разберёшься. ))
anonymous
()
- Показать ответ
- Ссылка
Ответ на:
комментарий
от anonymous
Умею им пользоваться — творение Сергея Стрельца всегда на флешке, но хотелось бы иметь две независимые для загрузки ос ))))
Novichok2014 ★★★
()
автор топика
- Показать ответы
- Ссылка
Ответ на:
комментарий
от Novichok2014
Так они и будут независимые. Win остаётся на своём месте. А Grub ставишь на раздел /. Далее Easy под Win, там добавишь запись и будет тебе счастье.
anonymous
()
- Ссылка
А чего-то не выкуриваю проблему, отключаешь диск с виндой, ставишь Линукс, подключаешь диск. Выбор в менюшке биоса.
- Показать ответ
- Ссылка
Ответ на:
комментарий
от Novichok2014
тебе же уже сказали про gpt и efi. а efi разделы больше винда не трет. минутка легкого удержания в курсе. хочешь держи их на 1 диске, хочешь на разных, но испортить их будет трудно. все таки винда уже не та помойка.
anonymous
()
- Ссылка
Ответ на:
комментарий
от ilovewindows
Плюсану. Сейчас вообще все просто.
- Ссылка
lilo:
other=/dev/sdb1
        label=Win
        boot-as=0x80    # must be C:
Ну Windows ставить при отключенном hdd с Linux. Хотя может достаточно в BIOS переставить.
AS ★★★★★
()
Последнее исправление: AS
(всего
исправлений: 1)
- Ссылка
положить ядро на EFI раздел, добавить в меню загрузчика с помощью утилиты efibootmgr.
пример: efibootmgr -c -d /dev/sdX -p 1 -L "LINUX" -l "\EFI\vmlinuz.efi" -u "root=PARTUUID=xxxxxxxx-xxxx-xxxx-xxxx-xxxxxxxx rw"
На арч и генту вики исчерпывающая информация.
anonymous
()
- Ссылка
остоедени винчестер с виндой и установи линукс на второй винчестер, в grub допиши
GRUB_DISABLE_OS_PROBER=rtue
что бы линуксу винду не видно было, подсоедени винчестер с виндой обратно, в биосе выставь приоритет на винтарь с виндою — она будет стартовать по умолчанию, а линукс через выбор по F8…
anonymous
()
- Ссылка
1 марта 2021 г.
Материнская плата:
Asus TUF B450M-PRO GAMING
Можно ли как то в биос этой материнки отключить ссд с виндой что бы его не было видно при установке линукс?
Novichok2014 ★★★
()
автор топика
- Показать ответы
- Ссылка
Ответ на:
комментарий
от Novichok2014
Берешь и руками отсоединяешь. Альтернатива — изучаешь инструкцию к плате и находишь, как отключить конкретный канал SATA или NVMe
One ★★★★★
()
- Ссылка
Ответ на:
комментарий
от Novichok2014
Линукс тебе загрузчика винды не затрёт, если ты только сам его об этом не попросишь.
Так что если знаешь, что делаешь, можно и не отсоединять.
Но лучше физически отключи.
wandrien ★★★
()
- Показать ответ
- Ссылка
Ответ на:
комментарий
от wandrien
Ответ на:
комментарий
от Novichok2014
Читал. Не вижу проблемы.
Ставишь линь, говоришь ему прописать загрузчик на «свой» диск. Всё, два диска полностью независимы.
Проблема с загрузчиком всегда заключается только в том, что винда затирает загрузочный сектор на ВСЕХ подключенных дисках. Если винда уже стоит, вопрос решен. Линь лишнего не затирает.
wandrien ★★★
()
- Показать ответ
- Ссылка
Ответ на:
комментарий
от wandrien
Ставишь линь, говоришь ему прописать загрузчик на «свой» диск. Всё, два диска полностью независимы.
Перед установкой линукс (хубунту), выбрал место загрузчика на том диске где установлен линукс — при старте пк выскакивает меню выбора ос для загрузчика.
Novichok2014 ★★★
()
автор топика
- Показать ответ
- Ссылка
Ответ на:
комментарий
от Novichok2014
Ответ на:
комментарий
от wandrien
В том, что мне не нужно это окно выбора загрузки ос.
Что бы сразу стартовала одна из ос, а второую что бы можно было выбрать через клавишу ф8.
Вот я о чем.
Об этом всем написано в первом посте данной темы…
Novichok2014 ★★★
()
автор топика
- Показать ответ
- Ссылка
Ответ на:
комментарий
от Novichok2014
Поставить 0 в качестве времени ожидания меню.
Об этом всем написано в первом посте данной темы…
Там не написано, что загрузчик настраивать не умеешь.
wandrien ★★★
()
- Показать ответ
- Ссылка
Ответ на:
комментарий
от wandrien
Поставить 0 в качестве времени ожидания меню.
Где это ставить?
Там не написано, что загрузчик настраивать не умеешь.
Вот поэтому и была создана данная тема, а не для раздолья кормиться троллям!!!!
Novichok2014 ★★★
()
автор топика
- Показать ответ
- Ссылка
Ответ на:
комментарий
от Novichok2014
Нет ребята, то что вы советуете это совсем не то.
Мне не нужно скрывать какие то меню, мне нужно что бы винда не видела вообще загрузчик линукс, что бы только через ф8 загрузчик линукс был виден.
Я даже EasyBCD использовал — она не видит загрузчик линукс, видит только виндовый, хотя при этом загрузчик линукс на месте.
Есть еще вариант, но мне просто винду не охота переустанавливать…
Всем огромное спасибо за участие в теме!!!
Novichok2014 ★★★
()
автор топика
- Показать ответы
- Ссылка
Ответ на:
комментарий
от Novichok2014
мне нужно что бы винда не видела вообще загрузчик линукс
А тут и делать ничего не надо. Эта дура кроме самой себя вообще ничего не знает и не видит. Ты сам это подтверждаешь:
EasyBCD использовал — она не видит загрузчик линукс, видит только виндовый
Беда в том, что все, что она не знает, она норовит «поломать».
andytux ★★★★★
()
- Показать ответ
- Ссылка
Ответ на:
комментарий
от andytux
В данном случае, мне не важно, кто дура, а кто умница, или кто ломает или кто строит — мне главное решить свою проблему.
На данный момент вижу только один вариант: переустановка винды.
Novichok2014 ★★★
()
автор топика
- Показать ответы
- Ссылка
Ты придумал несуществующую проблему. Если каждая ось на своём диске, то загрузка из «биоса» и так будет работать без проблем. Пляски начинаются, как раз когда линь и винду селят на один хард
- Ссылка
что бы на случае переустановки винды не восстанавливать загрузчик
Винда ставит загрузчик на свой диск, ей насрать на другие харды в системе
- Ссылка
Ответ на:
комментарий
от Novichok2014
«Разруха в головах, а не в клозетах.»
нужно что бы винда не видела вообще загрузчик линукс
она не видит загрузчик линукс, видит только виндовый
Ты сначала сам с собой договорись.
andytux ★★★★★
()
- Ссылка
Ответ на:
комментарий
от Novichok2014
На данный момент вижу только один вариант: переустановка винды.
На данный момент непонятно, как размечены диски (GPT или MBR) и, соответственно, в каком режиме установлены обе ОС.
mamboo ★★
()
- Ссылка
Ответ на:
комментарий
от Novichok2014
мне нужно что бы винда не видела вообще загрузчик линукс
Ну так она и не видит.
Сам просил.
wandrien ★★★
()
- Ссылка
На одном диске винда, на втором Линукс с загрузчиком. Ставишь второй диск оснговным.
Если хочется переустановить виндоус — делаешь загрузочным диск с виндоус и переустанавливаешь — на втором диске загрузчик на пострадает. На крайняк просто физически отрубаешь его перед установкой.
grem ★★★★★
()
- Ссылка
Ответ на:
комментарий
от Novichok2014
Кривой биос?
Ставил винду на второй диск ноута с линуксом — всё встало без проблем (нет), выбор ОС через UEFI’шный хоткей выбора носителя. Когда сделал update-grub, он подтянул виндовый бут менеджер в своё меню, и стало совсем просто. Никто никому загрузчики не портит.
- Ссылка
Вы не можете добавлять комментарии в эту тему. Тема перемещена в архив.
UPDATED 1/2/2025: Although Windows 11 (and 10) allows you to install Linux distributions like Ubuntu, Mint, Kali, and Fedora through the Windows Subsystem for Linux (WSL) or a virtual machine, there are scenarios where a full Linux installation is necessary to utilize the hardware’s full capabilities for optimal performance.
If you don’t have a separate device for installing Linux, you can configure your existing system to run both Linux and Windows in a dual-boot setup. This guide focuses on dual-booting Windows 11 and Ubuntu, one of the most popular Linux distributions. However, these steps can be adapted for nearly any Linux distro or Windows 10 setup.
If your system uses BitLocker, you can still configure a dual-boot setup. However, you’ll need to temporarily disable BitLocker encryption before proceeding. Once Linux is installed, you can re-enable BitLocker.
In this guide, I will explain the process of setting up a dual-boot system with Windows and Linux, specifically using Windows 11 (or 10) and Ubuntu. Additionally, you can use similar steps to configure dual-boot with two different Windows versions. You can also use these more specific instructions to dual-boot Linux Mint and Windows 11.
Warning: It’s important to note that even though it’s safe to use this process to install Linux alongside Windows 11, creating a full backup of your computer before proceeding in case you need to roll back is still recommended.
Dual-boot set up using Windows 11 and Linux
Setting up a dual-boot system involves three main steps. First, create a bootable USB drive with the Linux distribution of your choice. Next, shrink the current Windows installation to allocate space for the second operating system. Finally, install the Linux distribution alongside Windows 11 (or 10) on the same computer.
- Step 1: Create Linux USB bootable media
- Step 2: Shrink Windows 11 partition
- Step 3: Dual-boot Windows 11 and Linux
Step 1: Create Linux USB bootable media
You’ll need to download the Linux ISO file for the latest version of your preferred distribution (in this example, Ubuntu) to create a bootable USB drive. Below are the links to download some popular Linux distributions:
- Ubuntu ISO download
- Linux Mint ISO download
- Fedora ISO download
- Kali Linux ISO download
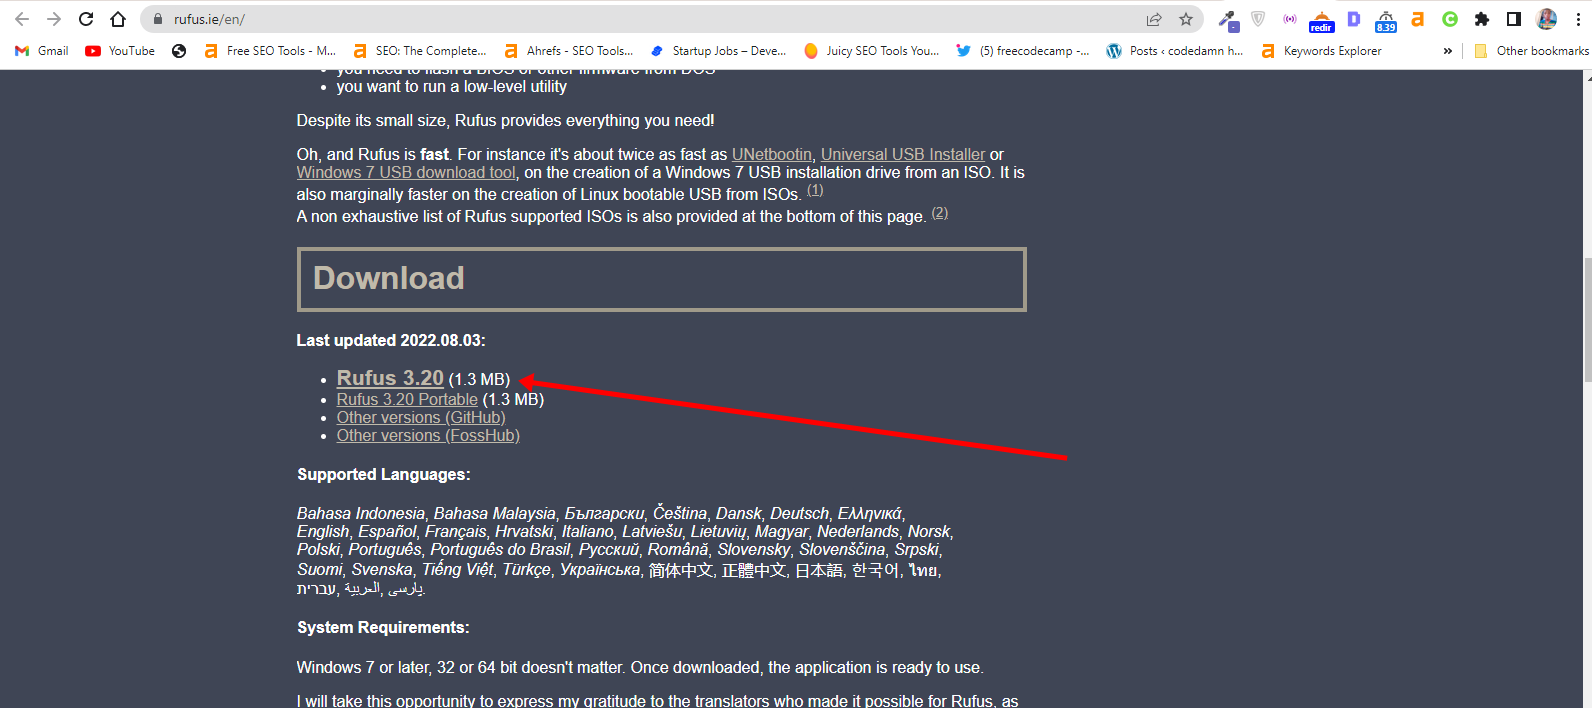
On Windows, the easiest way to create a bootable USB drive that works with both BIOS and UEFI systems is by using the Rufus tool. Rufus is user-friendly and widely recommended for this purpose.
To create a bootable Linux USB drive, follow these steps:
-
Open the Rufus page.
-
Click the Download option for the latest version.
-
Save the file onto your computer.
-
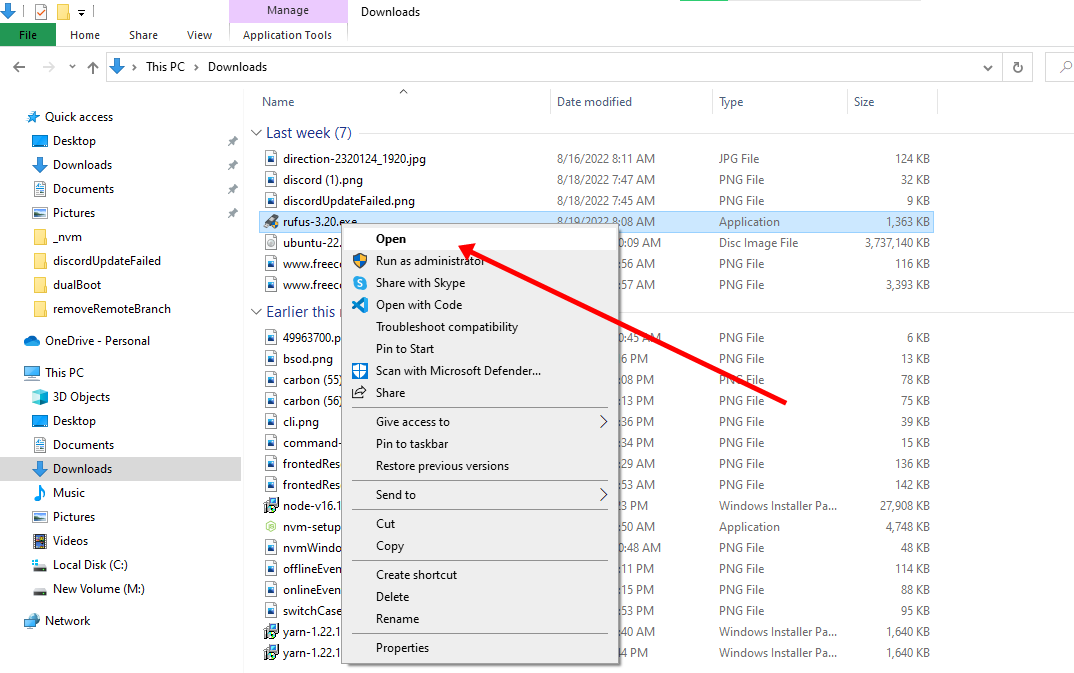
Double-click the Rufus-x.x.exe file to launch the tool.
-
On “Device,” use the drop-down menu and select the USB flash drive.
-
Click the Select button.

-
Choose the Linux ISO file (in this case, Ubuntu).
-
Click the Open button.
-
Choose the MBR option in the “Partition scheme” setting.
-
Choose the BIOS or UEFI option in the “Target system” setting.
-
On “File System,” select FAT32.
-
(Optional) Confirm a name for the drive in the “Volume label” setting.
-
Choose the FAT32 option in the “File system” setting.
-
Continue with the default settings as they are.
-
Click the Start button.
-
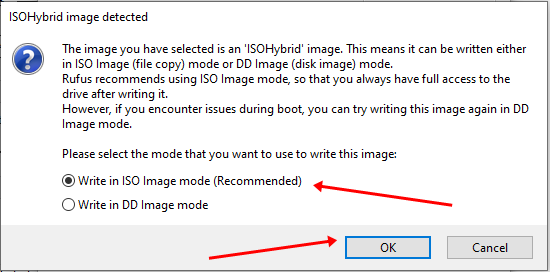
Choose the “Write in ISO image mode” option (if applicable).

-
Click the OK button.
-
Click the Yes button (if applicable).
-
Click the OK button.


After completing the steps, you can proceed with the steps below to create a dual-boot system with Ubuntu and Windows 11.
Alternatively, you can use the Ventoy utility to make any installation media bootable by dragging and dropping the ISO file into a USB drive.
Step 2: Shrink Windows 11 partition
Although the Ubuntu installer provides an option to install alongside Windows 11 (or 10), this feature may not always function as expected. To ensure a smoother installation process, it’s recommended to manually shrink the Windows partition beforehand to create space for Ubuntu and then use the “Manual” installation option during setup.
Alternatively, you can use a secondary internal drive for the Ubuntu installation. This approach keeps each operating system on a separate physical drive, avoiding the need to modify the existing Windows partition and reducing the risk of accidental data loss.
If your device does not currently have an operating system installed, follow these instructions to perform a clean installation of Windows 11 (or use these steps for Windows 10). Once Windows is installed, proceed with the instructions below to set up a dual-boot configuration.
To shrink a partition on Windows 11 or 10 using Disk Management, follow these steps:
-
Open Start.
-
Search for Create and format hard disk partitions and click the top result to open the Disk Management console.
-
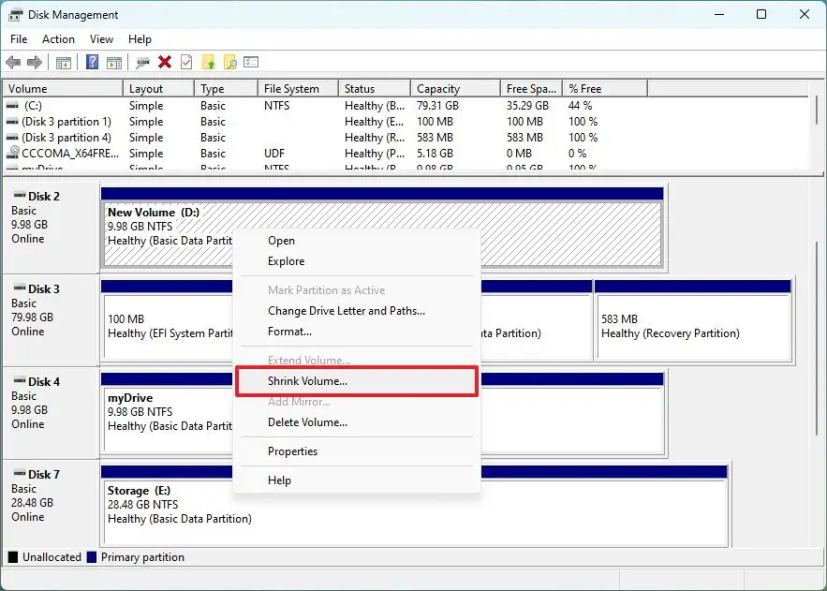
Right-click the drive you want to change its partition size and select the Shrink Volume option.

-
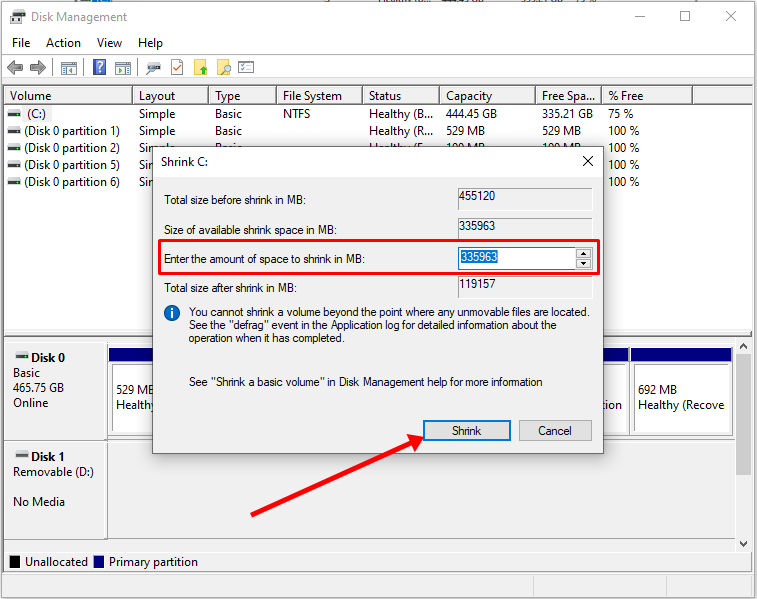
Confirm the amount of space to shrink the partition (in megabytes).
Quick note: Ubuntu (and most distros) requires at least 25GB of available space.
-
Click the Shrink button.

Once you complete the steps, you’ll end up with a small partition and some unallocated space to install Ubuntu. You can also use other methods to change the size of the partition on Windows 11.
Step 3: Dual-boot Windows 11 and Linux
After shrinking the Windows 11 (or 10) system partition and creating a bootable Linux drive, you can proceed with the dual-boot installation
To dual-boot Windows 11 and Linux, follow these steps:
-
Restart your computer with a Linux USB bootable media.
Quick Tip: If your computer is not starting into the Ubuntu (Fedora, Kali, or Mint) setup, you may need to access the system BIOS to change the boot settings to start from USB. Typically, you can change these settings by pressing one of the functions (for example, F2, F8, F12), Delete, or ESC key. However, check your computer manufacturer’s support website for more details.
-
Select the “Try or Install Ubuntu” option and press Enter to continue.

-
Choose your language.

-
Click the Continue button.
-
Continue selecting your accessibility preferences.
Quick note: You can configure visual, hearing, typing, and input settings.
-
Click the Next button.
-
Choose your keyboard layout.
-
Click the Next button.
-
Select your network connection. For example, “Use wired connection.”
-
Click the Next button.
-
Select the Install Ubuntu option.
-
Click the Next button.
-
Choose the Interactive installation.
-
Click the Next button.
-
Choose the Default selection option.
Quick tip: The “Default selection” option sets up a leaner installation of the operating system with only the essential utilities. You can then use the App Center app to add more apps. The “Extended selection” adds more tools that are typically useful for offline situations.
-
Check the “Install third-party software for graphics and Wi-Fi hardware” option.
-
Check the “Download and install support for additional media formats” option.
-
Click the Next button.
-
Choose the “Install Ubuntu alongside Windows Boot Manager” option.
-
Click the Next button.
-
Create a local Linux account.
Quick note: In this section, do not try to use the “root” username and choose the name for your computer.
-
Click the Next button.
-
Change your timezone (if applicable).
-
Click the Next button.
-
Click the Install button.
-
Click the Restart now button.


Once you complete the steps, Linux will install on your device alongside Windows 11 (or 10).
If you’re unable to start the device after updating to the latest build of Windows 11, it’s likely because Microsoft has fixed a vulnerability with the Secure Boot Advanced Targeting (SBAT) setting that also happened to affect dual-boot systems. This error will produce the “Verifying shim SBAT data failed: Security Policy Violation. Something has gone seriously wrong: SBAT self-check failed: Security Policy Violation” message.
If you haven’t restarted the computer to complete the installation of KB5041585, you can run the reg add HKEY_LOCAL_MACHINE\SYSTEM\CurrentControlSet\Control\SecureBoot\SBAT /v OptOut /d 1 /t REG_DWORD command through Command Prompt (admin).
After the August 2024 update has been applied to the computer, you will have to disable Secure Boot in the UEFI/BIOS, boot into Ubuntu, and remove the SBAT policy running the sudo mokutil --set-sbat-policy delete command. Then restart the computer into Linux to update the changes, reboot the computer one more time, and re-enable Secure Boot.
If you plan to test this setup with VMware Workstation Pro, consider that Ubuntu 24.04 is not officially supported and may encounter issues. For instance, I encountered graphics and networking problems while writing this guide. If this is your case, you may be able to mitigate the graphics issues by disabling the 3D graphics and the auto-adjust interface features. If the problem is the network, you must install the drivers manually.
When the time comes, you can use these instructions to safely uninstall Linux from the dual-boot system.
Update January 2, 2025: This guide has been updated to ensure accuracy and reflect changes to the process.

You don’t have to have two different computers to use Linux and Windows 10. It’s possible to have a Linux distro installed on a computer with Windows 10 preinstalled.
In this article, I will show you how to dual boot Windows 10 and the popular Ubuntu Linux distro. But before that, you have to install Ubuntu on your Windows 10 PC.
Before you go through this process, you must backup your files. That’s because installing an OS is a risky process. Sometimes it can overwrite the existing OS and delete all your files.
N.B.: Most of the processes in this article take time to get done, so you need to be patient.
What We’ll Cover – A step-by-step Guide to Dual-Booting Windows 10 and Linux
- Prerequisites
- How to Partition your Hard Drive for Ubuntu
- How to Optimize your Hard Drive for More Partition Space (Optional)
- How to Download Ubuntu in ISO Image Format
- How to Make an Ubuntu (Linux) Bootable USB Drive
- How to Install Ubuntu Linux Distro along with Windows 10
- Now You Can Dual Boot Ubuntu and Windows 10
- Conclusion
Prerequisites
Most importantly, there are some things you must have in place if you want to use (and dual boot) Ubuntu and Windows 10 on the same PC:
- A computer preinstalled with Windows 10
- A partitioned hard drive
- A BIOS in UEFI mode (Unified Extensible Firmware Interface)
- An empty USB drive of at least 4Gig for creating a bootable disk
- An internet connection to download Ubuntu ISO image (the Linux distro) and Rufus (a bootable drive creation tool)
How to Check If Your PC BIOS is in UEFI Mode
To check if your PC BIOS comes in UEFI mode, search for “system information” and hit ENTER.
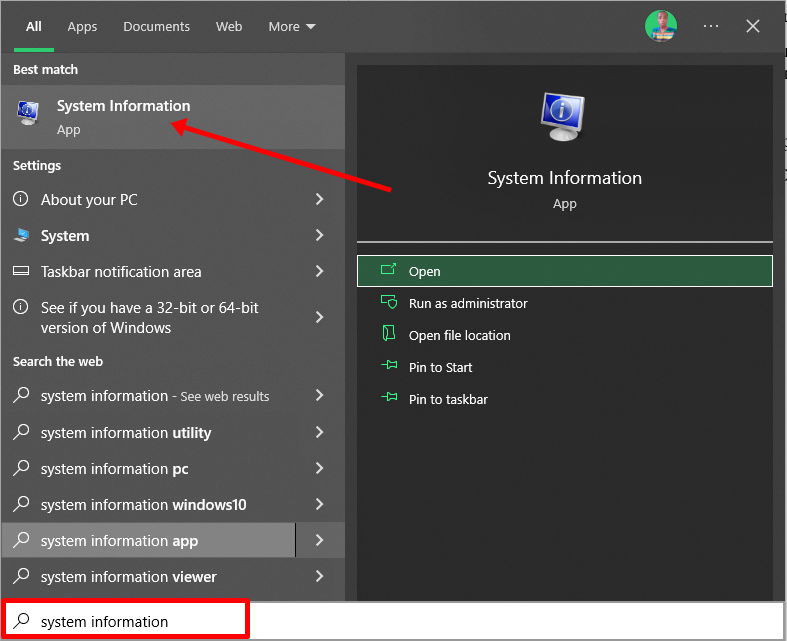
Look under BIOS mode to confirm that your PC BIOS mode comes as UEFI.
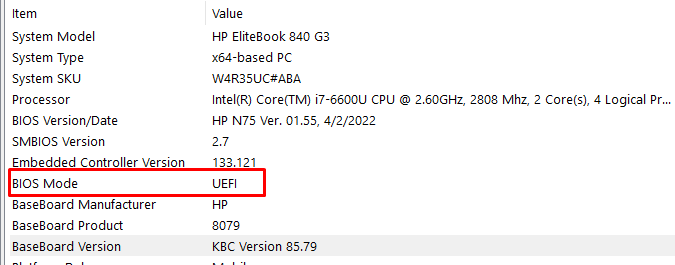
If your PC BIOS is not in UEFI mode, the two operating systems won’t see each other. You can learn more about the difference between these two modes here.
How to Partition your Hard Drive for Ubuntu
You have to partition your hard drive because you must set aside at least 20Gig for Ubuntu to live in and boot from.
To partition your hard drive, follow the steps below:
Step 1: Right-click on Start and select “Disk Management”.
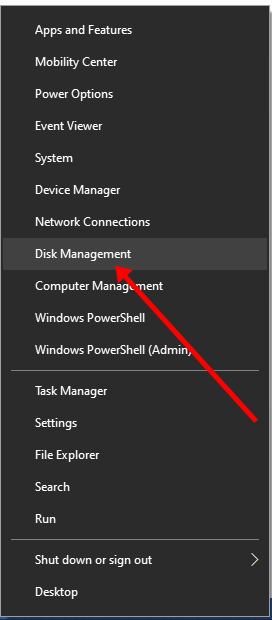
Step 2: Right-click on your C drive and select shrink volume.
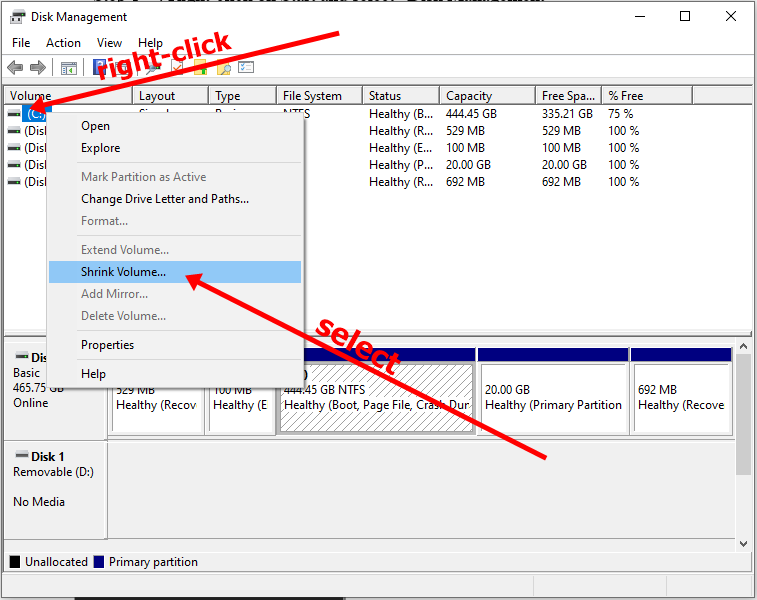
Step 3: Select at least (20000) 20Gig for Ubuntu and click “Shrink”. IT can take some time to complete, so be patient.
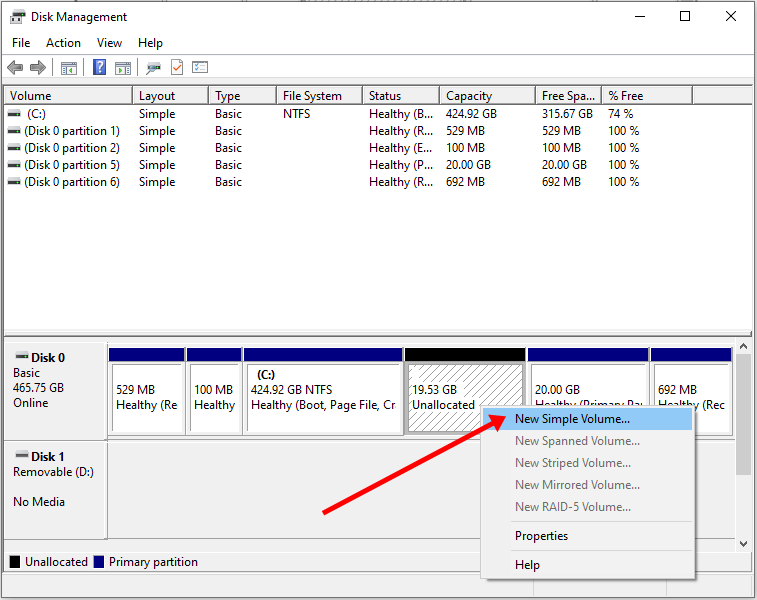
Step 4 (optional): You can go ahead and assign a letter to the new volume. Right-click on the unallocated space and select “New Simple Volume”.
Step 5: Follow the wizard and assign a letter to the drive, then follow the rest of it.
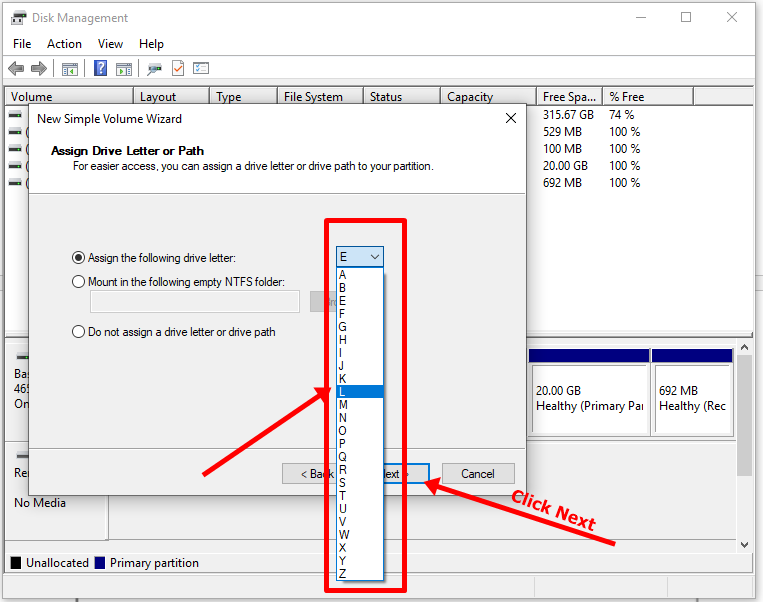
After completing the wizard, the drive should be listed on your computer.
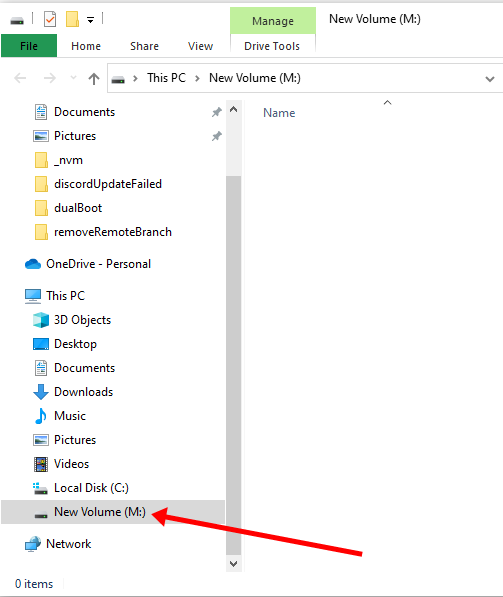
Congrats! You’ve successfully partitioned your hard drive.
N.B.: If you have a lot of free space in your hard drive but your PC still didn’t give you up to 20Gig partition space, then you need to optimize your PC’s hard drive. Proceed to the next section of this article to do that.
How to Optimize your Hard Drive for More Partition Space (Optional)
The common purpose of hard disk optimization is to speed up your computer during boot time and make it run smoother.
At the same time, the process will defragment the hard disk and make free space more available for partitioning.
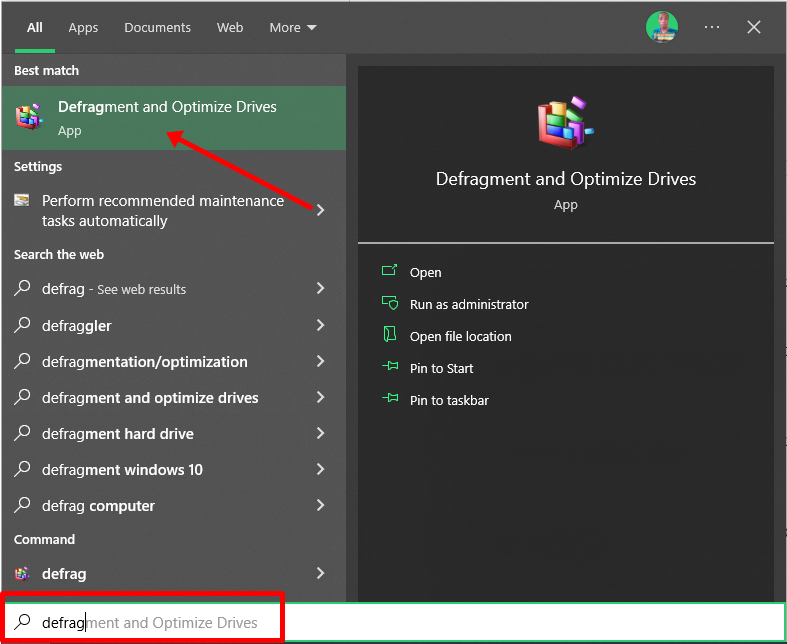
To optimize your hard drive, click Start (Windows logo key), search for “defrag” and select “Defragment and Optimize Drives”.
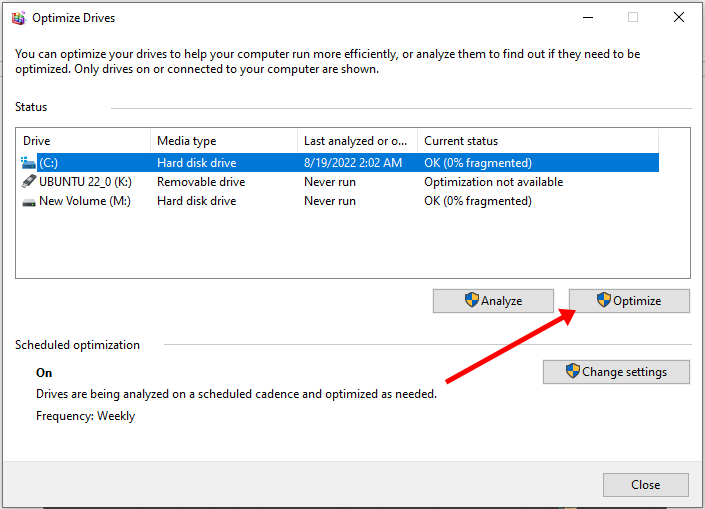
Make sure your C drive is highlighted, then click “Optimize”.
After you’ve been able to set aside at least 20Gig for Ubuntu by partitioning your hard drive, then it’s time to download Ubuntu and make a bootable USB.
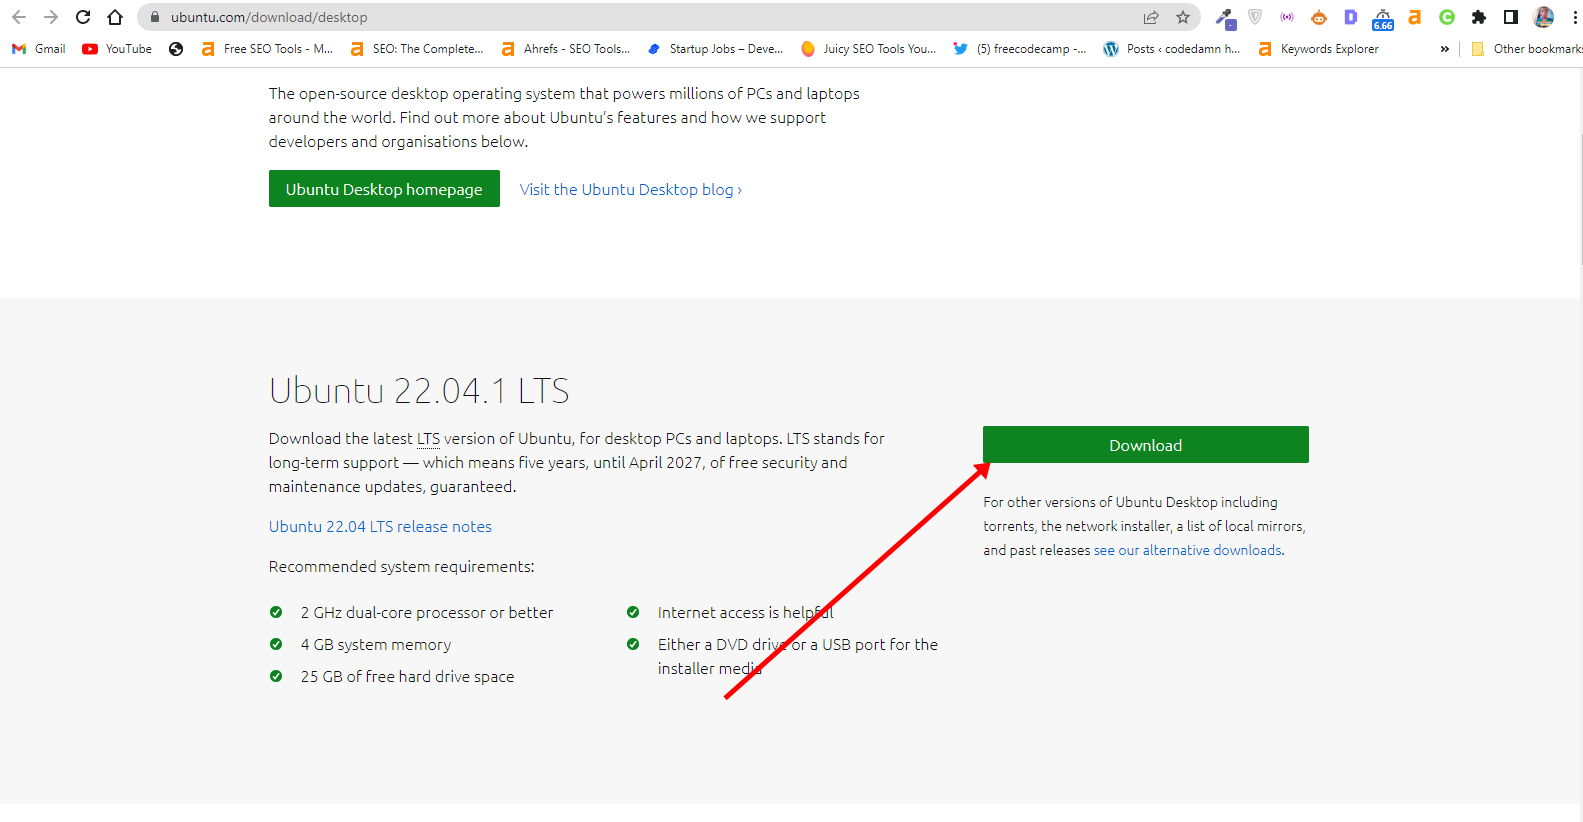
How to Download Ubuntu in ISO Image Format
The next thing is to download Ubuntu in ISO image format so you can install Ubuntu. You can download it from the Ubuntu distro website.
After downloading Ubuntu, don’t do anything with it yet. You need to make a bootable USB and put it in there. That’s how you’ll be able to use it.
The reason you can’t install Ubuntu just like that is that it doesn’t come as an executable. It comes in form of ISO (optical disk image). That means you have to find a disk to put it in before it can work.
The next part of this guide shows how you can put the downloaded Ubuntu ISO on a USB stick.
How to Make an Ubuntu (Linux) Bootable USB Drive
You won’t be able to make a bootable USB drive for Ubuntu by just placing the downloaded ISO image in it. Follow these steps to get it done:
Step 1: You need to download a bootable USB drive creation tool like Rufus. You can download Rufus from their website.
Step 2: Insert the empty USB drive into your Windows 10 PC. Right-click on Rufus and select “Open”.
Step 3: Under “Device”, select your USB drive. And under “Boot selection”, click the “Select” button and select the Ubuntu ISO file you downloaded
Step 4: Leave every other thing as default and click the “START” button to start burning the Ubuntu distro to the drive.

Step 5: Click OK to start the process.
Once the process is done, you should see “READY” on a green background. Click the Close button. Its time to install Ubuntu.
Congrats! Now you have a bootable drive with which you can install Linux.
The next step is to install the Ubuntu distro on your Windows 10 PC. To do this, you have to boot your PC from the bootable USB drive you created.
How to Install Ubuntu Linux Distro along with Windows 10
Step 1: Ensure the bootable drive is inserted into your Windows 10 PC
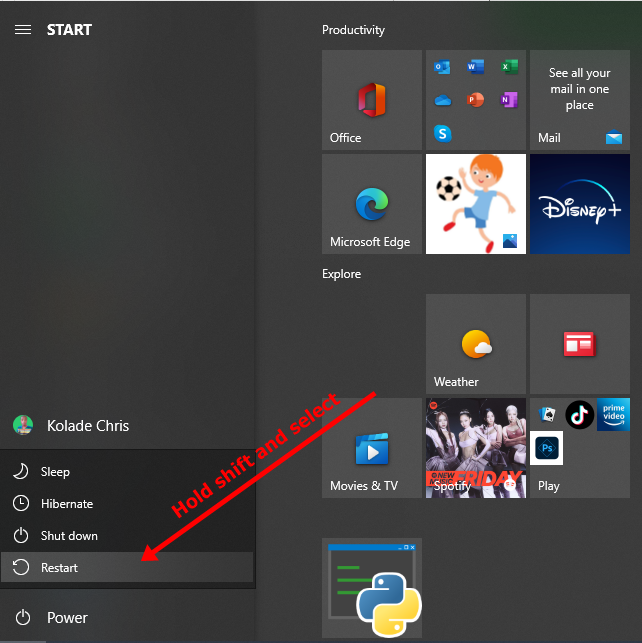
Step 2: Right-click on Start, hold SHIFT, and select Restart.
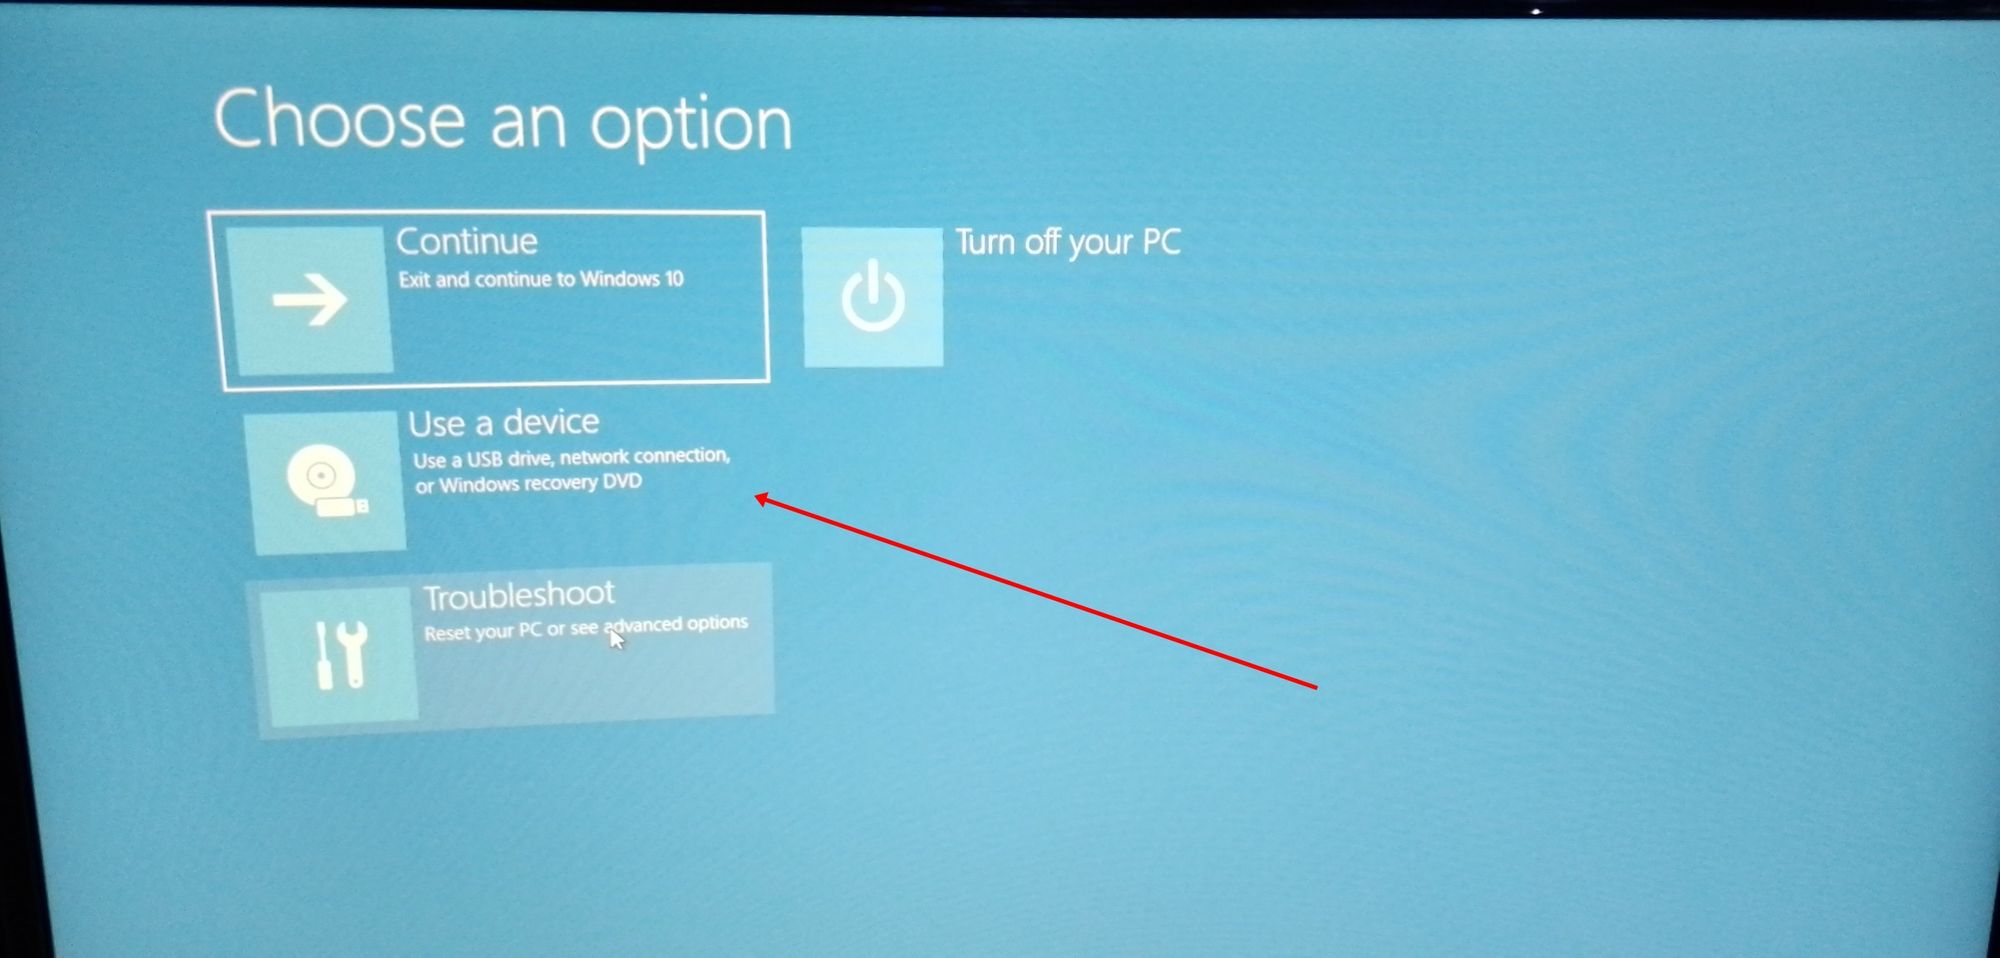
Step 2: Select “Use a Device”.
Step 3: On the next screen, you should see several devices you can boot from.
You may see the bootable drive as the name of the USB brand.
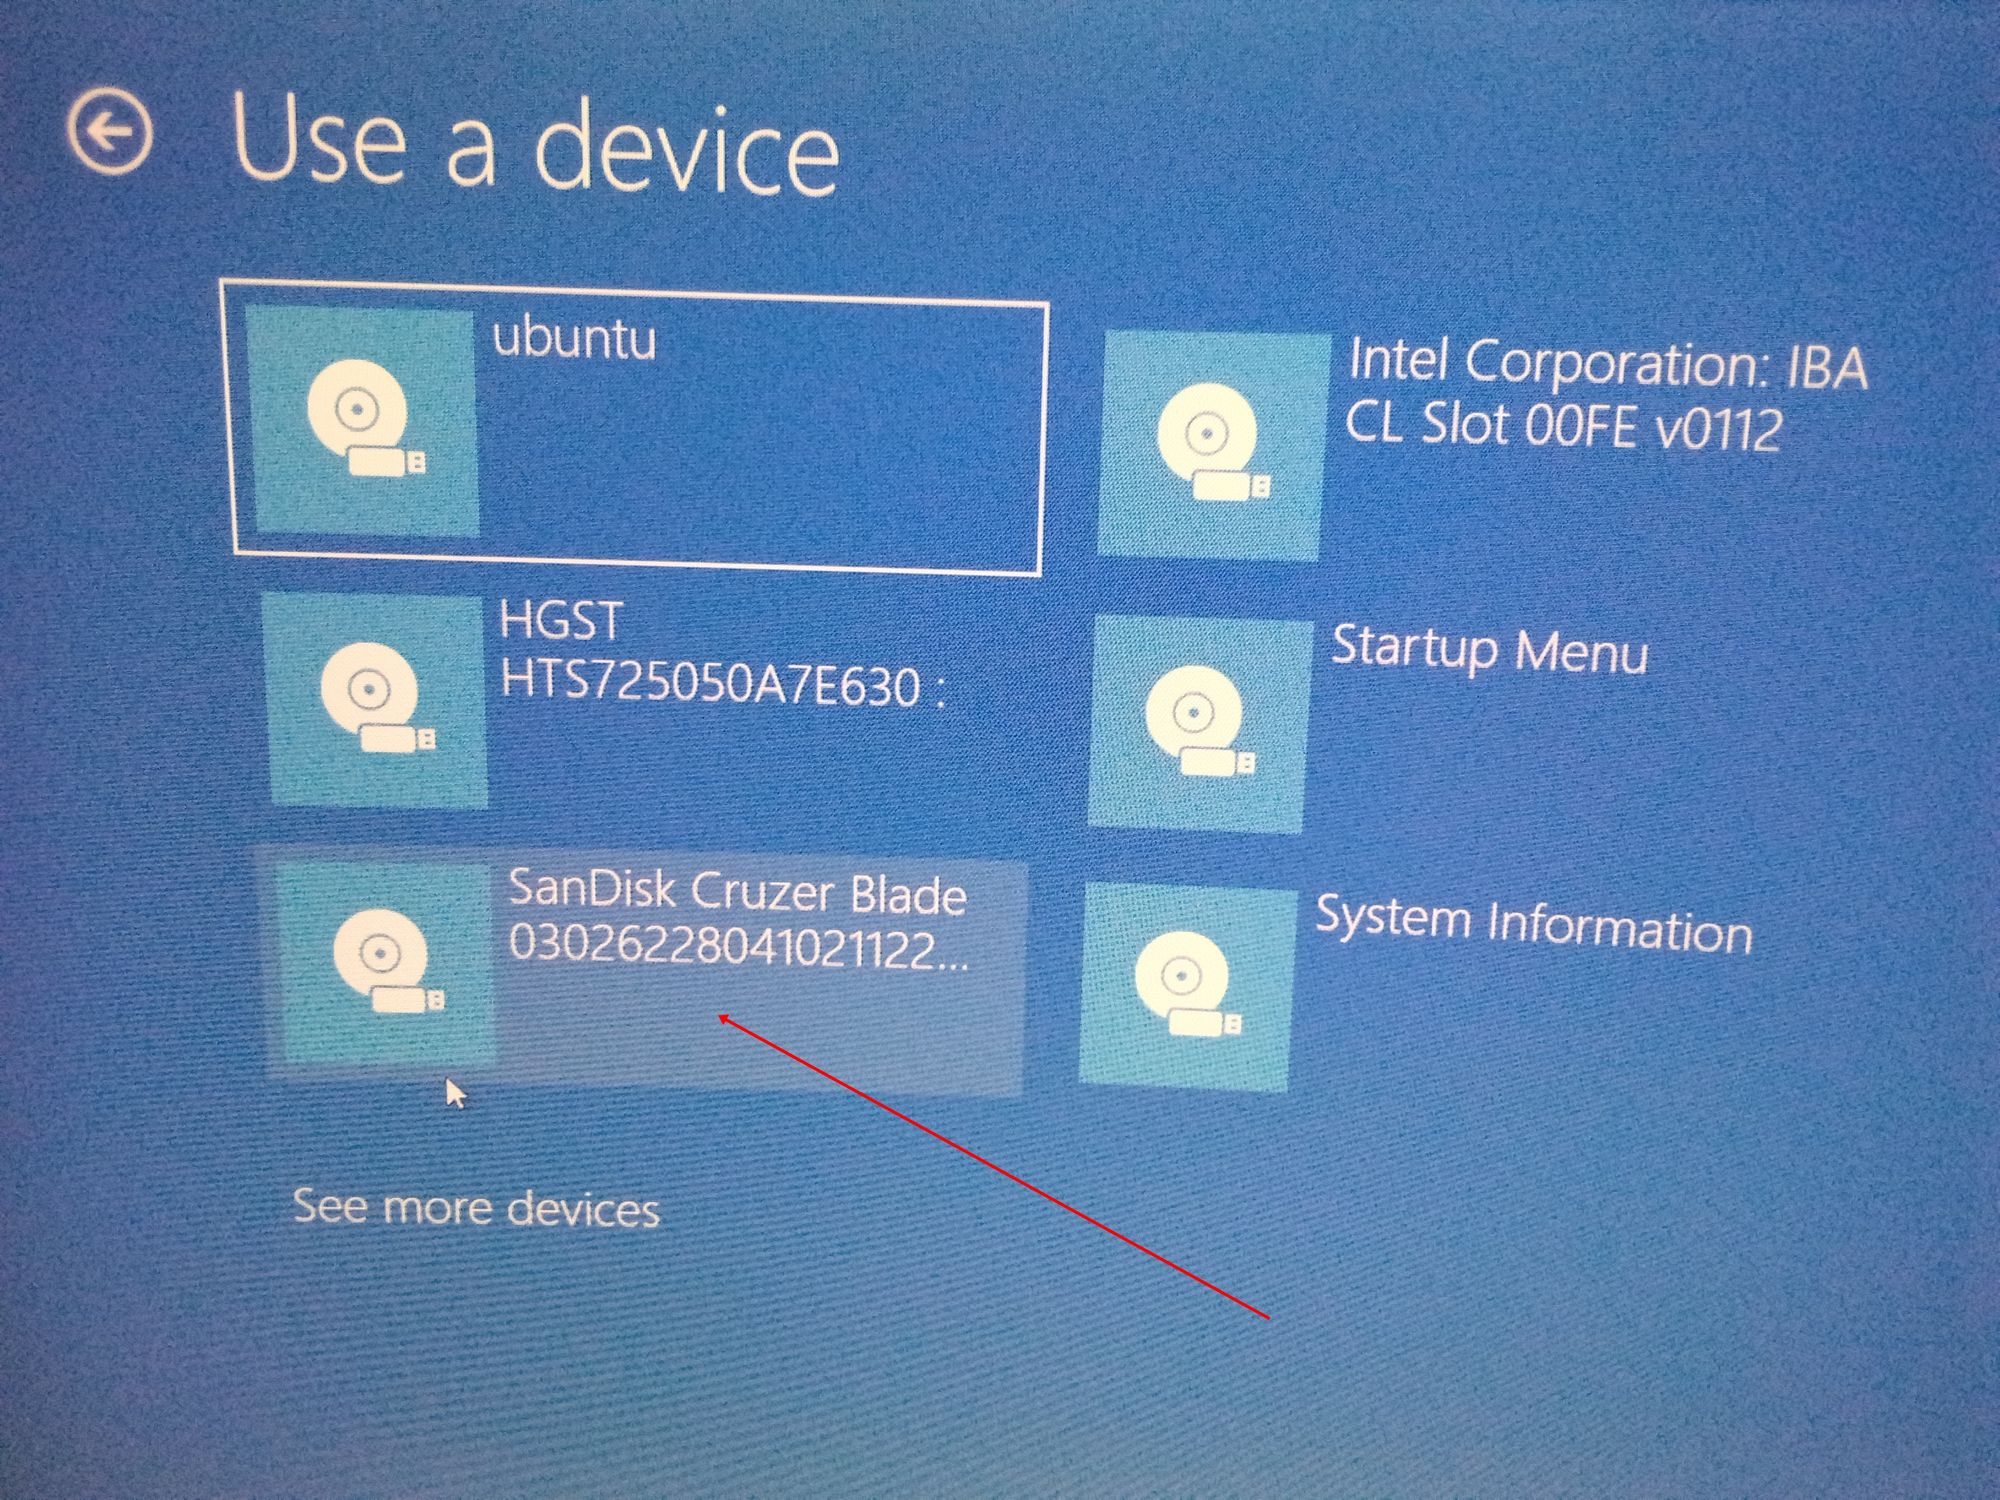
It’s possible to see it as “Ubuntu” too. Some other times, you might not see it, so you need to click on “See more devices».
If you still cannot see your bootable drive, head over to your boot menu by getting into BIOS. You will see it there.
N.B.: You should be very careful while making changes in BIOS. Whatever you do there has a lasting effect on your computer. If you are not sure of what you’re doing there, you should contact an IT professional.
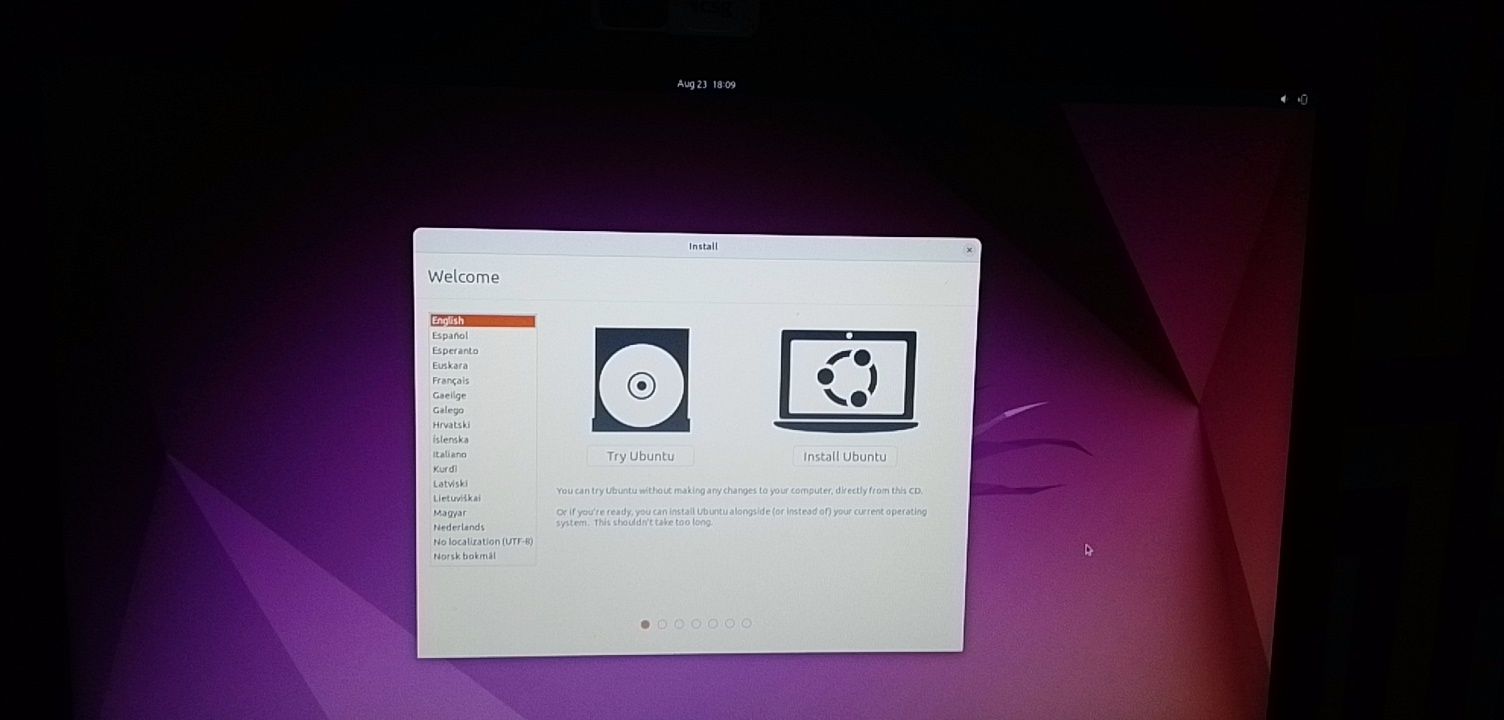
Step 4: Choose «Install Ubuntu». You can also try it before installing it.
Follow other prompts of the installation wizard and make sure you don’t replace your Windows 10 OS installation with Ubuntu. This is why I suggested you back up all your files.
When you get to the point to select the partition you made, scroll to the partition you made earlier and press ENTER.
Click OK to select all the space in the partition.
This time around, the “Install now” button will not be greyed out anymore.
Follow other prompts until Ubuntu starts installing.
After the installation is done, Ubuntu will prompt you to remove the bootable drive and press ENTER to reboot your Computer.
Now You Can Dual Boot Ubuntu and Windows 10
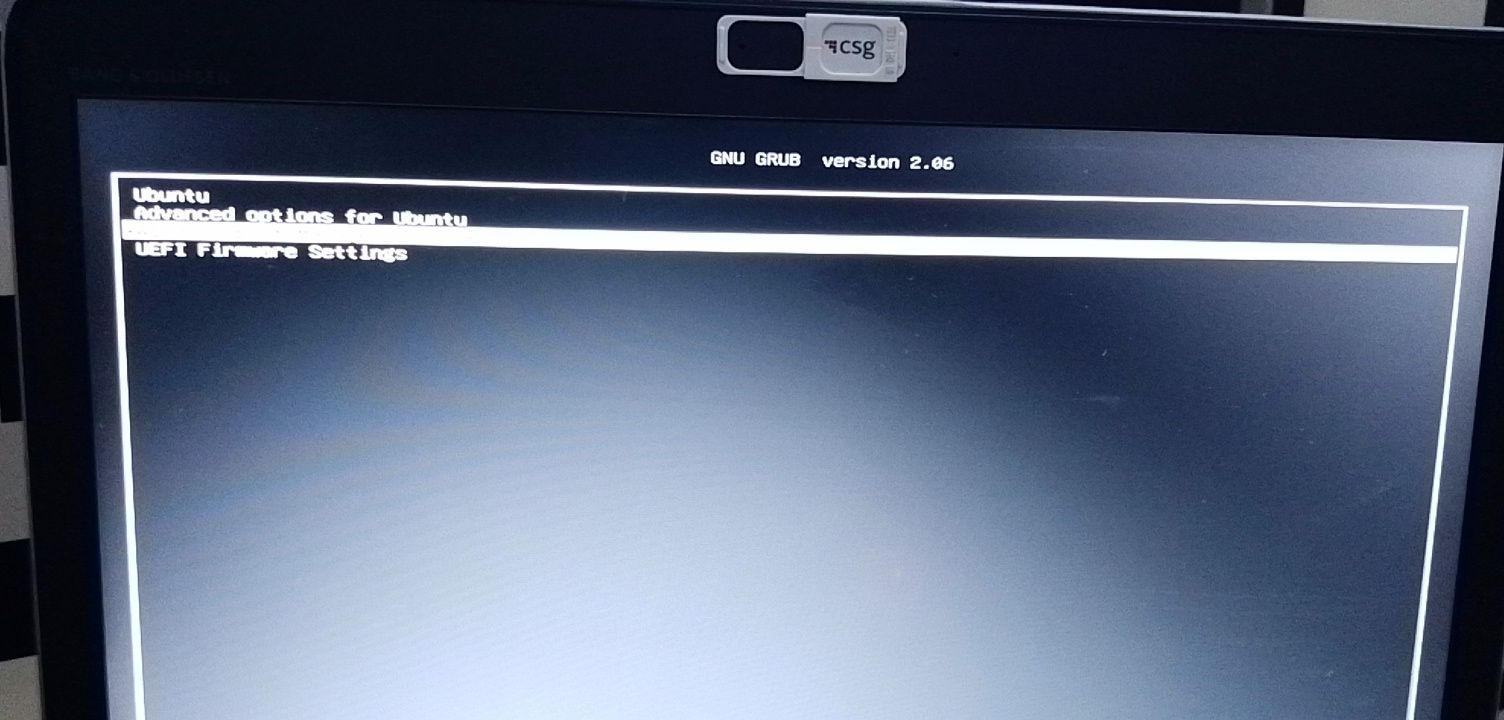
Immediately after you reboot the computer, you should see a screen that looks as shown below:
Now, you can select which one to boot into between Ubuntu and Windows 10.
To boot into Ubuntu, select Ubuntu. And to boot into Windows 10, select Windows boot manager.
You can also get into your BIOS from the same place by choosing UEFI Firmware Settings.
Conclusion
I hope this article helps you dual boot Ubuntu and Windows 10 on your computer.
The ultimate aim of this article was to show you how to dual boot Ubuntu and Windows 10.
But the article went beyond that to show you how to:
- check if your PC’s BIOS is in UEFI mode
- partition your hard drive
- optimize your hard drive
- make a bootable USB drive
- install Ubuntu Linux Distro along with Windows on your Windows 10 PC.
If you find this article helpful, kindly share it with your friends and family.
Learn to code for free. freeCodeCamp’s open source curriculum has helped more than 40,000 people get jobs as developers. Get started