
You’ve finally made the bold decision to make a switch from Windows 10 to CentOS 7, which is a cool decision by the way. You may have tried running CentOS 7 as a virtual machine or you may have tried it out using a CentOS 7 Live CD and now, you are ready to install it on your hard drive without losing your Windows 10 installation.
Read Also: How to Install CentOS 7 in a USB Drive
So, how do you go about having the two bootable operating systems on the same system? This guide will take you through a step-by-step procedure on how to dual boot Windows 10 with CentOS 7.
Before proceeding, you need to take note of the following:
- Dual-booting any Linux distribution (not just CentOS 7) will not slow down your Windows system. The two operating systems will be independent of each other and will not impact each other.
- In a dual boot setup, you can only use one operating system at a time. During the booting process, you will be presented with a list of operating systems to choose from by the boot loader.
Before we begin, let’s take note of a few safety guidelines:
- Ensure you back up all your data in the Windows system. This is crucial so that in case of any mishaps or accidental formatting of the hard drive, you will still have your data intact.
- It’s prudent to a have a Windows repair disk in case the Windows installation gets messed up and you cannot boot into it.
NOTE: In this tutorial, you are installing CentOS 7 on a PC with Windows 10 already installed and not the other way around.
Prerequisites:
Before you begin with the installation, perform a flight check and ensure you have the following:
- An installation media – 8 GB (or more) USB Drive or a blank DVD.
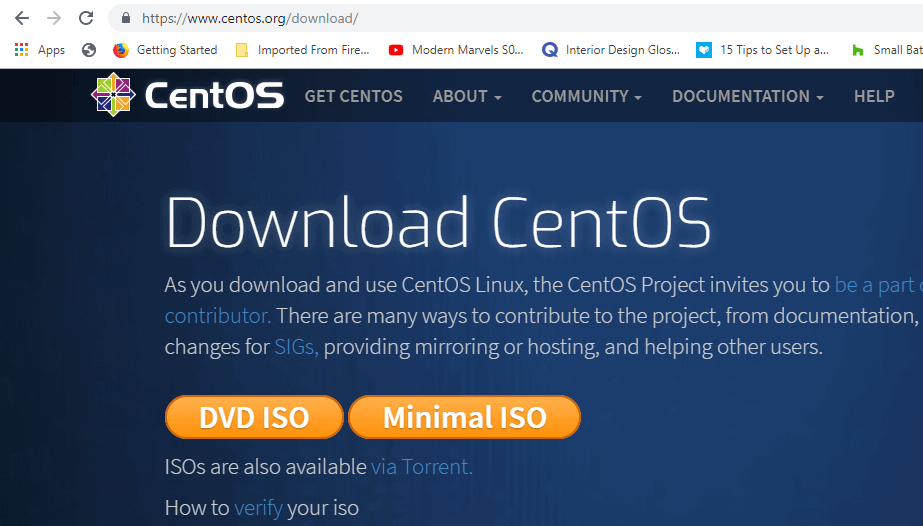
- A CentOS 7 ISO image. This can be downloaded at CentOS main website.
You can choose to download the ‘DVD ISO‘ which comes with added options of installing a Graphical User Interface and other services or you can opt for the ‘Minimal ISO‘ which comes devoid of the GUI and added features.
- A utility for making the USB bootable or burning the CentOS 7 ISO image on the DVD. In this guide, we will use Rufus tool.
Creating Bootable CentOS USB Drive
With all the requirements in place, it’s time now to create the USB drive bootable by downloading a copy of Rufus utility.
Once the download is done, double click on the installer and the Window below will be shown. Be sure to select your USB drive and the CentOS 7 ISO image.
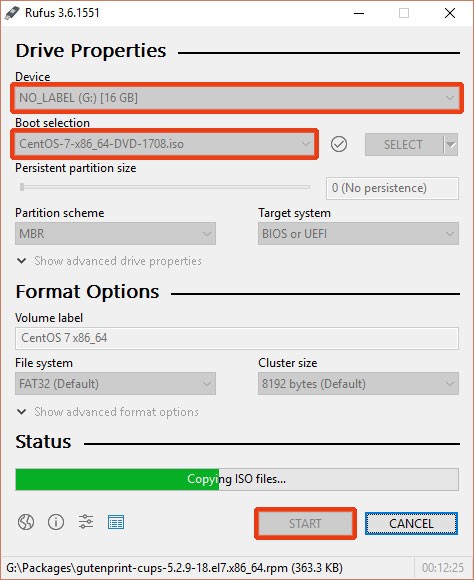
With everything in place, press the ‘START‘ button to start copying the installation files onto the USB drive.
When the process is done, remove the USB drive and connect it into a PC and reboot. Ensure to set the correct boot order in the BIOS settings so that the system first boots from the USB drive.
Save the changes and allow the system to boot.
Creating a Partition for Installing CentOS 7 on Windows 10
To successfully install CentOS 7 (or any other Linux OS), you need to set aside a free partition in one of your drives.
Press the Windows button + R to open the Run dialogue box and type.
diskmgmt.msc
Click OK or hit ‘ENTER‘ to open the disk management Window.
As discussed earlier, you need to create a sizable free partition for your CentOS 7 installation from one of the Windows volumes. To create a free partition, we need to shrink one of the volumes.
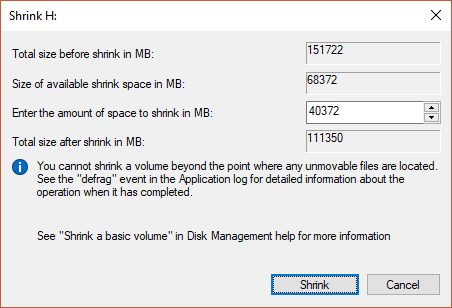
In this guide, we will shrink volume H as shown below.
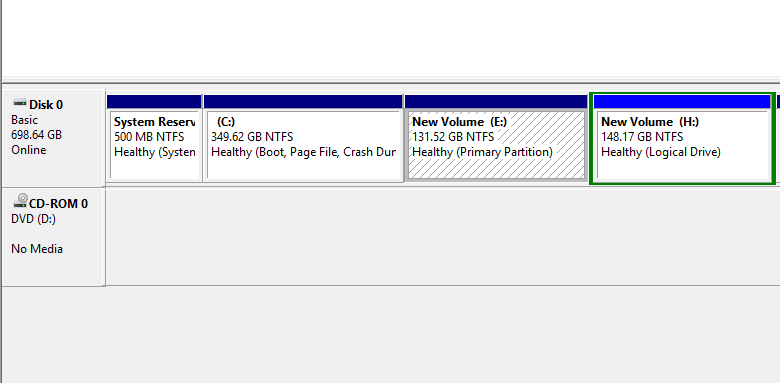
Right click on the volume and select the ‘Shrink‘ option.
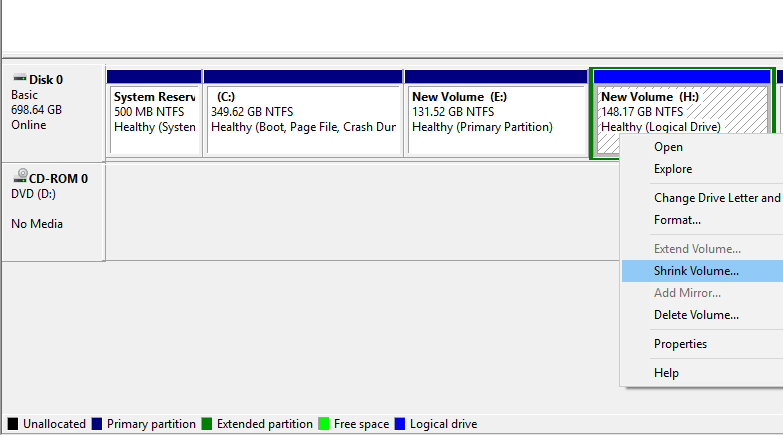
In the pop-up window that appears, specify the amount to shrink the volume in Megabytes. This will be equivalent to the size of the Free partition on which we will install CentOS 7. In the example below, we have specified 40372 Megabytes (about 40GB) for the free partition.
Click on ‘Shrink‘ to begin shrinking the partition.
After a few seconds, the Free space will be created as shown below.
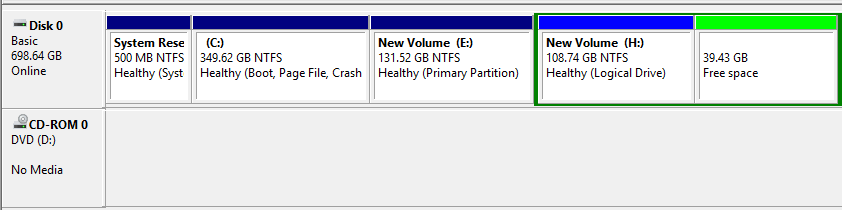
You can now close the Window.
Plug the bootable USB drive into your PC or insert the DVD media into the DVD ROM and reboot.
Be sure to set your PC to boot from your installation media from the BIOS options and save the changes.
Installing CentOS 7 Alongside Windows 10 Dual Boot
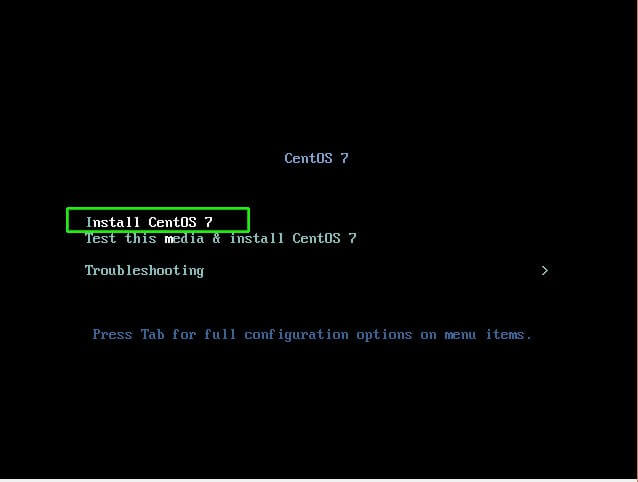
Upon rebooting, the first screen presents you with a list of choices to choose from. Select the first option “Install CentOS 7” to begin the installation process.
Select the Language
In the next step, select your preferred language and hit the ‘Continue‘ button.
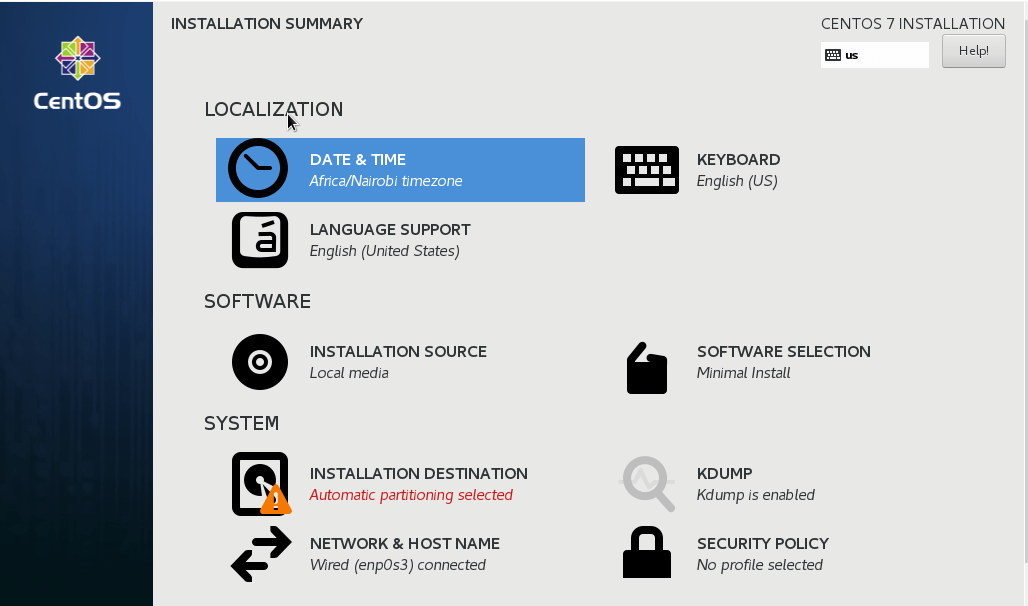
Configure the Date and Time
In the next page, you will be presented with the following interface with a few parameters that need to be configured. First online is the DATE & TIME configuration.
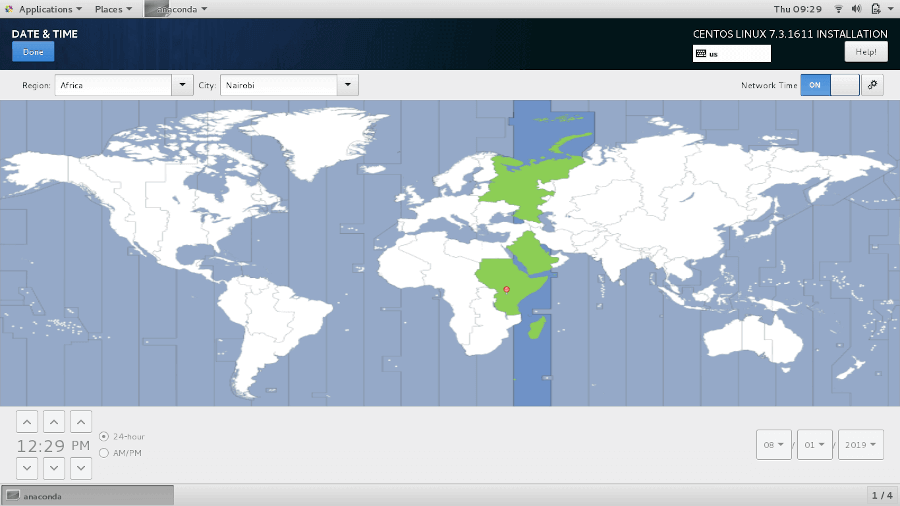
The world’s map will be displayed. Click on your current physical location on the map to set your time and hit the ‘DONE‘ button to save the changes.
This brings you back to the previous page.
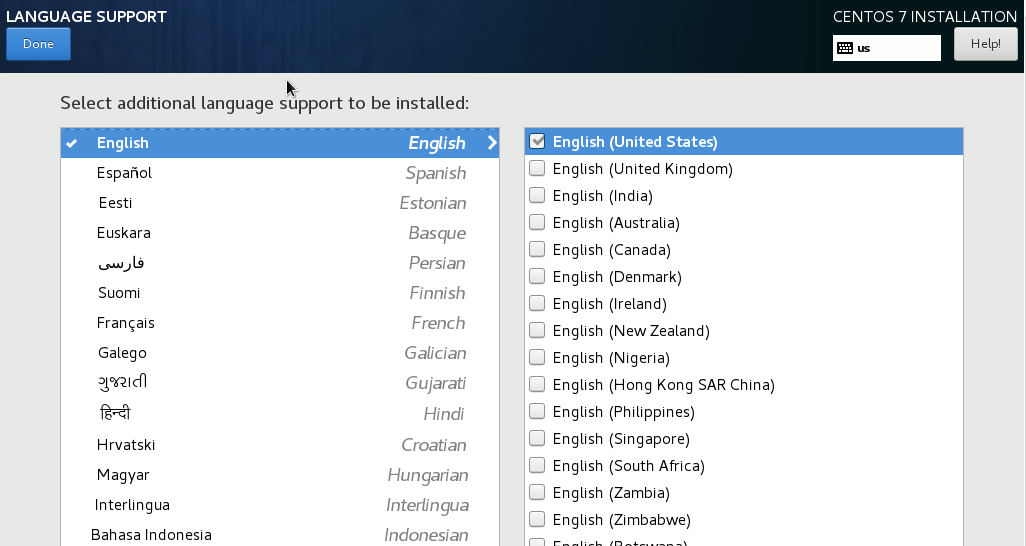
Configure Language Support
Next, click on the ‘LANGUAGE SUPPORT‘ option to configure your language settings.

Select your preferred language and as before, hit the ‘DONE‘ button to save the settings.

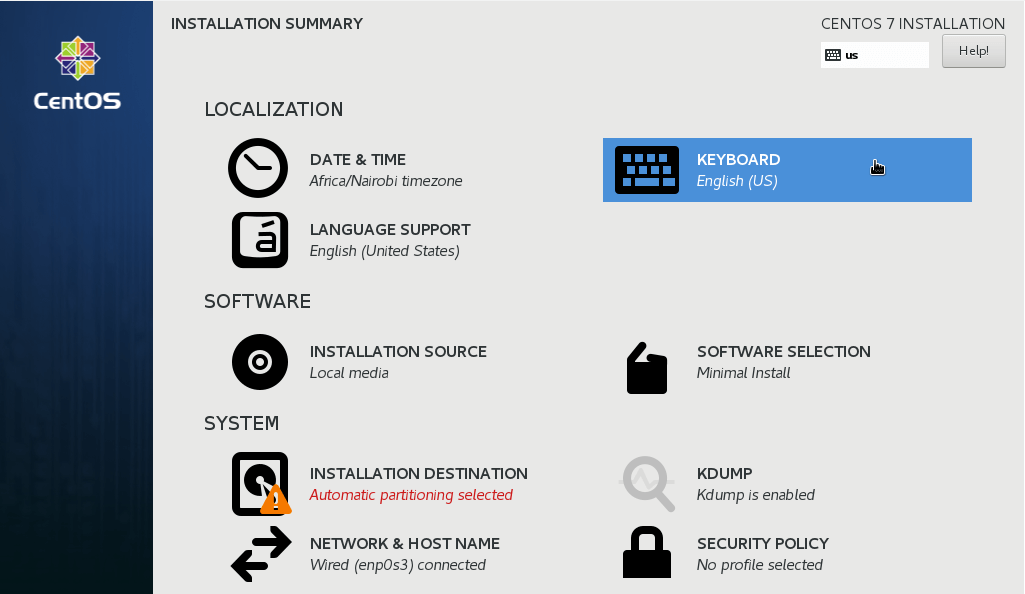
Configure Keyboard
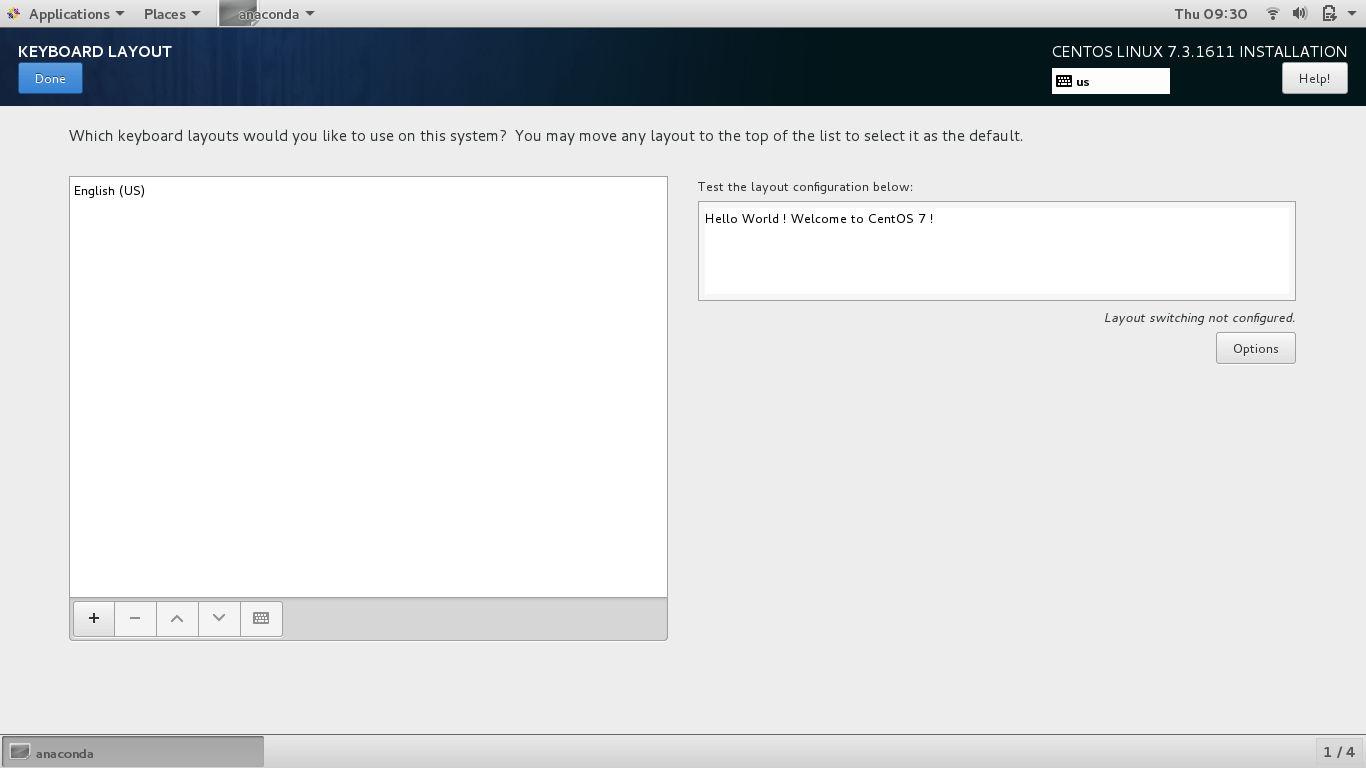
Next online is the keyboard configuration. Click on the keyboard option.
You can test the keyboard configuration and when you are satisfied with the ouputs, click on the ‘DONE‘ button as before.
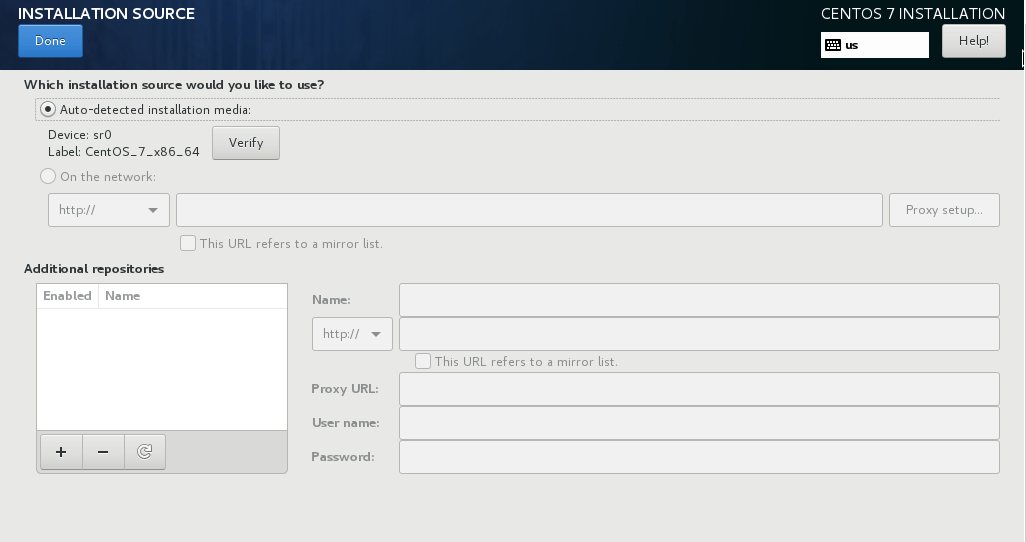
Select Installation Source
In the next step, click on ‘INSTALLATION SOURCE‘ to customize your installation using other sources other than the traditional USB/DVD.
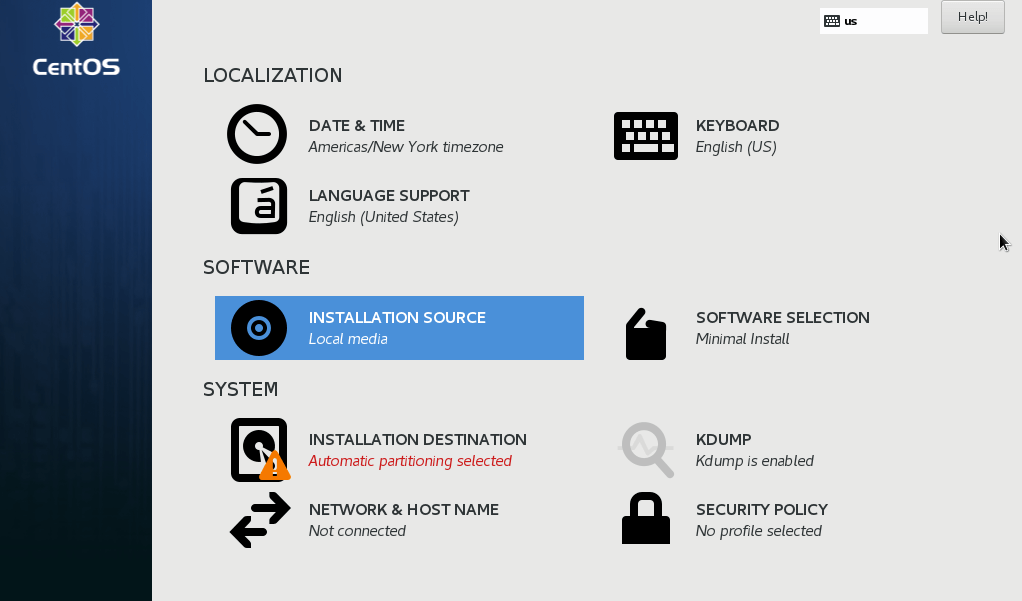
It’s recommended however to leave this option in its default setting as ‘Auto-detected installation media‘. Hit ‘DONE‘ to save the changes.
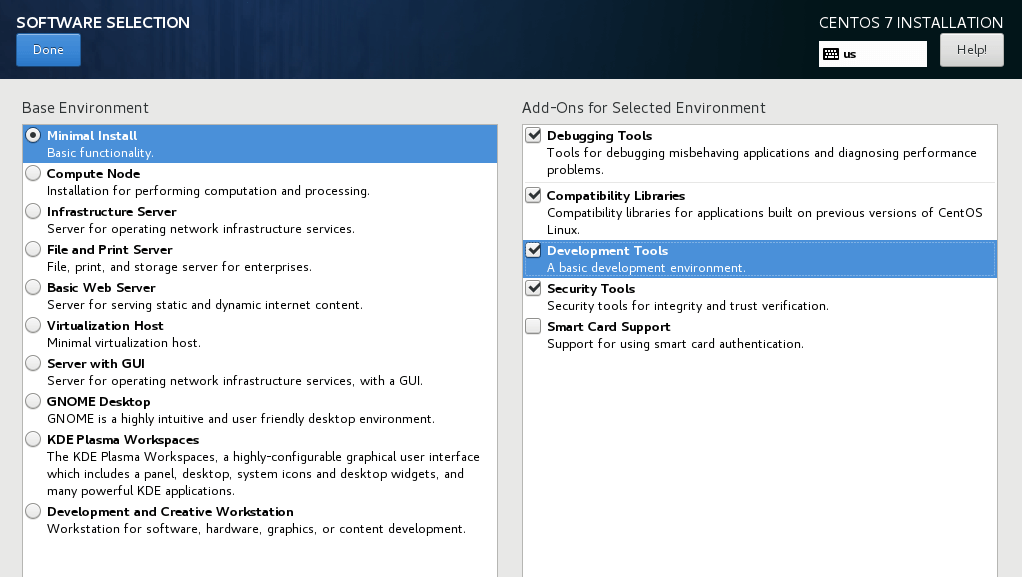
Configure Software Selection
This is the step where you will select your preferred system installation software. CentOS offers a myriad of Desktop and Server installation environments to choose from.
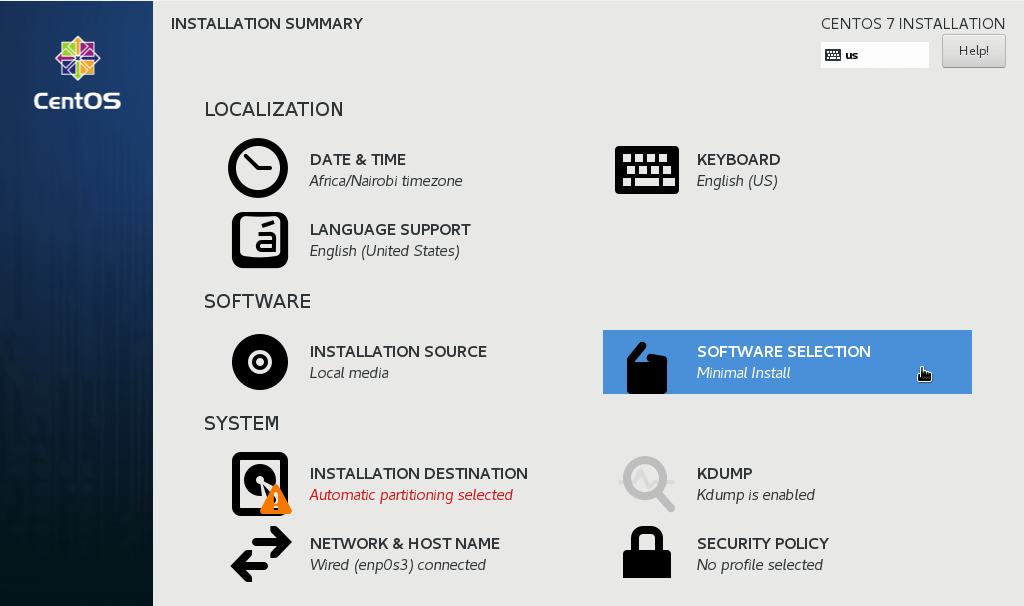
For production environments, the minimal install is preferred since it’s lightweight and lack a graphical user environment which gobbles up significant memory and CPU resources.
You may also choose to include other add-ons on the right pane. Once satisfied with your choices, Hit the ‘Done‘ button to save the changes.
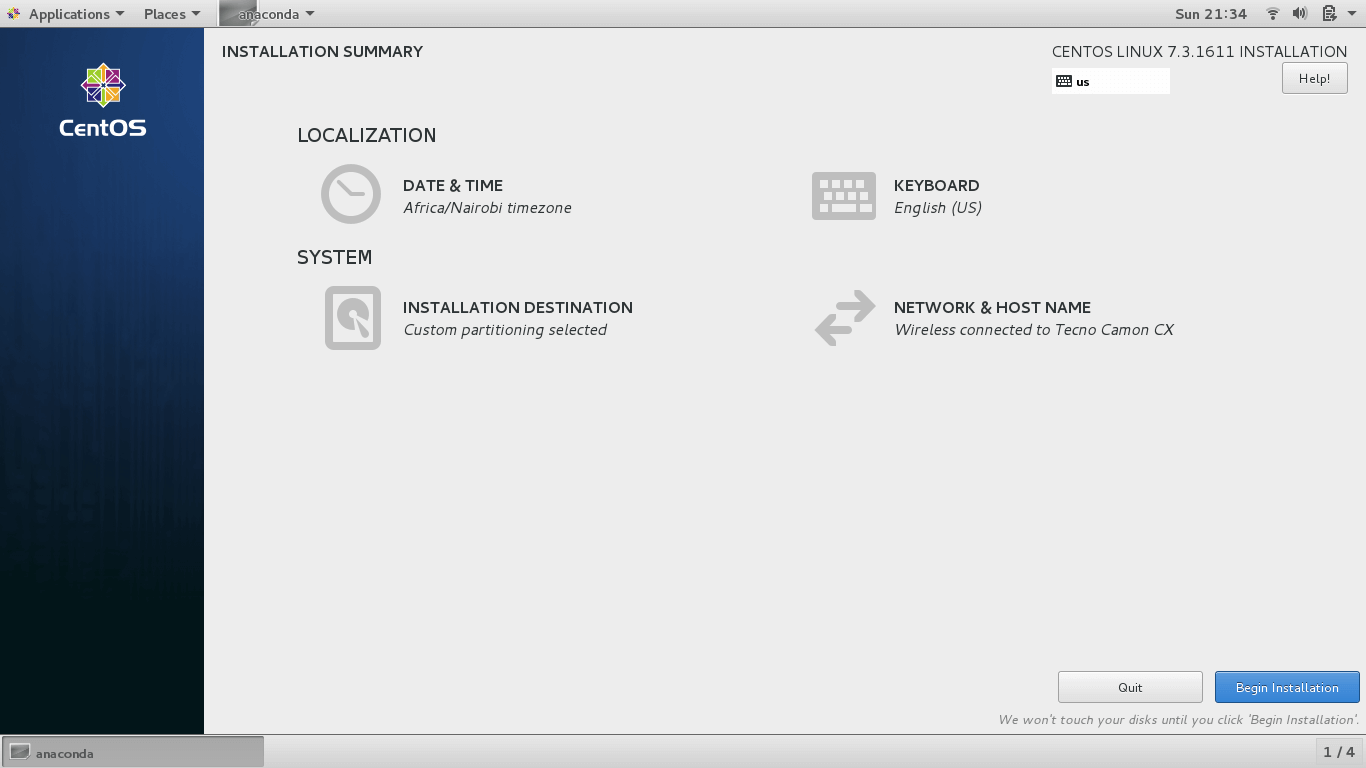
Configure Partitioning
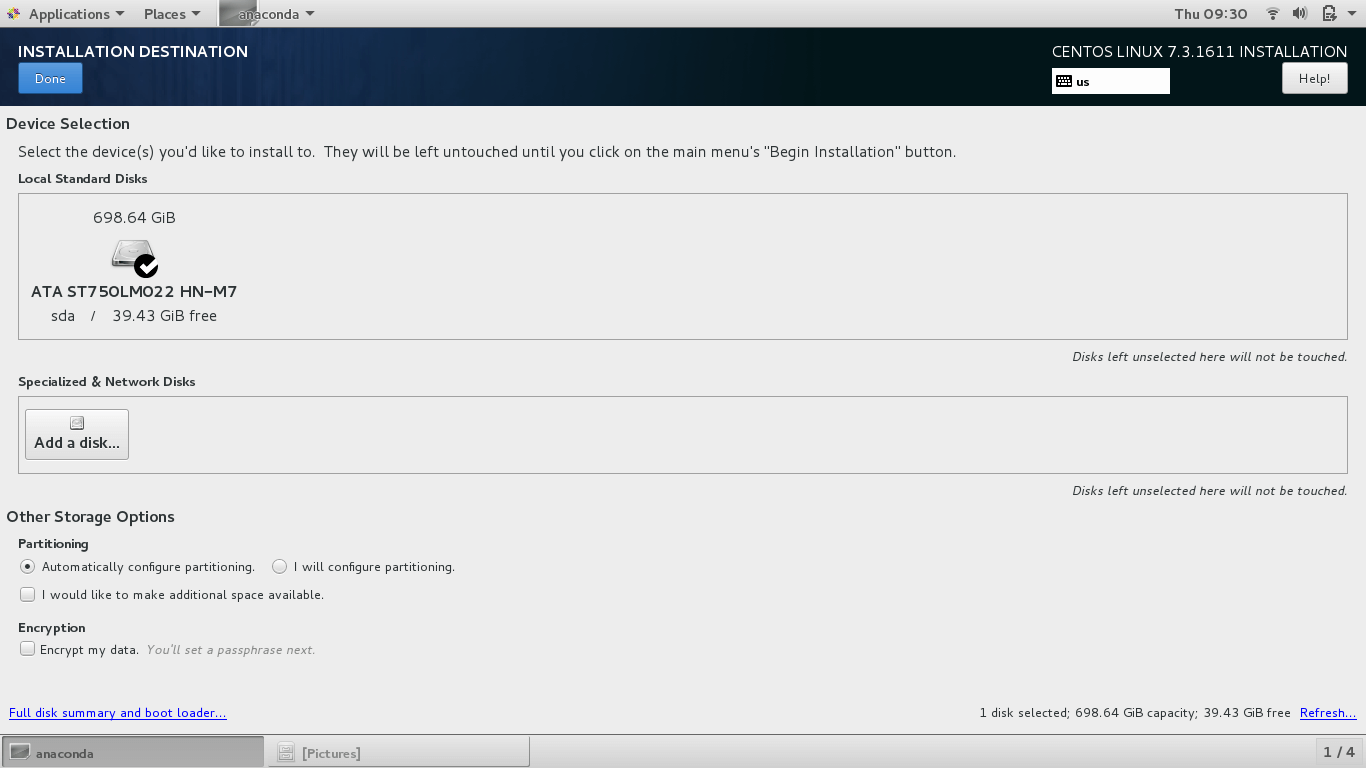
This is the part where you configure your hard disk, Click on ‘INSTALLATION DESTINATION‘ option.
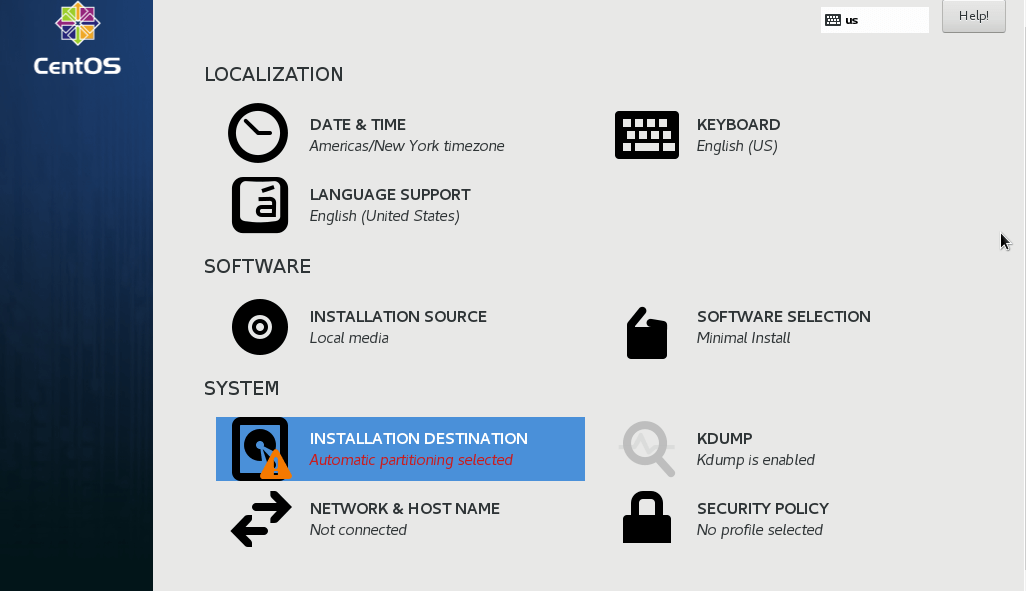
As you can see, we have our free partition which we shrunk to about 40GB. Click on it to select it and click on automatic partitioning.
With automatic partitioning, the system automatically partitions the hard drive into the three main partitions as follows:
- The
/(root) - The
/home - The
swap
Next, click Done to save the changes and return to the previous screen.
If you want to create the partitions manually, click on the ‘I will configure partitioning‘.

Next, choose the LVM (Local Volume manager) or any other mount point. Then click on ‘Click here to create them automatically‘ option.

Other partitioning schemes you can choose from include:
- Standard Partition
- LVM Thin provisioning
- Btrfs
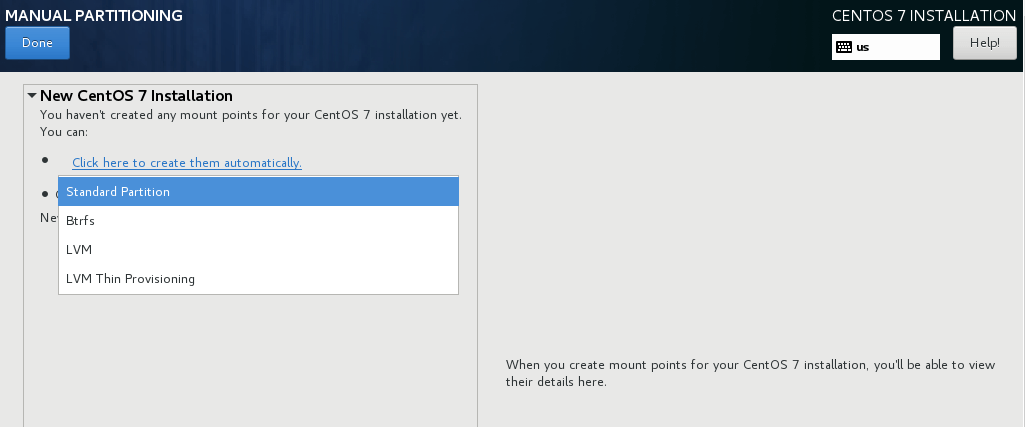
Click on LVM and click on ‘Click here to create them automatically’ option to make your work easier.
If you are still not satisfied with the results, you can use the add, remove or reload the partition scheme to start all over again using the three buttons shown below.
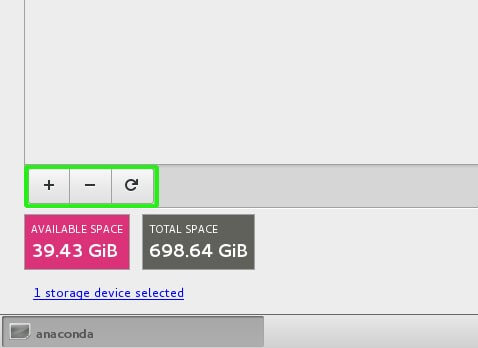
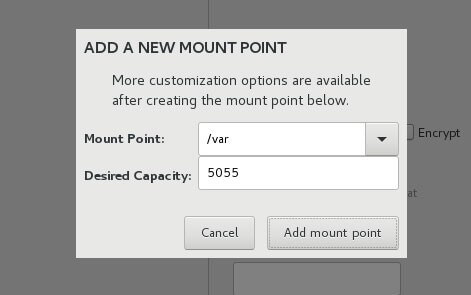
To add a new mount point, click the on plus [+] button. A pop up will appear prompting you to select the mount point type and specify the memory capacity.
To remove a mount point, click on the mount point first and then hit the minus [-] button.
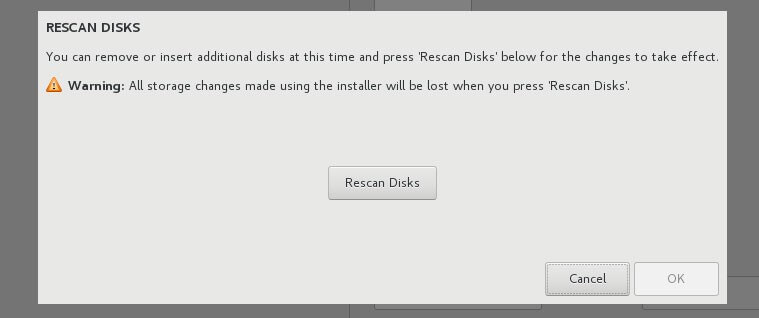
To start over all again click on the Reload button.
The display below will be displayed. Click on ‘Rescan Disks‘ and click OK to start over again with partitioning the disk.
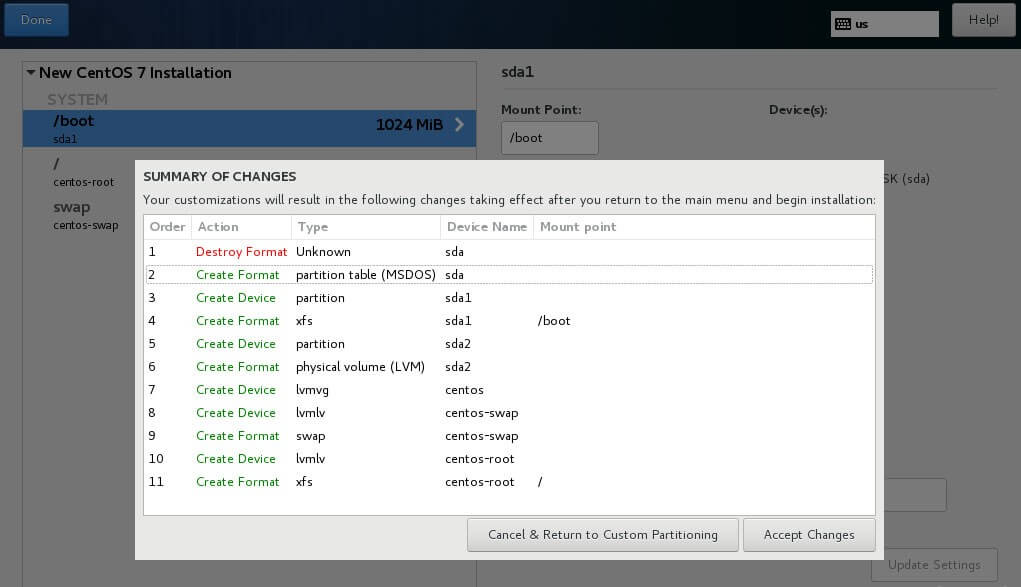
Once done, hit ‘Done‘ to save the changes.
Next, accept the summary of the changes by clicking on the ‘Accept Changes‘ button.
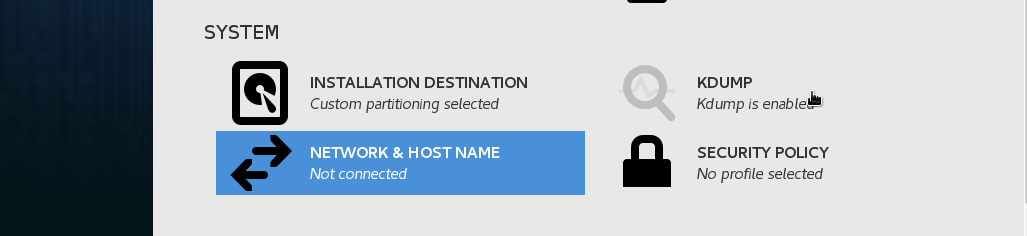
Configure Networking & Hostname
Next, hit the networking tab.
On the far right, flip the networking button 'ON'. If you are in a DHCP environment, your system will automatically pick an IP address as shown below. Next, click on the upper ‘Done‘ button.
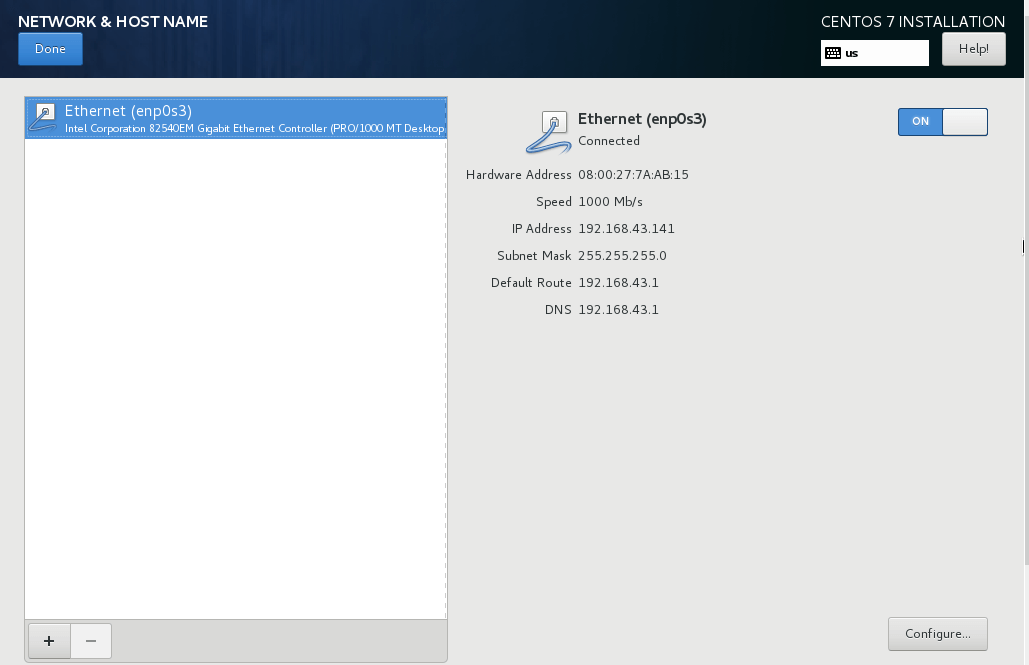
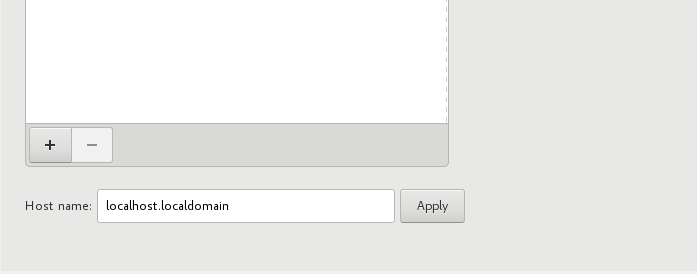
To set the hostname, scroll to the bottom and specify you preferred hostname.
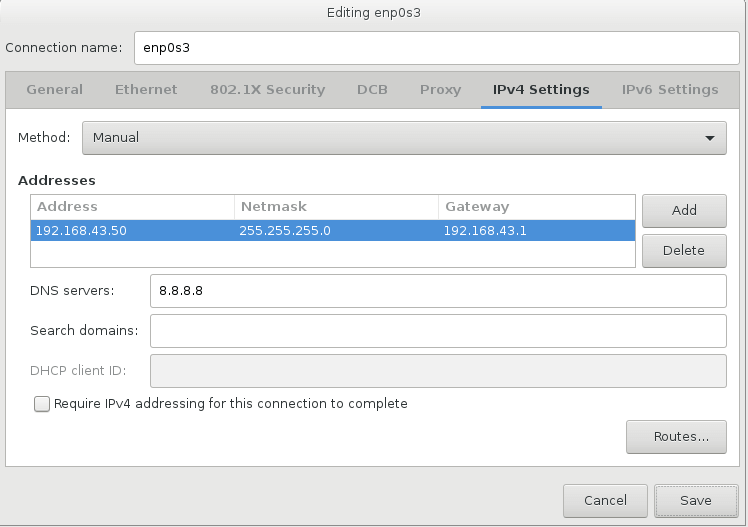
If you want to manually set your own IP address, then hit the ‘Configure button‘ at the bottom-right corner.
Head out to the IPv4 settings and enter the details about your preferred IP address, subnet mask, gateway, and DNS servers and click ‘Save‘ then click on ‘Done‘ to save the configuration.
Configure Kdump
Kdump is an advanced crash dumping mechanism. Its purpose is to create crash dumps in case of a Kernel crash. This is crucial and allows system administrators to debug the errors and determine the cause of the Linux kernel crash.
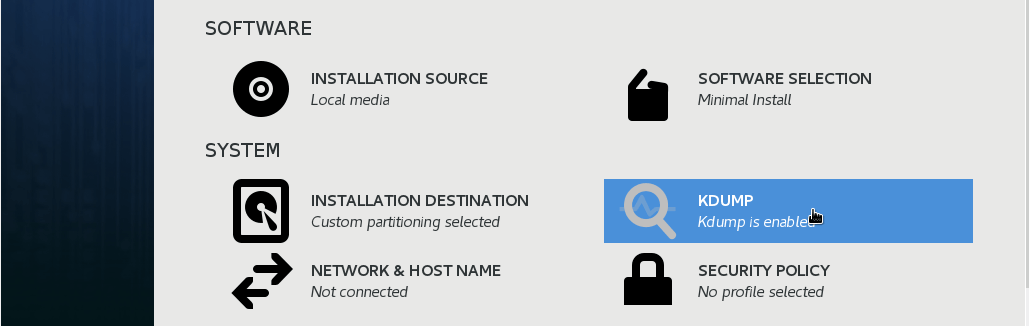
By default, Kdump is enabled, so we shall leave it the way it is.
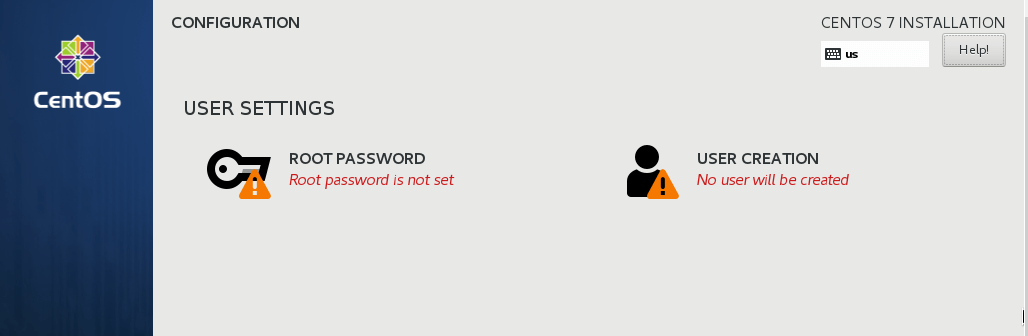
Begin CentOS 7 Installation
Now it’s time to commence the installation of the system. Click on the ‘Begin Installation‘ button.
At this point, you will be required to create both the root password and a regular user in the system.
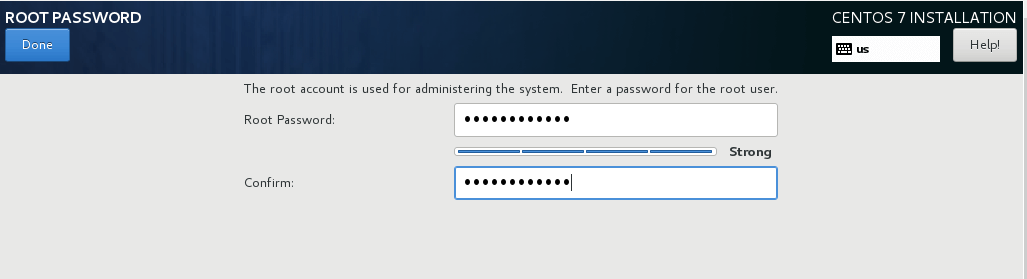
Click on ‘ROOT PASSWORD‘ to create the root password. Type a strong password and click on ‘Done‘.
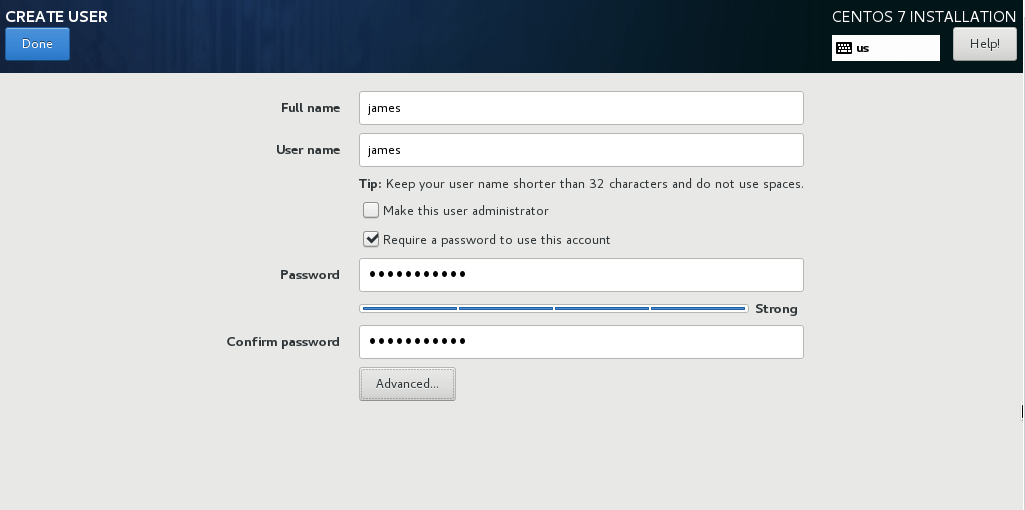
Next, click on ‘USER CREATION‘ to create a New User. Fill all the required details and click on the ‘Done‘ button.
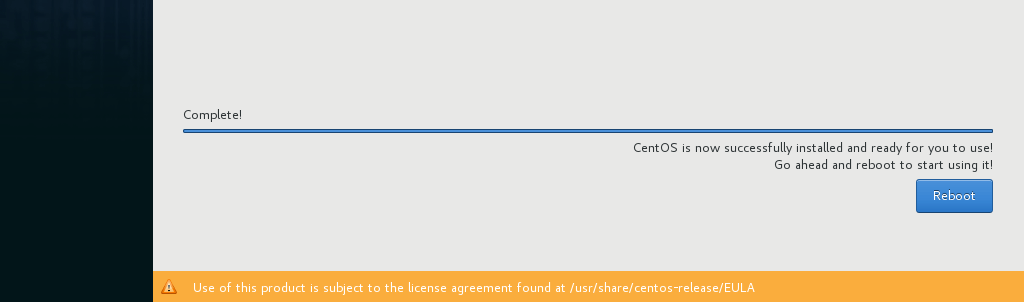
Now, sit back and relax as the installation progresses. At the very end, you will get a notification at the bottom of the progress bar that the installation was successful!
Remove the USB button and hit the ‘Reboot‘ button to restart your system.
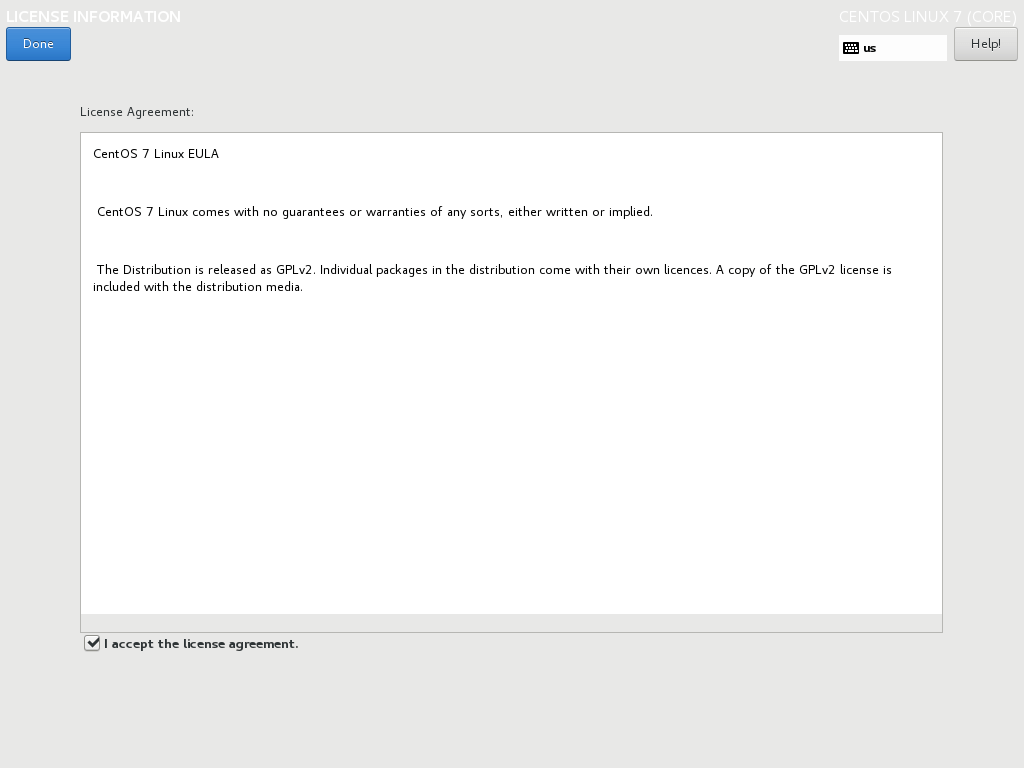
After the systems reboot, you will be required to accept the End User License Agreement.
Click on ‘LICENSE INFORMATION‘.
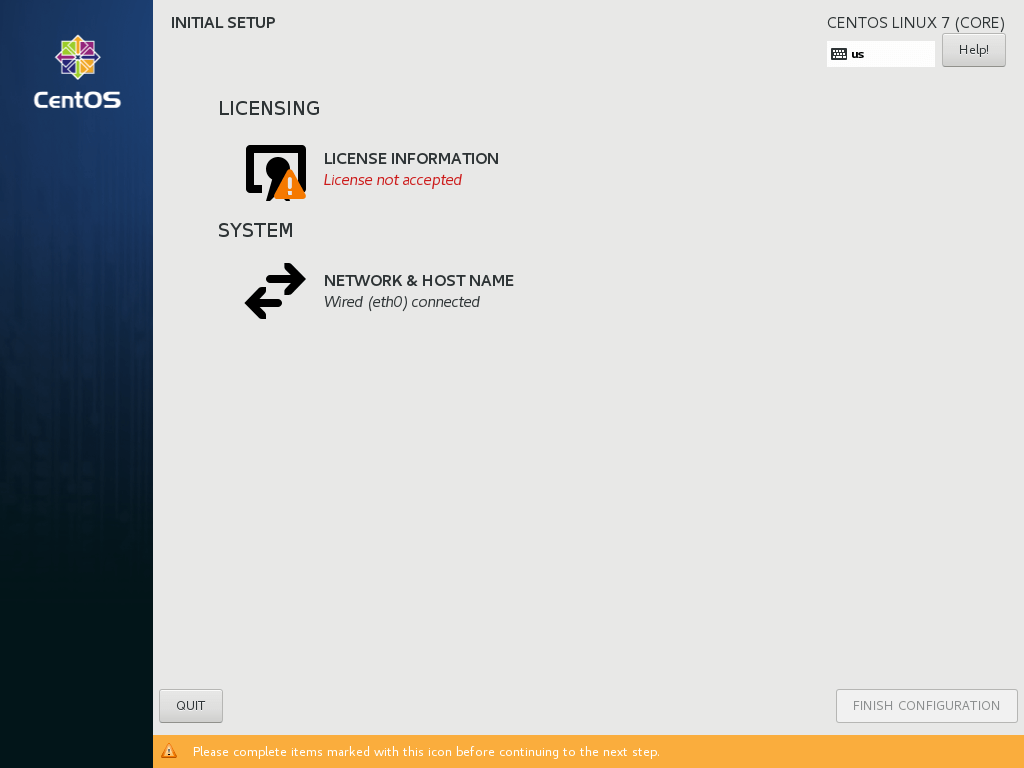
Check the ‘I accept the license agreement‘ checkbox to accept the license agreement.
Finally, click on ‘FINISH CONFIGURATION’ to complete the process.
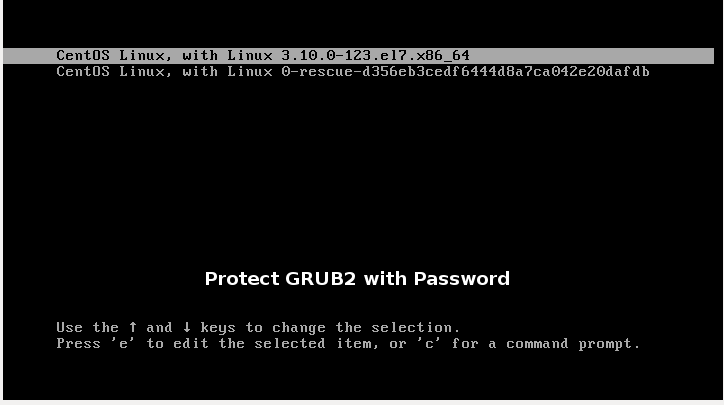
The system will reboot, and the CentOS bootloader will give you options to boot either from CentOS, Windows or any other installed Operating system.
Conclusion
We have finally come to the end of this tutorial. In this guide, you learned how to install CentOS 7 alongside Windows in a dual boot setup.
Linux · September 27, 2024
Dual booting allows users to run two operating systems on a single machine, providing the flexibility to switch between them as needed. This guide will walk you through the steps to install CentOS 7 alongside Windows 10, ensuring that both systems can coexist without issues.
Prerequisites
- A computer with Windows 10 already installed.
- A USB drive (at least 8GB) for the CentOS installation media.
- Backup of important data from your Windows system.
- Basic knowledge of partitioning and BIOS settings.
Step 1: Prepare Windows 10 for Dual Boot
Before installing CentOS, you need to create space on your hard drive for the new operating system. This involves shrinking the Windows partition:
- Right-click on the Start menu and select Disk Management.
- Locate your primary Windows partition (usually C:), right-click on it, and select Shrink Volume.
- Enter the amount of space to shrink (at least 20GB is recommended for CentOS) and click Shrink.
Next, you need to create a bootable USB drive with the CentOS 7 ISO:
- Download the CentOS 7 ISO from the official CentOS website.
- Use a tool like Rufus (for Windows) to create a bootable USB drive:
- Select the USB drive in Rufus.
- Choose the CentOS ISO file.
- Click Start to create the bootable USB.
Step 3: Boot from the USB Drive
Once the USB drive is ready, you need to boot your computer from it:
- Restart your computer and enter the BIOS/UEFI settings (usually by pressing F2, F10, or Delete during startup).
- Change the boot order to prioritize the USB drive.
- Save changes and exit the BIOS.
Step 4: Install CentOS 7
After booting from the USB, follow these steps to install CentOS:
- Select Install CentOS 7 from the boot menu.
- Choose your language and click Continue.
- In the Installation Summary, configure the following:
- Date & Time: Set your timezone.
- Keyboard: Select your keyboard layout.
- Installation Destination: Select the disk where Windows is installed. Ensure to choose the option to Automatically configure partitioning.
- Click Begin Installation.
- Set the root password and create a user account during the installation process.
Step 5: Configure the Bootloader
Once the installation is complete, CentOS will install the GRUB bootloader, which allows you to choose between Windows and CentOS at startup. Ensure that the bootloader is installed on the correct drive (usually the same drive as Windows).
Step 6: Reboot and Test Dual Boot
After installation, reboot your computer. You should see the GRUB menu, allowing you to select either CentOS or Windows 10. Test both operating systems to ensure they boot correctly.
Troubleshooting
If you encounter issues booting into either operating system, you may need to adjust the boot order in the BIOS or repair the GRUB bootloader using a live CentOS USB.
Conclusion
Installing CentOS 7 alongside Windows 10 can enhance your computing experience by providing access to both operating systems. By following the steps outlined in this guide, you can successfully set up a dual boot environment. For those looking for reliable server solutions, consider exploring USA VPS Hosting options that can complement your dual boot setup.
2 minute read
This post assumes that Windows was installed first, and then CentOS was installed second.
Once you install CentOS 7 alongside your Windows OS, you may find that you cannot boot into Windows. The Grub bootloader may only show your Linux OS as your only options to boot from.
To fix this and have the Grub bootloader list your Windows OS, you need to edit the Grub bootloader files. If you have used CentOS is the past (with 6 or earlier), you may find that editing Grub is different. Previously, you would edit /boot/grub/grub.conf. This is no longer the case, as the grub2.cfg file is generated dynamically, based on dependency files. Here’s what you need to edit to configure your bootloader.
- Boot into CentOS 7, if you haven’t already.
- Determine what partition your Windows OS resides on by running
sudo fdisk -lin Terminal. Here’s my output:Disk /dev/sda: 320.1 GB, 320072933376 bytes, 625142448 sectors Units = sectors of 1 * 512 = 512 bytes Sector size (logical/physical): 512 bytes / 512 bytes I/O size (minimum/optimal): 512 bytes / 512 bytes Disk label type: dos Disk identifier: 0xcd8b1219 Device Boot Start End Blocks Id System /dev/sda1 * 2048 4194303 2096128 7 HPFS/NTFS/exFAT /dev/sda2 4194304 360402758 178104227+ 7 HPFS/NTFS/exFAT /dev/sda3 360402942 625141759 132369409 5 Extended /dev/sda5 612595712 625141759 6273024 82 Linux swap / Solaris /dev/sda6 360407040 361431039 512000 83 Linux /dev/sda7 361433088 612589567 125578240 8e Linux LVM+ In this example, /dev/sda1 is the recovery partition, and /dev/sda2 is the Windows OS partition. Since partition indexes start at zero, the Windows OS partition will be `hd0,1` (a = 0, 2 = 1; or first disk, second partition) when we edit the Grub file. Make note of this. - Open a terminal and navigate to
/etc/grub.d/:cd /etc/grub.d/
- Edit the
40_customfile. You may not see the file if youlsin /grub.d/. That’s okay.sudo nano 40_custom
- You should see the following in the nano text editor:
 #!/bin/sh
 exec tail -n +3 $0
 # This file provides an easy way to add custom menu entries.  Simply type the
 # menu entries you want to add after this comment.  Be careful not to change
 # the 'exec tail' line above.
- Below the last #, type on a new line:
menuentry "Windows 7" { set root=(hd0,1) chainloader +1 } - Finally, run the following to apply the changes to the grub.cfg file:
grub2-mkconfig --output=/boot/grub2/grub.cfg
- Once you reboot, you should see the option of booting into Windows 7. If a default boot entry into Windows (or something else) is requested, then you need to edit the
GRUB_DEFAULTin/etc/default/grub:
GRUB_DEFAULT="Windows 7"
- Once you reboot, you should see the option of booting into Windows 7. If a default boot entry into Windows (or something else) is requested, then you need to edit the
Dual booting Windows 10 and CentOS 7 can be a powerful way to have both operating systems on your computer. This setup allows you to enjoy the benefits of both Windows and CentOS, whether it’s for work or personal use. However, setting up a dual boot system can be a bit tricky if you’re not familiar with the process. In this blog post, we will guide you through the steps required to successfully dual boot Windows 10 and CentOS 7.
What’s Needed
To dual boot Windows 10 and CentOS 7, you will need the following:
- A computer or laptop running Windows 10
- A blank USB drive with at least 8GB of storage capacity
- A CentOS 7 ISO file
- A backup of all your important data
Video Tutorial:
What Requires Your Focus?
Before proceeding with the dual boot setup, there are a few things that require your attention:
- Understanding Dual Booting: It’s important to understand the concept of dual booting and how it works before attempting the setup.
- Partitioning: You need to allocate a separate partition on your hard drive for CentOS 7.
- Data Backup: It is crucial to back up all your important files and data before starting the dual boot installation.
- UEFI or Legacy BIOS: Depending on your system, you need to determine whether it uses UEFI or Legacy BIOS.
Option 1. How to Dual Boot Windows 10 and CentOS 7 via USB
To dual boot Windows 10 and CentOS 7 via USB, follow these steps:
Step 1: Create a Bootable USB Drive
1. Format the USB drive to FAT32 file system.
2. Use a tool like Rufus to create a bootable USB drive with the CentOS 7 ISO file.
Step 2: Shrink Windows Partition
1. Press the Windows key + X and select Disk Management.
2. Right-click on the C: drive and select Shrink Volume.
3. Specify the amount of space you want to allocate for CentOS 7. Make sure to leave enough space for future use.
Step 3: Disable Secure Boot and Fast Startup
1. Restart your computer and enter the BIOS settings.
2. Disable Secure Boot and Fast Startup.
Step 4: Install CentOS 7
1. Insert the bootable USB drive and restart your computer.
2. Select the USB drive as the boot option.
3. Follow the on-screen instructions to install CentOS 7 on the allocated partition.
Pros:
– Allows you to choose between Windows and CentOS 7 at startup.
– Provides access to both operating systems and their respective features and applications.
Cons:
– Requires partitioning of your hard drive, which may lead to data loss if not done correctly.
– Requires a separate installation and setup for each operating system.
Option 2. How to Dual Boot Windows 10 and CentOS 7 via Virtualization
To dual boot Windows 10 and CentOS 7 via virtualization, follow these steps:
Step 1: Install a Virtualization Tool
1. Download and install a virtualization tool like Oracle VirtualBox on your Windows 10 operating system.
Step 2: Create a New Virtual Machine
1. Open VirtualBox and click on the «New» button.
2. Enter a name for the virtual machine and select Linux as the type and version.
3. Allocate memory and create a virtual hard disk.
Step 3: Install CentOS 7
1. Select the newly created virtual machine and click on «Settings.«
2. Navigate to the «Storage» section and add the CentOS 7 ISO file as a virtual disk.
3. Start the virtual machine and follow the on-screen instructions to install CentOS 7.
Pros:
– No need for partitioning or dual boot setup.
– Allows you to run CentOS 7 within the Windows environment.
– Easy to create and manage virtual machines.
Cons:
– May experience reduced performance compared to a native installation.
– Requires more resources and memory to run both Windows 10 and CentOS 7 simultaneously.
Option 3. How to Dual Boot Windows 10 and CentOS 7 via Windows Boot Manager
To dual boot Windows 10 and CentOS 7 via the Windows Boot Manager, follow these steps:
Step 1: Create Partition for CentOS 7
1. Press Windows key + X and select Disk Management.
2. Shrink the C: drive and create a new partition for CentOS 7.
Step 2: Disable BitLocker
1. If BitLocker is enabled on your Windows 10 drive, you need to temporarily disable it.
Step 3: Disable Secure Boot
1. Restart your computer and enter the BIOS settings.
2. Disable Secure Boot.
Step 4: Install CentOS 7
1. Insert the CentOS 7 installation media and restart your computer.
2. Select the installation media as the boot option and follow the on-screen instructions to install CentOS 7 on the allocated partition.
Pros:
– Uses the Windows Boot Manager for simplified dual boot options.
– No need for virtualization or separate installations.
Cons:
– Requires partitioning of your hard drive, which may lead to data loss if not done correctly.
– Requires manual selection of the operating system during startup.
Option 4. How to Dual Boot Windows 10 and CentOS 7 via Separate Hard Drives
To dual boot Windows 10 and CentOS 7 using separate hard drives, follow these steps:
Step 1: Install CentOS 7 on a Separate Hard Drive
1. Disconnect your Windows 10 hard drive.
2. Install CentOS 7 on the separate hard drive.
Step 2: Reconnect Windows 10 Hard Drive
1. Reconnect your Windows 10 hard drive.
2. Restart your computer.
Step 3: Configure Boot Order
1. Enter the BIOS settings and configure the boot order to prioritize the Windows 10 hard drive.
Pros:
– Keeps Windows 10 and CentOS 7 completely separate on different hard drives.
– No risk of data loss due to partitioning.
– Allows for easy removal of one operating system without affecting the other.
Cons:
– Requires multiple hard drives and installation of each operating system independently.
– Requires manual selection of the operating system during startup.
If you are unable to dual boot Windows 10 and CentOS 7, here are a few possible reasons and alternative solutions to consider:
1. Insufficient Disk Space:
Make sure you have enough free space on your hard drive to accommodate both operating systems. Consider freeing up disk space by deleting unnecessary files, uninstalling unused applications, or moving files to an external storage device.
2. Compatibility Issues:
Check if there are any compatibility issues between your hardware and CentOS 7. Ensure that your computer meets the minimum system requirements for both Windows 10 and CentOS 7.
3. Corrupted Bootloader:
If you encounter issues with the bootloader or the boot menu options, you can use boot repair tools or utilities to repair or reinstall the bootloader.
Implications and Recommendations
Here are a few implications and recommendations to consider when dual booting Windows 10 and CentOS 7:
1. Data Backup: Always backup your important files and data before making any changes to your system or performing a dual boot setup. This ensures that you have a copy of your data in case of any unforeseen issues.
2. Regular OS Updates: Keep both Windows 10 and CentOS 7 updated with the latest software updates and security patches. Regular updates help ensure the stability, performance, and security of your operating systems.
3. Security Considerations: Install and update antivirus software on both operating systems to protect against malware and other security threats. Be cautious when browsing the internet and downloading files from unknown sources.
The Bottom Line
Dual booting Windows 10 and CentOS 7 can provide you with the flexibility to use both operating systems according to your needs. Whether you choose to dual boot via USB, virtualization, the Windows Boot Manager, or separate hard drives, it’s crucial to follow the necessary steps and precautions to ensure a successful and error-free setup.
5 FAQs about Dual Booting Windows 10 and CentOS 7
Q1: Can I dual boot Windows 10 and CentOS 7 without partitioning my hard drive?
A: No, you will need to allocate a separate partition on your hard drive for CentOS 7. Partitioning allows you to have two different operating systems on the same physical hard drive.
Q2: Can I switch between Windows 10 and CentOS 7 without restarting my computer?
A: Yes, using virtualization software like Oracle VirtualBox, you can run CentOS 7 within a virtual environment on your Windows 10 operating system. This allows you to switch between the two without needing to restart your computer.
Q3: Can I uninstall one operating system and keep the other?
A: Yes, you can uninstall either Windows 10 or CentOS 7 without affecting the other operating system. However, it is recommended to backup your data and follow the proper uninstallation process to avoid any complications.
Q4: What happens if I accidentally delete the wrong partition during setup?
A: Accidentally deleting the wrong partition during setup can lead to permanent data loss. It is crucial to double-check and ensure that you are selecting the correct partition before proceeding with the installation. Always backup your data before dual booting or making any changes to your hard drive.
Q5: Can I dual boot Windows and CentOS with different versions, such as Windows 7 and CentOS 8?
A: Yes, you can dual boot different versions of Windows and CentOS. The steps may vary slightly, but the general concept of dual booting remains the same. Make sure to check the compatibility requirements and follow the appropriate installation steps for each operating system.
|
You are reading a sample chapter from the CentOS 5 Essentials Essentials book. Purchase a copy of the fully updated CentOS 8 edition in eBook ($24.99) or Print ($36.99) format CentOS 8 Essentials Print and eBook (ePub/PDF/Kindle) editions contain 31 chapters and over 260 pages. Learn more…
|
CentOS, just like most Linux distributions, will happily co-exist on a hard disk drive with just about any version of Windows up to and including Windows 7. This is a concept known as dual-booting. Essentially, when you power up your PC you will be presented with a menu providing the option to boot either CentOS or Windows. Obviously you can only run one operating system at a time, but it is worth noting that the files on the Windows partition of your disk drive will be available to you from CentOS regardless of whether your Windows partition was formatted using NTFS, FAT16 or FAT32.
This installation method involves shrinking the size of the existing Windows partition to accommodate the installation of CentOS. How you go about doing this will depend on the version of Windows currently installed on the disk.
Partition Resizing
In order to accommodate CentOS on a disk drive that already contains a Windows installation the first step involves shrinking the Windows partition to make some room. If you are running Windows Vista, Windows 7 or Windows Server 2008 the recommended course of action is to use the Windows Disk Management interface to reduce the size of the partition before attempting to install CentOS. You can generally access this by right clicking on the Computer icon and selecting Manage from the popup menu. Within the Computer Management interface, select Disk Management to display a graphical representation of the disk drives in your system:
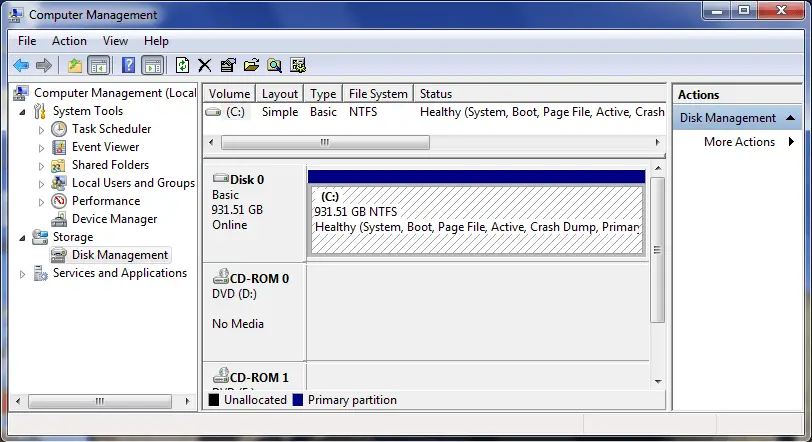
Right click on the partition you wish to reduce and select Shrink Volume. The tool will calculate the maximum amount by which the volume can be shrunk without data loss (a process that can take several minutes depending on the overall size of the partition). Once this analysis is complete, a dialog similar to the one in the following figure will appear:
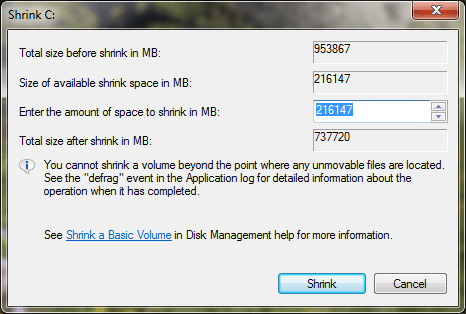
Enter into the Total size after shrink in MB field the new target size for the partition and click on Shrink to proceed. Once the resizing operation is complete, reboot using the CentOS installation media (as outlined in Installing CentOS on a Clean Disk Drive) and proceed with the installation. When prompted to decide on where CentOS is to be installed be sure to select the Use free space on selected drives and create default layout option.
Shrinking a Windows XP Partition
Whilst it is possible to shrink existing Windows partitions using the Windows Disk Management tool on recent versions of Windows, this is not possible from within Windows XP. If you need to shrink a Windows XP partition in order to install CentOS, one option is to use one of the commercially available partitioning tools such as PartitionMagic. If you would prefer not to buy a partitioning tool, the repartitioning can also be performed from within the CentOS Live CD using the fdisk and ntfsresize utilities.
Before attempting this resizing technique it is vital that you back up all essential data from your Windows XP system. In this section we will be performing some low level disk partitioning activities using command line tools. Whilst following these steps is an invaluable method for learning about the structure of disk partitions, it is important that you understand that errors in performing the following the steps may result in loss of data. With that warning out of the way we can proceed.
The first step in the process is to boot from the CentOS Live CD (for steps on downloading this refer to Installing CentOS on a Clean Disk Drive). Once loaded, log in and open a terminal window (right click anywhere on the desktop and select Open Terminal). In the terminal window, gain root privileges by executing the following command:
su –
The fdisk tool is installed by default but the ntfsresize tool is not part of the standard CentOS distribution or installation repositories. Instead, we need to install from a different source. To enable access to the required repository, one of the following commands must be run depending on whether you are running a 32-bit or 64-bit version of CentOS:
For 32-bit systems:
rpm -Uhv http://apt.sw.be/redhat/el5/en/i386/rpmforge/RPMS/rpmforge-release-0.3.6-1.el5.rf.i386.rpm
For 64-bit systems:
rpm -Uhv http://apt.sw.be/redhat/el5/en/x86_64/rpmforge/RPMS//rpmforge-release-0.3.6-1.el5.rf.x86_64.rpm
Next, we need to install the package that contains the ntfsresize utility:
yum install ntfsprogs
Now that we have installed the tools we need, the next step is to identify the disk drive on which the Windows XP partition resides. This is achieved by running the fdisk command as follows:
[root@livecd ~]# fdisk –l

Disk /dev/hda: 21.4 GB, 21474836480 bytes
255 heads, 63 sectors/track, 2610 cylinders
Units = cylinders of 16065 * 512 = 8225280 bytes

   Device Boot      Start         End      Blocks   Id  System
/dev/hda1   *           1        2609    20956761    7  HPFS/NTFS
As we can see, in the case of the above example we have a single disk drive (/dev/hda) that contains a single partition (/dev/hda1) that is formatted as NTFS (a sure sign that is a Windows partition). Since the Boot column contains an asterisk we also know this is a bootable partition. Clearly the partition we want to shrink is /dev/hda1. Depending on your system configuration you may see different results (for example if you have multiple disk drives).
Having identified the disk and partition we now need to find out how much unused space is available within the partition for us to free up. To obtain this information we use the ntfsresize tool as follows:
root@livecd ~]# ntfsresize -i /dev/hda1
ntfsresize v1.13.1 (libntfs 9:0:0)
Device name        : /dev/hda1
NTFS volume version: 3.1
Cluster size       : 4096 bytes
Current volume size: 21459722752 bytes (21460 MB)
Current device size: 21459723264 bytes (21460 MB)
Checking filesystem consistency ...
100.00 percent completed
Accounting clusters ...
Space in use       : 2047 MB (9.5%)
Collecting resizing constraints ...
You might resize at 3232108544 bytes or 3233 MB (freeing 18227 MB).
Please make a test run using both the -n and -s options before real resizing!
The output from ntfsresize for our example tells us that we can safely free up 18277MB of disk space by shrinking the Windows partition. In practice you will want to leave space on your Windows system for storing future data, so it is recommended that you do not shrink the partition to the full extent available. For the purposes of this example we will shrink the partition to 6000MB. Before performing the live resize, it is best to run through a simulation in order to identify any problems before permanent changes are made. To do this, run ntfsresize with the –no-action option:
[root@livecd ~]# ntfsresize --no-action -b --size 6000M /dev/hda1
ntfsresize v1.13.1 (libntfs 9:0:0)
Device name        : /dev/hda1
NTFS volume version: 3.1
Cluster size       : 4096 bytes
Current volume size: 21459722752 bytes (21460 MB)
Current device size: 21459723264 bytes (21460 MB)
New volume size    : 5999993344 bytes (6000 MB)
Checking filesystem consistency ...
100.00 percent completed
Accounting clusters ...
Space in use       : 2047 MB (9.5%)
Collecting resizing constraints ...
Needed relocations : 21547 (89 MB)
Schedule chkdsk for NTFS consistency check at Windows boot time ...
Resetting $LogFile ... (this might take a while)
Relocating needed data ...
100.00 percent completed
Updating $BadClust file ...
Updating $Bitmap file ...
Updating Boot record ...
The read-only test run ended successfully.
Assuming the read-only test runs successfully, the actual resize can be performed by running the same command, but this time without the –no-action option:
[root@livecd ~]# ntfsresize -b --size 6000M /dev/hda1
ntfsresize v1.13.1 (libntfs 9:0:0)
Device name        : /dev/hda1
NTFS volume version: 3.1
Cluster size       : 4096 bytes
Current volume size: 21459722752 bytes (21460 MB)
Current device size: 21459723264 bytes (21460 MB)
New volume size    : 5999993344 bytes (6000 MB)
Checking filesystem consistency ...
100.00 percent completed
Accounting clusters ...
Space in use       : 2047 MB (9.5%)
Collecting resizing constraints ...
Needed relocations : 21547 (89 MB)
WARNING: Every sanity check passed and only the dangerous operations left.
Make sure that important data has been backed up! Power outage or computer
crash may result major data loss!
Are you sure you want to proceed (y/[n])? y
Schedule chkdsk for NTFS consistency check at Windows boot time ...
Resetting $LogFile ... (this might take a while)
Relocating needed data ...
100.00 percent completed
Updating $BadClust file ...
Updating $Bitmap file ...
Updating Boot record ...
Syncing device ...
Successfully resized NTFS on device '/dev/hda1'.
You can go on to shrink the device for example with Linux fdisk.
IMPORTANT: When recreating the partition, make sure that you
  1)  create it at the same disk sector (use sector as the unit!)
  2)  create it with the same partition type (usually 7, HPFS/NTFS)
  3)  do not make it smaller than the new NTFS filesystem size
  4)  set the bootable flag for the partition if it existed before
Otherwise you won't be able to access NTFS or can't boot from the disk!
If you make a mistake and don't have a partition table backup then you
can recover the partition table by TestDisk or Parted's rescue mode.
At this point we have reduced the size of the NTFS partition but the partition does not yet know we have done so. If, for example, we use fdisk to tell us about the partition the partition table information still indicates the original size:
[root@livecd ~]# fdisk -l

Disk /dev/hda: 21.4 GB, 21474836480 bytes
255 heads, 63 sectors/track, 2610 cylinders
Units = cylinders of 16065 * 512 = 8225280 bytes

   Device Boot      Start         End      Blocks   Id  System
/dev/hda1   *           1        2609    20956761    7  HPFS/NTFS
In order to address this we will have to delete the partition information and then recreate it with the new size information. Before doing so, make a note of the Start and Id values for the partition provided by the above fdisk command (yours will possibly differ from the example and we will need these when we recreate the partition). Begin by starting fdisk with the name of the disk drive on which we are going to modify the partition table information:
[root@livecd ~]# fdisk /dev/hda
At the command prompt, delete the partition (for the example this is partition 1 but may be different on your system):
Command (m for help): d
Selected partition 1
Next, we need to recreate the partition with the new size information (keeping in mind that we reduced the partition to 6000MB):
Command (m for help): n
Command action
   e   extended
   p   primary partition (1-4)
p
Partition number (1-4): 1
First cylinder (1-2610, default 1): 1
Last cylinder or +size or +sizeM or +sizeK (1-2610, default 2610): +6000M
Next, the Id of the partition needs to set to the original value as indicated by the fdisk –l command (in this case 7 to indicate the partition uses the Windows NTFS format):
Command (m for help): t
Selected partition 1
Hex code (type L to list codes): 7
Changed system type of partition 1 to 7 (HPFS/NTFS)
Finally, we need to make sure the partition is still bootable:
Command (m for help): p

Disk /dev/hda: 21.4 GB, 21474836480 bytes
255 heads, 63 sectors/track, 2610 cylinders
Units = cylinders of 16065 * 512 = 8225280 bytes

   Device Boot      Start         End      Blocks   Id  System
/dev/hda1               1         730     5863693+   7  HPFS/NTFS
If the Boot column does not contain an asterisk (*) then we need to make the partition bootable before we write the new configuration disk:
Command (m for help): a
Partition number (1-4): 1
Once again, it is prudent to check the settings before proceeding:
Command (m for help): p

Disk /dev/hda: 21.4 GB, 21474836480 bytes
255 heads, 63 sectors/track, 2610 cylinders
Units = cylinders of 16065 * 512 = 8225280 bytes

   Device Boot      Start         End      Blocks   Id  System
/dev/hda1   *           1         730     5863693+   7  HPFS/NTFS
If all is well, write the new partition information to disk:
Command (m for help): w
The partition table has been altered!

Calling ioctl() to re-read partition table.
The resize is now complete and you can reboot the system. If you check the disk volumes in the Windows XP disk manager (right click on My Computer, select Manage and choose Disk Management from the Computer Management tool). The newly freed space will be displayed as Unallocated.
Having resized the partition, reboot using the CentOS installation media (as outlined in Installing CentOS on a Clean Disk Drive) and proceed with the installation. When prompted to decide on where CentOS is to be installed be sure to select the Use free space on selected drives and create default layout option.
Choosing an Operating System at Boot Time
Once the installation completes, the system will display the standard boot countdown screen. Pressing any key on the keyboard at this point will display the boot menu screen as illustrated in the following figure:
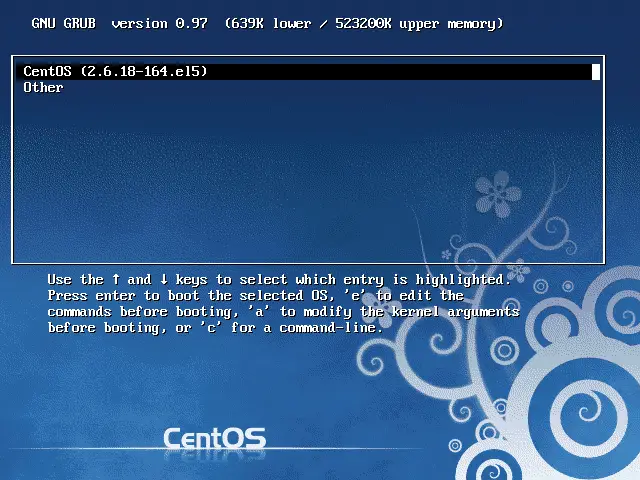
This menu provides the option of booting either «CentOS» or «Other». In this instance, selecting «Other» will boot your original Windows installation. In the next section we will cover the steps to modify this menu to change the boot default and rename the «Other» menu option to something more descriptive.
Once you have logged into the system and the desktop is visible the next step is to configure the boot menu so that it lists the alternate operating system as Windows instead of Other. The boot menu configuration settings are stored in the /boot/grub/menu.lst file. This file may be edited in a terminal window as follows:
su -
gedit /boot/grub/menu.lst
When prompted by the su command to enter a password be sure to enter the root password created during the installation process, not the password you created for your user account during the setup agent configuration steps.
The contents of a typical menu.lst file is listed below:
# grub.conf generated by anaconda
#
# Note that you do not have to rerun grub after making changes to this file
# NOTICE:  You have a /boot partition.  This means that
#          all kernel and initrd paths are relative to /boot/, eg.
#          root (hd0,1)
#          kernel /vmlinuz-version ro root=/dev/VolGroup00/LogVol00
#          initrd /initrd-version.img
#boot=/dev/hda
default=0
timeout=5
splashimage=(hd0,1)/grub/splash.xpm.gz
hiddenmenu
title CentOS (2.6.18-164.el5)
        root (hd0,1)
        kernel /vmlinuz-2.6.18-164.el5 ro root=/dev/VolGroup00/LogVol00 rhgb quiet
        initrd /initrd-2.6.18-164.el5.img
title Other
        rootnoverify (hd0,0)
        chainloader +1
The above menu.lst file contains options to boot from two operating systems. The CentOS section of the configuration typically reads as follows:
title CentOS (2.6.18-164.el5)
        root (hd0,1)
        kernel /vmlinuz-2.6.18-164.el5 ro root=/dev/VolGroup00/LogVol00 rhgb quiet
        initrd /initrd-2.6.18-164.el5.img
The Windows section of the configuration is likely to be similar to the following:
title Other
        rootnoverify (hd0,0)
        chainloader +1
The default=0 line indicates that the first entry in the file is to be default operating systems (in other words, the operating system that will boot by default if the user does not intervene during the boot phase). The timeout=5 directive specifies the number of seconds the boot screen is displayed before the default operating system is automatically booted.
To configure the system to boot Windows by default simply change this line so that it reads as follows:
default=1
To increase or decrease the timeout before the default operating system boots, change the timeout value (in this case to 20 seconds):
timeout=20
The final task in our dual boot configuration process is to rename the Windows boot option to something more descriptive than «Other». To achieve this, simply change the «Other» line as follows:
title Windows
Note that the title value can be anything you choose.
The next time the system is rebooted, the boot screen will wait 20 seconds before auto-booting. If no keys are pressed the system will now boot Windows by default, instead of CentOS. If the user does intervene and display the boot menu, the Windows option is now titled «Windows» and not «Other».
Accessing the Windows Partition from Linux
When running CentOS in a dual boot configuration it is still possible to access files located on the Windows partition. This can be achieved by manually mounting the partition from the command-line. Before doing so, however, some additional packages need to be installed on the system. To do so, run the following commands inside a terminal window:
su -
yum install fuse
Next, we need to set up access to the Dag RPMForge repositories:
For 32-bit systems:
rpm -Uhv http://apt.sw.be/redhat/el5/en/i386/rpmforge/RPMS/rpmforge-release-0.3.6-1.el5.rf.i386.rpm
For 64-bit systems:
rpm -Uhv http://apt.sw.be/redhat/el5/en/x86_64/rpmforge/RPMS//rpmforge-release-0.3.6-1.el5.rf.x86_64.rpm
Next, install the NTFS driver:
yum install fuse-ntfs-3g
Once the requisite packages are installed, the next step is to create a directory to use as the mount point for our Windows partition. In this example we will create a directory called /windows:
mkdir /windows
When prompted for a password by the su command, enter the root password specified during the CentOS installation process. Next, we need to run the mount command (still with root privileges and assuming the Windows partition is /dev/sda1 and NTFS format — this may be different on your system):
mount –t ntfs-3g /dev/hda1 /windows
Under some circumstances you may get a message that the Windows partition needs to be checked. If so, either reboot into Windows again and manually run chkdsk (if it does not run automatically during the boot process), or force the mount with the –o option:
mount /dev/hda1 /windows -o force
To automate the mount each time the system is booted, simply add the mount line to the /etc/fstab file:
/dev/hda1 /windows ntfs defaults 0 0
To unmount the Windows file system at any time:
umount /windows
|
You are reading a sample chapter from the CentOS 5 Essentials Essentials book. Purchase a copy of the fully updated CentOS 8 edition in eBook ($24.99) or Print ($36.99) format CentOS 8 Essentials Print and eBook (ePub/PDF/Kindle) editions contain 31 chapters and over 260 pages. Learn more…
|