
Briefly explain how to complete the task set out by the prompt. This should give readers a quick overview of what to expect. It should be 100 words or less, and someone should be able to understand how to accomplish the task specified by the prompt after reading this paragraph.
Dual booting Windows 10 and Kali Linux involves installing both operating systems on the same computer. You’ll need to create a partition on your hard drive, install Windows 10 first, followed by Kali Linux. During the Kali Linux installation, you’ll configure the boot loader to let you choose between the two operating systems each time you start your computer. This guide will walk you through each step, making the process simple and straightforward.
In this step-by-step tutorial, you’ll learn how to set up a dual-boot system with Windows 10 and Kali Linux. This will enable you to choose which operating system to use each time you turn on your computer.
Step 1: Back Up Your Data
Before proceeding, back up all important files to an external drive or cloud storage.
Creating a backup ensures that you won’t lose precious data if something goes wrong during the installation process.
Step 2: Create a Windows 10 Partition
Open Disk Management in Windows 10 and shrink the volume to create space for Kali Linux.
This step is crucial because it makes room on your hard drive for the Kali Linux installation.
Step 3: Download Kali Linux ISO
Go to the official Kali Linux website and download the latest ISO file.
Having the ISO file is necessary for creating a bootable USB drive, which you’ll use to install Kali Linux.
Step 4: Create a Bootable USB Drive
Use software like Rufus to create a bootable USB drive with the Kali Linux ISO.
A bootable USB drive will allow you to install Kali Linux on your computer.
Step 5: Boot from USB Drive
Restart your computer and boot from the USB drive by changing the boot order in BIOS.
Booting from the USB drive will start the Kali Linux installer.
Step 6: Install Kali Linux
Follow the installation prompts to install Kali Linux on the partition you created earlier.
Make sure to select the correct partition to avoid overwriting your Windows 10 installation.
Step 7: Configure the Boot Loader
During the Kali Linux installation, you’ll be prompted to install GRUB, the boot loader. Choose to install it.
GRUB will allow you to select between Windows 10 and Kali Linux each time you start your computer.
Step 8: Complete the Installation
Finish the Kali Linux installation and restart your computer.
You’ll now have the option to choose which operating system to boot into.
After completing these steps, you will have a dual-boot system with Windows 10 and Kali Linux. You’ll be able to choose which operating system to use each time you turn on your computer.
Tips for Dual Booting Windows 10 and Kali Linux
- Backup: Always back up your important files before starting the installation process.
- Partitioning: Make sure to create sufficient space for Kali Linux. At least 20GB is recommended.
- BIOS Settings: Familiarize yourself with accessing BIOS settings to change the boot order.
- Patience: Take your time during installation. Rushing can lead to mistakes.
- Updates: Keep both operating systems updated for the best performance and security.
Frequently Asked Questions
Can I dual boot on any computer?
Most modern computers support dual booting, but older models may have limitations.
Will dual booting slow down my computer?
No, dual booting does not slow down your computer. Each operating system runs independently.
Can I remove one OS later?
Yes, you can remove one operating system, but you’ll need to reconfigure the boot loader.
Is dual booting safe?
Dual booting is generally safe, but always back up your data just in case.
How much space do I need for Kali Linux?
At least 20GB of free space is recommended for a smooth experience.
Summary of How to Dual Boot Windows 10 and Kali Linux
- Back up your data.
- Create a Windows 10 partition.
- Download Kali Linux ISO.
- Create a bootable USB drive.
- Boot from USB drive.
- Install Kali Linux.
- Configure the boot loader.
- Complete the installation.
Conclusion
Dual booting Windows 10 and Kali Linux offers the best of both worlds, allowing you to enjoy the versatility of Linux while keeping the familiarity of Windows. While the process might seem daunting at first, following these steps makes it straightforward. Remember to back up your data and take your time during the installation. If you’re interested in cybersecurity or just want to explore different operating systems, setting up a dual-boot system can be a rewarding experience. For further reading, consider exploring online forums and tutorials, as they provide valuable insights and community support. Ready to take the plunge? Go ahead and start your dual-boot journey today!
Kermit Matthews is a freelance writer based in Philadelphia, Pennsylvania with more than a decade of experience writing technology guides. He has a Bachelor’s and Master’s degree in Computer Science and has spent much of his professional career in IT management.
He specializes in writing content about iPhones, Android devices, Microsoft Office, and many other popular applications and devices.
Read his full bio here.
Hello folks, In this article, We will discuss how to dual boot Kali Linux with Windows 10. If you have windows pre-installed and want to install Kali Linux, You can install it on a virtual machine as explained in the following article: Install Kali Linux on Virtualbox in 3 Easy Steps.
Another option is to install it next to windows. Dual-booting means you can choose at the startup which operating system to use. It will open one operating system at a time. Here, We will discuss how to dual boot Kali Linux with windows.
Before the installation procedure, we will see system requirements, installation pre-requisites, and some basic options needed for the dual boot.
Also read: Create Custom Wordlists Using Crunch in Kali Linux
System Requirements
Kali Linux can be installed with a requirement of as low as 512 MB of RAM but only with an SSH server and no desktop.
To install kali with a desktop, You will need at least 4 GB of RAM and 20 GB of space.
Installation Pre-requisites
- A PC/Laptop with Windows pre-installed
- 4 GB USB device( 8GB recommended)
- Intel or AMD dual-core processor
- Rufus software for flashing the USB
- Disable secure boot in the BIOS menu
- Disable Fast startup from the power option(in the control panel)
1. Free up Space From Hard Disk
For installing Kali Linux, You need to free up some space from your hard disk. I assume your windows is taking 100% of your space, so, we need to resize the windows partitions and shrink the volume.
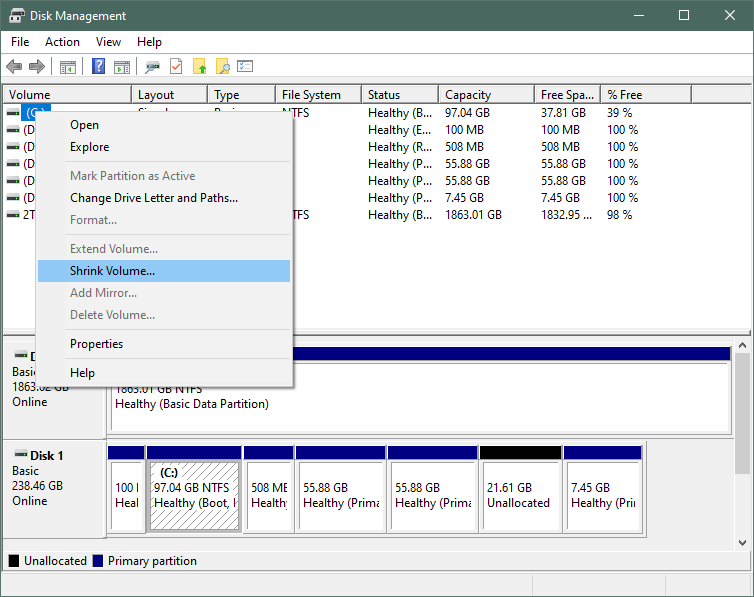
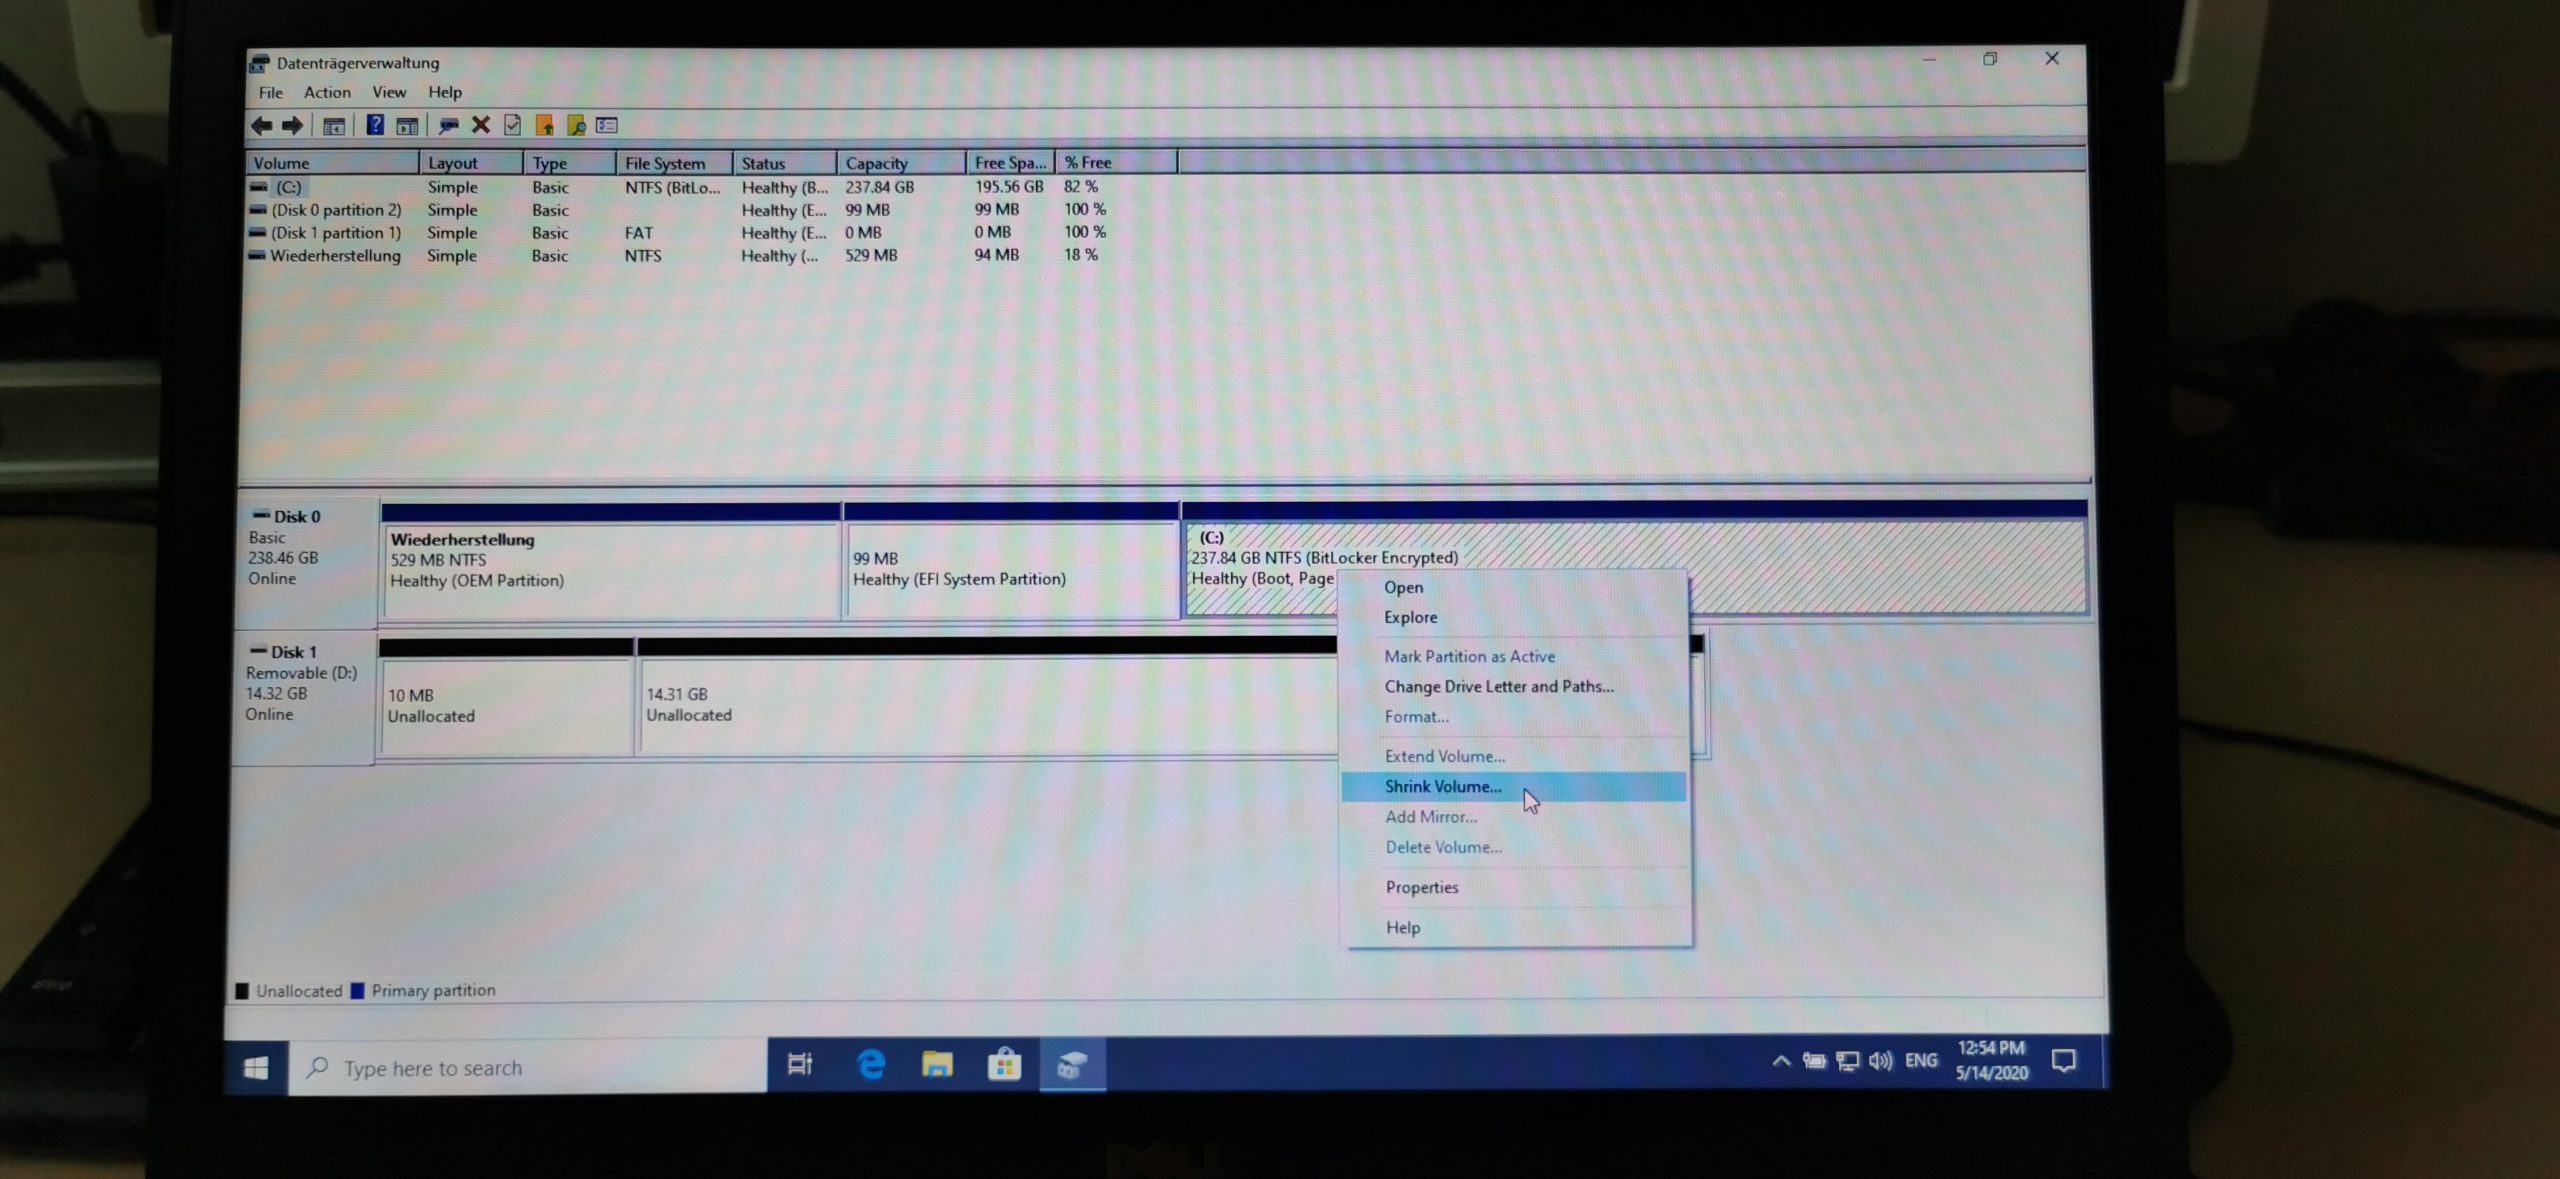
Open Disk Management through search or press Windows+R. Type diskmgmt.msc and press Enter.
Now, Right-click on the disk partition you want to shrink. Click on Shrink volume. Here the disk partition with a size 97GB is the Windows partition.
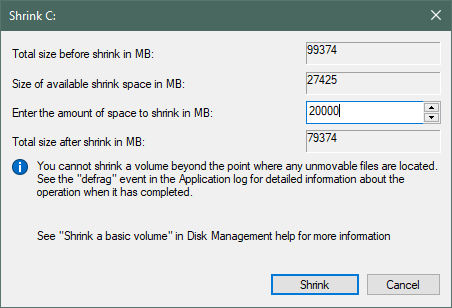
Now, Enter the amount of space to shrink. Here, We are freeing up 20GB of space from the windows partition by shrinking the volume. IT also shows the size of available shrink space.
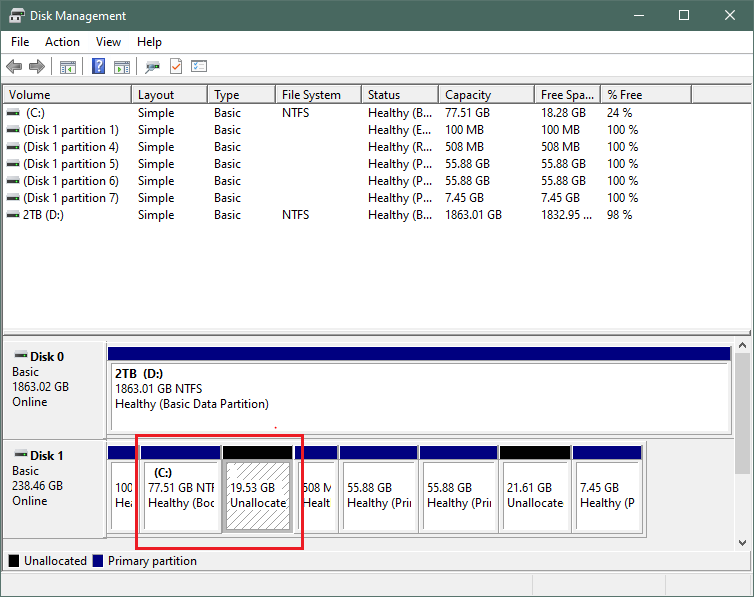
20GB of unallocated space is created and the windows partition size is reduced to 77GB as shown below.
2. Installing the Pre-requisites
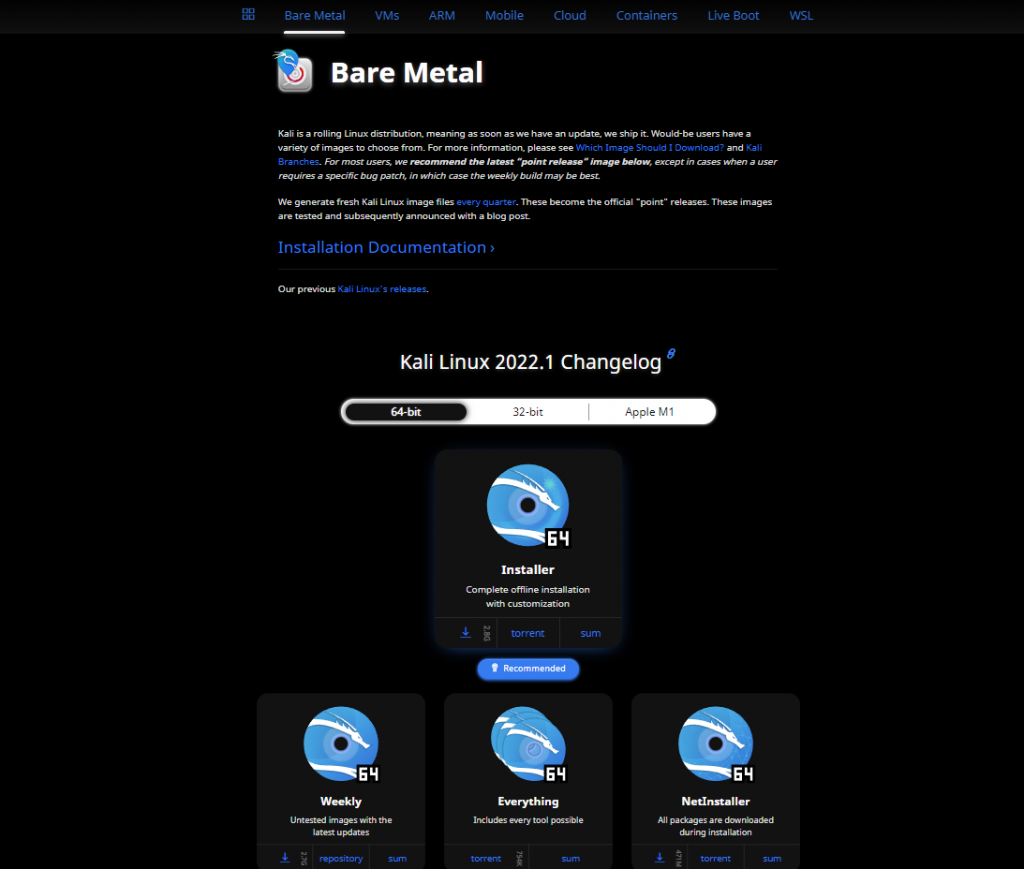
To download the Kali Linux iso file, Go to the official website of Kali Linux or click here to directly install the amd-64 image file. Wait till the download completes. There are other options like weekly( weekly release), everything( contains every tool possible).
Now, Install Rufus software to create a bootable USB flash drive. Click here to directly download the software for windows from the official website. Now Open Rufus and select the USB drive and the ISO file. Click on Start and wait till it completes.
3. Create a Bootable USB
After flashing the USB drive, Shut down the system and boot into the installation media from the boot menu. Press F12 ( or F11) for the boot menu. Select the installation media(USB drive) and press Enter. Select Graphical installer and press Enter.
Select a language, location, and keyboard layout and click Continue.
Now, Enter the hostname, full name, Username and choose a password.
This password will also be your root password. Choose a password and click on Continue.
After setting up your username and password, Choose your preferred timezone. Then, You will be provided with a partition disk menu.
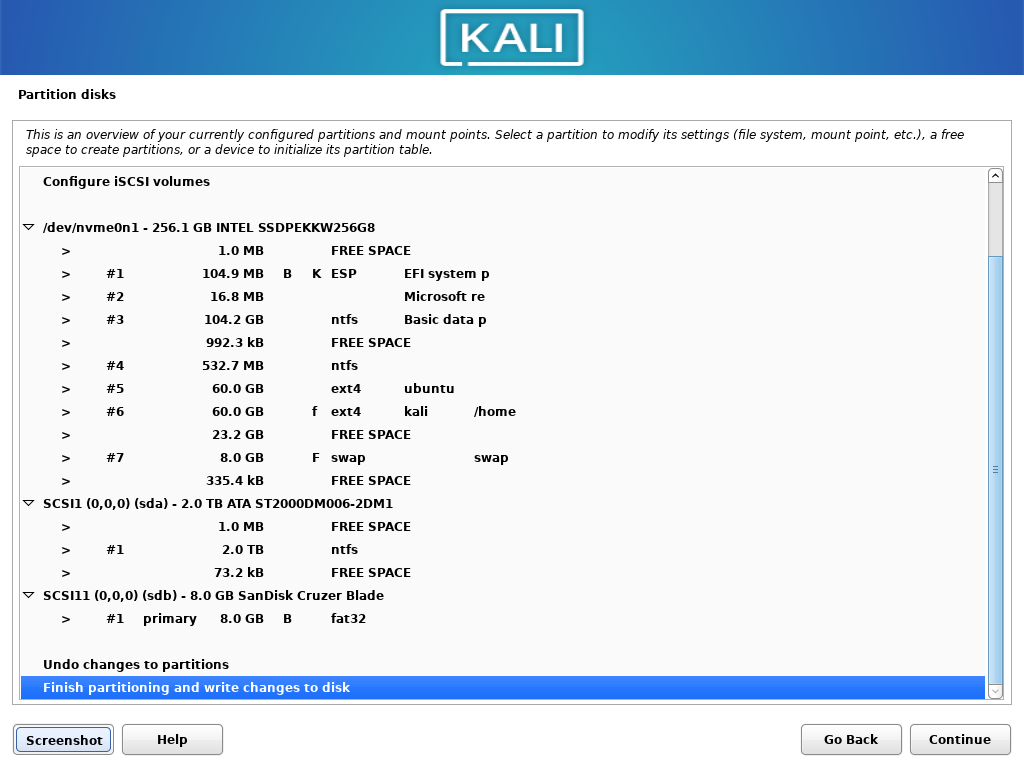
Setting Up Partitions (Critical)
This is the most important step. Perform this step carefully without overwriting any partition of windows. It may corrupt your windows partition. So, Choose Manual from the partition disk menu and Click on Continue.
Now, Select the unallocated free space(83GB in my system) and press Enter. Click on Create new partition and press Enter. Choose your disk partition size(minimum of 20GB) and press Enter. Then choose whether you want this partition at the beginning or end of the free space. Choose beginning and press Enter.
After choosing all the appropriate options, The partition will be shown like this. Double- Click on Done setting up the partition.
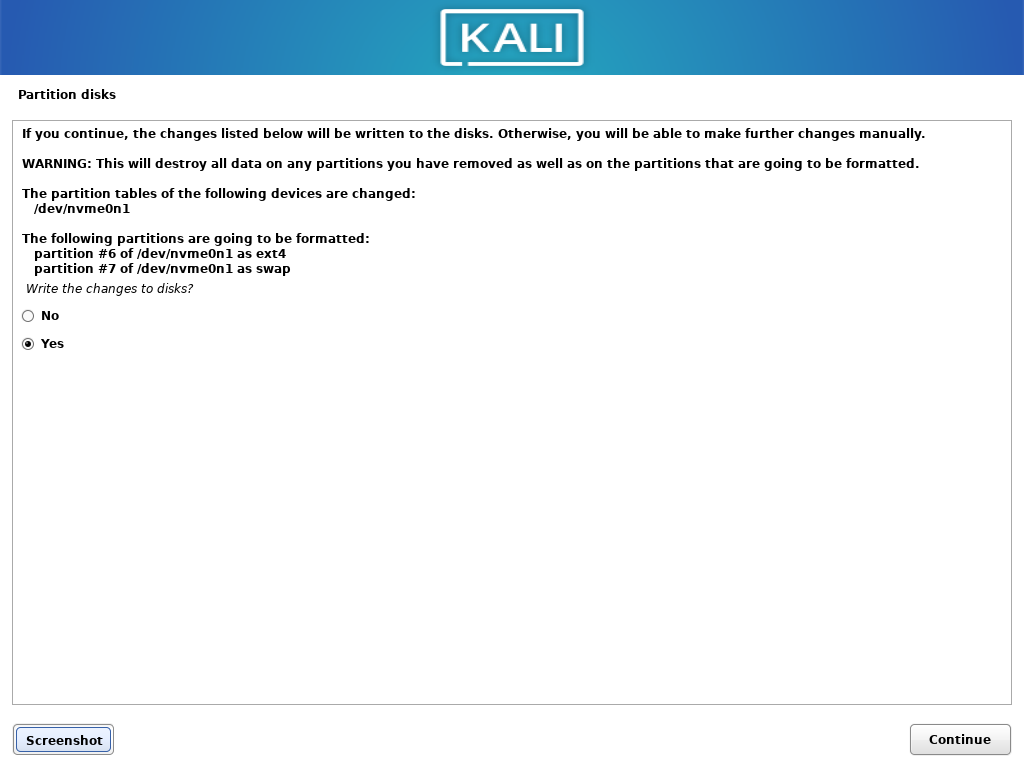
From the free space available, create another partition of 8GB and mount point as swap. After creating the partitions, Double-Click on Finish partitioning and write changes to the disk. On the next option, Click on Yes to confirm writing changes to the disk and click on Continue.
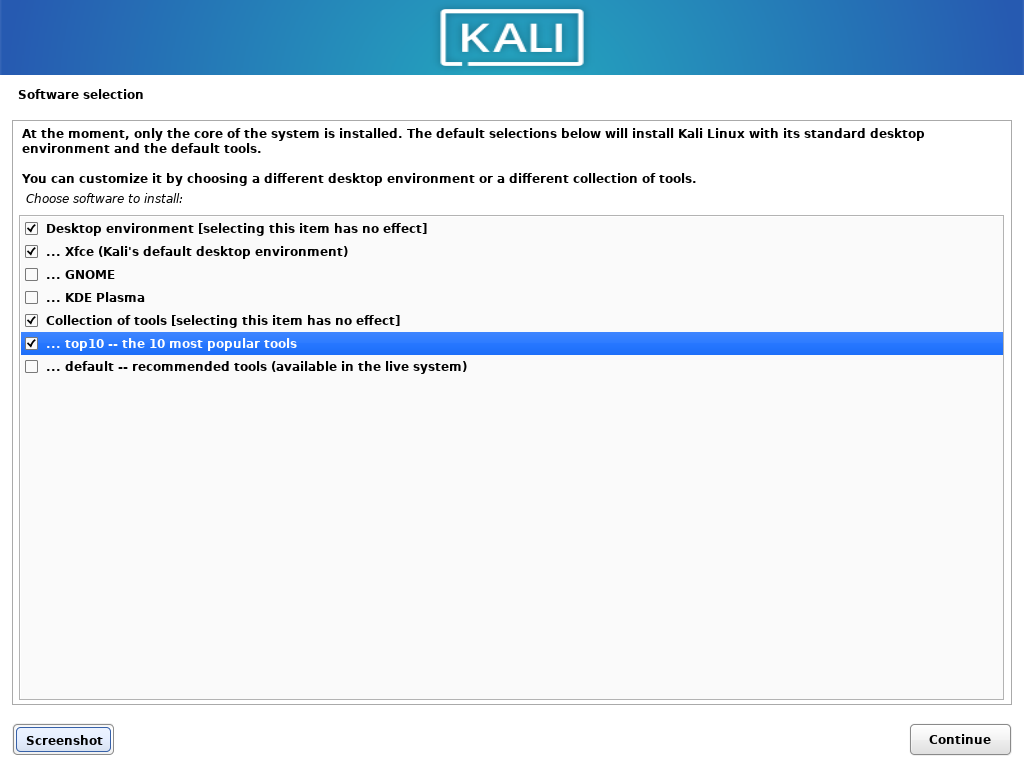
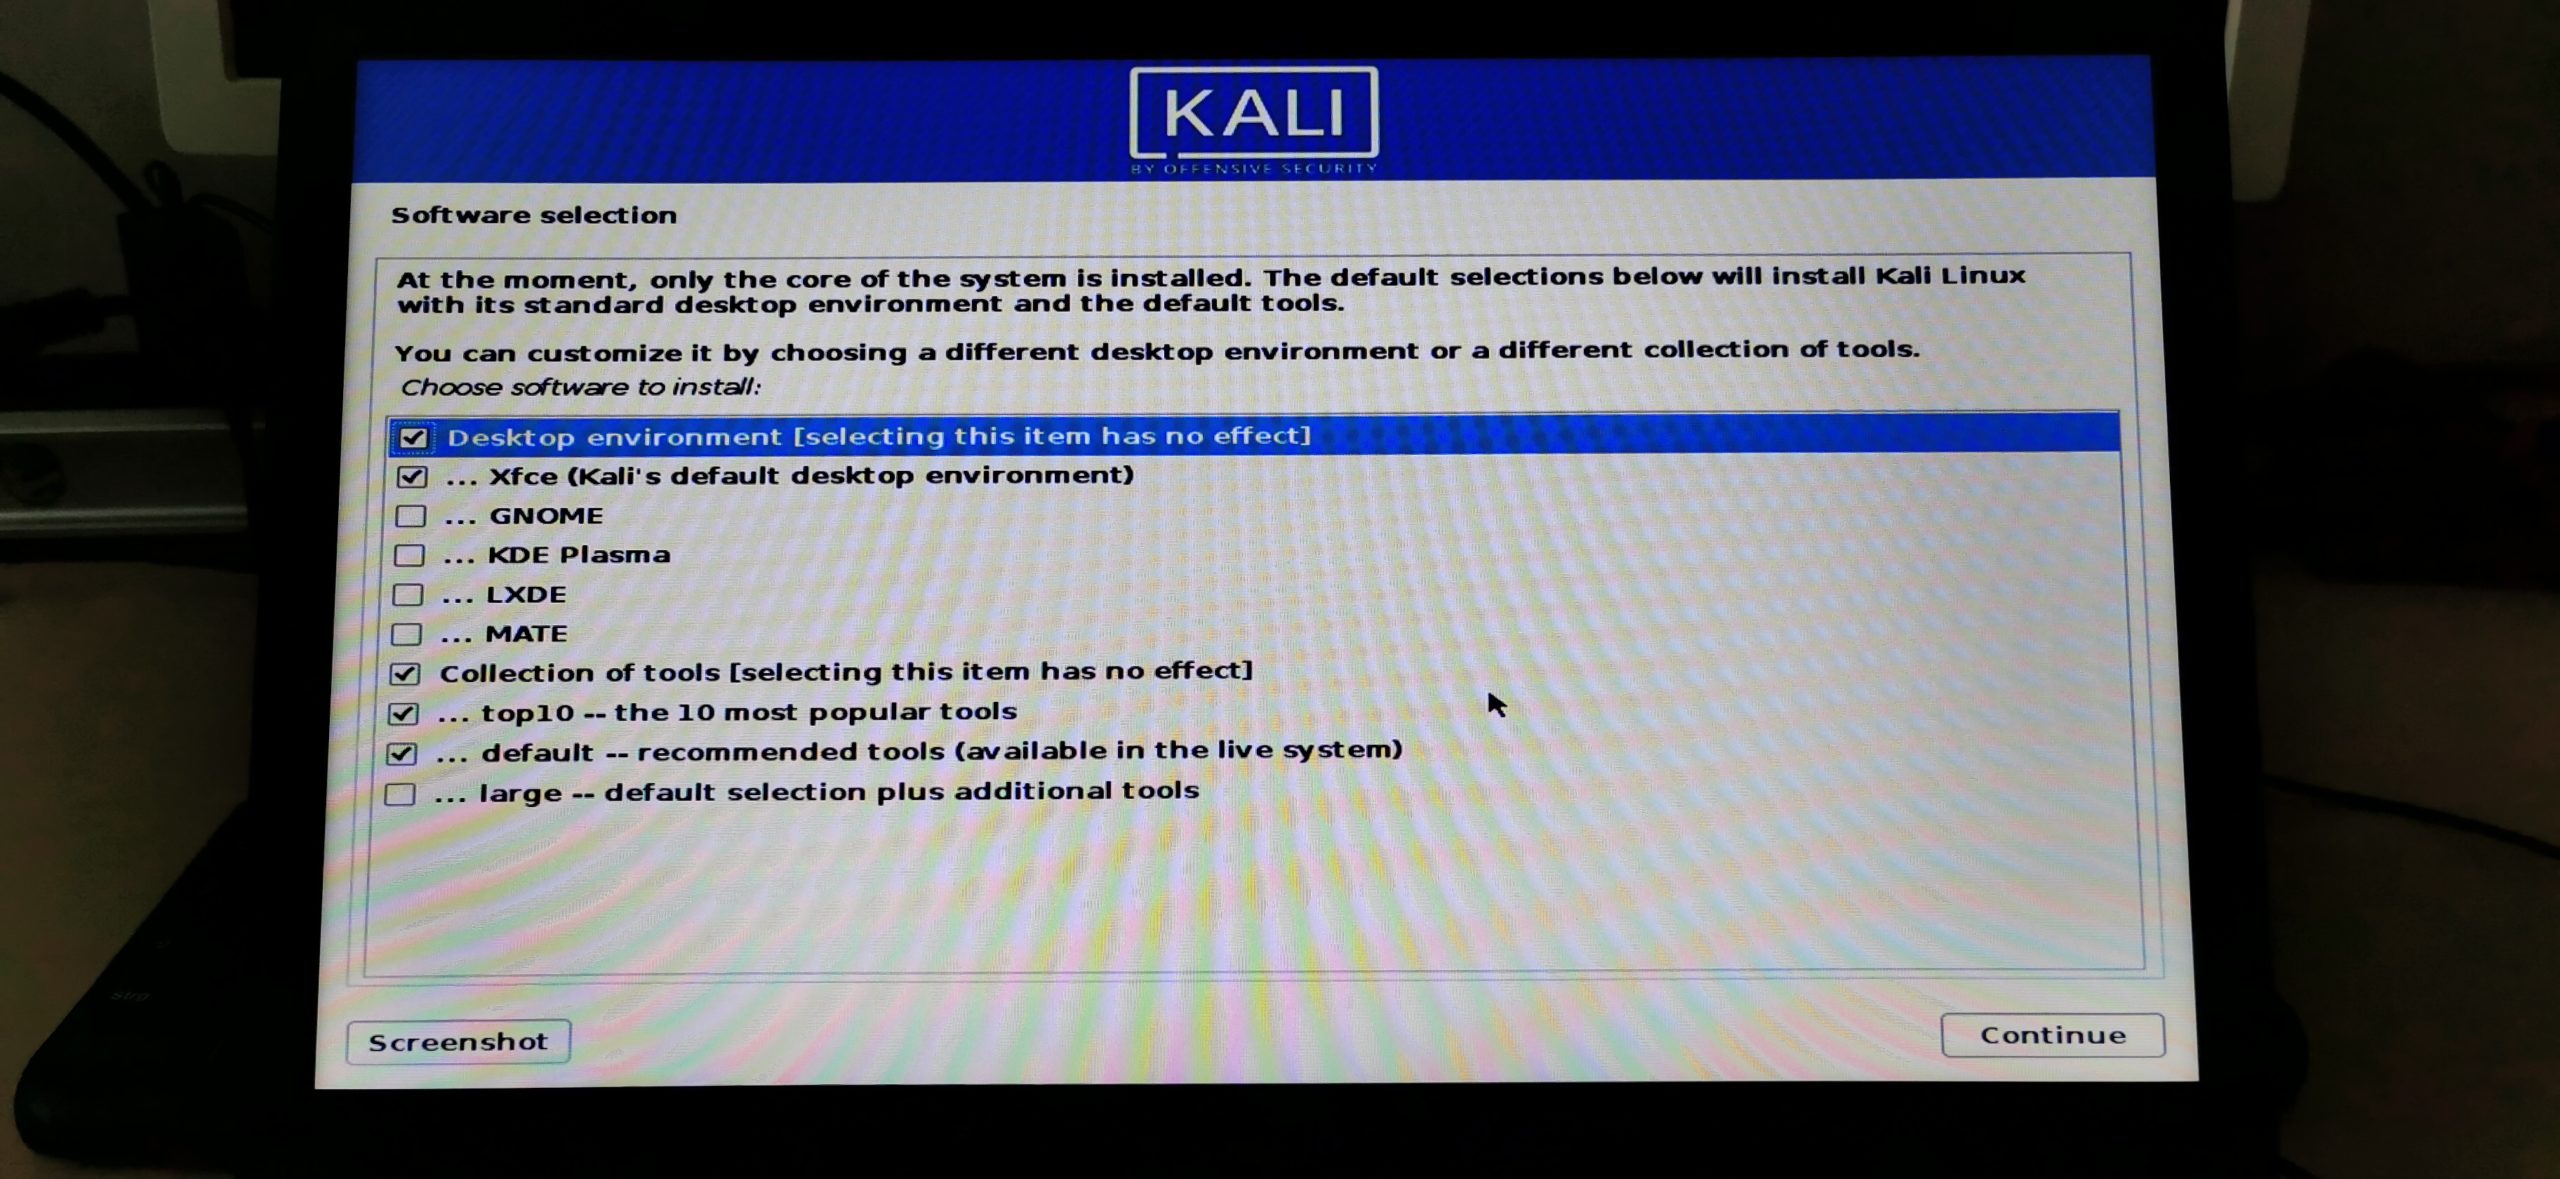
After Disk partitioning, in the Software selection menu, You can choose to install a different desktop environment (default is Xfce) and choose a different collection of tools. Click on Continue.
Wait till the installation completes.

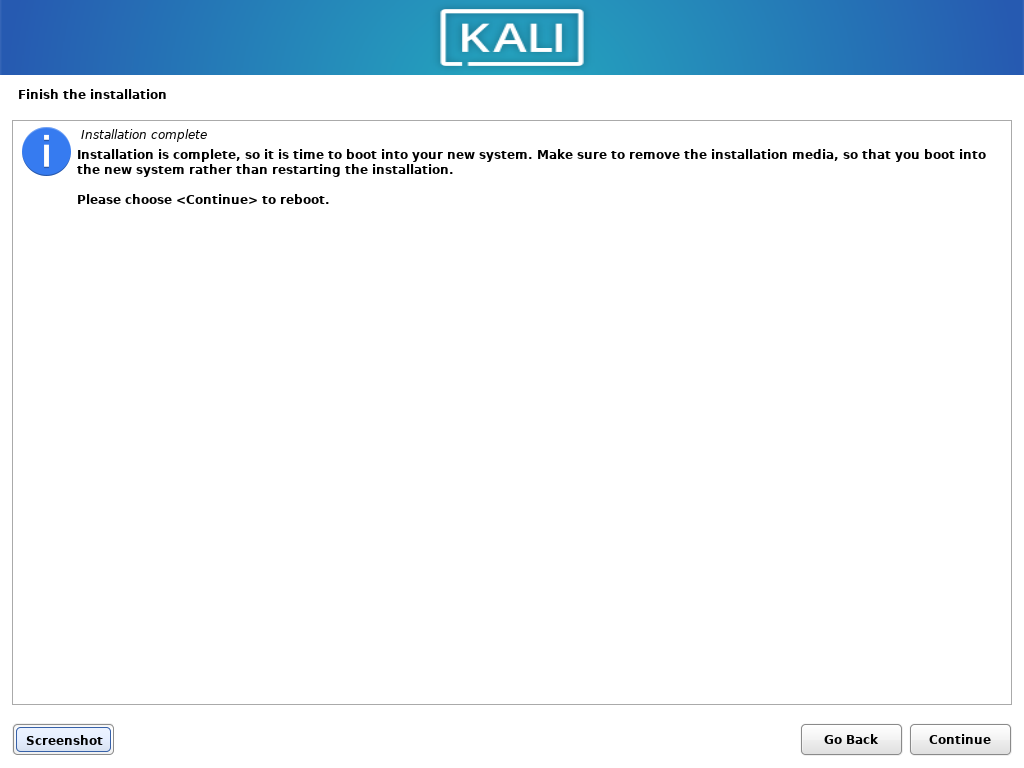
After the installation is completed, click on Continue to reboot to your newly installed kali Linux. Make sure you remove the installation media after clicking on Continue.
Now boot into Kali Linux from the boot menu. You can also change the desktop environment when you are logging in.
Conclusion
So, We discussed how to install Kali Linux along with windows by creating a dual boot environment. Thank you for reading!
Dual boot Windows 10 and Linux — Introduction
If you are looking forward to running both Kali and Windows on your system, you have two options:
- Virtualization
- Dual-booting
Virtualization is the concept of running an operating system (virtual machine) inside your host/ main operating system using virtualization software like VMware and VirtualBox. On the other hand, dual-booting refers to installing two operating systems on your computer and selecting the one you want to use on boot.
In this post, we are going to look at how to dual boot Windows 10 and Kali Linux. Kali Linux is a Debian-based Linux distribution with a focus on security auditing and penetration testing. Windows OS, on the other hand, is one of the most popular Operating Systems used worldwide. Imagine having access to these two systems on your single PC. Windows enables you to perform your day-to-day activities like development, editing, etc. On the other hand, you can practice your penetration skills and hunt for vulnerabilities on digital systems with Kali Linux.
Step-1: Requirements
- Microsoft Windows 10 (Already installed, preferably Windows 10)
- Free Disk Space — Minimum 25 GB free space recommended.
- Kali Linux ISO image.
- USB Drive (At least 4GB size)
- Rufus / Balena Etcher
NOTE:
In this post, we will assume you already have Windows installed and running on your machine. Additionally, if you are just getting started with a Linux system, I highly emphasize installing Windows first, followed by Kali Linux or any other Linux distribution you have in mind. After installing Linux, installing Windows will overwrite the Grub configuration, and your Linux system will not boot. Even though that can be fixed, it can be quite an overwhelming process for a newbie.
Step-2: Disk Partitioning
HINT:
When setting up a dual-boot or multi-boot, every operating system should be installed in its own partition. If you install an operating system in a partition containing another OS’s files, they will be overwritten, and the operating system won’t boot. The first step in this tutorial will be creating a partition where we will install Kali Linux.
Follow the steps below:
On your keyboard, press Windows key + R hotkey and type diskmgmt.msc on the small window that appears. Click OK or hit the Enter key to open the disk management window.
A new window will open showing all the drives connected to your PC and their different partitions, similar to the image below.
![Dual boot Windows 10 and Linux [Step-by-Step]](https://www.golinuxcloud.com/wp-content/uploads/Disk-Management.png "Dual boot Windows 10 and Linux [Step-by-Step]")
Right-click on the partition you want to resize, select shrink volume, and set the size of the disk where you want to install the virtual machine. This post will resize partition C and create a new partition with a 40 GB storage size, as shown in the image below. This is the partition where we will install Kali Linux.
![Dual boot Windows 10 and Linux [Step-by-Step]](https://www.golinuxcloud.com/wp-content/uploads/Create-new-partition-1.png "Dual boot Windows 10 and Linux [Step-by-Step]")
Step-3: Download Kali Linux
As of writing this post, Kali Linux comes packaged for different platforms. Some of them include:
- Bare metal: Meant for installing directly on your PC hardware
- Virtual machines: These are packaged ISO files meant to run on VirtualBox or VMware.
- ARM: This ISO format is meant for systems running on the ARM architecture, such as the Raspberry Pi.
Since we want to perform a dual-boot, we will download the Kali Bare Metal ISO file.
Step-4: Create a Bootable Disk of Kali Linux
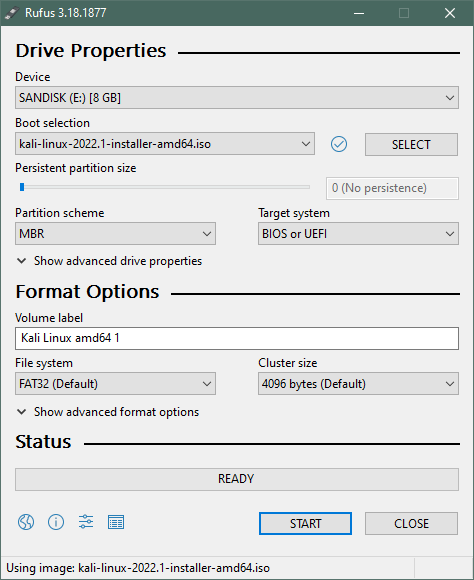
Previously, we wrote a post on creating Kali Linux bootable USB [3 Different Methods]. Please check it out. In this post, we will use Rufus. It’s an open-source tool available for Windows systems. If you are on a Linux pc, you can use Balena Etcher or the DD command. Follow the steps below.
Download Rufus and execute the setup file. On running Rufus, a screen similar to this will appear.
![Dual boot Windows 10 and Linux [Step-by-Step]](https://www.golinuxcloud.com/wp-content/uploads/Rufus-1.png "Dual boot Windows 10 and Linux [Step-by-Step]")
First, ensure that your USB drive is selected on the Device dropdown menu.
In the boot selection, locate the Kali Linux ISO file you downloaded and select it.
Click the Start button for the process to start, wait for the process to complete.
Once the process is complete, click ‘CLOSE‘ to close Rufus Window.
Step-5: Boot PC from the Bootable Kali USB Drive
Since we have dealt with all initial stages, we can now begin with the essential part of the dual boot setup — Booting your PC from the bootable USB drive and installing Kali Linux. Before getting started, ensure you disable secure boot on your BIOS (if it’s enabled) since it doesn’t work well with most Linux systems.
When done, shut down the PC completely, then start it again. You need to change the normal boot order to boot it from the bootable Kali Linux USB drive. To do so, you will need to press specific Function keys depending on the PC brand. On HP, it’s F9, Dell laptops use F12, and so on. When the boot devices window appears, select the bootable Kali Linux USB drive and hit Enter. In our case, the USB drive is listed as ‘Removable devices.
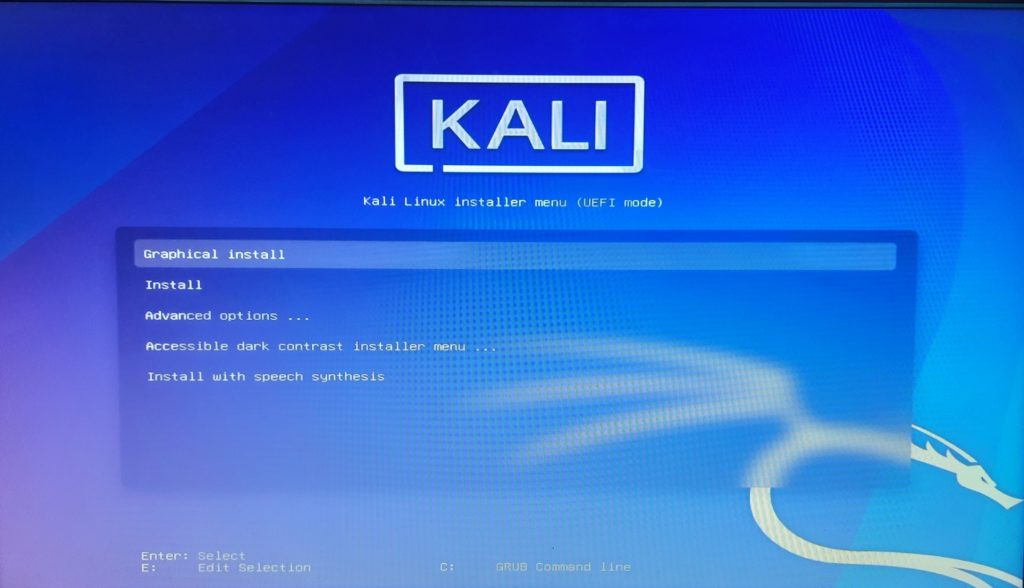
After a few seconds of booting the kernel, you will see the Kali Linux installer menu.
Step-6: Install Kali Linux Alongside Windows
There are different options for installing Kali Linux; in our case, we will use “Graphical Install.”
![Dual boot Windows 10 and Linux [Step-by-Step]](https://www.golinuxcloud.com/wp-content/uploads/kali-17.jpg "Dual boot Windows 10 and Linux [Step-by-Step]")
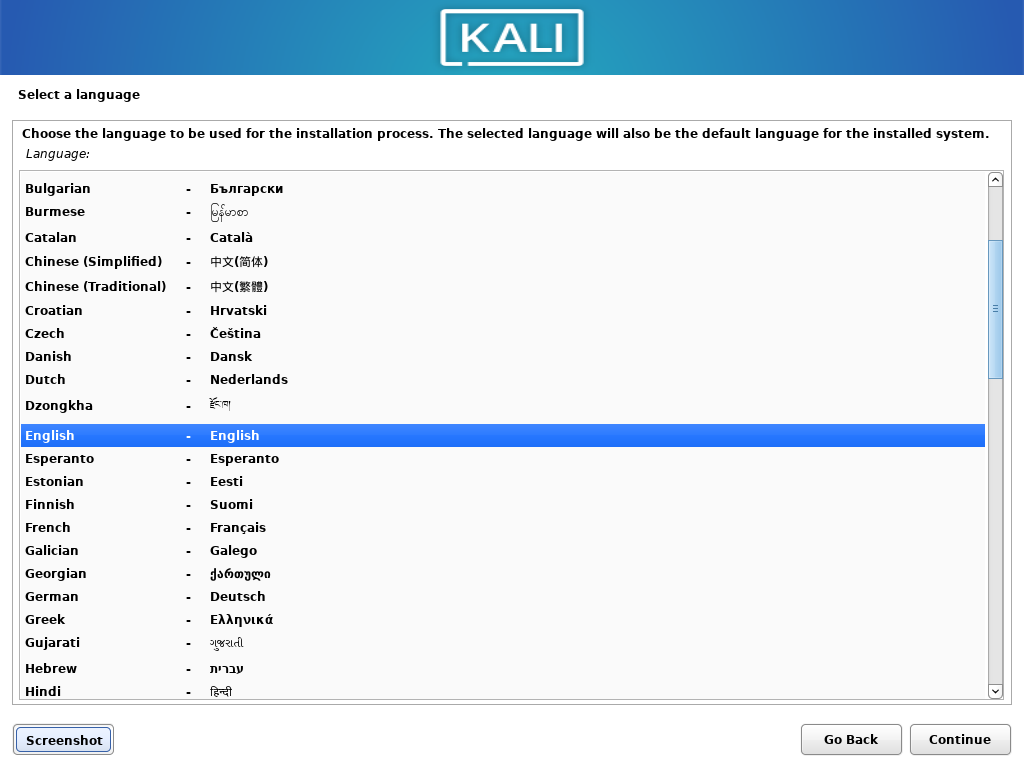
After a few minutes of starting up the Linux kernel, you will see the Select Language Screen. Choose the language that you wish to use during the installation and hit Enter.
![Dual boot Windows 10 and Linux [Step-by-Step]](https://www.golinuxcloud.com/wp-content/uploads/kali-18.png "Dual boot Windows 10 and Linux [Step-by-Step]")
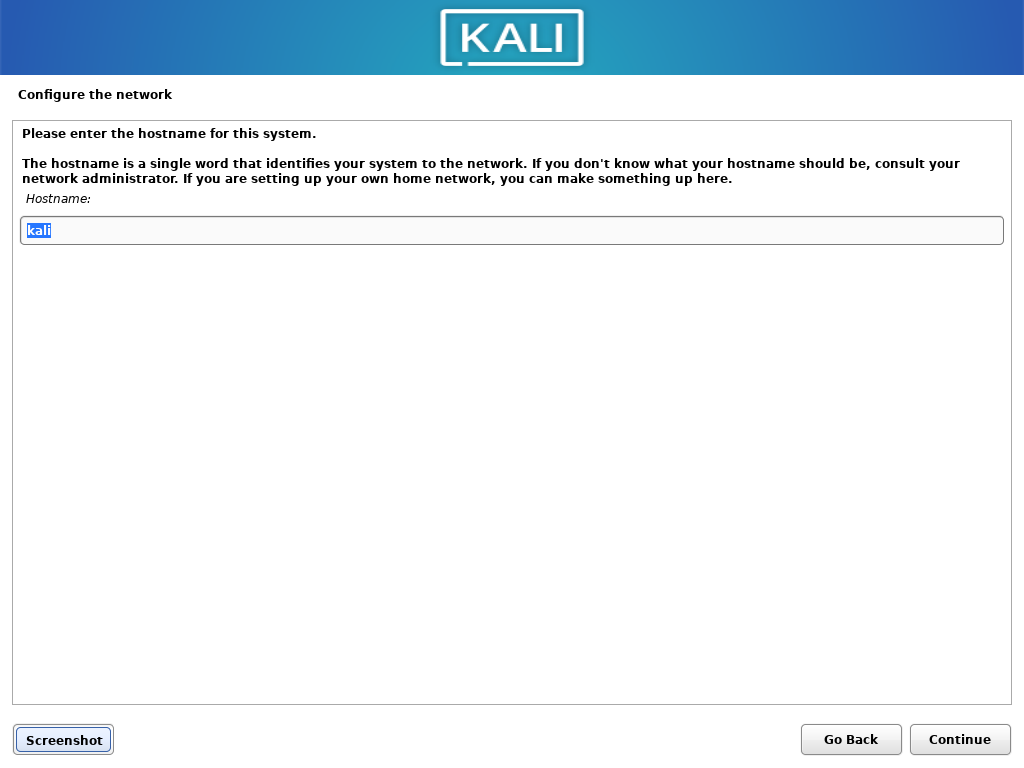
Next, select your Location and proceed to set the desired Keyboard layout. Press Enter when done. You will be required to set the Hostname that identifies your system on the Network. It can be any name. Click Continue.
![Dual boot Windows 10 and Linux [Step-by-Step]](https://www.golinuxcloud.com/wp-content/uploads/kali-19.png "Dual boot Windows 10 and Linux [Step-by-Step]")
On the next screen, you will be prompted to set the Domain name. That should be something that ends with a ‘.com,’ ‘.edu,’ ‘.org,’ and so on. Alternatively, you can leave this field empty and hit Continue.
![Dual boot Windows 10 and Linux [Step-by-Step]](https://www.golinuxcloud.com/wp-content/uploads/Domain-Name.png "Dual boot Windows 10 and Linux [Step-by-Step]")
Next, we are going to set up the Full name of our user. Enter the desired username and hit Continue.
![Dual boot Windows 10 and Linux [Step-by-Step]](https://www.golinuxcloud.com/wp-content/uploads/Full-name.png "Dual boot Windows 10 and Linux [Step-by-Step]")
On the next screen, we will set the desired Username. Click Continue when done.
![Dual boot Windows 10 and Linux [Step-by-Step]](https://www.golinuxcloud.com/wp-content/uploads/username-1.png "Dual boot Windows 10 and Linux [Step-by-Step]")
On the next screen, we will set up the password for our new user. Click Continue when done.
![Dual boot Windows 10 and Linux [Step-by-Step]](https://www.golinuxcloud.com/wp-content/uploads/Password.png "Dual boot Windows 10 and Linux [Step-by-Step]")
IMPORTANT NOTE: This is most critical part. Perform partition as guided to avoid loosing your Windows 10 OS data
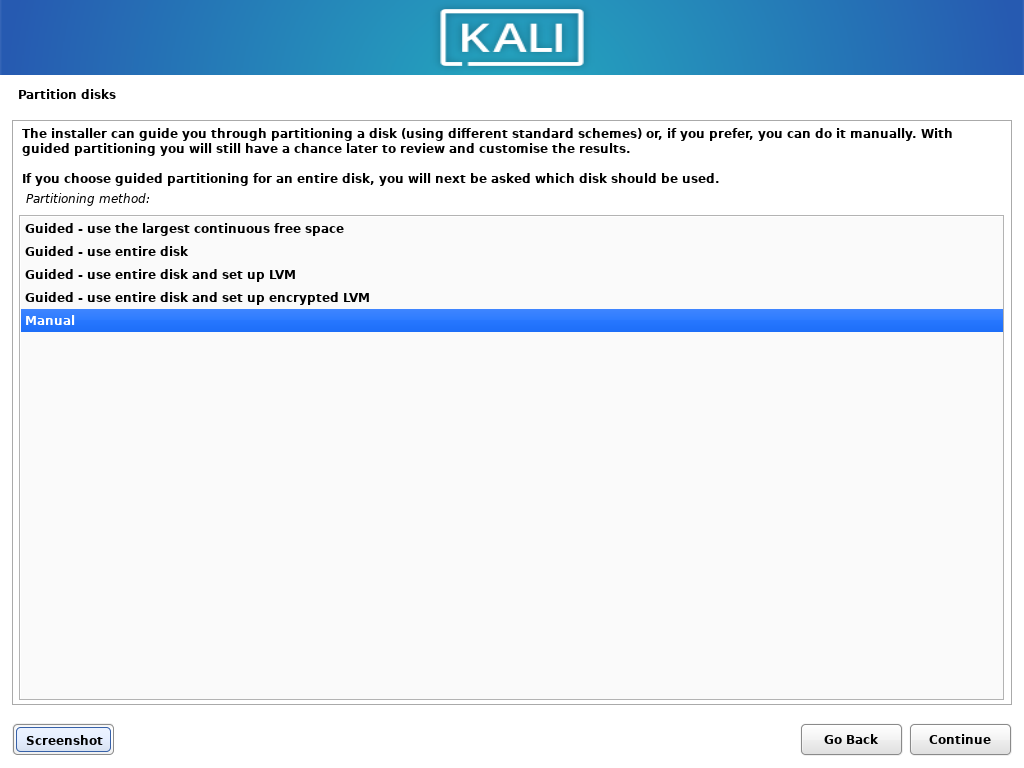
On the next screen, select your time zone and hit Continue. You will now get to the Partition disks window, the most crucial part of our installation process. You will see four options:
- Guided — Use the entire disk
- Guided — Use the entire disk and set up LVM
- Guided — Use entire disk and set up encrypted LVM
- Manual
![Dual boot Windows 10 and Linux [Step-by-Step]](https://www.golinuxcloud.com/wp-content/uploads/partition-disks-3.png "Dual boot Windows 10 and Linux [Step-by-Step]")
Select ‘Manual‘ and hit Enter.
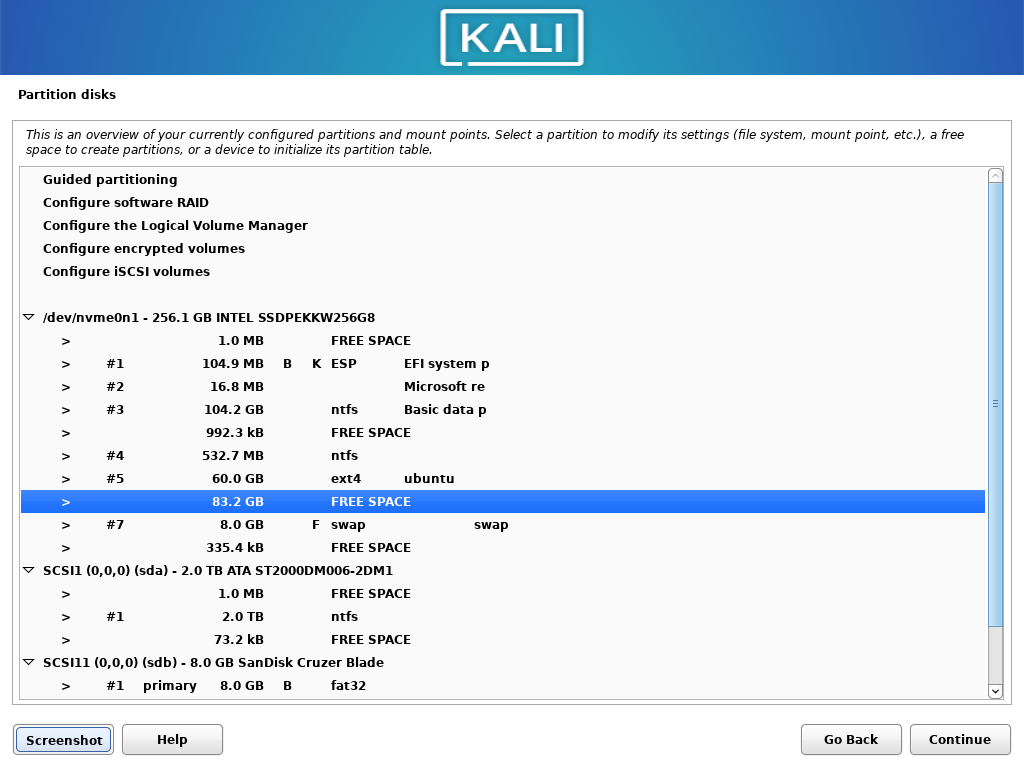
On the new screen that appears, you will see all the partitions available on your internal hard drive, as shown in the image below. Yours might be a little different since we are demonstrating this dual-boot setup on VirtualBox.
![Dual boot Windows 10 and Linux [Step-by-Step]](https://www.golinuxcloud.com/wp-content/uploads/Disks.png "Dual boot Windows 10 and Linux [Step-by-Step]")
Select the partition that you want to install Kali Linux and hit Enter. In our case, it’s the 40 GB that we created in the ‘Disk Partioning’ section. If yours is not labeled as ‘FREE SPACE,’ hit the ‘Delete the partition’ option as shown below.
![Dual boot Windows 10 and Linux [Step-by-Step]](https://www.golinuxcloud.com/wp-content/uploads/Delete-Partition.png "Dual boot Windows 10 and Linux [Step-by-Step]")
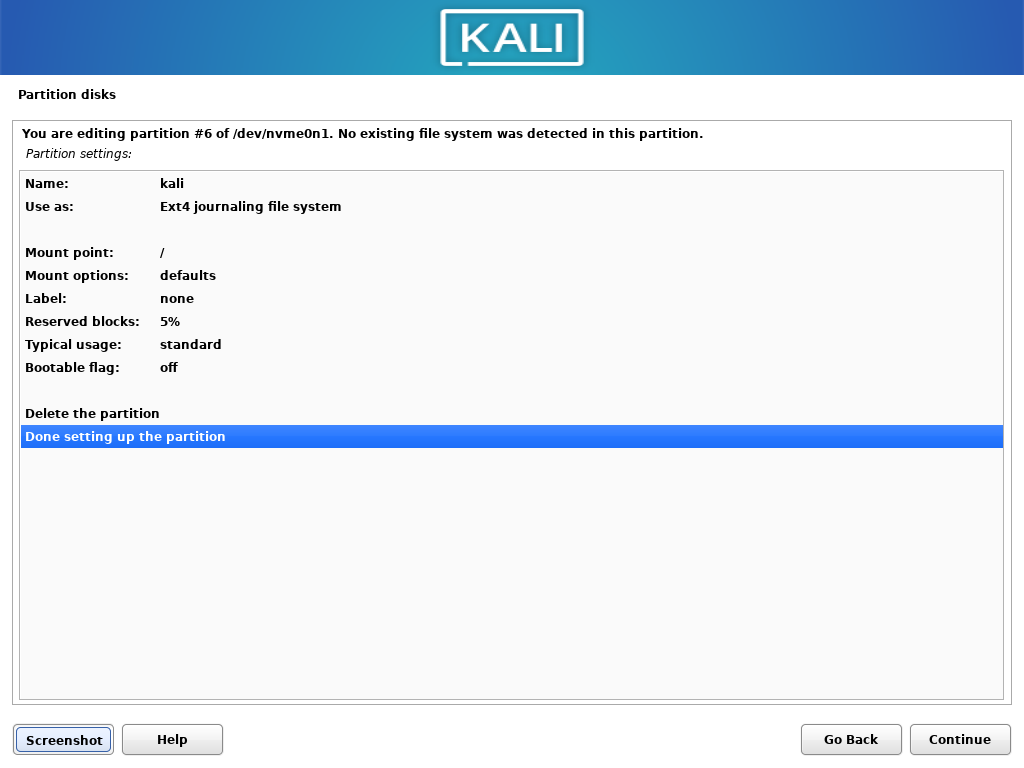
Select the newly created ‘FREE SPACE’ and hit Enter. On the window that appears, set the parameters below:
- Use as: Ext4 journaling system
- Mount point: /
When done, click ‘Done setting up the partition.’
![Dual boot Windows 10 and Linux [Step-by-Step]](https://www.golinuxcloud.com/wp-content/uploads/Setup-partition.png "Dual boot Windows 10 and Linux [Step-by-Step]")
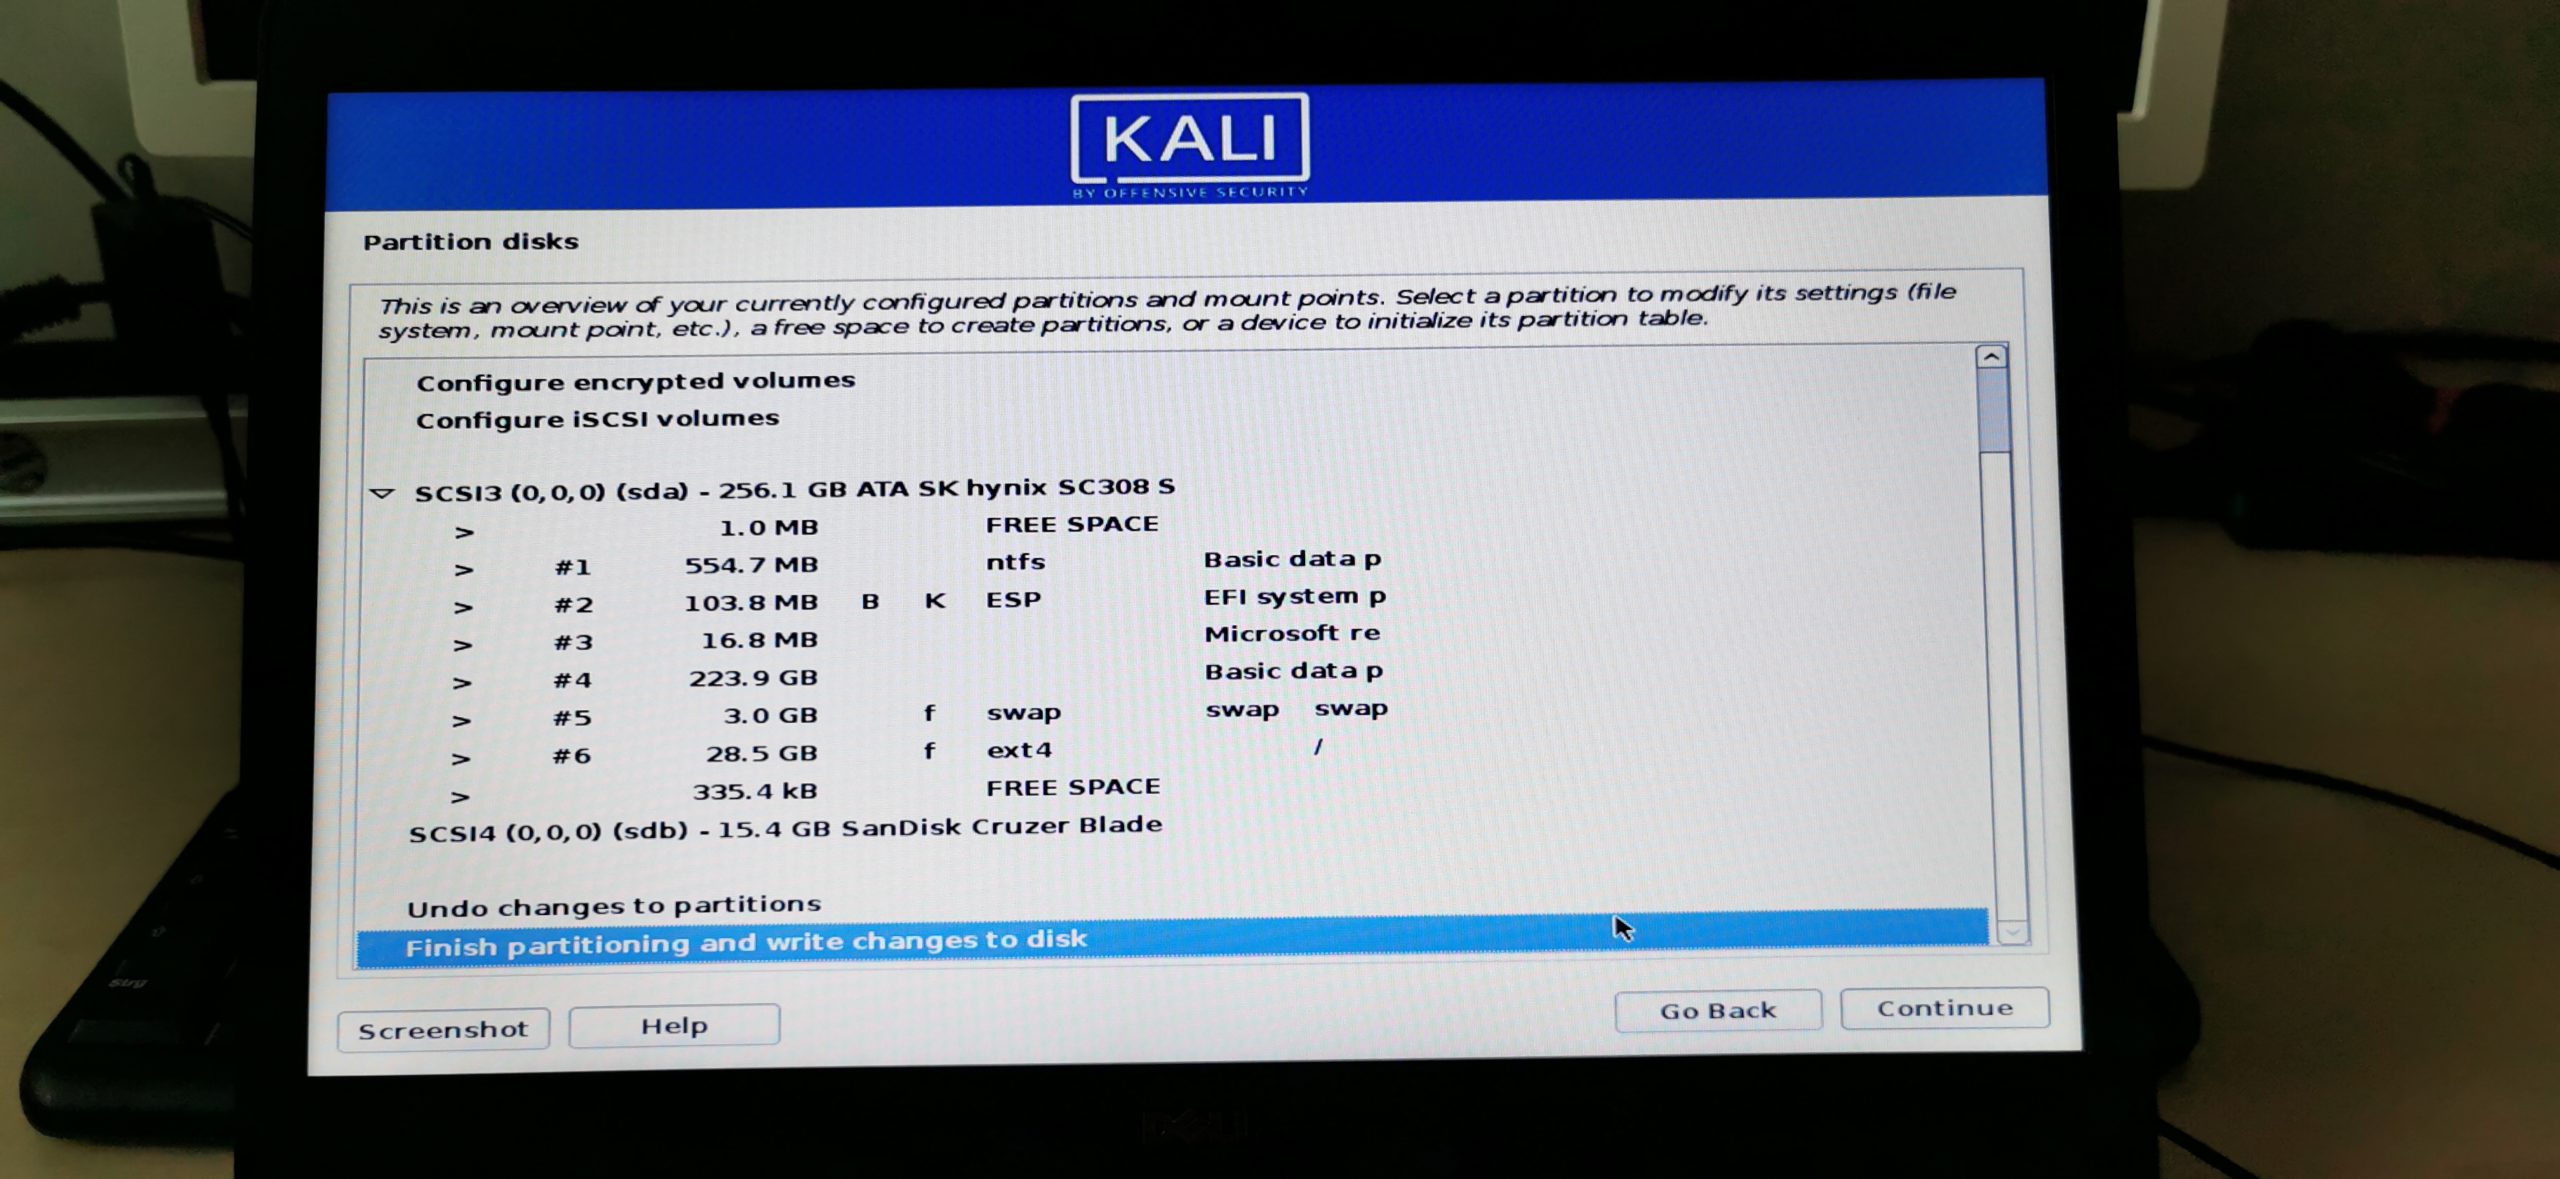
You will be taken back to the ‘Partition disks’ screen. Scroll down and select ‘Finish partitioning and write changes to disk.’
![Dual boot Windows 10 and Linux [Step-by-Step]](https://www.golinuxcloud.com/wp-content/uploads/Finish-partition-setup.png "Dual boot Windows 10 and Linux [Step-by-Step]")
You will see the prompt ‘Do you want to return to partioning menu?,’ select ‘No’ and click Continue. When you see the prompt ‘Write the changes to disks?,’ select ‘Yes’ and hit Continue to start the installation process.
![Dual boot Windows 10 and Linux [Step-by-Step]](https://www.golinuxcloud.com/wp-content/uploads/Install-system.png "Dual boot Windows 10 and Linux [Step-by-Step]")
The installation process might take quite some time — please be patient. After a while, you will see the ‘Select Software’ screen. Select the Software that you want to install during the installation and hit ‘Enter.’
Note:
Some of these packages will be downloaded from the Kali repositories, and your internet speed might impact the total installation time.
![Dual boot Windows 10 and Linux [Step-by-Step]](https://www.golinuxcloud.com/wp-content/uploads/install-software-2.png "Dual boot Windows 10 and Linux [Step-by-Step]")
After some time, you will see a prompt to install GRUB, select ‘Yes’ and hit Continue. Next, you will be required to select where to install the GRUB boot loader. Select your internal hard drive (/dev/sda) and hit Enter.
![Dual boot Windows 10 and Linux [Step-by-Step]](https://www.golinuxcloud.com/wp-content/uploads/install-Kali.png "Dual boot Windows 10 and Linux [Step-by-Step]")
Step-7: Dual boot Windows 10 and Kali Linux
After a successful installation of Kali Linux, you will be prompted to reboot your PC. Hit Enter. After restarting your PC, you will be greeted by the GRUB menu, which will list the two operating systems installed on your PC, as shown below.
![Dual boot Windows 10 and Linux [Step-by-Step]](https://www.golinuxcloud.com/wp-content/uploads/Dual-boot.png "Dual boot Windows 10 and Linux [Step-by-Step]")
Select the operating system that you want to use and hit Enter.
Wrapping Up!
This post has given you a step-by-step guide to install dual boot Windows 10 and Kali Linux on your PC in a dual-boot setup. You can use the same concept of creating a new partition to install another Linux operating system which will now become a «multi-boot» setup.
If you encounter any issues carrying out any step above, please feel free to hit the comments below. We are here to help you.
In this article, you will learn how to Dual Boot Kali Linux with Windows 10 or 11. This is a complete step-by-step instructional that you can follow along.
Read This Before Starting
This is a disclaimer. There are so many people out there who think it’s a great idea to have their first Linux experience with Kali (Hint: It isn’t!). While things got better and Kali came more secure out of the box, if you haven’t installed Linux or any other operating system before, you’ll set yourself up for trouble.
While I will try to cover every single step as detailed as possible, there is a chance that you lose your existing Windows Installation and all of your files when following this tutorial. Why? Because every computer is different, everyone has different stuff installed, different partitioning schemes, and different BIOS settings. I can’t possibly cover everything. Be very aware of this and obviously I won’t help you or be responsible if your system gets messed up. Please DO NOT E-Mail me with Kali questions. I am not your personal tech support.
But don’t be scared either, my Kali tutorials generally have a very high success rate. Just make sure you take the right precautions and backup your files before starting.
Table of Contents
- Read This Before Starting
- Requirements
- Checking if your Laptop runs on UEFI or LEGACY
- Step 1 – Downloading the Kali ISO file
- Step 2 – Downloading Rufus & Creating a Bootable USB Drive
- Step 3 – Creating a new partition on Windows 10
- Step 4 – Booting from our USB Drive
- Step 5 – Install Kali Linux in Dual Boot with Windows 10
- 5.1 – Select a language
- 5.2 – Select your location
- 5.3 – Configure locales
- 5.4 – Configure the keyboard
- 5.5.1 – Detect Network Hardware (Probably Optional Step)
- 5.5 – Configure the network
- 5.5.1 – Configure the Network
- 5.5.2 – Configure the Network
- 5.6 – Set up users and passwords
- 5.6.1 – Set up users and passwords
- 5.6.2 – Set up users and passwords
- 5.7 – Partition disks (Follow this very carefully, don’t make a mistake here)
- SWAP Step 1 – Partitioning Method
- SWAP Step 2 – Selecting the partition we created in Step 3
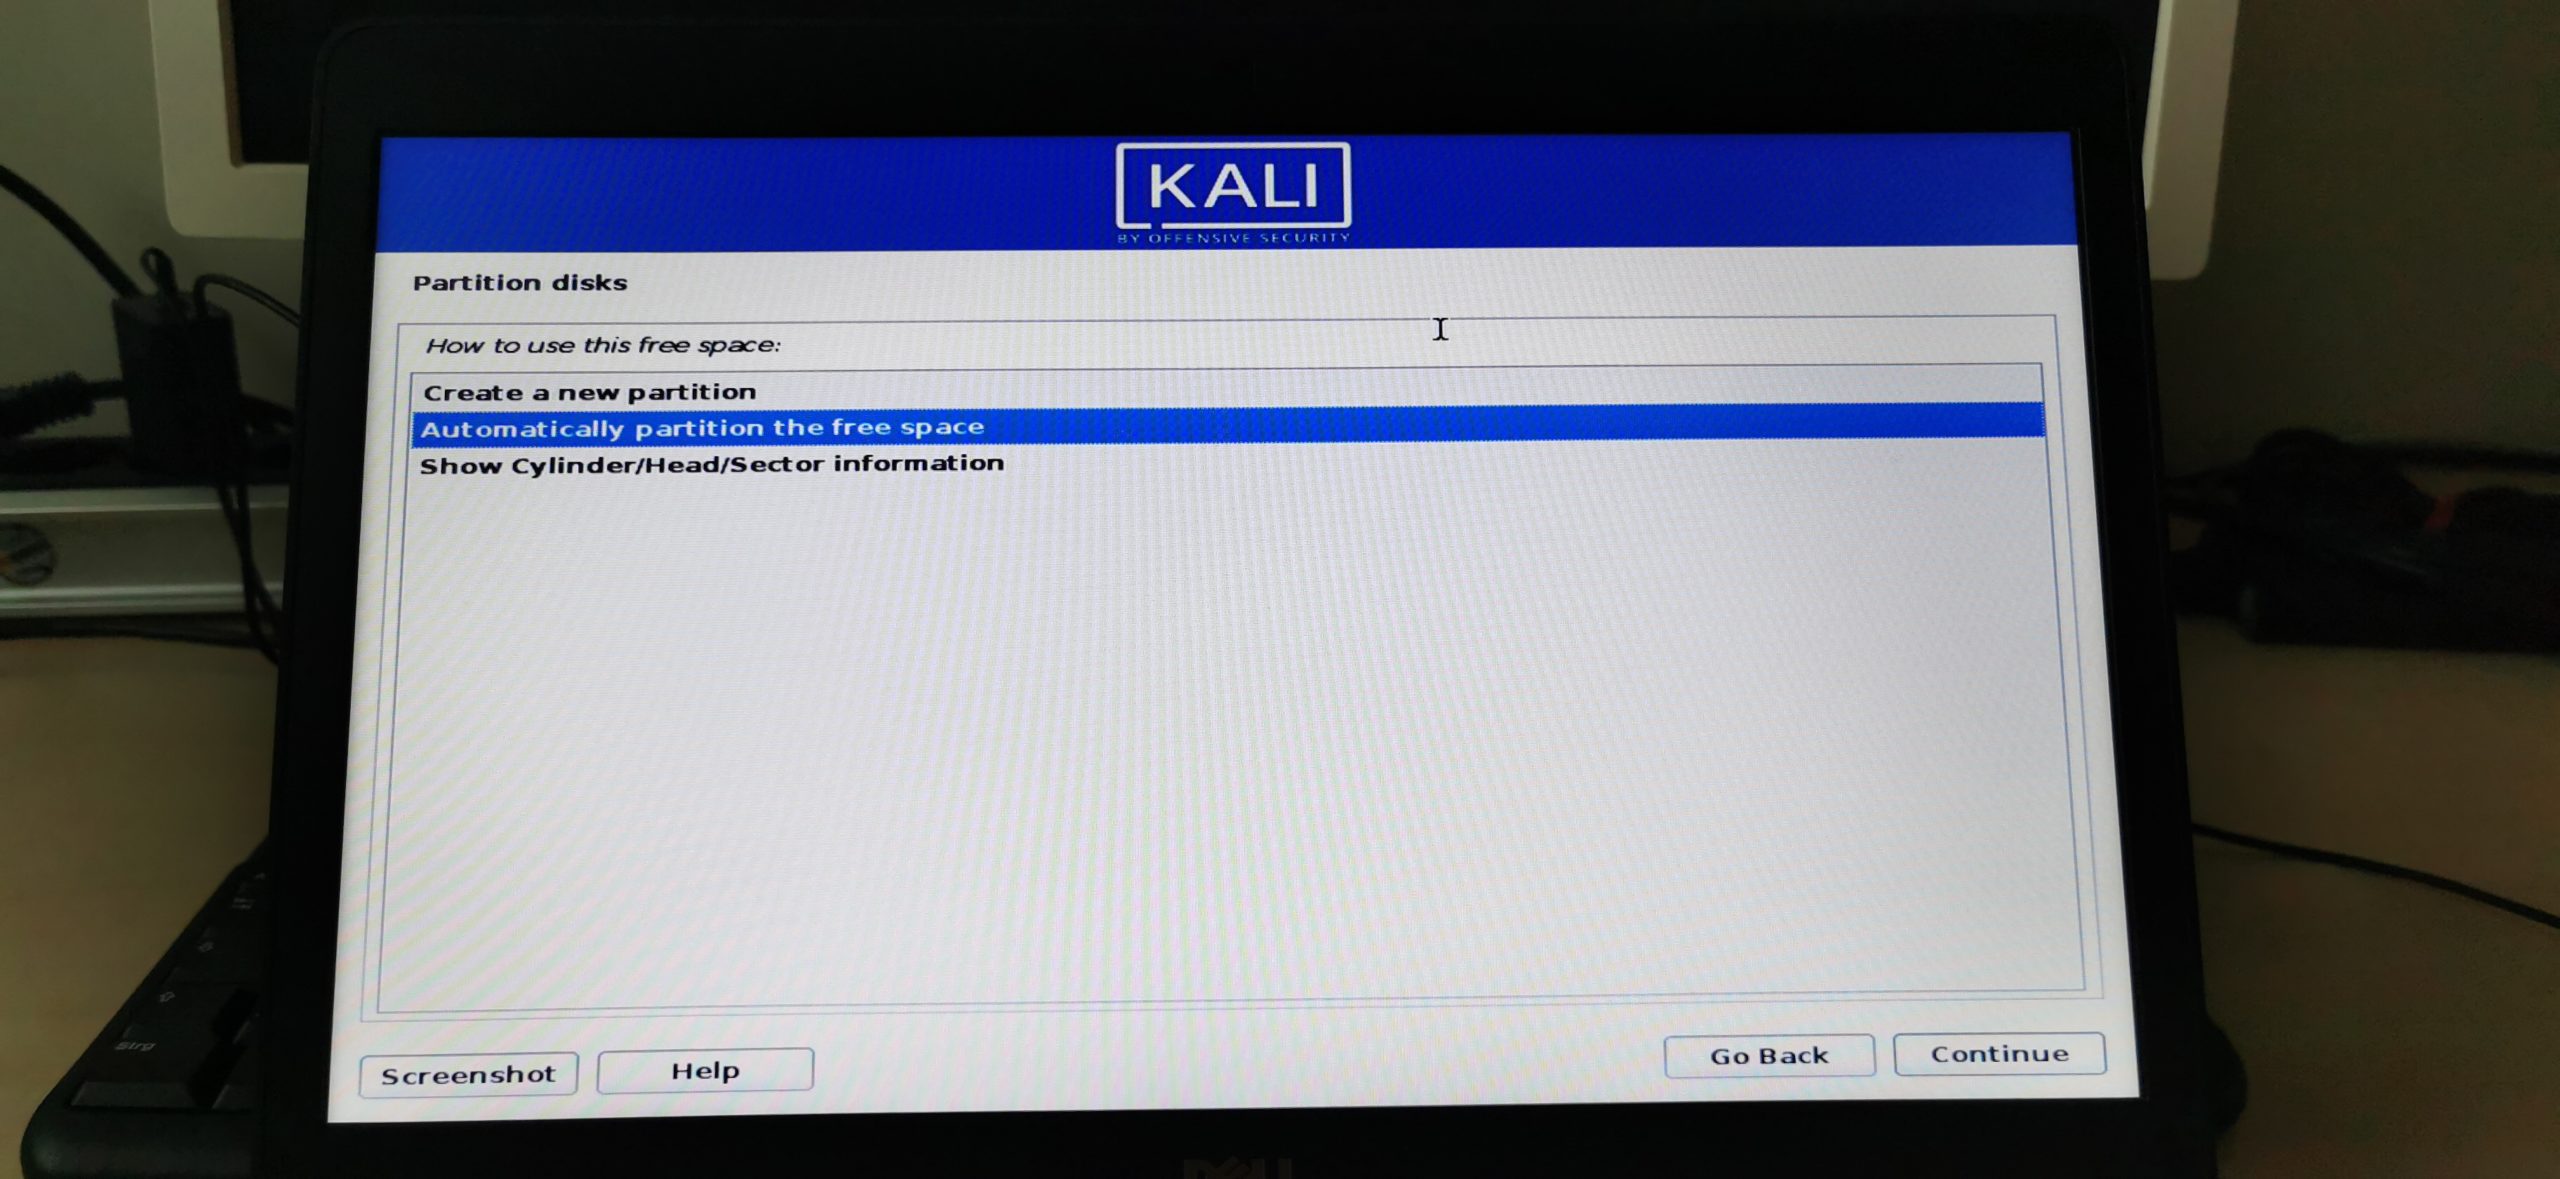
- SWAP Step 3 – How to use this free space
- SWAP Step 4 – Setting up the SWAP partition
- SWAP Step 5 – Location for the new Partition
- SWAP Step 6 – Naming the Partition
- SWAP Step 7 – Setting the partition to use as SWAP
- MAIN Step 1 – Selecting the Main Partition
- MAIN Step 2 – How to use this free space
- MAIN Step 3 – Partitioning Scheme
- MAIN Step 4 – Finishing
- 5.8 – Configure the package manager
- 5.9 – Software selection
- 6 – Finish the installation
- Step 6 – Booting up Kali Linux
- Step 7 – Updating Kali Linux
- Step 8 – Booting into Windows
- Troubleshooting
- Where to go from here
Requirements
Now, I won’t create a tutorial for LEGACY Bios. I think legacy is slowly getting obsolete and if you bought a Laptop in the last ~7-10 Years, it’s probably capable of running UEFI. I am using a Dell Latitude E5470 with a vanilla Windows 10 installation for this tutorial.
- UEFI Bios capable Laptop
- 8GB USB Flash Drive (EMPTY!)
- Access to LAN or WiFi during installation
- A backup of all your important Windows 10 files
Checking if your Laptop runs on UEFI or LEGACY
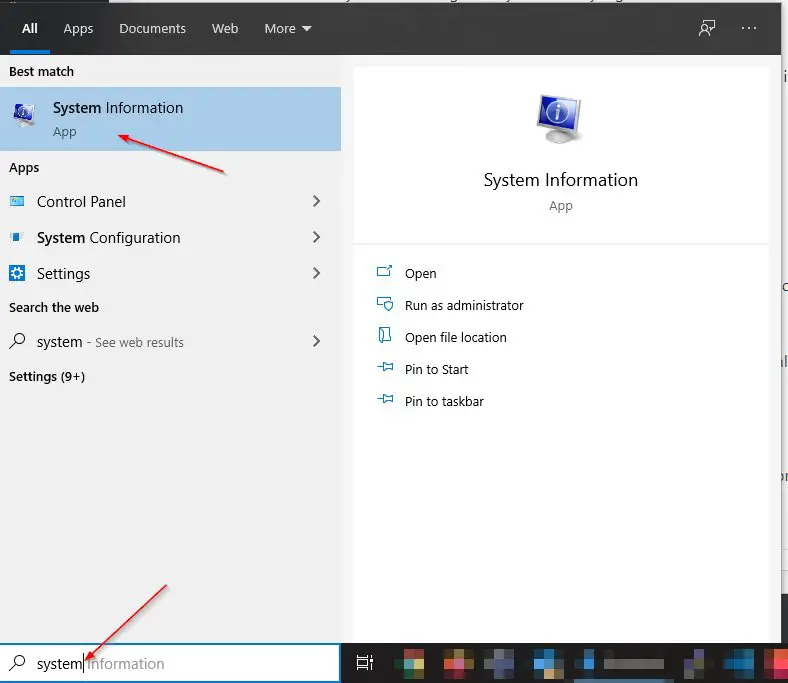
If you are unsure if your Laptop runs on UEFI or LEGACY, it’s easy to find out. Press the Windows key and search for “System“. Open the System Information tool.
On the right side, you find all your System’s information. What interests us is BIOS Mode.
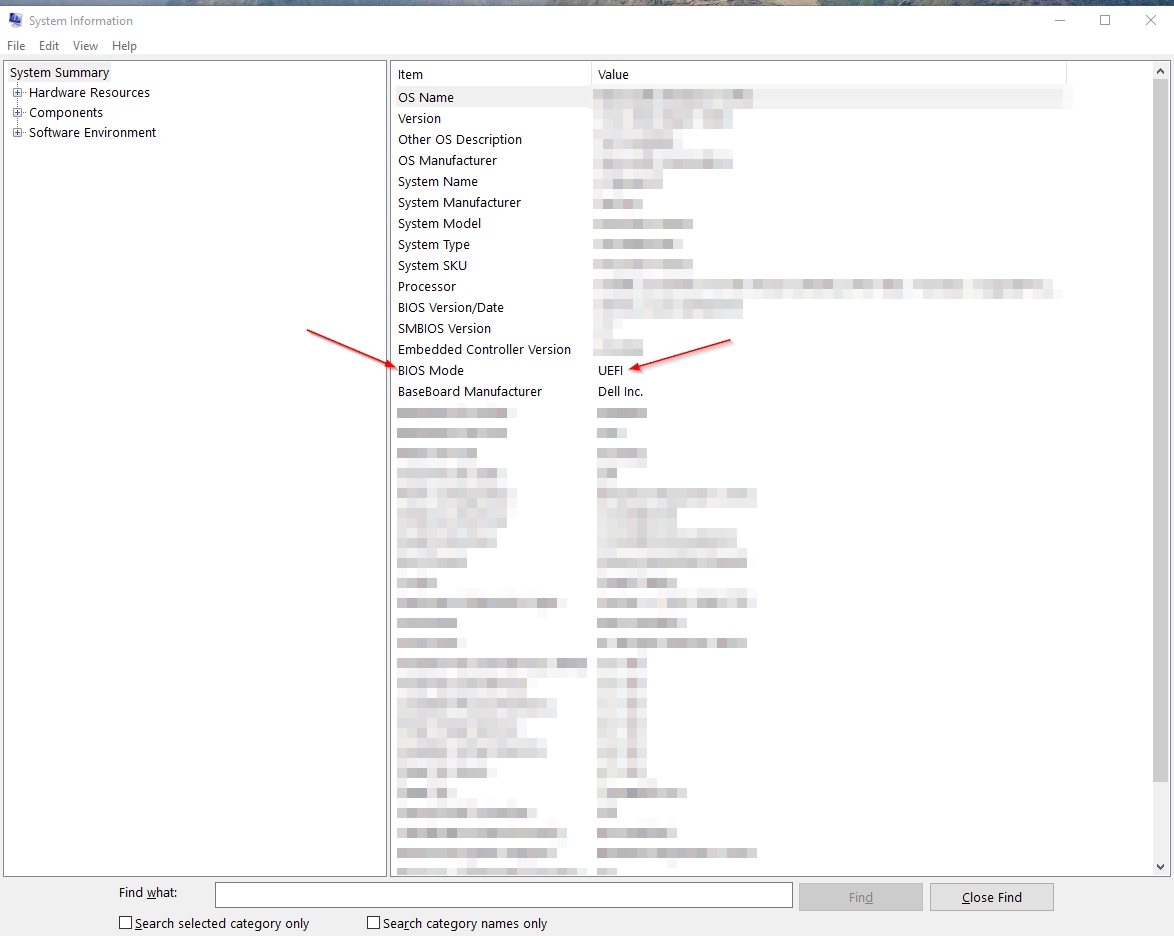
As you can clearly see, my BIOS is running on UEFI.
I say this out loud: IF YOU RUN ON LEGACY AND YOU WANT TO KEEP YOUR CURRENT WINDOWS 10 INSTALLATION INTACT – DO NOT FOLLOW THIS GUIDE!
However, if you run LEGACY and you don’t care and are willing to re-install Windows 10 in UEFI to run Kali and Windows 10 in Dual Boot, go ahead and change your BIOS to UEFI, install a fresh Windows 10 and then proceed with this guide.
Step 1 – Downloading the Kali ISO file
To install Kali Linux in Dual Boot with Windows 10, we first need to download the Kali ISO File. Choose the Kali Linux 64-Bit (Installer).

Step 2 – Downloading Rufus & Creating a Bootable USB Drive
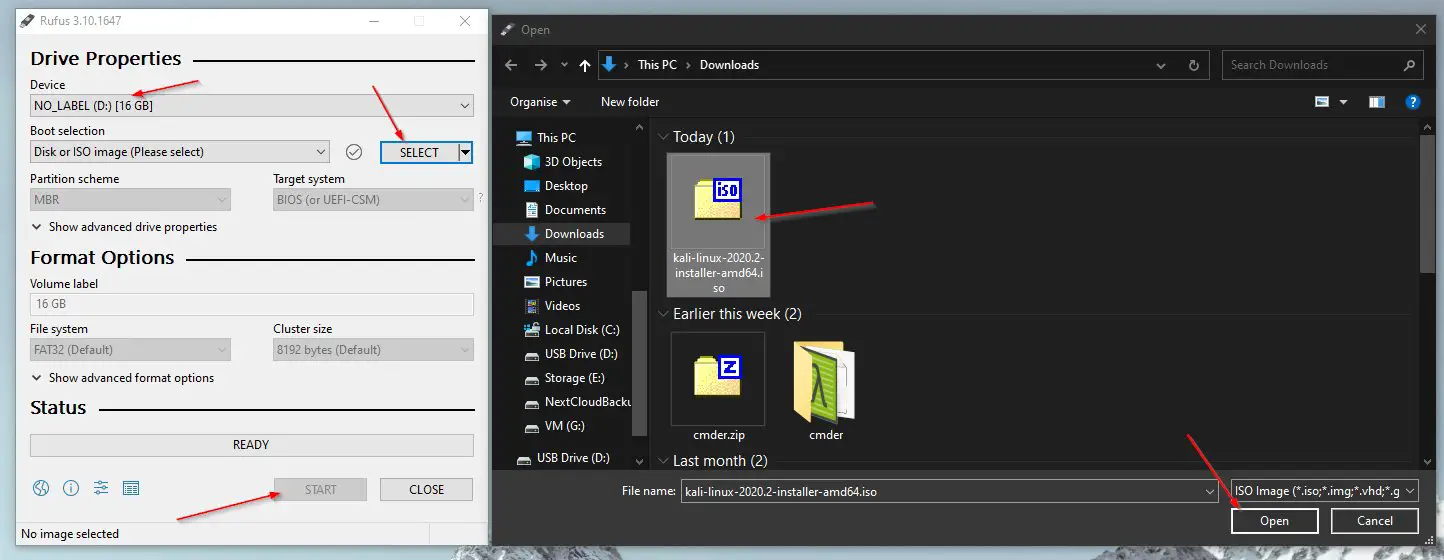
We are going to use Rufus to create our Bootable USB Drive. We do this so we can boot from it on our Laptop and install Kali Linux in Dual Boot with Windows 10. Be aware that everything on your USB Drive will get wiped.
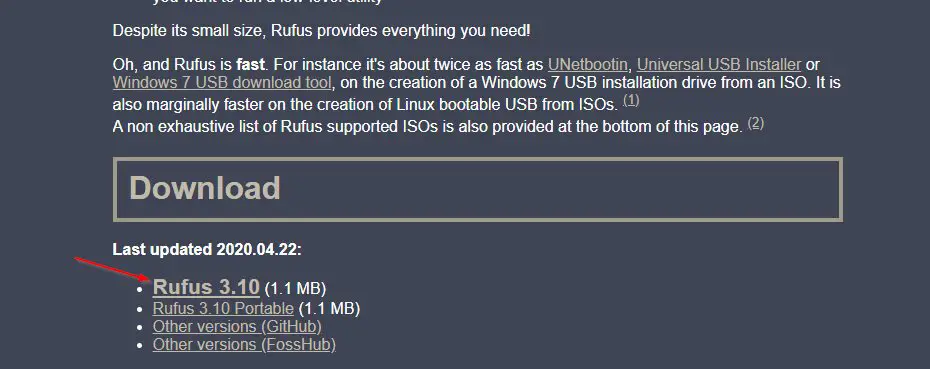
- Download Rufus
- Plug your USB Drive into your computer
- Go to your Downloads folder and start Rufus
- Make sure your USB Drive is correctly selected (Double check the drive letter!)
- Click on Select -> Choose your Downloads folder -> Select the kali-linux-2020.4-installer-amd64.iso file click Open
- Click on Start
- Agree with Yes for the Download required warning
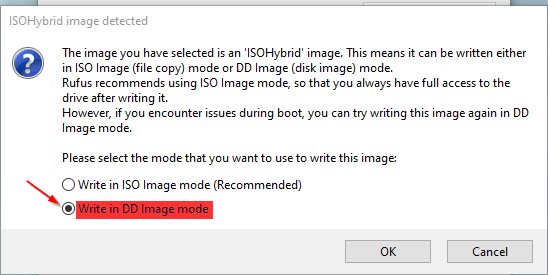
- Select Write in DD Image mode in the next dialogue (VERY IMPORTANT, otherwise the installation will fail)
- Agree to the final warning that everything on your USB Drive will get erased
- Wait for it to finish
Phew, quite some steps there. Good thing, one of the hardest parts is done.
Step 3 – Creating a new partition on Windows 10
To be able to install Kali Linux in Dual Boot with Windows 10, we need to first borrow some Gigabytes from our existing Windows 10 partition on your laptop. This is really easy! Follow the steps below. You want to select the partition on which your Windows 10 is installed on. Most like the one indicated by the letter (C:). Borrow as much space as you want, but leave enough left for your Windows 10 to still function properly. Reversing this will be very difficult.
For Kali, I would suggest a minimum of 20GB if you plan to install some tools, but I rather would go higher than that. The sweet spot is probably somewhere around 50-80GB for me. Extending the volume after you run out of space, later on, is a pain in the a**.
- Press Windows key + X to open up the system menu
- Select Disk Management
- Select Shrink Volume
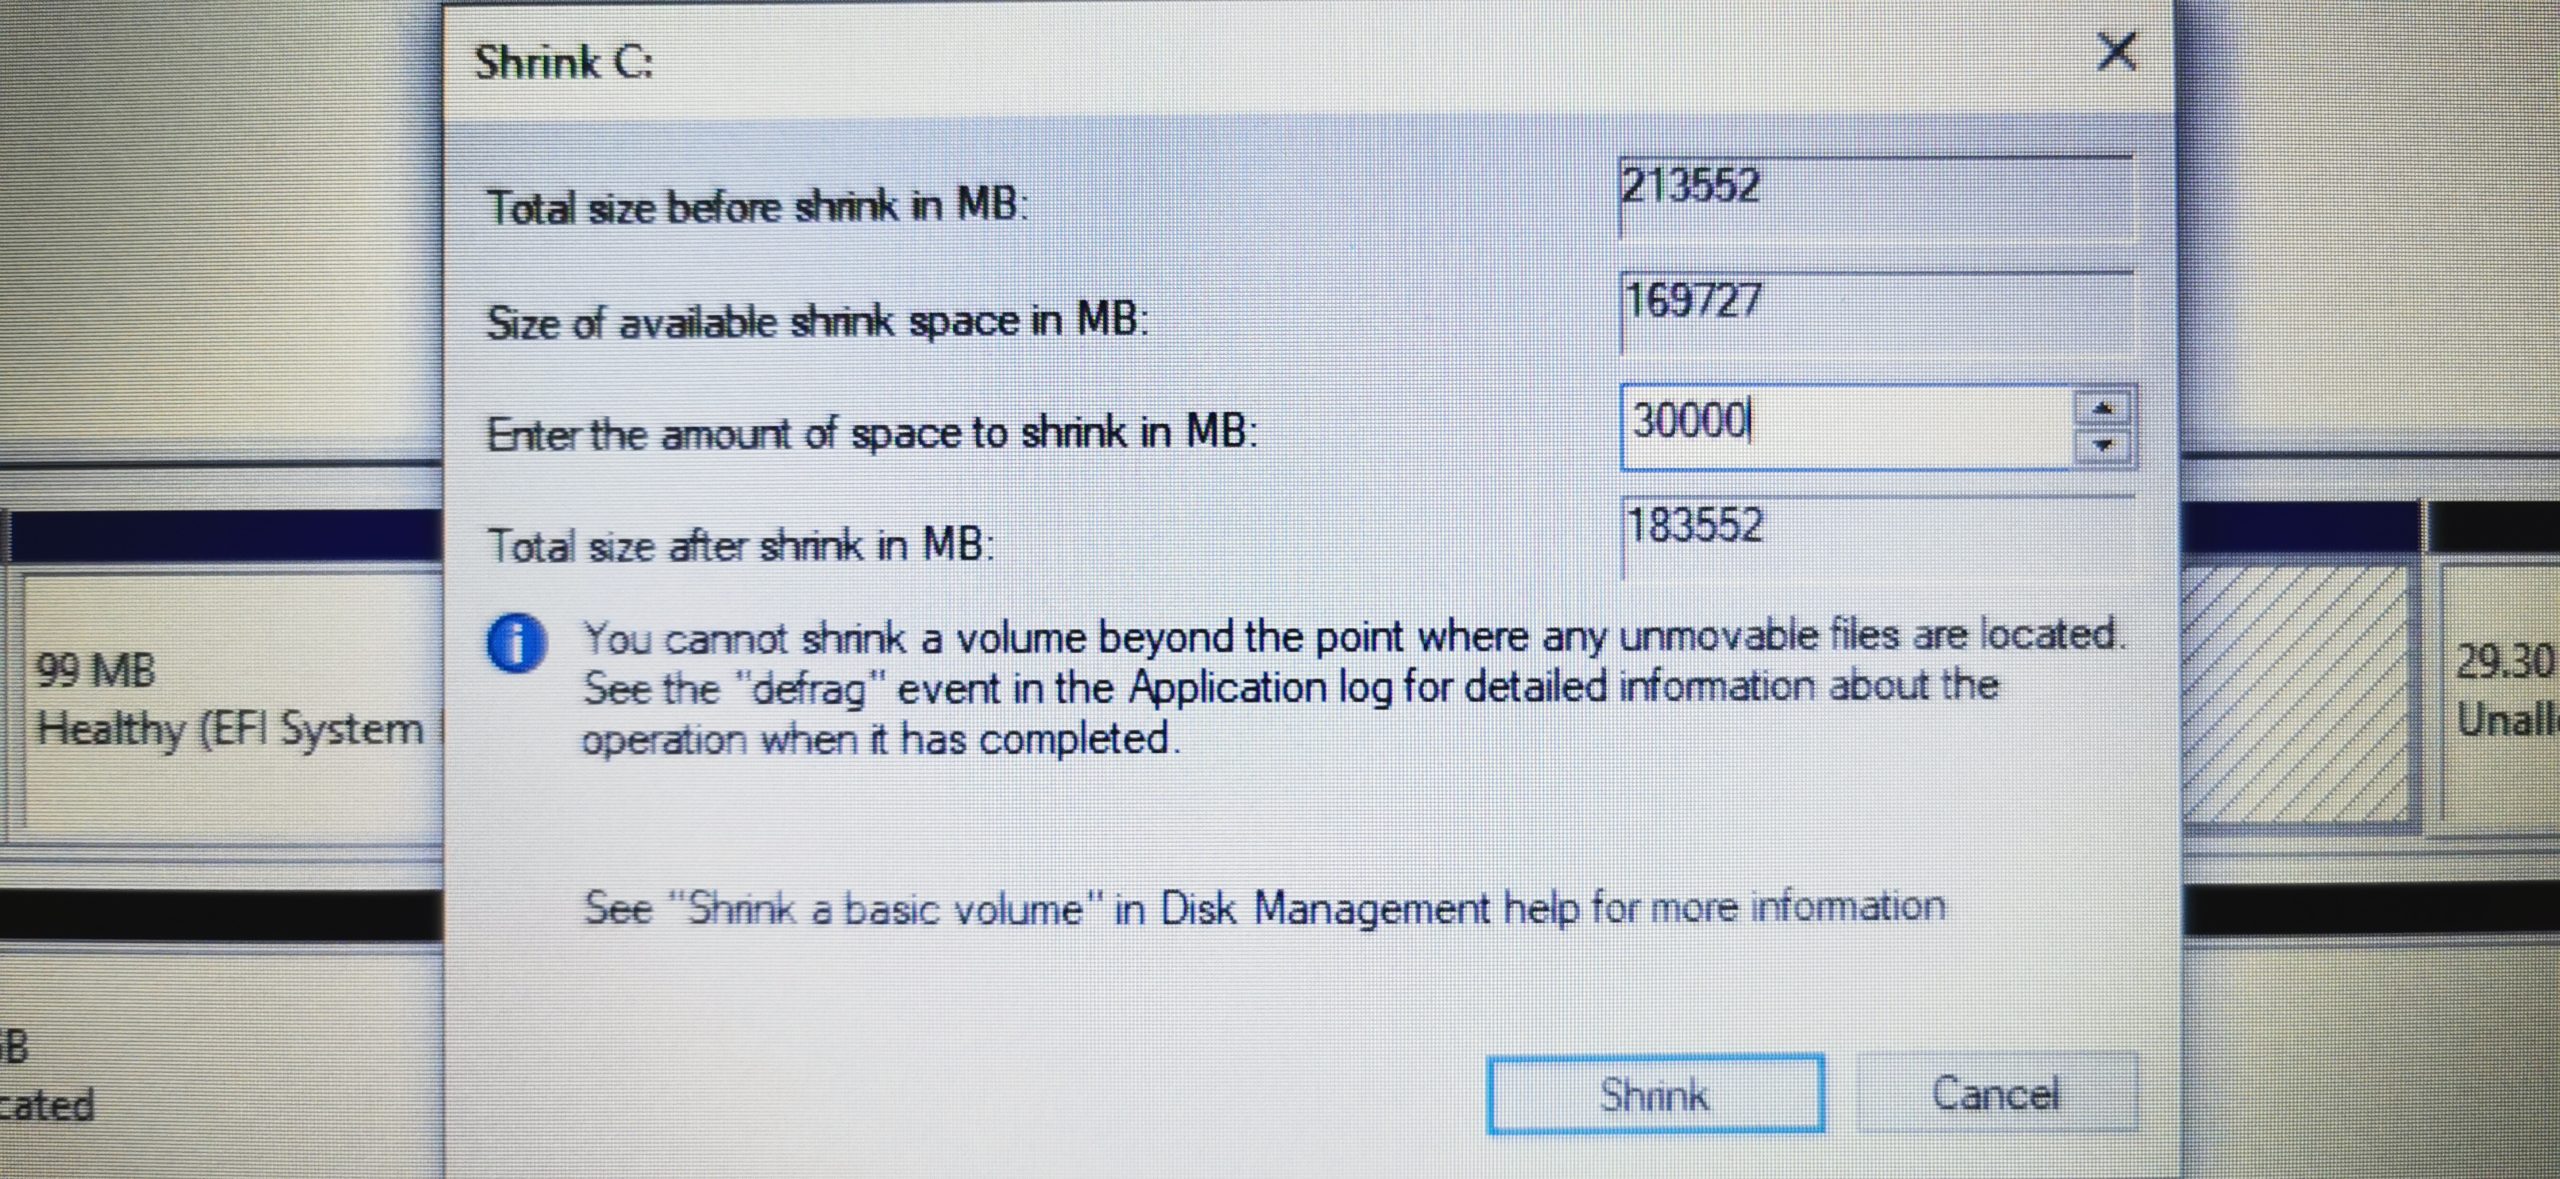
- Change the value in the “Enter the amount of space to shrink in MB” field. I choose 30GB so I enter 30000.
Step 4 – Booting from our USB Drive
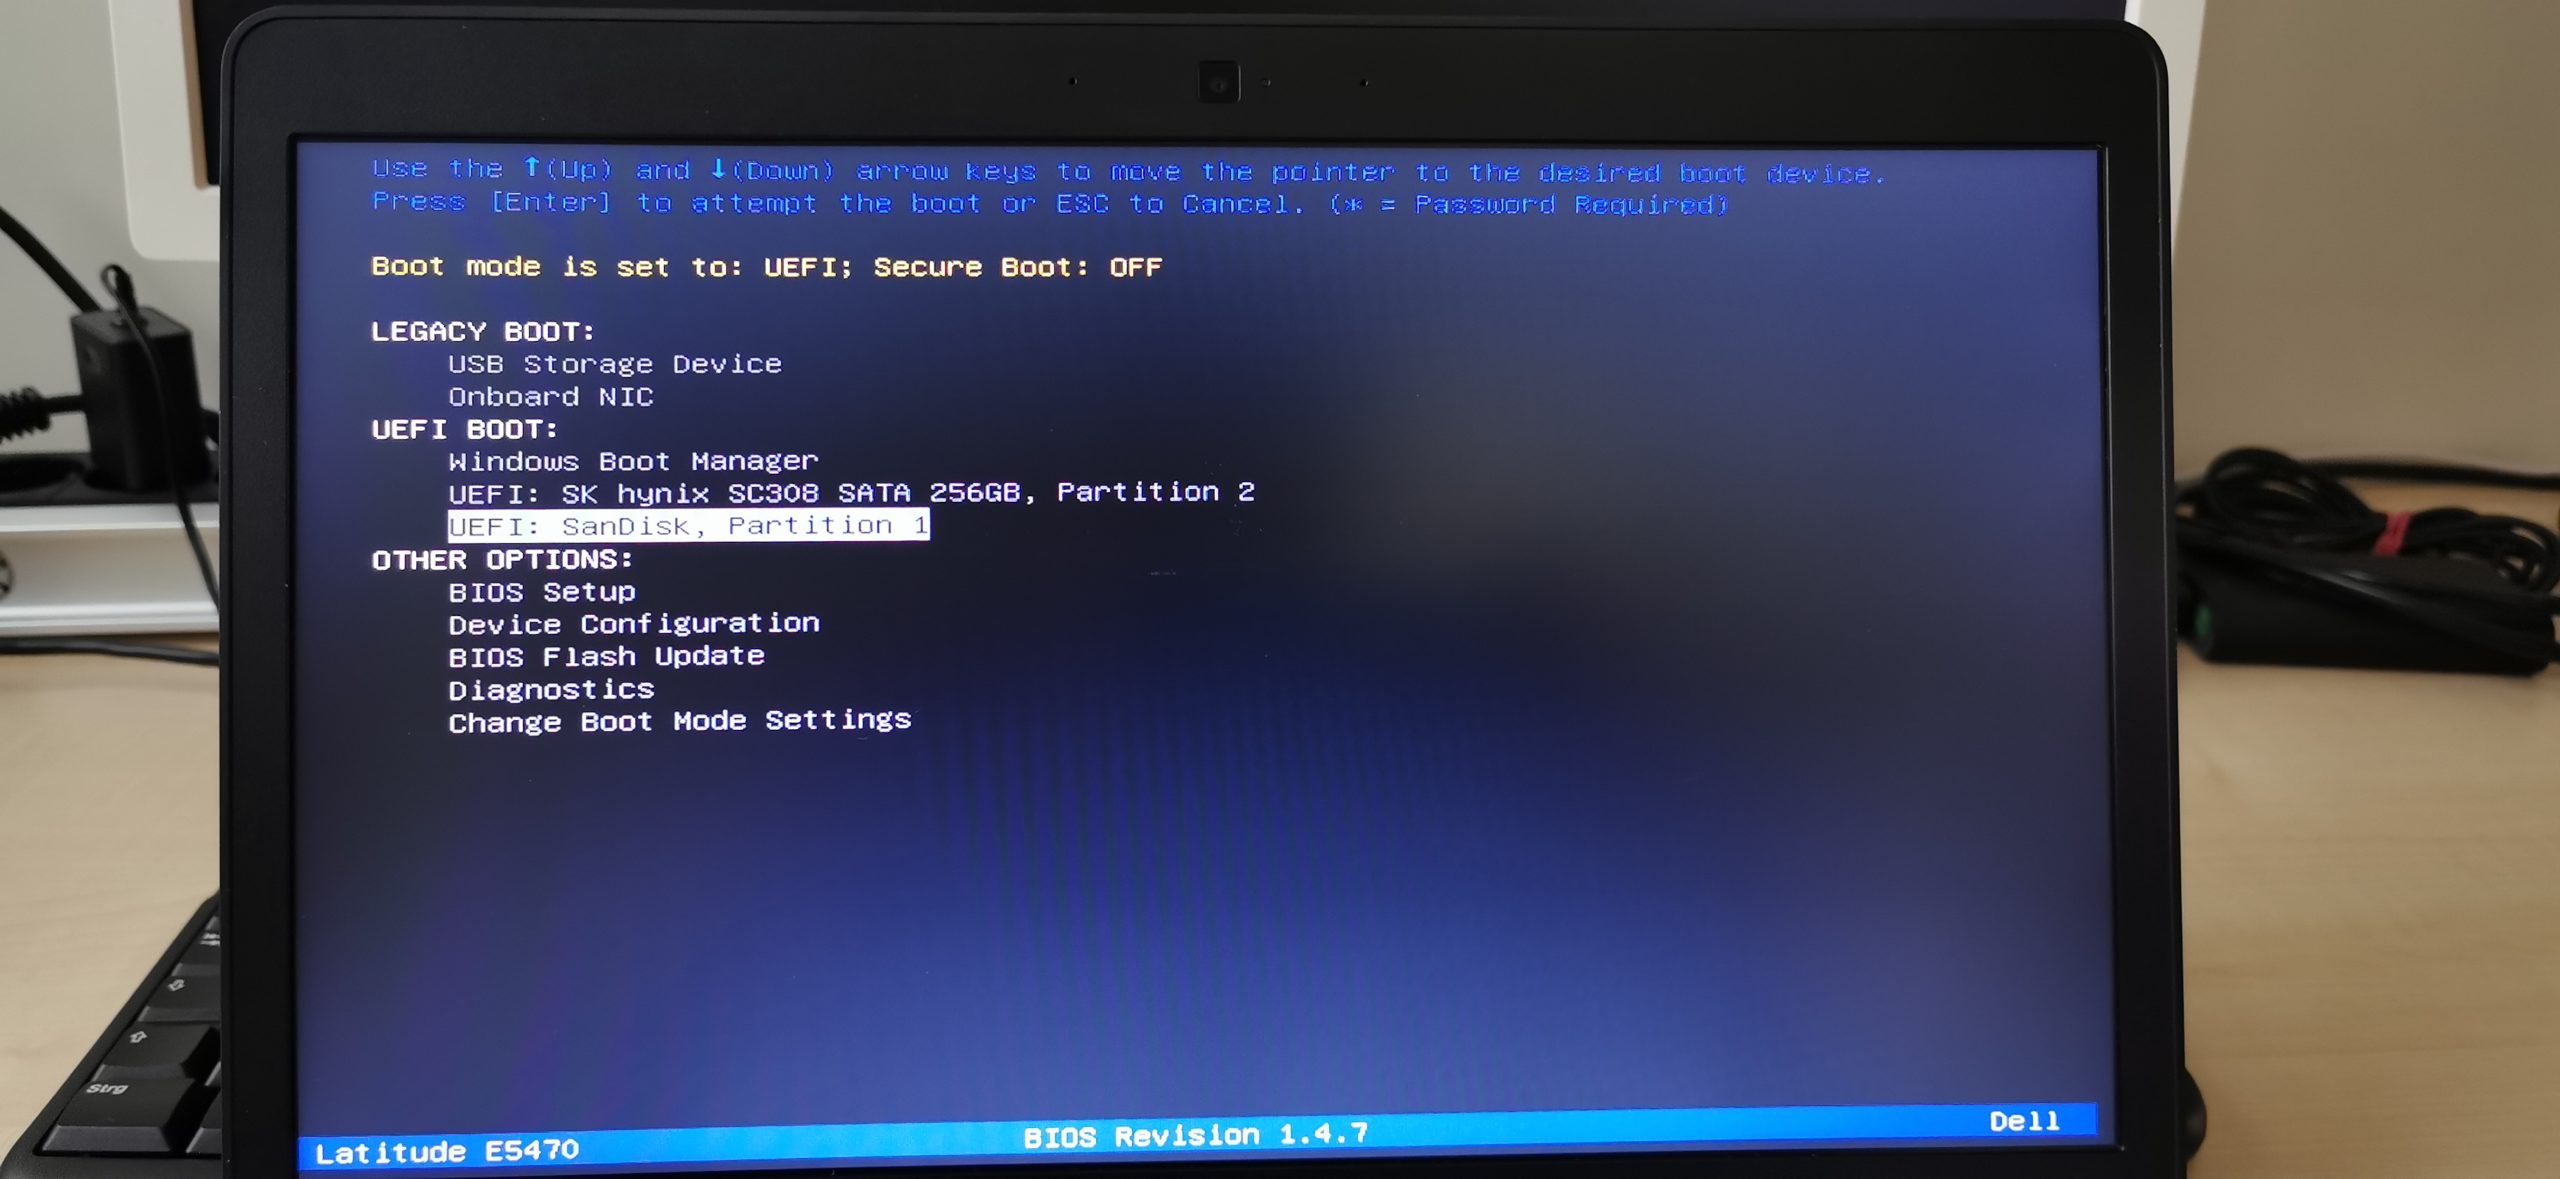
Alright, now this will differ from every Laptop manufacturer and probably even varies in different models of the same manufacturer: How to enter the BIOS Boot Menu.
Tip: It is possible that you need to deactivate Secure Boot if you run into any problems while trying to boot from your USB Drive.
The easiest way to find out which button to press is by simply Googlin‘: “YourLaptopModel Boot Menu“
For the Dell Latitude E5470 I would Google: Dell Latitude E5470 Boot Menu
4.1 – Plug the USB Drive into your Laptop
4.2 – Shutdown your Laptop
4.3 – Once it’s shut down, start it up and hit the key that brings up the Boot Menu repeatedly (For me it’s F12). Once you reach the boot menu, select your USB Drive, and hit enter.
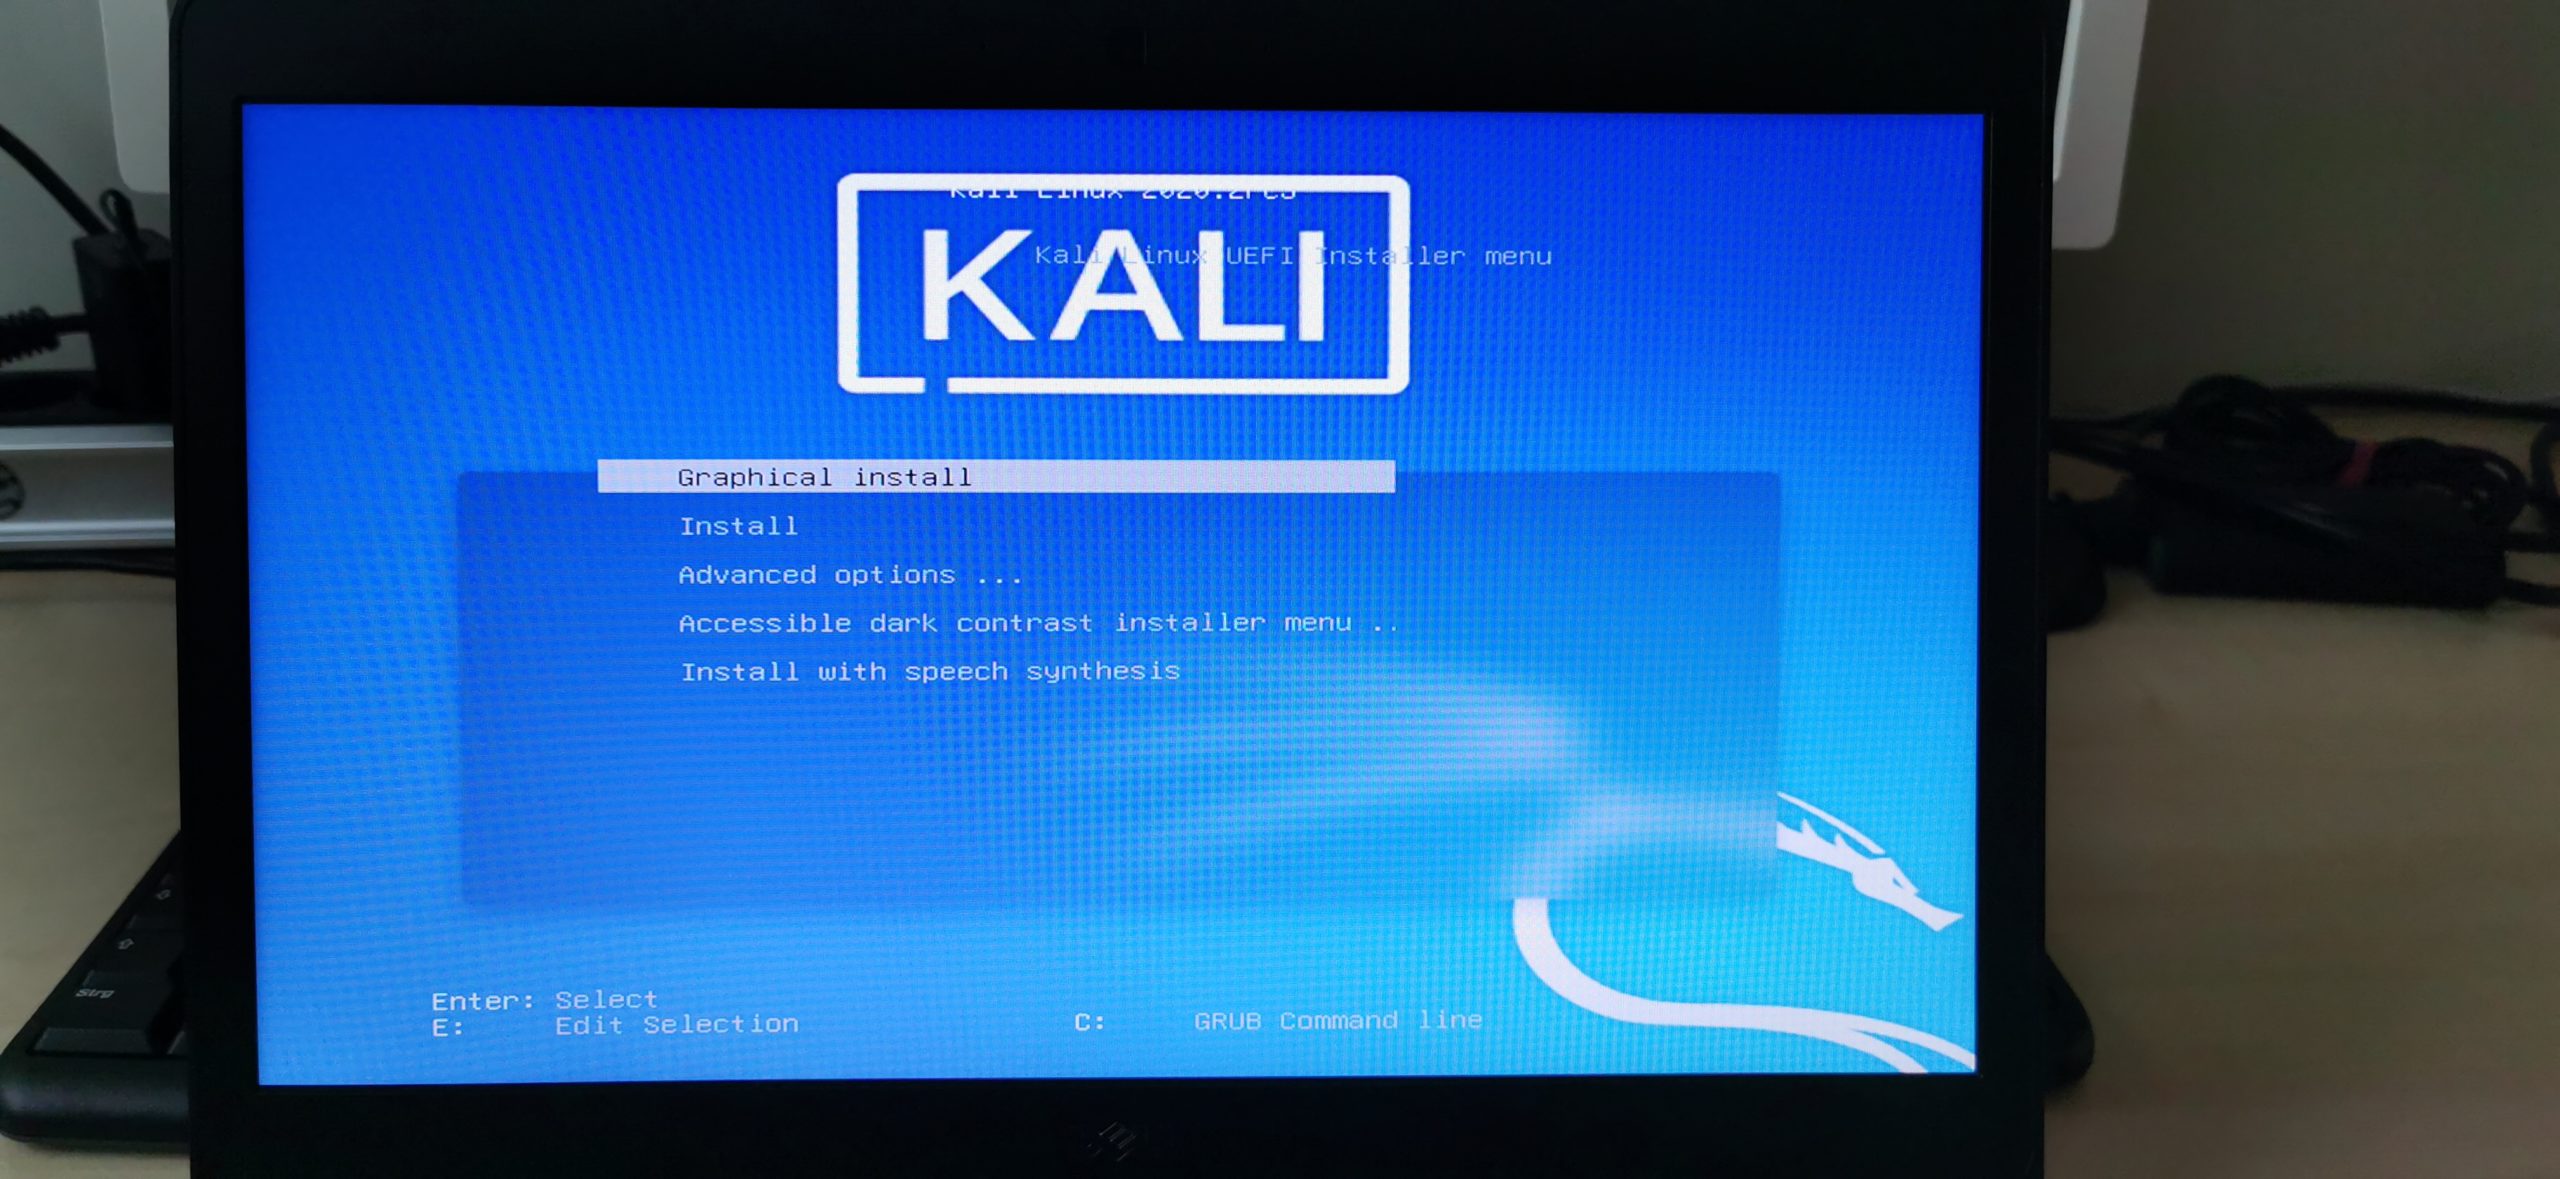
4.4 – When the Kali UEFI Installer Menu comes up select Graphical Install.
Step 5 – Install Kali Linux in Dual Boot with Windows 10
Alright, time to install Kali. I will now guide you through every step of the Installer process in the same fashion as in Step 3. Some steps will be accompanied by a screenshot, but some trivial steps won’t. You got this. Each step will be named after the window title in the Kali Installer.
Side-Note: I got reports that the Laptop Touchpad isn’t working on some models (mine included). To circumvent this, either plug a USB mouse in your laptop or navigate through the installer menus by using the tab key on your keyboard. That works well enough.
Side-Note2: I also got multiple reports that WiFi Drivers were not working during installation. Therefore, I recommend connecting your Laptop via LAN cable to your router during the installation.
5.1 – Select a language
Choose the language you want to use for your System and the Installer itself. I recommend leaving it on English as all tutorials you will ever find will be, you guessed it, in English.
5.2 – Select your location
Select your current location to set up your time zone correctly.
5.3 – Configure locales
Choose another locale or leave it on United States (I always leave this on US).
5.4 – Configure the keyboard
Choose your preferred keyboard layout.
Note: If you got an error message while Kali was loading installer components, you did not write your image in DD Image mode as described in Step 2.
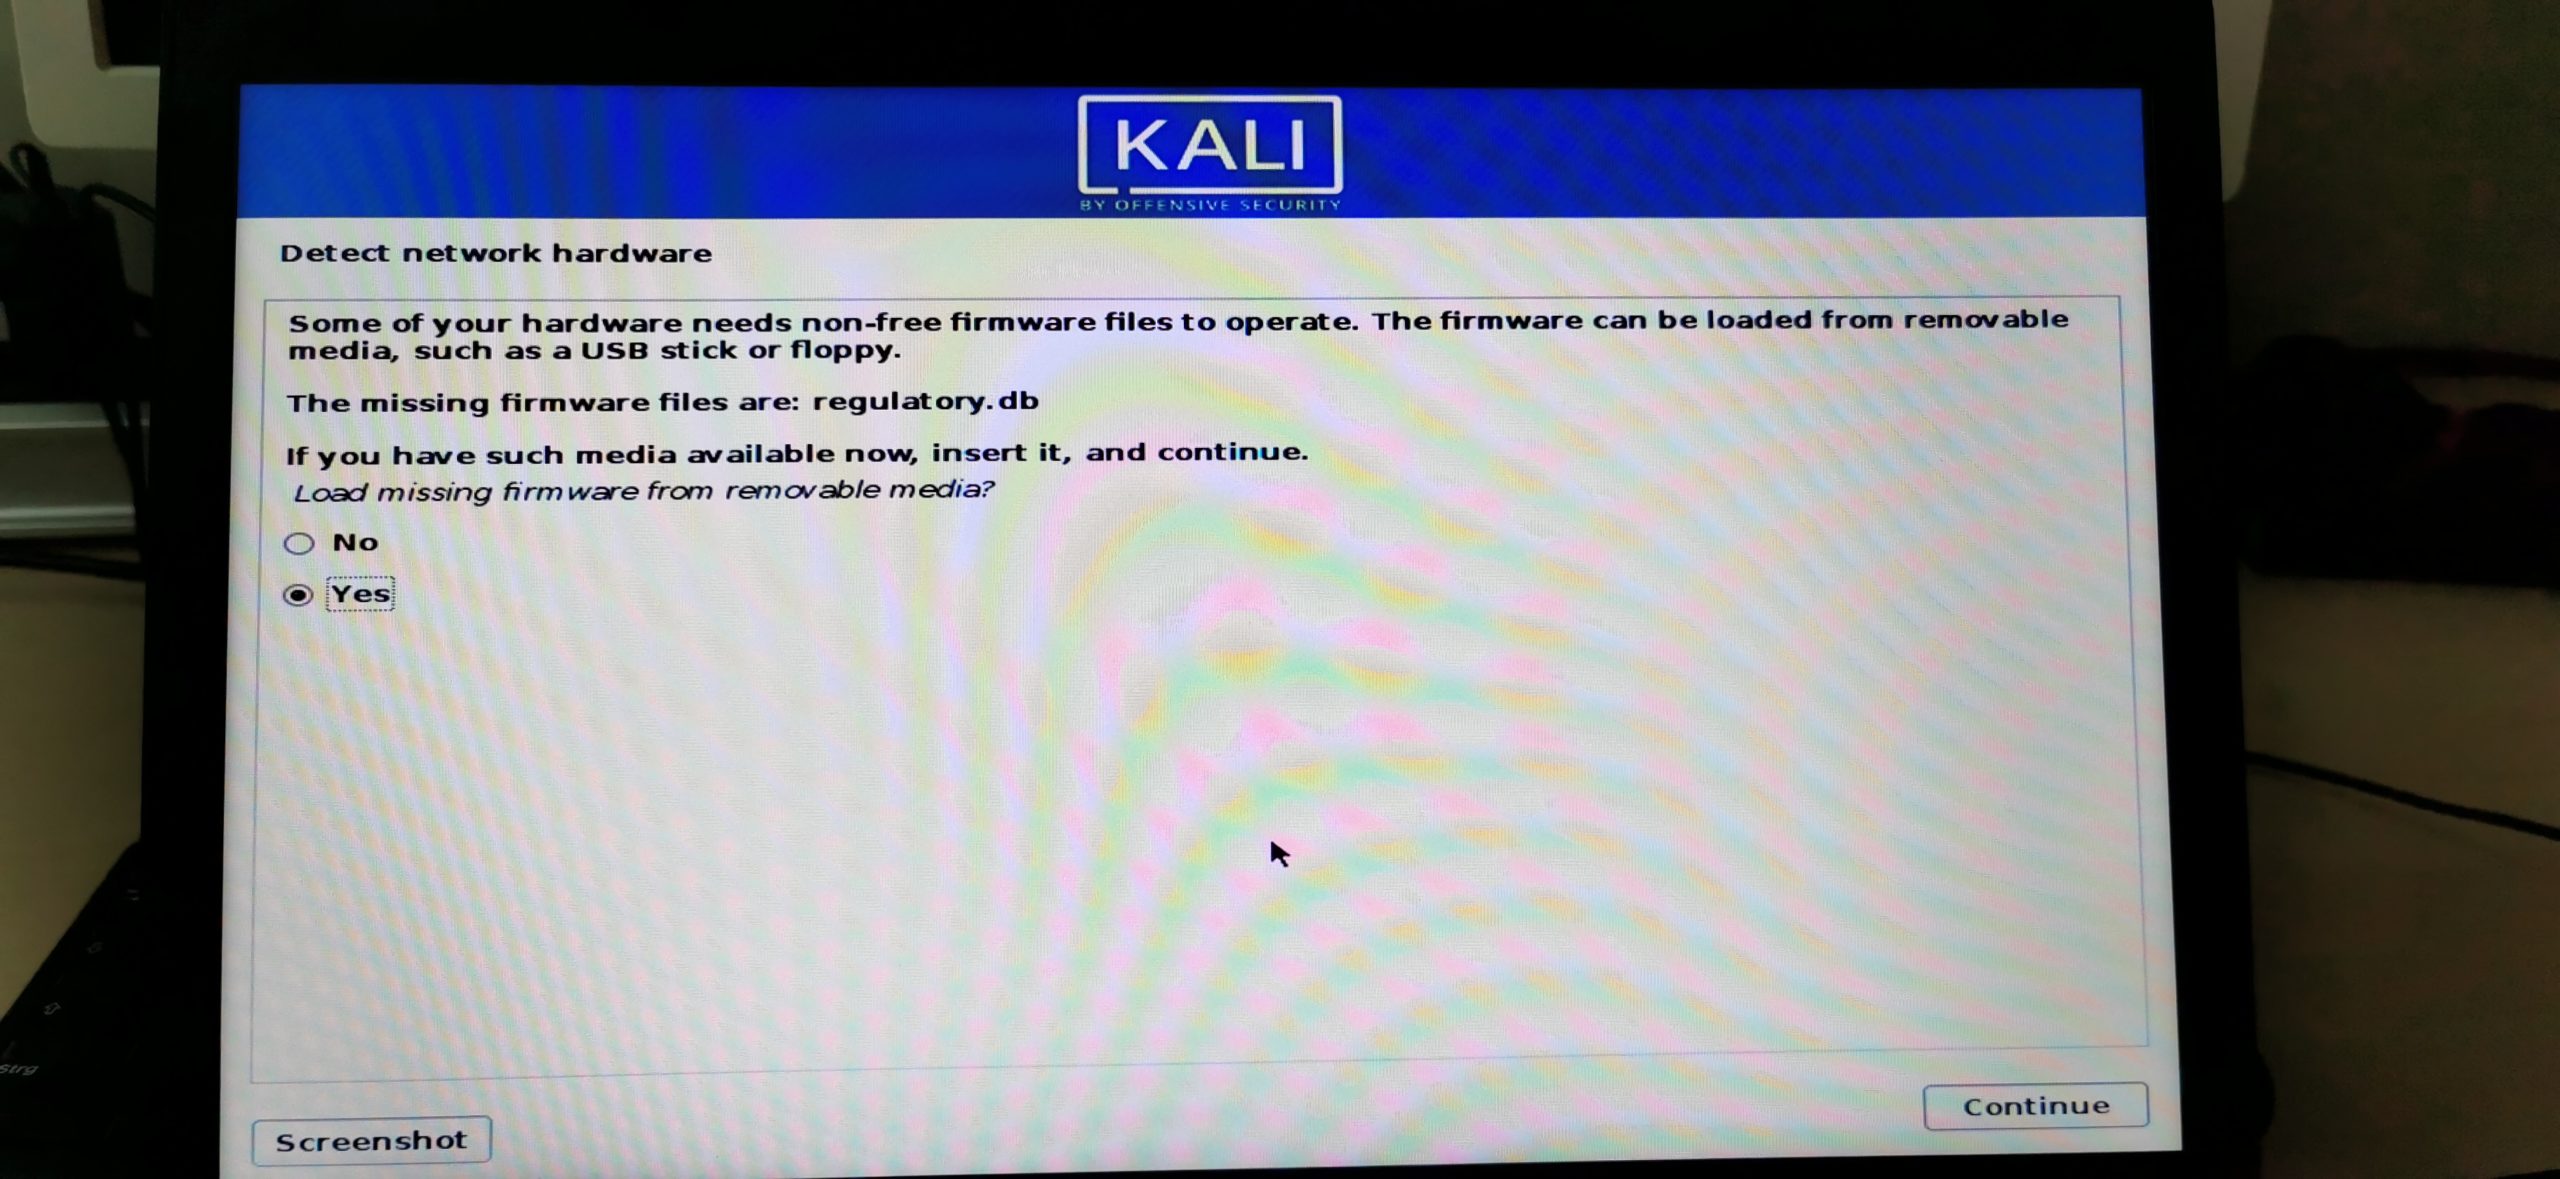
5.5.1 – Detect Network Hardware (Probably Optional Step)
You might get a message asking you if you would like to install some missing non-free firmware during installation. Select Yes if so and click continue.
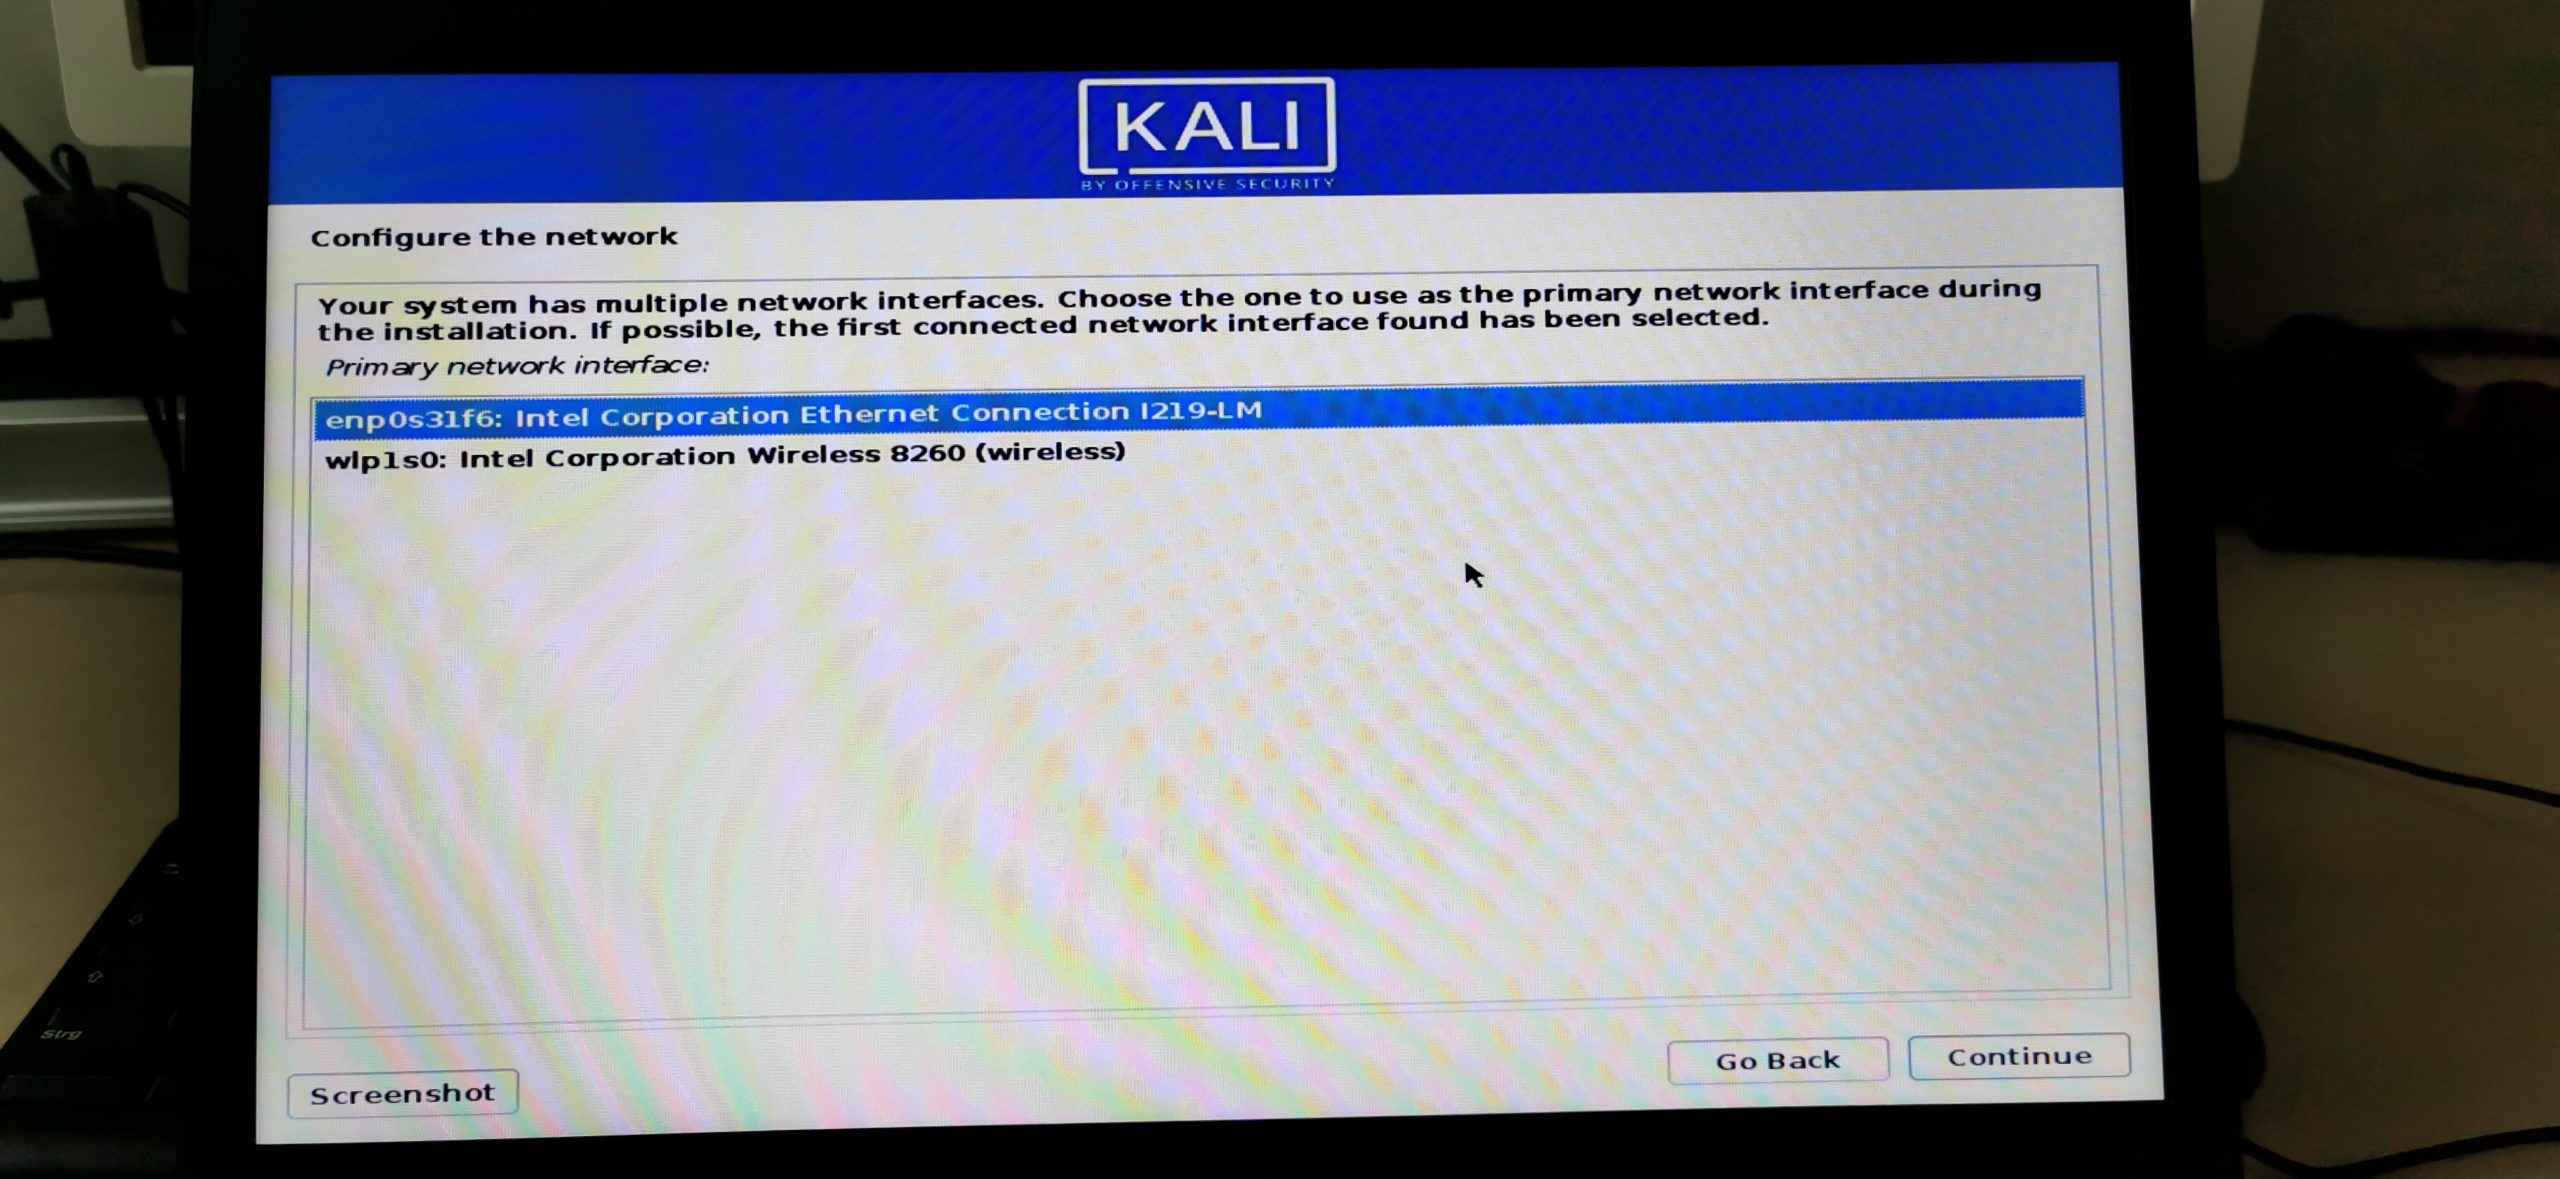
5.5 – Configure the network
Now you are able to choose between cable connection or wifi. Make your choice. I choose Ethernet Connection as I have an ethernet cable plugged in.
5.5.1 – Configure the Network
You can now choose a hostname for your Kali machine.
5.5.2 – Configure the Network
You can also enter a Domain if you’d like. If you don’t know what that means just leave it as default or enter local.
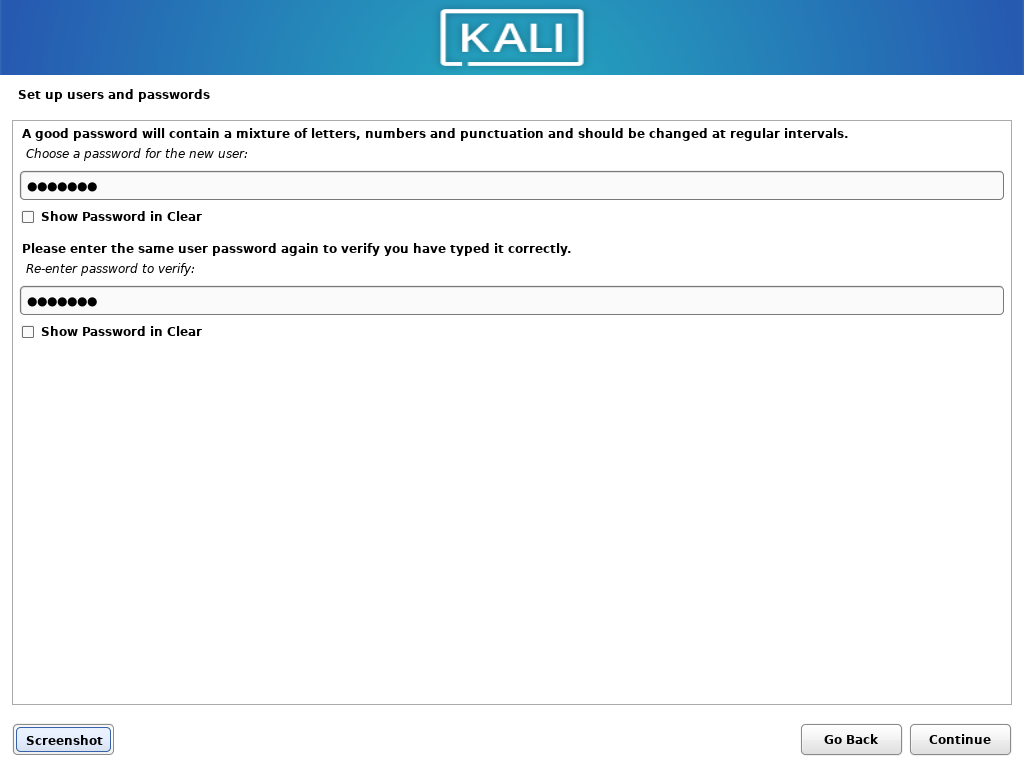
5.6 – Set up users and passwords
Here you can enter your name if you want. Like, your first name for example. Or your cat’s name.
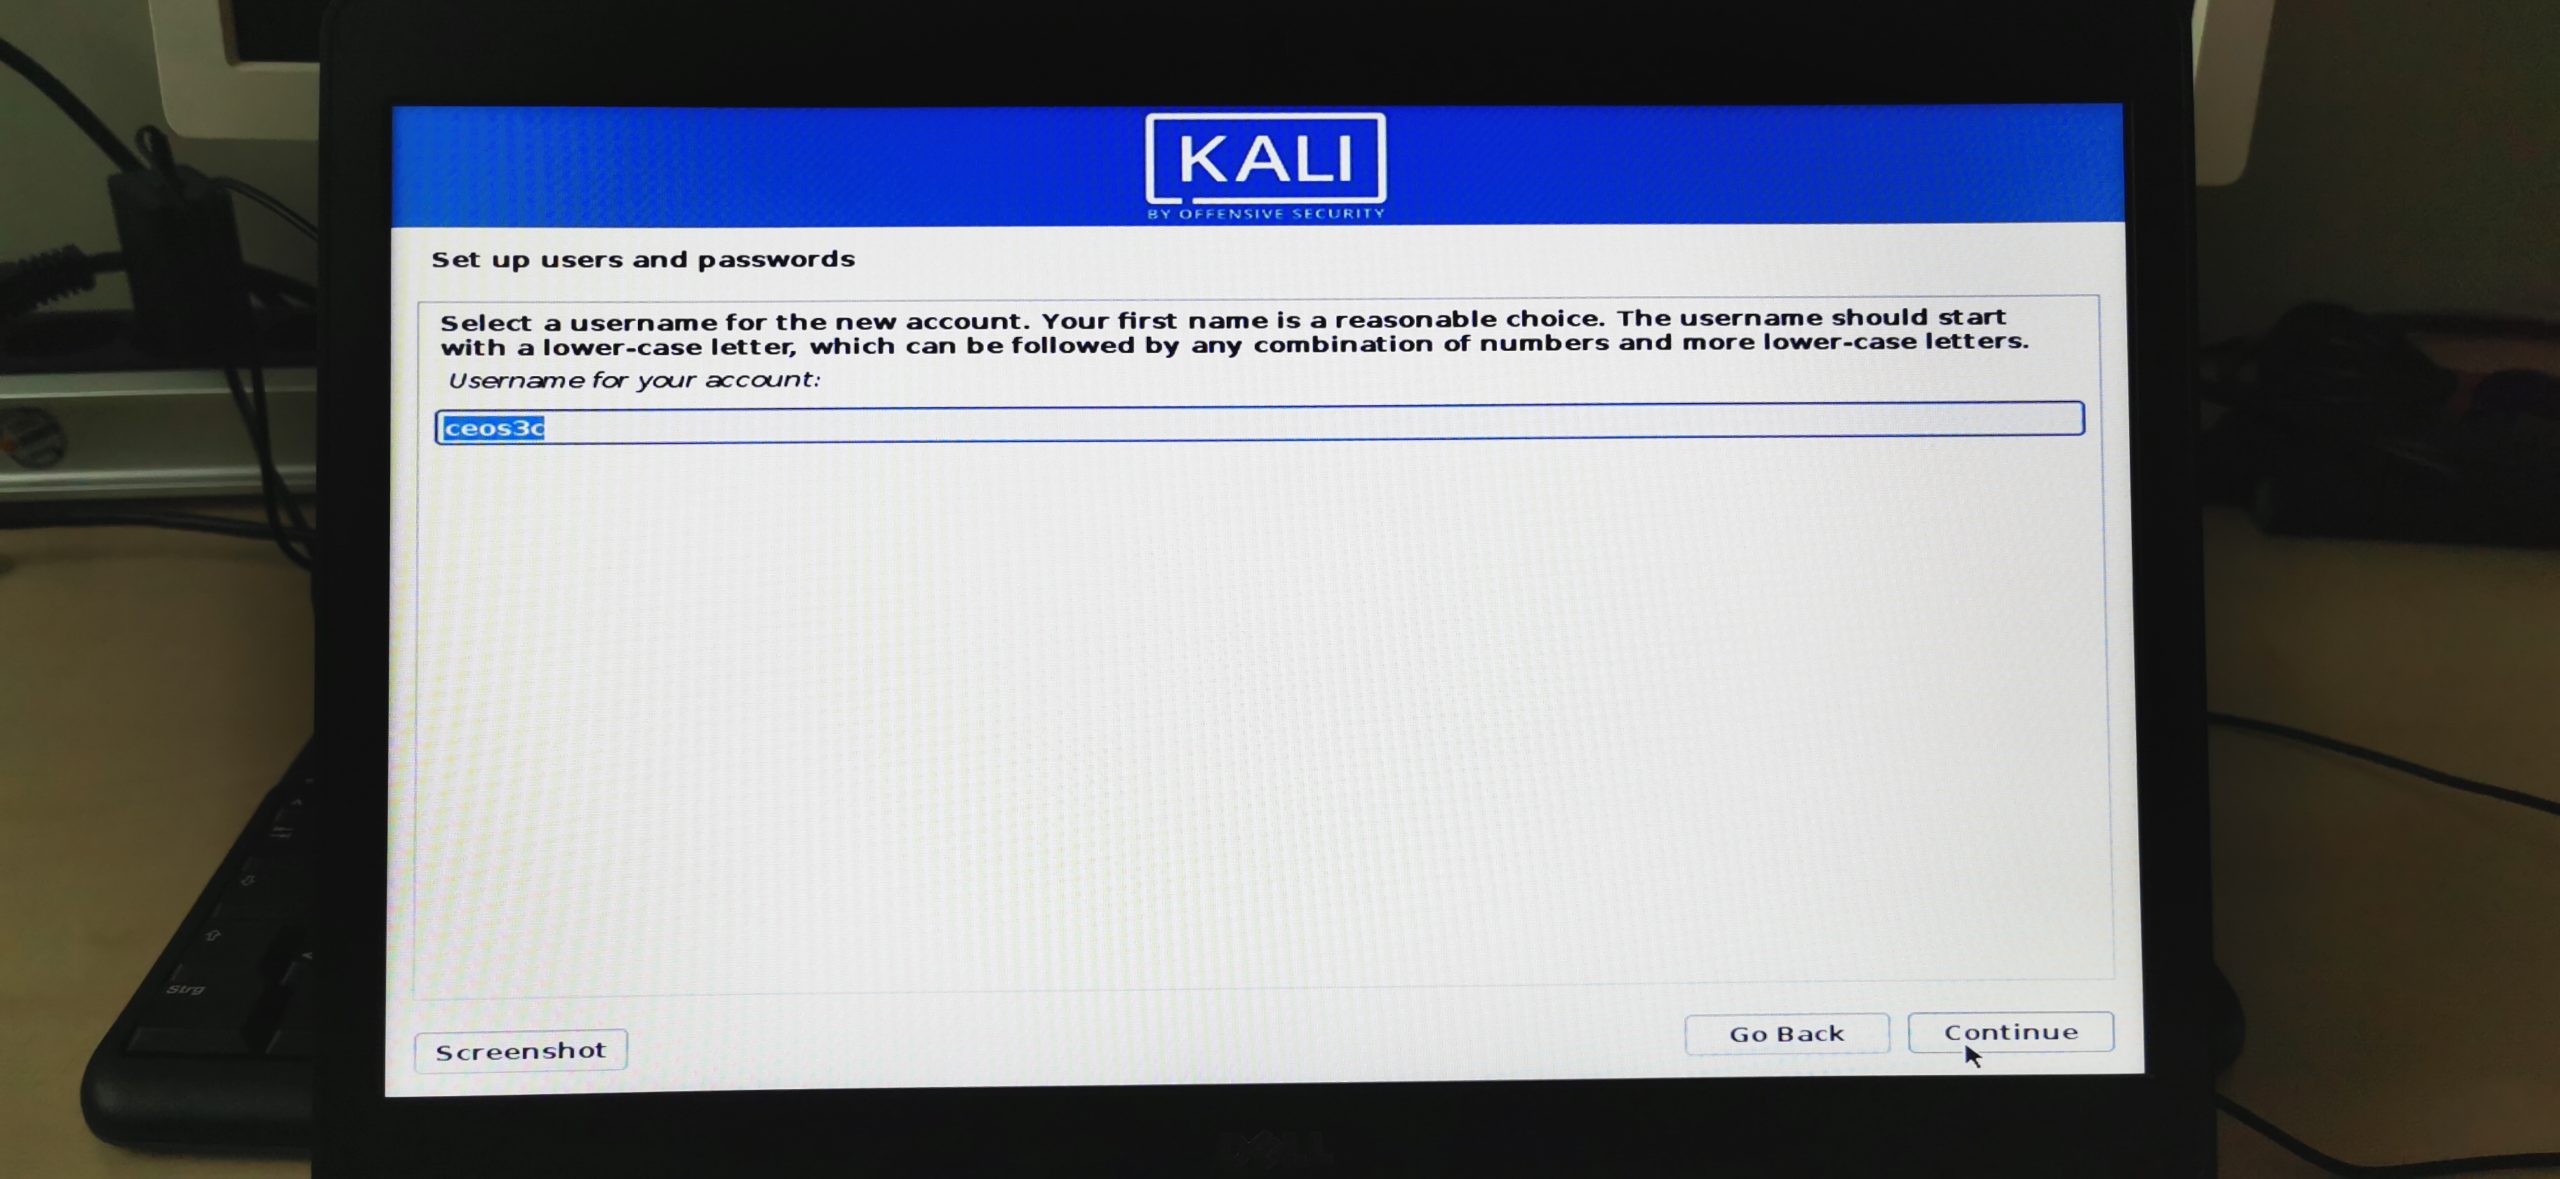
5.6.1 – Set up users and passwords
You will now create a low-privileged user account that you will use instead of the root user. This is more secure. Choose whatever username you want, for the sake of this tutorial I name my user ceos3c. Careful, usernames on Linux are Case-Sensitive.
5.6.2 – Set up users and passwords
Choose a strong password.
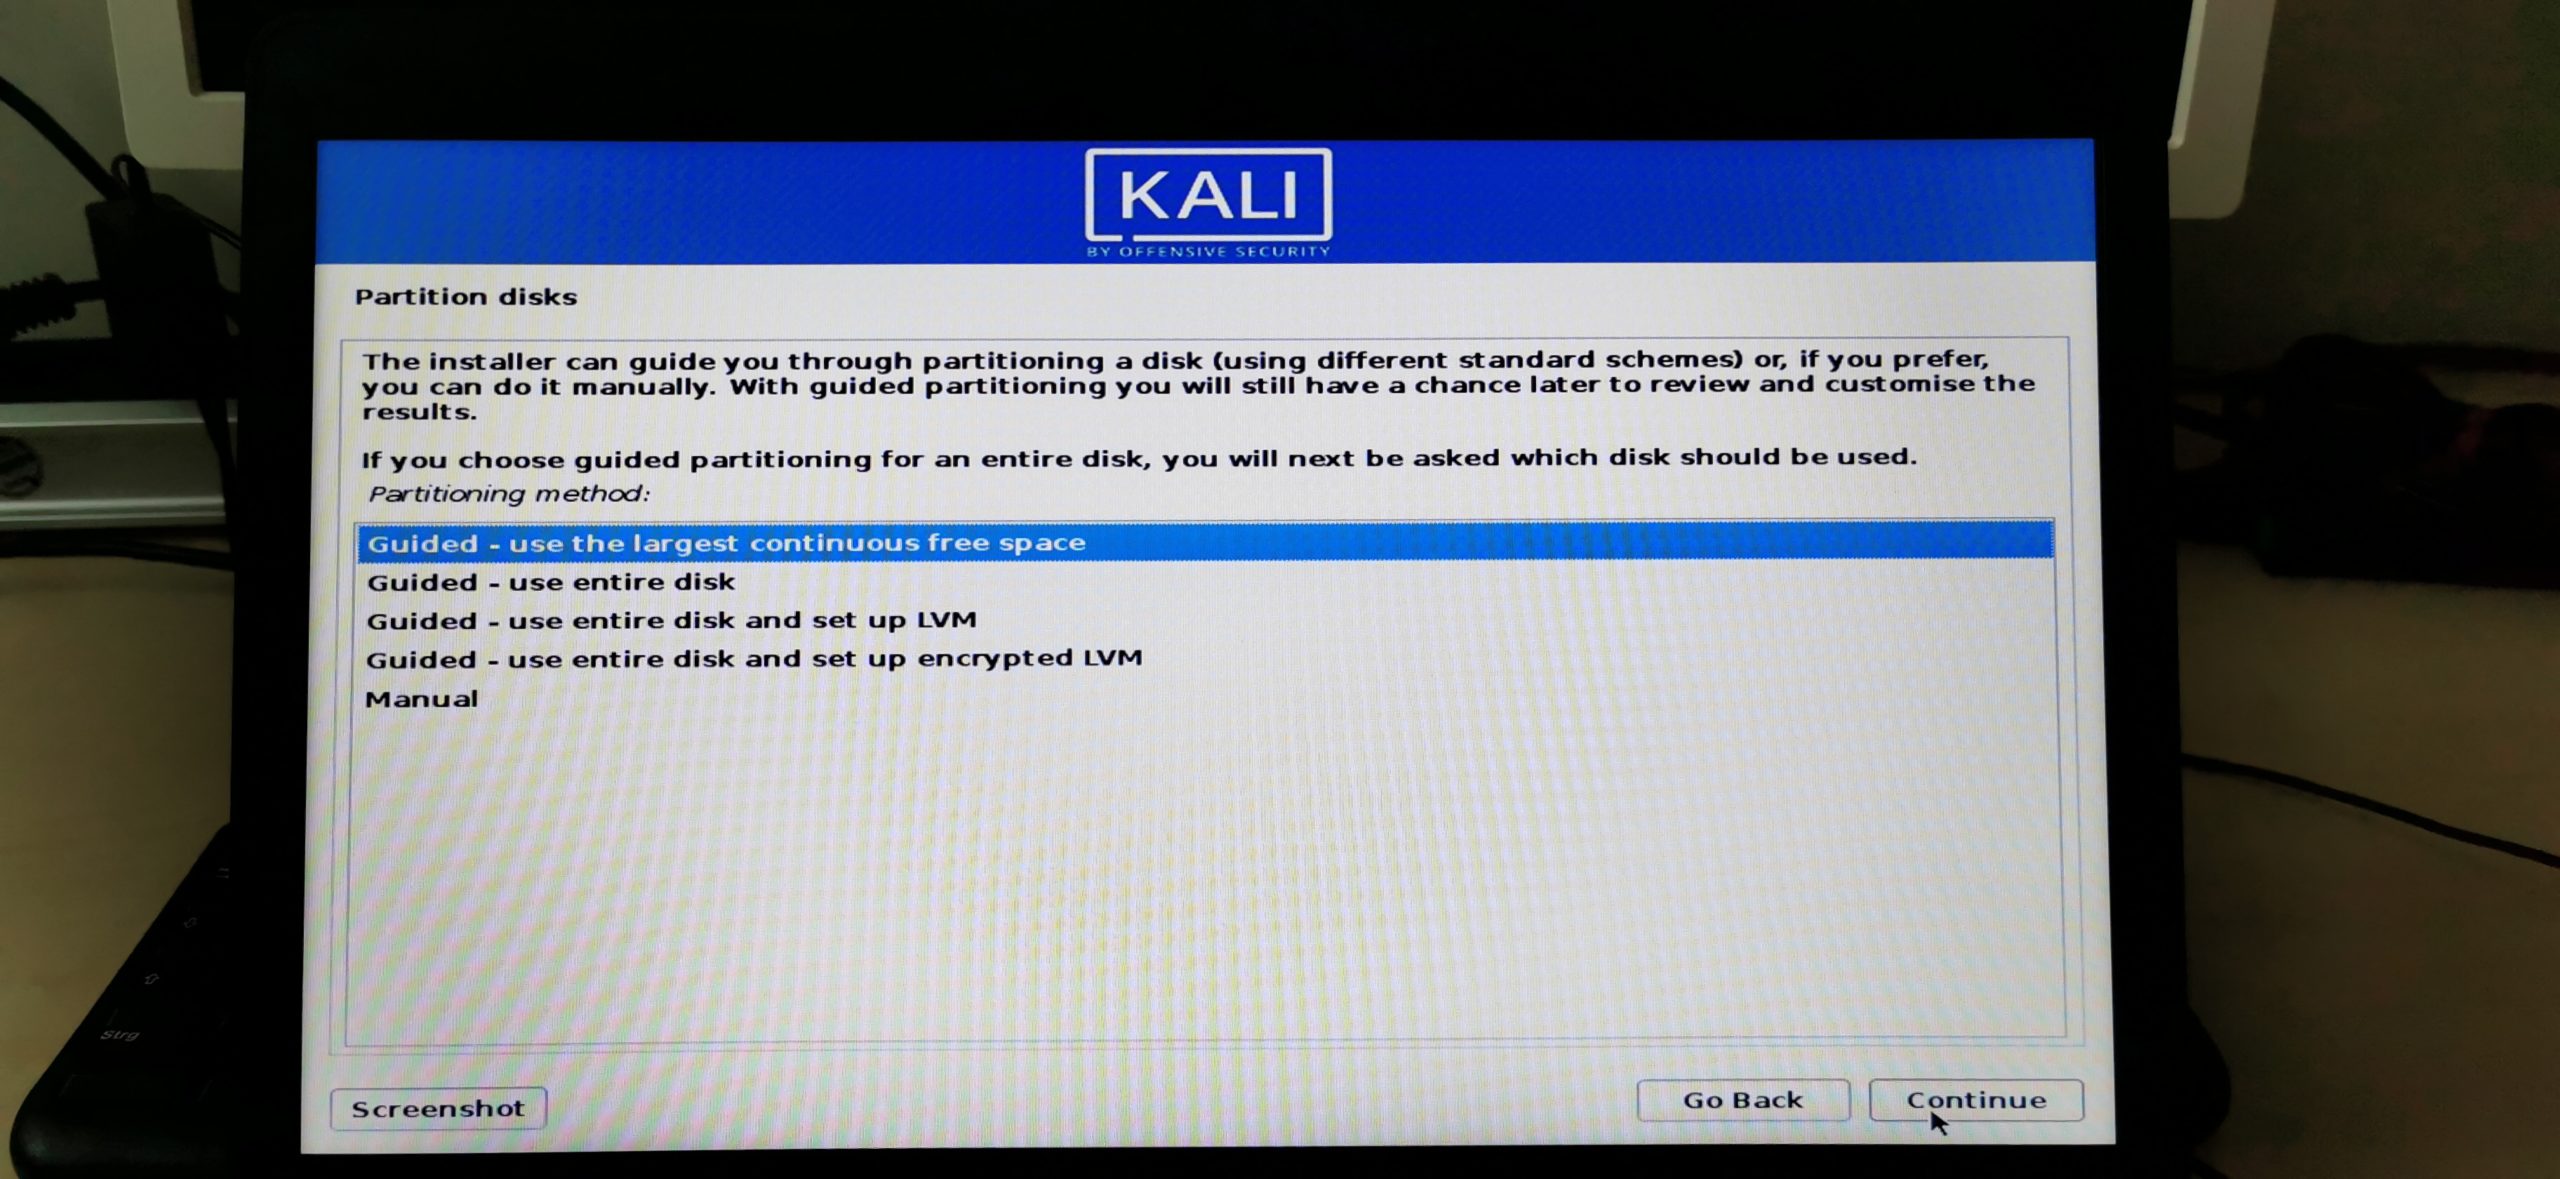
5.7 – Partition disks (Follow this very carefully, don’t make a mistake here)
To make this more clear, I will separate each step again. First, we will create a SWAP partition and then repeat the process to create our main partition. I will try to make it as clear as possible.
SWAP Step 1 – Partitioning Method
Choose Manual here
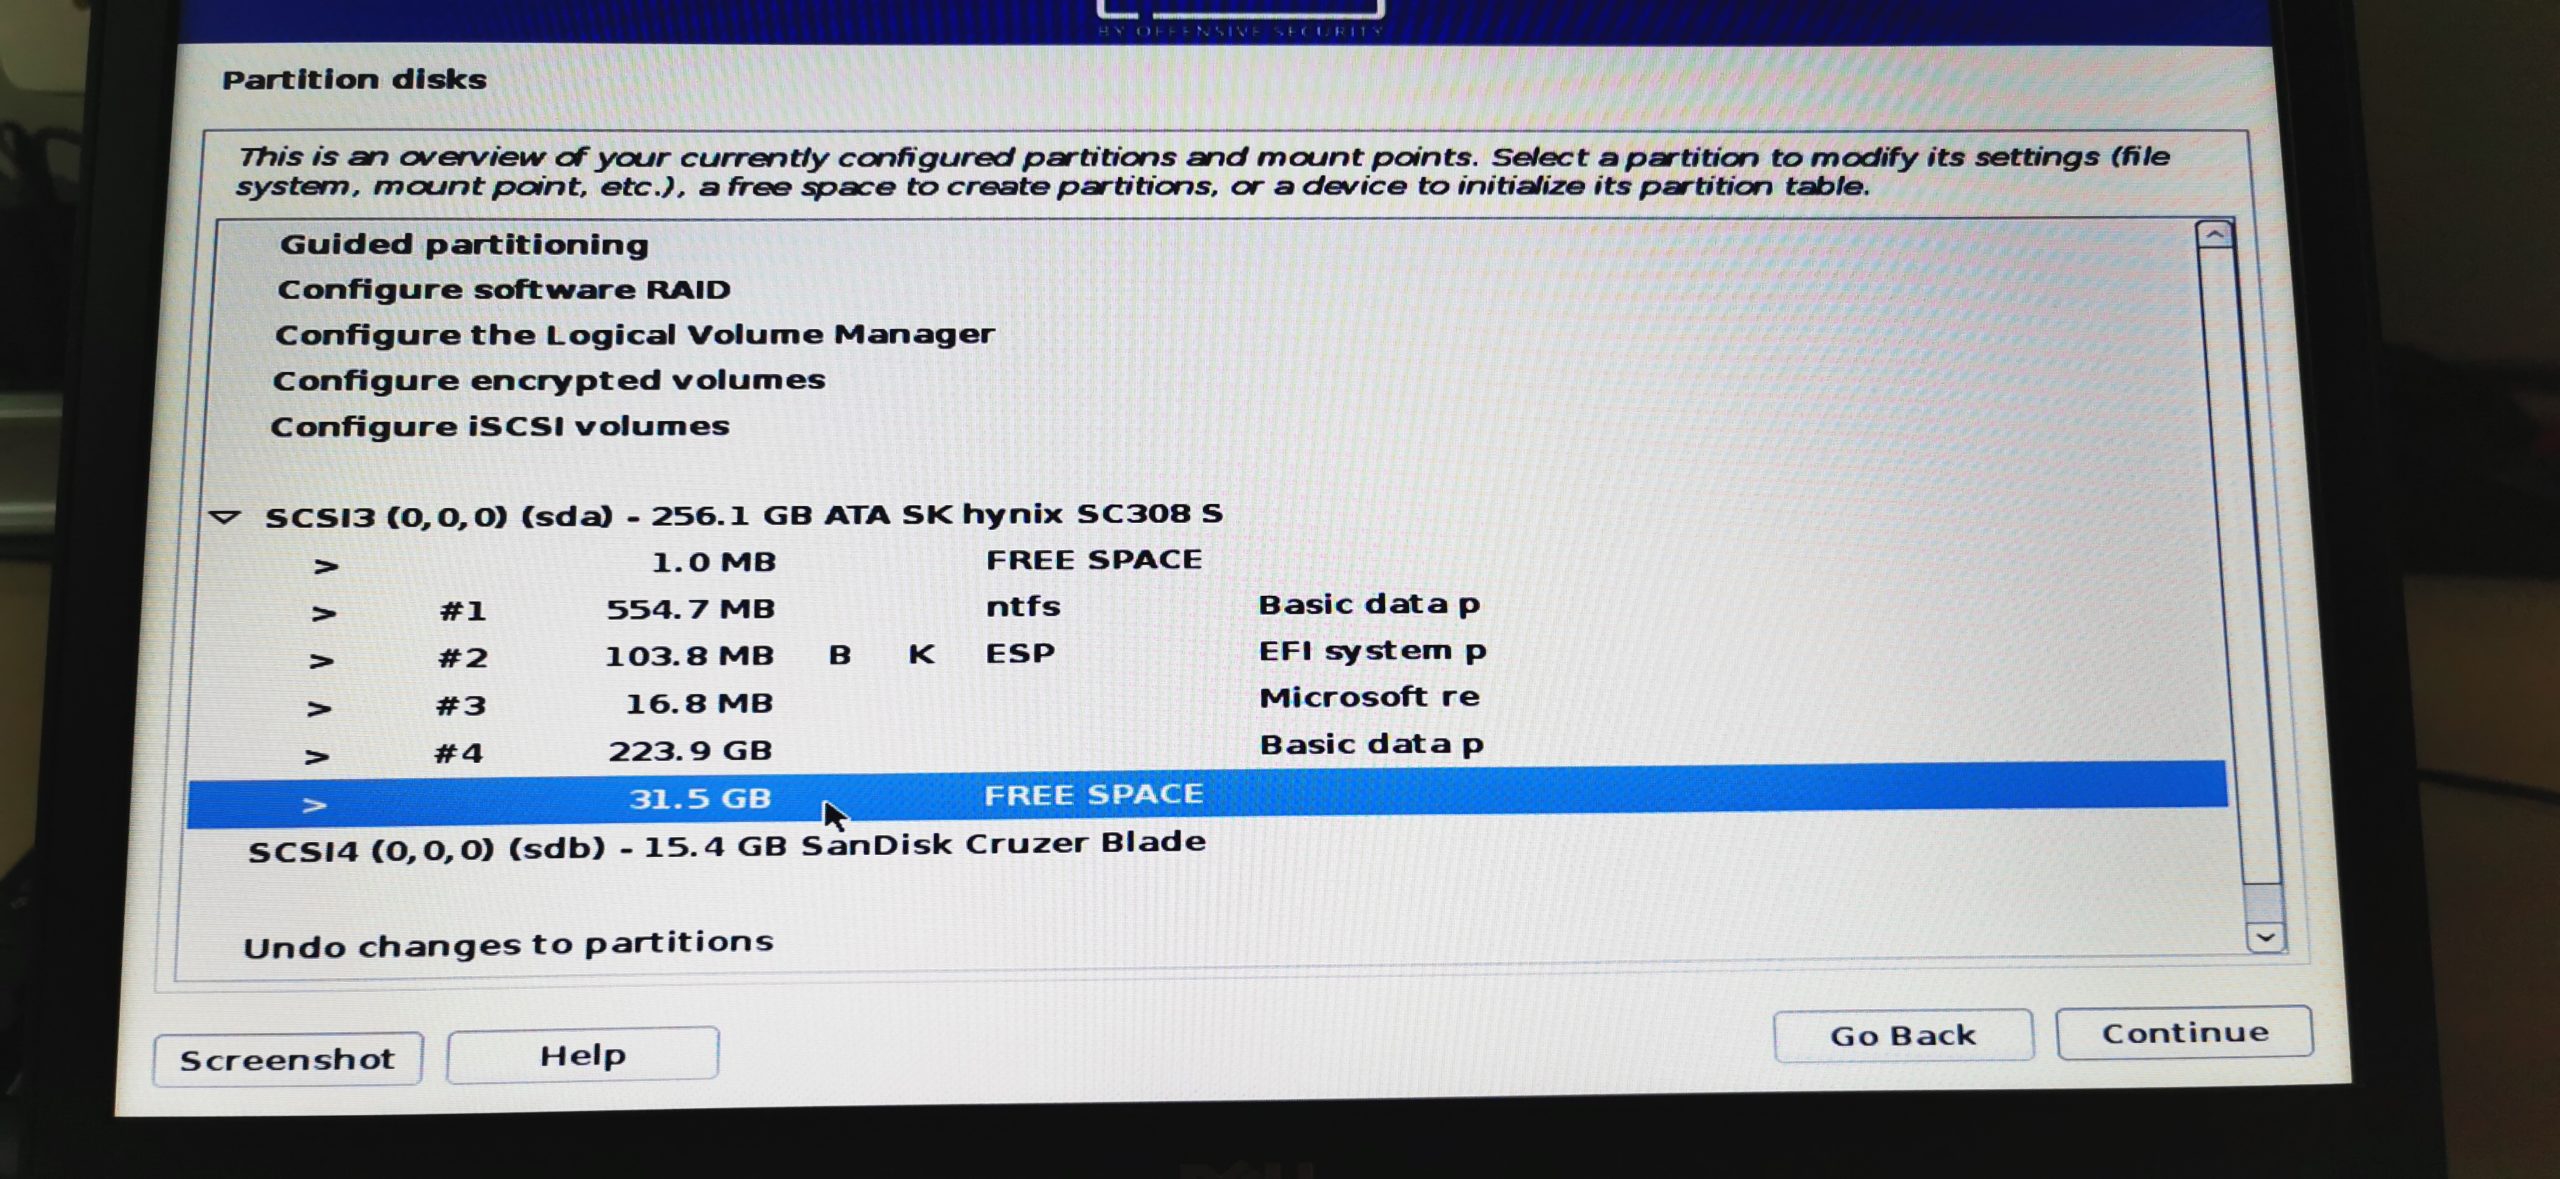
SWAP Step 2 – Selecting the partition we created in Step 3
Make sure to select the correct partition here! You can easily spot it as it should be indicated by FREE SPACE, or by the amount of GB you set in Step 3. Select it and click Continue.
SWAP Step 3 – How to use this free space
Select Create a new partition.

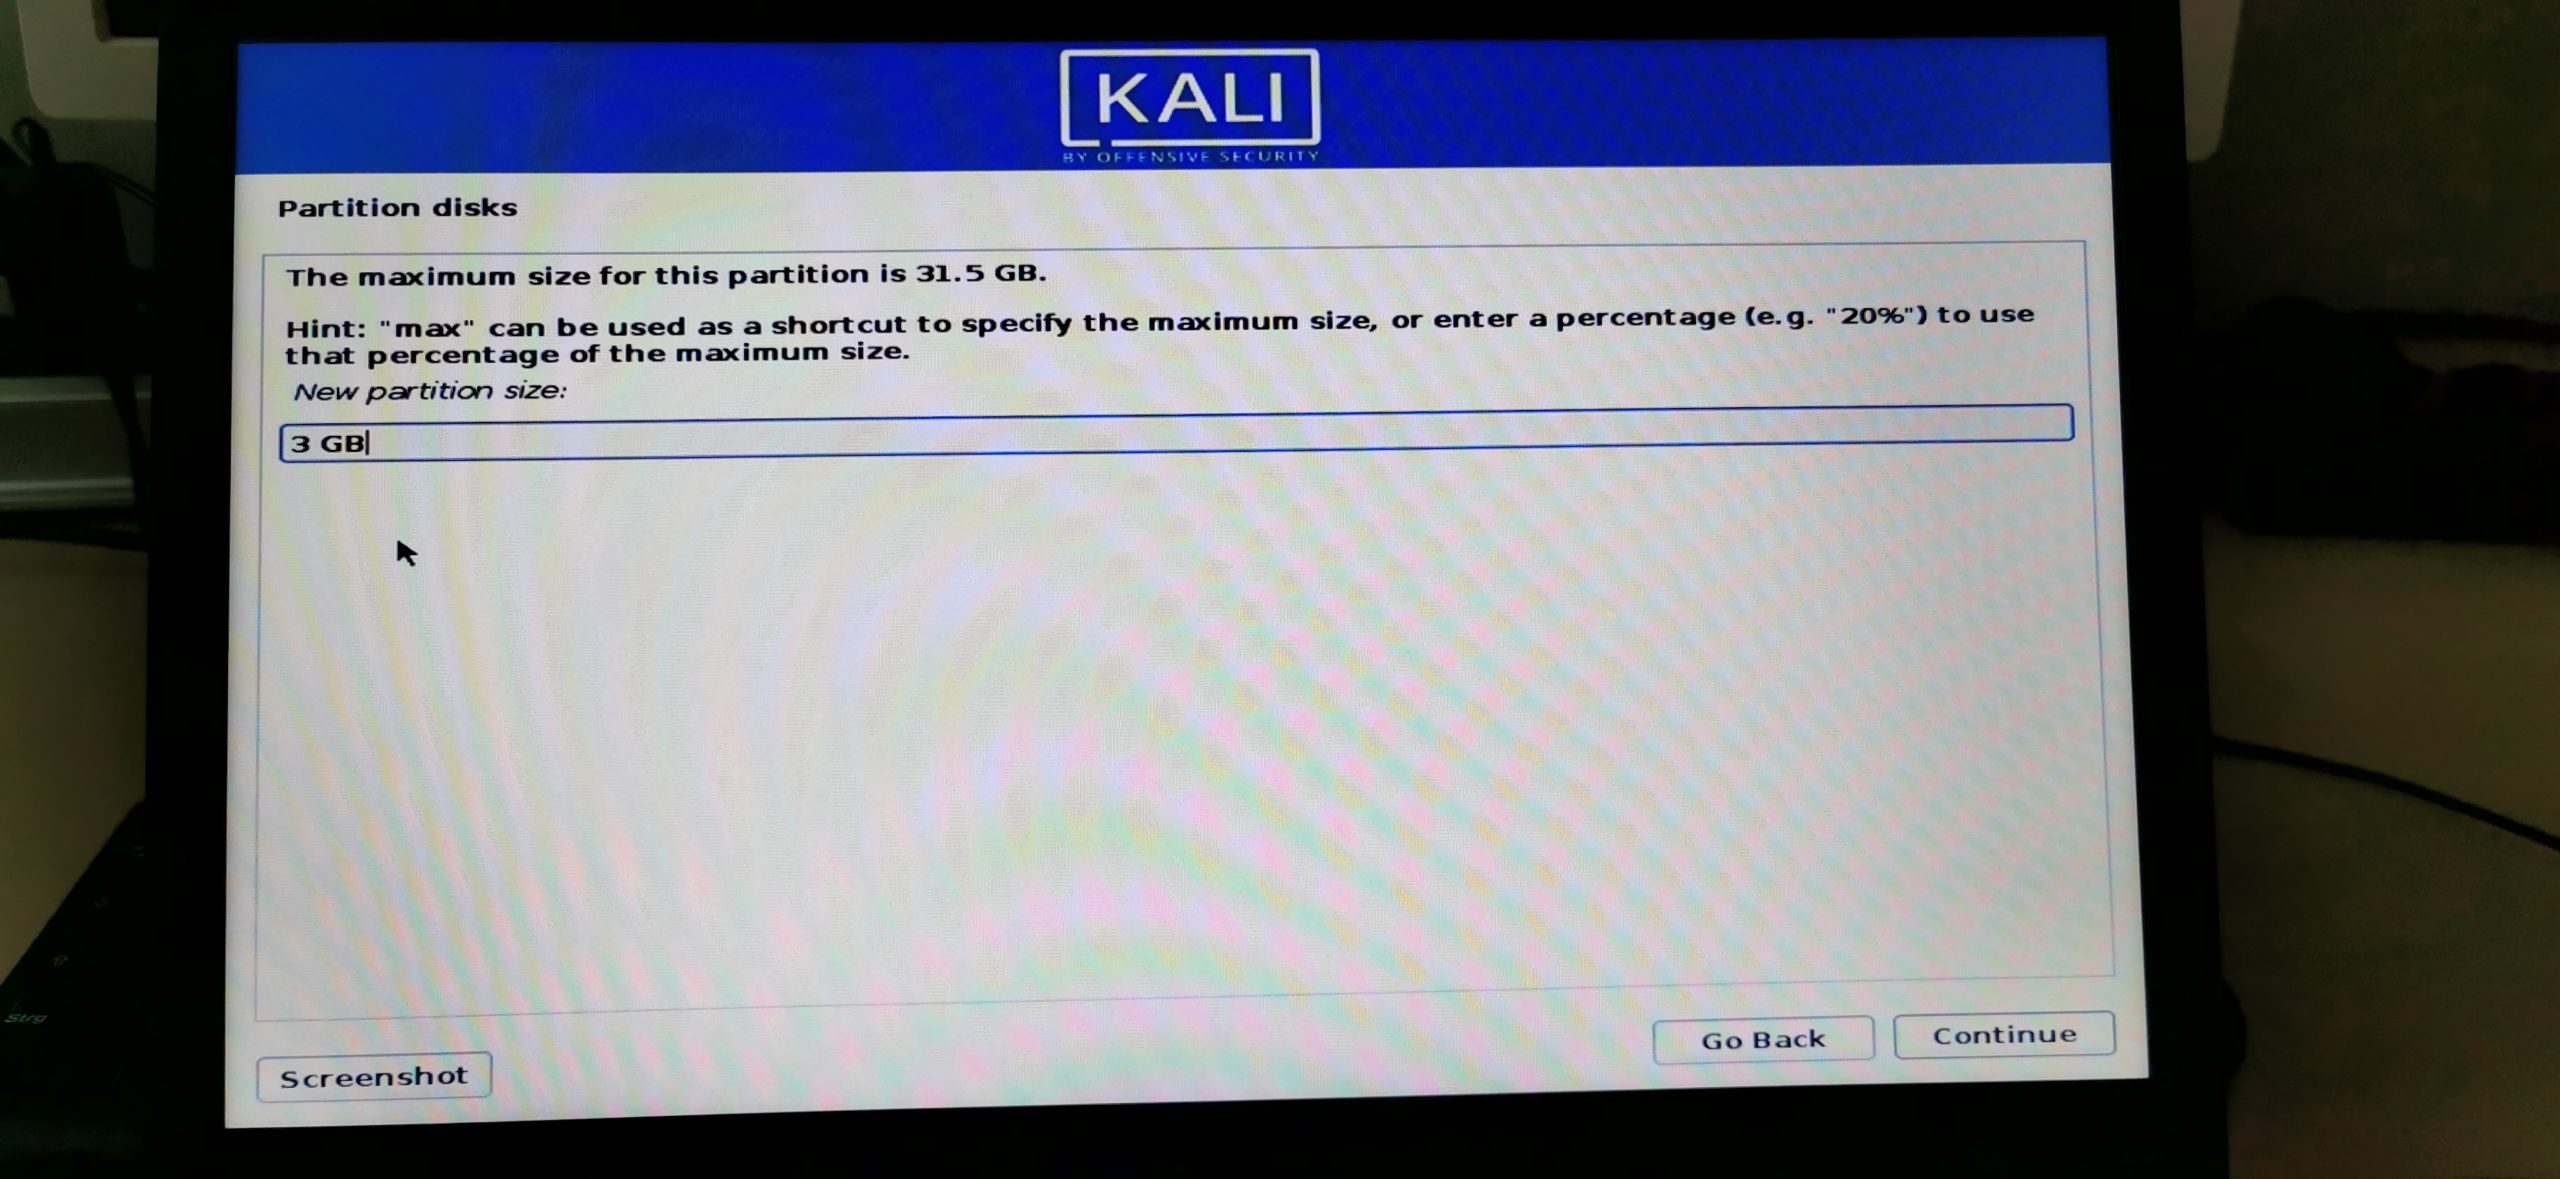
SWAP Step 4 – Setting up the SWAP partition
The SWAP partition size is set by the amount of memory you have in your computer. It’s a rather tiresome topic so I save you some time by creating the below table for you. In short: You should allocate around 20% of the amount of your system memory as your SWAP partition size. Now there is a whole topic on adjusting SWAP size if you use Hibernation vs no Hibernation you can read up on if you want, I generally stick to the No Hibernation chart and had no problems so far. You’ll find the information out there. Yea I know, I see myself out.
| RAM Laptop | Swap Size (No Hibernation) |
| 1GB | 1GB |
| 2GB | 1GB |
| 4GB | 2GB |
| 6GB | 2GB |
| 8GB | 3GB |
| 12GB | 3GB |
| 16GB | 4GB |
| 24GB | 5GB |
| 32GB | 6GB |
| 64GB | 8GB |
So, my laptop has 8GB of RAM so according to that table, I choose a SWAP size of 3GB. I hope that makes sense.
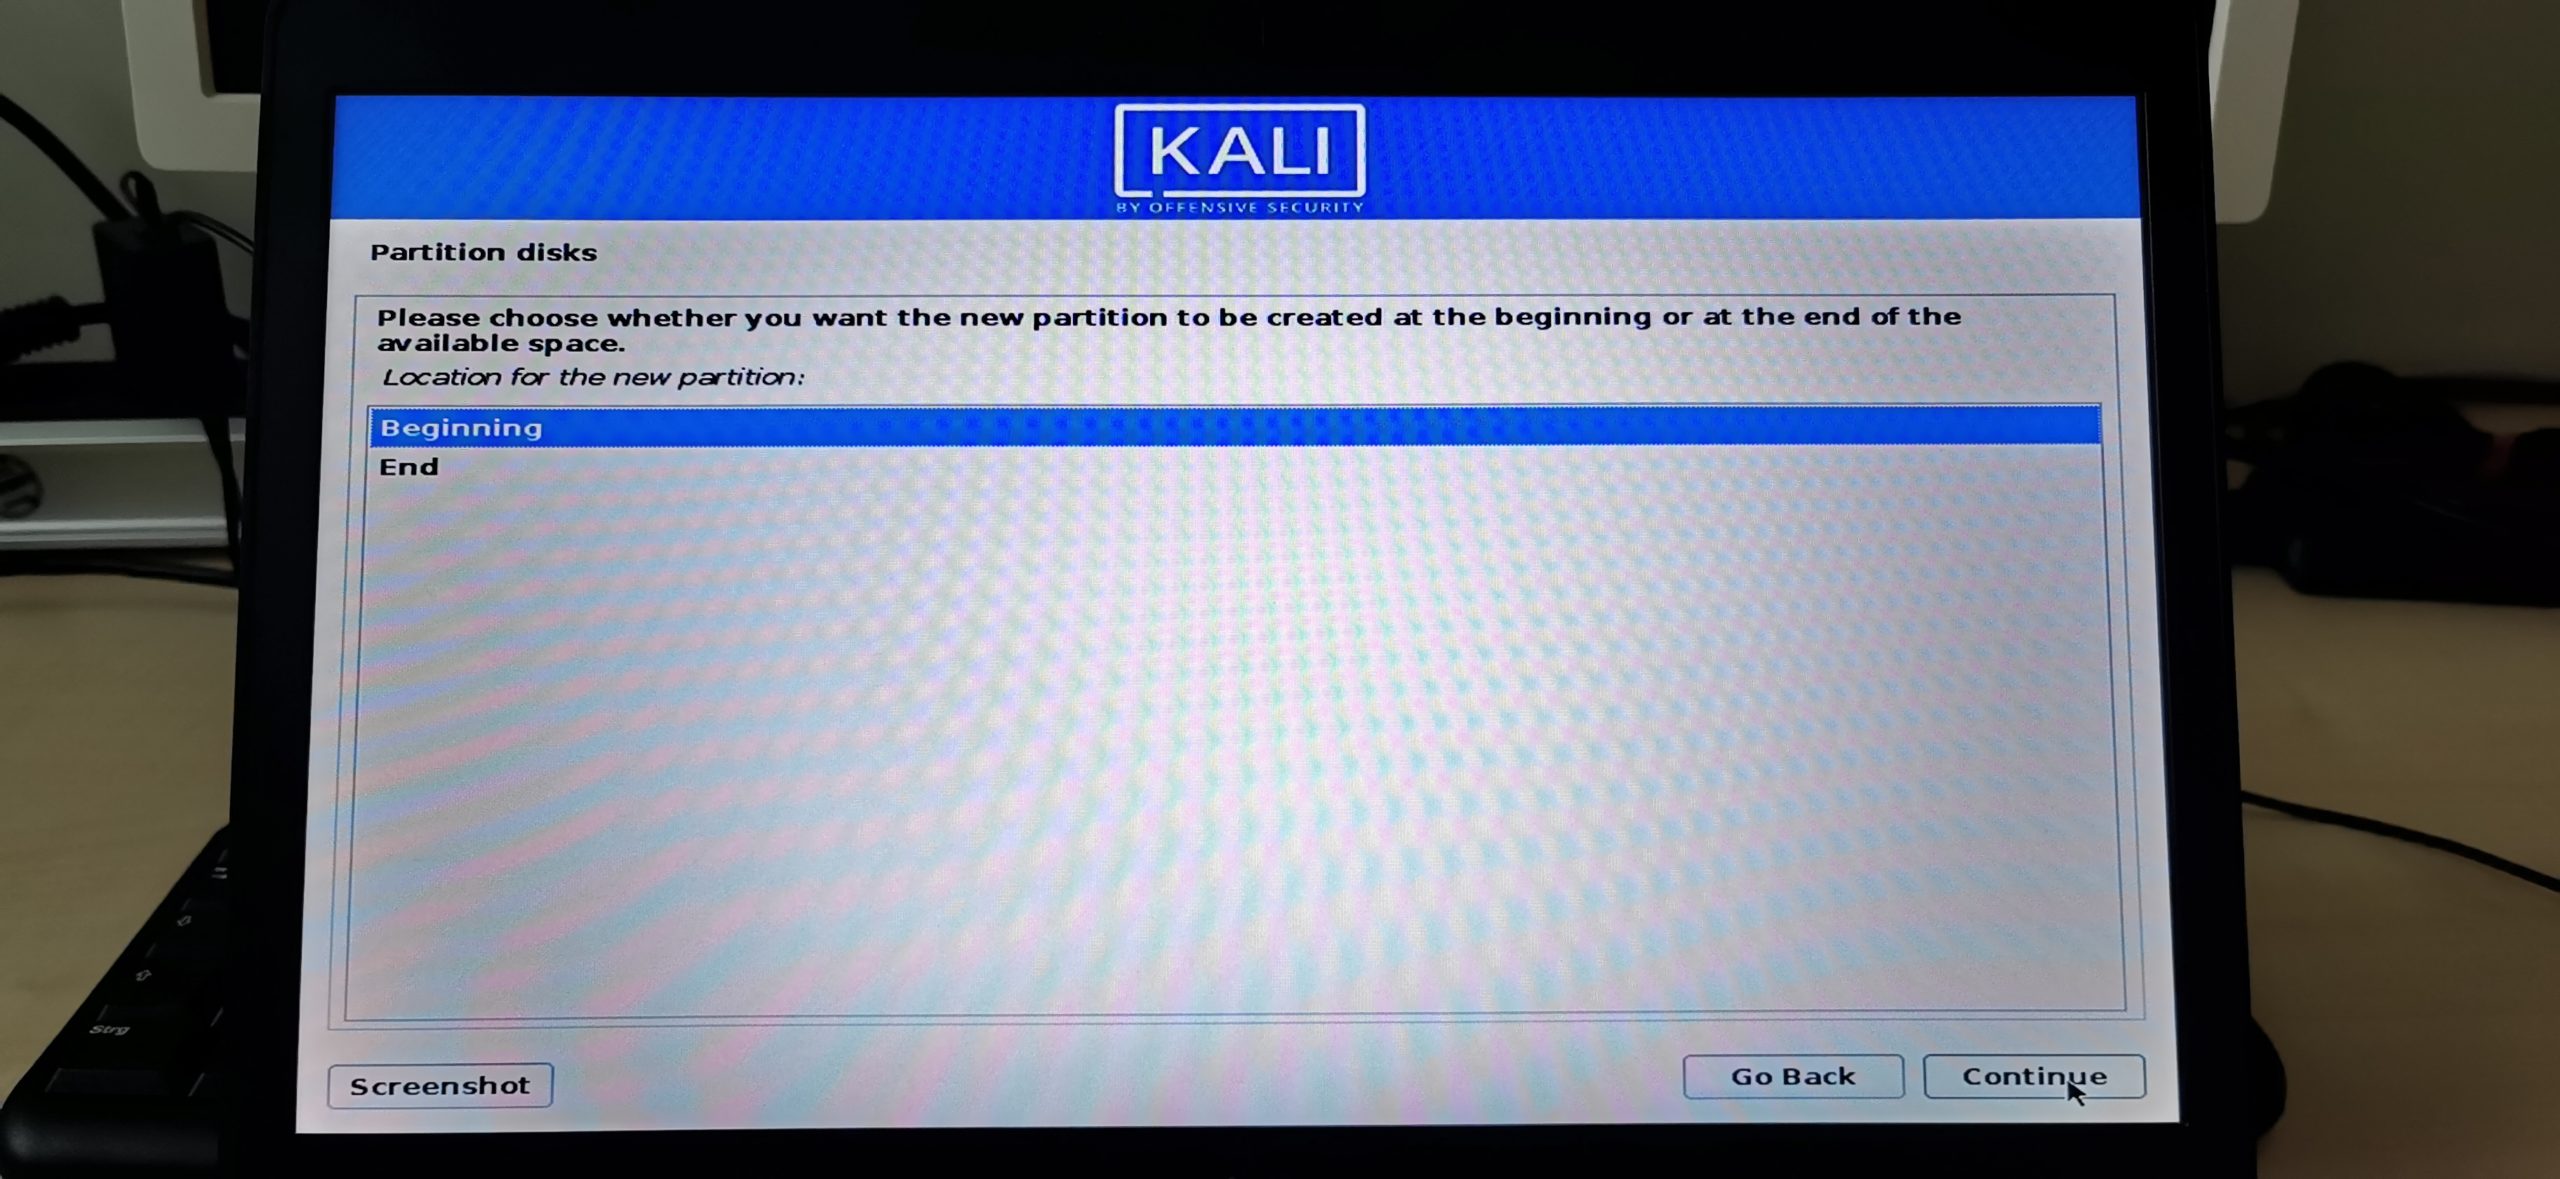
SWAP Step 5 – Location for the new Partition
Choose Beginning and click Continue.
SWAP Step 6 – Naming the Partition
Double-click on Name: and name your partition swap. Click Continue.
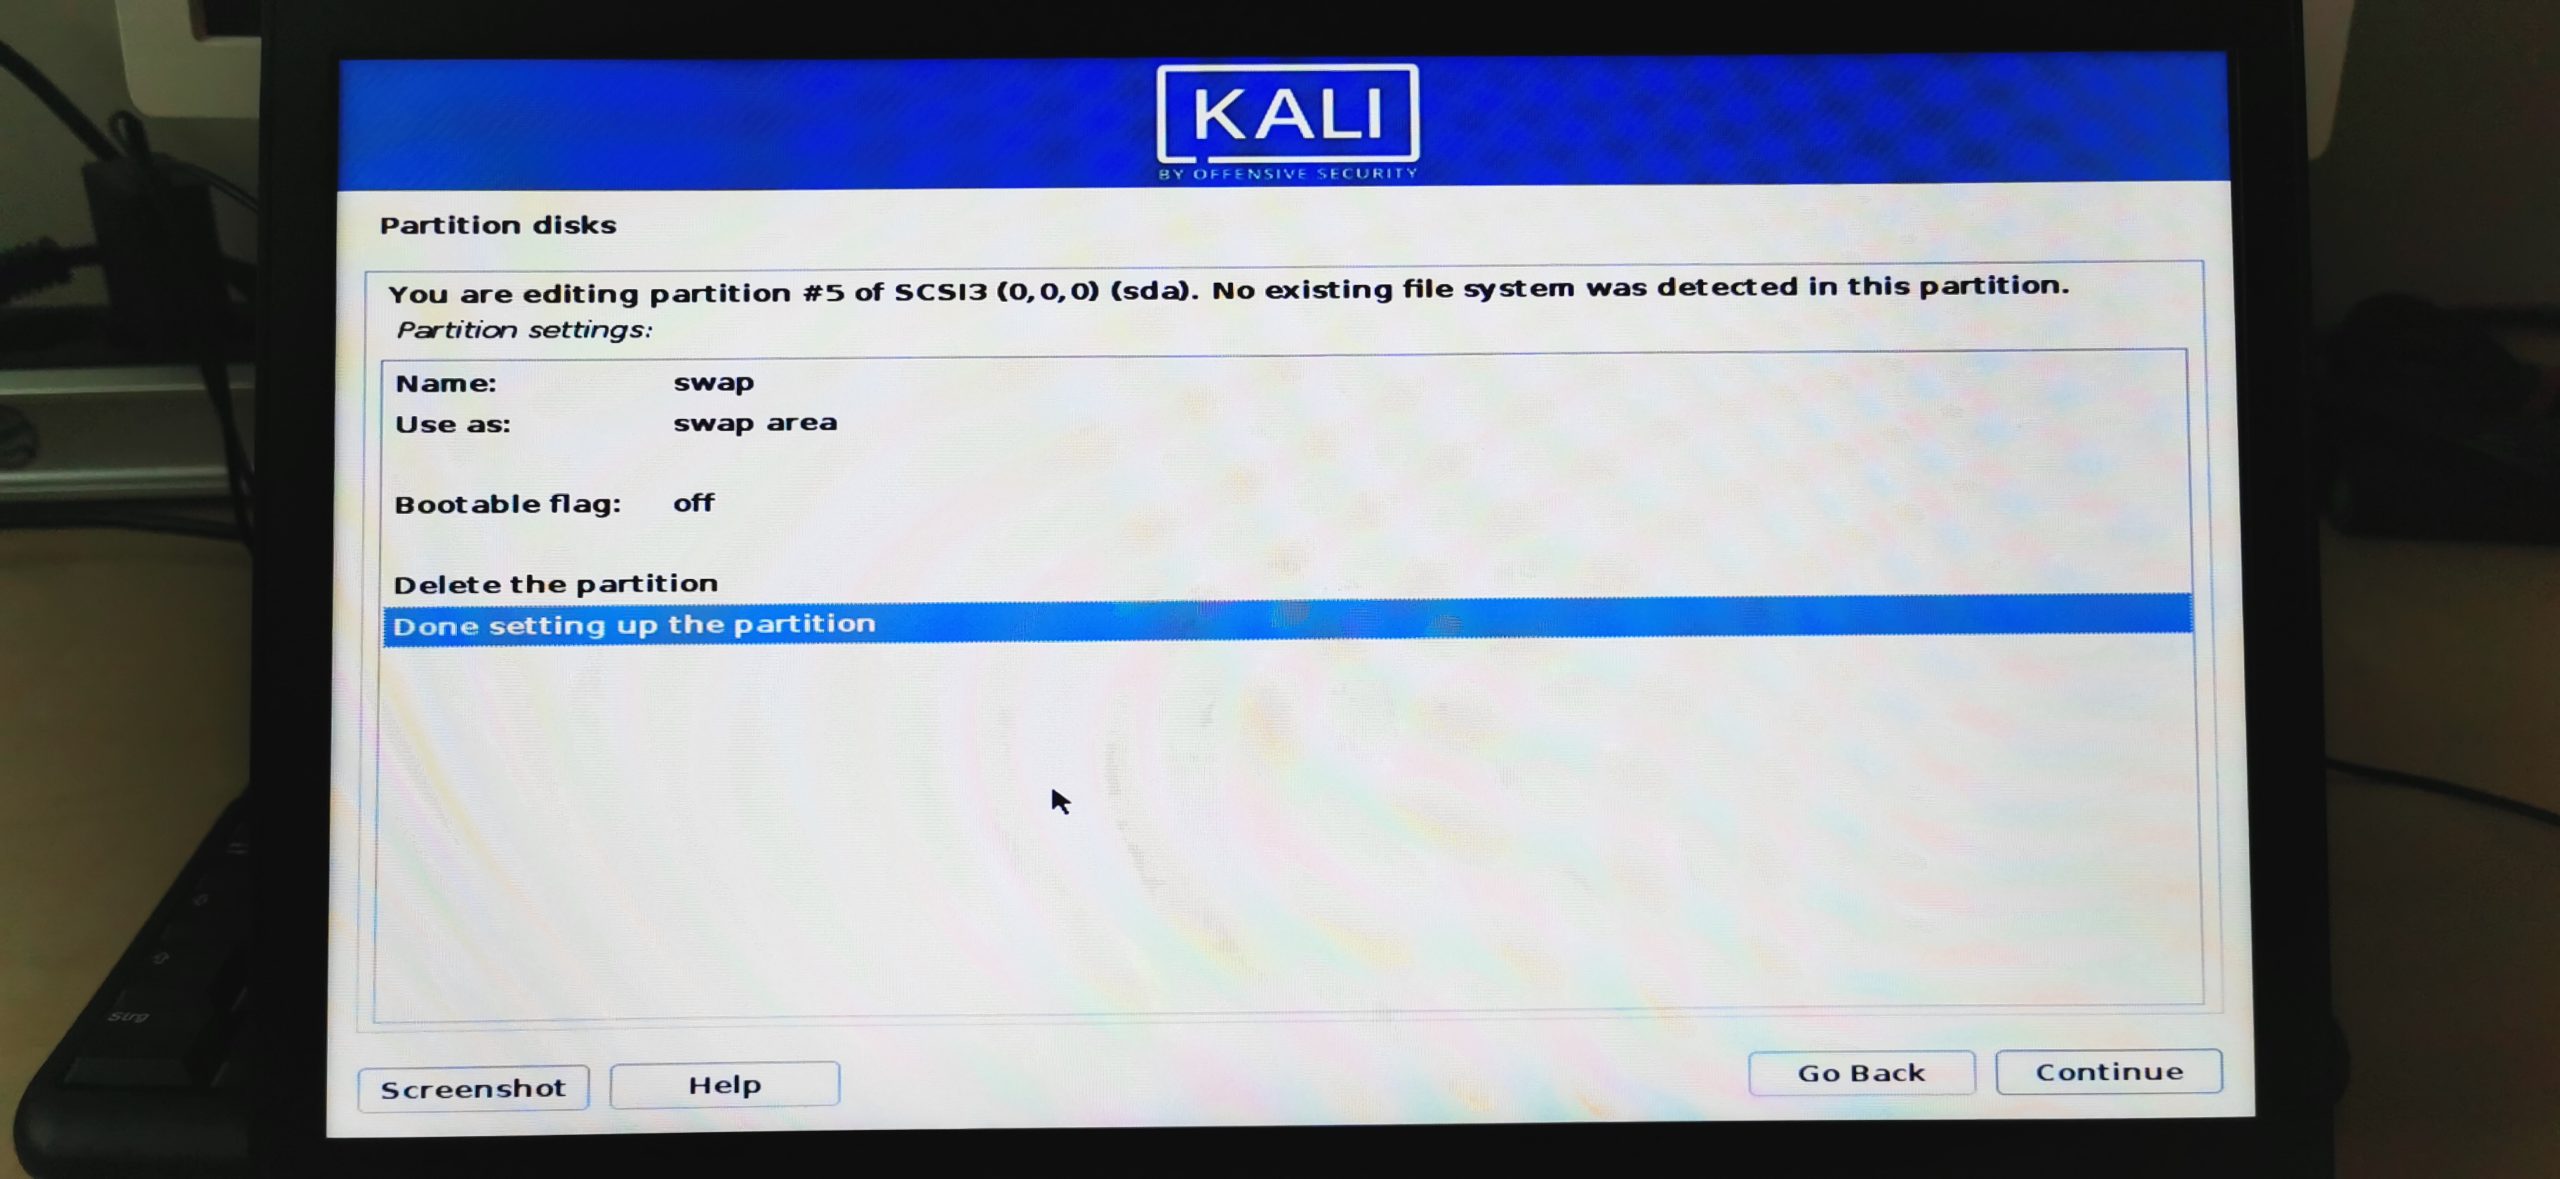
SWAP Step 7 – Setting the partition to use as SWAP
Double-click on Use as: and select swap area.
If that is done, choose “Done setting up the partition” on the bottom and click Continue. Now we need to repeat this process (it’s a little shorter) for our Main partition.
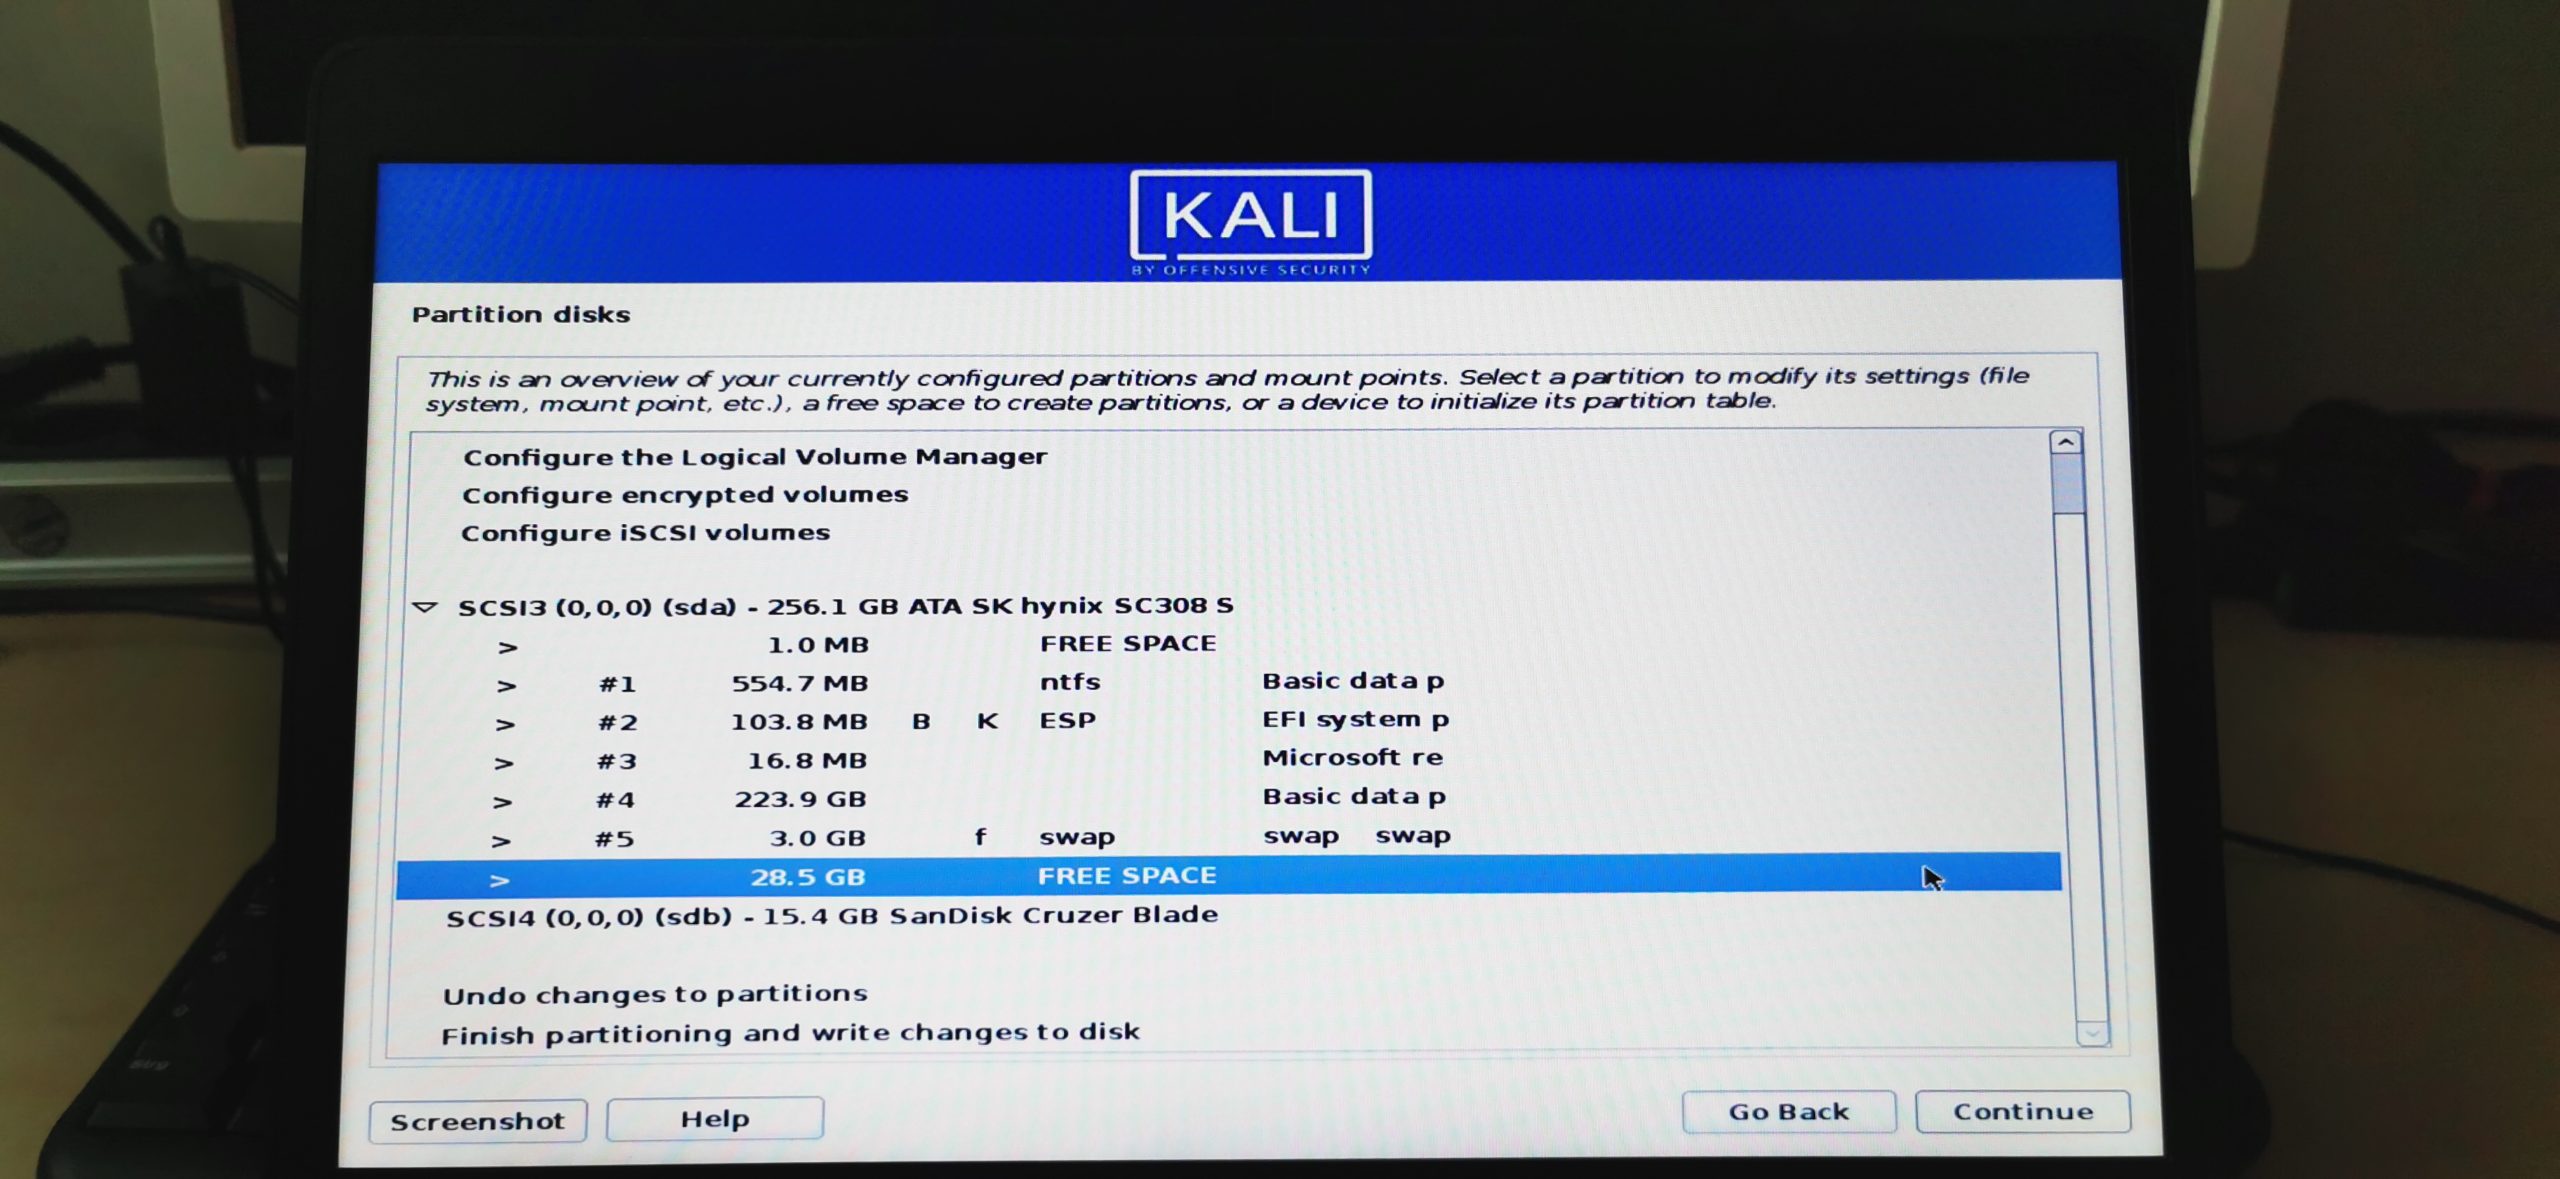
MAIN Step 1 – Selecting the Main Partition
Again, double-click the partition indicated by FREE SPACE.
MAIN Step 2 – How to use this free space
Select Automatically partition the free space here.
MAIN Step 3 – Partitioning Scheme
Select All files in one partition (recommended for new users) here. Click Continue.
MAIN Step 4 – Finishing
Select Finish partitioning and write changes to disk and click Continue.
Finally, select Yes to the question if you are sure that you want to write changes to the disk.
You made it! You definitely have passed the hardest part of this tutorial. What a ride so far, huh?
5.8 – Configure the package manager
Click on Continue or enter a Proxy server address if you use one. Now Kali will start downloading some updates and additional drivers and tools.
5.9 – Software selection
Now you get the chance to modify how Kali will look like (Desktop Environment) and also what kind of tools you want to install per default. You can do all of this later and it is perfectly fine to leave everything on the default values, which sets you up with the default Kali installation. This is perfectly fine for most cases, especially if you don’t know what that means, just leave it as is and hit Continue.
This process might take a while depending on your internet connection speed. Sit back and relax.
6 – Finish the installation
Finally, you can click on Continue to reboot. Remove the USB Drive from your system now!
You made it! You have successfully installed Kali Linux in Dual Boot with Windows. Only a few steps to go.
Step 6 – Booting up Kali Linux
Once your system reboots, you’ll end up in the GRUB Boot Loader. If you don’t press any button within the first 5 seconds, Kali, or whatever you set as a default system (you can change that to Windows, so Windows will automatically boot instead of Kali on each reboot). Just Google: Change GRUB Boot Order to achieve this. But be careful, messing around with GRUB can still mess up your system!
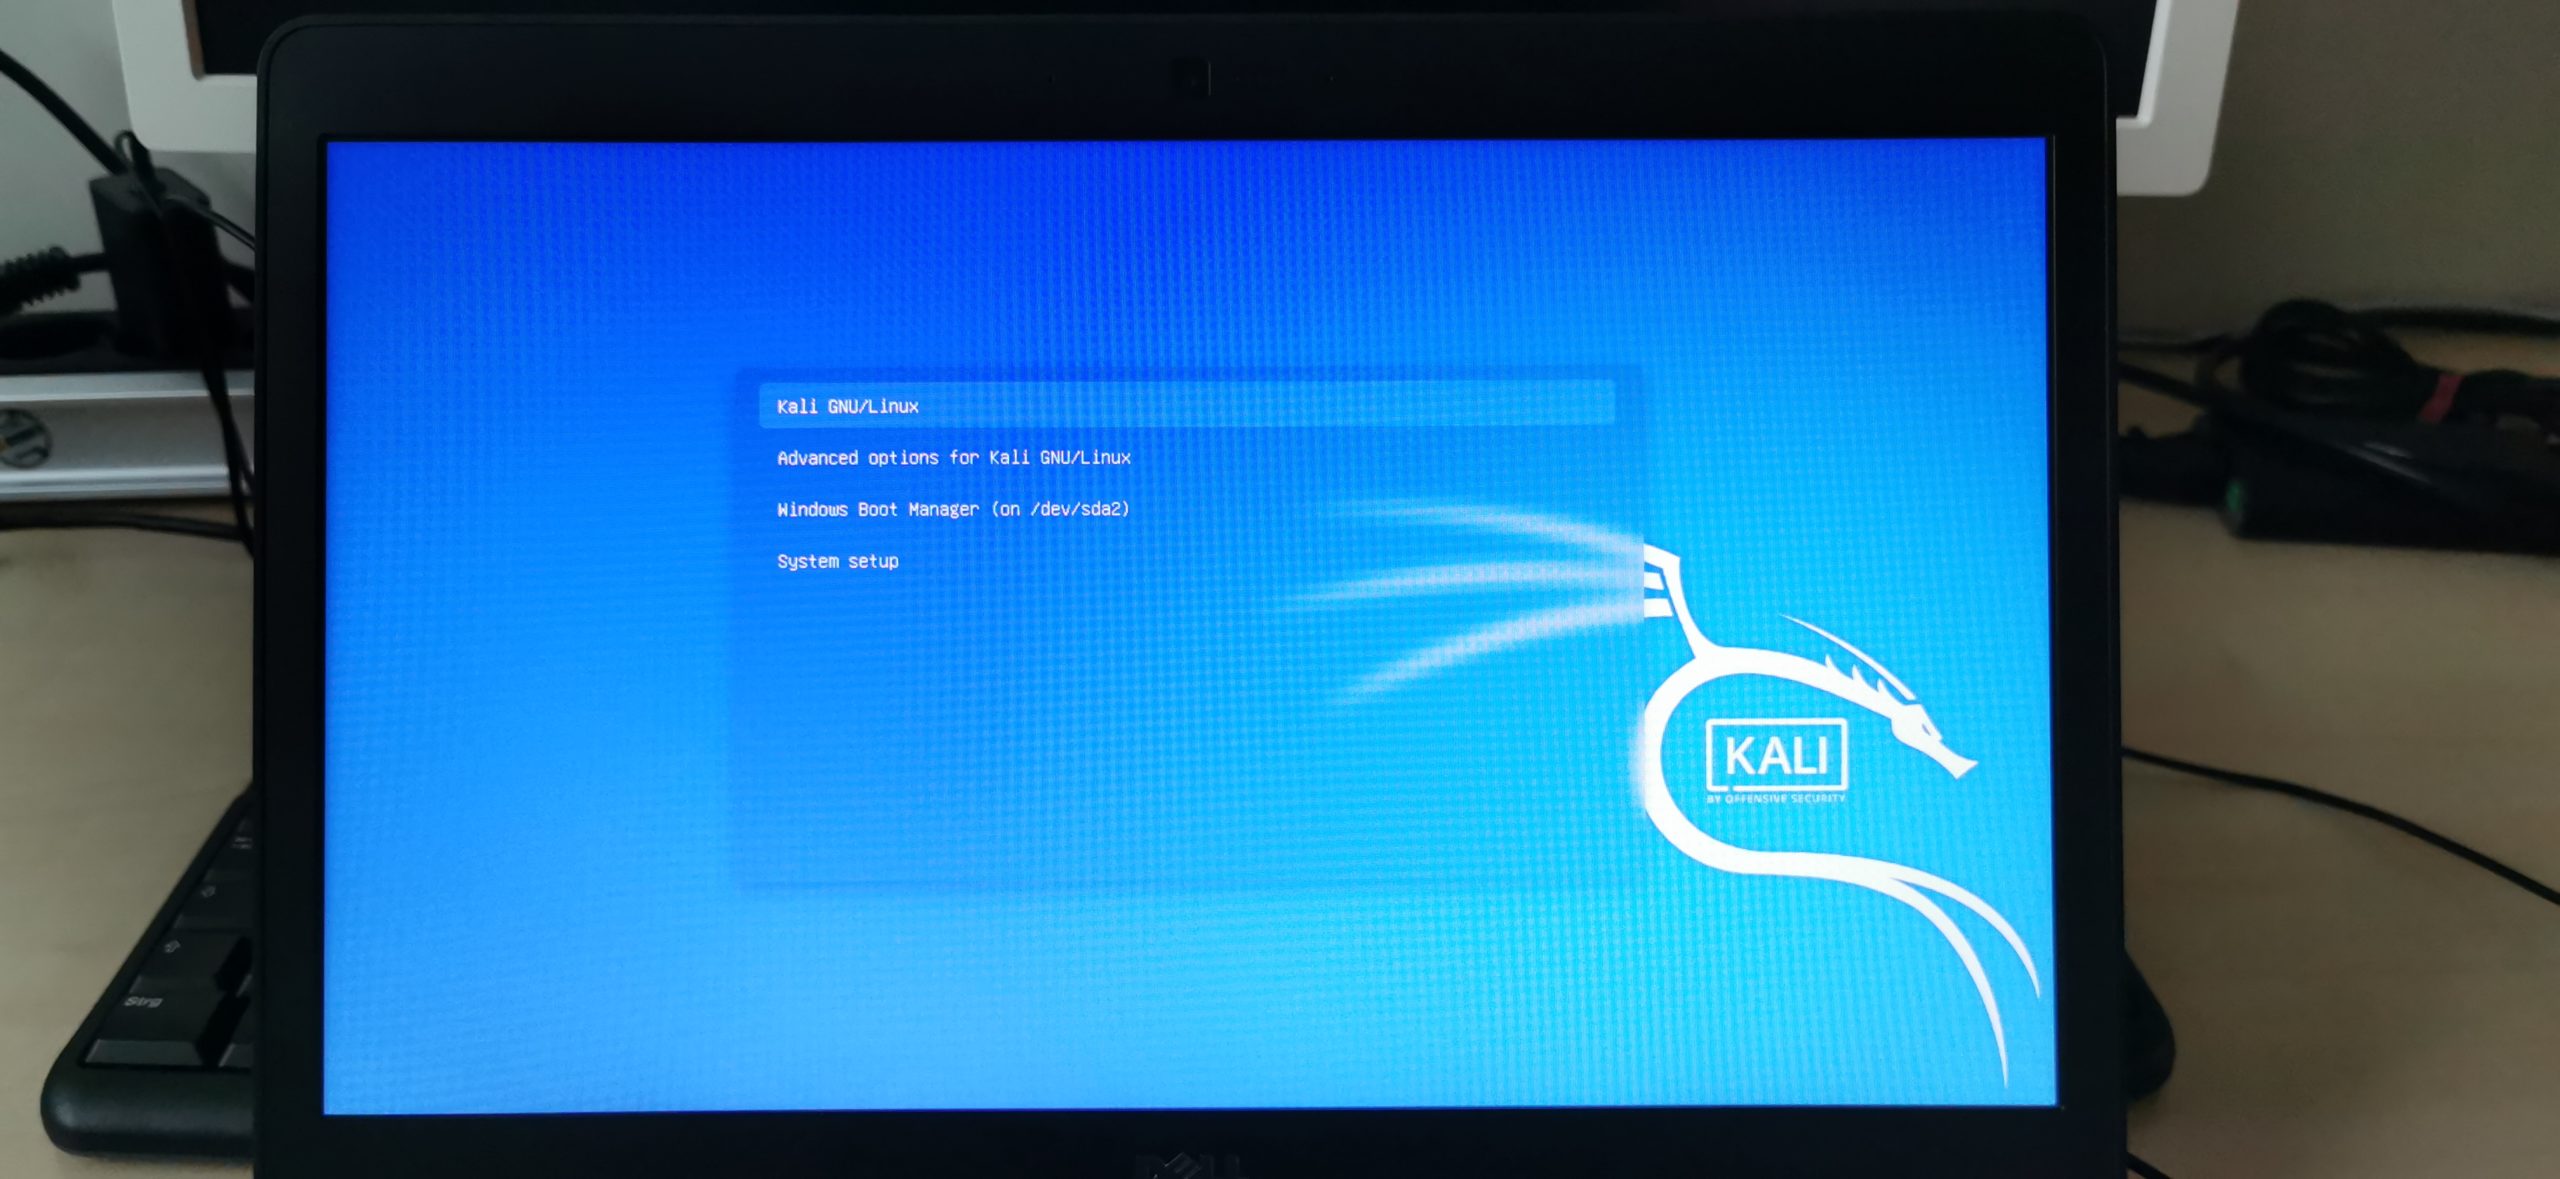
Let’s see if Kali boots up.
It does! Log in with the username and password you had set during the installation. There is only one thing I will show you to get started, for everything else read on in the Top Things to do after installing Kali Linux article that I constantly update. Including more steps here would just make this unnecessary long.
Step 7 – Updating Kali Linux
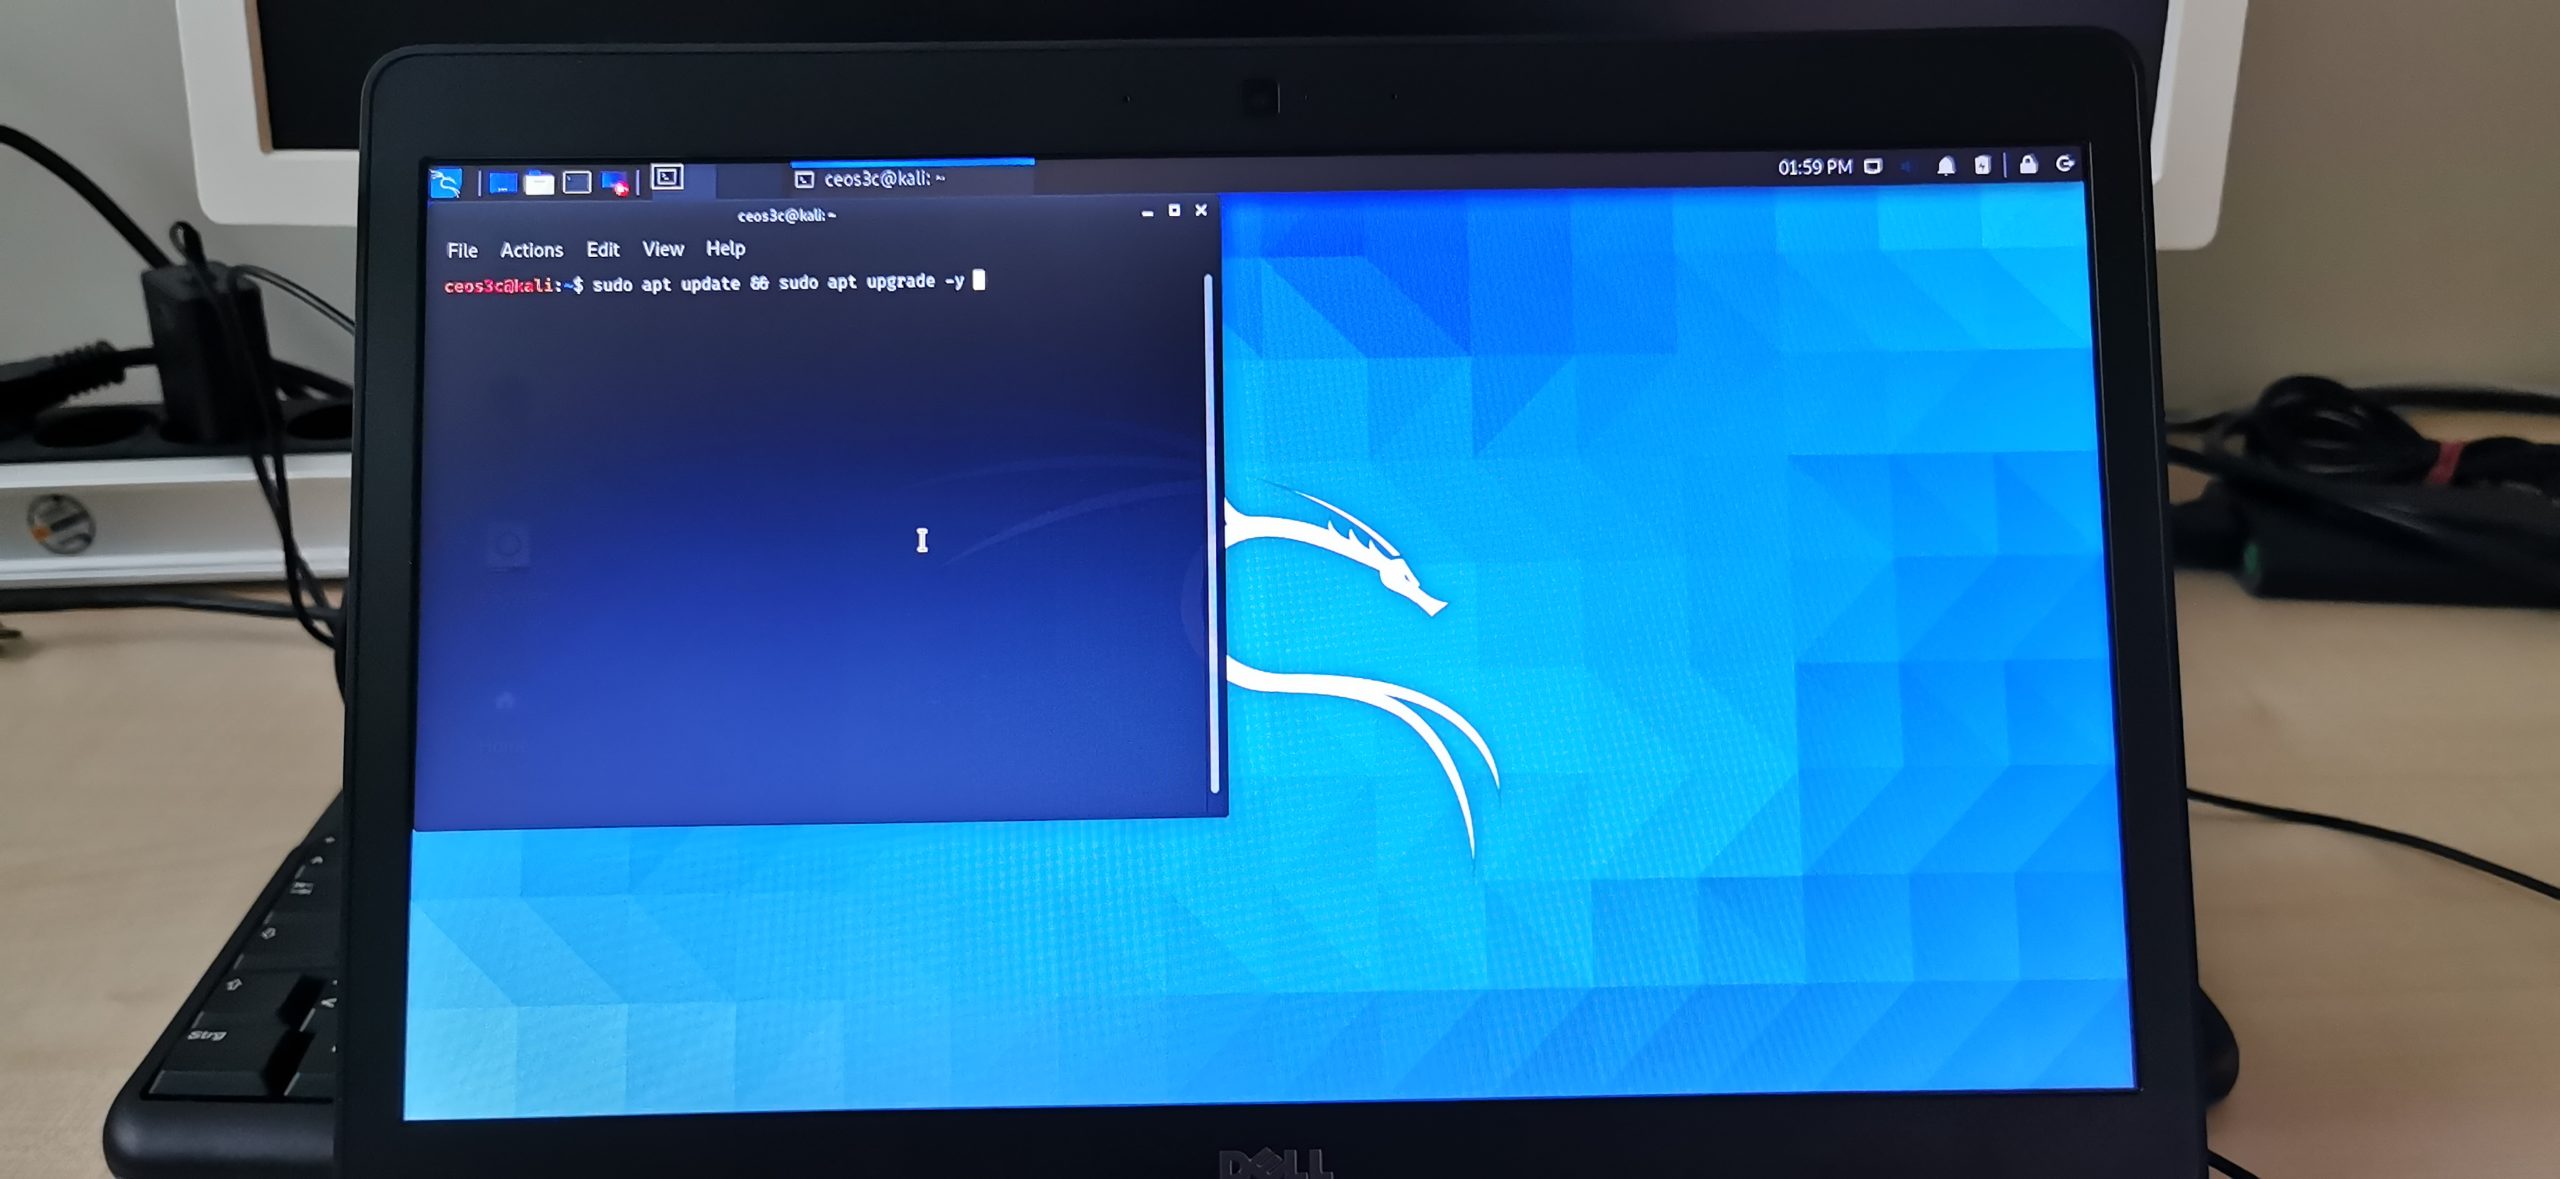
The first thing I always do on a fresh Kali install is to make sure it’s up to date, your system should have already been updated and upgraded during the installation, we’ll make sure anyway. Open a terminal window and run:
sudo apt update && sudo apt upgrade -yThis ensures your system is up to date. As mentioned before, continue here if you want to set up further tools and secure your system.
Step 8 – Booting into Windows
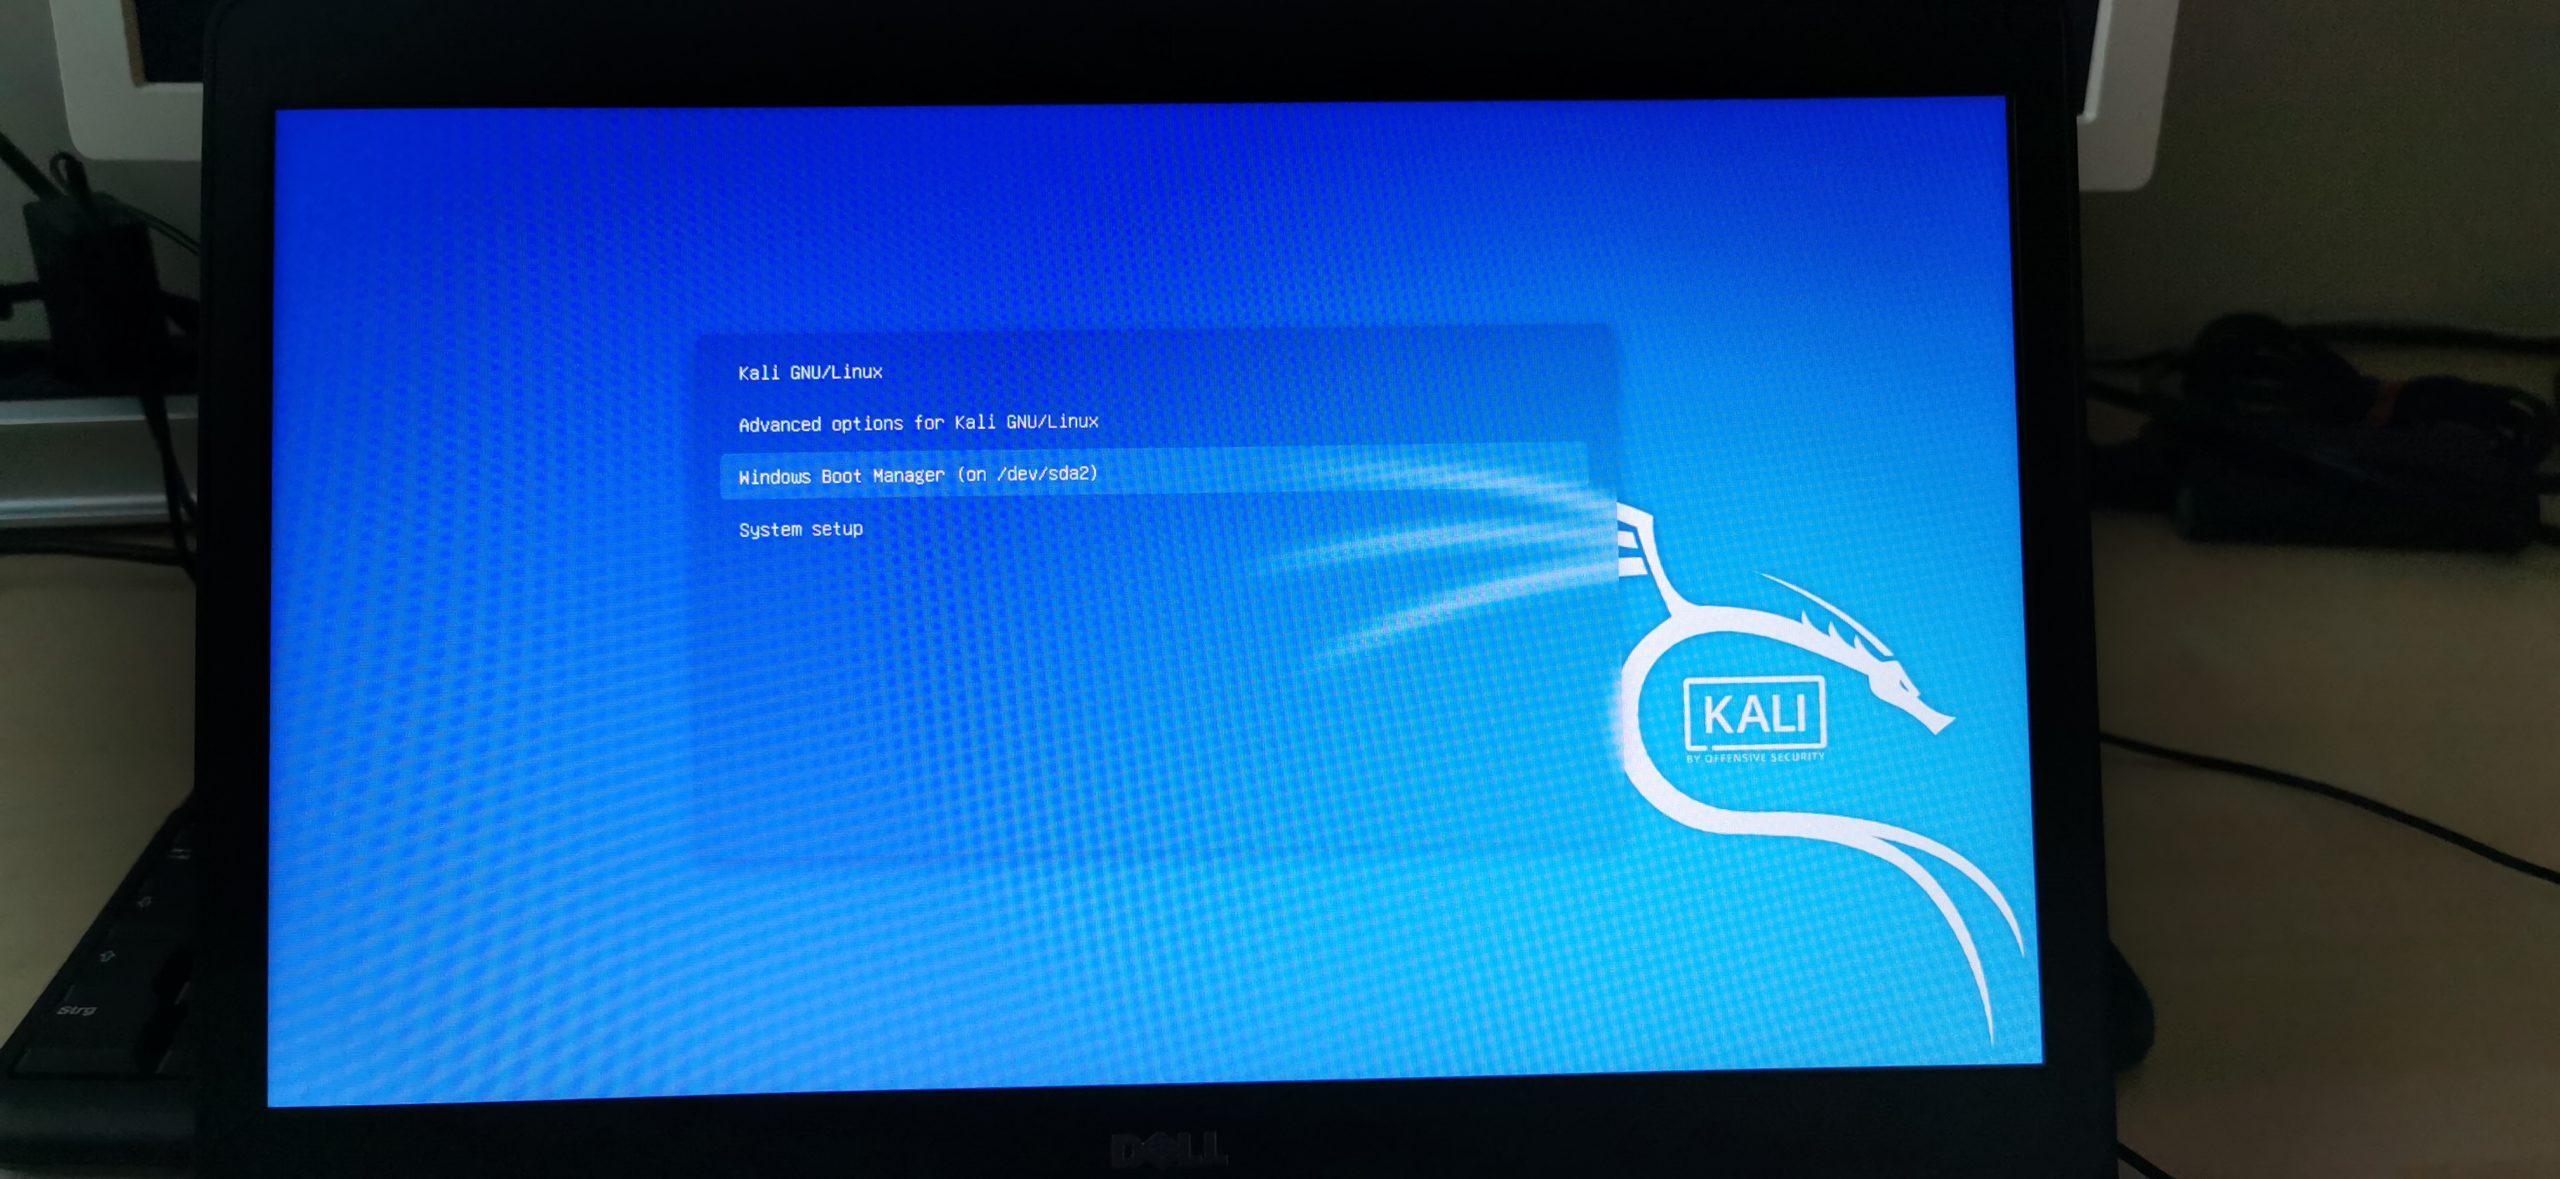
Either enter “sudo reboot now” in your terminal or click on the Kali Menu button and choose Logout in the lower right corner on the arrow symbol and choose Restart. Now to boot into Windows, make sure to be quick because otherwise Kali boots up again within 5 seconds of no interaction in the GRUB boot loader.
Select the Windows Boot Manager.
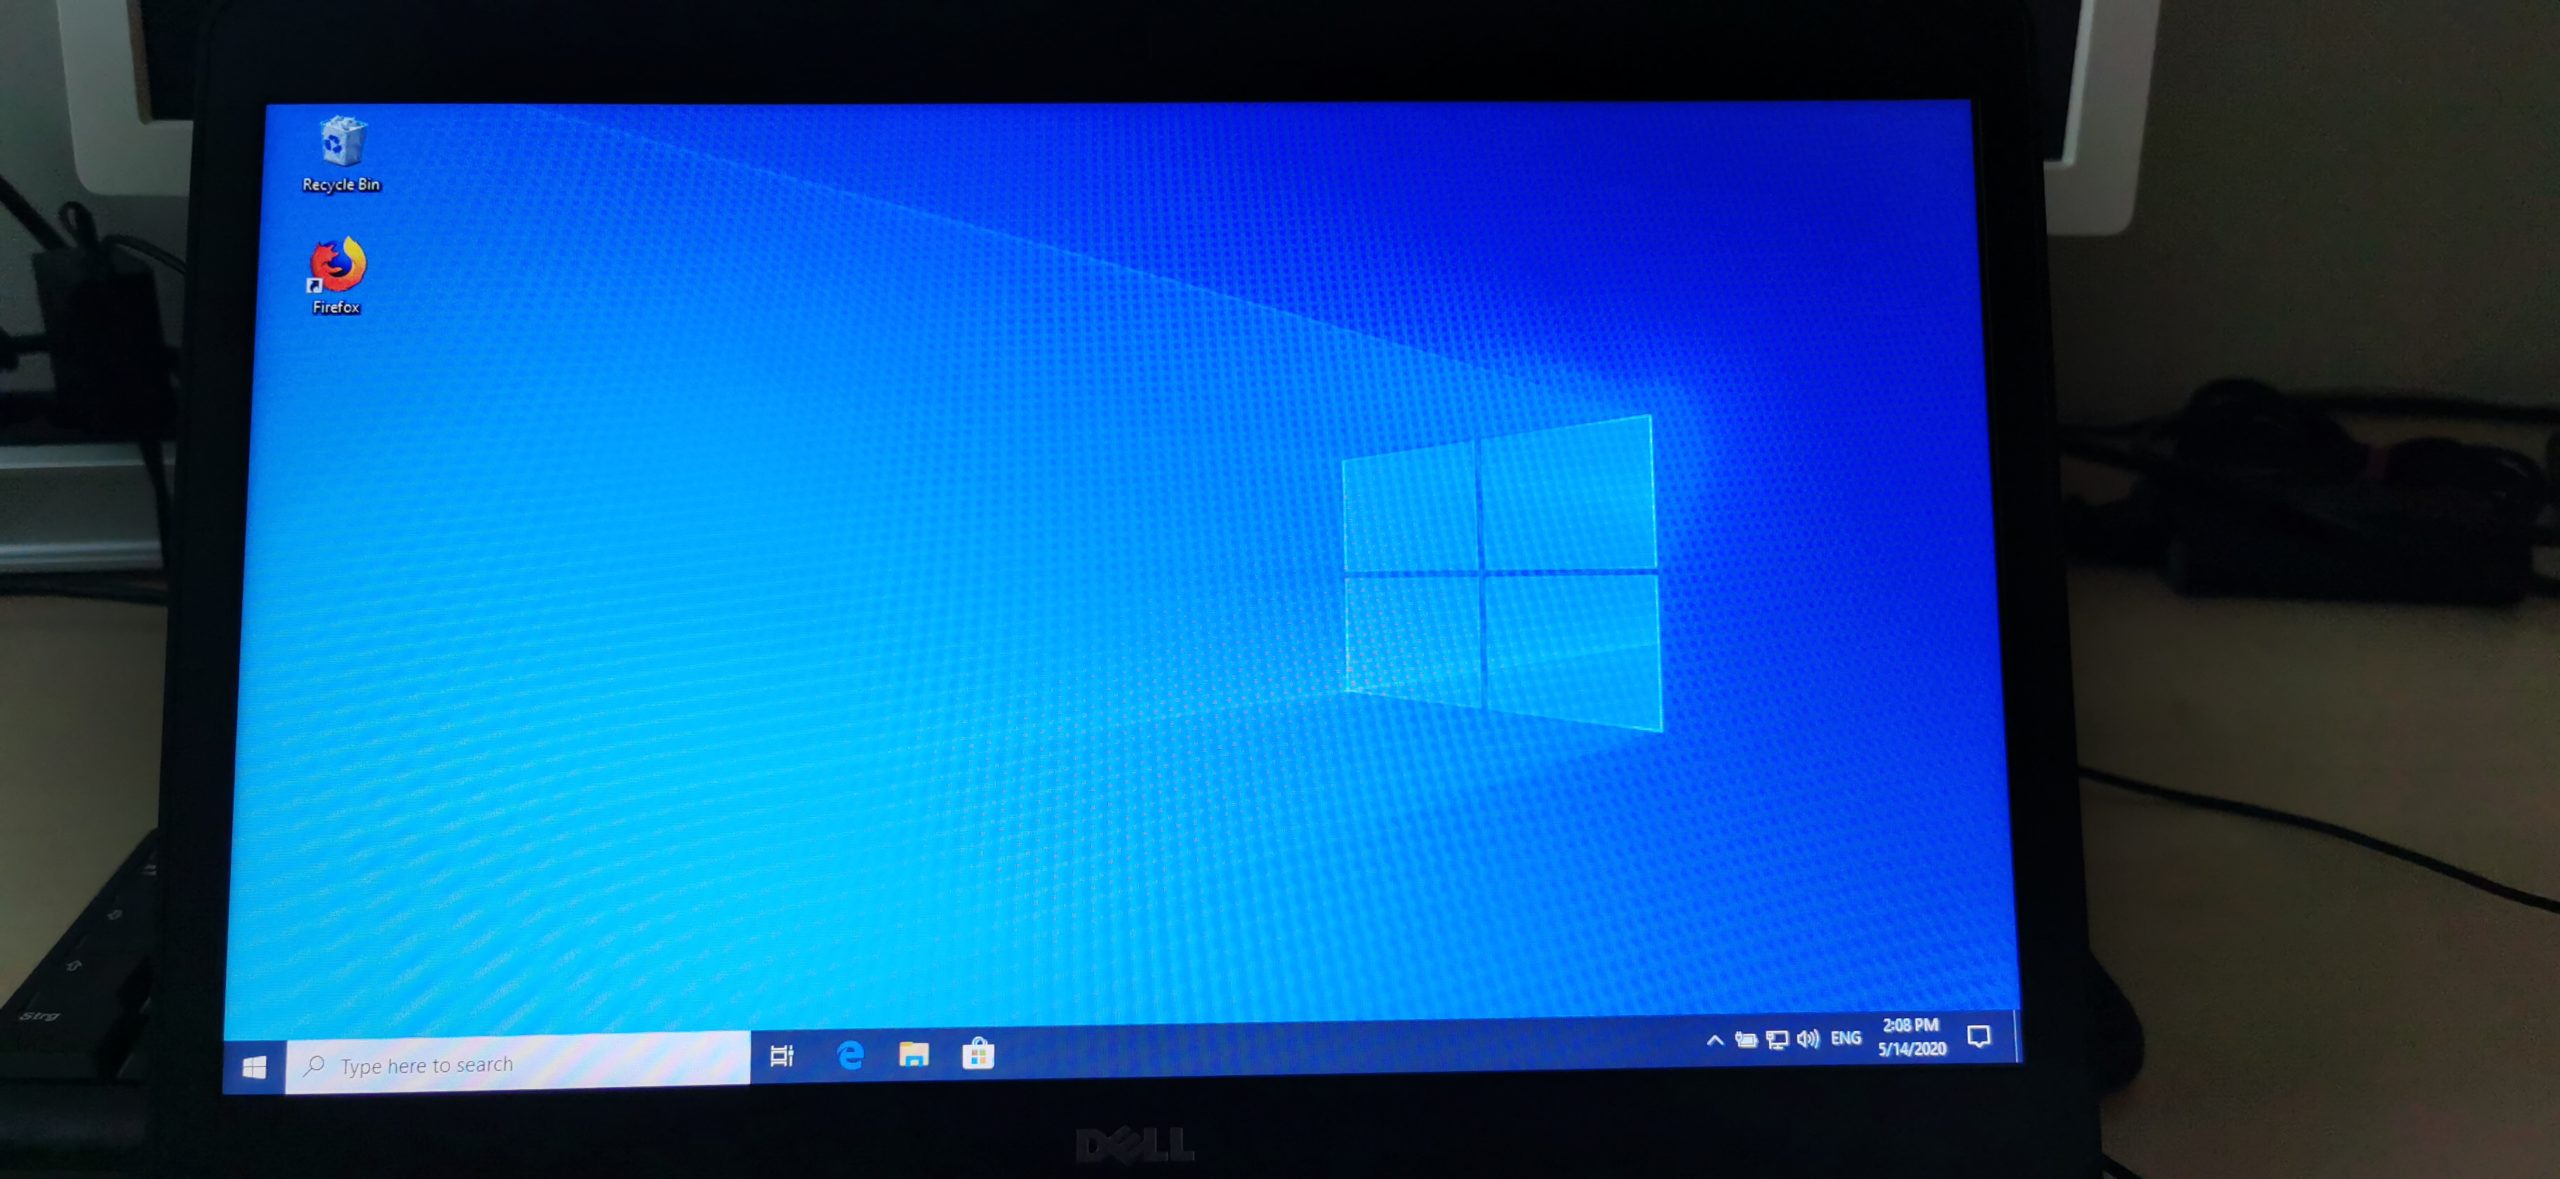
Now if you did everything correctly, you should be back in your Windows installation and you learned how to install Kali Linux in Dual Boot with Windows.
Troubleshooting
Further troubleshooting steps will be added as we go.
- My USB Drive is unusable
- It is possible that imaging your USB Drive with Kali will mess up its partitioning, rendering it unusable on Windows. You can easily fix this by following this guide I have written.
Where to go from here
This is how you install Kali Linux in Dual Boot with Windows. Congratulations! You have set yourself up with a pretty neat system!
I know, it’s a long process and when I first tried that myself I was scared too because there was no thorough guide out there on how to do it, I decided to create this one.
Below, I’ll leave a few additional resources in case you want to learn something new.
👀 This Tutorial has some related Articles!
👉 How to get started in Cyber Security – The Complete Guide
👉 How to get started with Bug Bounties
👉 Terminal Customization Series
👉 Best Ethical Hacking Books
👉 Download Kali Linux Safe & Easy
👉 Best Ethical Hacking Tools
👉 Install VSCode on Kali Linux
👉 Dual Boot Kali Linux with Windows
👉 Install Kali Linux on VirtualBox – Complete Beginner Guide
👉 Top Things to do after installing Kali Linux
👉 WiFi Adapter for Kali Linux – The Ultimate Guide
👉 Nmap Beginner Guide Series
👉 Metasploit Tutorial Series
👉 Burp Suite Beginner Guide
Stefan
Stefan is the founder & creative head behind Ceos3c.
Stefan is a self-taught Software Engineer & Cyber Security professional and he helps other people to learn complicated topics.
Kali-Windows-Dual-Boot-Tutorial
Step-by-step guide to create a dual-boot system using Kali Linux and Windows 10.
Requirements:
- 20 GB minimum disk space for Kali Linux installation. However I recommend much more than that.
- CD-DVD/USB boot support.
- Kali Linux ISO image or Windows 10 installer image. For this example I will be starting out with a Windows 10 machine. Starting with Windows 10 installation is easiest.
- Disk imaging software like Etcher or Win32 Disk Imager
- Non-PXE system
Step 1) Backup data incase of failure, power outage, or a mistake during this process.
Step 2) Enter your BIOS/UEFI and change boot-order to give priority to USB or CD-DVD.
Step 3) Download and burn your desired disk image to either USB or CD-DVD:
- Download Kali Linux Live image at kali.org downloads page
- Open your disk imaging software and select your USB or CD-DVD. Then select your disk image and burn image to medium.
Step 4) Create partition for Kali Linux OS. 20 GB minimum.
- Back up important files incase of failure.
- Right-click Start Icon, and select Disk Management.
- Locate the disk you wish to use. It will be the disk that contains your C: Drive.
- Right-click the drive and select Shrink Volume…
- Find the box labeled Enter the amount of space to shrink in MB: and resize to leave at least 20 GB free space.
- Click button labeled Shrink.
DO NOT format the free space. Kali installer will do that for you.
Step 5) Install Kali-Linux.
- Insert USB drive or CD-DVD and reboot into the Kali Linux menu.
- Choose either Install or Graphical install.
- Follow basic install instructions described here Hard-disk Install until you reach Partition disks section.
- Choose option labeled Guided-use the largest continuous free space. This will create necessary partitions in the free space you created in Step 4.
- Finish installation steps until completed. Once completed, safely remove installation medium, and reboot system. If done correctly you will be greeted with a GRUB boot menu that allows you to choose either Kali Linux or Windows 10.
- Enjoy your new dual-boot system.
NOTE:
- If you are starting out with a Kali Linux system the steps are basically the same except instead of using Windows Disk Management you will use GParted software included with Kali OS. Also resize to leave 32 GB of free space instead of 20 GB as described above.