A couple years back, one of our colleagues made a post about ‘Good old DSA.msc on Server 2012‘.
With more and more implementations of Windows Server 2016, we noticed that we still want our “good old DSA”.
For this reason, we have made a quick update on this post but now how to enable DSA.msc on Windows Server 2016.
Like the original post, we will first discuss the mouseclick way before explaining the PowerShell variant.
DSA.msc is a part of the Active Directory Tools, so basically we want to add those.
The first step is open the server manager:
Then click “Manage” and “Add Roles and Features”:
When this is done head for the “Features” section in the menu and make sure to select the following options:

Finish up with clicking “next” and “Install”
Once the installer is finished “DSA.msc” will be available on your server!
The PowerShell way:
Of course, we all prefer PowerShell as it is quicker and easier to use. So to enable DSA.msc trough PowerShell we have to the following:
First, open PowerShell with elevated rights (Administrator) and let’s make sure we can use Server Manager commands:
Import-Module ServerManager
We now need to know which feature we need, so we can run the following command for an easy overview:
Get-WindowsFeature | Out-GridView
Now you will get a clear overview of all the features and which are installed or available.

To know which command to use, make sure you look at the second column. So, in this case, we need “RSAT-ADDS”:
Import-Module ServerManager

Install-WindowsFeature RSAT-ADDS

Now when we try to run DSA.msc via Start – Run it will be available!
Of course, you can add more features using this method, just look up the correct module name for the install command in the gridview and change the above PowerShell script accordingly.
In case you want to remove a feature, simply use:
Import-Module ServerManager

Remove-WindowsFeature RSAT-ADDS
However be careful as some features require a reboot of the server.
Together with our sister company BlueParq, we are developing a visual PowerShell builder (like Lego 🙂 ), a kick-ass editor and the square where you can share your BluePrints. So how does above script looks like in the BlueParq console?

Greetings,
Stef Driessen and Daniel Nikolic
Is interested in everything connected to technology. Has a passion for cloud, virtualization and software development. Always finds appropriate IT solutions for customers that match their needs strategically, technically and financially.
Core qualities
Quick thinker, result driven, ambitious, customer-friendly, enthusiastic
Hobbies
Running, listening to music, good food and doing fun things with family
Job description
CTO PepperByte, LoadGen, and BlueParq
Any Windows Server administrator must have used the Active Directory Users and Computers (ADUC) Microsoft Management Console on a Domain Controller (DC). Using this console, you can control and manage users, user groups, computers, and the Organizational Units (OUs) in the domain.
The ADUC console is no longer limited to servers anymore. You can install the Active Directory Users and Computers snap-in on a Windows 11 or Windows 10 computer as well, which performs the same functions as the original Server console. This snap-in is part of the Remote Server Administration Tools (RSAT) for Windows operating systems.
We have written separate posts for installing any RSAT tools on Windows 11 and Windows 10. This article focuses on installing specifically the Active Directory Users and computers snap-in on a Windows PC and then using it to manage your domain.
Table of Contents
How to Install Active Directory Users and Computers (ADUC) on Windows
All RSAT tools, including the Active Directory Users and Computers snap-in, allow you to manage the different Active Directory components as if you are on the server itself. This way, you do not always have to access the server, neither physically nor remotely, to perform an action.
You can download and install the Active Directory Users and Computers snap-in using the Settings app, from the Command Prompt, and Windows PowerShell.
Note: On Windows 10 v1803 and older, you must download and install all RSAT tools using the MSI files. You can find the MSI files for your version of Windows here.
Install Active Directory Users and Computers from Settings App
The easiest way to install the ADUC snap-in on a Windows PC is from the settings app. It does involve more steps than the other methods shared below, but this is the only method using the Windows GUI.
Use these steps to install the ADUC snap-in from the Settings app:
-
Navigate to the following:
Settings app >> Apps >> Optional Features
-
Click “View features.”
Add an optional feature -
Search for “Active Directory,” select “RSAT: Active Directory Domain Services and Lightweight Directory Services Tools,” and click Next.
Select Active Directory Users and Computers -
Click “Install.”
Install Active Directory Users and Computers from the Settings app -
Once installed, restart the computer.
The Active Directory Users and Computers snap-in will now be installed. If you prefer installing it using the command line, refer to the sections below. To learn how to use the snap-in, continue reading down.
Install Active Directory Users and Computers from Command Prompt
Below are the simple steps to install Active Directory Users and Computers snap-in using the Command Prompt:
-
Open an elevated Command Prompt instance.
-
Run the following command:
DISM /Online /Add-Capability /CapabilityName:Rsat.ActiveDirectory.DS-LDS.Tools~~~~0.0.1.0Install Active Directory Users and Computers snap-in using Command Prompt
The ADUC snap-in should now be installed. Run the following command in Command Prompt to confirm that the Active Directory Users and Computers snap-in has been installed:
DISM.exe /Online /Get-CapabilityInfo /CapabilityName:Rsat.ActiveDirectory.DS-LDS.Tools~~~~0.0.1.0
You should see “Installed” in front of Status.
Install Active Directory Users and Computers from PowerShell
Use the following steps to install the Active Directory Users and Computer snap-in using PowerShell:
-
Launch an elevated PowerShell instance.
-
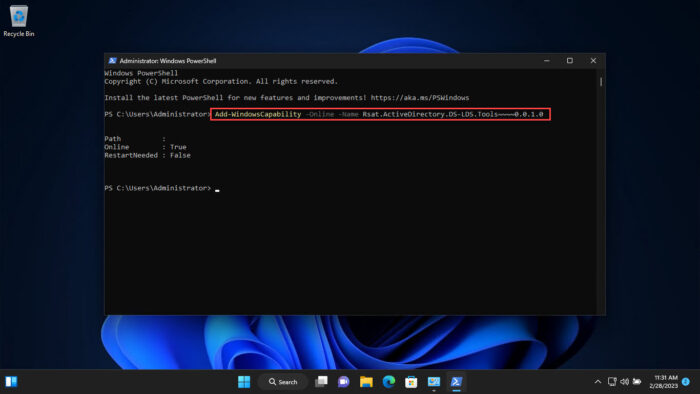
Run the following command to install ADUC:
Add-WindowsCapability -Online -Name Rsat.ActiveDirectory.DS-LDS.Tools~~~~0.0.1.0Install Active Directory Users and Computers snap-in using PowerShell
The ADUC snap-in should now be installed. To confirm its status, run the following command in PowerShell:
Get-WindowsCapability -Online | Where-Object {$_.Name -like "RSAT.ActiveDirectory*"}
You should see “Installed” in front of State.
These are all the methods to install the Active Directory Users and Computers snap-in on a Windows 11/10 PC. Let us now continue to see how to use this tool.
How to Use Active Directory Users and Computers
How to Open Active Directory Users and Computers Snap-In
Now that Active Directory Users and Computers is installed, you can open it by searching for it in the Start menu, or running the following in the Run Command box:
dsa.mscAlternatively, you can also open the ADUC snap-in through the Control Panel at the following location:
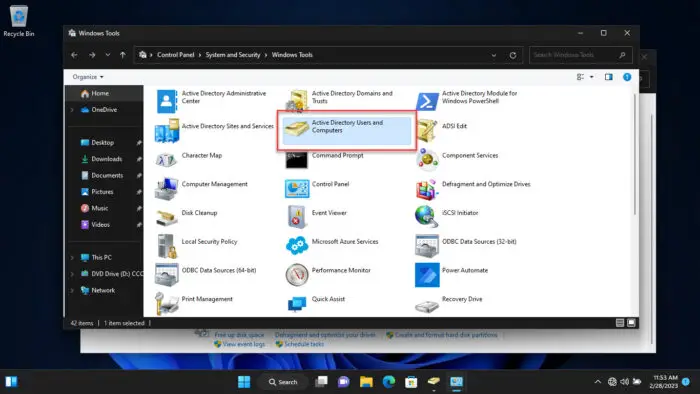
Control Panel >> System and Security >> Windows Tools

If your computer is connected to a domain and you are logged in from an authorized domain account, then the ADUC snap-in will automatically connect to the server. However, if one is not connected, then you must connect to the Domain Controller.
Connect ADUC to Domain Controller
Use these steps to connect to a Domain Controller. You can also use these to change your domain/Domain Controller.
-
From the ADUC console, click “Action,” and then click “Change Domain Controller.”
Change or connect to Domain Controller The Change Directory Server window will now open.
-
Select the “This Domain Controller or AD LDS instance” radio button, then select the Domain Controller from the give list and click Ok.
Select and connect to Domain Controller
The ADUC will now connect to the Domain Controller and populate the fields.

Now that you are connected to the Domain Controller, you can now begin making changes and managing the different components of the domain.
Manage Users, Computers, Organizational Unit using ADUC

You can now begin adding new users, computers, printers, and Organizational Units to the domain. Simply right-click on the OU that you want to add the new device/user to, expand “New”, and select the element that you want to add.
Once you have selected the element to add, the respective window will open, where you can then configure the component to add.
You can now also use other operators to manage the users, devices, and other elements configured inside the domain directly from your Windows PC.
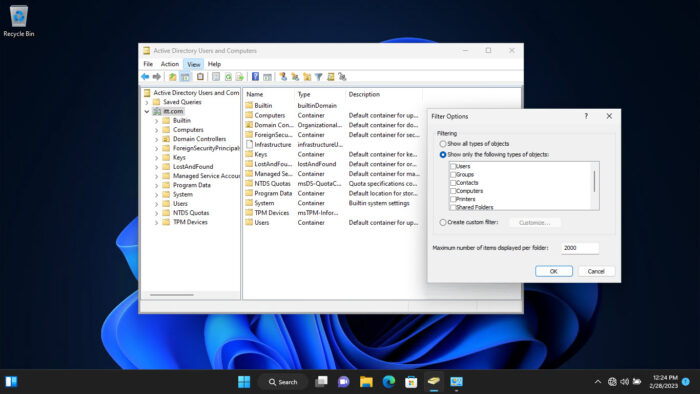
Additionally, you can also manage what you see inside the snap-in. Click “View” from the top menu and select the things that you want to see. You can then also click “Filter options” to open the advanced viewing options.

The list does not end here. There are a bunch of other management options you can perform directly from the ADUC snap-in on a Windows PC. We suggest that you play around to discover all the options. However, we advise caution and only use the console if you know what you are doing.
What is Active Directory Users and Computers Used For
By now, we have a pretty good understanding of what the ADUC snap-in can be used for. However, there is more to it than meets the eye. The Active Directory Users and Computers RSAT tool can be used to perform the following actions:
- Create and manage user accounts, computers, and Active Directory groups.
- View and edit AD object attributes with ADSI Edit.
- Search for AD objects.
- Change or reset user password in Active Directory.
- Create organizational units and build hierarchical structures for AD objects. You can also delegate administrative permission on these OUs to other domain users.
- Delegate administrative permissions.
- Raise domain functional level, and transfer FSMO roles with PowerShell to another domain controller.
From this, it is understood how useful the ADUC snap-in is for administrators that use Windows client PCs.
The Active Directory Users and Computers is a management console used to administer Active Directory (manage users, groups, computers, polices, etc.).
By default, it is deployed on a Windows Server host, when it’s promoted to the domain controller during the Active Directory Domain Services role installation.
In this short note i am showing how to start the Active Directory Users and Computers console from the “Run” dialog, from a command-line prompt (CMD) or from a Windows PowerShell.
Cool Tip: How to determine whether the current user is a Domain User account or a Local User account! Read more →
The easiest way to start the Active Directory Users and Computers is by executing the dsa.msc from the “Run” dialog.
DSA.MSC: The DSA stands for Directory System Agent. The files with .MSC extension are “consoles” or “programs” which are used to configure certain aspects of Windows.
To start the Active Directory console – press the ⊞ Win + R shortcut to open the “Run” dialog, type in dsa.msc and click “OK”.
To start the Active Directory console from a command-line prompt (CMD) or from a Windows PowerShell, simply use the dsa command:
C:\> dsa
Cool Tip: Find out what domain controller am i connected to! Read more →
Was it useful? Share this post with the world!
Click Start, point to Administrative Tools, and then click Active Directory Users and Computers to start the Active Directory Users and Computers console. Click the domain name that you created, and then expand the contents.
Use these steps to install it.
- Right-click the Start button and choose “Settings” > “Apps” > “Manage optional features” > “Add feature“.
- Select “RSAT: Active Directory Domain Services and Lightweight Directory Tools“.
- Select “Install“, then wait while Windows installs the feature.
How do I access Active Directory?
Select Start > Administrative Tools > Active Directory Users and Computers. In the Active Directory Users and Computers tree, find and select your domain name. Expand the tree to find the path through your Active Directory hierarchy.
How do I open Active Directory Users and Computers in Windows Server 2012?
Here’s how to install Active Directory Users and Computers in Windows Server 2012 R2:
- Click with Windows Icon at the Bottom Right Corner of your Screen, and click “Server Manager” when the menu opens.
- When the Server Manager Dashboard displays, click the “Add Roles and Features” link to open the Wizard.
How do I open Active Directory Users and Computers Server 2008?
Access the Active Directory in Windows Server 2008 by opening the Active Directory Administrative Center.
- Click Start to open the Start Menu from the desktop.
- Left-click on the Administrative Tools option from the Start Menu and select the Active Directory Administration Center.
How do I open Active Directory Users and Computers on Windows Server 2019?
From the Start menu, select Settings > Apps. Click the hyperlink on the right side labeled Manage Optional Features and then click the button to Add feature. Select RSAT: Active Directory Domain Services and Lightweight Directory Tools. Click Install.
How do I open Active Directory Users and Computers in Windows Server 2016?
Navigate into Server Manager.
- Click Manage -> Add roles and features.
- Pick Role based or feature based installation -> Click Next.
- Pick the Server from the Server pool -> click Next.
- Check Active Directory Domain Services -> Click Next.
- Follow the screenshot and click Next.
- Proceed by clicking Next.
How do I turn on Active Directory Administrative Center?
To enable Active Directory Recycle Bin in ADAC on the target domain
- Right click the Windows PowerShell icon, click Run as Administrator and type dsac.exe to open ADAC.
- Click Manage, click Add Navigation Nodes and select the appropriate target domain in the Add Navigation Nodes dialog box and then click OK.
What is domain controller and Active Directory?
Active Directory is a directory service that stores information of users, network resources, files and other network objects. On the other hand, a domain controller is a server that responds to security authentication requests within a Windows Server domain.
How do I use Microsoft Active Directory?
Right-click on the Start button and go to Settings > Apps > Manage optional features > Add feature. Now select RSAT: Active Directory Domain Services and Lightweight Directory Tools. Finally, select Install then go to Start > Windows Administrative Tools to access Active Directory once the installation is complete.
How do I find Active Directory users in Windows 10?
Open File Explorer, select Network, and you should see a button in the toolbar labeled “Search Active Directory”. Depending on your permissions, it will let you search users and groups by name, and view the membership of those.
What is DSA MSC?
By default, the Active Directory Users and Computers (dsa. msc) console is installed on a Windows Server host, when it’s promoted to the domain controller during the Active Directory Domain Services (AD DS) role installation.
How do you create a group by using Active Directory Users and Computers snap in?
To add a new membership group in Active Directory
- Open the Active Directory Users and Computers console.
- In the navigation pane, select the container in which you want to store your group.
- Click Action, click New, and then click Group.
- In the Group name text box, type the name for your new group.
What are the 5 roles of Active Directory?
Currently in Windows there are five FSMO roles:
- Schema master.
- Domain naming master.
- RID master.
- PDC emulator.
- Infrastructure master.
Is Active Directory only for Windows Server?
The main Active Directory service is Active Directory Domain Services (AD DS), which is part of the Windows Server operating system.It’s important to understand that Active Directory is only for on-premises Microsoft environments.
What is the difference between server and Active Directory?
Definition. A directory service produced by the Microsoft for the networks of windows domain is known as the active directory whereas a server that responds to the authentication security requests such as checking permissions, logging in, etc.
It is the effective command used by the domain administrators and tech supports. This tool is taken out of the default installation of Windows 2008. The major reason is because of security.
However, you can enable/recover in Windows 2008 and its takes only a minutes time without the reboot.
Please follow the steps to enable DSA.MSC.
1. Open “Server Manager”.
2. Select “Features” and then “Add Features Wizard”.
3. Place a check mark over ” Remote Server Adminstration Tools”.
4. Choose ” Role Administrator Tools”.
5. Select “Active Directory Domain Services Tools”.
6. Choose “Active Directory Domain Controller Tools”.
This should now enable dsa.msc on the server.


