
Plenty of complaints have been registered in the last few days for one of the prominent blue screen issues on Windows 10 namely DRIVER VERIFIER IOMANAGER VIOLATION. From the origin, it is a BSOD error and nowadays pretty common with the users. With an effect, you can see an abnormal blue flashing on the screen which the company said to cause devastating damage. The error has a bug check value of 0x000000C9 and it needs an immediate resolution.
The majority of the Blue Screen errors like DRIVER VERIFIER IOMANAGER VIOLATION occurs due to the system having outdated and incompatible drivers. Besides, missing system resources because of malware attack or conflict between similar programs are equally responsible for causing the same. When the bug cause vulnerability in the system, computer freezes randomly making it inaccessible. Working along becomes too tough as the functionality drops down for a slow operation. Nowadays, the error has become so threatening that we have to take necessary actions before it’s too late. We will discuss all the possible resolutions to eliminate this risk in the following segment. Here are the jump links to resolution processes and resources discussed in the article –
DRIVER VERIFIER IOMANAGER VIOLATION Error in Windows 10 Solutions
Here is how to fix DRIVER VERIFIER IOMANAGER VIOLATION Error in Windows 10 –
1] Install all available patches
Operating System needs to be updated every time to keep pace with modern features. As to facilitate this process, Microsoft releases cumulative updates quite regularly. These files have to address bugs inside as well. An outdated OS is very much prone to be affected by DRIVER VERIFIER IOMANAGER VIOLATION Error. Therefore, we need to install the update patches when available.
Important – Manage to get connected with a speedy internet connection to reduce time consumption while downloading. Also, remember to disable the Metered Connection if you are using Mobile Hotspot.
- Open Windows Settings, the built-in app by pressing Win + I hotkeys together.
- While in the app area, click Update & Security tile.
- Windows Update page shows up, switch to the right pane. Click Check for updates button.
- When all the patches are available here, hit the Download button to get the update files in the system.
- Upon finishing the process, the installation will start automatically.
- Restart the Windows when asked to complete the installation process.
2] Run System File Checker to Resolve DRIVER VERIFIER IOMANAGER VIOLATION
Operating system with missing DLL files and corrupted resources is very much likely to suffer from DRIVER VERIFIER IOMANAGER VIOLATION Error. We can rectify these components using a simple tool named System File Checker. The tool will only be effective in an Elevated Command Prompt. Follow the below guidelines to complete the task –
- Press Win+S together and let Taskbar Search appear.
- Write cmd.exe in the empty typing space given here.
- When the results are loaded, do a right-click on Command Prompt and select Run as Administrator.
- Choose Yes to give consent once UAC prompts for permission.
- When you are already in the prompt window, copy the following text and enter are the blinking cursor –
Sfc /scannow
- Now, press the Enter key to power up the System File Checker and wait for a while.
- Upon finishing, Restart the device and later on, check if there is an error in the system.
3] Use Windows Security to dismiss malware
Whenever malware enters the system, it deletes the necessary OS components. Some of the important DLL files go missing for them as well which ultimately results in DRIVER VERIFIER IOMANAGER VIOLATION Error. To remove these bugs easily, you can use Windows Security in Windows 10. Let’s make the use of this tool and dismiss them internally –
- Press Win+S hotkeys and let Taskbar search appear.
- Type Security in the search field and press Enter.
- Once the Windows Security app arrives, select option Virus & threat protection.
- From the visible window, click on the Scan options link.
- Choose the round radio button for Full scan and then “Scan now” to initiate the process.
- Select the Clean threats option if the application traces out any possible virus in the system.
- Hit Remove and later on Start actions button to remove them completely.
4] Update all the outdated Drivers to fix DRIVER VERIFIER IOMANAGER VIOLATION
Drivers are an integral component of the operating system and they also cause BSOD error when found to be outdated. Updating them is the best workaround for maintaining Windows in good condition. Usually, in Windows 10, all these drivers are updated automatically but sometimes it might miss out and cause DRIVER VERIFIER IOMANAGER VIOLATION Error eventually. The Device Manager comes in the first place when we consider updating them. On this platform, these drivers are usually shown with a warning sign facilitating the task a lot. This will be easier to understand who is playing a big role in causing the error. Give the solution a try following below steps –
- Invoke the Run dialog pressing Win+R hotkey together.
- Type devmgmt.msc in the provided text box here and press Enter.
- After the console shows up, have a close look for any Exclamation mark in it.
- If there is any, select that it and expand the driver list eventually.
- Do a right-click on the driver and select Update driver option.
- Make the same for all drivers and once the process comes to an end, restart Windows to implement the changes.
- After restarting, check if there is any BSOD error in the system.
5] Use the DISM tool
Windows image files, in many cases, become damaged and cause DRIVER VERIFIER IOMANAGER VIOLATION error in Windows 10. However, we need to fix these files immediately and for that, the DISM tool can be helpful. Since the utility executes in Elevated Command Prompt, therefore, we need to launch it first. Here are the complete guidelines –
- Open the Run dialog box and to do so, press “Win+R” hotkeys together.
- In the text box provided here, type cmd.
- Use the combination of Ctrl + Shift + Enter keys to load Elevated Command Prompt directly.
- If UAC prompts on the screen, click on the Yes button.
- Once it opens, type following command tool –
DISM.exe /Online /Cleanup-image /Restorehealth
- Press Enter key to activate the DISM tool.
- All the defective image files will be detected and fixed automatically. It might slightly be a time taking process, hold the patience until it finishes.
- To make this resolution effective, reboot the device.
6] Disable Automatic Reboot
Once a device is detected to be affected with DRIVER VERIFIER IOMANAGER VIOLATION Error in Windows 10, the system intends to reboot automatically without prior notice. This will make things worse as you cannot do an important task smoothly on the PC. Even while trying to resolve the issue, there is no enough room to deploy the workarounds. Hence, considering this with the highest priority, we need to disable the action immediately. Tweaking the default setting a little will be enough for that. Move out with the below method –
- First of all, save and close if you are running any ongoing processes and then press Win+D keys at once to load the Desktop area directly.
- Right-click on the This PC icon and choose Properties option.
- When the System window comes in, select ‘Advanced system settings‘ from the left pane.
- After a new popup appears namely System Properties; you will be taken to the Advanced tab.
- In this tab, click Settings located under the Startup and Recovery section.
- On the subsequent page, visit the System failure section.
- Here, remove the mark before the Automatically restart choice.
- Save these changes to the Windows by clicking the OK button.
After changes being effective, Windows will not prompt to reboot all of a sudden. Thus, there will be an abundant scope for expanding the rest of the resolutions.
7] Use Windows Blue Screen Troubleshooter
Stop errors are noted to perform severe losses to the device and sometimes damaging it completely resulting in DRIVER VERIFIER IOMANAGER VIOLATION. Considering this point, the company came up with a default utility which is a preferable solution for this issue. They introduced an application in the name of Windows Blue Screen Troubleshooter and it becomes the most influential relief ever. To have this utility, you need to upgrade the OS to Windows 10 Fall Creators Update version or above. Afterward, follow the below guidelines and apply the tool –
- Open the Windows Settings app pressing Win + I together.
- From the appearing Homepage, select Update & Security to load its more settings.
- From the succeeding page, select Troubleshoot lying on the left pane.
- Go to the right and find out the Blue Screen option.
- Do a click on the option and hit the Run the Troubleshooter button.
8] Repair Memory Problems to fix DRIVER VERIFIER IOMANAGER VIOLATION
When the Random Access Memory (RAM) has poor segments in it, BSOD DRIVER VERIFIER IOMANAGER VIOLATION errors promote up. Because of the wrong allocation of memory, this issue also arises in the device. To avoid these circumstances, we need to settle these issues immediately using Windows Memory Diagnostic tool. Let’s proceed –
- Invoke Taskbar Search pressing Win+S hotkeys.
- When the Search opens, type “Memory” in the empty space.
- Select Windows Memory Diagnostic once it appears in the list.
- When it opens, click on “Restart now and check for problems (recommended)”.
- Windows complete the first cycle of the rebooting process in a moment.
- Once it powers up, you will come across a blue screen detecting memory issues.
- When the progress hits 100%, the OS will reboot for the second time.
- After completing the process, you can check the result of the diagnosis in the Notification area of the System Tray.
9] Make space out of Disk Storage
For the execution of tasks, the device produces a good number of unnecessary files every day. They usually keep on saving in the Disk space but when it gets stored in large quantities, they occupy huge space in the storage. In the meantime, if you feel that the Disk Space running low and operational speed is affected then there is a chance to have DRIVER VERIFIER IOMANAGER VIOLATION Error. To clean up these unnecessary files, Disk Cleanup Utility comes handy. To deploy the tool, instructions are as following –
- Press Win+X menu and select Run from the Power-user menu.
- In the search box provided here, type cleanmgr and press Enter.
- Choose C: by clicking on the dropdown menu and hit Enter key.
- In a moment, the Disk Cleanup application will appear after making the calculation.
- When a wizard opens, hit the Clean up system files button.
- Once the tool prompts to pick the drive again, select C: and press Enter key.
- In the Disk Cleanup for (C:) popup once appears, move on to Files to delete the section.
- Now, check all boxes available here except Downloads.
- Hit the OK button and let the process start.
Important – Perform a check in the Recycle Bin before deleting all the files. This will save you from losing necessary items unwillingly.
10] Disconnect External Hard Drive temporarily
According to several users, they have experienced DRIVER VERIFIER IOMANAGER VIOLATION Error just after connecting an additional Hard Drive to the system. This report brought disquietness all around as we know how important such drivers are. However, the good news is that we can fix the issue easily only by disconnecting hard drive temporarily.
- Before proceeding this, make sure to carry out the task with care to avoid damaging anything.
- Now, detach the drive and Restart your Windows 10 PC.
- Upon returning to operation, check for error again.
- If nothing comes up, you can connect the device again.
- For more stability, download and install its latest driver from the official website going through a browser.
11] Uninstall similar applications to fix DRIVER VERIFIER IOMANAGER VIOLATION
Similar applications in a system cause a collision often in between them. The result is quite critical and they remove the essential OS components from the System. Missing files from Windows may cause DRIVER_VERIFIER_IOMANAGER_VIOLATION errors, so there’s the need to restrict those programs from a collision. The only way out is to remove one of these by uninstalling. Here is how to proceed –
- Right-click on the Start menu and select Apps and Features option.
- By default, you will be guided to the Apps Settings page.
- Move to the right side pane and find programs with similar functionality.
- Select each and choose the Uninstall button located in the expanded pane and follow the on-screen instructions.
- Restart Windows once and after signing back in, check for BSOD error in the system.
- If no issues found in it, you can download and install these programs once necessary.
12] Uninstall buggy Windows Update
To maintain the OS in good condition, we need to install updates patches once available. Microsoft has made the whole Windows updating system autonomous to facilitate users. When this system terminates abnormally, there is a chance of having DRIVER VERIFIER IOMANAGER VIOLATION Error. You can easily reduce the chance by uninstalling these files. The guidelines are as follows –
- Open the Settings app using Win+I altogether.
- From the appearing app area, select Update & Security.
- On the following page, do a click on the View update history link.
- Select the Uninstall updates link. The action will load the Installed Updates immediately in a separate window.
- In the current page, reach out to the latest patch you have installed.
- Do a right-click on it and choose the Uninstall option once visible.
- Follow the on-screen guidelines until you get rid of them finally.
13] Perform System restore to resolve DRIVER VERIFIER IOMANAGER VIOLATION
Installing a new program to a device or uninstalling existing modify Windows Registry. If you are getting DRIVER VERIFIER IOMANAGER VIOLATION Error after such changes mean, there is something wrong here. Well, we can skip having a BSOD issue by performing System Restore. It’s a simple technique to head back to the previous point. User must have a previously created Restore points to use this workaround. Unless you have one, skip the process here and move for the others. Fortunately, if your Windows have such points, move with below instructions –
- Open the Taskbar Search by making a press of Win+S hotkeys.
- Type rstrui in the empty field and then press the Enter key.
- Choose the Next button to proceed ahead.
- Make a click on Show more points option when the next page comes in.
- From the list make a click on the latest one and hit the Next button once again.
- After the succeeding page loads, select Finish and let the utility start restoring.
14] Remove Third-party Anti-virus programs
In the past, the user used to access third-party antivirus programs for dealing with malware. But coming to this time, Windows Security has become the best ever utility in this case. Typically, other third-party anti-malware programs are really ineffective and they can even take part in causing DRIVER VERIFIER IOMANAGER VIOLATION Error. Therefore, we prefer to remove this program to get rid of Stop errors. To complete the task, instructions are as following –
- Do a right-click on the Start menu and choose Run to open.
- In the small pop-up menu, type appwiz.cpl and click on the OK button.
- This will unroll Programs and Features window in the display.
- Locate the third-party antivirus applications in the appearing list.
- Select it and then click on the Uninstall option from the top ribbon.
- Once UAC asks permission, hit Yes to proceed.
- Follow the further guidelines until this app uninstalls successfully.
15] Settle down Hard Disk Bad sector
After using the same Hard Disk for a long time, bad regions might form in it and as a result, DRIVER VERIFIER IOMANAGER VIOLATION Error evolves. However, you are able to fix this mess easily using the Disk Checking tool. First of all, you need to enter into Elevated Command Prompt to execute the utility and then move with the below guidelines –
- Press Ctrl + Alt + Del keys at once and choose Task Manager from appearing window.
- When in the app UI, select the File option located at the top left corner.
- Choose Run a new task option from the appearing menu.
- Once a dialog comes into view, enter “cmd” text in its typing box.
- Scroll and put checkmark before “Create this task with administrative privileges”.
- Now, press Enter key to launch Elevated Command Prompt directly.
- Once it opens, type the following URL near the cursor –
chkdsk C: /f /r /x
- Press the Enter key and let Disk Checking Tool activate.
- Wait for a while until it finishes and then restart the device.
- Once return back, check if there is any BSOD error available.
16] Boot the device in Safe Mode to fix DRIVER VERIFIER IOMANAGER VIOLATION
From the very beginning, Windows used to gets affected by bugs and problems right after starting its journey as Operating System. It was a little bit unstable and indulged in issues but at the same time, booting in Safe Mode came out as resolution. In this special Startup method, Windows load only basic programs that in last improve the DRIVER VERIFIER IOMANAGER VIOLATION Blue Screen Error. We will now give a try to Boot into Safe Mode. Here are the guidelines –
- Click on the Start Menu and select the Power icon.
- Choose Restart holding Shift key at the same time.
- When Windows starts the booting process, you will come across an Advanced Blue screen showing few options.
- Make a click on the Troubleshoot option and load the next screen.
- On this page, select Advanced Options followed by a hit on “Startup Settings”.
- Now, click on the Power icon and choose Restart option and let the Windows to reboot for the second time.
- When the next Startup screen arrives, you will see a set of options including one to Enable Safe Mode.
- From here, press the F4 button to enter into the Safe Mode.
Hereby, we have discussed all the possible workarounds that can potentially eliminate DRIVER VERIFIER IOMANAGER VIOLATION Error BSOD in Windows 10. These are proven resolution processes and should work for your case as well. Unfortunately, if nothing comes in your way, don’t lose hope as you can still recover the PC by performing the Clean Reinstallation of Windows 10.
Before starting to perform the workaround, save a backup for the necessary files first. Connect the device with speedy internet for downloading content at a faster rate. Try seeking help from skilled professionals if you are not confident enough.
Methods:
1] Install all available patches
2] Run System File Checker
3] Use Windows Security to dismiss malware
4] Update all the outdated Drivers
5] Use the DISM tool
6] Disable Automatic Reboot
7] Use Windows Blue Screen Troubleshooter
8] Repair Memory Problems
9] Make space out of Disk Storage
10] Disconnect External Hard Drive temporarily
11] Uninstall similar applications
12] Uninstall buggy Windows Update
13] Perform System restore
14] Remove Third-party Anti-virus programs
15] Settle down Hard Disk Bad sector
16] Boot the device in Safe Mode
That’s all!!
-
Home
-
News
- How to Fix DRIVER VERIFIER IOMANAGER VIOLATION BSOD?
By Sonya |
Last Updated
How to deal with the DRIVER VERIFIER IOMANAGER VIOLATION BSOD in Windows 10? If you don’t know how to do it, then you should read this post from MiniTool carefully. There are five methods you can try to get rid of the error.
When you are using Windows computer, you may meet different errors, such as the Blue Screen of Death and update errors. The culprit of BSOD could be Netwtw06.sys and DRIVER VERIFIER DMA VIOLATION. This post is mainly talking about DRIVER VERIFIER IOMANAGER VIOLATION BSOD.
Before you try the following methods to fix DRIVER VERIFIER IOMANAGER VIOLATION, you need to restart your computer to a normal state. And if you cannot boot your computer into a normal state in this way, then you should boot your computer into Safe Mode.
Method 1: Stop or Reset Driver Verifier
Although Driver Verifier is a powerful built-in tool in the Windows system, your computer may crash when running Driver Verifier. Therefore, you can stop or reset Driver Verifier to fix DRIVER VERIFIER IOMANAGER VIOLATION.
Stop Driver Verifier
Step 1: Type verifier in the Search bar and then click the best match one to open Verifier.
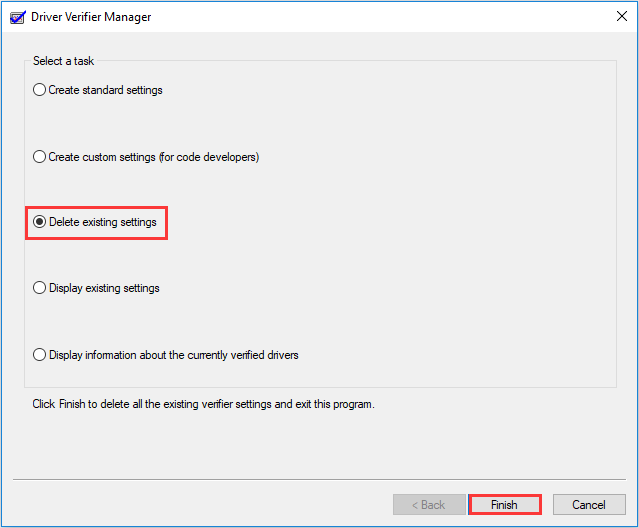
Step 2: In the pop-out window, choose Delete existing settings and then click Finish.
Step 3: Restart your system and then check if the error is gone.
Reset Driver Verifier
Step 1: Press the Win + R keys at the same time to open the Run box.
Step 2: Type cmd in the box and then press the Shift + Ctrl + Enter keys at the same time to open Command Prompt as an administrator.
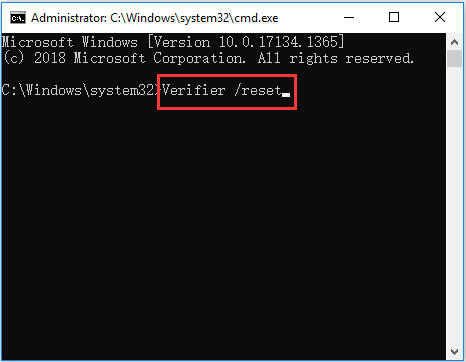
Step 3: Type Verifier /reset in the window and then press Enter.
Step 4: Restart your computer and then check if the DRIVER VERIFIER IOMANAGER VIOLATION Windows 10 error disappears.
Method 2: Update Your Driver
You could also meet the DRIVER VERIFIER IOMANAGER VIOLATION error when your driver is out of date. Thus, to solve the issue, you need to update your driver. Here is the tutorial:
Step 1: Press the Win + X keys at the same time to select Device Manager.
Step 2: Right-click the device with a yellow indication to choose Update driver.
Step 3: Choose Search automatically for updated driver software, and then follow the on-screen instructions to finish updating the driver. If you have several devices with yellow indications, then do the same as above for all.
Step 4: Reboot your computer and then check if the error is gone.
Method 3: Run SFC Scan
If your system files are corrupted, then you can also meet the DRIVER VERIFIER IOMANAGER VIOLATION BSOD. So running the SFC tool can scan your system and repair detected issues. Here is a quick guide:
Step 1: Open Command Prompt as an administrator, type sfc /scannow in the window and then press Enter.
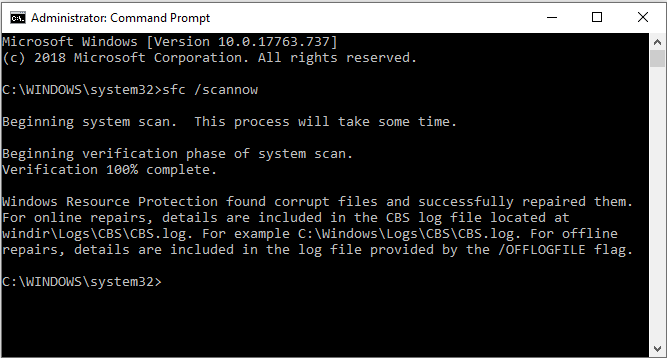
Step 2: Wait until the process is done. Usually, if there is something wrong being detected, the SFC tool will repair them automatically.
Step 3: Restart your computer to check whether the DRIVER VERIFIER IOMANAGER VIOLATION error is fixed.
Method 4: Uninstall the Newly Installed Software
If you recently installed some software, then the cause of the DRIVER VERIFIER IOMANAGER VIOLATION may be them. So you can try to uninstall the newly installed software to check if this can get rid of this error. Here is a quick guide:
Step 1: Press the Win + I keys at the same time to open Settings. Choose Apps.
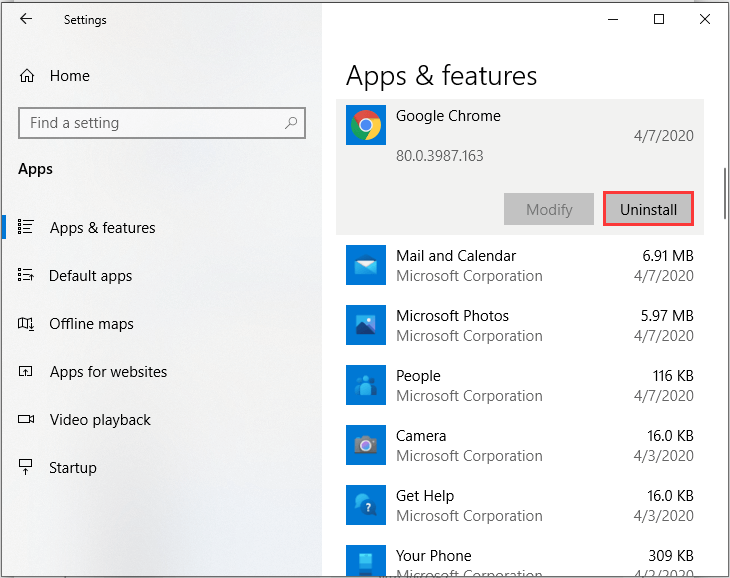
Step 2: Go to the Apps & features tab, and then set Sort by: Install date. Click the newly installed software to choose Uninstall.
Step 3: Restart your computer to check if the error is fixed.
Method 5: Perform System Restore
If none of the methods above can get rid of the DRIVER VERIFIER IOMANAGER VIOLATION BSOD, and you have created a restore point in advance, then you need to perform System Restore to make your computer go back to the previous normal state.
You should read this post to get detailed instructions – What Is System Restore Point and How to Create It? Look Here!
Final Words
How to fix DRIVER VERIFIER IOMANAGER VIOLATION BSOD? After reading this post, you can find 5 efficient methods to deal with it. And if you have any confusion about the methods, leave a comment below and we’ll reply to you as soon.
About The Author
Position: Columnist
Author Sonya has been engaged in editing for a long time and likes to share useful methods to get rid of the common problems of Windows computers, such as Windows Update error. And she aims to help more people to protect their data. What’s more, she offers some useful ways to convert audio and video file formats. By the way, she likes to travel, watch movies and listen to music.
Mar. 19, 2025 / Updated by
Seraphina to
Windows Driver Solutions

When using the Windows operating system, you may encounter the «Driver Verifier IOManager Violation» error, which can cause system instability or even result in a Blue Screen of Death (BSOD). This article provides several effective solutions to help you restore system stability.
1. Update Device Drivers
Outdated or incompatible drivers are often the root cause of the IOManager violation error. Ensuring all hardware drivers are up to date can effectively resolve this issue. Using Driver Talent is recommended as it automatically detects and updates drivers, saving time and preventing incorrect driver installations.
Download Driver Talent
-
Click the download button to get the latest version of Driver Talent, install and open the software, then click «Scan».
-
Once the scan is complete, the software will list outdated or missing drivers. Find the required drivers and click «Update».

-
After updating, restart your computer to apply the changes.
2. Repair System Files
Press Windows + S, type «Command Prompt«, and select «Run as administrator».
In the Command Prompt window, type the following command and press Enter: sfc /scannow

The system will begin scanning and repairing corrupted files. This process may take some time, so please be patient.
After the scan is complete, review the results and restart your computer if needed.
Check if the Driver Verifier IOManager Violation error is resolved.
3. Reset Driver Verifier
When your computer starts, continuously press F8 to enter the Advanced Startup Options menu.
Select «Safe Mode» and press Enter.

Follow Step 2 to open Command Prompt as an administrator. Type the following command and press Enter: verifier /reset
(Note: There is a space before the «/»)
Restart your PC.
4. Run the Windows Memory Diagnostic Tool
Press Windows + R, type «mdsched.exe«, and press Enter.
In the popup window, select «Restart now and check for problems».

The system will restart and automatically scan your memory for issues. This process may take several minutes.
After the scan, the system will display diagnostic results. If any memory issues are detected, consider replacing the faulty RAM modules.
5. Scan and Repair Hard Drive Errors
Open Command Prompt as an administrator.
Type the following command and press Enter: chkdsk C: /f /r

(Replace «C:» with the drive you want to check. If you have multiple drives, run this command for each one.)
If prompted, type «Y» and press Enter to schedule the scan for the next reboot.
Restart your computer, and Windows will scan and repair disk errors automatically. This process may take some time depending on the drive size and number of errors.
After the scan is complete, check if the error is resolved.
6. Perform a System Restore
Press Windows + R, type «rstrui«, and press Enter.
In the System Restore wizard, select a restore point from before the error occurred and click «Next».
Confirm your selection and click «Finish» to start the restoration.
Your system will automatically restore itself during the next reboot, which may take a few minutes.
After the process is complete, check if the Driver Verifier IOManager Violation error has been resolved.
Download Driver Talent
By following these steps, you can effectively fix the Driver Verifier IOManager Violation error and restore system stability. If you are unfamiliar with these operations, consider backing up important data beforehand to avoid data loss.
See also:
How to Fix a Computer Stuck on Boot Screen
HP DeskJet 2755e Driver Update Steps for Windows 10
How to Fix Mouse Arrow Disappearance on Windows 10
6 Ways to Fix an Unresponsive Wireless Mouse
Fixing Valheim Keeps Freezing on PC
Recommended Download
|
ExplorerMax |
Driver Talent for Network Card | |||
| Smart and advanced file explorer tool for Windows platforms | Download & Install Network Drivers without Internet Connection | |||
|
30-day Free Trial |
Free Download |
Problem: Windows 10 users reported encounter Blue Screen of Death (BSOD) error with stop code DRIVER VERIFIER IOMANAGER VIOLATION occurs when a system file or drive like ndis.sys, ntoskernel.exe, hidclass.sys, etc. gets corrupted or damaged.

Solved: How do I fix BSOD Error “DRIVER VERIFIER IOMANAGER VIOLATION”?
The detail error message as below:
Your PC ran into a problem and needs to restart. We’re just collecting some error info, and then we’ll restart for you (0% complete)
If you’d like to know more you can search online later for this error: DRIVER_VERIFIER_IOMANAGER_VIOLATION (ndis.sys)
In this article, we have outlined some solution steps to fix the DRIVER VERIFIER IOMANAGER VIOLATION BSOD error.
Table of Contents
- Content Summary
- Solution 1: Restart to Normal Mode
- Solution 2: Delete Driver Verifier Manager Existing Settings
- Solution 3: Reset Driver Verifier Manager
- Solution 4: Update Device Driver
- Solution 5: Execute Deployment Image Servicing and Management (DISM)
- Solution 6: Execute System File Checker (SFC)
- Solution 7: Remove Newly Installed Software
- Solution 8: Perform Windows Clean Boot
- Solution 9: Update BIOS or Firmware
- Solution 10: Uninstall Virtualization Software
- Solution 11: Restore System to Earlier Stage
Content Summary
Solution 1: Restart to Normal Mode
Solution 2: Delete Driver Verifier Manager Existing Settings
Solution 3: Reset Driver Verifier Manager
Solution 4: Update Device Driver
Solution 5: Execute Deployment Image Servicing and Management (DISM)
Solution 6: Execute System File Checker (SFC)
Solution 7: Remove Newly Installed Software
Solution 8: Perform Windows Clean Boot
Solution 9: Update BIOS or Firmware
Solution 10: Uninstall Virtualization Software
Solution 11: Restore System to Earlier Stage
Solution 1: Restart to Normal Mode
You can wait for the PC to restart after automatically or you can hold the Power button for about 5 seconds to perform hard reboot.
In the event that the Windows unable boot into normal mode, you can boot it into safe mode by pressing F4 to start the computer in Safe Mode. If you’ll need to use the Internet, press F5 for Safe Mode with Networking. After that restart the PC again.
Solution 2: Delete Driver Verifier Manager Existing Settings
Step 1: Right-click on the Start menu and choose Run from the menu list.
Step 2: Type verifier and press Enter to open the Driver Verifier Manager window. Click on the Yes button if UAC Prompt.
Step 3: Select Delete existing settings.

Delete Driver Verifier Manager Existing Settings
Step 4: Click the Finish button.
Step 5: Restart your computer.
Solution 3: Reset Driver Verifier Manager
Step 1: Press the Windows + R key to open the Run box.
Step 2: type cmd and then press CTRL + SHIFT + ENTER to open Command Prompt in admin/elevated mode. Click Yes for the UAC.
Step 3: Type the following command and press Enter: verifier /reset

Command to Reset Driver Verifier Manager
Step 4: Restart your PC.
Solution 4: Update Device Driver
Refer to the file name stated in the error for example, ndis.sys is the corrupted, missing or crashing system file or drive file. Based on the search on the internet, ndis. sys is a Windows system file related to Network Driver Interface Specification. In this case, you will need to update, roll back or reinstall the Network drivers.
Step 1: Right-click on the Start button and select Device Manager from the menu list.
Step 2: Locate the related device driver from the list.
Step 3: Right-click on it and choose the Update driver option from the context menu.
Step 4: Click on the Search automatically for the drivers or Search automatically for updated driver software option.

Click on the Search automatically for the drivers or Search automatically for updated driver software option.
Step 5: Windows will start to look for a newer version of the driver from the Internet. If available, you will be prompted about the same.
Step 6: If the newer version of the driver found, proceed with the installation.
Step 7: Restart your PC.
Solution 5: Execute Deployment Image Servicing and Management (DISM)
Deployment Image Servicing and Management (DISM) tool will replace potentially corrupted or missing system files with good ones.
Step 1: Press Windows key once.
Step 2: Type cmd in the search box.
Step 3: Choose Run as administrator option to open an elevated command prompt. If you are prompted for an administrator password or for a confirmation, type the password, or select Allow.
Step 4: Type the following command and press Enter to perform an advanced scan to check if the Windows 10 image has any problems: DISM /Online /Cleanup-Image /ScanHealth
Step 5: Type the following command and press Enter to run an advanced scan and repair any problems automatically: DISM /Online /Cleanup-Image /RestoreHealth

Repairing issues with DISM using RestoreHealth option
If the Windows Update client is already corrupted, you will be prompted to use a running Windows installation as the repair source or use a Windows side-by-side folder from a network share, as the source of the files. Type the following command and press Enter: DISM.exe /Online /Cleanup-Image /RestoreHealth /Source:C:\RepairSource\Windows /LimitAccess
*Replace the C:\RepairSource\Windows placeholder with the location of your repair source.
Alternatively, you can execute the DISM/Cleanup-Image tool in PowerShell with Run as administrator option.
Repair-WindowsImage -Online –CheckHealth

Repair-WindowsImage -Online –ScanHealth

Repair-WindowsImage -Online –RestoreHealth
Step 6: Once the process is complete, DISM will create a log file in %windir%/Logs/CBS/CBS.log and capture any issues that the tool finds or fixes.
Step 7: Once the DISM scan and repair is completed, close the elevated CMD window and restart the computer.
Solution 6: Execute System File Checker (SFC)
Run System File Checker (SFC) to replace potentially corrupted system files.
Step 1: Press Windows key once.
Step 2: Type cmd in the search box.
Step 3: Choose Run as administrator option to open an elevated command prompt. If you are prompted for an administrator password or for a confirmation, type the password, or select Allow.
Step 4: Type the following command below and press Enter for each line of command: sfc /scannow

Execute System File Checker (SFC) scan
Step 5: Wait until the message The operation completed successfully or Windows Resource Protection did not find any integrity violations show then close Command Prompt.
Step 6: Restart the computer.
Solution 7: Remove Newly Installed Software
If you have recently installed any application software on your PC then try to remove it temporarily and see if the error fixed.
Step 1: Press Windows key once.
Step 2: Type control panel in the search box.
Step 3: Click the Control Panel from the search result.
Step 4: Choose to view by Category and then click Uninstall a program.

Choose to view by Category and then click Uninstall a program.
Step 5: Locate any newly installed program.
Step 6: Right-click on it and click Uninstall.

Right-click on it and click Uninstall.
Step 7: Follow the on-screen instructions to complete the uninstallation process.
Step 8: Restart your computer.
Solution 8: Perform Windows Clean Boot
Start Windows in Clean Boot state will use a minimal set of drivers and startup programs to help eliminate software conflicts that occur when you install a program or an update or when you run a program in Windows.
Step 1: Press Windows key + R to open the Run box.
Step 2: Type msconfig and press Enter to open the System Configuration. If the UAC (User Account Control) prompted then click Yes to grant administrative access.
Step 3: In the General tab, click on the radio button beside Selective startup. Uncheck the Load startup items checkbox.

In the General tab, click on the radio button beside Selective startup. Uncheck the Load startup items checkbox.
Step 4: Choose the Services Tab, then check on Hide All Microsoft services and click on Disable all button.

Perform Windows clean state
Step 5: Click the Apply button, and then click on the OK button. Choose Restart Later option.
Step 6: Press Windows + R key to open a Run box.
Step 7: Type msconfig and click OK to open the system configuration window.
Step 8: Choose Startup and select Open Task Manager.
Step 9: Disable all applications in the list to prevent it from startup when the computer is booting up.
Step 10: Close Task Manager and click Apply button in System Configuration windows then click OK.
Step 11: Choose to restart when prompt to do so.
Solution 9: Update BIOS or Firmware
Refer to the motherboard’s manual for detailed instructions to access BIOS and update firmware because each model may have different steps.
Solution 10: Uninstall Virtualization Software
Step 1: Press Windows key once.
Step 2: Type control panel in the search box.
Step 3: Click the Control Panel from the search result.
Step 4: Choose to view by Category and then click Uninstall a program.
Step 5: Locate Microsoft System Center Application Virtual Management Server or Microsoft System Center Application Streaming Server.
Step 6: Right-click on it and click Uninstall.
Step 7: Follow the on-screen instructions to complete the uninstallation process.
Step 8: Restart your computer.
Solution 11: Restore System to Earlier Stage
Step 1: Press Windows key once.
Step 2: Type control panel in the search box.
Step 3: Click the Control Panel from the search result.
Step 4: Click System > System protection.

Windows System Protection
Step 5: Click on the System Restore button.
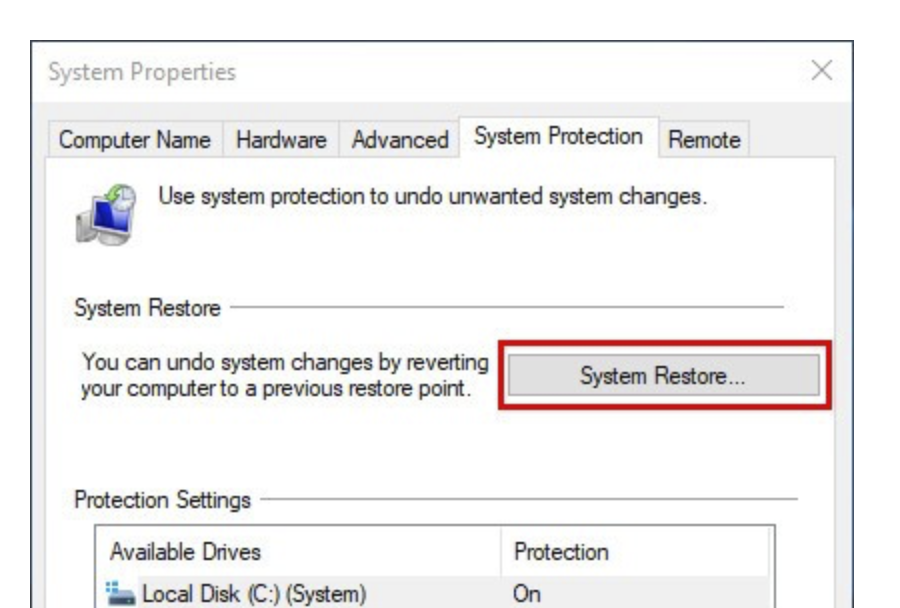
Click on the System Restore button.
Step 6: Click the Next button to open System Restore wizard.
Step 7: Choose a restore point where the Windows didn’t show any errors. Then follow the on-screen instructions to finish the restore process.
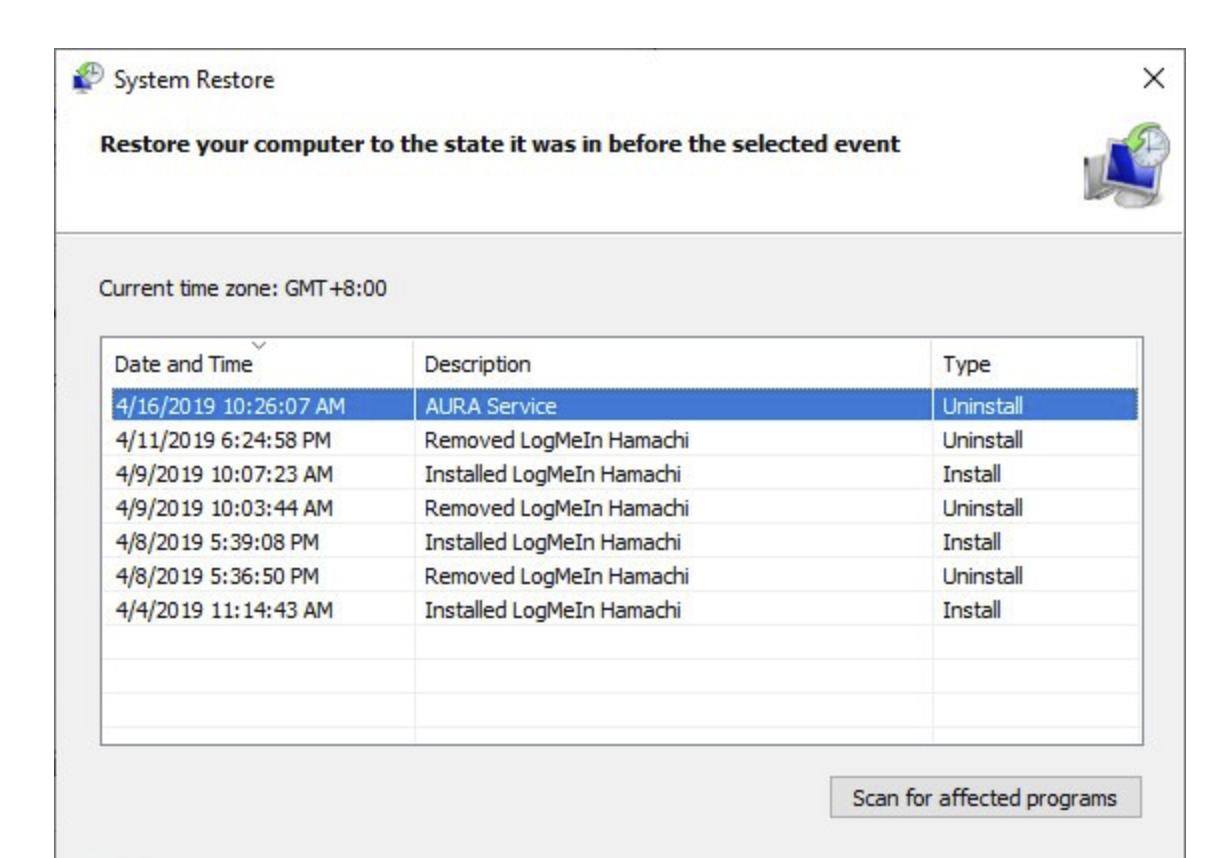
Choose a restore point where the Windows didn’t show any errors. Then follow the on-screen instructions to finish the restore process.
Step 8: Choose to restart when prompt to do so.
While using your Windows 10/11 PC, you may encounter various errors. While some errors are common and can be resolved with a simple restart, others may necessitate a more technical troubleshooting approach.
Among these errors is the DRIVER VERIFIER IOMANAGER VIOLATION BSOD. What is it and what causes DRIVER VERIFIER IOMANAGER VIOLATION BSOD on Windows 10/11?
What is DRIVER VERIFIER IOMANAGER VIOLATION BSOD on Windows 10/11?
BSOD errors are your PC’s way to tell you that something is wrong. And if you come across the DRIVER VERIFIER IOMANAGER VIOLATION BSOD on Windows 10/11, your PC is telling you that a drive or a system file is corrupted or has crashed. It usually comes with the message telling you that your PC has ran into a problem and has to restart.
What to Do About DRIVER VERIFIER IOMANAGER VIOLATION BSOD on Windows 10/11?
So, what is the best course of action when faced with the DRIVER VERIFIER IOMANAGER VIOLATION BSOD? We cannot suggest the best fix, but we can recommend trying any of the solutions below until you find one that can resolve your problem.
Solution #1: Restart your PC
The first solution you should try when you encounter the DRIVER VERIFIER IOMANAGER VIOLATION BSOD is to restart your PC. Although your PC should attempt to reboot by itself, you can choose to restart manually by holding the Power button for about 5 seconds. If restarting your PC resolves the error, then great. Otherwise, proceed to another solution.
Solution #2: Stop or reset Driver Verifier
Every Windows operating system has a built-in Driver Verifier tool that is designed to catch faulty drivers that cause BSOD errors. However, it is worth noting that running the tool can cause a PC to crash. You can either stop it from running or reset it to resolve the blue screen error.
Here’s how to stop Driver Verifier:
- Into the search field, input verifier and hit Enter.
- Choose Delete existing settings and click Finish.
- Restart your PC.
To reset Driver Verifier, follow these steps:
- Open the Run dialog box by pressing the Windows + R keys.
- Into the text field, type cmd and hit Shift + CTRL + Enter. This will open Command Prompt with administrator privileges.
- Into the command line, type the verifier /reset command and hit Enter.
- Restart your PC.
Solution #3: Update your device driver
BSOD errors may appear because of incompatible or outdated drivers. You have two ways to find the right drivers: manual or automatic.
When you choose the manual method, go to the manufacturer’s website and look for the most recent driver compatible with your device.
Now, if you prefer the second method, you may need to install a third-party driver updater tool that can recognize your system and install the correct drivers for you.
Once you have the updated device driver version installed, restart your PC and check if the BSOD error still shows.
Solution #4: Repair problematic system files
When system files become corrupted or broken, BSOD errors may be triggered. To resolve them, you can use the System File Checker utility that is in-built on your Windows device. This tool can efficiently repair corrupted system files for you.
Here’s how to run the System File Checker to repair damaged system files:
- Press the Windows + R keys to open the Run dialog box.
- Into the text area, type cmd and press SHIFT + CTRL + Enter to launch Command Prompt with administrator privileges.
- Type the sfc /scannow command into the command line and hit Enter.
- Wait for the entire scan to be complete. After that, restart your PC and check if the BSOD error is fixed.
If the scan result tells you that corrupted files exist but SFC cannot fix it, then you have the option to use the Deployment Image Servicing and Management (DISM) tool.
To use the DISM tool, follow these instructions:
- Press the Windows + X keys and select Command Prompt (Admin).
- When asked for permission, click Yes.
- Into the command line, enter this command: DISM /Online /Cleanup-Image /RestoreHealth. Press Enter.
- Wait for the process to finish.
- Once done, restart your PC.
Solution #5: Uninstall any newly installed software
There are times when third-party software programs that you install on your PC are not compatible with your system. As a result, BSOD errors like the DRIVER VERIFIER IOMANAGER VIOLATION BSOD surfaces. Uninstalling the software should resolve the BSOD error.
Here’s what to do:
- Into the search field, enter control panel.
- Click on the most relevant search result.
- Select to view by Category.
- Go to the Programs section and click Uninstall a program.
- Find the program you have just installed. Right-click on it and select Uninstall.
- Follow the on-screen prompts to proceed with the uninstallation.
- Restart your PC.
Solution #6: Revert your settings using a restore point
If you can’t tell which device driver or software program is causing the DRIVER VERIFIER IOMANAGER VIOLATION BSOD to show, then restore your system to a previously working restore point. Doing this will roll back all software updates and device drivers to a state when they were still working just fine.
Here’s how to use System Restore on Windows:
- Press the Windows + Pause keys and select System Protection.
- Click the System Restore button.
- Hit Next.
- A new window should now open. Select a restore point when Windows was still free of errors. After choosing, follow the on-screen prompts to complete the restoration process.
- Restart your PC.
Solution #7: Update firmware or BIOS
This fix may be too complex for beginners, which is why we’d only recommend this for tech-savvy individuals. If, at this point, you’re still having the BSOD issue, update your system firmware or BIOS.
Before you begin updating your BIOS, be sure you have backed up your files. This is because if anything gets corrupted, you will need a technician to have it fixed.
So, how do you update the BIOS? Visit the manufacturer’s site and download the most recent BIOS update. Use your current BIOS serial number or service tag to identify the most appropriate product. Download the update and double-click on it. This will automatically reboot your system and take you to the BIOS update page.
Wrapping Up
There you have it! One of these solutions should resolve the DRIVER VERIFIER IOMANAGER VIOLATION BSOD on Windows 10/11. If you find this article useful, feel free to share it with friends and colleagues who may need it. You may also leave questions and comments below!
Give us some love and rate our post!