
Ошибки с вызовом синего экрана являются самыми раздражающими для пользователей, так как они прерывают работу компьютера и принудительно перезагружают систему. Однако эта процедура играет важную роль в инфраструктуре Windows, предотвращая фатальный ущерб, который в противном случае может быть нанесён операционке.
Сообщение DRIVER_VERIFIER_DMA_VIOLATION указывает на неисправность инструмента Driver Verifier. Этот процесс используется для отслеживания драйверов и их корректной работы. Проблема с появлением экрана BSOD возникает, когда данная утилита отключена, либо неисправна. Чтобы устранить ошибку, выполните поочерёдно каждое из предложенных ниже решений.
Решение 1. Обновите все драйверы
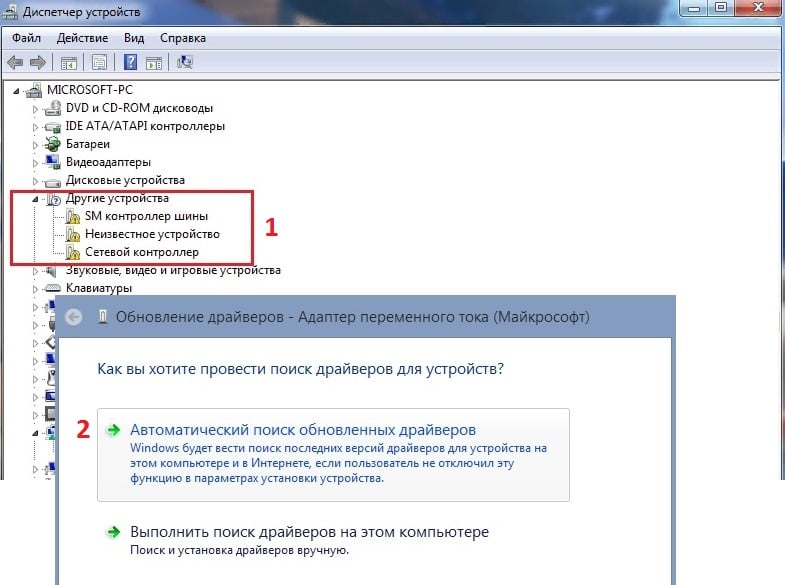
Поскольку одной из основных причин возникновения синего экрана с данной ошибкой является проблема с драйверами, следует обновить все сторонние приложения. Это можно сделать с помощью специальных программ, следящих за актуальностью установленных программных обеспечений, или вручную, в диспетчере устройств.
- Нажмите сочетание клавиш Win + X, и выберите Диспетчер устройств.
- Разверните каждый из разделов, и проверьте наличие неисправных драйверов.
- Все приложения, помеченные восклицательным знаком, неработают или являются устаревшими.
- Необходимо обновить каждый из них.
- Нажмите по такому драйверу ПКМ, и выберите соответствующий пункт.
- В следующем окне выберите Автоматический поиск новых программных обеспечений.
- После обновления всех необходимых приложений, перезагрузите систему.
Стоит иметь в виду, что обновление через диспетчер устройств является не самым оптимальным решением. Лучше посетить официальный сайт разработчиков конкретного драйвера, и скачать оттуда последнюю версию.
Решение 2. Выполните сканирование SFC и DISM
Ещё одной причиной могут быть повреждённые системные файлы. Необходимо запустить сканирование SFC и DISM, чтобы выяснить, исправит ли это проблему.
- Снова нажмите комбинацию Win + X, и выберите Командная строка (Администратор).
- В открывшееся системное окно скопируйте и вставьте команду: sfc/scannow
- Нажмите Enter, и ожидайте окончания диагностики.
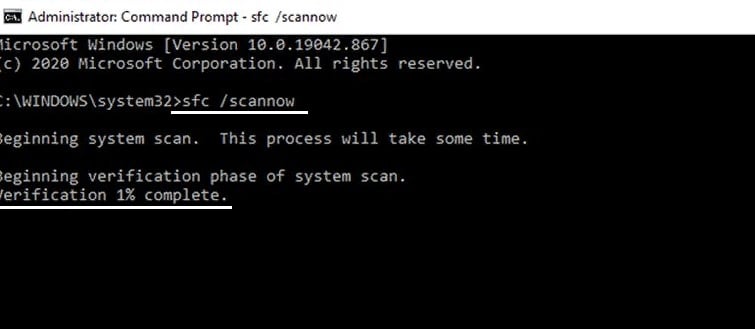
- Если SFC восстановит повреждённые файлы, перезагрузите компьютер.
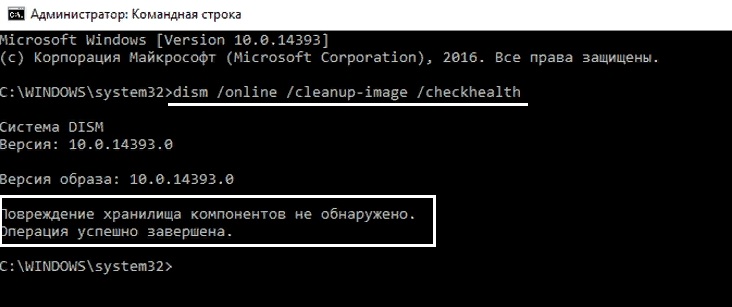
- Когда сканирование не даст результатов, запустите DISM.
- Ещё раз откройте командную строку от имени администратора.
- Вставьте следующие команды, нажимая Enter после каждой (имейте в виду, что каждый из процессов займёт некоторое время):
- DISM /Online /Cleanup-Image /CheckHealth
DISM /Online /Cleanup-Image /ScanHealth
DISM /Online /Cleanup-Image /RestoreHealth
Решение 3. Удалите средство проверки драйверов
Помимо прочего, можно вовсе удалить процесс Driver Verifier, из-за которого появляется ошибка BSOD. Однако следует понимать, что это не оптимальное решение, так как данная программа выполняет важные функции.
- Снова откройте командную строку от имени администратора, как описано выше.
- Введите команду verifier и нажмите Enter.
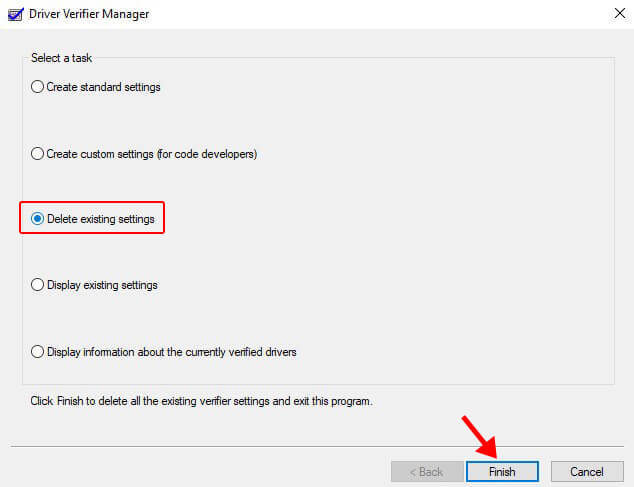
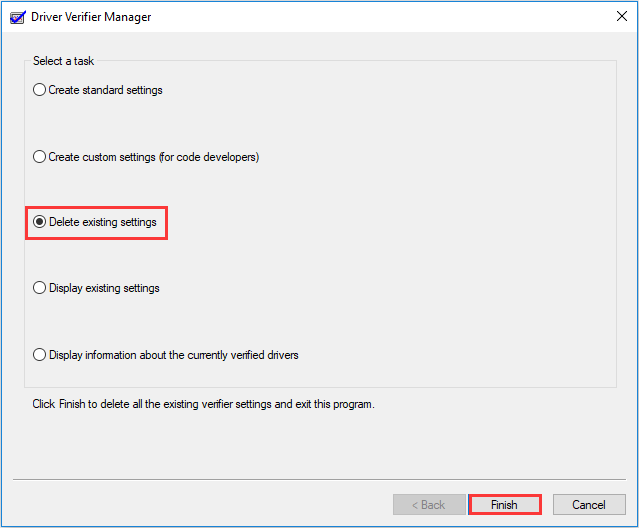
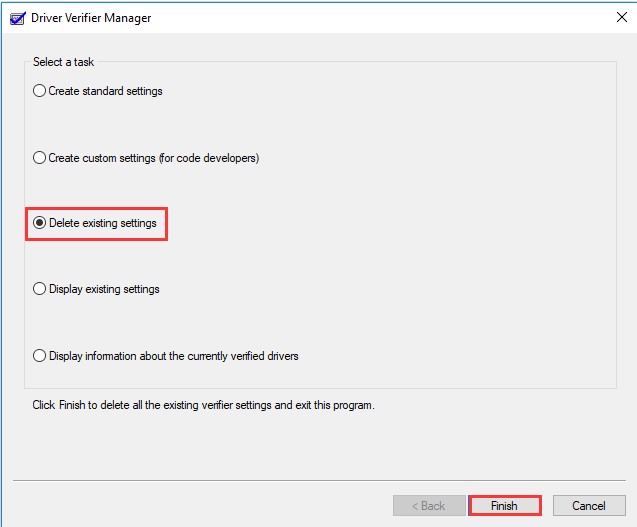
- Когда откроется Диспетчер проверки драйверов, выберите Удалить существующие параметры и нажмите Готово.
- Перезагрузите компьютер.

Решение 4. Обновите BIOS
Обновление BIOS — относительно рискованная процедура, поэтому будьте осторожны. Если вы не уверены, что делаете, пропустите этот шаг или обратитесь к специалисту.
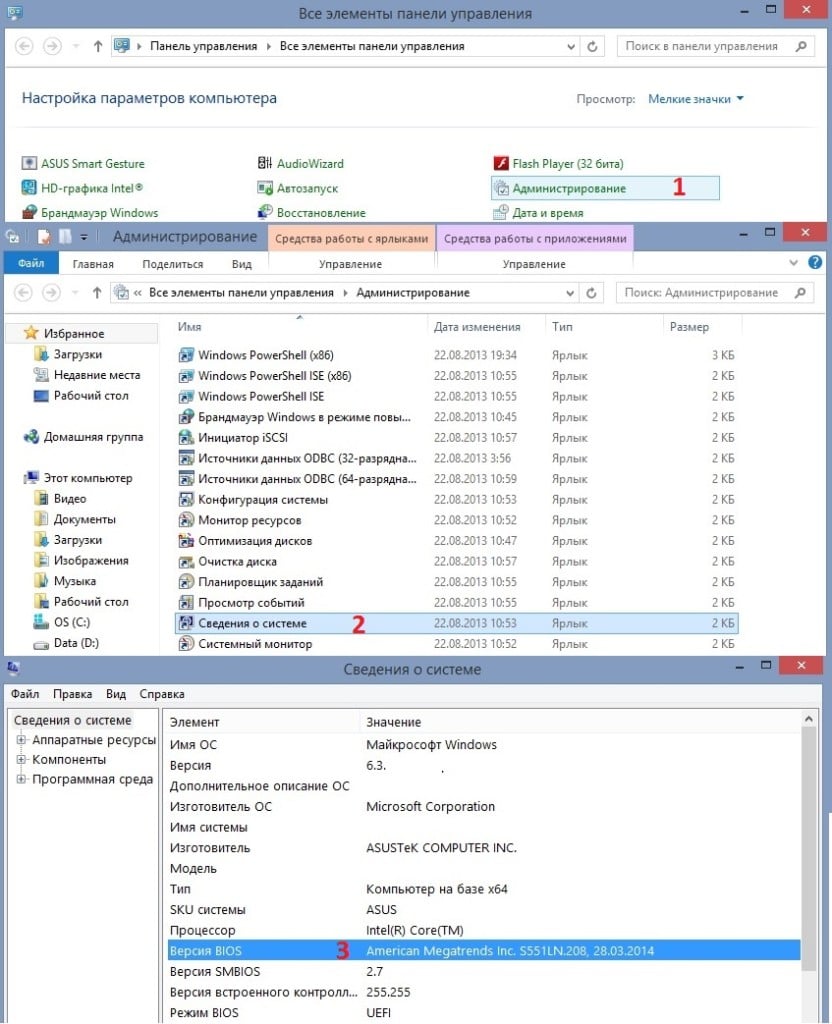
- Нажмите ПКМ по значку Windows и выберите Панель управления.
- Перейдите в раздел Администрирование.
- Затем откройте Сведения о системе.
- Посмотрите вашу версию BIOS.
- Посетите сайт производителя вашей материнской платы и перейдите в раздел Загрузки.
- Здесь скачайте последнюю версию BIOS для вашей материнской платы и запустите установщик.
- После завершения процесса перезагрузите компьютер.
BSoDs or Blue Screen of Death are dreaded system errors that occur due to a critical failure in Windows. The DRIVER VERIFIER DMA VIOLATION BSoD error screen gets unexpectedly generated on Windows 10/11 systems due to various reasons like outdated drivers, outdated SSD firmware or corrupted drivers. This blue screen error generates a stop code DRIVER_VERIFIER_DMA_VIOLATION with a bug check value of 0x000000E6 (0xE6).
The DRIVER VERIFIER DMA VIOLATION is a critical system issue, which causes system wide instability. According to the affected users, the observations suggest that in most of the cases, outdated or corrupted drivers, outdated SSD firmware or BIOS or faulty hardware could lead to the generation of this error. Let’s look at the methods to fix this error.
What Causes the DRIVER VERIFIER DMA VIOLATION Blue Screen Error?
As soon as the system generates the DRIVER VERIFIER DMA VIOLATION BSoD screen, it crashes Windows 10/11 OS. The enabled Driver Verifier is a possible reason behind this. This stop code is also the result of the device driver freeing up the same scatter/gather list twice. Now that we have an idea about this error, let’s look at the causes that lead to the generation of the DRIVER VERIFIER DMA VIOLATION stop code on Windows 10/11 computers –
- Outdated drivers
- Corrupted drivers
- Outdated SSD firmware
- Outdated BIOS
What Are the Methods to Fix the DRIVER VERIFIER DMA VIOLATION BSoD Error?
Finding the exact root cause behind a BSoD is tricky, but there are many possible ones that lead to their generation. Same goes with their resolutions. There is no one method that fixes them all. We have circled out a few methods that you can employ to fix the DRIVER VERIFIER DMA VIOLATION blue screen error on your Windows 10/11 computer.
Method 1: Update Device Drivers and OS
This is the most basic and the simplest way to eliminate the DRIVER VERIFIER DMA VIOLATION BSoD error on your Windows 10/11 computer. Outdated device drivers and OS lead to an unstable system, which causes apps and system files to go haywire. This causes BSoDs like this error to pop-up on the screen. Follow the steps mentioned below to update device drivers and Windows OS.
To update device drivers –
- Press WIN + X and click on Device Manager from the list.
- Double-click on all the devices to expand them.
- Find all the entries with an exclamation mark.
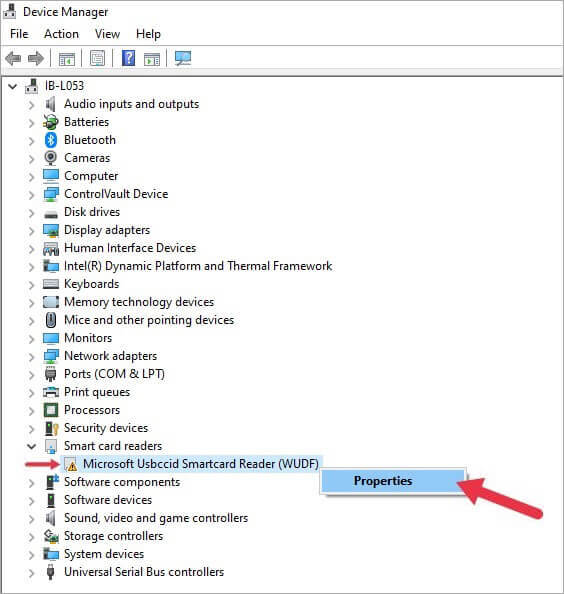
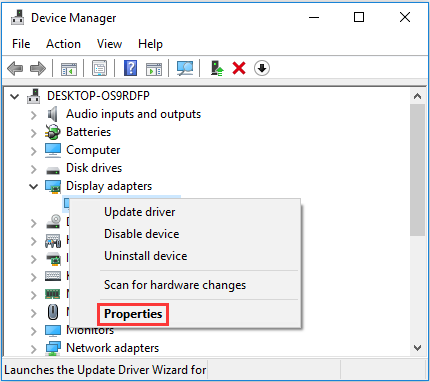
- Right-click on each of them one-by-one and click on Properties.
- Under the Driver tab, click on Update driver.
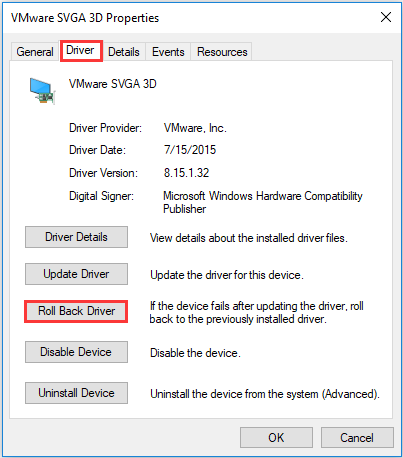
Note – If you are encountering this error screen after updating device drivers, you can revert the changes by right-clicking on the device for which you wish to revert the driver > Properties > Roll Back Driver.
To update Windows OS –
- Press WIN + I to open Settings.
- Click on Update & Security.
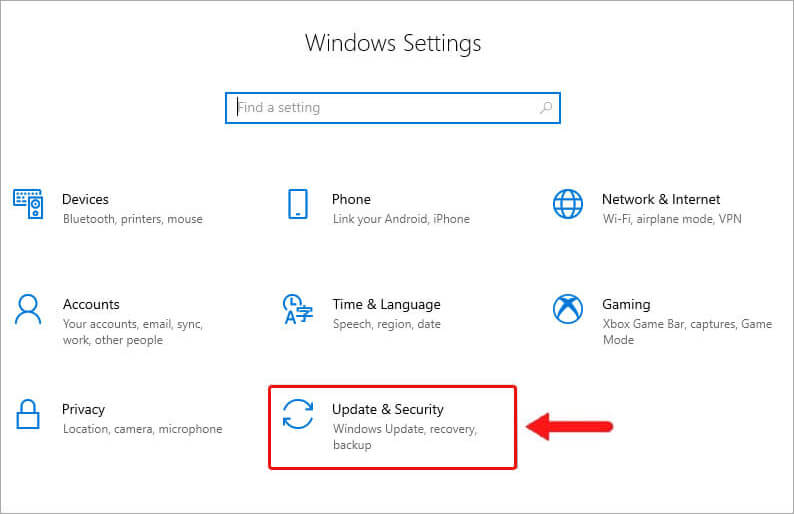
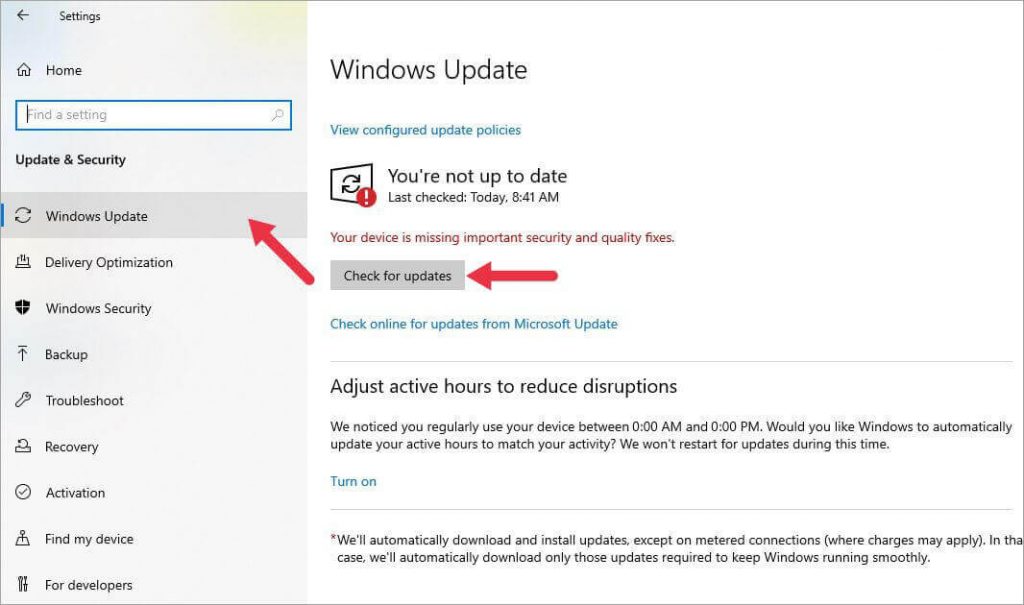
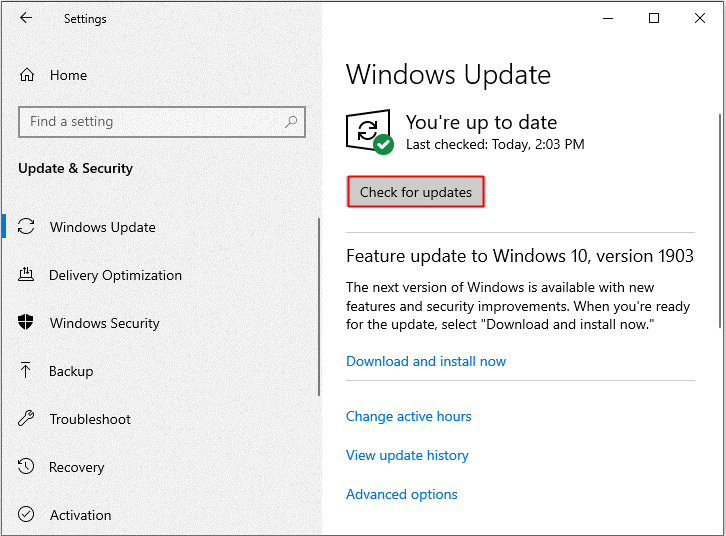
- Click on Windows Update and then Check for updates.
Method 2: Disable Driver Verifier
As mentioned earlier, in some cases, the Driver Verifier causes the DRIVER VERIFIER DMA VIOLATION BSoD to occur. You can try disabling the Driver Verifier to help you resolve the issue. Simply follow the steps as mentioned –
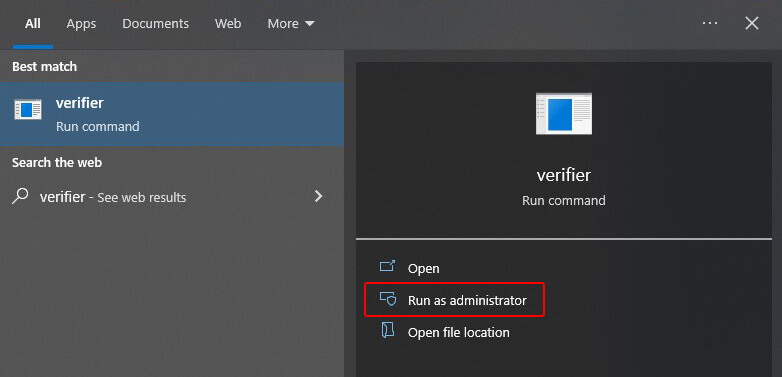
- Type Verifier in the search bar and select the one denoted as a ‘Run Command’.
- Click on Run as administrator to launch it.
- In the next window, select the Delete existing settings option and click Finish.
- Restart your system to check if this has fixed the BSoD.
If disabling the Driver Verifier doesn’t solve the issue, it’s time for you to reset it. Follow the below-mentioned steps to do so –
- Press WIN + R to launch Run.
- Type CMD, and press CTRL + SHIFT + ENTER to launch it as Administrator.
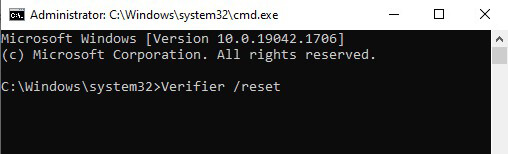
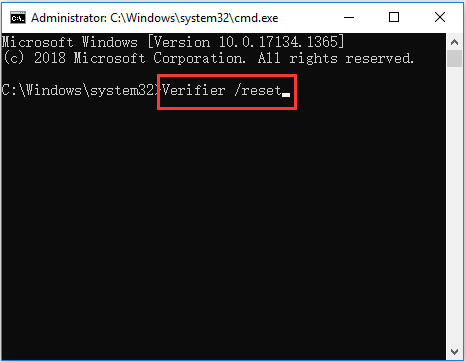
- Type Verifier /reset and hit ENTER.
- Once the process is complete, close the terminal and restart your computer to check if this has fixed your problem.
Method 3: Check for Faulty Hardware
Many a times, BSoD errors are the result of faulty or improperly configured hardware. If you have encountered the DRIVER VERIFIER DMA VIOLATION blue screen on your computer, then it could be due to either faulty RAM or Motherboard. You can check the cables, connections, and the hardware to pin point any faulty piece and replace it to resolve this issue.
Method 4: Hardware troubleshooter
If you are still seeing the DRIVER VERIFIER DMA VIOLATION BSoD after checking for faulty hardware, you can run the hardware troubleshooter to resolve the issue at hand. This tool has a set of automated fixes, which are deployed once the troubleshooter begins the process. To do this –
- Press WIN + I and open Settings.
- Click on Update & Security.
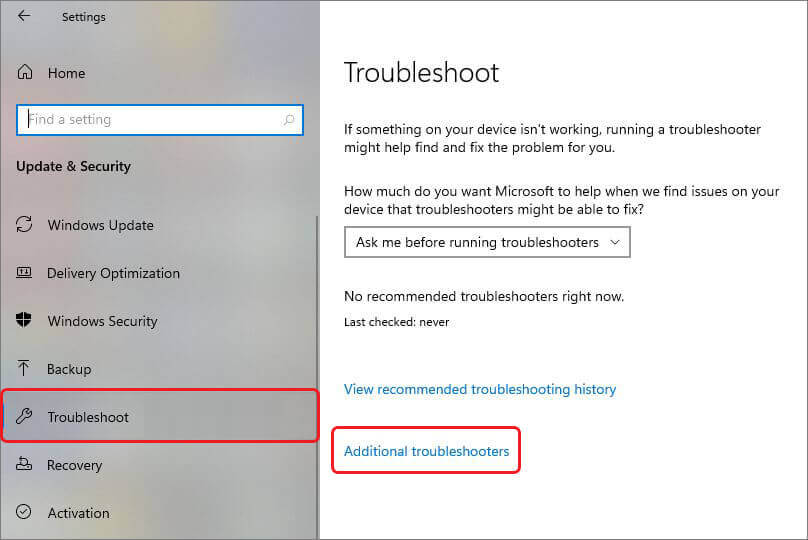
- Click on Troubleshoot in the left panel and then Additional troubleshooters on the right.
- Search for Hardware and Devices and select it.
- Click on Run the troubleshooter and wait.
- Follow the instructions as prompted by the wizard to complete the process.
- Once complete, restart your computer to check if this has fixed this blue screen error.
Note – This method is only applicable if you are running Windows 10 version 1806 or earlier. This troubleshooter was removed from the later versions of Windows 10.
Method 5: SFC scan
SFC Scan and Deployment Imaging Servicing and Management or DISM are command line tools. SFC scan searches for issues causing errors like BSoDs and the DISM reloads the Windows 10/11 image. To run the SFC Scan –
- Launch CMD as Administrator.
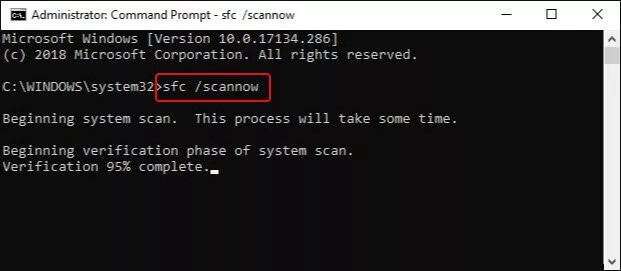
- Type sfc/scannow and hit Enter.
- Once done, restart your system, and see if this resolves the issue.
To run the DISM tool, type the following commands and run them one-by-one –
- DISM.exe /Online /Cleanup-image /Scanhealth and hit Enter.
- DISM.exe /Online /Cleanup-image /Restorehealth and hit Enter.
- Restart the system after the process is finished.
Method 6: Update SSD Firmware
If you are using an SSD as a boot drive, it is recommended to keep your boot drive’s firmware updated as an outdated firmware could result in BSoDs and error screens like the DRIVER VERIFIER DMA VIOLATION error screen.
Note – Be careful while updating the firmware as any interruption to the firmware update process could lead to permanent damage and data loss. You can check the device manufacturer’s website for related details and instructions.
Method 7: Update BIOS
In some cases, Blue screen (BSoD) errors like the DRIVER VERIFIER DMA VIOLATION are a result of outdated BIOS. If you are running an outdated BIOS, we recommend updating it to the latest version to fix this error.
An Upgraded BIOS brings new features and updates on your motherboard to work smoothly in tandem with other hardware. However, be extra cautious while performing the upgrade as it is a critical procedure and any interruption could lead to irreversible damage to the system and severe data loss.
Before updating your BIOS, be sure to check your motherboard manual for more details and instructions related to this step. You can also check this guide to get a rough idea about this process.
Method 8: Perform System Restore
System restore is a great way to restore the system to the previous or normal state before you start encountering random error screens and BSoDs like the DRIVER VERIFIER DMA VIOLATION BSoD error. If you have created a System Restore point well in advance, you can follow the below mentioned steps to restore your system to the previous normal state. Please make sure to save your work before performing this process. To do this –
- Press WIN + I to open Settings app.
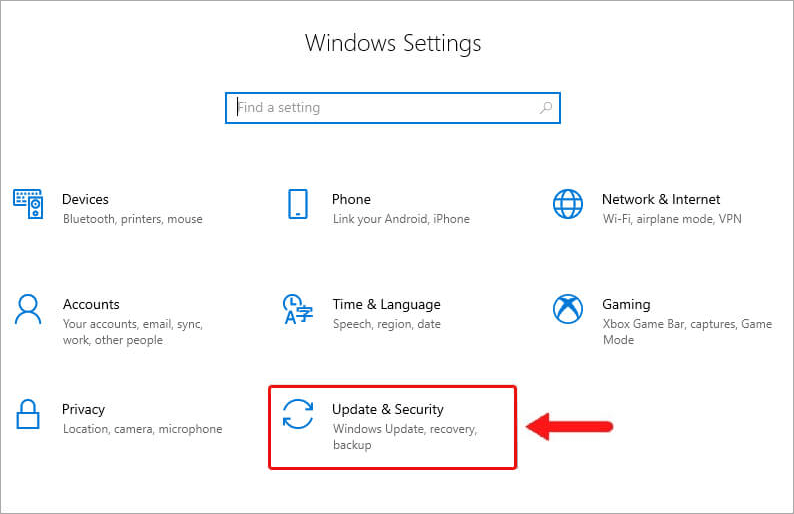
- Click on Update & Security.

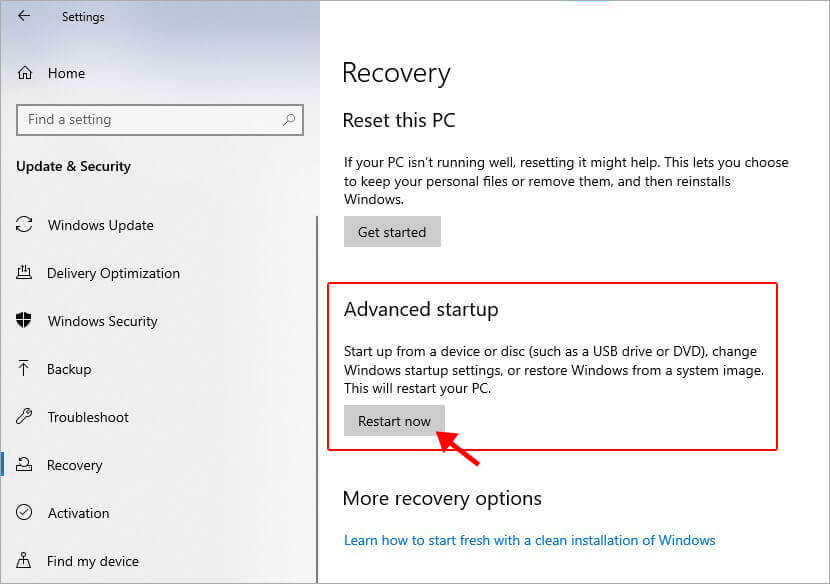
- Click Recovery in the left pane and then click Restart now under Advanced startup.
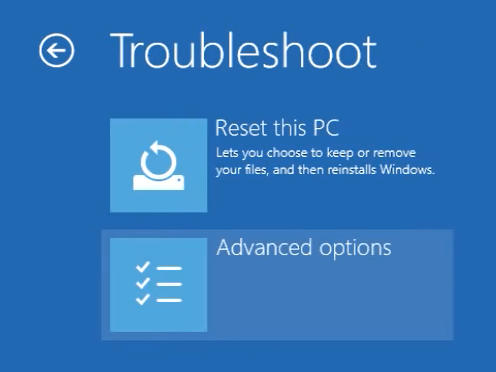
- On the WinRE screen, click Troubleshoot.
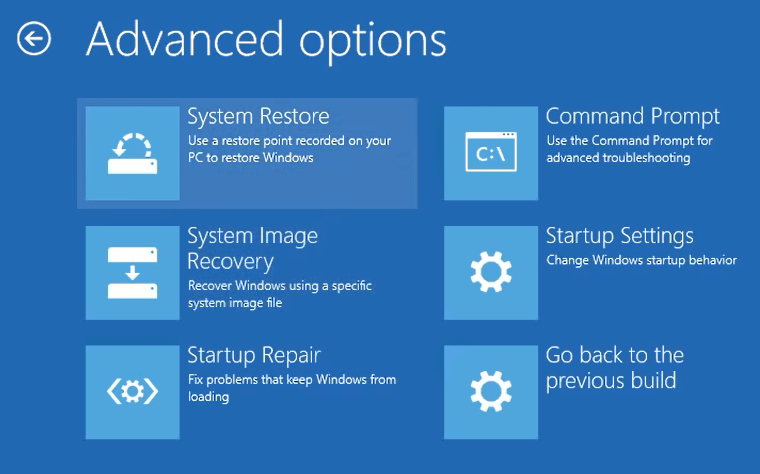
- Click Advanced options.
- Click System Restore.
- The wizard will prompt you to select your username and enter password for it, if required.
- Select Choose a different restore point and click Next.
- Choose the restore point you wish to return to and click Next.
- Wait for the process to finish restoring Windows 10/11 to its previous state should fix this BSoD error.
Method 9: Reset Windows 10/11
Resetting Windows 10/11 to its original state is the last resort if none of the available solutions provide a resolution for the problem in hand. We would recommend taking a complete backup of your data on an external storage device before proceeding with this. Once you have taken a complete backup of your data, carefully follow the steps below to reset your PC –
- Press WIN + I to open the Settings app.
- Click Update & Security.
- Click Recovery in the left pane and then click on Get started under Reset this PC.
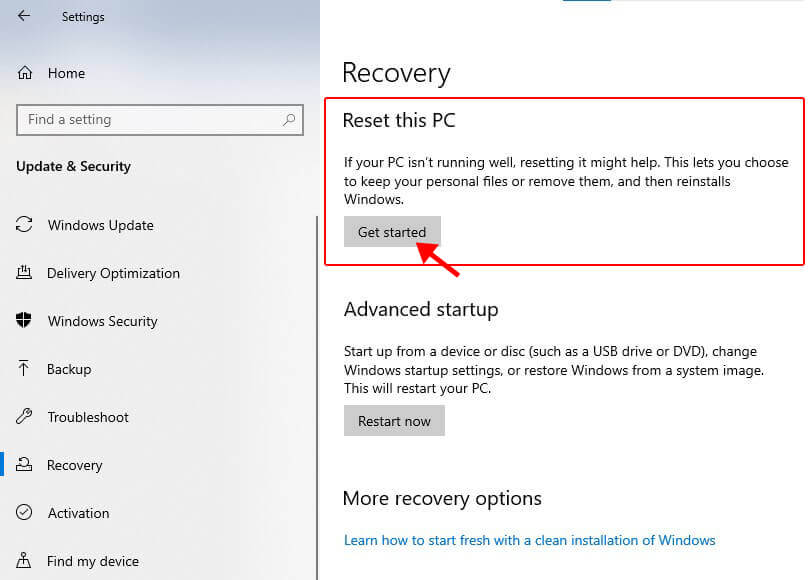
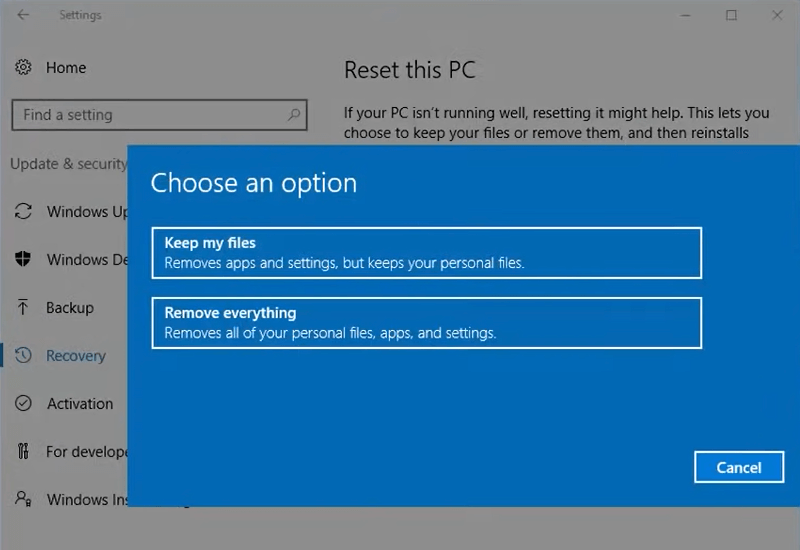
- A prompt will ask you to either Keep my files or Remove everything. Make your selection and proceed further.
- In the next section, you will have to choose between Cloud download or Local reinstall. Carefully select whatever you feel comfortable with.
Note – Selecting cloud download will download a fresh image of Windows OS and remove any custom OS image that came preinstalled with the PC.
- Proceed with the wizard by carefully reading the reinstallation instructions listed on the Ready to reset this PC screen. Click Reset whenever you are ready.
Performing this procedure installs a clean and fresh Windows image that should fix the DRIVER VERIFIER DMA VIOLATION BSoD error.
Expert Data Care Solution
If the DRIVER VERIFIER DMA VIOLATION blue screen error is causing your system to crash and has rendered it unbootable, you can use a handy professional tool for rescuing your data from such a system. Stellar Data Recovery Professional is an advanced software that allows users to recover data lost in any data loss scenario like accidental deletion, system crash, and more.
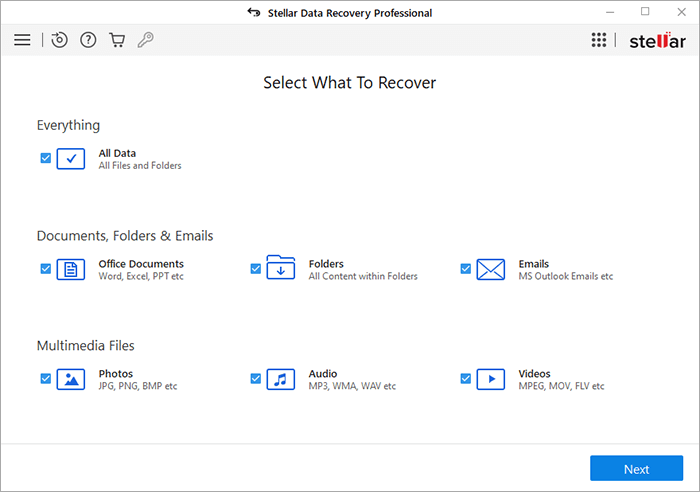
Stellar Data Recovery Professional brings a clean and intuitive UI, which makes data recovery simple. It is a capable software, which allows users to create a bootable media for recovering data from a crashed Windows PC.
Conclusion
Like all other BSoDs, the DRIVER VERIFIER DMA VIOLATION is a critical blue screen error that causes system wide instability and unexpected crashes. In this article, we learned about the causes behind this issue along with methods to resolve this BSoD. We hope that the fixes mentioned in this article will help you fix this issue and get your PC back on track.
FAQs
How do I know if the Driver Verifier is running on my Windows 10/11 computer?
Open Command Prompt with admin privileges and type verifier/querysettings and press Enter. If it displays a list of drivers, it means it the Driver Verifier is running.
What causes the DRIVER VERIFIER DMA VIOLATION BSoD on Windows 10/11 PC?
Outdated device drivers, Windows OS, BIOS, SSD firmware could possibly trigger the DRIVER VERIFIER DMA VIOLATION blue screen error.
Was this article helpful?
YES0
NO
При загрузке, во время работы или при запуске определенных программ и игр пользователи Windows 11/10 и других версий ОС могут столкнуться с ошибкой DRIVER VERIFIER DETECTED VIOLATION на синем экране.
В этой инструкции о том, чем вызвана ошибка и о том, как её исправить в зависимости от конкретной ситуации её появления.
Отключение диспетчера проверки драйверов
Ошибка DRIVER VERIFIER DETECTED VIOLATION вызвана работой диспетчера проверки драйверов (Driver Verifier) — специальным средством, проверяющим работу драйверов устройств в различных режимах и инициирующим рассматриваемый синий экран при обнаружении неправильной работы какого-либо из них.

При этом вы могли запустить его не непосредственно перед её появлением, а когда-то давно и продолжительное время никаких сообщений об ошибках не появлялось: до момента обновления того или иного драйвера, либо запуска ПО, которое «по-особому» обращается к уже имеющимся драйверам.
Обычно для того, чтобы ошибка больше не появлялась, достаточно отключить работу Driver Verifier (при условии, что в работе драйверов нет других наблюдаемых проблем, если есть — следует заняться их обновлением или, наоборот, откатом).
Отключение, в зависимости от ситуации может выполняться по-разному. Если вход в Windows и работа возможны, достаточно выполнить следующие шаги:
- Запустите командную строку от имени администратора.
- Введите команду
verifier /reset
и нажмите Enter
- Перезагрузите компьютер
Если синий экран не позволяет зайти в Windows, вы можете использовать следующий подход для отключения диспетчера проверки драйверов (если проблема появилась недавно, проще будет использовать точки восстановления системы из среды восстановления):
- Загрузите ваш компьютер с загрузочной флешки.
- Прямо на экране выбора языка установки нажмите клавиши Shift+F10 (иногда — Shift+Fn+F10), это откроет командную строку. Введите regedit (смена языка по Alt+Shift) и нажмите Enter.
- В открывшемся редакторе реестра выберите раздел HKEY_LOCAL_MACHINE, в меню выберите «Файл» — «Загрузить куст», перейдите в папку
C:\Windows\System32\config
(буква диска может отличаться от C при загрузке с флешки), выберите файл SYSTEM (без расширения), нажмите «Открыть» и укажите любое имя раздела на ваше усмотрение.

- Внутри раздела HKEY_LOCAL_MACHINE появится подраздел с заданным вами именем, в нём перейдите по пути
ControlSet001\Control\Session Manager\Memory Management\
и, если в нём присутствует подразделы с именами VerifyDrivers и VerifyDriverLevel — удалите их (правый клик по разделу — удалить).
- Выберите раздел с именем, заданным вами, и используйте пункт меню «Файл» — «Выгрузить куст».
- Закройте редактор реестра и перезагрузите компьютер как обычно.


На сайте есть более подробная статья про диспетчер проверки драйверов Windows и его использование, если вам будет интересно. Остались вопросы? — можно задать их в комментариях, я постараюсь ответить.
What will you do if you encounter the DRIVER VERIFIER DMA VIOLATION error in Windows 10/11? If you don’t know how to deal with it, then this post from MiniTool is what you need. You can find multiple efficient solutions to get rid of the Blue Screen of Death error.
Meet BSOD in Windows system? That’s frustrating and troublesome. When the Blue Screen appears, it will be accompanied by different stop codes, such as PAGE FAULT IN NONPAGED AREA. And this post is mainly talking about Windows stop code DRIVER VERIFIER DMA VIOLATION BSOD.
What is DRIVER VERIFIER DMA VIOLATION (DRIVER_VERIFIER_DMA_VIOLATION)? It has an error code 0x000000E6 and this error appears because device drivers act abnormally. Then how to fix DRIVER VERIFIER DMA VIOLATION Windows 10/11? Keep reading.
Method 1: Update Your Operating System
Keeping your system up to date can avoid many errors appearing. Therefore, when you meet the DRIVER VERIFIER DMA VIOLATION Windows 10/11 error, updating your system may help you get rid of the error. Here is what you need to do:
Step 1: Press the Win + I keys at the same time to open Settings and then choose Update & Security.
Step 2: Click Windows Update and then choose Check for updates on the right panel.
Step 3: If your system is not up to date, Windows will start to download updates automatically.
Step 4: Reboot your computer to finish updating your system. Then the Windows 10 DRIVER VERIFIER DMA VIOLATION error should be fixed.
Method 2: Disable Driver Verifier
If Driver Verifier meets some unexpected problems, then the DRIVER VERIFIER DMA VIOLATION error will appear. Thus, you can try disabling Driver Verifier to solve the problem. Here is a quick guide:
Step 1: Type verifier in the Search bar and then click the best match one to open Verifier. If a UAC prompts, click Yes.
Step 2: In the pop-out window, choose Delete existing settings and then click Finish.
Step 3: Restart your system and then see whether the error is gone.
If the error doesn’t disappear after you disable Driver Verifier, then you need to reset the Verifier. Here is what you need to do:
Step 1: Press the Win + R keys at the same time to open the Run box.
Step 2: Type cmd in the box and then press the Shift + Ctrl + Enter keys at the same time to open Command Prompt as an administrator.
Step 3: Type Verifier /reset in the window and then press Enter.
Step 4: Restart your computer and then check if the DRIVER VERIFIER DMA VIOLATION error disappears.
Method 3: Make Changes to the Drivers
You can also try to make some changes to your drivers to fix the DRIVER VERIFIER DMA VIOLATION error because outdated or corrupted drivers will trigger the BSOD error in Windows 11/10.
Update Your Drivers
If you haven’t updated your drivers for a long time, then the culprit of the DRIVER VERIFIER DMA VIOLATION error may be outdated drivers. So updating your drivers may fix the problem.
Step 1: Press the Win + X keys at the same time to select Device Manager.
Step 2: Right-click the device with a yellow indication to choose Update driver.
Step 3: Choose Search automatically for updated driver software, and then follow the on-screen instructions to finish updating the driver. If you have several devices with yellow indications, then do the same as above for all.
Step 4: Reboot your computer and then check if the error is gone.
Roll Back Your Drivers
If you recently updated your driver, and the driver is not compatible with your system or it is corrupted, then you will get the DRIVER VERIFIER DMA VIOLATION BSOD error. Thus, you need to roll back your driver to solve the problem.
Step 1: Open Device Manager and then find the drive that you recently updated. Right-click the driver to choose Properties.
Step 2: In the newly pop-out window, go to the Driver tab and then click Roll Back Driver. Then follow the instructions showing on the screen to roll back the driver.
Step 3: Reboot your computer to check if the error persists.
Method 4: Run the Blue Screen Troubleshooter
Running the Blue Screen Troubleshooter will easily help you get rid of the DRIVER VERIFIER DMA VIOLATION error from your Windows 10/11 PC. Here is the tutorial:
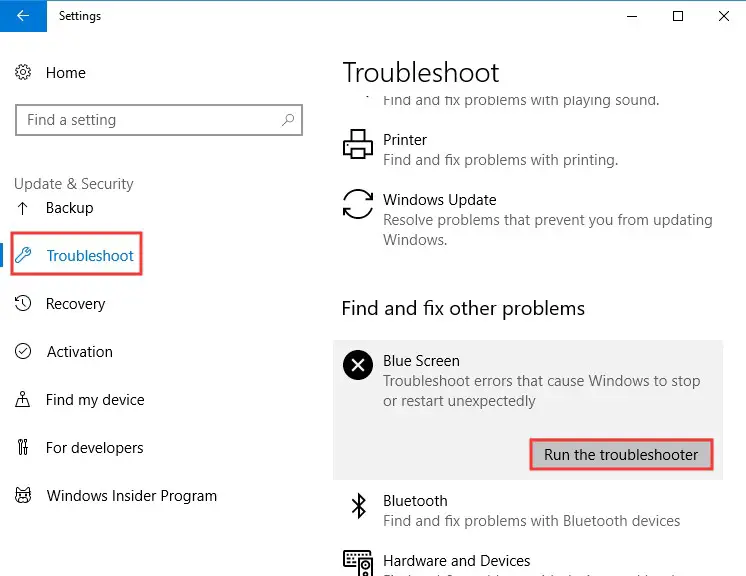
Step 1: Open Settings, choose Update & Security and then click Troubleshoot.
Step 2: Click Blue Screen in the right panel and then click Run the troubleshooter.
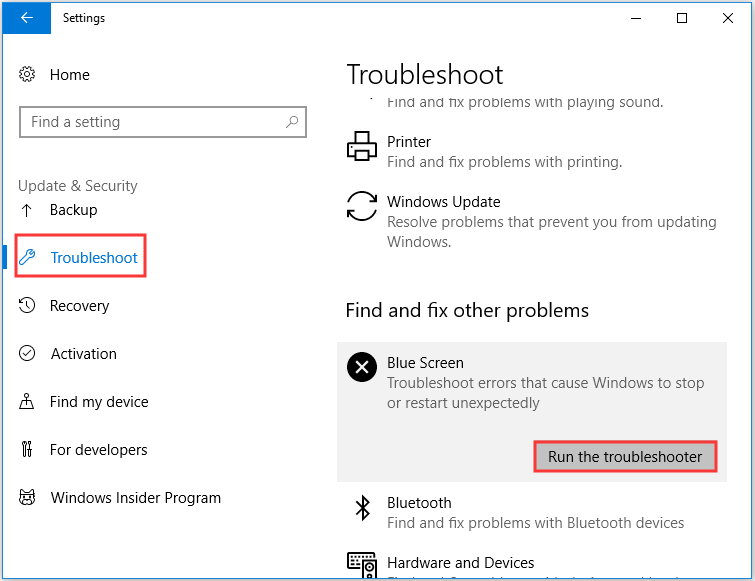
Step 3: Follow the on-screen prompts to complete the troubleshooting. Restart your computer and then see if the error is fixed.
If running the Blue Screen Troubleshooter cannot solve the issue, then you can run the SFC tool to scan your system and repair detected issues. Here is a quick guide:
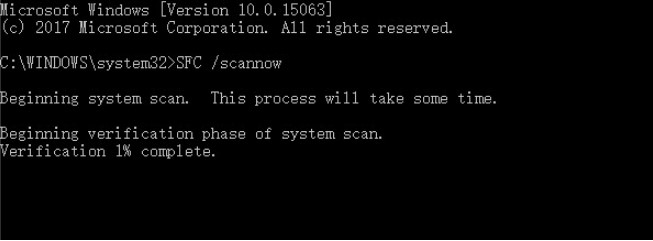
Step 1: Open Command Prompt as an administrator, type sfc /scannow in the window and then press Enter.

Step 2: Wait until the procedure is done. Normally, if there is something wrong being detected, the SFC tool will repair them automatically.
Step 3: Restart your computer to check whether the DRIVER VERIFIER DMA VIOLATION error is fixed.
Running the SFC tool failed? Then you can try to run the DISM tool. DISM can also help you scan for corrupted system files and repair them automatically. Here is what you need to do:
Step 1: Open Command Prompt as an administrator as mentioned above.
Step 2: Type DISM.exe /Online /Cleanup-image /Restorehealth in the window and then press Enter.
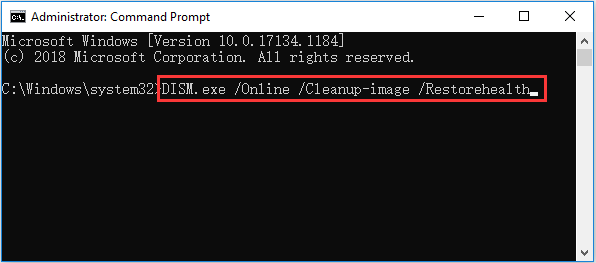
Step 3: Wait for the process to finish. Then restart your system to check if the error still exists.
Method 7: Check for Faulty Hardware
The BSOD errors often caused by faulty hardware (such as RAM and motherboard), therefore, it is highly recommended to check if your hardware works normally. If your hardware doesn’t work well, then you can try to replace it to get rid of the DRIVER VERIFIER DMA VIOLATION error.
You may be interested in the two posts: How to Tell If RAM Is Bad? 8 Bad RAM Symptoms Are for You! and How to Test Motherboard for Faults? Much Info Is Introduced!
Method 8: Update Your BIOS
Outdated BIOS can cause many troubles and the DRIVER VERIFIER DMA VIOLATION BSOD error is one of them, so you need to update your BIOS to fix the error. But you need to be careful when you perform the method because the faulty operation will cause serious damage to your motherboard.
Method 9: Update Your SSD Firmware
If you install Windows on your SSD, then it is recommended to update your SSD firmware because outdated firmware may trigger different BSOD errors such as DRIVER VERIFIER DMA VIOLATION.
However, if you fail to perform the SSD firmware update operation properly, it may cause permanent damage and lose all data. Therefore, you must be extremely careful and follow the correct instructions provided by the manufacturer to complete the task.
Method 10: Perform System Restore
If you have created a restore point in advance, then you can perform System Restore to make your computer go back to the previous normal state of Windows 11/10. Here is a simple guide:
Step 1: Open the Run box, type rstrui in the box and then click OK to open System Restore.
Step 2: In the pop-out window, click Next. Then choose s system restore point from the list and click Next.
Step 3: Confirm your restore point and then click Finish. Read the message saying that “Once started, System Restore cannot be interrupted. Do you want to continue?”, then click Yes.
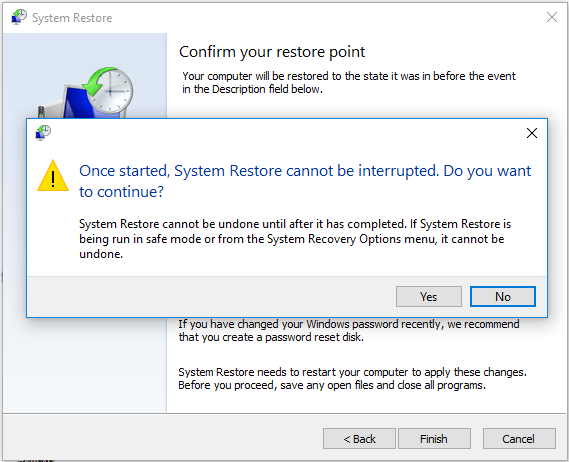
Step 4: Wait until the process is completed, then your computer can run normally without the DRIVER VERIFIER DMA VIOLATION blue screen error.
Method 11: Reset Windows 10/11
If none of the methods above solve the DRIVER VERIFIER DMA VIOLATION error, then you need to reset your PC. Here is what you need to do:
Step 1: Click Update & Security on the Settings page.
Step 2: Go to the Recovery tab and click Get Started under the Reset this PC section on the right panel.

Step 3: Choose whether to Keep my files or Remove everything while resetting your PC.
Step 4: Follow the prompts on the screen to finish the process. After you reset your system, you can run your system without BSOD.
Click to Tweet
Top Recommendation: Back up Your Windows System
It is common to meet data loss due to system crash, power failure, BSOD and virus attack. Then you may wonder how to avoid losing data. The answer is to back up your data. And you’d better back up your system in advance so that you can easily restore your system to normal state without performing the above methods when you meet BSOD errors.
Referring to backup, it is strongly recommended to use MiniTool ShadowMaker – a piece of fantastic and wonderful backup and restore software for Windows. It allows you to back up files and folders, disks and partitions, and even the operating system. And you can save backup images to four different locations: Administrative, Libraries, Computer, and Shared.
And the Sync feature is useful to sync files and folders to other locations. While the Disk Clone feature allows you to create a bootable external hard drive and clone simple volumes in the dynamic disks.
What’s better, MiniTool ShadowMaker offers you a Trial Edition with 30 days to enjoy all the features.
MiniTool ShadowMaker TrialClick to Download100%Clean & Safe
Here is the way to back up your Windows system using MiniTool ShadowMaker:
Step 1: Install and launch MiniTool ShadowMaker, then click Keep Trial.
Step 2: Go to the Backup page. MiniTool ShadowMaker selects your system as the source by default and it selects the backup destination by default, too. However, you’d better choose your external hard drive as a backup destination by clicking the DESTINATION.
Step 3: After you have confirmed the backup source and destination, then click Back Up Now to back up your system immediately. You can also click Back Up Later to delay the backup.

And you’d better create bootable media when your system runs normally so that you can use it to boot your computer when your computer fails to boot.
Bottom Line
This post focuses on the DRIVER VERIFIER DMA VIOLATION Windows 11/10 error. It offers you 11 useful methods to deal with the error, so if you meet the error, try the methods mentioned above. And if you have any better suggestions or have any confusion about the methods, leave a comment below or send an email to [email protected].
DRIVER VERIFIER DMA VIOLATION FAQ
How do I turn off Driver Verifier?
- Type cmd in the Search box and then right-click Command Prompt to choose Run as administrator.
- Type verifier in the window and then press Enter to open Driver Verifier Manager.
- Choose Delete existing settings and then click Finish.
- Reboot your computer.
How do I run driver verifier?
- Open Driver Verifier Manager, choose Create standard settings and then click Next.
- Choose one of the selection schemes under Select what drivers to verify. For example, if you click Select driver names from a list, click Next, and then choose one or more specific drivers.
- Click Finish and then restart your computer.
Is blue screen of death bad?
Of course, the Blue Screen of Death is bad. When you meet BSOD, then you have to restart your computer and reload the programs and files you had open to go back to work. If you want to fix BSOD, then you should read this post – Windows 10 Blue Screen of Death – You Can Quickly Fix It.
How to Fix DRIVER_VERIFIER_DMA_VIOLATION Blue Screen Error in Windows 10
DRIVER_VERIFIER_DMA_VIOLATION can trigger a Blue screen of Death (BSOD) error. Driver Verifier is a built-in utility in the Windows 10 operating system. It is the one that ensures the integrity of all the drivers in the system. If during runtime, it finds the driver’s signature or activity suspicious, it stops the suspected action by triggering an error.It is common to occur in Windows 7, Windows 8.1 as well as Windows 10. When you encounter such an error, you will see the following message on your screen:
“Your PC ran into a problem that it couldn’t handle, and now it needs to restart.
If you’d like to know more, you can search online later for this error: DRIVER_VERIFIER_DMA_VIOLATION”
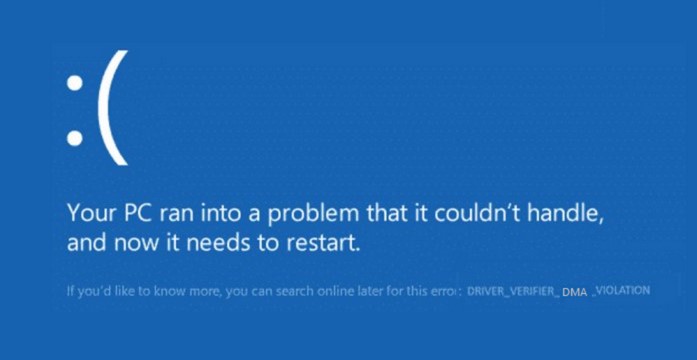
Driver_Verifier_DMA_Violation
This error appears because device drivers act abnormally. For more details, refer to each one of the ways how to fix it provided below.
DRIVER VERIFIER DMA VIOLATION Blue Screen Error
Fix 1 – Try to disable the Driver Verifier Manager
If Driver Verifier meets some unexpected problems, then the DRIVER_VERIFIER_DMA_VIOLATION or error code 0x000000E6 will appear. Thus, you can try disabling Driver Verifier to solve the problem.
Method 1: Disable the Driver Verifier Manager with Command Prompt
- Press the Win + R keys at the same time to open the Run box.
- Type cmd in the box and then press the Shift + Ctrl + Enter keys at the same time to open Command Prompt as an administrator.
- Type Verifier /reset in the window and then press Enter.
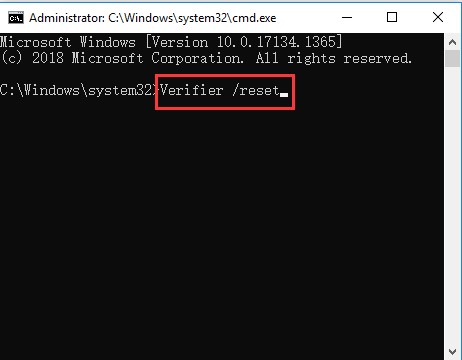
Disable Driver Verifier Manager
- Restart your system and then see whether the error is gone.
Method 2: Disable the Driver Verifier Manager manually
Step 1: Type verifier in the search bar and then click the best match one to open Verifier. If a UAC prompts, click Yes.
Step 2: In the pop-out window, choose to Delete existing settings and then click Finish.
Disable Driver Verifier Manager
Step 3: Restart your system and then see whether the error is gone.
Fix 2: Make Changes to the Drivers
You can also try to make some changes to your drivers because outdated or corrupted drivers will trigger the BSOD error.
Method 1: Update Your Drivers
If you haven’t updated your drivers for a long time, then the culprit of the DRIVER_VERIFIER_DMA_VIOLATION or error code 0x000000E6 may be outdated drivers. So updating your drivers may fix the problem.
- Press the Win + X keys at the same time to select Device Manager.
- Right-click the device with a yellow indication to choose Update driver.
- Choose Search automatically for updated driver software, and then follow the on-screen instructions to finish updating the driver. If you have several devices with yellow indications, then do the same as above for all.
- Reboot your computer and then check if the error is gone.
Method 2: Roll Back Your Drivers
If you recently updated your driver, and the driver is not compatible with your system or it is corrupted, then you will get the “DRIVER_VERIFIER_DMA_VIOLATION” or “error code 0x000000E6”. Thus, you need to roll back your driver to solve the problem.
- Open Device Manager and then find the drive that you recently updated. Right-click the driver to choose Properties.
Roll Back Drivers
- In the newly pop-out window, go to the Driver tab and then click Roll Back Driver. Then follow the instructions showing on the screen to roll back the driver.
Roll Back Drivers
- Reboot your computer to check if the error persists.
Fix 3: Run the SFC Tool
If running the Blue Screen Troubleshooter cannot solve the issue, then you can run the SFC tool to scan your system and repair detected issues.
Step 1: Open System File Checker
- Type Command Prompt in the search bar of Windows 10.
- Select the best-matched one and choose Run as administrator.
Step 2: Type the command
- In the pop-up window, type the command sfc /scannow and hit Enter to continue.
- Please do not close the window until you see the message Verification 100% complete
SFC scan now command
Step 3: Reboot your computer to check if the error persists.
Fix 4: Run the DISM Tool
In case when the error is still present you can try to run the DISM tool
The DISM tool (Deployment Image Servicing and Management) also perform an in-depth search on your PC, errors that couldn’t be detected by the SFC scan can be detected with DISM.
- Run Command Prompt by following the steps above for the SFC scan.
- You now type this command when Command Prompt open: exe /online /cleanup-image /restorehealth
- Hit enter to run the command, it will now scan for problems on your PC and fix them automatically.
- Restart your pc and after the scan is finished, then check to see if the error is gone.
Fix 5: Run the Blue Screen Troubleshooter
Running the Blue Screen Troubleshooter will easily help you get rid of the error code 0x000000E6. Here is the tutorial:
- Open Settings, choose Update & Security and then click Troubleshoot.
- Click Blue Screen in the right panel and then click Run the troubleshooter.
Blue Screen Troubleshooter – Driver_Verifier_DMA_Violation
- Follow the on-screen prompts to complete the troubleshooting. Restart your computer and then see if the error is fixed
Note: If running the built-in Blue Screen Troubleshooter didn’t work, you can also try running Microsoft’s online Blue Screen Troubleshooter. All you have to do is go to Microsoft’s website and from there, you will see a simple wizard that will walk you through the troubleshooting process.
Fix 6: Install Latest Windows Update
Keeping your system up to date can avoid many errors appearing. Therefore, when you meet the DRIVER_VERIFIER_DMA_VIOLATION or error code 0x000000E6 Windows 10 error, updating your system may help you get rid of the error. Here is what you need to do:
- Press the Win + I keys at the same time to open Settings and then choose Update & Security.
- Click Windows Update and then choose to Check for updates on the right panel.
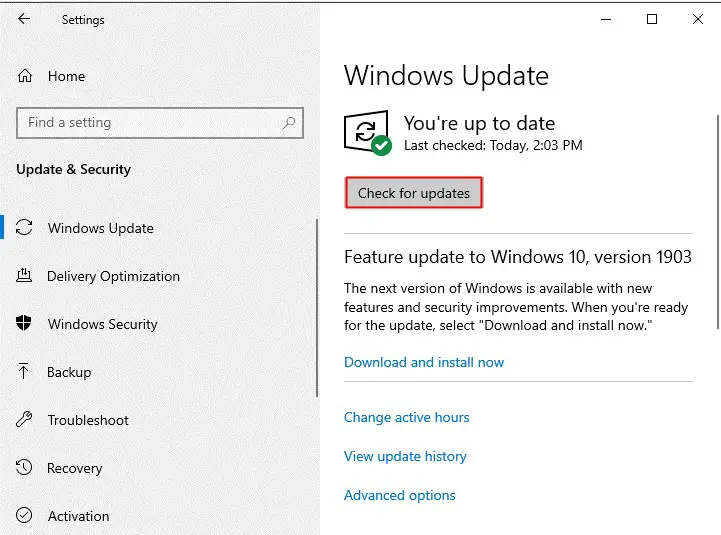
Windows Update – Error code 0x000000E6
- If your system is not up to date, Windows will start to download updates automatically.
- Reboot your computer to finish updating your system. Then the Windows 10 error code 0x000000E6 should be fixed.
Fix 7: Check for Faulty Hardware
The BSOD errors often caused by faulty hardware (such as RAM and motherboard), therefore, it is highly recommended to check if your hardware works normally. If your hardware doesn’t work well, then you can try to replace it to get rid of the error.
Fix 8: Update Your BIOS
Outdated BIOS can cause many troubles and the DRIVER VERIFIER DMA VIOLATION BSOD error is one of them, so you need to update your BIOS to fix the error. But you need to be careful when you perform the method because the faulty operation will cause serious damage to your motherboard.
Fix 9: Update Your SSD Firmware
If you install Windows on your SSD, then it is recommended to update your SSD firmware because outdated firmware may trigger different BSOD errors such as DRIVER_VERIFIER_DMA_VIOLATION or error code 0x000000E6.
However, if you fail to perform the SSD firmware update operation properly, it may cause permanent damage and lose all data. Therefore, you must be extremely careful and follow the correct instructions provided by the manufacturer to complete the task.
Fix 10: Perform System Restore
If you have created a restore point in advance, then you can perform System Restore to make your computer go back to the previous normal state. Here is a simple guide:
- Open the Run box, type rstrui in the box, and then click OK to open System Restore.
- In the pop-out window, click Next. Then choose s system restore point from the list and click Next.
- Confirm your restore point and then click Finish. Read the message saying that “Once started, System Restore cannot be interrupted. Do you want to continue?”, then click Yes.
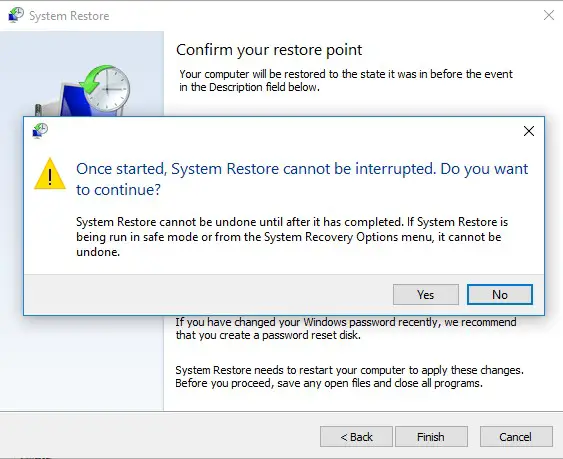
System Restore – Error code 0x000000E6
- Wait until the process is completed, then your computer can run normally without the blue screen error.
Fix 11: Reset Windows 10
If none of the methods above solve the DRIVER_VERIFIER_DMA_VIOLATION error, then you need to reset your PC. Here is what you need to do:
- Click Update & Security on the Settings page.
- Go to the Recovery tab and click Get Started under the Reset this PC section on the right panel.
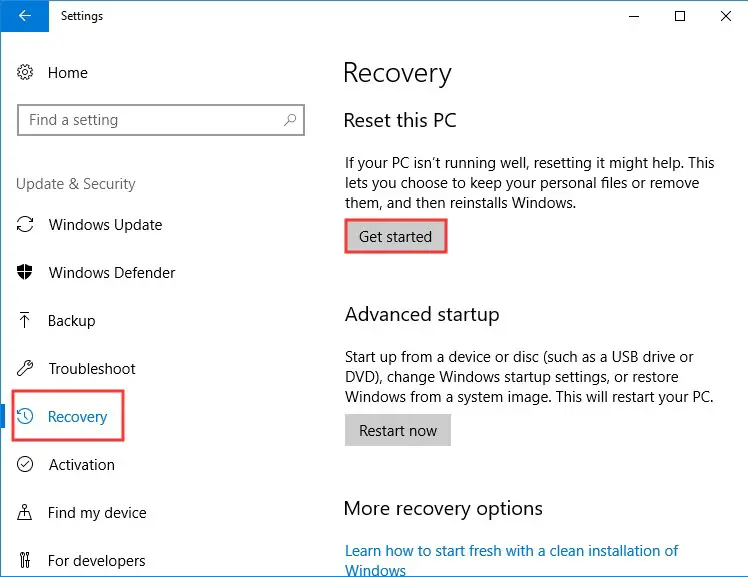
Reset Windows 10 – Error code 0x000000E6
- Choose whether to Keep my files or Remove everything while resetting your PC.
- Follow the prompts on the screen to finish the process. After you reset your system, you can run your system without BSOD.
Conclusions
Dear followers of Get IT Solutions, DRIVER_VERIFIER_DMA_VIOLATION or error code 0x000000E6 is one of the Windows 10 errors that often show Blue Screen of Death (BSoD) and cause PC crashes and freezes. In our step-by-step tutorial, we have provided all the possible solutions for you to fix it. We hope you will find this method helpful. Have you managed to solve it? Please let us know in the comments below.