
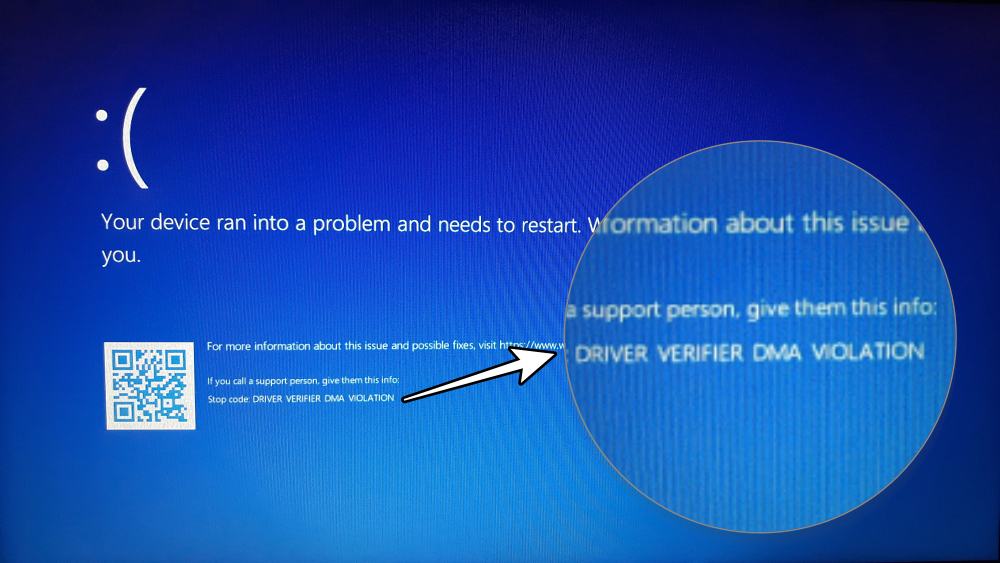
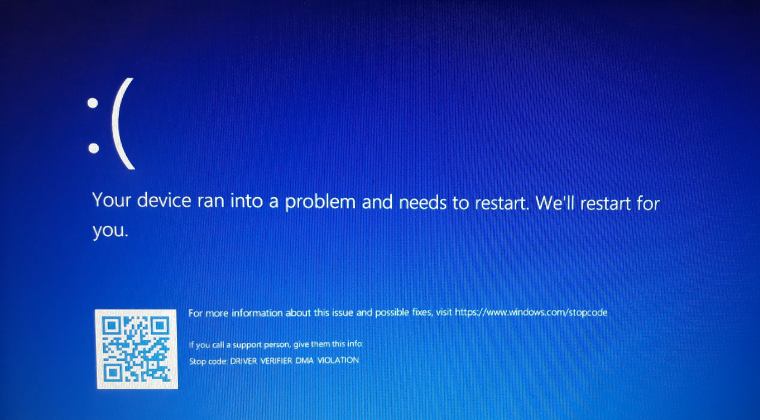
BSoDs or Blue Screen of Death are dreaded system errors that occur due to a critical failure in Windows. The DRIVER VERIFIER DMA VIOLATION BSoD error screen gets unexpectedly generated on Windows 10/11 systems due to various reasons like outdated drivers, outdated SSD firmware or corrupted drivers. This blue screen error generates a stop code DRIVER_VERIFIER_DMA_VIOLATION with a bug check value of 0x000000E6 (0xE6).
The DRIVER VERIFIER DMA VIOLATION is a critical system issue, which causes system wide instability. According to the affected users, the observations suggest that in most of the cases, outdated or corrupted drivers, outdated SSD firmware or BIOS or faulty hardware could lead to the generation of this error. Let’s look at the methods to fix this error.
What Causes the DRIVER VERIFIER DMA VIOLATION Blue Screen Error?
As soon as the system generates the DRIVER VERIFIER DMA VIOLATION BSoD screen, it crashes Windows 10/11 OS. The enabled Driver Verifier is a possible reason behind this. This stop code is also the result of the device driver freeing up the same scatter/gather list twice. Now that we have an idea about this error, let’s look at the causes that lead to the generation of the DRIVER VERIFIER DMA VIOLATION stop code on Windows 10/11 computers –
- Outdated drivers
- Corrupted drivers
- Outdated SSD firmware
- Outdated BIOS
What Are the Methods to Fix the DRIVER VERIFIER DMA VIOLATION BSoD Error?
Finding the exact root cause behind a BSoD is tricky, but there are many possible ones that lead to their generation. Same goes with their resolutions. There is no one method that fixes them all. We have circled out a few methods that you can employ to fix the DRIVER VERIFIER DMA VIOLATION blue screen error on your Windows 10/11 computer.
Method 1: Update Device Drivers and OS
This is the most basic and the simplest way to eliminate the DRIVER VERIFIER DMA VIOLATION BSoD error on your Windows 10/11 computer. Outdated device drivers and OS lead to an unstable system, which causes apps and system files to go haywire. This causes BSoDs like this error to pop-up on the screen. Follow the steps mentioned below to update device drivers and Windows OS.
To update device drivers –
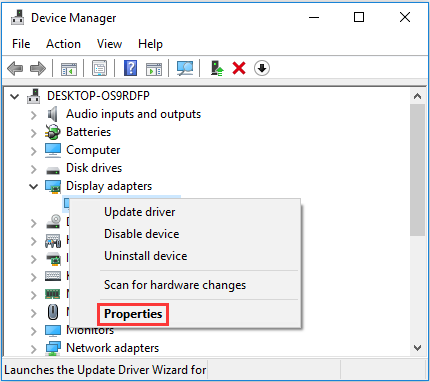
- Press WIN + X and click on Device Manager from the list.
- Double-click on all the devices to expand them.
- Find all the entries with an exclamation mark.
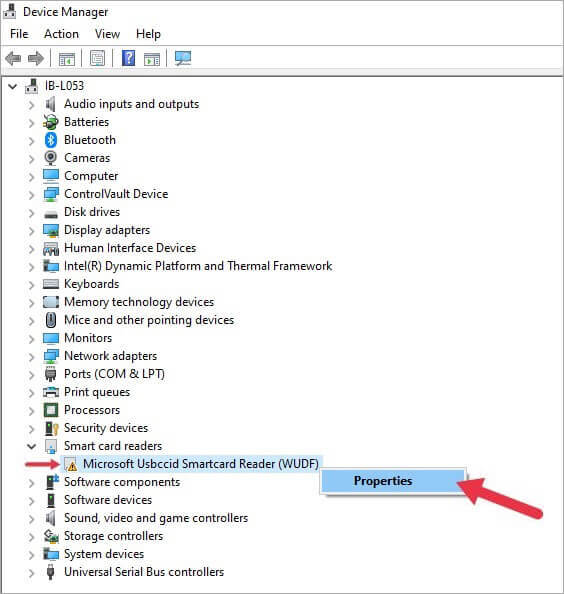
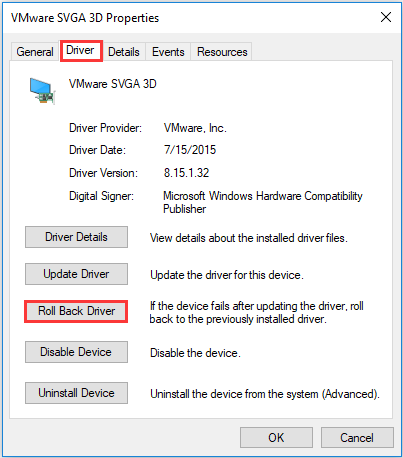
- Right-click on each of them one-by-one and click on Properties.
- Under the Driver tab, click on Update driver.
Note – If you are encountering this error screen after updating device drivers, you can revert the changes by right-clicking on the device for which you wish to revert the driver > Properties > Roll Back Driver.
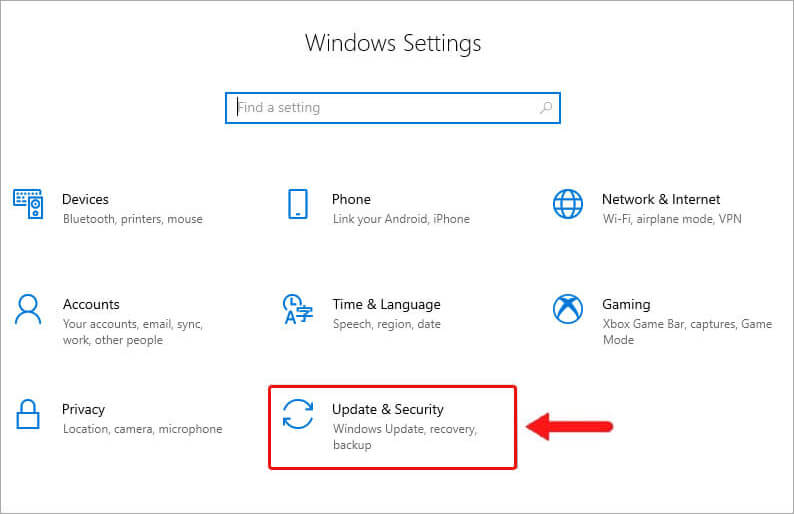
To update Windows OS –
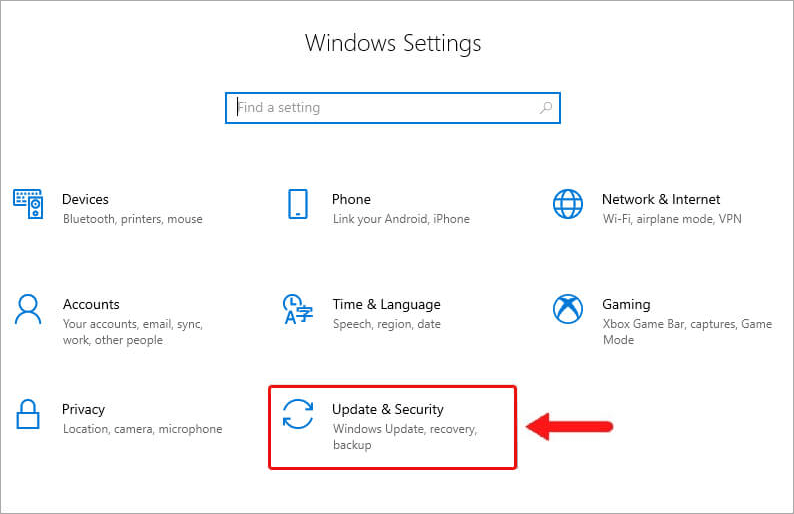
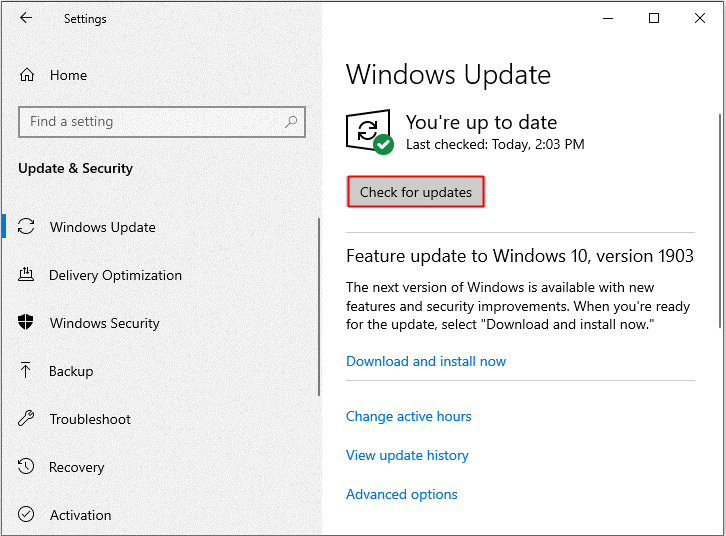
- Press WIN + I to open Settings.
- Click on Update & Security.
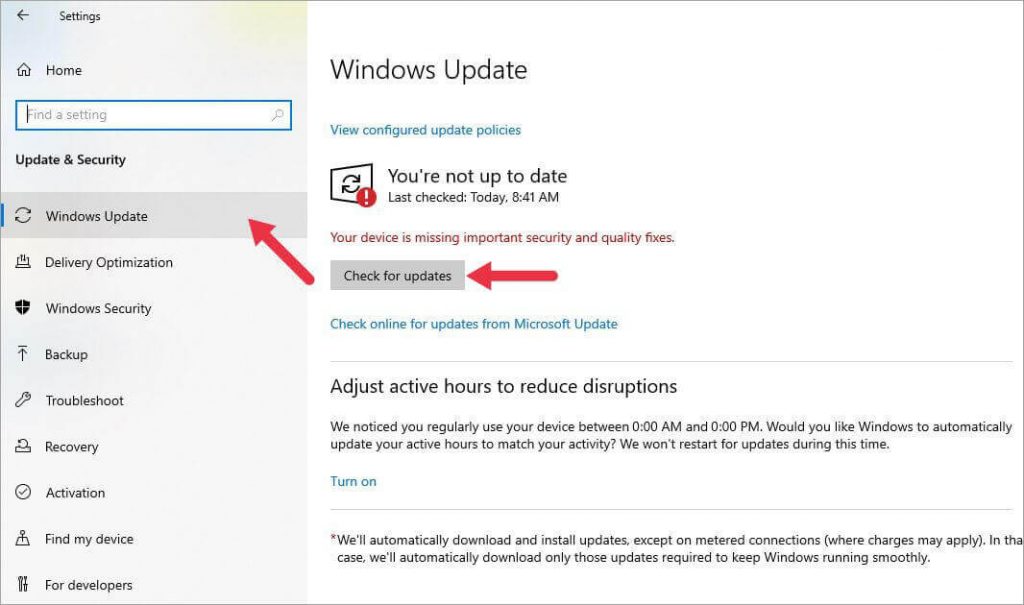
- Click on Windows Update and then Check for updates.
Method 2: Disable Driver Verifier
As mentioned earlier, in some cases, the Driver Verifier causes the DRIVER VERIFIER DMA VIOLATION BSoD to occur. You can try disabling the Driver Verifier to help you resolve the issue. Simply follow the steps as mentioned –
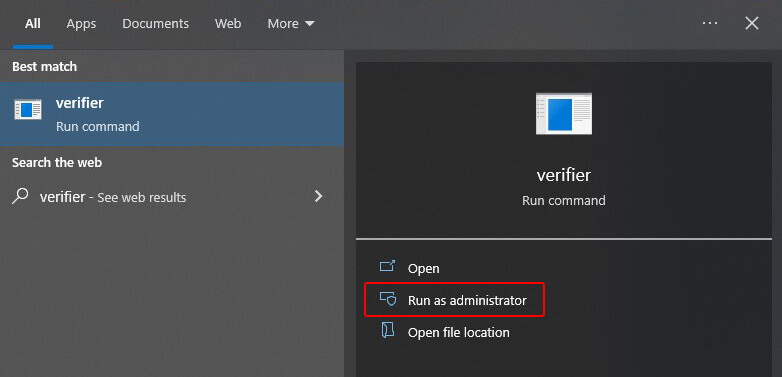
- Type Verifier in the search bar and select the one denoted as a ‘Run Command’.
- Click on Run as administrator to launch it.
- In the next window, select the Delete existing settings option and click Finish.
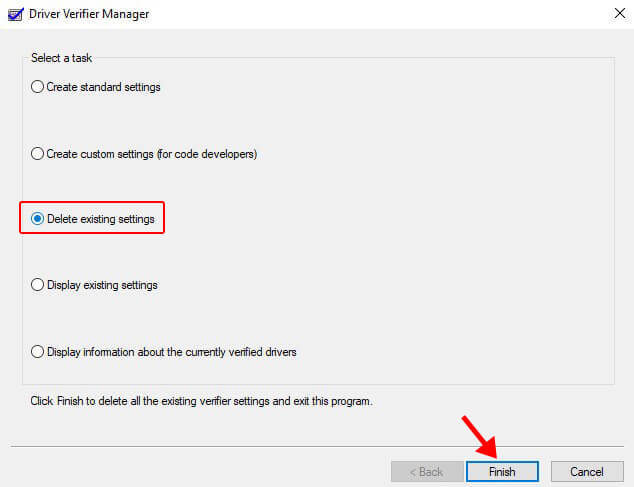
- Restart your system to check if this has fixed the BSoD.
If disabling the Driver Verifier doesn’t solve the issue, it’s time for you to reset it. Follow the below-mentioned steps to do so –
- Press WIN + R to launch Run.
- Type CMD, and press CTRL + SHIFT + ENTER to launch it as Administrator.
- Type Verifier /reset and hit ENTER.
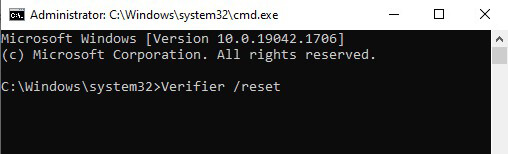
- Once the process is complete, close the terminal and restart your computer to check if this has fixed your problem.
Method 3: Check for Faulty Hardware
Many a times, BSoD errors are the result of faulty or improperly configured hardware. If you have encountered the DRIVER VERIFIER DMA VIOLATION blue screen on your computer, then it could be due to either faulty RAM or Motherboard. You can check the cables, connections, and the hardware to pin point any faulty piece and replace it to resolve this issue.
Method 4: Hardware troubleshooter
If you are still seeing the DRIVER VERIFIER DMA VIOLATION BSoD after checking for faulty hardware, you can run the hardware troubleshooter to resolve the issue at hand. This tool has a set of automated fixes, which are deployed once the troubleshooter begins the process. To do this –
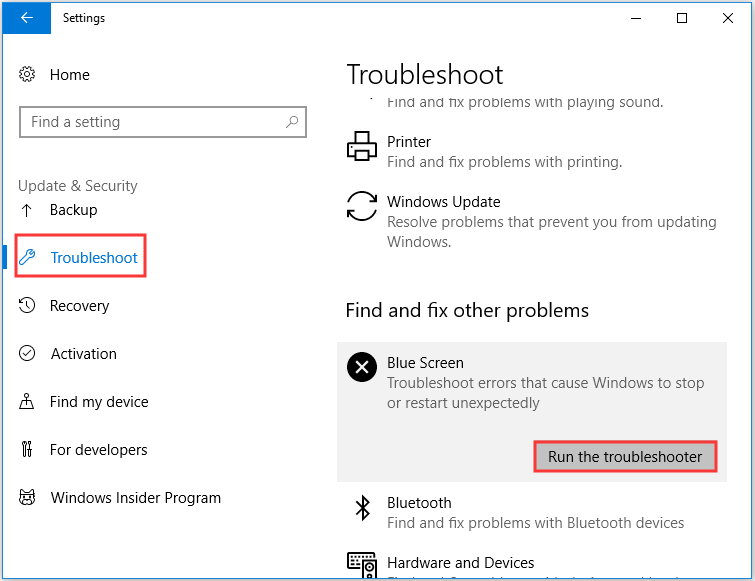
- Press WIN + I and open Settings.
- Click on Update & Security.
- Click on Troubleshoot in the left panel and then Additional troubleshooters on the right.
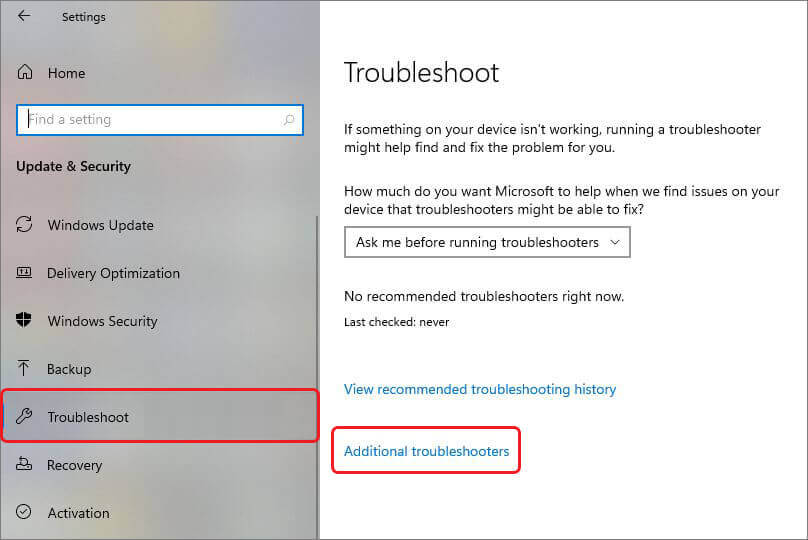
- Search for Hardware and Devices and select it.
- Click on Run the troubleshooter and wait.
- Follow the instructions as prompted by the wizard to complete the process.
- Once complete, restart your computer to check if this has fixed this blue screen error.
Note – This method is only applicable if you are running Windows 10 version 1806 or earlier. This troubleshooter was removed from the later versions of Windows 10.
Method 5: SFC scan
SFC Scan and Deployment Imaging Servicing and Management or DISM are command line tools. SFC scan searches for issues causing errors like BSoDs and the DISM reloads the Windows 10/11 image. To run the SFC Scan –
- Launch CMD as Administrator.
- Type sfc/scannow and hit Enter.
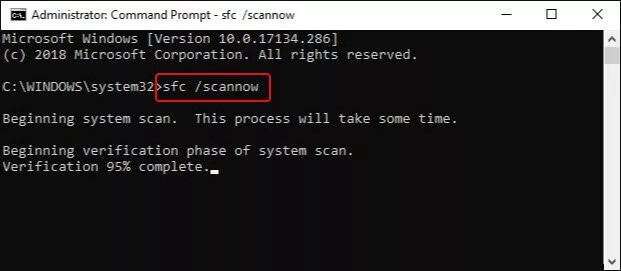
- Once done, restart your system, and see if this resolves the issue.
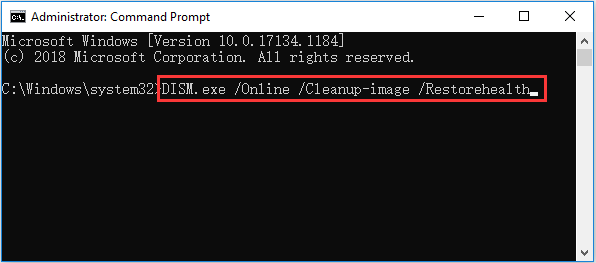
To run the DISM tool, type the following commands and run them one-by-one –
- DISM.exe /Online /Cleanup-image /Scanhealth and hit Enter.
- DISM.exe /Online /Cleanup-image /Restorehealth and hit Enter.
- Restart the system after the process is finished.
Method 6: Update SSD Firmware
If you are using an SSD as a boot drive, it is recommended to keep your boot drive’s firmware updated as an outdated firmware could result in BSoDs and error screens like the DRIVER VERIFIER DMA VIOLATION error screen.
Note – Be careful while updating the firmware as any interruption to the firmware update process could lead to permanent damage and data loss. You can check the device manufacturer’s website for related details and instructions.
Method 7: Update BIOS
In some cases, Blue screen (BSoD) errors like the DRIVER VERIFIER DMA VIOLATION are a result of outdated BIOS. If you are running an outdated BIOS, we recommend updating it to the latest version to fix this error.
An Upgraded BIOS brings new features and updates on your motherboard to work smoothly in tandem with other hardware. However, be extra cautious while performing the upgrade as it is a critical procedure and any interruption could lead to irreversible damage to the system and severe data loss.
Before updating your BIOS, be sure to check your motherboard manual for more details and instructions related to this step. You can also check this guide to get a rough idea about this process.
Method 8: Perform System Restore
System restore is a great way to restore the system to the previous or normal state before you start encountering random error screens and BSoDs like the DRIVER VERIFIER DMA VIOLATION BSoD error. If you have created a System Restore point well in advance, you can follow the below mentioned steps to restore your system to the previous normal state. Please make sure to save your work before performing this process. To do this –
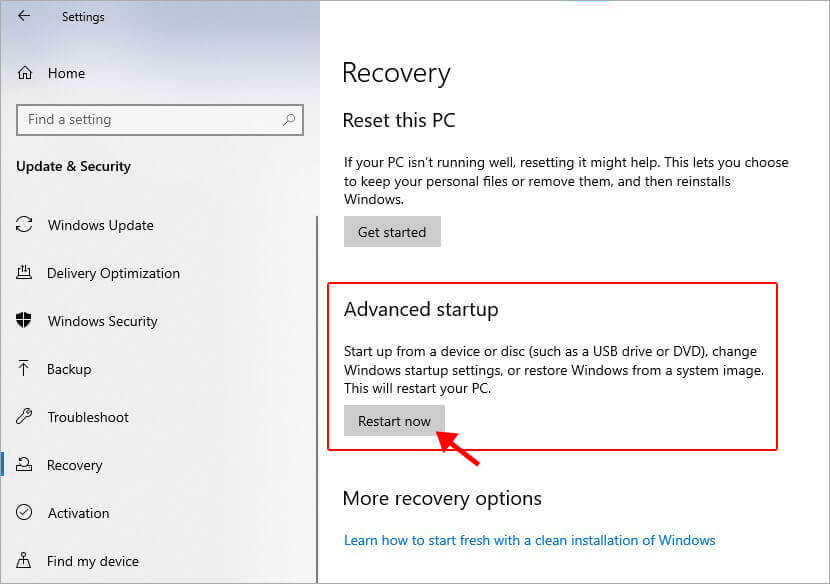
- Press WIN + I to open Settings app.
- Click on Update & Security.

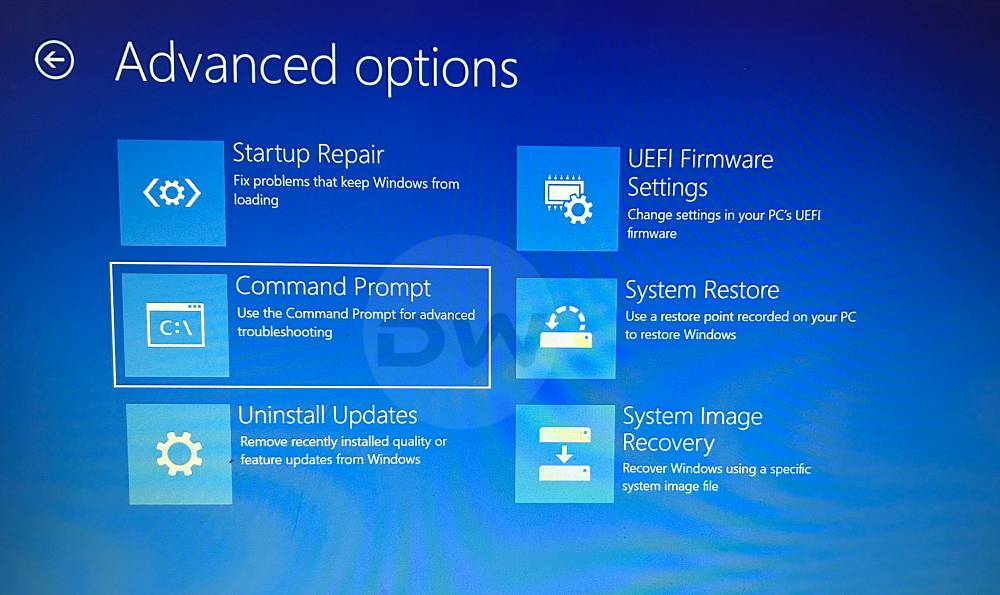
- Click Recovery in the left pane and then click Restart now under Advanced startup.
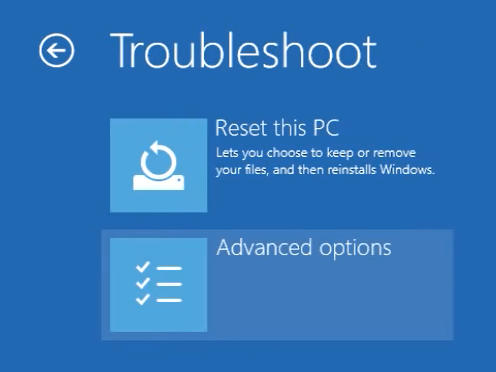
- On the WinRE screen, click Troubleshoot.
- Click Advanced options.
- Click System Restore.
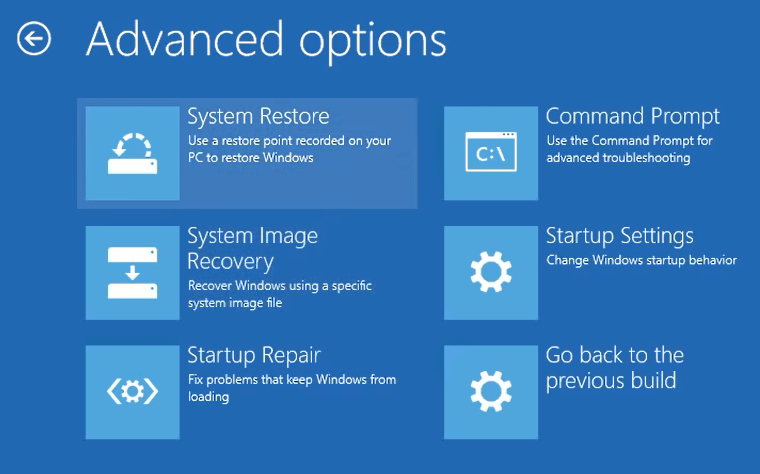
- The wizard will prompt you to select your username and enter password for it, if required.
- Select Choose a different restore point and click Next.
- Choose the restore point you wish to return to and click Next.
- Wait for the process to finish restoring Windows 10/11 to its previous state should fix this BSoD error.
Method 9: Reset Windows 10/11
Resetting Windows 10/11 to its original state is the last resort if none of the available solutions provide a resolution for the problem in hand. We would recommend taking a complete backup of your data on an external storage device before proceeding with this. Once you have taken a complete backup of your data, carefully follow the steps below to reset your PC –
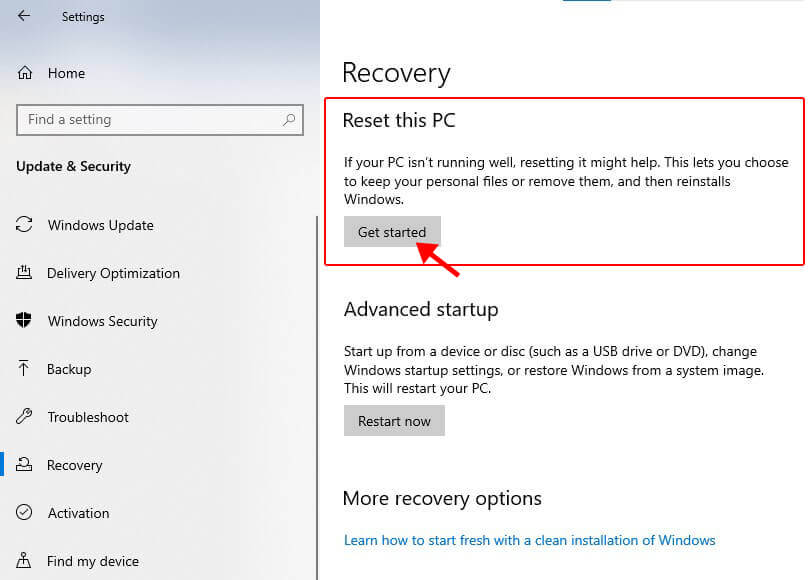
- Press WIN + I to open the Settings app.
- Click Update & Security.
- Click Recovery in the left pane and then click on Get started under Reset this PC.
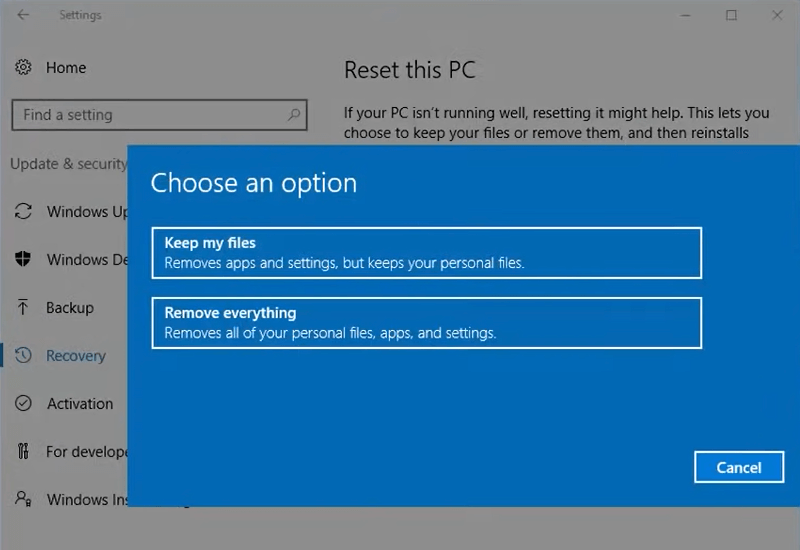
- A prompt will ask you to either Keep my files or Remove everything. Make your selection and proceed further.
- In the next section, you will have to choose between Cloud download or Local reinstall. Carefully select whatever you feel comfortable with.
Note – Selecting cloud download will download a fresh image of Windows OS and remove any custom OS image that came preinstalled with the PC.
- Proceed with the wizard by carefully reading the reinstallation instructions listed on the Ready to reset this PC screen. Click Reset whenever you are ready.
Performing this procedure installs a clean and fresh Windows image that should fix the DRIVER VERIFIER DMA VIOLATION BSoD error.
Expert Data Care Solution
If the DRIVER VERIFIER DMA VIOLATION blue screen error is causing your system to crash and has rendered it unbootable, you can use a handy professional tool for rescuing your data from such a system. Stellar Data Recovery Professional is an advanced software that allows users to recover data lost in any data loss scenario like accidental deletion, system crash, and more.
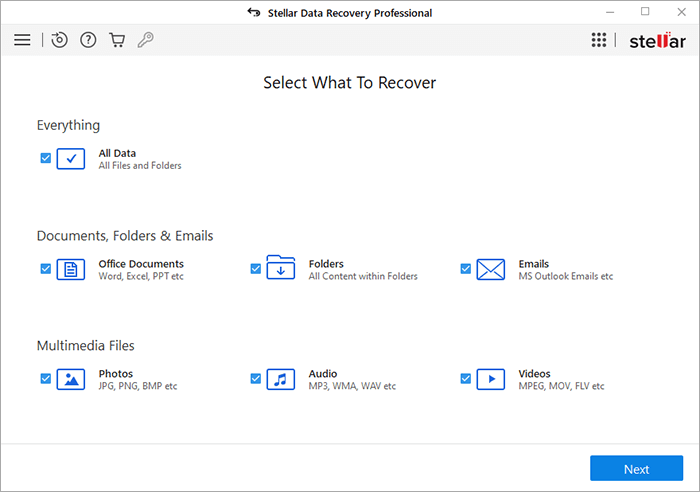
Stellar Data Recovery Professional brings a clean and intuitive UI, which makes data recovery simple. It is a capable software, which allows users to create a bootable media for recovering data from a crashed Windows PC.
Conclusion
Like all other BSoDs, the DRIVER VERIFIER DMA VIOLATION is a critical blue screen error that causes system wide instability and unexpected crashes. In this article, we learned about the causes behind this issue along with methods to resolve this BSoD. We hope that the fixes mentioned in this article will help you fix this issue and get your PC back on track.
FAQs
How do I know if the Driver Verifier is running on my Windows 10/11 computer?
Open Command Prompt with admin privileges and type verifier/querysettings and press Enter. If it displays a list of drivers, it means it the Driver Verifier is running.
What causes the DRIVER VERIFIER DMA VIOLATION BSoD on Windows 10/11 PC?
Outdated device drivers, Windows OS, BIOS, SSD firmware could possibly trigger the DRIVER VERIFIER DMA VIOLATION blue screen error.
Was this article helpful?
YES0
NO
In this guide, we will show you various methods to fix the DRIVER_VERIFIER_DMA_VIOLATION BSOD error in Windows 11. Recently I installed an update on my Windows PC [which was pending for ages]. While the update was successfully installed, however, the real fiasco began right after that- the PC got stuck in a bootloop and was unable to boot to the OS, the only saving grace was the fact that I could access the OS [more on that later].
But guess what, my friend [with a Lenovo laptop] was stuck in a similar situation, but he wasn’t even able to access the BIOS via any function keys whatsoever. So I did a detailed investigation into this issue and managed to find a few nifty methods that should help you fix the DRIVER_VERIFIER_DMA_VIOLATION BSOD error on your Windows 11 PC. So without further ado, let’s check them out.
Table of Contents
It is recommended that you try out each of the below-mentioned workarounds and then see which one spells out success. So with that in mind, let’s get started. Droidwin and its members wouldn’t be held responsible in case of a thermonuclear war, your alarm doesn’t wake you up, or if anything happens to your device and data by performing the below steps.
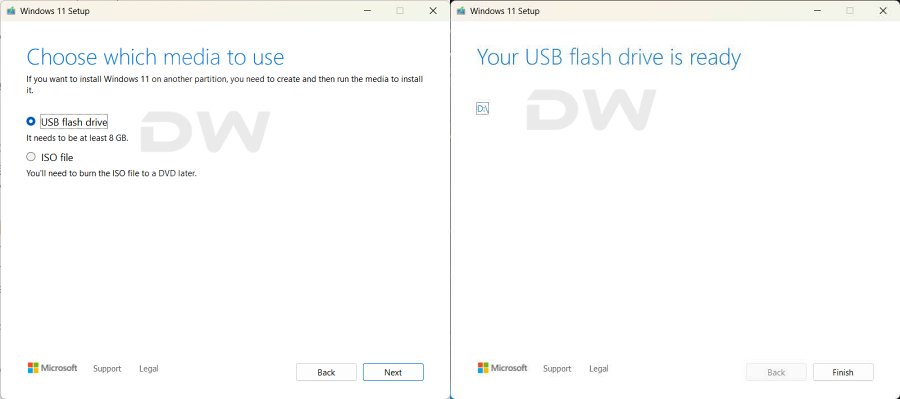
The Prerequisite: Create a Bootable Windows 11 USB
- Get hold of a pen drive having at least 8GB free space [though 16GB is recommended].
- The pendrive will be formatted. So make sure to take a backup of the data beforehand.
- Now download the Windows 11 Media Creation Tool.
- Then launch it, select your pendrive, and proceed with the on-screen instructions to create a bootable USB.

- Once done, boot your PC to BIOS [you may refer to this guide for the same].
- Lenovo PC also has a Nova button that you can press via a PIN for 4-5 seconds and then release the PIN, the laptop should boot to BIOS.
- Now change the boot order and select your USB Drive [pendrive] as the primary bootable drive.

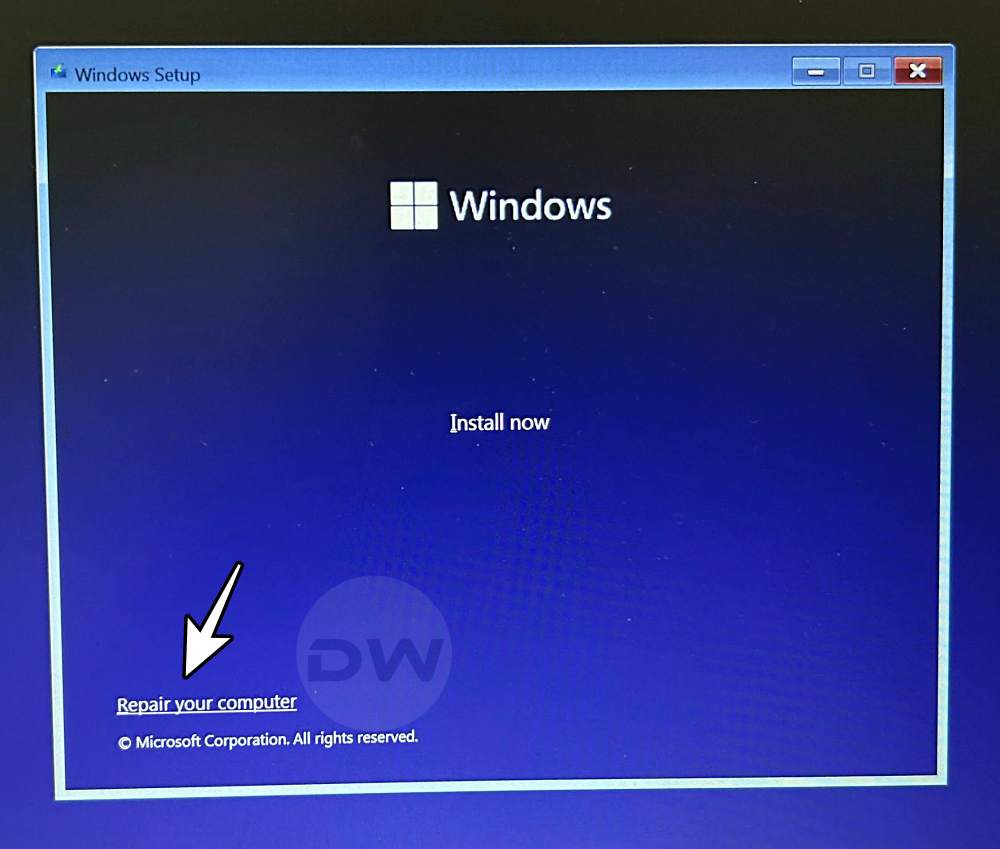
- Save and exit the changes. Your PC will now boot via the pendrive and you should be taken to the Windows 11 setup screen.
- Click Next in the language screen and then click on “Repair your computer” at the bottom left.

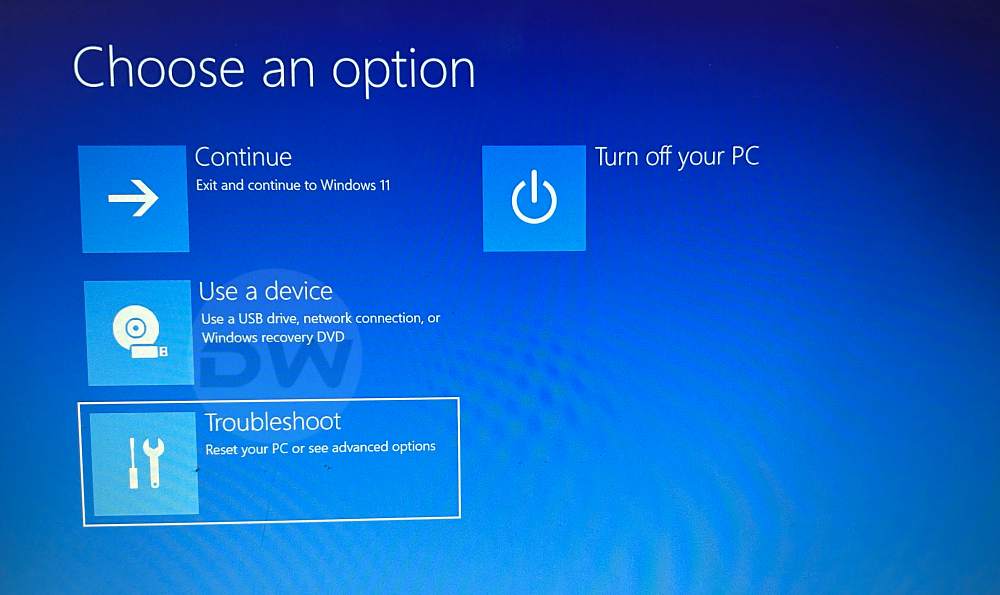
- You’ll be taken to the Windows Recovery Environment.


Congrats! You have now passed the major hurdle. Let’s proceed ahead and fix the DRIVER_VERIFIER_DMA_VIOLATION BSOD error on your Windows 11 PC.
Non-Command Prompt Fixes
These are the fixes that don’t require the use of Command Prompt. Just make sure that you are booted to the Windows Recovery Environment, as explained in the Prerequisites section, and then get started with the below fixes.
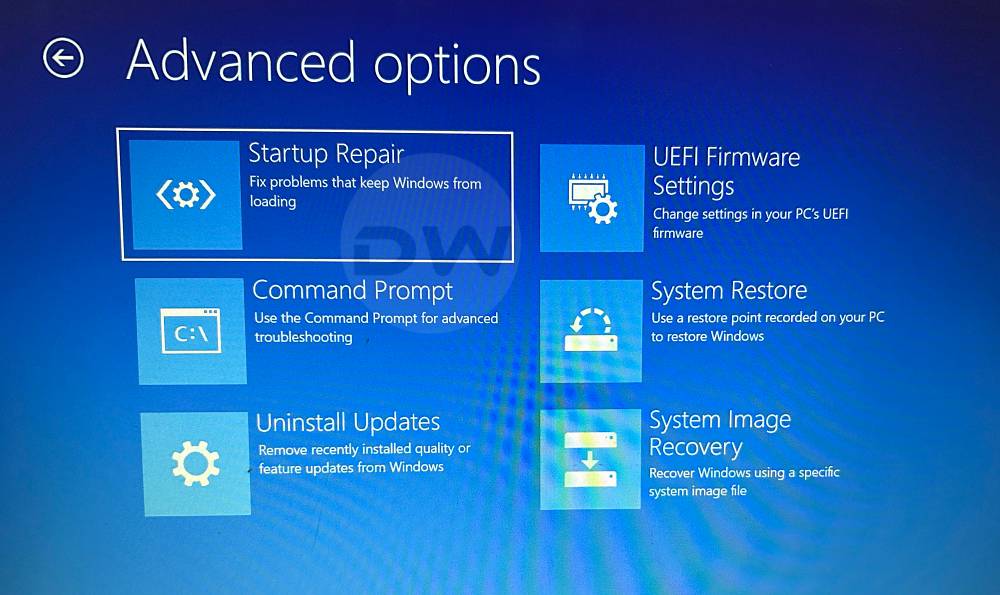
FIX 1: Startup Repair
As is evident from its name, this feature will rectify all the issues that are preventing your PC from booting to the OS. So select Startup Repair from the Windows Recovery Environment, proceed with the on-screen instructions to put this tool to the test, and then check if it rectifies the issue.
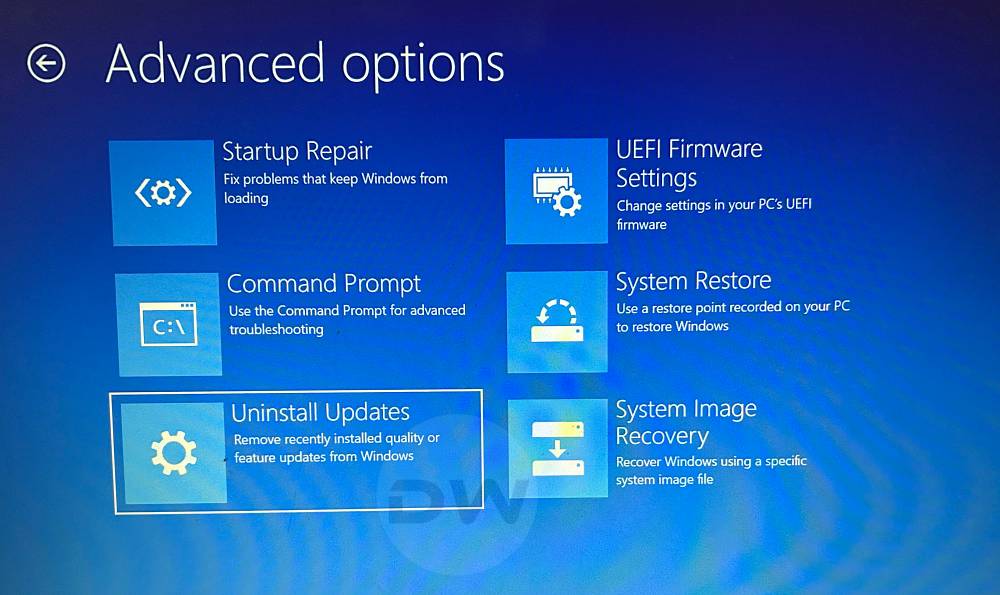
FIX 2: Uninstall Updates
If the culprit is the latest install update on your PC, then this is just the right functionality to rectify this issue. It will remove that update and roll back to the earlier stable working build which in turn should boot your PC to the OS. So do give this tweak a try and check if it fixes the DRIVER_VERIFIER_DMA_VIOLATION BSOD error in Windows 11.
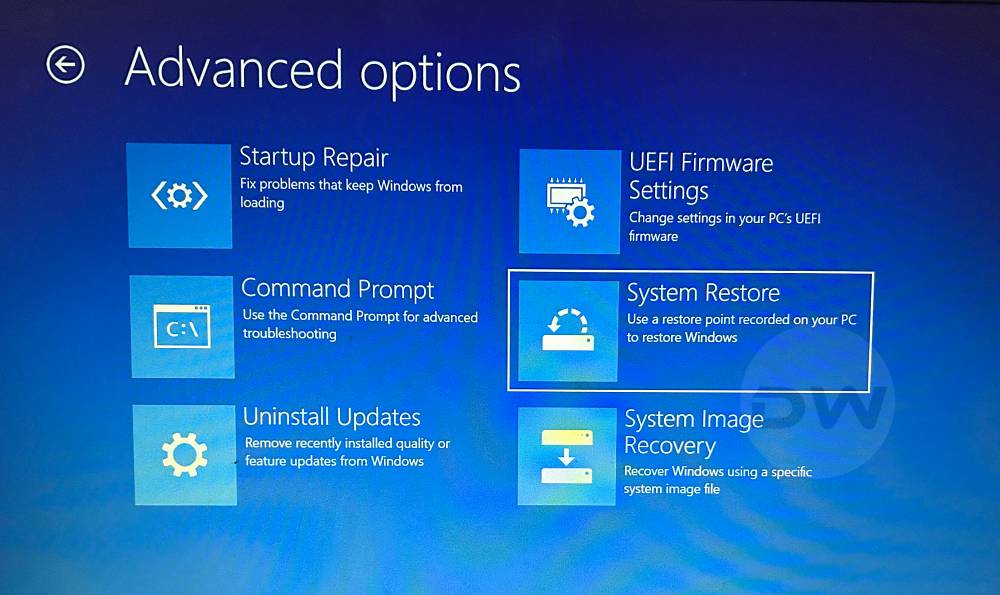
FIX 3: System Restore
If you had scheduled a system restore on your PC, then it would have taken a few backups of a working instance of the system. And now is just the right time to restore that backed-up data and get our PC up and running again. So select the System Restore option from the Windows Recovery Environment and then proceed with the on-screen instructions to get the job done.
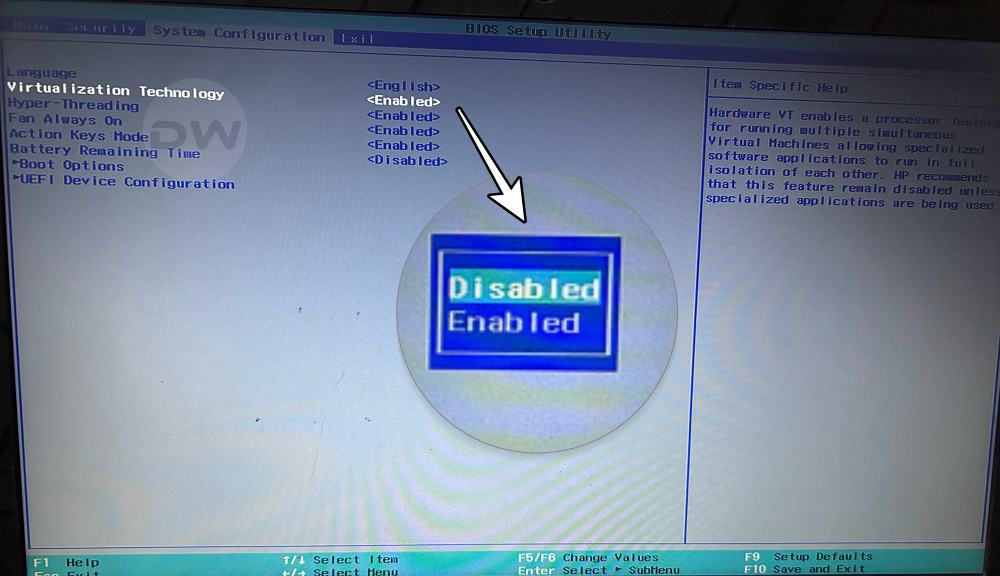
FIX 4: Disable Virtualization
In simpler terms, Virtualization lets your PC emulate a different operating system, like Android or Linux on your Windows PC. However, in some instances, it might also conflict with the proper functioning of your PC. Therefore, it is recommended that you turn off this functionality and then test out the result:
- Boot your PC to BIOS and go to Advanced.
- Then disable the Virtualization Technology.
- Likewise, also disable the VT-d [if present].

Command Prompt Fixes
These fixes would require the use of the CMD window, which could be invoked right via the Windows Recovery Environment itself. So from the said screen, go to Troubleshoot > Advanced options > Command Prompt. Now try out each of the below-listed fixes until it spells out success for you.
FIX 1: Via SFC
System File Checker checks the integrity of system files. If some of these files are corrupted or missing, then SFC will replace them with their working counterparts, which are located in C:\Windows. So let’s put this tool to the test and check out the results. For that, simply execute the below command and wait for the process to complete:
sfc /scannow
FIX 2: Via DISM Command
Deployment Image Servicing and Management (DISM.exe) is a command-line tool that can be used to service and prepare Windows images. For that, execute each of the three below commands, one after another, and then check if it spells out success for you or not.
Dism /Online /Cleanup-Image /CheckHealth
Dism /Online /Cleanup-Image /ScanHealth
Dism /Online /Cleanup-Image /RestoreHealth
FIX 3: Via CHKDSK
ScanDisk Repair or CheckDisk measures the health of the drives and repairs them accordingly. So let’s try out this tool and check if it manages to fix the DRIVER_VERIFIER_DMA_VIOLATION BSOD error on your Windows 11 PC [c: is the drive name, replace it accordingly, if needed].
chkdsk c: /f /x /r
FIX 4: Via Bootrec.exe
You could also make use of Bootrec.exe to fix issues related to the Master Boot Record, Boot Sector, and/or the Boot Configuration Data. So let’s give it a try and check out the results. For that, you need to execute the below four commands, one after the other:
bootrec.exe
BOOTREC /FIXMBR
BOOTREC /FIXBOOT
BOOTREC /RebuildBcd
FIX 5: Via Rstrui.exe
If you had enabled the System Restore feature before the issue first popped up, then you could make use of the Rstrui.exe tool to restore the backup data which in turn should boot your PC to the working OS. So execute the below command to bring up the rstrui.exe tool, then a restore point, and proceed with the on-screen instructions to restore your PC to working condition.
rstrui.exe
FIX 6: Via System Reset
If none of the aforementioned methods spelled out success, then your last course of action should be to do a reset. However, do note that this will wipe off all the data on your PC. So proceed ahead with caution and at your own risk.
systemreset -cleanpc
That’s it. These were the various methods that should help you fix the DRIVER_VERIFIER_DMA_VIOLATION BSOD error in Windows 11. If you have any queries concerning the aforementioned steps, do let us know in the comments. We will get back to you with a solution at the earliest.
- Windows 11 Games Crashing/BSOD due to FASR: How to Fix
- Prevent BSOD with Intel SST Driver and install Windows 11 2022 Update
- Fix Windows Cannot Verify the Digital Signature for the Drivers
- Enable/Disable Local Security Authority Protection in Windows 11
If you’re dealing with a Driver Verifier DMA Violation error on Windows 11, you’re probably seeing a blue screen, and it’s not the kind that brings peaceful skies to mind. Don’t worry, though; we’ve got a straightforward fix for you. This error usually stems from driver issues, so we’ll focus on updating, disabling, or rolling back drivers to get you back on track.
We are about to walk you through a step-by-step guide designed to tackle the Driver Verifier DMA Violation error on Windows 11. These steps will help you identify and fix the problematic drivers that are causing the issue.
Step 1: Boot into Safe Mode
Safe Mode is a diagnostic mode in Windows that starts your computer with a minimal set of drivers.
To do this, restart your computer and press Shift + F8 before Windows starts loading. This will take you to the Advanced Boot Options.
Step 2: Disable Driver Verifier
The Driver Verifier tool can be disabled to stop it from checking unsigned drivers, which might be causing the error.
Open Command Prompt as an administrator and type verifier /reset. This command will disable Driver Verifier.
Step 3: Update Drivers
Updating your drivers ensures they are the most recent and compatible with Windows 11.
Open Device Manager, right-click on problematic devices (usually marked with a yellow triangle), and select “Update Driver.”
Step 4: Roll Back Drivers
If updating drivers didn’t help, rolling back to a previous version might solve the problem.
In Device Manager, right-click on the problematic driver, go to Properties, and select “Roll Back Driver” under the Driver tab.
Step 5: Reinstall Faulty Drivers
Reinstalling a driver can often clear up any corruption or errors.
Right-click on the problematic driver in Device Manager and select “Uninstall device.” Then, restart your computer to let Windows reinstall it automatically.
Once you’ve gone through all these steps, Windows should boot normally without showing the Driver Verifier DMA Violation blue screen. Your computer should be more stable and reliable afterward.
Tips for Fixing Driver Verifier DMA Violation Windows 11
- Always keep your drivers up-to-date by regularly checking the manufacturer’s website.
- Use reliable driver update software if you’re not comfortable manually updating drivers.
- Create a system restore point before making any major changes to your system.
- Ensure your Windows 11 is up-to-date with the latest patches and updates.
- Avoid downloading drivers from unverified sources to prevent future issues.
Frequently Asked Questions
What causes a Driver Verifier DMA Violation in Windows 11?
This error is usually caused by faulty, outdated, or unsigned drivers that conflict with your system.
Can I disable Driver Verifier permanently?
Yes, using the verifier /reset command in Command Prompt will permanently disable Driver Verifier.
What if Safe Mode doesn’t work?
If Safe Mode doesn’t work, you might need to use a Windows 11 installation media to access recovery options.
How do I know which driver is causing the issue?
Device Manager will often show problematic drivers with a yellow triangle. You can also check the Event Viewer for error logs.
Is it safe to uninstall problematic drivers?
Yes, uninstalling and then rebooting will prompt Windows to attempt to reinstall the driver correctly.
Summary
- Boot into Safe Mode.
- Disable Driver Verifier.
- Update Drivers.
- Roll Back Drivers.
- Reinstall Faulty Drivers.
Conclusion
Fixing a Driver Verifier DMA Violation on Windows 11 can seem like a daunting task, but it doesn’t have to be. By following our step-by-step guide, you can identify and resolve driver issues that lead to this blue screen error. Remember, maintaining up-to-date and verified drivers is crucial to keeping your system running smoothly.
Not only does this process resolve the immediate problem, but it also serves as a good habit to cultivate for long-term system health. If you’re still facing issues after trying out these steps, you might need to consult with a tech professional or explore more advanced troubleshooting options. For further reading, consider looking up more on Windows’ built-in tools for maintaining system integrity.
So go ahead, tackle that Driver Verifier DMA Violation, and get your Windows 11 system back to its peak performance.
Matthew Burleigh has been writing tech tutorials since 2008. His writing has appeared on dozens of different websites and been read over 50 million times.
After receiving his Bachelor’s and Master’s degrees in Computer Science he spent several years working in IT management for small businesses. However, he now works full time writing content online and creating websites.
His main writing topics include iPhones, Microsoft Office, Google Apps, Android, and Photoshop, but he has also written about many other tech topics as well.
Read his full bio here.
What will you do if you encounter the DRIVER VERIFIER DMA VIOLATION error in Windows 10/11? If you don’t know how to deal with it, then this post from MiniTool is what you need. You can find multiple efficient solutions to get rid of the Blue Screen of Death error.
Meet BSOD in Windows system? That’s frustrating and troublesome. When the Blue Screen appears, it will be accompanied by different stop codes, such as PAGE FAULT IN NONPAGED AREA. And this post is mainly talking about Windows stop code DRIVER VERIFIER DMA VIOLATION BSOD.
What is DRIVER VERIFIER DMA VIOLATION (DRIVER_VERIFIER_DMA_VIOLATION)? It has an error code 0x000000E6 and this error appears because device drivers act abnormally. Then how to fix DRIVER VERIFIER DMA VIOLATION Windows 10/11? Keep reading.
Method 1: Update Your Operating System
Keeping your system up to date can avoid many errors appearing. Therefore, when you meet the DRIVER VERIFIER DMA VIOLATION Windows 10/11 error, updating your system may help you get rid of the error. Here is what you need to do:
Step 1: Press the Win + I keys at the same time to open Settings and then choose Update & Security.
Step 2: Click Windows Update and then choose Check for updates on the right panel.
Step 3: If your system is not up to date, Windows will start to download updates automatically.
Step 4: Reboot your computer to finish updating your system. Then the Windows 10 DRIVER VERIFIER DMA VIOLATION error should be fixed.
Method 2: Disable Driver Verifier
If Driver Verifier meets some unexpected problems, then the DRIVER VERIFIER DMA VIOLATION error will appear. Thus, you can try disabling Driver Verifier to solve the problem. Here is a quick guide:
Step 1: Type verifier in the Search bar and then click the best match one to open Verifier. If a UAC prompts, click Yes.
Step 2: In the pop-out window, choose Delete existing settings and then click Finish.
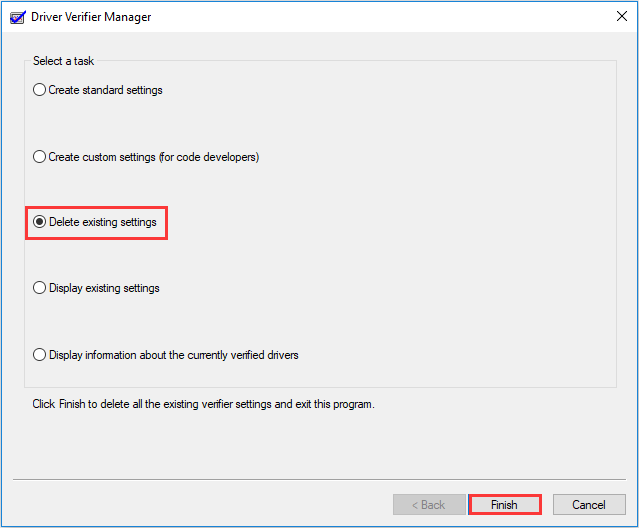
Step 3: Restart your system and then see whether the error is gone.
If the error doesn’t disappear after you disable Driver Verifier, then you need to reset the Verifier. Here is what you need to do:
Step 1: Press the Win + R keys at the same time to open the Run box.
Step 2: Type cmd in the box and then press the Shift + Ctrl + Enter keys at the same time to open Command Prompt as an administrator.
Step 3: Type Verifier /reset in the window and then press Enter.
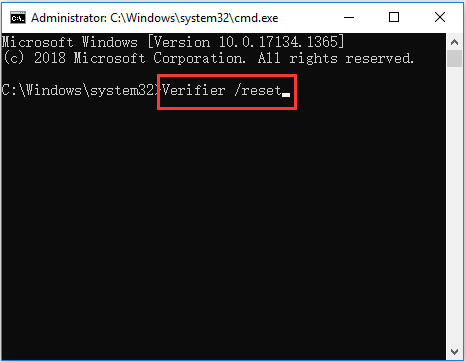
Step 4: Restart your computer and then check if the DRIVER VERIFIER DMA VIOLATION error disappears.
Method 3: Make Changes to the Drivers
You can also try to make some changes to your drivers to fix the DRIVER VERIFIER DMA VIOLATION error because outdated or corrupted drivers will trigger the BSOD error in Windows 11/10.
Update Your Drivers
If you haven’t updated your drivers for a long time, then the culprit of the DRIVER VERIFIER DMA VIOLATION error may be outdated drivers. So updating your drivers may fix the problem.
Step 1: Press the Win + X keys at the same time to select Device Manager.
Step 2: Right-click the device with a yellow indication to choose Update driver.
Step 3: Choose Search automatically for updated driver software, and then follow the on-screen instructions to finish updating the driver. If you have several devices with yellow indications, then do the same as above for all.
Step 4: Reboot your computer and then check if the error is gone.
Roll Back Your Drivers
If you recently updated your driver, and the driver is not compatible with your system or it is corrupted, then you will get the DRIVER VERIFIER DMA VIOLATION BSOD error. Thus, you need to roll back your driver to solve the problem.
Step 1: Open Device Manager and then find the drive that you recently updated. Right-click the driver to choose Properties.
Step 2: In the newly pop-out window, go to the Driver tab and then click Roll Back Driver. Then follow the instructions showing on the screen to roll back the driver.
Step 3: Reboot your computer to check if the error persists.
Method 4: Run the Blue Screen Troubleshooter
Running the Blue Screen Troubleshooter will easily help you get rid of the DRIVER VERIFIER DMA VIOLATION error from your Windows 10/11 PC. Here is the tutorial:
Step 1: Open Settings, choose Update & Security and then click Troubleshoot.
Step 2: Click Blue Screen in the right panel and then click Run the troubleshooter.
Step 3: Follow the on-screen prompts to complete the troubleshooting. Restart your computer and then see if the error is fixed.
If running the Blue Screen Troubleshooter cannot solve the issue, then you can run the SFC tool to scan your system and repair detected issues. Here is a quick guide:
Step 1: Open Command Prompt as an administrator, type sfc /scannow in the window and then press Enter.

Step 2: Wait until the procedure is done. Normally, if there is something wrong being detected, the SFC tool will repair them automatically.
Step 3: Restart your computer to check whether the DRIVER VERIFIER DMA VIOLATION error is fixed.
Running the SFC tool failed? Then you can try to run the DISM tool. DISM can also help you scan for corrupted system files and repair them automatically. Here is what you need to do:
Step 1: Open Command Prompt as an administrator as mentioned above.
Step 2: Type DISM.exe /Online /Cleanup-image /Restorehealth in the window and then press Enter.
Step 3: Wait for the process to finish. Then restart your system to check if the error still exists.
Method 7: Check for Faulty Hardware
The BSOD errors often caused by faulty hardware (such as RAM and motherboard), therefore, it is highly recommended to check if your hardware works normally. If your hardware doesn’t work well, then you can try to replace it to get rid of the DRIVER VERIFIER DMA VIOLATION error.
You may be interested in the two posts: How to Tell If RAM Is Bad? 8 Bad RAM Symptoms Are for You! and How to Test Motherboard for Faults? Much Info Is Introduced!
Method 8: Update Your BIOS
Outdated BIOS can cause many troubles and the DRIVER VERIFIER DMA VIOLATION BSOD error is one of them, so you need to update your BIOS to fix the error. But you need to be careful when you perform the method because the faulty operation will cause serious damage to your motherboard.
Method 9: Update Your SSD Firmware
If you install Windows on your SSD, then it is recommended to update your SSD firmware because outdated firmware may trigger different BSOD errors such as DRIVER VERIFIER DMA VIOLATION.
However, if you fail to perform the SSD firmware update operation properly, it may cause permanent damage and lose all data. Therefore, you must be extremely careful and follow the correct instructions provided by the manufacturer to complete the task.
Method 10: Perform System Restore
If you have created a restore point in advance, then you can perform System Restore to make your computer go back to the previous normal state of Windows 11/10. Here is a simple guide:
Step 1: Open the Run box, type rstrui in the box and then click OK to open System Restore.
Step 2: In the pop-out window, click Next. Then choose s system restore point from the list and click Next.
Step 3: Confirm your restore point and then click Finish. Read the message saying that “Once started, System Restore cannot be interrupted. Do you want to continue?”, then click Yes.
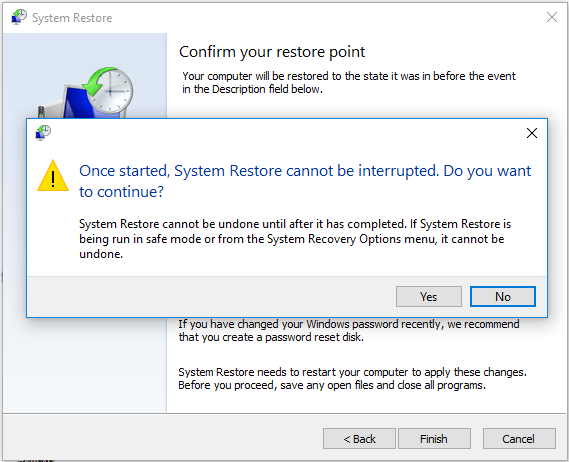
Step 4: Wait until the process is completed, then your computer can run normally without the DRIVER VERIFIER DMA VIOLATION blue screen error.
Method 11: Reset Windows 10/11
If none of the methods above solve the DRIVER VERIFIER DMA VIOLATION error, then you need to reset your PC. Here is what you need to do:
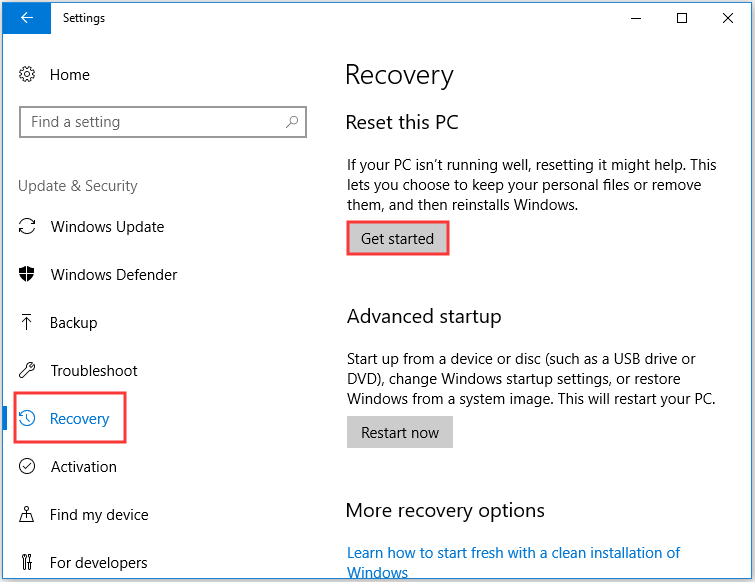
Step 1: Click Update & Security on the Settings page.
Step 2: Go to the Recovery tab and click Get Started under the Reset this PC section on the right panel.
Step 3: Choose whether to Keep my files or Remove everything while resetting your PC.
Step 4: Follow the prompts on the screen to finish the process. After you reset your system, you can run your system without BSOD.
Click to Tweet
Top Recommendation: Back up Your Windows System
It is common to meet data loss due to system crash, power failure, BSOD and virus attack. Then you may wonder how to avoid losing data. The answer is to back up your data. And you’d better back up your system in advance so that you can easily restore your system to normal state without performing the above methods when you meet BSOD errors.
Referring to backup, it is strongly recommended to use MiniTool ShadowMaker – a piece of fantastic and wonderful backup and restore software for Windows. It allows you to back up files and folders, disks and partitions, and even the operating system. And you can save backup images to four different locations: Administrative, Libraries, Computer, and Shared.
And the Sync feature is useful to sync files and folders to other locations. While the Disk Clone feature allows you to create a bootable external hard drive and clone simple volumes in the dynamic disks.
What’s better, MiniTool ShadowMaker offers you a Trial Edition with 30 days to enjoy all the features.
MiniTool ShadowMaker TrialClick to Download100%Clean & Safe
Here is the way to back up your Windows system using MiniTool ShadowMaker:
Step 1: Install and launch MiniTool ShadowMaker, then click Keep Trial.
Step 2: Go to the Backup page. MiniTool ShadowMaker selects your system as the source by default and it selects the backup destination by default, too. However, you’d better choose your external hard drive as a backup destination by clicking the DESTINATION.
Step 3: After you have confirmed the backup source and destination, then click Back Up Now to back up your system immediately. You can also click Back Up Later to delay the backup.

And you’d better create bootable media when your system runs normally so that you can use it to boot your computer when your computer fails to boot.
Bottom Line
This post focuses on the DRIVER VERIFIER DMA VIOLATION Windows 11/10 error. It offers you 11 useful methods to deal with the error, so if you meet the error, try the methods mentioned above. And if you have any better suggestions or have any confusion about the methods, leave a comment below or send an email to [email protected].
DRIVER VERIFIER DMA VIOLATION FAQ
How do I turn off Driver Verifier?
- Type cmd in the Search box and then right-click Command Prompt to choose Run as administrator.
- Type verifier in the window and then press Enter to open Driver Verifier Manager.
- Choose Delete existing settings and then click Finish.
- Reboot your computer.
How do I run driver verifier?
- Open Driver Verifier Manager, choose Create standard settings and then click Next.
- Choose one of the selection schemes under Select what drivers to verify. For example, if you click Select driver names from a list, click Next, and then choose one or more specific drivers.
- Click Finish and then restart your computer.
Is blue screen of death bad?
Of course, the Blue Screen of Death is bad. When you meet BSOD, then you have to restart your computer and reload the programs and files you had open to go back to work. If you want to fix BSOD, then you should read this post – Windows 10 Blue Screen of Death – You Can Quickly Fix It.
This article acquaints you with the best, easiest, and quickest ways to fix the DRIVER VERIFIER BSOD issue on Windows 10/11.
Blue Screen of Death or BSOD errors are among the most frightening scenarios a user can experience on Windows. These stop errors occur when Windows bumps into a critical issue from which it fails to recover. DRIVER VERIFIER DMA VIOLATION is an example of such annoying Blue Screen of Death errors.
With not enough information available on the screen about this error, it becomes an uphill battle to fix it. However, you can solve this problem effortlessly since you have found this article.
This article guides you through tried and tested solutions to the Blue Screen DRIVER_VERIFIER_DMA_VIOLATION Windows 11/10 error. However, let us discuss the possible causes of this issue before trying to fix it for easy troubleshooting.
Causes of Stop Code DRIVER VERIFIER DMA VIOLATION
The below factors may be responsible for the Blue Screen of Death error you are experiencing.
- Corrupted or outdated drivers
- Out-of-date operating system
- Unexpected issues with the Driver Verifier
- Corrupted system files
- Outdated BIOS or SSD firmware
Above, we listed various causes of the problem you are struggling with. Let us learn how to fix this issue in the subsequent section of this article.
Fixes for DRIVER VERIFIER DMA VIOLATION (Quick and Easy)
You can apply the following solutions to get rid of the Blue Screen error you are trying to solve.
Fix 1: Try disabling the Driver Verifier
The DRIVER VERIFIER DMA VIOLATION stop code may appear as a result of some unexpected problems with your computer’s Driver Verifier. Hence, disabling the verifier can fix the issue. Here is how to disable it.
- Firstly, input the Verifier in the search bar on the taskbar.
- Secondly, click on the best match to launch the Verifier.
- Click Yes if a UAC prompt appears on your screen.
- Now, select the option to Delete existing settings and click on the Finish button.

- Lastly, restart your computer and check if the error disappears. If the error persists, you can try the following fixes.

Also Read: Windows Cannot Initialize The Device Driver For This Hardware
Fix 2: Reset your Driver Verifier
If disabling the Driver Verifier does not solve the problem, you can try resetting it. Here is how to reset the Driver Verifier.
- To begin with, use the Windows+R keyboard shortcut to access the Run tool.
- Secondly, input Cmd in the on-screen box and use the Shift+Ctrl+Enter shortcut to launch Command Prompt as an administrator.
- Now, input Verifier /reset in the command line and press the Enter key.

- Lastly, restart your PC to complete the Driver Verifier reset.

Fix 3: Perform Windows update
Your operating system may be buggy or outdated, resulting in the issue you have encountered. Hence, you can update Windows to fix the issue. Here are the steps to do it.
Also Read: How to Fix ene.sys Driver Cannot Load on Windows 11
Fix 4: Update outdated drivers (Recommended)
Outdated drivers break the communication between the connected peripherals and the system, leading to BSOD DRIVER_VERIFIER_DMA_VIOLATION stop code and many other issues. Hence, updating drivers is one of the most recommended solutions to your problem.
You can update drivers hassle-freely via Win Riser, a renowned program to update drivers and optimize PC performance. Win Riser is best known for its driver backup and restoration, junk removal, malware detection, and a lot of other incredible features. You can experience this wonderful software by downloading and installing it from the following link.
After installing the software, you can follow the below quick series of steps to update all outdated drivers automatically.
- Wait for a few seconds until Win Riser scans your computer for outdated drivers and other issues.
- Secondly, review the scan results to understand what is hampering your computer’s performance.
- Click on the Fix Issues Now button to solve all problems automatically.


Fix 5: Perform SFC scan
Corrupted system files are another reason you may experience problems such as DRIVER DMA VIOLATION Windows 11/10 error. Hence, you can follow the below steps to scan and repair the system issues.
- To begin with, launch Command Prompt as an administrator.
- Secondly, input the sfc /scannow command in the on-screen window and press the Enter key.

- Now, wait for the process to complete.
- Lastly, restart your computer after the process completes.

Note: If the SFC command fails to solve the problem, you can try the DISM.exe /Online /Cleanup-image /Restorehealth Command Prompt command to repair corrupted system files.

Also Read: How to Fix GeForce Experience Driver Download Failed
Fix 6: Update BIOS
Outdated BIOS may lead to many issues like the one you have encountered. Thus, you can update BIOS to drive the problem away. You can use one of the best BIOS update software to perform this task hassle-freely.
Fix 7: Try updating your SSD firmware
Outdated SSD firmware can cause BSOD errors. Hence, you can follow the below directions to update the boot driver’s firmware.
Also Read: Windows Could Not Find Driver for Your Network Adapter (FIXED)
DRIVER VERIFIER DMA VIOLATION Error Fixed
You can follow the above guide to fix the Driver Verifier Blue Screen of Death error. However, if you have any confusion or have any suggestions for us, feel free to use the comments section below to contact us. We will be more than happy to assist you. Also, kindly stay connected with us to learn how to fix other tech problems quickly and efficiently.