
Синий экран смерти (BSOD) с ошибкой DRIVER VERIFIER DETECTED VIOLATION в Windows указывает на проблему с драйверами. Эта ошибка возникает, когда встроенный в Windows инструмент Driver Verifier обнаруживает несоответствия или ошибки в работе драйверов устройств. Самое интересное в том, что сам по себе этот инструмент не запустится, и, если вы не включали в своей системе проверку драйверов, то первым делом отключите её и проверьте ПК на вредоносные программы. Начинающему пользователю сделать это будет не совсем просто, так как, вероятнее всего, войти в работающую Windows ни в обычном, ни в безопасном режиме не получится.
- Некорректные или поврежденные драйверы – если драйверы установлены с ошибками или несовместимы с системой, они могут вызвать сбой.
- Конфликт драйверов – наличие нескольких конфликтующих драйверов может привести к критической ошибке.
- Аппаратные проблемы – неисправности жесткого диска, оперативной памяти или других компонентов могут вызывать сбои в драйверах.
- Вредоносное ПО – вирусы могут повреждать драйверы и системные файлы.
- Разгон системы – изменение частоты процессора или оперативной памяти может привести к нестабильности драйверов.
С данной ошибкой загрузить Windows 11 даже в безопасном режиме представляется сложной задачей, так как из-за синего экрана в систему вы войти не сможете. Однако вам поможет эта статья. Или попробуйте безотказный способ: три раза подряд аварийно выключите и включите компьютер с помощью кнопки питания. В результате запустится среда восстановления Windows, в которой можно выбрать безопасный режим.
Примечание: Если в безопасном режиме вы тоже получите синий экран, переходите сразу ко второй части статьи.
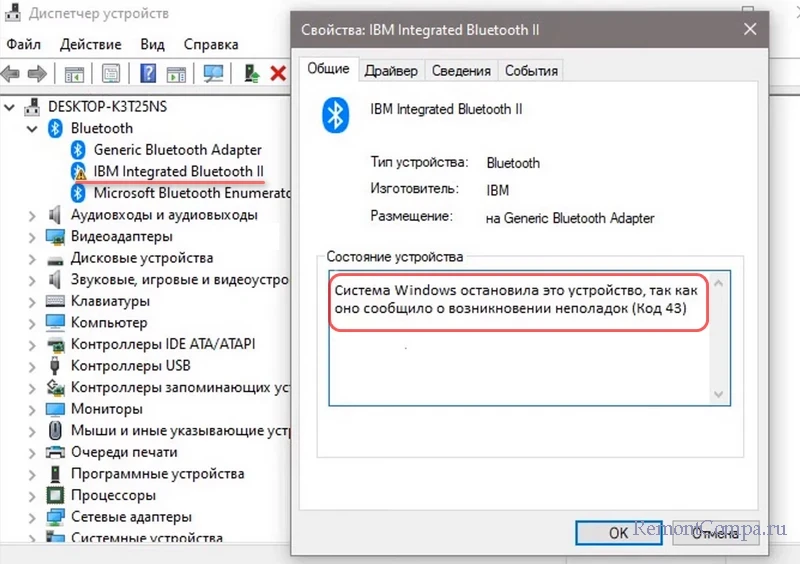
Найдите устройство с проблемным драйвером (обычно оно отображается с жёлтым треугольником).
Кликните правой кнопкой мыши и выберите Удалить устройство, затем перезагрузитесь и установите актуальный драйвер с сайта производителя.
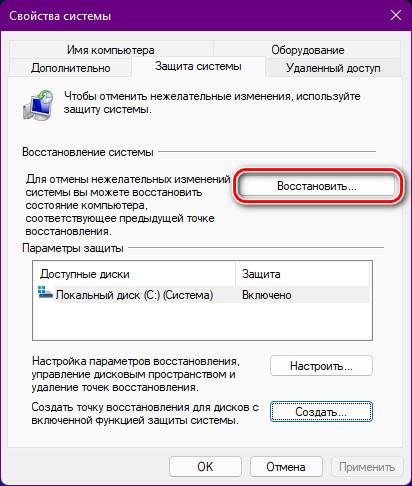
В безопасном режиме нажмите Win + R, введите rstrui и нажмите Enter.
Следуйте инструкциям мастера восстановления системы и выберите точку отката на тот момент, когда он работал без критических ошибок.
Откройте Командную строку от имени администратора (Win + R, затем введите cmd и нажмите Ctrl + Shift + Enter).
Введите команду:
verifier /reset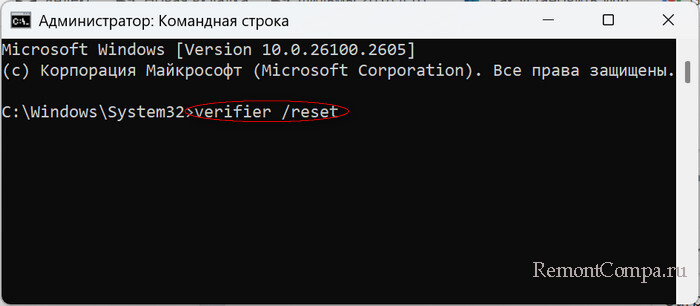
Перезагрузите компьютер.
Откройте Командную строку от имени администратора. Введите команду:
sfc /scannow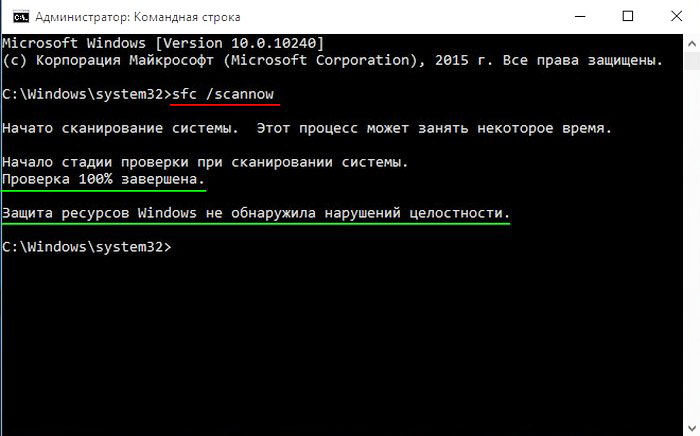
Дождитесь завершения проверки и перезагрузите компьютер.
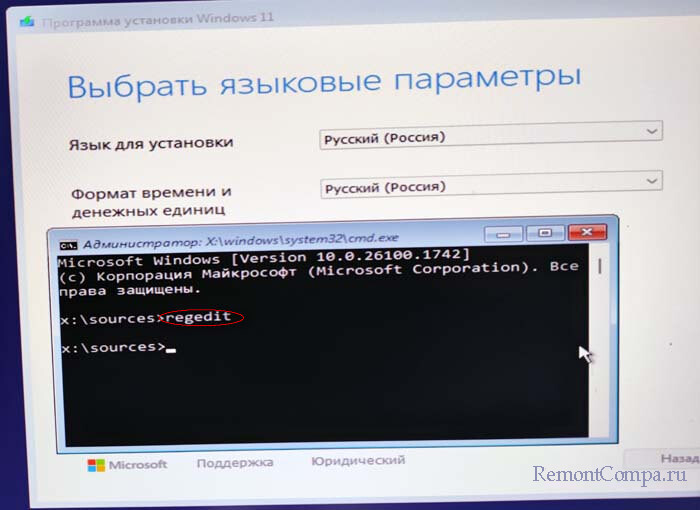
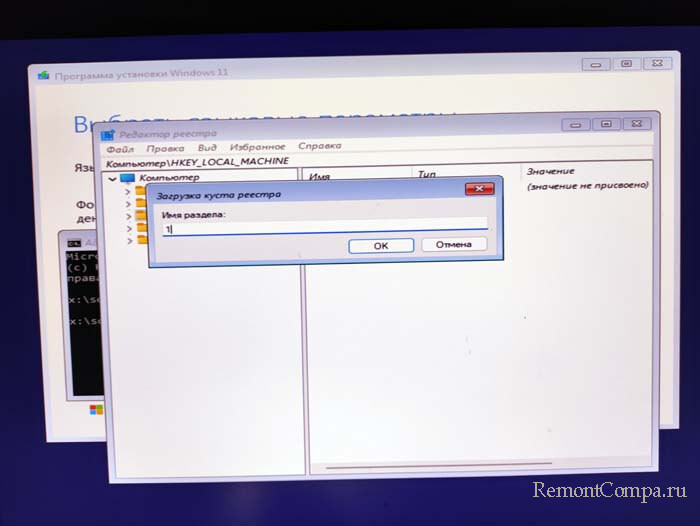
Загрузите ваш компьютер с загрузочной флешки Windows 10, 11.
В начальном окне установки нажмите клавиши Shift+F10, откроется командая строка.
Введите regedit и нажмите Enter.
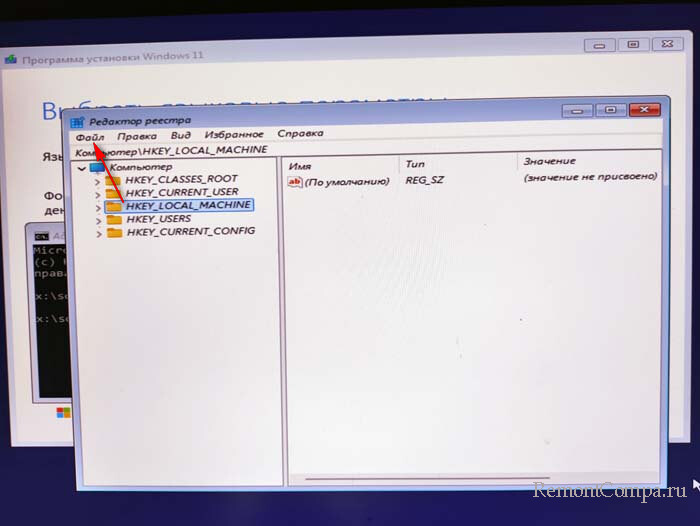
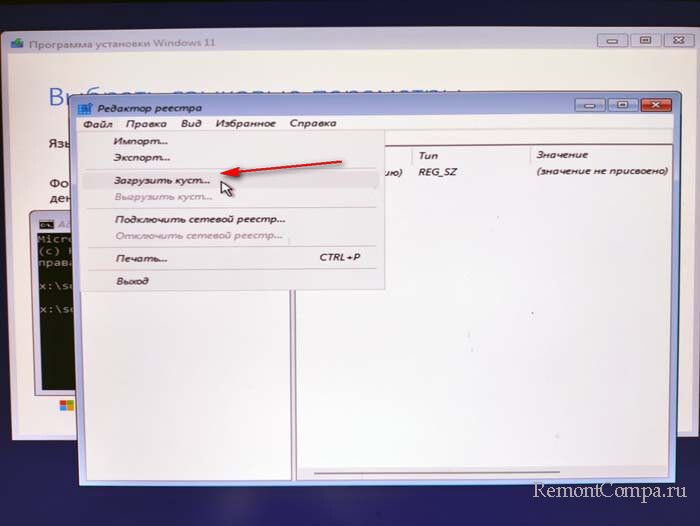
В редакторе реестра выделите раздел HKEY_LOCAL_MACHINE и в меню «Файл»
загрузите куст,
В открывшемся Проводнике перейдите в папку C:\Windows\System32\config, в ней выберите файл SYSTEM. Будьте внимательны: буква диска с вашей операционной системой может отличаться от C: при загрузке с флешки с Windows.
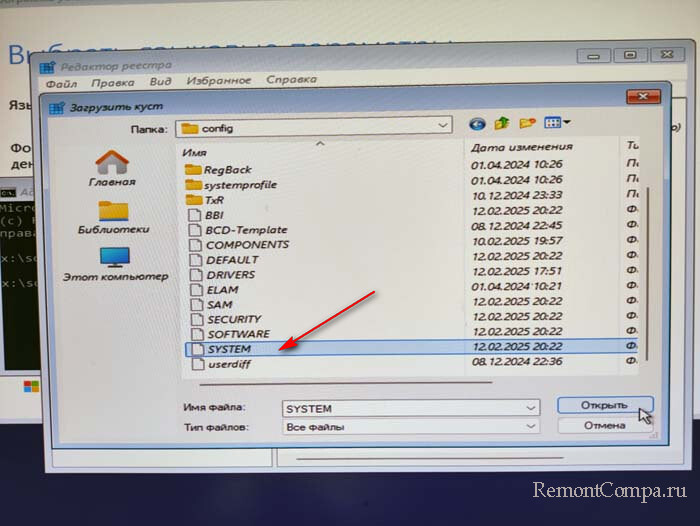
Нажмите «Открыть» и укажите любое имя раздела, к примеру — 1.
Произойдёт загрузка куста реестра вашей системы и внутри раздела HKEY_LOCAL_MACHINE появится раздел с присвоенным вами именем.

Пройдите по пути: ControlSet001\Control\Session Manager\Memory Management и удалите подразделы с именами VerifyDrivers и VerifyDriverLevel (если такие писутствуют).
HKEY_LOCAL_MACHINE\SYSTEM\CurrentControlSet\Control\Session Manager\Memory Management\VerifyDriversHKEY_LOCAL_MACHINE\SYSTEM\CurrentControlSet\Control\Session Manager\Memory Management\VerifyDriverLevel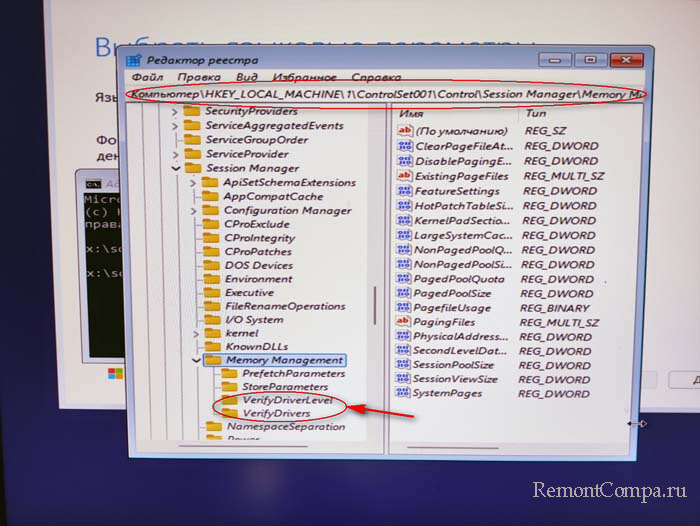
Далее выделите раздел с присвоенным вами именем, потом меню «Файл» —> «Выгрузить куст».
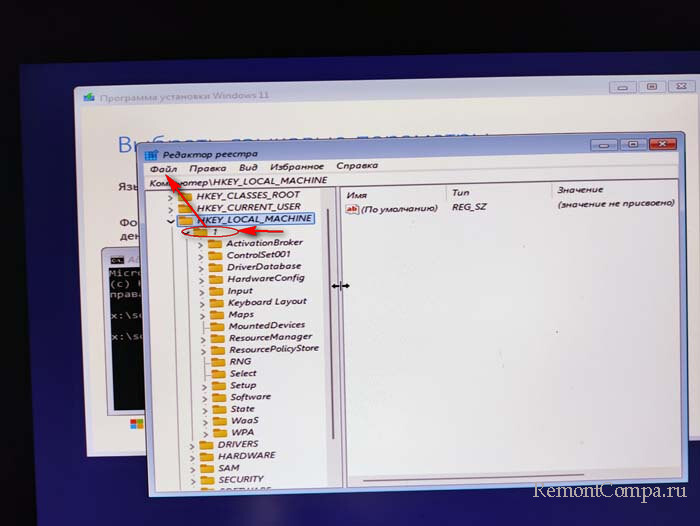

Закрывайте реестр и перезагружайте компьютер, ваша система должна загрузиться нормально.
Не забудьте проверить вашу OS на вирусы.
The “Driver verifier detected violation error” is a common BSOD (Blue Screen of Death) issue that can keep you stuck at startup for hours. A few users have also reported that this BSOD error occurred on their devices in endless loops. This error is majorly encountered due to the presence of faulty or corrupt drivers, faulty hardware, virus or malware infection, and a couple of other reasons.

Well, the good thing is that this issue can easily be fixed by following a few workarounds and making some changes in the system settings. In this post, we will be learning all about what is the driver verifier violation error, what causes it, and how to get past this BSOD hindrance to getting your device up and running again!
Let’s get started.
What Does Driver Verifier Detected Violation Mean? What Causes it?
The Driver_Verifier_Detected_Violation is typically a BSOD error that is caused due to faulty drivers or hardware. Some other reason that may trigger this error on your device include:
- Outdated drivers.
- Presence of virus or malware.
- Outdated Windows version.
- Problematic third-party apps.
- GPU overclocking.
- Incompatible graphic card.
How to Fix the “Driver Verifier Detected Violation Error” on Windows 10?
#1 Update Windows
Are you operating an outdated version of Windows? If yes, then we strongly recommend you to check for any available updates and install the latest copy of Windows OS on your device. To do so, here’s what you need to do.
Tap the Windows icon, select the gear-shaped icon to open Settings.

Tap on “Update and Security”. Hit the “Check for Updates” button and then install the latest version of Windows on your device right away.
#2 Roll Back Graphic Drivers
If your graphic card drivers are incompatible with the current Windows version, then you may encounter the “Driver Verifier Detected Violation error” on your device. To fix this, we advise you to roll back the graphics driver installed on your PC to check if it fixes the issue. Follow these quick steps:
Press the Windows + R key combination to open the Run dialog box.
Type “Devmgmt.msc” in the textbox, hit Enter.

In the Device Manager window, look for the “Display Adapter” option as it includes the graphic drivers.
Right-click on the respective graphic driver’s title, select “Uninstall Device”.
Uninstalling the graphic drivers will load it to its default version.
Reboot your machine and check if you’re still facing the BSOD hindrance.
Also read: Step By Step Guide To Roll Back NVIDIA Drivers On Windows 10
#3 Update All Drivers
If rolling back the display drivers to the default version didn’t bring any luck, let’s move to our next solution. To update all existing drivers installed on your device, you can either go by the manual way and use Device Manager to get the job done.
But yes, of course, this sounds way too hectic. Isn’t it?

Download and install the Smart Driver Care utility on your Windows device and leave all the hassle behind. Smart Driver Care is one of the best driver updater tools for Windows that scans your entire device, hunts for outdated and corrupt drivers, and lists them down. With just one click, you can update all the outdated drivers with the help of this useful utility tool. (Yes, you can thank us later)

Updating drivers via Smart Driver Care can help you save a lot of time and effort. Download today!
Also read: How To Check For Missing Drivers Using Automatic Driver Updater Software?
#4 Reset Driver Verifier
Moving to our next troubleshooting hack. We will now be resetting the Driver Verifier on Windows 10 and delete all the existing settings.
Launch the Start menu search box, type Command Prompt, right-click on it and select “Run as Administrator”.
In the Command Prompt shell, type “Verifier” and hit Enter.

The “Driver Verifier Manager” window will now appear on the screen. Tap on “Delete Existing Settings”. Hit the “Finish” button to save your recent changes.
Reboot your device once done and check if the “Driver Verifier Detected Violation errors” persists.
#5 Scan your Device for Viruses or Malware
If the above-mentioned solutions didn’t work out too well, let’s try something else. Ever wondered if your device is infected with a virus, malware, or any other malicious threat? Well, there’s a way to find that out!
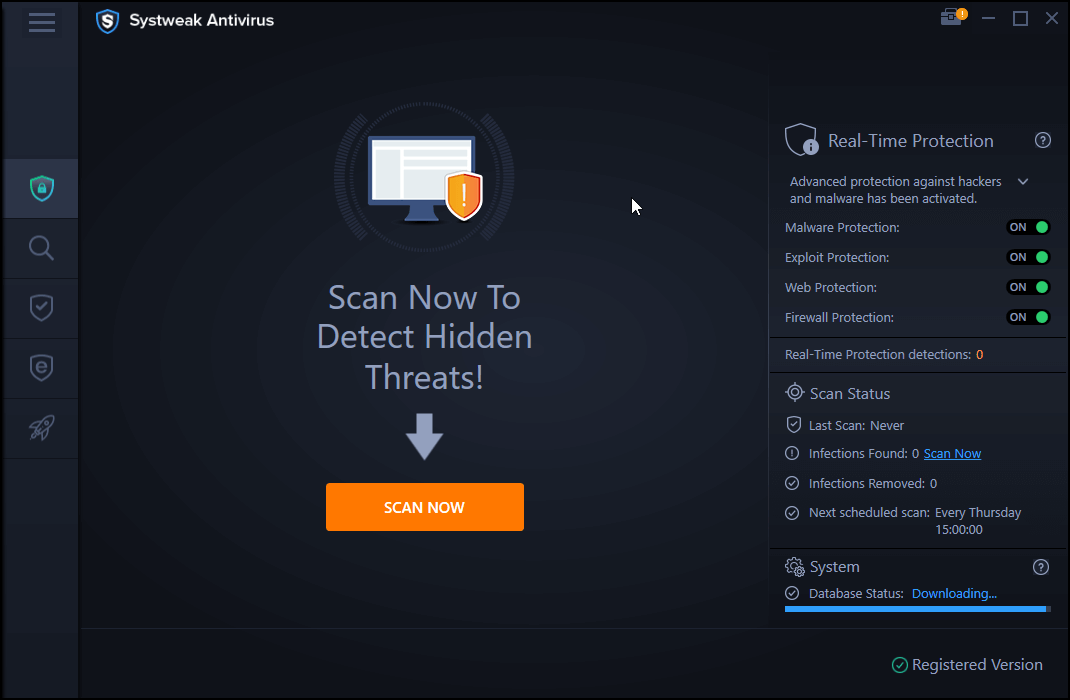
Download and install Systweak Antivirus on your Windows PC that offers real-time protection against viruses, malware, trojans, spyware, adware, and ransomware attacks. Systweak Antivirus shields your device and keeps a constant check to stop zero-day vulnerabilities and exploits from entering your device. It is a must-have security tool to scan and fix any virus or malware traces, hidden threats to keep your device and sensitive data protected.
#6 Run the Memory Diagnostic Tool
Press the Windows + R key combination to open the Run dialog box.
Type “mdsched.exe” in the textbox to run the Memory Diagnostic tool to check for any recent hardware failures.
Follow the on-screen instructions to complete the scan. Once done, reboot your device to see if it fixed the issue.
Also read: How To Check RAM Performance With Windows Memory Diagnostic Tool
Conclusion
And it’s a wrap! We hope the above-mentioned solutions prove out helpful to you in fixing the “Driver Verifier Detected Violation Error” on Windows 10 devices. Do let us know which solution worked wonders for you. Feel free to share your thoughts in the comments space!
The blue screen errors are common on the Windows operating system, and most Windows users have experienced it at least at some point. One such blue screen error that can trigger without any warning is Driver Verifier Detected Violation. The reasons for this blue screen of death error are issues with Driver Verifier, outdated, corrupt, or faulty device driver, malware or virus, corrupt system files, and some random unknown cause.
Well, at times, the blue screen errors are resolved on their own by your OS, and other times you need to perform different fixes to get rid of them.
If your system does not resolve the Driver_Verifier_Detected_Violation blue screen error on its own, you need to try out the below fixes one by one. However, if the error restricts you from logging in, you can enter safe mode and perform the fixes.
You may need administrator access to perform some of the fixes, so it’s better to log in from the admin account and start with the solutions below.
1. Update Windows 10
Windows update includes device driver update as well. So, if the BSOD error is because of outdated drivers, updating Windows can fix it.
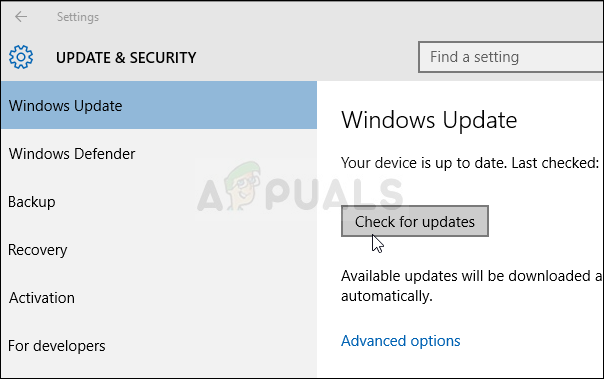
Press Windows key + I to open the Settings app and go to “Update & Security.”
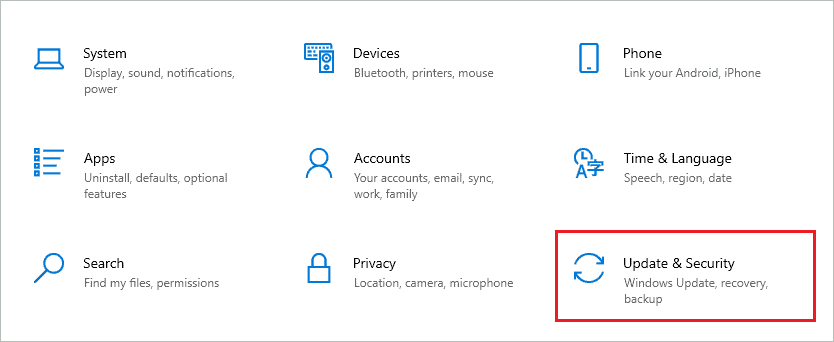
Make sure you are in the Windows Update section and click on “Check for updates” button.
If there are any updates, click on “Download and Install” to install them on your computer. Once the updates are installed, reboot the PC once more and check if the blue screen error is resolved or not.
2. Modify the Registry
Another way to resolve the Driver Verifier Detected Violation blue screen of death is to change the Registry Editor. One needs to be careful while modifying the registry, as it holds all the settings, data, and other PC information. We recommend backing up the registry before making any changes to it.
Press Windows key + R to open the “Run” dialog box and type “regedit” there. Press Enter to open Registry Editor.
If you are not able to enter safe mode as well, press Shift + F10 keys. A terminal prompt will show up, type regedit there, and press Enter key to open Registry Editor.
Once the Registry Editor window opens, go to the below-mentioned path.
HKEY_LOCAL_MACHINE\SYSTEM\Setup\Status\ChildCompletionNow, double-click on “setup.exe” to make changes to this DWORD. Set the Value data of the setup.exe file to “3” and click “OK” to save changes.
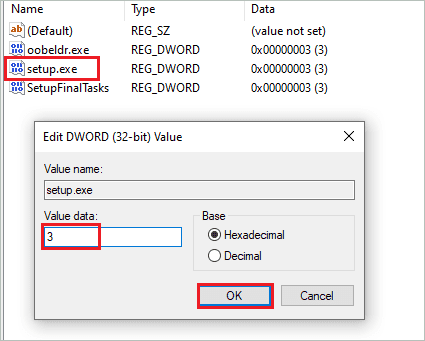
After making the changes, close the Registry Editor and reboot your computer. The Driver_Verifier_Detected_Violation error will be resolved after performing this fix.
3. Disable and Reset Driver Verifier
Many users fixed Driver Verifier Detected Violation in Windows 10 by disabling and resetting Driver Verifier. You can follow the steps to disable/reset Windows Driver Verifier correctly.
Step 1: Type cmd in the Start menu search bar and click on “Run as administrator” for Command Prompt to open it with administrator privileges.
Step 2: In the terminal window, type “verifier” and press “Enter.” This will open the Driver Verifier tool on your computer.
Step 3: In the Driver Verifier Manager window, select “Delete existing settings” and click on the “Finish” button.
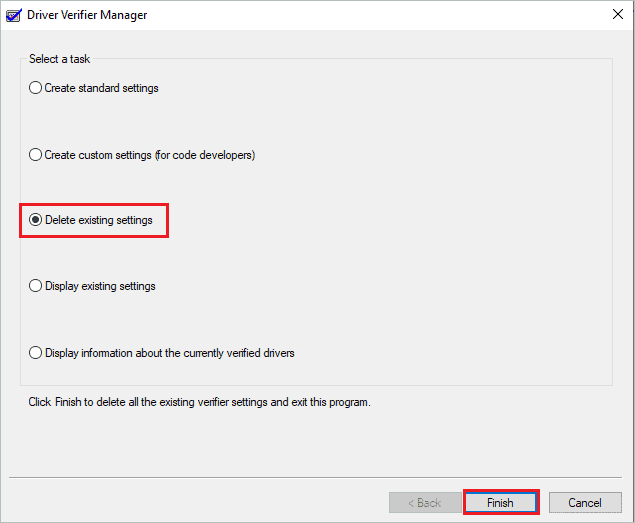
After this, reboot your PC. Now, if you still have a BSOD error, you can reset the Driver Verifier.
Open Command Prompt with administrator privileges and execute the below command there.
verifier/resetThis will reset the Driver Verifier for you. Again reboot your computer and check if you got rid of trouble on your PC.
4. Run SFC Scan
The corrupt system files can also lead to Driver Verifier Detected Violation error in Windows 10. Therefore, you need to repair such corrupted files to resolve this blue screen error. Windows inbuilt utility called System File Checker (SFC) can help you scan and repair the corrupt system files.
Open Command Prompt with admin rights and execute the below there.
sfc /scannowThe command execution may take some time. Once the command is executed, close the Command Prompt window and reboot the computer.
After restart, check if the BSOD error stopped troubling you or not.
5. Run DISM Scan
If SFC didn’t help repair the corrupt system files, you could use the DISM tool (Deployment Image Servicing and Management) utility. The DISM utility can be used from Command Prompt.
Open elevated Command Prompt and execute the below command there.
dism /online /cleanup-image /restorehealth
Wait till the command is executed. You can reboot the PC once the command execution is done and check if the BSOD error is resolved or not.
6. Uninstall Virtualization Software
If there are any virtualization programs like VMware or VirtualBox, you can temporarily uninstall them. However, the virtualization software can cause Driver Verifier Detected Violation blue screen error in Windows 10 on some PCs. So, you can uninstall this software and check if it helps you resolve the error or not.
7. Roll Back Graphics Driver
You can roll back the graphics card drivers to fix the Driver_Verifier_Detected_Violation BSOD. If the graphics card driver was recently updated and you started experiencing trouble after that, rolling back drivers can help.
Press Windows key + X to open the quick link menu and click on “Device Manager” to open it.
Expand “Display adapters” in the Device Manager window and then right-click on the display driver. Select “Properties” from the context menu.
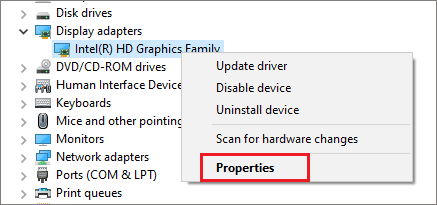
Go to the “Driver” tab in the Properties dialog box and click on the “Roll Back Driver” button. You can then follow the screen instructions to complete the roll-back process.
You can follow the same instructions for the AMD and Nvidia driver.
8. Reinstall Display Drivers
If the roll-back driver’s button was greyed out, you could try reinstalling the graphic card driver. In other words, uninstall the display drivers and install them again to fix Driver Verifier Detected Violation error. This can help you fix the device driver bug and faulty driver issue as well.
Open Device Manager and expand the “Display adapter” section. Next, right-click on the display driver and click on “Uninstall device” from the context menu.
When asked for confirmation, confirm the driver’s uninstallation. Once the driver is uninstalled, reboot the device to reinstall it. Reinstalling drivers can resolve many errors in Windows 10, including Driver_Verifier_Detected_Violation.
9. Disable third-party Antivirus
The antivirus programs that are not downloaded from trusted sources can create trouble while using the Windows PC. You can temporarily disable your antivirus software to fix the Driver Verifier Detected Violation.
If you are not sure how to turn off antivirus protection for some time, refer to the manual or guide on their official website. You can also contact the support team to know how to do it.
If the error vanishes after disabling antivirus, you can find another malware removal tool or use Windows inbuilt security app.
10. Use chkdsk Command
You can use the chkdsk command to check if there are any issues with your drive. The chkdsk command checks all the file systems on the drive and fixes the errors, if any. You can use this command in the Command Prompt to fix the blue screen error on your PC.
Open Command Prompt with admin rights and execute the below command there.
chkdsk C: /f /x /r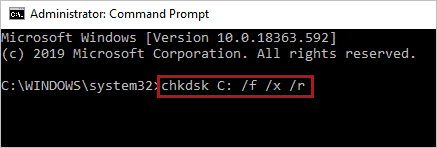
Here, replace the letter C with your system drive letter and then execute the command. Once the command is executed, restart your computer and check if the BSOD error is resolved or not.
11. Update your Device Driver
The outdated device drivers need to be updated to function correctly. You can update the driver manually via Device Manager to fix Driver Verifier Detected Violation error. Make sure you download stable and correct driver software from a trusted source; otherwise, it can permanently damage your PC.
If you don’t wish to update drivers manually, you can use Driver Booster as well. You need to check the driver for signs like exclamation marks or yellow marks in Device Manager and then update the driver accordingly.
12. Remove Junk and Temp Files
The unwanted junk files present on your computer can not only slow down your PC but can also create trouble. You can delete all the temporary files from your computer using Disk Cleanup.
Search for “Disk Cleanup” in the Start menu search bar and open the same from the search result. If you have multiple drivers, select your system drive.
Now, make sure you check the checkbox next to Temporary files and Temporary Internet files. If you wish to delete anything else, select that as well.
Lastly, click “OK” to delete the files.
Once all the temp files are deleted, reboot the computer and check if this solution was able to resolve the BSOD problem or not.
13. Underclock your Graphics Card
Many Windows users overclock their processor to maximize its performance. However, to resolve the Driver Verifier Detected Violation error, you need to underclock the graphics card. This will minimize the performance, but you will be able to work on your computer without a blue screen error.
Also, underclocking by 100 MHz helped many users resolve this blue screen error in Windows 10. Make sure you use a trusted software from a trusted source to underclock the hardware components. If something goes wrong, the hardware can be damaged.
14. Scan for Malware and Viruses
The viruses can enter your system through any medium. Therefore, you need to scan for viruses residing on your computer and remove them to prevent further damage. The Driver Verifier Detected Violation error can also be resolved by removing viruses and malware from your PC.
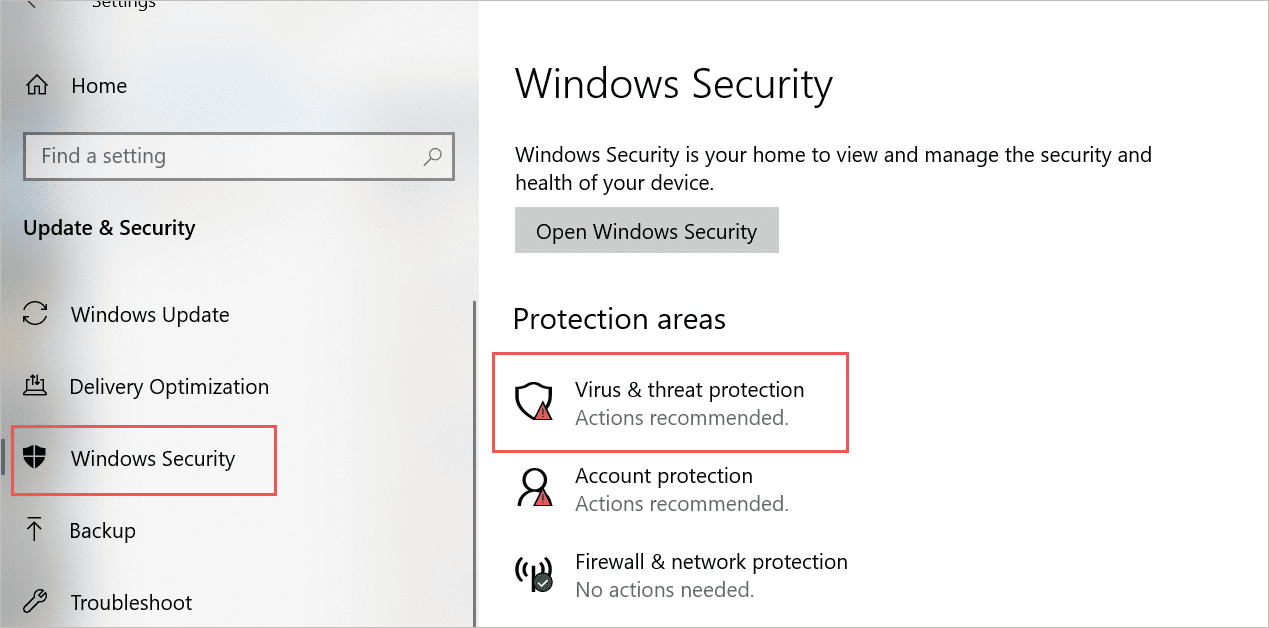
The third-party antivirus software is disabled based on the above solutions; you can use the Windows Defender Security app.
Step 1: Launch the Settings app and go to the “Update & Security” section.
Step 2: In the Update & Security settings, go to “Windows Security” from the left pane.
Step 3: Click on “Virus & threat protection.”
Step 4: Now, click on the “Scan options” link.
Step 5: Select the “Full scan” option to thoroughly scan your computer, and then click on the “Scan now” button.
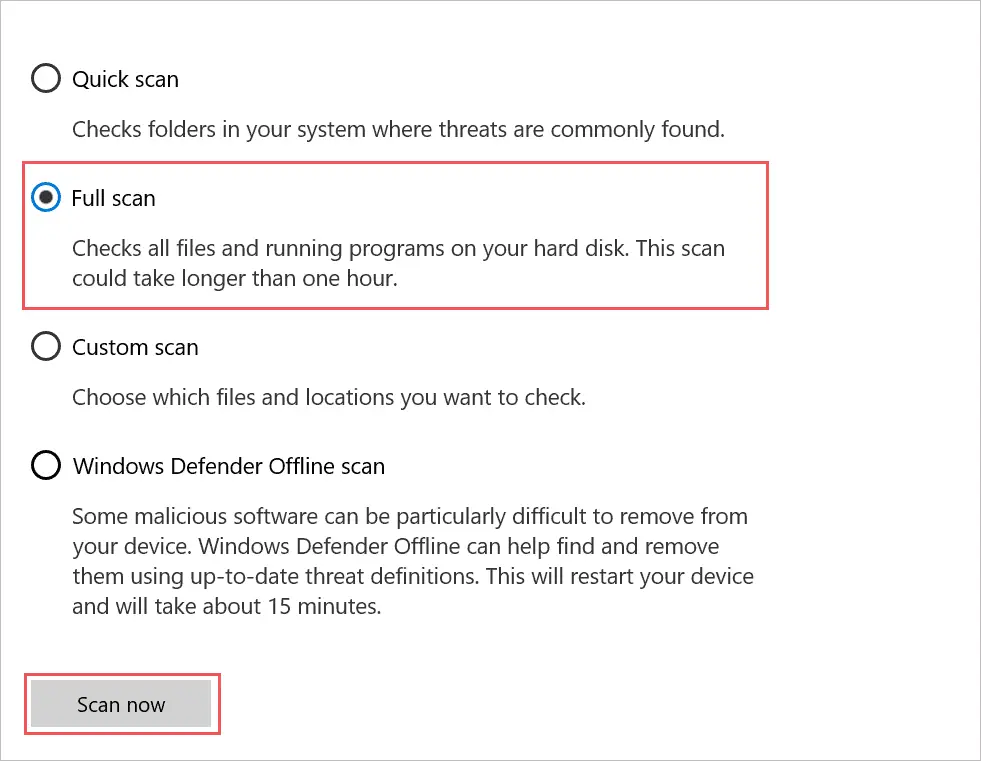
Now, let Windows complete the scan. Once the scan is completed, reboot your PC and check if the BSOD error is resolved or not.
15. Run Memory Diagnostic Tool
If there are issues with your RAM or memory causing Driver Verifier Detected Violation blue screen error, you can run the Windows memory diagnostics tool. This tool checks RAM for issues.
Press Windows key + R to open the Run window and type “mdsched” there. Click “OK” to open the Memory Diagnostics tool.
Click on “Restart now and check for problems (recommended).” Make sure you close all apps and unsaved files before clicking on the option.
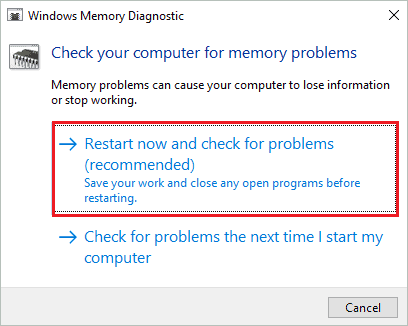
Once the PC restarts, check if there are any issues with system RAM.
16. Run Startup Repair
You can run a Windows startup repair to resolve the Driver_Verifier_Detected_Violation error. It is easy to run startup repair; all you need to do is enter the Advanced Startup option/Advanced options and select “Startup Repair.”
You can follow the instructions on your screen to start the startup repair and resolve the BSOD error on your computer.
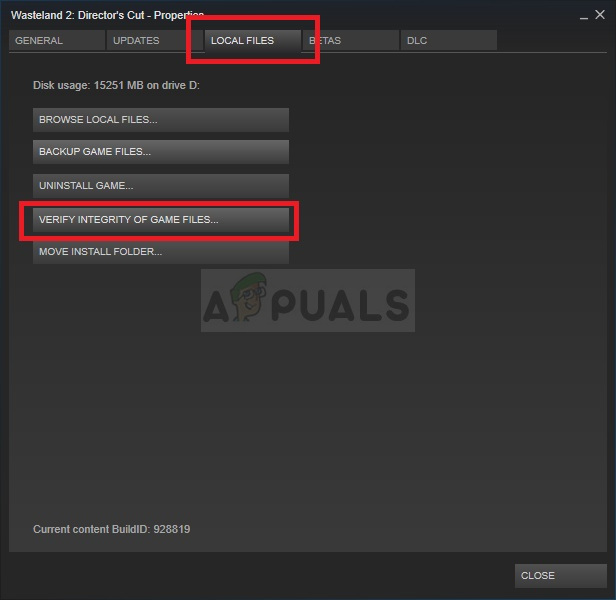
17. Verify Integrity of Game Files
If the blue screen error shows up only when you open Steam games or try updating/installing games, you can verify the integrity of game files.
Search for Steam client in the Start menu search bar and open the same from the search results.
Now, right-click on the game giving Driver Verifier Detected Violation error and click on “Properties” from the contextual menu.
Go to the “Local Files” tab and click on the “Verify Integrity of Game Files…” option there.
You can relaunch the game and check if the error is resolved or not.
18. Check your PC for Faulty Hardware
The hardware faults on your computer can cause troubles like blue screen errors. You can check if any hardware part is damaged or the wire is loose on the motherboard. If you don’t know how to perform these checks, you can get in touch with experts. And make sure you do it correctly, as if the cables, wires, or components are damaged while opening the PC, it can create unnecessary problems.
19. Perform a System Restore
If there are no hardware failures, you can perform a system restore. The system restore can revert your system to a point where everything is working properly. If you have created a system restore point recently, just revert the PC to that point, and it will resolve the Driver Verifier Detected Violation error on your PC.
System restore won’t delete your personal files and folders; only the apps that were installed after the restore point was created will be deleted. Also, the settings change will be reverted.
20. Reset your PC
If system restore didn’t help you resolve the Driver Verifier Detected Violation error, you could reset your PC. Resetting the Windows computer is the final resort to fix this blue screen error. The Windows operating system is reinstalled when you reset your PC. Therefore, all the third-party applications are uninstalled during the reset process. Also, the settings are restored to default.
However, there is an option to keep your personal files intact during the process. So, make sure you select that option.
Conclusion
The blue screen error is not a surprise for Windows 10 users, but it can get annoying when it shows up every now and then. You can experience Driver Verifier Detected Violation error randomly at any given time without any intimation. This error can pop up because of the Driver Verifier issue or some other problems on your PC.
With the right solutions, it becomes easy to resolve the blue screen errors. You can check out the long list of solutions in the above guide and try them out one by one to get rid of the Driver_Verifier_Detected_Violation BSOD error.
FAQs
What causes Driver Verifier Detected Violation error in Windows 10?
The problem in Driver Verifier, corrupt system files, corrupt, faulty or missing device drivers, and malware or virus can cause Driver Verifier Detected Violation in Windows 10.
How do I fix Driver Verifier Detected Violation blue screen error in Windows 10?
You can reset/disable Driver Verifier, work on device drivers, remove viruses, repair corrupt system files, check PC’s hardware, and make some other changes on your computer to fix Driver Verifier Violation blue screen error in Windows 10.
How do I reset the Driver Verifier?
You can use the verifier/reset command in elevated Command Prompt to reset the Driver Verifier.
Why shouldn’t you use a Driver Verifier?
Well, Driver Verifier, performs various stress tests on your device driver, and therefore it can cause your PC to crash. If you are a developer or tester developing/testing driver software, you can make the most out of Driver Verifier. However, if you are a regular user, you don’t need a Driver Verifier as the manufacturer team already checks your driver software.
The worst kind of errors which can occur to you is the Blue Screen of Death which occurs every once in a while. If an error occurs too often, it becomes almost impossible to treat it properly because you don’t have access to your computer long enough to treat the error.
Driver Verifier can cause these errors if there is a faulty driver on your computer which needs to be repaired. Unfortunately, Driver Verifier can also be triggered by false alarms or simply outdated drivers which are still working properly. Follow the solutions below in order to try to solve the DRIVER VERIFIER DETECTED VIOLATION BSOD on Windows.
Solution 1: Disable Driver Verifier From Starting
If Driver Verifier is enabled by default or if it has started on its own, you can always try to disable it. Disabling Driver Verifier is easy when you have uninterrupted access to all settings on your computer but things can become tricky if the BSOD appears each couple of seconds or minutes or if you are not able to access your computer at all. Luckily, there is a way to fix that as well.
Preparation
In order to perform any of the troubleshooting introduced in this article, you will need to prepare a Windows installation DVD or USB which you will use to troubleshoot the error. For older versions of Windows (older than Windows 10) you will need to use the original disc you received with the operating system. However, for Windows 10, you can create it in no time.
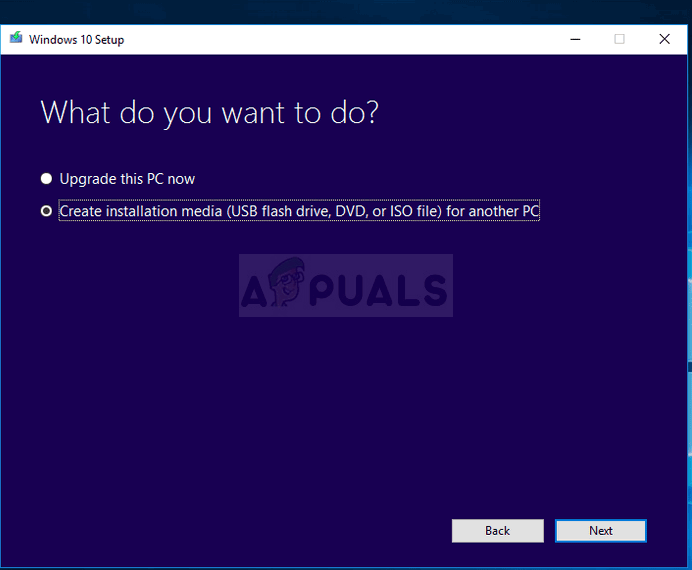
- Download the Media Creation Tool from Microsoft’s official website. Double-click on the downloaded file called MediaCreationTool.exe in order to open the wizard. Tap Accept.
- Select the Create installation media (USB flash drive, DVD, or ISO file) for another PC from the initial screen.
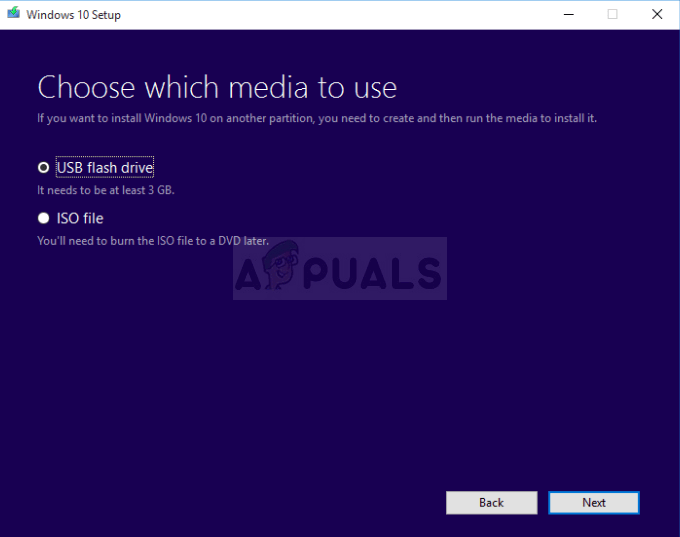
- The language, architecture, and edition of the bootable drive will be chosen based on your computer’s configuration, but you should uncheck the Use the recommended options for this PC in order to select the correct settings for the PC which is encountering the error (you are probably creating this on a different PC).
- Click Next and click on the USB flash drive or DVD option when prompted to choose between USB or DVD, depending on which device you want to use.
- Click Next and choose the drive from the list which displays the storage devices connected to your PC.
- Click Next and the Media Creation Tool will proceed to download the files necessary to install create the installation device.
Now it’s time to use this recovery media to fix your computer.
- Insert the recovery drive you own or which you created for your operating system and start your computer. The following steps are different from one operating system to another so follow them accordingly:
WINDOWS XP, VISTA, 7: Windows Setup should open prompting you to enter the language along with time and date settings. Enter them correctly and choose the Repair your computer option at the bottom part of the screen. Keep the first radio button as your choice when prompted with Use recovery tools or Restore your computer and click on the Next button. Choose Command Prompt when prompted with the Choose a recovery tool screen.
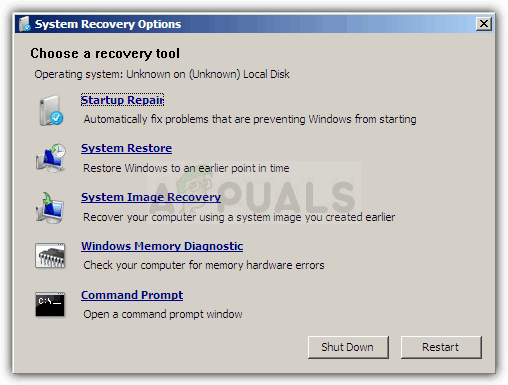
WINDOWS 8, 8.1, 10: You will see a Choose your keyboard layout screen so choose the one you want to use. The Choose an option screen will appear so click on Troubleshoot >> Advanced Options >> Command Prompt.
- Once Command Prompt opens successfully, type in the following command and make sure you click the Enter key after you finish:
Verifier /reset
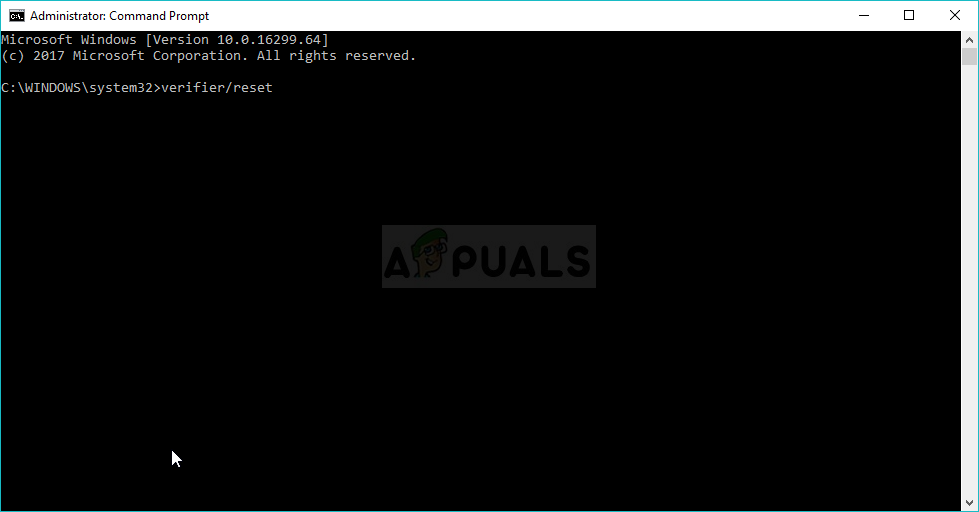
- Restart your computer without the recovery media and check to see if the problem still appears.
Since Driver Verifier is a trustworthy tool, it’s quite possible that one of your drivers has indeed malfunctioned and it’s only a matter of time before other weird errors begin to take place on your computer. That is why it’s important to update all of your drivers as soon as you are able to boot into your computer without constant BSODs.
- Select the Start button, type in Device Manager, and select it from the list of results at the top.
- Expand one of the categories to find the name of the device you want to update, then right-click on it, and select Update Driver. For graphics cards, expand the Display adapters category, right click your graphics card and select Update Driver.

- Select Search automatically for updated driver software.
- If Windows doesn’t find a new driver, you can try looking for one on the device manufacturer’s website and follow their instructions. You will need to repeat the same process for all devices or you can use an automated tool to do this for you.
Note: If you are using Windows 10, latest drivers are often installed alongside other Windows updates so make sure you keep your computer up to date. Windows Update is run automatically on Windows 10 but you can check by following the instructions below for a new update.
- Use the Windows Key + I key combination in order to open Settings on your Windows PC. Also, you can search for “Settings” by using the search bar located at the left part of the taskbar.
- Locate and open the “Update & security” submenu in the Settings app.
- Stay in the Windows Update tab and click on the Check for updates button under the Update status in order to check whether there is a new version of Windows available.
- If there is one, Windows should proceed with the download process automatically.
Bonus Solution: If the Problem Appears with a Steam Game
If the BSOD error appears when trying to run a Steam game or while trying to perform additional actions such as installing an update or an extension to the game, users have reported that verifying the game’s cache can generally help and solve the problem instantly, preventing the BSOD from appearing again. Make sure you check this out!
Verifying the integrity of game cache is an option available solely to Steam users who have downloaded the game from there. This is quite a good fix since this option will search through your game’s files in search for a broken one and it will also automatically download any missing or corrupt files. Follow the steps below in order to achieve this.
- Open your Steam client by double-clicking on it or by searching for it in the Start menu and navigate to the Library tab.
- Right-click on the game which is causing these issues and select Properties from the drop-down menu.
- Navigate to the Local Files tab and click on the Verify Integrity of Game Files… option.
- Try running the game and check if the DRIVER_VERIFIER_DETECTED_VIOLATION BSOD still appears.
Kevin Arrows
Kevin Arrows is a highly experienced and knowledgeable technology specialist with over a decade of industry experience. He holds a Microsoft Certified Technology Specialist (MCTS) certification and has a deep passion for staying up-to-date on the latest tech developments. Kevin has written extensively on a wide range of tech-related topics, showcasing his expertise and knowledge in areas such as software development, cybersecurity, and cloud computing. His contributions to the tech field have been widely recognized and respected by his peers, and he is highly regarded for his ability to explain complex technical concepts in a clear and concise manner.
Windows users try everything possible to avoid the dreaded Blue Screen of Death. They do everything, whether updating drivers, having sufficient memory, or updating software. Still, the infamous Driver Verifier Detected Violation BSOD errors knock on the door and keep the device stuck at startup. If you are also facing it or are looking for a solution to help someone else, you are in luck. This post will discuss how to troubleshoot a driver verifier violation error.
Sometimes, the technical steps cannot do what a simple system reboot can. Hence, restart the system before you try anything else to see if it does the trick. If this doesn’t help, identifying the primary cause of the problem will help deal with the issue before any further damage is caused.
What is Windows Driver Verifier?
It is a tool that ensures drivers work in an assigned manner and adheres to the conditions Microsoft defines. These standards are set to ensure driver reliability and performance on Windows operating systems.
The Driver Verifier Detected Violation error is encountered when the Driver Verifier identifies a failure in system drivers that cannot be undone. Here’s why users face this error on Windows:
Also Read: Fixed Error: Driver irql_less_or_not_equal on Windows 10
What Causes “Driver Verifier Detected Violation”?
Usually, the error is a result of faulty drivers or hardware. Besides that, other potential reasons include:
– Outdated drivers
– Virus or malware infections
– An outdated version of Windows
– Conflicting third-party applications
– Overclocking GPU
– A graphics card that is not compatible.
– Faulty hardware like CPU, RAM, HDDs, etc are not working properly
To check system hardware for issues, follow these steps:
1. Open the Run window. Press the Windows + R key.
2. Type mdsched.exe and click OK.
3. Click Restart now and check for problems.

4. Wait for the process to finish.
In addition to this, follow the steps to check the functionality of your system drive:
1. Right-click Start menu > This PC.
2. Look for the System Drive (mostly the drive letter is C:), right-click > select Properties.

3. Click Tools tab > Check.

4. Click the Scan drive option.
5. Let the process run.
If no flaws are detected, check the Motherboard and Power Supply Unit (PSU) so no software can test them. If you do not know how to perform the check, seek professional help.
Also Read: How To Fix Display Driver Failed To Start Issue
How To Fix Driver Verifier Detected Violation Error?
Method 1: Windows Update
Windows update helps keep Windows updated and apply the bug fixes released by Microsoft. To update Windows, follow these steps:
Step 1: Press the Windows key.
Step 2: Look for an icon that looks like a gear/cog wheel and click on it. It is the Settings icon,
Step 3: The last option in the left side panel is ” Windows Update.” Click on this option.

Step 4: Now, click on the Check For Updates button on the right side.
Step 5: The Download & Install button will start the installation process. Some updates may require a restart to complete.
Step 6: Bring your mouse cursor to Advanced Options and click on it. Then click on Optional Updates.
Step 7: Check the boxes next to the optional updates you want to install and click Download & Install.
Step 8: Wait for the Update process to complete and reboot your PC.
Method 2: Roll Back Graphics Drivers
Rolling back drivers, in some cases, help fix the error. Here’s how to do it:
Step 1: Press the keys Win + X on your keyboard to open the Power Menu.
Step 2: Choose “Device Manager”.
Step 3: Click “Display adapters.”

Step 4: Double-click on your graphics card, and the “Properties” box will open.
Step 5: A new box will open, the Properties window. Here, you have to click on the “Driver” tab.
Step 6: Click on the “Roll Back Driver” button. If not available, click on Uninstall Driver.
Step 7: Reboot your PC.
Note: No previous version is available if the “Roll Back Driver” option is greyed out. In such cases, you can uninstall the driver and restart the system to reinstall the generic one.
Also Read: How To Reset Your Graphics Driver On Windows
Method 3: Driver Update
Drivers are essential for your computer’s smooth functioning. They ensure good communication between hardware and software. To avoid driver-related issues, you can update them in three ways.
Way 1 – Update using the Manufacturer’s Website
Manufacturers have an official website to find drivers and other hardware resources. Anyone can visit the site, search for the latest drivers using the model number, and update the driver. The catch is that they need all the information about the operating system and the device they use. They might install an incorrect driver if they do not have these details or are unsure about them. Therefore, to avoid such issues, most users use Device Manager.
Way 2 – Update using Device Manager
Device Manager is a built-in utility offered by Windows that helps keep drivers updated and detect issues. To use it, press Win + X > select Device Manager. This will open the Device Manager window. Here, double-click the category > look for the driver > right-click > update driver.

Select Search automatically for drivers, the first option and follow the on-screen instructions to update the driver.
In this case, you need to double-click on Display Adapters and update your graphics card.
Again, here is something you should know. Device Manager doesn’t always show the latest driver update. It only shows the driver updates added to the database. This is why people who know this use a driver updating tool.
Way 3 – Update via Advanced Driver Updater (Recommended)
Advanced Driver Updater is a powerful and trusted driver updating tool that helps update drivers. Before updating the driver, the tool takes a backup, allowing you to decide which driver to update. Also, you can see the details of the old and new driver versions. To use it and keep drivers updated, you can follow these steps:
Note: You can update only one driver at a time using its trial version. You need to upgrade the version to update all outdated drivers in a go.
Step 1: Download Advanced Driver Updater. You can click the button provided below.
Step 2: Install the application. Then, open it and click the “Start Scan Now” button.

Step 3: The app will display a list of drivers that need updates. Click the “Update” button next to the graphics driver.

Step 4: Restart your PC to complete the update process.
Also Read: Error: The Driver May Be Corrupted or Missing (Code 39) {FIXED}
Method 4: Activate Driver Verifier
Driver Verifier helps find bad drivers that cause PC crashes and errors. Here are steps:
Step 1: Press Win + R on the keyboard.
Step 2: The RUN box will open.
Step 3: Type “cmd”.
Step 2: Hit Ctrl + Shift + Enter.
Step 3: The Command Prompt will open in Admin mode.
Step 3: Type “verifier” and press Enter.

Step 4: Select “Select driver names from a list” and click the Next button.
Step 5: Check the checkboxes next to the drivers you want to verify.
Step 6: After selecting the drivers, click Finish to start the verification process.
Step 7: After configuring the Driver Verifier, restart your computer.
Note : If the issue persists, disable the Driver Verifier before proceeding to the next step. Open the Command Prompt in admin mode and type “verifier /reset” followed by Enter.
Also Read: Quick Fixes For ‘Display Driver has Stopped Responding’ Error
Method 5: Activate The Memory Diagnostic Tool
Step 1: Click on the Start menu
Step 2: Type “Windows Memory Diagnostic.”
Step 3: Click on the relevant result under best match.
Step 4: Select “Restart now and check for problems.”
Step 5: If there are issues after rebooting, a notification will appear in the system tray. You can click on it to see details.
Tip : If issues are found, you may need to buy new RAM.
Method 6: Run A Malware Scan
Step 1: Press Win + I to open Settings.
Step 2: Click Privacy and Security.
Step 3: Click Windows Security.

Step 4: Click Virus & Threat Protection.
Step 5: Click Scan Options.

Step 6: Click Full Scan.
Step 7: Click Scan Now.
After the scan, follow the steps to delete or quarantine the virus if found.
Method 7: Uninstall Virtualization Software (If Installed)
If you are using virtualization software, remove it from your PC. This software can cause PC issues and is not good for PC health. After removing the software, you must check if the issue is fixed. Then, install a different Virtualization software.
Method 8: Run Hardware Troubleshooter
Step 1: Open the Run box and type the following command:
msdt.exe -id DeviceDiagnostic
Step 2: A new box will open, and you must click the Advanced link. Ensure that the checkbox before “ Apply Repairs Automatically “ is checked.

Step 3: Click on the Next button.
Step 4: Reboot the PC for the changes to take effect.
Method 9: Use SFC
The SFC tool repairs files on your PC. Steps on how to use it:
Step 1: Press Win + S and type cmd.
Step 2: Right-click “Command Prompt” in the search results and choose “Run as administrator.”
Step 3: In the Command Prompt window, type “sfc /scannow” and hit Enter.
Step 4: Exit the Command Prompt window and reboot your computer.
Method 10: Utilize DISM Tool
Step 1: Press Windows + S, type “cmd,” right-click on Command Prompt, and select “Run as administrator.”
Step 2: In the Command Prompt window, type the following command and press Enter:
DISM /Online /Cleanup-Image /RestoreHealth
Step 3: Allow the process to complete and reboot your PC.
Method 11: Run Chkdsk
Step 1: Press Win + R to open the RUN dialog.
Step 2: Type “CMD” and press Ctrl + Shift + Enter to launch the Command Prompt with administrative privileges.
Step 3: If the User Account Control prompt appears, click “Yes” to proceed.

Step 4: Copy and paste the following command.
chkdsk /f /r
Step 5: Reboot your PC.
Method 12: System Restore
Step 1: Restart your PC, enter the Windows Recovery Environment, and select “Troubleshoot.”
Step 2: Choose “Advanced options,” followed by “System Restore.”
Step 3: Select your Administrator Account, enter your password, and click “Continue.”
Step 4: Choose the system restore point you created and follow the on-screen instructions to complete the process.
Read Also: How to Fix Windows 10/11 System Restore Is Taking a Long Time
Method 13: Reset This PC
Step 1. Open the Start menu and search for ‘Reset this PC.’ Then, select the appropriate option from the search results.

Step 2. Click on “Reset PC.”

Step 3. Select “Keep my files.”
Step 4: Follow the on-screen instructions to start the reset process for your Windows computer.
Note : Although Windows provides an option to keep your data during the reset, it is recommended to manually back up your files externally to prevent any potential data loss.
Final Words
We hope the abovementioned steps will help fix the Driver Verifier Detected Violation issue on your PC. You must check after each step to see if the problem has been fixed. This way, you can ignore the other remaining steps. We have a comments section below where you can tell us which method helped you resolve the issue.
Read Also : [Solved] – GPU Crashes But PC Stays On