
Are you finding a blue screen on your computer all of a sudden and got astonished? When DRIVER PNP WATCHDOG occurs you might get yourself in a peculiar situation because even after using Windows 11 or 10 USB stick the system mightn’t boot. This BSOD mostly shows up when you attempt to install new patches of Windows or upgrade the OS to a higher version. With bug check code 0x000001D5, this BSOD points out that a driver failed to carry out a PnP operation within the fixed time frame.
Though there might be thousands of reasons for which DRIVER PNP WATCHDOG error can occur, invalid SATA controller setting in BIOS, Touchpad, missing system elements due to virus attack, outdated device drivers, and broken registry are mainly responsible. Besides, corruption in Windows update, issues with volume shadow services, damaged hard disk drive, faulty system services, and bad RAM is equally accountable for.
DRIVER PNP WATCHDOG
Here is how to Fix DRIVER PNP WATCHDOG Error Windows 11 or 10 –
1] Unplug Touchpad
The process is a little complex but worth trying as most of the people fix DRIVER PNP WATCHDOG by unplugging the touchpad cable only. To do it on your own, take the service manual that comes with your device. Such manual includes guidelines for the benefit of in-house technicians or licensed service agents with step by step procedure of common repair as well as replacing or disassembling process.
Unfortunately, most of the device doesn’t provide service manual nowadays but you still can manage one by navigating the manufactures website. The manufacture posts Standard PDF format online for free so that their user can take the help of these when needed. You can download it to mobile or other devices in order to get the guidance while disassembling the laptop for unplugging touchpad. However, it’s better to take help from professionals if you are not confident enough.
2] Modify SATA controller settings in BIOS
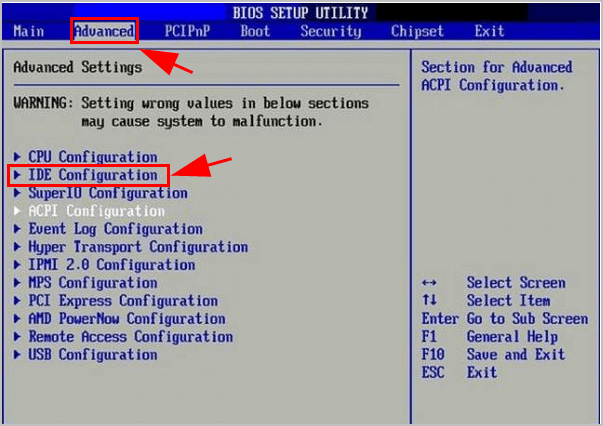
BIOS is the first thing that starts when you power on your PC and anything wrong with its settings can lead to DRIVER PNP WATCHDOG error. Usually, inappropriate SATA controller mode in the BIOS is found to cause such blue screen error as it prevents the communication system between OS and the device. However, when you change the SATA controller mode from AHCI to IDE, this particular BSOD error oftentimes goes away. Here is the procedure to do so –
- Shut down your Windows 11 or 10 PC.
- When the device is fully turned off, press the power button to turn it on again.
- While powering up, keep pressing the F2 key or the one that lets you enter into the BIOS settings.
- Once there, use the arrow keys to choose an option Advanced or Main, then press Enter to access the same.
- Look for options Storage Configuration, IDE Configuration, or Drive Configuration. After getting any, select the same by using arrow keys and then press the Enter.
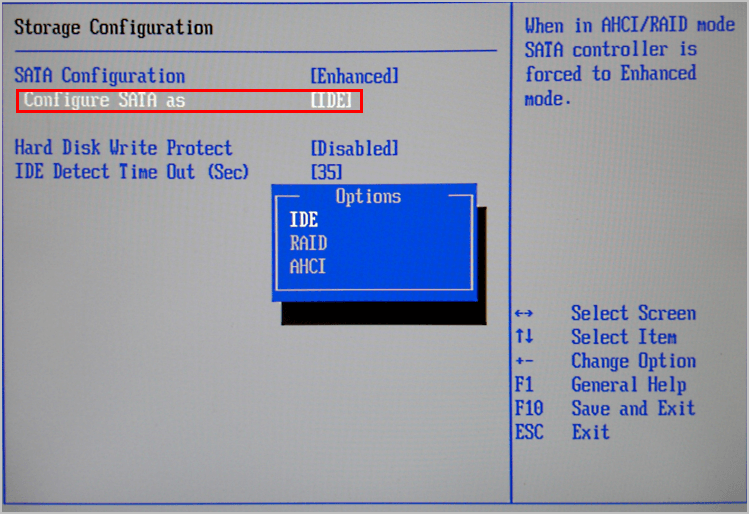
- Subsequently, look for any of Configure SATA, SATA Mode, or SATA Configuration.
- Change that option to [IDE].
- Save the changes and exit from the BIOS settings page.
3] Replace SSD to fix DRIVER PNP WATCHDOG
Many users who were struggling with DRIVER PNP WATCHDOG said that changing the SSD worked for them to resolve the blue screen error. Simply, take the SSD drive out and reboot the device using Media creation tool iso. Though it’s not sure why SSD drive throws such an issue, giving it a try is a must to resolve the error.
4] Run a full scan to eliminate existing threats
All malware attacks your system is not dangerous always, some enter as a weak one and then start replicating themselves to gather more strength. If you don’t break the chain in between, they will replace all the genuine system files and give rise to unexpected error codes such as DRIVER PNP WATCHDOG. To eliminate the existing threats, Windows Security is pretty convenient as the utility provides real-time protection against Trojans, Spywares, and any kind of malware. Let’s check out the step by step guide to use the built-in antimalware tool –
- Press Win+I hotkey to bring forward Windows Settings app.
- Click on Update & Security.
- Select Windows Security from the left sidebar.
- Move to alongside right and opt for the option Virus & threat protection.
- When a separate window shows up, click Scan options link from the right pane.
- From the next page, click the radio button located alongside Full scan.
- Subsequently, hit the button Scan now.
- After completion of the scanning process, click Clean threats option if the utility traces out any virus.
- From the consequent page, click Remove first followed by Start actions.
- When the removing process ends, reboot Windows 11 or 10.
5] Check the startup type of Volume Shadow Copy service
Volume Shadow Copy Service or VSS lets the Windows to continue the backup against a specific disk drive without causing any significant changes in it while the operation is going on. This also implements the volume shadow copies necessary for backing up and manages other associated processes. VSS while creating a backup usually locks the file or the drive as read-only for the proper execution of the task.
When the service stuck in an unexpected loop or launched in an improper way, you may lose access to that file or the drive precisely resulting in blue screen error DRIVER PNP WATCHDOG. The same can also be triggered when the service isn’t running properly. To fix the problem, follow the below steps –
- Click the search icon from the taskbar and type in services.msc.
- When you see Services at top of search result, hit Enter.
- From the dedicated console, look for Volume Shadow Copy that you will get under Name column.
- Once found, double-click the same to bring forth its properties.
- Reach to Startup type and click the drop-down list located aside.
- Choose Automatic.
- Finally, click on Apply followed by OK to make the changes effective.
6] Take help of Windows update troubleshooter
Update issues are pretty common in Windows 11 or 10 and resolving them is not hard at all every time. But often such an issue ends up causing blue screen error DRIVER PNP WATCHDOG from which it’s hard to recover. This happens if the Windows update fails to operate a particular task. However, you can fix up the things by using built-in Windows update troubleshooter which not only scans the full system for related errors but also resolve them automatically. Here is how to proceed –
- Right-click on Start button and choose Settings.
- From the app interface, opt for Update & Security.
- Select Troubleshoot from the left sidebar.
- Shift to alongside right and click on Windows Update.
- From the expanded tray, hit the button Run the troubleshooter.
- When the utility ends up scanning for the trouble that is causing BSOD, comply with on-screen guidelines to eradicate the found issue fully.
7] Update system drivers to fix DRIVER PNP WATCHDOG
Drivers are the sole component of any operating system and corruption in them gives rise to unexpected error codes that are stubborn enough to fix. Whenever a device driver becomes outdated or faulty, they affect the compatibility at the same time performance. As a result, the system performs slower than ever and keeps freezing time and again. These are the early signs you will come across if corruption takes place in any driver. Generally, drivers get corrupted if any recent change made the registry entries whacked moreover removed essential system elements.
You may also confront driver corruption if the version you are using is incompatible itself in Windows 10 or 11. To get rid of such an issue, all you need is update and install a compatible system driver. In order to update all drivers at once, you may think of third-party software but to be honest, nothing comes handy than the built-in Device Manager. This utility presents outdated drivers with yellow exclamation marks, so it becomes easy to find the corrupt one.
- Bring forth Run dialog by pressing Win+R hotkeys at the same time.
- Type devmgmt.msc in the command box and hit Enter.
- When the Device Manager floats up, look for any mark of exclamation beside a device.
- After getting the same, double-click on it to expand the driver lists.
- Right-click on the driver with yellow indication and then choose Update driver.
- From the next pop-up, opt for Search automatically for updated driver software option.
- Doing so will commence the searching process online.
- If any newer version found, the downloading and installing process will take place automatically.
- After completion, do the same procedure for all outdated drivers.
- Once done, restart Windows 10 for bringing these changes into effect.
Note – If the system fails to get an updated version for the faulty driver, visit the manufactures website, and search for the driver manually. When you find a recent and of course compatible one, download as well as install the same.
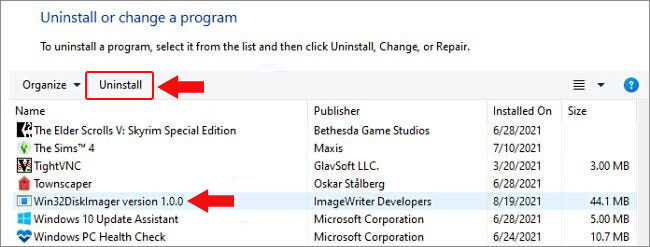
8] Uninstall third-party antimalware program
In this internet-based era, keeping your system safe from potential malware is a real challenge. To make the process easier, thousands of third-party antivirus programs are available in the market that not only warn you about existing threats but also resolves them if detected after real-time scanning. Though they do a great job, all software found on the web is not trustworthy and instead of protecting the system, they give rise to blue screen error like DRIVER PNP WATCHDOG.
Furthermore, when you install an additional antimalware program often it ends up conflicting with the built-in one. During such conflicts, they lost their own components at the same time essential system elements that are very much needed to run the Windows 11 or 10 error-free. To avoid such collision, it’s always better to keep one antimalware active and disable the other ones. We suggest keeping the Windows Security as it is as powerful as any other third-party programs moreover it will not create unnecessary trouble. Let’s see the procedure to uninstall the third-party antimalware program –
- Press Windows key to invoke Start menu.
- Click the Settings cog from the bottom left corner.
- When the dedicated window shows up, select Apps.
- Go through the app lists from the right-pane and search for the installed antimalware program.
- Once found, click on the same and choose Uninstall from the expanded pane.
- If UAC prompts for permission, choose Yes to continue.
- Keep following on-screen instructions to remove the app completely.
- After completion, restart the device.
9] Repair broken registry
Whatever you do in your Windows PC from installing an app to surf the web, all these things are stored in the registry. If they are not maintained properly or you set their value incorrectly, unwanted issues may occur including blue screen error. Mainly, registry entries get broken when you forcefully end a task such as installation or uninstallation process in between just because the procedure is taking a long time. Also, missing system elements due to virus attack are equally responsible to cause broken registry.
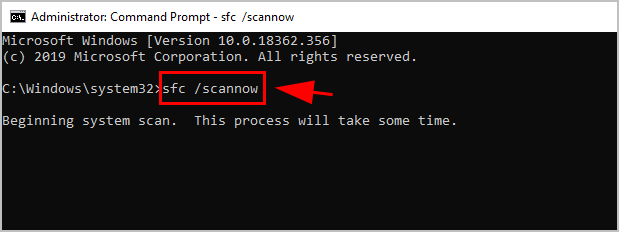
There are various ways to get rid of registry corruption but running System file checker followed by the DISM command is the most reliable one. Once executed in elevated Command Prompt, this will recover the missing system components also repair the broken registry as well. Here is how to proceed –
- Press Win and X simultaneously and choose Run from Power user menu.
- In the command box, type in cmd.
- Press Ctrl+Shift+Enter altogether to launch Command Prompt as admin.
- If a UAC prompts for asking permission, click the Yes button.
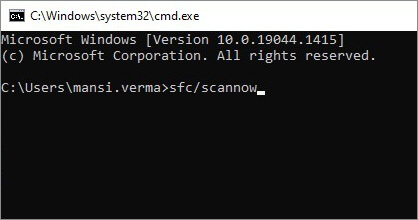
- On the appearing black panel, put
sfc /scannowand hit the Enter key to execute the command. - Let the process hits 100% without any interruption.
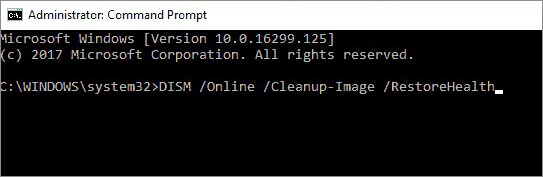
- When System File Checker finishes its work, insert
DISM /Online /Cleanup-Image /ScanHealthin the same Command Prompt panel followed by hitting Enter. - Once the process ends successfully, reboot the device and check if DRIVER PNP WATCHDOG still throws.
10] Try for automatic repair to fix DRIVER PNP WATCHDOG
When the system generates unexpected error codes, a special feature called automatic repair becomes active by Windows in its third boot. But there might be an instance when this feature is turned off as often the self-repair mechanism gets stuck in a loop itself from where its difficult to get back in normal state. In such a case, you need to perform it manually.
This process takes a good amount of time as a lot of tests are carried out to diagnose the issue you are struggling with. Hence, be patient and follow the below steps –
- Open Windows Settings and click on Update & Security.
- From the appearing page, choose Recovery option from the left pane.
- Shift to the adjacent right side.
- Click Restart now button you will get under Advanced startup section.
- When system powers up after the reboot, choose Troubleshoot =>Advanced options => Startup Repair respectively.
- Once Automatic Repair page shows up, provide valid Microsoft account credentials.
- Thereafter, click on Continue to initiate the repairing process.
11] Tweak Windows update service
As DRIVER PNP WATCHDOG mostly shows up while installing an update, there is a high chance that corrupted Windows update service is causing the issue. This mainly happens when Windows Update fails to connect to the Microsoft servers due to some inconvenience. Resetting the component may help to recover yourself from such a state. To do so –
- Press the Windows key and type cmd.exe.
- When the Command Prompt arrives at the top, click the option Run as Administrator from the right flyout.
- Click Yes for the User Account Control.
- In the Command Prompt, insert the following commands one after another and press enter after each one –
net stop wuauserv
net stop cryptSvc
net stop bits
net stop appIDSvc
- After execution, open File Explorer by pressing Win+E and navigate the following directory –
C:\Windows
- From the available folder lists, locate SoftwareDistribution and then rename it to SoftwareDistribution.old.
- Now go to the following path –
C:\WIndows\System32\
- Rename catroot2 folder to Catroot2.old.
- Get back to Command Prompt and execute the below command-lines one by one –
net start wuauserv
net start cryptSvc
net start bits
net start msiserver
net start appIDsvc
- Thereafter type in
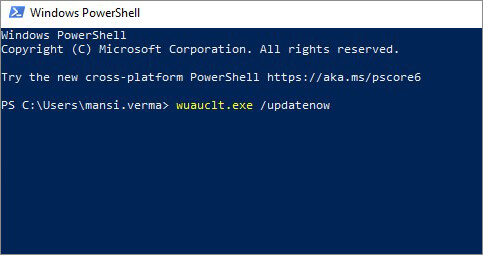
exitafter winking cursor and hit the Enter key. - Later on, right-click on Start icon and choose Windows PowerShell (Admin).
- When the console becomes ready to execute a command, insert the below line and press Enter –
wuauclt.exe /updatenow
- Finally, restart the system to make the changes effective.
12] Check for hard disk error
A hard disk is often compared to the soul of a system as it holds all information and data of your computer. When you use it for a long time, bad areas may form in it which mostly ends up causing blue screen error. However, there are many tips and tricks to maintain the hard disk in healthy condition but if bad areas are already formed you need to check for the error and solve it as well.
To do so, Disk Checking Tool comes handy which activates in the elevated Command Prompt. Here is how to use the tool –
- Manage access to the elevated Command Prompt.
- When in the black window, enter the following command at the base of winking cursor –
chkdsk C: /f /r /x
- Hit Enter key to let the system execute the command-line.
- Let Disk Checking Tool finds out corruption existing in the hard drive.
- Usually, the utility fix up found issue automatically but if it doesn’t, check the diagnosis report and take further steps.
13] Unplug external hardware accessories
In the recent past, a new weird issue has come up to cause blue screen errors like DRIVER PNP WATCHDOG. Connecting hardware accessories like mouse, keyboard, speaker or printer is becoming serious trouble to cause the BSOD error. Though the drawback may evolve from the USB adapters, the primary reason is yet to be known precisely.
However, there is an easy fix that came up to resolve this issue as well and many users have eliminated blue screen error by disconnecting these hardware peripherals temporarily. You can deport them for instance and then restart Windows 11 or 10 in the usual method. If the error is resolved afterward, connect those again and use them like before. During the process, also check if any specific accessory is causing the BSOD. If yes, you might need to change the peripheral itself.
14] Fix RAM issues to fix DRIVER PNP WATCHDOG
Oftentimes memory problems are treated as one of the most prominent causes behind DRIVER PNP WATCHDOG BSOD error in Windows 11 or 10. Memory issues are associated with a defective RAM stick mostly. Usually, these cases come up when the device falls on the ground and become physically damaged. When a blue screen error is evolved from bad RAM, you may need to replace it fully which is not suitable always. Before going that far, you can use the Windows Memory Diagnostic tool. Here is how to use the utility –
- Pressing Win+I key at once.
- In the search bar of Windows Settings, type memory.
- From the search result, pick the option Diagnose your computer’s memory problems.
- When the assigned pop-up becomes visible, click Restart now and check for problems (recommended).
- After completing the first cycle of the reboot, a blue screen will show up detecting memory issues.
- Once the progress hits 100%, the device will go for the second restart.
- After signing back in, check the diagnostic result you will get in the notification area.
15] Run online blue screen troubleshooter
Blue screen error is usually irrecoverable mostly and often comes with unknown causes of origin. This makes the troubleshooting very much difficult so as to resolve the error from the system. Microsoft technicians took this fatality into account and introduced a new utility so that users can easily get rid of BSOD errors.
Since the internet is much reachable nowadays, Microsoft released a new online version and you can access it directly using a browser. Here are the steps to access this online tool –
- Launch a browser and navigate the dedicated page of Microsoft’s online troubleshooting by clicking this link.
- Once there, scroll down to When did you get the error? section.
- Opt for a radio button depending on your scenario.
- Doing so will stretch out stepwise tasks to resolve the existing issue.
- Follow them to fix DRIVER PNP WATCHDOG blue screen error.
16] Restore the PC to its default state to fix DRIVER PNP WATCHDOG
Making changes in system settings, services, and registry entries are pretty common to make the Windows 11 or 10 device more user-friendly. But when it is done in the wrong way, various issues may rise up including blue screen error.
To revert back any recent change you made, perform system restore. It will take you back to a point where there was no error. Here is how to proceed –
- Press Win+R and type rstrui in the dialog box.
- Click OK button open System Restore wizard.
- Hit the Next button from the bottom.
- Go for the most recent restore point and click on Next.
- Comply with the on-screen instruction if any and lastly, click on Finish.
Methods:
1] Unplug Touchpad
2] Modify SATA controller settings in BIOS
3] Replace SSD
4] Run a full scan to eliminate existing threats
5] Check the startup type of Volume Shadow Copy service
6] Take help of Windows update troubleshooter
7] Update system drivers
8] Uninstall third-party antimalware program
9] Repair broken registry
10] Try for automatic repair
11] Tweak Windows update service
12] Check for hard disk error
13] Unplug external hardware accessories
14] Fix RAM issues
15] Run online blue screen troubleshooter
16] Restore the PC to its default state
That’s all!!
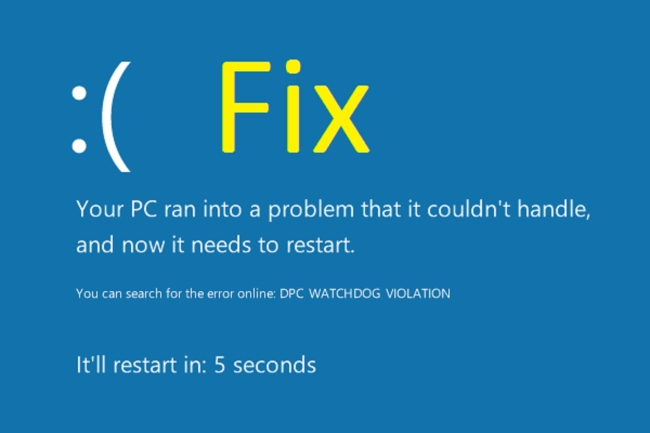
While using your system, you don’t want to bump into any problems. However, a lot of problems are inevitable and may occur at any moment. One such issue is –the Driver PNP Watchdog error. This error is causing Windows 10 and 11 users to face different setbacks, such as system freezing, boot-up error, app crashes, problematic Windows Update installation, BSODs (Blue Screen of Death), etc.
However, there is no need to stress over this error, as some proven fixes will help you combat it and let you access the system and its data.
Driver PNP Watchdog Windows 11 error is related to PNP drivers that support physical, logical, and virtual devices on machines. This error occurs when a system driver fails to complete the PnP operation within a specific time. It usually contains a bug check value of 0x000001D5. However, it can also appear with a bug check value of 0xc1900101.
The error arises with BSoD (Blue Screen of Death), a common Windows OS problem. There could be many reasons for this error, including malware/viruses, invalid or damaged PC registry, outdated system files, drivers, etc.
You may encounter the error message – Driver PNP Watchdog on boot or while installing Windows updates. It may cause system freezing, hanging, boot-loop, startup error, OS crashing, or even epic failure.
How to Fix Driver PNP Watchdog Error?
Despite all the challenges you may face due to this error, you must have the knowledge to overcome and solve the problem. Here, we’ve provided effective methods to solve Driver PNP Watchdog error. You can go through the fixes and apply them as you find suitable.
#1 Run Windows Troubleshooter
Driver PNP Watchdog Windows 10 /11 error may hinder the Windows Update installing process. However, you can give a shot to Windows Troubleshooter to fix the problem. Follow the given steps to run the troubleshooter.
- Open system Settings by pressing Windows + I and then open Update & Security.
- Next, in the left panel, locate Troubleshoot and open it.
- Choose ‘Run troubleshooters automatically, then notify me’ from the drop-down given on the right.
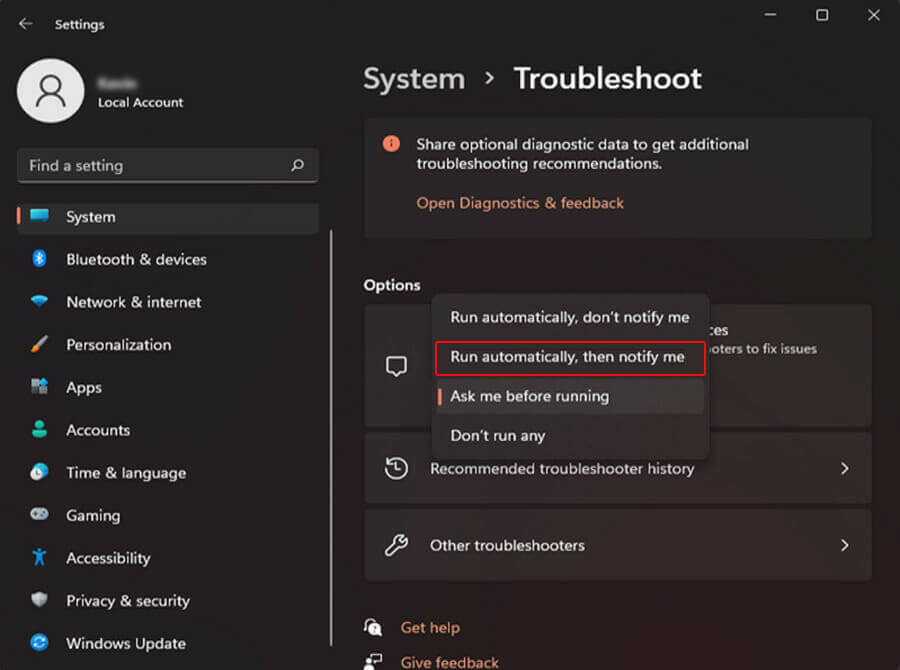
- Once done, your system may restart automatically. If it doesn’t, reboot it and check if the issue is solved.
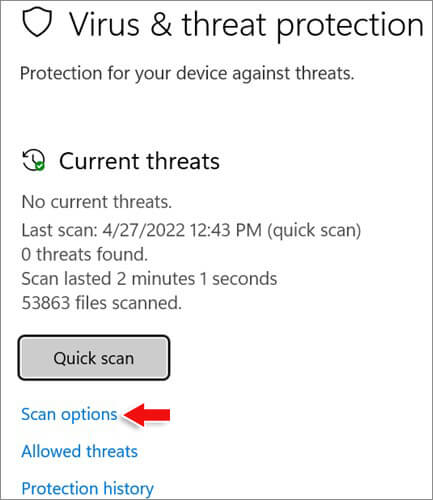
#2 Run Windows Defender to Full Scan your PC
As stop code Driver PNP Watchdog can occur due to malware or viruses, try running a complete scan using the Windows Defender Program. This Windows built-in antivirus program helps you identify any malware or virus in the system and guides you to remove them. To run Windows Defender, follow the given steps:
- Open Windows Settings by pressing Windows + I and go to Update & Security.
- Next, select Windows Security from the left and click Virus & threat protection from the right panel.
- Now, click Scan options.
- You’ll see the scanning options as ‘Quick scan,’ ‘Full scan,’ ‘Custom scan,’ and ‘Microsoft Defender Offline scan.’
- Choose Full Scan from the given options and then click Scan now.
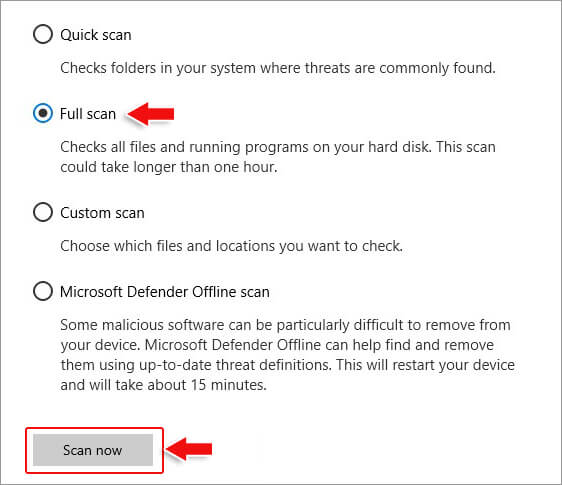
- Let the process finish, and then restart your PC. Now check if the error is fixed.
#3 Repair Invalid/Damaged Windows Registry
Sometimes, corrupted system files on your system may lead to an invalid or damaged Windows registry. You can try the System File Checker (SFC) utility to repair the registry and fix the issue. This utility checks the integrity of protected system files and replaces the corrupt or damaged ones with the correct versions.
- On your system screen, locate the Search bar and type cmd.
- Right-click the Command Prompt and choose the ‘Run as administrator’ option.
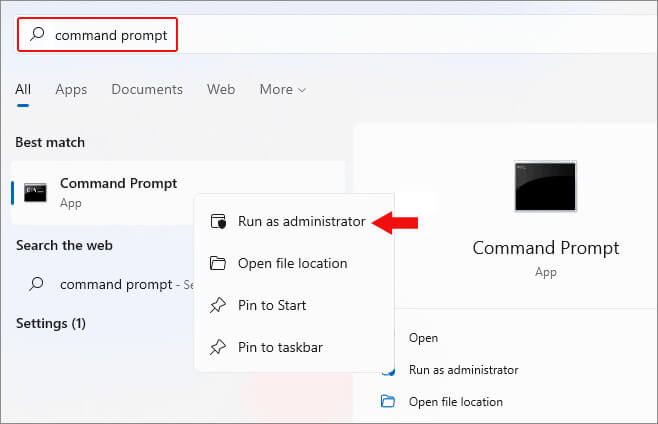
- Further, click Yes (if prompted) to confirm the action.
- Now, in the Command Prompt window, type sfc/scannow and hit Enter.
- The System File Checker will initiate scanning and check for corrupted/damaged files.
- If you’re a Windows 8, 8.1, or 10 user, first run DISM.exe /Online /Cleanup-image /Restorehealth and then run the SFC command.
- Once the process is completed, proceed with the SFC command.
- Don’t interrupt the process. Instead, wait until the scan is done and then reboot your system.
#4 Uninstall the Malicious Apps/Software
Sometimes, the issue may occur after installing a particular application/software on your system. That application or software may be incompatible with the system or corrupted or malicious. You can try to uninstall such apps/software and see if the problem is fixed.
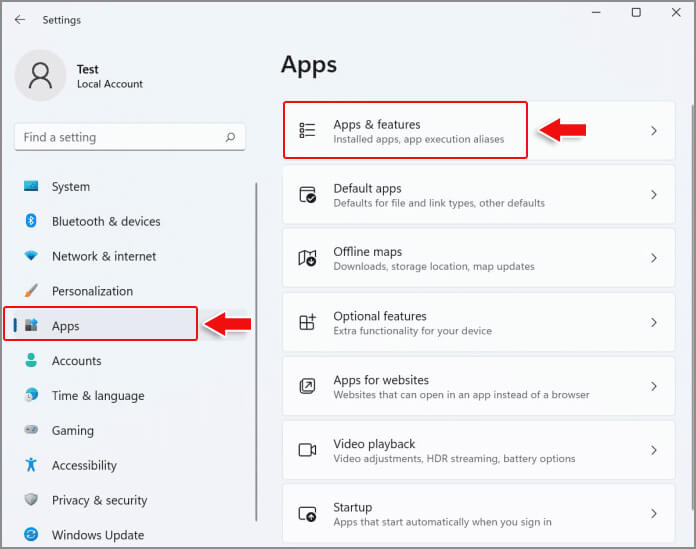
- Press Windows + I to open system Settings.
- Navigate to Apps > Apps & features and locate the app/software you recently installed.
- Right-click on the app and click Uninstall.
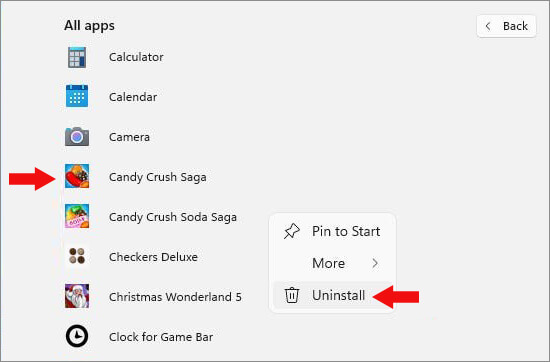
- If the app is a Windows Store app, you may get a confirmation pop-up box; click Uninstall to proceed.
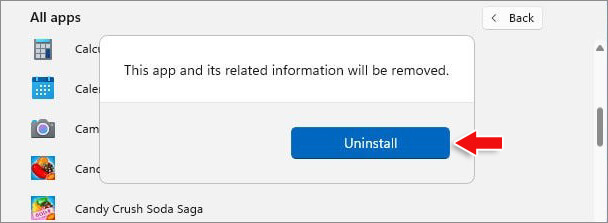
- If it is a classic Win32 App, you will see Programs & Features page in the Control Panel. Here, locate the app and click Uninstall, given in the toolbar.
#5 Adjust System Services
System Services confirms that your system runs and performs at optimum level. However, Driver PNP Watchdog Windows 11 error may occur when a service is faulty. Therefore, try to adjust the system services with the following steps to overcome the issue.
- In the Search bar, type cmd and run Command Prompt as an administrator.
- In the Command Prompt window, type the below commands and hit Enter.
net stop wuauserv
net stop cryptSvc
net stop bits
net stop appIDsvc
- Let the process complete. Once done, close the window.
- Now, open File Explorer and follow This PC > Local Disk (C:) > Windows > System32 > Catroot2.
- Right-click on Catroot2 and rename it to Catroot2.old.
- Next, open the Command Prompt window, and run the given commands.
net start wuauserv
net start cryptSvc
net start bits
net start msiserver
net start appIDsvc
- Once completed, exit the window and open Windows PowerShell as administrator.
- Type the following commands and hit Enter.
wuauclt.exe /updatenow
- Wait until the process is done and reboot your system to check if the error is gone.
#6 Reset your system to Factory Settings
Restoring your system to the factory settings may resolve the Stop Code Driver PNP Watchdog error. However, doing so will uninstall the apps, services, files, drivers, etc. All the changes made to your system will be lost. Therefore, take a backup of your data before performing this method. To reset your PC, follow the given steps:
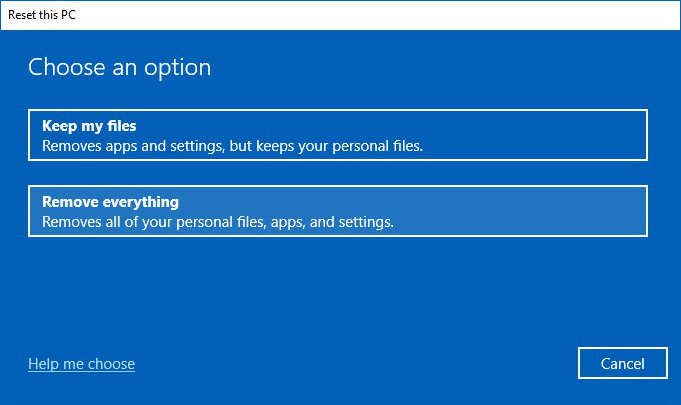
- Press Windows + I to open system Settings. There, select Update & Security.
- Next, choose Recovery and click Reset PC.
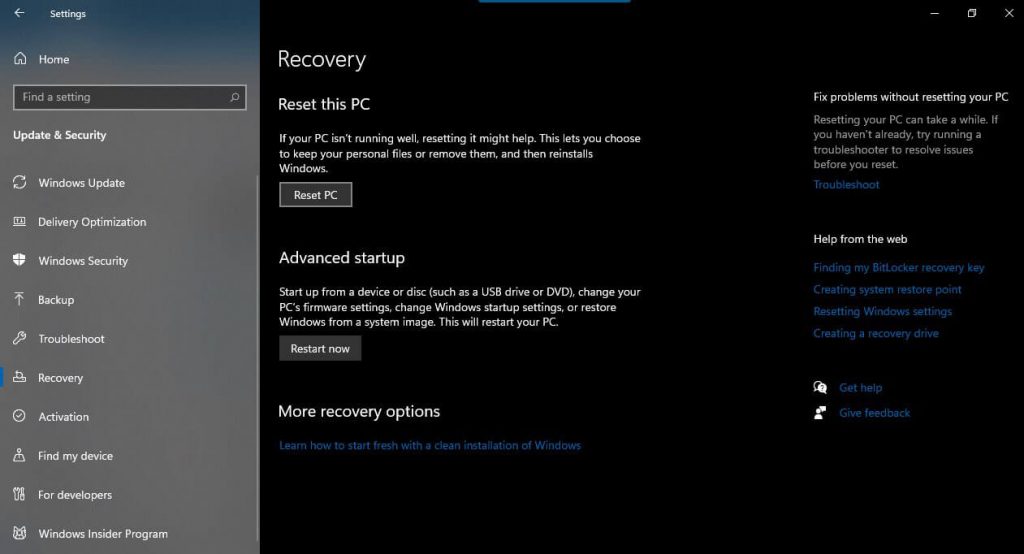
- Enter admin credentials, if required.
- On the next prompt, you’ll see two options – Keep my files and Remove everything. Then, choose to Remove everything for the process to work efficiently.
- Now, choose Local reinstall from the given options.
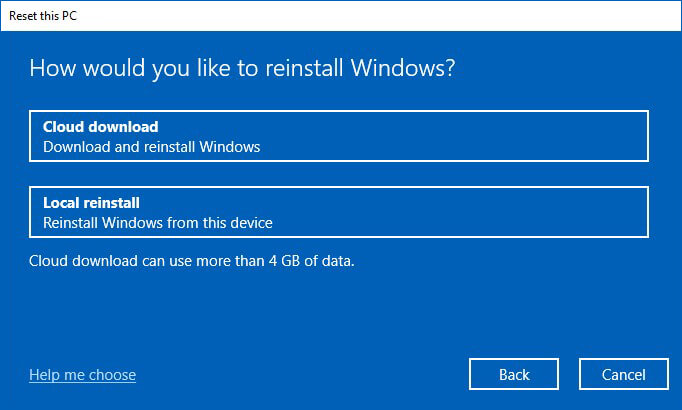
- Next, you can proceed with the current settings and click Next. Else, you can click Change Settings.
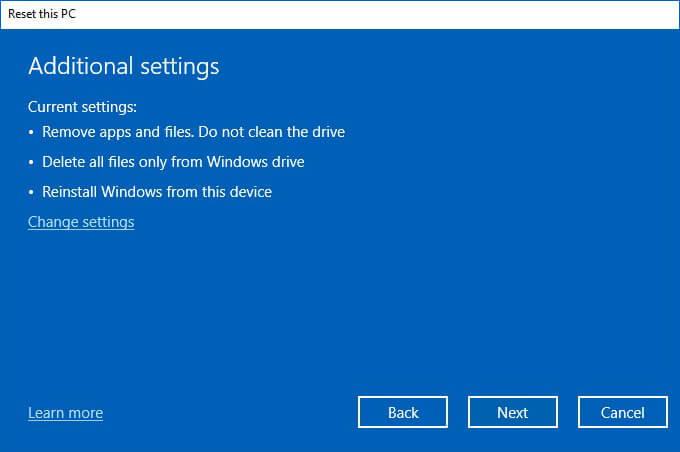
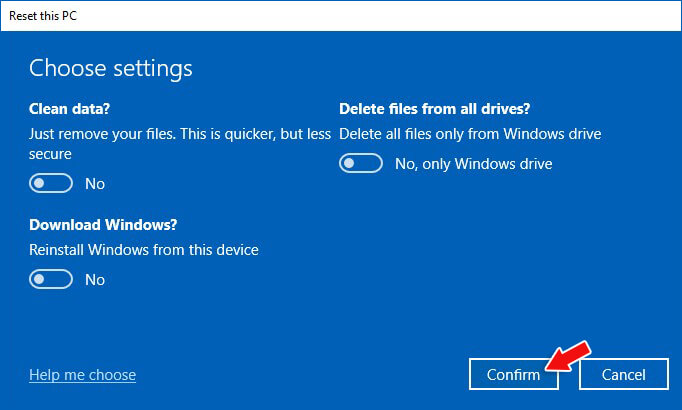
- If you select ‘Change settings,’ you will get the options to Clean data, Delete files from all drives and Download Windows.
- All these options will cause data loss. It is advised to back up your system data first and then proceed. If you already have a backup, choose Clean data; it will only remove your files. Proceed by clicking Confirm.
- Finally, proceed with resetting the PC and wait until the process is complete.
So these are some methods you may try to resolve Driver PNP Watchdog errors on Windows 10 and 11. However, there is a risk of losing data in some methods, such as adjusting system services or resetting the PC. Make sure you first back up your system data before performing these methods.
But what to do if you forget to back up as well? Don’t worry! You still have a chance to restore your data. You may use Stellar Data Recovery Professional to recover data after a factory reset.
FAQ
Can RAM cause Driver PNP Watchdog Error?
Primarily, the causes behind Driver PNP Watchdog errors are malware/viruses, damaged PC registry, or outdated system files. Additionally, corrupted or damaged RAM may cause different types of BSoD errors.
Why Does DPC Watchdog Violation Occur?
The DPC Watchdog Violation may occur due to multiple reasons, including
- Faulty or corrupt hard drive
- Unsupported SSD firmware
- Hardware incompatibility issues
- Outdated, corrupted, or faulty device drivers
- Corrupted system files
- Corrupt/incompatible software installed on the system
Read more
Was this article helpful?
YES1
NO
‘Driver PNP Watchdog’ error trying to install windows 10 on 2020 iMac
2020 iMac with 4TB SSD, Radeon 5700. Catalina up to date.
Tried installing Windows 10 (both 20H2 build and 1909 build) without success. Boot camp partitions just fine and iMac reboots to windows blank blue screen ‘setup is starting’ then crashes to BSOD with Stop error = Driver_PNP_WatchDog. I then have to reclaim the boot camp partition in disk utility. AppleCare could not find solution as this is on the Windows side. I have not pinged Microsoft hard yet but a quick internet search shows this error as a problem on Windows machines tied to many types of issues from device drivers to BIOS drive controller. Any ideas?
Posted on Oct 21, 2020 11:15 AM
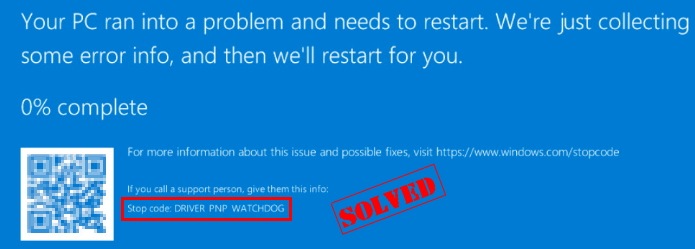
Many Windows users see a DRIVER PNP WATCHDOG error when booting up Windows or running Windows Update, and usually Driver PNP Watchdog happens with a blue screen. The complete error message is: You PC ran into a problem and needs to restart. We’re just collecting some error info, and then we’ll restart for you. … Stop code: Driver PNP WATCHDOG.
If you’re one of them, don’t worry. This post puts together the workarounds to fix Driver PNP Watchdog.
Try these fixes
Here are the solutions to try. You shouldn’t have to try them all; just work your way down the list until everything’s working.
- Check SATA controller settings in BIOS
- Run System File Checker
- Perform a disk check
- Update your device drivers
- Try Automatic Repair
- Check Volume Shadow Copy service
Note: Performing these methods requires getting into Windows GUI. If you can’t log into Windows at all, you should boot into Safe Mode with Networking at first, then perform these methods.
Fix 1: Check SATA controller settings in BIOS
When Driver PNP Watchdog error appears with a blue screen, it may relate to the BIOS settings. So you can check your BIOS settings in this way:
1) Ensure your computer is OFF.
2) Press the Power button to power on your computer, and keep pressing the F2 key (or DEL key, F1, F3, or ESC key depending on your computer brand) to enter BIOS.
3) Use the arrow keys to select an option like Advanced or Main, then press Enter to access.
4) Find an option like Storage Configuration, IDE Configuration, or Drive Configuration. Then press the Enter key.
5) Find an option like Configure SATA, SATA Mode or SATA Configuration.
6) Change that option to IDE, ATA, or Compatible.
7) Save and exit BIOS.
Now check if Driver PNP Watchdog has been resolved.
Fix 2: Run System File Checker
Basically the missing or corrupted system files may cause system errors or blue screen issues, so you can run System File Checker (SFC) to fix your problem by scanning and repairing any problematic files.
To do so, follow these steps:
1) Type cmd in the search bar on your desktop, and right click Command Prompt (or CMD if you’re using Windows 7) and select Run as administrator.
2) Copy and paste the following command into Command Prompt, and press Enter.
sfc /scannow
3) Wait for the process to be 100% complete.
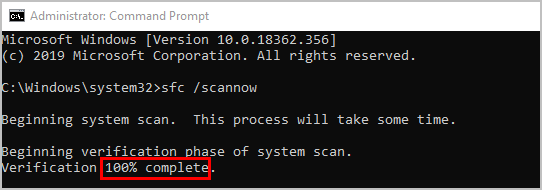
4) Type exit in Command Prompt and press Enter.
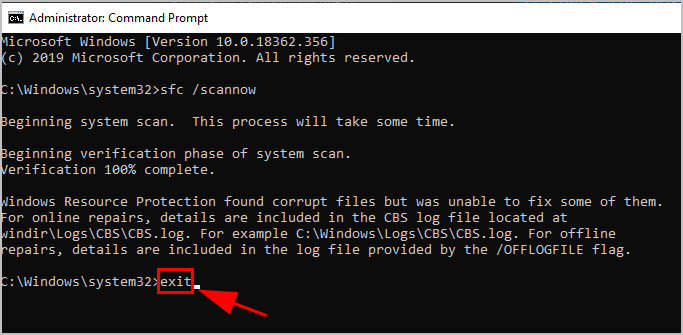
5) Restart your computer.
Now run Windows Update and see if the Driver PNP Watchdog error has been resolved.
Fix 3: Perform a disk check
CHKDSK is a Windows tool that checks the file system metadata of a volume for errors. So if you see the Driver PNP Watchdog error in your computer, running the CHKDSK tool may help scan that issue and fix it.
Here’s how to do it:
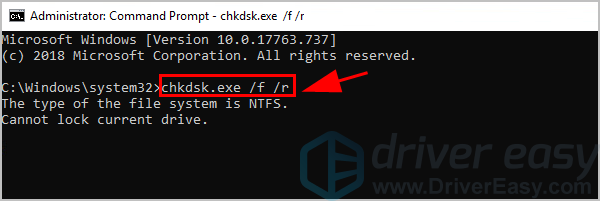
1) Type cmd in the search box on your desktop, right-click Command Prompt (or CMD if you’re using Windows 7), and select Run as administrator.
2) Click Yes to accept UAC if prompted.
3) Type (or copy and paste) the following command in Command Prompt. Then press Enter on your keyboard.
chkdsk.exe /f /r
3) Type Y in the Command Prompt to confirm that you’d like to perform the disk check next time you restart your computer. Then press Enter.
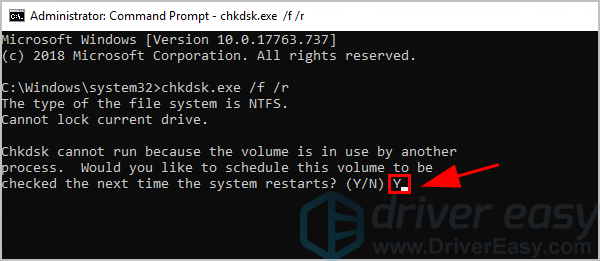
4) Make sure you’ve closed all the applications and saved your work. Then restart Windows.
5) Disk check will start after restarting your computer. It might take some time to complete (could be a day for some).
Note: If you don’t have time to wait for the disk check when restarting, you can skip it. If you want to reschedule the disk check again, perform the steps above to reschedule.
6) Once the disk check has been completed, check your computer or run Windows Update again to see if the Driver PNP Watchdog error has been removed.
If so, then congrats. If not, don’t worry. There are other solutions.
Fix 4: Update your device drivers
A missing or outdated device driver can cause Driver PNP Watchdog in your computer. In these circumstances, you should update your device drivers to the latest version.
You can automatically update all your device drivers to the latest correct version with Driver Easy.
Driver Easy will automatically recognize your system and find the correct drivers for it. You don’t need to know exactly what system your computer is running, you don’t need to risk downloading and installing the wrong driver, and you don’t need to worry about making a mistake when installing.
You can update your drivers automatically with either the FREE or the Pro version of Driver Easy. But with the Pro version, it takes just 2 clicks (and you get full support and a 30-day money-back guarantee):
1) Download and install Driver Easy.
2) Run Driver Easy and click the Scan Now button. Driver Easy will then scan your computer and detect any problem drivers.
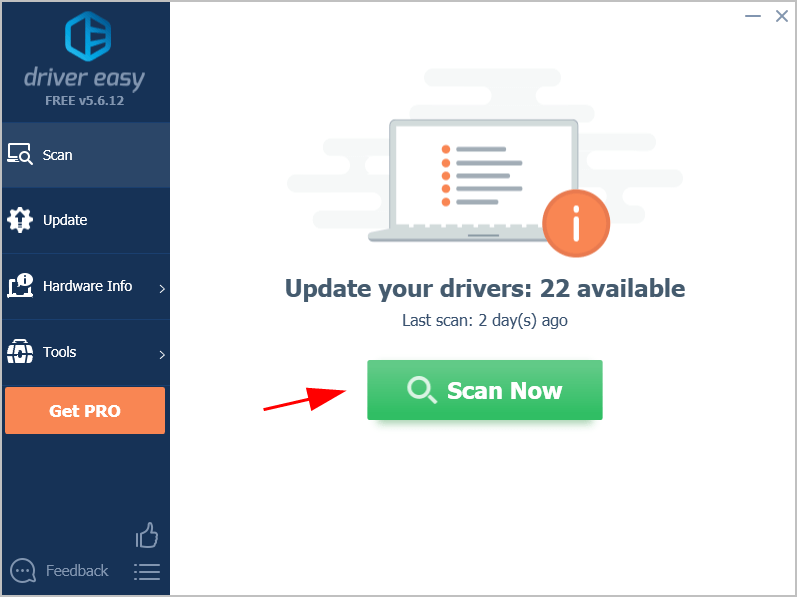
3) Click the Update button next to any flagged device to automatically download and install the correct version of that driver (you can do this with the FREE version).
Or click Update All to automatically download and install the correct version of all the drivers that are missing or out of date on your system (this requires the Pro version – you’ll be prompted to upgrade when you click Update All).

4) Restart your computer as normal and see if the error disappears.
If your Driver PNP Watchdog error persists, try the next method below.
Fix 5: Try Automatic Repair
Automatic Repair helps fix problems that keep Windows from loading, including a blue screen error like Driver PNP Watchdog. So if Driver PNP Watchdog keeps occurring, try Automatic Repair.
If you can boot normally, try this to access Automatic Repair:
1) On your keyboard, press and hold down the Shift key.
2) While holding down the Shift key, click the Start button at the bottom left corner, and click the Power button, then click Restart.
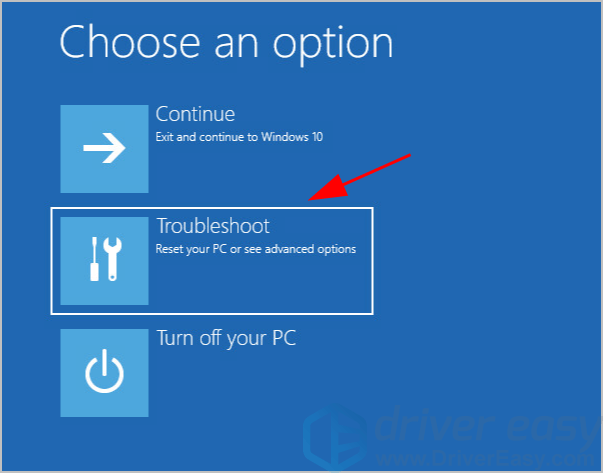
3) The Windows RE (Recovery Environment) screen opens. Click Troubleshoot.
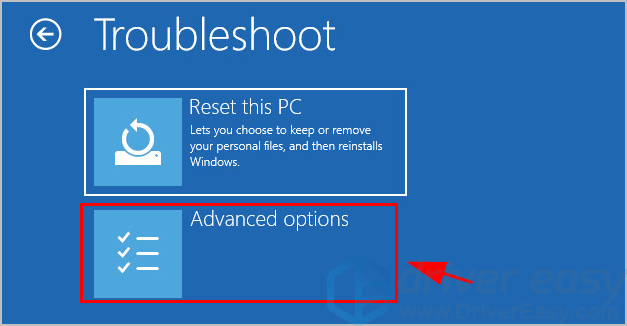
4) Click Advanced options under the Troubleshoot screen.
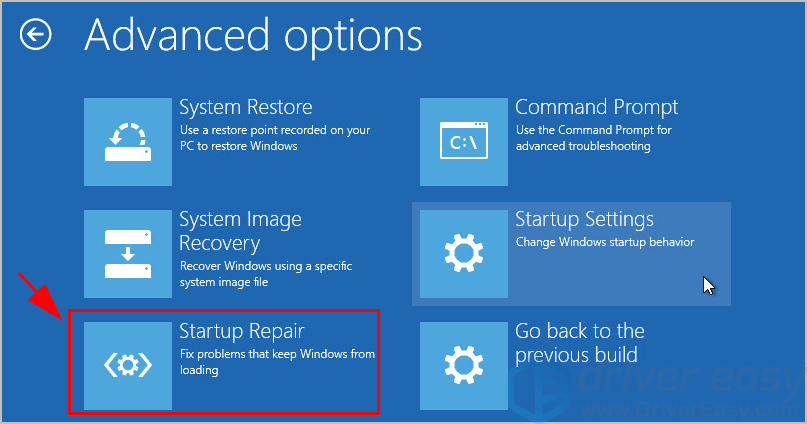
5) Click Startup Repair.
6) Follow the on-screen instructions to finish the process.
Now boot into Windows and see if it fixes your problem.
If you can’t boot normally, try this to get into Automatic Repair:
1) Ensure your PC is off.
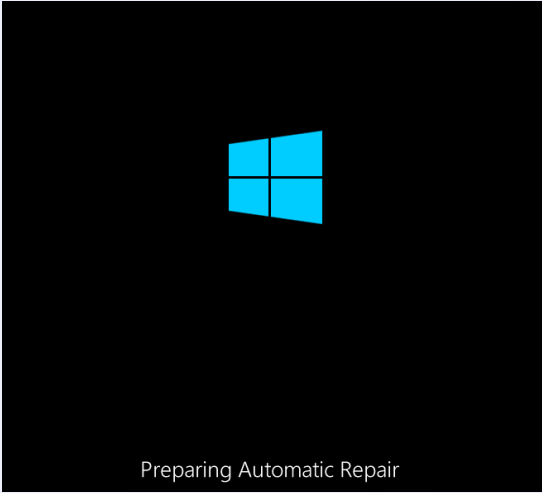
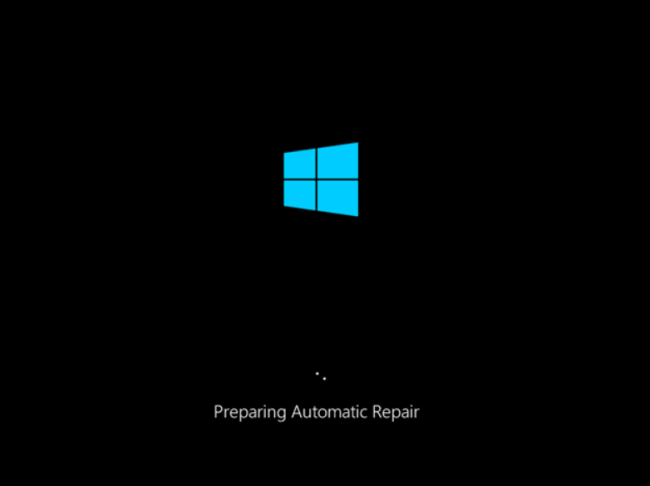
2) Press the Power button to turn on your PC, then hold the Power button down until PC shuts down automatically (about 5 seconds). Repeat this more than 2 times until you see the Preparing Automatic Repair (see below screenshot).
Note: If you’ve seen this screen for the first time when you power up the computer, skip this step.
3) When you see the Startup Repair screen, click Advanced Options.
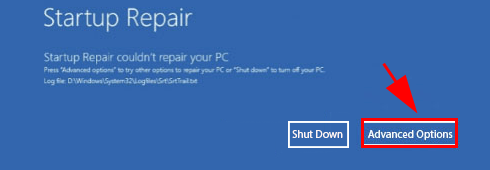
4) Click Troubleshoot.
5) Click Advanced Options.
6) Click Startup Repair.
7) Follow the on-screen instructions to finish it.
Hopefully, Windows repair will scan and fix your error automatically.
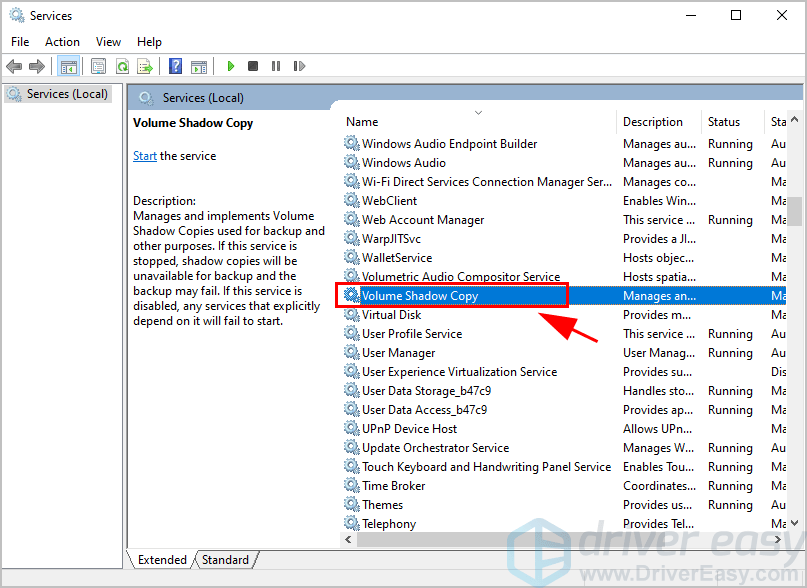
Fix 6: Check Volume Shadow Copy service
The Volume Shadow Copy service manages and implements Volume Shadow Copies used for backup and other purposes. If this service isn’t running properly, it can cause problems.
You should make sure the Volume Shadow Copy service is running properly:
1) On your keyboard, press the Windows logo key and R at the same time to invoke the Run box.
2) Type services.msc and click OK.
3) Scroll down and double-click Volume Shadow Copy.
4) Make sure the Startup type is set to Automatic, and the Service status is Running. Then click Apply and OK to save your changes.
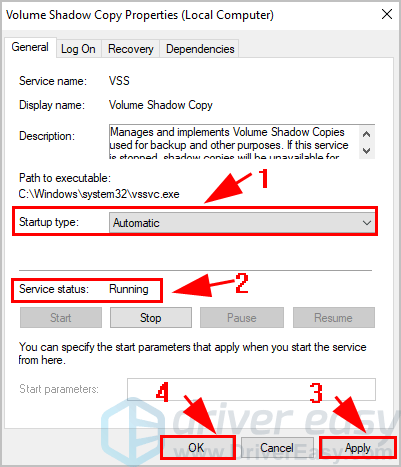
5) Restart your computer.
Now check if the Driver PNP Watchdog error disappears, or re-run Windows Update and see how it works.
There you go – six solutions to fix Driver PNP Watchdog error in your computer. Hope this post helps in resolving your issue.
If you have any questions, feel free to leave us a comment below.
How to fix Driver PNP Watchdog error
Driver PNP Watchdog error is a system issue that often appears while installing Windows 10 version 1803 Update. This happens when the user tries upgrading Windows 10, the update starts and then freezes at some stage and eventually showing the “Blue Screen of Death” (BSOD) with the Driver PNP Watchdog error. There are many reasons for the appearance of this error. It may be caused due to the system problems, the presence of viruses and other malware, out of date drivers or damaged hard drives of your PC and so on. As a result, the user can’t install important updates without facing Driver PNP Watchdog error. Below in this guide, you will find several methods to fix Driver PNP Watchdog error.
Ways to fix Driver PNP Watchdog error :
Automatic solution
Repairing system errors may be not an easy task, so we should warn you that performing some of the steps may require above-average skills, so if you don’t feel experienced enough, you may apply to an automatic tool.
All operations are carried out in Safe Mode with networking. To load your system in this mode, perform the following steps:
For Windows XP/Vista/7
- Reboot you PC;
- Press F8 button when you turn on the computer;
- Advanced Boot Options menu should appear;
- Select Safe Mode with Networking;
For Windows 10
Since Windows 10 fails to load, and we can’t access System Configuration, let’s try using this simple method. The thing – Windows 10 turns on “Automatic Repair mode” (in this mode we can boot into Safe Mode) when it fails to boot 3 times in a row. To cause “Automatic Repair mode” we need to press “Reset” button when you see the Windows logo.
If you’ve done it right, you will see a screen that your system is “Preparing Automatic Repair”
- Once “Automatic Repair” is loaded, press the “Advanced options” button.;
- Select “Troubleshoot” on the next screen.;
- Go to Troubleshoot -> Advanced options -> Startup Settings and press Restart;
- After Windows 10 restarts, you should press F5 key to Enable Safe Mode with Networking.
Once loaded, you need to download and launch it. Open and run a scan for Windows errors and Registry issues. The program itself will detect and fix all system errors preventing the operating system from booting.
Download Advanced System Repair
Steps of manual resolving
Solution 1. Remove problem causing registry entries
- Press Windows+R
- Input ‘regedit’ and hit the Enter key
- Go to the following location HKEY_LOCAL_MACHINE\COMPONENTS\
- Remove the below listed entries
- AdvancedInstallersNeedResolving
- PendingXMLIdentifier
- NextQueueEntryIndex
- Reboot the PC
Solution 2. Re-register the required components
- Initiate the search for ‘command prompt’ as administrator
- Type the following commands and hit Enter after each
- Exit
SC config wuauserv start= auto

SC config bits start= auto

SC config cryptsvc start= auto

SC config trustedinstaller start= auto - Reboot the PC
If you are not sure what type of system you are using, then simply right-click the My Computer or This PC icon and choose Properties – in the appeared window you will see the information on your system version.
Solution 3. Permit VSS Copy
- Go to the Control Panel
- Change the view type to Icons
- Choose Administrative tools and within it go to the Services tab
- There at the bottom of the window find the Volume Shadow Copy service and double-click it
- Click on the Startup type menu and select Automatic
- Confirm your choice by clicking OK
Solution 4. Delete Conflicting File
Use this method if the error message emerges when you’re performing an installation of software through InstallShield.
- Navigate to C:\Program Files\Common Files\InstallSheild\Professional\Runtime\ISProbe.tlb
- And remove ISProbe.tlb file
It is likely that you will need to view hidden files & folders to detect the file. For this open the Control Panel and click Folder Options. In the emerged window go to the tab View and mark the option ‘Show hidden files, folders, and drivers’