
Все способы:
- Способ 1: Режим контроллера SATA
- Способ 2: Служба теневого копирования
- Способ 3: Сброс кеша обновлений
- Способ 4: Утилита «SFC»
- Способ 5: Замена дистрибутива
- Дополнительные рекомендации
- Вопросы и ответы: 0
Ошибка «Driver PNP Watchdog» может возникнуть при чистой установке, при обновлении более ранних систем до Windows 10, а также при установке новой сборки Windows 10.
Способ 1: Режим контроллера SATA
Если ошибка возникает при чистой установке системы, попробуйте изменить режим контроллера SATA в BIOS.
- Зайдите в BIOS или UEFI, для чего нажмите и удерживайте клавишу F2, F8, ESC или Del при включении компьютера. Функциональная клавиша в разных моделях материнских плат может отличаться.
Подробнее: Вход в BIOS на компьютере / ноутбуке
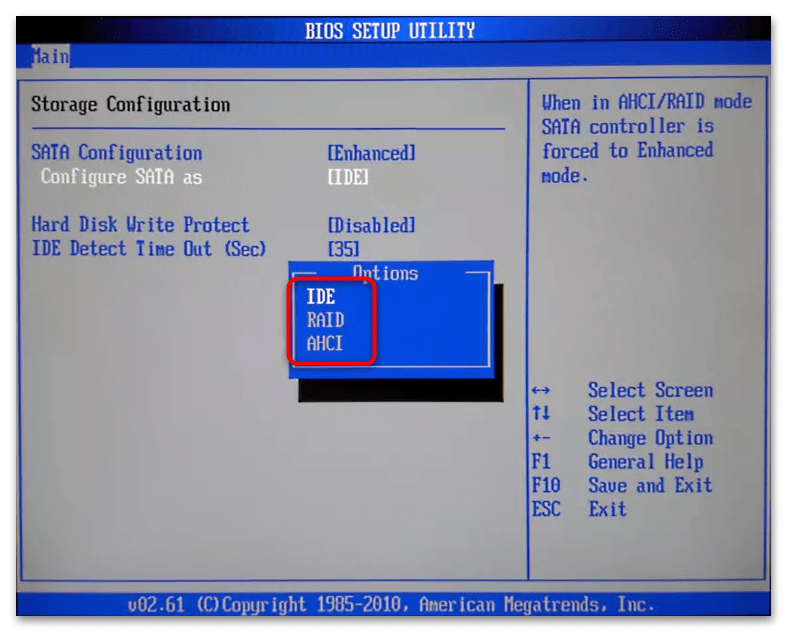
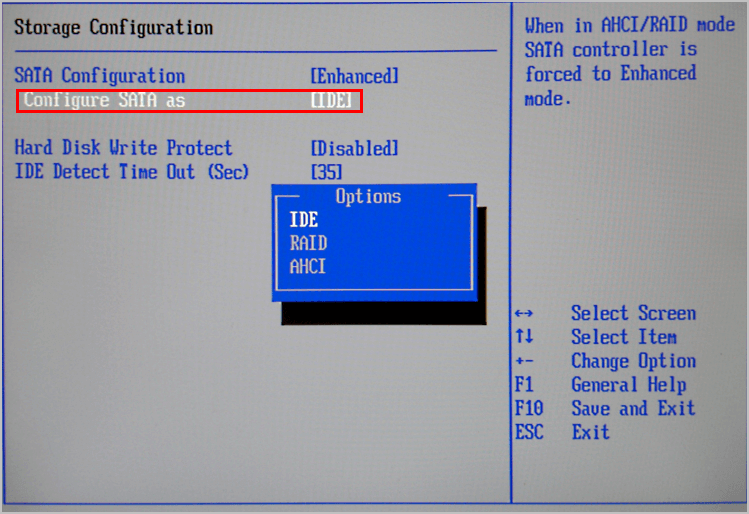
- Отыщите опцию «Configure SATA», «SATA Mode» или «SATA Emulation» (редко имеет другие похожие названия). Располагаться она может в разделах «Integrated Peripherals», «Advanced», «Main» – все опять же зависит от модели материнской платы, типа и версии BIOS. Измените значение параметра на IDE или AHCI в зависимости от того, какое было установлено изначально.
- Сохраните настройки нажатием клавиши F10.
Если ничего не изменится или появится другая критическая ошибка, восстановите исходные настройки SATA-контроллера.
Способ 2: Служба теневого копирования
Если установка Windows 10 выполняется путем обновления системы до нового выпуска, проверьте статус службы «Теневое копирование тома». Сбой или некорректные настройки этой службы приводят к невозможности обновления ряда системных файлов, в результате чего возникает ошибка «Driver PNP Watchdog».
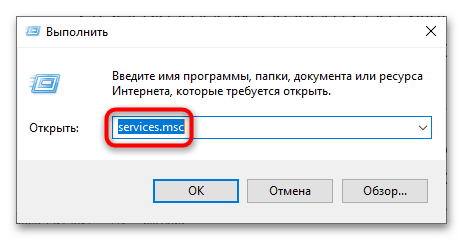
- Нажатием клавиш Win + R вызовите диалоговое окошко быстрого запуска приложений, введите в него команду
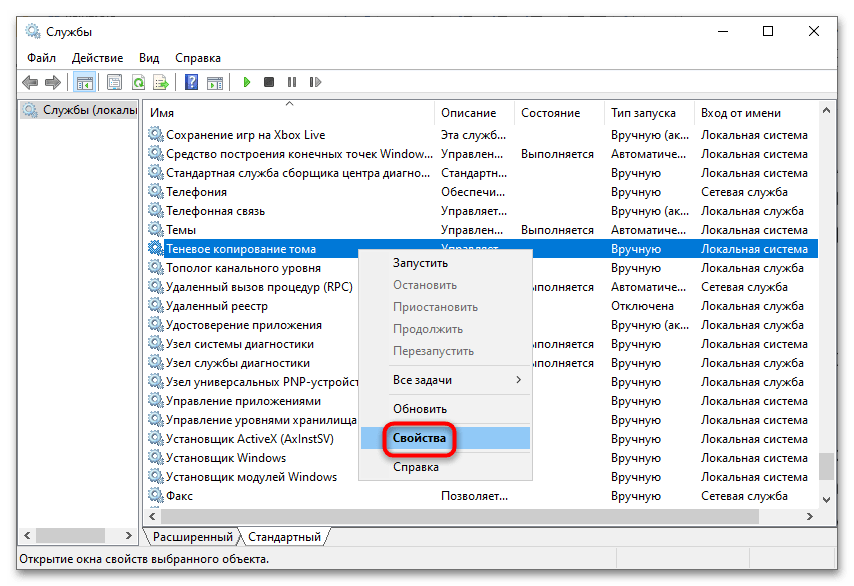
services.mscи нажмите клавишу ввода, чтобы открыть оснастку управления службами. - Отыщите в списке службу «Теневое копирование тома» и откройте ее «Свойства».
- Убедитесь, что служба имеет тип запуска «Автоматически». Если тип отличается, выберите из выпадающего списка указанный. Перезапустите службу нажатием кнопок «Остановить» и «Запустить».
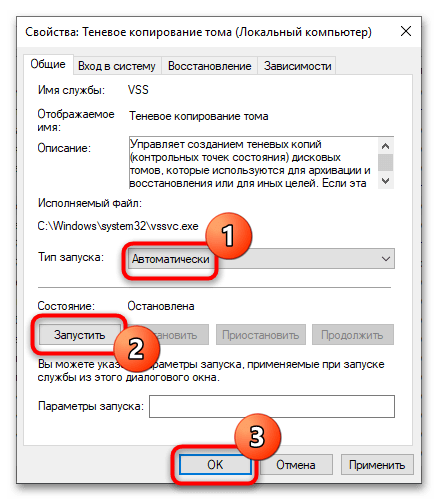
После сохранения настроек попробуйте снова запустить процедуру обновления.
Способ 3: Сброс кеша обновлений
Распространенной причиной ошибки также является повреждение кеша файлов установки. В этом случае эффективным решением может стать очистка или переименование каталога «SoftwareDistribution».
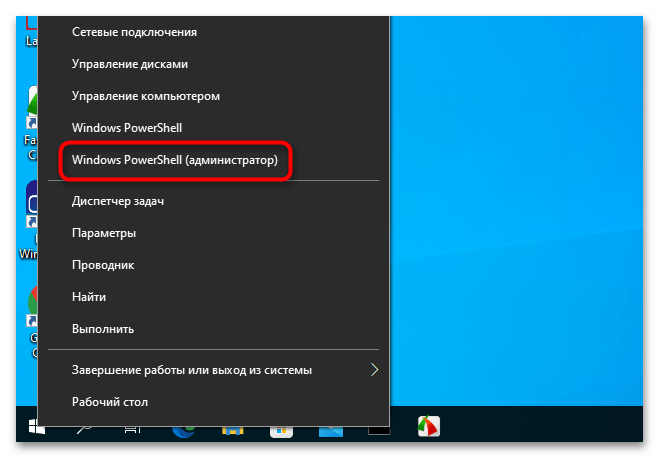
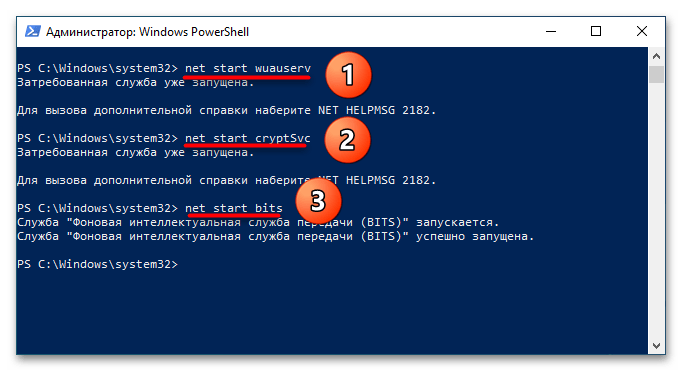
- Откройте от имени администратора «PowerShell» из контекстного меню кнопки «Пуск».
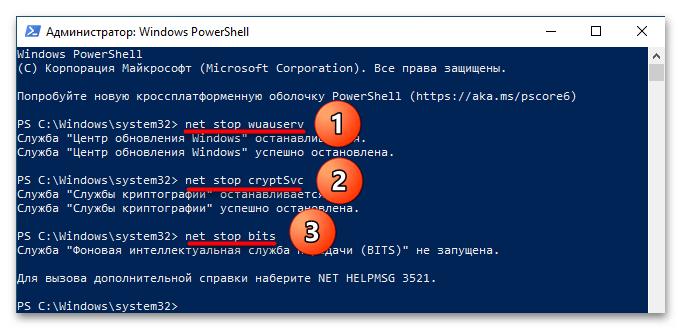
- Выполните одну за другой следующие команды:
net stop wuauservnet stop cryptSvcnet stop bits
Не закрывайте консоль.
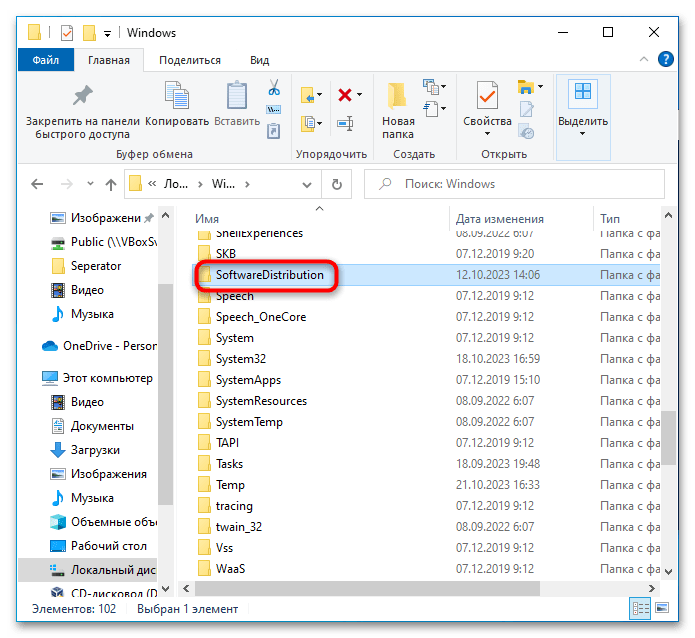
- Перейдите в расположение
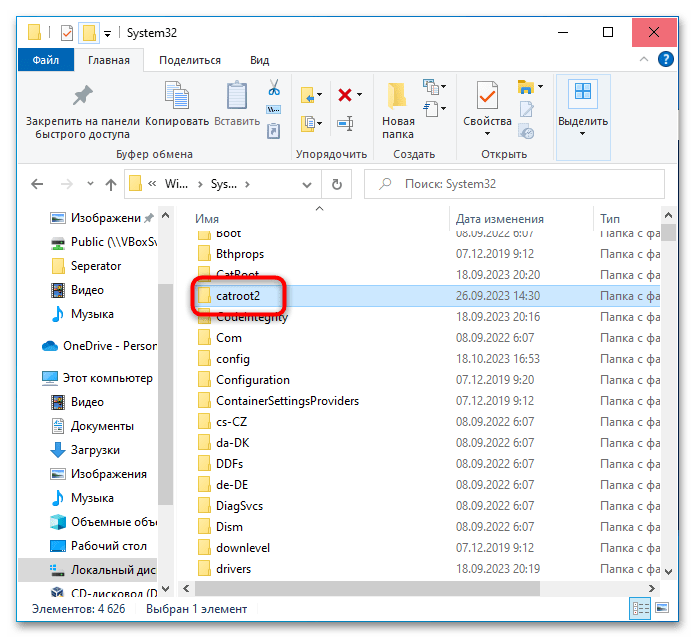
C:\Windowsи удалите или переименуйте каталог «SoftwareDistribution». - Затем зайдите в папку
C:\Windows\System32и удалите либо переименуйте каталог «Catroot2». - Вернитесь в «PowerShell» и запустите ранее остановленные службы, выполнив следующие команды:
net start wuauservnet start cryptSvcnet start bits
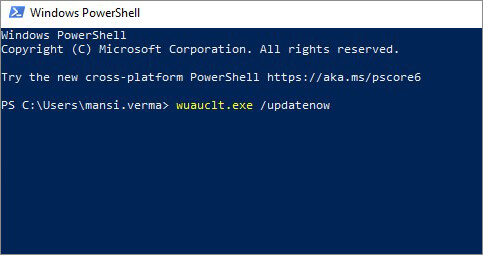
- Затем выполните команду
wuauclt.exe /updatenowи перезагрузите компьютер.
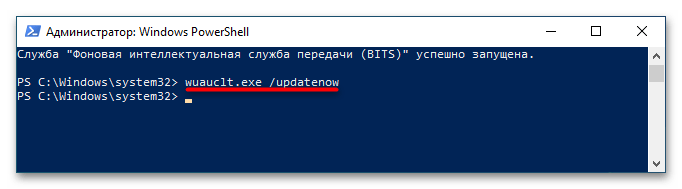
В результате папки для скачивания файлов обновлений будут пересозданы. После того как Windows загрузит нужные обновления, установку новой версии системы можно будет выполнить повторно. В случае успеха удалите ранее переименованные каталоги «SoftwareDistribution.old» и «Catroot2.old».
Способ 4: Утилита «SFC»
Исключите нарушение целостности системы, из-под которой выполняется обновление или запускается мастер установки Windows 10.
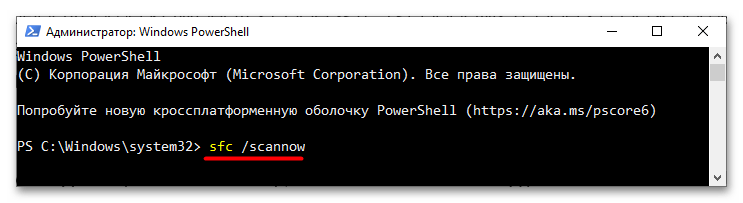
- Откройте от имени администратора «PowerShell».
- Выполните команду
sfc /scannowи дождитесь получения результатов. Если будет выявлено нарушение целостности, утилита устранит повреждения, скопировав нужные файлы из хранилища компонентов.
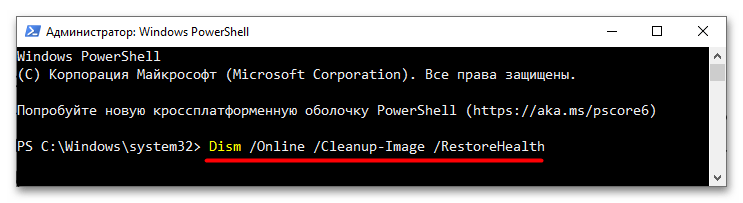
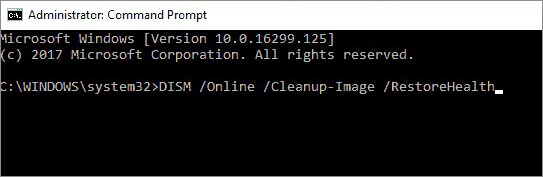
Если команда вернет ошибку, выполните команду восстановления самого хранилища Dism /Online /Cleanup-Image /RestoreHealth, а затем повторите сканирование средствами «SFC».
Способ 5: Замена дистрибутива
Причиной ошибки «Driver PNP Watchdog» при чистой установке Windows 10 может быть повреждение дистрибутива операционной системы. Исключите этот сценарий, предприняв следующее:
- Сверьте контрольную сумму установочного ISO-образа системы с контрольной суммой, указанной на сайте, с которого был скачан дистрибутив. Если хэши не совпадают, значит, образ поврежден и его нужно заменить. О том, как получить хэш образа, читайте по ссылке ниже.
Подробнее: Способы проверки контрольной суммы образа ISO
- Перезапишите установочный образ на флешку. Если в программе для создания загрузочной флешки имеется функция валидации, используйте ее для проверки корректности записи.
Читайте также:
Создание загрузочной флешки с Windows 10 для UEFI / для BIOS
Программы для создания загрузочной флешки - Используйте только оригинальные сборки Windows 10.
Дополнительные рекомендации
Хотя это маловероятно, но нельзя исключать, что рассмотренная ошибка вызывается некорректными настройками BIOS, а также аппаратными неисправностями, например наличием на жестком диске bad-блоков или повреждением оперативной памяти. Если устранить ошибку не удается, проверьте указанные компоненты, руководствуясь материалами по ссылкам ниже.
Подробнее:
Как проверить оперативную память / жесткий диск в Windows 10
Как сбросить настройки БИОС
Наша группа в TelegramПолезные советы и помощь
Are you finding a blue screen on your computer all of a sudden and got astonished? When DRIVER PNP WATCHDOG occurs you might get yourself in a peculiar situation because even after using Windows 11 or 10 USB stick the system mightn’t boot. This BSOD mostly shows up when you attempt to install new patches of Windows or upgrade the OS to a higher version. With bug check code 0x000001D5, this BSOD points out that a driver failed to carry out a PnP operation within the fixed time frame.
Though there might be thousands of reasons for which DRIVER PNP WATCHDOG error can occur, invalid SATA controller setting in BIOS, Touchpad, missing system elements due to virus attack, outdated device drivers, and broken registry are mainly responsible. Besides, corruption in Windows update, issues with volume shadow services, damaged hard disk drive, faulty system services, and bad RAM is equally accountable for.
DRIVER PNP WATCHDOG
Here is how to Fix DRIVER PNP WATCHDOG Error Windows 11 or 10 –
1] Unplug Touchpad
The process is a little complex but worth trying as most of the people fix DRIVER PNP WATCHDOG by unplugging the touchpad cable only. To do it on your own, take the service manual that comes with your device. Such manual includes guidelines for the benefit of in-house technicians or licensed service agents with step by step procedure of common repair as well as replacing or disassembling process.
Unfortunately, most of the device doesn’t provide service manual nowadays but you still can manage one by navigating the manufactures website. The manufacture posts Standard PDF format online for free so that their user can take the help of these when needed. You can download it to mobile or other devices in order to get the guidance while disassembling the laptop for unplugging touchpad. However, it’s better to take help from professionals if you are not confident enough.
2] Modify SATA controller settings in BIOS
BIOS is the first thing that starts when you power on your PC and anything wrong with its settings can lead to DRIVER PNP WATCHDOG error. Usually, inappropriate SATA controller mode in the BIOS is found to cause such blue screen error as it prevents the communication system between OS and the device. However, when you change the SATA controller mode from AHCI to IDE, this particular BSOD error oftentimes goes away. Here is the procedure to do so –
- Shut down your Windows 11 or 10 PC.
- When the device is fully turned off, press the power button to turn it on again.
- While powering up, keep pressing the F2 key or the one that lets you enter into the BIOS settings.
- Once there, use the arrow keys to choose an option Advanced or Main, then press Enter to access the same.
- Look for options Storage Configuration, IDE Configuration, or Drive Configuration. After getting any, select the same by using arrow keys and then press the Enter.
- Subsequently, look for any of Configure SATA, SATA Mode, or SATA Configuration.
- Change that option to [IDE].
- Save the changes and exit from the BIOS settings page.
3] Replace SSD to fix DRIVER PNP WATCHDOG
Many users who were struggling with DRIVER PNP WATCHDOG said that changing the SSD worked for them to resolve the blue screen error. Simply, take the SSD drive out and reboot the device using Media creation tool iso. Though it’s not sure why SSD drive throws such an issue, giving it a try is a must to resolve the error.
4] Run a full scan to eliminate existing threats
All malware attacks your system is not dangerous always, some enter as a weak one and then start replicating themselves to gather more strength. If you don’t break the chain in between, they will replace all the genuine system files and give rise to unexpected error codes such as DRIVER PNP WATCHDOG. To eliminate the existing threats, Windows Security is pretty convenient as the utility provides real-time protection against Trojans, Spywares, and any kind of malware. Let’s check out the step by step guide to use the built-in antimalware tool –
- Press Win+I hotkey to bring forward Windows Settings app.
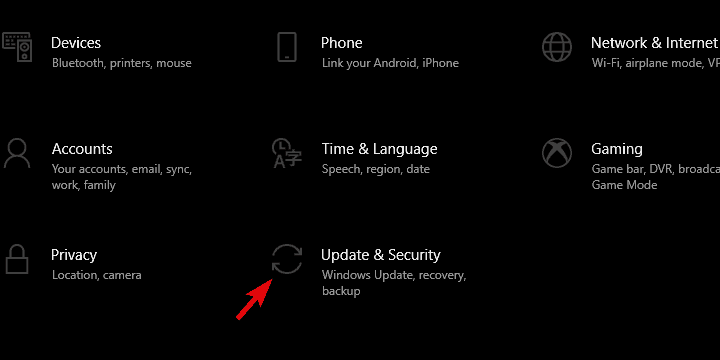
- Click on Update & Security.
- Select Windows Security from the left sidebar.
- Move to alongside right and opt for the option Virus & threat protection.
- When a separate window shows up, click Scan options link from the right pane.
- From the next page, click the radio button located alongside Full scan.
- Subsequently, hit the button Scan now.
- After completion of the scanning process, click Clean threats option if the utility traces out any virus.
- From the consequent page, click Remove first followed by Start actions.
- When the removing process ends, reboot Windows 11 or 10.
5] Check the startup type of Volume Shadow Copy service
Volume Shadow Copy Service or VSS lets the Windows to continue the backup against a specific disk drive without causing any significant changes in it while the operation is going on. This also implements the volume shadow copies necessary for backing up and manages other associated processes. VSS while creating a backup usually locks the file or the drive as read-only for the proper execution of the task.
When the service stuck in an unexpected loop or launched in an improper way, you may lose access to that file or the drive precisely resulting in blue screen error DRIVER PNP WATCHDOG. The same can also be triggered when the service isn’t running properly. To fix the problem, follow the below steps –
- Click the search icon from the taskbar and type in services.msc.
- When you see Services at top of search result, hit Enter.
- From the dedicated console, look for Volume Shadow Copy that you will get under Name column.
- Once found, double-click the same to bring forth its properties.
- Reach to Startup type and click the drop-down list located aside.
- Choose Automatic.
- Finally, click on Apply followed by OK to make the changes effective.
6] Take help of Windows update troubleshooter
Update issues are pretty common in Windows 11 or 10 and resolving them is not hard at all every time. But often such an issue ends up causing blue screen error DRIVER PNP WATCHDOG from which it’s hard to recover. This happens if the Windows update fails to operate a particular task. However, you can fix up the things by using built-in Windows update troubleshooter which not only scans the full system for related errors but also resolve them automatically. Here is how to proceed –
- Right-click on Start button and choose Settings.
- From the app interface, opt for Update & Security.
- Select Troubleshoot from the left sidebar.
- Shift to alongside right and click on Windows Update.
- From the expanded tray, hit the button Run the troubleshooter.
- When the utility ends up scanning for the trouble that is causing BSOD, comply with on-screen guidelines to eradicate the found issue fully.
7] Update system drivers to fix DRIVER PNP WATCHDOG
Drivers are the sole component of any operating system and corruption in them gives rise to unexpected error codes that are stubborn enough to fix. Whenever a device driver becomes outdated or faulty, they affect the compatibility at the same time performance. As a result, the system performs slower than ever and keeps freezing time and again. These are the early signs you will come across if corruption takes place in any driver. Generally, drivers get corrupted if any recent change made the registry entries whacked moreover removed essential system elements.
You may also confront driver corruption if the version you are using is incompatible itself in Windows 10 or 11. To get rid of such an issue, all you need is update and install a compatible system driver. In order to update all drivers at once, you may think of third-party software but to be honest, nothing comes handy than the built-in Device Manager. This utility presents outdated drivers with yellow exclamation marks, so it becomes easy to find the corrupt one.
- Bring forth Run dialog by pressing Win+R hotkeys at the same time.
- Type devmgmt.msc in the command box and hit Enter.
- When the Device Manager floats up, look for any mark of exclamation beside a device.
- After getting the same, double-click on it to expand the driver lists.
- Right-click on the driver with yellow indication and then choose Update driver.
- From the next pop-up, opt for Search automatically for updated driver software option.
- Doing so will commence the searching process online.
- If any newer version found, the downloading and installing process will take place automatically.
- After completion, do the same procedure for all outdated drivers.
- Once done, restart Windows 10 for bringing these changes into effect.
Note – If the system fails to get an updated version for the faulty driver, visit the manufactures website, and search for the driver manually. When you find a recent and of course compatible one, download as well as install the same.
8] Uninstall third-party antimalware program
In this internet-based era, keeping your system safe from potential malware is a real challenge. To make the process easier, thousands of third-party antivirus programs are available in the market that not only warn you about existing threats but also resolves them if detected after real-time scanning. Though they do a great job, all software found on the web is not trustworthy and instead of protecting the system, they give rise to blue screen error like DRIVER PNP WATCHDOG.
Furthermore, when you install an additional antimalware program often it ends up conflicting with the built-in one. During such conflicts, they lost their own components at the same time essential system elements that are very much needed to run the Windows 11 or 10 error-free. To avoid such collision, it’s always better to keep one antimalware active and disable the other ones. We suggest keeping the Windows Security as it is as powerful as any other third-party programs moreover it will not create unnecessary trouble. Let’s see the procedure to uninstall the third-party antimalware program –
- Press Windows key to invoke Start menu.
- Click the Settings cog from the bottom left corner.
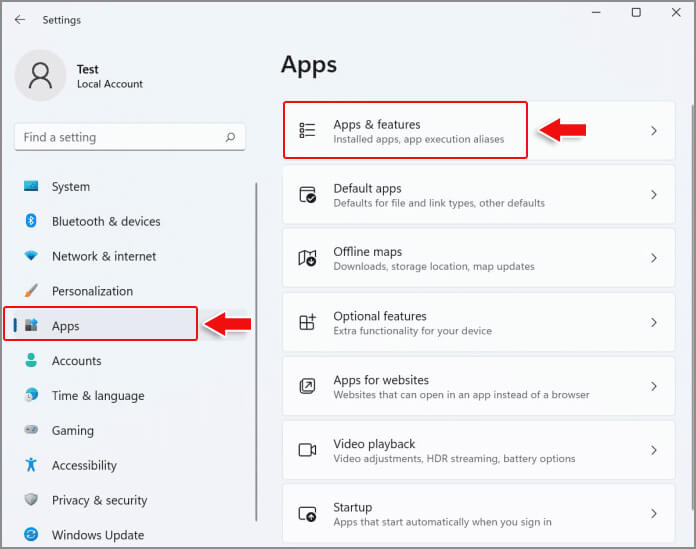
- When the dedicated window shows up, select Apps.
- Go through the app lists from the right-pane and search for the installed antimalware program.
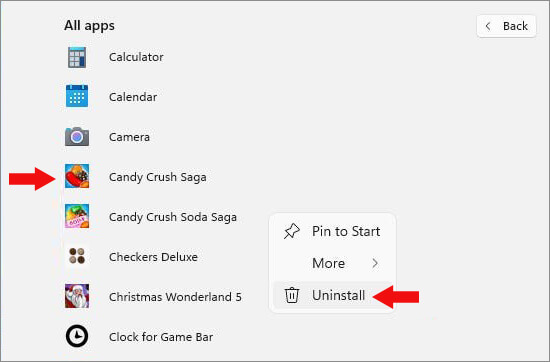
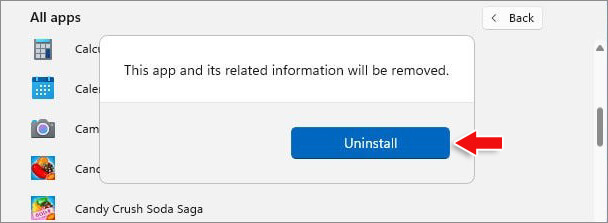
- Once found, click on the same and choose Uninstall from the expanded pane.
- If UAC prompts for permission, choose Yes to continue.
- Keep following on-screen instructions to remove the app completely.
- After completion, restart the device.
9] Repair broken registry
Whatever you do in your Windows PC from installing an app to surf the web, all these things are stored in the registry. If they are not maintained properly or you set their value incorrectly, unwanted issues may occur including blue screen error. Mainly, registry entries get broken when you forcefully end a task such as installation or uninstallation process in between just because the procedure is taking a long time. Also, missing system elements due to virus attack are equally responsible to cause broken registry.
There are various ways to get rid of registry corruption but running System file checker followed by the DISM command is the most reliable one. Once executed in elevated Command Prompt, this will recover the missing system components also repair the broken registry as well. Here is how to proceed –
- Press Win and X simultaneously and choose Run from Power user menu.
- In the command box, type in cmd.
- Press Ctrl+Shift+Enter altogether to launch Command Prompt as admin.
- If a UAC prompts for asking permission, click the Yes button.
- On the appearing black panel, put
sfc /scannowand hit the Enter key to execute the command. - Let the process hits 100% without any interruption.
- When System File Checker finishes its work, insert
DISM /Online /Cleanup-Image /ScanHealthin the same Command Prompt panel followed by hitting Enter. - Once the process ends successfully, reboot the device and check if DRIVER PNP WATCHDOG still throws.
10] Try for automatic repair to fix DRIVER PNP WATCHDOG
When the system generates unexpected error codes, a special feature called automatic repair becomes active by Windows in its third boot. But there might be an instance when this feature is turned off as often the self-repair mechanism gets stuck in a loop itself from where its difficult to get back in normal state. In such a case, you need to perform it manually.
This process takes a good amount of time as a lot of tests are carried out to diagnose the issue you are struggling with. Hence, be patient and follow the below steps –
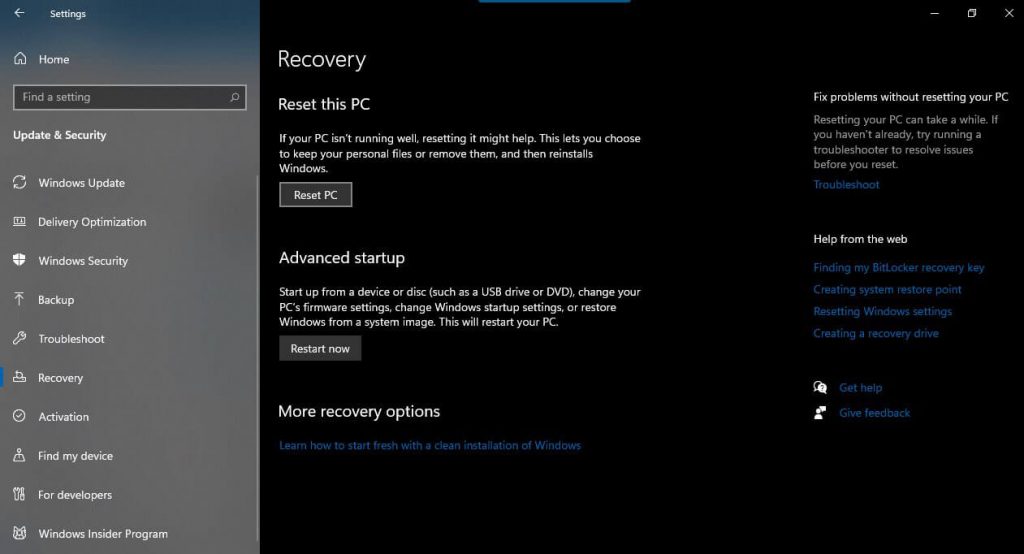
- Open Windows Settings and click on Update & Security.
- From the appearing page, choose Recovery option from the left pane.
- Shift to the adjacent right side.
- Click Restart now button you will get under Advanced startup section.
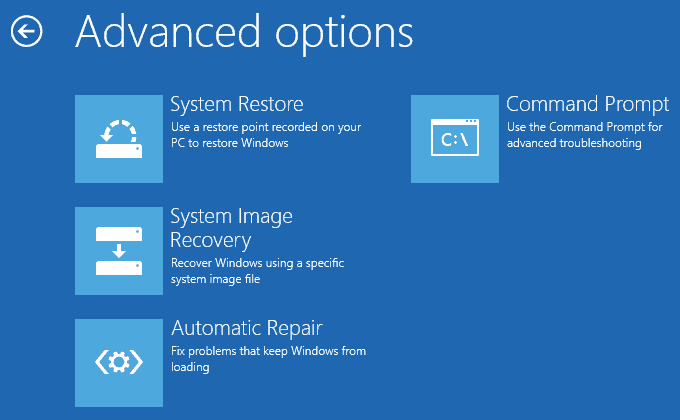
- When system powers up after the reboot, choose Troubleshoot =>Advanced options => Startup Repair respectively.
- Once Automatic Repair page shows up, provide valid Microsoft account credentials.
- Thereafter, click on Continue to initiate the repairing process.
11] Tweak Windows update service
As DRIVER PNP WATCHDOG mostly shows up while installing an update, there is a high chance that corrupted Windows update service is causing the issue. This mainly happens when Windows Update fails to connect to the Microsoft servers due to some inconvenience. Resetting the component may help to recover yourself from such a state. To do so –
- Press the Windows key and type cmd.exe.
- When the Command Prompt arrives at the top, click the option Run as Administrator from the right flyout.
- Click Yes for the User Account Control.
- In the Command Prompt, insert the following commands one after another and press enter after each one –
net stop wuauserv
net stop cryptSvc
net stop bits
net stop appIDSvc
- After execution, open File Explorer by pressing Win+E and navigate the following directory –
C:\Windows
- From the available folder lists, locate SoftwareDistribution and then rename it to SoftwareDistribution.old.
- Now go to the following path –
C:\WIndows\System32\
- Rename catroot2 folder to Catroot2.old.
- Get back to Command Prompt and execute the below command-lines one by one –
net start wuauserv
net start cryptSvc
net start bits
net start msiserver
net start appIDsvc
- Thereafter type in
exitafter winking cursor and hit the Enter key. - Later on, right-click on Start icon and choose Windows PowerShell (Admin).
- When the console becomes ready to execute a command, insert the below line and press Enter –
wuauclt.exe /updatenow
- Finally, restart the system to make the changes effective.
12] Check for hard disk error
A hard disk is often compared to the soul of a system as it holds all information and data of your computer. When you use it for a long time, bad areas may form in it which mostly ends up causing blue screen error. However, there are many tips and tricks to maintain the hard disk in healthy condition but if bad areas are already formed you need to check for the error and solve it as well.
To do so, Disk Checking Tool comes handy which activates in the elevated Command Prompt. Here is how to use the tool –
- Manage access to the elevated Command Prompt.
- When in the black window, enter the following command at the base of winking cursor –
chkdsk C: /f /r /x
- Hit Enter key to let the system execute the command-line.
- Let Disk Checking Tool finds out corruption existing in the hard drive.
- Usually, the utility fix up found issue automatically but if it doesn’t, check the diagnosis report and take further steps.
13] Unplug external hardware accessories
In the recent past, a new weird issue has come up to cause blue screen errors like DRIVER PNP WATCHDOG. Connecting hardware accessories like mouse, keyboard, speaker or printer is becoming serious trouble to cause the BSOD error. Though the drawback may evolve from the USB adapters, the primary reason is yet to be known precisely.
However, there is an easy fix that came up to resolve this issue as well and many users have eliminated blue screen error by disconnecting these hardware peripherals temporarily. You can deport them for instance and then restart Windows 11 or 10 in the usual method. If the error is resolved afterward, connect those again and use them like before. During the process, also check if any specific accessory is causing the BSOD. If yes, you might need to change the peripheral itself.
14] Fix RAM issues to fix DRIVER PNP WATCHDOG
Oftentimes memory problems are treated as one of the most prominent causes behind DRIVER PNP WATCHDOG BSOD error in Windows 11 or 10. Memory issues are associated with a defective RAM stick mostly. Usually, these cases come up when the device falls on the ground and become physically damaged. When a blue screen error is evolved from bad RAM, you may need to replace it fully which is not suitable always. Before going that far, you can use the Windows Memory Diagnostic tool. Here is how to use the utility –
- Pressing Win+I key at once.
- In the search bar of Windows Settings, type memory.
- From the search result, pick the option Diagnose your computer’s memory problems.
- When the assigned pop-up becomes visible, click Restart now and check for problems (recommended).
- After completing the first cycle of the reboot, a blue screen will show up detecting memory issues.
- Once the progress hits 100%, the device will go for the second restart.
- After signing back in, check the diagnostic result you will get in the notification area.
15] Run online blue screen troubleshooter
Blue screen error is usually irrecoverable mostly and often comes with unknown causes of origin. This makes the troubleshooting very much difficult so as to resolve the error from the system. Microsoft technicians took this fatality into account and introduced a new utility so that users can easily get rid of BSOD errors.
Since the internet is much reachable nowadays, Microsoft released a new online version and you can access it directly using a browser. Here are the steps to access this online tool –
- Launch a browser and navigate the dedicated page of Microsoft’s online troubleshooting by clicking this link.
- Once there, scroll down to When did you get the error? section.
- Opt for a radio button depending on your scenario.
- Doing so will stretch out stepwise tasks to resolve the existing issue.
- Follow them to fix DRIVER PNP WATCHDOG blue screen error.
16] Restore the PC to its default state to fix DRIVER PNP WATCHDOG
Making changes in system settings, services, and registry entries are pretty common to make the Windows 11 or 10 device more user-friendly. But when it is done in the wrong way, various issues may rise up including blue screen error.
To revert back any recent change you made, perform system restore. It will take you back to a point where there was no error. Here is how to proceed –
- Press Win+R and type rstrui in the dialog box.
- Click OK button open System Restore wizard.
- Hit the Next button from the bottom.
- Go for the most recent restore point and click on Next.
- Comply with the on-screen instruction if any and lastly, click on Finish.
Methods:
1] Unplug Touchpad
2] Modify SATA controller settings in BIOS
3] Replace SSD
4] Run a full scan to eliminate existing threats
5] Check the startup type of Volume Shadow Copy service
6] Take help of Windows update troubleshooter
7] Update system drivers
8] Uninstall third-party antimalware program
9] Repair broken registry
10] Try for automatic repair
11] Tweak Windows update service
12] Check for hard disk error
13] Unplug external hardware accessories
14] Fix RAM issues
15] Run online blue screen troubleshooter
16] Restore the PC to its default state
That’s all!!
While using your system, you don’t want to bump into any problems. However, a lot of problems are inevitable and may occur at any moment. One such issue is –the Driver PNP Watchdog error. This error is causing Windows 10 and 11 users to face different setbacks, such as system freezing, boot-up error, app crashes, problematic Windows Update installation, BSODs (Blue Screen of Death), etc.
However, there is no need to stress over this error, as some proven fixes will help you combat it and let you access the system and its data.
Driver PNP Watchdog Windows 11 error is related to PNP drivers that support physical, logical, and virtual devices on machines. This error occurs when a system driver fails to complete the PnP operation within a specific time. It usually contains a bug check value of 0x000001D5. However, it can also appear with a bug check value of 0xc1900101.
The error arises with BSoD (Blue Screen of Death), a common Windows OS problem. There could be many reasons for this error, including malware/viruses, invalid or damaged PC registry, outdated system files, drivers, etc.
You may encounter the error message – Driver PNP Watchdog on boot or while installing Windows updates. It may cause system freezing, hanging, boot-loop, startup error, OS crashing, or even epic failure.
How to Fix Driver PNP Watchdog Error?
Despite all the challenges you may face due to this error, you must have the knowledge to overcome and solve the problem. Here, we’ve provided effective methods to solve Driver PNP Watchdog error. You can go through the fixes and apply them as you find suitable.
#1 Run Windows Troubleshooter
Driver PNP Watchdog Windows 10 /11 error may hinder the Windows Update installing process. However, you can give a shot to Windows Troubleshooter to fix the problem. Follow the given steps to run the troubleshooter.
- Open system Settings by pressing Windows + I and then open Update & Security.
- Next, in the left panel, locate Troubleshoot and open it.
- Choose ‘Run troubleshooters automatically, then notify me’ from the drop-down given on the right.
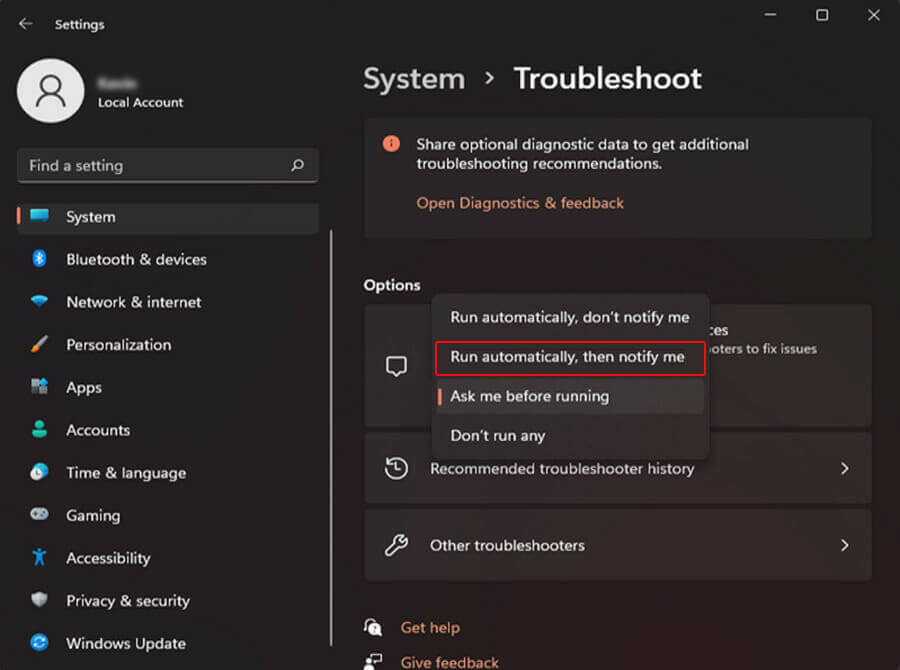
- Once done, your system may restart automatically. If it doesn’t, reboot it and check if the issue is solved.
#2 Run Windows Defender to Full Scan your PC
As stop code Driver PNP Watchdog can occur due to malware or viruses, try running a complete scan using the Windows Defender Program. This Windows built-in antivirus program helps you identify any malware or virus in the system and guides you to remove them. To run Windows Defender, follow the given steps:
- Open Windows Settings by pressing Windows + I and go to Update & Security.
- Next, select Windows Security from the left and click Virus & threat protection from the right panel.
- Now, click Scan options.
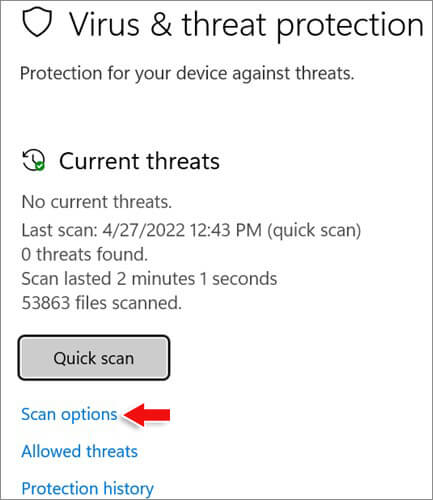
- You’ll see the scanning options as ‘Quick scan,’ ‘Full scan,’ ‘Custom scan,’ and ‘Microsoft Defender Offline scan.’
- Choose Full Scan from the given options and then click Scan now.
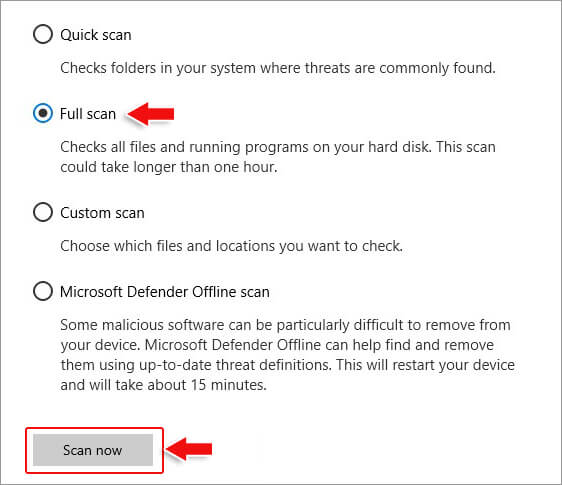
- Let the process finish, and then restart your PC. Now check if the error is fixed.
#3 Repair Invalid/Damaged Windows Registry
Sometimes, corrupted system files on your system may lead to an invalid or damaged Windows registry. You can try the System File Checker (SFC) utility to repair the registry and fix the issue. This utility checks the integrity of protected system files and replaces the corrupt or damaged ones with the correct versions.
- On your system screen, locate the Search bar and type cmd.
- Right-click the Command Prompt and choose the ‘Run as administrator’ option.
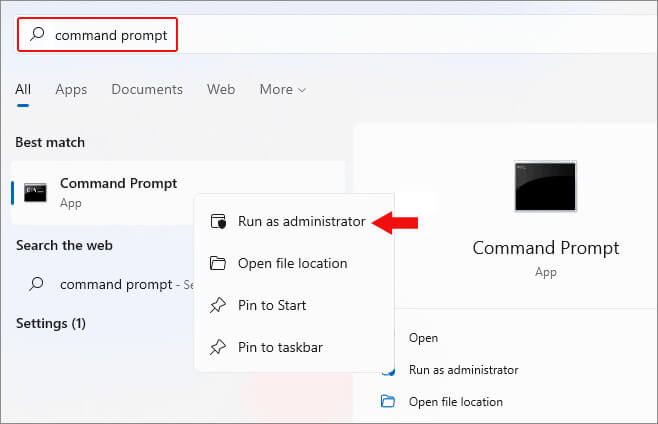
- Further, click Yes (if prompted) to confirm the action.
- Now, in the Command Prompt window, type sfc/scannow and hit Enter.
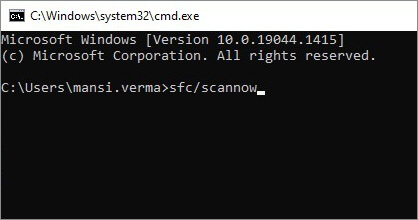
- The System File Checker will initiate scanning and check for corrupted/damaged files.
- If you’re a Windows 8, 8.1, or 10 user, first run DISM.exe /Online /Cleanup-image /Restorehealth and then run the SFC command.
- Once the process is completed, proceed with the SFC command.
- Don’t interrupt the process. Instead, wait until the scan is done and then reboot your system.
#4 Uninstall the Malicious Apps/Software
Sometimes, the issue may occur after installing a particular application/software on your system. That application or software may be incompatible with the system or corrupted or malicious. You can try to uninstall such apps/software and see if the problem is fixed.
- Press Windows + I to open system Settings.
- Navigate to Apps > Apps & features and locate the app/software you recently installed.
- Right-click on the app and click Uninstall.
- If the app is a Windows Store app, you may get a confirmation pop-up box; click Uninstall to proceed.
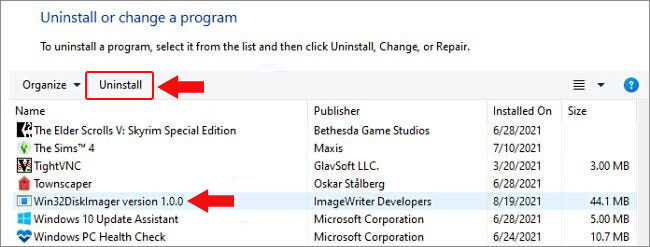
- If it is a classic Win32 App, you will see Programs & Features page in the Control Panel. Here, locate the app and click Uninstall, given in the toolbar.
#5 Adjust System Services
System Services confirms that your system runs and performs at optimum level. However, Driver PNP Watchdog Windows 11 error may occur when a service is faulty. Therefore, try to adjust the system services with the following steps to overcome the issue.
- In the Search bar, type cmd and run Command Prompt as an administrator.
- In the Command Prompt window, type the below commands and hit Enter.
net stop wuauserv
net stop cryptSvc
net stop bits
net stop appIDsvc
- Let the process complete. Once done, close the window.
- Now, open File Explorer and follow This PC > Local Disk (C:) > Windows > System32 > Catroot2.
- Right-click on Catroot2 and rename it to Catroot2.old.
- Next, open the Command Prompt window, and run the given commands.
net start wuauserv
net start cryptSvc
net start bits
net start msiserver
net start appIDsvc
- Once completed, exit the window and open Windows PowerShell as administrator.
- Type the following commands and hit Enter.
wuauclt.exe /updatenow
- Wait until the process is done and reboot your system to check if the error is gone.
#6 Reset your system to Factory Settings
Restoring your system to the factory settings may resolve the Stop Code Driver PNP Watchdog error. However, doing so will uninstall the apps, services, files, drivers, etc. All the changes made to your system will be lost. Therefore, take a backup of your data before performing this method. To reset your PC, follow the given steps:
- Press Windows + I to open system Settings. There, select Update & Security.
- Next, choose Recovery and click Reset PC.
- Enter admin credentials, if required.
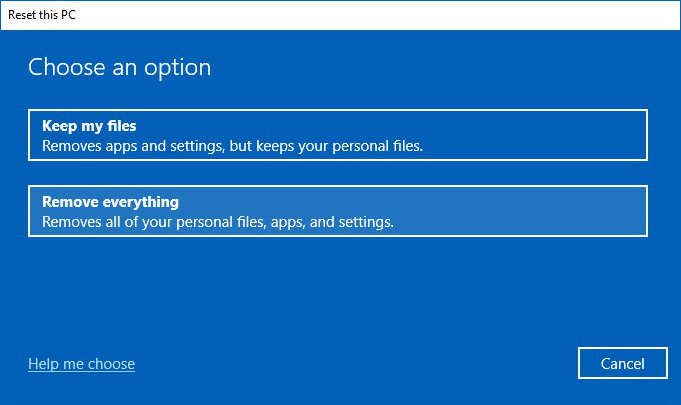
- On the next prompt, you’ll see two options – Keep my files and Remove everything. Then, choose to Remove everything for the process to work efficiently.
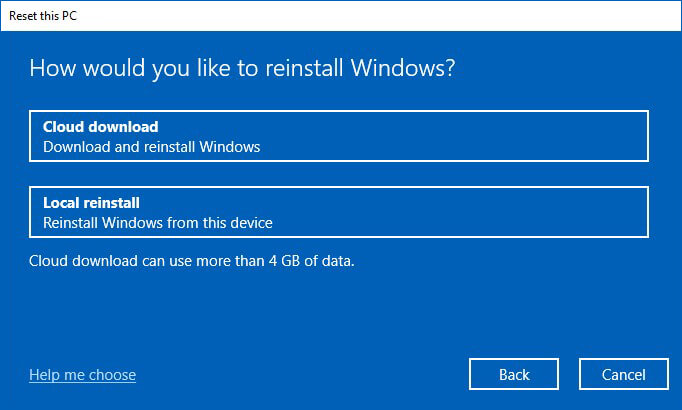
- Now, choose Local reinstall from the given options.
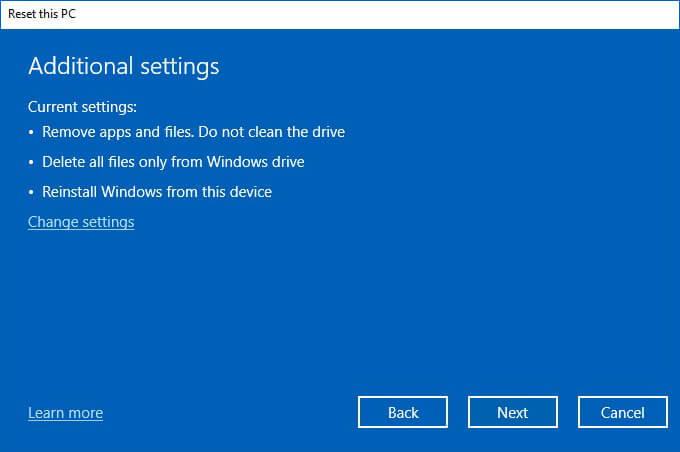
- Next, you can proceed with the current settings and click Next. Else, you can click Change Settings.
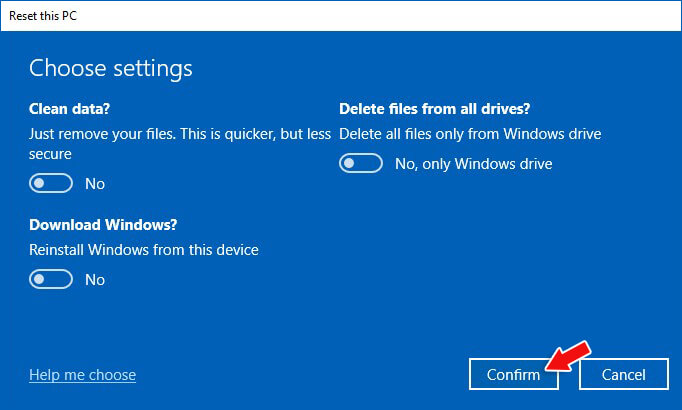
- If you select ‘Change settings,’ you will get the options to Clean data, Delete files from all drives and Download Windows.
- All these options will cause data loss. It is advised to back up your system data first and then proceed. If you already have a backup, choose Clean data; it will only remove your files. Proceed by clicking Confirm.
- Finally, proceed with resetting the PC and wait until the process is complete.
So these are some methods you may try to resolve Driver PNP Watchdog errors on Windows 10 and 11. However, there is a risk of losing data in some methods, such as adjusting system services or resetting the PC. Make sure you first back up your system data before performing these methods.
But what to do if you forget to back up as well? Don’t worry! You still have a chance to restore your data. You may use Stellar Data Recovery Professional to recover data after a factory reset.
FAQ
Can RAM cause Driver PNP Watchdog Error?
Primarily, the causes behind Driver PNP Watchdog errors are malware/viruses, damaged PC registry, or outdated system files. Additionally, corrupted or damaged RAM may cause different types of BSoD errors.
Why Does DPC Watchdog Violation Occur?
The DPC Watchdog Violation may occur due to multiple reasons, including
- Faulty or corrupt hard drive
- Unsupported SSD firmware
- Hardware incompatibility issues
- Outdated, corrupted, or faulty device drivers
- Corrupted system files
- Corrupt/incompatible software installed on the system
Read more
Was this article helpful?
YES1
NO
If you are facing ‘Driver pnp watchdog error Windows 10’ or ‘DRIVER PNP WATCHDOG BSOD error’ error in your Windows 10 computer while working on Windows computer or when start/restart computer, then you are in right-place for the solution. Let’s starts the discussion.
‘DRIVER PNP WATCHDOG BSOD error’: It is common Windows Problem considered as Blue Screen of Death (BSOD) error. This BSOD error is appeared with message saying ‘Your PC ran into a problem and needs to restart. We’re just collecting some error info, and then we’ll restart for you’ along with Windows Stop Code DRIVER PNP WATCHDOG error.
This BSOD error is usually occurred due to wrong SATA Controller settings in BIOS, broken registry settings, volume shadow services issues, malware or viruses infections, corrupted system files or registry and others. This problem can be occurred if SATA controller mode is wrongly configured in BIOS. You can re-configure SATA controller settings in order to fix the issue.
Another possible reason behind the issue can be the faculty system services, corrupted system files and hard disk system image. You can run SFC scan and DISM scan in computer in order to repair the corruption in system files or registry and resolve this error. This issue can be occurred due to outdated Window OS and Windows Device Drivers. You can update device drivers and Windows OS in order to fix the issue. Let’s go for the solution.
How to fix Driver pnp watchdog error Windows 10?
Method 1: Fix DRIVER PNP WATCHDOG BSOD error with PC Repair Tool
‘PC Repair Tool’ is easy & quick way to find and fix BSOD errors, DLL errors, EXE errors, problems with programs/applications, malware or viruses issues, system files or registry issues, and other system issues with just few clicks.
Method 2: Change SATA Controller settings in BIOS
One possible way to fix the issue is to change SATA Controller settings in BIOS in computer.
Step 1: Restart your computer and when booting process initiate, press ‘F2’ or BIOS key to open BIOS menu
Step 2: Once BIOS setting page appeared, go to ‘Advanced’ or ‘Main’ menu and find ‘IDE Configuration, Storage Configuration, or ‘Drive Configuration’, and then hit ‘Enter’ key
Step 3: Now, find ‘Configure SATA, SATA Mode’ or ‘SATA Configuration’ or similar
Step 4: Change the particular option to ‘ATA, IDE or Compatible’, and save the changes and exit BIOS’, restart your computer and check if it works.
Method 3: Check Volume Shadow Copy Service
Step 1: Open ‘Services’ app in Windows PC via Windows Search Box
Step 2: Find and double-click on ‘Volume Shadow Copy’ to open its ‘Properties’
Step 3: In ‘Properties’ window, select ‘Automatic’ option from ‘Startup’ dropdown, and hit ‘Start’ option under ‘Service Status’ section, and then hit ‘Apply’ and ‘Ok’ button to save the changes, and restart your computer and check if the issue is resolved.
Method 4: Changes with some required services
Step 1: Type ‘cmd’ in Windows Search Box and press ‘SHIFT + ENTER’ keys on keyboard to open ‘Command Prompt as Administrator’
Step 2: Type the following commands one-by-one and hit ‘Enter’ key after each to execute
net stop wuauserv
net stop cryptSvc
net stop bits
net stop appIDSvc
Step 3: Once executed, now go to ‘c:\Windows\’ path, find and ‘SoftwareDistribution’ folder and rename it to ‘SoftwareDistribution.old’
Step 4: Now, go to ‘c:\WIndows\System32\’ folder, find ‘Catroot2’ and rename to ‘catroo2.old’
Step 5: Now, execute the following commands in Command Prompt window
net start wuauserv
net start cryptSvc
net start bits
net start msiserver
net start appIDsvc
Step 6: Once executed, close Command Prompt. Now, type ‘PowerShell’ in Windows Search Box, right-click on Windows PowerShell and select ‘Run as Administrator’
Step 7: Execute ‘wuauclt.exe /updatenow’ command in Windows Powershell and then restart your computer, and check if it works for you.
Method 5: Run Windows Update troubleshooter

You can run Windows built-in Windows Update troubleshooter in order to fix the issue.
Step 1: Open ‘Settings’ App in Windows PC via Windows Search Box and go to ‘Update & Security > Troubleshoot > Additional Troubleshooter’
Step 2: Find and select ‘Windows Update’ troubleshooter, and click ‘Run the troubleshooter’ button. Once troubleshooting finished, please check if the issue is resolved.
Method 6: Reset Windows PC to its default settings
If the issue is still persist, then you can perform Windows 10 reset to its default settings in order to fix the issue.
Step 1: Restart your computer several times until Windows Automatic Repair screen is appeared. Once appeared, select ‘Advanced Options > Troubleshoot’ in Windows Recovery Environment
Step 2: Now, select ‘Reset this PC’, select if you want to keep your files or ‘Delete’ them and click ‘Reset’ option and proceed with resetting process. Once finished, check if the issue is resolved.
Method 7: Update Device Drivers
Updating Device drivers in computer can resolve the issue.
Step 1: Open ‘Device Manager’ in Windows PC via Windows Search Box and look for device driver that is outdated/corrupted
Step 2: Right-click on device driver that is causing issue, and select ‘Update Driver’, and follow on-screen instructions to finish update process.
Step 3: Repeat the same step to update all other necessary drivers. Once updated, restart your computer and check if the issue is resolved.
Download or reinstall Device Drivers in Windows PC [Automatically]
You can also try to update all Windows drivers using Automatic Driver Update Tool. You can get this tool through button/link below.
Method 8: Update Windows 10 OS
Updating Windows OS to latest update version can resolve the issue.
Step 1: Open ‘Settings’ App in Windows PC and go to ‘Update & Security > Windows Update’ and click ‘Check for updates’ button
Step 2: Download and install all available updates in computer, and once updated, restart your computer and check if it works for you.
Conclusion
I am sure this post helped you on How to fix Driver pnp watchdog error Windows 10 with several easy steps/methods. You can read & follow our instructions to do so. That’s all. For any suggestions or queries, please write on comment box below.
You may fix Windows 10 driver PNP Watchdog error with some quick and easy fixes. Here, in this article, we share these solutions for you.
Were you trying to update Windows 10 to ensure better computer performance but ended up with a Driver PNP Watchdog error? If yes, then don’t consider yourself alone, as many users have reported struggling with the same problem.
However, now that you have arrived at this article, you may put all your worries to rest. Through this article, we look at the best possible fixes for the Windows 10 Driver PNP Watchdog error.
Before moving to these solutions, it is a good idea to understand the Watchdog error on Windows 10 and its causes. If you know what the error means and why it may have occurred, fixing it is no tough job.
Hence, let us first answer the question, what does Driver PNP Watchdog mean, and what are its causes?
What Is Driver PNP Watchdog Error on Windows 10
PNP Driver Watchdog or code 0x000001D5 is a Blue Screen of Death error that appears when you try updating Windows. This error forces you to restart the machine and may make you bump into problems, like freezing of the system, boot-up issues, app crashing, etc. As far as causes are concerned, the following are the core culprits behind the Windows 10 Watchdog error.
Causes of Driver PNP Watchdog Error on Windows 10
- Wrongly configured SATA Controller Settings
- System infected with malware
- Issues with the antivirus and Firewall
- Missing or corrupted system files on your computer
- Out-of-date device drivers
- Conflicting or problematic operating system updates
- Outdated operating system
Above were the meaning and top causes of PNP Driver Watchdog. Let us now walk you through tried and tested fixes to this issue.
100% Working Fixes to Driver PNP Watchdog Error on Windows 10
You may apply the solutions shared below to fix Windows 10 Driver PNP Watchdog errors quickly and easily.
Fix 1: Change BIOS SATA Controller settings
BIOS is a core system component. BIOS having communication problems with a device prevents the operating system from communicating with that device. And it may lead to a Driver PNP Watchdog error on Windows 10. Therefore, you may check and change the settings of your BIOS SATA Controller through these steps.
- Ensure that your PC is turned off.
- Hit the Power button and keep pressing your computer’s key to access BIOS (generally, it is F2).
- Using the arrow keys, select the Main or Advanced option and hit the keyboard’s Enter key.
- Locate IDE Configuration, Drive Configuration, or Storage Configuration options.
- Hit the Enter button on your keyboard to proceed further.

- Locate and select the option named SATA Configuration, Configure SATA, or SATA Mode.

- Change the above option to Compatible, IDE, or ATA.

- Save and close BIOS.
- Restart your device and check whether Windows 10 Watchdog error is fixed or not.
Fix 2: Scan your system for viruses/malware infections
Viruses and malware infections may corrupt crucial files your system needs to communicate with any peripheral device. And, this, in turn, may cause the error Driver PNP Watchdog on Windows 10. Hence, you should use trusted antivirus software to check your system and make sure that it is not infected.
Also know: USB PnP Sound Device Drivers Download, Install and Update
Fix 3: Perform system file checking
Windows boasts a System File Checker to help you fix corrupted files existing on your computer. You may use this utility to check and fix system files to fix the Watchdog error on Windows 10. The following are the detailed directions to do it.
- Search cmd, right-click Command Prompt, and select the run as administrator option.
- Copy the sfc /scannow command and paste it into the Command Prompt window.
Fix 4: Update outdated drivers (Recommended)
Perhaps, there is no menace bigger than outdated drivers for your computer. Almost every problem, including errors like PNP Driver Watchdog on Windows 10 stems from outdated drivers.
Hence, updating the drivers is among the best fixes to get rid of the Watchdog error on Windows 10 and many other problems. You may update your drivers automatically with no hassles using one of the most renowned driver updaters, i.e.,
Bit Driver Updater. The Bit Driver Updater software is well-known for its excellent features, such as one-click automatic driver updates, driver backup and restores, driver download speed acceleration, scan scheduling, and many more.
Below we provide the link from where you can download the Bit Driver Updater program to install and experience it.
Once the software is installed, within one or two seconds, you get a list comprising all outdated drivers present on your device. If you wish, you may stop the automatic scan and run the process manually using the Scan button.
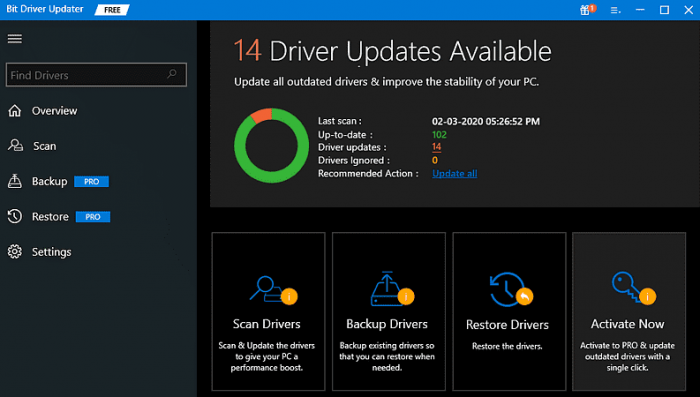
Now, you may select the option to Update All problematic drivers with just a click on the button to do it.

There is also an Update Now tool for those wanting to update only a single driver. However, updating all drivers is recommended to make the most of your computer.
Fix 5: Perform Windows updates troubleshooting
Since BSOD errors like Driver PNP Watchdog errors on Windows 10 occur when you try updating the operating system, troubleshooting Windows updates can help you fix the issue. Thus, below we share the steps to troubleshoot Windows updates.
- Search Troubleshooting on your computer.
- Select the option to View All troubleshooting options from the left pane.
- Choose Windows Update from the options that appear.
- Run the troubleshooter for Windows update and follow the on-screen directions to complete the troubleshooting process.
- Restart your computer and check whether Windows 10 Driver PNP Watchdog error is fixed or not.
Also read: How to Download, Update and Install CH340 Driver
Fix 6: Perform disk checking
Disk issues may also result in a PNP Driver Watchdog error on Windows 10. Hence, you may take these steps to check and solve disk problems to drive the issues you are experiencing away.
- Run Command Prompt as an administrator on your computer.
- Copy the chkdsk.exe /f /r command and paste it into the window on your screen.
- Key in Y to confirm that you would like to perform disk checking on your PC.
- Press the Enter key and wait for the checking to complete.
- Restart your device after completing the disk checking.
- After restarting your computer, try updating the operating system to check whether Windows 10 Driver PNP Watchdog error has disappeared or not.
Fix 7: Perform automatic repair
Automatic Repair fixes issues that may prevent your operating system from loading, thereby fixing BSOD errors like Driver PNP Watchdog. Hence, below is how to perform the automatic repair on Windows 10.
- Firstly, press and hold the Shift key on your keyboard.
- Select the Start button from the extreme left corner, choose the Power option, and pick the Restart option.
Note: If you cannot boot your computer normally, you may need to perform the following steps to use the automatic repair feature.
- Make sure that your computer is off.
- Turn on your PC using the power button.
- Now, press the power button again until your PC automatically shuts down.
- Choose Startup Repair and then follow the on-screen commands to complete it.
Fix 8: Ensure the Volume Shadow Copy service is running correctly
The Volume Shadow Copy service is responsible for managing and implementing Volume Shadow Copies needed for backup and various other reasons. If this service is not functioning properly, you may experience issues like Driver PNP Watchdog Windows 10 error. Thus, below is how to check and fix the problems with this service.
- Using the Windows+R shortcut, access the Run tool.
- Key in services.msc in the box that appears on your screen and select OK.
- Click twice on the Volume Shadow Copy service.
- Set the Startup type to Automatic and Service status to Running.
- Save changes using Apply and OK buttons.
- After completing all the above steps, restart your device.
Also know: Best Free Driver Updater Software for Windows 11, 10, 8, 7
Windows 10 Driver PNP Watchdog Error Fixed
Through this write-up, we guided you through the solutions to the Driver PNP Watchdog errors on Windows 10. You may start with the first solution and move on to the next one until the error disappears.
If you do not find it convenient to try every solution, you may choose to update drivers directly with Bit Driver Updater to fix the issue with just a few clicks.
In case any confusion or question persists about this post, you may reach out to us through comments.