
Skip to content
Navigation Menu
Provide feedback
Saved searches
Use saved searches to filter your results more quickly
Sign up
Repository files navigation
Intel Ethernet Connection I219-V driver installation for Windows Server
System requirements
- Windows Server 2012
- Windows Server 2012 R2
- Windows Server 2016
- Windows Server 2019
- Windows Server 2022
- Windows Server 2025
Driver version
- Update: 26.4 (2021-07-22)
- SHA1: 90694EA1D4DB9CDDE243CB28B4BC42759D60A07B
- Update: 30.0 (2025-01-21)
- SHA1: 1F1DA97C4D9ADF41251361F3907EF94C5FB42E9F
Modifications
- Deleted all files except the I219-V driver files.
- Modified
e1d.inffiles based on server version.
Supported operating systems by each directory
- PRO1000/Winx64/NDIS63: Windows Server 2012 (v26.4)
- PRO1000/Winx64/NDIS64: Windows Server 2012 R2 (v26.4)
- PRO1000/Winx64/NDIS65: Windows Server 2016 (v30.0)
- PRO1000/Winx64/NDIS68: Windows Server 2019 (v30.0)
- PRO1000/Winx64/WS2022: Windows Server 2022 (v30.0)
- PRO1000/Winx64/WS2025: Windows Server 2025 (v30.0)
Instructions
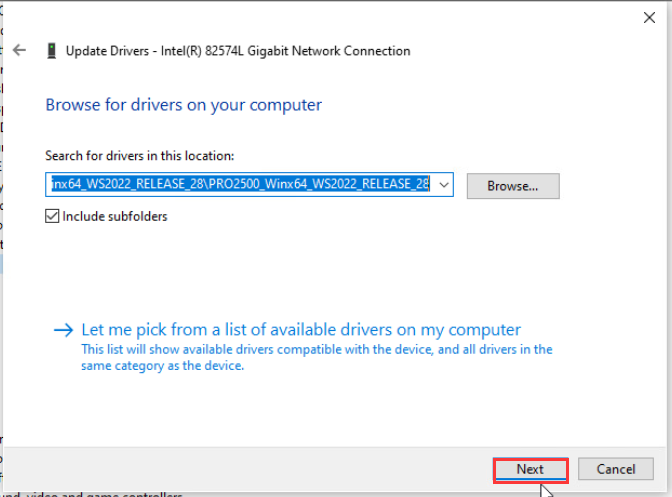
- Run
ENABLE_TESTMODE.cmdto reboot as test signing mode. - Open
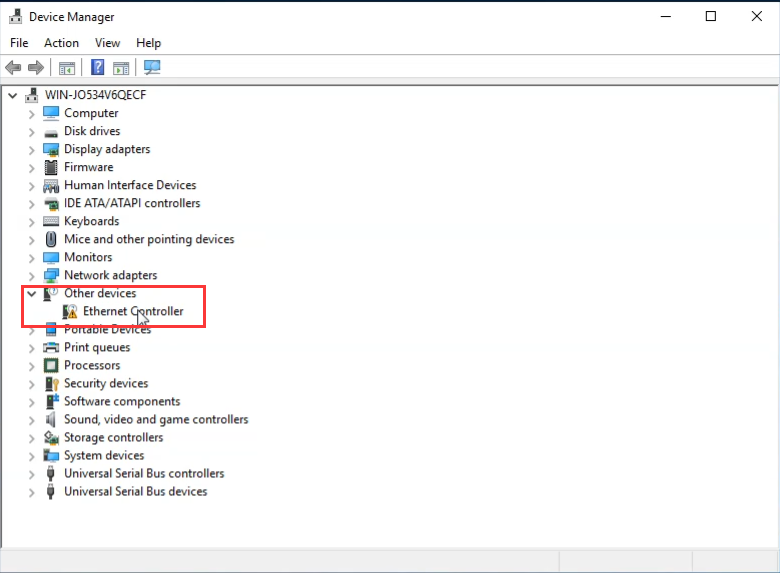
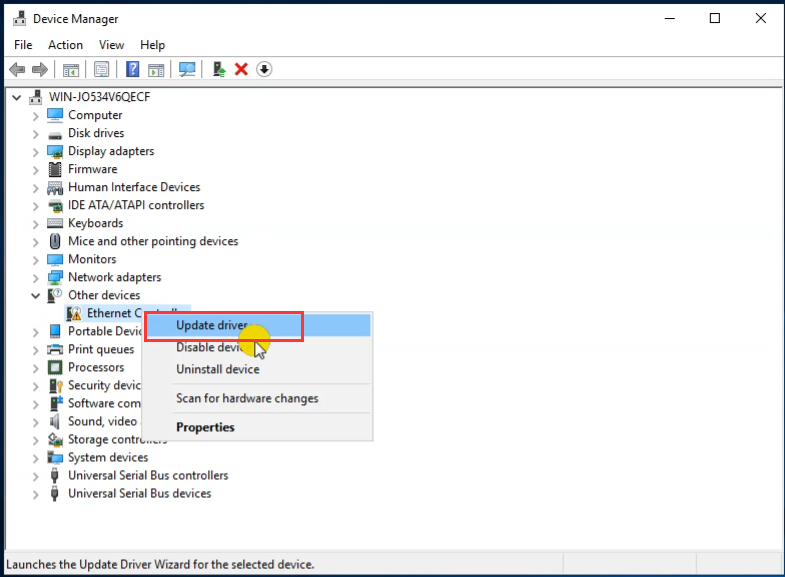
devmgmt.msc. - Select the Ethernet Controller in Other devices.
- Click the Driver update button.
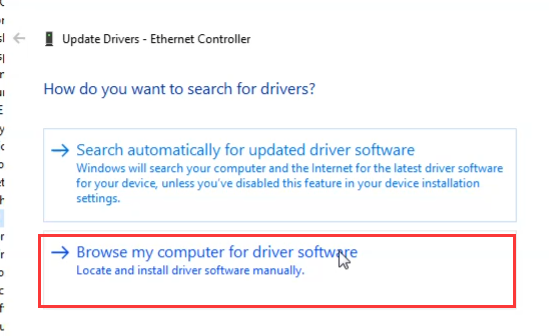
- Find the driver manually.
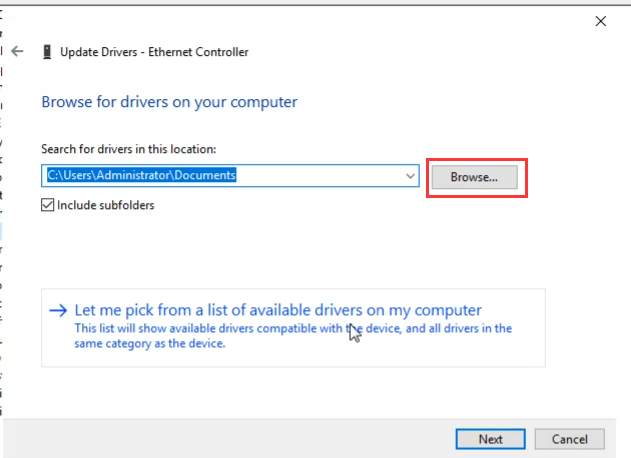
- Choose directly from the list of available drivers.
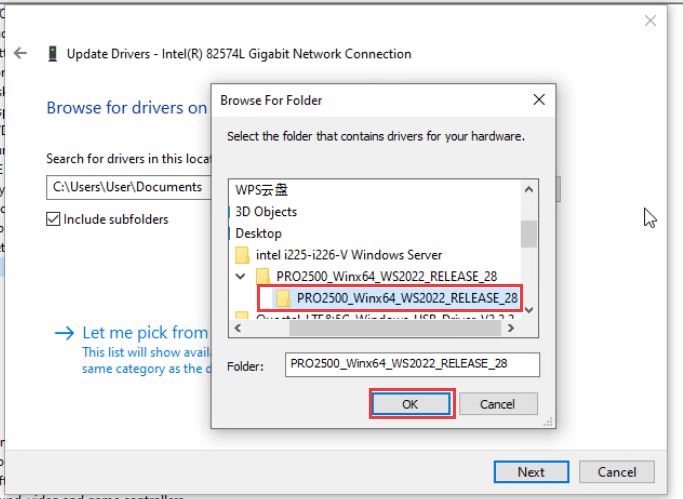
- Select the
NDIS*/e1d*x64.inforNDIS*/e1d.inffile in the directory for current Windows Server version. - Select
Intel(R) Ethernet Connection (2) I219-Vfrom the driver list. - Continue and finish installation even if an unsigned driver installation warning appears.
- Run
DISABLE_TESTMODE.cmdto reboot as standard signing mode.
I use Intel NUCs in my lab environment to test different workloads and produce technical articles, such as this one. I recently published an article about building your home lab using Intel NUCs. You can read it here.
Intel NUC supports Windows 10 and Windows 11 and provides corresponding drivers for different hardware components. They work fine, and nothing is missing.
However, if you want to install Windows Server and its drivers, you will face challenges with the Ethernet adapter. Since there is no dedicated Ethernet driver for Windows Server, the network connection will not function.
For writing this article, I run my workloads on powerful mini PC - Intel NUC powered with the CPU i7 the latest generation, 64 GB RAM DDR4, 256 M.2 SSD. Intel® NUC Mini PCs are fully complete and ready to work out of the box. You can learn more here Intel® NUC Products.In this article, I’ll show you how to install an Intel NUC network driver on Windows Server 2019, 2022 and 2025
Step 1: Download the driver
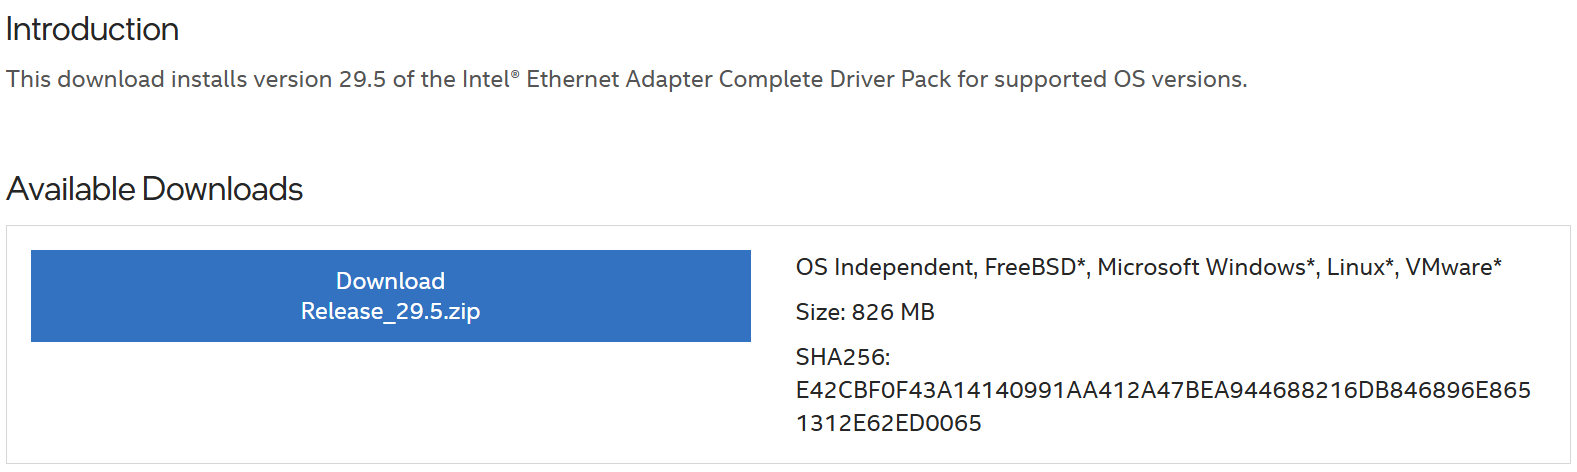
In the first step, you need to download the proper driver for your Ethernet adapter. As mentioned, there is no dedicated driver for Windows Server 2022, and you need to use one designed for OS independence.
I installed it and used it for several weeks without any problems. You can download a driver here Intel® Ethernet Adapter Complete Driver Pack. This driver has been tested on Windows Server 2019, Windows Server 2022, and Windows Server 2025, and it works flawlessly. However, the installation process for Windows Server 2019/2022 differs from that for Windows Server 2025.
Once downloaded, transfer the file to your Intel NUC, and then extract it.
Step 2: Install the Ethernet driver
In the second step, you will install the network adapter driver on your Intel NUC.
Windows Server 2019/2022
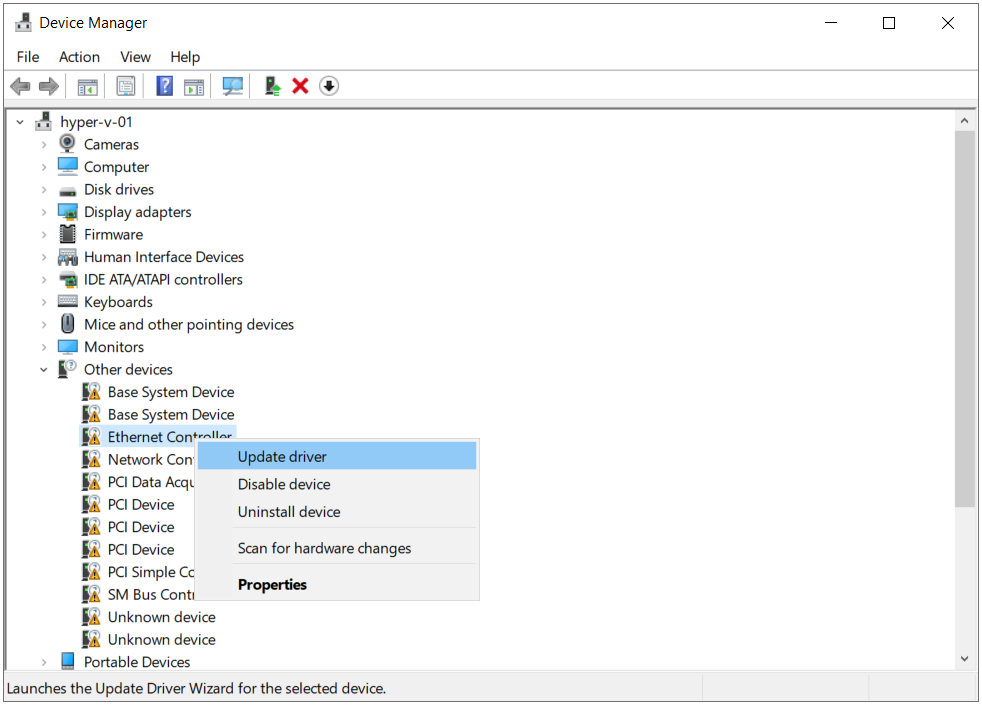
- Open Device Manager and expand other devices.
- Right click on Ethernet Controller and click Update driver.
- Select Let me pick from a list of available drivers on my computer and click Next.
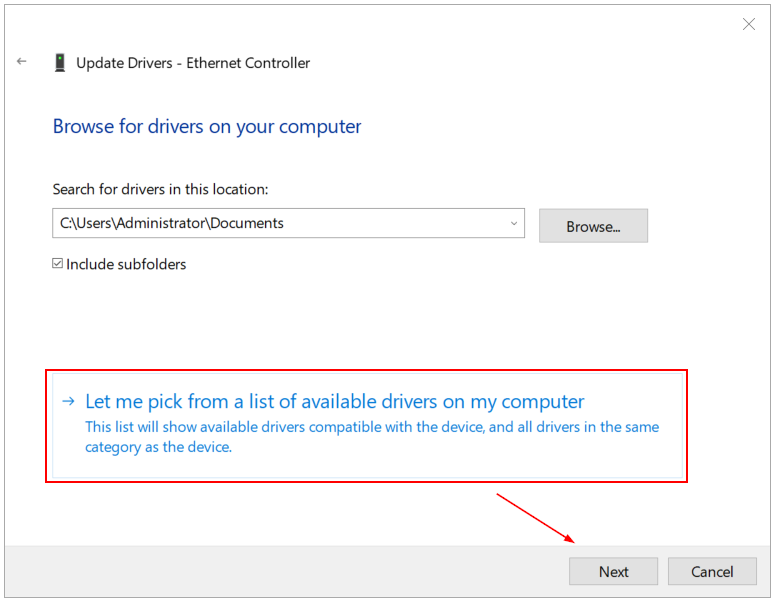
- Select Network adapters and click Next.
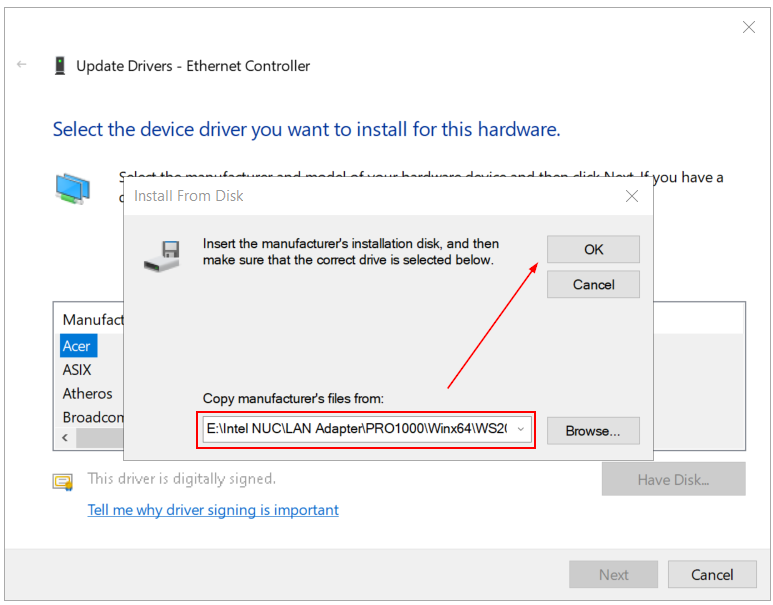
- Click Have Disk…
- Select the drivers, you previously downloaded and click OK. Once you extract your file, you need to navigate to *\PRO1000\Winx64\W2022\*.sys.
- Select Intel(R) l210 Gigabit Network Connection and click Next.
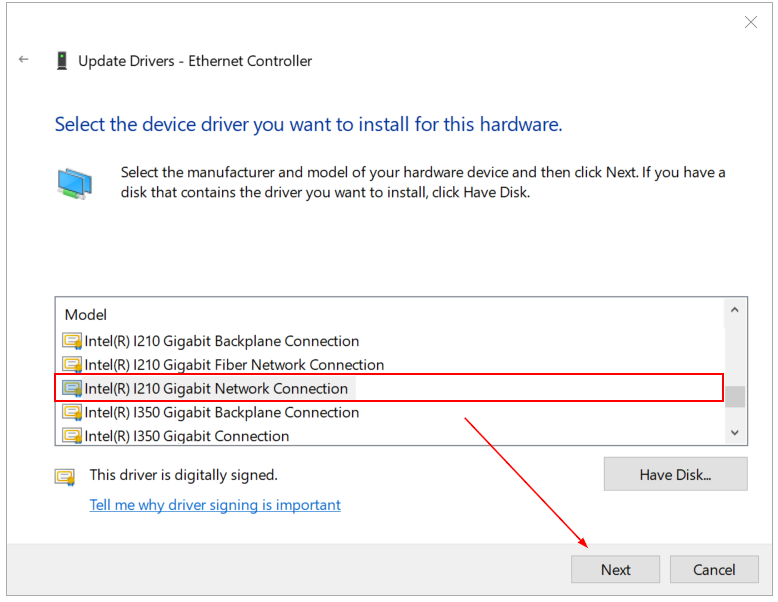
- Click Yes to confirm updating the driver.
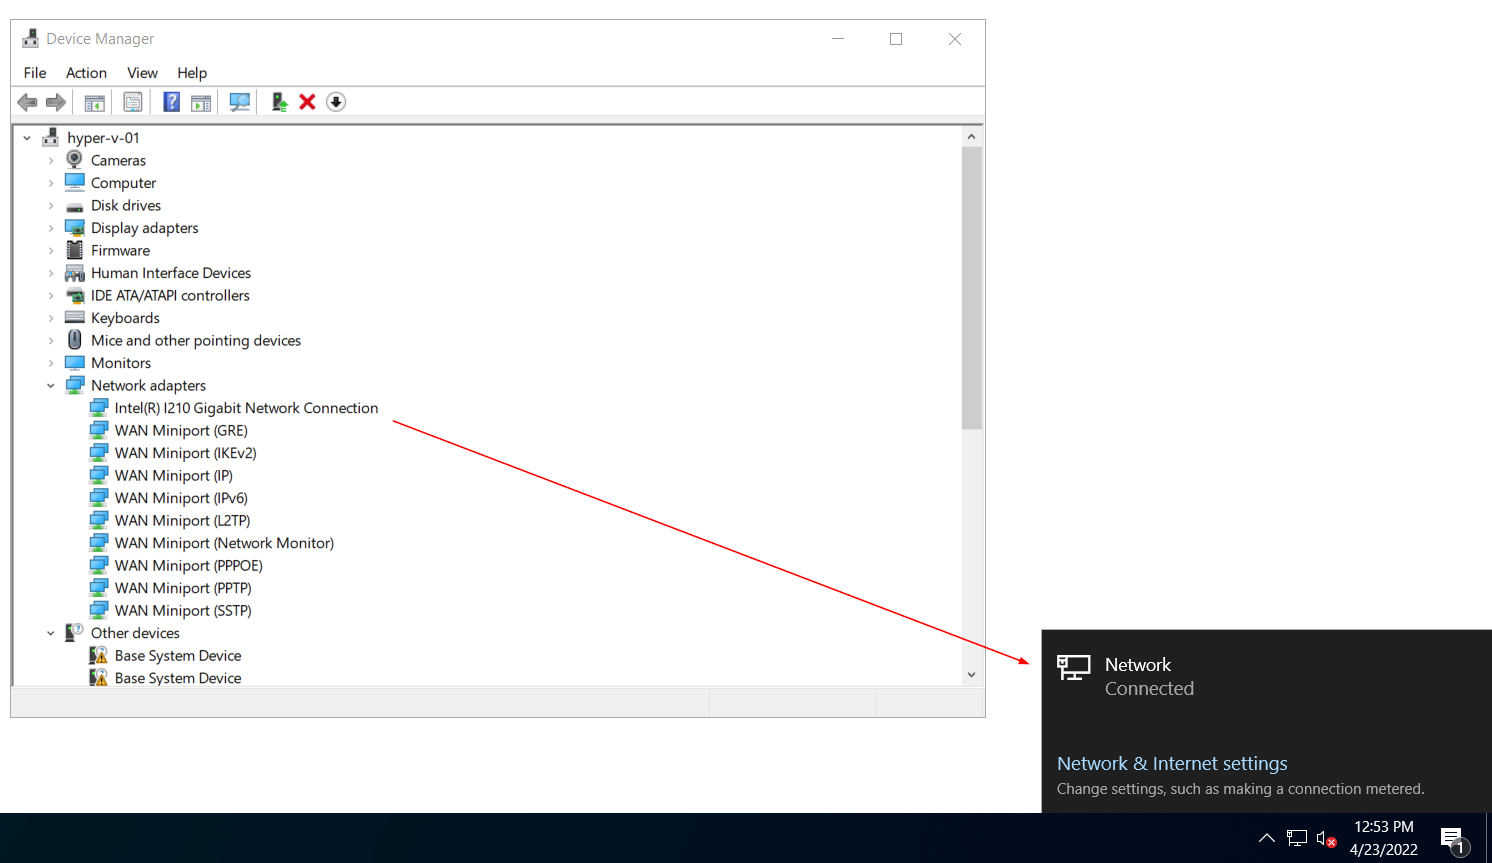
- Windows has successfully updated your drivers. Click Close. You will notice that your Intel NUC is connected to your network
Windows Server 2025
I tried the method above for Windows Server 2025, but it didn’t work. So, I explored alternative drivers and found one that does. Follow steps 1 to 5 from the previous section, and then proceed with the steps below.
- Open Device Manager and expand other devices.
- Right click on Ethernet Controller and click Update driver.
- Select Let me pick from a list of available drivers on my computer and click Next.
- Select Network adapters and click Next.
- Click Have Disk…
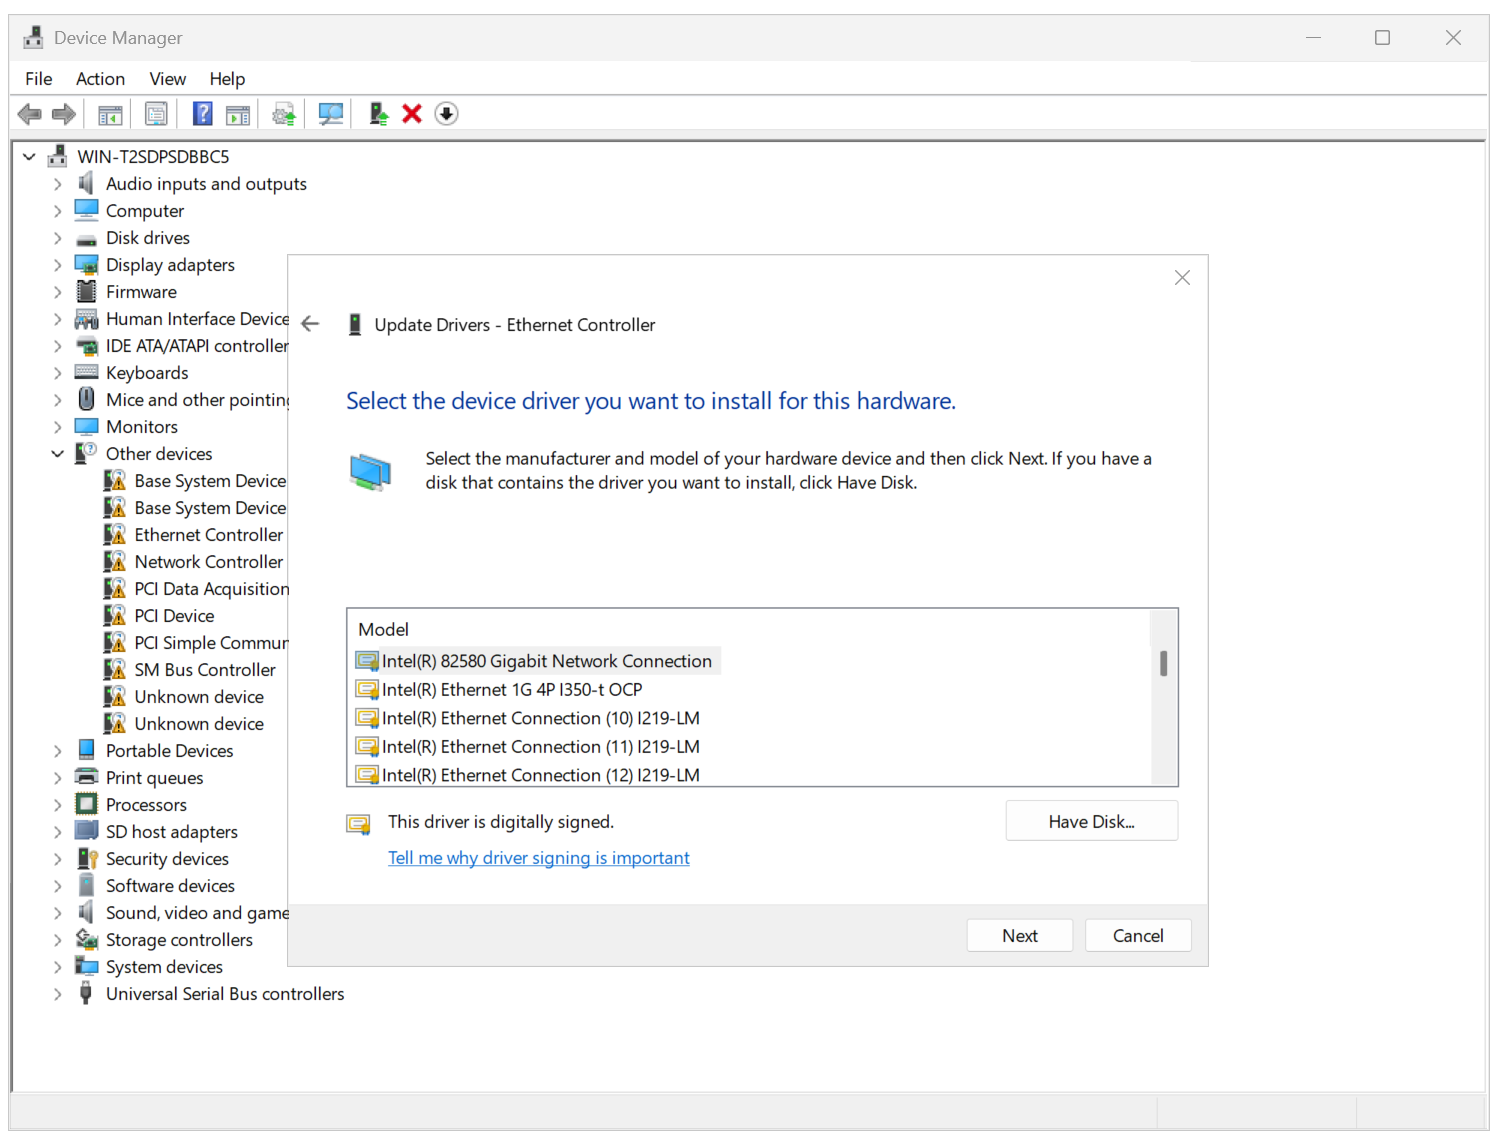
- Select the drivers, you previously downloaded and click OK. Once you extract your file, you need to navigate to *\PRO1000\Winx64\W2025\.
- Select Intel(R) 82580 Gigabit Network Connection and click Next.
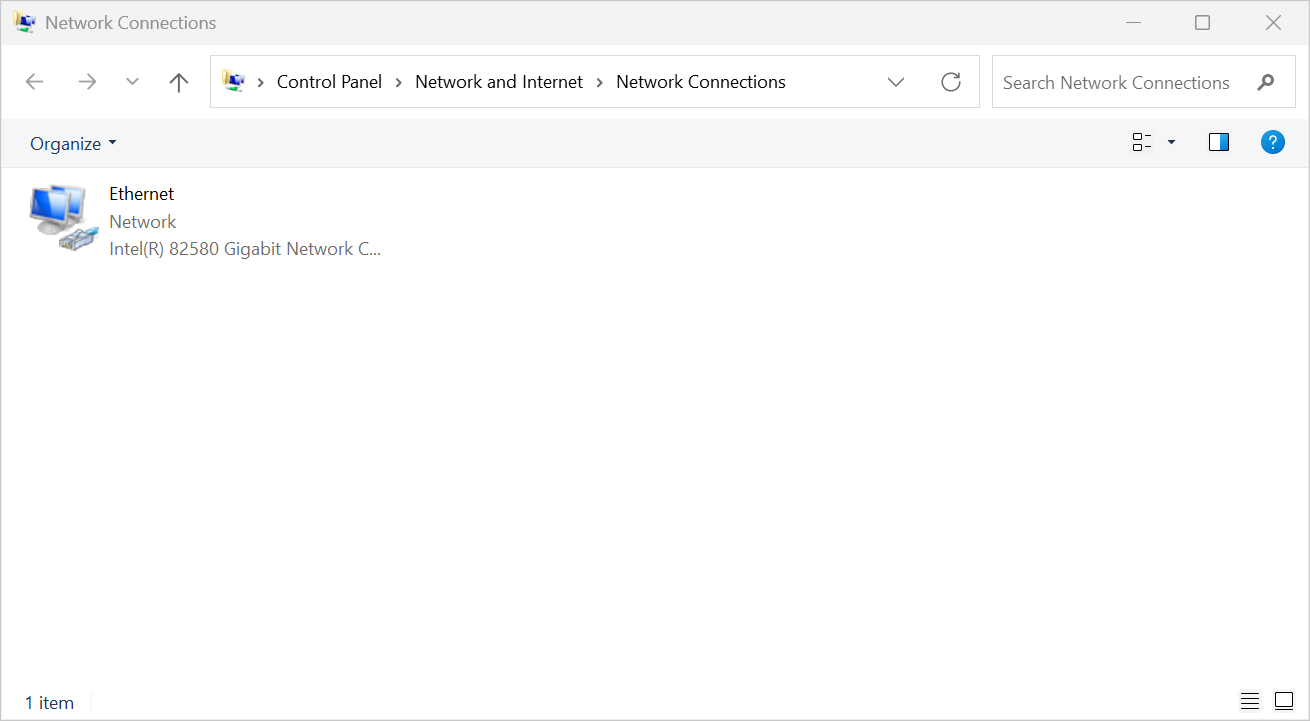
Windows has successfully updated the network drivers.

You are online.
If asked, restart your PC to complete the device setup. Don’t forget to share this article with your network.

As you know, I am using an Intel NUC as my Windows Server lab machine, where I run Windows Server 2019 and Hyper-V on. Many people asked me about how you can install the Intel NUC Windows Server 2019 Network Adapter driver because there are no Windows Server 2019 drivers for it. My blog reader, Michael Williams, shared how you can install the Windows Server 2019 Network adapter drivers on the Intel NUC 8th generation.
Here are the simple steps you can follow to install the Intel NUC Windows Server 2019 Network Adapter Driver:
- Download the latest PROWinx64.exe for Windows Server 2019 from Intel including drivers for the Intel® Ethernet Connection I219-V
- To manually install the network drivers, extract PROWinx64.exe to a temporary folder – in this example to the C:\Drivers\Intel\ folder. Extracting the .exe file manually requires an extraction utility like WinRAR or others. You can also run the .exe and it will self-extract files to the %userprofile%\AppData\Local\Temp\RarSFX0 directory. This directory is temporary and will be deleted when the .exe terminates.
- The driver for the Intel I219-V network adapter can be found in the C:\Drivers\Intel\PRO1000\Winx64\NDIS68.
Extracted Network Drivers for Windows Server 2019 – Intel NUC PROWinx64
- Open Device Manager right click on Ethernet Controller and select Update Driver.
Device Manager Update Driver Ethernet Controller – Intel NUC Windows Server 2019 Driver
- Select “Browe on my computer for driver software”, and select “Let me pick from a list of available drivers on my computer”, now you can select Network Adapter.
Update Driver
- Click on “Have Disk…” enter the following path “C:\Drivers\Intel\PRO1000\Winx64\NDIS68.”
Driver Location
- Now select Intel Ethernet Connection I219-LM (The I219-V version is not shown)
Select the Intel Ethernet Connection I219-LM
- And you are done.
Huge thank you again to Michael Williams for sharing that with us. I hope this short blog post provides you a step by step guide on how you can install Windows Server 2019 Network adapter drivers on the Intel NUC. If you have any questions, feel free to leave a comment.
Tags: Adapter, Driver, drivers, Intel, Intel NUC, Microsoft, Network, Network Driver, Networking, NUC, Server, Windows, Windows Server, Windows Server 2019 Last modified: July 11, 2024
About the Author / Thomas Maurer
Thomas works as a Principal Program Manager & Chief Evangelist Azure Hybrid at Microsoft (Cloud + AI). He engages with the community and customers around the world to share his knowledge and collect feedback to improve the Azure hybrid cloud and edge platform. Prior to joining the Azure engineering team (Cloud + AI), Thomas was a Lead Architect and Microsoft MVP, to help architect, implement and promote Microsoft cloud technology.
If you want to know more about Thomas, check out his blog: www.thomasmaurer.ch and Twitter: www.twitter.com/thomasmaurer
Overview: Intel network cards come in two product lines, with i225-V/i226-V belonging to the consumer-grade line. The -LM suffix denotes the commercial-grade product line. By default, Windows Server only installs network card drivers for the commercial-grade line. However, it’s possible to forcibly install them using modified drivers, although this process can be somewhat complex. Here, we’ll provide the modified driver for installation.
Download Link for Intel i225-V/i226-V Windows Server Network Card Driver:
Extraction Code: HYSZ
1.Download the driver from the cloud storage or contact your supplier for access. Once downloaded, extract the files from the folder.
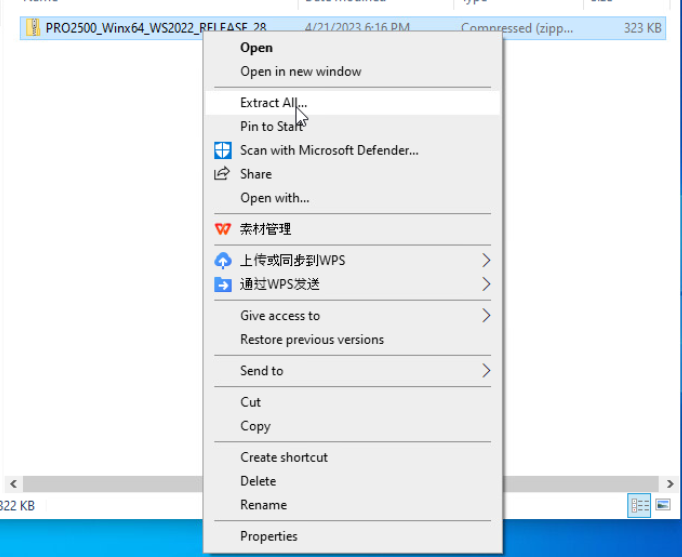
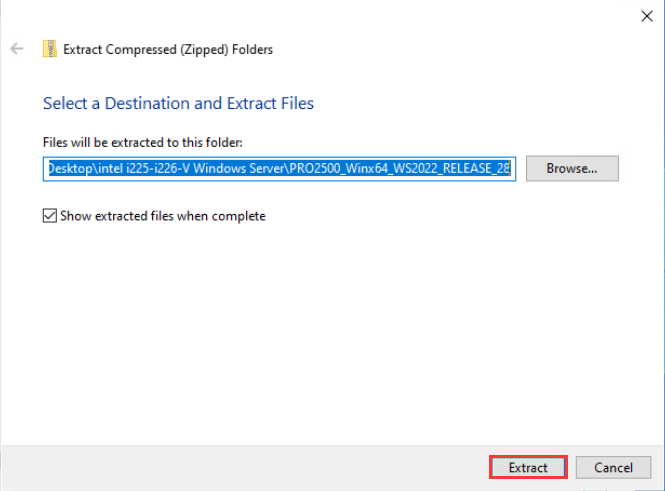
2.Installing the Driver
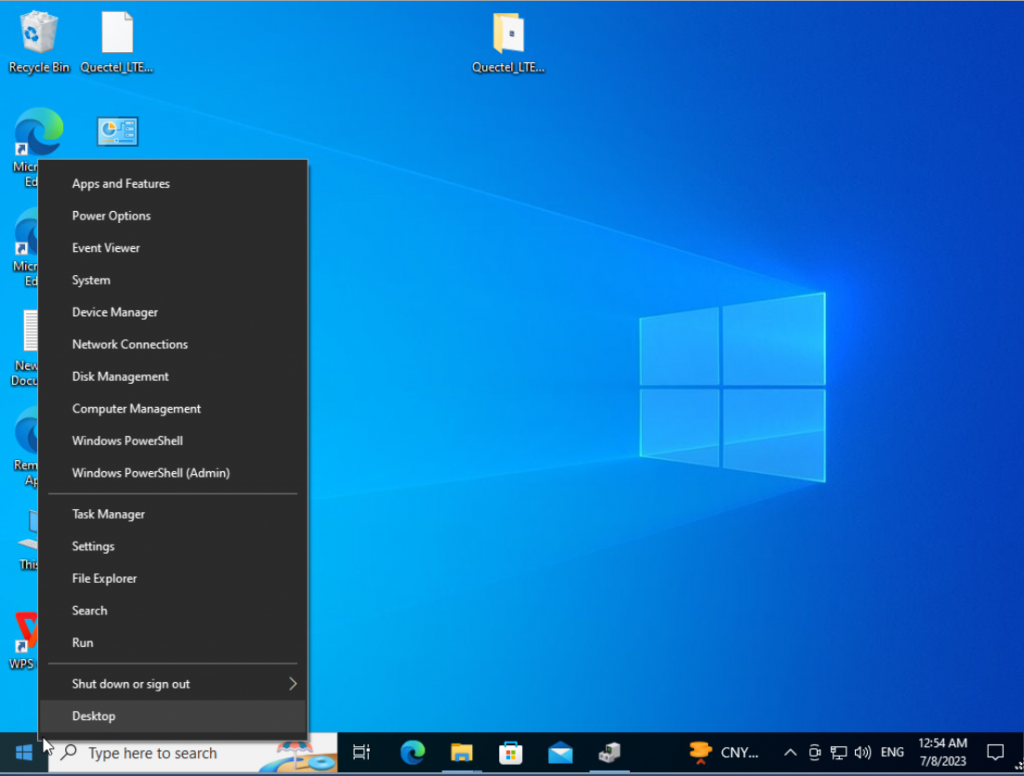
● Access Windows Server 2022 and open CMD (Run as Administrator). Enter the following two commands:
bcdedit -set loadoptions DISABLE_INTEGRITY_CHECKS
bcdedit -set TESTSIGNING ON
● Restart your machine.
3.Post-restart, right-click on the «Start» menu, choose «Device Manager» > right-click on «Ethernet Controller» > «Update driver» > «Browse my computer for driver software» > «Browse…» and select the directory of the extracted driver files. Follow the prompts to complete the installation.
4.Exiting Test Mode
● After the driver installation, in CMD (Run as Administrator), enter the following two commands to disable test mode:
bcdedit -set loadoptions ENABLE_INTEGRITY_CHECKS
bcdedit -set TESTSIGNING OFF
● Restart your computer. This completes the driver installation process!
(How to install the intel i225/i226-V network card driver under Windows Server system?)
Overview: Intel’s network cards are divided into two product lines. i225-V/i226-V belongs to the consumer product line, and those with the -LM suffix belong to the commercial product line. By default, Windows Server can only install network card drivers from commercial product lines. However, it can be forced to install through the magic driver modification. The magic driver modification process is a bit cumbersome and will not be introduced here. We will upload the modified driver.
Intel i225-V /i226-V Windows Server network card driver download address:
Baidu Netdisk: //pan.baidu.com/s/1_LxQAuvgx7aJm08KYNWiYw
Extraction code: HYSZ
1. Go to the network disk to download the driver or contact your supplier to obtain it. After the download is complete, unzip the folder.
-
2. Install the driver
Enter Windows Server 2022 and enter the following two commands in CMD (as administrator):
bcdedit -set loadoptions DISABLE_INTEGRITY_CHECKSbcdedit -set TESTSIGNING ON
Then restart the machine.
After restarting, right-click the «Start» menu and select Device Manager>right-click Ethernet Controller>Update driver>Browse my computer for driver software>Browse… Select the decompressed driver directory and follow the prompts to install it.
-
3. Exit test mode
After the driver installation is completed, enter the following two commands in CMD (as administrator) to turn off the test mode:
bcdedit -set loadoptions ENABLE_INTEGRITY_CHECKSbcdedit -set TESTSIGNING OFF
Then restart the computer and the driver installation is complete!