
Jun. 23, 2022 / Updated by
Bessie Shaw to
Windows Driver Solutions
Install 64-bit or 32-bit Windows 7 on your Apple Mac computer and need drivers? Windows 7 drivers for Mac are not found in BootCamp? Get the wrong drivers for Windows 7 with BootCamp? Many of you want to download Windows 7 drivers for MacBook Pro, MacBook Air or Mac mini, and the drivers include Windows 7 graphics driver for Mac, Windows 7 audio driver for Mac, Windows 7 USB driver for Mac, etc. In fact, it’s easy to download and install all Apple drivers for Windows 7.
You can use Boot Camp Assistant (similar to Microsoft Windows Update) to download Windows support software, the Windows 7 drivers, but it requires long time and many Windows 7 drivers you need may not be available from it. One of the easiest and also the most effective ways to download and update Mac drivers for Windows 7 is to use Driver Talent (formerly called DriveTheLife), which is a professional Windows drivers download and update utility. It offers all Windows 7 drivers for your Apple Mac computer, including display drivers, audio drivers, WiFi drivers (wireless network drivers), Bluetooth drivers, trackpad drivers, Xbox 360 controller drivers, etc.
Free download and install Driver Talent on your Windows 7 Mac computer, like the MacBook Pro, MacBook Air, MacBook, iMac, Mac mini or Mac Pro.
Download Now
Updated: DriveTheLife has been updated to the new version called Driver Talent with a fresh new look.
Driver Talent also works to download Windows 8/8.1 drivers on Mac, and Windows 10 drivers on Mac.
How to Free Download, Install or Update Windows 7 Drivers for MacBook, iMac, Mac mini/Pro
As we all know, if the drivers are outdated, corrupted, missing, damaged or incompatible, your computer won’t work properly. Driver Talent will help to avoid the driver issues and keep your Mac computer on Windows OS from conflicts & errors.
It works to get all 64-bit or 32-bit Windows 7 drivers for your Mac, including:
|
Windows 7 drivers for MacBook Pro |
Windows 7 drivers for MacBook Pro Retina |
Windows 7 drivers for MacBook Air |
|
Windows 7 drivers for MacBook |
Windows 7 drivers for iMac |
Windows 7 drivers for iMac Retina 5K |
|
Windows 7 drivers for Mac mini |
Windows 7 drivers for Mac mini Server |
Windows 7 drivers for Mac Pro |
|
Mac graphics drivers for Windows 7 |
Mac audio/sound drivers for Windows 7 |
Mac WiFi drivers for Windows 7 |
|
Mac Bluetooth drivers for Windows 7 |
Mac trackpad drivers for Windows 7 |
Mac Xbox 360 controller drivers for Windows 7 |
|
Mac touchpad drivers for Windows 7 |
Mac Boot Camp drivers for Windows 7 |
Mac network drivers for Windows 7 |
|
Mac game drivers for Windows 7 |
Mac Canon drivers for Windows 7 |
And more |
Here are the steps to one click download, install or update Windows 7 drivers for Mac without BootCamp assistant.
Step 1. Scan Windows 7 Mac to Check All Driver Issues
After you install Driver Talent on your Mac computer in Windows 7, launch it and click on the «Scan» button. It will start to scan your computer to find all the driver issues.
Note: If you have USB devices to connect to Mac computer, such as iPhone, iPad, USB keyboard, USB mouse, USB hard drive, etc., connect them to Mac to allow Driver Talent to scan drivers issues.
Step 2. One Click to Download, Install or Update Windows 7 Drivers for Mac
Driver Talent helps to list all the driver issues and offer one click to repair all the drivers. Once you click on the “Repair” button, it will start to download and install the best-matched and also the latest drivers for your Mac on Windows 7.
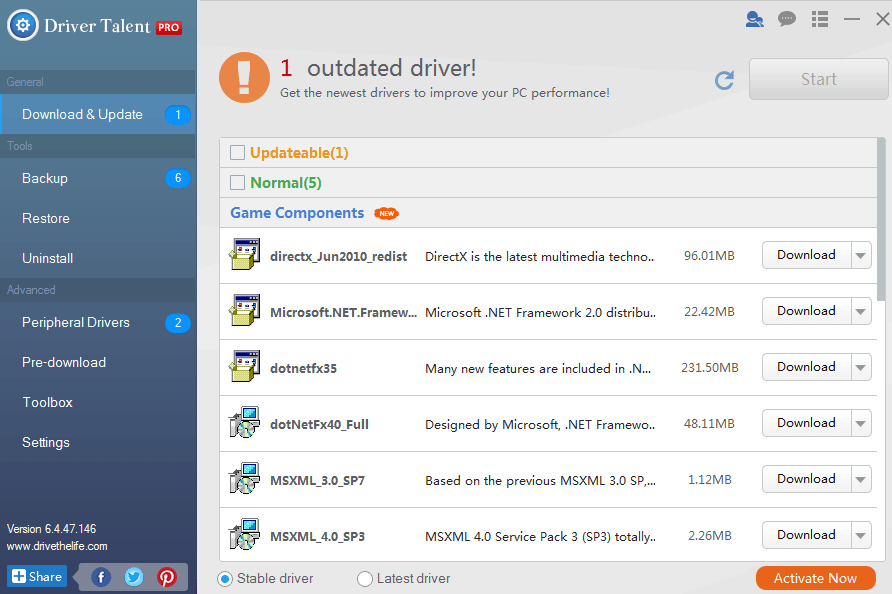
Step 3. Restart Your Mac
After all the drivers are downloaded and installed, reboot your computer. This will help to complete the driver installation processes and make all the driver work properly.
For more information, refer to how to use Driver Talent to download Windows drivers on Mac. If you have any problem when downloading Mac drivers for Windows 7, please leave it in your comment. We’ll try our best to help you out.
Recommended Download
|
ExplorerMax |
Driver Talent for Network Card | |||
| Smart and advanced file explorer tool for Windows platforms | Download & Install Network Drivers without Internet Connection | |||
|
30-day Free Trial |
Free Download |
Hi,
I would like to install windows 7 on my 13″ 2010 macbook pro through bootcamp. The only problem that i have is that i do not have the mac os install disk to get all the proper drivers for windows 7. Is there any way i can get the windows 7 drivers easily? Any advise would help.
thanks
2010 13″ Macbook Pro
Posted on Jun 7, 2010 7:02 PM
Jun 7, 2010 8:05 PM in response to bobbyj408
bobbyj408 wrote:
I would like to install windows 7 on my 13″ 2010 macbook pro through bootcamp. The only problem that i have is that i do not have the mac os install disk to get all the proper drivers for windows 7. Is there any way i can get the windows 7 drivers easily?
Welcome to Apple’s discussion groups.
This Web page
http://support.apple.com/downloads#Boot
will give you a list of Boot Camp software that might be useful to you. Study the descriptions to determine which one applies to your case.
Jun 8, 2010 5:46 PM in response to bobbyj408
Not having any need for Windows I haven’t tried this but it is my understanding that after you use Boot Camp to create the partition and install Windows then you use Windows with the snow Leopard DVD to install the drivers for Windows.
Allan
Jun 8, 2010 5:55 PM in response to Allan Eckert
yea thats what i though. Is there somewhere i can get the snow leopard DVD? can i get it at an apple store?
Also, I have a 2010 macbook 13″ 2.4 GHz. Would i be able to put windows 32 bit on it? or would i have to put 64 bit?
Jun 8, 2010 5:58 PM in response to bobbyj408
It should be on the DVD that came with your Mac.
For your other questions I would suggest you ask over on the Boot Camp forum where the serious Windows types hang out. Over here you are talking to Snow Leopard users who think of Windows as the dark side.
Allan
Jun 8, 2010 6:13 PM in response to bobbyj408
I couldn’t get the new downloaded Bootcamp drivers to work with the 64-bit version of Windows 7. I finally wiped and re-installed the 32-bit Windows 7 and then had no problems.
64-bit Windows 7 can cause compatibility issues with some devices so I wasn’t all that fussed.
Jun 8, 2010 7:14 PM in response to Allan Eckert
Allan Eckert wrote:
Not having any need for Windows I haven’t tried this but it is my understanding that after you use Boot Camp to create the partition and install Windows then you use Windows with the snow Leopard DVD to install the drivers for Windows.
That’s generally true but doesn’t account for the possibility that Apple might have issued new versions of those drivers since the particular Snow Leopard DVD was released.
Jun 8, 2010 7:18 PM in response to bobbyj408
bobbyj408 wrote:
Is there somewhere i can get the snow leopard DVD?
You shouldn’t need it. I’d download this file («Boot Camp Software Update 3.1 for Windows 32 bit»):
http://support.apple.com/kb/DL996 and read the instructions that come with it.
Also, I have a 2010 macbook 13″ 2.4 GHz. Would i be able to put windows 32 bit on it? or would i have to put 64 bit?
I believe you can use 32-bit Windows.
This thread has been closed by the system or the community team.
You may vote for any posts you find helpful, or search the Community for additional answers.
Bootcamp Windows 7 Drivers
- About
- Blog
- Projects
- Help
-
Donate
Donate icon
An illustration of a heart shape - Contact
- Jobs
- Volunteer
- People
Item Preview
Icon-MacOS Bootcamp Windows.png
MXCL3.jpg
MXCL3_AV2.jpg
MXCL3_AV3.jpg
MXK53.jpg
MXK53_AV1.jpg
MXK53_AV3.jpg
MXK93.jpg
MXK93_AV1.jpg
MXK93_AV2.jpg
software
Bootcamp Support Software v5.1.5722
- by
- Apple
Apple Macintosh MacOS X Bootcamp Support Software v5.1.5722
Includes Windows 7/8/10 (64-bit) drivers for:
- Apple Bluetooth
- Apple Camera
- Apple Display
- Apple Keyboard
- Apple Multi-Touch TrackPad
- Apple SuperDrive
- Apple SDCard Reader
- Apple Magic Mouse
- Apple Magic TrackPad
- Addeddate
- 2021-04-17 01:11:31
- Identifier
- bootcamp5.1.5722
- Scanner
- Internet Archive HTML5 Uploader 1.6.4
comment
Reviews
(1)
There is 1 review for this item. .
1,873
Views
3
Favorites
1
Review
DOWNLOAD OPTIONS
Uploaded by
AC Mild
on
SIMILAR ITEMS (based on metadata)
Время на прочтение4 мин
Количество просмотров211K
Данный пост написан не холивара ради, а просто, чтобы поделится опытом. Сразу отвечу на основную часть вопросов:
— Зачем это надо?
— Это просто надо!
— Есть же MacOS, зачем на Маке Windows?
— Каждый выбирает для себя, с чем ему удобнее работать! Мне нравятся железки от Apple, но привык я работать в Windows!
— Есть же виртуальные машины?
— Они работают медленно!
— Есть же Bootcamp!?
— На Air мало место, и только Windows занимает около 30-40Гб, со всем софтом!
Ответил на все вопросы?! Если вам все еще интересно как это провернуть, тогда добро пожаловать в пост…
Если у вас есть внешний CD привод, возможно этот пост не для вас, здесь я расскажу как установить Windows на MacBook Air без наличия привода.
Для того чтобы это все провернуть, нам понадобится:
- 2 USB флэшки (одна для Windows 7 (от 4Гб), другая для драйверов (от 1 Гб))
- 1 PC – с Windows 7
- Интернет
- и конечно же новенький Macbook Air 2010 Late
Этап 1. Подготовка загрузочной флэшки с Windows 7
Для начала займемся подготовкой флэшки и сделаем ее загрузочной. Для этого нам понадобится PC с Windows 7 и диск от Windows (желательно x64, так как ноутбук поддерживает x64).
Вставляем флэшку на 4Гб в USB, набираем в поиске CMD, правой клавишей «Запустить с правами Администратора».
Далее набирает diskpart (это системная утилита для разбивания дисков, аналог старого fdisk). Теперь по этапам, что делаем в diskpart:
- Набираем list disk (отобразится список дисков, в нем ищем нашу флэшку на 4Гб, у меня она disk 3)
- select disk 3 (выбираем нашу флэшку)
- clean (стираем с нее все)
- create partition primary (создаем на ней основной раздел)
- select partition 1 (заходим в созданный раздел)
- active (делаем раздел активным)
- format fs=fat32 quick (форматируем, можно отформатировать в NTFS)
- assign (подключаем диск, и назначаем ему букву)
- exit (выходим, cmd не закрываем, он нам еще понадобится)
Подробнее о diskpart: http://support.microsoft.com/kb/300415
Теперь у нас есть USB флэшка, отформатированная в FAT32, которая активная, т.е. может стать загрузочной.
Для того чтобы установить загрузчик, надо сделать так в CMD:
- F: (у меня CD-ROM обозначается буквой F:, у вас может быть другая)
- cd \boot\
- bootsect /nt60 E: (где E: это имя флэшки)
Все! Теперь наша флэшка является загрузочной с установленным загрузчиком Windows 7, осталось скопировать, все файлы с CD Windows 7 на эту флэшку, это можно сделать проводником, или любым другим удобным вам способом.
Этап 2. Подготовка Macbook Air
Если было бы так все просто, и можно было просто вставить флэшку в Macbook и установить Windows 7, этого бы поста не было.
И так по пунктам:
- Для начала нам потребуются драйвера для Windows 7, на флэшке, которая идет в комплекте с Air, драйверов нет (кстати, флэшка которая идет в комплекте, определяется как внешний CD-ROM).
- Возьмем вторую флэшку, отформатируем ее в Fat32 с помощью дисковой утилиты.
- Запустим bootcamp. И на вопрос, есть ли у нас подобная флэшка или диск с драйверами, ответим нет, и попросим скачать с интернета:

- После того как все скачается, запишем это на нашу флэшку выбрав пункт, записать на внешний диск:


На предложение разбить диск на разделы и вставить диск с Windows отвечаем отрицательно, и просто закрываем Bootcamp.
Подробнее о том как работать с Bootcamp: http://support.apple.com/kb/ht4407
Этап 3. Заставить Macbook видеть USB Flash с Windows
Все мои попытки заставить Macbook видеть загрузочную флэшку, завершились неудачей, поэтому пришлось воспользоваться Google.
Оказывается я не один, кому нужен чистый Windows/Linux на Macbook, и для этого есть программа rEFIt.
Скачиваем ее с официального сайта: http://refit.sourceforge.net/. Я установил себе последнею версию 0.14. Устанавливается она стандартно, как любое приложение в MacOS.
После установки надо перезагрузить компьютер 2 раза. На второй перезагрузке необходимо зажать правый-option и появится подобное меню (USB Flash с Windows должна быть в MacBook):

У вас по умолчанию будет значок MacOS и значок Windows. Нам надо выбрать Windows.
После запуска установщика, ввода ключа, выбираем «полная установка».
Будет выведен список разделов, на которые размечен SSD:

Удалям все разделы! И создаем новые, при создание Windows предложит, точнее прикажет, создать системный раздел на 100Мб.
Диск я разбил на 100Мб(), 40Гб (система), и остальное.
Как все установится, компьютер перезагрузится, и запустится виндовс, в начале, он возможно долго будет висеть на белом экране, и искать раздел MacOS, это вылечится после установки драйвером, и приложения Bootcamp в Windows, чтобы быстрее нашелся нужный раздел, зажимаем левый option и выбирает диск с Windows.
После того как установка завершится, устанавливаем драйвера со второй флэшки, перегружаем. После перезагрузки заходим в Bootcamp, выбираем диск для загрузки Windows и нажимаем перезагрузить сейчас. ВСЁ! Теперь вы не будете видеть белый экран включения Macbook около минуты.
Немного о том как все это работает
Поработав 2 дня, на новеньком MacBook, я оценил все преимущества SSD. Windows грузится 10-15 секунд (от нажатия кнопки включения, до того как все иконки в систреи загрузятся)
Word отскрывается за 1 секунду
Photoshop CS5 – первый раз за 4 секунды, если выключить и включить заново 2 секунды (связано скорее всего с ReadyBoost, и всякими новыми фичами в Windows 7)
Время отклика приложения мгновенное.
И все это с сочетание Core2Duo, DDR3, Multi-touchpad, 1440×900…
Одним словом, я очень доволен! И не имеет значение что стоит Windows или MacOS, потому что MacBook Air 2010 Late отличная железка!
Всем счастливого Нового Года и хороших подарков!
— updated after BootCamp 5 release June 2013 —
Where can you get a direct download of Windows drivers for Macs if BootCamp is stuck, and says ‘could not continue’ or you have some other problem downloading the drivers?
The brute force solution: it’s a darned large download, so physically take your machine to somewhere with a very fast internet connection that can download 600MB – 1GB in a couple of minutes. There, you’re done. Especially if you have a laptop, this would be the simplest solution — even take it to an Apple Store.
For the rest of us:
- If you have 64 bit Windows 8, and your Mac is 2010 or later (2009 or later for Mac Pro) then see if this page works for you: www.cafe-encounter.net/p1414/direct-download-of-bootcamp-drivers-for-windows-8
- If not, then first find out your Mac’s ModelIdentifier
- Q: How do I find my Mac’s Model Identifier?
A: Open System Information, and look in the Hardware Overview section.
In other words: Click Apple menu -> About this Mac -> More Info… -> System Report -> Hardware. Now, read down the list in the Hardware Overview panel, looking for Model Identifier
- If you’re stuck, see the note below.
- Note that a ModelIdentifierHasNoSpacesInItAtAll.
- Q: How do I find my Mac’s Model Identifier?
- Second, get a download manager. You can try doing without, but the reason you’re on this page is that you’re having trouble getting a file to download reliably. A download manager such as iGetter or Folx solves this problem.
-
Then, search for your ModelIdentifier in the table below. Click the link to get the download package. Be patient as they are 600MB to over 1GB. It will be much simpler if you do the download in OS X, because OS X can open the downloaded file and also open the dmg file inside it.
-
Still in Mac OS X, once your pkg is downloaded, double click it and install to a folder on your hard drive so you know where to find it. During the Installation, click the «Change Location» option so that you can choose where it gets installed.
- The folder contains a nest of folders, the last of which contains a dmg disk image file. Double click that to open. At last! Here are your Windows installer files.
- Copy them to a usb drive, or a burnable CD. NB, it’s still 660MB or more, so it’s a full CDs worth of burning time.
- Done. You can now proceed with Boot Camp assistant Windows installation and boot the Mac in Windows.
If you must do the download in Windows instead OS X, it’s harder. You will need the help on http://www.cafe-encounter.net/p860/opening-a-bootcamp-driver-download-on-windows-7-or-8-with-7-zip to open the pkg file and the dmg file inside it.
BootCamp Direct Download Links
Most of these driver downloads work for both Windows 7 and Windows 8. Windows 8 on 32-bit is not officially supported, but almost everything seems to works on fine on not-officially supported models: the only specific shortcoming I’m aware of is that the screen brightness buttons don’t work on all models.
| Model Identifier | Size & driver release date | Direct Download Link |
|---|---|---|
|
Macmini6,1 Macmini6,2 MacBookPro10,2 iMac13,1 iMac13,2 |
438MB, 3 Dec 2012 | http://swcdn.apple.com/content/downloads/54/18/041-8805/9tglhtxadqtnrro79rsdy4f0mkgu7wg6or/BootCampESD.pkg |
|
MacBookPro9,1 MacBookPro9,2 |
1,058MB, 15 June 2012 | http://swcdn.apple.com/content/downloads/11/05/041-0925/g27es04pw9re5ggrfp3vuf8ew6r53asfz8/BootCampESD.pkg |
|
MacBookPro10,1 MacBookAir5,1 MacBookAir5,2 |
942MB, 15 June 2012 | hhttp://swcdn.apple.com/content/downloads/55/51/041-3891/se4uhpqng48t842cdsosqh28lft54fmswl/BootCampESD.pkg |
|
MacBookAir4,1 MacBookAir4,2 Macmini5,1 Macmini5,2 Macmini5,3 |
676MB, 23 May 2012 | hhttp://swcdn.apple.com/content/downloads/32/33/041-2303/W5jKtsQhhMgMXs3TKhPDqLXrpXyY2HdXMN/BootCampESD.pkg |
|
MacBook2,1 MacBook3,1 MacBook4,1 MacBook5,1 MacBook5,2 MacBook5,3 MacBook6,1 MacBook7,1 MacBookAir1,1 MacBookAir2,1 MacBookAir3,1 MacBookAir3,2 MacBookPro2,1 MacBookPro2,2 MacBookPro3,1 MacBookPro4,1 MacBookPro5,1 MacBookPro5,2 MacBookPro5,3 MacBookPro5,4 MacBookPro5,5 MacBookPro6,1 MacBookPro6,2 MacBookPro7,1 MacBookPro8,1 MacBookPro8,2 MacBookPro8,3 MacPro1,1 MacPro2,1 MacPro3,1 MacPro4,1 MacPro5,1 Macmini2,1 Macmini3,1 Macmini4,1 iMac5,1 iMac6,1 iMac7,1 iMac8,1 iMac9,1 iMac10,1 iMac11,1 iMac11,2 iMac11,3 iMac12,1 iMac12,2 |
632MB, 23 May 2012 | http://swcdn.apple.com/content/downloads/33/54/041-2011/pRtCDYcWShMLxFggy3TzFzmfnnWQNFQBfJ/BootCampESD.pkg |
Finding your ModelIdentifier
If you’re struggling to find your ModelIdentifier then you want the brilliant page at everymac.com which can tell you what model Mac you have based on serial number. On the result page after you submit, look carefully and you’ll the ModelIdentifier.
Still stuck?
If you’re still stuck, then:
- Look through the comments for people with similar problems — there have been a couple of hundred so they cover pretty much everything I can suggest.
- Try my summary of problems/solutions for direct download of bootcamp drivers
References
See BootCampESD.pkg download instructions for references and for the DIY instructions to work out these links yourself.