
Some PC users have reported that when they were trying to scan files or documents with the Windows Fax and Scan applet on their Windows 111 or Windows 10 device, they received the error message No scanners were detected. This post offers the most suitable solutions you can try to successfully resolve this issue.

Windows Fax and Scan not working in Windows 11/10
When you encounter this issue. you’ll receive the following full error message;
Windows Fax and Scan
No scanners were detected. If a scanner is installed, make sure that it is powered on and connected to the computer, and then try again.
For information about adding or troubleshooting scanners, see Help and Support.
The error usually arises when the computer fails to successfully detect a scanner to send or receive a job request. This error is caused by various reasons including the incorrect installation of drivers, the scanner not connected correctly, or problems in wireless connection.
If you’re faced with this issue, you can try our recommended solutions below in no particular order and see if that helps to resolve the issue.
- Check Scanner setup
- Run Hardware and Devices Troubleshooter
- Disable and Re-enable Windows Fax and Scan
- Reconfigure the Scanner
- Update the Scanner Drivers
Let’s take a look at the description of the process involved concerning each of the listed solutions.
1] Check Scanner setup
If you are prompted that Windows 10 Fax and Scan not detecting scanner, there may be something wrong with the setup of your scanner. Therefore, you should carefully check your scanner’s setup, paying attention to the following:
Check the cables and power supply
Make sure that the scanner is powered on, you need to check whether you have plugged the scanner into the power source and then make sure you have turned on the switch button to connect the scanner to the power supply. In addition, plug in the cables correctly and firmly at both ends to enable them to work properly. Also, you can try changing the power cables to eliminate the possibility of faulty power cables.
Check the USB port
Sometimes the cause of this error may lie in the USB port problem. Therefore, when you encounter the issue that no scanners were detected by Windows Fax and Scan, you can try to disconnect the scanner and then plug it into a different USB port to see if it works. Also, you can try changing the USB cable to eliminate the possibility of a faulty USB cable.
After you have done these preliminary checks and the issue is still unresolved, you can try the next solution.
Read: How to install TWAIN driver.
2] Run Hardware and Devices Troubleshooter
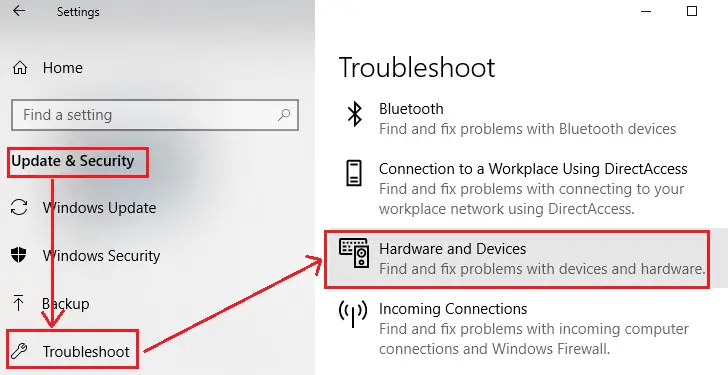
This solution requires you to run the Windows built-in Hardware and Devices troubleshooter to diagnose and fix the issue.
3] Disable and Re-enable Windows Fax and Scan

This solution requires you to disable the Windows Fax and Scan via Windows Features applet, restart your computer and then re-enable it again. This simple operation can resolve the issue.
Do the following:
- Press Windows key + R to invoke the Run dialog.
- In the Run dialog box, type
appwiz.cpland hit Enter to open the Programs and Features applet. - In the windows that opens, on the left side, click the Turn Windows features on or off link.
- In the Windows Features applet, scroll down to look for Print and Document Services and expand it.
- Uncheck the option of Windows Fax and Scan.
- Click OK to save changes and exit.
- Restart your computer to make the changes take effects and then re-enable Windows Fax and Scan by re-checking the box again.
If this doesn’t fix the issue, proceed with the next solution.
Related: Windows Fax and Scan not working in Windows 11
4] Reconfigure the Scanner

This error message primarily means that the scanner isn’t connected to your computer or Windows doesn’t detect a valid online scanner to send the job to. You can try reconfiguring the scanner and see if that resolves the issue.
Follow the below instructions to add the scanner as a new device on your Windows 10 computer.
To begin, make sure that the scanner is powered on during the process, then continue as follows:
- Press Windows key + R to invoke the Run dialog.
- In the Run dialog box, type
controland hit Enter to open Control Panel. - From the top right corner of the window, set the View by option to Large icons or Small icons.
- Select Devices and Printers.
- Click Add a device in the Devices and Printers window. And then it will start searching printers or scanners for you. You’ll see the devices listed in the box.
- Select the printer or scanner you intend to connect.
- Click Next to continue. Windows will start to install the printer or scanner for you, and wait for the process to finish.
Once done, try to connect to your scanner and scan again to see if it works. Otherwise, try the next solution.
5] Update the Scanner Drivers
If all the above methods fail to fix the issue, it’s likely the scanner driver is missing or outdated. In this case, you should try to update the scanner driver in order to fix this issue.
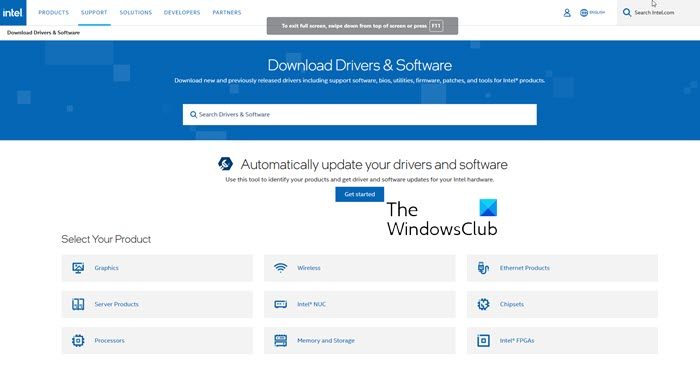
You can either update your drivers manually via the Device Manager, or you can get the driver updates on the Optional Updates section under Windows Update. You can download the latest version of the driver from the manufacturer’s website.
Bear in mind that there are few cases where a newer driver doesn’t work. In that case, download an older version of the driver and install it.
I hope this helps!
Related post: Scanner is not working on Windows.
How do I get Windows to recognize my scanner?
You must ensure your scanner is properly connected to your computer and powered on. Update your scanner drivers via the Device Manager or the manufacturer’s website. Run the Windows Troubleshooter for hardware and devices. If the problem persists, check if the scanner is compatible with your Windows version.
TIP: Suggestions to resolve Scanner problems, troubleshooting tips and solutions here.
Soon after the recent windows 10 version 21H2 upgrade, a number of users report unable to connect to printer and scanners. As the same printer and scanner working properly on PC/Laptop, But after installing the windows 10 21H2 update the System Cannot communicate with the scanner. For some other scanning process stuck, the scanner hangs (not responding ).
Contents
- 1 scanner not working after Windows 10 upgrade
- 2 Fix Cannot communicate with the scanner
- 2.1 Update Driver for the Scanner
- 2.2 Check Windows Image Acquisition service
- 2.3 Repair Corrupted System Files
scanner not working after Windows 10 upgrade
As users shared the following issue on Microsoft forum as : “Using the Canon software for Windows 10 (64bit) I press preview scan and the scanner runs through its cycle and produces a preview, I then press Scan, the scanner gets 28% of the way down the bed and stops. Scanner then hangs and it takes Task manager to end task before I can use it again. This happens with both PCs using the appropriate software and also using the Windows Scan software in Windows 10 and the free version from the App store.”
There is a various reason that causes scanner stop working, but Incompatible Printer/scanner driver is the most common reason behind this problem. especially if the problem started after the windows 10 upgrade them there is change may the driver corrupted or not compatible with the current Windows 10 version. Again printer & scanner USB not connected properly, scanner related service not running, corrupted system files also result “Cannot communicate with the scanner”
Whatever the reason, here some solutions you may apply to Fix Scanner Not Working “Cannot communicate with the scanner” applicable on Windows 10, 8.1 and 7 PC.
First of all, check the USB cable between the Printer & scanner device and your PC properly connected. Also, try to connect on a different USB Port on your system and check the scanner connected or not.
Restart your PC and Printer & scanner device, Also Temporarily Disable Security software (Antivirus) if installed and check scanner working.
Update Driver for the Scanner
As discussed Printer & scanner driver is the most common reason behind this problem “Cannot communicate with the scanner“. So first we recommend to update/reinstall the driver for the scanner or Printer & scanner.
Simply visit Printer & scanner device manufacturer website, Download and save the latest available driver version for your printer and scanner.
Now open control panel, Programs & features ( press Windows + R, type appwiz.cpl and ok ). Here uninstall the current installed printer & scanner driver and restart windows. On the next login install the latest driver ( previously downloaded from manufacturer website ) for your printer and scanner and check printer & scanner working properly. There is no more Error While performing the scanning task.
Check Windows Image Acquisition service
- Press Windows + R, type services.msc and ok to open windows services.
- Here look for Windows Image Acquisition service double click on it to get its properties.
- under the General tab, set the startup type as Automatic and start the service.
- Click Apply and OK to run it.
Note also Check Its Related services are on running state:
Remote procedure Call RPC
DCOM Server Process Luncher
RPC Endpoint Mapper
Shell Hardware Detection
Windows Image Acquisition ( WIA )
Then move to Log On tab, select the local system account and make sure Allow service to interact with desktop is checked.
- Next In the Recovery tab, choose to Restart the Service option from the First failure drop-down box lists.
- That’s all click apply and ok to make save changes and restart your system, On the next login check scanner working properly.
Repair Corrupted System Files
Also, run the System file checker utility to check and make sure faulty or corrupted system files not causing the issue.
- Type cmd on start menu search,
- From search results right-click on the command prompt and select run as administrator.
- Then type command sfc /scannow and hit the enter key to start the scanning process.
This will start the scanning process for corrupted, missing system files if found any the SFC utility will restore them from a special folder located on ” %WinDir%\System32\dllcache ”
Wait until 100% complete the scanning process, after that restart windows and check on the next login scanner working properly.
Note: If Sfc scan results Windows Resource Protection found corrupt files, but it was unable to fix them. Then run DISM command to repair system image and allow SFC to do its job.
Did these solutions help to fix “Scanner Not Working, Cannot communicate with the scanner” on windows 10, 8.1 and 7 Computers? Let us know which option worked for you.
Also Read
- This app is preventing the shutdown of Windows 10
- Fix windows installer service could not be accessed Error On windows 10
- How to repair missing or corrupted system files windows 10
- What is the relationship between internet and network (Network vs. Internet)?
- Solved: Cant print documents, Printer Driver is unavailable in Windows 10
Политика технологической индустрии такова, что 100% рабочее устройство придется выбросить на помойку из-за отсутствия мелочи – драйвера для ОС. Это особенно часто случается со старыми принтерами и сканерами, которые работают десятилетиями и не ломаются. Однако есть простой способ получить драйвер для такого девайса.
Принтер Epson Stylus Color 1160 разрабатывался еще во времена, когда на компьютерах работали Windows 3.1, Windows 95/98, Windows NT, – аппарату сегодня порядка 20 лет. Производитель предоставляет отдельные драйверы вплоть до Windows XP. Официально принтер также поддерживается в Windows Vista и Windows 7, но уже через Windows Update.
Попытка подключить Stylus Color 1160 к Windows 10 х64 закончилась отсутствием драйвера. Но слова производителя о наличии драйвера для Windows Vista х64 и Windows 7 х64 дают надежду.
Чтобы получить драйвер для принтера, скачайте на компьютер Oracle VM Virtual Box. Это виртуальная машина, которая эмулирует отдельный компьютер. Создайте новую виртуальную машину кнопкой «Создать» и введите имя, адрес размещения его файлов и объем доступной оперативной памяти.
Запустите виртуальную машину кнопкой «Запустить» и в появившемся окне укажите путь к ISO-слепку установочного диска Windows. Это должна быть версия ОС, которая имеет драйвер на принтер или сканер.
В случае с Stylus Color 1160 установка Windows 7 х64 оказалась бесполезной – несмотря на информацию на сайте производителя, драйверов эта ОС не нашла. Установка Windows Vista х64 была успешной – ОС нашла драйверы на принтер.
В интернете есть куча программ, которые обещают создать резервную копию драйверов для выбранного устройства. Но они часто делают неполные копии, которые нетрудоспособны. Однако такие программы позволяют узнать адрес размещения файлов драйвера.
В Windows все драйверы находятся в папке C:\Windows\System32\DriverStore\FileRepository\. Найдите среди доступных драйвер. В случае со Stylus Color 1160 его драйвер находится в папке C:\Windows\System32\DriverStore\FileRepository\prnep001.inf_amd64_2a57da8b739ed5f9.
Скопируйте папку на USB-носитель. Чтобы установить этот драйвер в Windows 10, зайдите в «Диспетчер устройств», найдите принтер или сканер без драйвера и нажмите на нем правой кнопкой мыши. Выберите «Обновить драйвер» и укажите папку со скачанным драйвером.
При подключении сканера или МФУ с функциями сканера, многие пользователи сталкиваются с сообщением об ошибке «Для использования этого устройства требуется драйвер WIA. Установите его с установочного компакт-диска или веб-сайта изготовителя и повторите попытку».
Драйвер WIA — это драйвер Windows Image Acquisition, который требуется для того, чтобы графические программы могли взаимодействовать с соответствующими устройствами. В этой инструкции подробно разберем возможные способы решить проблему и скачать драйвер WIA при необходимости.
Для использования этого устройства требуется драйвер WIA — первые действия

Прежде чем пробовать найти в Интернете, где скачать драйвер WIA для вашего принтера/сканера/МФУ, рекомендую выполнить следующие простые действия, которые часто могут решить проблему:
- Откройте службы Windows. В Windows 10 и Windows 11 нажмите клавиши Win+R на клавиатуре (Win — клавиша с эмблемой Windows), введите services.msc и нажмите Enter.
- В списке служб найдите «Служба загрузки изображений Windows (WIA)». Эта служба должна выполняться, а в поле «Тип запуска» установлено «Автоматически».

- Если это не так, дважды нажмите по имени службы, установите тип запуска «Автоматически», примените настройки, а затем нажмите «Запустить» — не исключено, что уже эти действия решат проблему.


Следующее простое действие, которое, если судить по многим отзывам, часто оказывается работоспособным — подключить устройство, которое требует драйвер WIA по USB 2.0 вместо USB 3.0 (как правило, разъемы USB 3.0 синего цвета, а 2.0 — чёрные), иногда может потребоваться последующая переустановка сканера (МФУ). Попробуйте использовать этот вариант — действительно многим помогает.
В случае, если предложенные методы не сработали, служба WIA уже была запущена, а подключение к USB 2.0 не возымело действия, переходим к следующим действиям.
Где скачать драйвер WIA для сканера
Если устройство при установке сообщает, что для его использования требуется драйвер WIA, почти гарантированно он есть на официальном сайте производителя устройства на странице поддержки вашей модели.
Учитывайте: на официальном сайте может отсутствовать драйвер для текущей версии системы. Например, рассматриваемый вопрос часто возникает по поводу МФУ HP LaserJet M1120. Если у вас установлена Windows 10 или Windows 11. Не обращайте внимания, что на официальном сайте есть драйвер только для Windows 8 — он вполне успешно может использоваться и на более новых операционных системах.
Если скачанный драйвер не устанавливается, сообщая о неподдерживаемой операционной системе, вы можете:
- Распаковать файл с установщиком драйвера. Например, для LaserJet M1120 с этим успешно справляется 7-Zip, иногда могут пригодиться утилиты наподобие Universal Extractor. На изображении ниже — скриншот открытого файла установщика драйвера, где мы наблюдаем, в том числе и файлы драйвера WIA (что следует из имени файлов драйверов).

- Установить драйвер вручную из INF-файла.

При возникновении проблем с установкой драйверов, предварительно удалите все имеющиеся драйверы вашего сканера или МФУ и само устройство с помощью диспетчера устройств (может потребоваться включить показ скрытых устройств в меню «Вид» и найти устройство в разделе «Устройства обработки изображений»), а также программы от производителя — HP, Canon, Epson или другого.
На работе пришлось перейти с Windows XP на 10 (Новый системный блок). Для этого сканера нет драйверов под 7-8-10. Пробовал поставить на 7 — не получилось. Пробовал вручную, с ini фай��а, через диспетчер устройств, сам драйвер ставится, но работать не хочет.
Программа, которая ставится с драйвером MiraScan пишет:
Как вы понимаете, сканер подключен, с кабелем проблем нет.
Погуглив в интернете, попробовал программу VueScan. Она вроде как подхватывает сканер, но при нажатии кнопки «Просмотр» или «Сканировать» сканер пару секунд пытается начать сканировать и стопается, а программа зависает.
Если попробовать отсканировать через «Устройства и принтеры», то пишет:
Где его найти, без понятия. Виртуалку ставить для такой цели не хочется.
В общем, если кто сталкивался с такой дичью, напишите пожалуйста. Есть ли варианты решения?
UPD. Все-таки смог победить) Нашел драйвер версии 6.3. Так как многие спрашивают, где его найти, то оставляю ссылку, где можно скачать:
Там есть поддержка 64-битной версии XP. Устанавливаем драйвер и находим в установленной папке Migrate файл scan04.inf, с помощью которого драйвер можно вручную поставить.
Но драйвер без цифровой подписи. Поэтому, чтобы его установить, надо перезагрузить компьютер без проверки цифровой подписи драйверов.
После перезагрузки обновляем драйвер. Идем в Панель управления -> Устройства и принтеры. Нажимаем по нашему сканеру правой кнопкой, выбираем Свойства -> Оборудование -> Свойства -> Драйвер -> Обновить драйвер -> Найти драйверы на этом компьютере -> Выбрать драйвер из списка -> Установить с диска -> и ищем нашу папку с файлом .inf.
Затем выбираем драйвер и он установится.
Перезагружаем компьютер и все должно заработать. Теперь если сканировать без сторонних программ посредством самого сканера, то он не будет говорить, что нет WIA драйверов.
Через сам MiraScan всё также не будет находить устройство, а через VueScan всё также будет зависать. Но мне подсказали в комментариях программу NAPS2. Через нее всё отлично сканирует, можно сразу редактировать изображение, что вполне удобно. Надеюсь ещё кому-то поможет данный метод.