
Please note that drivers will be installed automatically via Windows Update if connected to the internet.
However, click to download the Windows 10, Windows 11 and Windows Server driver installer (setup executable) for ease of installation. This contains both VCP and D2XX drivers.
Refer to our Installation Guides for more information.
For older OS drivers and installers, see ‘No Longer Supported’ section on the VCP or D2xx driver pages.
Drivers are available which allow FTDI devices to work with the following operating systems:
| Windows Certified | Others | Legacy |
|---|---|---|
| Windows 11 (64) | Linux | Windows 8 / 8.1 (32/64) |
| Windows 10 (32/64) | MacOS | Windows 7 (32/64) |
| Windows Server 2022 | Android | Windows Vista (32/64) |
| Windows Server 2025 | Windows XP (32/64) | |
| Windows 2000 | ||
| Windows ME | ||
| Windows 98 | ||
| Windows Server 2016 | ||
| Windows Server 2012 R2 x64 | ||
| Windows Server 2008 R2 x64 | ||
| MAC OS 8/9 | ||
| Windows CE (Version 4.2 and greater) | ||
| Windows RT |
VCP or D2xx Drivers
For most of these operating systems two types of driver are available: Virtual COM Port (VCP) drivers and direct (D2XX) drivers. The VCP driver emulates a standard PC serial port such that the USB device may be communicated with as a standard RS232 device. The D2XX driver allows direct access to a USB device via a DLL interface.
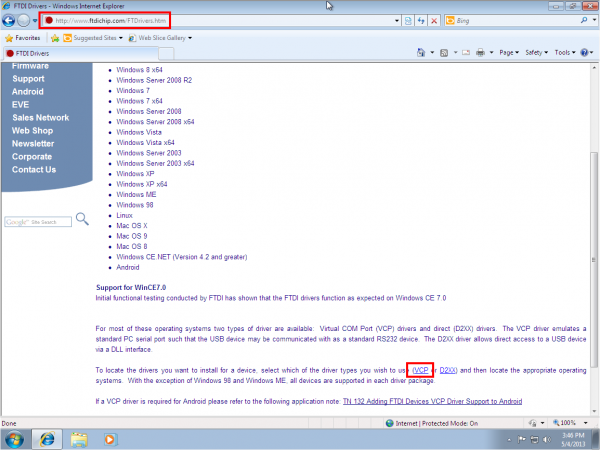
To locate the drivers you want to install for a device, select which of the driver types you wish to use (VCP or D2XX) and then locate the appropriate operating systems.
D3XX
D3XX drivers are only suitable for FTDI’s Superspeed USB bridge services (e.g. FT60x series).
FT4222H
FT4222H requires the D2XX drivers and LibFT4222 library for operation (no VCP).
OS Provided Drivers
FT260 and FT602 use built in OS drivers (no need to install any drivers manually).
Custom Drivers
When editing driver INF files, refer to the following document:AN_107 Advanced Driver Options. Note that for Windows this breaks driver signing. Please contact us for more information.
Как правило, платы Arduino имеют встроенный USB-TTL преобразователь, позволяющий без труда подключить Arduino к компьютеру для загрузки прошивки. Оригинальные Arduino, как правило, используют для этих целей программатор FTDI от Шотландской компании FTDI Chip и в стандартных сборках Windows этот драйвер поставляется вместе с ОС.
Драйверы доступны под огромное количество различных ОС:
- Windows
- Linux
- Mac OS X
- Windows CE 6.0/7.0
- Windows CE 2013
Единственная ОС, которая требует определенных модификация для подключения драйвера FTDI программатора – Android.
Для Windows самой стабильной версией является 2.08.14
Как установить драйвер FTDI на компьютер?
Установка драйвера FTDI FT232RL для Windows производится в несколько простых шагов:
- Скачиваем драйвера по ссылкам выше
- Распаковываем архив с установочными файлами
- Открываем диспетчер устройств
- В диспетчере устройств выбираем неизвестное устройство, кликаем правой кнопкой мыши, в появившемся окне выбираем пункт обновить драйвер
- В появившемся окне выбираем пункт “Выполнить поиск драйверов на этом компьютере”
- Если нужно, то указываем путь к файлам, которые мы извлекли из архива ранее
- Перезагружаем компьютер для корректного обновления данных в реестре
После установки драйвера заново подключаем контроллер и смотрим, чтобы плата корректно отобразилась в списке диспетчера устройств.
Программаторы FTDI в нашем магазине
Смотрите также
Общие сведения:
Эта статья — пошаговая инструкция по установке драйвера USB-UART преобразователя на чипе от FTDI для операционной системы Window 10.
Внимание! Для установки драйверов необходимы права администатора. Зайдите от имени пользователя с правами администратора или попросите администатора компьютера дать повышенные права аккаунту, от имени которого будет производиться установка драйвера.
Драйвер — исполняемая программа-модуль, предоставляющая интерфейсы высокого уровня для управления устройствами на низком уровне.
Шаг 1. Подключение устройства.
Подключите устройство с USB-UART перобразователем к персональному компьютеру. Если компьютер не подключён к сети интернет или на нём не работает Windows Update, то драйвера для USB-UART преобразователя придётся установить вручную.
Шаг 2. Диспетчер устройств.
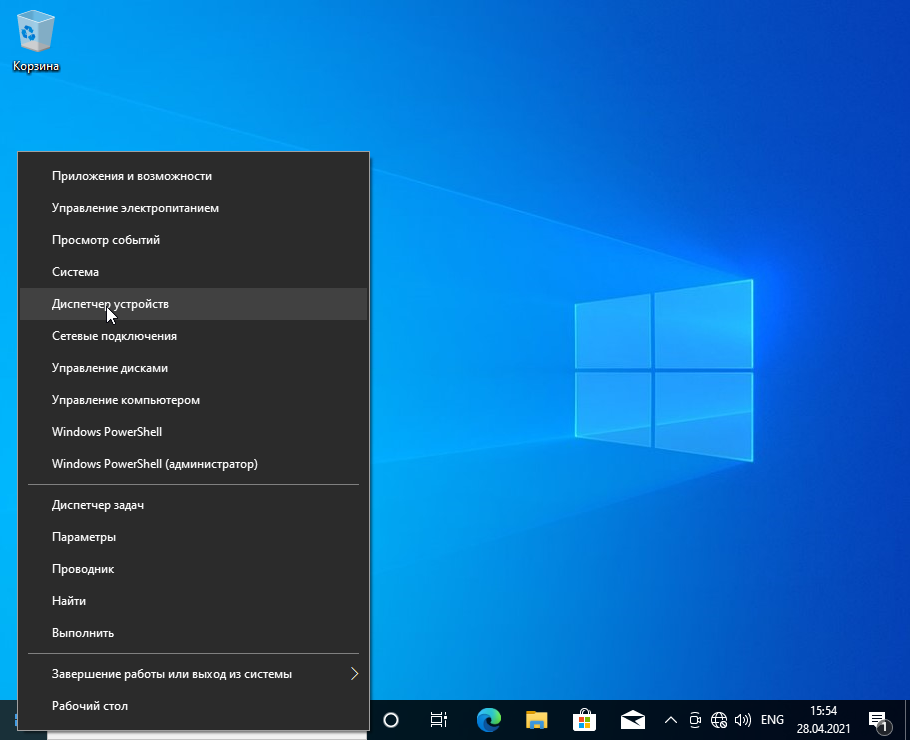
Нажмите правой клавишей мыши на кнопку с логотипом Windows в левом нижнем углу и нажмите на пункт «Диспетчер устройств» в открывшемся меню.
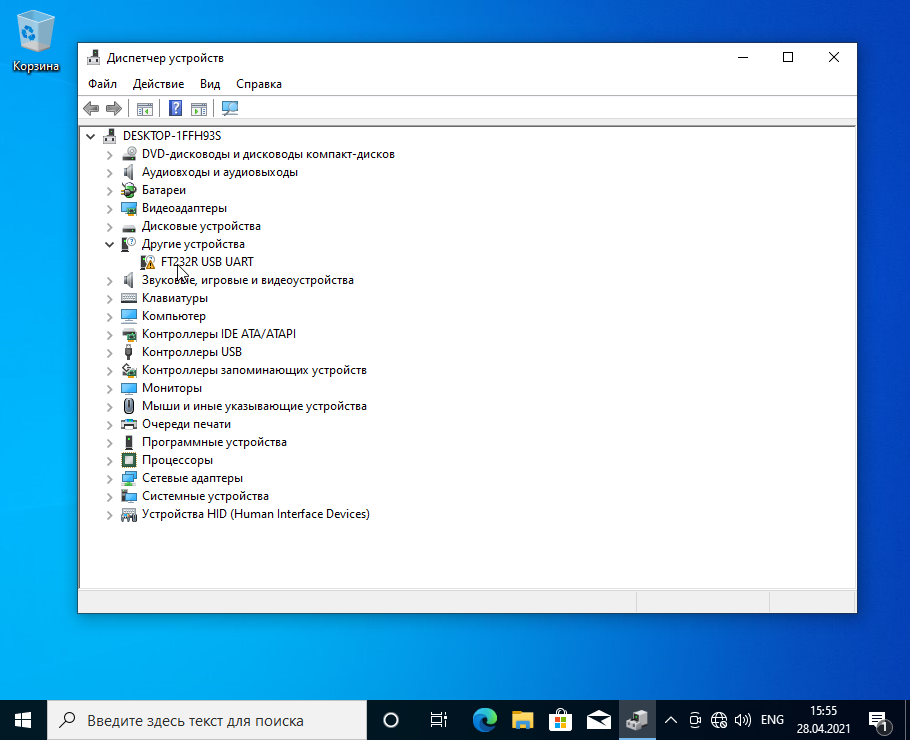
Откроется окно Диспетчера устройств, в нём должен быт пункт «Другие устройства -> FT232R USB UART» с пиктограммой в виде жёлтого треугольника с восклицательным знаком.
Шаг 3. Скачивание драйвера.
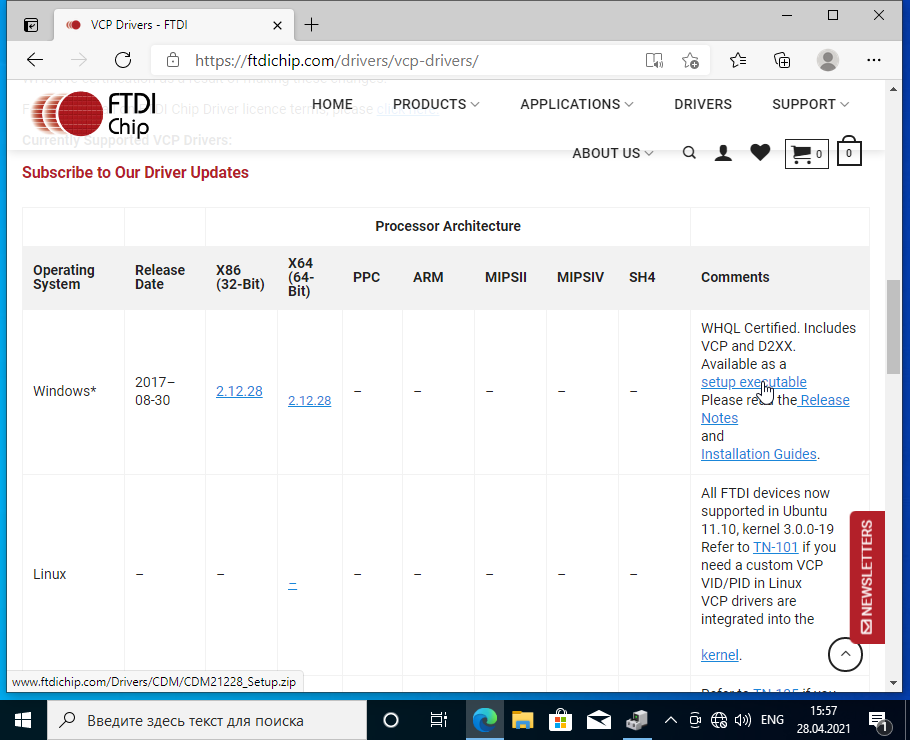
Кликните по ссылке ftdichip.com и проскрольте вниз до таблицы. В ней кликнете на «setup executable» как на рисунке. Начнётся скачивание драйвера. Или скачайте драйвер с нашего сайта, в случае, если сайт производителя по каким-либо причинам не работает.
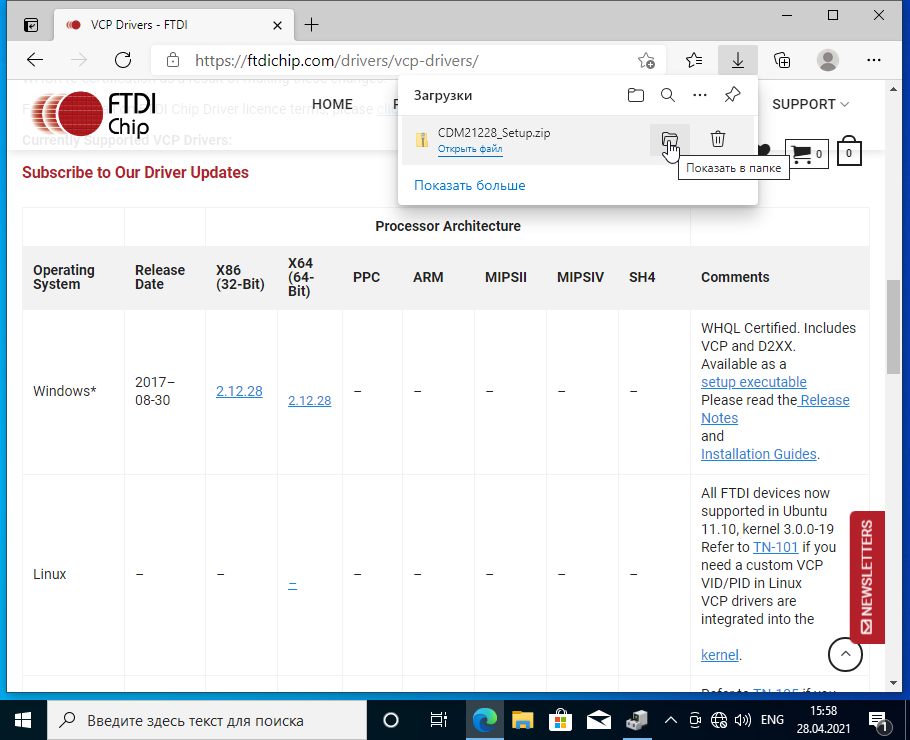
После того как файл скачался, нажмите на иконку «Показать в папке» в окне загрузок.
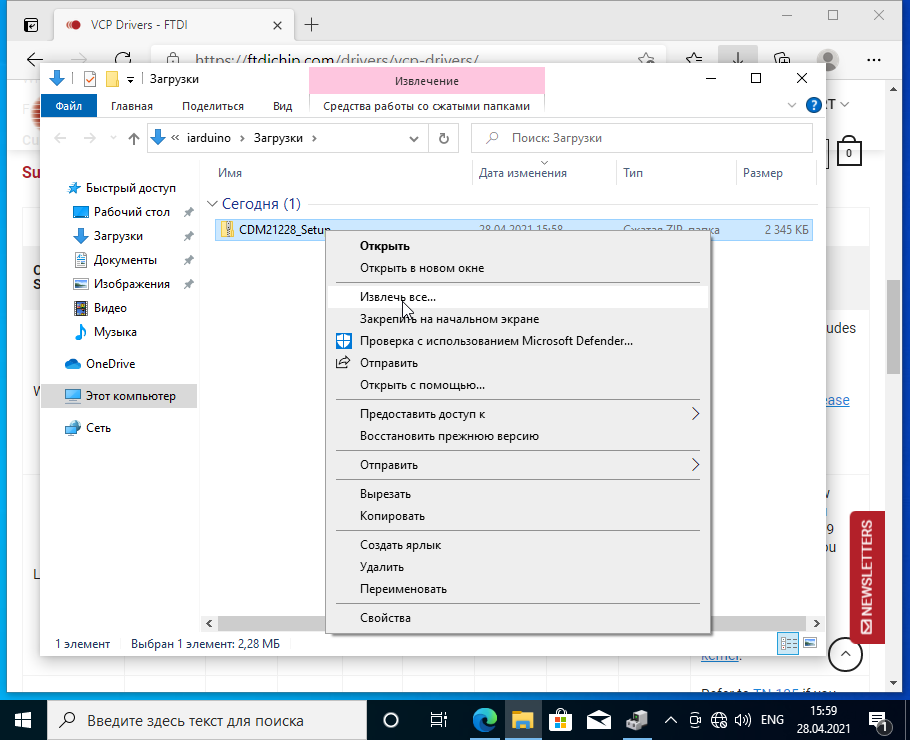
Откроется окно Windows Explorer. Нажмите на только что скачанный файл правой клавишей мыши и выбирите пункт «Извлечь все…» из меню.
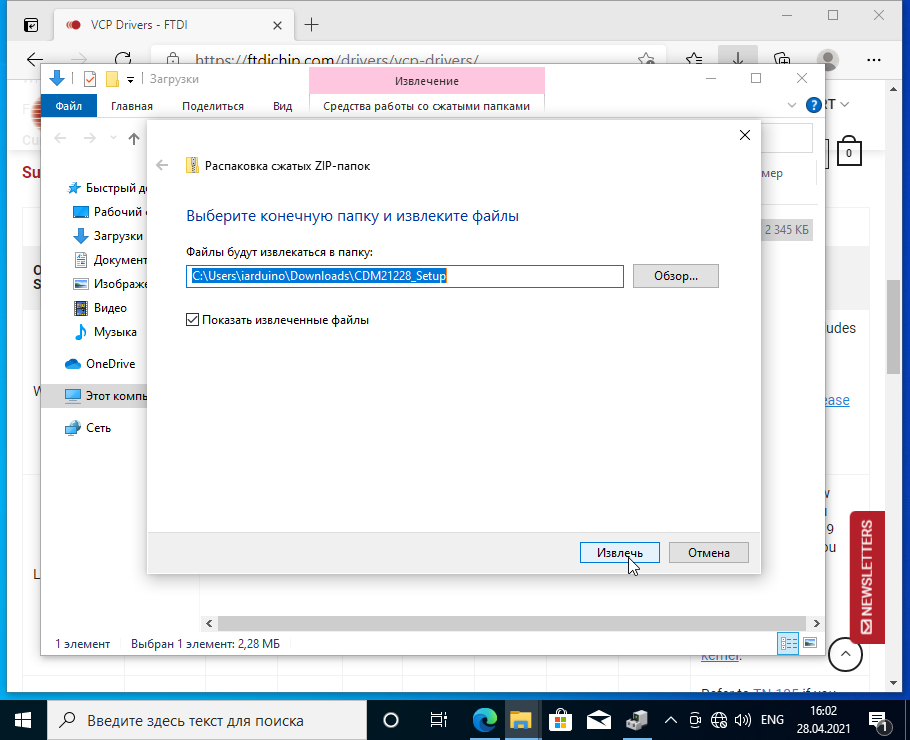
Во вновь открывшемся окне нажмите «Извлечь«. Убедитесь, что стоит галочка слева от фразы «Показать извлечённые файлы».
Шаг 4. Установка драйвера.

После извлечения файлов установщика откроется окно с исполняемым файлом. Запустите его двойным щелчком мыши.
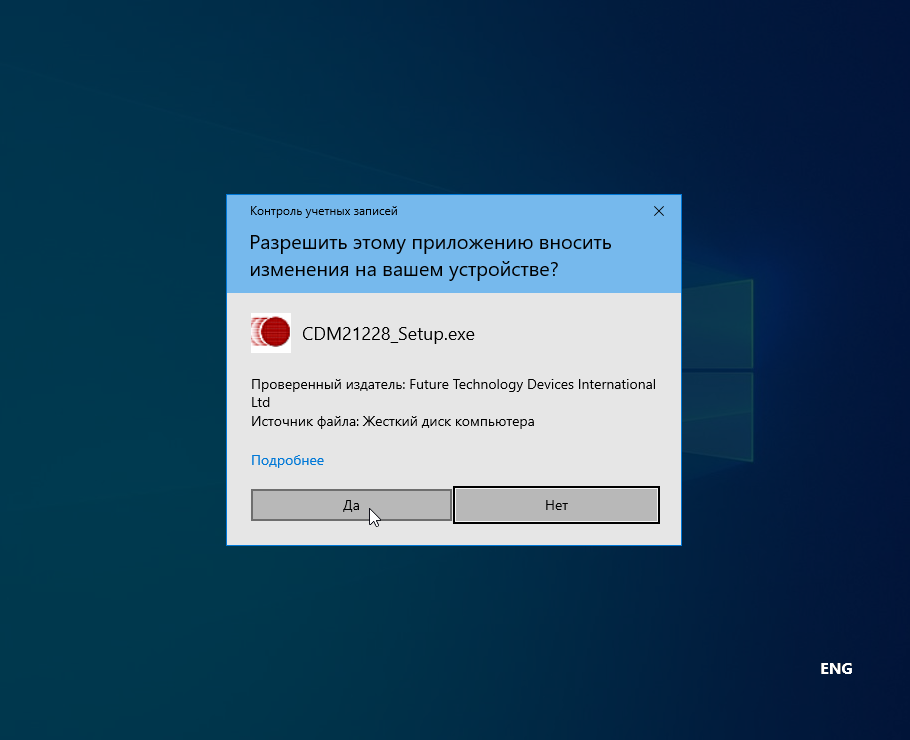
Во вновь открывшемся окне нажмите на кнопку «Да».
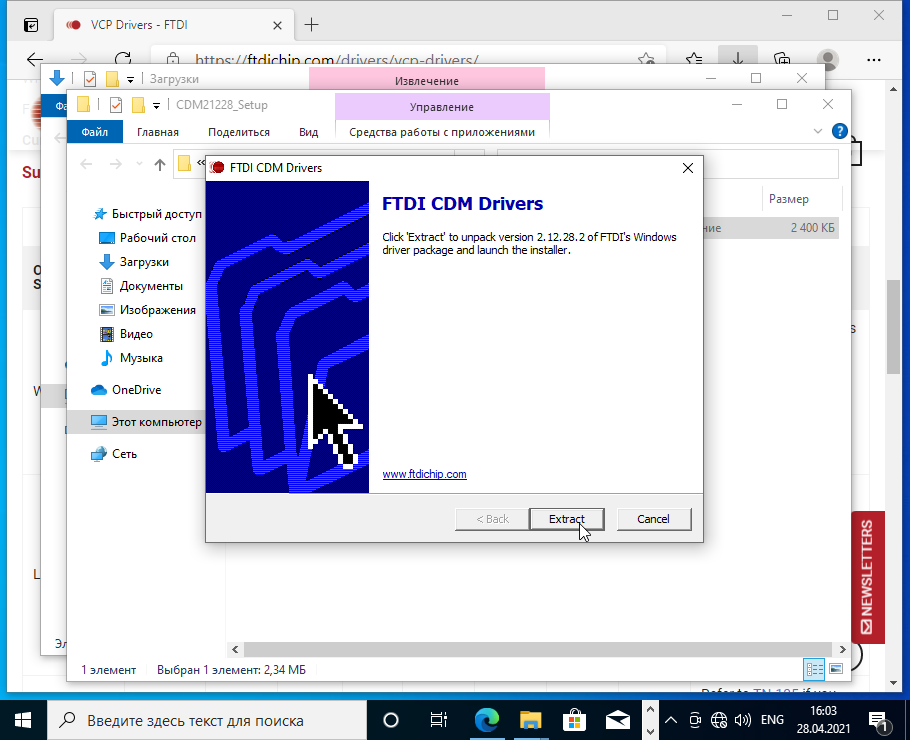
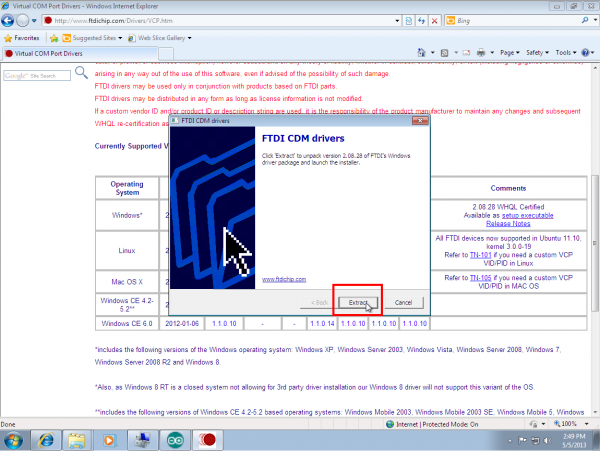
Откроется окно распаковщика. Нажмите «Extract».
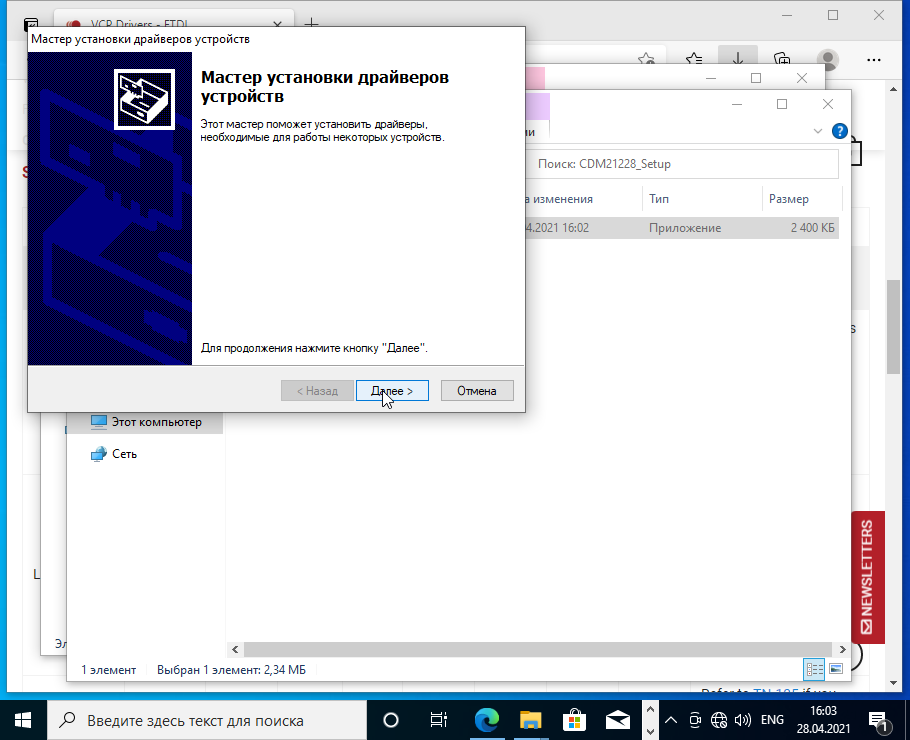
После распаковки установочных файлов автоматически запустится Мастер установки. Нажмите «Далее >»
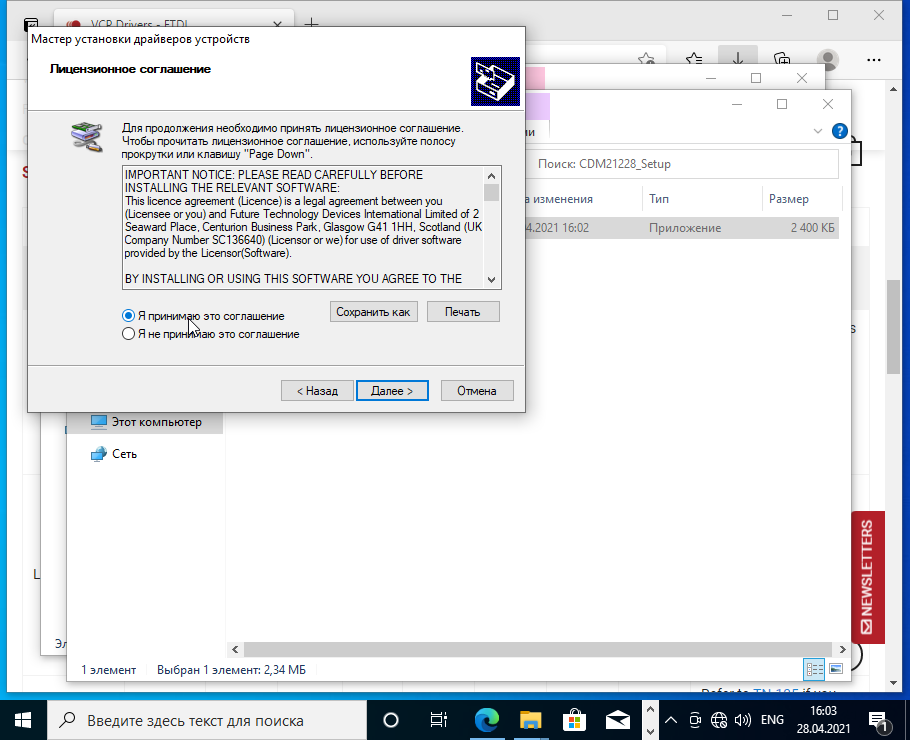
Внимательно прочитайте лицензионное соглашение и кликните на фразу «Я принимаю это соглашение», если Вы с ним согласны.

Нажмите «Далее».
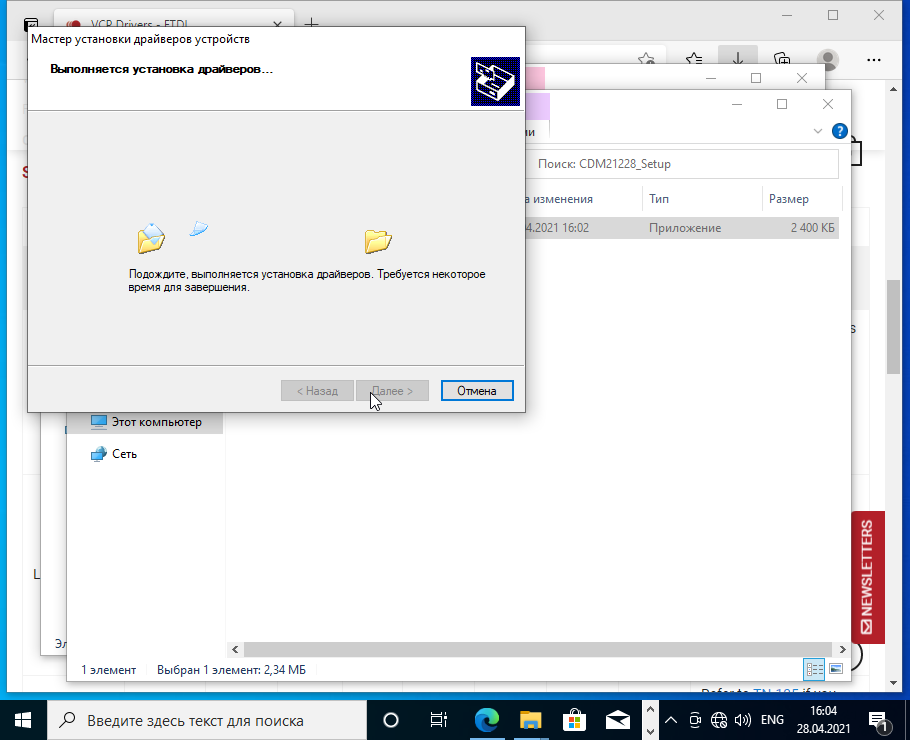
Начнётся процесс установки.
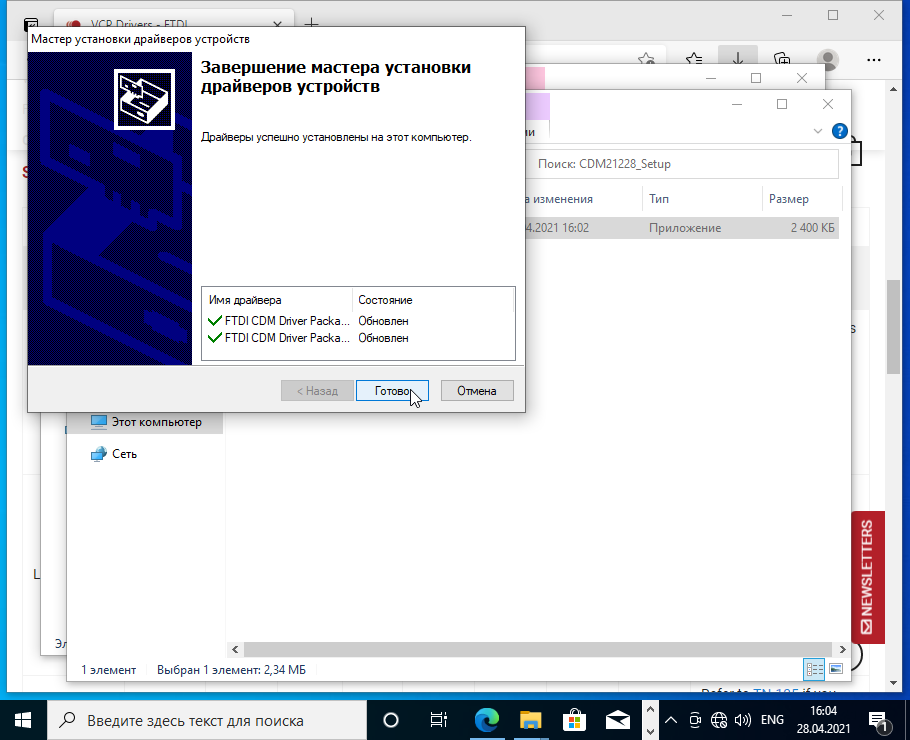
После завершения установки нажмите «Готово».
Шаг 5. Проверка.

После установки драйвера откройте Arduino IDE и убедитесь, что появился новый виртуальный COM-порт.
Introduction
In this tutorial, we’ll show you how to install FTDI drivers on multiple operating systems. Although this tutorial was written using Windows 7, Mac OS X 10.6, and Ubuntu 13.04, the process should be very similar, if not exactly the same, for other versions/variations of these operating systems.
Suggested Reading
Before you begin this tutorial, you should have the Arduino IDE installed on your computer. Check out our Installing Arduino tutorial for a step by step guide.
Here are some other tutorials and concepts you may want to familiarize yourself with before reading this tutorial:
- What is an Arduino?
- Serial Communication
- RS-232 vs TTL Serial Communication
- Logic Levels
- Connector Basics
Alright, let’s get to work! You can visit the next section to learn more about the FTDI Basic and why you need the FTDI drivers, or you can skip straight to the operating system of your choice!
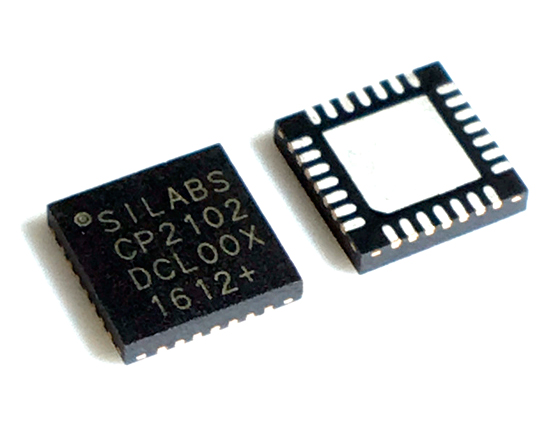
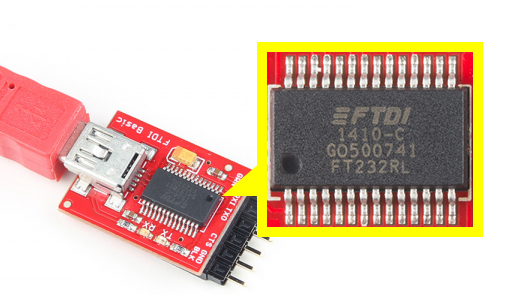
Meet the FT232RL
The FT232RL is one of the more commonly used ICs used to convert USB signals to UART signals. This process is very handy in that it allows you communicate with and upload code to an Arduino or other microcontroller without the need for an external programmer. SparkFun carries a board called the FTDI Basic that conveniently breaks out the necessary pins on the FT232RL to perform these actions.
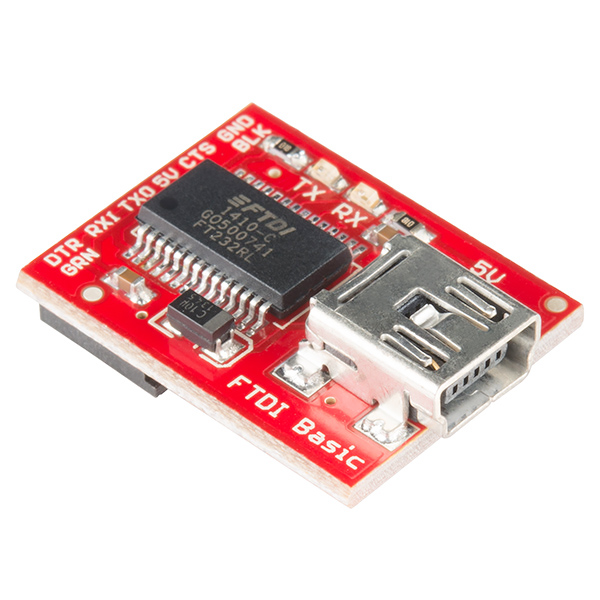
SparkFun’s 5V FTDI Basic. Notice the IC—FT232RL.
There are a few different flavors of the FTDI Basic:
If you are using a 5 volt device, you will need the 5 volt FTDI. If you have a 3.3 volt device, you guessed it, use a 3.3 volt FTDI. LilyPad boards all operate on 3.3V.
We also carry a complete breakout board for the FT232RL should you need access to more pins than the FTDI Basic provides.

Here is a list of some SparkFun products that require the use of an FTDI Basic, come with an FTDI Basic, or have an FT232RL chip on board:
- RedBoard
- Arduino Pro 5V and 3.3V
- Arduino Pro Mini 5V and 3.3V
- Mega Pro 5V and 3.3V
- Mega Pro Mini
- LilyPad Main Board
- LilyPad Simple Board
- Arduino FIO
- Protosnap — Pro Mini
- Protosnap — LilyPad Development Board
- Protosnap — LilyPad Development Board Simple
There are also some legacy Arduino boards that use the FT232RL. The Arduino Diecimila and Duemilanove main boards along with the original Arduino Mega all use the FT232RL IC. If you have one of these older versions, you’ll want to use the FDTI drivers as well. For a complete list of all Arduino boards, check out this page. Newer versions of Arduino boards, such as the Uno, use a different communication IC, and they will not be covered in this tutorial.
Now that you know why the FTDI Basic is important and what products it is used for, let’s learn how to install the drivers.
Windows — Quick and Easy
Note: The screen shots in this tutorial are from Windows 7. The process should be very similar for other versions of Windows.
For most late versions of windows, such as 8.1 through Windows 10, the hardware may work fine without any driver install. If you can’t locate a COM port for your hardware, then the set of instructions below is the possible fix.
The exception to this is Windows 8. For instructions on how to disable device driver signatures, [please visit this tutorial](https://learn.sparkfun.com/tutorials/disabling-driver-signature-on-windows-8).
Note for Educators: You will most likely need to obtain administrative privileges from your network or IT administrator in order to install these drivers.
-
By default, windows does not have FTDI drivers installed. If you plug in your FTDI, open the Arduino IDE, go to ‘Tools -> Serial Ports’, and see nothing, you need the drivers! Let’s go get them!

-
Download a copy of the v2.12.28 FTDI VCP Driver Executable here:
Windows FTDI VCP Driver Executable — v2.12.28 (CDM21228_Setup.exe)
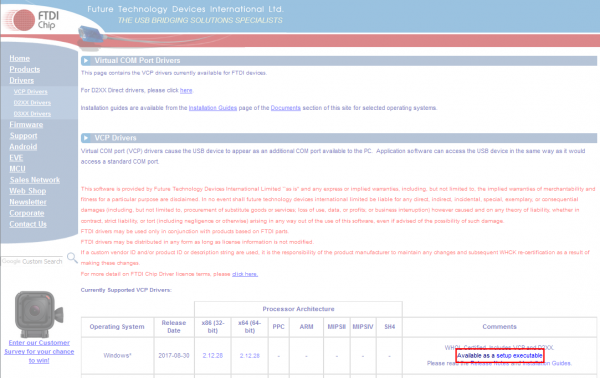
Otherwise, visit FTDI’s VCP Drivers page for the latest download of the Windows FTDI Driver executable and clicking on the Window’s «Available as a setup executable» link. Make sure to unzip the executable before proceeding to the next step.
-
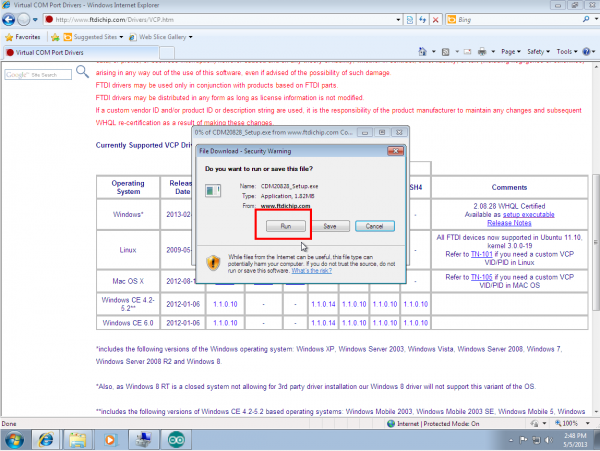
Choose ‘Run’ once it is has finished downloading, or find the file you just downloaded «CDM21228_Setup.exe» and double-click it to run it.
Note: At the time of this tutorial, the images were referencing the old “v2.12.00” FTDI VCP driver executable. The installation process will be the same regardless of the version number.
-
Choose ‘Extract’ and continue through the installation until it finishes.
-
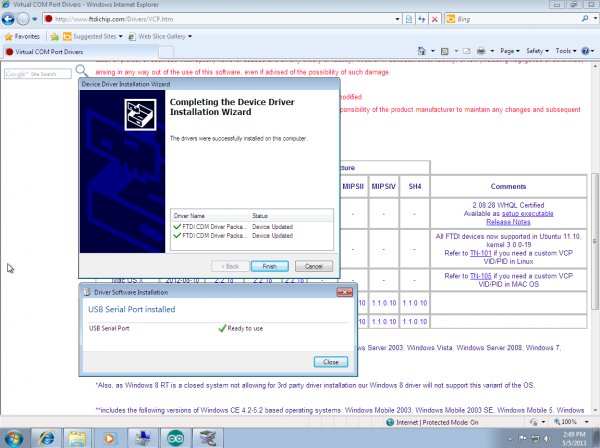
If everything was successful, you should see some nice green check marks, indicating success!
Note: You may need administrator privileges on your machine in order for this to run properly. If things didn’t work out, try the next section of this tutorial: Windows — In Depth.
-
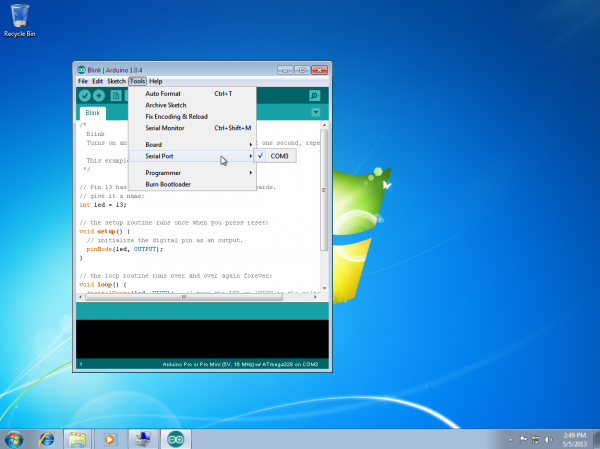
Open up the Arduino IDE, and go to ‘Tools -> Serial Port’. If you now have a COM port, congratulations! Again, if something went wrong, either retry this tutorial or give Windows — In Depth a try!

Windows — In Depth
Note: The screen shots in this tutorial are from Windows 7. The process should be very similar for other versions of Windows.
Note for Educators: You will most likely need to obtain administrative privileges from your network or IT administrator in order to install these drivers.
-
Plug in your FTDI using a USB cable. Windows doesn’t have the correct drivers, so let’s find them!
-
Navigate to the FTDI website, and choose the ‘VCP’ (Virtual Com Port) option near the bottom.
-
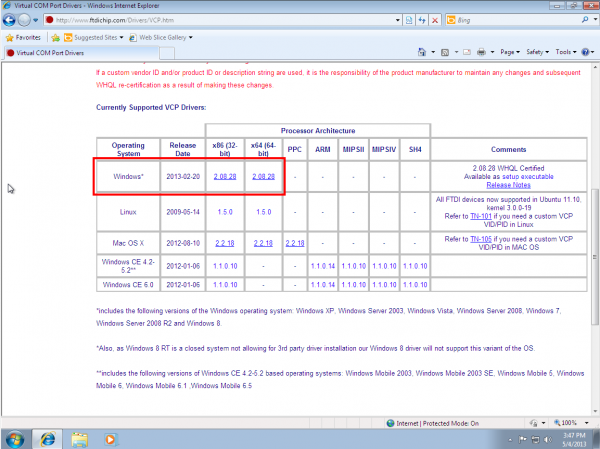
Now choose either the 32 bit version or the 64 bit version. Not sure which you have? The next steps will go over how to find that information. If you already know which version you are running, you may skip the next two steps.
-
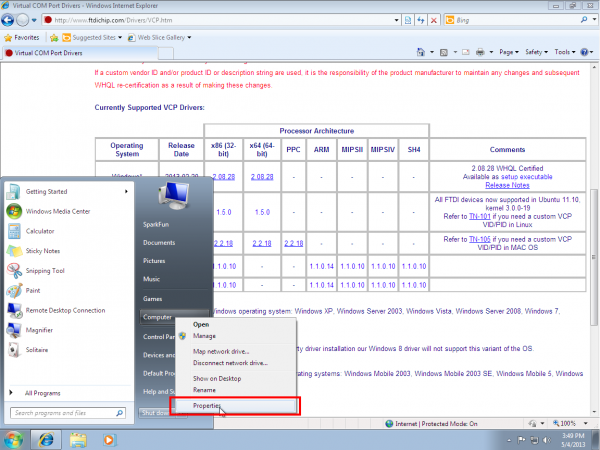
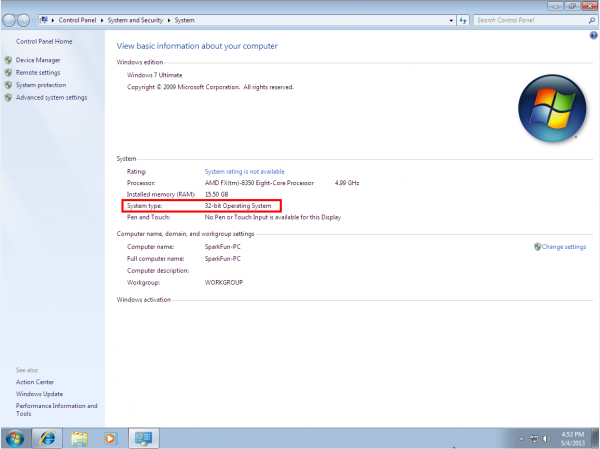
Open the start menu, right-click on ‘Computer,’ and left-click on ‘Properties’.
-
Look under ‘System type,’ to see which version you have.
-
Now go back to the FTDI site, right-click on the correct version, and save it to your computer. Remember where the files are saved. We’ll need them in the next step.
-
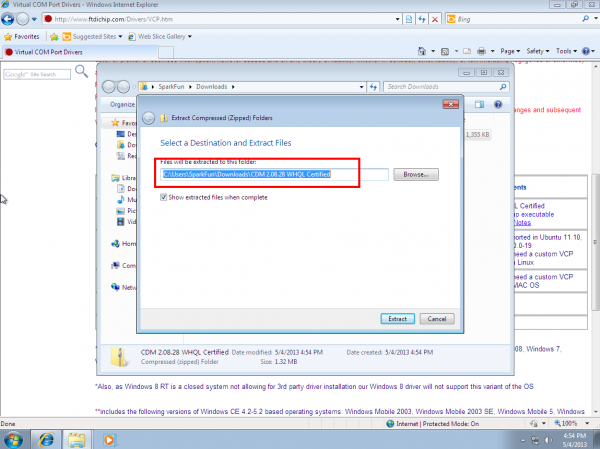
Navigate to the folder containing the files. They will be inside of a .zip file, so you’ll need to extract them. Right-Click on the .zip file, and choose ‘Extract All…’ When the next window appears, as shown above, pay attention to where it is extracting the files. Make sure that ‘Show extracted files when complete’ is checked, and click ‘Extract’.
-
When the extraction is complete, the folder is opened. Again, take note of this folder location. This is the one containing the drivers.
-
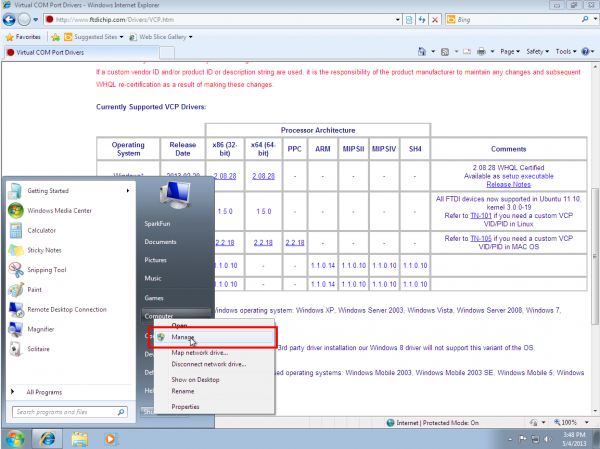
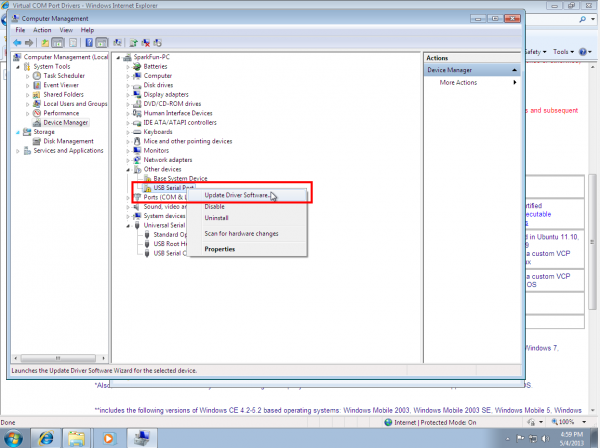
We’re almost there! Open the start menu, right-click on ‘Computer’, and left-click on ‘Manage’. You will need administrator rights to do this. If you aren’t an administrator on your computer, talk to the person who is and have them enter their credentials.
-
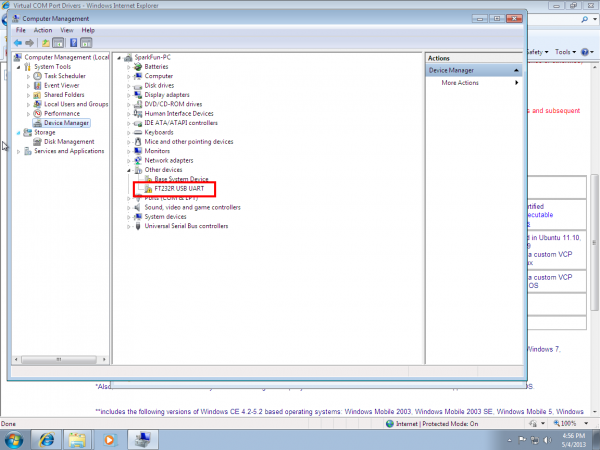
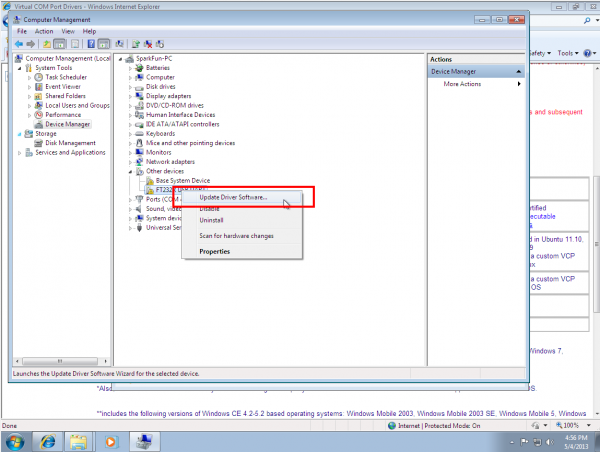
Left-click on ‘Device Manager’ in the leftmost column. Here is where we see the offending hardware. It has an exclamation mark next to it.
-
Right-click on ‘FT232R USB UART,’ and left-click ‘Update Driver Software…’
-
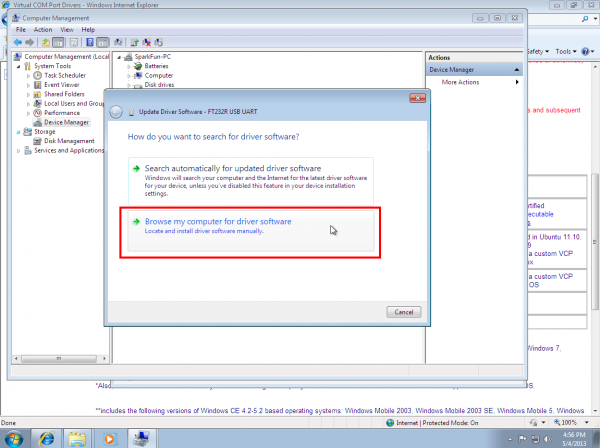
Now choose ‘Browse my computer for driver software’.
-
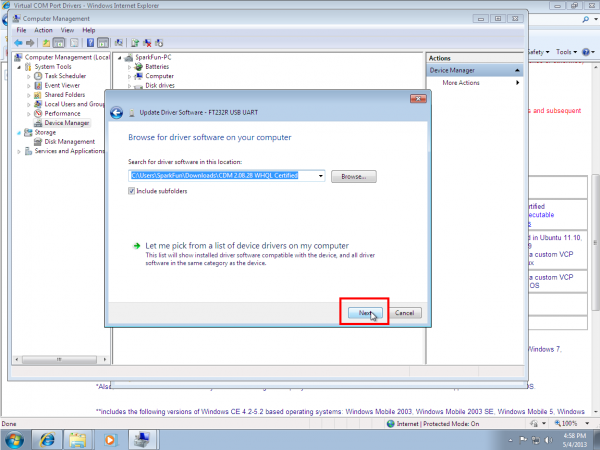
Left-click ‘Browse,’ and navigate to the location of the extracted files. Choose the extracted folder. There is no need to search any further in the folder. Then left-click ‘OK’.
-
Make sure ‘Include subfolders’ is checked (very important!), and left-click ‘Next’.
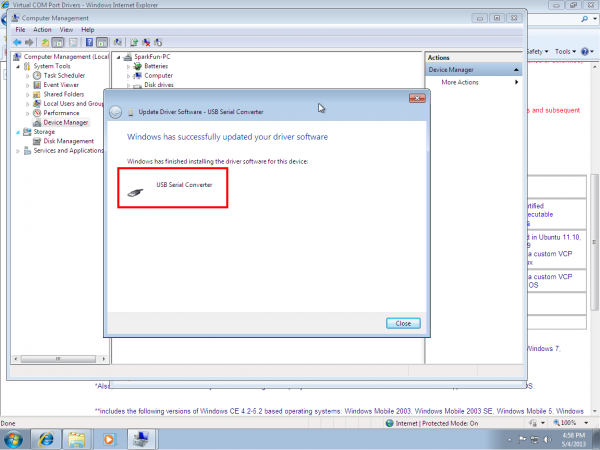
-
After a moment, you will see a success message! Left-click ‘Close’.
-
The Device Manager page will refresh and you will see a new item with an exclamation mark named ‘USB Serial Port’. You will need to install a second driver for the same device. Follow the steps 1-15, as before, and use the same driver folder too!
-
Once those steps are complete, you will see another success message! Left-click ‘Close’.
-
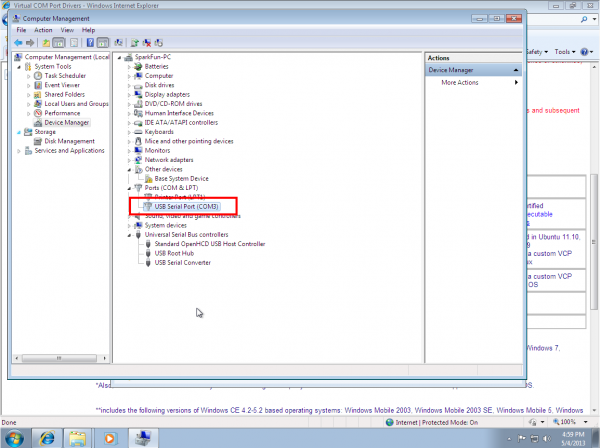
The Device Manager Page will refresh again and show ‘USB Serial Port (COMxx),’ where xx = some number. Congratulations, you now have the proper FTDI drivers and can begin to use your device!


Mac
Notice: The screen shots in this tutorial are from OS X 10.6. The process should be very similar, if not exactly the same, for other versions of Mac OS X. If you are on OS X 10.10 Yosemite, follow along to install the drivers. If you need to install drivers on Yosemite, please visit the bottom of this section. Most people will be using the VCP drivers and not the D2XX drivers.
Note for Educators: You will most likely need to obtain administrative privileges from your network or IT administrator in order to install these drivers.
-
Most of the time, when you install Arduino on Mac OS X, the drivers are installed automatically. However, if there was a problem with the installation and you don’t see any options that include ‘usbserial’ under the ‘Tools -> Serial Port’ menu, then you will need to install the drivers. You may also need to install the full FTDI drivers if you are running OSX 10.10 or later. The factory drivers are not complete.
-
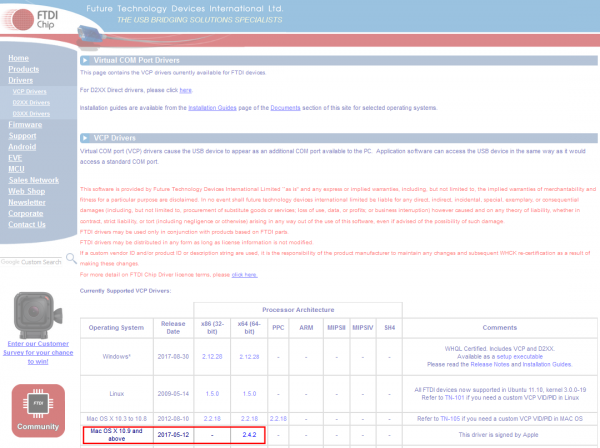
a.) OS X 10.9 (Mavericks) or above: Download this driver. Locate the file FTDIUSBSerialDriver_v2_4.2.dmg file that was downloaded to your computer, and double click on it to open \ run it.
You may need to visit FTDI’s VCP Drivers page for the latest download of the Mac OS X FTDI Driver. Click on the link for the «Mac OS X 10.9 and above» driver’s version. The image below shows version 2.4.2 so you would need to click on **2.4.2* to download the latest driver. If there is an update to the drivers by FTDI, the version number will change but it should be in the same location on the table.
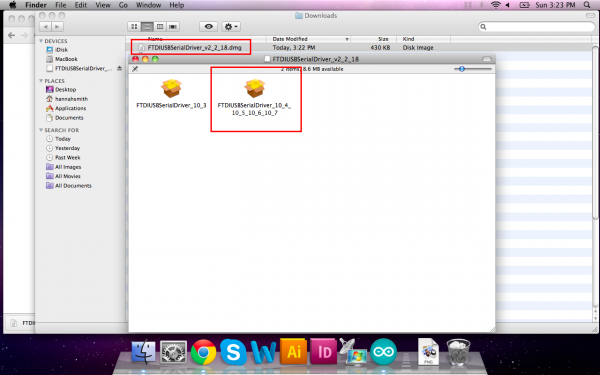
b.) OS X 10.8 (Mountain Lion) or lower: Download this driver. Locate the file FTDIUSBSerialDriver_v2_2_18.dmg file that was downloaded to your computer, and double click on it to open \ run it.
If you are using the driver for OS X 10.8 (Mountain Lion) or older, you will see two files. Open up the driver file that corresponds with your operating system. For most users, it will be the second file:
-
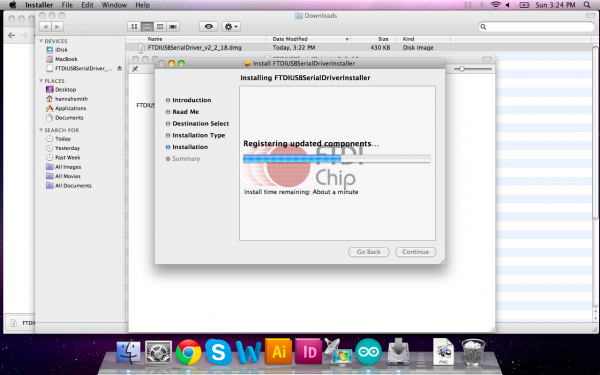
Continue through the installation, and wait for it to finish. Then click ‘Close.’
-
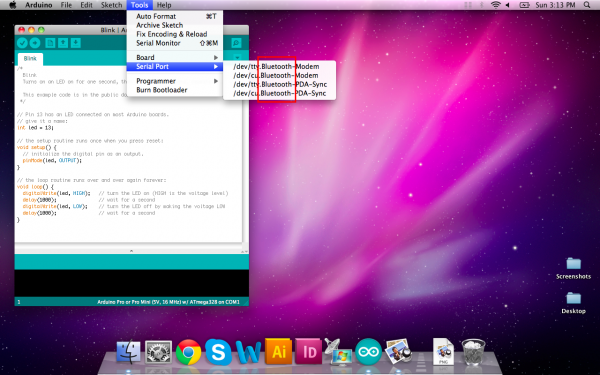
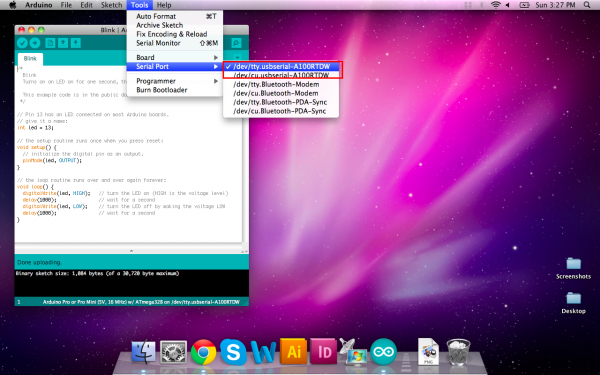
Now open the Arduino IDE. Under ‘Tools -> Serial Port’ you will now see a ‘usbserial’ option. Congratulations, you’re all set!
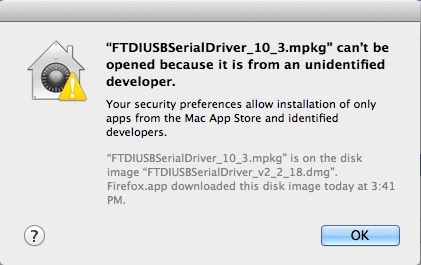
Troubleshooting: Unidentified Developer Error
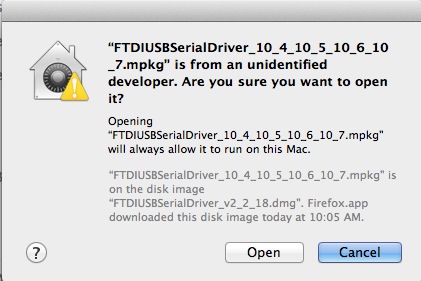
On newer versions of OS X, when you double-click the install packages inside the FTDI disk image, you may be presented with a very Windows-esque type error about not being able to open the files because they are not from an identified developers. This is very similar to the unsigned driver issue in Windows 8.
Quick Fix
To get around this, simply right-click the package you want to install, or press CTRL + click, if you don’t have a right-click. Then select open from the menu.
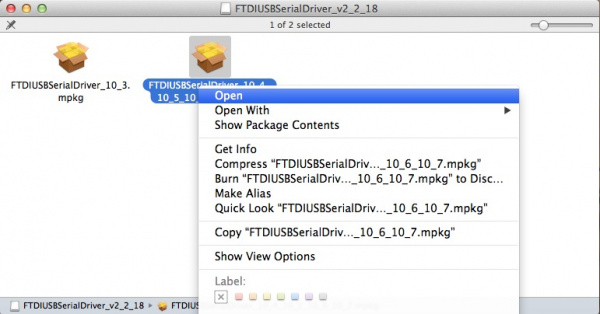
You will then be given another window asking if you are certain. Click Open, and proceed with the installation as stated above.
In-Depth Fix
For a more permanent fix, you can follow these instructions. **However, this method is not suggested as it leaves your computer vulnerable. **
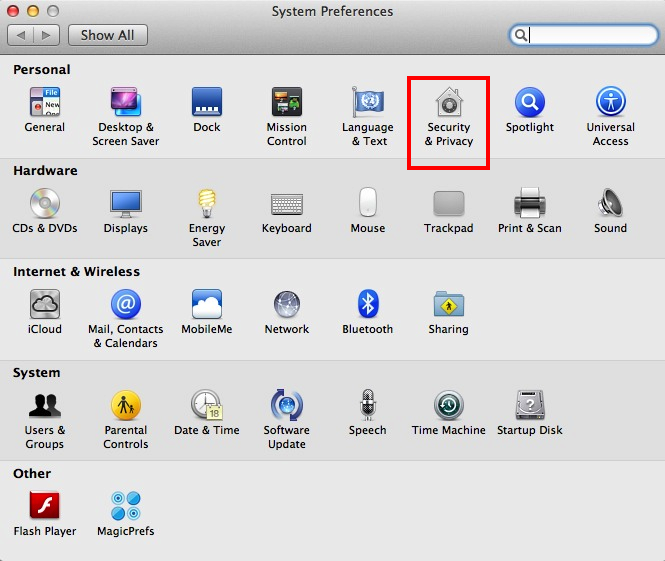
Open your System Preferences.
Once open, click the Security & Privacy icon.
Under the General tab, you should see a section about allowing the running of downloaded applications from specific sources. In preveious version of OS X, the default was set to Anywhere. However, the defualt setting is now Mac App Store and identified developers.
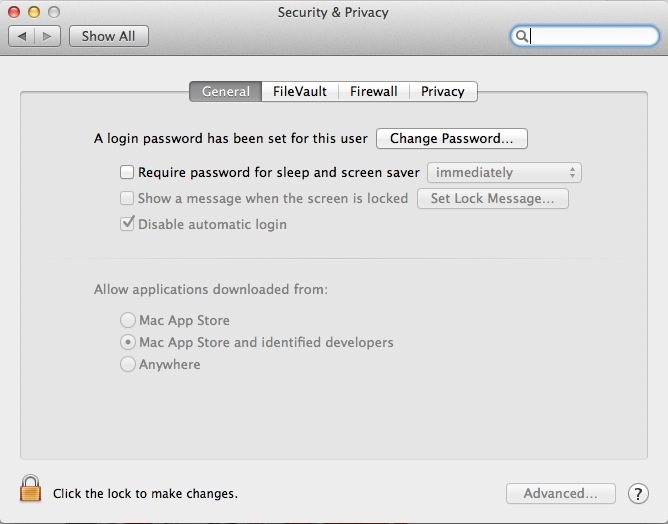
To use the FTDI drivers, you’ll need to set this back to Anywhere. First, you may need to click on the little lock icon and enter your admin password to make these changes.
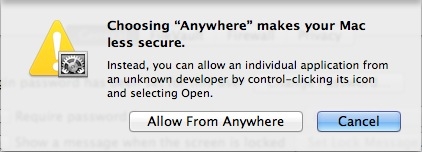
Once unlocked, click the Anywhere option. Another obnoxious window may appear asking you if you’re sure you want to allow this. Click Allow from Anywhere. Or, you can follow the directions in this window, if you don’t want to make your Mac «less secure.»
You should now be able to install the FTDI drivers.

Troubleshooting: FTDI Drivers and OS X Yosemite
With Mac OS 10.9 (Mavericks) and later, Apple has built their own version of the FTDI VCP driver into the operating system (AN134). However, there seems to be some conflict between drivers from FTDIchip.com and the ones inherent to Apple. Luckily, there is a solution to this problem, and it comes from FTDI directly.
Quick Fix
If you are trying to use the FTDI VCP Driver in your applications, it will not work due to a conflict between the VCP and D2XX drivers. In order to get around this, the Apple supplied Driver must be uninstalled. Plug in the FTDI device in question, and type the following command in a Terminal window:
sudo kextunload –b com.apple.driver.AppleUSBFTDI <ret>
In-Depth Fix
If the above doesn’t work, you may have better luck using this script from FTDI.
Clicking on this file will bring up the Script Editor on all Macs. The script can be run by clicking on the run icon (black triangle). Again, make sure your FTDI device is connected.
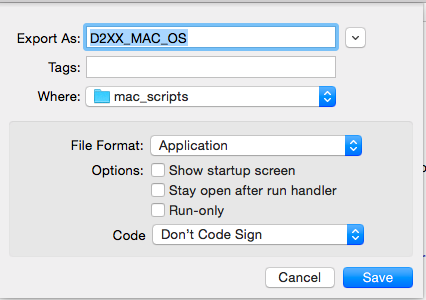
You can make this script into a clickable icon by exporting the script as an application. In the Script Editor, select Export… from the File pull down menu:
In the Export dialog, select Application as the File Format. You can choose any name for the application.
You should now have an automated Apple Script icon to use on your Mac. With the Apple supplied Drivers uninstalled, you may return to the top of this section and install the FTDI VCP Driver as needed. Repeat this process for any other FTDI devices you are using. You may need to repeat this every time you restart your computer.
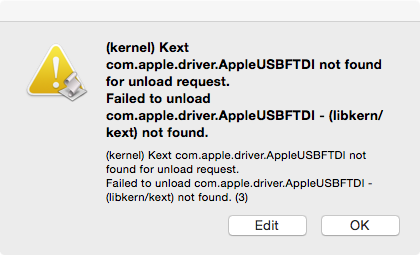
Troubleshooting: No FTDI Driver Installed
If you receive this error, it means that the driver has been uninstalled already, and you will need to install the FTDI VCP Driver, as stated above.
Linux
Note: The screen shot in this tutorial is from Ubuntu 13.04. The process should be very similar, if not exactly the same, for other versions/variations of this operating system.
Note: You will most likely need to obtain administrative privileges from your network or IT administrator in order to install these drivers.
-
Plug in the FTDI device to a USB cable.
-
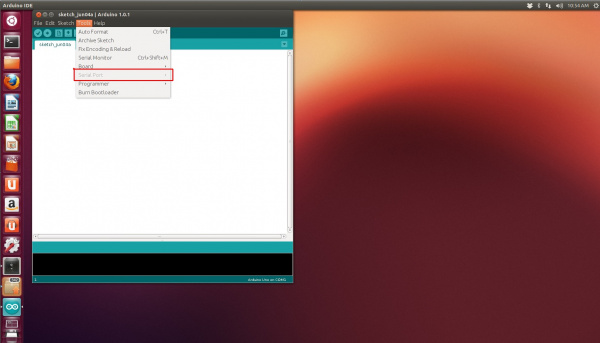
When you download the Arduino IDE in Linux, the download comes with the FTDI drivers bundled with the IDE. However, if you just open Arduino from the desktop, you’ll notice that, if you click on ‘Tools’, the ‘Serial Port’ option is grayed out.
-
Linux includes the drivers necessary to use Arduino, and no additional install is needed. However, permissions might need to be configured. For current instructions on how to set up these permissions, visit this page.
An alternative method is to run Arduino as root in the terminal with the following command:
sudo arduinoHowever, this method is encouraged only if you know what you are doing and should only be used as a last resort. You will also need to enter your administrative password to run as root.
-
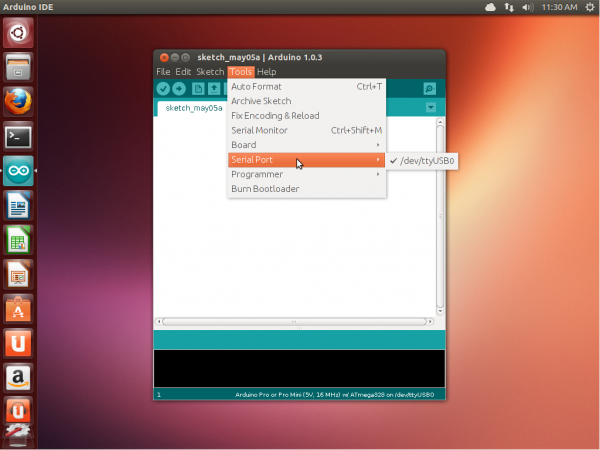
Arduino should open, and this time the ‘Serial Port’ menu is available.
-
The FTDI device will show up under this menu. It should be named /dev/ttyUSB0. The number may vary depending on how many USB devices you have plugged into your computer. That’s all.
Resources and Going Further
Now that you’ve successfully got your FTDI up and running, it’s time to incorporate it into your own project!
For more hardware specifications, check out the resource below:
For more information about the drivers, check out the resources below:
- In-depth FTDI Installation Guides — In-depth guides to install an FTDI for any OS.
- Latest FTDI Virtual COM PORT (VCP) Drivers — The latest VCP Drivers found on FTDI’s website.
- SparkFun’s USB Serial Driver Quick Install Tutorial — A condensed version of our «How to Install FTDI Drivers» tutorial.
Check out these tutorials to dive even deeper into the world of microcontrollers!
- Installing an Arduino Library — How do I install a custom Arduino library? It’s easy!
- Learn how to use a breadboard to interface your Arduino with circuits built by you.
- Learn the basics of e-textiles with this great tutorial
Or check out this blog post for more ideas.
FT232RL FTDI USB to TTL serial converter modules are used for general serial applications and popularly used for communication to and from microcontroller development boards such as ESP-01s and Arduino micros, which do not have USB interfaces to computer via a USB mini port and for flashing STM32 bootloader.
The FT232RL IC is used to convert USB signals to UART signals which facilitates communication with and upload code to microcontrollers like Arduino, STM32 and ESP-01 without the need for an external programmer.
FT232RL FTDI Hardware overview
The FTDI USB to TTL serial converter module is a Universal Asynchronous Receiver-Transmitter (UART) board used for TTL serial communication. It is a breakout board for the FTDI FT232R chip with a USB interface, can use 3.3 or 5 V DC and has Tx/Rx and other breakout points.
The module has a mini-B USB port which is used to connect to a USB port of an interfaced device like a computer.
It has a 3.3/5V DC selection jumper and supplies 500 mA through its VCC pin.
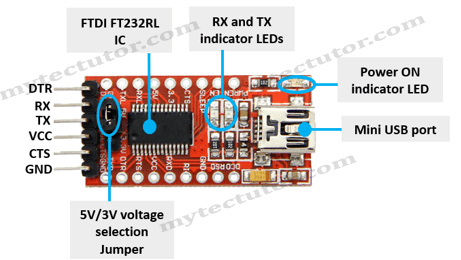
The FTDI USB to TTL serial converter module has 6 male header pins which are breadboard friendly and 18 through-hole connectors.
- DTR – Data Terminal Ready (Output used for flow control)
- RX – Serial Data Receive
- TX – Serial Data Transmit
- VCC – Power Input
- CTS – Clear to send (Input used for flow control)
- GND – Ground
Pins RX, TX, VCC and GND are connected to the corresponding pins of the microcontroller with RX connected to TX and TX to RX.
There are TX and RX indicator LEDs and you can actually see serial traffic using these LEDs which helps to verify if the board is working.
The DTR pin is connected to the reset pin of the microcontroller, which will trigger an auto-reset signal after a sketch is uploaded.
Flow control is used to indicate to the other end of the connection that it is safe to send data. It is always recommended to use hardware flow control for UART communication. This means that in addition to the RXD and TXD data pins, the FT232RL FTDI module has two more pins used to indicate when it is safe to send data from each side. These pins are known as Data Terminal Ready (DTR) and Clear To Send (CTS).
The DTR pin allows a target to auto-reset when a new Sketch is downloaded. This is a really nice feature to have and allows a sketch to be downloaded without having to hit the reset button. This board will auto reset any board that has the reset pin brought out to a 6-pin connector.
Apart from being a USB to serial UART, it has an integrated EEPROM and an internal clock generator operating at 6MHz, 12MHz, 24MHz and 48MHz that can be used to drive a microcontroller or external logic.
Checking whether FTDI drivers are installed on Windows.
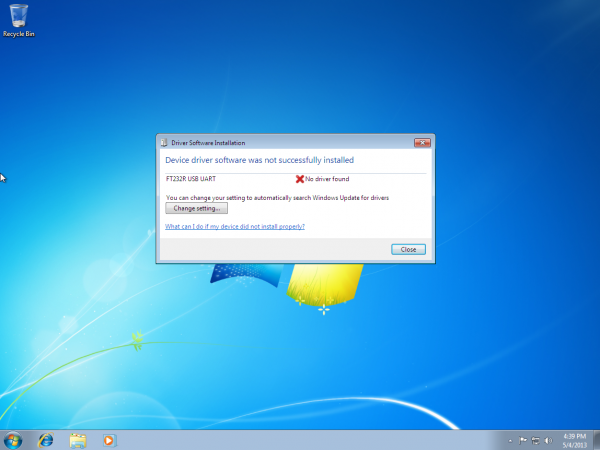
If FTDI drivers are not installed and you plug the FTDI module in a computer, you may get the “USB device not recognized” error message and if you check in Device Manger, the FTDI module will appear with a danger symbol as shown below.
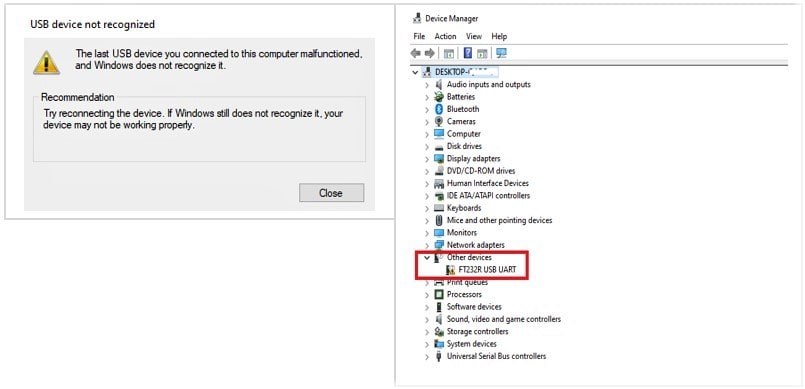
These errors can also occur if the FTDI drivers are installed by corrupted. In both situations you need to install or update the drivers.
Using Arduino IDE.
Plug the FTDI module in one of your computer’s USB ports and open Arduino IDE.
Go to Tools > Serial Ports and if the FTDI drivers are not installed, you will not be able to select COM port in the Arduino IDE.
Installing FTDI Drivers on Windows 10.
By default, Windows Operating system does not come with FTDI drivers. However, these drivers are needed by some devices to register the FTDI USB to TTL serial converter module to be able to appear as a COM port. This allows application software to access the module in the same way as it would access a standard COM port.
- First you need to download the FTDI drivers for example v2.12.36.4 FTDI VCP driver executable file that I have provided for Windows 64-bit system. Alternatively, you can download FTDI VCP drivers from ftdichip website where you can get drivers for various operating systems.
- Unzip the downloaded file and run the installer by double clicking on the unzipped file