
Last updated: January 12, 2023
These drivers are only needed for ADB and fast boot commands. If you just want to access files over USB you won’t need to install these drivers!
Since Windows 8 does not allow the installation of unsigned drivers please see here on how to disable the driver signature verification check. For installation on a Unix based OS click here.
Install on Windows 7 or older
- Download Setup from the link below
- If you have the Nautiz plugged into your PC, unplug it now.
- Run the exe as administrator Right-click > Run as administrator.

- Click Next to start the installation.

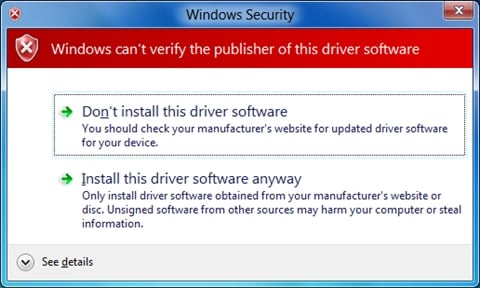
- When asked, select Install this driver software anyway.

- Close the installation dialog by clicking Finish.
- Plug in the Nautiz now.
- The Nautiz will now show up when using the ADB (eg ADB devices)


Install on Windows 8
To install the drivers on Windows 8 you’ll have to disable the driver signature verification check. Follow the steps below to do that.
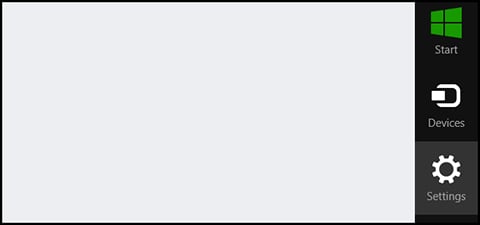
- Press the Win + C keyboard combination to bring up the Charms Bar, then click on the Settings Charm.

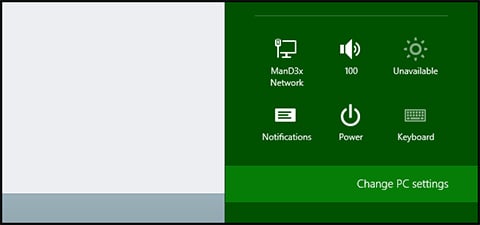
- We need to head into the Modern Control Panel, so go ahead and click on the Change PC settings link.
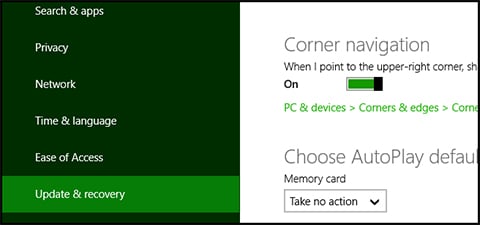
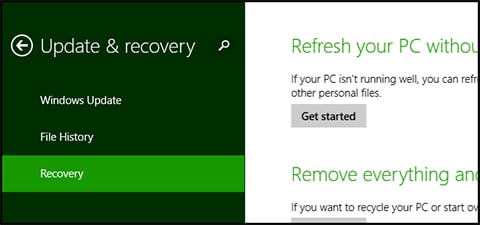
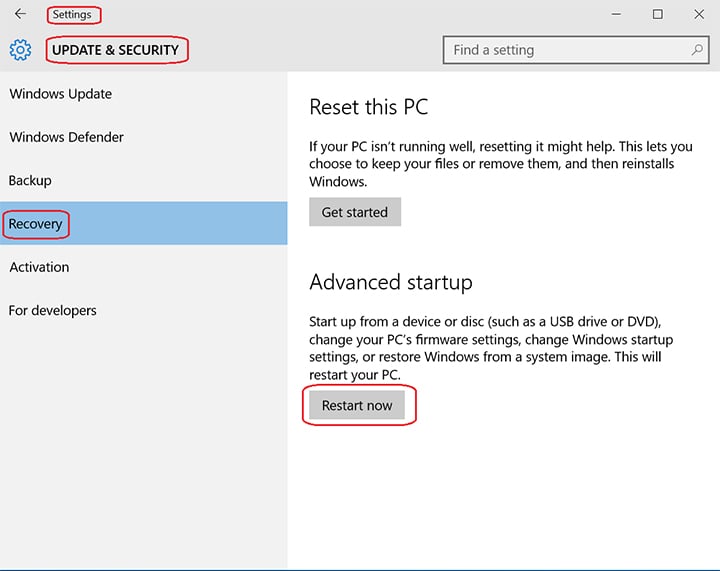
- When the Control Panel opens, switch over to the Update & recovery section.
- Then click on the Recovery option on the left-hand side.
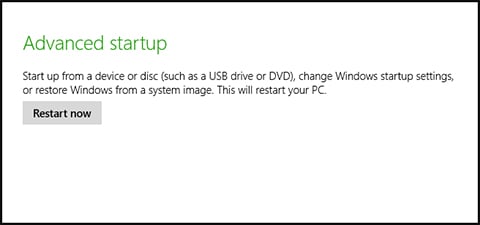
- Once selected, you will see an advanced startup section appear on the right-hand side. You will need to click on the Restart now button.
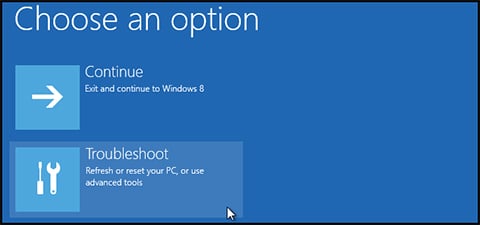
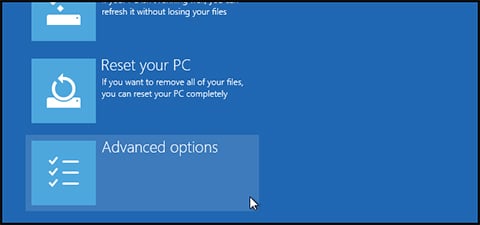
- Once your computer has rebooted you will need to choose the Troubleshoot option.
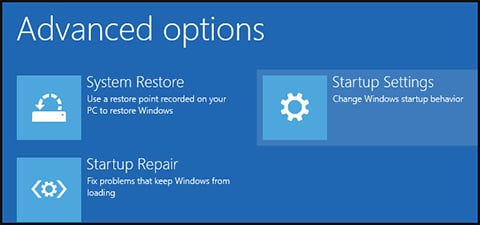
- Then head into Advanced options.
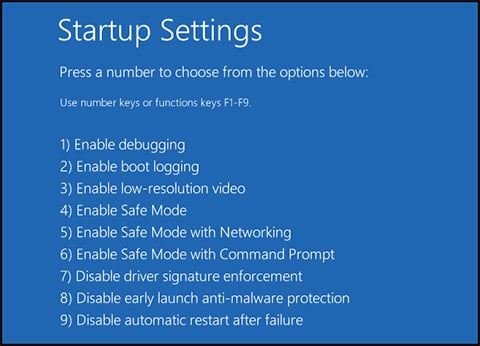
- Then Startup Settings.
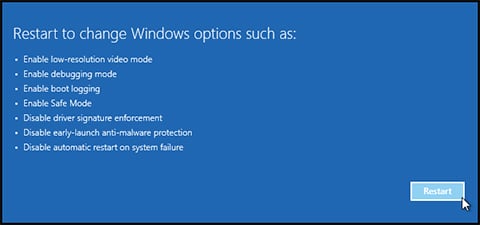
- Since we are modifying boot time configuration settings, you will need to restart your Computer one last time.
- Finally, you will be given a list of startup settings that you can change. The one we are looking for is Disable driver signature enforcement. To choose the setting, you will need to press the F7 key.

- That’s all there is to it. Your PC will then reboot and you will be able to install unsigned drivers. You can now continue with the installation like on a Windows 7 PC.


Install on Windows 10
To install the drivers on Windows 10 you’ll have to disable the driver signature verification check. Follow the steps below to do that:
- Go to Settings > Update & Security > Recovery and press button Restart now.

- Once your Computer has rebooted you will need to choose the Troubleshoot option.
- Then head into Advanced options.
- Then Startup Settings.
- Since we are modifying boot time configuration settings, you will need to restart your Computer one last time.
- Finally, you will be given a list of startup settings that you can change. The one we are looking for is Disable driver signature enforcement. To choose the setting, you will need to press the F7 key.
- That’s all there is to it! Your PC will then reboot and you will be able to install unsigned drivers. You can now continue with the installation like on a Windows 7 PC.


Unix and Linux
- Install the device and ADB as described in the Android Developer documents.
- For ADB to recognize the Nautiz X4 and X8, you have to manually add a new Vendor ID (0x2A48 and ) to the ~/.android/adb_usb.ini file. You can do so by running echo “0x2A48” >> ~/.android/adb_usb.ini in a Terminal
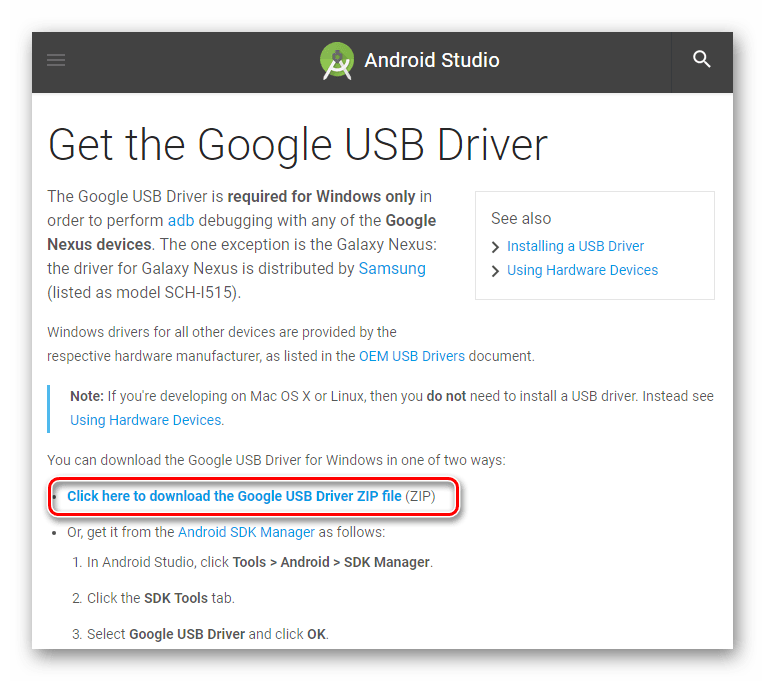
Downloads
Was this article helpful?
Yes
No
These are instructions on how to install Android ADB Driver on Windows Computer (this method can be used on Windows 7, Windows 8, 8.1, 10 and Windows 11).
Requirements: You need to have the Windows Computer and the Android ADB Driver (.inf based) to follow the below guidelines.
Install Android ADB Driver (.inf) manually
- Download and extract Android ADB Driver (.inf based) on the Computer. If in case, you have already downloaded and extracted the driver, then SKIP this step.
- Open Device Manager on the Computer. Press Win + R key from the keyboard and type devmgmt.msc and Click on OK Button:
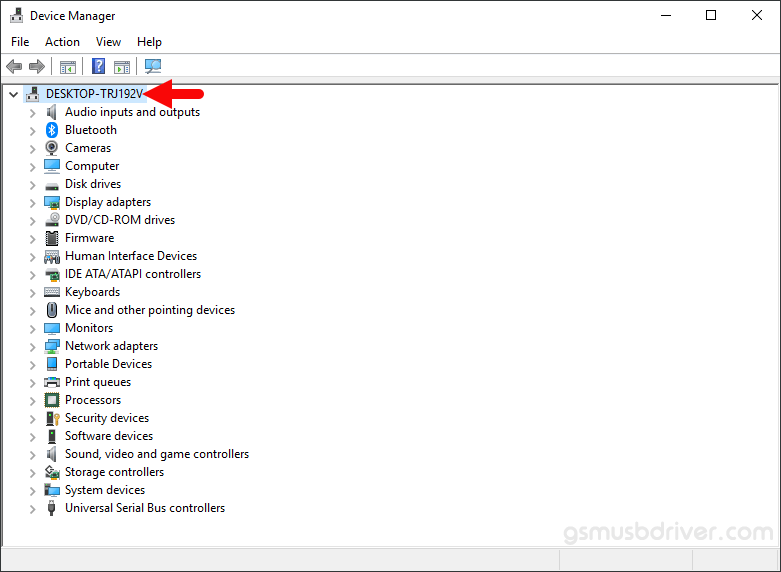
- Once the Device Manager is Launched, Click on the Computer Name (name can vary from the image below):
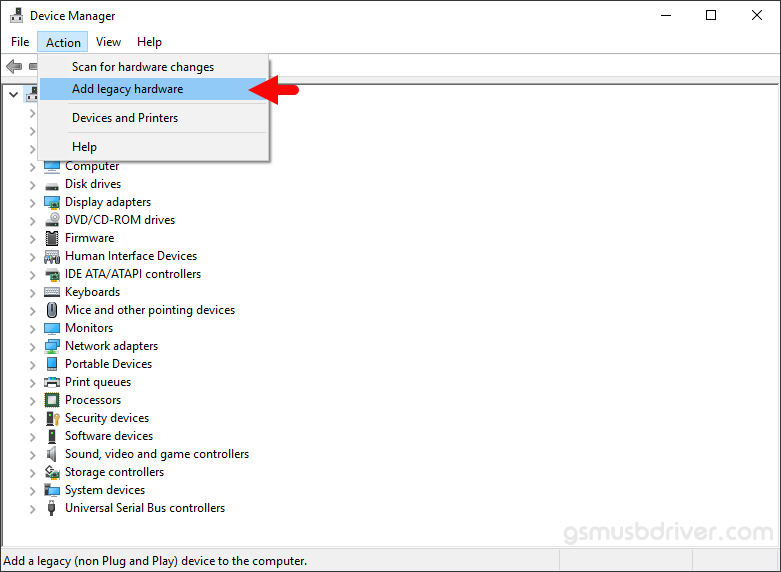
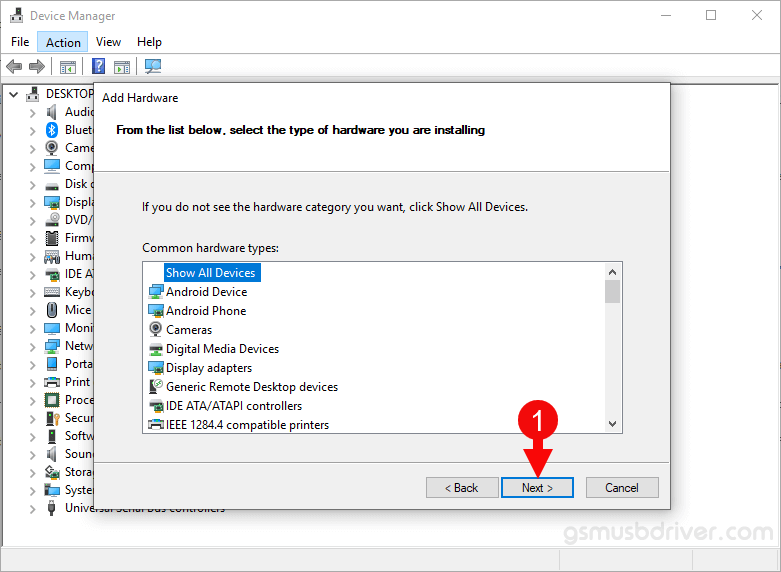
- Click on the Action Menu and Select Add Legacy Hardware option:
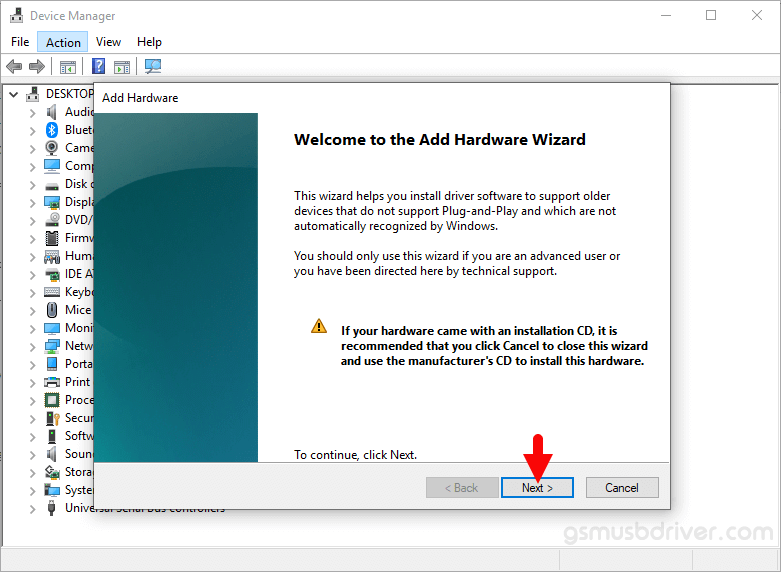
- Under Add hardware Dialog Box, Click on the Next Button:
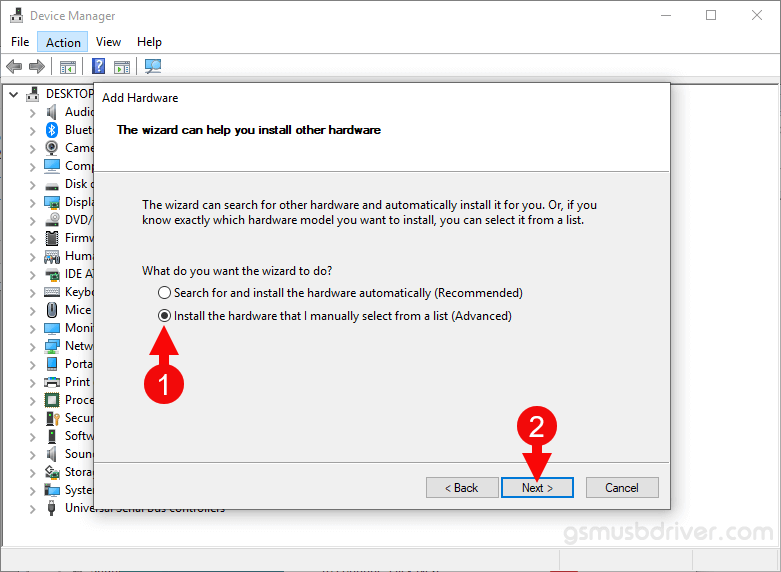
- Tick on the Install the hardware that I manually select from a list checkbox and Click on the Next Button:
- Click on the Next Button:
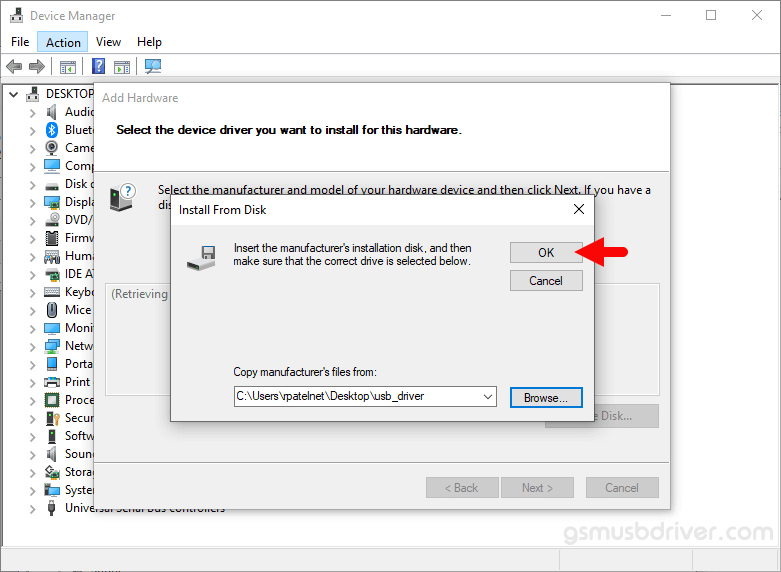
- Click on the Browse Button:
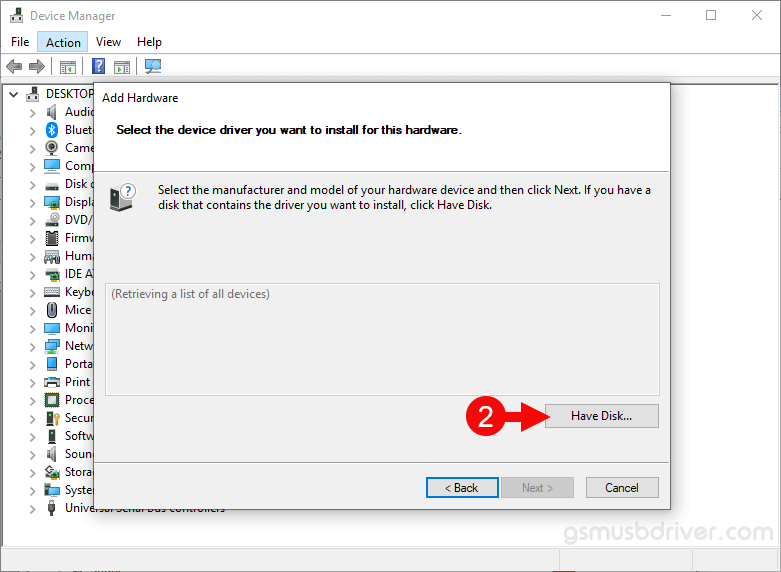
- Click on the Next button:
Then Click on the Have Disk Button:
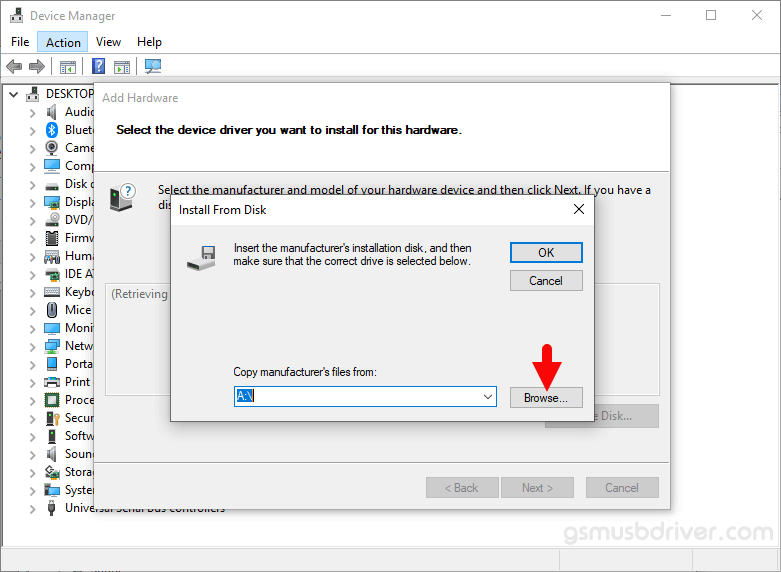
Locate the .inf file from the computer (this file can be found in the extracted driver folder).
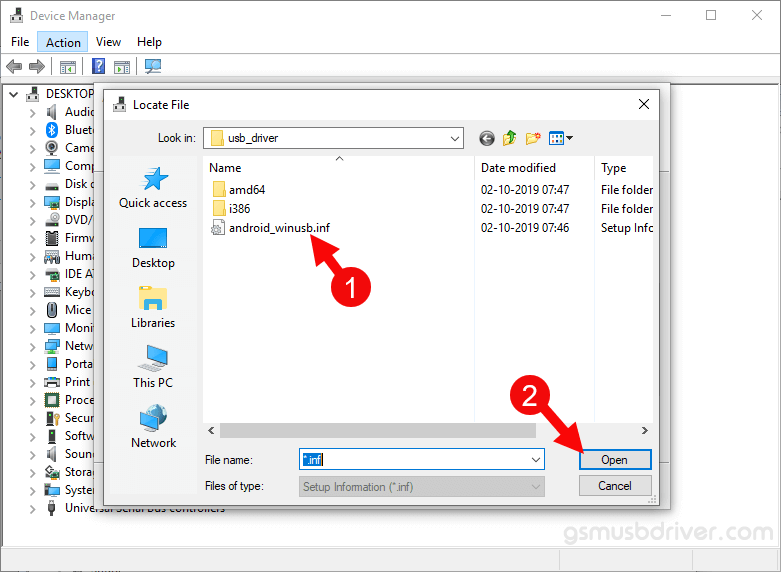
Click on the OK Button:
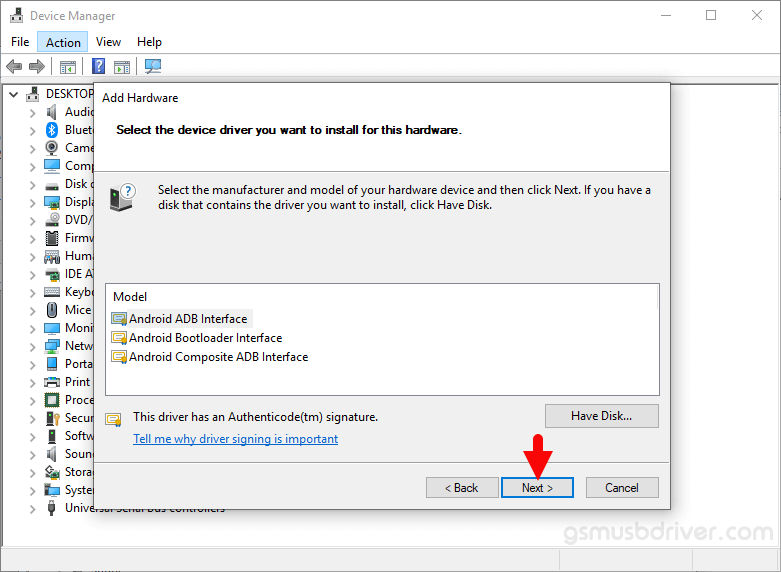
Again Click on the Next button:
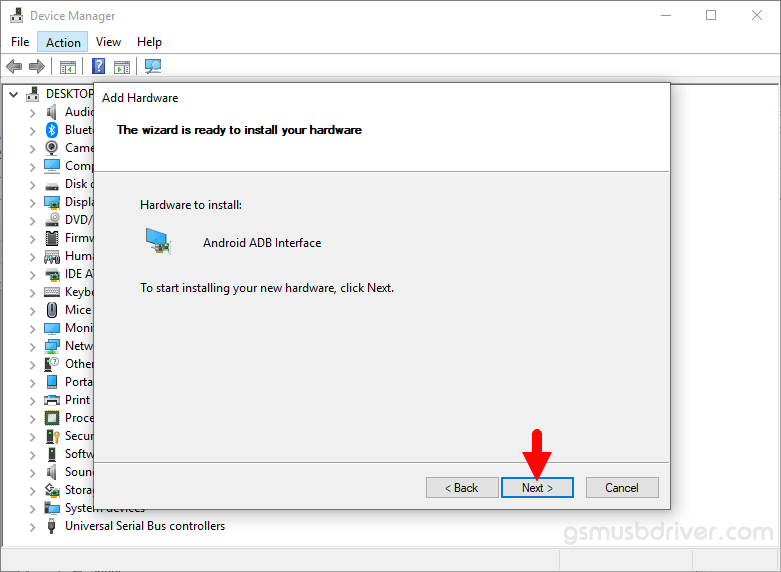
Click on the Finish button to complete the installation process (ignore Code 10; it will be gone post restarting the computer).
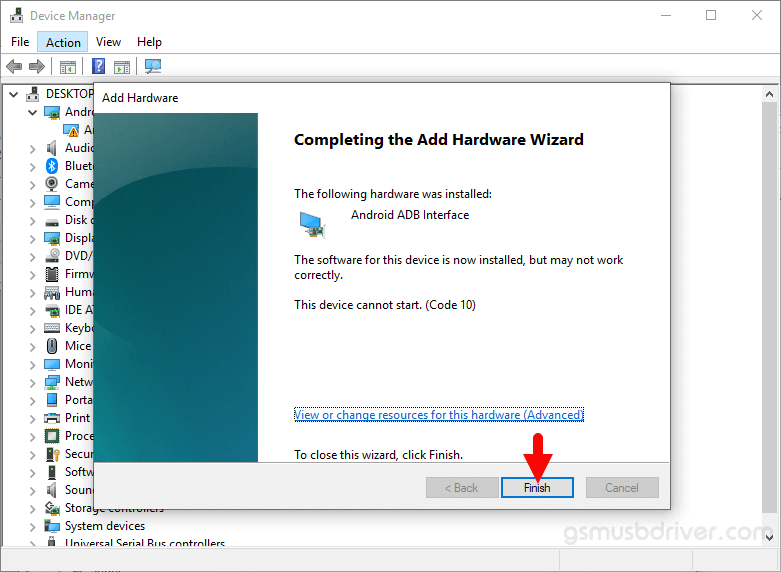
Your driver is listed in the Device Manager.

Now, Restart the Computer. Once the computer is restarted, you can easily connect your Mobile device to the computer.
Readme Once:
[*] We have used the Android ADB Driver to create the above manual. If you wish, you can download the same driver from here.
[*] Driver Signature Error: If you are facing Driver Signature Error while installing the USB Driver, then head over to How to Fix Driver Signature Error page.
[*] Driver Easy: We recommend you to use Driver Easy application to update all the computer drivers in a Single Click.
[*] Credits: ADB Driver is created and distributed by Google. So, all credit goes to them for sharing the driver for free.
Easily install ADB Drivers on Windows
First of all, congratulations! Your search for “How to install ADB drivers on Windows” has landed you in the perfect place. This blog will walk you through the detailed steps involved in installing ADB Drivers on your Windows PC easily and efficiently.
Before we begin, let’s look at a quick definition of ADB and ADB Drivers.
Android Debug Bridge (ADB) is a versatile command-line tool that lets you communicate with a device. The ADB command facilitates a variety of device actions, such as installing and debugging apps, and it provides access to a Unix shell that you can use to run a variety of commands on a device.
ADB Driver is the piece of software that we install in our machine that helps us run the ADB commands and connect to our Android device using the ADB.
Now that we know what ADB and ADB Drivers are, let’s look at how can we install them on our Windows machine. So let’s get started without further ado.
How to install ADB Drivers?
Before beginning with the installing process, it makes sense to first check if you already have the ADB drivers installed. To check this, we perform a test on Google Chrome to check if it can connect to our Android device. Follow these steps to do so:
- Connect your Android device with your Windows PC using a USB cable.
- Next, enable USB debugging on your Android device. If you do not know the steps involved in enabling USB debugging on your Android device, you can look at them at the bottom of this blog.
- Once you have enabled USB debugging, open Google Chrome on your Windows PC.
-
Type “chrome://inspect” in the address bar and hit Enter.
-
If the ADB drivers are already installed, you must see the name of your Android device listed in available devices.

Picture Credits: DriverEasy
-
However, if the drivers are not installed, you will see something like this:


Now, to install the missing ADB Drivers on your Windows PC, we first need to download the device driver. Each device driver is specific to a device. For example, if you are using an Android device by Samsung, you would need to download Samsung’s Device Driver. If you are using a Google device like the Google Nexus, you would be required to download the Google Device Driver. Follow the steps given below to install your device driver:
- If you are using a Google device, install the Google Device Driver from here.
-
If you are using some other device, install its driver from here. In case your device’s manufacturer isn’t available in the above list, search it up on the internet.
- Download and extract the .zip file on your Windows PC.

Now that you have the device driver file installed, connect your Android device to your Windows PC using a USB cable and turn on USB debugging on your Android device and follow these steps:
- Hit the Windows key + R to open the Run dialog box. Type “devmgmt.msc” in the dialog box and hit Enter.
-
Once the device manager opens, find your Android device listed under Portable Devices. Right-click on your Android device and select Properties.
-
Go to the Driver tab and then click on Update Driver…
- In the window that pops up, select Browse my computer for driver software and navigate to the device driver file that you downloaded in the previous steps.
- Check the Include subfolders check-box and hit Next.
- Your device driver should be updated in a minute or two.
- Next, install the Android SDK tools if not already installed. You can install it on your Windows by clicking here, on macOS from here and on Linux from here. The rest of the process remains the same for all three.
- Extract the zip folder into an easy-access location such as C://PlatformTools.
- Navigate to the extracted directory and open a command prompt in the same directory as your PlatformTools.
- Make sure that your Android device is still connected to your Windows PC with USB debugging enabled.
- Enter the command adb devices to get the list of your devices.
- You should see your Android device in the output of the above command. This ensures that your device is connected and the ADB drivers were successfully installed.

How to enable USB debugging
In most Android devices, USB debugging isn’t enabled by default. In order to enable it, follow the steps given below:
- Open the Settings app of your Android device.
- Scroll to the bottom and tap on About phone or About.
- Tap on the build number seven times to make the developer options available.
-
Next, go to the developer options and toggle on USB debugging.
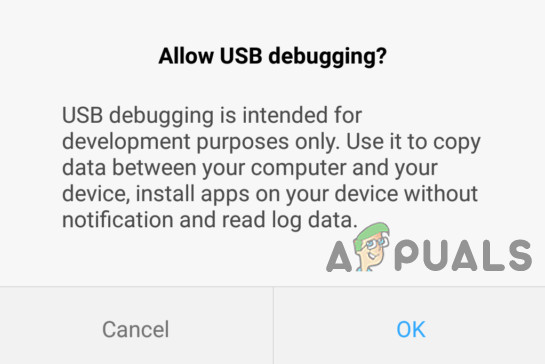
- Finally, connect your Android device to your Windows PC using a USB cable and you will get a prompt on your Android device confirming if you want to allow USB debugging. Tap on OK to allow it.
In conclusion, this was the general method of installing ADB drivers on any Android device. Hope you try it out.
Все способы:
- Подготовка Android
- Подготовка Windows
- Установка драйверов для Android-устройств известных брендов
- Установка драйверов ADB, Fastboot, Bootloader
- Установка драйверов VCOM для устройств Mediatek
- Установка драйверов для прошивки Qualcomm-аппаратов
- Советы по устранению проблем
- Вопросы и ответы: 4
Приступая к прошивке Android-девайса, изначально нужно позаботиться о подготовительных процедурах. Это позволит провести процесс записи нужных программных компонентов в устройство максимально быстро и эффективно, а также даст возможность избежать ошибок, которые превратят процедуру в мучение. Одним из самых важных шагов при работе с ПО Android-аппаратов через специализированные Windows-приложения является установка «прошивочных» драйверов.
Подготовка Android
Перед тем, как приступить к установке программных компонентов в Windows, Андроид-девайс нужно подготовить. Во многих случаях для прошивки используются, хотя бы частично либо на определенном этапе, возможности Android Debug Bridge (ADB). Этот инструмент может работать с Android-аппаратом только в том случае, если на последнем активирован режим «Отладки по USB». Практически все производители девайсов и разработчики различных вариаций ОС Android изначально блокируют данную возможность для пользователей. Т.е., после первого запуска аппарата «Отладка по USB» по умолчанию отключена. Включаем режим, идя следующим путем.
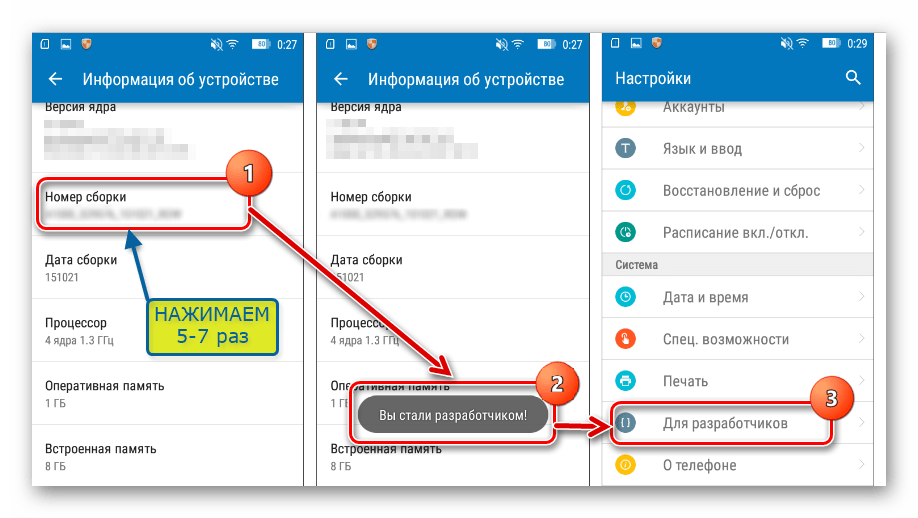
- Сначала нужно активировать пункт «Для разработчиков» в меню «Настройки». Для этого открываем «Настройки» в Android, листаем в самый низ и нажимаем пункт «Об устройстве» (может называться «О планшете», «О телефоне», «Справка» и т.п.).
- Открыв пункт «Об устройстве» меню «Настройки», информирующий о составляющих программно-аппаратной части аппарата, находим надпись: «Номер сборки». Для активации пункта «Для разработчиков» необходимо нажимать на эту надпись 5-7 раз. Каждое нажатие через короткий промежуток времени. Продолжаем до появления сообщения «Вы стали разработчиком!».
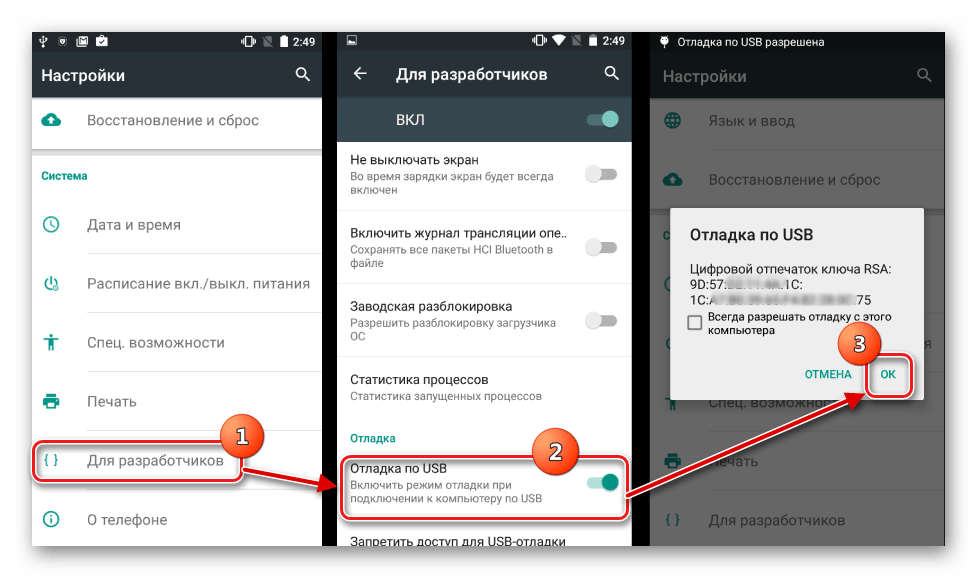
- После вышеописанной манипуляции в меню «Настройки» появляется ранее отсутствующий пункт «Для разработчиков». Заходим в это меню, находим пункт «Отладка по USB» (может называться «Разрешить отладку по USB» и т.п.). Возле этого пункта обязательно присутствует поле для установки галочки, либо переключатель, активируем его или устанавливаем отметку. При подключении к ПК аппарата с включенной «Отладкой по USB» на экране Андроид может быть отображен запрос о предоставлении разрешения конкретному компьютеру работать c девайсом через ADB (3). Даем разрешение нажатием кнопки «ОК» или «Разрешить».

Подготовка Windows
Что касается ОС Windows, ее подготовка перед началом процесса прошивки заключается в отключении проверки цифровой подписи драйверов. Во избежание возможных проблем, необходимо проведение операций, описанных в статье:
Урок: Решаем проблему с проверкой цифровой подписи
Установка драйверов для Android-устройств известных брендов
Первое, что нужно сделать при поиске драйвера для прошивки Android, это обратиться на официальный сайт производителя устройства. Знаменитые производители в большинстве случаев предоставляют возможность загрузки драйверов либо отдельным пакетом, либо в составе фирменного программного обеспечения, предназначенного для обслуживания девайсов бренда.

Для инсталляции, в случае наличия на официальном сайте производителя необходимых файлов, достаточно скачать автоустановщик либо инсталлятор программы для обслуживания Андроид-аппаратов марки, запустить его и следовать подсказкам в окнах приложения.
Разработчики Android решили несколько облегчить пользователям задачу поиска веб-страниц, предназначенных для загрузки необходимых при прошивке аппаратов файлов. На официальном сайте инструментария разработчиков Android Studio есть страница, содержащая таблицу, с помощью которой легко осуществить переход на официальный сайт загрузки ПО многих широко известных брендов.
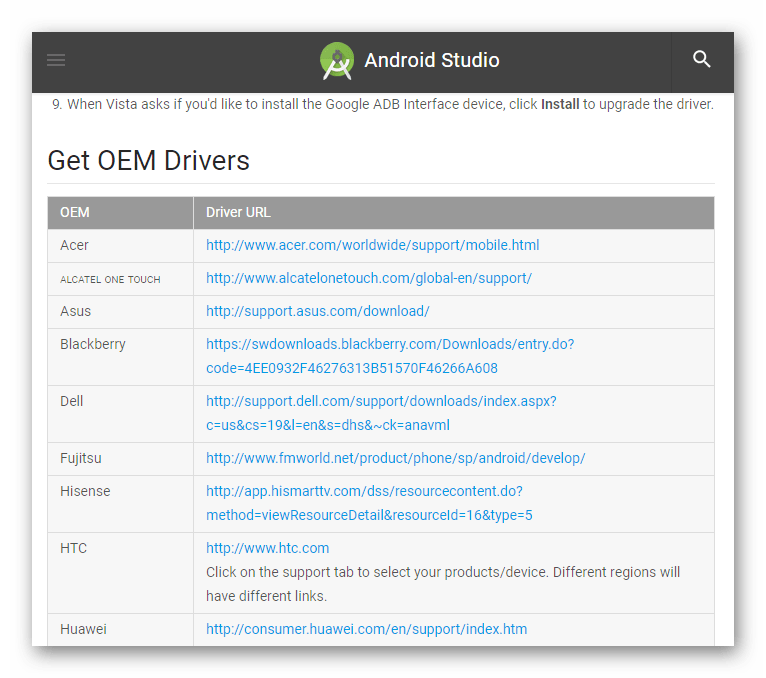
Загрузить драйвера для прошивки Android c официального сайта
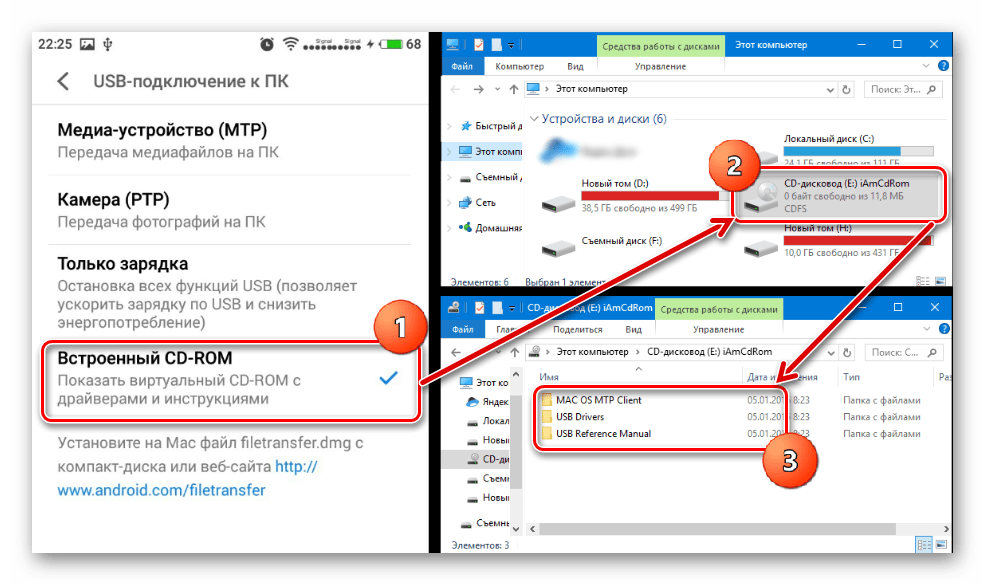
У владельцев устройств, выпущенных широко известными брендами, часто существует еще одна возможность установить нужные компоненты системы, о которой многие забывают. Это интегрированный в систему Android виртуальный CD-диск, содержащий все необходимое.
Для использования этого решения, нужно подключить девайс к USB-порту компьютера и в настройках USB-подключения Android выбрать пункт «Встроенный CD-ROM». После подключения Андроид-девайса в таком режиме в Windows появляется виртуальный дисковод, в котором содержатся в том числе и драйвера необходимые при прошивке.
Установка драйверов ADB, Fastboot, Bootloader
Во многих случаях для установки программных компонентов, обеспечивающих сопряжение и взаимодействие с Windows аппарата в режимах ADB, Fastboot, Bootloader достаточно прибегнуть к пакету, предоставляемому разработчиками Android на официальной странице инструментария Android Studio.
Загрузить драйвера ADB, Fastboot, Bootloader c официального сайта
В том случае, если вышеописанное не срабатывает, обращаемся на сайт производителя девайса и загружаем пакет файлов оттуда.
-
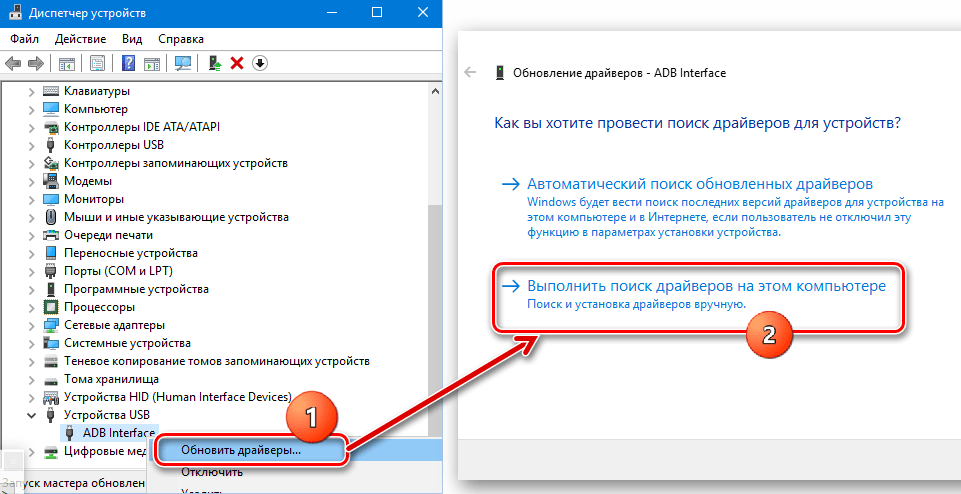
Установка драйверов ADB и Fastboot вручную. Перезагружаем устройство в режим, для которого необходима инсталляция дополнительных компонентов ПО и подключаем его к компьютеру. Находим в «Диспетчере устройств» наименование устройства, для которого не были установлены драйвера, кликаем по его наименованию правой кнопкой мыши и выбираем в раскрывшемся меню пункт «Обновить драйверы…». В открывшемся окне выбираем пункт «Выполнить поиск на этом компьютере».

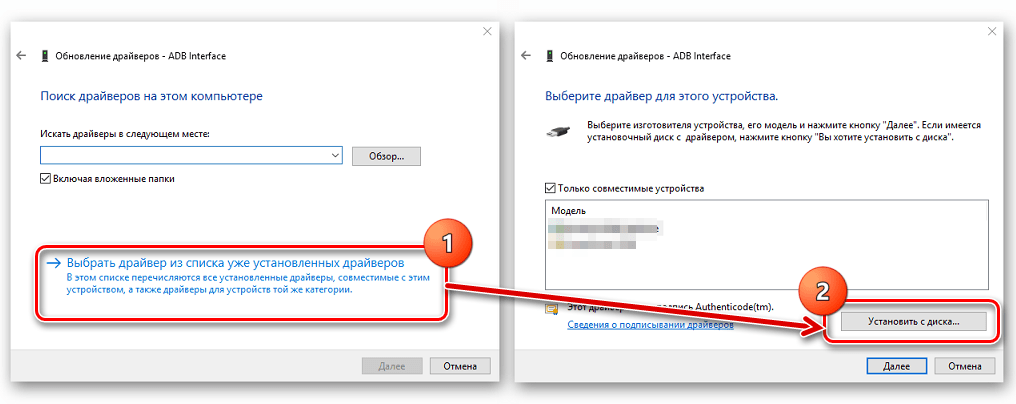
Затем «Выбрать из списка уже установленных…» — «Установить с диска».

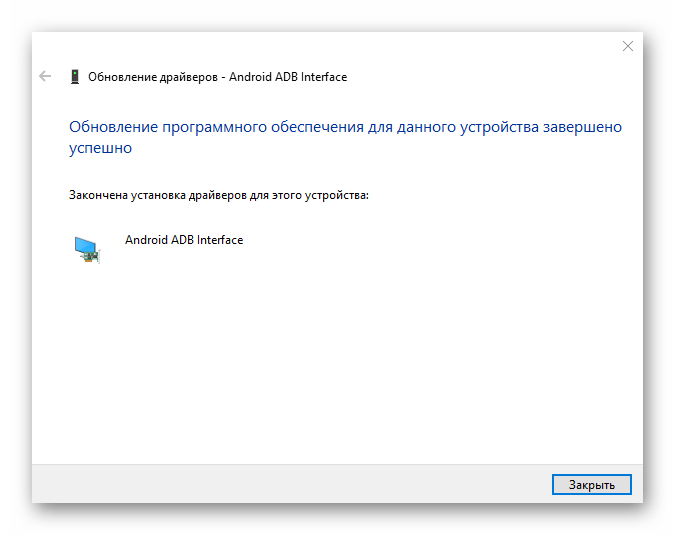
Указываем путь к месту расположения скачанного и распакованного пакета с файлами и выбираем android_winusb.inf. Осталось только дождаться завершения копирования файлов
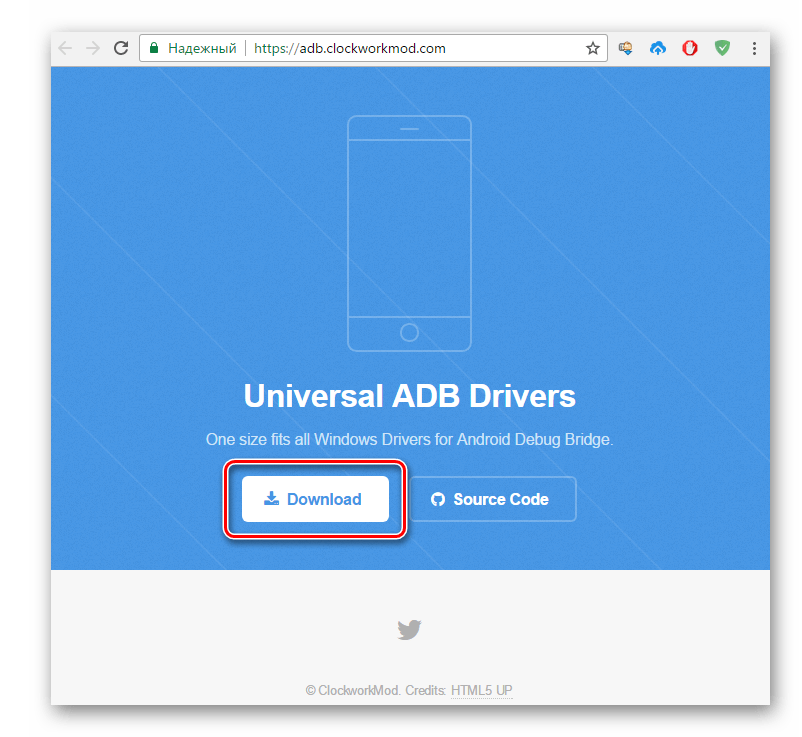
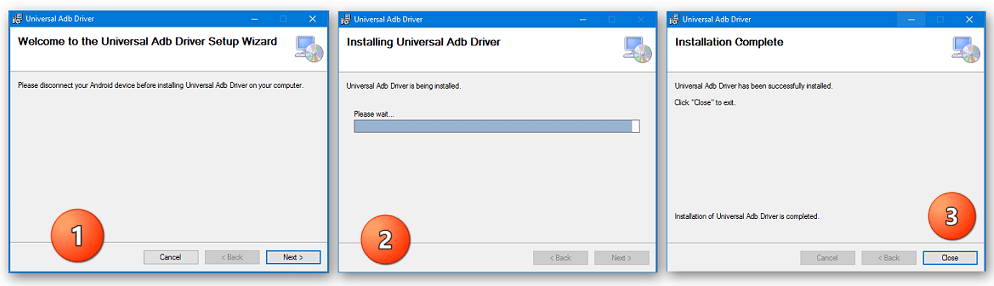
- Существует иное, довольно часто действенное решение установки ПО для особых режимов работы Андроид-устройств. Это пакет универсальных ADB-драйверов c инсталляцией в автоматическом режиме через приложение от создателей всем известного CWM Recovery – команды Сlockworkmod.

Загрузить Universal ADB Drivers с официального сайта
После загрузки инсталлятора, достаточно запустить его и следовать подсказкам в окнах приложения-установщика.
-
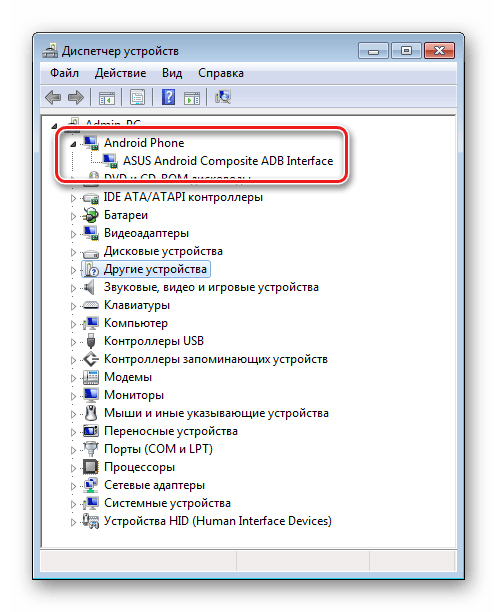
Для проверки правильности установки нужно убедиться в корректном отображении подключенного девайса в «Диспетчере устройств».

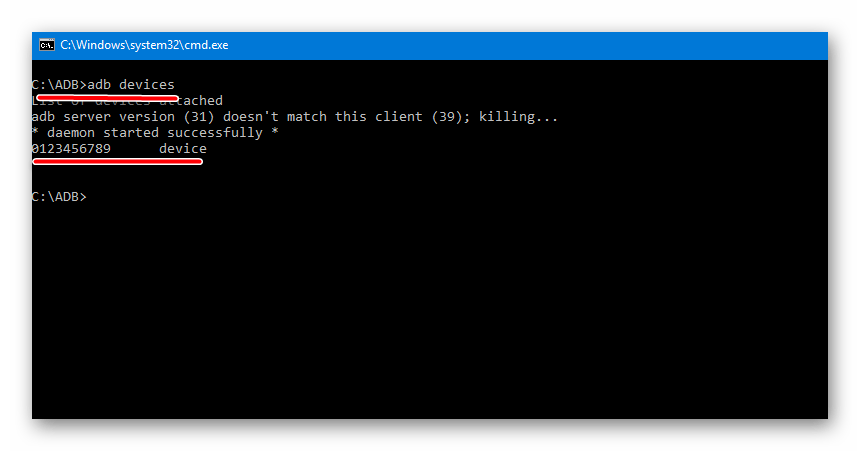
Кроме того, можно послать в консоли ADB команду
adb devices. Ответом системы при правильно настроенном сопряжении девайса и ПК должен быть серийный номер аппарата.
Установка драйверов VCOM для устройств Mediatek
Построенные на базе платформы MTK аппараты примечательны тем, что их прошивка в большинстве случаев осуществляется с помощью приложения SP Flash Tool, а это в свою очередь подразумевает предварительную установку Preloader USB VCOM Driver.
Существует автоустановщик MTK-драйверов. Изначально пробуем решить проблему сопряжения с помощью него.
Скачать MediaTek PreLoader USB VCOM Port с автоустановкой
Необходимо просто загрузить файл-установщик и запустить его. Приложение по своей сути является консольным скриптом и все действия по добавлению в систему необходимых компонентов осуществляются автоматически.

Если способ c автоустановщиком не срабатывает, придется инсталлировать MediaTek PreLoader USB VCOM Port вручную. Для этого выполняем следующие шаги.
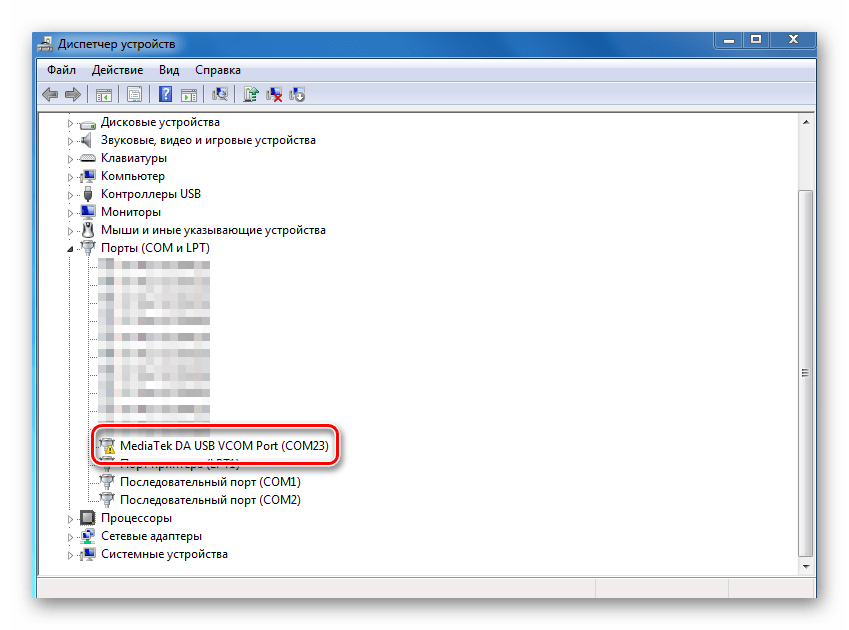
- Выключаем полностью девайс, вытаскиваем и вставляем обратно батарею, если она съемная. Открываем «Диспетчер устройств» и подключаем выключенный Андроид-аппарат к порту ЮСБ компьютера. В некоторых случаях понадобиться подключать аппарат без аккумулятора. Наблюдаем за перечнем устройств в «Диспетчере». На короткое время в перечне аппаратных составляющих должно появиться «Неизвестное устройство», но это редкий случай. Чаще всего MediaTek PreLoader, для которого необходимо установить драйвера отображается на несколько секунд в списке «Порты COM и LPT», помеченный восклицательным знаком.
- При появлении в перечне нового пункта нужно уличить момент и успеть кликнуть по наименованию порта, обозначенного восклицательным знаком, правой кнопкой мыши. В раскрывшемся меню выбираем пункт «Свойства».
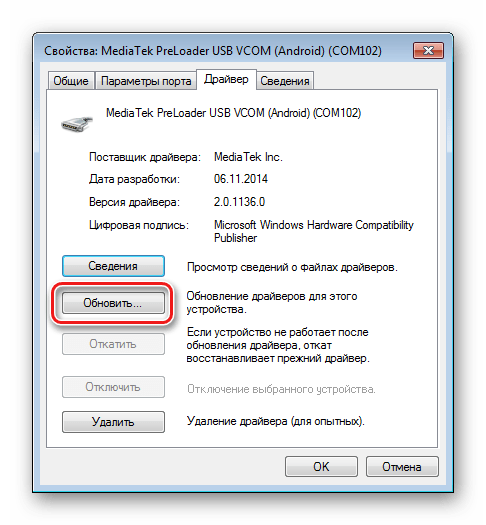
- В открывшемся окне переходим на вкладку «Драйвер» и кликаем кнопку «Обновить…».
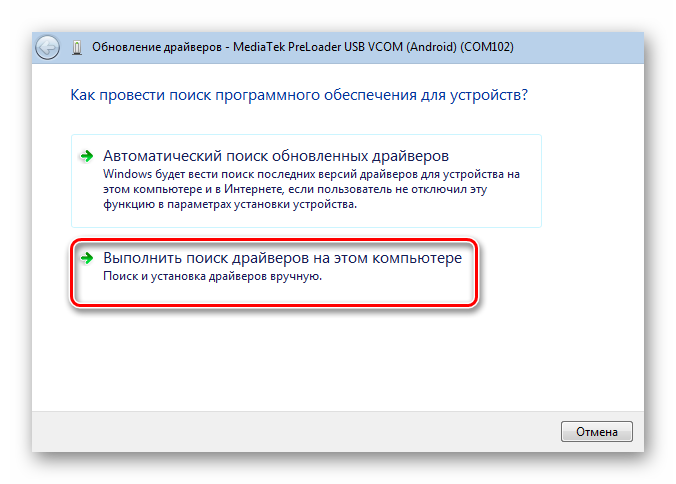
- Выбираем режим «Выполнить поиск драйверов на этом компьютере».
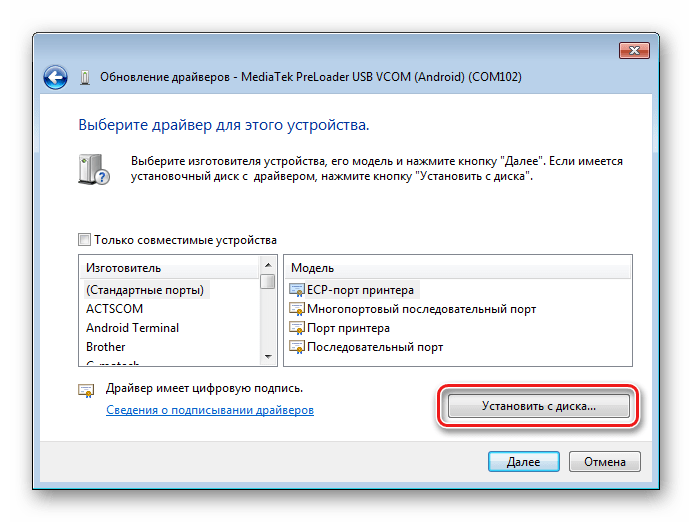
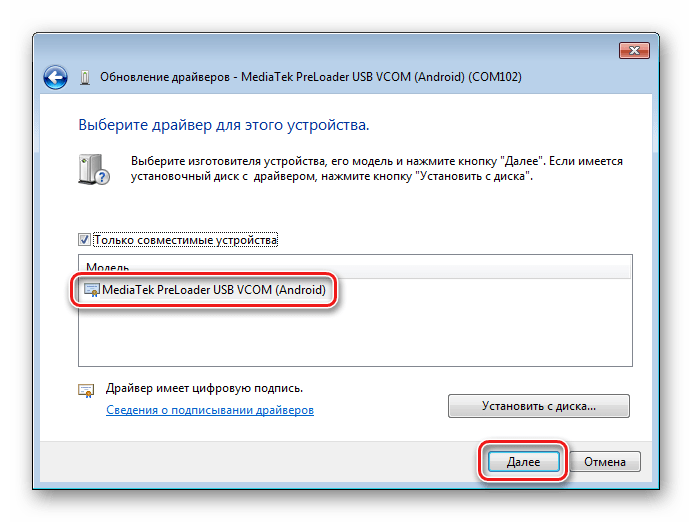
- Доходим до окна с кнопкой «Установить с диска…», нажимаем эту кнопку и указываем путь к папке, содержащей скачанное для девайса ПО. Открываем соответствующий inf-файл.
-
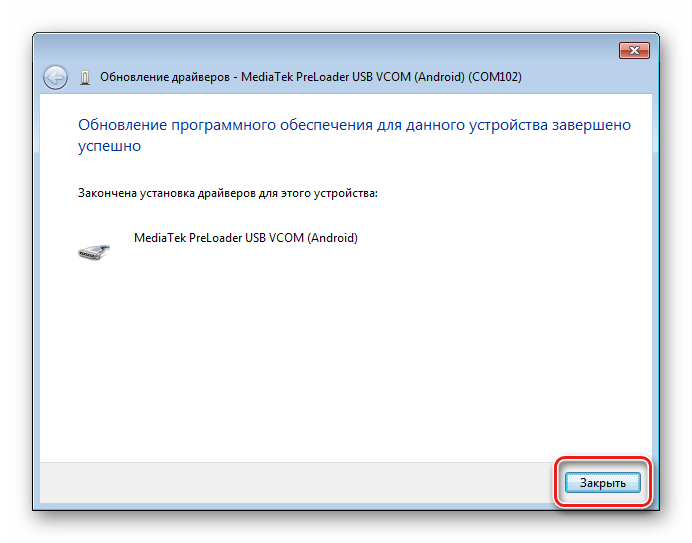
После добавления файла, нажимаем кнопку «Далее»

и ждем окончания процесса установки.
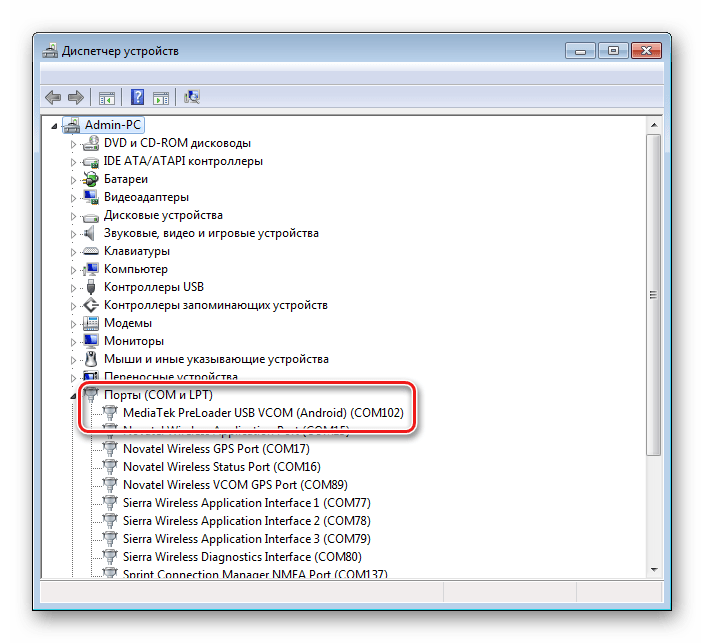
- Следует отметить, что даже если все вышеперечисленное сделано верно и установлены необходимые компоненты Windows, проверить наличие девайса в системе можно лишь переподключив его к USB-порту. Постоянно MediaTek PreLoader USB VCOM Port не отображается в «Диспетчере устройств», показывается только на короткий промежуток времени при подключении выключенного аппарата, а затем исчезает из перечня COM-портов.

Установка драйверов для прошивки Qualcomm-аппаратов
В общем случае при сопряжении Андроид-девайса, в основе которого лежит аппаратная платформа Qualcomm, с ПК не возникает особых сложностей. К сожалению, Qualcomm не предоставляет возможности загрузки программного обеспечения с собственного официального сайта, а рекомендует обратиться к ресурсам на сайтах OEM-производителей.

Практически для всех устройств, так и следует поступить. Для удобства и ускорения поиска ссылок на страницы загрузки производителей устройств, можно использовать таблицу , составленную разработчиками Andrоid.
Или воспользоваться ссылкой ниже и загрузить последнюю версию пакета Qualcomm Drivers с автоустановкой.
Загрузить драйвера для прошивки Qualcomm
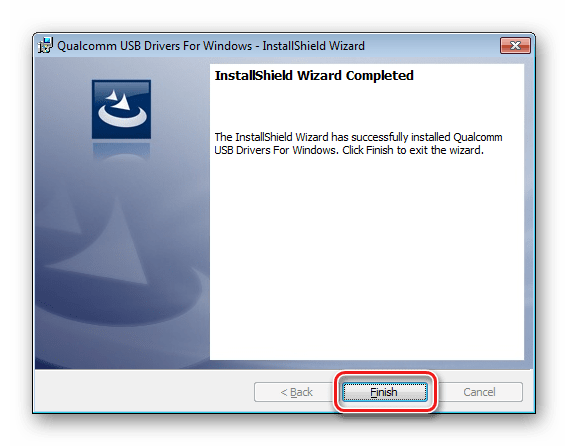
- Загрузив приложение QDLoader HS-USB Driver Setup, запускаем его, нажимаем в главном окне кнопку «Next».
- Затем следуем инструкциям-подсказкам в программе.
- Дожидаемся появления окна с сообщением об успешном окончании работы инсталлятора и закрываем его, нажав кнопку «Finish».
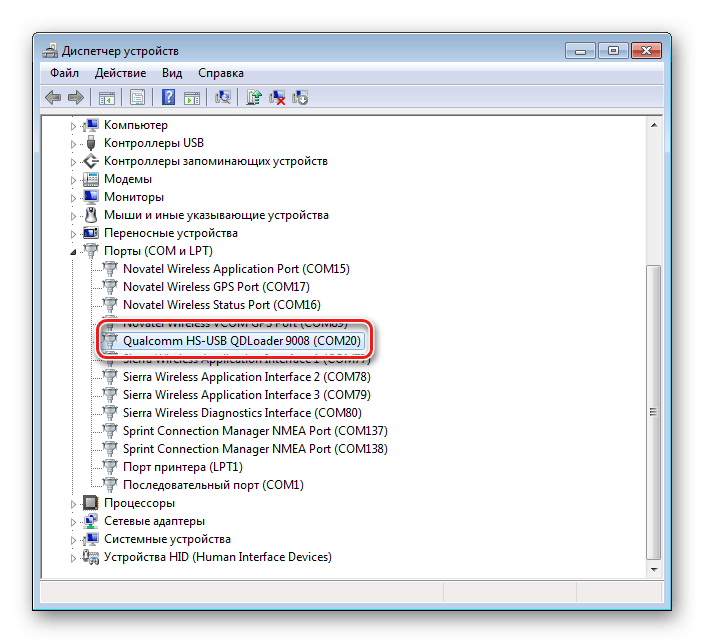
- Можно проверить корректность установки, подключив аппарат в режиме «Download» к USB-порту компьютера и открыв «Диспетчер устройств».


Советы по устранению проблем
Как видим, инсталляция драйверов для прошивки Андроид, не так сложна, как может показаться. Наибольшие трудности пользователь, в действительности, испытывает при поиске необходимого пакета файлов. Три простых совета, как избежать проблем или устранить возникшие ошибки при выполнении сопряжения Android и Windows.
- Если никак не получается подобрать работающий драйвер, можно воспользоваться методом описанным в статье:
- Довольно часто при установке компонентов необходимых для прошивки девайса, выпущенного под малоизвестной торговой маркой, ситуацию «спасает» специальная программа — DriverPack. Инструкция по работе с данным приложением, позволяющим во многих случаях успешно добавить необходимые файлы в систему, представлена по ссылке:
- Еще одной распространенной проблемой является установка драйверов неправильной версии, а также конфликтующие между собой компоненты системы. Для того, чтобы избежать подобной ситуации, необходимо удалить «лишние» в системе аппаратные компоненты. Для облегчения процесса обнаружения и удаления USB-устройств используем программу USBDeview.
Урок: Поиск драйверов по ID оборудования
Подробнее: Как установить драйвера с помощью DriverPack Solution
Скачать программу USBDeview с официального сайта
Наша группа в TelegramПолезные советы и помощь
The Android Debug Bridge (ADB) is an important command-line tool for controlling your Android device from your computer. With ADB you can perform many useful commands to back-up your data, sideload .zip files you would otherwise flash in custom recovery, unlock your bootloader on Nexus devices, and several other uses for debugging your Android phone.
Installing ADB on a Windows machine is a fairly painless but involved process. This guide will walk you from start to finish.
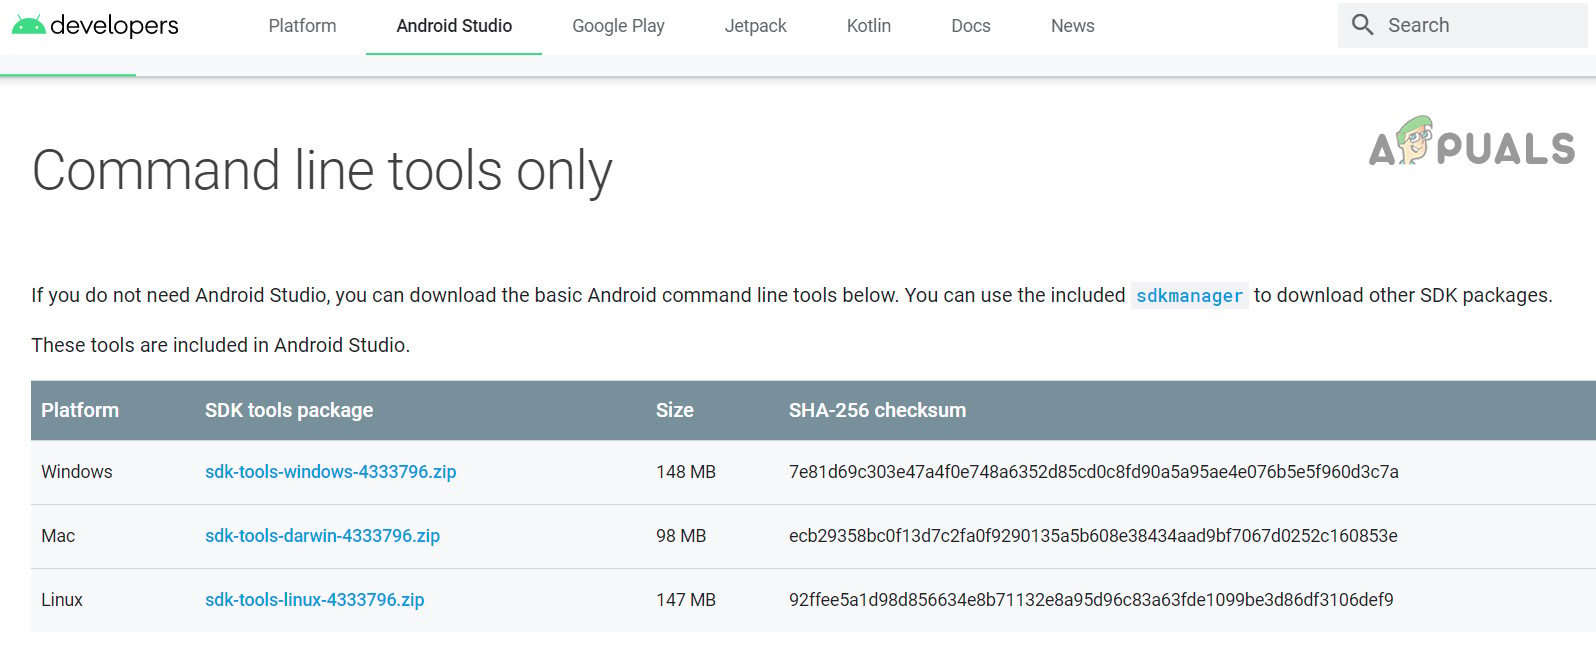
- Go to the Android SDK website and navigate to “SDK Tools Only”. Download the version for your platform.

Download SDK Tools - Open the SDKManager.Exe and choose only the “Android SDK Platform Tools” for installation. If you’re on a Nexus phone, you should also choose “Google USB Driver”. When you click Install, it will begin downloading the necessary files to your computer.

Downloading Android SDK Platform Tools - Enable USB debugging on your device. ADB will only work on your device when USB debugging is enabled. USB debugging is usually found under Developer Options, so if you have not enabled Developer Options yet, go to Settings>About Phone> tap on “Build Number” 7 times, and you will get an alert that Developer Options are enabled. You can now go into the Developer Options to turn on USB Debugging.

Allow USB Debugging - Navigate to the folder on your PC where the SDK tools were installed. Shift + Right Click on the folder and select “Open Command Window Here”.
- Connect your Android phone to your computer via USB (Make sure that you are using Data cable, not the charging cable). If you are prompted on your device, then choose “file transfer (MTP)” mode. Now in the command terminal type:
adb devices

It should display your device as being connected. If there is no device shown in the command prompt, you may need to download USB drivers specific to your phone from the manufacturer’s website.
You should now configure your system-path so you can always run ADB commands from inside the command terminal without having to run it from the SDK tools folder. The methods are nearly the same but a little different between Windows 7, 8, and 10.
Add ADB to System Path for Windows 7, 8
- Go to Control Panel > System > Security and click the “Advanced System Settings” button, then click on “Environment Variables”.

Edit Environment Variables - Find the variable called “Path” on it to highlight, then click “Edit“.
Edit Path of Environment Variables - Add your ADB folder to the end of the variable value, with no spaces, preceded by a semicolon. For example:
;C:\Android\platform-tools

Add ADB to System Path in Windows 10
Follow the steps above until 3. Instead of adding the string to a pre-existing variable string, you are simply going to click “Add New” in the environment variable box that opens. Simply add your ADB folder and press enter.
List of Useful ADB Commands
- adb install C:\package.apk – Install an .apk package from your C:\ to your Android device.
- adb uninstall package.name – Uninstall an app package from your device – package name would be the specific app package name as seen in your device, for example, com.facebook.katana
- adb push C:\file /sdcard/file – Copies a file from your C:\ to your devices SD card.
- adb pull /sdcard/file C:\file – The reverse of ADB push.
- adb logcat – View the log from your Android device.
- adb shell – This will open an interactive Linux command line on your device.
- adb shell command – This will run a command on your device’s command line.
- adb reboot – This will reboot your device.
- adb reboot-bootloader – Reboots your device to the bootloader.
- adb reboot recovery – Reboots your device to recovery.
fastboot devices – ADB commands only work once your phone is fully booted, not from the bootloader. FastBoot allows you to push ADB commands to your device from the bootloader, useful for when you’re stuck in a recovery loop, for example.
Kevin Arrows
Kevin Arrows is a highly experienced and knowledgeable technology specialist with over a decade of industry experience. He holds a Microsoft Certified Technology Specialist (MCTS) certification and has a deep passion for staying up-to-date on the latest tech developments. Kevin has written extensively on a wide range of tech-related topics, showcasing his expertise and knowledge in areas such as software development, cybersecurity, and cloud computing. His contributions to the tech field have been widely recognized and respected by his peers, and he is highly regarded for his ability to explain complex technical concepts in a clear and concise manner.