
При выполнении каких-либо действиях за компьютером, в играх или программах, а иногда — при загрузке ОС некоторые пользователи могут столкнуться с ошибкой DPC WATCHDOG VIOLATION.
В этой инструкции подробно о том, что вызывает синий экран с кодом DPC WATCHDOG VIOLATION, как выяснить, что к нему привело в вашем конкретном случае и исправить ошибку в Windows 11.
Причины ошибки DPC WATCHDOG VIOLATION

Ошибка DPC WATCHDOG VIOLATION (0x00000133) связана с механизмом отложенного вызова процедур (Deferred Procedure Call, DPC), позволяющим откладывать выполнение задач, обычно связанных с обработкой аппаратных событий на момент, когда процессор будет менее загружен.
Для отслеживания выполнения DPC используется таймер Watchdog, который в случае задержек или зависания соответствующих задач останавливает систему. Результат — рассматриваемый синий экран.
Что может приводить к рассматриваемым задержкам:
- Неправильная работа драйверов устройств и реализация DPC в них, либо неправильный вызов функций драйверов каким-либо ПО.
- Конфликты в работе драйверов нескольких устройств.
- Проблемы с оборудованием.
В большинстве случаев причиной оказывается сбой какого-либо драйвера. Задача — выяснить, какого именно и предпринять соответствующие действия.
Как исправить ошибку
Чтобы решить проблему, прежде всего следует определить, что именно вызывает синий экран DPC WATCHDOG VIOLATION. Здесь помогут дампы памяти, по умолчанию создаваемые Windows автоматически и содержащие необходимую информацию о сбое. Если вы обнаружите, что дампа памяти не создаются, вы можете включить их сохранение.
В случае, если работа в Windows 11 возможна, вход в систему работает, а ошибка возникает при определённых условиях, которых можно избегать, рекомендую проанализировать сохранённый дамп памяти с помощью утилиты Microsoft WinDbg (популярная BlueScreenView и другие программы анализа дампов памяти с большой вероятностью укажет лишь на процесс ядра ntoskrnl.exe):
- Установить WinDbg из Microsoft Store или напрямую с сайта Майкрософт.
- Запустите WinDbg, после чего используйте меню «Файл» — «Open Dump File», чтобы указать путь к актуальному файлу дампа в папке
C:\Windows\Minidump
- Дождитесь загрузки файла, после чего либо нажмите по ссылку на команду
!analyze -v
либо введите эту команду вручную в поле ввода команд.

- Дождитесь завершения анализа дампа памяти и обратите внимание на информацию, которую удалось извлечь. В частности, для рядового пользователя интерес могут представлять поля PROCESS_NAME (в рамках какого процесса был вызван драйвер), MODULE_NAME и IMAGE_NAME (указание на сам драйвер). Например, на скриншоте ниже мы можем видеть, что сбой вызван драйвером hidclass.sys, Интернет нам подскажет, что это стандартный драйвер Windows для работы с HID-устройствами (мыши, клавиатуры, тачпады, веб-камеры и другие) и можно предположить, что проблема кроется в работе одного из таких устройств.
- На следующем скриншоте видно, что проблемный драйвер — ndis.sys (отвечает за работу сетевых функций в Windows), а имя процесса — steam.exe. Возможный вывод — есть проблема взаимодействия Steam с сетью, причины могут разниться: от драйверов сетевой карты или Wi-Fi адаптера, до стороннего ПО, влияющего на сетевой трафик.

- Определив имя файла драйвера, если вы не знаете его назначение, поищите имя соответствующего файла SYS в сети, с большой вероятностью вы сможете определить, о каком устройстве или функциональности системы идёт речь.


В ситуации, когда вход или работа в Windows невозможны (например, ошибка возникает при входе в систему), вы можете попробовать проделать то же самое в безопасном режиме с поддержкой сети. Для входа в него можно использовать следующие способы:
- Если есть возможность попасть на экран входа в систему, удерживая клавишу Shift нажать по кнопке перезагрузки в меню завершения работы. После перезагрузки вы попадёте в среду восстановления, где в разделе «Поиск и устранение неисправностей» — «Дополнительные параметры» — «Параметры загрузки» вы сможете выбрать режим загрузки, для начала рекомендую попробовать вариант «Безопасный режим с загрузкой сетевых драйверов», а если он не сработает, просто «Безопасный режим».

- В случае, если на экран входа в систему попасть также нельзя, то после нескольких неудачных попыток старта системы или принудительных отключений долгим удержанием кнопки питания вы должны будете увидеть синий экран с сообщением о том, что «Компьютер запущен некорректно». Нажав по кнопке «Дополнительные параметры», вы сможете перейти в среду восстановления, после чего использовать путь, описанный в предыдущем пункте.

Дальнейшие действия будут зависеть от того, что вам удалось узнать о причинах ошибки и драйверах, вызывающих синий экран DPC WATCHDOG VIOLATION:
- Если речь идёт о драйверах, имеющих отношение к работе сети, вручную скачайте и установите драйверы Wi-Fi, Ethernet с сайта производителя материнской платы или ноутбука именно для вашей модели, не полагайтесь на драйверы, устанавливаемые автоматически Windows или сторонними утилитами. При наличии средств «модификации» сетевых подключений, а также сторонних антивирусов может помочь их удаление. Здесь может пригодиться Отдельная инструкция про синие экраны, вызываемые ndis.sys.
- Для драйвера видеокарты может помочь чистая установка драйвера другой (более новой или, наоборот, более старой) версии драйвера. При наличии нескольких видеоадаптеров, например, интегрированного и дискретного, рекомендую установить драйверы для обоих, даже если используется лишь один.
- Для драйверов, имеющих отношение к работе накопителей, может помочь установка оригинальных драйверов чипсета от производителя, а при наличии — дополнительных драйверов контроллеров SATA и USB, предоставляемых на странице поддержки вашего устройства. В некоторых случаях к сбоям могут приводить изменения настроек накопителей в БИОС/UEFI — если вы изменяли их, обновляли или сбрасывали БИОС, проверьте соответствующие настройки.
- В части накопителей можно попробовать проверить наличие других совместимых драйверов в диспетчере устройств (открыть свойство накопителя и/или его контроллера — «Обновить драйвер» — «Найти драйверы на этом компьютере» — «Выбрать из списка доступных драйверов на компьютере») и при наличии установить их.

- Для съёмных накопителей начать стоит с установки оригинальных драйверов контроллеров USB (при наличии на сайте производителя) или отключения соответствующих накопителей, возможно уже это решит проблему.
- Для устройств HID следует попробовать отключение всех необязательных устройств, пока не будет выявлено то, которое вызывает проблему. Далее — действовать по ситуации, в частности, постараться разобраться, в самом устройстве или же его драйверах заключается проблема.

Общий подход будет схожим, независимо от ситуации и состоит из:
- Установки оригинальных драйверов устройств от производителя материнской платы, ноутбука или самого периферийного устройства: на чипсет, сетевые устройства, USB и SATA контроллеры, в зависимости от того, с чем именно наблюдается проблема.
- Если проблема вызвана драйвером какого-либо ПО (антивирусы, файрволлы и многие другие программы устанавливают драйверы виртуальных устройств) — удаление соответствующих программ, при необходимости — переустановка или поиск других версий.
- При подозрении, что причиной является не сам драйвер, а устройство — проверка его работоспособности, например, на другом компьютере.
Дополнительная информация
Некоторые нюансы, которые могут оказаться полезными при решении проблемы:
- Если ошибка DPC WATCHDOG VIOLATION появляется после включения компьютера по прошествии некоторого времени после завершения работы, а при последующей принудительной перезагрузке исчезает, попробуйте отключить быстрый запуск Windows 11.
- При недавнем появлении ошибки при неизменном оборудовании можно попробовать использовать точки восстановления системы.
- Выполните проверку целостности и восстановление системных файлов Windows.
- При включённом диспетчере проверки драйверов, отключите его. Подробнее — в отдельной инструкции.
- В ситуации, когда проблема возникает с работой устройств, подключаемых по USB, проверьте их работу на других разъёмах: других версий, на тыльной стороне системного блока вместо передней панели.
- При обнаружении проблем со стороны локальных накопителей рекомендую проверить их с помощью CHKDSK, CrystalDiskInfo, официальной утилиты производителя SSD
- В некоторых случаях корнем проблемы оказываются баги БИОС — проверьте, не было ли выпущено новых версий для вашей материнской платы, при наличии — выполните обновление, внимательно следуя инструкциям производителя.
И, наконец, если синий экран DPC WATCHDOG VIOLATION продолжает появляться, опишите в комментариях, что именно удалось обнаружить: драйвер, приводящий к сбою, какие-то закономерности поведения, что уже было опробовано и к чему привело, я постараюсь помочь.
,
If Windows 11 crashes to a blue screen with error DPC WATCHDOG VIOLATION, continue reading below to fix the problem.
Blue Screen of Death (BSOD) is one of the most frustrating problems users face when using their Windows devices. One of the most notable bsod errors is the DPC_WATCHDOG_VIOLATION with error code 0x00000133.
DPC Watchdog is a bug checker for monitoring processes in the background and in the foreground. The DPC_Watchdog_Violation error occurs when the bug checker must wait for more than 100 microseconds without receiving a response from the deferred procedure call (DPC), causing the BSOD error and computer shutdown.
What Can Cause the DPC_Watchdog_Violation error on Windows 11?
- A Faulty Hardware device: such as a printer, a game controller, or a removable USB drive can cause Windows 11 to crash with a blue screen.
- Corrupt or missing system files can also cause the DPC_Watchdog Violation error. At this case, repairing the system files can fix the issue.
- Old or Outdated driver(S) has been identified by users as a major cause of DPC Watchdog Violation error. This issue can also emerge when important drivers are missing on a device. Graphics cards from Nvidia or AMD needs to be constantly updated to avoid this issue.
- Programs running on the background could also cause bsod errors. (e.g. a third-party antivirus program such as AVAST, AVG, etc..).
How to FIX the DPC_WATCHDOG_VIOLATION error on Windows 11.
To fix the DPC Watchdog Violation error (0x00000133), follow the methods below according your case/scenario:
Scenario 1: The PC Starts in Windows after the DPC Watchdog Violation error but the problem occurs again.
- Method 1. Check Installed Hardware & Software.
- Method 2. Change the SATA Controller driver.
- Method 3. Repair System Files with SFC & DISM tools.
- Method 4. Check Hard Disk for errors.
- Method 5. Repair Upgrade Windows 11.
Scenario 2: The PC Cannot boot into Windows after the DPC Watchdog Violation error.
- Method 6. System Restore.
- Method 7. Repair Windows 11 with SFC & DISM tools.
- Method 8. Reset this PC.
- Method 9. Clean Install Windows 11.
Scenario 1: How to fix DPC Watchdog Violation error if Windows 11 can start Normally or in Safe Mode.
Method 1: Remove External Devices and Uninstall Background Programs.
Faulty hardware, drivers or programs running in the background may be the cause of the DPC Watchdog violation error. So, apply the below steps and see if the problem persists:
- Ensure that all pending updates are installed on the computer.
- Uninstall any third-party antivirus or other programs running on the background.
- Update the Display Adapter’s drivers. (If you have recently updated the VGA drivers, proceed and install a previous stable driver version).
- Disconnect External Devices: Unplug all external hardware devices such as Printers, Game controllers, or USB drives and check if the problem persists. If so, go to step-5 below.
If not, reinsert each disconnected device every 2 hours to identify the culprit causing the blue screen error. When you find the problematic device, visit the manufacturer’s website and see if there is available an update driver for it. - Uninstall Programs: Check the programs you installed on your device during the period when the DPC_Watchdog_Violation error occurred and uninstall them. Then reinstall them one-by-one to find the culprit.
Method 2: Replace the SATA Controller driver.
Many users reported that by changing the SATA controller driver they were able to fix the DPC_Watchdog_Violation error.
1. Right-click at Start menu and select Device Manager.

2a. In Device Manager, expand IDE ATA/ATAPI Controllers.
2b. Now notice the name of the SATA Controller/Driver and proceed as follows:
- If it is Standard SATA AHCI Controller skip to method-3, because this is the recommended compatible driver for the Windows 11.
- If you see another controller model (other than the «Standard SATA AHCI Controller»), right-click on it and select Properties.

3. Select the Driver tab, then click on Driver details.

4. Check the value of the driver files and if it ends with storeahci.sys (as seen in the image below), skip to Method 3. However, if the value is different from what is in the image, continue to the next step.

5. At the Driver tab, click Update Driver.

6. In the new window that appears, select Browse my computer for drivers.

7. Select Let me pick from a list of available drivers on my computers.

8. In the Model section, check Show compatible hardware, select Standard SATA AHCI Controller, then click Next.

9. The new controller will be installed and you will get a prompt to restart the PC to effect the changes. Select Yes.
Method 3: Repair Windows 11 System Files with SFC and DISM tools.
The next method to solve the DPC_Watchdog_Violation bsod error, is to check and repair Windows system files from command prompt.
1. On the search bar type CMD and select Run as administrator
![image_thumb[1]](https://www.wintips.org/wp-content/uploads/2022/04/image_thumb1_thumb.png "image_thumb[1]")
2. In the cmd window, type the command below and press Enter.
- Dism.exe /Online /Cleanup-Image /Restorehealth
3. Be patient until DISM repairs component store. When the operation is completed, (you should be informed that the component store corruption was repaired), give this command and press Enter:
- SFC /SCANNOW
![image_thumb[4]](https://www.wintips.org/wp-content/uploads/2022/04/image_thumb4_thumb.png "image_thumb[4]")
4. This may take a few minutes to complete. Restart the PC once it is done and check if everything works fine now.
Method 4: Check Hard Disk for problems.
The next method to fix the issue, is to check the hard disk for errors and to repair them, using the CHKDSK command. To do that:
1. Launch command prompt as administrator
2. In the command prompt, type the command below and press Enter.
- chkdsk c: /x /r
3. You will get a prompt to schedule the disk check the next time the system restarts. Press Y (to select Yes) and restart your device to scan and repair the disk errors.
![image_thumb[6]](https://www.wintips.org/wp-content/uploads/2022/04/image_thumb6_thumb.png "image_thumb[6]")
4. Upon restart let Windows to complete the check and repair process and after entering Windows, check if the problem persists.
Method 5. Repair Upgrade Windows 10.
If the SFC and DISM tools fails to fix the issue, the repair upgrade is your best option to repair Windows 11 without losing your files.
1. Visit Microsoft Windows 11 download page and at ‘Create Windows 10 Installation Media’ section, click Download tool now.

2. Open the downloaded MediaCreationTool.exe file. Then select Accept to agree to the applicable notices and license terms.

3. Choose Upgrade this PC now and click Next. The latest version of Windows 10 will begin to download.

4. A new window will appear asking you to Choose what to keep. Select Keep personal files and apps, and click Next.

5. Finally, click Install to start the installation/repair process of Windows 10, without losing your data.

6. During the process your computer will restart several times. There is nothing to worry about. Wait until the installation is complete and enter Windows.
Scenario 2: How to fix DPC Violation error if Windows 11 Cannot Start.
When Windows can’t start normally because of the DPC_Watchdog_Violation error, it’s a bit more difficult to overcome the problem, but don’t worry, here are some methods to fix the problem.
Method 6. Repair Windows 11 with System Restore.
«System Restore» is the first and recommended option to fix the DPC Violation error by restoring Windows 11 to a state where it was working perfectly. To do that:
Step 1. Enter in Windows Recovery Environment (WinRE).
If Windows cannot start you have to repair Windows from the Windows Recovery Environment (WinRE). To enter in WinRE use one of the following two ways:
1. Force your PC to boot into WinRE: Restart your computer and when the manufacturer’s logo appears, hold down the power button for 5 seconds to turn off the computer. Once it shuts down, turn it on again. Repeat this process 3-4 times and then wait for the «Automatic Repair» screen to appear. When this done, click Advanced Options, and continue below to repair Windows 11.
2. Boot your PC from a USB Windows 11 installation media: If you don’t own a USB Windows 11 installation media:
- From another PC, create a Windows 11 installation media on an empty USB drive (at least 8GB).
- Power on the affected computer and boot from the USB Windows Installation media.
- Click Next at the first screen and then click Repair your Computer > Troubleshoot.
- Continue below to repair your computer.
Step 2. Run System Restore from the WinRE options.
1. On WinRE Advanced options, click System Restore.

2. If prompted, select an account with administrative privileges, type a password for that account and click Continue.

3. At System Restore screen, click Next. *
* Note: If you receive the message that «no restore points have been created on your computer…» skip to next method.

4. Select Show more restore points and select a date that you know your computer was working correctly, and then click Next.

5. Click Finish and Yes again to start to restore process.
6. Now wait until the restore process is completed. During the restore process, your computer will restart several times and when it’s done, you should enter in Windows without problems.
Method 7. Repair Windows 11 System Files from WinRE.
1. Follow the step-1 in method-6 above to enter in WinRE.
2. In Advanced Options menu, select Command Prompt.

3. In command prompt, type the following command and press Enter.
- bcdedit
4. Notice the drive letter of Windows OS partition (e.g. «osdevice –> partition=C: «)
5. Then give this command and press Enter:*
- chkdsk X: /r /x
* Note: Replace the red «X» in the above command with the drive letter you noticed above in the OS partition.*
* e.g. In this example the OS partition has the letter «C», so the command will be:
- chkdsk C: /r /x

6. When the CHKDSK process is completed, give this command: *
- SFC /SCANNOW /OFFBOOTDIR=X:\ /OFFWINDIR=X:\Windows
* Note: Where «X» in the above command, is the drive letter of the OS partition you noticed before. (Don’t forget to add a space between \ /)
e.g. In this example the OS partition has the letter «C», so the command will be:
- sfc /SCANNOW /OFFBOOTDIR=C:\ /OFFWINDIR=C:\Windows

7. When the SFC scan process is completed, give the following command to create a scratch directory on the Windows drive. *
- mkdir X:\Scratch
* Note: Change the drive letter X according to the drive letter of the OS partition (e.g. «C» in this example).

8. Then give this DISM command to repair the Windows image:*
- DISM /Image:X:\ /ScratchDir:X:\Scratch /Cleanup-Image /Restorehealth
* Note: Where «X» in the above command, is the drive letter of the OS partition you noticed before. (Don’t forget to add a space between \ /)
e.g. In this example the OS partition has the letter «C», so the command will be:
- DISM /Image:C:\ /ScratchDir:C:\Scratch /Cleanup-Image /Restorehealth

9. Wait for DISM to repair any corrupted files and then close all open windows and turn off your PC.
10. Try to boot to Windows normally and check is the problem is solved.
Method 8: Reset Windows 11 to default state.
The next method to fix the DPC Violation error, is to reset Windows 11 to default state, by using the Reset the PC, option.
1. Force your PC to boot into WinRE by following the instructions in step-1 on method-6 above to enter in WinRE. *
* Note: The Reset this PC option is not available if you started from a USB Windows installation Media.
2. Click Reset this PC in Troubleshoot screen.

3. At the next screen choose Keep my files. *
* Please Note: All applications and settings will be removed if you continue and you will need to reinstall your programs when the process is complete.

4. If prompted, select an account with administrative privileges, type a password for that account and click Continue.
5. If you PC is connected to Internet, select Cloud download, otherwise choose Local reinstall.

6. Finally, let the Reset this PC tool to reinstall Windows.
Method 9. Clean Install Windows 11 & Check Hardware.
If none of the above methods doesn’t resolve your problem, then your final option is to backup your files and to perform a clean installation of Windows 11.
* Final notes: If you experience the same error after clean installing Windows 10, this indicates a problem with a device driver or a hardware problem. In such a case, proceed as follows to find the culprit:
- Check the memory (RAM) for problems to make sure it’s okay.
- Install Windows on another hard drive, preferably an SSD
That’s it! Which method worked for you?
Let me know if this guide has helped you by leaving your comment about your experience. Please like and share this guide to help others.
If this article was useful for you, please consider supporting us by making a donation. Even $1 can a make a huge difference for us in our effort to continue to help others while keeping this site free:
- Author
- Recent Posts
Konstantinos is the founder and administrator of Wintips.org. Since 1995 he works and provides IT support as a computer and network expert to individuals and large companies. He is specialized in solving problems related to Windows or other Microsoft products (Windows Server, Office, Microsoft 365, etc.).
Содержание статьи:
- Что рекомендуется проверить при возникновении ошибки с кодом 0x00000133
- Драйверы
- Приложения
- ОЗУ
- Диск
- BIOS | UEFI
- PS (послесловие)
- Вопросы и ответы: 0
Всем здравия!
Сегодня хочу уделить немного времени ошибке с кодом 0x00000133 (возникает внезапно, часто после подвисания. Если успеете присмотреться — на синем экране заметите: «DPC WATCHDOG VIOLATION…»).
Что она означает (кратко): в Windows есть спец. механизм (DPC-сторожевой таймер), используемый для «сглаживания» работы драйверов и ПО (предотвращает зависания, ошибки и т.п.). В случае «чего-то» критического (часто с драйверами) — возникает эта ошибка и ПК перезагружается…
Собственно, приведу пару рекомендаций ниже, которые могут помочь в устранении…
*
Что рекомендуется проверить при возникновении ошибки с кодом 0x00000133
Драйверы
В первую очередь я бы настоятельно посоветовал обратить внимание на драйверы (особенно, если вы их накануне обновляли/переустанавливали. Или подключили какое-то новое оборудование). Особое внимание на видеодрайвер!
Что можно сделать:
- во-первых, если вы только-только подкл. новое оборудование и начались ошибки — попробуйте вернуться на старое (загрузите другой драйвер для этого оборудования);
- во-вторых, если у вас ноутбук — крайне желательно зайти на его официальный сайт (Asus, Acer, MSI и т.д.) и загрузить драйверы с него! Затем переустановить их (те драйверы, что подбирает сама Windows — они часто сбойные…);
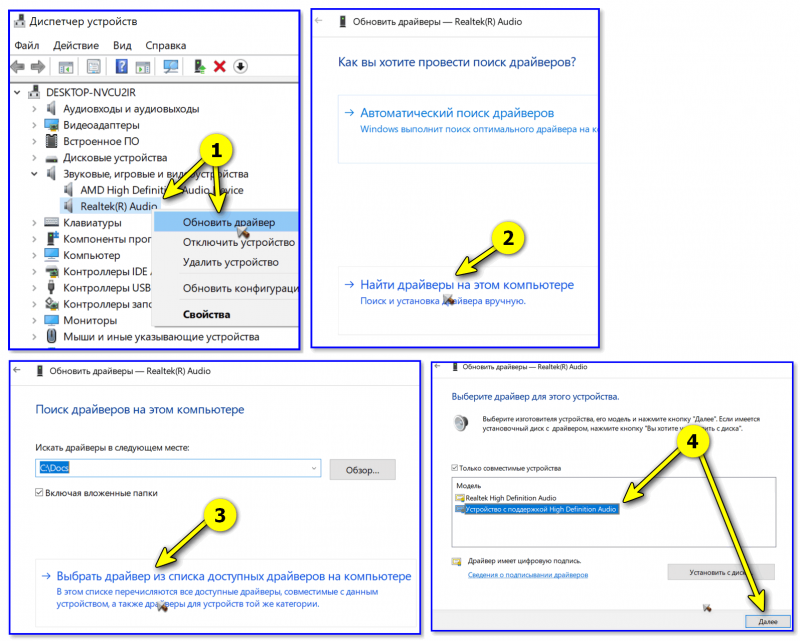
- в-третьих, попробуйте для аудио- и видеодрайвера (вкладка «Видеоадаптеры») в диспетчере устройств выбрать вручную драйвер, например, более старый (прим.: как правило их в системе может быть несколько, т.к. Windows автоматически может загружать и ставить их);

Выбор текущего драйвера из списка установленных — диспетчер устройств
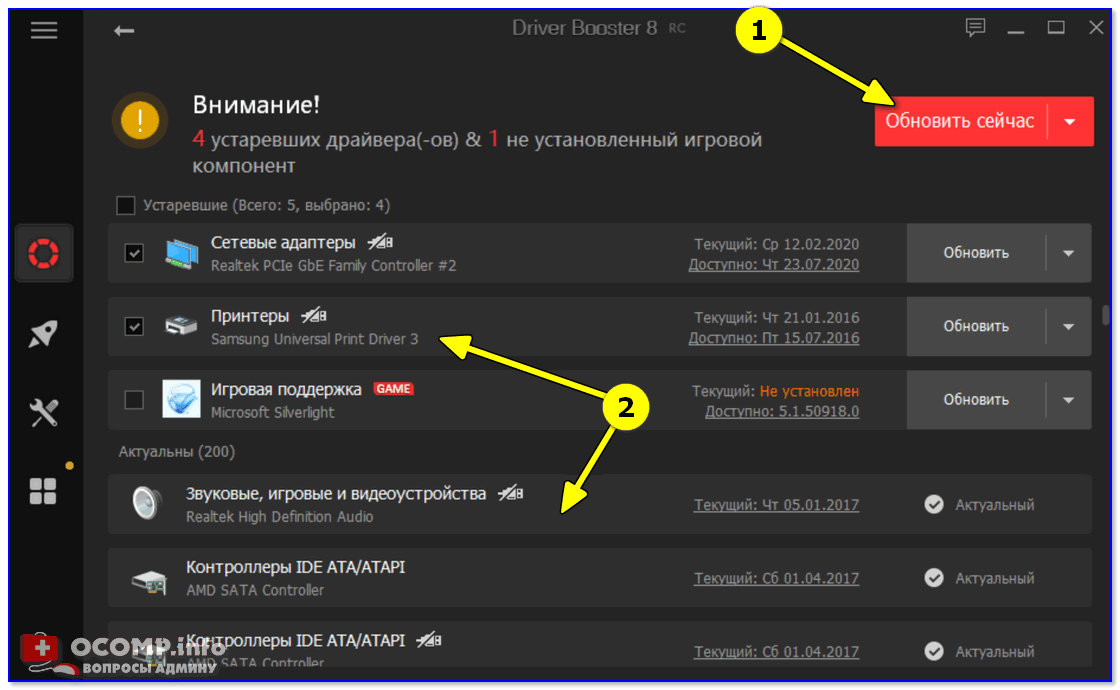
- в-четвертых, системные библиотеки Windows и драйверы можно обновить также с помощью 📌Driver Booster (это спец. утилита). Прибегать к ее помощи я бы посоветовал в тех случаях, когда вы не можете найти драйверы на офиц. сайте.

Driver Booster — найдено 4 устаревших драйвера, и 1 игровой компонент
*
Приложения
Обратите внимание при работе каких приложений вылетает ошибка. В ряде случаев не исключены какие-то несовместимости с вашей ОС (или др. приложениями). Можно попробовать поискать другую версию сбойной программы… (особенно это касается игр, загруженных с торрент-трекеров…).
📌 Автозагрузка Windows
В диспетчере задач (Ctrl+Alt+Del) в разделе «Автозагрузка» не лишним было бы откл. все неизвестные вам приложения.
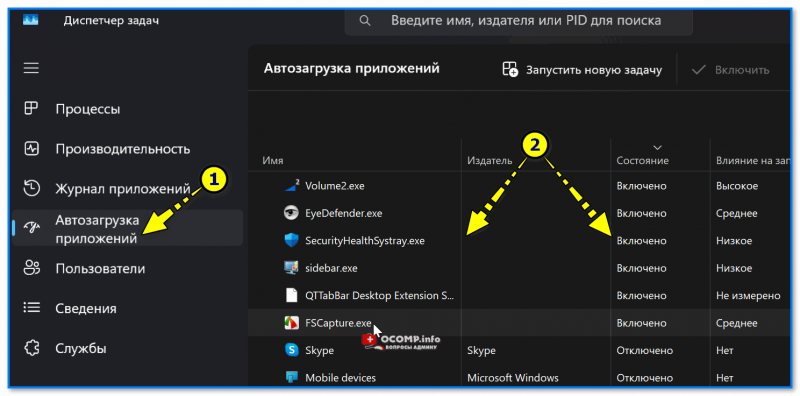
Автозагрузка приложений — диспетчер задач
📌 Планировщик заданий
Также стоит обратить внимание на планировщик заданий (Win+R, команда: control schedtasks): нередко в нем есть задачи, которые могут периодически запускаться, чем и вызывать ошибку.
Чтобы откл. в планировщике заданий все лишнее и незнакомое: достаточно открыть в нем вкладку «Библиотека…», затем кликнуть ПКМ по ненужному заданию и перевести его в режим откл. (или удалить вовсе…).
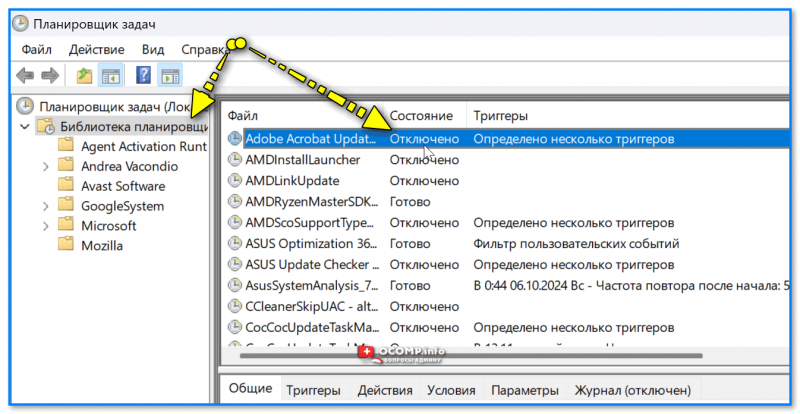
control schedtasks — отключаем все лишнее
*
📌 Журнал событий
В журнал событий (Win+R, и команда eventvwr) стоит зайти в целях доп. диагностики (дело в том, что Windows сохраняет все события: перезагрузки, ошибки и т.д. Возможно, там будет указано примечание, которое подскажет с каким ПО возникли проблемы…).
Кстати, искать нужно критические события в разделе «Система». Желательно это делать сразу же после возникновения ошибки.
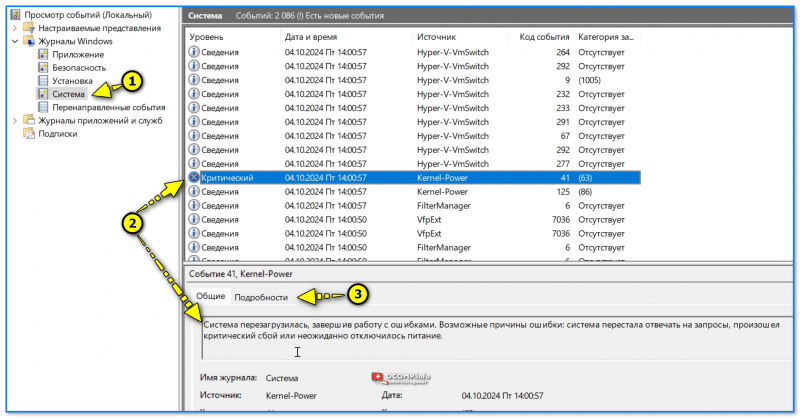
Журнал событий — ищем критические события
*
ОЗУ
В некоторых случаях ошибка может возникать из-за неисправности ОЗУ. Чтобы исключить оное — рекомендовал бы проделать небольшой 📌тест:
- нажать Win+R;
- ввести команду mdsched;
- согласиться на проведение теста после перезагрузки ПК;
- если ошибки будут найдены — Windows сообщит вам об этом. Более подробно тут: 📌https://ocomp.info/testirovanie-operativnoy-pamyati-test-ozu-ram.html
*
Диск
Системный диск (на котором установлена ОС Windows) рекомендуется также проверить (благо, что это делается быстро). Например, мне в этом плане импонирует утилита Victoria 5: достаточно нажать кнопку «Quick» и дождаться результатов 3-минутного теста…
📌Подробно о проверки в Виктории: https://ocomp.info/diagnostika-i-proverka-diska.html
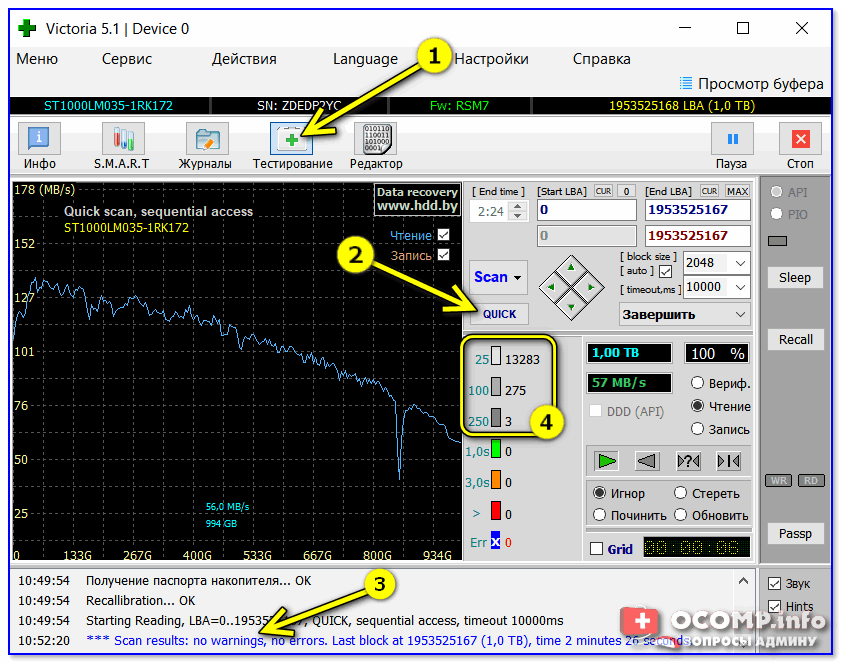
Тестирование быстрое (Quick) — Victoria 5
*
BIOS | UEFI
Не разгоняли ли вы ЦП? Не повышали ли частоты ОЗУ?
Нередко критические ошибки (вроде 0x00000133) возникают после того, как будут изменены некоторые параметры в BIOS (например, плашки ОЗУ от Radeon часто не работают стабильно на частоте 3200Mhz, хотя она и заявлена в их хар-ках. Но после выставления частоты 2400Mhz — всё работает штатно).
Что тут можно порекомендовать:
- во-первых, сбросить BIOS до безопасных настроек (если не знаете как — то в помощь: 📌https://ocomp.info/kak-sbrosit-nastroyki-bios.html);
- во-вторых, если в Windows устанавливали какие-то доп. приложения для разгона — удалите их!
*
PS (послесловие)
Кстати! Возможно, некоторых устроит иное решение — а именно переход на др. ОС, например, на Linux. Если проблема не носит аппаратный характер — этот ход может полностью избавить от проблемы…
Например, на одном моем стареньком ноутбуке (для которого нет драйверов для Windows 10) — при установке оной вылетала эта ошибка. После перехода на Linux Elementary — он уже работает пару лет вообще без единого критич. сбоя. Пользоваться этой ОС ничуть не сложнее, чем Windows…
📌📌 Мои рекомендации по выбору версии Linux (для начинающих) — https://ocomp.info/vyibor-linux.html
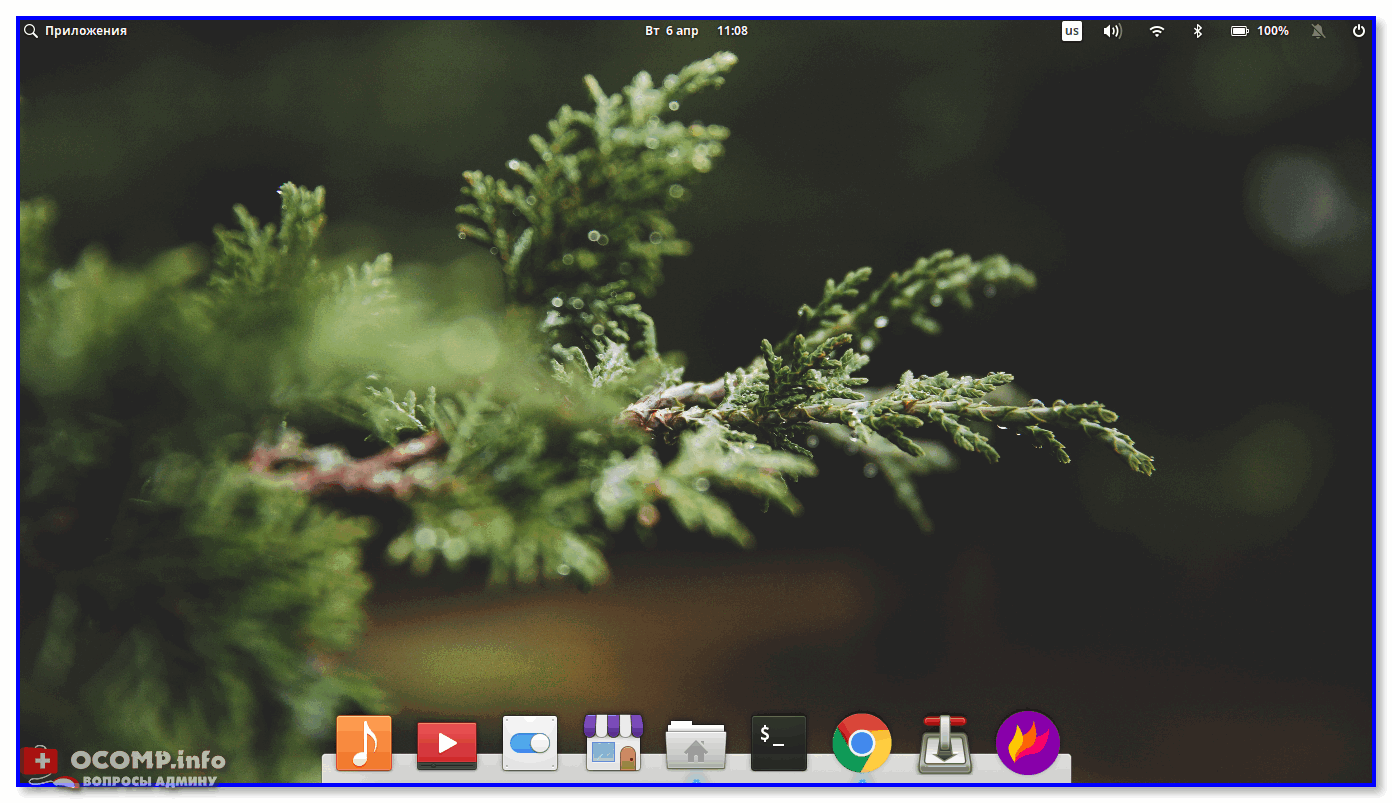
Рабочий стол Elementary OS
*
Если вам удалось устранить ошибку — поделитесь своим опытом в комментариях ниже (заранее благодарю).
Удачи!
Here are several fixes you can try before you need to open your computer
Updated on March 18, 2025
Rainer Jagmann / iStock / Getty Images Plus
It’s hard to use a computer that’s displaying the DPC Watchdog Violation Blue Screen of Death (BSOD) error. But don’t give up—we’ve got all the solutions below that will help you get back into your computer in no time.
How to Fix a DPC Watchdog Violation Error
This error could point to a hardware compatibility issue, but you don’t need to open your computer just yet. Here are some potential solutions to try first:
-
Unplug any external devices you’re currently using, such as portable hard drives, printers, scanners, smartphones, digital cameras, and other unnecessary devices.
If the DPC Watchdog Violation error goes away after doing so, you know that it’s one of those pieces of hardware. Plug them back in, one by one, to see which one caused the error.
Then, update your drivers, plug the device into a different USB port, or format the drive.
-
Run the SFC /Scannow command to fix any corrupted system files. Once it’s complete, see if the error repeats itself.
-
Run the chkdsk command to fix any errors with your storage drivers. This process can fix problems with an SSD that might be causing the DPC Watchdog Violation error in Windows 11.
-
Update your SATA AHCI driver, either through Device Manager or with a free driver updater tool.
-
Update Windows 11 to see if there are any patches out for a bug that’s causing this error.
-
Check for a firmware update. If you suspect that your SSD is the problem, the manufacturer’s website might include a firmware update that you’ll need to install. You can usually find these on the support page.
-
Revert to a previous restore point, if you have one, to get around all sorts of problems, including this one.
-
Reset Windows 11 to its factory defaults. This will wipe all the software from the computer, which could include deleting whatever software conflict is to blame for the Windows 11 DPC Watchdog Violation error.
-
Remove the hardware that’s causing the error. If you think your main boot drive is to blame, install a new hard drive and put Windows 11 on it.
Causes of the DPC Watchdog Violation Error
The DPC Watchdog Violation error is most commonly caused by hardware compatibility problems, most often with PCs with an SSD and external devices, but it doesn’t always happen when you install a new component.
This error can also occur when you’re missing a driver, or with software conflicts between different applications.
The specific cause of your DPC Watchdog Violation error will be hard to pin down, but there are several fixes to try, which may reveal what the problem was in the first place.
FAQ
-
The above fixes should work for earlier versions of Windows. First, unplug all of your devices, and then check for driver updates. As a last resort, reinstall Windows.
-
The «Attempted Switch from DPC» error is another issue that gives you the Blue Screen of Death; its error code is 0x000000B8, and it usually happens when third-party software is interfering with Windows. To fix it, you may have to start up your computer in Safe Mode, and then go to Settings > System > Apps & features and uninstall the apps that may be causing the error.
Thanks for letting us know!
Get the Latest Tech News Delivered Every Day
Subscribe
A Blue Screen of Death (BSOD) is generally a fatal error that causes the system to crash and brings everything to a complete stop. The DPC Watchdog Violation in Windows 11 is one such annoying BSOD error.
 1")
As with most Blue Screen of Death issues, the DPC Watchdog Violation forces the user to restart their system and potentially lose their unsaved documents or files. Luckily, there are some ways to fix this problem.
What causes the DPC Watchdog Violation error?
The error in question is generally caused when the system fails to recognize, read, or run certain files or hardware. Here are some of the most common cases where you might see the DPC Watchdog Violation error in Windows 11/10:
- Hardware incompatibilities: The system is unable to identify or run devices like SSD, USB devices, or other external components. Missing or outdated drivers may cause the hardware to face compatibility issues.
- Corrupted or missing files: The issue can be caused if certain important system files are corrupt or missing.
- Software conflicts: Multiple programs conflicting with each other for system resources can also lead to this dreadful BSOD.
Fortunately, there are a lot of troubleshooting steps that can help you get rid of the annoying DPC Watchdog Violation error in Windows 11/10 and earlier versions. Here are some solutions that you can try:
Unplug all the external devices
Incompatible external devices like printers, scanners, USB drives, SSDs, game controllers, microphones, and cameras can cause the system to crash with the DPC Watchdog Violation error.
You can potentially fix the problem by disconnecting all these devices and then trying to use the system. If everything works fine, reconnect those devices (one by one) after regular intervals of time.
If connecting a specific device leads to the BSOD, then you’ve successfully identified the faulty hardware. Now you can fix the problematic device by updating its drivers, formatting it, or by plugging it into a different port.
 2")
You can usually download drivers directly from the manufacturer’s website (e.g., NVIDIA, AMD, Intel). Or use the instructions discussed here, install and update drivers.
Run SFC (System File Checker) or DISM scan
SFC and DISM are tools built into Windows that can scan protected system files and replace corrupted ones. As the DPC Watchdog Violation BSOD can be caused due to corrupted files, running an SFC or DISM scan can resolve the problem.
Fix Outdated or Corrupt NVIDIA GPU
DCP WATCHDOG VIOLATION error may occur on some systems using GeForce GTX 600/700/16 and GeForce RTX 20 series GPUs or a particular GPU from NVIDIA.
In case, you’ve installed the latest version of drivers on video cards, then it’s possible that you’re seeing this stop code due to compatibility issues.
In this situation, always keep track of the NVIDIA forum about similar reports and hotfixes released by the company. You can this article on how to fix DCP WATCHDOG VIOLATION due to NVIDIA GPU to mitigate the issue.
Run a CHKDSK scan
The Windows CHKDSK tool scans and examines the disk space and usage to identify and repair various errors.
Click on the Search icon and type CMD, when Command Prompt appears in search results, click on Run as administrator. When the UAC dialog box appears, click Yes to continue.
 3")
In the Command Prompt window, you need to type this: chkdsk c: /f /r /x and hit enter.
When asked for confirmation, press Y and then Enter.
Once the CHKDSK scan is completed, Restart your PC to save the changes.
Replace or update the SATA AHCI driver
Go to Search and look for Device Manager. Open the top result.
Under IDE ATA/ATAPI controllers, right-click on Standard SATA AHCI Controller.
 4")
Select Properties, go to the Driver tab, and click on the Driver Details button.
If the driver file ends with Storahci.Sys, then everything is completely fine and you can move on to the next troubleshooting step.
 5")
However, if the driver file ends with iaStorA.sys, it needs to be replaced. Click OK to close the Driver Details window.
In the Driver tab, press Update Driver.
Now Click on Browse my computer for drivers.
 6")
Select Let me pick from a list of available drivers option at the bottom of the window.
 7")
Now make sure that you select the Standard SATA AHCI Controller and click the next button.
 8")
Restart your system to apply the changes.
Update to the latest version of Windows 11/10
Windows 11 consistently receives updates that bring various improvements and bug fixes. Updating to the latest version can help resolve certain issues with hardware incompatibility, outdated or corrupt drivers, and software conflicts.
 9")
Update your SSD driver
There is a possibility that your PC’s SSD is causing the DPC Watchdog Violation error. In such cases, you need to find the model name or number for your SSD and search for its drivers on the manufacturer’s website.
You can also use third-party software that helps you update drivers for your PC components.
Revert to an earlier restore point
Windows offers the ability to create a System Restore Point if things go wrong. If you have previously created a restore point, reverting to it can help fix the issue.
Note that this will remove all the software installed after creating that restore point. Here’s how to perform a system restore:
Right-click on the Windows Start button and select the Run option.
Type this rstruicommand in the Run search box.
 10")
Select OK and this will open the System Restore utility.
Click on Choose a different restore point and then click Next.
Now choose the desired restore point. Make sure that this point was created before you started experiencing issues with your system.
 11")
Then select Next and Finish to roll back to a previous restore point.
 12")
Reset your Windows 11/10 system
If nothing else works, unfortunately, you are only left with the option to reset your Windows 11 PC to factory settings. This will delete all your system settings and third-party software. However, there is a way to keep your personal files.
 13")
Here’s how you can reset Windows 11/10 without losing your personal data.
Troubleshoot Windows in Safe Mode
If you’re unable to log into Windows after encountering the DPC Watchdog Violation error, the best option would be to boot into Safe Mode.
Shut down your system and press the Power button.
When the PC starts booting up, hold the Power button for 5-10 seconds until the boot is stopped and the PC shuts down again.
Repeat these steps 2-3 times. On the third attempt, you enter the Windows Recovery Environment.
Go to Troubleshoot, then Advanced options.
 14")
Click on the Startup options and press the Restart button.
 15")
Once the system Restarts, click F5 to boot into Safe Mode with Networking.
 16")
After you enter Windows in Safe Mode, you can try to identify and repair the problematic components.
FAQs about DPC Watchdog Violation error
Do these steps apply to earlier versions of Windows?
Yes. The steps mentioned above should be relatively the same for Windows 11, 10, and earlier versions. However, the location of certain settings could be a little different.
Is the DPC Watchdog Violation error a virus?
No. DPC Watchdog Violation error generally occurs due to software conflicts, hardware incompatibilities, and corrupted or outdated files.
Can faulty RAM or GPU lead to DPC Watchdog Violation?
Yes. A faulty RAM module or malfunctioning GPU can potentially lead to the DPC Watchdog Violation BSOD error.
Are you facing a similar issue on your system? If you know of any other solution that we might have missed, do let us know in the comments section.