
Free download Windows App for MacOS Latest Offline Installer — Remote access to Windows-based systems from your Mac.
Free Download Windows App (Microsoft Remote Desktop), the latest standalone offline installer for macOS. It empowers users to seamlessly access and control their Windows-based systems from their Mac, fostering productivity and collaboration in the remote work landscape.
Overview of Windows App for macOS
It provides users a seamless bridge to their Windows-based systems from their Mac. With its intuitive interface, cross-platform compatibility, and robust security features, this application facilitates high-quality remote access, enabling users to work efficiently and collaboratively, regardless of geographical constraints. Whether customizing settings, integrating local resources, or managing multiple sessions, this tool delivers a versatile and user-friendly solution, redefining the remote work experience for users.
Features of Windows App for macOS
- High-Quality Remote Access: The application prioritizes seamless remote access, ensuring you can work efficiently, regardless of location.
- Secure Connection: Your data remains protected during transit, fostering a secure connection between your Mac and remote Windows system.
- Customizable Settings: Allows users to customize settings, including display resolution, keyboard shortcuts, and more, providing a personalized and efficient workspace.
- Clipboard Integration: Ensures your workflow remains uninterrupted by enabling clipboard integration, enhancing the overall user experience.
- Smart Card Authentication: It supports smart card authentication for users in environments with heightened security requirements. This feature adds an extra layer of protection, making it suitable for enterprise and government users.
- Resource Redirection: Enhance your productivity by redirecting local resources to your remote session. Print documents, access local drives, and use peripherals seamlessly with resource redirection capabilities.
- Multiple Session Support: Switch effortlessly between different connections, allowing you to manage various projects and tasks without constant disconnection and reconnection.
- Dynamic Resolution Changes: Adapt to different screen sizes without compromising clarity. It dynamically adjusts the resolution to ensure optimal visuals, making it a versatile tool for users with varying display setups.
Technical Details and System Requirements
macOS 11.0 or later
FAQs
Q: Is my data secure during remote sessions?
A: Yes, it employs robust encryption protocols to ensure the security of your data during transit.
Q: Can I access my remote Windows machine from a different network?
A: Yes, as long as the Mac and the remote Windows machine have internet connectivity, you can connect from anywhere.
Conclusion
It is a versatile and reliable solution for users seeking efficient remote access to Windows-based systems. With its user-friendly interface, advanced features, and commitment to security, this application is invaluable for individuals and businesses. Streamline your workflow, enhance collaboration, and embrace the power of seamless remote connectivity on your Mac.
Comments
If you want to enjoy Windows 10 /11 on your Mac computer, you can download Windows 10/11 ISO for Mac, then install Windows on Mac via Boot Camp Assistant. In this article, MiniTool Software will show you how to download Windows ISO for Mac free for installation.
Can you run macOS on a Windows computer? Of course, the answer is yes. You can run macOS on a Windows PC using VMware. On the other hand, can you run Windows on a Mac computer? The answer is also yes. You can easily install Windows on your Mac computer with the help of Boot Camp Assistant. After that, you can switch between macOS and Windows as per your needs.
Before installing Windows 10/11 on your Mac computer, you need to download Windows 10/11 ISO for Mac. Now, let’s first talk about downloading Windows 10/11 ISO images for Mac.
Download Windows ISO for Mac Free
In this part, we will introduce how to download Windows 10 ISO for Mac and download Windows 11 ISO for Mac separately.
Download Windows 10 ISO for Mac Free
To protect your computer from viruses, malware, and spyware, you should download a Windows 10 ISO image for Mac using a reliable download source. Fortunately, Microsoft now enables you to directly download Windows 10 ISO image files for free from its official site. The Windows 10 ISO image direct download is only available when your computer agent is not Windows. So, it is very lucky. You can directly download a Windows 10 ISO image from Microsoft’s official site on your Mac computer and use it to install Windows 11 on Mac.
Tips:
If you are using a Windows PC, you can also directly download a Windows 10 ISO file from Microsoft by changing the user agent under the developer mode of your Chromium browser like Google Chrome or Microsoft Edge. See this post: Windows 10 ISO Images Direct Download via Microsoft’s Website.
Step 1: Go to the Download Windows 10 Disc Image (ISO File) page from Microsoft’s official site on your Mac.
Step 2: Click the Select edition menu and select Windows 10 (multi-edition ISO) option from the drop-down list.
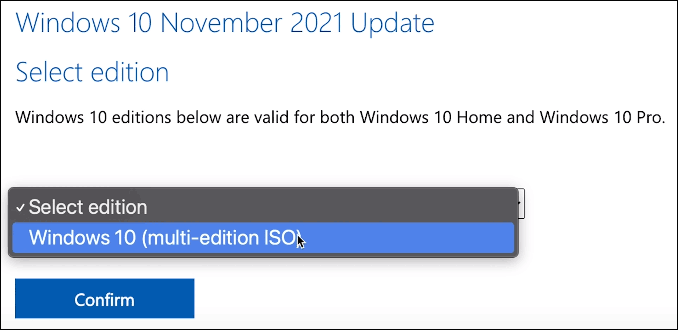
Step 3: Click the Confirm button and wait for your request to be verified
Step 4: Choose your language and click the Confirm button to continue.
Step 5: On the next page, you will see two available download buttons: 64-bit Download and 32-bit Download. Your Mac computer only allows you to install Windows 10 Home 64-bit edition or Windows 10 Pro 64-bit edition. So, you need to click the 64-bit Download button to start downloading Windows 10 ISO file for Mac.
Step 6: The size of the Windows 10 64-bit ISO file is about 5.8 GB. So, it will take a while to complete the whole downloading process. You should wait patiently.
After downloading the Windows 10 ISO file on Mac, you should let it stay in the download folder, move to the install section, and follow the steps to install Windows 10 on your Mac computer.
Download Windows 11 ISO for Mac Free
Microsoft has released a direct download link for all users since the official initial release of Windows 11. It is also free to download a Windows 11 ISO file for Mac from Microsoft.
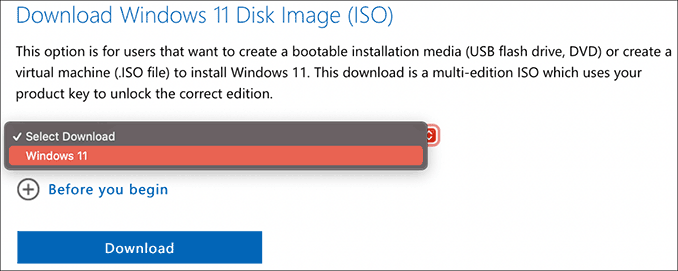
Step 1: Go to the Download Windows 11 Disc Image (ISO File) page from Microsoft’s official site using your Mac.
Step 2: Scroll down to the Download Windows 11 Disk Image (ISO) section. Then, click the Select Download menu and select Windows 11 option from the drop-down list.
Step 3: Click the Download button and wait for your request to be verified.
Step 4: Choose your language and click the Confirm button to continue.
Step 5: Windows 11 only has 64-bit editions. So, there is only one available download button: 64-bit Download. Click that button to download the Windows 11 ISO file on your Mac.
Step 6: The Windows 11 64-bit ISO file is 5.1 GB in size. You should wait patiently until the whole download progress ends.
Likewise, you should let the downloaded Windows 11 ISO image stay in the download folder, move to the install section, and follow the steps to install Windows 10 on your Mac computer.
Want to download Windows 10/11 ISO for Mac? This post introduces how to directly download one from Microsoft’s official site.Click to Tweet
Install Windows 10/11 on a Mac Computer
How to Install Windows 10 on Mac?
Preparations:
1. Windows 10 installation on Mac needs a Boot Camp Assistant and Boot Camp requires a Mac with an Intel processor. So, you need to have one of the following Mac computers:
- MacBook released in 2015 or later
- MacBook Air released in 2012 or later
- MacBook Pro released in 2012 or later
- Mac mini released in 2012 or later
- Mac Pro released in 2013 or later
- iMac released in 2012 or later1
- iMac Pro (all models)
2. You also need to install the latest macOS updates because they include the updates to Boot Camp Assistant.
3. To store the Windows 10 installation files, your Mac startup disk should have at least 64 GB of free storage space. Of course, more is better. For example, 128 GB of available storage space can provide the best experience because Windows updates will take up more space.
4. An external USB flash drive, which has at least 16 GB of space. However, if you are using one of the following Mac computers, it will not need a USB flash drive to install Windows 10:
- MacBook released in 2015 or later
- MacBook Air released in 2017 or later3
- MacBook Pro released in 2015 or later3
- Mac Pro released in late 2013 or later
- iMac released in 2015 or later
- iMac Pro (all models)
5. A Windows 10 Home 64-bit ISO file or Windows 10 Pro 64-bit ISO file. We have mentioned the download method above. If it is the first time to install Windows 10 on your Mac, you need to have a full version of Windows 10 rather than an upgrade.
Steps to install Windows 10 on Mac
To install Windows, use Boot Camp Assistant, which is included with your Mac.
Step 1: Change the Secure Boot settings if necessary. You need to use Full Security to install Windows 10 on Mac. After the Windows 10 installation, the Secure Boot setting will not affect the Windows startup.
Step 2: Open the Utilities folder of the Application folder. Then, open Boot Camp Assistant.
Step 3: Connect your external USB flash drive to your computer if you are required.
Step 4: Boot Camp Assistant will begin to create a Windows 10 bootable USB flash drive for installation.
Step 5: Boot Camp Assistant needs to create a BOOTCAMP partition for the Windows installation, which size should be at least 64 GB. You should not forget this. However, you should set the partition size as large as possible because you can’t change the size later.
Step 6: When Boot Camp Assistant ends the process, you need to restart your Mac to the Windows installer. In general, the installer will automatically select and format the BOOTCAMP partition. If not, the installer will ask where to install Windows. Then, you should select the BOOTCAMP partition manually and click Format to format it.
Step 7: Remove all unnecessary external drives from your Mac. Then, click the Next button and follow the onscreen instruction to install Windows 10.
Step 8: When the installation ends, your Mac machine will start up in Windows with a Welcome to the Boot Camp installer window. You need to follow the instructions to install Boot Camp and the necessary Windows support software drivers on Mac. You will be asked to restart your Mac when everything is done. Just do it.
Here is how to install Windows 10 on Mac.Click to Tweet
How to Install Windows 11 on Mac?
Windows 11 has new hardware and system requirements. Is it possible to install Windows 11 on your Mac computer? Of course, yes. But you need to use some extra steps to make the installation think your Mac device is compatible with Windows 11.
Step 1: You can also use the steps introduced in the How to Install Windows 10 on Mac section to install Windows 11 on Mac, but only when you see the Windows Setup interface pops up, you need to press Shift+F10 to call out the Command Prompt to make some changes to the related Registry key.
Step 2: Type regedit in Command Prompt and press enter to open Registry Editor.
Step 3: Go to HKEY_LOCAL_MACHINE\SYSTEM\Setup.
Step 4: Right-click the Setup folder and then select New > Key.
Step 5: Name the new key LabConfig.
Step 6: Right-click the newly created key and go to New > DWORD (32-bit). Then, name it BypassTPMCheck. After that, you should open this key and set the value to 1.
Step 7: Repeat the above steps to create two other new keys to bypass the RAM check and Secure Boot check. These two new keys should be named ByPassRAMCheck and ByPass SecureBootCheck. And their values should also be 1.
Step 8: Close the Registry Editor and Command Prompt to go back to the Windows setup interface. Then, click the Install Now button and follow the onscreen instructions to install Windows 11 on your Mac.
Here is how to install Windows 11 on Mac.Click to Tweet
Recover Lost and Deleted Files on Windows 10/11
MiniTool Power Data Recovery is a piece of professional data recovery software that works on all Windows versions, including Windows 11, Windows 10, Windows 8/8.1, and Windows 7. You can use it to recover all types of files like images, videos, music files, documents, and more.
This MiniTool data recovery software can recover data from different kinds of data storage devices like computer internal hard drives, external hard drives, memory cards, USB flash drives, pen drives, and more.
This software has a trial edition. If you are not sure if it can find the files you want to recover, you can use this trial edition to scan the drive you want to recover data from and then check the scan results for your needed files.
MiniTool Power Data Recovery TrialClick to Download100%Clean & Safe
Here is how to use this free file recovery tool to scan your drive for lost files:
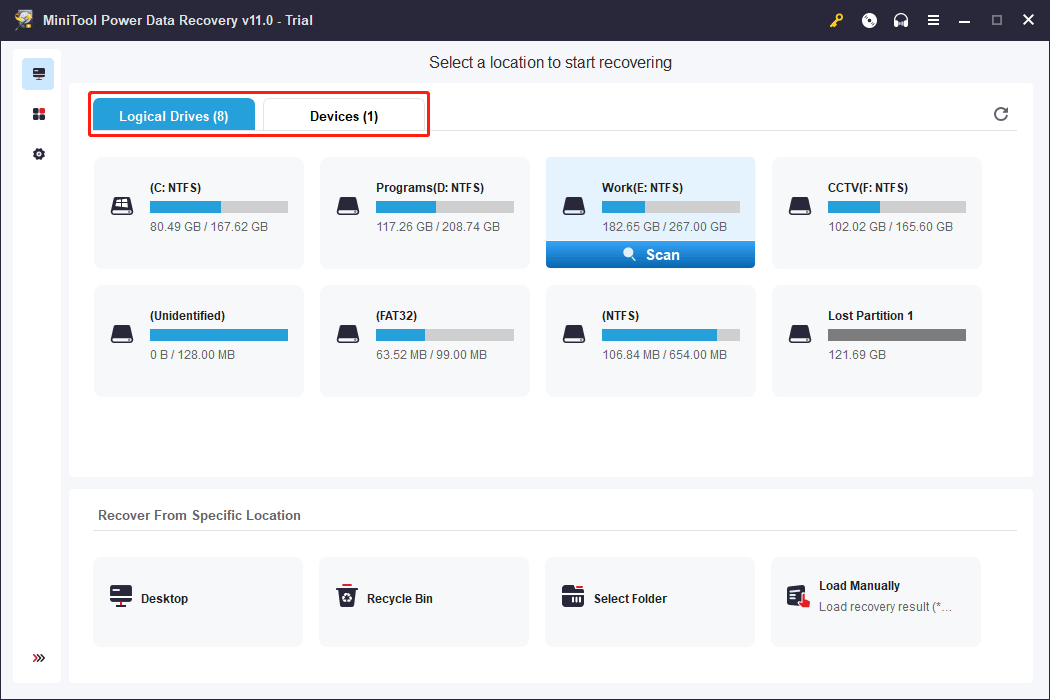
Step 1: Download and install MiniTool Power Data Recovery Trial on your device.
Step 2: Open it to enter its main interface.
Step 3: Find the drive you want to recover data from under the Drives section. Hover over it and click the Scan button to start scanning that drive. If you don’t know which the target drive is, you can switch to the Devices section and select the entire disk to scan.
Step 4: Wait until the scanning ends. Then, check the scan results to find your needed files.
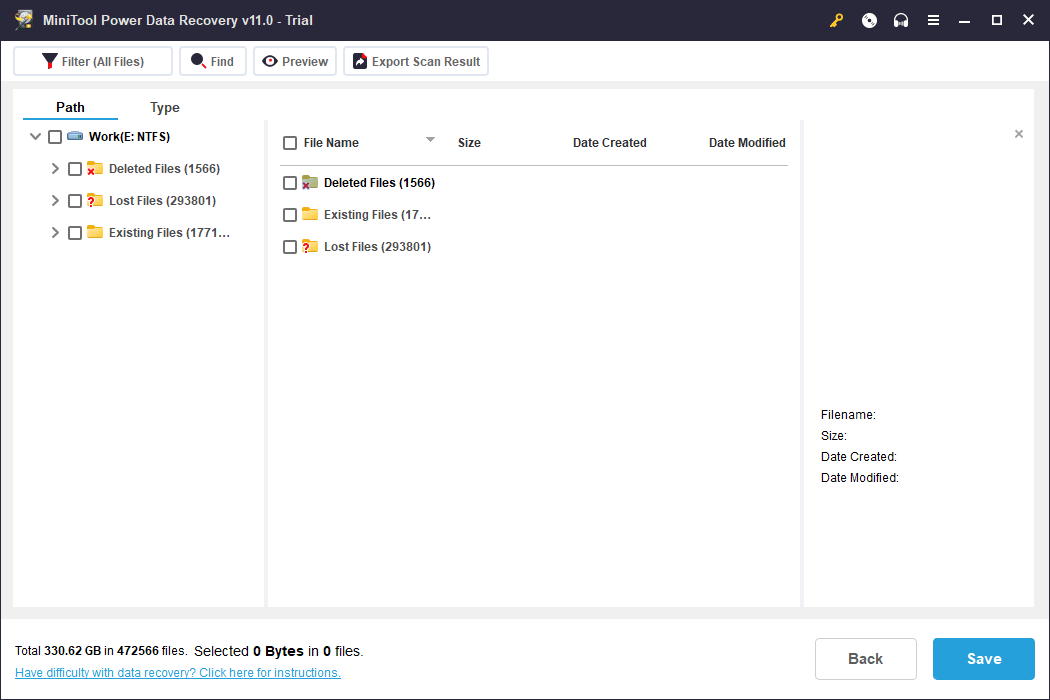
If you want to use this tool to recover your files, you need to use a full edition. You can just upgrade the software to a full edition in the scan results interface. So, you don’t need to take time to scan the drive again. After that, you can select all your needed files at once, click the Save button, and select a suitable folder to save files.
The End
Want to download Windows 10 ISO for Mac or download Windows 11 ISO for Mac? You can just get a Windows 10/11 ISO file from Microsoft’s official site on your Mac computer. This article shows you two related guides.
Additionally, you can also know how to install Windows 10 on Mac and how to install Windows 11 on Mac separately.
If you have other related issues to be fixed or have other good suggestions, you can let us know in the comment. You can also contact us via [email protected].
Remote access to Windows from Mac
Do you need to control a Windows computer from an Apple system? Well, you won’t have any sort of compatibility problems, if you download Microsoft Remote Desktop for Mac. With this tool you’ll be able to connect remotely to all the resources and documents you handle on a computer with Microsoft’s operating system.
Absolute control of Windows from Mac.
Features
- Remote access to Windows by means of a gateway from the Desktop.
- Safe connection to your data by means of Network Layer Authentication (NLA) technology.
- Simple management of all remote connections from the Connections Center.
- High video and sound quality via streaming.
- Simple connection to many monitors or projectors for presentations.
- Possibility to print from Windows to any printer configured on your Mac.
- Access to local files from your Mac’s local files from Windows’ applications.
Shortening distances
The lifelong compatibility problems between Microsoft and Apple’s platforms are reduced with Microsoft Remote Desktop. Without a doubt, it’s a valuable tool designed to satisfy the increasingly obvious demand of users that need to combine at work different resources hosted on different systems.
Download Microsoft Remote Desktop right now for Mac and give your productivity a boost.
Requirements and additional information:
- Minimum operating system requirements:
Mac OS X 10.12.
Elies Guzmán
With a degree in History, and later, in Documentation, I have over a decade of experience testing and writing about apps: reviews, guides, articles, news, tricks, and more. They have been countless, especially on Android, an operating system…
Для операционной системы Windows существует большое количество специализированного и профильного ПО, аналогов которому нет на macOS.
Пользователи вынуждены настраивать BootCamp, устанавливать Windows на внешний накопитель или готовить виртуальную машину с “виндой”.
Не все знают, что есть еще один способ запускать Windows-приложения прямо на Mac без дополнительных операционных систем и виртуальных машин. Работает это благодаря технологии Wine, которая не первый год выручает пользователей.
Что такое Wine
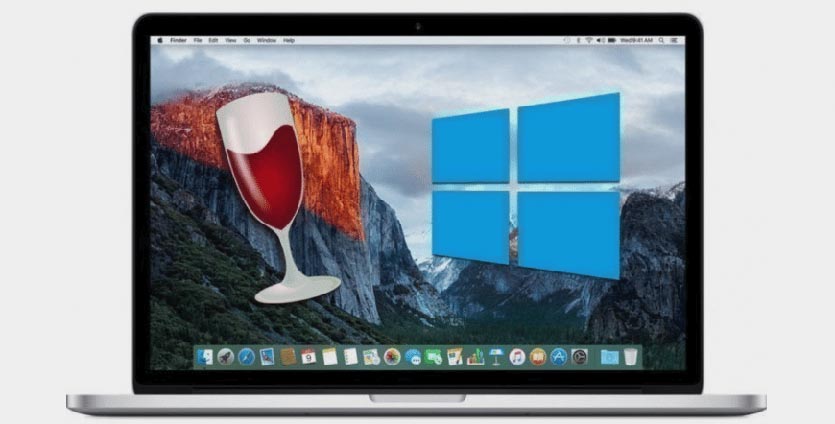
Wine — это свободно распространяемое ПО, которое предназначено для запуска 16-, 32- и 64- битных приложений, которые создавались для Microsoft Windows, в UNIX-подобных операционных системах.
Существуют сборки программы для Linux, macOS и даже Windows (чтобы запускать устаревшие программы и игры для “винды”). Wine основан на альтернативной реализации Windows API и не является эмулятором или виртуальной машиной.
Первые стабильные версии Wine появились в середине 2008 года. С того времени среда активно развивалась, части кода Wine использовались в разных программных продуктах и сборках операционных систем.
На данный момент при помощи Wine можно запустить практически любое приложение или игру из операционной системы Windows на Mac.
Преимущества и недостатки Wine
Прежде чем начать работу со средой Wine, следует изучить ее основные преимущества и недостатки. Возможно, в вашем случае уместнее использовать другой способ запуска Windows-программ.
✅ Windows приложения запаковываются в специальную “обертку” и работают как программы для macOS.
✅ Не требуется место, как для виртуальной машины, Boot Camp или дистрибутива Windows.
✅ Приложение запускается быстро и работает очень отзывчиво. Получится даже поиграть в динамичные игры.
✅ Среда имеет большое количество настроек графики и производительности, что позволяет добиться комфортной работы в большинстве случаев.
❌ Wine практически не взаимодействует с подключенными к компьютеру устройствами. Использовать Windows ПО, например, для работы с подключенным iPhone не получится.
❌ Каждое запакованное приложение будет занимать не менее пары ГБ, ведь будет включать в себя все необходимые API. Если нужно запускать таким способом более 5-6 программ, проще установить виртуальную машину.
❌ Некоторые программы и игры банально не запускаются в Wine, но при этом работают в виртуальной машине или Boot Camp.
Как отключить SIP
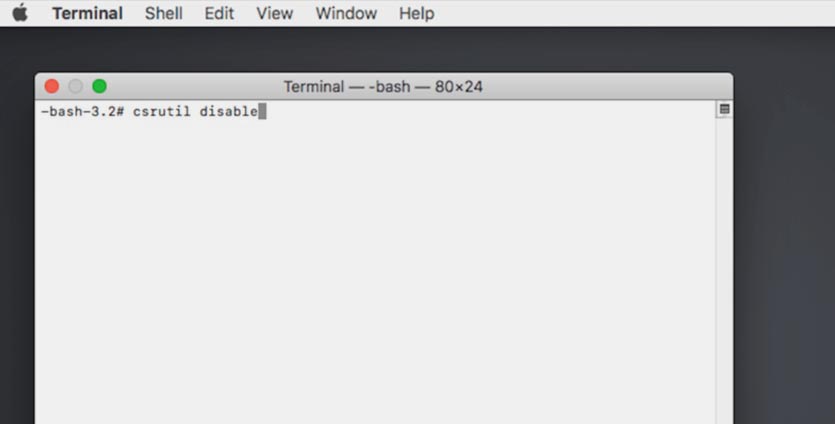
Для начала потребуется временно отключить защиту SIP (System Integrity Protection). Это необходимо для изменения системных файлов во время установки Wine и его компонентов.
1. Перезагрузите Mac.
2. Во время включения компьютера зажмите сочетание клавиш Command + R для загрузки в режиме восстановления.
Для этого нужно использовать оригинальную беспроводную клавиатуру Apple или любую проводную. Беспроводные клавиатуры других производителей могу подключаться к Mac уже после начала запуска ОС и не позволят загрузиться в любом служебном режиме.
3. После загрузки в режиме восстановления в строке меню выбираем Утилиты – Терминал.
4. Водим следующе команду и нажимаем Ввод:
csrutil disable
5. Перезагружаем Mac в обычном режиме. Сделать это можно из строки меню или при помощи команды “reboot”.
После завершения установки Wine и загрузки необходимых приложений можно заново включить защиту SIP. Для этого проделываем аналогичные действия, только для включения используем команду “csrutil enable”.
Как установить Wine

1. Скачайте последнюю неофициальную версию Wine с GitHub. Этот апдейт поддерживает работу с последними релизами macOS, которые еще за бортом официальных версий.
2. Извлеките приложение из архива и запустите его.
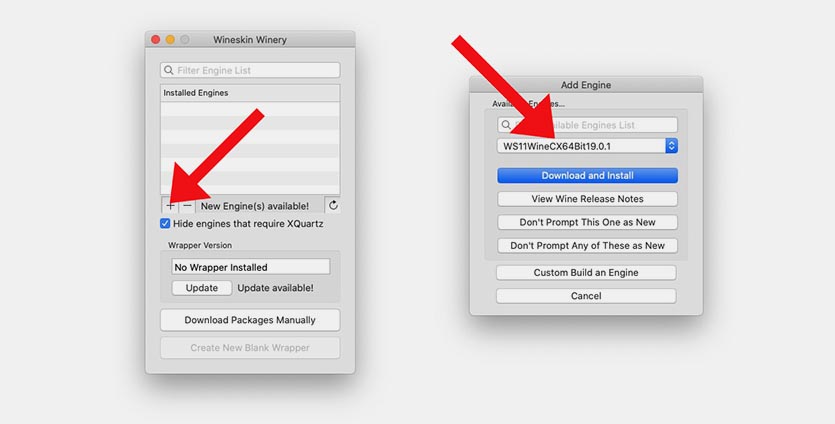
3. Нажмите “+” для добавления нового движка и найдите в списке WS11WineCX64Bit19.01.
Это самая актуальная версия с поддержкой 32-битных приложений.
4. Нажмите Download and Install и дождитесь окончания процесса установки.
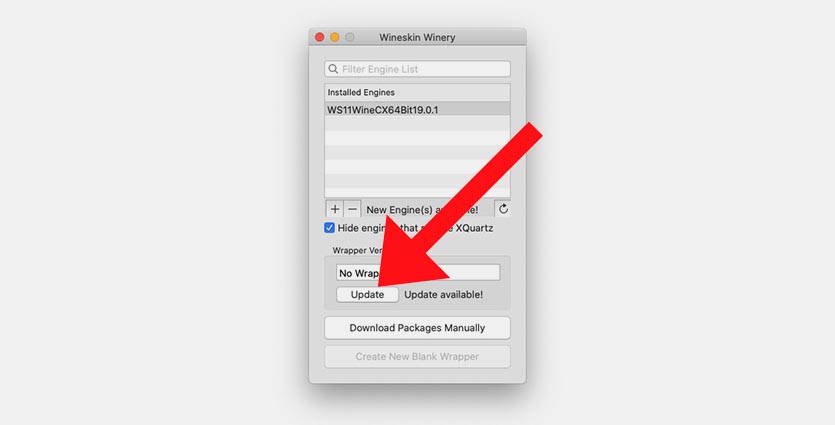
5. Нажмите кнопку Update и дождитесь окончания обновления модуля.
Все. Среда Wine готова для установки приложений. Скачайте подходящие установочные пакеты для операционной системы Windows.
Как установить приложение или игру через Wine
Описанные в предыдущем пункте манипуляции проводятся один раз. После этого для добавления новой программы или игры нужно сделать следующее:
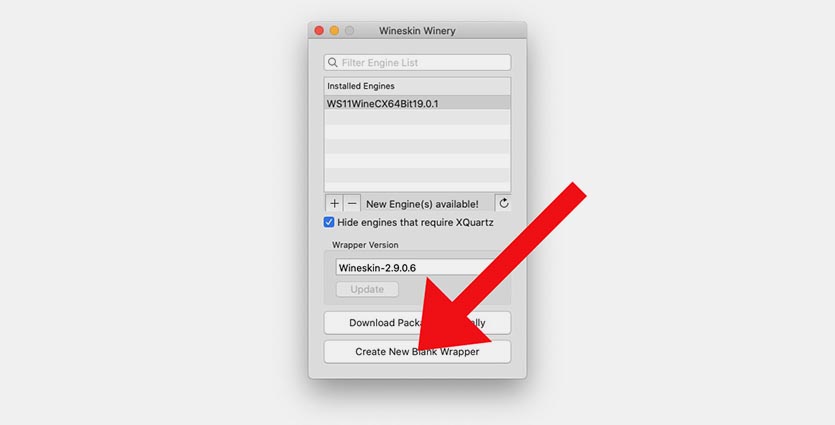
1. Нажмите кнопку Create New Blank Wrapper.
2. Укажите название будущего приложения, нажмите Ok и дождитесь окончания процесса.
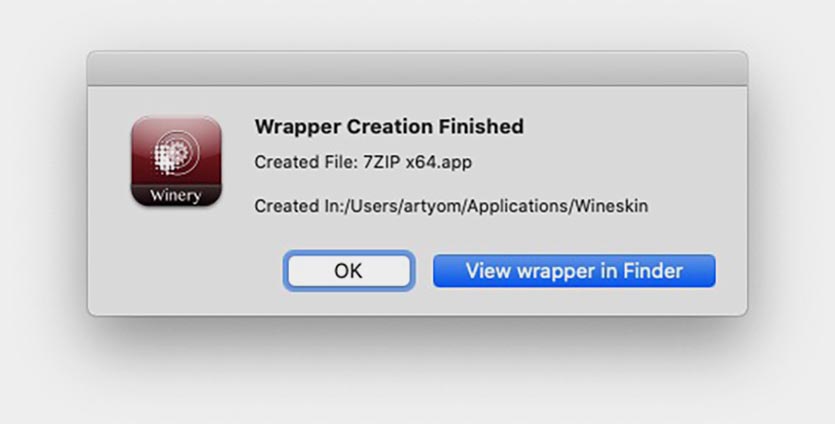
3. В последнем диалоговом окне нажмите View wrapper in Finder.
4. Запустите созданную заготовку будущего приложения.
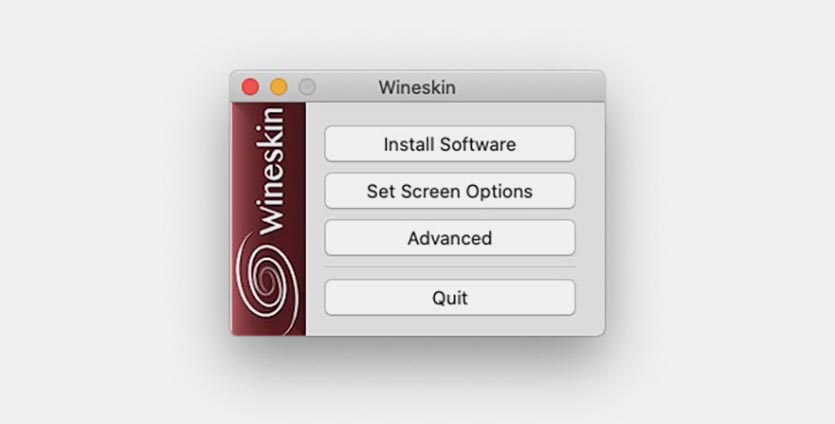
5. Нажмите кнопку Install software.
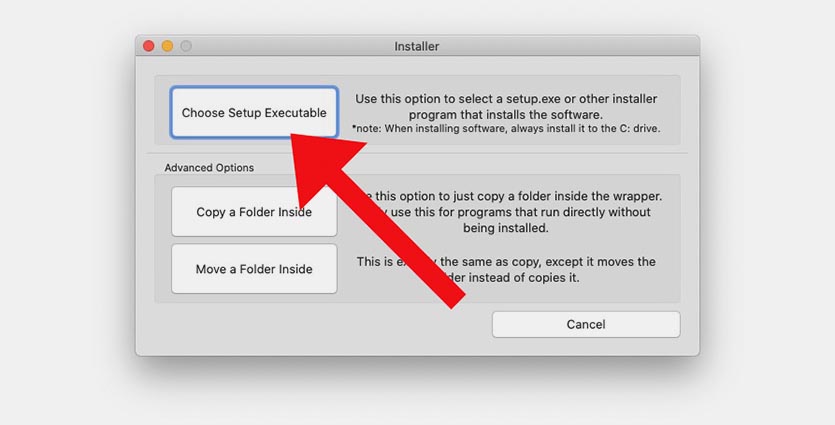
6. Выберите пункт Choose Setup Executable.
7. Укажите установочный покет для ОС Windows и произведите привычную установку программы.
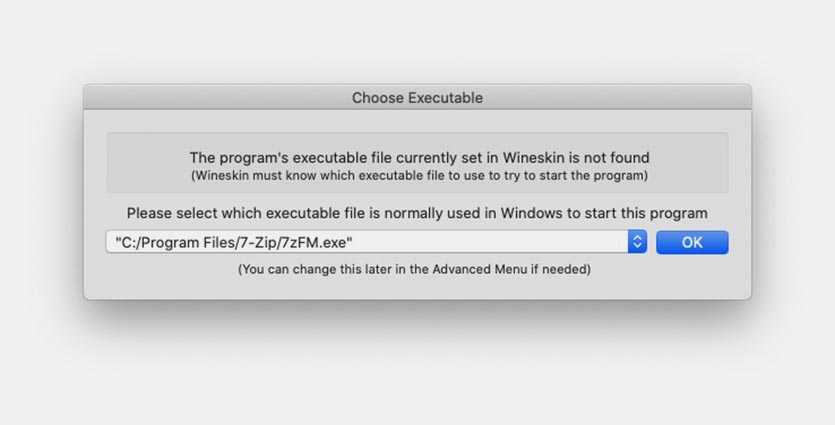
8. После установки укажите правильный *.exe файл для запуска программы и нажмите Ok. Приложение может подхватить не сам исполняемый файл, а, например, файл для деинсталляции программы.
9. Нажмите кнопку Advanced в меню Wineskin.
10. В настройках на вкладке Configuration можете изменить иконку приложения. На вкладке Options отключите все установленные флаги.
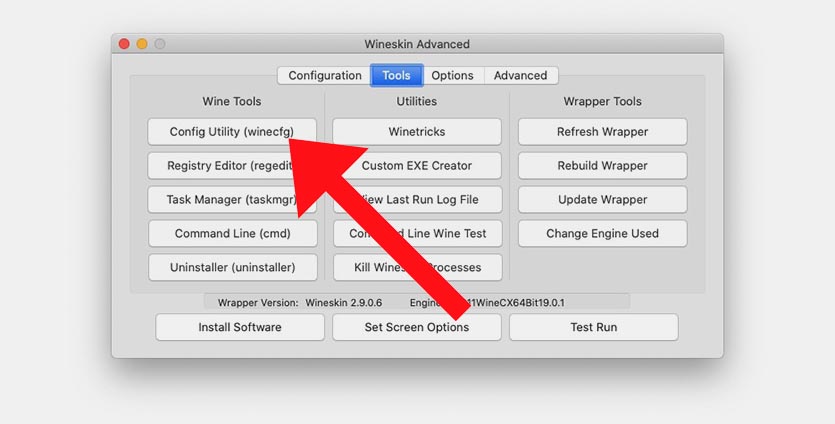
11. Перейдите на вкладку Tools и нажмите Config Utility (winecfg).
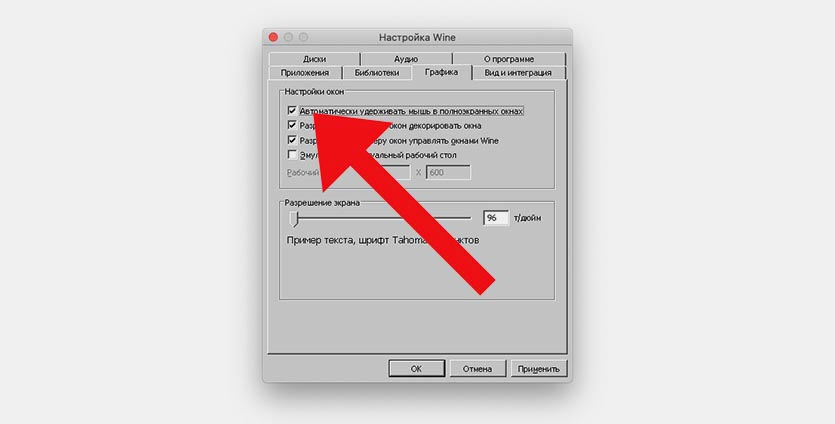
12. На вкладке Графика включите самую верхнюю опцию, нажмите Применить и закройте окно.
Готово! Теперь можете запускать созданное приложение. Оно будет доступно в папке /Applications/Wineskin или в Launchpad.
Вот так можно запросто запускать на Mac большинство Windows приложений. Кстати, можете установить 32-битные Windows-игры, аналоги которых для macOS не обновили под 64-битную архитектуру.
(27 голосов, общий рейтинг: 4.52 из 5)
iPhones.ru
Без BootCamp и виртуальных машин.
Артём Суровцев
@artyomsurovtsev
Люблю технологии и все, что с ними связано. Верю, что величайшие открытия человечества еще впереди!