
As a Linux user, I can’t help but spend most of my time on the command line. Not that the GUI is not efficient, but there are things that are simply faster to do with the keyboard.
Think about copy and paste. Select a text you want to copy, go to the edit menu, click, precisely move down to copy, click, then go to the destination, click where you want to paste, go to edit menu, click, move down to the paste option, then paste. Every time I see someone do this, I die a little inside. Sure you can save some time by right-clicking, copy, right-click, paste. But you can save some more time by pressing, ctrl-c then ctrl-v
My hands are already on the keyboard, and I would rather do the mundane things on the keyboard and not think about them.
One thing I do frequently is download files. They can be zip file, tgz, or jpg. On linux, all I have to do is open the command line, run wget with the file I want to download and it is done.
wget http://example.org/picture.jpg
Straight to the point. But how do you do that when you are on a Windows machine? Let me introduce you to cURL, pronounced curl. (i don’t know why I wrote it the way I did)
curl is a very powerful tool with too many feature. But I just want to download the file on Windows so let’s just learn how to do that.
Open PowerShell. That’s Windows Key + R then type powershell and press enter.
Now run the curl command with the -O option to specify the file output.
curl http://example.org/picture.jpg -O picture.jpg
Easy right? Now you can download files right from the command line all by simply using your keyboard.
OK. It is time I confess. This is not the curl tool you are using. It’s only an alias. In reality, we are calling the command Invoke-WebRequest. But hey! It works, so we don’t care. You can call it in its native format if you want to.
Invoke-WebRequest http://example.org/picture.jpg -O picture.jpg
Either way, now you know how to download a file from the command line.
Инструкция по загрузке оригинальных ISO Windows 10 и 11 из РФ в условиях блокировки.
Microsoft забанила официальную загрузку ОС Windows 10 и 11 из России. Если нужно скачать ISO Windows 11, придется использовать обходные способы. Некоторые требуют применения VPN, другие нет.
Скачайте Media Creation Tool у Microsoft через VPN
Содержание
- Скачайте Media Creation Tool у Microsoft через VPN
- Скачайте Windows 11 через Universal Media Creation Tool. VPN не требуется
- Используйте TechBench и UUP Generation Project от WZT для скачивания Windows 11 или 10
Активируйте VPN для доступа к официальному сайту Microsoft. Перейдите на официальный сайт компании Microsoft.
Кликните кнопку «Скачать» в блоке «Создание установочного носителя Windows 11». Отключите VPN. Запустите Media Creation Tool и скачайте нужные вам выпуски ОС Windows 11 или 10.

Загрузите Windows 10 со страницы:
https://www.microsoft.com/ru-ru/software-download/windows10

Скачайте Windows 11 через Universal Media Creation Tool. VPN не требуется
Строго придерживайтесь рассмотренной последовательности действий. Если сделать по-другому — может не сработать. Перейдите на страницу разработчика скрипта для скачивания Universal Media Creation Tool в GitHub. Введите в адресной строке браузера URL:
https://github.com/AveYo/MediaCreationTool.bat
Нажмите клавишу Enter. Кликните по кнопке «Code» над списком файлов.

Выберите из меню пункт «Download ZIP».
После завершения загрузки перейдите в папку, куда был сохранен файл. По умолчанию Windows 11 сохраняет скачанные файлы в каталоге «Загрузки». Кликните по скачанному ZIP-архиву правой кнопкой мыши. Выберите из меню «Извлечь все».

После распаковки архива зайдите в папку «MediaCreationTool.bat-main». Запустите пакетный файл Windows MediaCreationTool.

Дождитесь появления списка доступных для скачивания версий. Выберите «11».

Примечание: Метод стабильно работает только для Windows 11. Скачать данным способом ISO Windows 10 не получилось.
Выберите «MCT Defaults» для загрузки необходимой версии Media Creation Tool. При выборе других пунктов возможны сбои.

Дождитесь запуска «Программы установки Windows 11». Нажмите кнопку «Принять» под лицензионным соглашением.

Снимите «галочку» «Использовать рекомендуемые параметры для этого компьютера». Выберите язык и версию (выпуск) ОС из соответствующих списков. Нажмите «Далее» в правом нижнем углу окна.

Примечание: Когда «галочка» активна, доступен для скачивания только один вариант — оптимальный для данного ПК.

Примечание: ранее скачанная Media Creation Tool. Используйте, если сохранилась на диске вашего настольного ПК или ноутбука. Даже после успешного скачивания Windows 11 установить ОС без сложностей смогут лишь пользователи ПК, которые соответствуют минимальным требованиям. В том числе оснащены модулем TPM 2.0. Читайте в «Блоге системного администратора», как поставить Windows 11 практически на любой настольный ПК или ноутбук:
Используйте TechBench и UUP Generation Project от WZT для скачивания Windows 11 или 10
TechBench и UUP Generation Project — сторонние инструменты.
Скопируйте в адресную строку браузера URL:
https://tb.rg-adguard.net/public.php
Нажмите клавишу Enter. Выберите параметры нужной вам ОС из соответствующих списков:
- Select Type — тип.
- Select version — версию, выпуск (в данном примере самая свежая Windows 11).
- Select edition — редакцию.
- Select language — язык.
- Select file — файл образа (ISO).
Будет сгенерирован линк, по которому можно скачать операционную систему. Кликните на кнопке «Download» справа от списков для загрузки ISO Windows.

Метод неидеален — работает «через раз». Одни линки функциональны — скачивание идет без VPN, другие нет. Второй аналогичный инструмент — UUP Generation Project. Перейдите по ссылке:
https://uup.rg-adguard.net/
В списке «Select type download» оптимальный вариант — «Download ISO Compiler in OneClick». Кликните по ссылке для загрузки сформированного командного файла (с расширением *.cmd).

Защитник Windows может не пропустить. В таком случае добавьте файл в исключения Microsoft Defender. В свойствах данного файла активируйте пункт «Разблокировать этот файл». Если ноутбук или стационарный ПК был куплен в зарубежном интернет-магазине и язык интерфейса операционной системы вам не подходит, можно обойтись без скачивания русской версии. Читайте подробную инструкцию по русификации интерфейса Windows 11:
Вы пробовали качать Windows в последнее время? Напишите в комментариях какой метод помог.

Sometimes, you need to download a file directly from the Command Prompt (CMD). It’s simple, quick, and doesn’t require opening a browser. Here’s how to do it step-by-step. 😉
CURL Command on CMD
For Windows 10 and later, there is a built-in tool called Curl that can be used to download files using the command line. It’s pretty simple: open your command prompt by pressing the Win + R key on your keyboard, typing cmd on the search bar that appeared, and then hitting the Enter key.
Then type the below command, replacing the download URL of your file:
curl -O https://example.com/file.zipThis will download the file and save it with the same name as on the website.

Want to rename the file as you download it? Use this:
curl -o MyFile.zip https://example.com/file.zip
Invoke-WebRequest Command on PowerShell
Invoke-WebRequest functions similarly to the curl command, but in PowerShell. To download a file using this command, replace the URL with your file’s URL as shown in the command below:
Invoke-WebRequest https://example.com/file.zip -OutFile file.zipThis will save the file as file.zip in your current directory.

BITSADMIN Command for Older Versions of Windows
Windows XP, Vista, Windows 7, 8/8.1, and Windows 10 don’t support the curl and Invoke-WebRequest commands. In this case, you can use bitsadmin. To use it, open CMD and type the below command, replacing the download URL of your file:
bitsadmin /transfer myDownloadJob /download /priority normal https://example.com/file.zip C:\Users\yourusername\Downloads\file.zipThe file will be saved to the location C:\Downloads.

WGET Command for Linux Lovers on Windows
The WGET command is available on Windows but requires manual installation. It is a built-in utility in Linux, making it easier for Linux users to use the same command on Windows OS as well.
To use WGET, download wget from the internet (Google “wget for Windows”). And then add to the system path. To do this, follow the steps:
- Open your browser and search for “wget for Windows.”
- Go to a trusted source like Eternallybored.org or another reliable website.
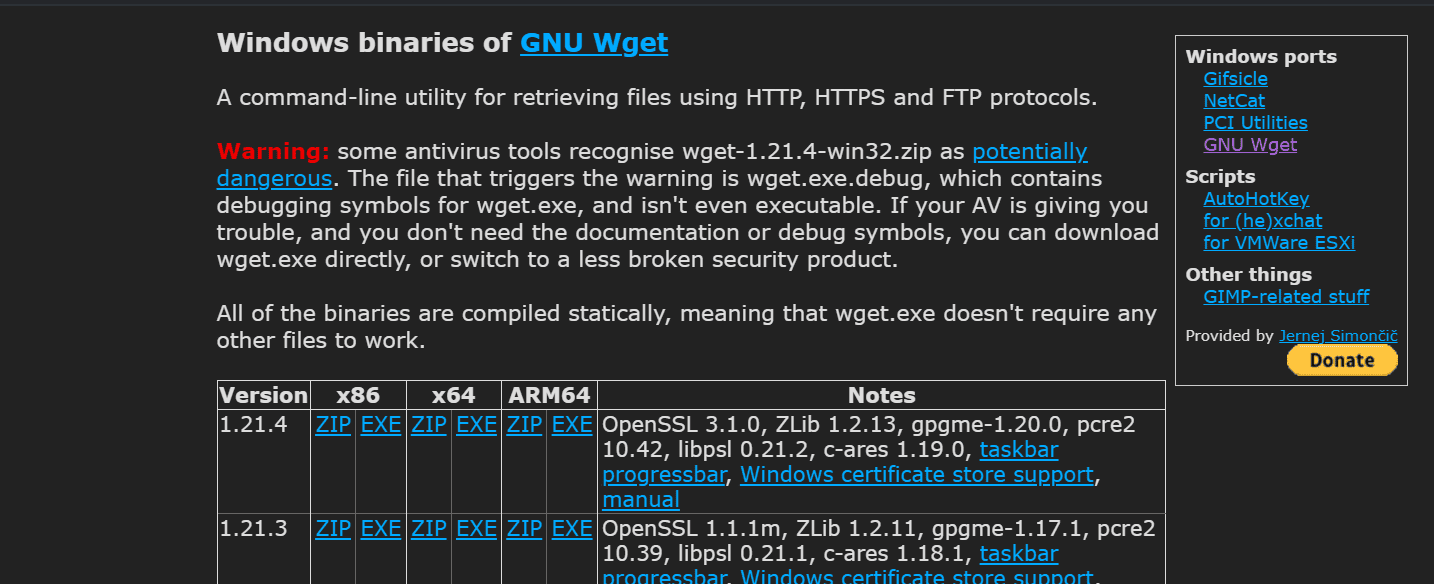
- Download the
wget.exefile. Choose the version that matches your system (32-bit or 64-bit). - Once downloaded, locate the
wget.exefile (usually in yourDownloadsfolder). - Move it to the location:
C:\Windows\System32\

Now you’re all set to use wget on your Windows system for downloading files. You can now open CMD and type after replacing the file URL in the below sample command:
wget https://example.com/file.zip
With this guide, you’ve covered all the methods to download a file from the CMD (command line) like a pro! 😃👏
Powerful VPS Hosting, Without the Premium Price
Get the performance you need at a price you’ll love. Explore our affordable VPS plans.
See Pricing
Quick Links
-
Set up FFmpeg to Convert Audio and Video Using the Command Prompt
-
How to Convert a Video from One Format to Another
-
How to Convert Audio from One Format to Another
-
How to Extract the Audio from a Video
-
How to Fix the «ffmpeg is not recognized as an internal or external command» Error
There are many ways to convert media files from one format to another on Windows 10, including using the Command Prompt—thanks to ffmpeg. If you prefer commands over graphical user interfaces, here’s how to convert your audio and video files using the Command Prompt.
Set up FFmpeg to Convert Audio and Video Using the Command Prompt
By default, the Command Prompt doesn’t offer the option to convert your media files. You need to install a third-party utility to perform these conversions, and FFmpeg is a great utility to do this with. It’s open-source, cross-platform, and very popular.
Using FFmpeg, you can convert nearly all audio and video formats to many other file formats. To use this utility, you need to download it first, then add its path to your system variables.
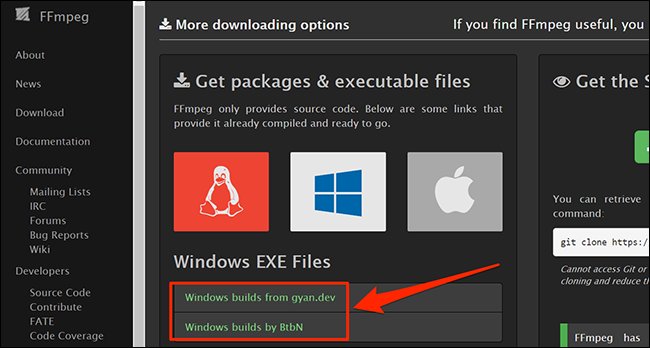
To begin, head over to the FFmpeg site, click «Download,» click the Windows icon under «Get packages & executable files,» and choose one of the providers to download the compiled FFmpeg package.
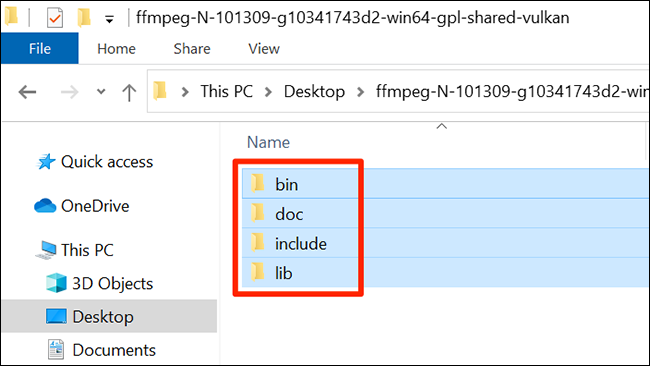
When the package is downloaded, right-click it and select «Extract All.» Then press Ctrl+A to select all your extracted files, and press Ctrl+C to copy the selected files. Basically, you’re copying the following folders: bin, doc, include, and lib.
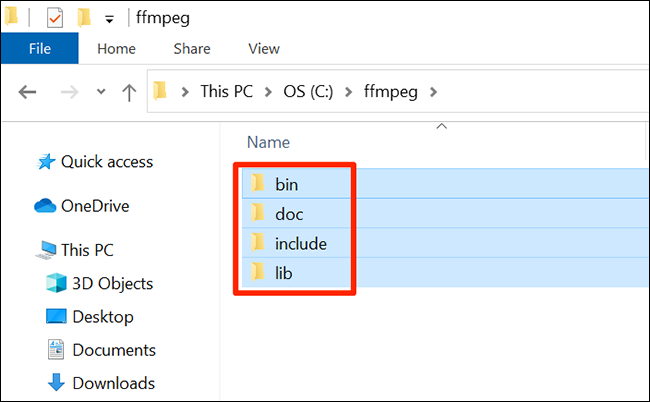
Open a File Explorer window, navigate to the «C» drive, and create a new folder called «ffmpeg». Head inside this folder and press Ctrl+V to paste all your FFmpeg folders here.
It’s time to add FFmpeg’s path to your system. To do this, open the «Start» menu, search for «View advanced system settings,» and click the first result.
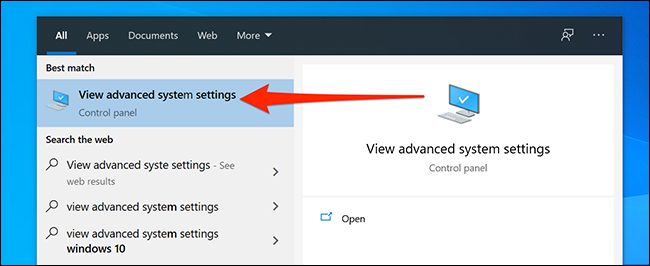
Find the button that says «Environment Variables» and click it. Then select «Path» from the upper part of your screen, and click «Edit.»
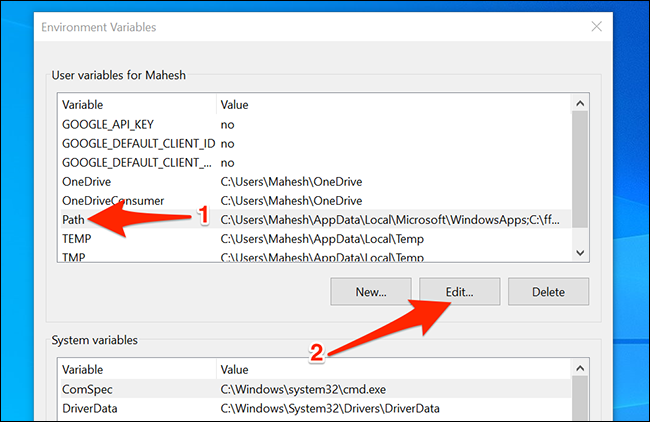
Select «New» on the right to add a new path. Type the following path in the box, which is FFmpeg’s path on your PC, then click «OK.»
C:\ffmpeg\bin\

FFmpeg is now ready to be used from the Command Prompt to convert your media files.
How to Convert a Video from One Format to Another
Since FFmpeg supports dozens of file formats, you can convert your videos from pretty much any format to any of your chosen target formats.
Performing this conversion only requires typing a single command. You use a parameter with the command, and the command turns your source file into your chosen format.
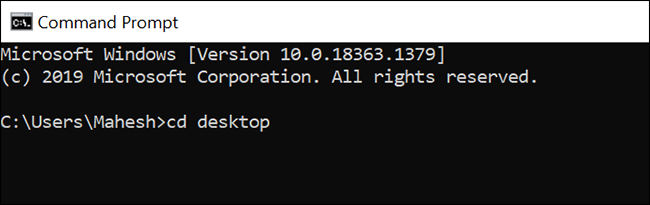
For this example, we’ll convert a video called «fog.mp4» placed on your desktop to «fog.mkv». To do this, open the «Start» menu, search for «Command Prompt,» and launch the tool.

Type the following command to make your desktop the current working directory:
cd desktop
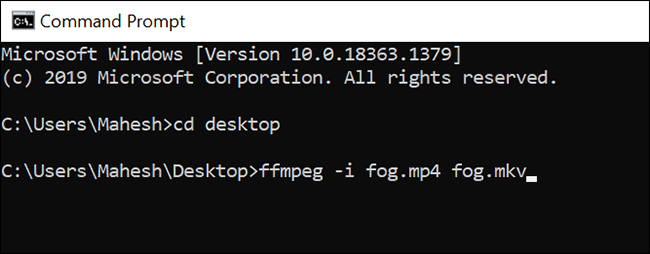
Now, type the following command to convert «fog.mp4» to «fog.mkv». Of course, replace the source and target files in the command to convert your actual files.
ffmpeg -i fog.mp4 fog.mkv
When the video is converted, the resulting file is placed in the same folder as the original file. It would be the desktop in this case.
How to Convert Audio from One Format to Another
You can convert your audio files using the Command Prompt just like how you convert your videos. Simply specify the input and output file names, and your files are converted.
For this example, let’s convert a file called «music.mp3» placed on your desktop to «music.wav». Start by opening the «Command Prompt» and typing the following in it to go to your desktop:
cd desktop
Then type the following command to convert your audio file. Make sure to replace «music.mp3» with your source file name «music.wav» with the target file name.
ffmpeg -i music.mp3 music.wav
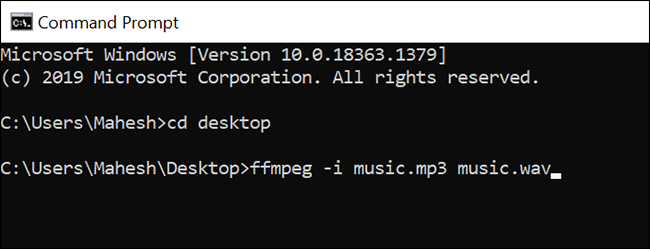
Like videos, your converted audio files are also placed in the same folder as your original files. You’ll find the «music.wav» file on your desktop in our example here.
You can use FFmpeg in conjunction with the Command Prompt to save video files as audio files. This way, you can strip off the video and only keep the audio part of your video file.
You might want to do this to save a song from a video, extract a nice melody from a video file, and so on.
To do this, open the «Start» menu, search for «Command Prompt,» and open the tool.
Assuming that the video is on your desktop, run the following command to make your desktop the current working directory. If your video is elsewhere, enter the actual path instead.
cd desktop
Next up, use the following command to extract audio from a video file. In the below example, we’ll extract the audio from a video file called «myvideo.mp4».
ffmpeg -i myvideo.mp4 -vn result.mp3

A new file called «result.mp3» will be generated. This file has the audio content of your video file.
How to Fix the «ffmpeg is not recognized as an internal or external command» Error
While running the ffmpeg command, if you get an error that says that the command is not recognized as an internal or external command, it’s due to an incorrect configuration of system variables.
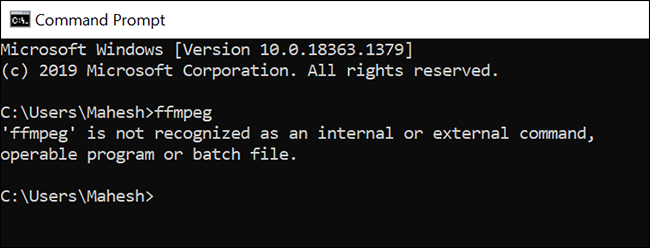
Make sure that you’ve followed our steps for adding the FFmpeg path to system variables properly. Also, reboot your computer, and this will likely fix the issue.
Did you know that you can use HandBrake to convert pretty much any media file to any format on Windows 10, too? Give it a try if you want a graphical solution.
If you are looking for how to copy files using command prompt, then keep reading further. This article also mentions other ways of copying files.
| 🎯Goal: | Copy files using the command prompt (CMD) |
| 🧰Tools: |
|
| Duration: | 3-5 minutes |
If you are experiencing a similar case as the Reddit post shown here, stay chill and follow the specific guide here to grab an efficient tutorial to copy files using command prompt:
How do I copy a folder to another folder using cmd? I’m sorry, but I just can’t find a direct response to this. I have a .bat file that compiles some stuff, and in the end, I want to copy a folder to another folder… I want to copy «myFolder» with its contents as well as the folder itself to «finalFolder». from Reddit
Note that if you are a non-technical user, unable to achieve the ability to utilize CMD command lines, turn to reliable PC file transfer software as recommended in method 2 for help.
When compared to the usual method of file copying, copying or moving files using CMD has some advantages. It saves time by eliminating the need to copy and paste manually. It also allows you to copy when unattended. That is to say, after entering specific commands, you can leave the computer alone and take a rest. The task will run on its own.
You can use the Copy and Xcopy command lines to copy files on your computer efficiently.
1. Use the Copy Command to Transfer Specific Files
Right-click the Start button and choose «Command Prompt (Admin)» to open CMD.
To copy files, use the copy command from the command line.
copy c:\myfile.txt e:
The command above will copy «myfile.txt» from the C: drive to the E: drive.
copy *.txt e:
The above command copies all text files in the current directory to the E: drive using a wildcard.
copy d:\example.xls
The command above copies the «example.xls» file from the D: drive to the current directory. We didn’t indicate a destination; by default, the current directory is utilized if the goal isn’t supplied.
2. Using the Xcopy Command to Copy All Files
Xcopy is a command that copies files or groups of files between directories. It’s convenient for copying data to and from a fixed drive.
Step 1. To find cmd, go to Start and type cmd into the search box. From the list, right-click Command Prompt and choose «Run as administrator».
Step 2. Now, in the command prompt, type the Xcopy command to copy folders and subfolders, including their contents, as shown below.
If you want to copy the «test» folder and its subfolders from the C drive to the D disc, use the Xcopy command as follows:
Xcopy C:\test D:\test /E /H /C /I
- /E — Copies all subdirectories, including any that are empty.
- /H – Copies files that are hidden or have system file attributes.
- /C – Even if an error occurs, keep copying.
- /I – Always presume the destination is a folder if in question.
A command-line interface differs from a graphical user interface, considering that it is text-only. A high learning curve, more space for error, a vast number of instructions, and the inability to figure anything out by research are all downsides of the command line interface.
Using Command Prompt Alternative to Copy Files
Unlike Command Prompt, turning to a reliable PC file transfer software won’t require a technical background of utilizing and inputting correct command lines for copying files. EaseUS Todo PCTrans Free enables you to transfer an unlimited number of files, programs, and settings between two PCs in a user-friendly manner.
It does not necessitate extensive computer skills or the acquisition of any additional equipment. With a lifetime license, you can get free upgrades for the rest of your life.
Now, download this PC data transfer software to transfer files from one computer to another in simple clicks.
Step 1. Set Up the Old PC
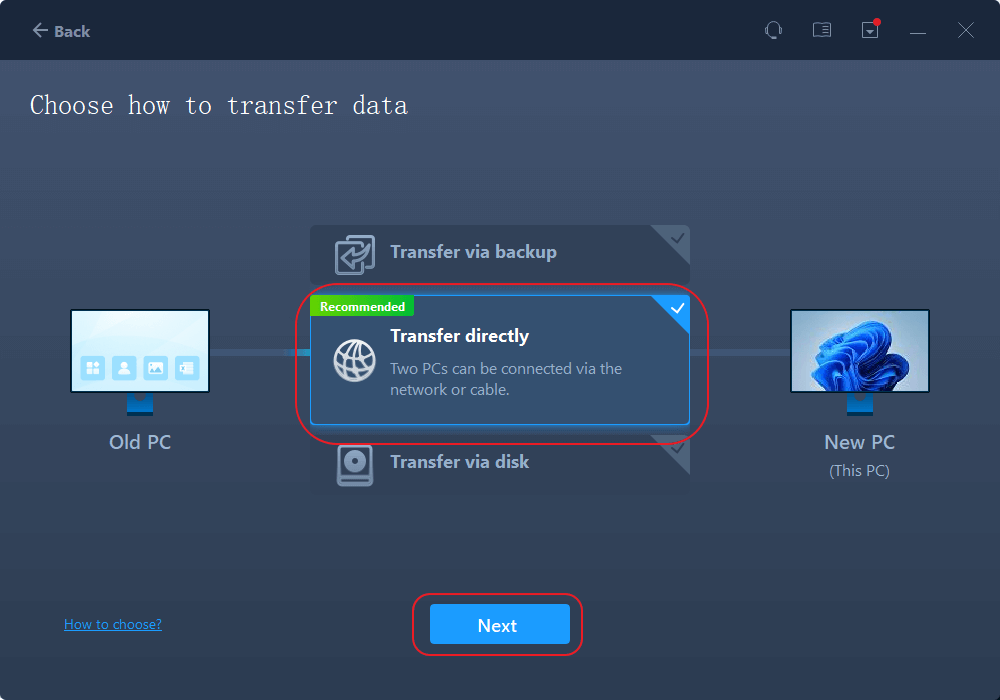
- First, install and launch EaseUS Todo PCTrans and select Data Transfer on the left panel of the main interface.
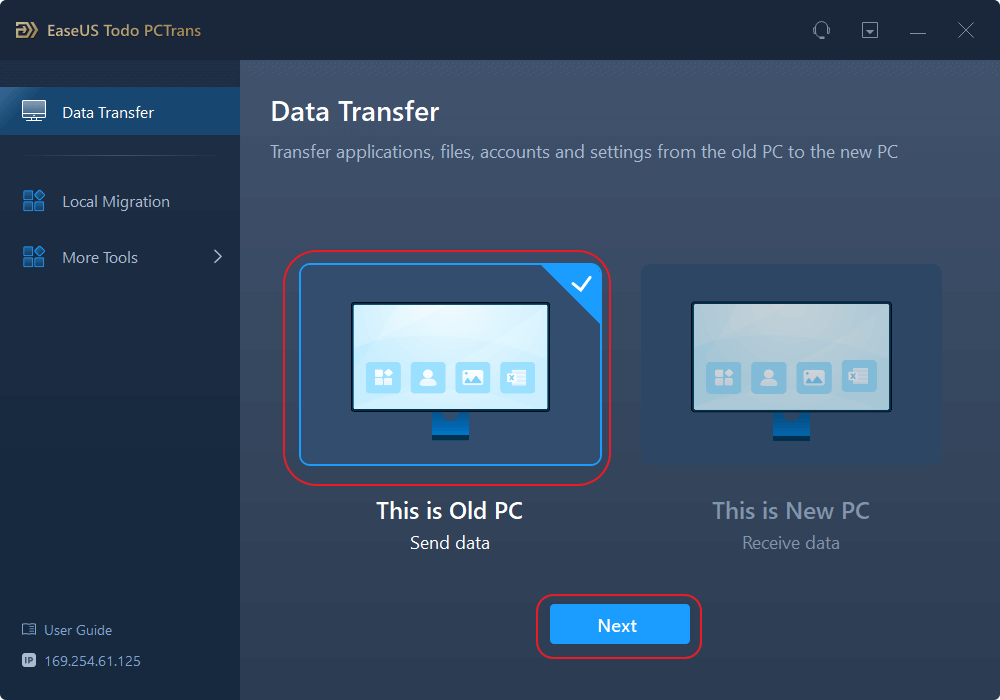
- Select «Transfer Directly» and click «Next» to continue.
Step 2. Set Up the New PC
- Download and launch EaseUS Todo PCTrans on the new computer; select «This is New PC» and click «Next».
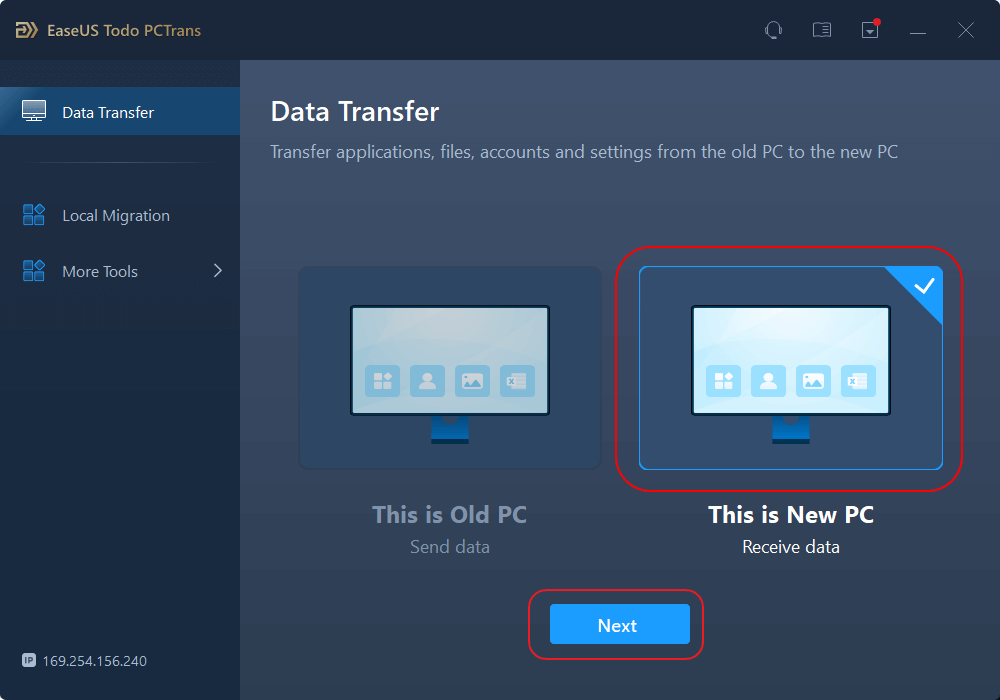
- Select «Transfer directly» and click «Next» to continue.
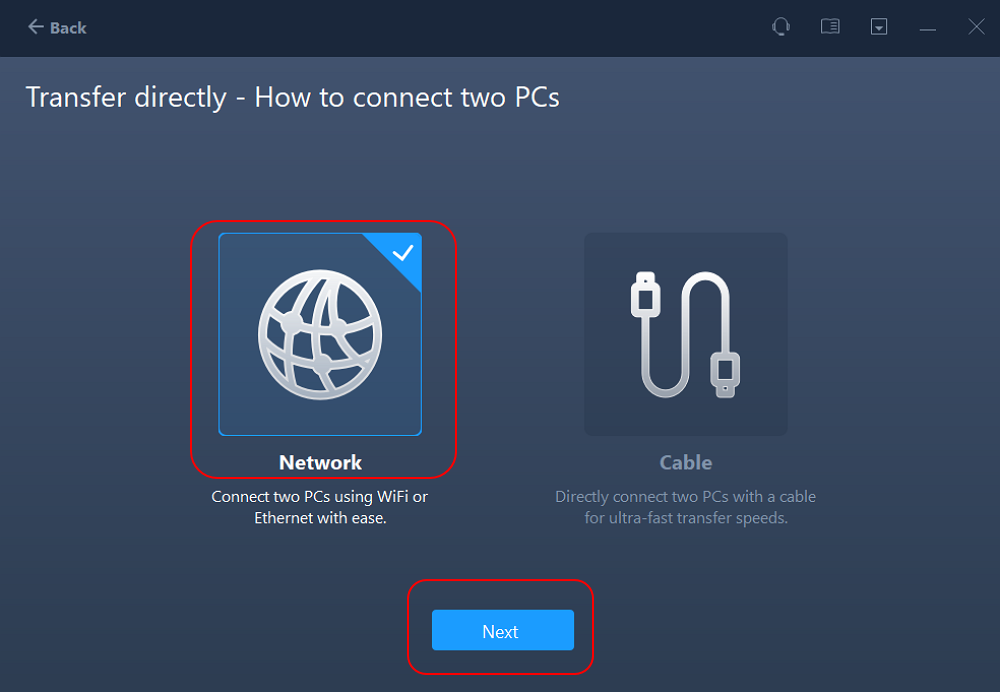
- Select «Network» and click Next to continue. This will automatically scan the old PC. (Make sure the two PCs are connected to the same LAN.)
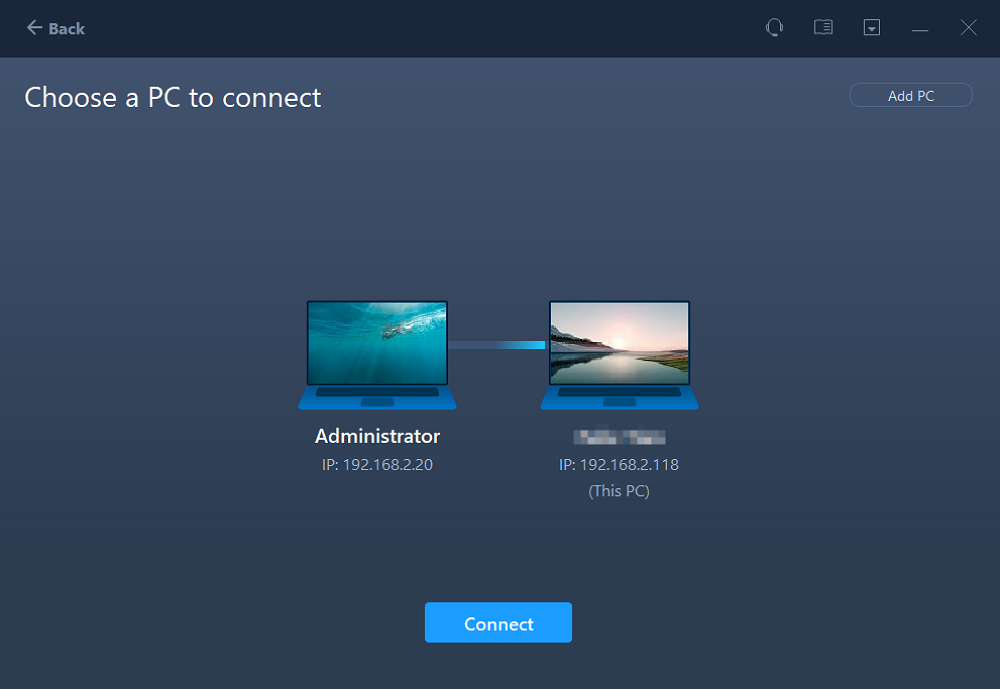
- Select the target PC and click Connect. Then, it will take some time to scan and analyze the data in old PC.
Step 3. Select the Files to Transfer
- Finally, on the new PC, select the Files tab, select the files you need to transfer. Then, click «Transfer» to start.

Feel free to share this amazing tool to help more of your friends efficiently transfer files between computers like an expert:
Other Easier GUI (Graphical User Interface) Methods to Copy Files
Here are three easier ways to transfer and copy files from one drive or one computer to another. Check the detailed content.
1. Use a USB Flash Drive
Depending on the drive’s capacity, USB flash memory devices, also known as memory keys and memory sticks, can replicate a few files or a large quantity of data.
Step 1. Place the flash drive in one of your computer’s USB ports.
Step 2. Open the File Explorer window and look for the flash drive’s entry in the left pane.
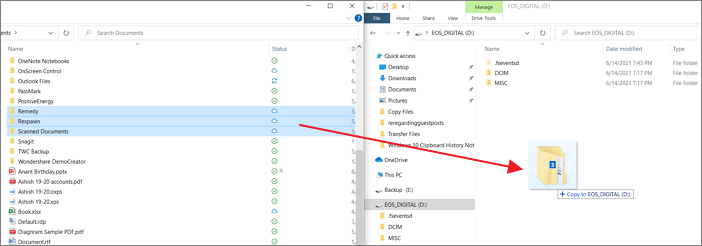
Step 3. Drag and drop the files you want to copy into the drive’s folder.
Step 4. Remove the flash drive and place it in a USB slot on the other PC after you finish.
Step 5. By picking and dragging the files into another folder in a File Explorer window, you can copy them to the new PC.
Share this article and let more users know how to copy files using a USB drive.
2. Use OneDrive
The cloud drive is another option for transferring files across your Windows devices. It can be accomplished by sharing the file with any Windows app that supports cloud storage services such as OneDrive. The storage space, upload time, and potential expense of this technology are its drawbacks. The method could be a terrific choice for you if you need to move smaller files more frequently.
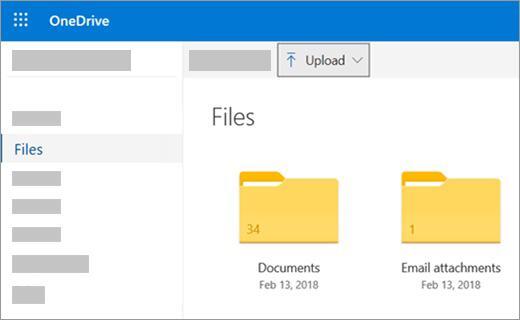
Step 1. Drag and drop files into OneDrive.
Go to OneDrive and sign in. Add the file to your OneDrive cloud account and simply click «Add» when the app opens. Your OneDrive account will receive the file.
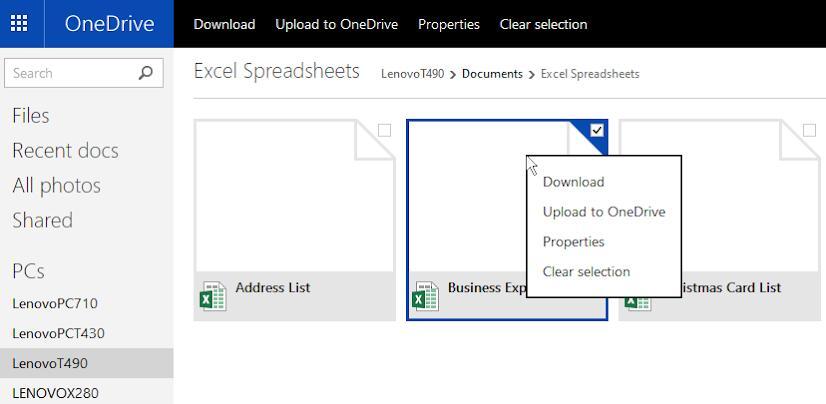
Step 2. Get the files you need.
Open the OneDrive software on the other laptop, right-click the file, and select «Download». The Files It will complete the file transfer from your laptop or computer to the other computer on your network.
Conclusion
There are many ways of copying files from one drive/computer to another. However, all the methods mentioned have their advantages, but they also come with many disadvantages. That’s why it is recommended that you should use EaseUS Todo PCTrans to copy files. This software poses no security threats and is easy to use.
It’s also a data and application backup software that can keep your files safe as long as you perform regular backups. It’s more than just PC migration software that can transfer files between local disks/drives or between two computers for free. For example, you can transfer programs from C drive to D drive securely.