
Transferring files between Linux and Windows might seem tricky at first, especially if you’re new to working across different operating systems. Now, whether you’re sharing documents, moving project files, or backing up data, knowing how to transfer files between these two platforms is very important.
In this blog, we’ll walk you through simple and effective methods to transfer files from Linux to Windows. From using shared networks and USB drives to leveraging powerful tools like Samba, SSH, and cloud services, we’ve got you covered. No matter your level of expertise, this guide will help you choose the best method for your needs and ensure your files are transferred quickly and securely.

Methods to How To Transfer File From Linux To Windows
Explore this section to get three methods that will help you in-order to transfer file form Linux system to Windows system.
Method 1: Using SSH Transfer Protocol with PuTTy
One of the easiest methods to transfer files from Linux (Ubuntu) to Windows OS is to use PuTTy pscp (PuTTy Secure Copy Client). PuTTy is used to create a client-server link to connect both platforms via a Wireless connection. PuTTy is a free open-source SSH client which works across multiple platforms and has become a mode for easy file transfers across platforms.
Step 1: Install SSH
- To start with Install SSH if you don’t have it in your Linux OS. Follow the Command prompt codes to do so.
Ubuntu/Debian OS
sudo apt update
sudo apt install ssh-server
sudo service ssh start
Red Hat and other Linux-based OS
sudo yum install openssh-server
sudo systemctl start sshd
Step 2: Install PuTTy
- Install PuTTy in your system if you don’t have it. Otherwise, ignore this step. If you want to install PuTTy in your Linux OS, follow the command prompt lines below:
For Ubuntu and Linux Mint OS
For Ubuntu, you’ll need to access the universal repository available and install PuTTy there. Hence, there are additional commands to access the universal repository below:
sudo add-apt-repository universe
sudo apt update
sudo apt install putty
For Debian OS
sudo apt-get putty
For Arch Linux OS
sudo pacman -S putty
For RHEL, Fedora, CentOS, AlmaLinux
sudo dnf install putty
For others
sudo yum install putty
Now you have successfully installed PuTTy in your Linux OS. Now, you can use it for file transfer from Linux to Windows and vice-versa. Similarly, you can also download PuTTy in Windows OS.
Step 3: Start Transferring Files
Transfer files across different OS. It becomes easy using PuTTy pscp (PuTTy Secure Copy Client). Simply provide the source path and the destination paths for file transfer and the files would be transfered.
Point to Note
In this case, the IP address of a sample Linux system is 192.168.0.18. Let’s see the skeletal structure of the command prompt line we’ll need to type:
[path_where_pscp_is_downloaded]>pscp user@[host:source destination]
Example 1:
For example, assume that PuTTy pscp is downloaded on the Windows Program Files directory and we’ll need to transfer files from Linux to Windows OS to send a file called “a.txt”. Follow the command prompt code below:
C:\Program Files\PuTTY>pscp user@192.168.0.18:/tmp/a.txt \Users\<username>
Example 2:
For vice-versa, to store the file in a new directory follow the code below:
Important: Check whether the directory exists or else, you’ll get an error. You can use the following command to create a new directory:
mkdir <directory_name>
C:\Program Files\PuTTY>pscp \Users\<username>\a.txt user@192.168.0.18:/<directory_name>
Now, you’ve successfully transferred files from Linux OS to Windows OS and vice-versa.
Method 2: Using FTP with FileZilla or Shared Network Folders
Another simple method used for file transfer is using FTP (File Transfer Protocol). This is the easiest method since this involves no coding/ command lines. Let’s see how to do that. If you don’t have FileZilla, check out How to install FileZilla on Windows. After installing FileZilla, follow the following steps.
Step 1: Download and Install FileZilla on Windows
- To trasnfer file from Linux to Windows you need a FTP server and for this you need to install FileZilla on Windows
Step 2: Open FileZilla
- Once the installation process is over open FileZilla on you Windows system.
Step 3: Open File
- Navigate to “File” section and select “Site Manager” after opening FileZilla.
Step 3: Choose SFTP Protocal
- Change the protocol to SFTP.
Step 4: Add Your Linux Address
- Type your Linux Address in the Host coloumn, which in this case is 192.168.0.18.
Step 5: Modify General Settings
- Under the General section, go to “Logon Type” and select “Normal” as shown in the image below:

Step 6: Enter the User Credentials
- Enter the Username and Password of the Linux OS machine.
Step 7: Share Files
- After all the 6 steps are done, click “Connect”.
- Now you’ve created a client-server connection with SFTP between Linux and Windows OS. After the connection is created, it is simply a matter of dragging and dropping files between the platforms mentioned earlier.
Method 3: Using SMB Protocol
One other way of transferring files from Linux to Windows is by connecting both OS systems using the SMB (Server Message Block) protocol. SMB can be used both in Windows and Linux to initiate a connection to share and transfer files.
Step 1: Use/ Install Samba in Linux
- Samba is an open-source software which provides clients with file and print services in a Windows-based network. This software supports connections between Windows systems and can be used to transfer files.
- To install Samba, type the following commands in your Linux terminal.
sudo apt install samba -y
- After successfully installing samba-client, check its status by typing the command:
systemctl status smbd
Step 2: Create a shared directory
- When transferring files from Linux to Windows, create a shared directory which will be used by both Linux and Windows OS. Follow the command below to see how to do so.
mkdir <directory_of_your_choice>
- Give administrative permission using the chmod command.
chmod 777 <directory_of_your_choice>
Note: There are several numbers in chmod which are used to give specific permissions. They are
- 777— everyone can read, write and edit (full access)
- 755— Owners can read, write and execute, and group users can read and edit the file.
- 644— Only owners can read, write and execute the files. The other people included by the owner can only view the file.
Step 3: Create a New uUer Specifically for File-Sharing
- While sharing files, create a new user whose account will be used for the sharing/ transfer of files. The command for this is
useradd <username>
Step 4: Give an SMB Password for the User
- To facilitate SMB protocol under the user, you must create an SMB password by executing the command below
smbpasswd -a <username>
- Then type out the password in the terminal.
Step 5: Edit the Config File in Samba Using Any Editor (or nano)
- Type out the command below
sudo nano /etc/samba/smb.conf
- After opening the file, scroll to the bottom of the file and add the following lines.
path = <directory_of_your_choice>
valid users = <username>
read only = no
browsable = yes
public = yes
writable = yes
browsable = yes
- Save and exit the file, then check if everything was edited and saved successfully by running the following command.
testparm
Step 6: Find the IP Address of Your Linux System
- Using ifconfig, find the IP address of your Linux system.
ifconfig wlo1
- Your IP address will be shown below:
Step 7: Connect to the Network from the Windows Side
- Launch the “Run” program by pressing the “Windows button” and “R”. Then type the IP address of the Linux system you got from the previous step. Type the IP address with two slashes before it.
- This will open the Linux-shared folders. Now you can view it and transfer files in between.
Methods 4 Use USB Drive (Easiest Method)
If you do not want to do any scription tasks or do not want to use FTP, then you can simple use USB drive to share files between Linux to Windows systems. Just insert your USB drive and copy all the files into the USB drive that you want to transfer into Windows. Once the copying task is completed, eject the USB drive from your Linux system, insert it into Windows system, and paste in anywhere in your Windows system.
Conclusion
Successfully transferring files from Linux to Windows can streamline your workflow and ensure that your data is accessible across different platforms. Whether you choose to use network sharing, SCP, or a USB drive, the methods covered in this guide provide you with the tools you need for efficient Linux to Windows file transfer. Understanding these techniques will help you handle cross-platform data management with ease.
Also Read
- How to Download a File from a Server with SSH / SCP?
- How to Troubleshoot SSH Connection Issues?
- How To Transfer Files From Android to iPhone?
Downloading a file from a Linux server to Windows may seem like a daunting task for some users, especially if they are not familiar with the process. However, with the right tools and a step-by-step guide, this task can be easily accomplished. In this article, we will walk you through the process of downloading a file from a Linux server to your Windows computer.
Using Secure Copy (SCP)
Secure Copy (SCP) is a secure file transfer protocol that allows you to transfer files between a local and a remote host. To download a file from a Linux server to Windows using SCP, follow these steps:
- Open a command prompt on your Windows computer.
- Use the following SCP command to download the file:
scp username@server_ip:/path/to/file.txt C:\Users\YourUsername\Desktop\
Replace username with your username on the Linux server, server_ip with the IP address of the Linux server, /path/to/file.txt with the path to the file on the Linux server, and C:\Users\YourUsername\Desktop\ with the destination folder on your Windows computer.
Using FileZilla
FileZilla is a popular FTP client that can be used to transfer files between a local and a remote host. To download a file from a Linux server to Windows using FileZilla, follow these steps:
- Download and install FileZilla on your Windows computer.
- Open FileZilla and connect to the Linux server using your credentials.
- Navigate to the directory on the Linux server where the file is located.
- Drag and drop the file from the Linux server to a local directory on your Windows computer.
Using PuTTY and PSCP
PuTTY is a popular SSH and Telnet client that also includes a tool called PSCP, which can be used to transfer files securely between a local and a remote host. To download a file from a Linux server to Windows using PuTTY and PSCP, follow these steps:
- Download and install PuTTY on your Windows computer.
- Open a command prompt and use the following PSCP command to download the file:
pscp username@server_ip:/path/to/file.txt C:\Users\YourUsername\Desktop\
Replace username, server_ip, /path/to/file.txt, and C:\Users\YourUsername\Desktop\ with the appropriate values as mentioned in the SCP method.
Conclusion
Downloading a file from a Linux server to Windows can be done using various methods such as SCP, FileZilla, or PuTTY with PSCP. Choose the method that works best for you based on your familiarity with the tools and the level of security required for the file transfer process. By following the steps outlined in this guide, you can easily transfer files between a Linux server and your Windows computer.
#DownloadFile #LinuxServer #Windows #FileTransfer #SCP #FileZilla #PuTTY #PSCP
In this tutorial, you will learn how to use the scp command to securely copy files and directories between local and remote systems using SSH.
In This Tutorial
- System Requirements for SCP
- SCP Command Syntax
- Examples: Copying Files from Local to Remote
- Examples: Copying Files from Remote to Local
- Copying Directories
- Copying Between Two Remote Servers
- Using an Identity File (Private Key)
System Requirements for SCP
Local Computer:
- The
scpcommand relies on the SSH protocol. - On the local computer where you’re running the
scpcommand, only an SSH client is needed. - Linux, macOS, and Windows all come with the
scpcommand installed by default.
Remote Computer:
- However, on the remote server side you need
OpenSSH serverto accept incoming SSH connections. - So the OpenSSH server must be running on the remote computer.
If your Linux system doesn’t have an SSH server, click this link for instructions on how to install the OpenSSH Server.
You can install the OpenSSH Server on Windows as well.
SCP Command Syntax
The basic syntax of the scp command looks like this:
scp [options] source destination- The source is the file or folder you want to copy.
- The destination is where you want to copy it to.
Command Options:
-r: Recursively copy directories.-P port: Specifies the port number to connect to on the remote host (if it’s not the default port 22).-i identity_file: Specifies the private key file to use for authentication.
Remote Path Format
When specifying a remote source or destination, the format is as follows:
user_name@IP-Address:pathExample:
[email protected]:/var/www/The user@ portion is optional if your local username is the same as the remote username. If it’s missing, the scp command will use your local user account name.
Examples: Copying Files from Local to Remote
Copy file1.txt from the local computer to the /tmp directory on the remote server at 192.168.1.10:
scp file1.txt [email protected]:/tmp/Copy file1.txt and file2.txt to the remote server at the same time:
scp file1.txt file2.txt [email protected]:/tmp/Examples: Copying Files from Remote to Local
Download /etc/passwd from the remote computer and save it in the C:\data\ folder on your Windows computer:
scp [email protected]:/etc/passwd C:\data\Download multiple files at once from the remote server:
scp [email protected]:/tmp/file1.txt /tmp/file2.txt /backup/Note: The above syntax for downloading multiple remote files might not work as expected in the Windows version of the scp command. It works in a Linux Bash shell.
Copying Directories
When copying a directory, you must use the -r option to copy all files and sub-directories recursively.
Examples:
scp -r /var/www/ [email protected]:/tmp/
scp -r [email protected]:/var/www/ /backup
Copying Between Two Remote Servers
It’s also possible to copy files between two remote computers using scp, but the data is transferred through your local machine.
Example:
scp -r [email protected]:/var/www/ [email protected]:/backup/Using an Identity File (Private Key)
And the last example we’ll look at is how to copy files using an identity file or private key, if you’re using passwordless authentication.
The command option to specify the identity file is -i.
scp -r -i srv01.pem [email protected]:/var/www/ /backup/And that concludes this tutorial on the Linux scp command. If you found it helpful, subscribe to @RealClearComputing for more Linux tutorials.
When you are working on the multiple servers, copying files between two servers is a common task for any system administrator. In this case, the SCP utility is the best choice for any system administrator.
SCP stands for “Secure Copy Protocol” is a Linux command-line tool used to transfer files and directories securely between two servers.
By default, GUI mode is not installed in Linux servers. SCP utility makes it easier for Linux system administrator to manage the multiple servers from the command-line.
SCP utility is based on the SSH, as so you will need a username and password of the source and target system to transfer the files.
In this tutorial, we will show you how to transfer files and directories between two systems using SCP file transfers!
Basic Syntax
The basic syntax of the scp command is shown below:
scp [OPTION] local-file-or-directory user@remote-ip:/directory/
You can use the above command to transfer files and directories from a local system to remote system.
scp [OPTION] user@remote-ip:/remote-file /local-directory
You can use the above command to transfer files and directories from a remote system to local system.
scp [OPTION] user@remote-ip:/directory/ user@remote-ip:/directory/
You can use the above command to transfer files and directories from one remote system to another remote system.
A brief explanation of each option in SCP command are shown below:
*Note: all these options are Case sensitive!
- -r
This option will copy files and directories recursively. - -v
This option will display verbose output during the copying process. - -P
This option is used to specify the ssh port number of the target host when the target host using the different SSH port. - -l
This option is used to limit the bandwidth while copying the files and directories. - -q
This option skips the SSH warning message. - -p
This option will preserve permissions, modes and access time of files while copying. - -i
This option is used to specify the SSH private key.
Transfer Files and Directories with SCP in Linux
The SCP utility allows you to transfer files between, local to remote, remote to local and remote to remote systems.
In this section we will show you how to transfer files and directories between them.
Local to Remote System Transfers:
Local to Remote File Transfers:
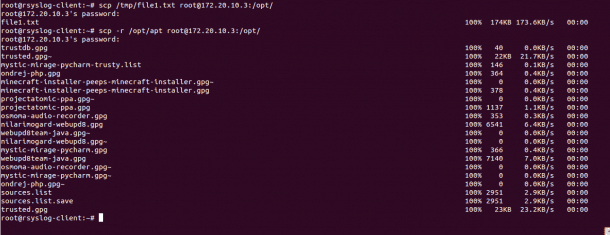
To transfer a file named file1.txt located inside /tmp directory from a local system to the remote system directory /opt use the following command:
scp /tmp/file1.txt root@172.20.10.3:/opt/
You will be asked to provide remote system’s root user password to transfer the file as shown below:
root@172.20.10.3's password:

file1.txt                                                                                                    100%  174KB 173.6KB/s   00:00
You can use the option -v with SCP to see the verbose output during the file transfer:
scp -v /tmp/file1.txt root@172.20.10.3:/opt/
Local to Remote Directories/Folders Transfers:
To transfer a directory named apt located inside /opt from a local system to the remote system directory /opt recursively use the following command:
scp -r /opt/apt root@172.20.10.3:/opt/
Provide remote system’s root user password to transfer the directory as shown below:
trustdb.gpg                                                                                                  100%   40     0.0KB/s   00:00

trusted.gpg~                                                                                                 100%   22KB  21.7KB/s   00:00

mystic-mirage-pycharm-trusty.list                                                                            100%  146     0.1KB/s   00:00

ondrej-php.gpg                                                                                               100%  364     0.4KB/s   00:00

minecraft-installer-peeps-minecraft-installer.gpg~                                                           100%    0     0.0KB/s   00:00

minecraft-installer-peeps-minecraft-installer.gpg                                                            100%  378     0.4KB/s   00:00

projectatomic-ppa.gpg~                                                                                       100%    0     0.0KB/s   00:00

projectatomic-ppa.gpg                                                                                        100% 1137     1.1KB/s   00:00

osmoma-audio-recorder.gpg                                                                                    100%  353     0.3KB/s   00:00

nilarimogard-webupd8.gpg                                                                                     100% 6541     6.4KB/s   00:00

webupd8team-java.gpg~                                                                                        100%    0     0.0KB/s   00:00

nilarimogard-webupd8.gpg~                                                                                    100%    0     0.0KB/s   00:00

mystic-mirage-pycharm.gpg                                                                                    100%  366     0.4KB/s   00:00

webupd8team-java.gpg                                                                                         100% 7140     7.0KB/s   00:00

osmoma-audio-recorder.gpg~                                                                                   100%    0     0.0KB/s   00:00

mystic-mirage-pycharm.gpg~                                                                                   100%    0     0.0KB/s   00:00

ondrej-php.gpg~                                                                                              100%    0     0.0KB/s   00:00

sources.list                                                                                                 100% 2951     2.9KB/s   00:00

sources.list.save                                                                                            100% 2951     2.9KB/s   00:00

trusted.gpg                                                                                                  100%   23KB  23.2KB/s   00:00
Example:
Remote to Local Transferring:
Remote to Local File Transfers:
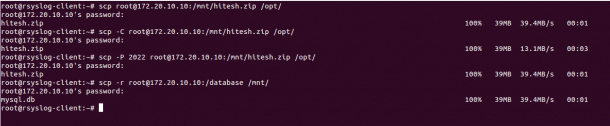
To transfer a file named hitesh.zip located inside /mnt directory of the remote to the local system’s directory /opt use the following command:
scp root@172.20.10.10:/mnt/hitesh.zip /opt/
You can increase the transfer speed by enabling the compression using the option -C with SCP as shown below:
scp -C root@172.20.10.10:/mnt/hitesh.zip /opt/
If your remote server uses SSH port 2022, then you can use -P option to specify the remote SSH port as shown below:
scp -P 2022 root@172.20.10.10:/mnt/hitesh.zip /opt/
Remote to Local Directory/Folders Transfers:
To transfer a directory named /etc from the remote system to local system’s directory /mnt recursively use the following command:
scp -r root@172.20.10.10:/database /mnt/
Example:
Remote to Remote System Transfers:
Remote to Remote File Transfers:
In order to transfer files and directories between two remote servers. You will need to configure SSH key-based authentication between both remote servers.
To transfer a file named /etc/rc.local from the one remote system (172.20.10.3) to another remote system’s (172.20.10.5) directory /opt use the following command:
scp root@172.20.10.3:/etc/rc.local root@172.20.10.5:/opt/
To transfer a directory named /mnt/apt from the one remote system (172.20.10.3) to another remote system’s (172.20.10.5) directory /opt use the following command:
scp -r root@172.20.10.3:/mnt/apt root@172.20.10.5:/opt/

Transfer Files and Directories with SCP in Windows (7, 8, 10, and Server)
If you are working on the Windows system and want to transfer files and directories from Windows to Linux and Linux to Windows system. Then, you can achieve this using WinSCP utility.
WinSCP is a free and open-source SCP and SFTP client for Windows based operating systems.
Transfer files between Windows and Linux system follow the below steps:
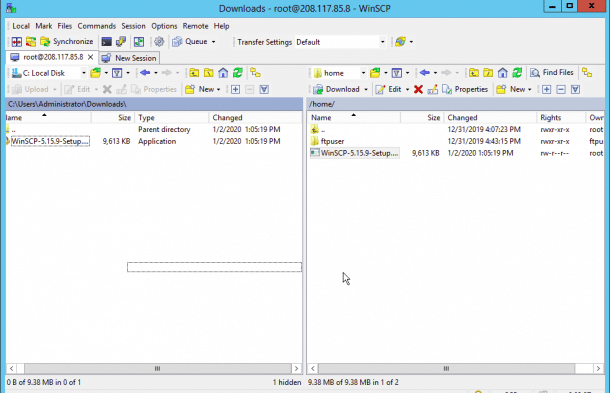
1. On the windows system, launch the WinSCP utility as shown below:
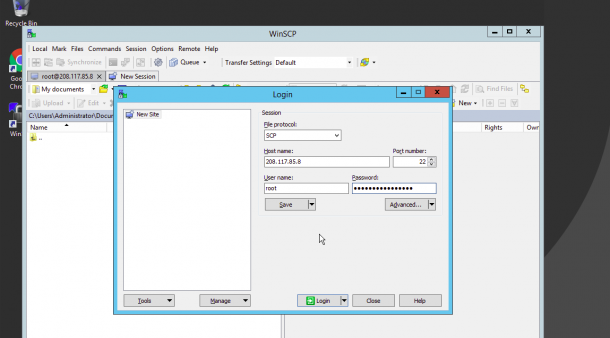
Now provide the following information:
- File Protocol : Select SCP as file transfer protocol.
- Host name : Provide your Linux server IP address.
- Port number : Provide your Linux server SSH port.
- User name : Provide the user name of your Linux server.
- Password : Provide your user’s password.
2. Now click on the Login button. You should see the following page:
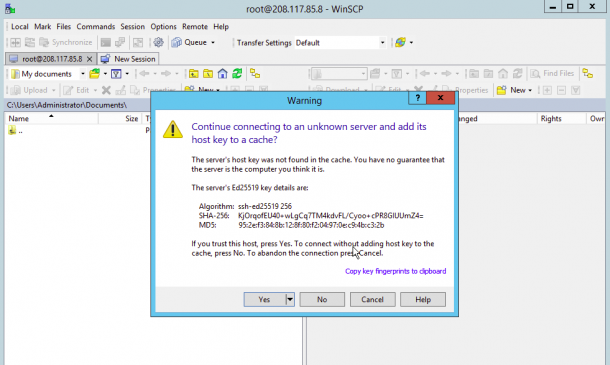
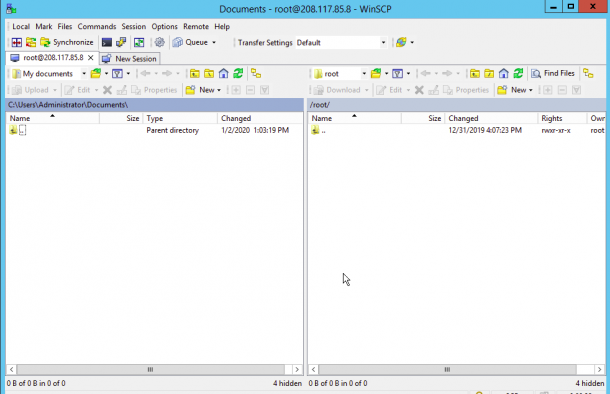
Click on the Yes button to verify the host. Once you are connected to the Linux server, you should see the following page:
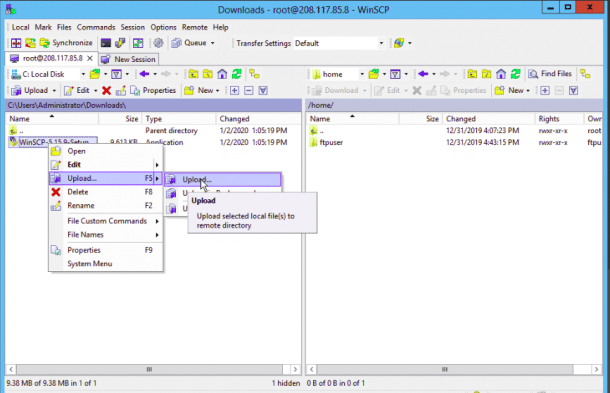
On the left pane, right-click on the file you want to upload on the Linux server and click on the Upload button as shown below:
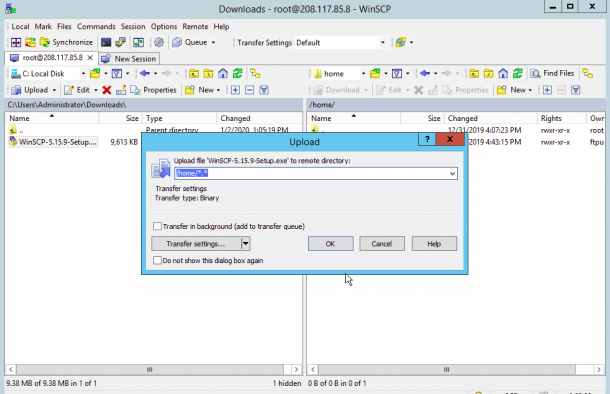
Now, provide the path of the Linux server’s directory and click on the OK button. Once the file has been uploaded, you should see the following page:
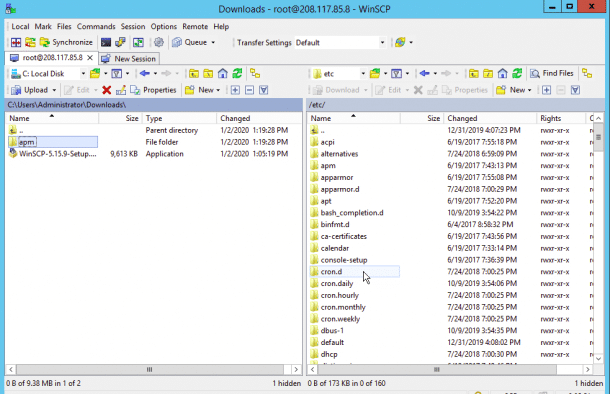
3. On the right pane, right-click on the directory you want to download from the Linux server to the Windows system and click on the Download button as shown below:


Now, provide the path of the Windows system directory and click on the OK button. Once the file has been uploaded, you should see the following page.
Conclusion
In the above tutorial, we’ve learned how to transfer files and directories from Linux to Linux, Windows to Linux and Linux to Windows. Feel free to ask questions below in the comments section if you have any!
File Transfer Methods
Step-by-step guides for securely exchanging files between Linux and Windows using SFTP, SCP, or downloading files from your Windows Server using FTP. Perfect for starting projects, downloading data, or managing server files efficiently.
Getting Started with File Transfers
Have a Windows Server and Want to Download Data
FTP Server on Windows. Download Data from Windows Server
Example: You’ve completed a project on your Windows server and want to download reports, logs, or other data to your machine. This guide helps you set up an FTP server on your RDP for easy file transfers, enabling seamless downloads from the server to your local machine.
Have a Linux Server and Want to Exchange Files
Windows Client connects to Linux Server
SFTP on Windows. Windows Connects to a Linux Server
Example: You are starting a project on a Linux server and you want to upload application files, images, or databases from your local Windows desktop. This guide shows you how to use WinSCP to securely exchange files with your Linux server using SFTP.
SCP on Windows. Windows Connects to a Linux Server
Example: You are finishing up a web project hosted on a Linux server and you want to download the project files to your local Windows computer. This guide helps you use WinSCP and SCP protocol for secure file copying.
Linux Client connects to Linux Server
SFTP on Linux. Linux Connects to a Linux Server
Example: You’re working on a Linux machine and you need to upload source code or download logs from your Linux server. This guide explains how to use the sftp command for secure and efficient file transfers between two linux machines.
SCP on Linux. Linux Connects to a Linux Server
Example: You’re deploying an application on a Linux server and need to upload the application files from your local Linux client. This guide explains how to use the scp command to copy files directly and securely between two Linux machines.
Was this page helpful?
Senior Linux Systems Engineer (KVM & Hosting Expert)FTP on Windows