
Функцию оптимизации доставки (Windows Update Delivery Optimization, WUDO) в Windows 10 можно использовать для более эффективного распространения обновлений Windows (полученных через Windows Update или WSUS), и пакетов Configuration Manager в корпоративной сети с множеством сайтов/филиалов. Благодаря использованию Delivery Optimization вы можете существенно уменьшить трафик и нагрузку на каналы между вашими офисами при получении обновлений.
В этой статье мы рассмотрим особенности настройки Delivery Optimization в Windows 10 и 11 для оптимизации трафика обновлений Windows Update, WSUS и SCCM в локальной сети предприятия.
Содержание:
- Настройка оптимизации доставки в Windows 10 и 11
- Настройка параметров Delivery Optimization на клиентах с помощью GPO
- Использование Delivery Optimization для оптимизации трафика обновлений WSUS
- Использование Delivery Optimization в Configuration Manager
- Статистика использования оптимизации доставки в Windows
Служба Delivery Optimization похожа на торренты, и основана на принципах Peer to Peer (P2P). Перед загрузкой файла обновления Windows или приложения из Windows Store, компьютер пытается найти это файл у ближайших компьютеров в сети. Если такой файл найден, компьютер скачивает этот файл с соседнего компьютера, не нагружая канал WAN. Для координации используется облачный сервис Microsoft Delivery Optimization. Это значит, что ваши компьютеры должны иметь доступ в интернет (прямой или через прокси).
В современных билдах Windows 11/10 оптимизация доставки поддерживается не только для обновлений Windows и приложений MS Store, но также и обновлений Microsoft Office (обычных, C2R и MSIX) и пакетов SCCM.
Настройка оптимизации доставки в Windows 10 и 11
Оптимизация доставки включена во всех редакциях Windows 10 (доступна начиная с билда 1511) и Windows 11. По умолчанию разрешено получать файлы только с компьютеров в этой локальной сети (LAN).
Настройки оптимизации доставки доступны в современной панели управления Windows. Перейдите в Settings -> Windows Update -> Advanced Options -> Delivery Optimization.
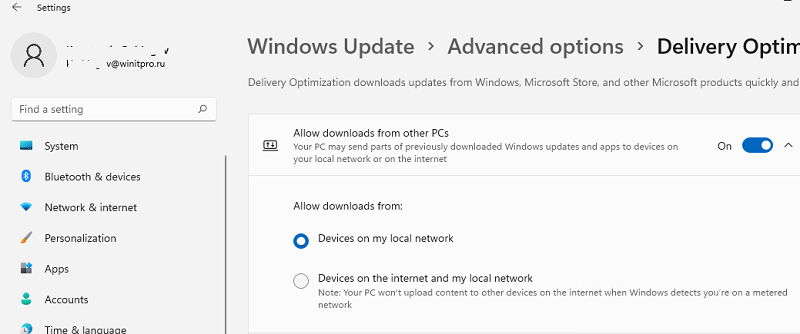
Как вы видите доступны только две опции:
- Allow downloads from other PCs – включает или отключает оптимизацию доставки;
- Allow downloads from: device on my local network/device on the Internet and my local network – позволяет указать, разрешено ли получать файлы с других устройств в интернете или только с устройств в локальной сети.
За функционал оптимизации доставки на стороне клиента отвечает служба Delivery Optimization (DoSvc). Служба по умолчанию включена и настроена на автозапуск:
get-service dosvc|Select-Object -Property Name,Status,StartType
Настройка параметров Delivery Optimization на клиентах с помощью GPO
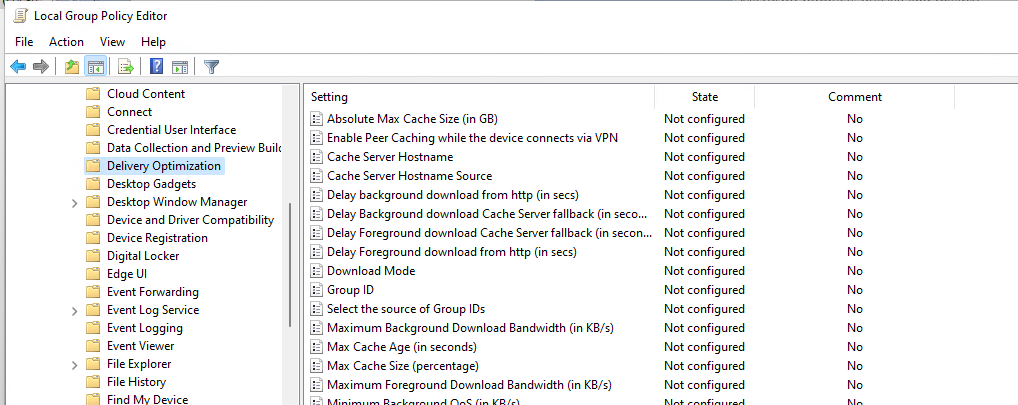
Расширенные настройки Delivery Optimization находятся в разделе групповых политик Computer Configuration -> Administrative Templates -> Windows Components -> Delivery Optimization.
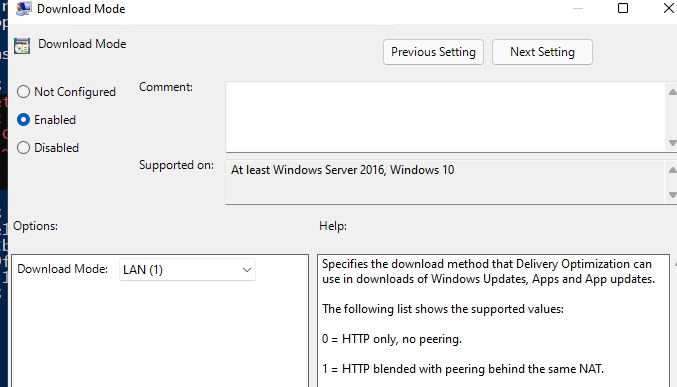
Чтобы принудительно включить Delivery Optimization на клиентах Windows используется политика Download Mode. Чаще всего здесь используются значения:
- LAN (1) – HTTP Peering behind the same NAT — рекомендуется использоваться, если все ваши компьютеры находятся в одной LAN;
- Group (2) — HTTP blended with peering across a private group — используется в больших сетях, состоящих из множества сегментов, соединенных WAN каналами. В качестве границ сетей могут использоваться домены, сайты AD.
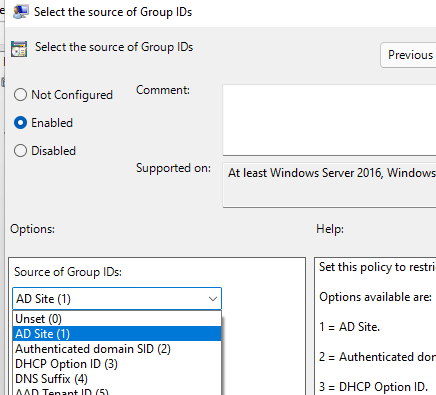
С помощью политики GroupID можно создать группы доставки обновлений в вашей сети. Например, с помощью GPO можно назначить компьютерам в каждой OU уникальный GUID. Компьютеры с одинаковыми GUID будут получать обновления только с компьютеров с тем же GUID (т.е. в рамках одной LAN, не нагружая трафиком WUDO каналы между площадками). Для генерации уникального GUID выполните команду: [guid]::NewGuid().
Либо вы можете привязать группу к сайтам Active Directory с помощью политики Select the source of group IDs = AD Site.
Устройство Windows будет работать в качестве пира сети Delivery Optimization, если на нем установлено не менее 4 Гб памяти и 32 Гб свободного места на диске. Можно изменить эти настройки в GPO:
- Minimum disk size allowed to use Peer Caching (in GB)
- Minimum RAM Capacity (inclusive) required to enable of Peer Caching (in GB)
По умолчанию оптимизация доставки не будет работать для устройств, подключенных в вашу сеть через VPN. Если вы хотите, чтобы клиенты VPN получали обновления через delivery optimization, включите опцию Enable peer caching while the device is connected over a VPN.
Использование Delivery Optimization для оптимизации трафика обновлений WSUS
Delivery Optimization автоматически поддерживается для обновлений на WSUS сервере. Создайте обычную групповую политику для получения обновлений с вашего WSUS и назначьте ее на клиентов.
Клиент после сканирования обновлений на WSUS, попытается найти файл обновления в кэше на клиентах в LAN. Для этого, он обращается к облачному сервису WUDO (по HTTP/HTTPS) и спрашивает о наличии файла с определенным хэшем на компьютерах в той же LAN.
Если файл найден, клиент обращается к службе Delivery Optimization на соседнем компьютере (порт 7680) и начинает загрузку файла по BITS.
Использование Delivery Optimization в Configuration Manager
ConfigMgr 1910 и выше поддерживает использование Delivery Optimization для распространения обновления и пакетов в сети.
Как и BranchCache, оптимизация доставки основывается на границах групп (boundaries). Включите опцию Allow peer downloads in this boundary group в настройках границы группы.
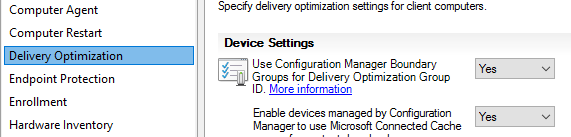
В настройках клиентов Configuration Manager нужно включить две опции:
- В разделе Delivery Optimization включите Use Configuration Manager boundary Groups for Delivery optimization for group ID;

- Включите Allow Clients to download delta content when available в разделе Software Update.
Если Delivery Optimization включена, и в рамках границ обнаружены пиры с нужным контентом, Windows будет скачивать с пиров все типы файлов независимо от клиента ConfigMgr.
Статистика использования оптимизации доставки в Windows
Вы можете получить статистику о получении файлов и обновлений через оптимизацию доставки с помощью Activity Monitor (доступен в панели управления Settings -> Update & Security -> Delivery Optimization). Здесь видно какой объем трафика из различных источников delivery optimization получал ваш компьютер и с кем делился.
Также можно использовать PowerShell для получения статистики DeliveryOptimization.
Команда для получения общей статистики Delivery optimization (сколько файлов скачано, отдано, размер, эффективность пира):
Get-DeliveryOptimizationPerfSnap
Подробная информация о текущих заданиях Delivery Optimization:
Get-DeliveryOptimizationStatus | ft

Командлет выводит информацию о всех файлах, полученных компьютером. Виден размер файла, какой процент файла получен через DO (PercentPeerCaching) и т.д.
С помощью следующей команды можно получить информацию о подключенных пирах:
Get-DeliveryOptimizationStatus –PeerInfo

Можно получить статистику delivery optimization для вашего устройства за месяц:
Get-DeliveryOptimizationPerfSnapThisMonth
Наибольший эффект от использования оптимизации доставки могут получить компании, состоящие из нескольких филиалов, соединенных по WAN с централизованной инфраструктурой WSUS/SCCM. Также Delivery Optimization позволит отказаться от использования реплик WSUS или точек распространения SCCM в удаленных офисах.
Performs content delivery optimization tasks.
This service also exists in Windows 11.
Startup Type
| Windows 10 version | Home | Pro | Education | Enterprise |
|---|---|---|---|---|
| 1507 | Automatic | Automatic | Automatic | Automatic |
| 1511 | Automatic | Automatic | Automatic | Automatic |
| 1607 | Automatic | Automatic | Automatic | Automatic |
| 1703 | Automatic | Automatic | Automatic | Automatic |
| 1709 | Manual | Automatic | Automatic | Automatic |
| 1803 | Manual | Automatic | Automatic | Automatic |
| 1809 | Manual | Automatic | Automatic | Automatic |
| 1903 | Manual | Automatic | Automatic | Automatic |
| 1909 | Manual | Automatic | Automatic | Automatic |
| 2004 | Manual | Automatic | Automatic | Automatic |
| 20H2 | Manual | Automatic | Automatic | Automatic |
| 21H1 | Manual | Automatic | Automatic | Automatic |
| 21H2 | Automatic | Automatic | Automatic | Automatic |
| 22H2 | Automatic | Automatic | Automatic | Automatic |
Default Properties
| Display name: | Delivery Optimization |
| Service name: | DoSvc |
| Type: | share |
| Path: | %WinDir%\System32\svchost.exe -k NetworkService -p |
| Error control: | normal |
| Object: | NT Authority\NetworkService |
| Privileges: |
|
Default Behavior
The Delivery Optimization service is running as NT Authority\NetworkService in a shared process of svchost.exe. Other services might run in the same process. If Delivery Optimization fails to start, the error is logged. Windows 10 startup proceeds, but a message box is displayed informing you that the DoSvc service has failed to start.
Dependencies
Delivery Optimization is unable to start, if the Remote Procedure Call (RPC) service is stopped or disabled.
Restore Default Startup Type of Delivery Optimization
Automated Restore
1. Select your Windows 10 edition and release, and then click on the Download button below.
2. Save the RestoreDeliveryOptimizationWindows10.bat file to any folder on your hard drive.
3. Right-click the downloaded batch file and select Run as administrator.
4. Restart the computer to save changes.
Note. Make sure that the svchost.exe file exists in the %WinDir%\System32 folder. If this file is missing you can try to restore it from your Windows 10 installation media.
Yea, though I walk through the valley of the shadow of death, I will fear no evil: for thou art with me; thy rod and thy staff they comfort me.
If you have noticed that your computer is running slower than usual, or that your internet bandwidth is being consumed by an unknown process, you might have a problem with DoSvc. DoSvc stands for Delivery Optimization Service, and it is a Windows feature that helps you download updates faster and more efficiently. However, some malware can hijack this service and use it to spread malicious files or steal your data. In this blog post, we will show you how to fix infected DoSvc and restore your system’s performance and security.
 1")
What is DoSvc?
DoSvc is a service that runs in the background on Windows 10 devices. It uses peer-to-peer technology to share updates with other devices on your local network or on the internet. This way, you can save bandwidth and download updates faster. DoSvc also helps you download updates from Microsoft servers when they are not available from other sources.
DoSvc is usually harmless and beneficial, but it can also become a target for malware. Some malicious programs can infect DoSvc and use it to download or upload harmful files without your knowledge or consent. This can compromise your system’s security and privacy, as well as slow down your internet connection and computer performance.
How to Fix Infected DoSvc (Delivery Optimization Service)
This malware removal guide may appear overwhelming due to the number of steps and numerous programs that are being used. We have only written it this way to provide clear, detailed, and easy-to-understand instructions that anyone can use to remove malware for free.
Please perform all the steps in the correct order. If you have any questions or doubts at any point, stop and ask for our assistance.
To fix infected DoSvc (Delivery Optimization Service), follow these steps:
- STEP 1: Use Rkill to terminate malicious processes
- STEP 2: Uninstall malicious programs from Windows
- STEP 3: Reset browsers back to default settings
- STEP 4: Use Malwarebytes to remove for Trojans and Unwanted Programs
- STEP 5: Use HitmanPro to remove Rootkits and other Malware
- STEP 6: Use AdwCleaner to remove Malicious Browser Policies and Adware
- STEP 7: Perform a final check with ESET Online Scanner
- STEP 8: Run the System File Checker (SFC) tool
- STEP 9: Run the Disk Check tool
STEP 1: Use Rkill to terminate malicious processes
In this first step, we will download and run Rkill to terminate malicious processes that may be running on your computer.
RKill is a program that was developed at BleepingComputer.com that attempts to terminate known malware processes so that your normal security software can then run and clean your computer of infections. When RKill runs it will kill malware processes and then removes incorrect executable associations and fixes policies that stop us from using certain tools.
-
Download Rkill.
You can download RKill to your computer from the below link. When at the download page, click on the Download Now button labeled iExplore.exe. We are downloading a renamed version of Rkill (iExplore.exe) because some malware will not allow processes to run unless they have a certain filename.
-
Run RKill.
After downloading, double-click the iExplore.exe icon to kill malicious processes. In most cases, downloaded files are saved to the Downloads folder.
The program may take some time to search for and end various malware programs. 2")
When it is finished, the black window will close automatically and a log file will open. Do not restart your computer. Proceed to the next step in this guide.
 2")
STEP 2: Uninstall malicious programs from Windows
In this second step, we will manually check if any unknown or malicious programs are installed on the computer. Sometimes adware and browser hijackers can have a usable Uninstall entry that can be used to remove them.
Windows 11Windows 10Windows 8Windows 7
-
Press the Windows key + I on your keyboard to open the Settings app.
First, open Windows Settings by pressing Windows+I on your keyboard. You can also right-click your Start button and select “Settings” from the list.

-
In the Settings app, click on “Apps” and then “Apps & features”.
When Settings opens, click “Apps” in the sidebar, then select “Apps & Features”.

-
Find the malicious program in the list of installed apps and uninstall it.
In Apps & Features settings, scroll down to the app list and search for unknown or suspicious programs. To make things easier, you can sort all installed programs by their installation date. To do this, click “Sort by” and select “Install date”.
Look out for any suspicious program that could be behind all the drama – anything you don’t remember downloading or that doesn’t sound like a genuine program. When you find a malicious program, click the three dots button beside it and select “Uninstall” in the menu that appears.
If you have checked your computer for malicious programs and did not find any, you can proceed with the next step in this guide.
-
Follow the prompts to uninstall the program.
In the next message box, confirm the uninstall process by clicking on Uninstall, then follow the prompts to uninstall the malicious program.
Make sure to read all of the prompts carefully, because some malicious programs try to sneak things in hoping that you won’t read them closely.


-
Press the Windows key + I on your keyboard to open the Settings app.
Press the Windows key + I on your keyboard to open the Settings app. You can also ope the Settings app by clicking the Start button on the taskbar, then select “Settings” (gear icon).

-
In the Settings app, click on “Apps”.
When the “Windows Settings” window opens, click on “Apps“. By default, it should open “Apps and Features” but if it doesn’t, select it from the list on the left.

-
Find the malicious program in the list of installed apps and uninstall it.
In Apps & Features settings, scroll down to the app list and search for unknown or suspicious programs. To make things easier, you can sort all installed programs by their installation date. To do this, click “Sort by” and select “Install date”.
Look out for any suspicious program that could be behind all the drama – anything you don’t remember downloading or that doesn’t sound like a genuine program. When you find a malicious program, click on it and select “Uninstall” in the menu that appears.
If you have checked your computer for malicious programs and did not find any, you can proceed with the next step in this guide.
-
Follow the prompts to uninstall the program.
In the next message box, confirm the uninstall process by clicking on Uninstall, then follow the prompts to uninstall the malicious program.
Make sure to read all of the prompts carefully, because some malicious programs try to sneak things in hoping that you won’t read closely.


-
Go to “Program and Features”.
Right-click on the Start button in the taskbar, then select “Programs and Features”. This will take you directly to your list of installed programs.
 3")
-
Search for malicious program and uninstall it.
The “Programs and Features” screen will be displayed with a list of all the programs installed on your computer. Scroll through the list until you find any unknown or suspicious program, then click to highlight it, then click the “Uninstall” button.
Look out for any suspicious program that could be behind all the drama – anything you don’t remember downloading or that doesn’t sound like a genuine program.
If you have checked your computer for malicious programs and did not find any, you can proceed with the next step in this guide.
 4")
-
Follow the on-screen prompts to uninstall malicious program.
In the next message box, confirm the uninstall process by clicking on Yes, then follow the prompts to uninstall malicious program. Make sure to read all of the prompts carefully, because some malicious programs try to sneak things in hoping that you won’t read closely.
 3")
 4")
-
Open the “Control Panel”.
Click on the “Start” button, then click on “Control Panel“.
-
Click on “Uninstall a Program”.
When the “Control Panel” appears, click on “Uninstall a Program” from the Programs category.
 6")
-
Search for malicious programs and uninstall them.
The “Programs and Features” screen will be displayed with a list of all the programs installed on your computer. Scroll through the list until you find any suspicious or unknown program, then click to highlight it, then click the “Uninstall” button.
Look out for any suspicious program that could be behind all the drama – anything you don’t remember downloading or that doesn’t sound like a genuine program.If you have checked your computer for malicious programs and did not find any, you can proceed with the next step in this guide.
 7")
-
Follow the on-screen prompts to uninstall malicious program.
In the next message box, confirm the uninstall process by clicking on Yes, then follow the prompts to uninstall malicious program. Make sure to read all of the prompts carefully, because some malicious programs try to sneak things in hoping that you won’t read closely.
 6")
 7")
If you are experiencing difficulty while attempting to uninstall a program, you can use Revo Uninstaller to completely remove the unwanted program from your computer.
Now that the malicious programs have been removed from your computer, we can proceed with the next step in this guide.
STEP 3: Reset browsers back to default settings
In this step, we will remove spam notifications, malicious extensions, and change to default any settings that might have been changed by malware.
Please note that this method will remove all extensions, toolbars, and other customizations but will leave your bookmarks and favorites intact. For each browser that you have installed on your computer, please click on the browsers tab below and follow the displayed steps to reset that browser.
ChromeFirefoxMicrosoft EdgeInternet Explorer
Reset Chrome for Windows to default settings
We will now reset your Chrome browser settings to their original defaults. This will reset your startup page, new tab page, search engine, and pinned tabs. It will also disable all extensions and clear temporary data like cookies. Your favorites, history, and saved passwords will not be cleared.
-
Click the three dots in the top-right corner and then click on “Settings”.
Open Chrome and click on the menu button (represented by three vertical dots) in the top right corner of the window. In the dropdown menu that opens, click “Settings“.

-
Click “Advanced”.
Chrome’s “Settings” should now be displayed in a new tab or window, depending on your configuration. In the left sidebar, click on the “Advanced” link.

-
Click “Reset and clean up”.
In the left sidebar, under the “Advanced” section, click on “Reset and clean up“.
 8")
-
Click “Reset settings to their original defaults”.
In the main window, the “Reset and clean up” section is visible, as shown in the screenshot below. Click on “Reset settings to their original defaults“.
-
Click “Reset settings”.
A confirmation dialog will now be displayed, detailing the components that will be restored to their default state should you continue with the reset process. To complete the restoration process, click on the “Reset settings” button.

-
(Optional) Reset Chrome Data Sync.
In case a malicious extension reinstalls itself even after performing a browser reset, you have an additional option to reset the data sync for your browser. To do this, navigate to chrome.google.com/sync and click on the Clear Data button.
 9")


 8")


 9")
Reset Firefox for Windows to default settings
We will now reset your Firefox browser settings to their default. The reset feature fixes many issues by restoring Firefox to its factory default state while saving your essential information like bookmarks, passwords, web form auto-fill information, browsing history, and open tabs.
-
Click the three horizontal lines in the top-right corner and then click on “Help”.
Click on Firefox’s main menu button, represented by three horizontal lines. When the drop-down menu appears, select the option labeled “Help“.

-
Click “More troubleshooting information”.
From the Help menu, click on “More troubleshooting information“.

-
Click on “Refresh Firefox”
When the “Troubleshooting Information” page opens, click on the “Refresh Firefox” button.
 10")
-
Confirm that you want to reset your browser settings.
To finish the reset process, click on the “Refresh Firefox” button in the new confirmation window that opens.
-
Click “Finish”.
Firefox will now close itself and will revert to its default settings. When it’s done, a window will list the information that was imported. Click on “Finish“.
Your old Firefox profile will be placed on your desktop in a folder named “Old Firefox Data“. If the reset didn’t fix your problem you can restore some of the information not saved by copying files to the new profile that was created. If you don’t need this folder any longer, you should delete it as it contains sensitive information.


 10")

Reset Microsoft Edge to default settings
We will now reset your Microsoft Edge browser settings to their default. This will reset your startup page, new tab page, search engine, and pinned tabs. It will also disable all extensions and clear temporary data like cookies. Your favorites, history, and saved passwords will not be cleared.
-
Click the three dots in the top-right corner and then click on “Settings”.
In the top right corner, click on Microsoft Edge’s main menu button, represented by three horizontal dots. When the drop-down menu appears, click on “Settings“.

-
Click on “Reset Settings”.
On the left side of the window, click on “Reset Settings“.
-
Click on “Restore settings to their default values”.
In the main window, click on “Restore settings to their default values“.

-
Click “Reset”.
A confirmation dialog should now be displayed, detailing the components that will be restored to their default state should you continue with the reset process. To complete the restoration process, click on the “Reset” button.
Microsoft Edge will now erase all your personal data, browsing history, and disable all installed extensions. Your bookmarks, though, will remain intact and still be accessible.


Reset Internet Explorer to default settings
We will now reset your Internet Explorer browser settings to their default. You can reset Internet Explorer settings to return them to the state they were in when Internet Explorer was first installed on your computer.
-
Go to “Internet Options”.
Open Internet Explorer, click on the gear icon in the upper-right part of your browser, then select “Internet Options“.
-
Select the “Advanced” tab, then click “Reset”
In the “Internet Options” dialog box, select the “Advanced” tab, then click on the “Reset” button.
-
Click on “Reset”.
In the “Reset Internet Explorer settings” section, select the “Delete personal settings” checkbox, then click on the “Reset” button.
-
Click on “Close”.
When Internet Explorer has completed its task, click on the “Close” button in the confirmation dialogue box.
Close your browser and then you can open Internet Explorer again.
STEP 4: Use Malwarebytes to remove for Trojans and Unwanted Programs
In this next step, we will we will install Malwarebytes to scan and remove any infections, adware, or potentially unwanted programs that may be present on your computer.
Malwarebytes stands out as one of the leading and widely-used anti-malware solutions for Windows, and for good reason. It effectively eradicates various types of malware that other programs often overlook, all at no cost to you. When it comes to disinfecting an infected device, Malwarebytes has consistently been a free and indispensable tool in the battle against malware. We highly recommend it for maintaining a clean and secure system.
-
Download Malwarebytes for Windows
You can download Malwarebytes by clicking the link below.
-
Install Malwarebytes
After the download is complete, locate the MBSetup file, typically found in your Downloads folder. Double-click on the MBSetup file to begin the installation of Malwarebytes on your computer. If a User Account Control pop-up appears, click “Yes” to continue the Malwarebytes installation.
 11")
-
Follow the On-Screen Prompts to Install Malwarebytes
When the Malwarebytes installation begins, the setup wizard will guide you through the process.
-
You’ll first be prompted to choose the type of computer you’re installing the program on—select either “Personal Computer” or “Work Computer” as appropriate, then click on Next.
 12")
-
Malwarebytes will now begin the installation process on your device.
 13")
-
When the Malwarebytes installation is complete, the program will automatically open to the “Welcome to Malwarebytes” screen.
 14")
-
On the final screen, simply click on the Open Malwarebytes option to start the program.
 15")
-
-
Enable “Rootkit scanning”.
Malwarebytes Anti-Malware will now start, and you will see the main screen as shown below. To maximize Malwarebytes’ ability to detect malware and unwanted programs, we need to enable rootkit scanning. Click on the “Settings” gear icon located on the left of the screen to access the general settings section.
 16")
In the settings menu, enable the “Scan for rootkits” option by clicking the toggle switch until it turns blue.
 17")
Now that you have enabled rootkit scanning, click on the “Dashboard” button in the left pane to get back to the main screen.
-
Perform a Scan with Malwarebytes.
To start a scan, click the Scan button. Malwarebytes will automatically update its antivirus database and begin scanning your computer for malicious programs.
 18")
-
Wait for the Malwarebytes scan to complete.
Malwarebytes will now scan your computer for browser hijackers and other malicious programs. This process can take a few minutes, so we suggest you do something else and periodically check the status of the scan to see when it is finished.
-
Quarantine detected malware
Once the Malwarebytes scan is complete, it will display a list of detected malware, adware, and potentially unwanted programs. To effectively remove these threats, click the “Quarantine” button.
 20")
Malwarebytes will now delete all of the files and registry keys and add them to the program’s quarantine.
-
Restart your computer.
When removing files, Malwarebytes may require a reboot to fully eliminate some threats. If you see a message indicating that a reboot is needed, please allow it. Once your computer has restarted and you are logged back in, you can continue with the remaining steps.
 11")
 12")
 13")
 14")
 15")
 16")
 17")
 18")
 19")
 20")
 21")
 22")
STEP 5: Use HitmanPro to remove Rootkits and other Malware
In this fifth step, while the computer is in normal back, we will download and run a scan with HitmanPro to remove Trojans, rootkits, and other malicious programs.
HitmanPro is a second-opinion scanner that takes a unique cloud-based approach to malware scanning. HitmanPro scans the behavior of active files and also files in locations where malware normally resides for suspicious activity. If it finds a suspicious file that’s not already known, HitmanPro sends it to its clouds to be scanned by two of the best antivirus engines today, which are Bitdefender and Kaspersky.
Although HitmanPro is shareware and costs $24.95 for 1 year on 1 PC, there is no limit on scanning. The limitation only kicks in when there is a need to remove or quarantine detected malware by HitmanPro on your system and by then, you can activate the one-time 30-days trial to enable the cleanup.
-
Download HitmanPro.
You can download HitmanPro by clicking the link below.
HITMANPRO DOWNLOAD LINK
(The above link will open a new web page from where you can download HitmanPro) -
Install HitmanPro.
When HitmanPro has finished downloading, double-click on “hitmanpro.exe” (for 32-bit versions of Windows) or “hitmanpro_x64.exe” (for 64-bit versions of Windows) to install this program on your computer. In most cases, downloaded files are saved to the Downloads folder.

You may be presented with a User Account Control pop-up asking if you want to allow HitmanPro to make changes to your device. If this happens, you should click “Yes” to continue with the installation.

-
Follow the on-screen prompts.
When HitmanPro starts you will be presented with the start screen as shown below. Click on the “Next” button to perform a system scan.


-
Wait for the HitmanPro scan to complete.
HitmanPro will now begin to scan your computer for malicious programs.
-
Click on “Next”.
When HitmanPro has finished the scan, it will display a list of all the malware that it has found. Click on the “Next” button to have HitmanPro remove the detected items.

-
Click on “Activate free license”.
HitmanPro may now require to activate the free 30-days trial to remove the malicious files. To do this, click on the “Activate free license” button to begin the free 30 days trial and remove all the malicious files from your computer.

When the malware removal process is complete, it will display a screen that shows the status of the various programs that were removed. At this screen, you should click on the Next button and then if prompted you should click on the Reboot button. If HitmanPro does not prompt you to reboot, please just click on the Close button.


STEP 6: Use AdwCleaner to remove Malicious Browser Policies and Adware
In this next step, we will use AdwCleaner to remove malicious browser policies and unwanted browser extensions from your computer.
AdwCleaner is a free popular on-demand scanner that can detect and remove malware that even the most well-known anti-virus and anti-malware applications fail to find. This on-demand scanner includes a lot of tools that can be used to fix the side effects of adware. browser hijackers and other malware.
-
Download AdwCleaner.
You can download AdwCleaner by clicking the link below.
-
Double-click on the setup file.
Double-click on the file named “adwcleaner_x.x.x.exe” to start AdwCleaner. In most cases, downloaded files are saved to the Downloads folder.

AdwCleaner program will now open and you will be presented with the program’s license agreement. After you read it, click on the I agree button if you wish to continue. If Windows prompts you as to whether or not you wish to run AdwCleaner, please allow it to run.

-
Enable “Reset Chrome policies” to remove malicious browser policies.
When AdwCleaner starts, on the left side of the window, click on “Settings” and then enable “Reset Chrome policies“.

-
Click on the “Scan” button.
On the left side of the AdwCleaner window, click on “Dashboard” and then click “Scan” to perform a computer scan.

-
Wait for the AdwCleaner scan to finish.
AdwCleaner will now scan your computer for malware. This process can take a few minutes.
-
Click on “Quarantine” to remove malware.
When the AdwCleaner scan is completed it will display all of the items it has found. Click on the “Quarantine” button to remove the malicious programs from your computer.

-
Click on “Continue” to remove the malicious programs.
AdwCleaner will now prompt you to save any open files or data as the program will need to close any open programs before it starts to clean. Click on the “Continue” button to finish the removal process.

AdwCleaner will now delete all detected malware from your computer. When the malware removal process is complete, you may be asked to restart your computer.


STEP 7: Perform a final check with ESET Online Scanner
This step involves installing and running a scan with ESET Online Scanner to check for any additional malicious programs that may be installed on the computer..
ESET Online Scanner is a free second-opinion scanner, designed to rescue your computer from malware (viruses, trojans, rootkits, etc.) that have infected your computer despite all the security measures you have taken (such as anti-virus software, firewalls, etc.).
-
Download ESET Online Scanner.
You can download ESET Online Scanner by clicking the link below.
-
Double-click on esetonlinescanner.exe to run the installer.
When ESET Online Scanner has finished downloading, double-click on “esetonlinescanner.exe” to install it program on your computer. In most cases, downloaded files are saved to the Downloads folder.

-
Install ESET Online Scanner.
When ESET Online Scanner starts you will be presented with the start screen as shown below. Select your desired language from the drop-down menu and click Get started.

In the Terms of use screen, click Accept.
Select your preference for the Customer Experience Improvement Program and the Detection feedback system and click Continue.
-
Start a Full Scan with ESET Online Scanner
Click on Full Scan to perform an in-depth inspection of the entire computer.
Select Enable for Detection of Potentially Unwanted Applications, then click Start scan.
-
Wait for the ESET Online Scanner scan to finish.
ESET Online Scanner will now begin to scan your computer for malware. This process can take quite a while, so we suggest you do something else and periodically check on the status of the scan to see when it is finished.
-
ESET Online Scanner will automatically remove the malicious files.
At the end of the scan, the Found and resolved detections screen will be displayed. You can click View detailed results to view specific information. Detected threats are automatically cleaned and quarantined.


STEP 8: Run the System File Checker (SFC) tool
In this step, we will use System File Checker (SFC) tool to detect and repair files that may have been corrupted by malware.
The SFC tool scans all protected system files on your computer and replaces any files that are corrupt or damaged with a cached copy that is stored in a compressed folder at %WinDir%\System32\dllcache. By running the SFC tool, you can help ensure that your system is functioning properly and fix any issues.
-
Open Command Prompt as Administrator.
To open the Command Prompt as an administrator in Windows, type “cmd” in the search bar and then right-click on the Command Prompt result and select “Run as administrator” as shown in the image below.
 26")
A User Account Control (UAC) prompt will appear asking for permission to allow the program to run. Click “Yes”.
-
Type “sfc /scannow”.
You will now be presented with a black screen called the ‘Administrator: Command Prompt’. On this screen, type “sfc /scannow” to scan for and repair any corrupt system files.
-
Restart your computer.
Restart your computer if sfc /scannow repaired files. System File Checker may or may not prompt you to restart but even if it doesn’t, you should restart anyway.
-
Run again sfc /scannow.
Run again sfc /scannow to check if the files were repaired.
 26")
 27")
STEP 9: Run the Disk Check tool
As a final step, we will utilize the Disk Check tool, commonly referred to as “chkdsk,” to identify and resolve any issues that were caused by malware.
This tool checks your hard disk for errors and can fix any issues it finds. To use the Disk Check tool, you will need to open the command prompt and enter the “chkdsk” command followed by the drive letter (e.g., “chkdsk C:”). You can also add the “/f” flag to the command to instruct the tool to fix any errors it finds. By running the Disk Check tool, you can help ensure that your hard disk is functioning properly and fix any issues that may be causing high disk usage.”
-
Open Command Prompt as Administrator.
To open the Command Prompt as an administrator in Windows, type “cmd” in the search bar and then right-click on the Command Prompt result and select “Run as administrator” as shown in the image below.
A User Account Control (UAC) prompt will appear asking for permission to allow the program to run. Click “Yes”.
-
Type “chkdsk /f /r”
You will now be presented with a black screen called the ‘Administrator: Command Prompt’. On this screen, type “chkdsk /f /r” to repair any errors on your hard drive.
-
Restart your computer
The Disk Check tool may require you to restart your computer in order to complete the scan and repair process. Type “Y” and click on Enter, then restart the computer.
A CHKDSK command can take a long time, especially when performed on larger drives. Once it’s done, however, it will present a summary of results including total disk space, byte allocation, and, most importantly, any errors that were found and corrected.
 29")
 30")
Your computer should now be free of trojans and other malware.
If your current antivirus allowed this malicious program on your computer, you may want to consider purchasing Malwarebytes Premium to protect against these types of threats in the future.
If you are still having problems with your computer after completing these instructions, then please follow one of the steps:
- Run a computer scan with ESET Online Scanner
- Ask for help in our Windows Malware Removal Help & Support forum.
Here are 10 basic security tips to help you avoid malware and protect your device:
To avoid potential dangers on the internet, it’s important to follow these 10 basic safety rules. By doing so, you can protect yourself from many of the unpleasant surprises that can arise when using the web.
Performs content delivery optimization tasks.
Default Settings
| Startup type: |
|
||||||||||||||||||||||||||||||||||||||||||||||||||||||||||||||||||||||||||||||||||||||||||||||||||||||||
| Display name: | Delivery Optimization | ||||||||||||||||||||||||||||||||||||||||||||||||||||||||||||||||||||||||||||||||||||||||||||||||||||||||
| Service name: | DoSvc | ||||||||||||||||||||||||||||||||||||||||||||||||||||||||||||||||||||||||||||||||||||||||||||||||||||||||
| Service type: | share | ||||||||||||||||||||||||||||||||||||||||||||||||||||||||||||||||||||||||||||||||||||||||||||||||||||||||
| Error control: | normal | ||||||||||||||||||||||||||||||||||||||||||||||||||||||||||||||||||||||||||||||||||||||||||||||||||||||||
| Object: | NT Authority\NetworkService | ||||||||||||||||||||||||||||||||||||||||||||||||||||||||||||||||||||||||||||||||||||||||||||||||||||||||
| Path: | %SystemRoot%\System32\svchost.exe -k NetworkService -p | ||||||||||||||||||||||||||||||||||||||||||||||||||||||||||||||||||||||||||||||||||||||||||||||||||||||||
| Registry key: | HKEY_LOCAL_MACHINE\SYSTEM\CurrentControlSet\Services\DoSvc | ||||||||||||||||||||||||||||||||||||||||||||||||||||||||||||||||||||||||||||||||||||||||||||||||||||||||
| Privileges: |
|
Default Behavior
Delivery Optimization is a Win32 service. It is starting automatically when the operating system starts in Windows 10 Pro 1709, Windows 10 Education 1709, Windows 10 Enterprise 1709, Windows 10 Pro 1803, Windows 10 Education 1803, Windows 10 Enterprise 1803, Windows 10 Pro 1809, Windows 10 Education 1809, Windows 10 Enterprise 1809, Windows 10 Pro 1903, Windows 10 Education 1903, Windows 10 Enterprise 1903, Windows 10 Pro 2004, Windows 10 Education 2004, Windows 10 Enterprise 2004, Windows 10 Pro 20H2, Windows 10 Education 20H2, Windows 10 Enterprise 20H2, Windows 10 Pro 21H1, Windows 10 Education 21H1, Windows 10 Enterprise 21H1, all editions of Windows 10 1507, Windows 10 1511, Windows 10 1607, Windows 10 1703, Windows 10 21H2, Windows 10 22H2. This service is starting only if the user, an application or another service starts it in Windows 10 Home 1709, Windows 10 Home 1803, Windows 10 Home 1809, Windows 10 Home 1903, Windows 10 Home 2004, Windows 10 Home 20H2, Windows 10 Home 21H1.
When the Delivery Optimization service is started, it is running as NT Authority\NetworkService in a shared process of svchost.exe along with other services. If Delivery Optimization fails to start, the failure details are being recorded into Event Log. Then Windows 10 will start up and notify the user that the DoSvc service has failed to start due to the error.
Dependencies
Delivery Optimization cannot be started under any conditions, if the Remote Procedure Call (RPC) service is disabled.
Restore Default Startup Configuration of Delivery Optimization
Before you begin doing this, make sure that all the services on which Delivery Optimization depends are configured by default and function properly. See the list of dependencies above.
1. Run the Command Prompt as an administrator.
2. Depending on the version of your operating system, copy the commands below, paste them into the command window and press ENTER.
For Windows 10 1507 Home, Windows 10 1507 Pro, Windows 10 1507 Education, Windows 10 1507 Enterprise, Windows 10 1511 Home, Windows 10 1511 Pro, Windows 10 1511 Education, Windows 10 1511 Enterprise, Windows 10 1607 Home, Windows 10 1607 Pro, Windows 10 1607 Education, Windows 10 1607 Enterprise, Windows 10 1703 Home, Windows 10 1703 Pro, Windows 10 1703 Education, Windows 10 1703 Enterprise, Windows 10 1709 Pro, Windows 10 1709 Education, Windows 10 1709 Enterprise, Windows 10 1803 Pro, Windows 10 1803 Education, Windows 10 1803 Enterprise, Windows 10 1809 Pro, Windows 10 1809 Education, Windows 10 1809 Enterprise, Windows 10 1903 Pro, Windows 10 1903 Education, Windows 10 1903 Enterprise, Windows 10 1909 Pro, Windows 10 1909 Education, Windows 10 1909 Enterprise, Windows 10 2004 Pro, Windows 10 2004 Education, Windows 10 2004 Enterprise, Windows 10 20H2 Pro, Windows 10 20H2 Education, Windows 10 20H2 Enterprise, Windows 10 21H1 Pro, Windows 10 21H1 Education, Windows 10 21H1 Enterprise, Windows 10 21H2 Home, Windows 10 21H2 Pro, Windows 10 21H2 Education, Windows 10 21H2 Enterprise, Windows 10 22H2 Home, Windows 10 22H2 Pro, Windows 10 22H2 Education, Windows 10 22H2 Enterprise:
sc config DoSvc start= auto
sc start DoSvc
For Windows 10 1709 Home, Windows 10 1803 Home, Windows 10 1809 Home, Windows 10 1903 Home, Windows 10 1909 Home, Windows 10 2004 Home, Windows 10 20H2 Home, Windows 10 21H1 Home:
sc config DoSvc start= demand
3. Close the command window and restart the computer.
The DoSvc service is using the svchost.exe file that is located in the C:\Windows\System32 directory. If the file is removed or corrupted, read this article to restore its original version from Windows 10 installation media.
Like always, I was writing an article for this websites and suddenly my laptop running Windows 10 Pro 64 Bit Creators Build crashed suddenly and I need to press the power button to turn on my laptop to continue my work. But after turning on the laptop I saw something was eating my bandwidth (high speed) like anything. And within 5 minutes it just ate my 500MB.
Following tutorial is applicable for Windows 11 users also but if you like a dedicated tutorial for Windows 11 then you read our complete solution from this link.
After a quick look with a network bandwidth tool, I found this DoSVC ate my bandwidth and its keep on eating it even while I was checking!
Contents
- So what is this dosvc ?
- With Windows 10 Fall Creators Update You Can Control DoSVC
- Method #1
- Stop or disable dosvc (delivery optimization service ) A Working Fix if you are using any older version of Win10
- Method #2
- Here is one more method if the above ones didn’t work
- Method #3 if none of the above methods work
So what is this dosvc ?
This is the info given by Microsoft
“Windows Update Delivery Optimization lets you get Windows updates and Windows Store apps from sources in addition to Microsoft. This can help you get updates and apps more quickly if you have a limited or unreliable Internet connection. And if you own more than one PC, it can reduce the amount of Internet bandwidth needed to keep all of your PCs up-to-date. Delivery Optimization also sends updates and apps from your PC to other PCs on your local network or PCs on the Internet.”
With Windows 10 Fall Creators Update You Can Control DoSVC
Method #1
Here are the steps for that
Make sure you are using Win10 Fall Creators update else download the full offline installer ISO image from here
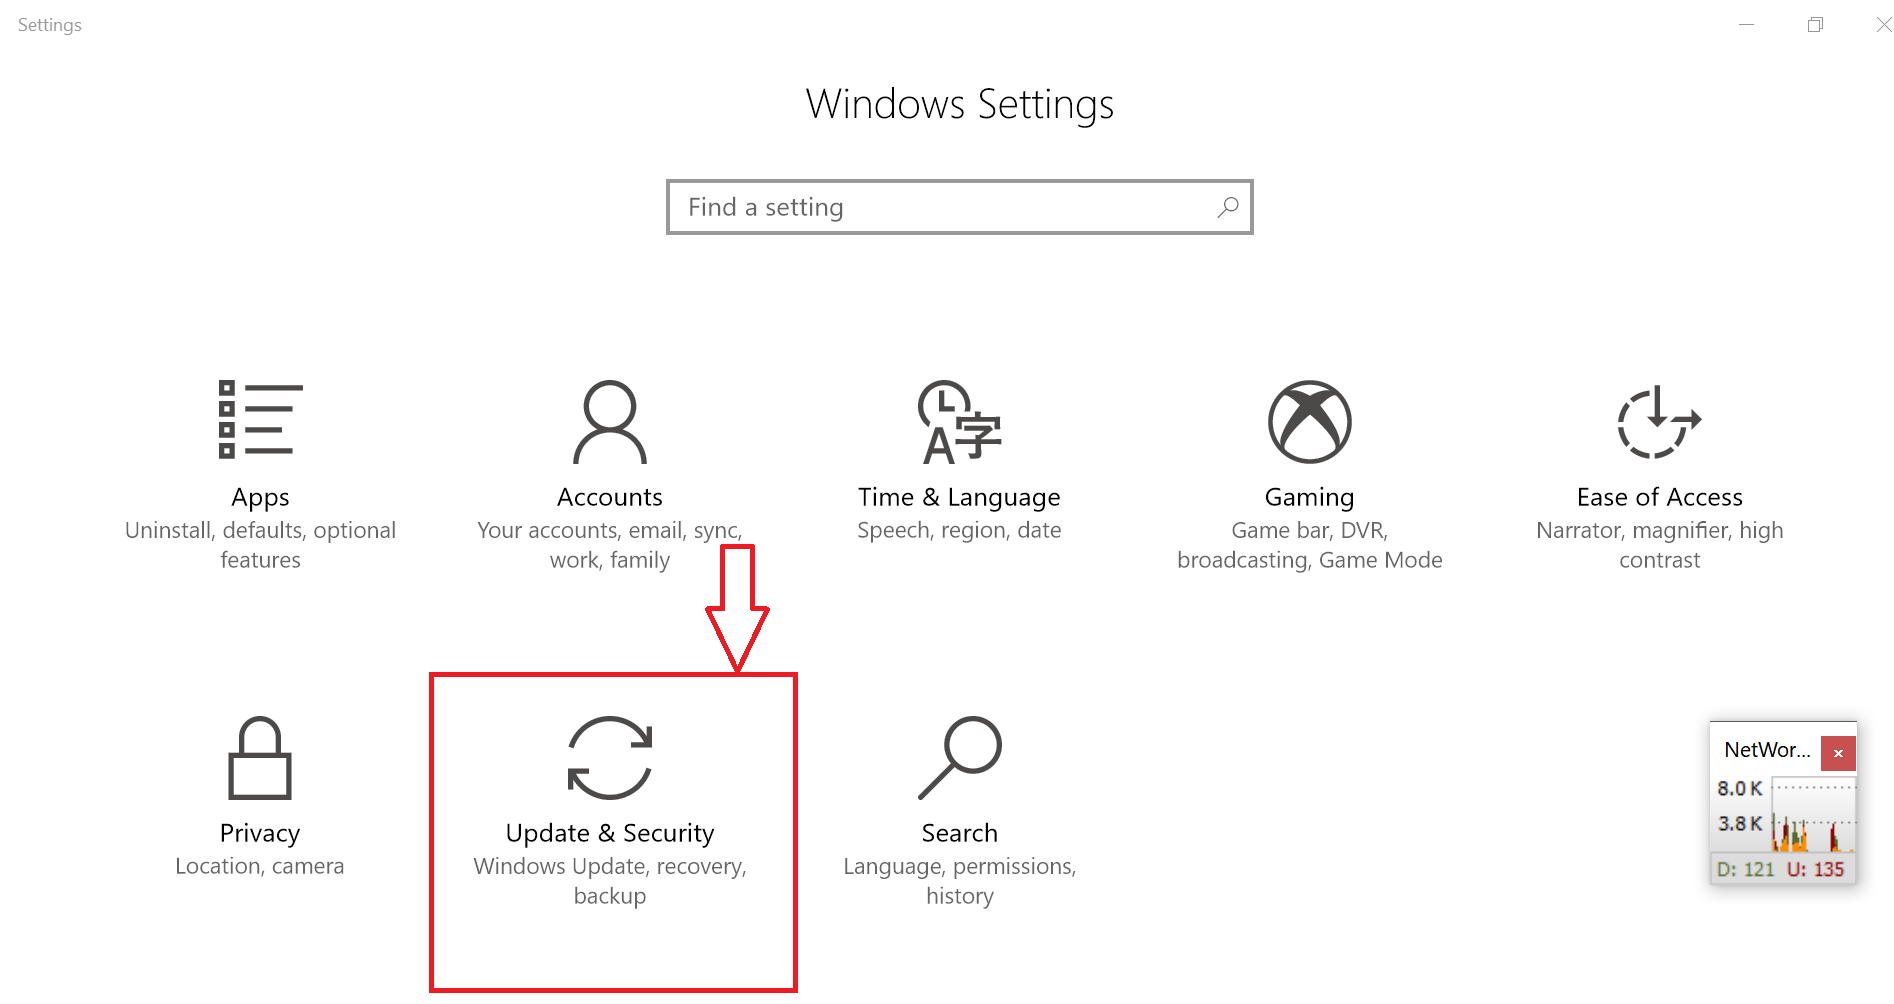
Step 1 : Go to Windows setting page and select “Update & Security”
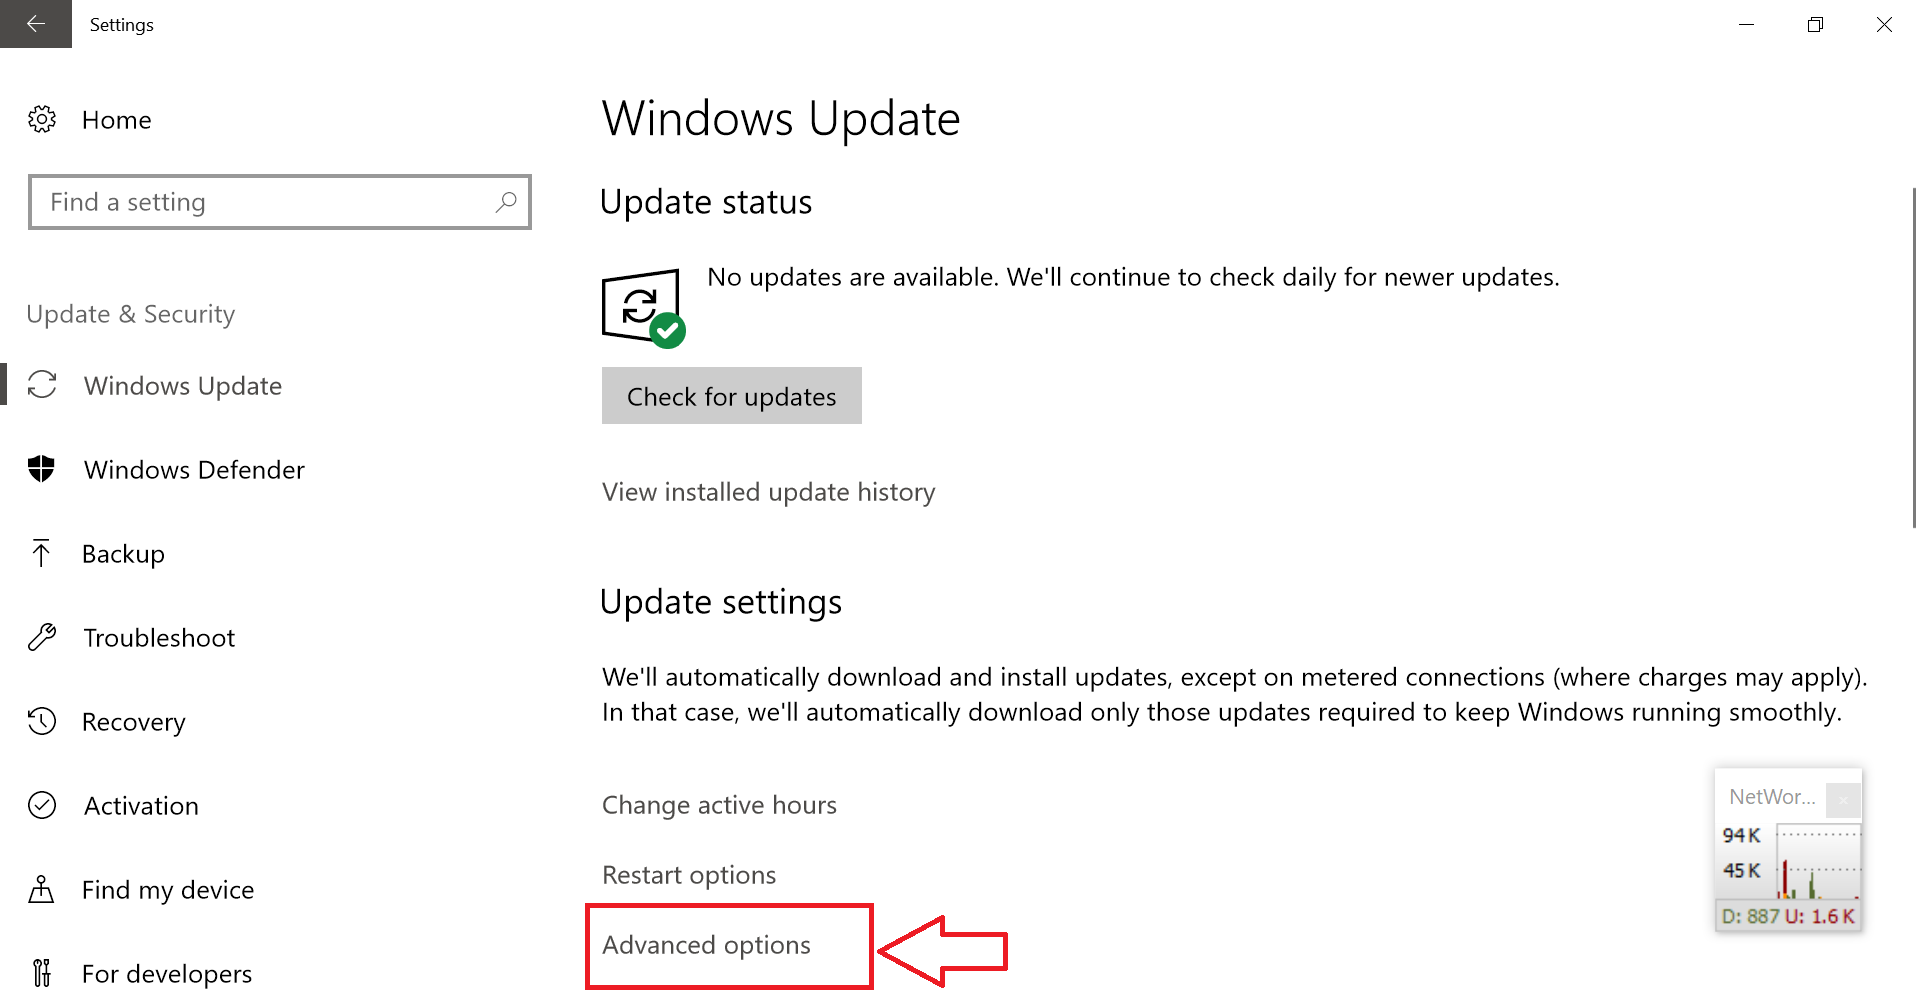
Step 2 : Select “Advanced Options”
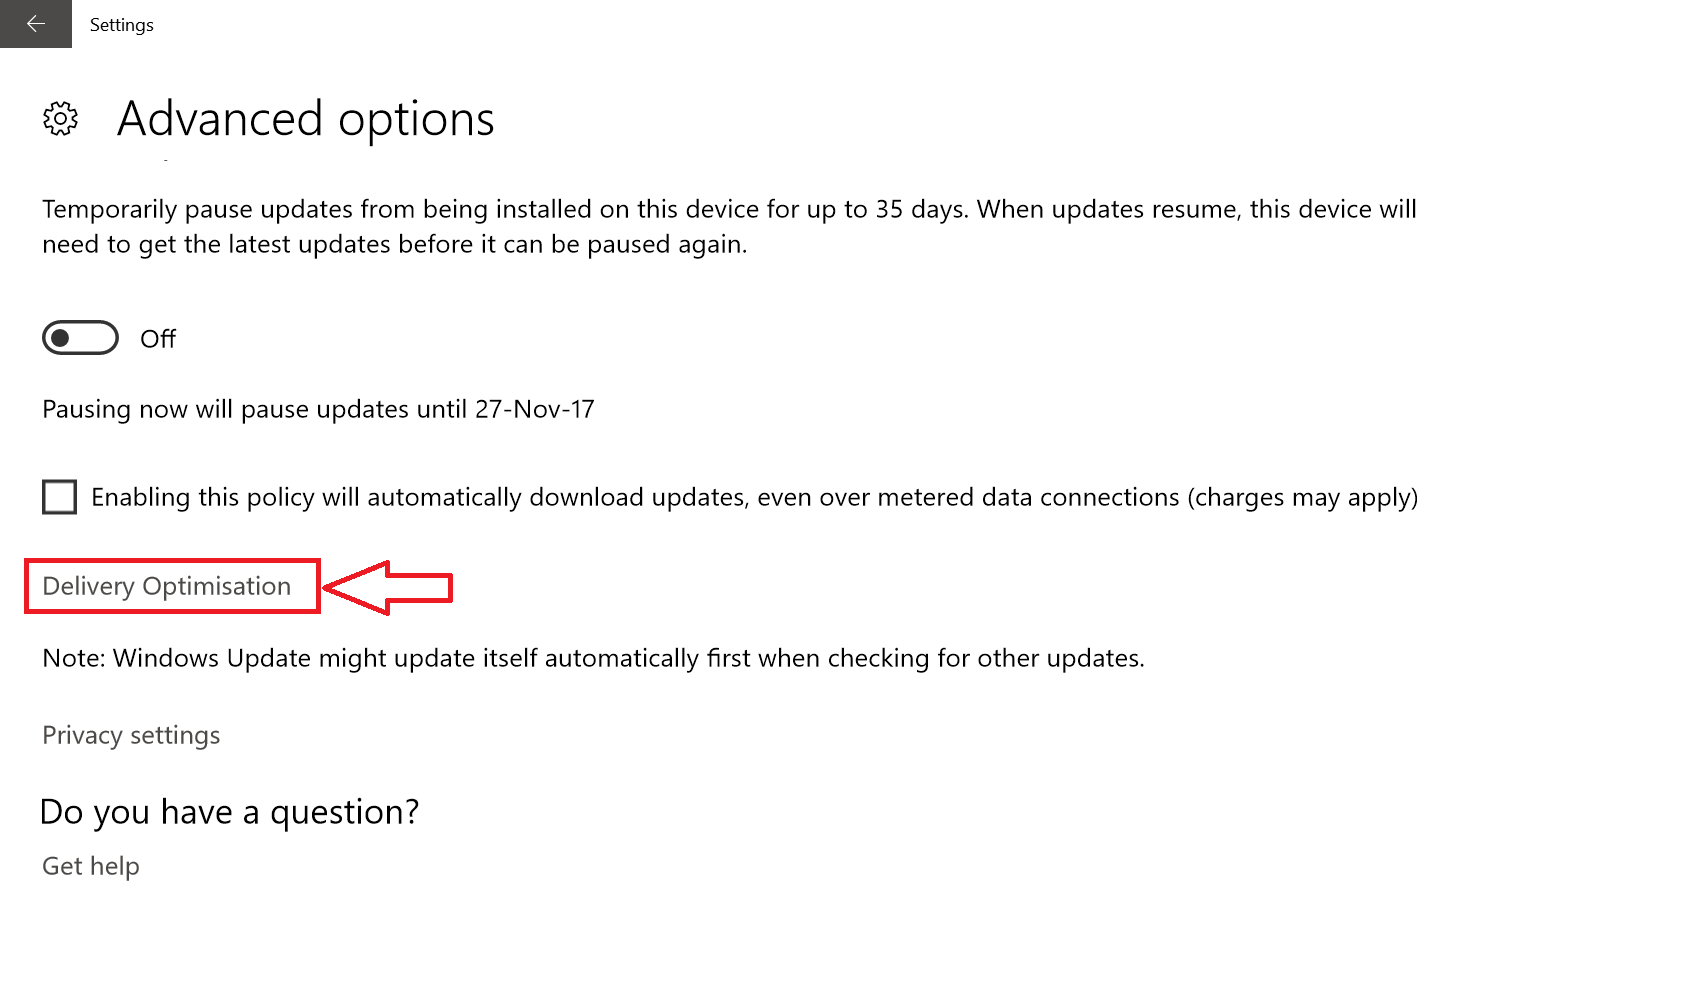
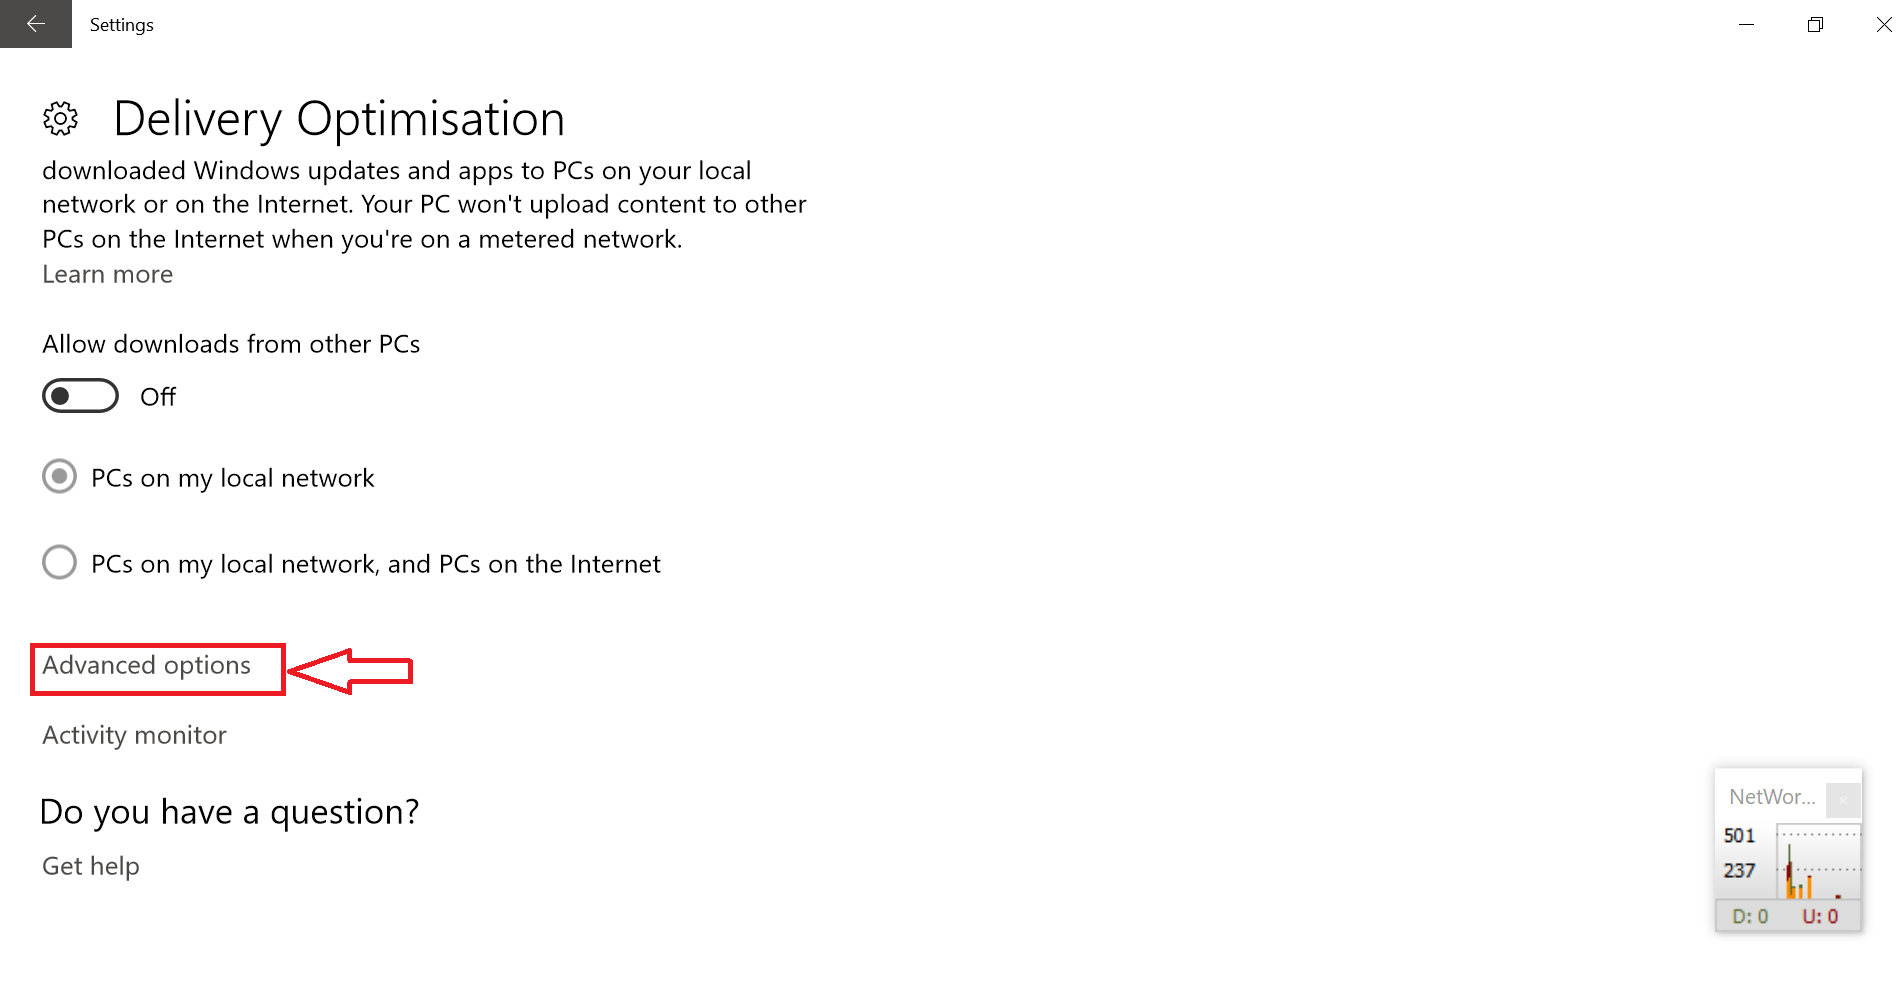
Step 3 : Scroll down in next page and select “Delivery Optimisation”
Step 4: In the next page also scroll down and select “Advanced Options“
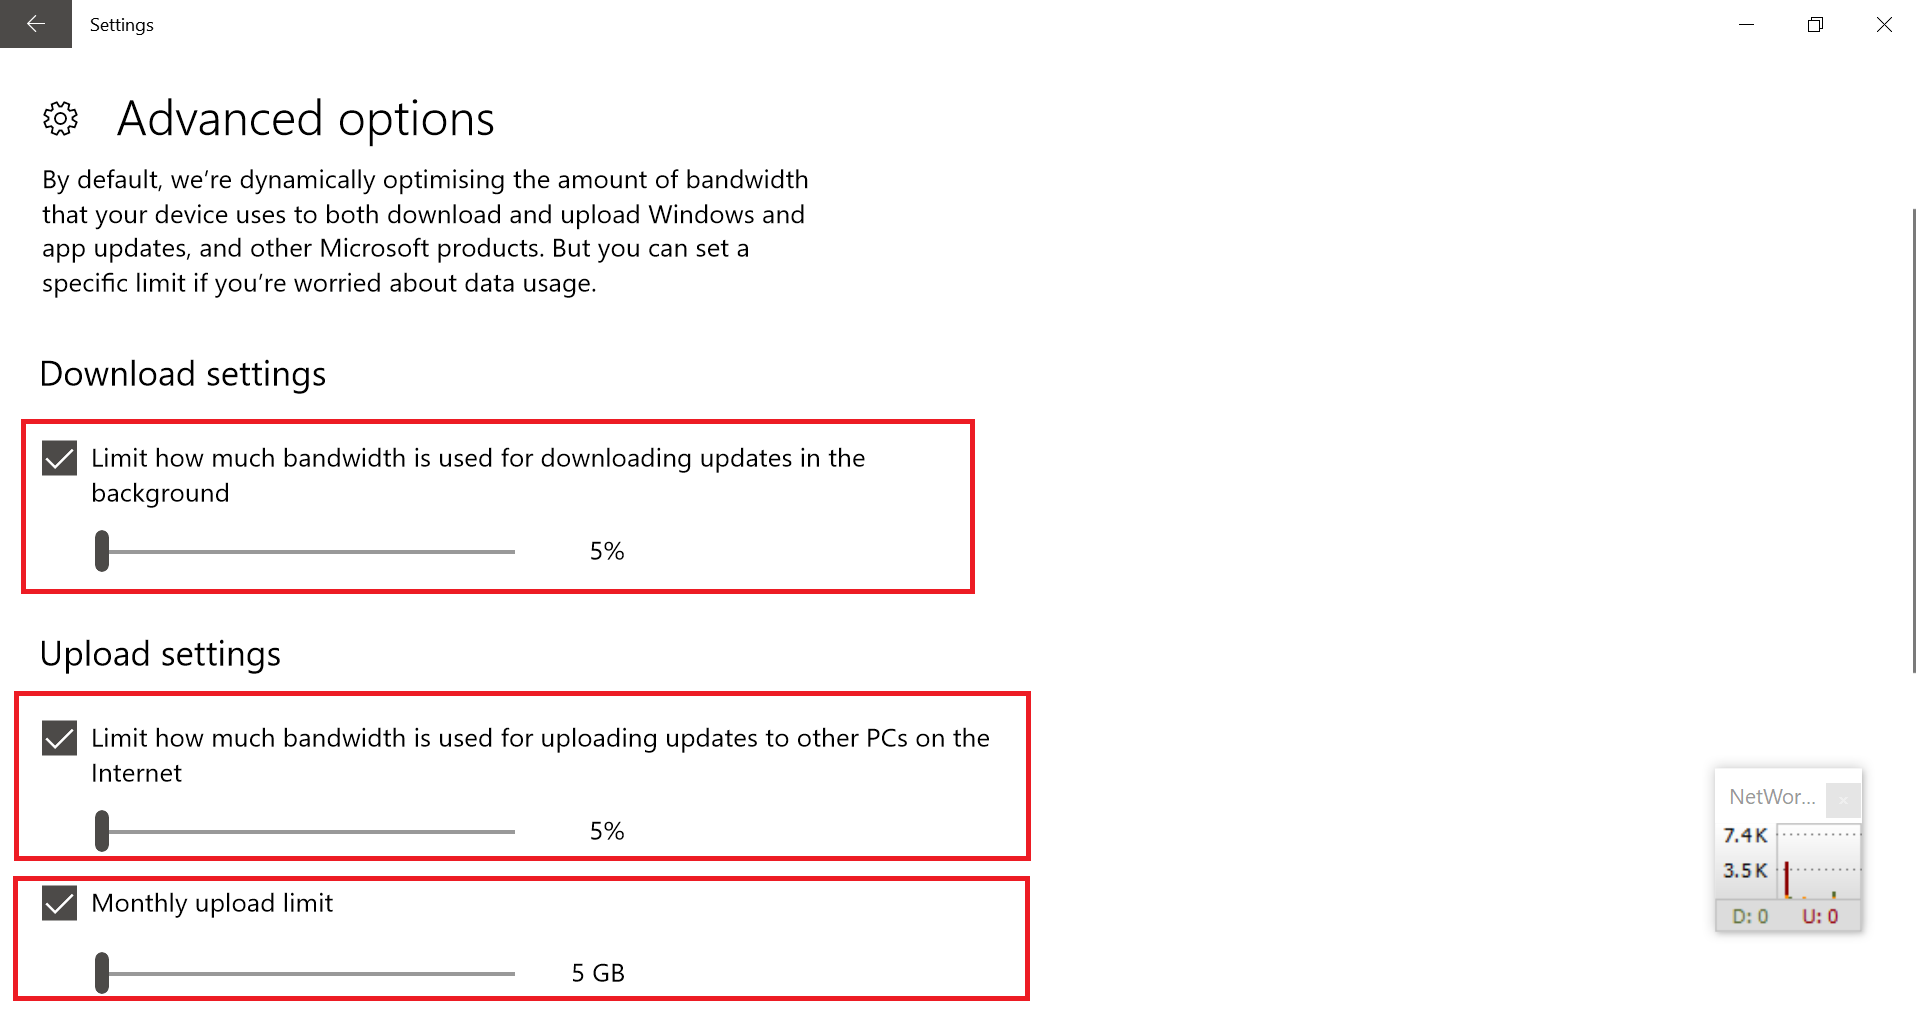
Step 5 : Now tick all the limit options and move the slider to least position that you can set which is 5GB upload limit. Refer the picture for getting the correct idea.
Stop or disable dosvc (delivery optimization service ) A Working Fix if you are using any older version of Win10
Method #2
Step 1 : Open the Task Manager ( Alt + Ctrl + Delete )
Step 2 : Now click on the services tab like shown below
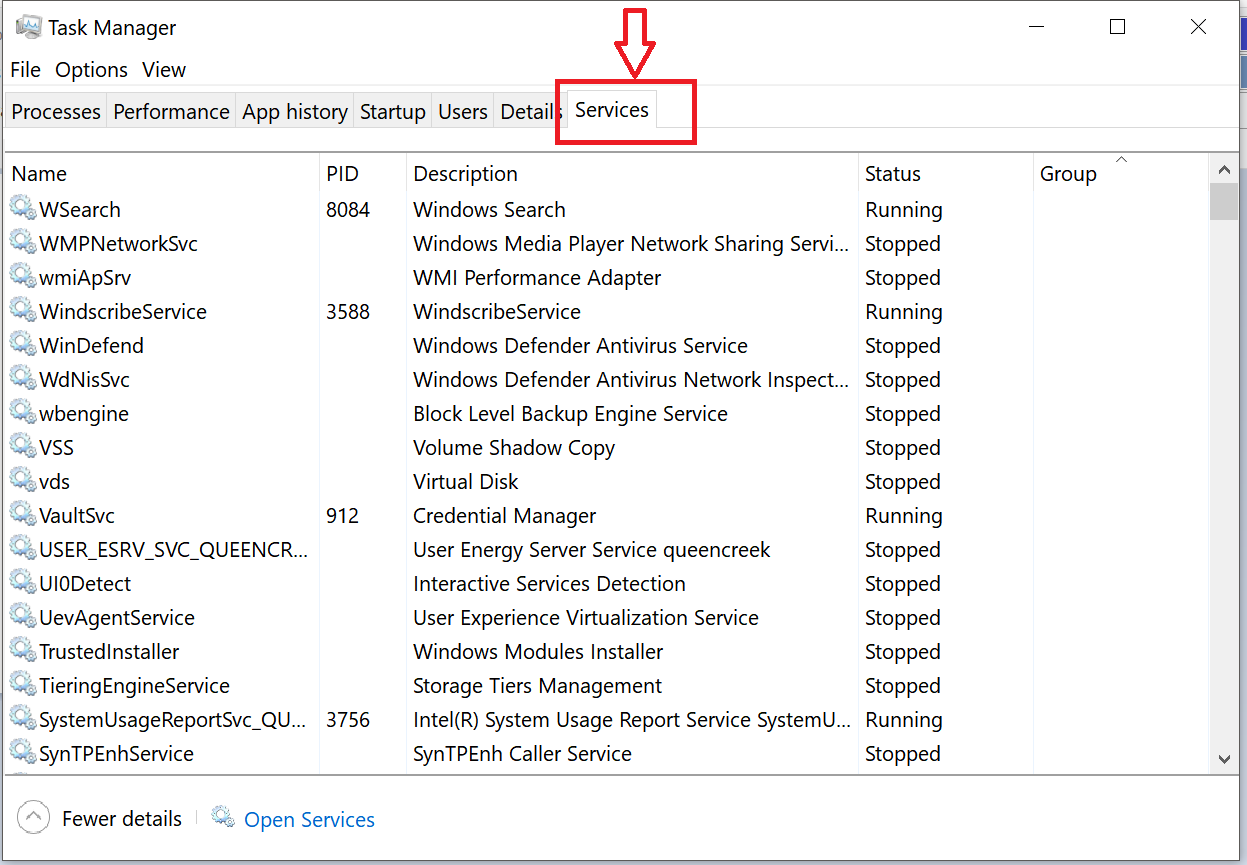
Note : Don’t search in task manager services, you won’t find this one there!
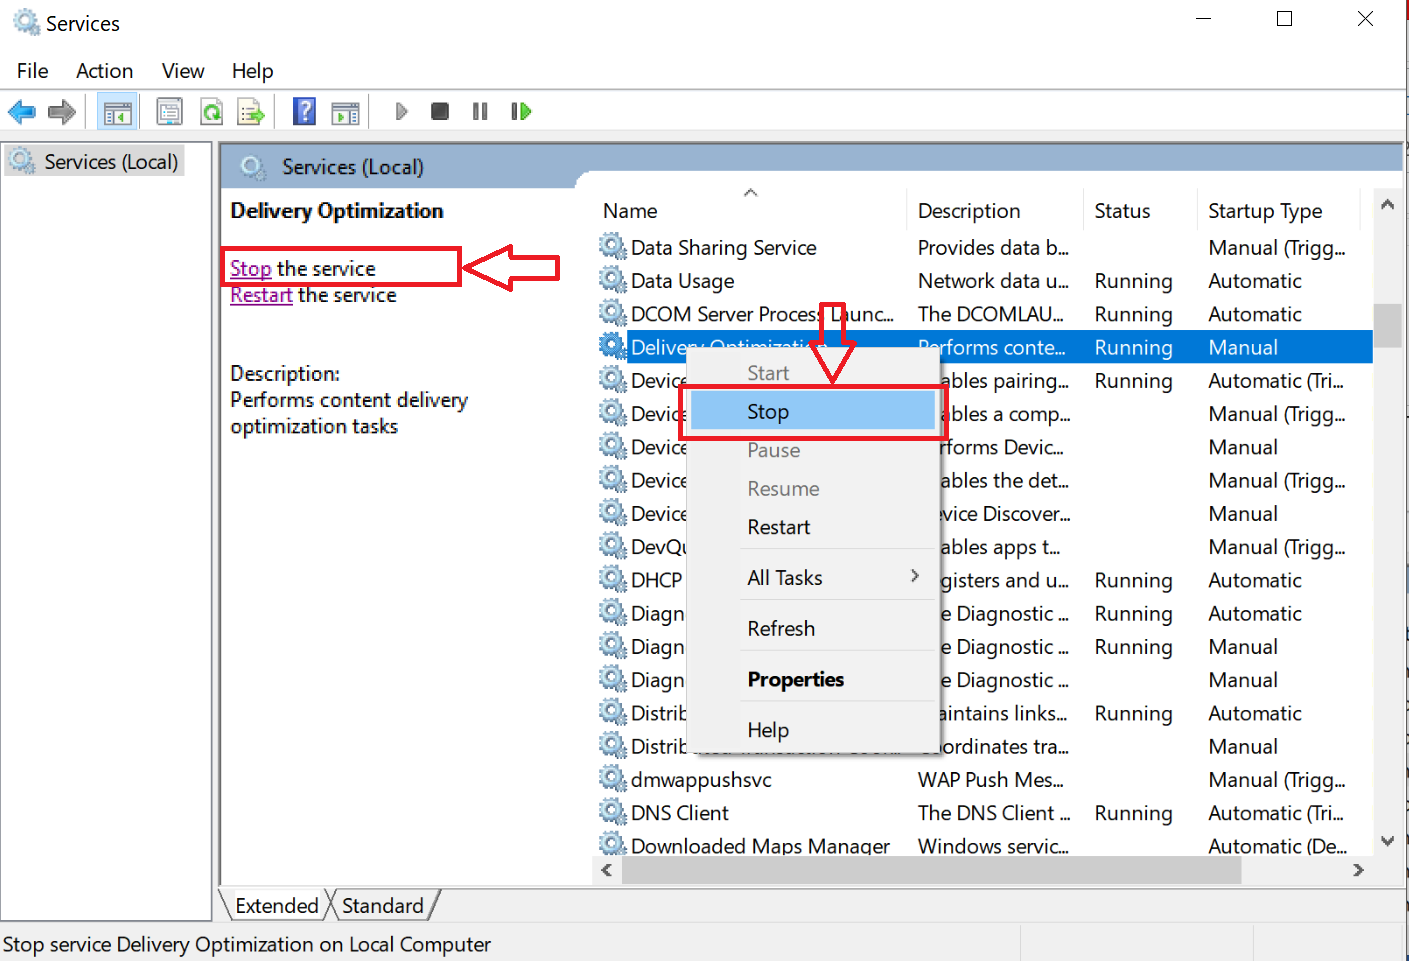
Step 3 : Now select “Open Services”

Step 4 : It will open up another window. Now press “d” on the keyboard till you find “Delivery optimization “
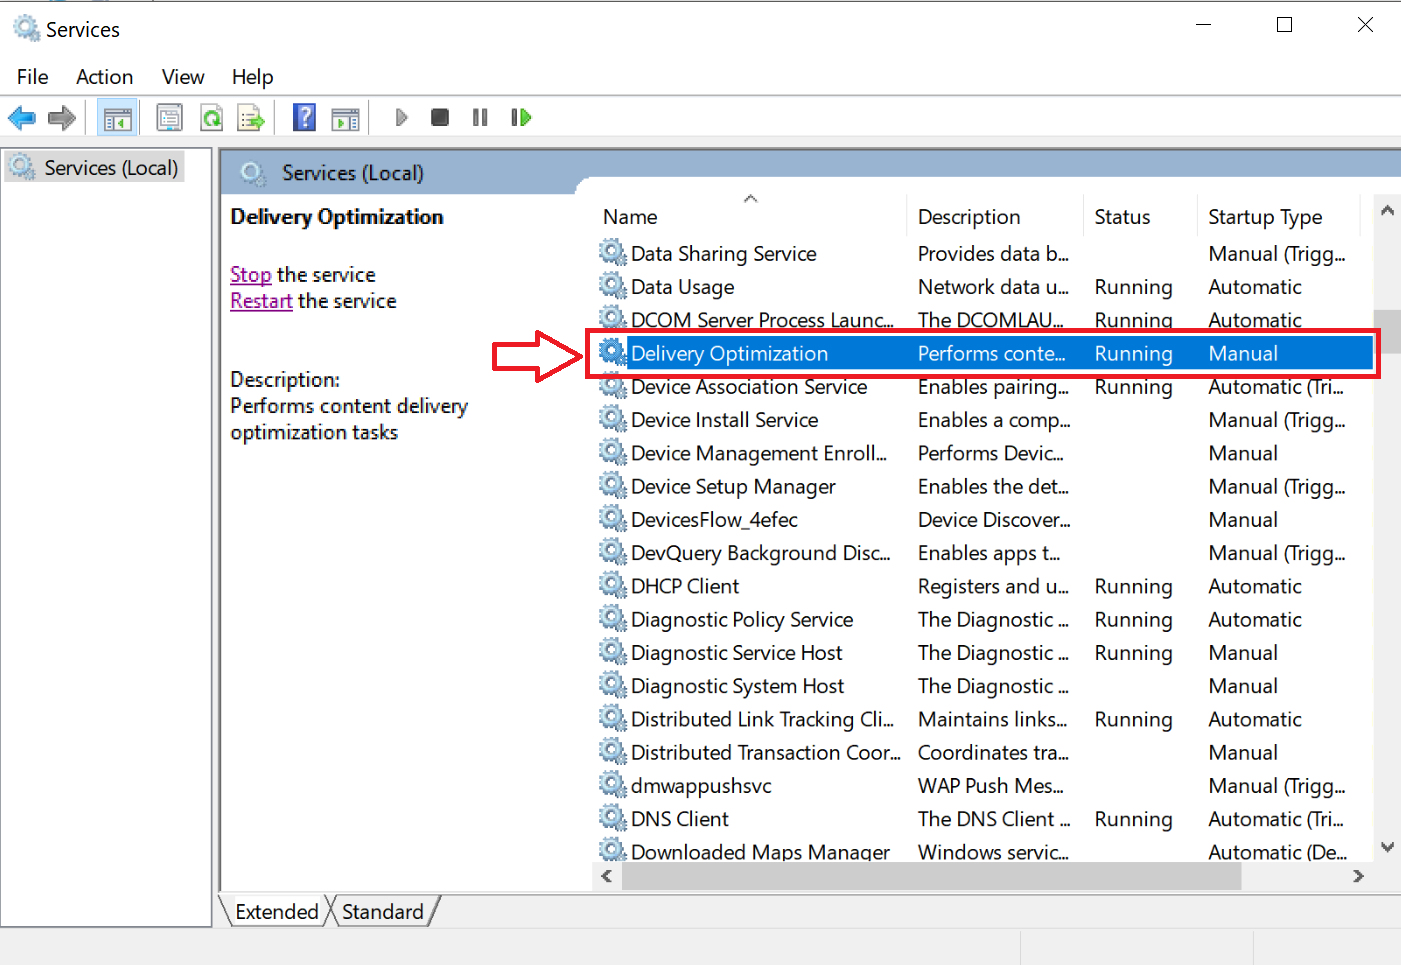
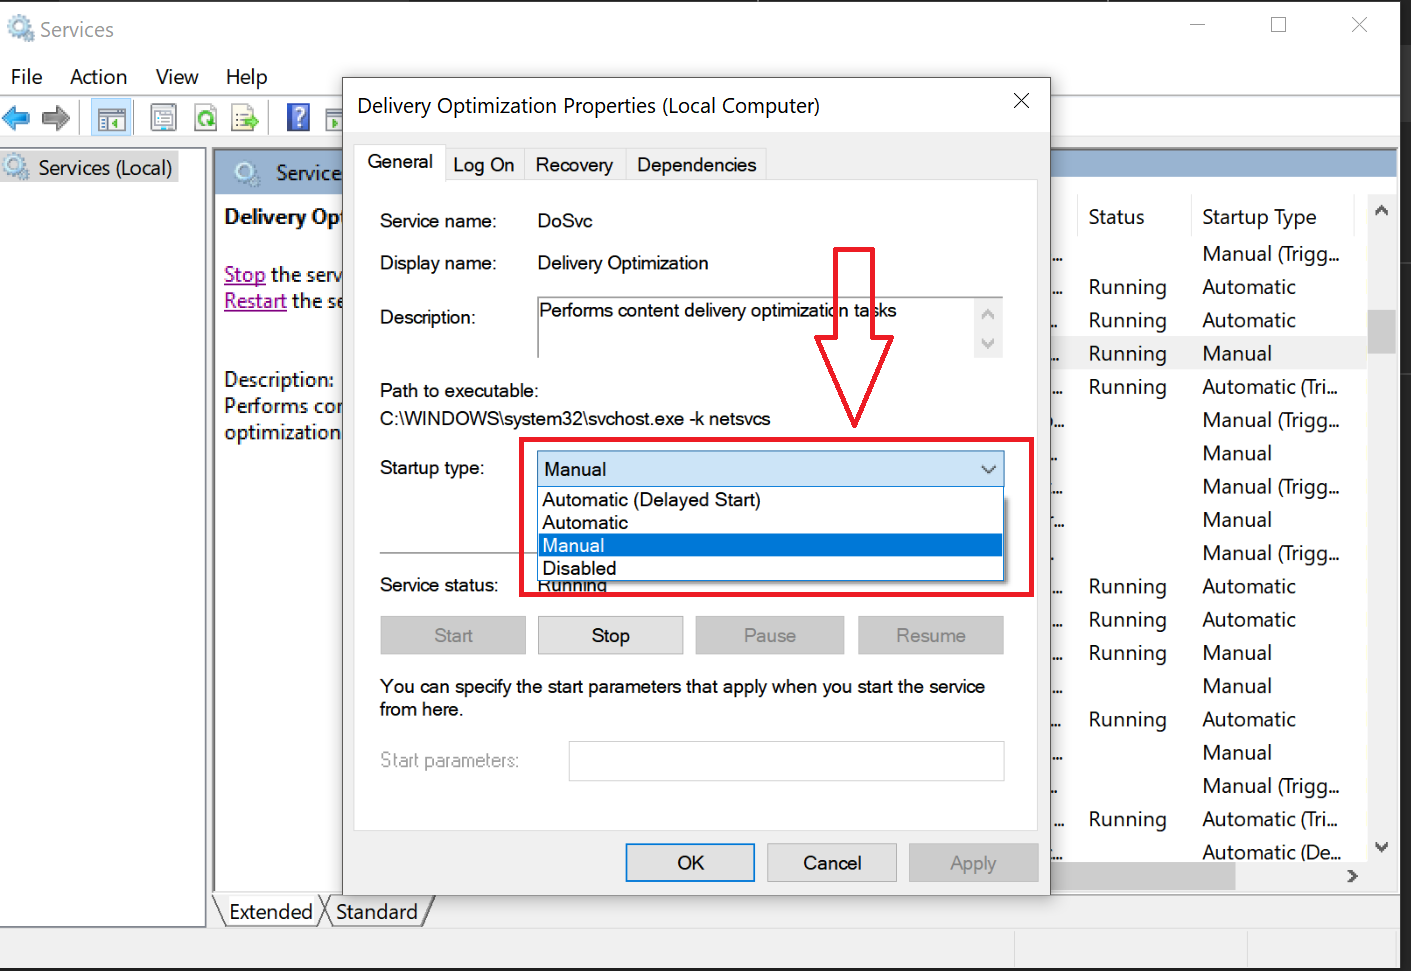
Step 5 : Now right click on that and select “Properties”
Step 6 : From there change the “Startup Type” to “Manual”. Hit “Apply” and then “OK”
Step 7 : Again right click on “Delivery optimization” and select stop. Or you can do that from the left side bar as shown in the pic below.
So be on safer side, just do a restart and you are good to go.
Here is one more method if the above ones didn’t work
Step : Just switch to “Log On” tab as shown in the picture added below
Step 2 : Just select “This account” and enter these in that box without quotes “Network Service” and enter wrong/any passwords.
If you get some errors with this account “Network Service” create a new Windows 10 login account and enter that user name in that box, but make sure you give wrong password and hit “OK“, if you give correct password once you login to that account DoSVC will start working.
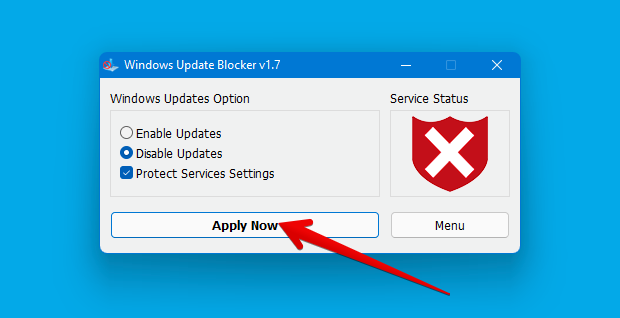
Method #3 if none of the above methods work
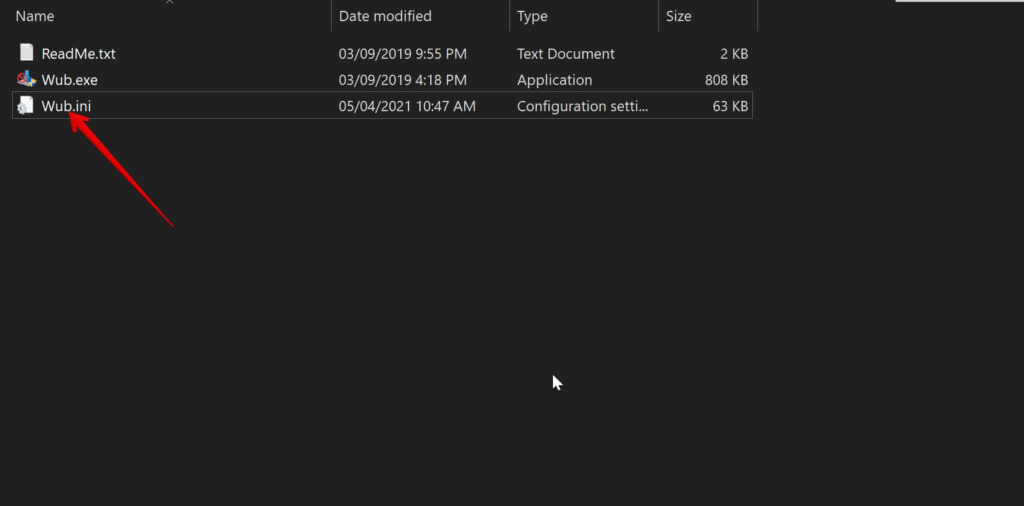
Download this tool : Windows Update Blocker or WUB and unzip the file.
- Now open Wub.ini file with notepad as shown in the below pic
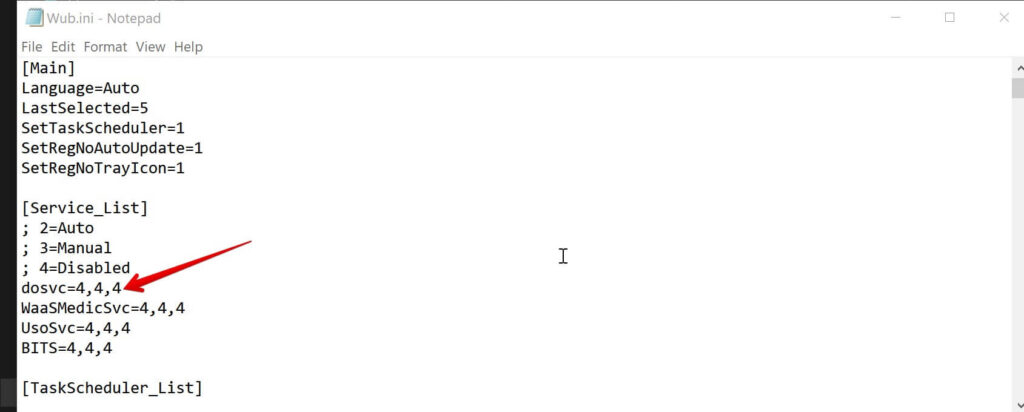
2. Now change the default values and enter these as shown in the below picture and save the file.
dosvc=4,4,4
3. Now open Wub.exe and hit”Apply Now”
What if you are using Insider/Anniversary version?
- You can try the above method and stop the bandwidth eater.
What if we need to update other computers or PC in same network ?
- Just download the offline updates and install the MSU files. Here is a full guide that covers this topic.
What port does this service use ?
- Its Port 7680
Can I use any other services or software to turn off this ?
- Yes, you can but make sure you are turning off the right service, else it will be a problem.
So how do you track bandwidth consumption in real time for free ?
- There is an inbuilt option but its not real time, you can use NetWorx 5.2.7 version as its free, for latest build you need to pay.
Some other things that you can do to save your precious high speed data
- Goto Windows store settings and turn off auto updates for apps.
- Goto WiFi settings and make sure your mark all your connections as metered connection. Do note DoSVC will run even if its metered connection but if you try the above fix it won’t run.