

Have you ever wondered, how to access the windows file system through WSL? If the answer is yes you are in the right place!
Microsoft WSL has given us an incredible way to access the windows file system, you have just to navigate through an exact path to do it. Without further due, let’s dive into the topic.
1. Use the cd command in the Linux terminal.
To access the windows files you have to navigate through /mnt/your_windows_path
cd /mnt/c/Users
**OR**
cd /mnt/d/your_folder/your_folder
Enter fullscreen mode
Exit fullscreen mode
Now you have access to every file in the Linux and Windows file systems.
2. Moving files between the two systems through WSL.
If you want to move files between the two operating systems you can simply use the cp or mv commands.
cp — command for copying files
mv — command for moving files
Use of cp command
cp /mnt/c/file.txt /home/username/Documents
Enter fullscreen mode
Exit fullscreen mode
Use of mv command
mv /mnt/c/file.txt /home/username/Documents
Enter fullscreen mode
Exit fullscreen mode
3. Editing windows files through WSL.
To edit windows files through the Linux terminal using WSL, you have to use any text editor that can be opened in the terminal. One of the most famous text editors is nano. In our example, I am going to use the nano editor.
Type into the terminal nano and the path to the file.
sudo nano /mnt/c/Users/file.txt
Enter fullscreen mode
Exit fullscreen mode
Now you can edit freely files from your terminal.
4. Creating files in windows through WSL.
To create a file in a specific windows directory you have first to navigate to it and then use the touch command to create a file.
touch — a command that creates a file.
!!! The file extension can be anything you want.
cd /mnt/c/Users/Public/Documents/
touch filename.txt
Enter fullscreen mode
Exit fullscreen mode
The file is created and can be opened from both systems.
5. Deleting files from the windows file system through WSL.
To delete windows files using WSL, you have to navigate to the directory where the file lives and use the rm command.
rm — a command that deletes files / directories
cd /mnt/c/Users/Public
sudo rm example_file.jpg
Enter fullscreen mode
Exit fullscreen mode
Congratulations you learned 5 vital skills about working with the Linux terminal. 🎺🎺🎺
If you have any questions, comment down, I will answer as soon as possible.
Windows 10 версии 1903 содержит ряд интересных изменений и улучшений, внесенных в функцию WSL. К ним относятся дополнительные дистрибутивы в Магазине, возможность просматривать файлы WSL в Проводнике и многое другое.
Возможность запуска Linux в Windows 10 обеспечивается функцией WSL. WSL это — Windows Subsystem for Linux, которая изначально была ограничена только Ubuntu. Современные версии WSL позволяют устанавливать и запускать несколько дистрибутивов Linux из Microsoft Store.
После включения WSL вы можете устанавливать различные версии Linux из Магазина, используя следующие ссылки:
Ссылки на дистрибутивы в магазине microsoft:
Ubuntu | openSUSE Leap | SUSE Linux Enterprise Server | Debain GNU / Linux | Kali Linux
В Windows 10 версии 1903 вы можете легко получить доступ ко всем файлам в ваших дистрибутивах Linux с помощью проводника Windows. На момент написания статьи эта функция реализована в сборке Windows 10 18836. Она находится на пути к ветви 19h1, поэтому мы увидим ее в следующей сборке. Вот как это можно сделать.
Чтобы получить доступ к файлам WSL Linux из проводника Windows 10 , выполните следующие действия.
Шаг 1: Включить функцию WSL (Подситема Windows для Linux)
Шаг 2: Установите какой-нибудь дистрибутив, например Ubuntu, и запустите его.
Подробнее в нашей статье: Руководство по установке и запуску — Ubuntu Bash в Windows 10.
Шаг 3: Находясь в каталоге Linux FS, введите^
explorer.exe .
Откроется окно проводника, расположенное внутри вашего дистрибутива Linux.
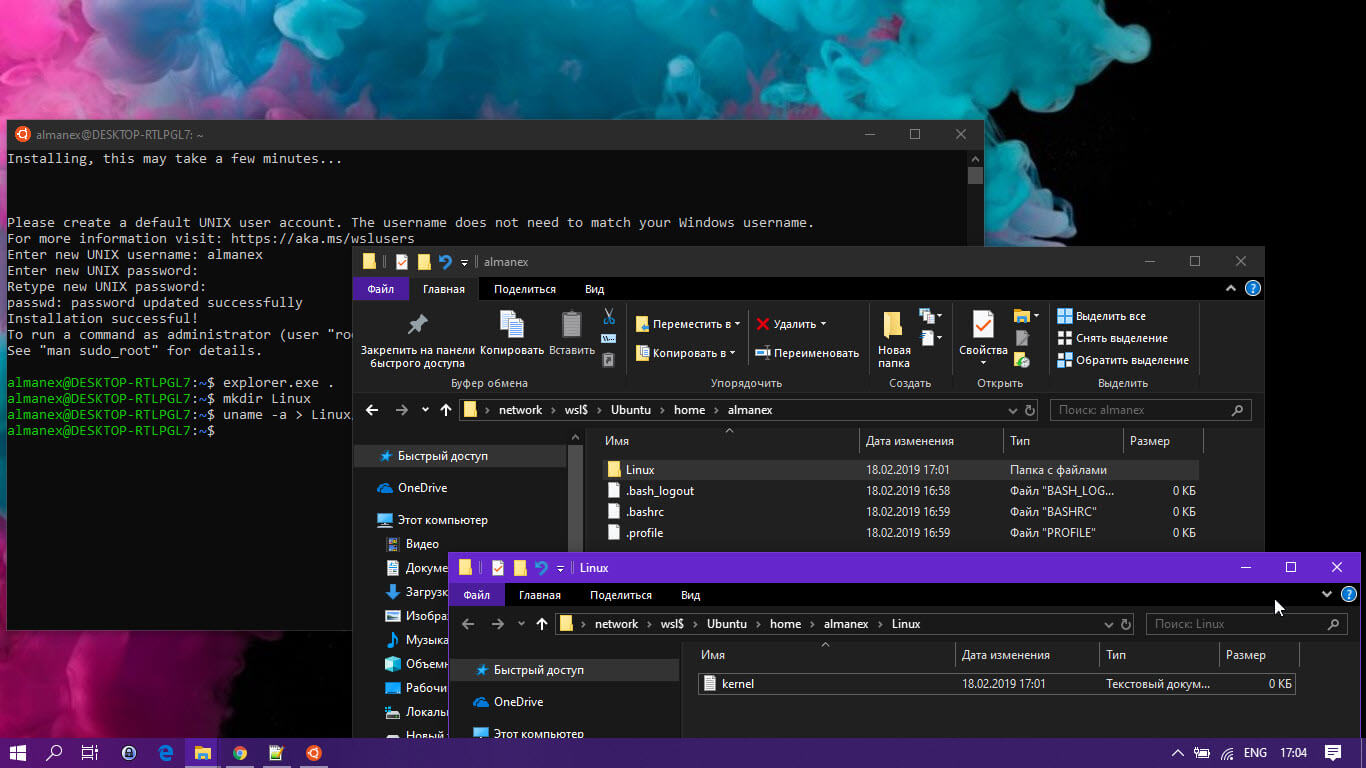
Теперь вы можете получить доступ к любым файлам Linux, так же, как и к любому другому файлу через проводник. Это включает в себя такие операции, как: перетаскивание файлов в другие места, копирование и вставка и даже использование пользовательских записей контекстного меню, добавленных Notepad ++, VSCode или другим программным обеспечением.
Проводник показывает файлы дистрибутива как виртуальный сетевой ресурс по пути \\ wsl $ \ <running_distro_name> \.
Команда WSL активно исследует способы улучшения обнаруживаемости файлов Linux внутри Проводника. Ход их работы уже можно увидеть в Windows 10 Build 18836, которая показывает файловую систему WSL / Linux в File Explorer.
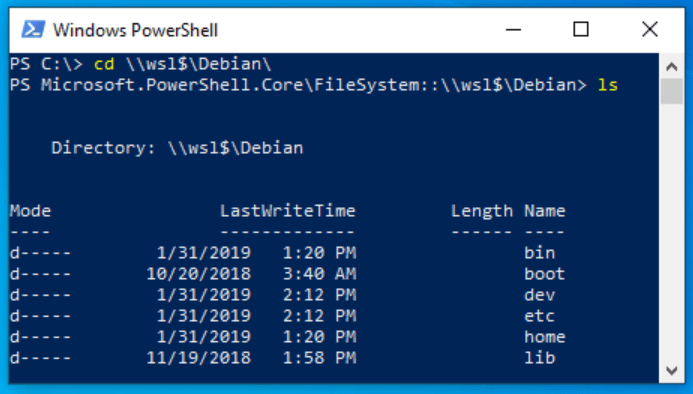
Доступ к файлам Linux в командной строке
В дополнение к Проводнику вы можете использовать классическую командную строку и инструменты PowerShell для доступа к файлам Linux. Точно так же вам нужно перейти к \\wsl$\{имя дистрибутива}\, где {имя дистрибутива} — это имя работающего дистрибутива.
Известные вопросы
Это новая функция, и некоторые ее части могут не работать идеально. Вот некоторые известные проблемы, о которых мы хотим сообщить вам при использовании этой функции:
На данный момент файлы дистрибутивов будут доступны только из Windows, когда дистрибутив работает. Разработчик собирается добавить поддержку не работающих дистрибутивов в будущем обновлении.
Поскольку файловый сервер 9P работает внутри каждого дистрибутива, он доступен только тогда, когда этот дистрибутив работает. Команда ищет способы решить эту проблему.
Доступ к файлам Linux рассматривается так же, как и доступ к сетевому ресурсу, и все правила доступа к сетевым ресурсам будут по-прежнему применяться,
- Например: при использовании CMD cd \\wsl$\Ubuntu\home не будет работать (поскольку CMD не поддерживает пути UNC, так как текущие каталоги), однако будет работать copy \\wsl$\Ubuntu\home\somefile.txt C:\dev\
- Старые правила по-прежнему применяются, вы не должны получать доступ к файлам Linux внутри папки AppData!
- Если вы пытаетесь получить доступ к своим файлам Linux через папку AppData, вы используете обход сервера 9P, что означает, что у вас не будет доступа к файлам Linux, и вы можете повредить ваш дистрибутив Linux.
Примечание: Сервер 9P — это сервер, который содержит протоколы, поддерживающие метаданные Linux, включая разрешения. Демон инициализации WSL теперь включает сервер 9P. Существует служба Windows и драйвер, который действует как клиент и взаимодействует с сервером 9P (который работает внутри экземпляра WSL). Клиент и сервер обмениваются данными через сокеты AF_UNIX, поскольку WSL позволяет взаимодействовать между приложением Windows и приложением Linux, используя AF_UNIX.
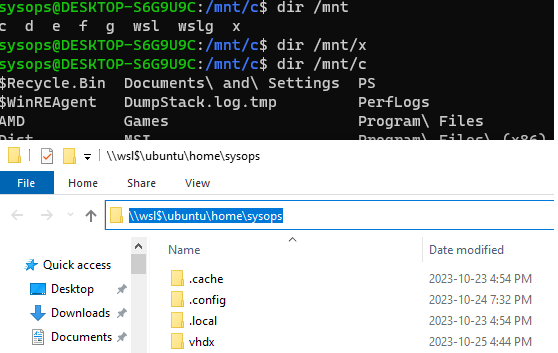
Windows Subsystem for Linux (WSL) предоставляет ряд удобных возможности подключения физических, виртуальных и сетевых дисков. По умолчанию в среде wsl в каталог
/mnt/
монтируются все логические диски, которые доступны в Windows. Кроме того, вы можете прямо из проводника Windows обратиться к файловой системе WSL по UNC пути
\\wsl$\
(например,
\\wsl$\ubuntu\etc\
).
В этой статье мы рассмотрим, как смонтировать различные типы дисков в среде WSL.
Содержание:
- Монтирование физических дисков Windows Subsystem for Linux 2
- Как подключить (смонтировать) сетевой диск в WSL
- Смонтировать виртуальный VHD/VHDX диск в WSL
Монтирование физических дисков Windows Subsystem for Linux 2
Новая версия Windows Subsystem for Linux (WSL 2) позволяет монтировать физические диски, или отдельные разделы с файловыми системами, которые не поддерживаются в Windows (список поддерживаемых файловых систем содержится в файле
/proc/filesystems
).
Например, у вас есть физический на которым созданы разделы с файловой системой диск ext4, и вы хотите получить к нему доступ из WSL и Windows.
Обновите свою версию WSL 2, прежде чем двигаться дальше:
wsl --update
Теперь нужно вывести список доступных дисковых устройств в Windows:
wmic diskdrive list brief
В этом примере к компьютеру подключены два физических диска.

Можно смонтировать в WSL диск целиком:
wsl --mount \\.\PHYSICALDRIVE2
Или только определенный раздел:
wsl --mount \\.\PHYSICALDRIVE2 --partition 1

Раздел физического диска был успешно смонтирован в директорию /mnt/wsl/PHYSICALDRIVE2p1.
Вы можете получить доступ к файлам на этом разделе из Windows по UNC пути
\\wsl$\ubuntu\mnt\wsl\PHYSICALDRIVE2p1
.
Проверьте, что раздел диска с файловой системой ext4 доступен в WSL:
lsblk -o NAME,FSTYPE,SIZE,MOUNTPOINT

Чтобы отмонтировать диск, выполните:
wsl --umount \\.\PHYSICALDRIVE2 --partition 1
Для автоматического монтирования раздела физического диска при входе пользователя в Windows, создайте с помощью PowerShell простое задание планировщика:
$TaskName="WSL_Mount"
$Trigger= New-ScheduledTaskTrigger -AtLogOn
$Action= New-ScheduledTaskAction -Execute "cmd" -Argument "/c wsl --mount \\.\PHYSICALDRIVE2 --partition 1"
Register-ScheduledTask -TaskName $TaskName -Trigger $Trigger -Action $Action -RunLevel Highest –Force
На данный момент WSL не поддерживает монтирование USB накопителей и SD карт. Для проброса USB накопителей в WSL рекомендуется использовать пакет usbipd-win, который позволяет реализовать проброс устройств с помощью протокола USB over IP.
Как подключить (смонтировать) сетевой диск в WSL
Из WSL вы можете получить доступ к общим сетевым папкам или NAS устройствам.
Есть два способа подключения сетевых дисков в WSL:
- Можно смонтировать сетевой диск, подключенный в Windows и которому назначена буква диска
- Смонитировать сетевую папку по UNC пути с помощью CIFS/SMB клиента в WSL.
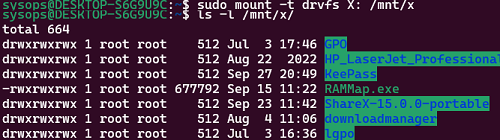
Допустим, вы подключили сетевую папку в виде диска с помощью команды net.exe use X: \\192.168.31.102\tools или подключили сетевой диск через GPO. Чтобы получить доступ к этому сетевому диску из WSL нужно:
- Создать точку монтирования:
$ sudo mkdir /mnt/x - Смонтировать диск:
$ sudo mount -t drvfs X: /mnt/x - Теперь вы можете получить доступ к файлам и папкам на сетевом диске.
Чтобы автоматически монтировать этот сетевой диск, добавьте следующую строку в /etc/fstab:
X: /mnt/x drvfs defaults 0 0
Затем смонтируйте все файловые системы:
$ mount -a
Также можно смонтировать сетевые папки через пакет CIFS:
$ sudo apt install cifs-utils
$ sudo mount -t cifs -o user={user},pass={password},iocharset=utf8,vers=3.0 //192.168.31.102/tools /mnt/tools
Смонтировать виртуальный VHD/VHDX диск в WSL
WSL позволяет смонтировать виртуальные диски в форматах VHD/VHDX.
Если на компьютере установлен роль или PowerShell модуль Hyper-V, вы можете создать новый виртуальный диск с помощью команды:
New-VHD -Path $env:USERPROFILE\wsl_shared_disk.vhdx -Dynamic -SizeBytes 20GB
Затем смонтируйте виртуальный VHDX диск в WSL:
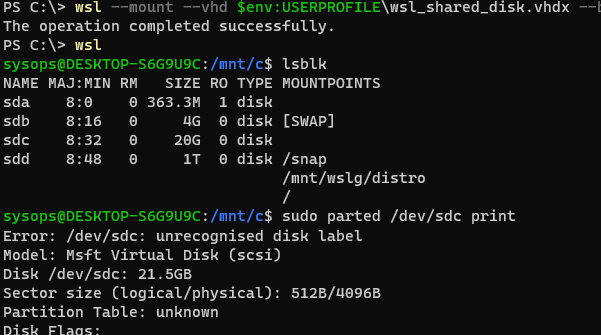
wsl --mount --vhd $env:USERPROFILE\wsl_shared_disk.vhdx --bare
Теперь вы можете создать на виртуальном диске таблицу разделов и раздел с файловой системой ext4:
$ lsblk
$ sudo parted /dev/sdc print
$ sudo parted /dev/sdc mklabel msdos
$ sudo parted -a optimal /dev/sdc mkpart primary ext4 0% 100%
$ lsblk -o NAME,FSTYPE,SIZE,MOUNTPOINT /dev/sdc
$ sudo mkfs.ext4 /dev/sdd1
Чтобы смонтировать новый раздел в определенную директорию, нужно получить его UUID;
$ sudo blkid
$ sudo mount UUID= 506f6faa-1f50-4763-b8a1-975f2b1c59fe /home/sysops/vhdx
Этот способ позволит смонтировать виртуальные диски других сред Linux, которые установлены на этом компьютере под WSL. Файловая система образов Linux WSL хранится в виртуальных дисках ext4.vhdx в папке
C:\Users\[user]\AppData\Local\Packages\[distro]\LocalState\[distroPackageName]
. Если на системном диске недостаточно места, можно перенести vhdx файл с файловой системой образа WSL на другой диск.
Can’t Access WSL Files from Windows? Here’s How to Fix It
Windows Subsystem for Linux (WSL) is a powerful tool that allows you to run Linux distributions on your Windows PC. However, there are a few common problems that users can run into, such as not being able to access WSL files from Windows.
In this article, we’ll show you how to fix the “can’t access WSL files from Windows” error. We’ll cover the following topics:
- What causes the “can’t access WSL files from Windows” error?
- How to fix the “can’t access WSL files from Windows” error
- How to prevent the “can’t access WSL files from Windows” error from happening again
By the end of this article, you’ll be able to access your WSL files from Windows without any problems.
What Causes the “Can’t Access WSL Files from Windows” Error?
There are a few different things that can cause the “can’t access WSL files from Windows” error. Here are the most common causes:
- Your WSL installation is not up to date. Make sure that you have the latest version of WSL installed. You can check your WSL version by running the following command in a PowerShell terminal:
wsl –version
- Your WSL filesystem is not mounted. By default, the WSL filesystem is not mounted in Windows. You can mount the WSL filesystem by running the following command in a PowerShell terminal:
wsl –mount
- Your WSL filesystem is not shared. By default, the WSL filesystem is not shared with Windows. You can share the WSL filesystem by running the following command in a PowerShell terminal:
wsl –share
How to Fix the “Can’t Access WSL Files from Windows” Error
Once you’ve identified the cause of the “can’t access WSL files from Windows” error, you can fix it by following the steps below:
1. Update your WSL installation. To update your WSL installation, open the Microsoft Store and search for “Windows Subsystem for Linux.” Click on the “Install” button to install the latest version of WSL.
2. Mount the WSL filesystem. To mount the WSL filesystem, open a PowerShell terminal and run the following command:
wsl –mount
3. Share the WSL filesystem. To share the WSL filesystem, open a PowerShell terminal and run the following command:
wsl –share
Once you’ve completed these steps, you should be able to access your WSL files from Windows without any problems.
How to Prevent the “Can’t Access WSL Files from Windows” Error from Happening Again
To prevent the “can’t access WSL files from Windows” error from happening again, you can follow these tips:
- Keep your WSL installation up to date.
- Mount the WSL filesystem when you start your PC.
- Share the WSL filesystem with Windows.
By following these tips, you can ensure that you can always access your WSL files from Windows without any problems.
| Error | Cause | Solution |
|---|---|---|
| Cannot access WSL files from Windows |
|
|
In this article, we will discuss how to access WSL files from Windows. We will cover the following topics:
- What is WSL and why can’t I access its files from Windows?
- How to access WSL files from Windows using the File Explorer
- How to access WSL files from Windows using the WSL terminal
- How to mount a WSL drive in Windows
- How to share files between Windows and WSL
What is WSL and why can’t I access its files from Windows?
WSL is a Windows subsystem that allows you to run Linux on Windows. By default, WSL files are not accessible from Windows. There are a few reasons for this, including:
- Security: WSL runs in a separate sandbox from Windows, so its files are not accessible by default to prevent security breaches.
- Performance: WSL files are stored in a different location than Windows files, so accessing them can be slower.
However, there are ways to access WSL files from Windows, as described in the following sections.
How to access WSL files from Windows using the File Explorer
The easiest way to access WSL files from Windows is to use the File Explorer. To do this, open the File Explorer and navigate to the following location:
C:\Users\\AppData\Local\Packages\\LocalState\rootfs
This folder will contain all of your WSL files. You can then open and edit these files just like you would any other files on your Windows system.
How to access WSL files from Windows using the WSL terminal
You can also access WSL files from Windows using the WSL terminal. To do this, open the WSL terminal and navigate to the directory where you want to access the files. For example, to access the files in the `/home/user` directory, you would type the following command:
cd /home/user
Once you are in the desired directory, you can use the `ls` command to list the files. For example, to list the files in the `/home/user` directory, you would type the following command:
ls
You can also use the `cat` command to view the contents of a file. For example, to view the contents of the `/home/user/file.txt` file, you would type the following command:
cat file.txt
How to mount a WSL drive in Windows
You can also mount a WSL drive in Windows so that you can access it as a regular drive. To do this, open the File Explorer and navigate to the following location:
C:\Users\\AppData\Local\Microsoft\WindowsApps
In this folder, you will find a folder for each of your WSL distributions. For example, if you have a WSL distribution called `Ubuntu`, you will find a folder called `Ubuntu-20.04`.
Double-click on the folder for your WSL distribution to open it. In this folder, you will find a file called `wsl.exe`. Right-click on this file and select `Open with` > `Windows PowerShell`.
In the PowerShell window, type the following command:
wsl –mount f:
This will mount the WSL drive as drive `F:`. You can now access the files on the WSL drive as you would any other drive on your Windows system.
**How to share files between Windows and WSL**
You can share files between Windows and WSL by using the following methods:
* **Using the File Explorer:** You can share files between Windows and WSL using the File Explorer. To do this, open the File Explorer and navigate to the directory where you want to share the file. Right-click on the file and select `Share with` > `Devices`. In the list of devices, select your WSL distribution.
- Using the WSL terminal: You can also share files between Windows and WSL using the WSL terminal. To do this, open the WSL terminal and navigate to the directory where you want to share the file. Type the following command:
wsl.exe -v
This will share the file with the WSL distribution named «.
- Using a third-party tool: There are a number of third-party tools that you can use to share files between Windows and WSL. Some popular tools include Win-SCP, FileZilla, and PuTTY.
Windows Subsystem for Linux (WSL) is a feature that allows you to run Linux distributions on Windows 10. This can be a great way to get the benefits of Linux without having to dual-boot your system. However, one common problem that people have is that they cannot access their WSL files from Windows.
There are a few reasons why this might happen. First, your WSL files might not be mounted correctly. Second, you might not have the correct permissions to access your WSL files. Finally, you might be using a different file system in WSL than you are in Windows.
In this article, we will discuss how to fix each of these problems. We will also provide some tips on how to avoid this problem in the future.
How to Mount WSL Files in Windows
The first step is to make sure that your WSL files are mounted correctly. By default, WSL files are mounted in the C:\Users\\AppData\Local\Packages\CanonicalGroupLimited.UbuntuonWindows_79rhkgkxlcmk0\LocalState\rootfs directory. However, you can change the location of this mount point by editing the wsl.conf file.
To open the wsl.conf file, open File Explorer and navigate to the following location:
C:\Users\\AppData\Local\Microsoft\WindowsApps
Right-click on the **wsl.conf** file and select **Open with** > Notepad.
In the wsl.conf file, you will see a section that looks like this:
[automount]
enabled = true
mount_options = “uid=1000,gid=1000,umask=0000”
This section specifies the default mount options for WSL files. The uid and gid values specify the user and group IDs that will be used to access the WSL files. The umask value specifies the permissions that will be applied to the WSL files.
If you want to change the location of the WSL mount point, you can do so by editing the mount_point value. For example, to mount your WSL files in the C:\WSL directory, you would change the mount_point value to the following:
mount_point = “C:\WSL”
Once you have made your changes, save the wsl.conf file and close Notepad.
To unmount your WSL files, open a WSL terminal and use the following command:
umount /mnt/c/WSL
How to Fix File Permission Problems
If you are unable to access your WSL files because of a file permission problem, you can fix this by changing the permissions of the files.
To change the permissions of a file, open File Explorer and right-click on the file. Select Properties and then click on the Security tab.
In the Security tab, you will see a list of users and groups that have permissions to the file. To change the permissions for a user or group, click on the Edit button.
In the Permissions for dialog box, you can change the following permissions:
- Read allows the user or group to read the file.
- Write allows the user or group to write to the file.
- Execute allows the user or group to run the file.
Once you have made your changes, click on the OK button.
How to Use a Different File System in WSL
By default, WSL uses the ext4 file system. However, you can also use a different file system, such as NTFS or FAT32.
To change the file system of your WSL drive, you can use the following command:
wsl –mount –file-system
For example, to change the file system of the C drive to NTFS, you would use the following command:
wsl –mount C –file-system ntfs
Once you have changed the file system, you will need to restart your WSL instance.
In this article, we have discussed how to fix common problems that people have with accessing WSL files from Windows. We have covered
Q: I cannot access my WSL files from Windows. What should I do?
A: There are a few possible reasons why you might not be able to access your WSL files from Windows. Here are a few things to check:
- Make sure that WSL is installed and running. You can check this by opening the Windows Terminal and typing `wsl –list-versions`. If WSL is not installed, you can install it from the Microsoft Store.
- Make sure that you are using the correct file path. WSL files are located in the `/mnt//home/` directory. For example, if your WSL distribution is called `Ubuntu` and your username is `user`, your files will be located in the `/mnt/Ubuntu/home/user` directory.
- Make sure that you have the correct permissions to access the files. By default, only the user who created the files has permission to access them. If you need to access files that were created by another user, you will need to either get permission from that user or change the permissions on the files yourself.
- Make sure that your Windows Firewall is not blocking access to WSL files. By default, the Windows Firewall blocks all incoming traffic from unknown sources. If you are trying to access your WSL files from a different computer on your network, you may need to open a port in the Windows Firewall.
If you have checked all of these things and you are still unable to access your WSL files from Windows, you can try the following steps:
1. Open the Windows Terminal and type the following command:
wsl –export
where « is the name of your WSL distribution and « is the name of the file you want to export. This will create a compressed archive of your WSL files.
2. Compress the archive using a tool like 7-Zip or WinRAR.
3. Copy the compressed archive to a location on your Windows computer where you can access it.
4. Uncompress the archive.
5. You should now be able to access your WSL files from Windows.
Q: I want to access my WSL files from Windows Explorer. How can I do that?
A: You can access your WSL files from Windows Explorer by following these steps:
1. Open Windows Explorer.
2. Click the This PC icon in the left pane.
3. Right-click the C drive and select Properties.
4. Click the Advanced system settings link in the System Properties window.
5. Click the Environment Variables button.
6. In the User variables for section, click New.
7. In the Variable name field, type `WSL_HOME`.
8. In the Variable value field, type the path to the WSL root directory. For example, if your WSL distribution is called `Ubuntu` and your username is `user`, you would type `/mnt/Ubuntu/home/user`.
9. Click OK.
10. Close the System Properties window.
11. Open Windows Explorer.
12. In the address bar, type `%WSL_HOME%` and press Enter.
You should now be able to see your WSL files in Windows Explorer.
Q: I want to share my WSL files with other users on my network. How can I do that?
A: You can share your WSL files with other users on your network by following these steps:
1. Open the Windows Terminal and type the following command:
wsl –export
where « is the name of your WSL distribution and « is the name of the file you want to export. This will create a compressed archive of your WSL files.
2. Compress the archive using a tool like 7-Zip or WinRAR.
3. Share the compressed archive with the other users on your network.
4. The other users can then extract the archive and access your WSL files.
Q: I want to mount my WSL files as a drive in Windows. How can I do that?
A: You can mount your WSL files as a drive in Windows by following these steps:
In this comprehensive guide, we have discussed the common reasons why you might not be able to access WSL files from Windows and how to fix them. We have also provided some tips on how to troubleshoot other WSL problems.
We hope that this guide has been helpful and that you are now able to access your WSL files from Windows without any problems. If you have any further questions or need help, please do not hesitate to contact us.
Key takeaways
- The most common reason why you cannot access WSL files from Windows is because the WSL filesystem is not mounted. To fix this, you can use the following command:
wsl –mount
- If you are still unable to access your WSL files, you can try the following troubleshooting steps:
- Make sure that you are running the latest version of Windows and WSL.
- Check the permissions on your WSL files.
- Try using a different file explorer.
- Restart your computer.
- Reinstall WSL.
- If you are still having problems, you can contact Microsoft support for help.
Author Profile
-
Hatch, established in 2011 by Marcus Greenwood, has evolved significantly over the years. Marcus, a seasoned developer, brought a rich background in developing both B2B and consumer software for a diverse range of organizations, including hedge funds and web agencies.
Originally, Hatch was designed to seamlessly merge content management with social networking. We observed that social functionalities were often an afterthought in CMS-driven websites and set out to change that. Hatch was built to be inherently social, ensuring a fully integrated experience for users.
Now, Hatch embarks on a new chapter. While our past was rooted in bridging technical gaps and fostering open-source collaboration, our present and future are focused on unraveling mysteries and answering a myriad of questions. We have expanded our horizons to cover an extensive array of topics and inquiries, delving into the unknown and the unexplored.
Latest entries
Иногда бывает нужно получить доступ с компьютера под управлением Windows к файловой системе на компьютере Linux, но нет возможности поставить samba или FTP. Да и расшаривать самбой или фтп корень системы, мягко говоря, не безопасно. На этот случай можно воспользоваться небольшой, но очень полезной программой – WinSCP.
Скачать программу можно здесь
Она поддерживает следующие протоколы – sftp, scp, ftp, webdav. Я покажу ее работу на примере scp протокола.
Все что нужно – доступ к компьютеру по SSH. Подключаемся к нашему компьютеру, вводим адрес, порт, выбираем протокол передачи, по желанию можно сохранить подключение. Адрес у меня стоит 127.0.0.1, т.к. подключаюсь через SSH туннель. О том как его настроить читайте в этой статье.
После того как необходимые параметры введены, жмем кнопку войти.

Вводим наш пароль если, не сохраняли его в первом окне.
Откроется окно, привычное всем пользователям таких файловых менеджеров как Total Commander. В левой части располагаются ресурсы локального компьютера, в правой – удаленного.

Для того что бы что-либо скопировать нужно выбрать файл, или несколько файлов и нажать F5, для удаления используется клавиша F8, возможно редактирование файлов встроенным редактором без копирования.
Видео по теме: