
Как проверить износ аккумулятора
В macOS и Windows можно проверить уровень жизни батареи ноутбука без установки дополнительных программ.
Инструкция для Windows 7 и новее
Нажмите Win + R и в меню «Выполнить» напишите команду cmd.
Еще «Командную строку» можно найти в поиске системы через меню «Пуск»
Откроется командная строка, напишите в ней команду powercfg-energy или powercfg /batteryreport и нажмите клавишу Enter. В следующей строке появится путь к папке, в которой можно найти отчет о состоянии батареи в формате HTML.
Стандартный путь, куда сохраняется отчет о состоянии батареи: «Мой компьютер» → «Локальный диск (С:)» → «Пользователи» или Users → папка с вашим именем пользователя. Найдите в ней файл battery-report.html и откройте его.
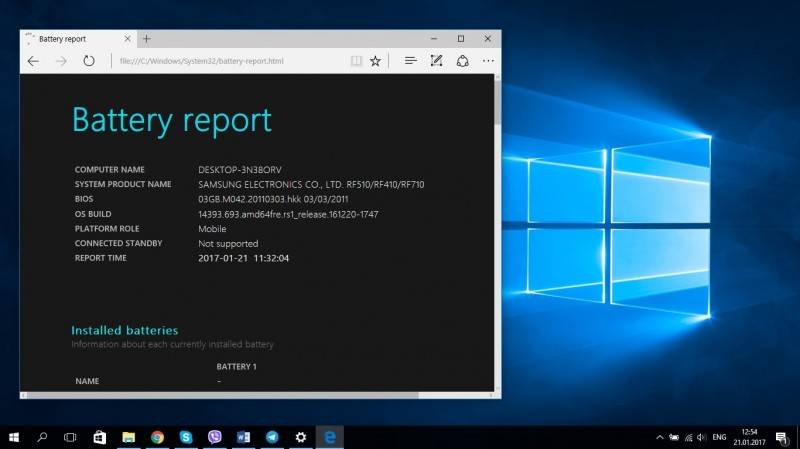
Отчет откроется в браузере, посмотрите в нем два параметра:
- Design Capacity — исходная емкость аккумулятора, которая была при покупке.
- Full Charge Capacity — текущая максимальная емкость аккумулятора при последней зарядке.
Cycle Count в этом же меню — это количество циклов перезарядки
Чтобы посчитать уровень износа аккумулятора, разделите текущую максимальную емкость на изначальную емкость и умножьте результат на 100.
В нашем примере получается 32 195 ÷ 50 117 × 100 = 64,2% — столько осталось от исходной емкости.
Инструкция для macOS
На MacBook зажмите клавишу Option (Alt) и кликните по логотипу Apple в верхнем левом углу экрана. Откройте пункт «Информация о системе…».
Эта инструкция работает даже с MacBook на старой OS X
В открывшемся меню слева кликните на пункт «Электропитание». Откроется окно с информацией о состоянии аккумулятора, ищите строчку «Максимальная емкость» — она показывает в процентах, какая максимальная емкость у батареи сейчас по отношению к новой.
В этом же меню на две строчки выше указано количество циклов перезарядки
Когда аккумулятор пора менять
Обычно проблемы с аккумулятором начинаются после 1000 циклов перезарядки или когда его остаточная максимальная емкость приближается к 50%.
Если уровень износа батареи вашего устройства близок к этим значениями или ниже и вы заметили, что ноутбук начал внезапно выключаться или быстро разряжаться, — скорее всего, пора менять аккумулятор.
Можете не менять аккумулятор, если пользуетесь ноутбуком только в стационарном режиме, то есть не снимаете с зарядки дома или в офисе.
Но для работы в поездках и кафе удобнее, когда аккумулятор в рабочем состоянии: не придется в каждом новом месте искать розетку, а ноутбук внезапно не выключится во время важной видеоконференции или при работе со срочным отчетом. Так что его лучше заменить.
Проще всего, когда у ноутбука съемный аккумулятор. Обычно такой встречается в моделях с диагональю 15 дюймов и больше, которые не относятся к классу ультрабуков. В таких устройствах батарея держится на защелках и меняется в пару движений.
Если у вашего ноутбука батарея спрятана в корпусе, лучше обратиться в сервисный центр. Без опыта в разборке техники можно что-то повредить, а специалисты помогут подобрать аккумулятор и быстро его заменят. Новая батарея может стоить от 2000 до 15 000 ₽, а замена в сервисе — до 1000 ₽ или включена в стоимость запчасти.
В Windows 10 (впрочем, в 8-ке эта возможность тоже присутствует) есть способ получить отчет с информацией о состоянии и использовании аккумулятора ноутбука или планшета — тип аккумулятора, проектная и фактическая емкость при полной зарядке, количество циклов зарядки, а также посмотреть графики и таблицы использования устройства от батареи и от сети, изменение емкости в течение последнего месяца.
В этой короткой инструкции — о том, как это сделать, и о том, что представляют собой данные в отчете о батарее (так как даже в русскоязычной версии Windows 10 информация представлена на английском). См. также: Что делать, если ноутбук не заряжается.
Стоит учесть, что полноценную информацию удастся увидеть только на ноутбуках и планшетах с поддерживаемым оборудованием и установленными оригинальными драйверами чипсета. Для устройств, изначально выпущенных с Windows 7, а также без необходимых драйверов, способ может не сработать или выдать неполную информацию (как и произошло у меня — неполная информация на одном и отсутствие информации на втором старом ноутбуке).
Создание отчета о состоянии аккумулятора
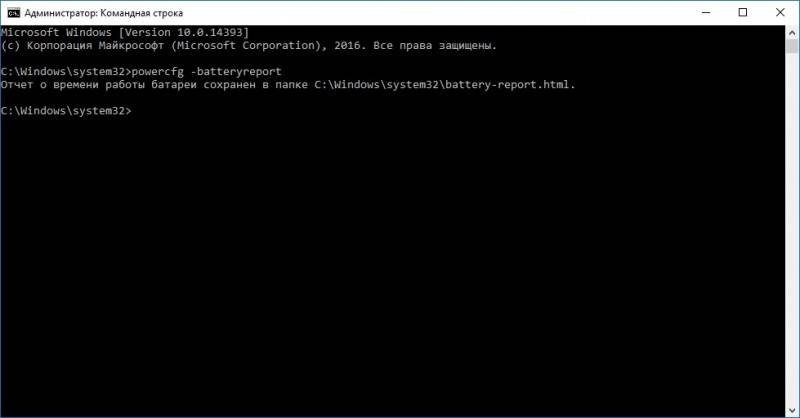
Для того, чтобы создать отчет об аккумуляторе компьютера или ноутбука, запустите командную строку от имени администратора (в Windows 10 для этого проще всего использовать меню правого клика по кнопке «Пуск»).
После этого введите команду powercfg -batteryreport (возможно написание powercfg /batteryreport) и нажмите Enter. Для Windows 7 можно использовать команду powercfg /energy (более того, её же можно использовать и в Windows 10, 8, если battery report не дает нужной информации).

Если все прошло успешно, то вы увидите сообщение о том, что «Отчет о времени работы батареи сохранен в папке C:\ Windows\ system32\ battery-report.html».
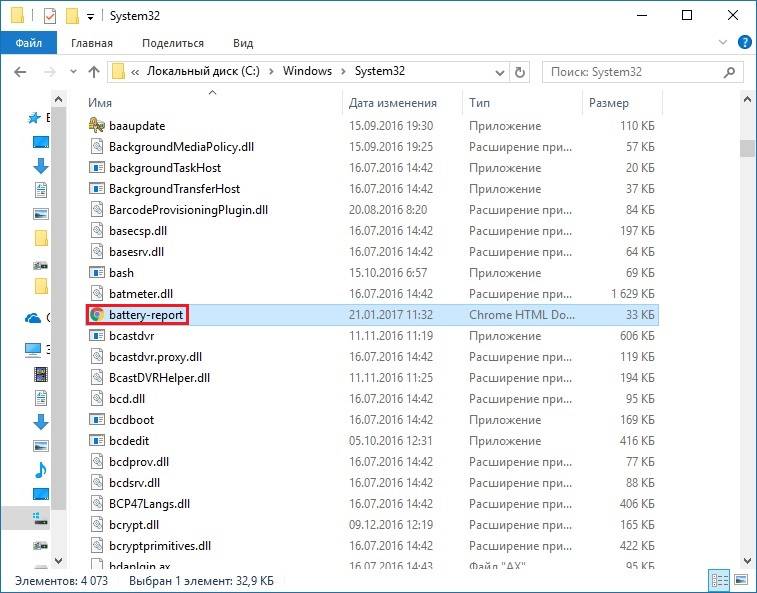
Перейдите в папку C:\ Windows\ system32\ и откройте файл battery-report.html любым браузером (правда, у меня на одном из компьютеров файл по какой-то причине отказался открываться в Chrome, пришлось использовать Microsoft Edge, а на другом — без проблем).
Просмотр отчета о батарее ноутбука или планшета с Windows 10 и 8
Примечание: как было отмечено выше, на моем ноутбуке информация не полная. Если у вас более новое «железо» и есть все драйвера, вы увидите и те сведения, которые отсутствуют на приведенных скриншотах.

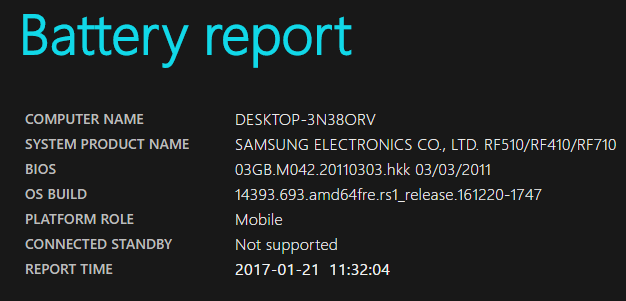
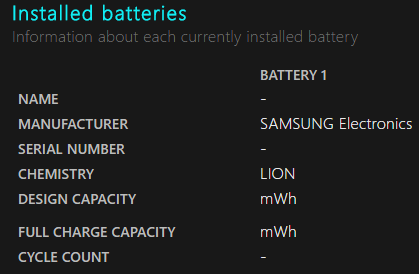
В верхней части отчета, после информации о ноутбуке или планшете, установленной системе и версии БИОС, в разделе Installed Battery, вы увидите следующую важную информацию:
- Manufacturer — производитель батареи.
- Chemistry — тип аккумулятора.
- Design Capacity — исходная емкость.
- Full Charge Capacity — текущая емкость при полном заряде.
- Cycle Count — количество циклов перезарядки.
Разделы Recent Usage и Battery Usage представляют данные об использовании батареи в течение последних трех дней, включая остаточную емкость и график расхода.

Раздел Usage History в табличном виде отображает данные по времени использования устройства от батареи (Battery Duration) и электросети (AC Duration).
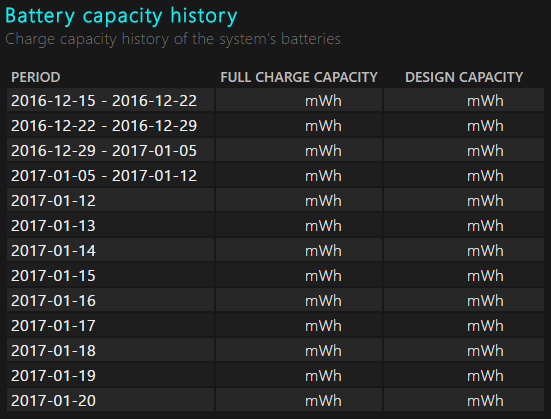
В разделе Battery Capacity History представлена информация об изменении емкости батареи за последний месяц. Данные могут быть не совсем точными (например, в некоторые дни, текущая емкость может «увеличиваться»).

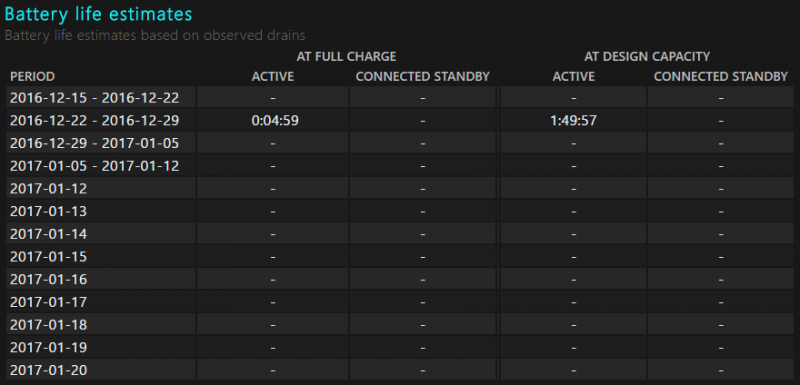
Раздел Battery Life Estimates отображает информацию о предполагаемом времени работы устройства при полной зарядке в активном состоянии и в режиме connected standby (а также информацию о таком времени при исходной емкости батареи в колонке At Design Capacity).
Последний пункт в отчете — Since OS Install отображает информацию об ожидаемом времени работы системы от аккумулятора, вычисленный на основании использования ноутбука или планшета с момента установки Windows 10 или 8 (а не за последние 30 дней).
Для чего это может потребоваться? Например, для анализа ситуации и емкости, если ноутбук вдруг стал быстро разряжаться. Или же для того, чтобы узнать, насколько «заезжен» аккумулятор при покупке б/у ноутбука или планшета (или устройства с витрины). Надеюсь, для кого-то из читателей информация окажется полезной.
Современные версии операционной системы Windows (в частности Windows 10 и 8/8.1) предоставляют возможность создать и просмотреть подробный отчет о состоянии аккумулятора ноутбука или планшета без использования каких-либо сторонних инструментов. Он находится не на виду, поэтому о нем знают далеко не все пользователи операционной системы от Microsoft. А ведь некоторым из них данная возможность периодически необходима. Например, для того, чтобы просмотреть информацию об использовании девайса от батареи и сети перед его покупкой. Если вы один из тех пользователей, которым нужны эти и другие данные по аккумулятору, эта инструкция расскажет вам, как создать и просмотреть отчет о состоянии батареи ноутбука или планшета в Windows 10.
Как создать отчет о состоянии аккумулятора ноутбука или планшета в Windows 10 и 8/8.1
- Нажмите на комбинацию клавиш Win+R и введите команду cmd.
- В появившееся окно впишите или вставьте следующую команду: powercfg -batteryreport. Также допускается ввод команды в таком формате: powercfg /batteryreport. Остальную документацию по powercfg вы можете найти по ссылке.
- Нажмите на клавишу Enter, чтобы выполнить команду. Если она введена верно, то в конце вы получите сообщение «Отчет о времени работы батареи сохранен в папке C:\Windows\System32\battery-report.html«. В некоторых случаях возможен вариант сохранения отчета по пути: C:\Users\Имя_пользователя\battery-report.html, где Имя_пользователя — название учетной записи.
Стоит отметить, что система сможет предоставить полную информацию по аккумулятору только в том случае, если в ноутбуке или планшете установлено поддерживаемое «железо», а в самой ОС присутствуют оригинальные драйвера для чипсета. Если устройство было выпущено с Windows 7 или же оно не оснащено нужными драйверами, система может сформировать неполный отчет, а то и вовсе – создать пустой файл.
Как просмотреть отчет о состоянии аккумулятора ноутбука или планшета в Windows 10 и 8/8.1
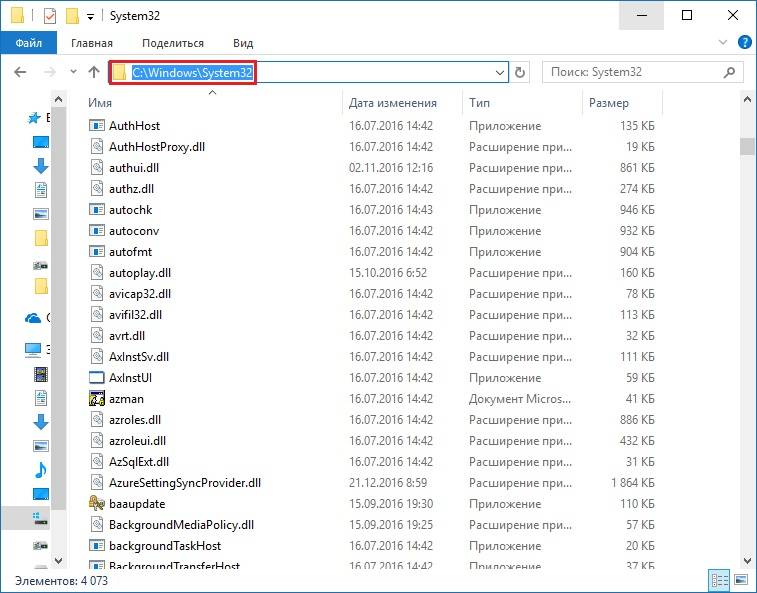
- Запустите Проводник и перейдите к каталогу: C:\Windows\System32\ или C:\Users\Имя_пользователя\
- В указанном каталоге найдите файл battery-report.html и откройте его с помощью браузера.

Учтите, что операционная система составляет отчет исключительно на английском языке. Если вы не владеете им, вашему вниманию предлагается расшифровка основных пунктов и разделов в сформированном файле.
В самой верхней части отчета находится информация о модели устройства, о версии BIOS, об установленной операционной системе и функции управления электропитанием.
В первом разделе Installed batteries, расположенном под этими сведениями, перечислены такие пункты:
- Name – Полное название батареи.
- Manufacturer – Производитель батареи.
- Serial Number – Серийный номер батареи.
- Chemistry – Тип батареи.
- Design Capacity – Исходная емкость аккумулятора.
- Full Charge Capacity – Текущая емкость аккумулятора с полным зарядом.
- Cycle Count – Количество циклов зарядки/разряда.
В разделе Recent usage отображается таблица с данными об использовании батареи за последние три дня:
- Start Time – Начальное время использования.
- State – Статус использования (Активно, Остановлено).
- Source – Источник питания.
- Capacity Remaining – Остаточная емкость.
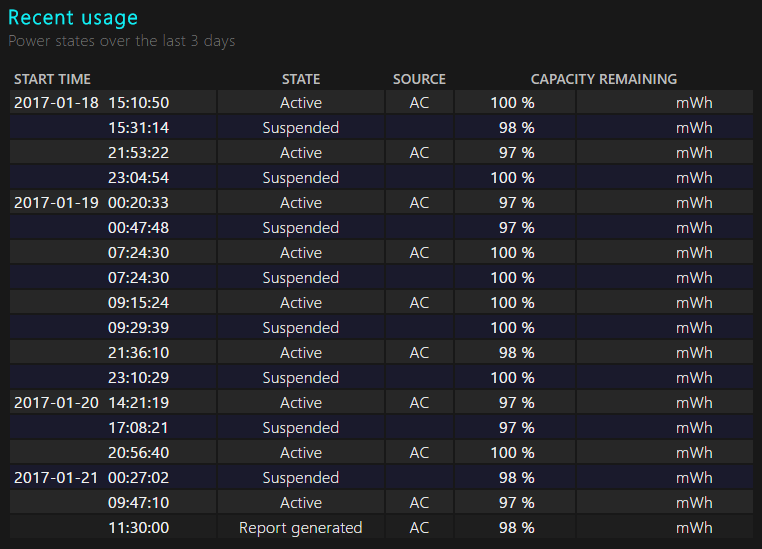
Раздел Battery usage включает в себя график использования аккумулятора за последние три дня, а также таблицу с зафиксированным временем начала использования, статусом, продолжительностью и данными об исчерпывании заряда батареи.

Раздел Usage history состоит из таблицы, в которой отображаются данные о времени использования системы от батареи и сети переменного тока.

В разделе Battery capacity history находится таблица с данными об изменении емкости батареи.
Раздел Battery life estimates в табличном виде отображает информацию о времени автономной работы аккумулятора на основе данных о его использовании в активном состоянии и в режиме Connected Standby.
В последнем пункте отчета, Since OS install, зафиксировано ожидаемое время работы системы от батареи. Данную информацию ОС подсчитывает отталкиваясь от сведений об использовании устройства с момента её установки.

In this guide, we will show you the steps to check your Windows 11 PC’s battery health and subsequently generate its report. Ever since I upgraded my PC to the latest iteration of the OS, I had witnessed a considerable rise in battery consumption. The usage case scenario is similar to the one as it was before in Windows 10, with no resource-hogging applications running in the background. To find the culprit, I tried all the basic troubleshooting steps.

These included running the Windows Defender Scan, using the CheckDisk and System File Checker command, among others. However, none of them manage to spell out success. So upon further digging around, I got hold of a nifty method that proved to be of great help in diagnosing the battery life. And in this guide, we will help you with just that. Given here are the detailed steps to check your Windows 11 PC’s battery health and then generate its report.
Table of Contents
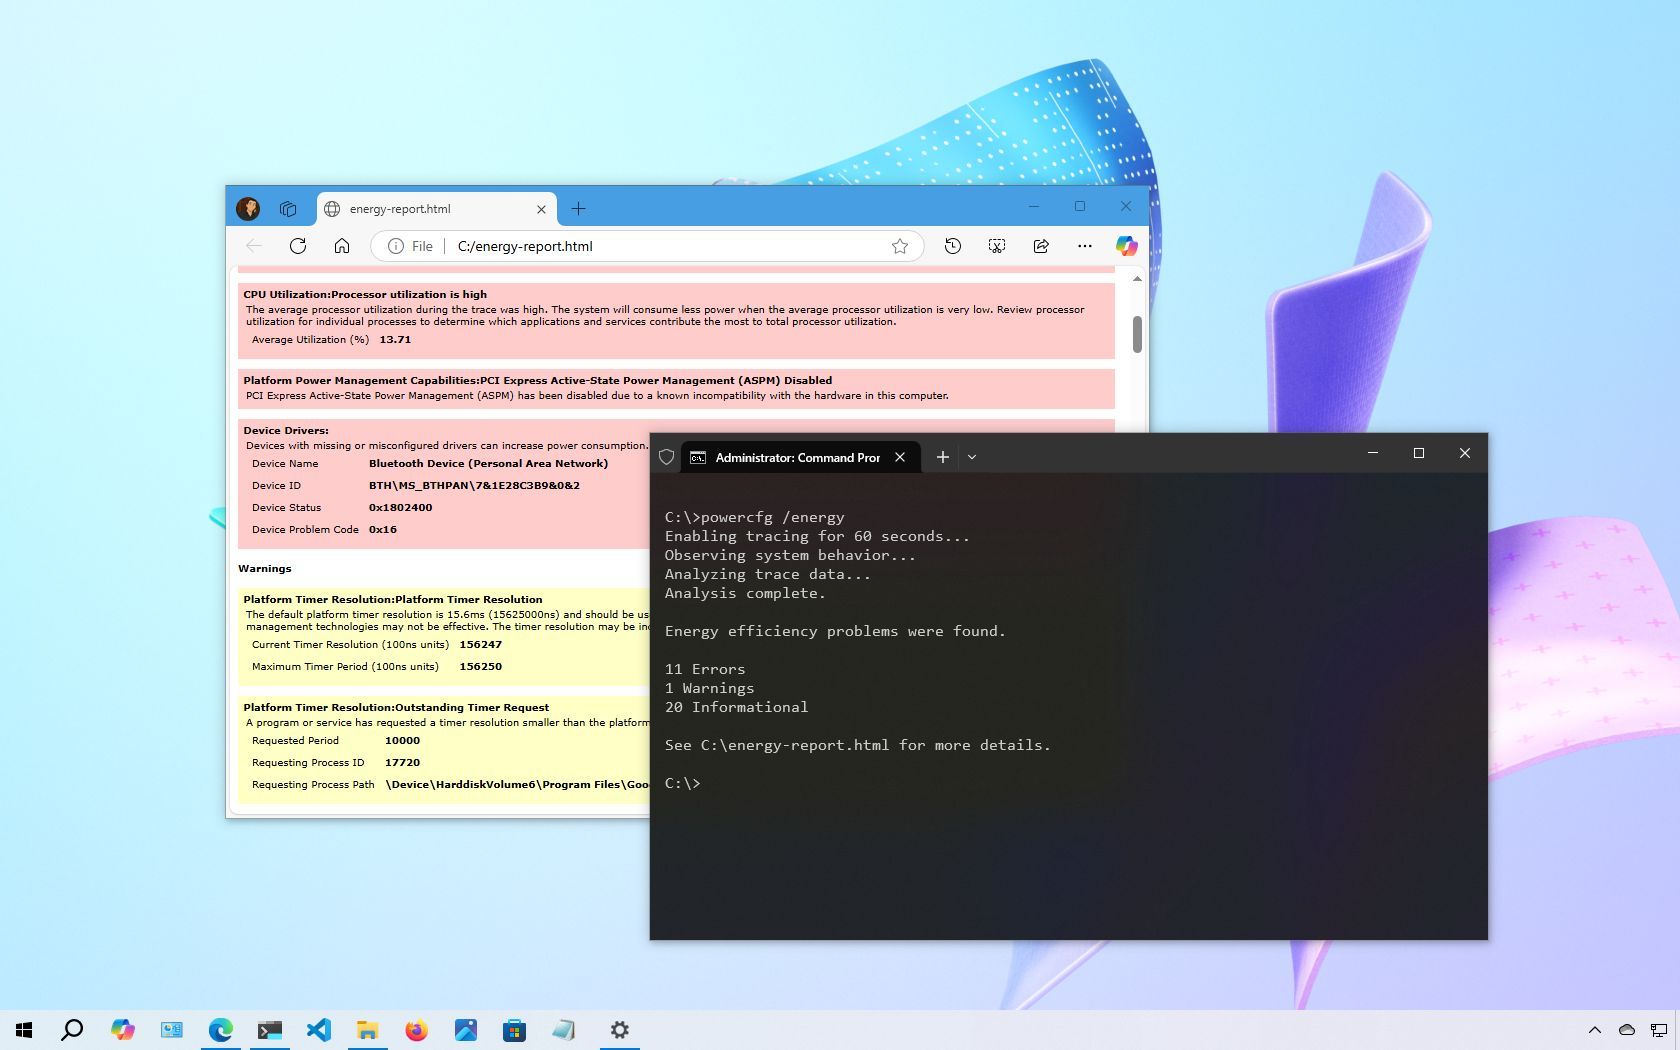
- To begin with, head over to the Start Menu, search CMD, and launch Command Prompt as an administrator.
- Then execute the below command:
powercfg/energy

- It will now analyze the system behavior and diagnose the battery’s working status for a minute.
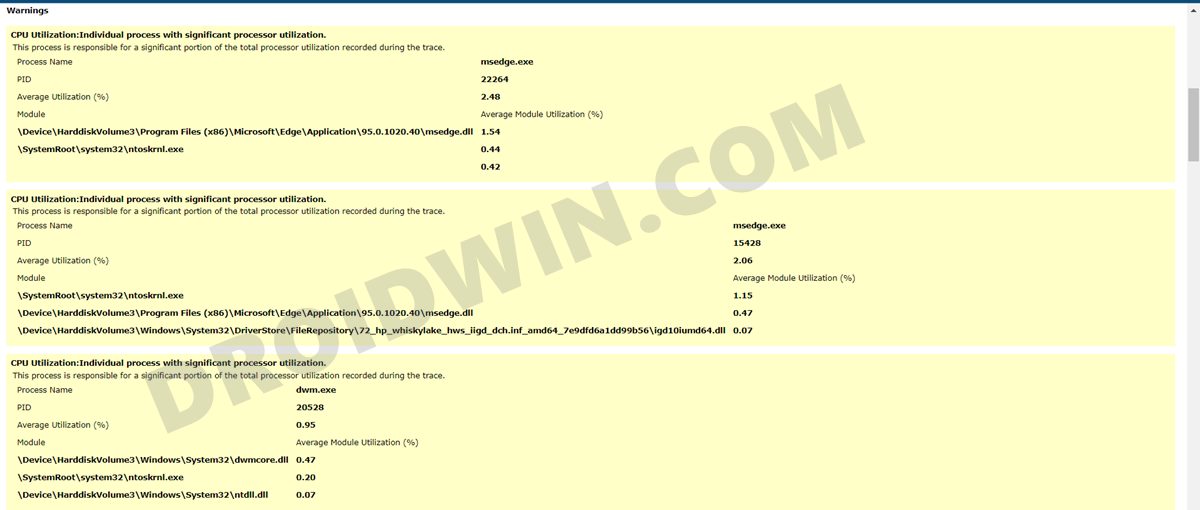
- Once the analysis is complete, it shall list out all the errors, warnings, and some additional information related to your battery.

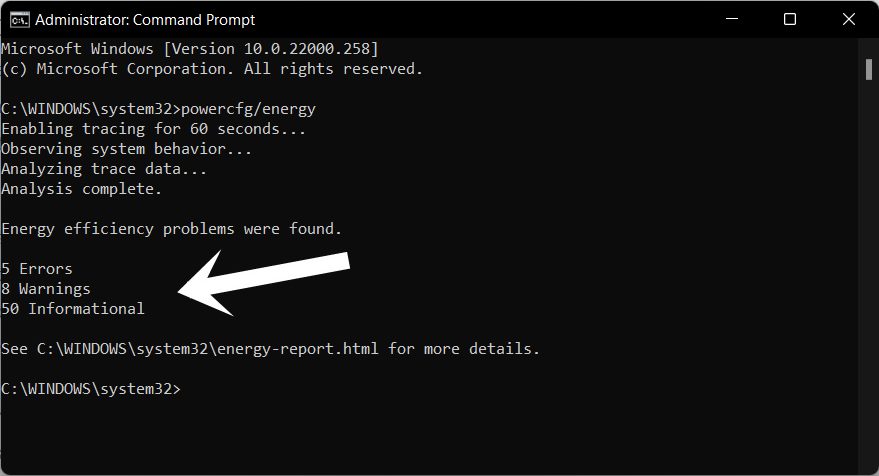
All these details are saved in an HTML Report. So let’s start analyzing this report and fix all the underlying battery issues.
How to Access My Windows 11 PC Battery Health Report
- Launch File Explorer via Windows+E shortcut keys.
- Then copy-paste the below location in the address bar:
C:\WINDOWS\system32\

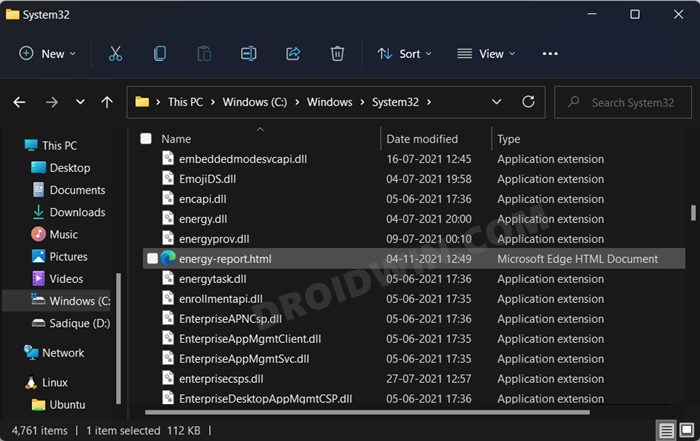
- There you should find the Energy Report file, double click to open it.

- You could also copy-paste the following location to directly open the report:
C:\WINDOWS\system32\energy-report.html
How to Analyze the Windows 11 Battery Report
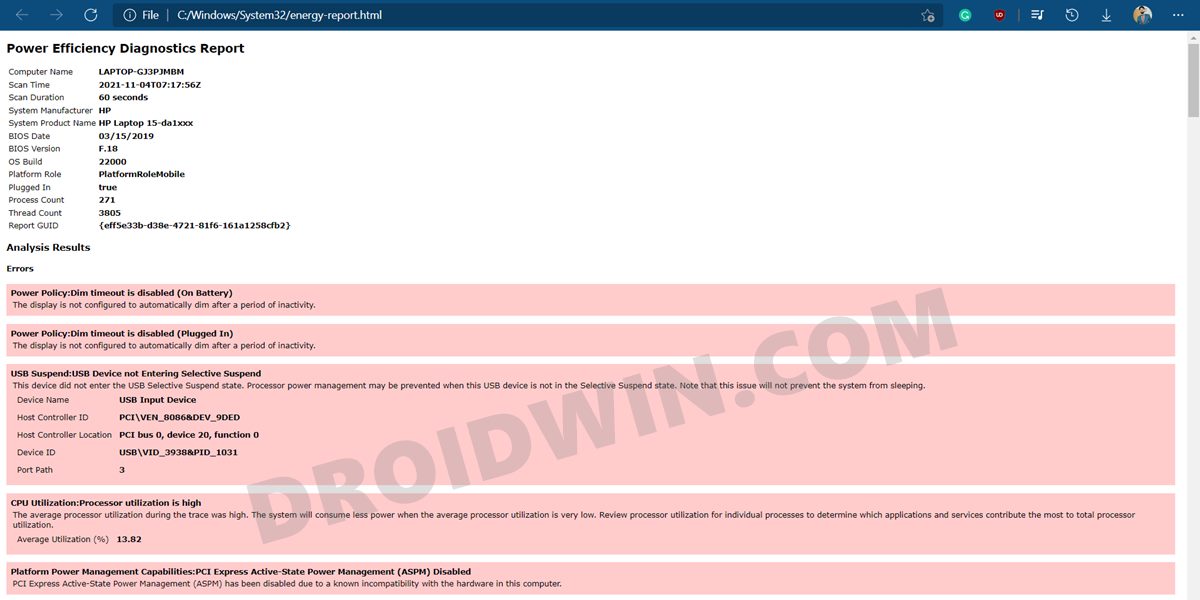
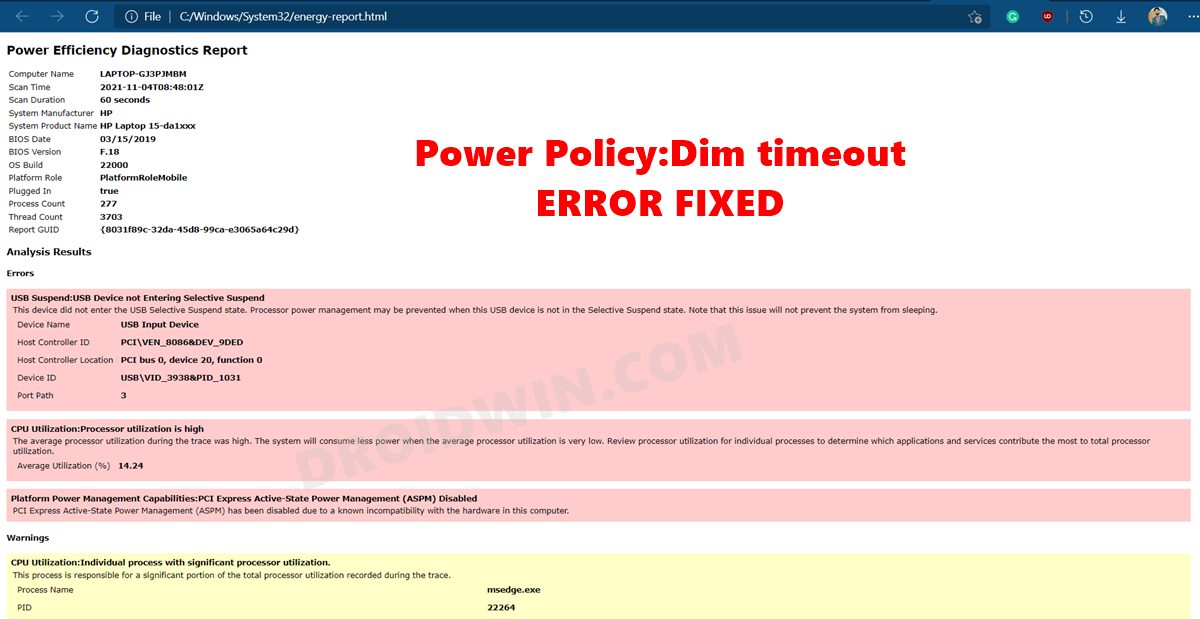
After you open the report, you should see some system-related information. Scroll down a little and go to the Analysis Results. It will be broken down into three different sections- Errors (highlighted in red), Warnings (highlighted in yellow), and then a few informational data related to the battery. When it comes to fixing these issues, near about all of them could be rectified from the Power Options themselves.
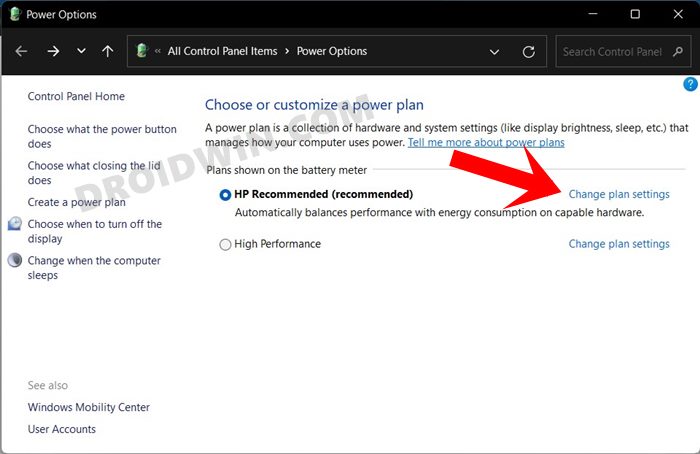
- So head over to the Start Menu, search Power Plan, and click on Choose a Power Plan.
- After that, click on Change Plan Settings next to your current plan.

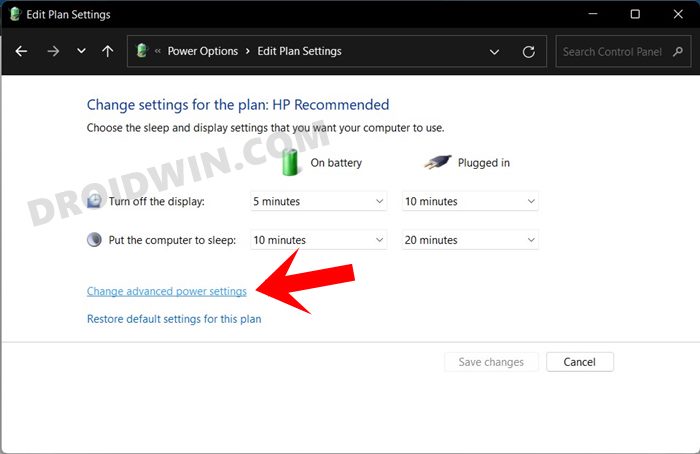
- Then click on Change Advanced Power Settings. It shall now open the Power Options dialog box.
- Now refer to the errors mentioned in the report and carry out the associated tweak in this Power Options menu to rectify them.
One of the errors that caught my attention was the “Power Policy:Dim timeout is disabled”. To fix it, all that was needed to do is to expand the Display tab under Power Options and then enable Power Policy:Dim timeout, both for On Battery and Plugged In State. However, it was easier said than done, as the option was nowhere to be found. But there’s a fix for this issue and you could easily enable it. Here’s how:
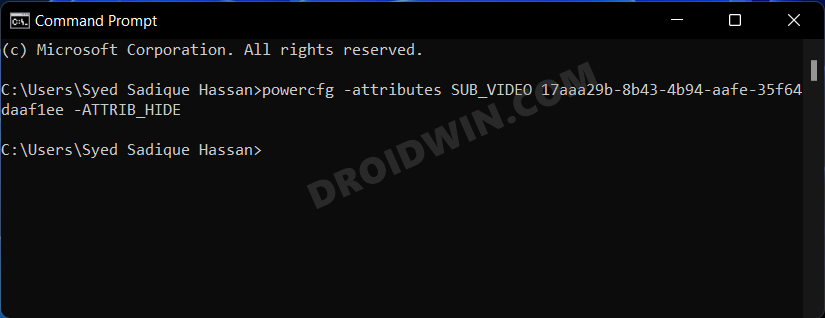
Where is the Power Policy:Dim timeout Feature
- Head over to the Start menu, search CMD, and launch Command Prompt as an administrator.
- Then copy-paste the below command and hit Enter:
powercfg -attributes SUB_VIDEO 17aaa29b-8b43-4b94-aafe-35f64daaf1ee -ATTRIB_HIDE

- The Power Policy:Dim timeout option should now be enabled.
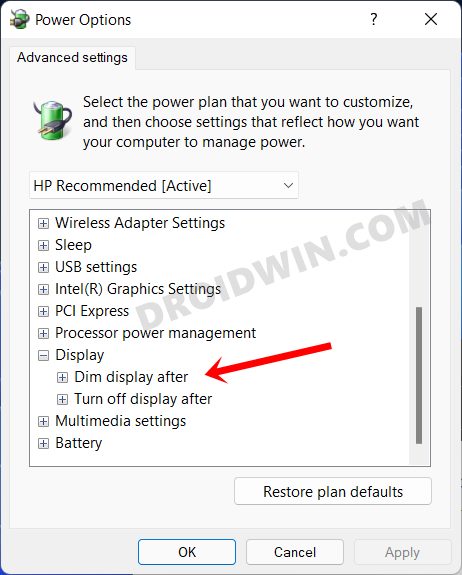
- To access it, open the Power Options dialog box as before and then expand the Display section.

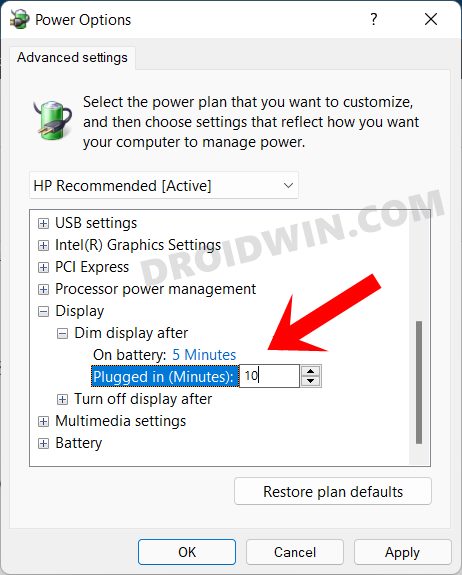
- This time you shall see the Dim Display After option. Expand it and assign it the desired time frame under the On Battery and Plugged in states.
- Finally, hit OK to save the changes. With this, you should have successfully fixed the “Power Policy:Dim timeout is disabled” error.
- However, if at any point in time, you wish to revert the changes and remove the Power Policy:Dim timeout option, then just execute the below command:
powercfg -attributes SUB_VIDEO 17aaa29b-8b43-4b94-aafe-35f64daaf1ee +ATTRIB_HIDE
Verify if Battery Errors Has been Fixed or not
Let’s now check if we were able to successfully rectify Windows 11 Battery related issue or not.
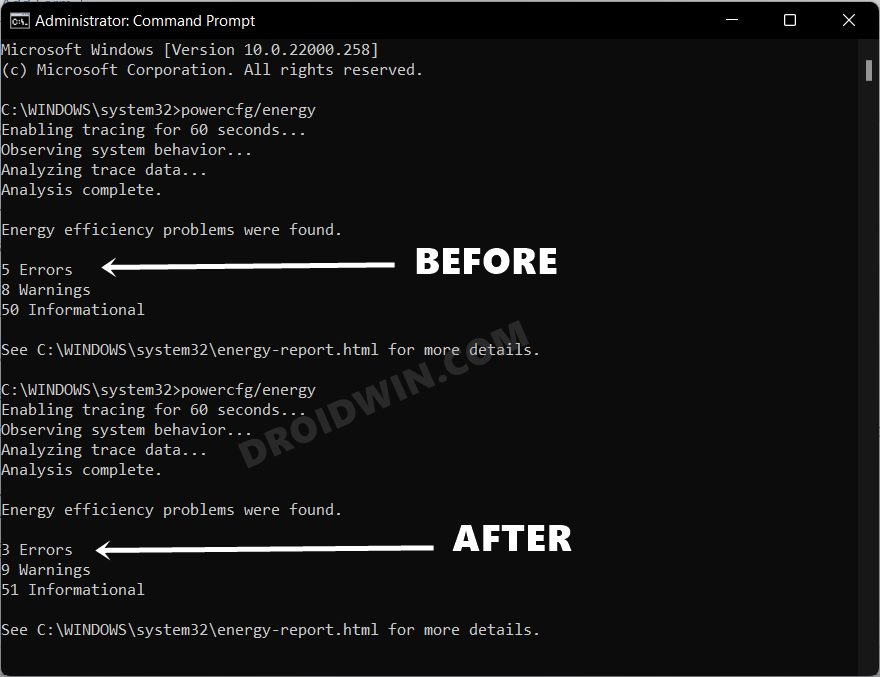
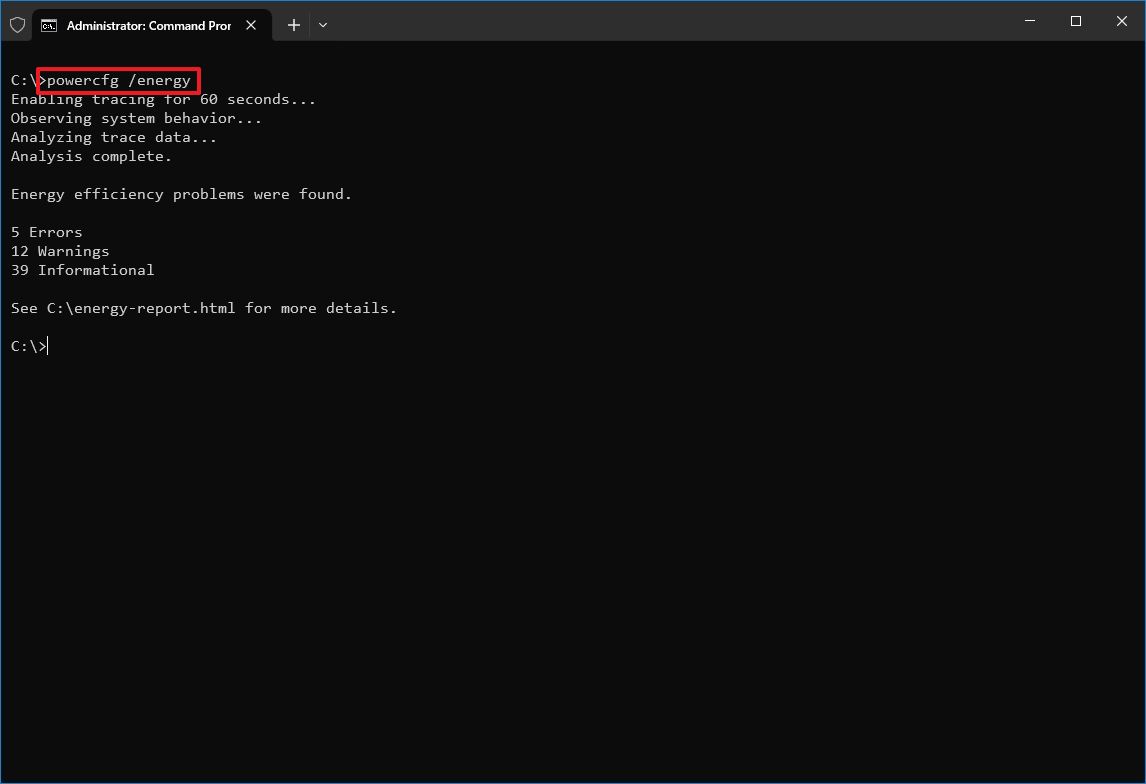
- Launch CMD and re-run the Battery Test via the following command (as explained in the first section above)
powercfg/energy

- The first hint is right in front of us, we did manage to lower down the errors from 5 to 3. Let’s check it inside the battery report as well.
- So copy-paste the below location in the address bar and it shall open the newly generated battery report
C:\WINDOWS\system32\energy-report.html

- You could now verify from the reports as well that the “Power Policy:Dim timeout is disabled” error has been rectified as well.
So with this, we round off the guide on how you could check your Windows 11 PC’s battery health, generate its report, and fix the “Power Policy:Dim timeout is disabled” error. Along the same lines, you could rectify other battery-related issues listed in the report from the Power Options dialog box. And if you have any queries regarding the same, do let us know in the comments section below.
- Snipping Tool Not Working in Windows 11: How to Fix
- How to Turn off/Disable Windows 11 Defender
- Install Google Play Store in Windows 11 via Windows Subsystem for Android
- How to Manually Download a Particular/Specific Windows 11 Update
(Image credit: Mauro Huculak)
Although Windows 10 generally does a good job of managing your device energy, you might still encounter issues like rapid battery drain or inefficient energy usage. In such cases, generating a detailed energy report can be incredibly useful.
The operating system includes a built-in diagnostic tool called powercfg, which you can run from Command Prompt. This tool collects data over a specific period to analyze power behavior, highlighting common problems that may affect battery life or overall energy efficiency. After generating the report, you can review the insights to make informed changes (whether that means adjusting system settings, upgrading hardware, or replacing a worn-out battery, if possible).
In this how-to guide, I’ll outline the steps to create an energy report on Windows 10 to diagnose your device’s power efficiency and battery life.
Recent updates
These instructions has been updated to ensure accuracy and reflect changes to the process in the operating system.
How to create energy report using Command Prompt
To generate an energy report on Windows 10, use these steps:
- Open Start.
- Search for Command Prompt, right-click the top result, and select the Run as administrator option.
- Type the following command to create an energy report and press Enter: powercfg /energy
- (Optional) Type the following command to generate an energy report with a specific duration and press Enter: powercfg /energy /duration SECONDS
In the command, replace «SECONDS» with the time you want the tool to monitor the power behavior to create a report. If you do not use the «duration» option, the command will run for 60 seconds. For example, this command runs the energy monitor for two minutes: powercfg /energy /duration 120
- Confirm the output to determine the location of the report.
Once you complete the steps, you can review the report to understand the energy and battery efficiency and investigate and resolve power problems on Windows 10.
For the best results, it is always recommended to use the command when no application is running and the device is in idle mode when generating an energy report.
All the latest news, reviews, and guides for Windows and Xbox diehards.
How to review energy report on Windows 10
To view the energy report, use these steps:
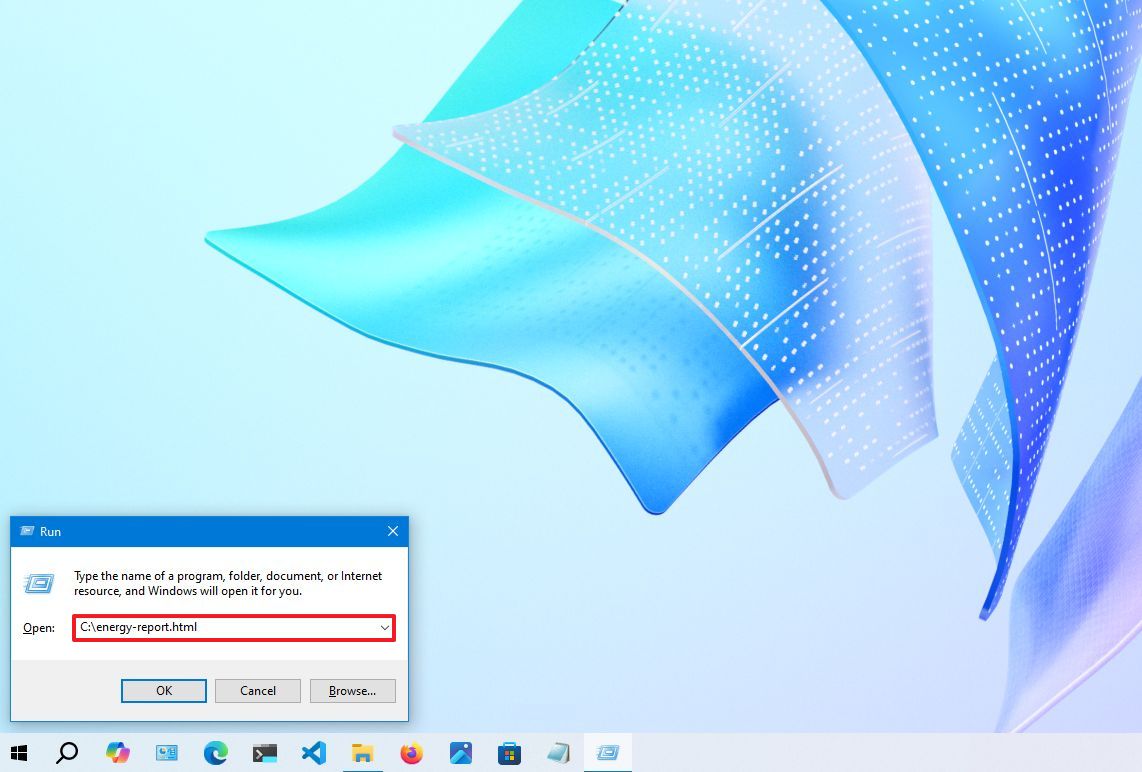
- Open Start.
- Search for Run and click the top result to open the Run command.
- Quick tip: You can also use the «Windows key + Run» keyboard shortcut to open the «Run» command. You can also right-click the «Start» button and select the «Run» option to open the app.
- Type the following path and press Enter: C:\energy-report.html
- Quick note: The location of the files may be different on your installation. As a result, ensure to note this information in the powercfg command result.
- Review the energy report in the web browser.
After you complete the step, the report will open with the default web browser configured on Windows 10.
The power efficiency report can be very long, but it is not too difficult to understand. The report includes a first part with the scan information, version of Windows 10, and related details.
The second part contains the analysis results, which are grouped into three categories: errors, warnings, and information.
The «Errors» section includes the items that are considered problems with your device. Usually, these are configuration issues rather than hardware problems.
For example, in this test, the report points out the «Power Policy: Sleep timeout is disabled (On Battery)» error, which simply means that the device is not configured to sleep automatically after a period of inactivity while on battery.
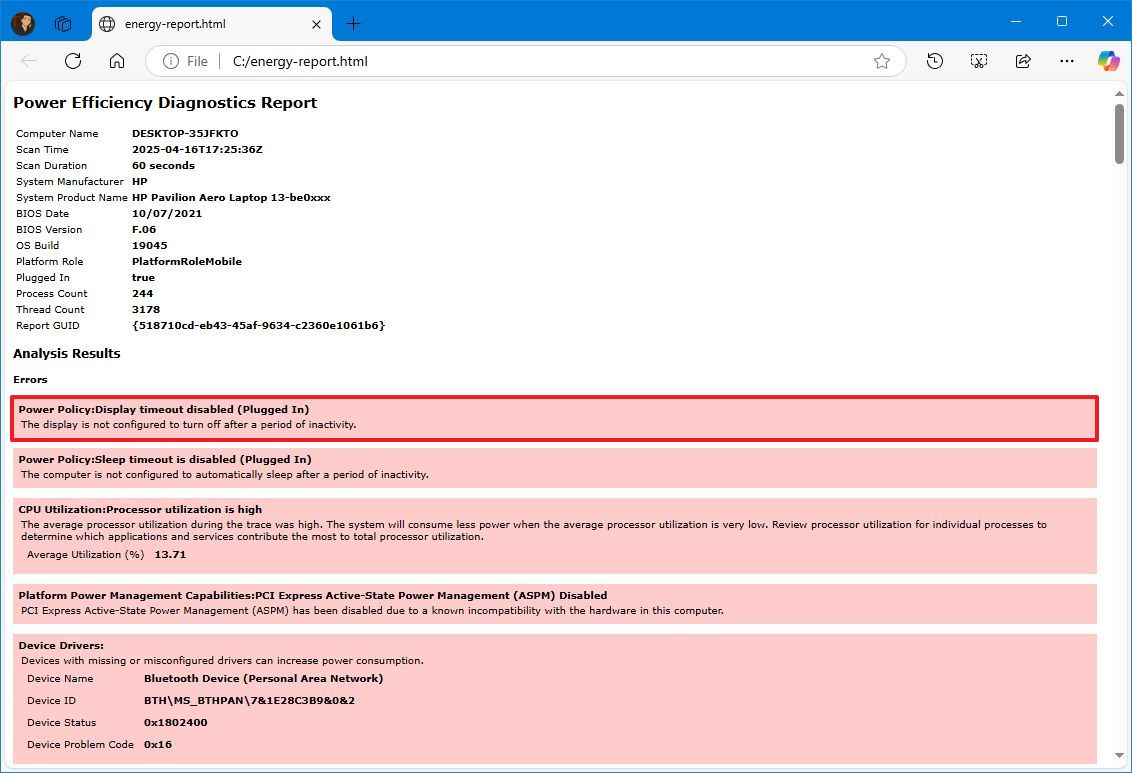
If this were a problem on your laptop, to resolve the issue and improve battery life, you would need to change the sleep settings to sleep automatically after a certain period on Settings > System > Power & Sleep.
The «Warnings» section reveals features and components that are not using the recommended settings or services that are responsible for consuming a lot of power during the trace.
For instance, the report points out the «Power Policy: Display timeout is long (On Battery)» warning, which indicates that the display turns off after five minutes when the recommended settings should be less than five.
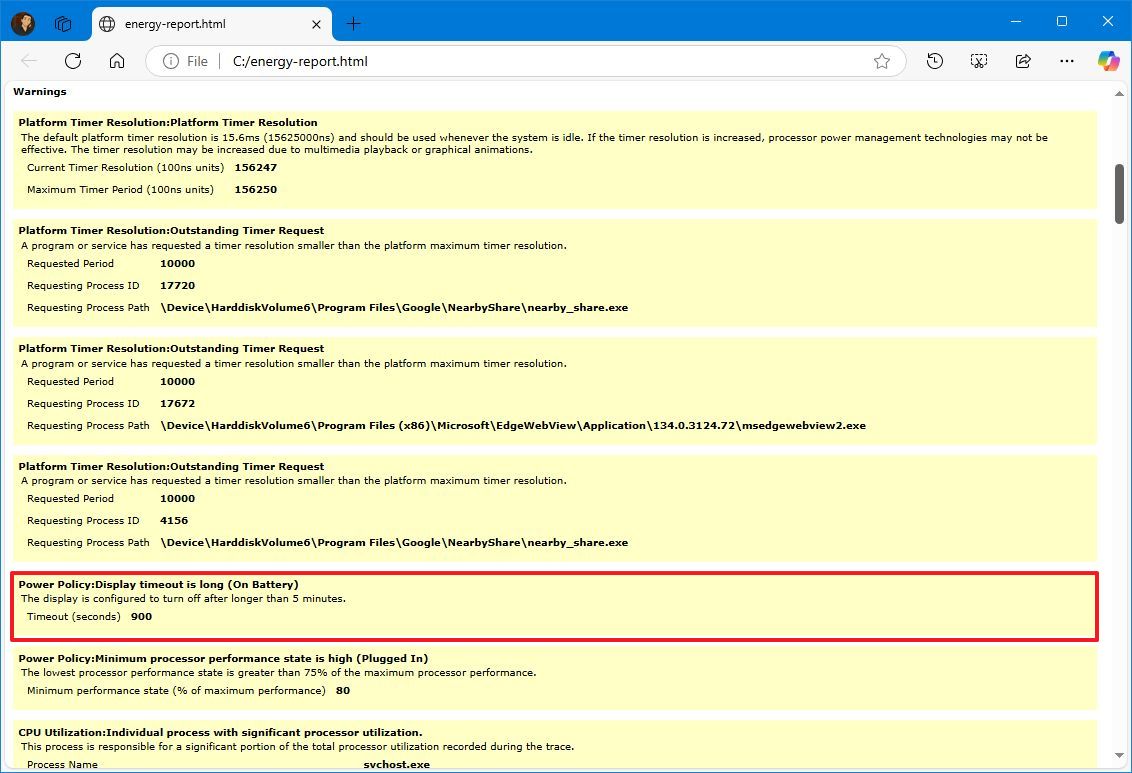
If this were an issue in your machine, you would fix it by changing the display sleep configuration on Settings > System > Power & Sleep.
The «Information» section displays important energy-related information about the system, including the currently configured power policies, battery information like brand, model, and capacity, the supported sleep features, and more.
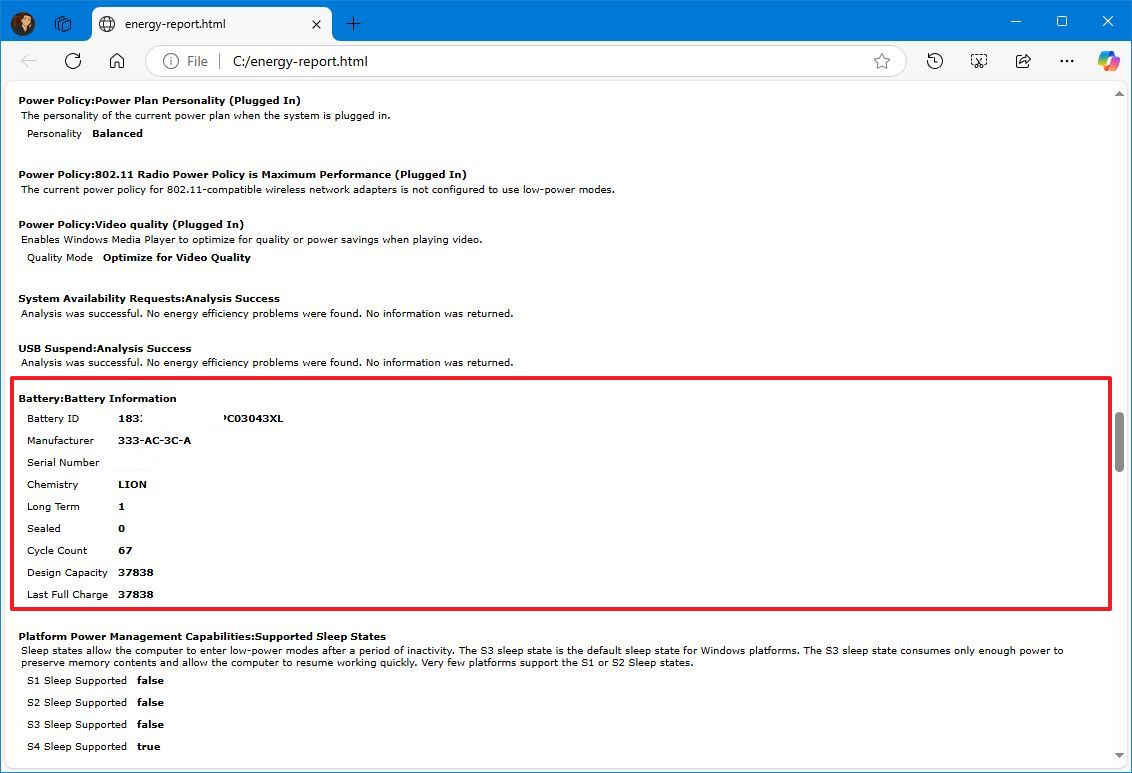
Perhaps the most significant piece of information is battery design capacity and the last full charge. For example, this test shows that the design capacity is 37838 MWh, but after many cycles, the capacity after the last charge is 37838 MWh. This means that the device can still hold around 100 percent of the charge. However, if the percentage was significantly lower and you were having a battery drain problem, this could indicate that the battery needs to be replaced.
If you need additional help, you can also send the report to tech support or a savvy friend to help you diagnose and tweak the power settings to optimize your desktop computer or laptop’s energy efficiency.
More resources
Find in-depth guides, troubleshooting tips, and the latest updates on Windows 11 and 10 here:
- Windows 11 on Windows Central — All you need to know
- Windows 10 on Windows Central — All you need to know
Mauro Huculak has been a Windows How-To Expert contributor for WindowsCentral.com for nearly a decade and has over 15 years of experience writing comprehensive guides. He also has an IT background and has achieved different professional certifications from Microsoft, Cisco, VMware, and CompTIA. He has been recognized as a Microsoft MVP for many years.