
Эта инструкция для тех, кто пользуется 64-битной версией Windows.
Воспользуйтесь ею, чтобы подключить плагины к графическому редактору Adobe Photoshop:
- Установка плагинов в Photoshop 64 bit на Windows 64 bit
Скопируйте файл, заканчивающийся на _64.8bf, из папки AKVIS в папку плагинов редактора Adobe Photoshop 64 bit.
Например, для установки плагина AKVIS Sketch скопируйте файл Sketch_64.8bf из папки C:\Program Files\AKVIS\Sketch
в папку Plug-ins графического редактора:- Photoshop CC 2024, CC 2023, CC 2022, CC 2021, CC 2020, CC 2019, CC 2018, CC 2017, CC 2015.5:
C:\Program Files\Common Files\Adobe\Plug-Ins\CC - Photoshop CC 2015:
C:\Program Files\Adobe\Adobe Photoshop CC 2015\Plug-ins - Photoshop CC 2014:
C:\Program Files\Adobe\Adobe Photoshop CC 2014\Plug-ins - Photoshop CS6:
C:\Program Files\Adobe\Adobe Photoshop CS6 (64 Bit)\Plug-ins
Перезапустите Photoshop и проверьте работоспособность плагина.

- Photoshop CC 2024, CC 2023, CC 2022, CC 2021, CC 2020, CC 2019, CC 2018, CC 2017, CC 2015.5:
- Установка плагинов в Photoshop 32 bit на Windows 64 Bit
Скопируйте файл *.8bf из папки AKVIS в папку плагинов редактора Photoshop.
Например, Sketch.8bf в папку Plug-ins редактора:
- Photoshop CC 2018, CC 2017, CC 2015.5:
C:\Program Files (x86)\Common Files\Adobe\Plug-Ins\CC - Photoshop CC 2015:
C:\Program Files (x86)\Adobe\Adobe Photoshop CC 2015 (32 Bit)\Plug-ins - Photoshop CC 2014:
C:\Program Files (x86)\Adobe\Adobe Photoshop CC 2014 (32 Bit)\Plug-ins - Photoshop CS6:
C:\Program Files (x86)\Adobe\Adobe Photoshop CS6\Plug-ins
Перезапустите Photoshop и проверьте работоспособность плагина.
- Photoshop CC 2018, CC 2017, CC 2015.5:


Внимание!
Иногда, если была выбрана дополнительная папка плагинов в Настройках редактора Photoshop (Edit -> Preference -> Plug-Ins) на обычной системе Windows (32 bit), может возникнуть сообщение об ошибке, что Photoshop не может распознать данный тип файла.
Скорее всего, это происходит потому, что в папке, выбранной в настройках Photoshop (например, C:\Program Files\AKVIS\Sketch), содержится 64-битный файл. Возможно, этот файл установился вместе с обычной версией плагина. Обычный 32-битный Photoshop пытается загрузить 64-битный файл и терпит неудачу.
Ничего страшного, но такие сообщения об ошибках могут ужасно раздражать. Решение простое: удалите 64-битный файл из этой папки или перенесите его куда-нибудь.
Download Article
Download plugins from the Creative Cloud app or install them manually
Download Article
- Installing Plugins Manually
- Using the Creative Cloud App
- Video
- Tips
|
|
|
Do you want to install plugins for Adobe Photoshop? Plugins are separate files that interact with Adobe Photoshop to increase its functionality and introduce new features. In Adobe Photoshop, plugins range from filters and patterns, to brush and pen styles. You can purchase and download plugins from the Creative Cloud desktop app or download them from other sources. Some plugins need to be installed manually, but doing so is not hard. This wikiHow article teaches you how to install plugins for Adobe Photoshop.
Things You Should Know
- Find plugins in the Creative Cloud app by clicking «Stock & Marketplace» > «Plugins». Click «Get» next to the plugin you want to install.
- Unzip downloaded plugins and copy the folder to «C:\Program Files\Adobe\Adobe Photoshop <year>\Plug-ins» on Windows.
- Unzip downloaded plugins and copy the folder to «~/Applications/Adobe Photoshop <year>/Plugins» on a Mac.
-

Most plugins are available through the Adobe Creative Cloud Marketplace, but you can often find unofficial plugins on third-party sites. Some are even free.
- Check out Adobe’s list of third-party plugins here: https://helpx.adobe.com/photoshop/kb/plugins.html
- If you’re looking for free Photoshop plugins, check these out:
- On1 Creative Assets: https://www.on1.com/free/creative-assets
- The Orange Box: https://www.the-orange-box.com/photoshop-add-ons/
- The plugins that are available from the Adobe Marketplace will need to be downloaded and installed through Creative Cloud.
- Some of the more advanced plugins come with their own installer file. To install these plugins, open the installer file once it is downloaded and follow the instructions to complete the installation.
-

Most Photoshop plugins come compressed inside a RAR or ZIP folder for easy transfer. Simply right-click on the downloaded file and extract it anywhere on your computer.
Advertisement
-
Copy the entire folder that contains the plugin files. Do this by right-clicking on the folder and selecting “Copy” from the context menu.
-

You can typically find the plugins folder at one of the following locations depending on if you are using a Windows PC or Mac:
- Windows: C:\Program Files\Adobe\Adobe Photoshop <year>\Plug-ins
- Mac: ~/Applications/Adobe Photoshop <year>/Plugins
-

Right-click an empty area in the “Plugins” folder and select Paste. This will install the plugin.
-
Do this by clicking its shortcut icon on the desktop or by opening it from the list of applications installed on your computer. You can also launch Photoshop from within the Adobe Creative Cloud app.
- If Photoshop is open while you copied and pasted the downloaded plugins into the Plugins folder, you will need to close the program and restart it.
-
Select the tools required to use the plugins you installed.
- For example, if you installed brush style plugins, use the Brush tool to test the styles you’ve installed.


Advertisement
-

It has a rainbow-colored icon with the Creative Cloud logo in the middle. Click the Creative Cloud logo in the Windows Start menu or in the Applications folder on Mac.
- If you haven’t already done so, download Creative Cloud from https://creativecloud.adobe.com/apps/download/creative-cloud.
- You can use the Creative Cloud app to download and install Photoshop, if you haven’t already done so. If you do not have a subscription to Adobe Photoshop, you can sign up for a free trial.
-
It’s the last tab in the menu bar at the top of the Creative Cloud app.
-
It’s the third-from-the-last tab in the secondary menu bar at the top of the Creative Cloud app.
- Alternatively, you can open this page from within Photoshop. To do so, click Plugins in the menu bar at the top of Photoshop. Then click Browse Plugins in the drop-down menu.
-

If you know the name of the plugin you want to install, you can enter it in the search bar at the top and press Enter. Otherwise, you can browse plugins on the Plugins page.
- To browse Photoshop plugins, click All Plugins in the menu bar to the left. Then click the checkbox next to «Photoshop.»
-

Depending on the plugin you want to install, you will either need to click Get to install the plugin or Learn More to go to the plugin’s information page.
- Some plugins are free, while others require purchase. To buy a plugin, click Buy.
-
The plugin will now install in Adobe Photoshop.
- If you install plugins using a personal Adobe account, you can use the plugins with a business account as well. However, if you install plugins using a business account, you will need to install them separately using a personal account in order to use them with a personal account.[1]
- If you install plugins using a personal Adobe account, you can use the plugins with a business account as well. However, if you install plugins using a business account, you will need to install them separately using a personal account in order to use them with a personal account.[1]


Advertisement
Ask a Question
200 characters left
Include your email address to get a message when this question is answered.
Submit
Advertisement
Video
-
Plugins are created both by Adobe and by other users. You can download either one, but make sure that you’re downloading from a reliable source or website to avoid malware infection.
-
Some plugins, especially patterns, may have copyrights. Contact its developer if you’re planning to use these plug-ins commercially.
-
You can also buy and download fonts and stock photos from the Adobe Stock & Marketplace on the Creative Cloud app.
Thanks for submitting a tip for review!
Advertisement
About This Article
Thanks to all authors for creating a page that has been read 195,985 times.
Is this article up to date?
To install Motion Bro and other any extensions for Adobe, you can use one of the methods described below:
- ZXP Installer
- Manual installation
After installing the extension, restart After Effects and, in top menu, go to: Windows > Extensions > Motion Bro.
All steps are the same both for Windows and for Mac.
1. ZXP Installer
1 Go to site aescripts.com
2 Download an installer that corresponds to your operating system and installs it.
3 Run ZXP Installer.
4 Download the Motion Bro extension and extract it from ZIP-archive.
5 Drag file Motion Bro.zxp to the installer window and wait for the installation to complete.
2. Manual Installation
1 Download the Motion Bro extension and extract it from ZIP-archive.
2 Rename file extension “Motion Bro.zxp” from ‘ZXP’ to ‘ZIP’.
3 Extract resulting ZIP archive.
4 Move the resulting “Motion Bro” folder into the directory for the extensions corresponding to your operating system:
- If you are a Windows user, paste the folder into Directory: Program Files (x86)\Common Files\Adobe\CEP\extensions.
- If you are a user of MacOS, paste folder into Directory: Library/Application Support/Adobe/CEP/extensions

If there are no folders “CEP” and “Extensions” in the mentioned directories – you can create it manually.
How to uninstall the Motion Bro extension
Delete the Motion Bro folder from the directory with extensions for Adobe:
- If you are a user of Windows: Program Files (x86)\Common Files\Adobe\CEP\extensions
- If you are a user of macOS: Library/Application Support/Adobe/CEP/extensions
Дополнительные материалы находятся здесь
Подключаемые модули представляют собой дополнительные программы, позволяющие расширить возможности головной программы. Дополнительные фильтры хранятся в файлах с расширением *.8bf . Чтобы подключить такой плагин-фильтр к Adobe Photoshop достаточно скопировать файл плагина в каталог …Program Files\Adobe\Adobe Photoshop CS6\Plug-ins. При каждом запуске программа просматривает свой каталог Plug-ins и регистрирует обнаруженные там файлы плагинов. После этого плагины становятся доступны в меню Adobe Photoshop.
1. Ulead Particle Plugin
Этот плагин предназначен для создания различных эффектов в виде мыльных пузырей, дождя и снега, эффектов облаков, сигаретного дыма, огня и звезд. Для каждого выбранного эффекта имеется возможность варьировать количество, размеры, уровень светового отражения и другие параметры. Выбор эффекта и изменения параметров отображаются в реальном времени. При установке программы укажите правильный путь для плагина …Program Files\Adobe\Adobe Photoshop\Plug-ins\Filters. Вызов установленного плагина осуществляется командой Фильтр-Ulead Effects-Particle —
рис.
40.1 и 40.2.
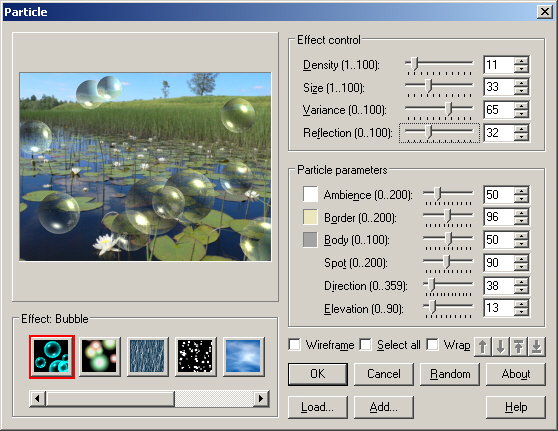
Рис.
40.1.
Фильтр, создающий на изображении мыльные пузыри

Рис.
40.2.
Пример применения фильтра Ulead Particle Plugin
2. Face Control
Face Control плагин позволяет изменить черты лица людей, животных. После установки эта программа вызывается командой Фильтр — Red Field — Face Control (
рис.
40.3).
Как видим, этой программой несложно создавать дружеские шаржи и первоапрельские шутки.
3. Загибание уголка
Установите плагин, запустив файл AV Bros.Setup Tool и перезапустите Adobe Photoshop. Окно фильтра вызывается командой Фильтр — AV Bros — AV Brod Page Curl (
рис.
40.4). С помощью ползунков настройте нужный угол загиба.
Результат работы плагина Av.Bros Page Curl Pro приведен на
рис.
40.5.