
Although Windows 11 can automatically adjust the display scaling settings to ensure that elements (text, icons, navigations, and others) are the right size and readable, it’s not perfect, and sometimes, adjusting the settings manually may be necessary.
For example, if you do not have perfect eyesight, making the elements bigger on the screen could make things easier to see and use, avoiding stressing your eyes. If you connect an external monitor, using a custom scale setting can help increase the size of the text, icons, and menus across the displays. Changing the display scale may also improve content visibility while showing a PowerPoint presentation on a projector.
In this how-to guide, I will explain how to change the scale settings on a desktop monitor or laptop display.
Recent updates
This guide has been updated to reflect changes and make sure the instructions are still accurate.
How to change display scale with recommended settings on Windows 11
To change a Windows 11 display scale size using the recommended settings, use these steps:
- Open Settings.
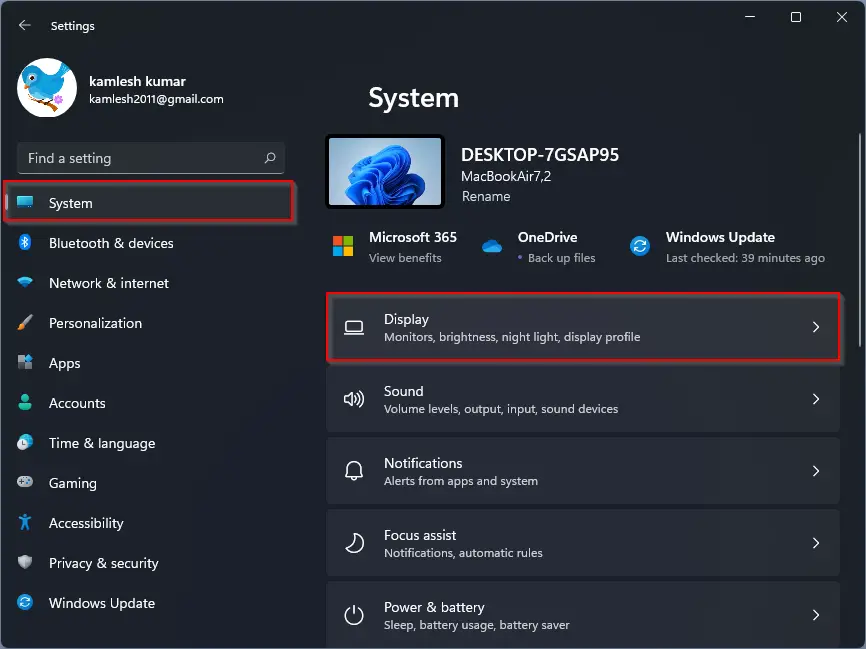
- Click on System.
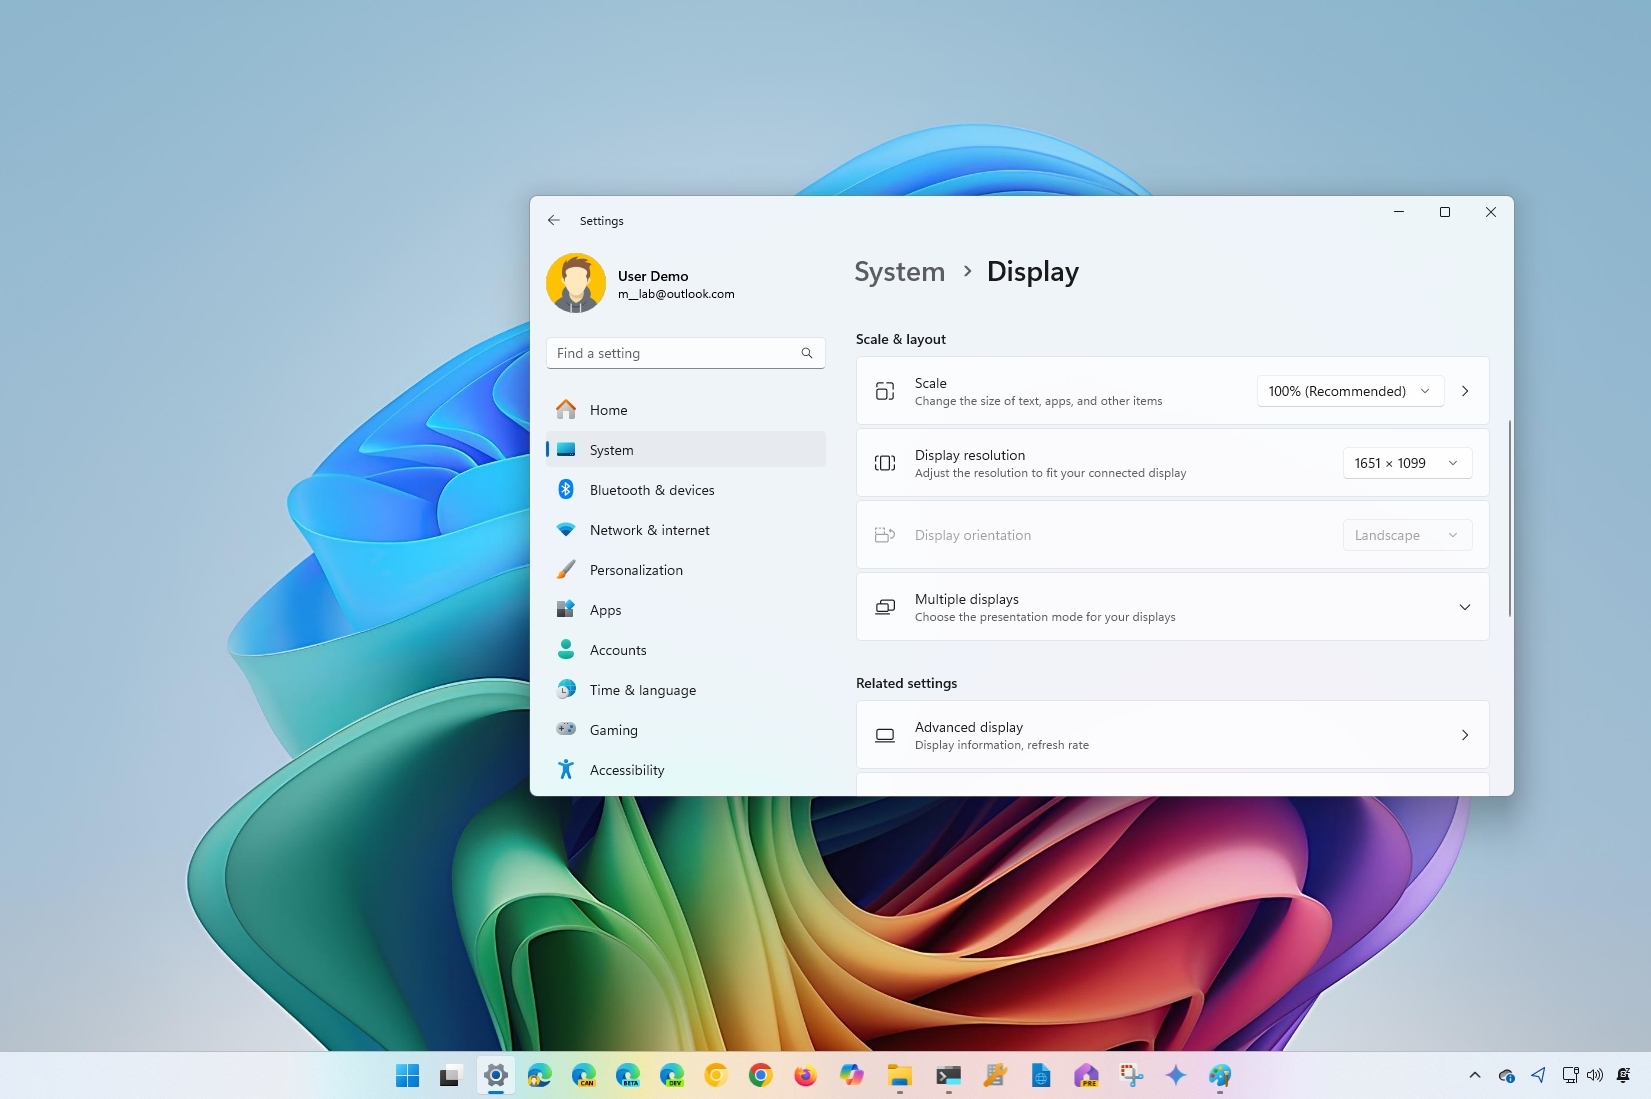
- Click the Display page on the right side.
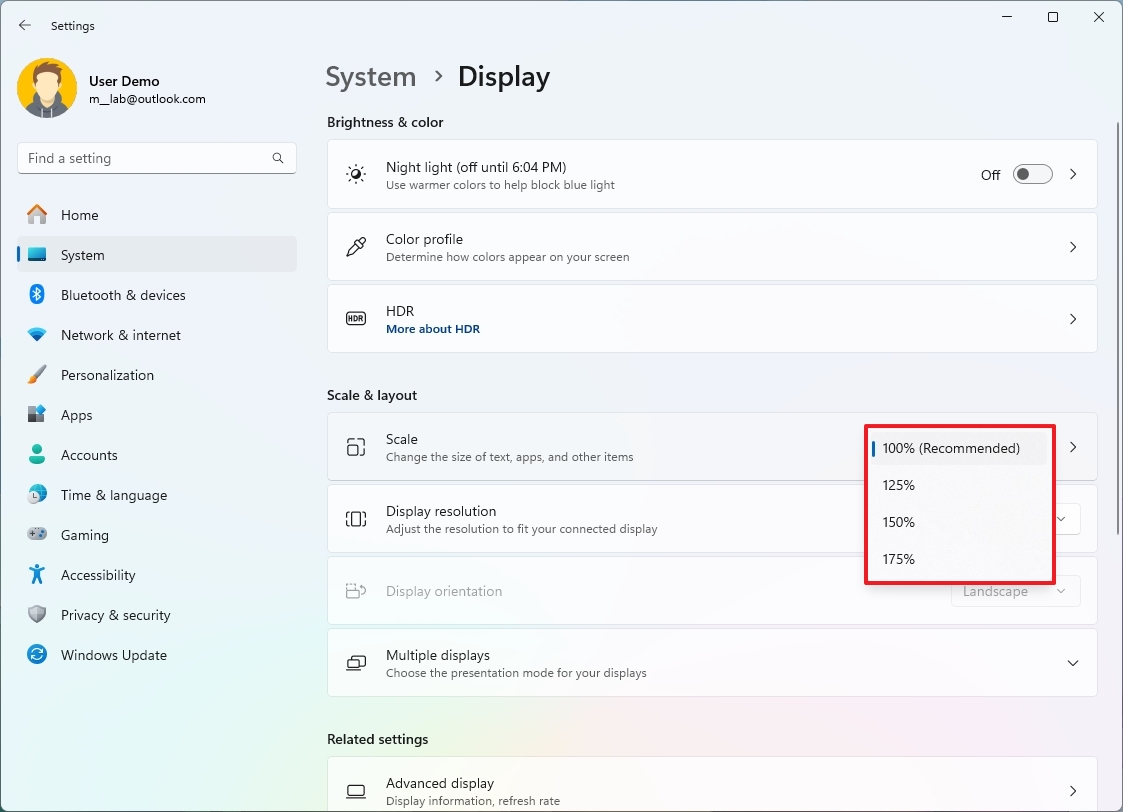
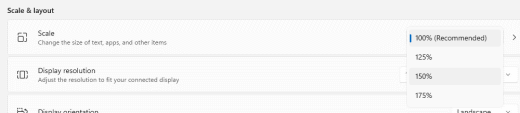
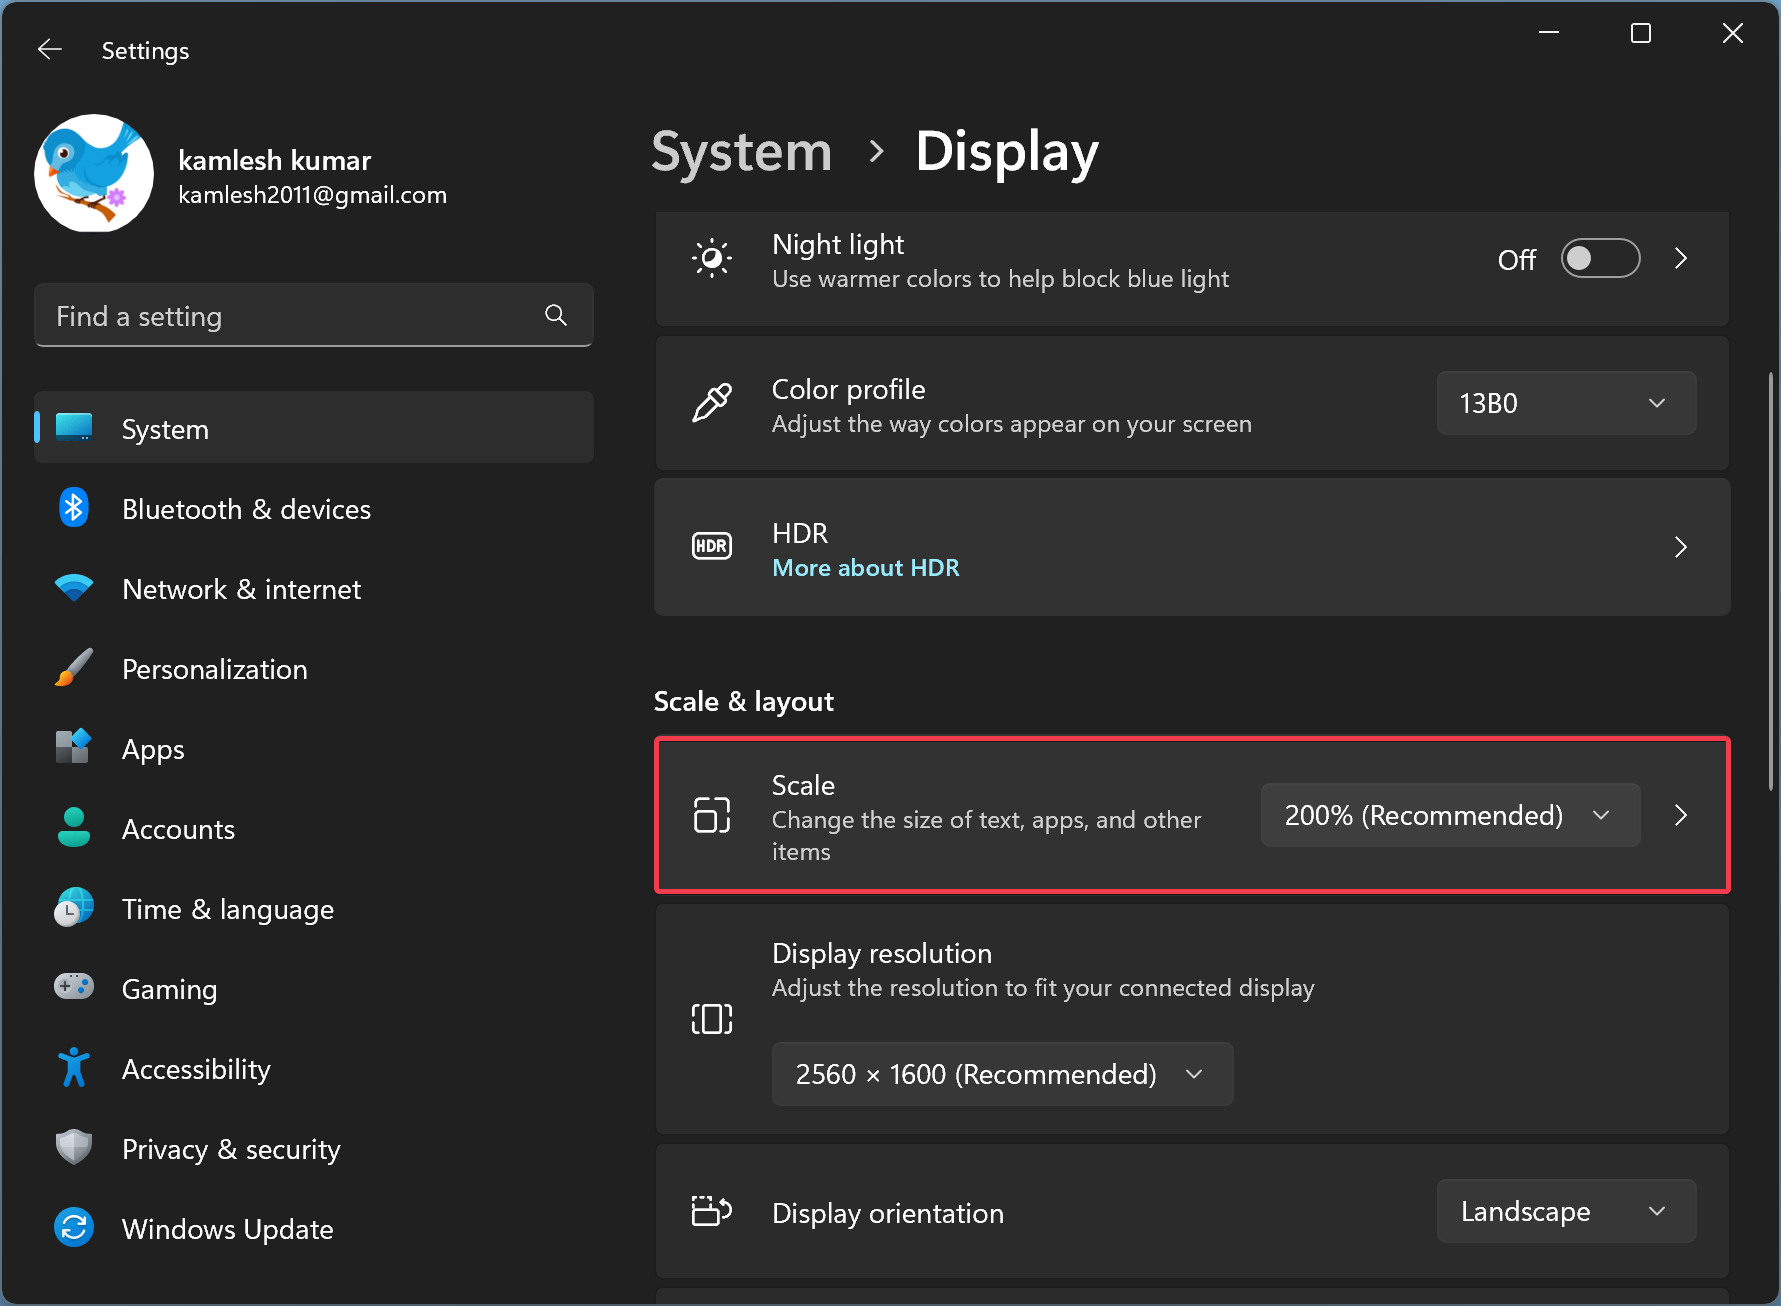
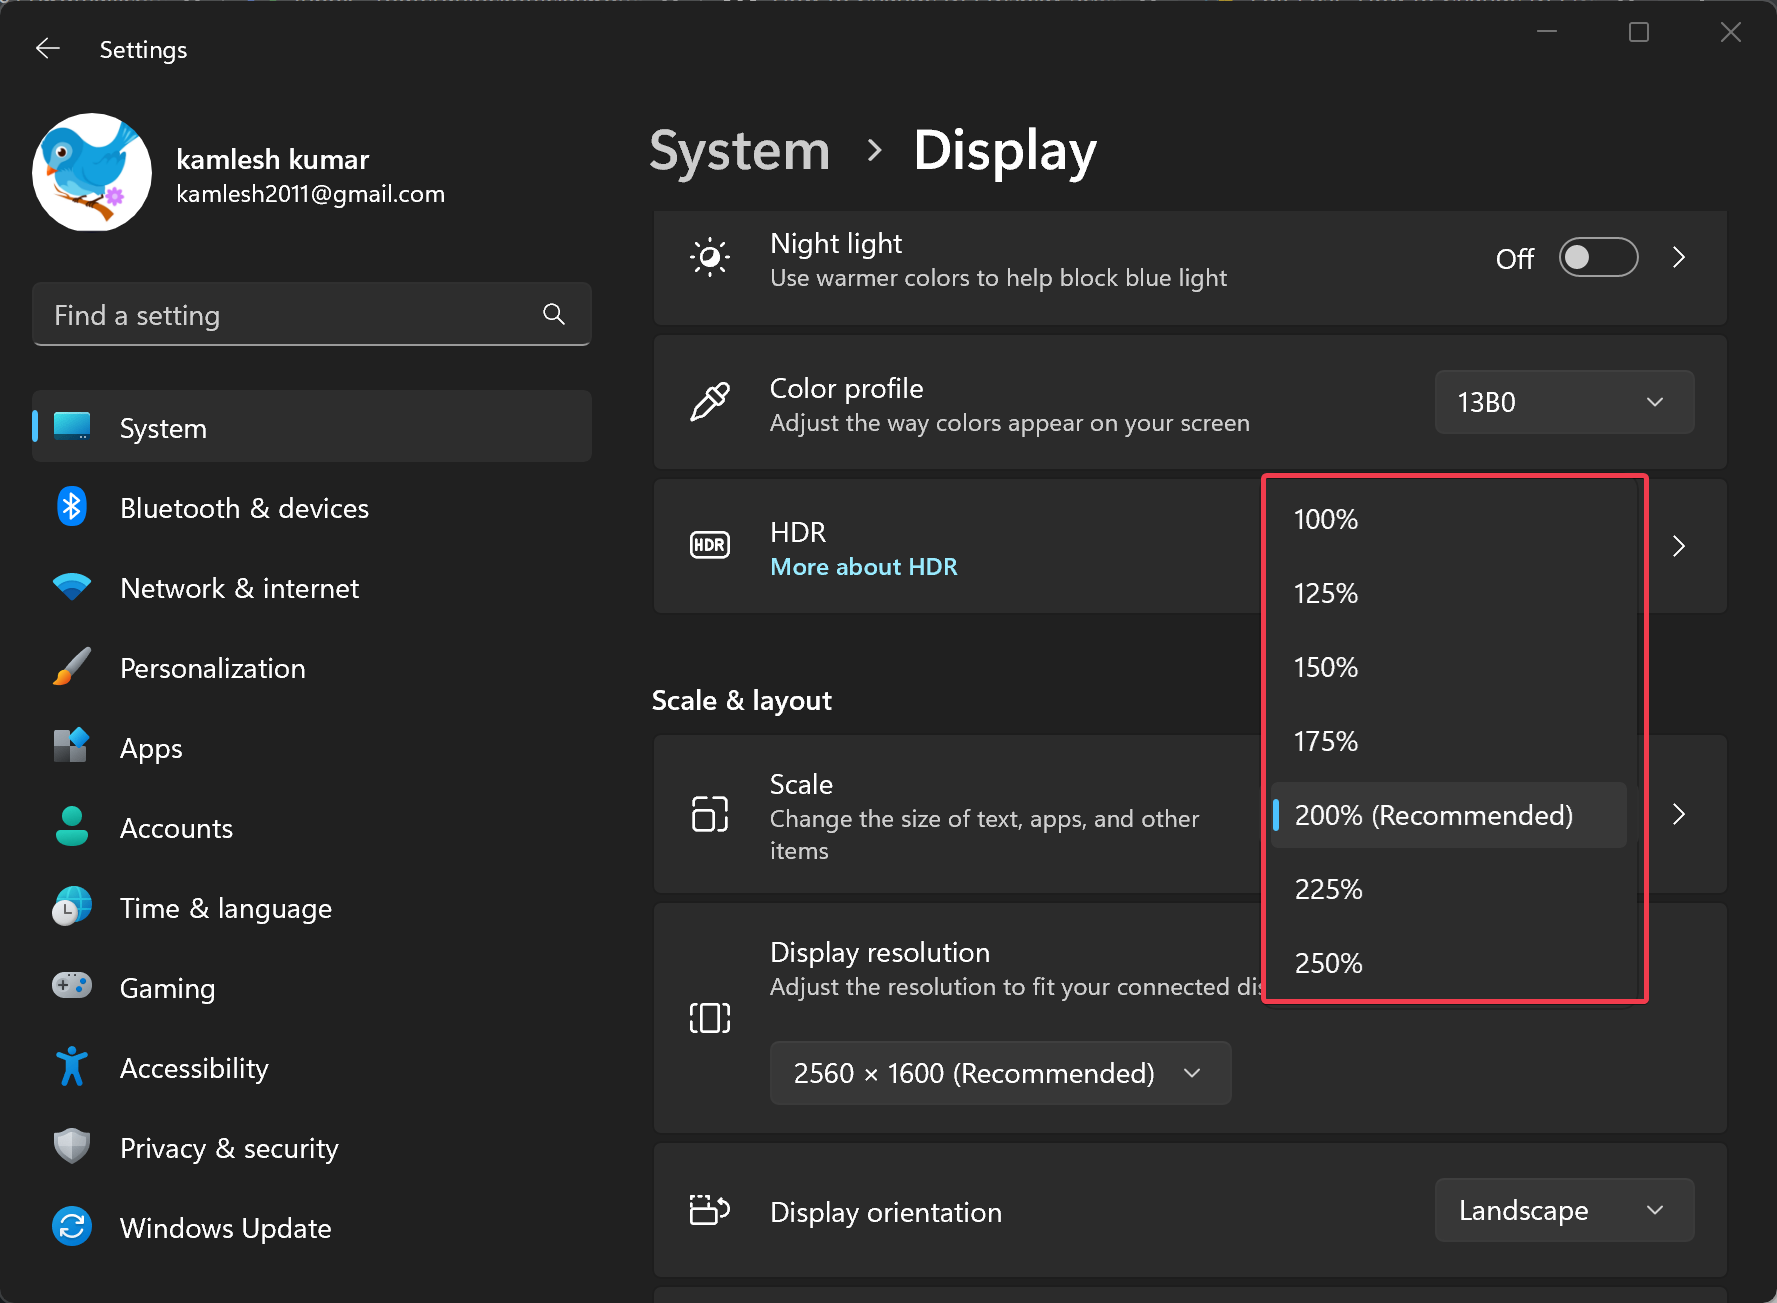
- Under the «Scale & layout» section, use the Scale drop-down menu and select the scale setting — for example, 100%, 125%, 150%, and 175%.
Once you complete the steps, the new scale configuration will apply. Although it’s not required, you may need to restart the computer to make sure the setting applies correctly for all supported applications.
How to change display scale with custom settings on Windows 11
You shouldn’t change the scale settings using custom values because it affects the viewing experience. However, if it’s necessary, and you do it correctly, it may help you hit that sweet spot.
To set a custom scale size of a display, use these steps:
All the latest news, reviews, and guides for Windows and Xbox diehards.
- Open Settings.
- Click on System.
- Click the Display page on the right side.
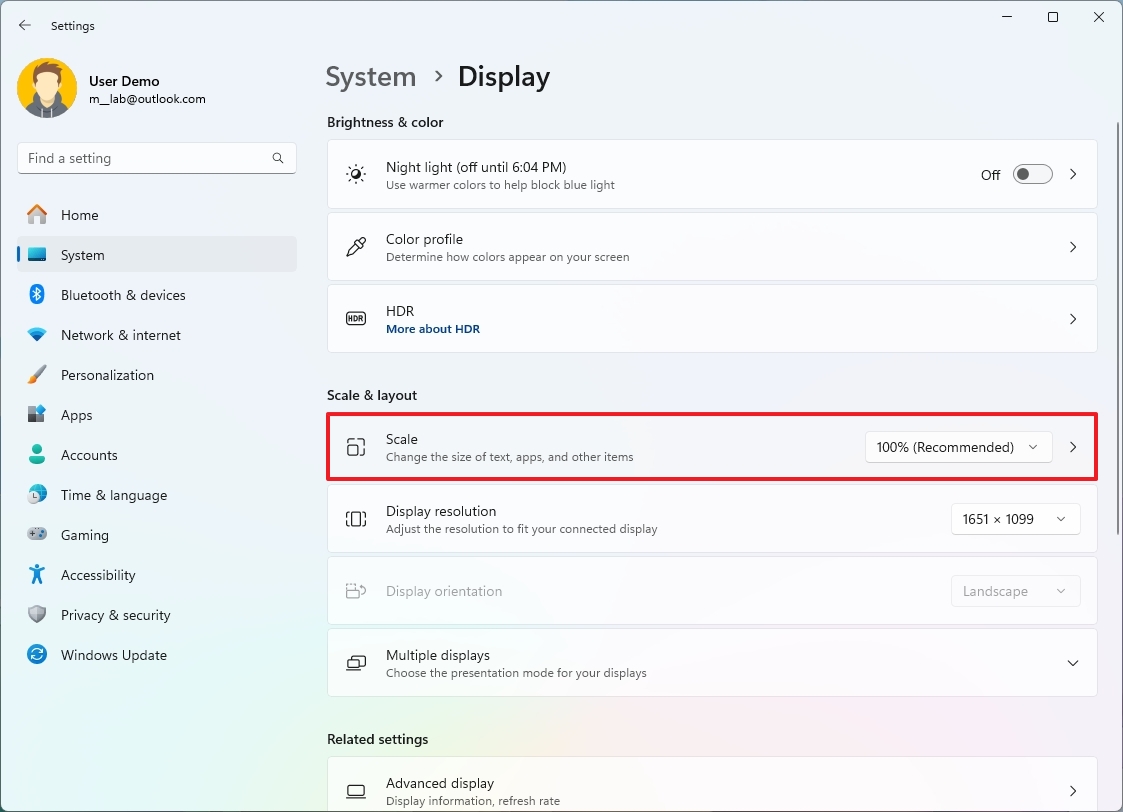
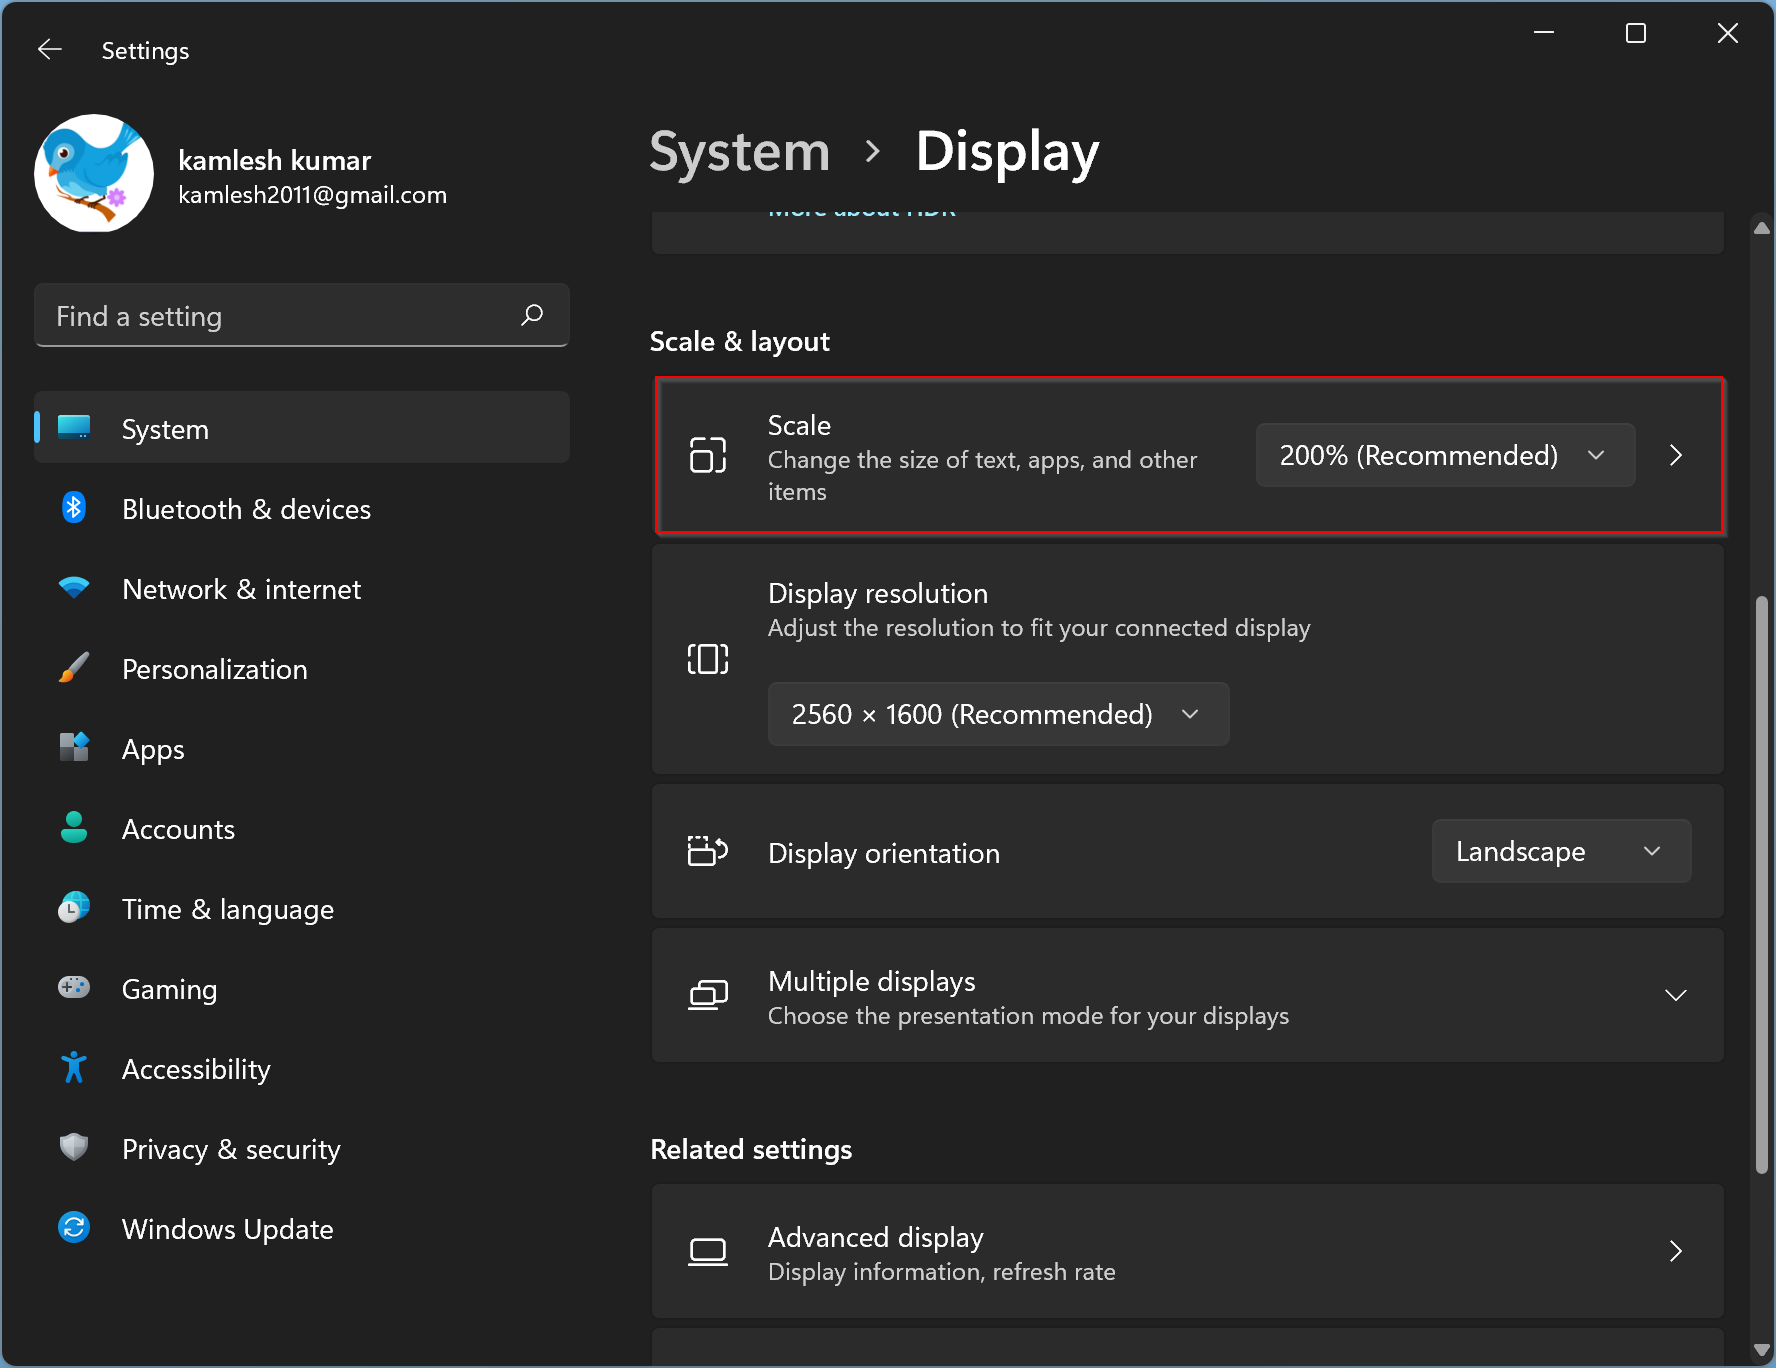
- Select the Scale setting under the «Scale & layout» section.
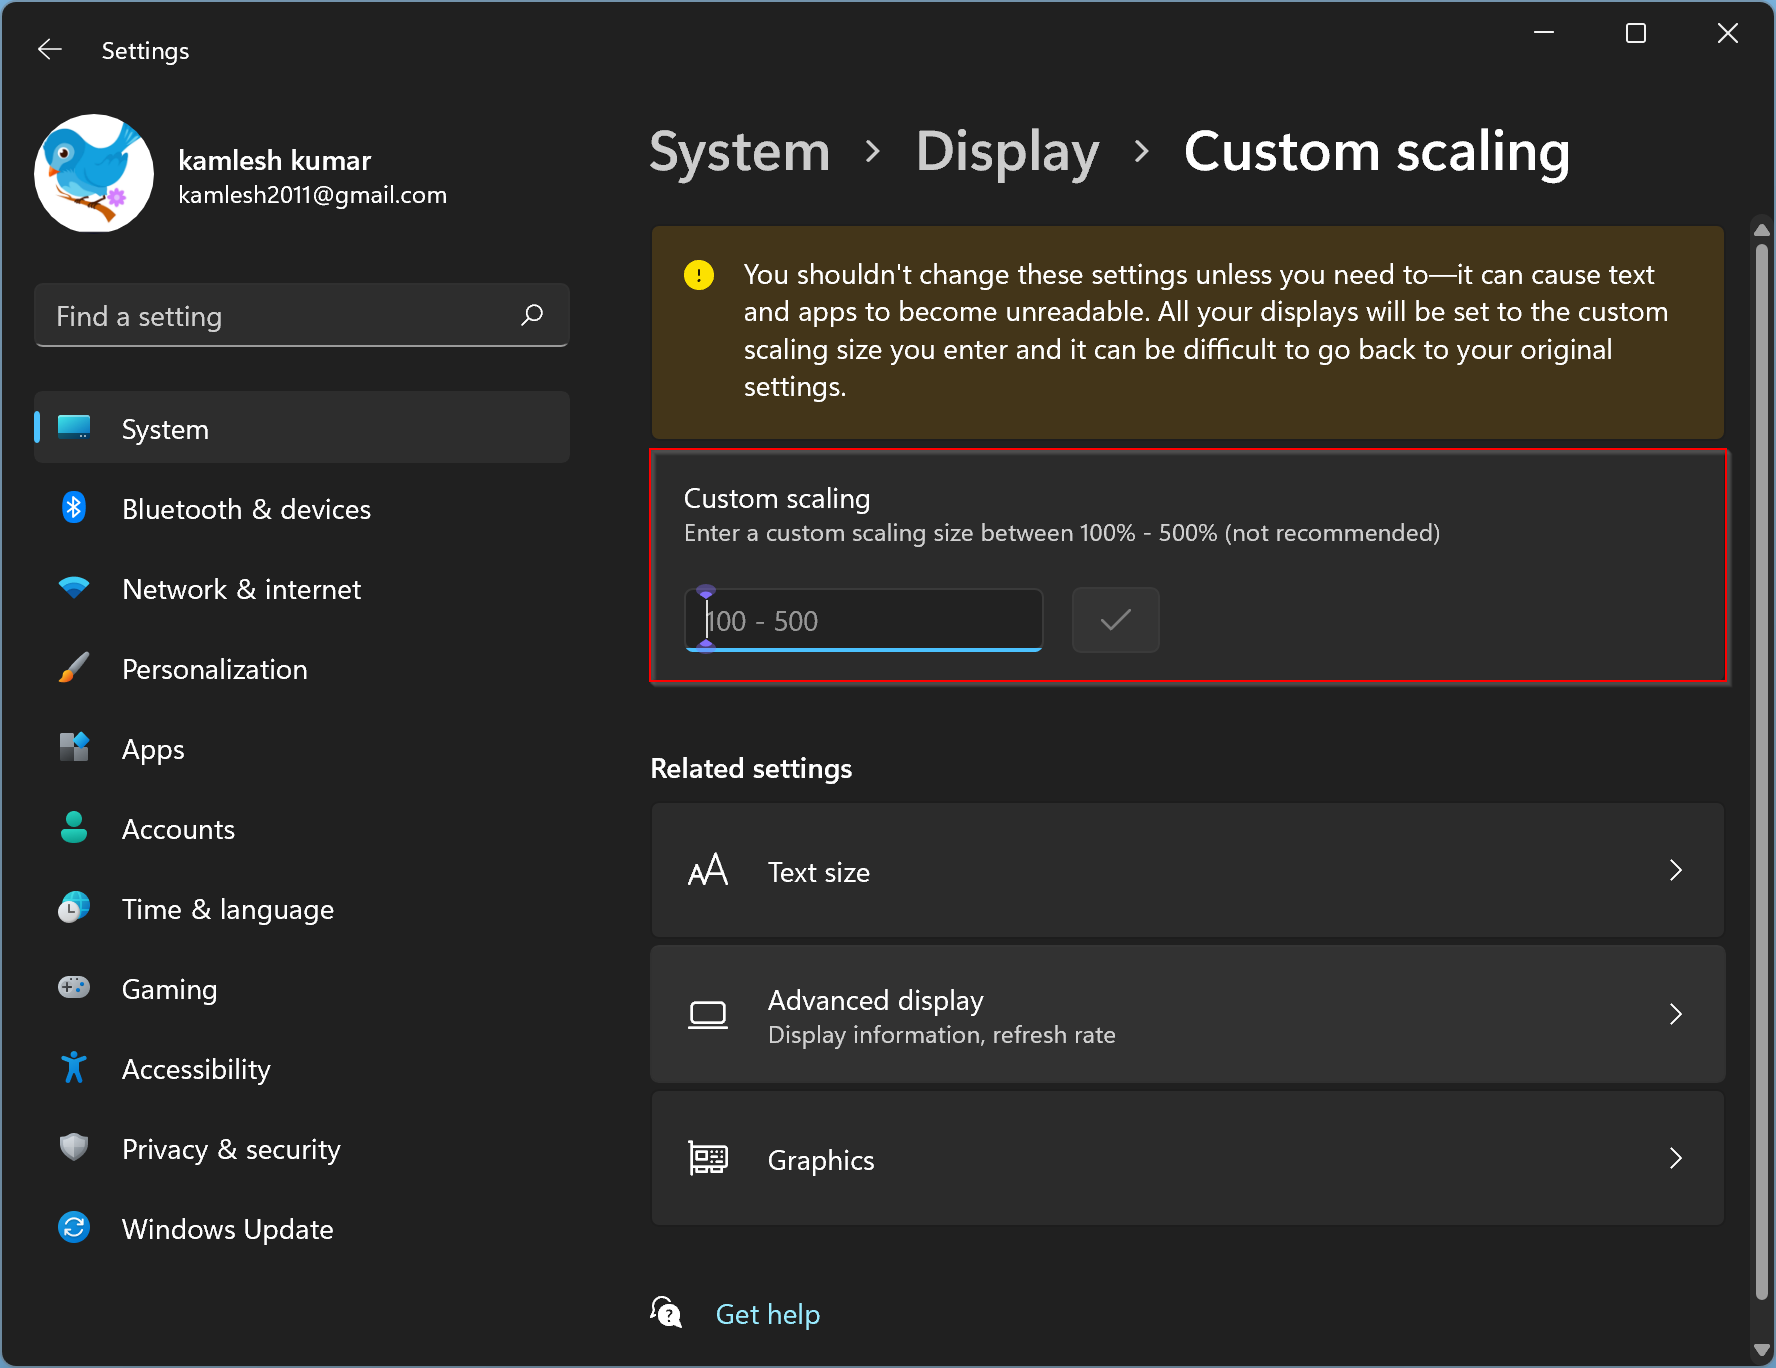
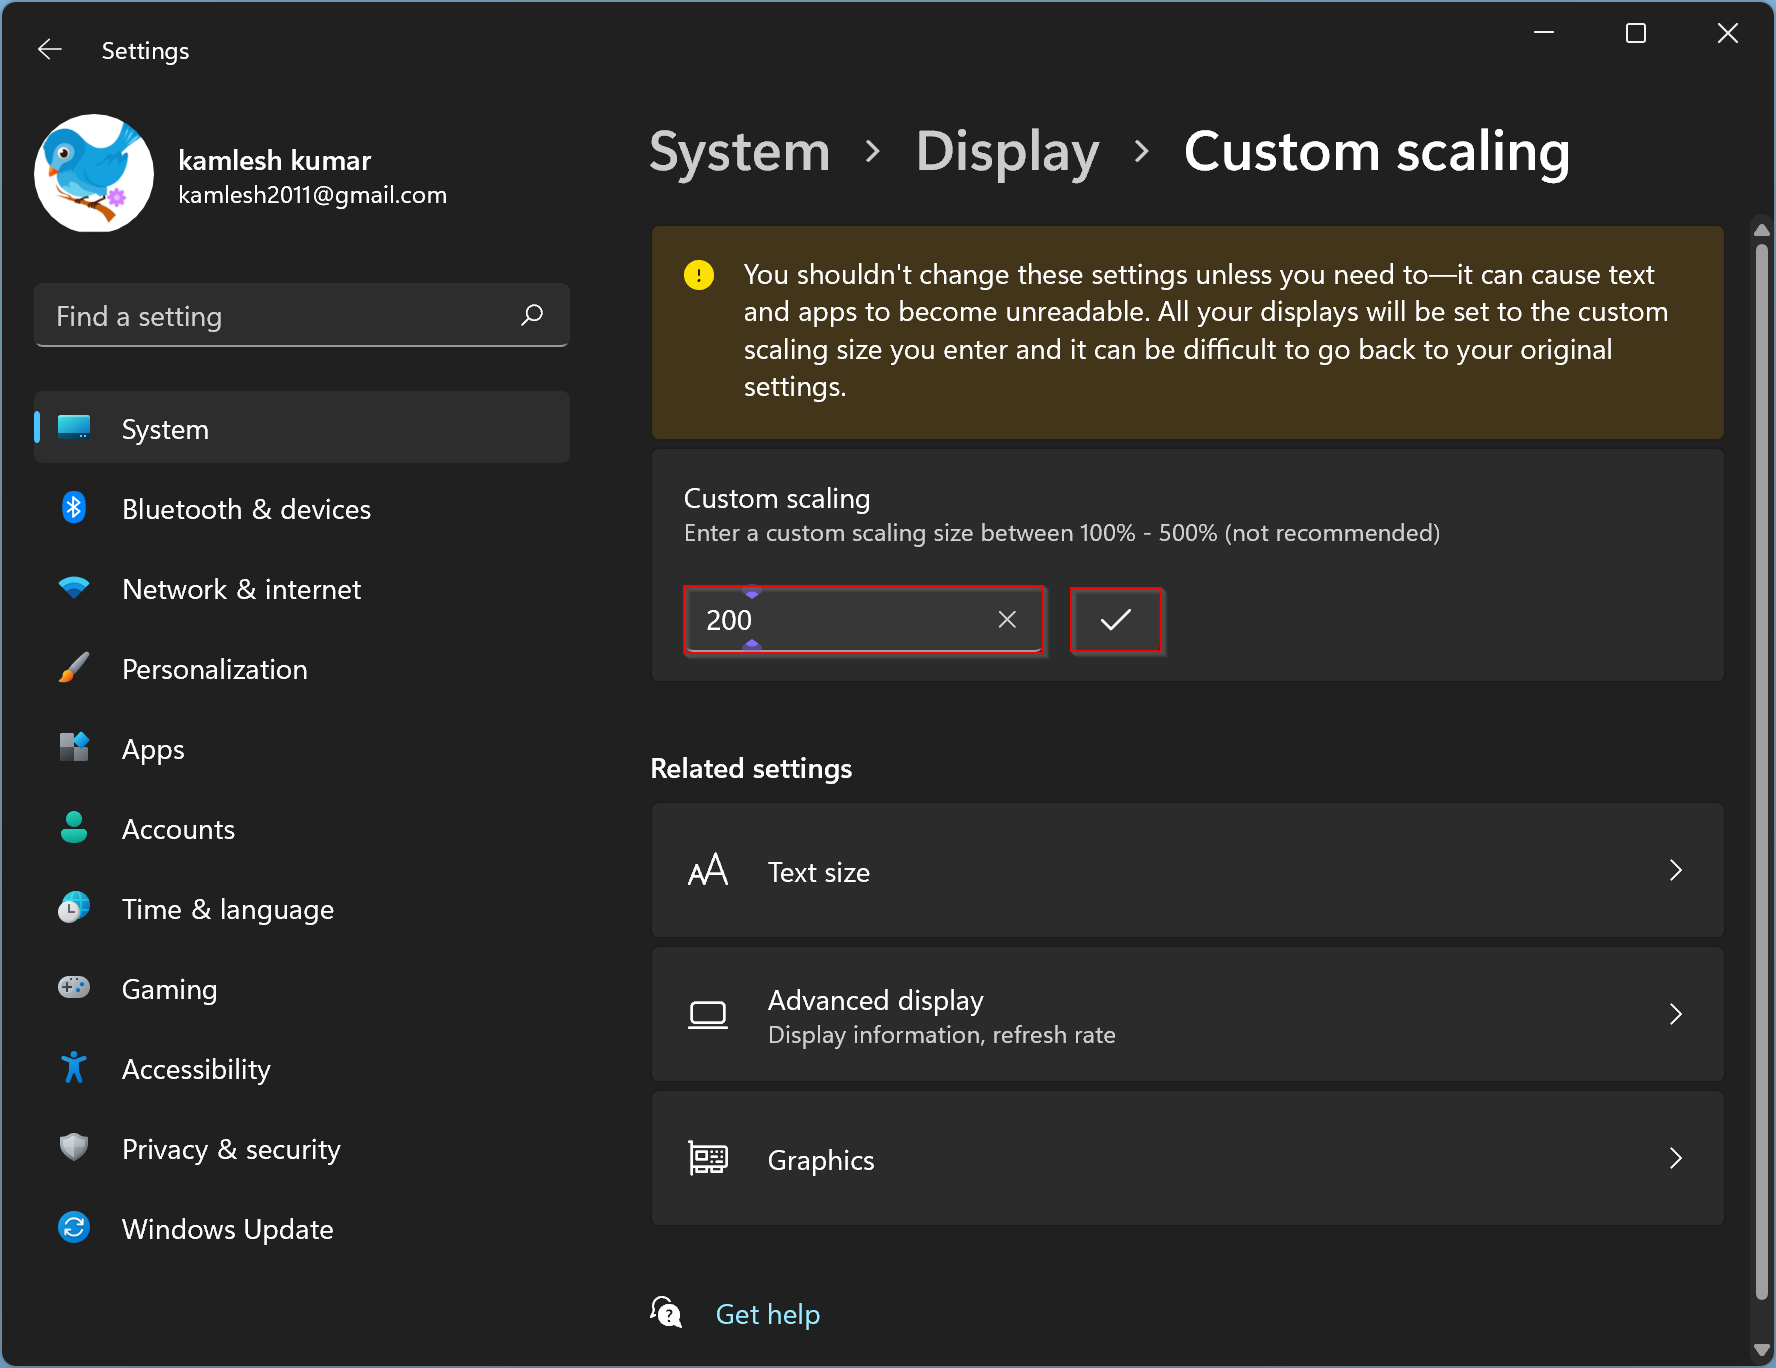
- Configure a custom scaling size between 100% and 500% under the «Custom scaling» section.
- Quick tip: If you want to increase the size of text, apps, and other items, you can try using 110% as the new scale value.
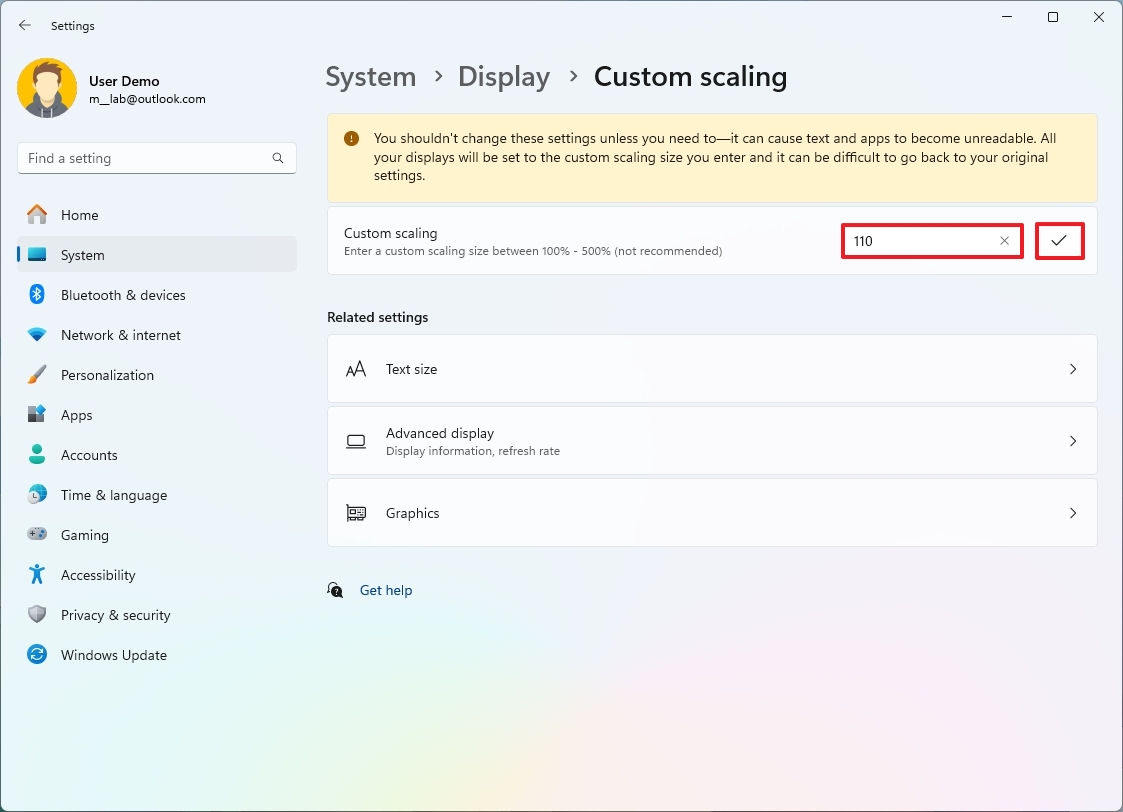
- Click the Check button.
- Click the Sign out now button.
- Sign back into the account.
After you complete the steps, the system will apply the setting you specified.
If the system isn’t scaling elements correctly, repeat the steps to select a different value to increase or decrease the scaling value until you reach the correct configuration.
You can always revert the changes using the same instructions outlined above, but in step 4, click the «Turn off custom scaling and sign out» option.
How to make text bigger without changing scale settings on Windows 11
If you want to make the text more readable, you should not adjust the scale settings. Instead, you should change the text size settings.
To make text bigger across the desktop, use these steps:
- Open Settings.
- Click on Accessibility.
- Click the Text size page on the right side.

- Use the «Text size» slider to make the font size across the desktop bigger.
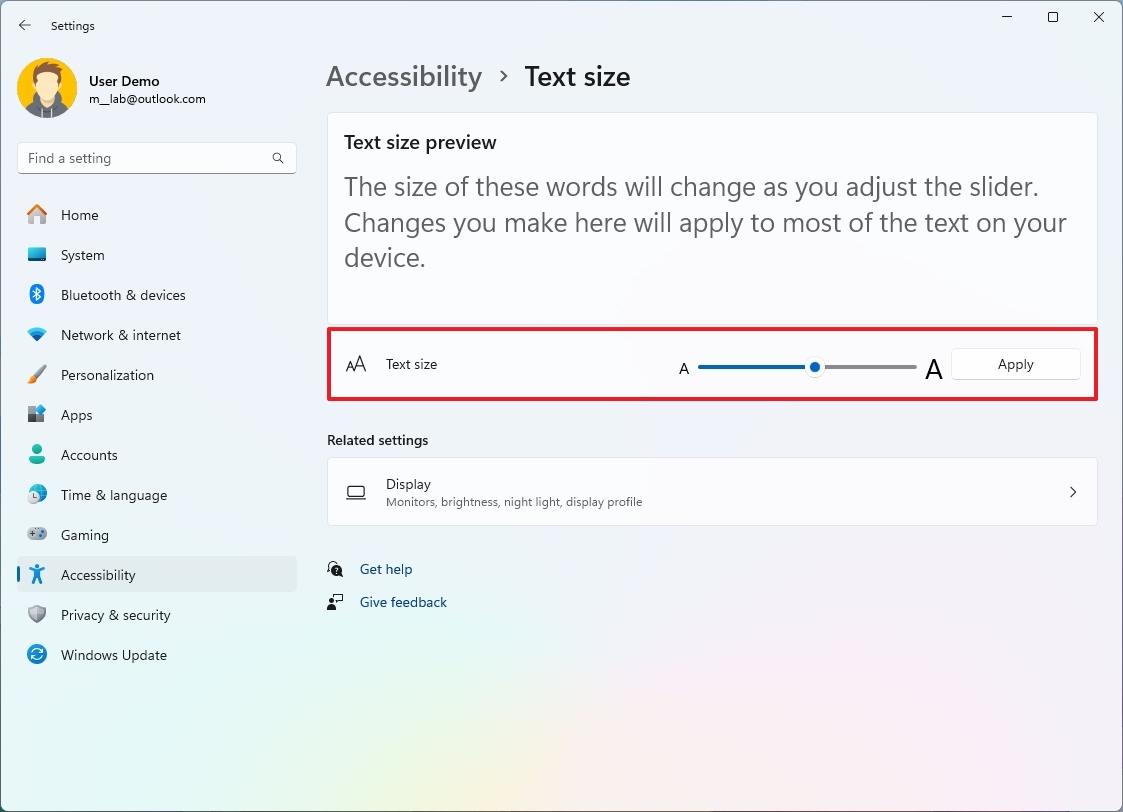
- Click the Apply button.
Once you complete the steps, the screen will flash a «Please wait» message to apply the new text size.
More resources
For more helpful articles, coverage, and answers to common questions about Windows 10 and Windows 11, visit the following resources:
- Windows 11 on Windows Central — All you need to know
- Windows 10 on Windows Central — All you need to know
Mauro Huculak has been a Windows How-To Expert contributor for WindowsCentral.com for nearly a decade and has over 15 years of experience writing comprehensive guides. He also has an IT background and has achieved different professional certifications from Microsoft, Cisco, VMware, and CompTIA. He has been recognized as a Microsoft MVP for many years.
В этой публикации, друзья, поговорим о том, как установить для программы или игры отдельный от всей Windows масштаб. В Windows мы можем использовать разный масштаб изображения. Но оптимальный для самой среды операционной системы, многих программ и игр масштаб не всегда приемлем в отдельных программах и играх, подчиняющихся системным настройкам экрана. В этих программах и играх увеличенный масштаб может отображаться размыто или перекошено, изображение может быть обрезанным. Современные версии Windows — 10 и 11 – предусматривают решение для таких случаев. Это решение – переопределение режима масштабирования. Также можно прибегнуть к масштабированию в панелях управления драйверов видеокарт.
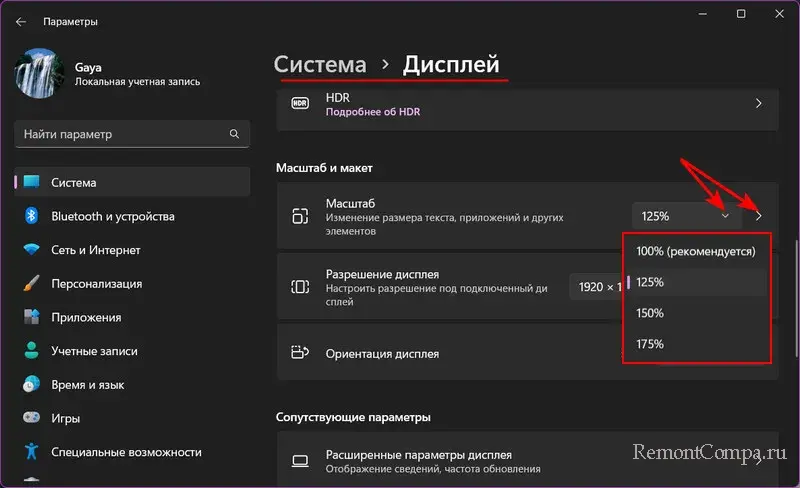
Итак, друзья, в Windows мы можем использовать не только исходный 100%-ный масштаб изображения, но также увеличенный. В Windows 10 и 11 системный масштаб настраивается в приложении «Параметры» по пути:
Здесь нам доступны стандартные значения увеличения масштаба — 100%, 125%, 150%, 175%. И мы можем выбрать дополнительные настройки масштабирования.
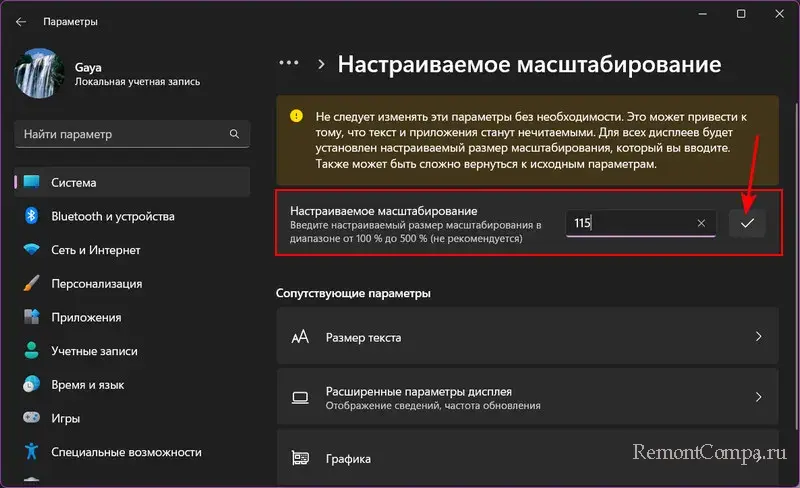
В дополнительных настройкам нам предоставляется возможность установить любое значение увеличения масштаба, вплоть до шага в 1%.
Настроенный таким образом масштаб применяется для всей операционной системы Windows и установленных в ней программ и игр, за исключением тех, у которых своя среда 2D или 3D, и работает своё разрешение и масштабирование экрана. Однако не все программы и игры, подчиняющиеся системным настройкам экрана, оптимизированы под увеличение системного масштаба Windows. И при увеличенном масштабе могут отображаться некорректно. Для таких программ и игр лучше оставить исходный 100%-ный масштаб, и тогда их интерфейс будет выглядеть чётче и качественнее. А, возможно, их изображение будет лучше с альтернативным режимом масштабирования Windows.
Установить для программы или игры отдельный масштаб можно в Windows 10 и 11 с помощью функции изменения параметров высокого DPI. Она предусматривает переопределение режима масштабирования высокого разрешения – изменение способа, которым операционная система масштабирует изображение конкретной программы или игры. При задействовании этой возможности Windows либо не будет масштабировать, либо будет использовать другой алгоритм масштабирования, который может устранить проблемы типа размытия, искажения или обрезки изображения.
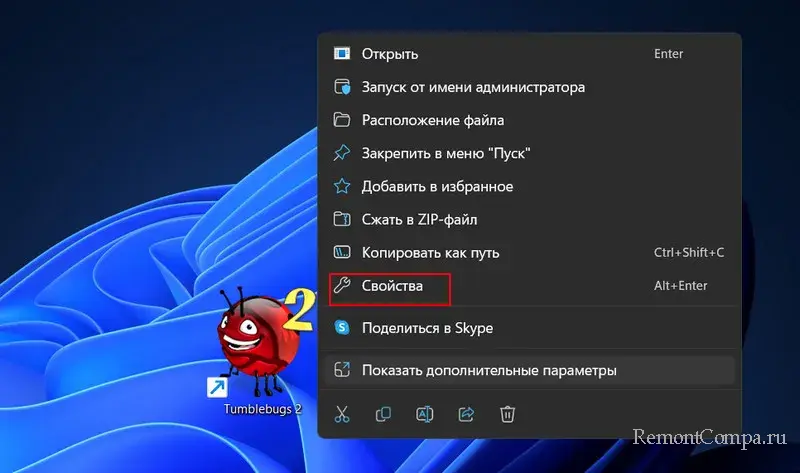
Давайте используем эту возможность Windows 10 и 11. Открываем свойства ярлыка нужной программы или игры – в контекстном меню на ярлыке жмём «Свойства».
Переходим на вкладку «Совместимость». Кликаем «Изменить параметры высокого DPI».
Устанавливаем галочку блока «Разрешение программы». Выбираем в выпадающем списке «Когда я открою эту программу».
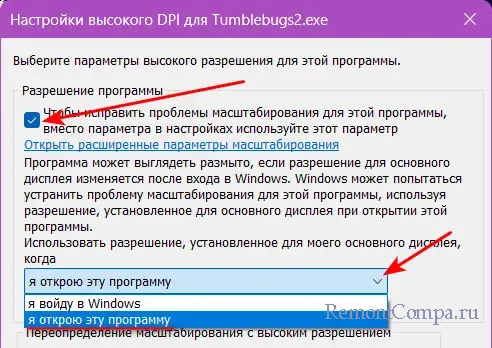
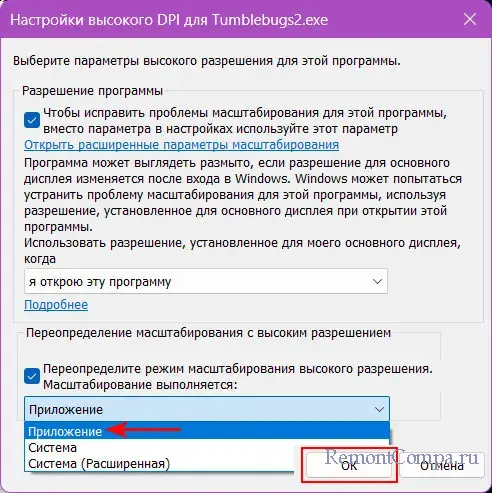
Ниже в блоке «Переопределите режим масштабирования высокого разрешения», в его выпадающем списке выбираем, собственно, режим. Их нам предлагается три:
- Приложение: этот режим означает, что Windows не будет масштабировать изображение программы или игры, а оставит его исходным, т.е. 100%-ным;
- Система: этот режим означает, что Windows будет масштабировать изображение программы или игры с помощью системного алгоритма, который растягивает изображение до нужного размера;
- Система (Расширенная): этот режим означает, что Windows будет масштабировать изображение приложения с помощью расширенного алгоритма, который учитывает DPI экрана и программы или игры.
В общем системном масштабировании Windows 10 и 11 применяется режим «Система (Расширенная)». Соответственно, друзья, если он вам не подходит, экспериментируйте с двумя другими режимами. И смотрите, какой лучше решает и решает ли вообще вашу проблему. В нашем примере нужен исходный 100%-ный масштаб. Потому мы выбираем режим «Приложение». И жмём «Ок».
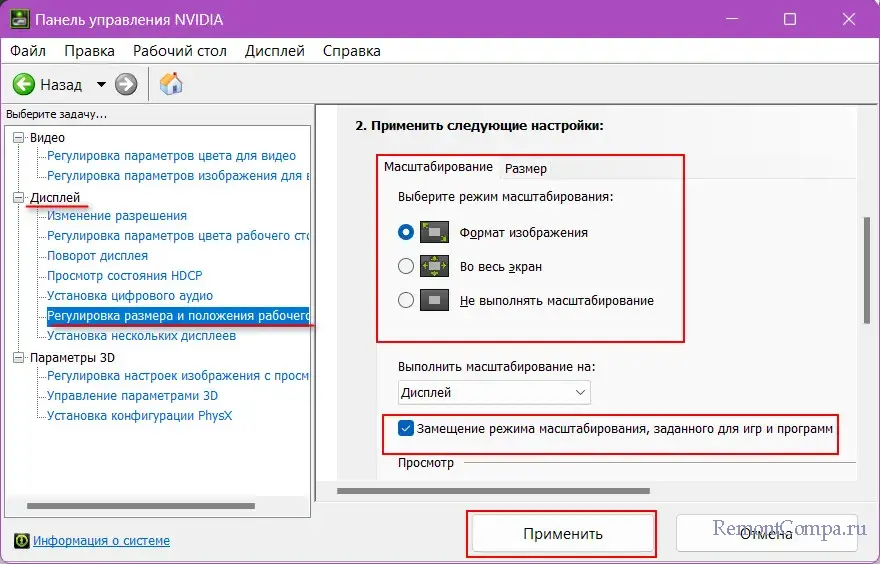
Также, друзья, настройка масштабирования есть в панелях управления драйверов видеокарт. Например, в панели управления Nvidia такая настройка находится по пути:
Дисплей →Регулировка размера и положения рабочего стола
Здесь можно поэкспериментировать с разными режимами масштабирования. И попробовать задействовать опцию замещения режима масштабирования, заданного для игр и программ. Последняя позволяет заставить программы и игры использовать режим масштабирования Nvidia, а не тот, который они сами задают.
Вот так, друзья, можно установить для программы или игры отдельный от всей Windows 10 или 11 масштаб.
Applies ToWindows 11 Windows 10
Трудно ли видеть текст или приложения на экране компьютера? Существуют простые способы упростить его просмотр в Windows.
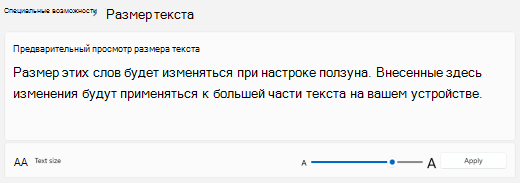
Увеличить размер текста на экране
Если размер текста слишком мал при переходе по Windows, вы можете увеличить текст. Это влияет, например, на заголовки, меню и тексты значков.
-
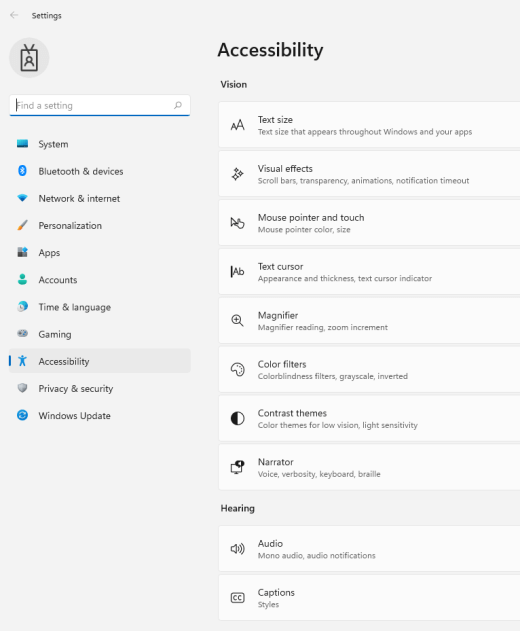
Чтобы перейти к параметрам специальных возможностей на компьютере, нажмите клавишу с логотипом Windows+U или выберите Запустить > Параметры > Специальные возможности.

-
Выберите Размер текста.
-
Перетащите ползунок Размер текста вправо, чтобы увеличить размер примера текста.
-
Когда размер текста вас устраивает, нажмите кнопку Применить. Windows масштабирует размер всего текста.
Увеличить размер изображений и приложений на экране
Помимо размера текста, вы также можете увеличить все остальное на экране, включая изображения и приложения.
-
Чтобы открыть параметры на компьютере, нажмите клавишу с логотипом Windows+I или выберите Пуск > Параметры .
-
Выберите Показать.
-
В разделе Масштаб & макета разверните меню Масштаб и выберите нужный параметр.
Для того чтобы некоторые изменения вступили в силу в определенных приложениях, может потребоваться выйти из нее и снова войти, но они применяются к большинству моментов немедленно.
См. также
специальные возможности Майкрософт
Нужна дополнительная помощь?
Нужны дополнительные параметры?
Изучите преимущества подписки, просмотрите учебные курсы, узнайте, как защитить свое устройство и т. д.
- To change the DPI scaling on Windows 11, open Settings > System > Display and choose your preferred scale size, or click the “Scale” setting and confirm a custom scaling size.
- Alternatively, you can open the Registry and modify the “LogPixels” and “Win8DpiScaling” keys to specify the desired scaling size for Windows 11.
The scale feature on Windows 11 allows you to change the size of text, apps, and other visual elements on the screen, and in this guide, I will outline the steps to configure this feature so that elements don’t look too small or too big.
Usually, you don’t have to think about the dots per inch (DPI) scaling settings on regular displays since they offer a more natural size. However, this could be a problem on laptops or monitors with high-resolution panels (such as 4K or higher resolution panels) that make elements and text too small to read. Also, even though Windows 11 can automatically configure an optimal scale setting for you, the system can sometimes choose an option that shows elements too big on the screen.
As a result, you can always change the display scaling settings in at least three ways. For example, you can use one of the predefined options, set a custom scaling size for elements on the screen, or change the DPI scaling settings using the Registry.
In this guide, I will teach you how to change the scale size on Windows 11.
- Change display scale with custom size on Windows 11
- Change display scale with predefined sizes on Windows 11
- Change display scale with Registry on Windows 11
Warning: Before proceeding, it’s crucial to acknowledge the risks associated with modifying the Windows Registry. Incorrect changes can lead to system instability or operational issues. Therefore, ensure you have a full system backup before making any changes. Proceed with caution and understanding.
Change display scale with custom size on Windows 11
To change the scale size of a display on Windows 11, use these steps:
-
Open Settings on Windows 11.
-
Click on System.
-
Click the Scale setting under the “Scale & layout” section.

-
Use the “Custom scaling” setting and specify the custom scaling size between 100% and 500% on Windows 11.

-
Click the Check button.
-
Click the “Sign out now” button.


Once you complete the steps, sign back in to start using the custom scaling on Windows 11.
If you want to revert to the previous setting, you can use the same instructions, but on step 3, click the “Turn off custom scaling and sign out” option.
Change display scale with predefined sizes on Windows 11
To use a different DPI scale size on Windows 11, use these steps:
-
Open Settings.
-
Click on System.
-
Under the “Scale & layout” section, use the Scale settings and select one of the predefined sizes, including 100%, 125%, 150%, and 175%.

After you complete the steps, you may need to restart some applications to reflect the new scale size.
If you want to revert the changes, you can use the same instructions, but in step 3, select the “Recommended” size.
You don’t have to change the scale settings if you only want to make the text on the screen bigger. If so, adjust the display text size with these instructions.
Change display scale with Registry on Windows 11
To change the Windows 11 scaling settings through the Registry, use these steps:
-
Open Start.
-
Search for regedit and click the top result to open the Registry Editor.
-
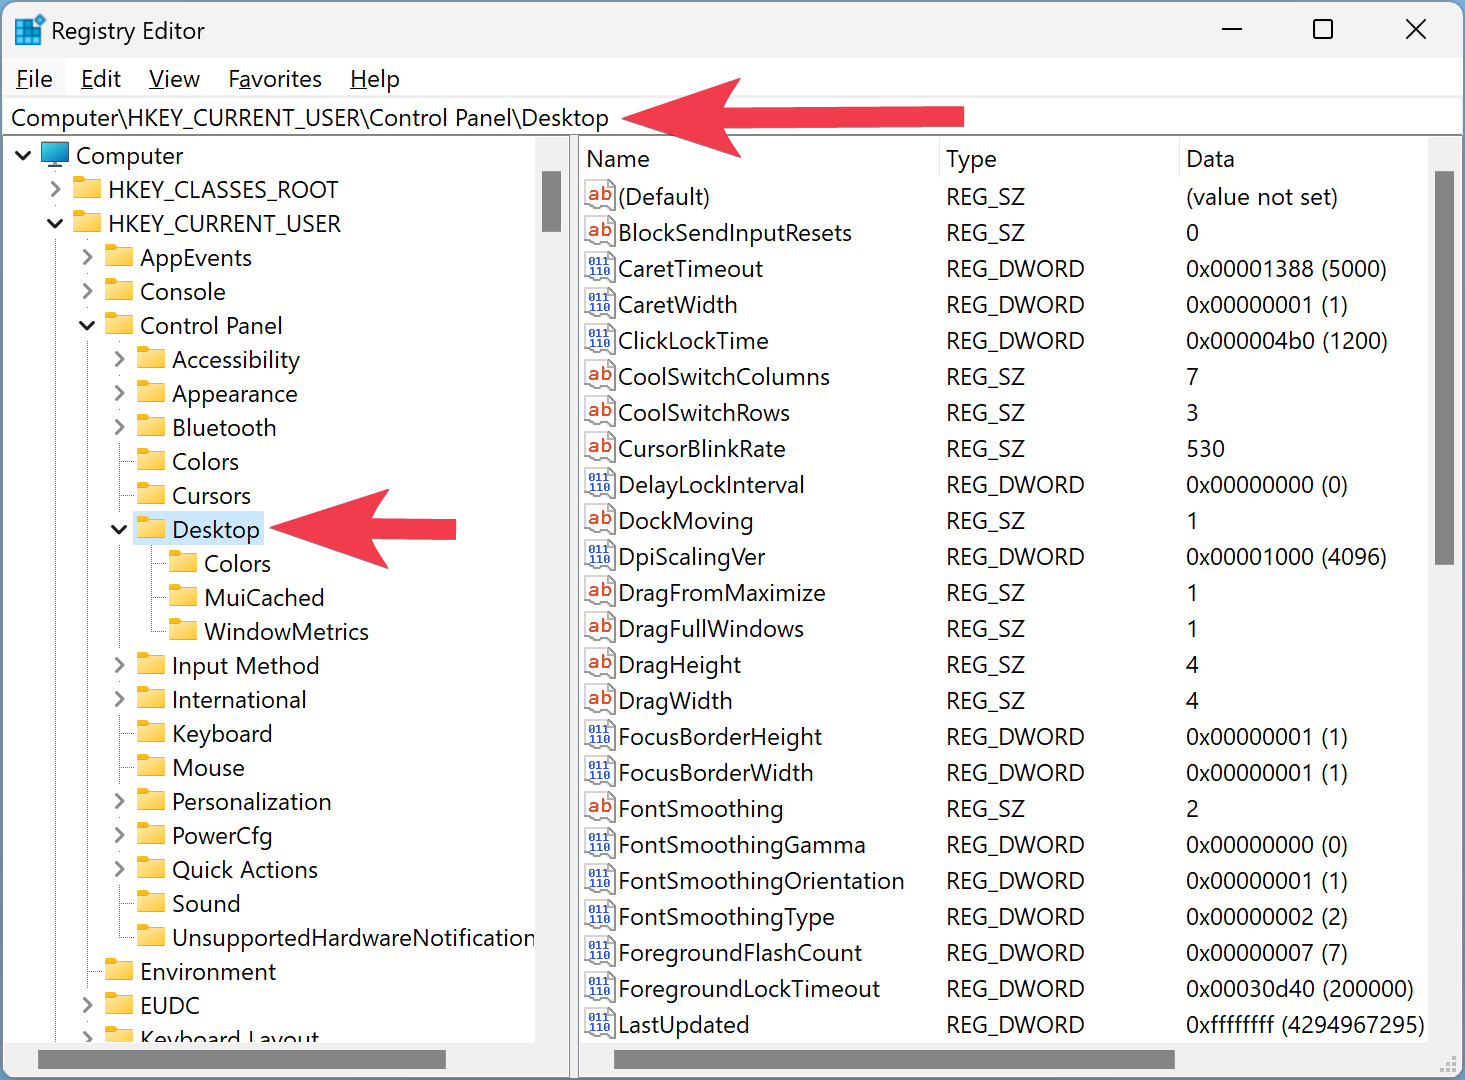
Browse to the following path:
HKEY_CURRENT_USER\Control Panel\Desktop
-
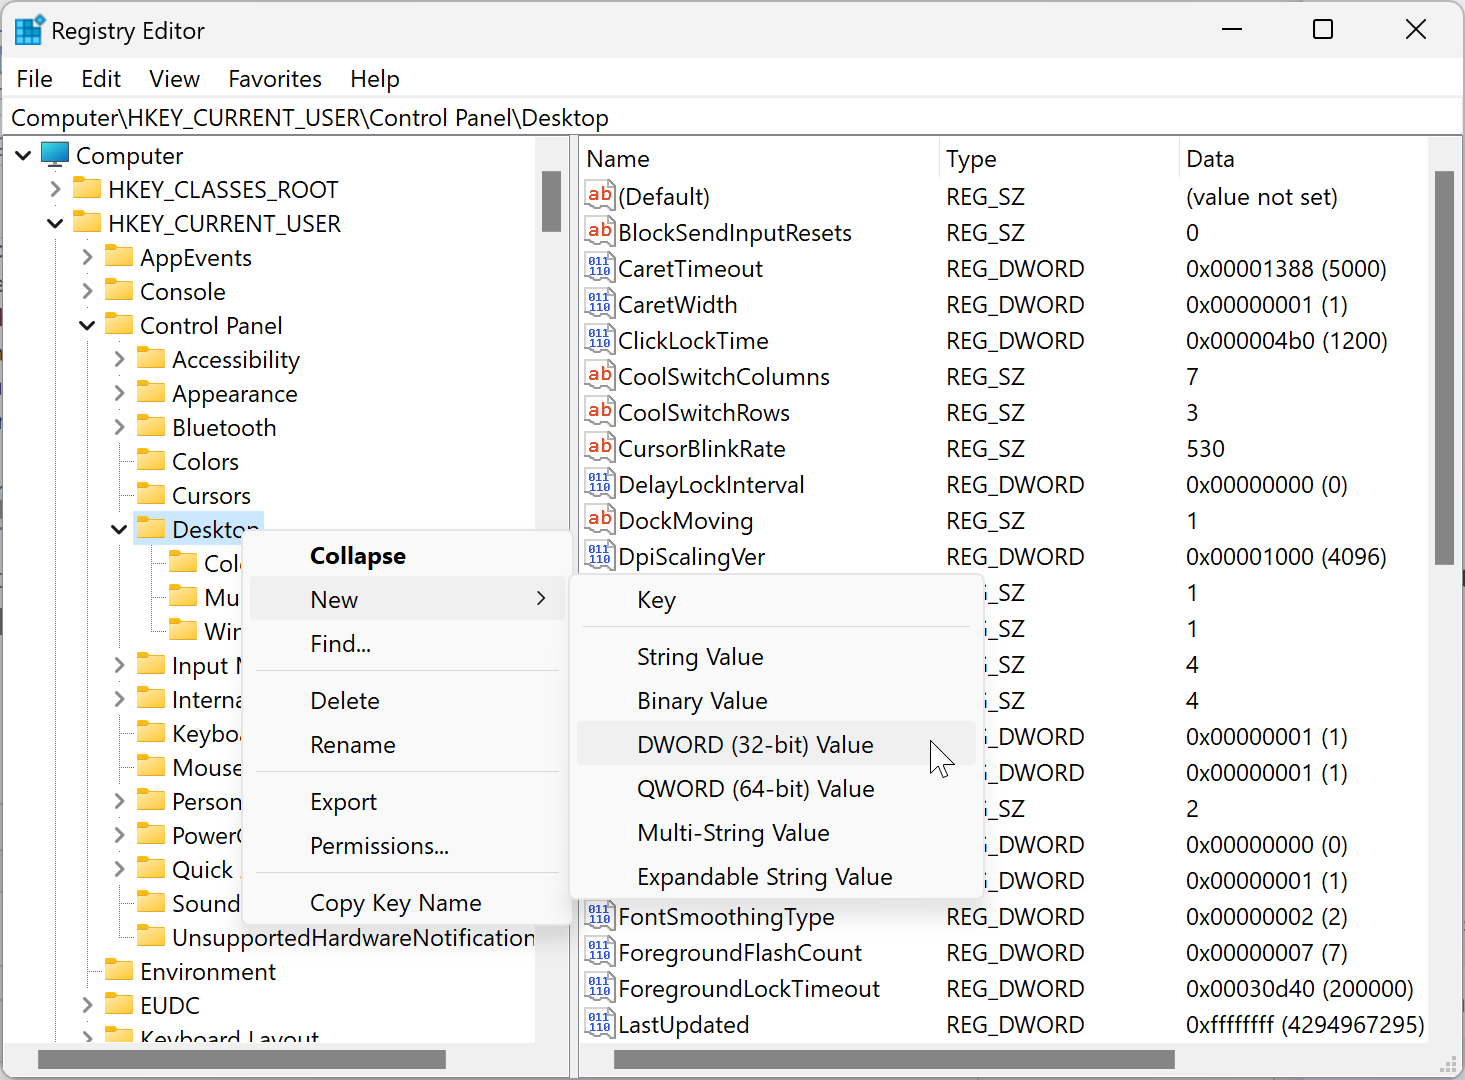
Right-click the Desktop key, choose New, and click on the “DWORD (32-bit) Value” option.
-
Confirm the LogPixels name and press Enter.

-
Right-click the newly created DWORD and choose the Modify option.
-
Choose the Decimal option.
-
Change the value from 0 to the number representing the scaling settings for Windows 11:
- 96 – Smaller 100% (Recommended)
- 120 – Medium 125%
- 144 – Larger 150%
- 192 – Extra Large 200%
- 240 – Custom 250%
- 288 – Custom 300%
- 384 – Custom 400%
- 480 – Custom 500%
-
Click the OK button.
-
If you didn’t use the value 96 in step 8, right-click the
DWORD and choose the Modify option.
-
Change the value from 0 to 1.
-
Click the OK button.
-
Restart the computer.


Once you complete the steps, the system should apply the new scaling setting on Windows 11.
If you want to undo the changes, you can use the same instructions, but in step 4, right-click the “LogPixels” key and choose the “Delete” option. Also, in step 11, set the value of “Win8DpiScaling” to 0 and click the “OK” button.
DPI complete form is Dots per inch. The DPI is a physical measurement of the number of pixels in a linear inch of a display for your information only. DPI represents a scale factor that Windows uses to resize the running apps and documents. Most modern computers use the most popular scaling factors in the range of 96-125 DPI.
Increasing or decreasing the display scaling in Windows 11 enables you to make UI elements in Windows 11 smaller or bigger. Windows 11 calculates the scaling factor for your monitor automatically, which may not follow your preferences, especially if you have a large display with a high resolution. All modern devices often include high-resolution displays. Even if you have a small Ultrabook or a Windows tablet, you may find a display resolution of 1080p or more. The modern desktop monitor supports up to 4K resolutions.
In most cases, Windows 11 will automatically adjust DPI scaling, so everything on your screen becomes more considerable. But, for every case, it will not be accurate. In such instances, you need to fix the DPI display scaling manually in Windows 11.
In this gearupwindows article, we will guide you on changing DPI Display Scaling in Windows 11 so that you can easily read the text on the monitor. According to your convenience, you can make the display smaller or more significant that suit your needs.
Several options are available on Windows 11 to set a custom DPI display scaling in Windows 11. We will review those methods that are easy to follow.
How to Adjust DPI in Windows 11 using the Settings app?
Follow these steps to adjust DPI in Windows 11 using the Settings app:-
Step 1. Open the Settings app by pressing the Windows + I keys.

Step 2. When Windows Settings opens, select the System category from the left side pane.
Step 3. On the right sidebar of the System, click the Display option.
Step 4. After that, find the Scale option and pick a new value from a drop-down list, such as 100%, 125%, 150%, etc.
Step 5. When you’re done, Windows 11 will instantly apply the new DPI scaling value.
If the texts do not appear on the monitor according to your wishes after selecting a particular DPI display, select another DP display and see if it suits your eyes. When you find the correct DPI, close the settings app. All the settings are saved automatically.
Follow these steps to adjust DPI Display Scaling in Windows 11 via Custom Scaling:-
Step 1. First, right-click on the free space on the Windows 11 desktop and select Display Settings from the menu that appears.
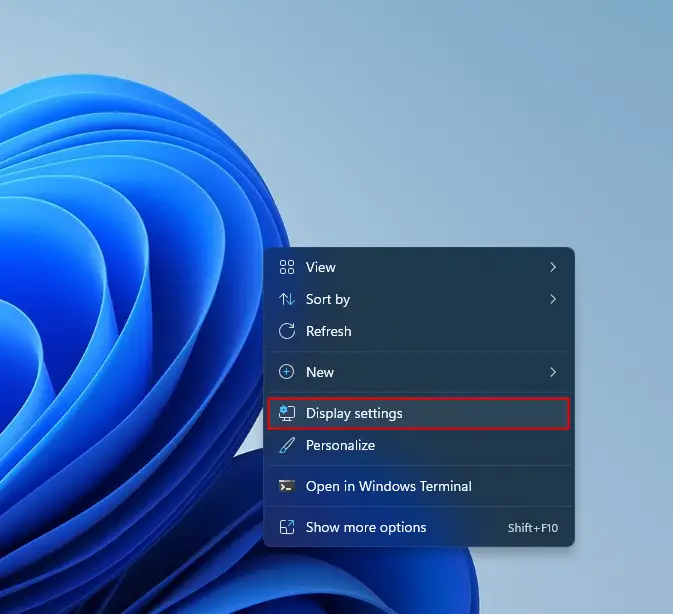
Step 2. When Windows Settings opens in the Display category, scroll down a bit and then click the Scale title in the right sidebar.
Step 3. Under the Custom Scaling option, enter the value you need between 100 and 500%.
Step 4. When you’re done, click the tick mark to apply the changes.
Step 5. At last, click the Sign out now button.
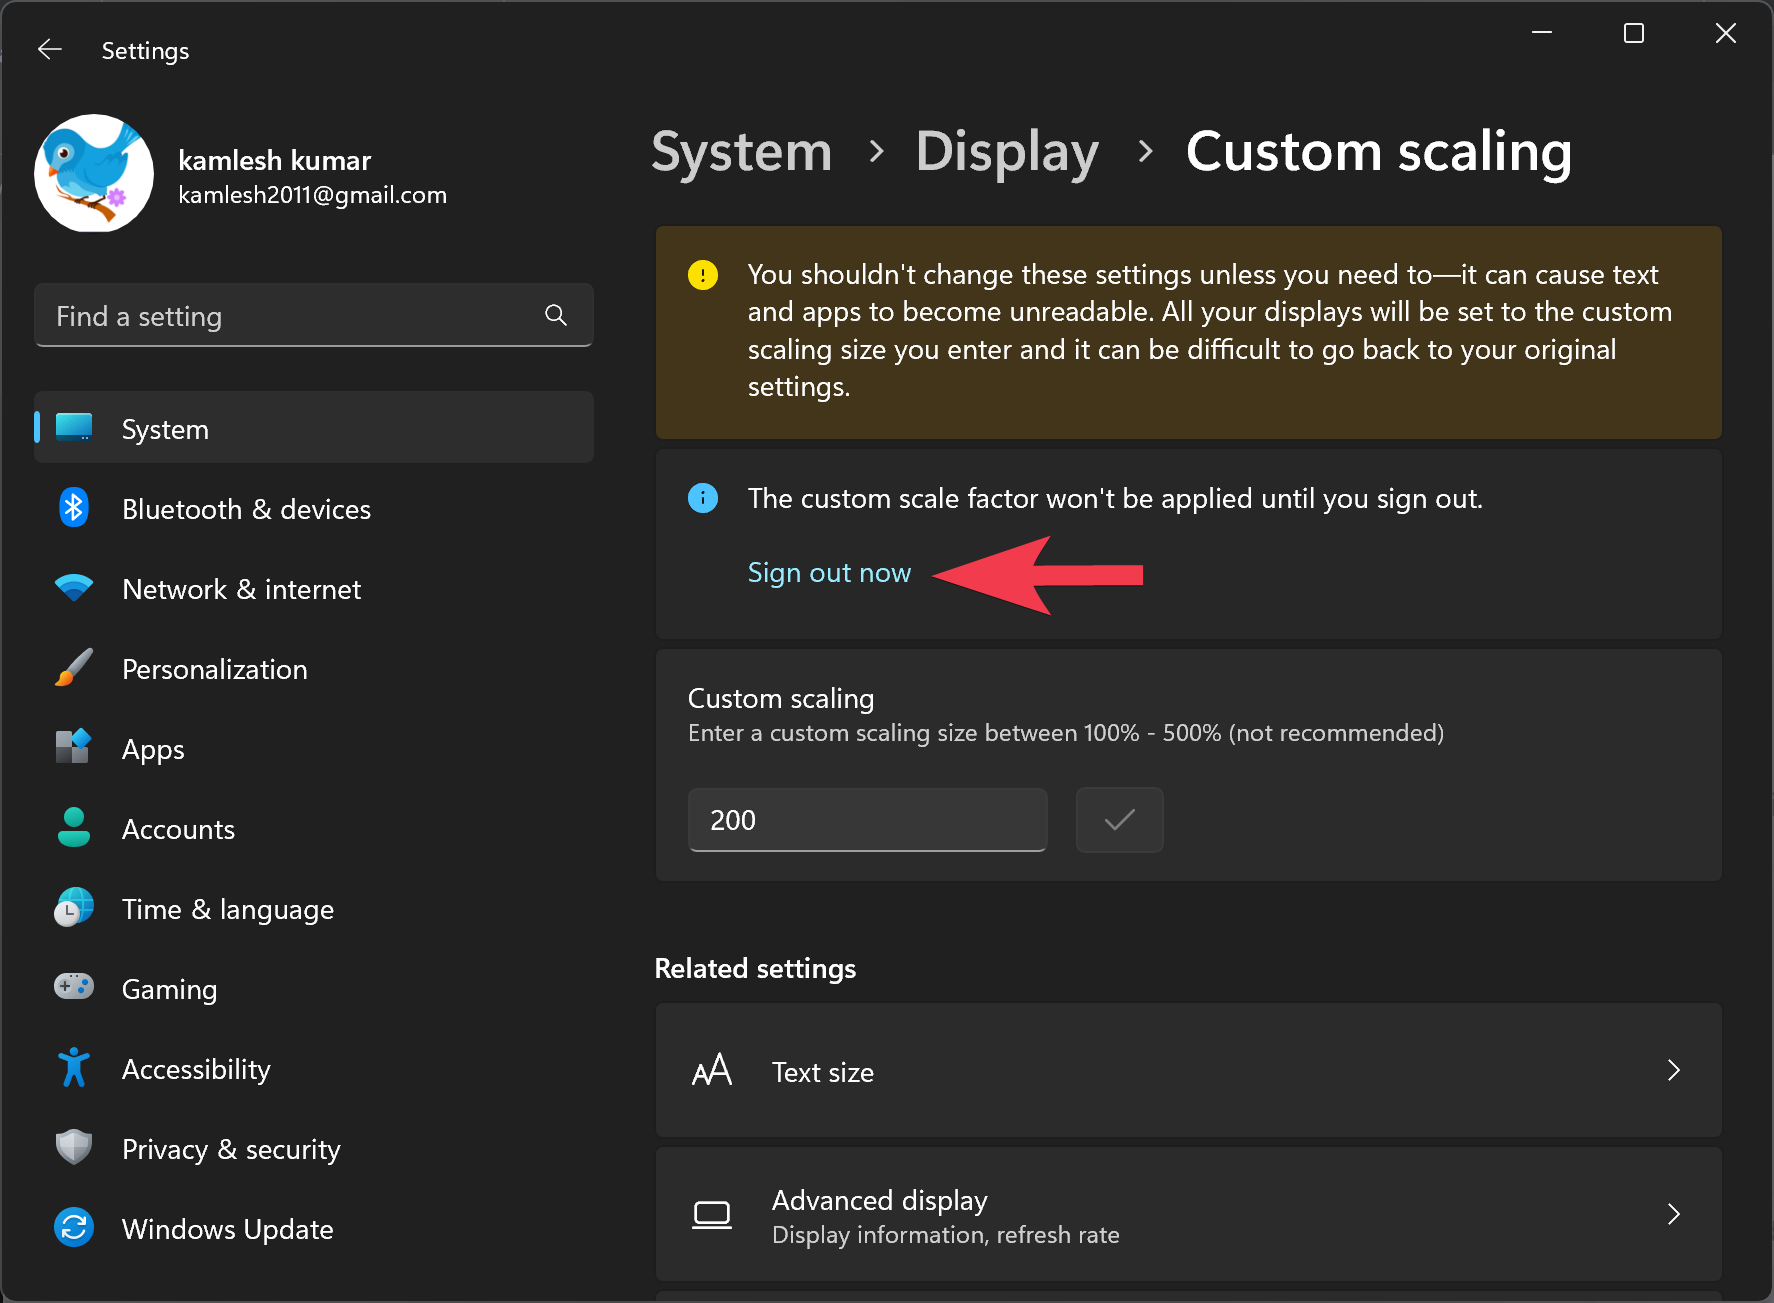
That’s it. Now, log in to your machine again to see the changes.
How to Change Windows 11 Display Scaling using Registry Editor?
If you prefer to use Registry Editor to adjust display scaling on your Windows 11 machine, use the following steps:-
Step 1. First, open Registry Editor.
Step 2. Then, steer for the following key on the left-hand side of the Registry Editor window:-
HKEY_CURRENT_USER\Control Panel\Desktop
Step 3. Now, right-click on the Desktop folder on the left side and select New > DWORD (32-bit) Value.
Step 4. Name the newly created REG_DWORD as LogPixels.
Step 5. Next, double-click on the LogPixel REG_DWORD and set Base to Decimal. Then, set the Value data as the following numbers:-
- 96 = default 100%
- 120 = medium 125%
- 144 = larger 150%
- 192 = extra-large 200%
- 240 = custom 250%
- 288 = custom 300%
- 384 = custom 400%
- 480 = custom 500%
Step 6. Click OK.
Step 7. Next, find the Win8DpiScaling REG_DWORD and double-click on it to open it. Set its “Value data” to 1 if you use a LogPixels value other than 96.
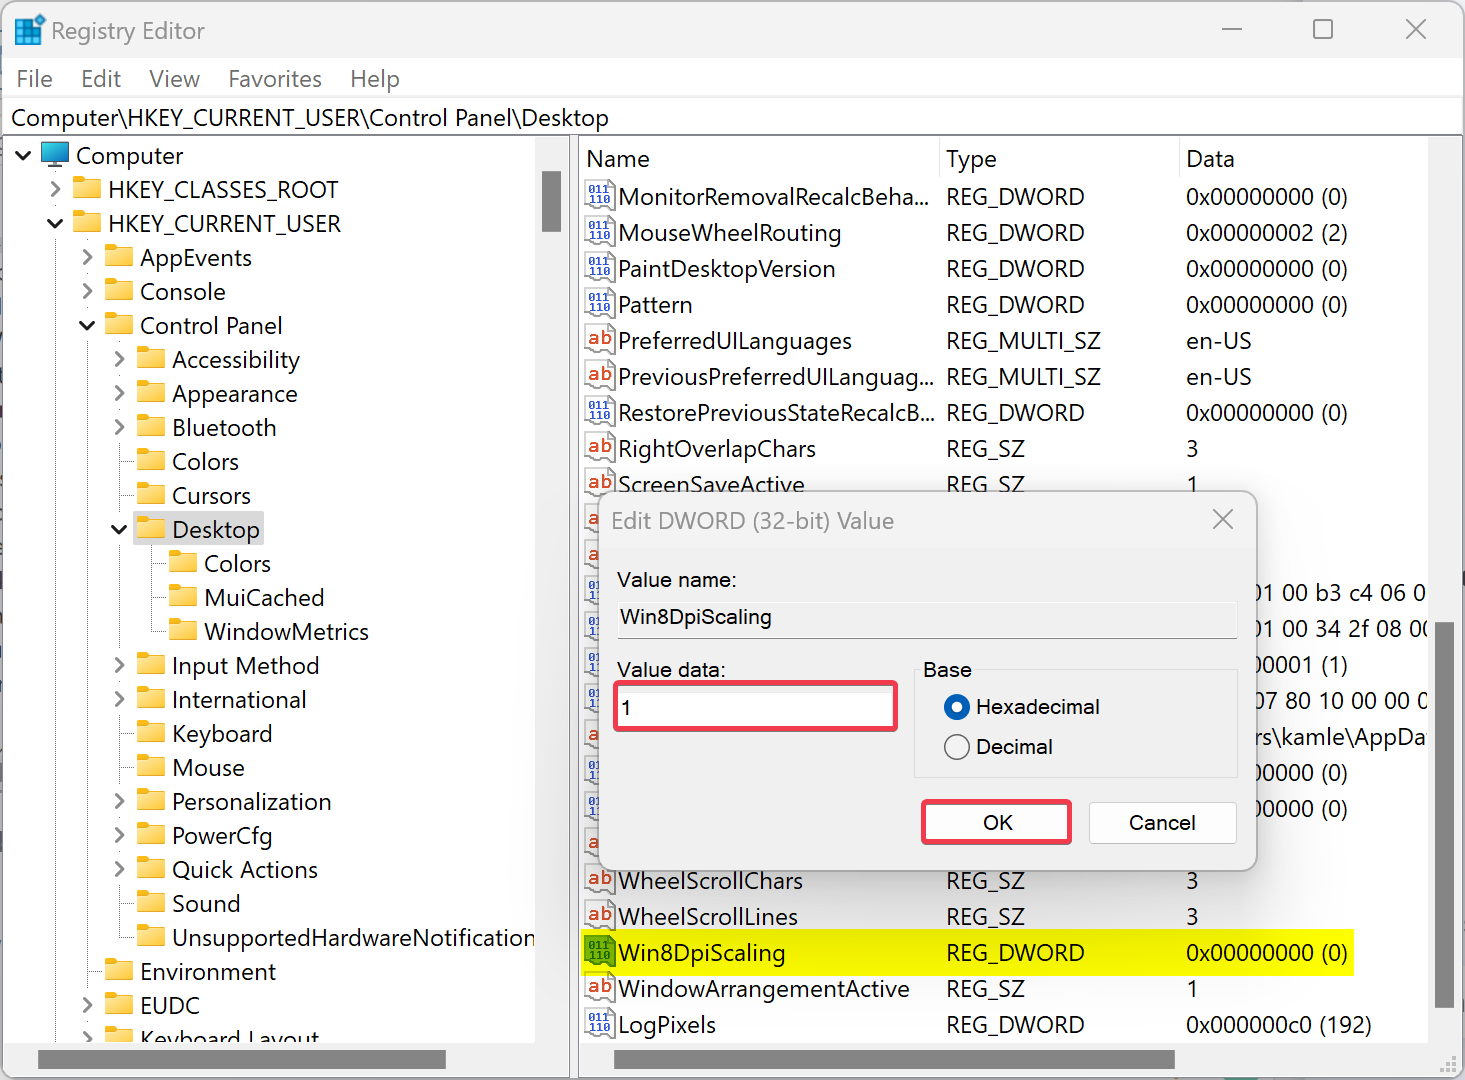
Step 8. Click OK.
Step 9. At last, reboot your computer to apply the changes.
Conclusion
In conclusion, DPI, or Dots per inch, is a physical measurement of the number of pixels in a linear inch of a display. Windows 11 uses DPI as a scale factor to resize running apps and documents. While most modern computers use popular scaling factors in the range of 96-125 DPI, users may prefer to customize the DPI scaling for their monitor. Windows 11 provides various options to adjust DPI scaling, such as through the Settings app, Custom Scaling, or Registry Editor. By following the steps provided, users can easily change DPI display scaling in Windows 11 and make the UI elements smaller or bigger according to their preferences.