
Doom-emacs. It’s a configuration framework for Emacs. Basically, it overrides the Emacs keybindings with most of vim’s.
As I mentioned in the last post. I started using Emacs at work due to org-mode… and work PC’s use windows behind a Firewall, so using git, pip, melpa and some more are useless in my work desktop (In the Laptop all of them work if I connect to another network, which was what I did).
As you can imagine, Doom is for a GNU program so Windows support is limited (because, who cares?). The guide is poor, it describes how to install it with scoop/chocolatey (that don’t work with a firewall). However, you can use the git-bash to install Doom without scoop/chocolatey.
Here is how you do it:
What you need
If you have limited permissions in Windows PC (e.g. admin privileges), you might not be able to use Chocolatey/Scoop.
However, you can still use git-bash.exe portable version!
- Download git.
- Download Ripgrep and fd. Make sure you download the
windows-gnuversion. - Of course, download emacs.
Extract the binaries1 from Ripgrep and fd to their respective folders and place them where you want.
- You should have one folder for
Ripgrepand another forfd.
Extract emacs and place it where you want.
It does not matter where they are, we will add them to the Path later (but keep them
safe and where you can remember).
Instructions
Edit system environment variables
-
Go to
Control panel -> User Accounts -> Change my environment variables.New, typeHOMEand set yourC:\Users\USERNAMEandOK.- Select
Path,editand add yourC:\path\to\the\emacs\binfolder andOK. - Select
Path,editand add yourC:\path\to\the\ripgrepfolder andOK. - Select
Path,editand add yourC:\path\to\the\fdfolder andOK. - Click
Ok.
- We still need to add
C:\Users\USERNAME\.emacs.d\bin; but first download Doom
files.
Install Doom
- Open
git-bash.exe - Type
cd ~ - Run:
git clone https://github.com/hlissner/doom-emacs ~/.emacs.d - After the download is completed, type
cd ~/.emacs.d/binand run:./doom install - If everything is fine, Doom is now installed.
- Just in case run
./doom sync -
Go to
Control panel -> User Accounts -> Change my environment variables.- Select
Path,editand addC:\Users\USERNAME\.emacs.d\bin, clickOK -> OK.
- Select
- Now you can start emacs and will see the Doom dashboard!
Nerd icons
By default icons will not be enabled in Windows.
- If icons is not installed. Open emacs and
M-x nerd-icons-install-fonts RET. - Select where to download the fonts and install them (double click -> install).
- Restart emacs and there you go.
From one PC to another
If one of your PCs does not have internet connection or is under a firewall, you can:
- Copy your
~/.doom.d ~/.emacs.d ripgrep fd emacsfolders directly to the
other PC (~/.domm.d ~/.emacs.dgo inC:\Users\USERNAME) - Edit the system environment variables accordingly.
- Copy and install the fonts you downloaded with
nerd-icons-install-fonts - Open
git-bash.exe,cd ~/.emacs.d/binand run:./doom sync - et voilà!.
Emacs server
If you use emacs server, Doom will place the server file in
C:\Users\USERNAME\.emacs.d\server folder.
-
Go to
Control panel -> User Accounts -> Change my environment variables.NewtypeEMACS_SERVER_FILEand set the file pathC:\Users\USERNAME\.emacs.d\server\server.- Create a
emacsclientw.exeshortcut withemacsclientw.exe -ncin target,
run emacs server and emacsclientw will work.
Now, rejoice!

If you found this content useful, please support me:
BTC: 1E2YjL6ysiPxRF4AEdXChpzpesRuyzgE1y
Scarlett
Posted on
• Edited on
You heard about something called Emacs and a couple of searches later you decided that you were going to try Doom Emacs for the first time, but… Oh, No — Most of the guides show how to make the installation just on Linux— So you think, where do I begin?
If this is your case, let me show you how I install Doom Emacs on Windows.
Previous Requiriments
- Git
- Ripgrep → Download the windows-gnu version → Unzip the content to a safe directory.
- fd → Download the windows-gnu version → Unzip the content to a safe directory.
Installing Emacs (Vanilla)
To get Emacs on Windows, you have two mainly options. Through MSYS2 or with an Emacs executable (.exe).
The way that I recommend if you don’t have a lot of experience working with Unix/Linux is to directly download the executable from a nearby GNU mirror and install it like an another program in windows.
If you are a MSYS2 user, in MSYS2 you have to use the follow command:
$ pacman -S mingw-w64-x86_64-emacs
Enter fullscreen mode
Exit fullscreen mode
Emacs GUI will be at C:\msys64\mingw64\bin\runemacs.exe
Creating an Emacs Files Backup (Optional)
If you installed emacs using the executable, in HOME directory rename the .emacs.d or if you are using MSYS2 the configuration files are in C:/Users/Scarlett/AppData/Roaming/
Renaming the .emacs.d directory:
$ mv .\.emacs.d\ .\.emacs.d.old
Enter fullscreen mode
Exit fullscreen mode
Set Environment Variables
Go to Settings → System → About → Advanced System Settings → Advanced → Environment Variables…
- On
User Variablessection→ Click on New button… → Set HOME to the variable name and set your path userC:\Users\USERNAMEto variable value → Finally click on OK
- Also, on User Variables → Select Path Variable and click on Edit button →
- Add
C:\msys64\mingw64\bin (MSYS2)orC:\ProgramFiles\Emacs\x86_64\bin (Executable) - Add your
C:\path\to\the\ripgrepdirectory - Add your
C:\path\to\the\fddirectory
- Add

Note: You don’t need to restart the system but the console (MSYS2, git bash, powershell…)
Installing Doom Emacs
At this point we should have a vanilla Emacs running correctly in our system, so in the next steps we are going to do a clean installation of Doom Emacs, also I will show you how to do that with both kind of Emacs installation that we have been seeing.
If you installed Emacs with the executable (.exe)
Open PowerShell or gitbash.exe to install Doom. Make sure that you are in your user directory, then clone doom:
$ git clone https://github.com/hlissner/doom-emacs .emacs.d
$ ~/.emacs.d/bin/doom install
Enter fullscreen mode
Exit fullscreen mode
Note: If the powershell or gitbash prompt: fatal: destination path ‘C:/Users/Scarlett/.emacs.d’ already exists and is not an empty directory.
We need to remove the.emacs.ddirectory
Once the installation is done, we need to ensure that the necessary packages are installed:
$ ~/.emacs.d/bin/doom sync
Enter fullscreen mode
Exit fullscreen mode
If you installed Emacs with MSYS2
Inside the C:/Users/your user/AppData/Roaming/ directory, clone and install doom:
$ git clone https://github.com/hlissner/doom-emacs .emacs.d
$ .emacs.d/bin/doom install
Enter fullscreen mode
Exit fullscreen mode
Once the installation is done, we need to ensure that the necessary packages are installed:
$ .emacs.d/bin/doom sync
Enter fullscreen mode
Exit fullscreen mode
Now you can start Emacs executing the emacs command, and it will display vanilla Emacs:
$ emacs
Enter fullscreen mode
Exit fullscreen mode
As you can see, apparently the doom installation is not working, however, we need to take one more step:
We have to remove the .emacs.d directory created when we ran Emacs:
$ rm C:\Users\USER\.emacs.d\
Enter fullscreen mode
Exit fullscreen mode
We need to create a symbolic link. For that, run cmd as administrator and execute the following command (remember change ‘USER’ on the path):
$ mklink /j "C:\Users\USER\.emacs.d" "C:\Users\USER\AppData\Roaming\.emacs.d"
Enter fullscreen mode
Exit fullscreen mode
Installing the Icons
Finally, if you don’t see the icons, you will need to install them, in Emacs type M-x (Alt + x) and write the following:
all-the-icons-install-fonts
Enter fullscreen mode
Exit fullscreen mode
Go to the folder where you downloaded the fonts and install manually all the files.

As you can see, there are more than one way to install Doom Emacs on Windows. If you know others, share in the comments for everyone!
I hope this post has allowed you to start exploring the Emacs world.
Thanks For Reading, Follow Me For More
I recently noticed that Xah had trouble installing Doom Emacs on Windows.
Here’s how to install it on Windows 7, 8 and 10+ using Chocolatey in case it helps someone else.
For Windows 10+, using WSL and Ubuntu makes the
installation similar to other operating systems, but if you don’t want to use WSL or are running an earlier version of Windows, Chocolatey works the same for all of them.
Install Chocolatey
To install Chocolatey itself, press the Windows key to open the Start menu,
type power on the keyboard to filter the options and then right-click Windows PowerShell to run it using the Administrator account.
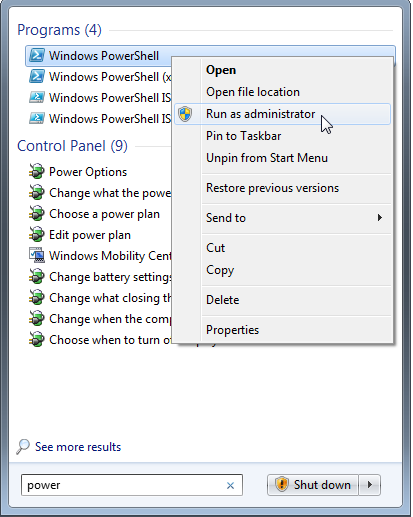
Chocolatey’s web installation requires at least PowerShell v3.0+ and .NET Framework v4.5+, so check the installed versions and upgrade if needed.
Windows PowerShell
Copyright (C) 2012 Microsoft Corporation. All rights reserved.

PS C:\Windows\system32> Get-Host | Select-Object Version

Version
-------
3.0


PS C:\Windows\system32> Get-ChildItem 'HKLM:\SOFTWARE\Microsoft\NET Framework Setup\NDP' -Recurse | Get-ItemProperty -Name version -EA 0 | Where { $_.PSChildName -Match '^(?!S)\p{L}'} | Select PSChildName, Version

PSChildName                                                 Version
-----------                                                 -------
v2.0.50727                                                  2.0.50727.5420
v3.0                                                        3.0.30729.5420
Windows Communication Foundation                            3.0.4506.5420
Windows Presentation Foundation                             3.0.6920.5011
v3.5                                                        3.5.30729.5420
Client                                                      4.8.03761
Full                                                        4.8.03761
Client                                                      4.0.0.0
Install Chocolatey using the command given in the instructions and then close the console with exit.
Windows PowerShell
Copyright (C) 2012 Microsoft Corporation. All rights reserved.

PS C:\Windows\system32> Set-ExecutionPolicy Bypass -Scope Process -Force; [System.Net.ServicePointManager]::SecurityProtocol = [System.Net.ServicePointManager]::SecurityProtocol -bor 3072; iex ((New-Object System.Net.WebClient).DownloadString('https://community.chocolatey.org/install.ps1'))
[...]
Getting Chocolatey from https://community.chocolatey.org/api/v2/package/chocolatey/0.12.1.
[...]
WARNING: It's very likely you will need to close and reopen your shell before you can use choco.
[...]
You may need to shut down and restart powershell and/or consoles first prior to using choco.
[...]
PS C:\Windows\system32> exit
Close the PowerShell console and restart it again using the Administrator account.
Install Emacs
In the PowerShell Administrator console, use Chocolatey to install the Windows-native packages for git, emacs, ripgrep, llvm and fd.
I also like to install hunspell to get spell-checking support. Use exit to close the PowerShell console afterwards.
Windows PowerShell
Copyright (C) 2012 Microsoft Corporation. All rights reserved.

PS C:\Windows\system32> choco install git emacs ripgrep llvm fd hunspell.portable -y
Chocolatey v0.12.1
Installing the following packages:
git;emacs;ripgrep;llvm;fd;hunspell.portable
[...]
Installed:
 - hunspell.portable v1.7.0
 - emacs v27.2.0.20210423
 - git.install v2.35.1.2
 - ripgrep v13.0.0.20210621
 - llvm v13.0.1
 - fd v8.3.2
 - git v2.35.1.2
[...]
PS C:\Windows\system32> exit
Install Doom
To install the Doom package, use the Start menu to run the Windows cmd prompt as the regular user and then cd to the appropriate directory depending on the Windows version.
On Windows 7, the configuration files should be installed into the user’s %APPDATA% directory.
Microsoft Windows [Version 6.1.7601]
Copyright (c) 2009 Microsoft Corporation.  All rights reserved.

C:\Users\ccammack>echo %APPDATA%
C:\Users\ccammack\AppData\Roaming

C:\Users\ccammack>cd %APPDATA%

C:\Users\ccammack\AppData\Roaming>
On Windows 8+, the configuration files should be installed into the user’s %USERPROFILE% directory.
Microsoft Windows [Version 6.2.9200]
(c) 2012 Microsoft Corporation. All rights reserved.

C:\Windows\System32>echo %USERPROFILE%
C:\Users\ccammack

C:\Windows\System32>cd %USERPROFILE%

C:\Users\ccammack>
Next, run git clone and doom install to clone and install the required configuration packages,
approximately following the installation instructions,
making adjustments for the different treatment of the ~ character and path separators in Windows.
During the installation, answer y to the prompt Generate an envvar file?.
Note any error messages and instructions that appear at the end of the installation output.
Microsoft Windows [Version 6.1.7601]
Copyright (c) 2009 Microsoft Corporation.  All rights reserved.

[...]

C:\Users\ccammack\AppData\Roaming>git clone --depth 1 https://github.com/hlissner/doom-emacs .emacs.d
Cloning into '.emacs.d'...
remote: Enumerating objects: 1090, done.
remote: Counting objects: 100% (1090/1090), done.
remote: Compressing objects: 100% (1036/1036), done.
remote: Total 1090 (delta 29), reused 566 (delta 15), pack-reused 0
Receiving objects: 100% (1090/1090), 1007.70 KiB | 4.16 MiB/s, done.

Resolving deltas: 100% (29/29), done.

C:\Users\ccammack\AppData\Roaming>.emacs.d\bin\doom install
> Installing straight...
  > Cloning use-package...
> Executing 'doom install' with Emacs 27.2 at 2021-24-07 09:50:08
[...]
Generate an envvar file? (see `doom help env` for details) (y or n) y
[...]
Doom cannot install all-the-icons' fonts on Windows!
You'll have to do so manually:
   1. Launch Doom Emacs
   2. Execute 'M-x all-the-icons-install-fonts' to download the fonts
   3. Open the download location in windows explorer
   4. Open each font file to install them

Finished! Doom is ready to go!

But before you doom yourself, here are some things you should know:

1. Don't forget to run 'doom sync', then restart Emacs, after modifying
   ~/.doom.d/init.el or ~/.doom.d/packages.el.

   This command ensures needed packages are installed, orphaned packages are
   removed, and your autoloads/cache files are up to date. When in doubt, run
   'doom sync'!

2. If something goes wrong, run `doom doctor`. It diagnoses common issues with
   your environment and setup, and may offer clues about what is wrong.

3. Use 'doom upgrade' to update Doom. Doing it any other way will require
   additional steps. Run 'doom help upgrade' to understand those extra steps.

4. Access Doom's documentation from within Emacs via 'SPC h d h' or 'C-h d h'
   (or 'M-x doom/help')

Have fun!

Finished in 8m51s
Run Doom Emacs
The Windows executable for Emacs is runemacs.exe and is located in C:\ProgramData\chocolatey\bin\runemacs.exe when installed via Chocolatey.
Either create a new shortcut with the Target: set to C:\ProgramData\chocolatey\bin\runemacs.exe or run it directly from the console.
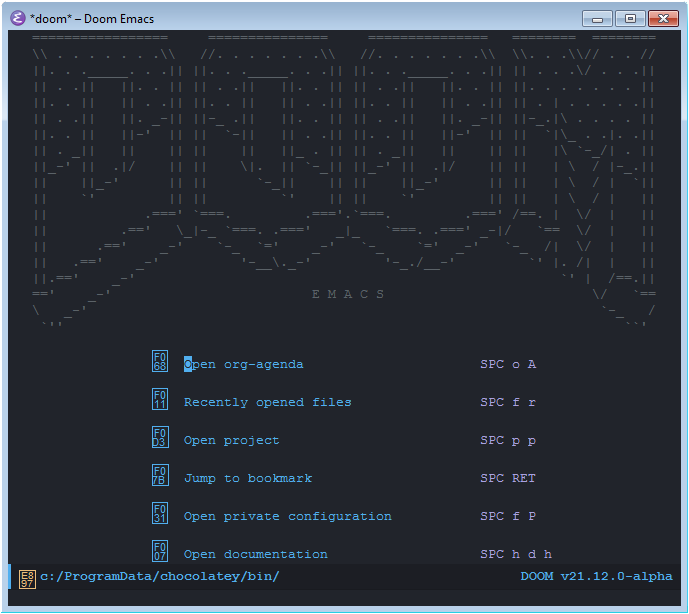
Install Required Fonts
The little orange square at the bottom left corner of the screen that says E897 indicates that the correct font for that character has not been installed.
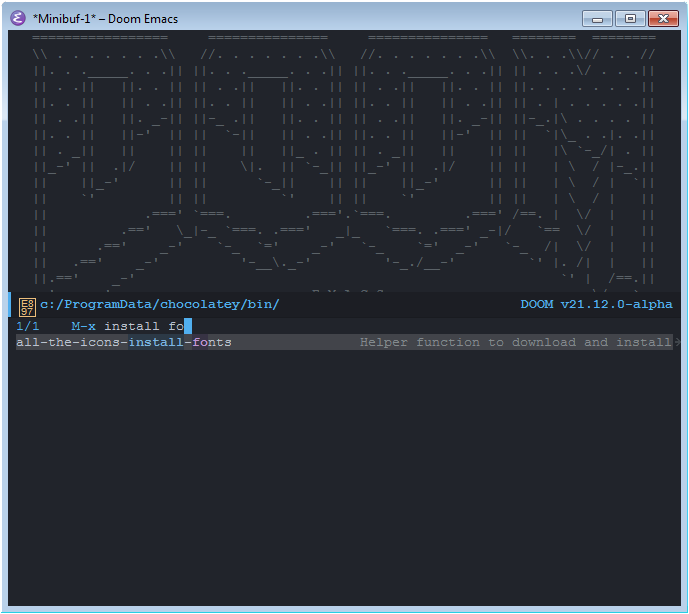
To download the missing fonts inside Emacs, press the space bar followed by the : character and enter the search text install fo.
In the documentation style for Doom Emacs, this command would look like SPC : install fo.
Entering this command shortcut inside Emacs will begin a so-called Meta-x command (M-x) and find the command matching the search string install fo.
Doing this will cause Emacs to suggest the command all-the-icons-install-fonts, which is the correct command to run.
Press Enter to run the selected command.
Emacs will then ask for confirmation with the prompt This will download and install fonts, are you sure you want to do this? (y or n).
Enter y to continue.
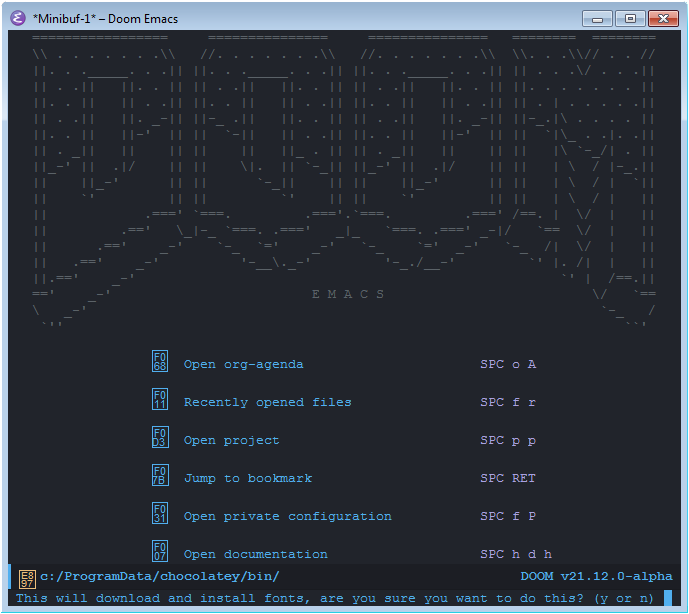
Next, Emacs will ask for a directory where the fonts should be downloaded.
Use the up and down arrow keys or enter filter text to select matching directories from the list.
If needed, enter ../ to move up one directory and list the directories there.
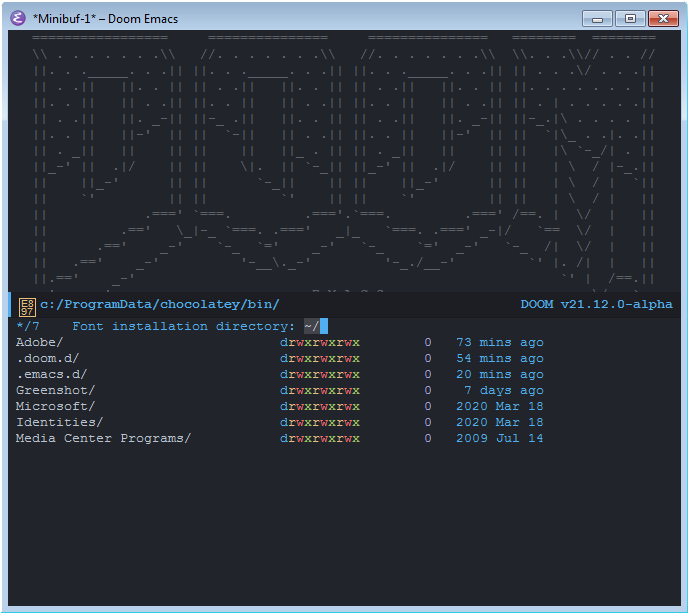
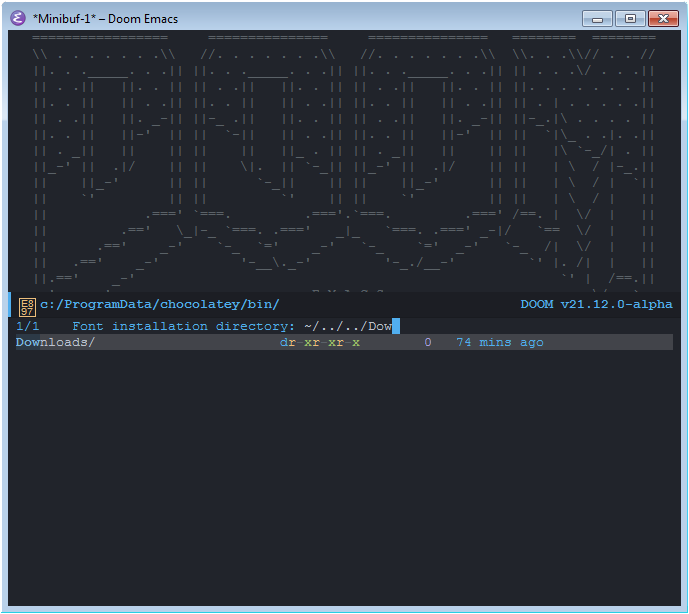
For example, if the current directory is c:/ProgramData/chocolatey/bin, type ../../Dow to go up two directories and select the Windows Downloads directory.
Press Enter to finalize the selection and download the required fonts.
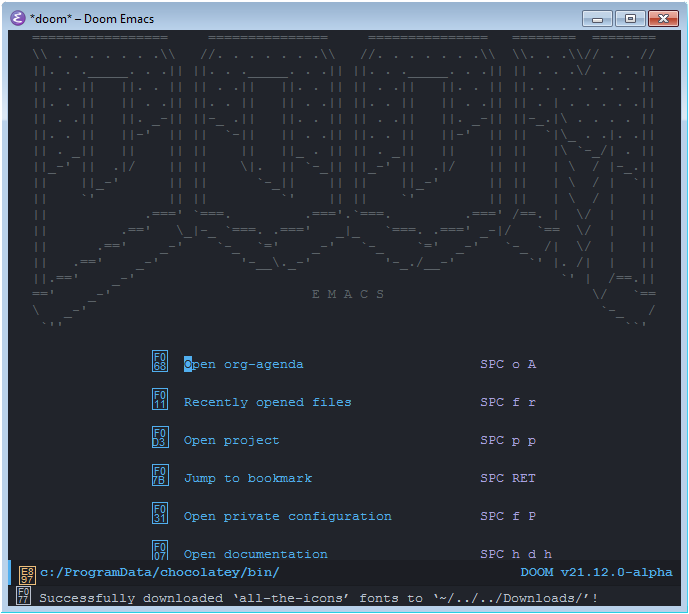
Press the space bar followed by q q (SPC q q) to exit Emacs, then open the Downloads folder and right-click each font file to install them.
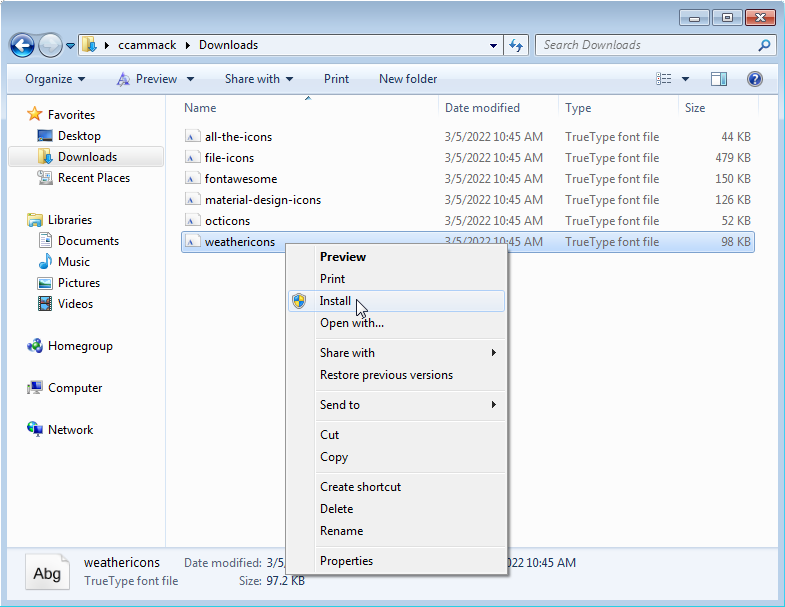
Restart Emacs and note that the little orange square previously at the bottom left corner now appears as a lock, indicating that the required fonts have been installed.
Provide feedback
Saved searches
Use saved searches to filter your results more quickly
Sign up
Appearance settings
Are you tired of using a traditional editor?
Looking for a break from the monotony… plus a little bit of Doom?
Look no further! Doom Emacs is a configuration framework for Emacs that abstracts away a lot of the complexity that goes into perfecting your setup, making it a much friendlier experience overall.
Doom is a purposely light layer over Emacs that emphasizes performance and startup time, without sacrificing extensibility.
It also provides (optional) vim emulation powered by evil-mode out of the box, so if you’re comfortable with vim keybindings, you’ll feel right at home.
With Emacs’ vast selection of amazing packages and excellent language server integration, you can make the most of your editor!
The goal of this post is to give you an intro to Doom/Emacs and offer an overview of some of its features.
I’ll be covering:
- What a typical workflow might look like.
- How to configure Doom using its built-in module system.
- My recommendations for packages and config tweaks: Turn Emacs into an IDE.
Before getting started, I’d highly recommend getting (at least) somewhat familiar with vim keybindings (try vimtutor by installing Neovim and running nvim +Tutor).
Installation #
Installing Emacs/Doom is very OS-specific, so I’m just going to defer to the doomemacs docs here (if you’re on Windows just use WSL).
A small note about Emacs versions, emacs28 (the latest Emacs version at the time of writing) introduces the native compilation feature, which speeds up the execution of Elisp, Emacs’ Lisp variant.
So it’s an all-around Good Thing™️.
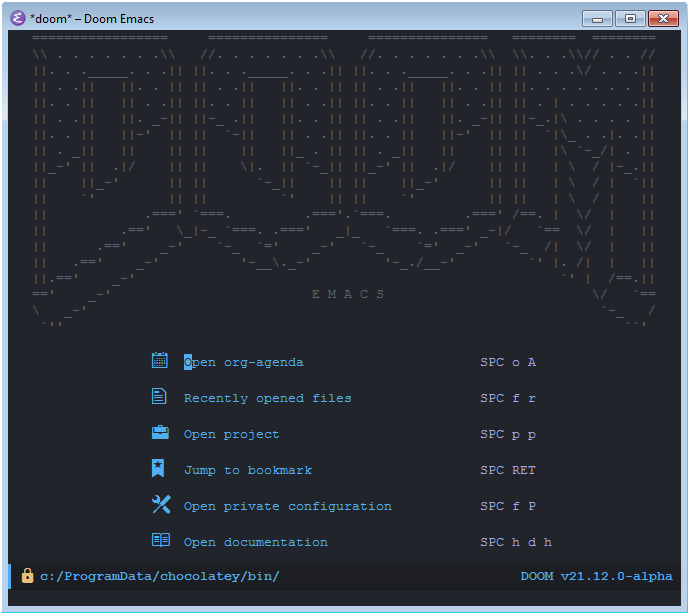
When everything is set up, run Emacs and you should be greeted by a splash screen like this:

First Moments #
So, now you’re in Emacs, congratulations! But, how do you do anything? Here are some helpful keybindings to help you navigate around and start working with files.
| Keybinding | Description |
|---|---|
| SPC . | Find file |
| SPC , | Switch buffer in a workspace |
| SPC b k | Kill buffer |
So, run SPC . and open a file of your choice.
If you open another file and would like to navigate back, you can switch the buffer that you’re looking at with SPC ,.
If you feel that your buffer list is too crowded, or that you’re fully done with working on the current file, use SPC b k to kill the buffer and remove it from the list.
Projects #
I typically structure my business into specific directories, so it’d be helpful if Emacs let you work on projects like a typical editor.
Well… it’s Emacs, so of course you can! Here are some helpful project-related keybindings.
| Keybinding | Description |
|---|---|
| SPC p a | Add known project |
| SPC p p | Switch project |
| SPC SPC | Find file in project |
| SPC / | Project wide search (with ripgrep) |
Warning! For projectile to recognize a “project”, it must contain a special file like a .git or .projectile. If it does not contain one, then it will silently remove your directory from the list.
Getting help + Discovery #
You might’ve heard that Emacs is self-documenting, but how do we actually take advantage of that?
Well, there are handy commands for learning more about the functions we’re using on top of discovering new ones.
Type SPC h and wait for a moment to view the available help commands and their corresponding keybinds.

which-keyMost of these are a little too involved for now, but I’ll be covering the hits (You can also access these via C-h).
| Keybinding | Description |
|---|---|
| M-x … | Search for and run any interactive function |
| SPC h b b | Explore all available key bindings |
| SPC h k | Describes a command associated with a keybinding |
| SPC h f | Describes a function |
| SPC h v | Describes a variable |
M-x (Alt x) is a very commonly used keybinding.
It lists and allows you to run every command you have access to.
You typically won’t be using many of the commands in this list, but it’s useful for learning more about what a package can do.
For example, try searching for projectile to get an idea of the commands you have access to (sometimes without keybindings), such as projectile-replace for find and replace functionality.
In the same spirit as M-x, SPC h b b lets you explore the keybindings you have access to.
You can try searching for either a specific keybind or package name.
For describing / learning more about commands (examples, docs etc…), try SPC h k and typing SPC . to learn more about the find-file function.
Next, try looking at the description for the doom-font variable with SPC h v.
Here you’ll see documentation and examples about how Doom configures your font. Which makes for a good segue about learning how to configure Doom Emacs!
Understanding Your Config #
| Keybinding | Description |
|---|---|
| SPC f p | Find file in private config |
| SPC h r r | Reload your config from within Emacs (like doom sync) |
| SPC q r | Restart Emacs and restore the current session |
| SPC h t | Choose a theme |
Located in $DOOMDIR, Doom’s configuration is mainly controlled by three files: init.el, config.el and packages.el.
To learn more about what each of these files do, I highly recommend reading through this section in the Doom docs.
init.el #
init.el contains your doom! block, which is how you’ll be configuring which packages/modules Doom installs.
To understand how it works, read through the module section in the docs.
Each module has built-in documentation that you can easily view by typing K with your cursor over the module.
As of the time of writing, the docs are still a work in progress, but you can still find helpful information about module flags and packages that a module installs.

If you’re looking into installing additional packages from online guides, you’ll first want to check whether there’s a relevant module in init.el that you can activate instead because modules are pre-configured and are well integrated into Doom.
If you’ve got time on your hands, you can window-shop through init.el and tweak it to your liking.
I’ll also be going over the highlights in Turn Emacs into an IDE.
To have your changes take effect after modifying your init.el, you can run doom sync in your terminal or SPC h r r from within Emacs.
config.el #
config.el is where you configure (shocker!) the packages you install in init.el and packages.el.
Emacs is built on Elisp (an Emacs-specific Lisp variant), so your configuration will also be written in Elisp.
If you’re not comfortable with Lisp, don’t worry!
You can get pretty far with just a basic understanding of the language.
Here’s a rudimentary rundown:
Basic Elisp #
;; (setq key val)

;; Basic values
(setq my-var 10)          ;; number
(setq my-name "Aquabeam") ;; string
(setq my-name 'Aquabeam)  ;; symbol

;; Multiple items in one setq
(setq item1 10
      item2 20
      item3 30)

;; Lists
(setq my-list '(1 2 3 4)) ;; list of numbers

;; Booleans
(setq item t)   ;; true
(setq item nil) ;; false

;; Functions
(message "hello")
You can get a LOT deeper into Elisp, but this is good enough for now.
Here’s a demo showcasing some basic configuration options:
- Configure font
(setq doom-font (font-spec :family "Jetbrains Mono" :size 13.5))
- Configure theme
(setq doom-theme `doom-old-hope)
Use SPC h t to try out available themes.
Also, take a look at doomemeacs/themes for screenshots.
More advanced configuration #
(use-package! markdown-mode
  :defer t
  :config
  (setq markdown-fontify-code-blocks-natively t)
  )
use-package!is a macro for grouping together related configurations. It helps keep yourconfig.elstructured as it grows.:deferis a property which delays loading the package until needed (i.e. when you open a markdown file), which helps improve startup time by not loading packages you might not use.
Caution! When writing your own config, make sure to always use either :after PACKAGE or :defer t in use-package! blocks to lazy load your packages.
packages.el #
This is where you install packages that aren’t built into Doom’s modules. Before installing anything, give this section in the docs a read, it contains warnings + good advice.
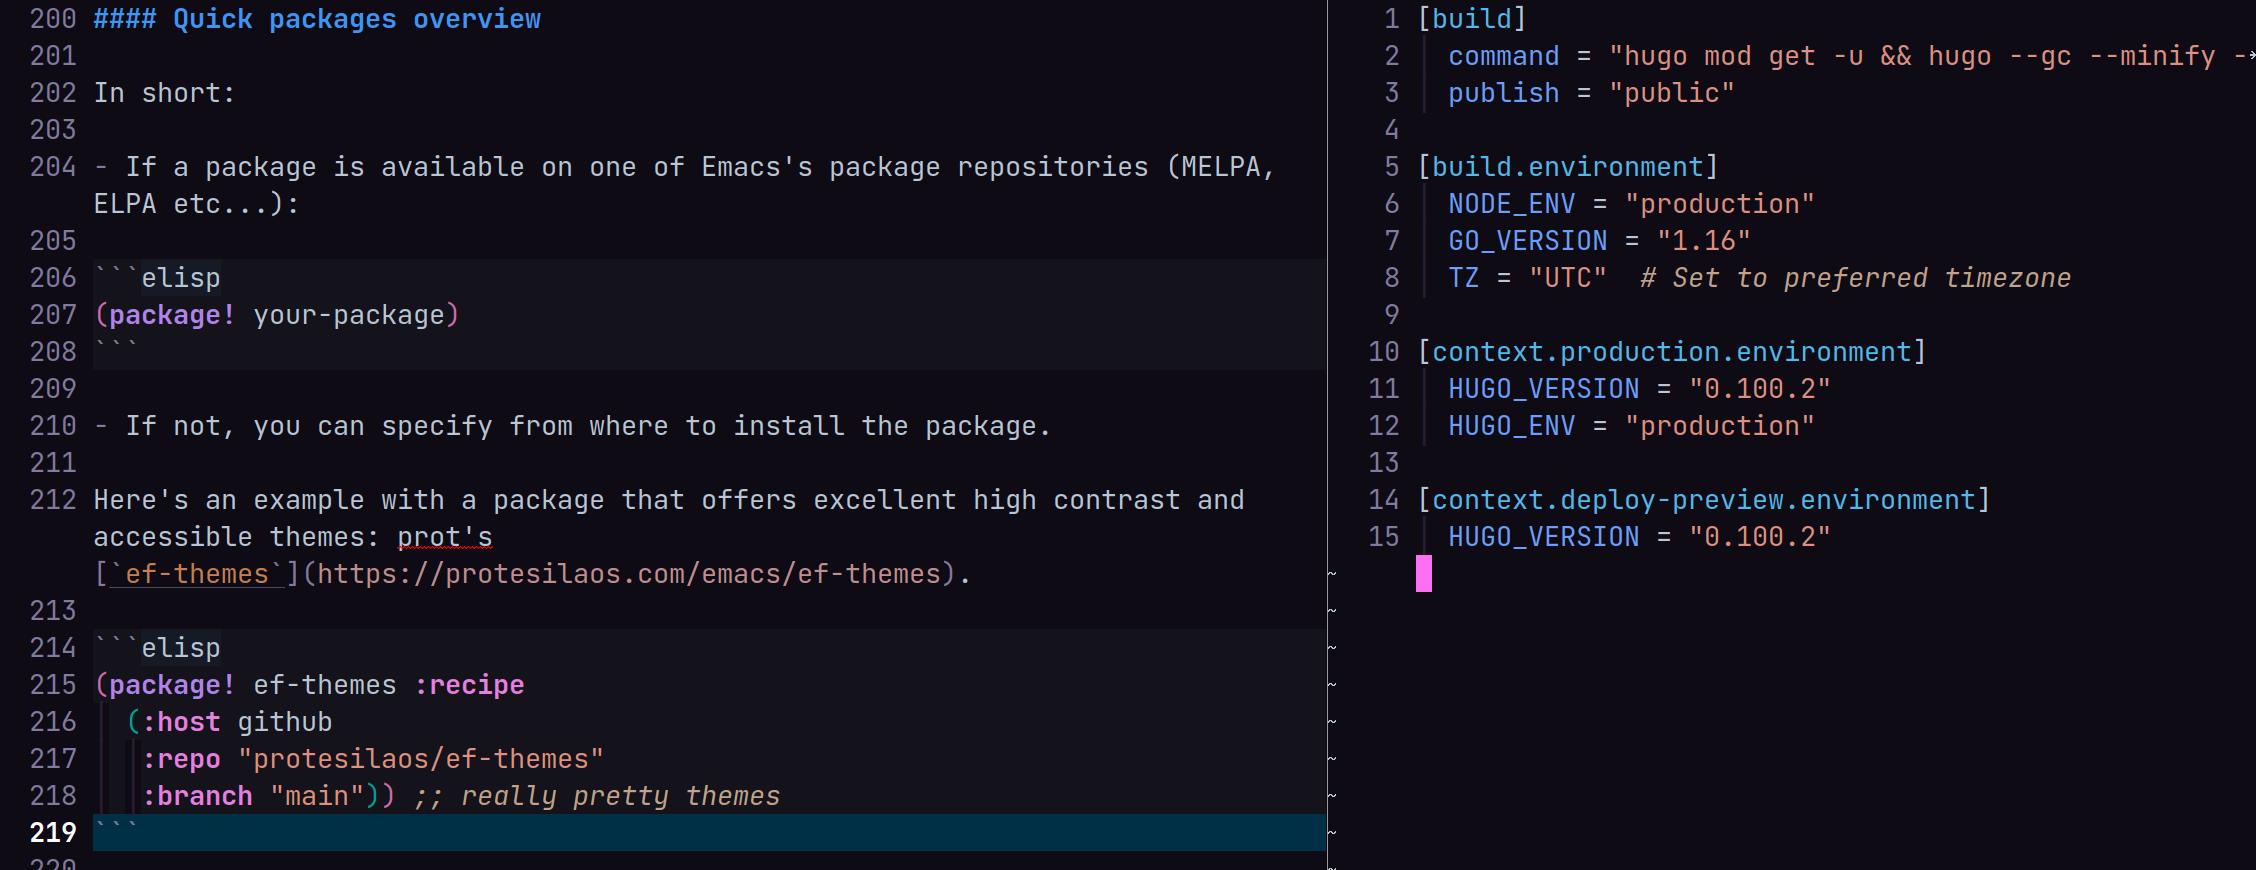
Quick packages overview #
In short:
- If a package is available on one of Emacs’s package repositories (MELPA, ELPA etc…):
- If not, you can specify where to install the package.
Here’s an example with a package that offers excellent high contrast and accessible themes: prot’s ef-themes.
(package! ef-themes :recipe
  (:host github
   :repo "protesilaos/ef-themes"
   :branch "main")) ;; really pretty themes
To have your changes take effect, you can run doom sync or SPC h r r from within Emacs.
Turn Emacs into an IDE #
If you’re coming over from another editor or IDE, you might be wondering how to make Emacs do all the fancy things your previous editor could do, or if it’s even possible.
Fortunately, it is not only possible but also quite painless to get up and running.
Thanks to Doom’s great defaults, all you have to do is toggle some modules in your init.el and carry on like usual!
Working with languages #
To get all the configuration, packages and conveniences you’d expect for a programming language of your choice, simply head over to the :lang section of your init.el and un-comment the language.
After that, make sure to reload your private config to make your changes take effect.
Some modules also have additional flags that you can enable for additional language-specific features.
For instance, I enable javascript integration with the following line in my init.el
(javascript +lsp +tree-sitter) ; all(hope(abandon(ye(who(enter(here))))))
These flags in particular (lsp + tree-sitter) are very important and applicable to many languages!
I’ll be covering them in the following sections.
You can find out which flags are available by typing K with your cursor over a module.
lsp — VSCode-esque intellisense #
The lsp module integrates language servers into Emacs, providing features like jump-to-definition, code completion, real-time linting and more!
To get started, enable the lsp module under :tools which will configure and install lsp-mode.
Then, for each language where you’d like to take advantage of lsp integration, just add the +lsp flag to its module.
If you do not have an appropriate language server installed, lsp-mode will prompt you to install it on your behalf.
When first opening a file that supports lsp, you’ll see the following message:

The first option to import the project root (i) is probably the one you want.
Although, if the project root doesn’t look right, then you might want to set it yourself with I.
Warning! Avoid setting extremely large directories (like your home dir) as the project root. Since lsp-mode will then watch every file in the directory, slowing Emacs down.
Here are some neat things you can do in lsp-mode (LSP keybindings are grouped together under SPC c …):
| Keybinding | Description |
|---|---|
| gd | Go to definition (use C-o to return, C-i to go back) |
| gD | Find all references of an item under your cursor |
| SPC c r | Rename an item (context aware) under your cursor |
| SPC c k/K | View documentation of an item under your cursor |
Tree-sitter — modern syntax highlighting #
The built-in Emacs syntax highlighting for some languages can be lacking at times.
Fortunately, thanks to Tree-sitter there’s a way to improve it.
I’ll defer to the emacs-tree-sitter package for an explanation.
Essentially, Tree-sitter introduces more performant and robust syntax highlighting which gives you more control over the buffer.
Not all languages currently have support for tree-sitter parsing (refer to the module docs for more info).
However, you’ll definitely want to use it when available.
To enable Tree-sitter support for a language, just add the +tree-sitter flag to the module.
vterm— a sweet terminal #
Every good editor needs an even better terminal. Emacs has a few solutions for built-in terminals, but vterm is the clear winner.
Since it’s based on libvterm (an external C library), it’s fast, light and offers “near universal compatibility with terminal applications” (according to the project repository).
To enable it, activate the vterm module in your init.el.
However, since it requires an external dependency, you’ll be prompted to build vterm-module.so during the installation process.
Refer to the module docs if anything goes wrong.
Here are the keybindings you need to know about:
| Keybinding | Description |
|---|---|
| SPC o t | Open a terminal buffer |
| SPC o T | Open a terminal buffer in your current window (allows having multiple open terminal buffers) |
Having a project drawer is a very convenient tool for managing files and understanding your project’s directory structure.
Thankfully Doom provides the treemacs module which does just that.
Simply enable treemacs in your init.el (also consider the +lsp flag for some additional lsp-mode integration)
I also have some additional configuration in my config.el to improve its appearance.
(use-package! treemacs
  :defer t
  :config
  ;; alters file icons to be more vscode-esque (better 😼)
  ;; https://github.com/doomemacs/themes/wiki/Extension:-Treemacs
  (setq doom-themes-treemacs-theme "doom-colors")
  )
Here’s an overview of the keybinds I use most frequently:
| Keybinding | Description |
|---|---|
| SPC o p | Initialize/toggle treemacs |
| SPC o P | Focus the current file in the treemacs window |
| cf | Create a file |
| cd | Create a directory |
| R | Rename a file/dir |
| m | Move a file/dir |
| < | Decrease width of side pane |
| > | Increase width of side pane |
| M-H | Move the project root one level up |
| M-L | Move the project root one level down (at cursor) |
Magit — a sane Git interface #
Despite the ubiquity of Git, it still carries a reputation for being difficult to use and understand.
So much so that if something ever goes wrong, it’s quite compelling to just give up, blow up your repo and start from scratch.
Magit changes that.
After getting comfortable with Magit, I’ve noticed a huge difference in the way I think about organizing commits and my repos. Magit taught me how to make the most of Git, not just as a means to an end.
Flanerie aside… Magit is great! There’s a reason it’s known as one of “Emacs Killer Apps”. The hype is real.
As expected, just enable the magit module in your init.el to install the package.
Unfortunately, it’s a little difficult to understand how to use Magit from a table of keybindings, so I’ll be deferring to SystemCrafers’ excellent Magit introduction video here. It goes through all you need to know to get started with Magit!
General tips #
Here’s a collection of information that’s neat to know.
Managing windows #
If you’re particularly adept at multitasking, you might enjoy being able to look at multiple buffers at once.
If so, here are the keybindings you need to know. Most of these can be repeated by typing ., so you won’t need to retype the entire command when making small modifications.
| Keybinding | Description |
|---|---|
| C-x } | Enlarge window horizontally |
| C-x { | Shrink window horizontally |
| C-x ^ | Enlarge window vertically |
| C-w v | Split window vertically |
| C-w s | Split window horizontally |
| C-w m m | Maximize current buffer |
| C-w [hjkl] | Navigate around open windows (just like regular movement) |
There are doom keybindings for these commands under the SPC w prefix, but I personally find the evil-mode defaults more ergonomic.
Workspaces #
Workspaces are a way of keeping different projects distinctly separate.
For example, they enable you to draft notes and churn out some code in the same Emacs instance, with no overlap between buffers/terminals/sidebars at all.
You might also notice that when you switch to a new project with SPC p p, a new workspace is automatically created for you.
Here are the keybinds you need to know (mostly grouped under SPC TAB ):
| Keybinding | Description |
|---|---|
| gt | Go to the next workspace |
| SPC TAB n | Create a new workspace |
| SPC TAB N | Create a new named workspace |
| SPC TAB d | Delete active workspace |
| SPC TAB r | Rename active workspace |
| SPC TAB TAB | Display active workspaces in echo area |