
You can run any application in Docker as long as it can be installed and executed unattended, and the base operating system supports the app. Windows Server Core runs in Docker which means you can run pretty much any server or console application in Docker.
TL;DR
Update! For a full walkthrough on Dockerizing Windows apps, check out my book Docker on Windows and my Pluralsight course Modernizing .NET Apps with Docker.
Check out these examples:
- openjdk:windowsservercore — Docker image with the Java runtime on Windows Server Core, by Docker Captain Stefan Scherer
- elasticsearch:nanoserver — Docker image with a Java app on Nano Server
- kibana:windowsservercore — Docker image with a Node.js app on Windows Server Core
- nats:nanoserver — Docker image with a Go app on Nano Server
- nerd-dinner — Docker image with an ASP.NET app on Windows Server Core
- dotnetapp — Docker image with a .NET Core app on Nano Server
The 5 Steps
Lately I’ve been Dockerizing a variety of Windows apps — from legacy .NET 2.0 WebForms apps to Java, .NET Core, Go and Node.js. Packaging Windows apps as Docker images to run in containers is straightforward — here’s the 5-step guide.
1. Choose Your Base Image
Docker images for Windows apps need to be based on microsoft/nanoserver or microsoft/windowsservercore, or on another image based on one of those.
Which you use will depend on the application platform, runtime, and installation requirements. For any of the following you need Windows Server Core:
- .NET Framework apps
- MSI installers for apps or dependencies
- 32-bit runtime support
For anything else, you should be able to use Nano Server. I’ve successfully used Nano Server as the base image for Go, Java and Node.js apps.
Nano Server is preferred because it is so drastically slimmed down. It’s easier to distribute, has a smaller attack surface, starts more quickly, and runs more leanly.
Being slimmed down may have problems though — certain Windows APIs just aren’t present in Nano Server, so while your app may build into a Docker image it may not run correctly. You’ll only find that out by testing, but if you do find problems you can just switch to using Server Core.
Unless you know you need Server Core, you should start with Nano Server. Begin by running an interactive container with
docker run -it --rm microsoft/nanoserver powershelland set up your app manually. If it all works, put the commands you ran into a Dockerfile. If something fails, try again with Server Core.
Derived Images
You don’t have to use a base Windows image for your app. There are a growing number of images on Docker Hub which package app frameworks on top of Windows.
They are a good option if they get you started with the dependencies you need. These all come in Server Core and Nano Server variants:
- microsoft/iis — basic Windows with IIS installed
- microsoft/aspnet — ASP.NET installed on top of IIS
- microsoft/aspnet:3.5 — .NET 3.5 installed and ASP.NET set up
- openjdk — OpenJDK Java runtime installed
- golang — Go runtime and SDK installed
- microsoft/dotnet — .NET runtime and SDK installed.
A note of caution about derived images. When you have a Windows app running in a Docker container, you don’t connect to it and run Windows Update to apply security patches. Instead, you build a new image with the latest patches and replace your running container. To support that, Microsoft release regular updates to the base images on Docker Hub, tagging them with a full version number (10.0.14393.693 is the current version).
Base image updates usually happen monthly, so the latest Windows Server Core and Nano Server images have all the latest security patches applied. If you build your images from the Windows base image, you just need to rebuild to get the latest updates. If you use a derived image, you have a dependency on the image owner to update their image, before you can update yours.
If you use a derived image, make sure it has the same release cadence as the base images. Microsoft’s images are usually updated at the same time as the Windows image, but official images may not be.
Alternatively, use the Dockerfile from a derived image to make your own “golden” image. You’ll have to manage the updates for that image, but you will control the timescales. (And you can send in a PR for the official image if you get there first).
2. Install Dependencies
You’ll need to understand your application’s requirements, so you can set up all the dependencies in the image. Both Nano Server and Windows Server Core have PowerShell set up, so you can install any software you need using PowerShell cmdlets.
Remember that the Dockerfile will be the ultimate source of truth for how to deploy and run your application. It’s worth spending time on your Dockerfile so your Docker image is:
- Repeatable. You should be able to rebuild the image at any time in the future and get exactly the same output. You should specify exact version numbers when you install software in the image.
- Secure. Software installation is completely automated, so you should make sure you trust any packages you install. If you download files as part of your install, you can capture the checksum in the Dockerfile and make sure you verify the file after download.
- Minimal. The Docker image you build for your app should be as small as possible, so it’s fast to distribute and has a small surface area. Don’t install anything more than you need, and clean up any installations as you go.
Adding Windows Features
Windows features can be installed with Add-WindowsFeature. If you want to see what features are available for an image, start an interactive container with docker run -it --rm microsoft/windowsservercore powershell and run Get-WindowsFeature.
On Server Core you’ll see that .NET 4.6 is already installed, so you don’t need to add features to run .NET Framework applications.
.NET is backwards-compatible, so you can use the installed .NET 4.6 to run any .NET application, back to .NET 2.0. In theory .NET 1.x apps can run too. I haven’t tried that.
If you’re running an ASP.NET web app but you want to use the base Windows image and control all your dependencies, you can add the Web Server and ASP.NET features:
RUN Add-WindowsFeature Web-server, NET-Framework-45-ASPNET, Web-Asp-Net45
Downloading Files
There’s a standard pattern for installing dependencies from the Internet — here’s a simple example for downloading Node.js into your Docker image:
ENV NODE_VERSION="6.9.4" `
    NODE_SHA256="d546418b58ee6e9fefe3a2cf17cd735ef0c7ddb51605aaed8807d0833beccbf6"

WORKDIR C:/node

RUN Invoke-WebRequest -OutFile node.exe "https://nodejs.org/dist/v$($env:NODE_VERSION)/win-x64/node.exe" -UseBasicParsing; `
    if ((Get-FileHash node.exe -Algorithm sha256).Hash -ne $env:NODE_SHA256) {exit 1} ;
The version of Node to download and the expected SHA-256 checksum are captured as environment variables with the ENV instruction. That makes it easy to upgrade Node in the future — just change the values in the Dockerfile and rebuild. It also makes it easy to see what version is present in a running container, you can just check the environment variable.
The download and hash check is done in a single RUN instruction, using Invoke-WebRequest to download the file and then Get-FileHash to verify the checksum. If the hashes don’t match, the build fails.
After these instructions run, your image has the Node.js runtime in a known location — C:\node\node.exe. It’s a known version of Node, verified from a trusted download source.
Expanding Archives
For dependencies that come packaged, you’ll need to install them as part of the RUN instruction. Here’s an example for Elasticsearch which downloads and uncompresses a ZIP file:
ENV ES_VERSION="5.2.0" `
    ES_SHA1="243cce802055a06e810fc1939d9f8b22ee68d227" `
    ES_HOME="c:\elasticsearch"

RUN Invoke-WebRequest -outfile elasticsearch.zip "https://artifacts.elastic.co/downloads/elasticsearch/elasticsearch-$($env:ES_VERSION).zip" -UseBasicParsing; `
    if ((Get-FileHash elasticsearch.zip -Algorithm sha1).Hash -ne $env:ES_SHA1) {exit 1} ; `
    Expand-Archive elasticsearch.zip -DestinationPath C:\ ; `
    Move-Item c:/elasticsearch-$($env:ES_VERSION) 'c:\elasticsearch'; `
    Remove-Item elasticsearch.zip
It’s the same pattern as before, capturing the checksum, downloading the file and checking the hash. In this case, if the hash is good the file is uncompressed with Expand-Archive, moved to a known location and the Zip file is deleted.
Don’t be tempted to keep the Zip file in the image, “in case you need it”. You won’t need it — if there’s a problem with the image you’ll build a new one. And it’s important to remove the package in the same RUN command, so the Zip file is downloaded, expanded and deleted in a single image layer.
It may take several iterations to build your image. While you’re working on it, it’s a good idea to store any downloads locally and add them to the image with
COPY. That saves you downloading large files every time. When you have your app working, replace theCOPYwith the proper download-verify-deleteRUNpattern.
Installing MSIs
You can download and run MSIs using the same approach. Be aware that not all MSIs will be built to support unattended installation. A well-built MSI will support command-line switches for any options available in the UI, but that isn’t always the case.
If you can install the app from an MSI you’ll also need to ensure that the install completed before you move on to the next Dockerfile instruction — some MSIs continue to run in the background. This example from Stefan Scherer’s iisnode Dockerfile uses Start-Process ... -Wait to run the MSI:
RUN Write-Host 'Downloading iisnode' ; \
    $MsiFile = $env:Temp + '\iisnode.msi' ; \
    (New-Object Net.WebClient).DownloadFile('https://github.com/tjanczuk/iisnode/releases/download/v0.2.21/iisnode-full-v0.2.21-x64.msi', $MsiFile) ; \
    Write-Host 'Installing iisnode' ; \
    Start-Process msiexec.exe -ArgumentList '/i', $MsiFile, '/quiet', '/norestart' -NoNewWindow -Wait
3. Deploy the Application
Packaging your own app will be a simplified version of step 2. If you already have a build process which generates an unattended-friendly MSI, you can can copy it from the local machine into the image and install it with msiexec:
COPY UpgradeSample-1.0.0.0.msi /

RUN msiexec /i c:\UpgradeSample-1.0.0.0.msi RELEASENAME=2017.02 /qn
This example is from the Modernize ASP.NET Apps — Ops Lab from Docker Labs on GitHub. The MSI supports app configuration with the RELEASENAME option, and it runs unattended with the qn flag.
With MSIs and other packaged deployment options (like Web Deploy) you need to choose between using what you currently have, or changing your build output to something more Docker friendly.
Web Deploy needs an agent installed into the image which adds an unnecessary piece of software. MSIs don’t need an agent, but they’re opaque, so it’s not clear what’s happening when the app gets installed. The Dockerfile isn’t an explicit deployment guide if some of the steps are hidden.
An xcopy deployment approach is better, where you package the application and its dependencies into a folder and copy that folder into the image. Your image will only run a single app, so there won’t be any dependency clashes.
This example copies an ASP.NET Web app folder into the image, and configures it with IIS using PowerShell:
RUN New-Item -Path 'C:\web-app' -Type Directory; `
    New-WebApplication -Name UpgradeSample -Site 'Default Web Site' -PhysicalPath 'C:\web-app'

COPY UpgradeSample.Web /web-app
If you’re looking at changing an existing build process to produce your app package, you should think about building your app in Docker too. Consolidating the build in a multi-stage Dockerfile means you can build your app anywhere without needing to install .NET or Visual Studio.
See Dockerizing .NET Apps with Microsoft’s Build Images on Docker Hub.
4. Configure the Entrypoint
When you run a container from an image, Docker starts the process specified in the CMD or ENTRYPOINT instruction in the Dockerfile.
Modern app frameworks like .NET Core, Node and Go run as console apps — even for Web applications. That’s easy to set up in the Dockerfile. This is how to run the open source Docker Registry — which is a Go application — inside a container:
CMD ["registry", "serve", "config.yml"]
Here registry is the name of the executable, and the other values are passed as options to the exe.
ENTRYPOINTandCMDwork differently and can be used in conjunction. See how CMD and ENTRYPOINT interact to learn how to use them effectively.
Starting a single process is the ideal way to run apps in Docker. The engine monitors the process running in the container, so if it stops Docker can raise an error. If it’s also a console app, then log entries written by the app are collected by Docker and can be viewed with docker logs.
For .NET web apps running in IIS, you need to take a different approach. The actual process serving your app is w3wp.exe, but that’s managed by the IIS Windows service, which is running in the background.
IIS will keep your web app running, but Docker needs a process to start and monitor. In Microsoft’s IIS image they use a tool called ServiceMonitor.exe as the entrypoint. That tool continually checks a Windows service is running, so if IIS does fail the monitor process raises the failure to Docker.
Alternatively, you could run a PowerShell startup script to monitor IIS and add extra functionality — like tailing the IIS log files so they get exposed to Docker.
5. Add a Healthcheck
HEALTHCHECK is one of the most useful instructions in the Dockerfile and you should include one in every app you Dockerize for production. Healthchecks are how you tell Docker if the app inside your container is healthy.
Docker monitors the process running in the container, but that’s just a basic liveness check. The process could be running, but your app could be in a failed state — for a .NET Core app, the dotnet executable may be up but returning 503 to every request. Without a healthcheck, Docker has no way to know the app is failing.
A healthcheck is a script you define in the Dockerfile, which the Docker engine executes inside the container at regular intervals (30 seconds by default, but configurable at the image and container level).
This is a simple healthcheck for a web application, which makes a web request to the local host (remember the healthcheck executes inside the container) and checks for a 200 response status:
HEALTHCHECK CMD powershell -command `
    try { `
     $response = iwr http://localhost:80 -UseBasicParsing; `
     if ($response.StatusCode -eq 200) { return 0} `
     else {return 1}; `
    } catch { return 1 }
Healthcheck commands need to return 0 if the app is healthy, and 1 if not. The check you make inside the healthcheck can be as complex as you like — having a diagnostics endpoint in your app and testing that is a thorough approach.
Make sure your
HEALTHCHECKcommand is stable, and always returns0or1. If the command itself fails, your container may not start.
Any type of app can have a healthcheck. Michael Friis added this simple but very useful check to the Microsoft SQL Server Express image:
HEALTHCHECK CMD ["sqlcmd", "-Q", "select 1"]
The command verifies that the SQL Server database engine is running, and is able to respond to a simple query.
There are additional advantages in having a comprehensive healthcheck. The command runs when the container starts, so if your check exercises the main path in your app, it acts as a warm-up. When the first user request hits, the app is already running warm so there’s no delay in sending the response.
Healthchecks are also very useful if you have expiry-based caching in your app. You can rely on the regular running of the healthcheck to keep your cache up-to date, so you could cache items for 25 seconds, knowing the healthcheck will run every 30 seconds and refresh them.
Summary
Dockerizing Windows apps is straightforward. The Dockerfile syntax is clean and simple, and you only need to learn a handful of instructions to build production-grade Docker images based on Windows Server Core or Nano Server.
Following these steps will get you a functioning Windows app in a Docker image — then you can look to optimizing your Dockerfile.
Уровень сложностиСредний
Время на прочтение6 мин
Количество просмотров11K

Если на компьютере под Linux нужно быстренько запустить Windows или MacOS, самый простой и быстрый способ сделать это — ввести команду для скачивания и загрузки докер-контейнера с этой ОС.
В маркетплейсе RuVDS много готовых образов с установленными операционными системами. Там разные дистрибутивы Linux, Windows Server и CentOS. Но нет контейнеров с операционными системами.
Операционная система в докер-контейнере (в QEMU) не требует ручной инсталляции ОС. Всего одна команда в консоли — и контейнер Windows скачивается и запускается.
Набор контейнеров Dockur
Хороший набор докер-контейнеров с готовыми образами операционных систем в виртуальных машинах QEMU можно найти в репозитории Dockur.
Для выбора версии Windows при установке контейнера нужно изменить соответствующее значение в переменной окружения конфигурационного файла:
environment:
  VERSION: "11"
В наличии следующие контейнеры Windows:
Предупреждение. Windows 8 потребляет очень много ресурсов CPU и RAM.
Есть также контейнеры MacOS, тут выбор поменьше:
Запуск через Docker Compose:
services:
  macos:
    image: dockurr/macos
    container_name: macos
    environment:
      VERSION: "13"
    devices:
      - /dev/kvm
      - /dev/net/tun
    cap_add:
      - NET_ADMIN
    ports:
      - 8006:8006
      - 5900:5900/tcp
      - 5900:5900/udp
    volumes:
      - ./macos:/storage
    restart: always
    stop_grace_period: 2m
Из консоли:
docker run -it --rm --name macos -p 8006:8006 --device=/dev/kvm --device=/dev/net/tun --cap-add NET_ADMIN -v ${PWD:-.}/macos:/storage --stop-timeout 120 dockurr/macosДля выбора версии тоже следует изменить значение в переменной окружения конфигурационного файла:
environment:
  VERSION: "13"
Версии MacOS перечислены в таблице выше.
Запуск контейнера Windows на сервере
Установить контейнер можно через Docker Compose, вот файл compose.yaml, который практически идентичен файлу для MacOS:
services:
  windows:
    image: dockurr/windows
    container_name: windows
    environment:
      VERSION: "11"
    devices:
      - /dev/kvm
      - /dev/net/tun
    cap_add:
      - NET_ADMIN
    ports:
      - 8006:8006
      - 3389:3389/tcp
      - 3389:3389/udp
    volumes:
      - ./windows:/storage
    restart: always
    stop_grace_period: 2m
Или из командной строки:
docker run -it --rm --name windows -p 8006:8006 --device=/dev/kvm --device=/dev/net/tun --cap-add NET_ADMIN -v ${PWD:-.}/windows:/storage --stop-timeout 120 dockurr/windowsПо умолчанию устанавливается Windows 11 Pro, другие версии можно указать, изменив параметр переменной окружения, как написано выше.
Дальнейший процесс полностью автоматический, нужно дождаться, пока контейнер скачается и запустится. Docker будет доступен через браузер на порту 8006.
Если зайти по нашему IP-адресу и указанному порту, мы увидим процесс скачивания ISO-образа Windows с сервера Microsoft:

Потом автоматическая установка и настройка Windows:

Это специальная версия Windows for Docker, она свободно распространяется с сайта Microsoft и требует активации для полноценной работы. Более старые версии Windows работают 30 дней без активации.

После завершения процесса в браузере откроется рабочий стол Windows:
Через браузер у нас работает система удалённого доступа к рабочему столу VNC (Virtual Network Computing), которая заметно подтормаживает, не поддерживает передачу звука и некоторых других функций. Для максимального комфорта рекомендуется настроить удалённый доступ через RDP. Собственно, этот доступ уже настроен в вышеуказанном файле compose.yaml, в котором присутствуют такие строки:
- 3389:3389/tcp
- 3389:3389/udp
По этим портам и осуществляется удалённый доступ к системе из RDP-клиента, такого как Microsoft Remote Desktop, можно на той же физической системе.
В командной строке для запуска контейнера мы видим параметр --device=/dev/kvm. Это указывает на использование виртуальной машины KVM (Kernel-based Virtual Machine), опенсорсной технологии виртуализации, встроенной в Linux. В частности, KVM позволяет превратить Linux в гипервизор для запуска нескольких изолированных виртуальных окружений, то есть виртуальных машин.
KVM — это часть Linux с 2006 года (с версии ядра 2.6.20), то есть в данном случае мы работаем с нативной виртуальной машиной Linux. Чтобы это стало возможным, материнская плата должна поддерживать технологию виртуализации на аппаратном уровне:

Чтобы проверить наличие поддержки KVM на сервере под Linux, можно запустить следующую команду:
sudo apt install cpu-checker
sudo kvm-ok
Если kvm-ok выдаёт ошибку, то нужно проверить, что:
- в BIOS включены соответствующие расширения виртуализации (Intel VT-x, VT-d или AMD SVM),
- включена «вложенная виртуализация», если контейнер запускается внутри виртуальной машины.
К сожалению, большинство облачных провайдеров не разрешают вложенную виртуализацию на своих VPS:

Поэтому Windows в докер-контейнере запустится только на выделенном сервере или на домашнем сервере/ПК.
Если kvm-ok не выдаёт никакой ошибки, но контейнер всё равно сообщает об отсутствии KVM-устройства, причиной может быть проблема с правами, в качестве решения можно добавить параметр privileged: true в файл compose (или sudo в команду docker).
KVM обеспечивает виртуальной машине доступ к USB-устройствам и другим аппаратным ресурсам. Он позволит даже редактировать BIOS, как в примере выше.
По умолчанию, контейнеру Windows выделяется два ядра CPU и 4 ГБ RAM, это минимальные требования для запуска Windows 11. Чтобы изменить объём выделяемых ресурсов, следует добавить следующие строчки в конфигурационный файл:
environment:
  RAM_SIZE: "8G"
  CPU_CORES: "4"
Увеличение объёма дискового пространства со стандартных 64 ГБ (по умолчанию) до 100 ГБ:
environment:
  DISK_SIZE: "100G"
Виртуальная машина будет занимать столько места на диске, сколько реально занимает контейнер с файлами, а не максимальное указанное значение.
Добавить несколько дисков:
environment:
  DISK2_SIZE: "32G"
  DISK3_SIZE: "64G"
volumes:
  - ./example2:/storage2
  - ./example3:/storage3
Зачем это нужно
Распространённая причина запуска Windows в контейнере — если у нас чисто линуксовое (или яблочное) окружение, вокруг нет ни одного компьютера под Windows, но срочно понадобилось запустить какую-то специфическую программу, которая работает только под Windows. В окружении виртуализации типа Wine эта программа не полностью функциональна. Например, старая утилита для редактирования BIOS (как AMIBCP на скриншоте) запускается под Wine, но не даёт реально изменять значения BIOS, то есть не сохраняет образ ROM:

Конечно, можно установить на ПК мультизагрузчик и вторую ОС или запустить виртуальную машину, но это тоже непростой и многоступенчатый процесс: сконфигурировать гипервизор, выделить аппаратные ресурсы.
Копия Windows в контейнере — самый простой и быстрый способ, если срочно нужна эта ОС. И самое удобное то, что не нужно проходить через процесс инсталляции системы вручную, потому что она устанавливается автоматически и сразу готова к работе. Вся процедура скачивания и запуска контейнера занимает несколько минут.
Другие наборы контейнеров
Кроме перечисленных выше, в репозитории Dockur есть и другие наборы докер-контейнеров, а также программы, полезные для самохостинга:
- Windows для ARM64,
- сервер Samba SMB,
- Dnsmasq,
- strfry, рилей-сервер Nostr,
- casa, операционная система CasaOS для самохостинга (личное облако или домашний дата-центр),

- statping — страничка с красивыми графиками, аналитикой и плагинами, всё для мониторинга сайтов и приложений,
- lemmy — агрегатор ссылок и форум, аналог Reddit или Hacker News, только для децентрализованной сети будущего, где у каждого пользователя свой сервер.

Windows на виртуальном сервере
Хотя KVM не работает на VPS, в маркетплейсе RUVDS есть четыре образа с установленной системой Windows Server 2019 и специализированным программным обеспечением:
- METATRADER 5 (MT5) – SERVER CORE с торговым терминалом MT5,
- SQL EXPRESS – SERVER CORE c бесплатной редакцией SQL Server 2019 и SQL Server Management Studio 18.4. Максимальный размер БД в этой редакции ограничен 10 ГБ,
- сервер Minecraft,
- VPN L2TP — позволяет сразу после установки шаблона подключаться к серверу по VPN, целиком меняя IP-адрес подключившегося.

Если выбрать такой образ — мы получаем готовую лицензированную Windows и настроенный софт.
Кроме того, при ручной конфигурации сервера в конфигураторе есть возможность выбрать несколько версий серверной ОС Windows для установки:
- Windows Server 2022.
- Windows Server 2019.
- Windows Server 2016.
- Windows Server 2012 R2.
- Windows Server Core 2022.

Есть и готовые тарифы с Windows:

Самая дешёвая Windows 2012 R2 стоит 588 руб. в месяц (470 руб. при оплате за год).
С 2023 года у российских пользователей возникли проблемы с покупкой Windows в условиях санкций. В такой ситуации выбор VPS с предустановленной Windows или докер-контейнер с официальным образом — легальный выход из ситуации.
Кстати, таким же удобным способом в Docker/QEMU можно запускать и Linux-контейнеры.
© 2025 ООО «МТ ФИНАНС»
Telegram-канал со скидками, розыгрышами призов и новостями IT 💻

I learned about an exciting project via an email from the developer. I would like to share a new project that allows you to run Windows inside a Docker container without jumping through a lot of hoops. What’s more, you can do this using a Linux Docker host with KVM installed. Let’s take a look at this really cool project in the following content to see how we can run Windows in this context.
Table of contents
- What is Dockurr?
- Prerequisites
- Install Kernel Virtual Machine (KVM)
- Pull down Dockurr in a container and spin up Windows in a Docker container
- Connecting RDP to Windows 11 desktop running in the container
- Running different Windows OS images in Docker
- Custom images
- Networking
- CPU and memory
- What use case does this solve?
- Different than traditional Windows containers
- Docker desktop is still a viable solution
- Wrapping up running Windows 11 Desktop in a Docker container
What is Dockurr?
It is a free and open-source project that allows running Windows client and Windows Server desktop installations inside a Docker container environment. It also allows you to do this on a Linux Docker host that would normally only be able to run Linux containers. Using KVM acceleration, it allows you to run Windows containers on a Linux container host without the need to install and start Docker Desktop or other compatibility issues that are typical with mixing OS’es between Linux and Windows.
You can find the project link to the official Github site here: dockur/windows: Windows in a Docker container. (github.com) .
Instead you can run Windows containers simultaneously with Linux containers using the solution after loading a Docker installation, Docker daemon, etc. Typically Docker Desktop is needed to run the Docker Engine and be able to run containers on Windows, or the reverse is true to run Linux on Windows, using something like WSL, WSL2, or Hyper-V.
It also provides a VNC connection to the container during the installation process. It also allows you to connect via Remote Desktop Protocol (RDP) to the Windows installation running in Docker.
What Windows distro configurations are supported?
- Windows 11 Pro
- Windows 10 Pro
- Windows 10 LTSC
- Windows 8.1 Pro
- Windows 7 SP1
- Windows Vista SP2
- Windows XP SP3
- Windows Server 2022
- Windows Server 2019
- Windows Server 2016
- Windows Server 2012 R2
- Windows Server 2008 R2
- Tiny 11 Core
- Tiny 11
- Tiny 10
Prerequisites
As mentioned, you will need:
- A Linux Docker host (so a Windows Docker host is not required)
- You will need to install Kernel Virtual Machine (KVM) on the Docker host
Install Kernel Virtual Machine (KVM)
First, let’s quickly look at installing Kernel Virtual Machine (KVM) that is used to run virtual machines. If you don’t have KVM installed and attempt to run the container, you will receive an error. I am using an Ubuntu Server 22.04 LTS machine running as a Virtual Machine with nested virtualization enabled on the VM, which allows you to enable hardware virtualization. However, you could use Debian, or another distribution that you like to work with.
Run the following from the command line to install KVM. Make sure you are root or in the sudo users permissions group.:
sudo apt install libvirt-clients libvirt-daemon-system libvirt-daemon virtinst bridge-utils qemu qemu-kvm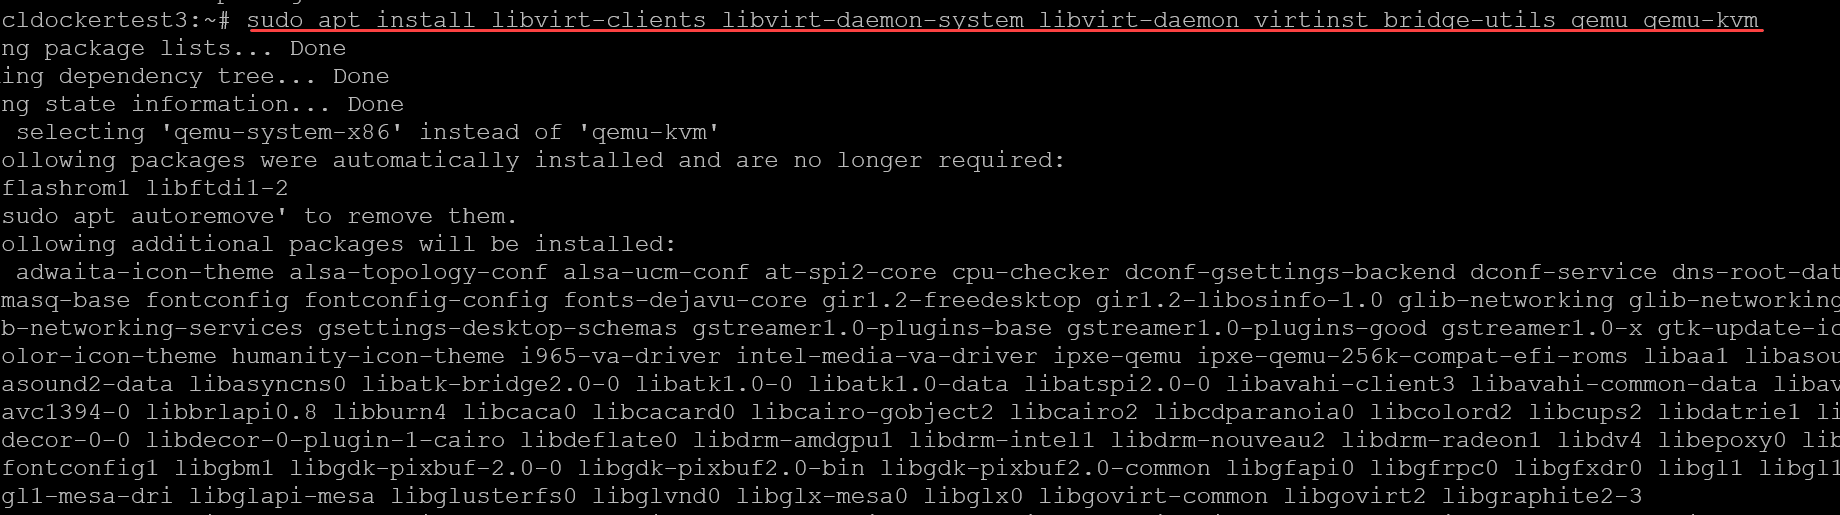
Pull down Dockurr in a container and spin up Windows in a Docker container
After installing KVM on our Linux Docker host, we can now spin up the Docker container called Dockurr, which uses the isolation of KVM. We can do this with some simple Docker compose code. When you spin up the default container configuration, it will pull a Windows 11 Docker image. Note the example Docker compose configuration below:
version: "3"
services:
  windows:
    image: dockurr/windows
    container_name: windows
    devices:
      - /dev/kvm
    cap_add:
      - NET_ADMIN
    ports:
      - 8006:8006
      - 3389:3389/tcp
      - 3389:3389/udp
    stop_grace_period: 2m
    restart: on-failure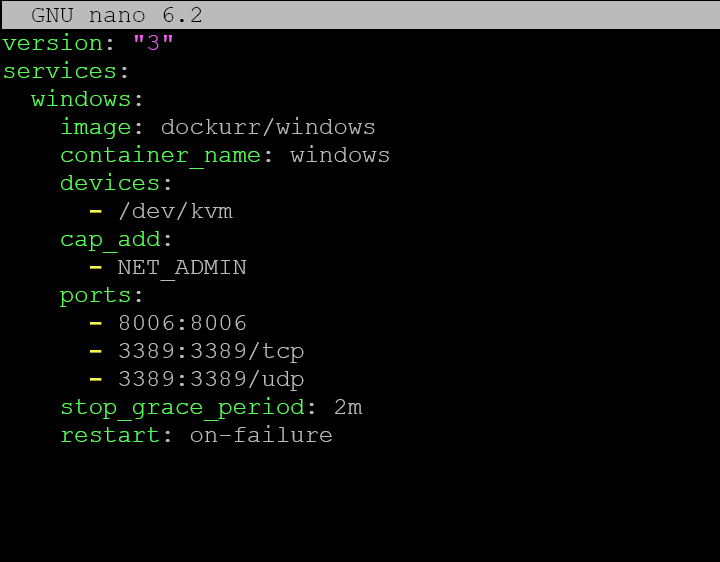
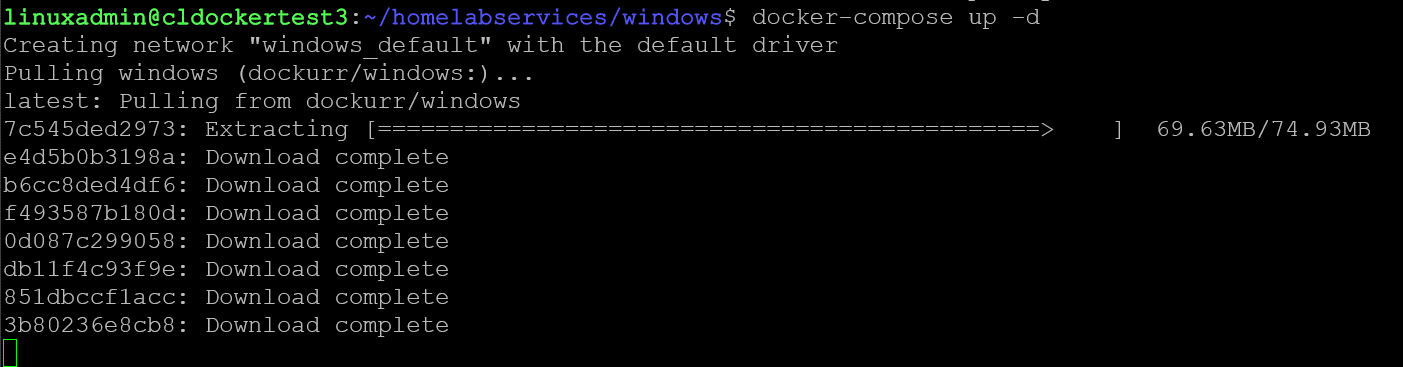
Below, we are running a docker-compose up -d command to bring up the container.
You an also use a docker run command from the docker CLI to pull the container down as well:
docker run -it --rm --name windows -p 8006:8006 --device=/dev/kvm --cap-add NET_ADMIN --stop-timeout 120 dockurr/windows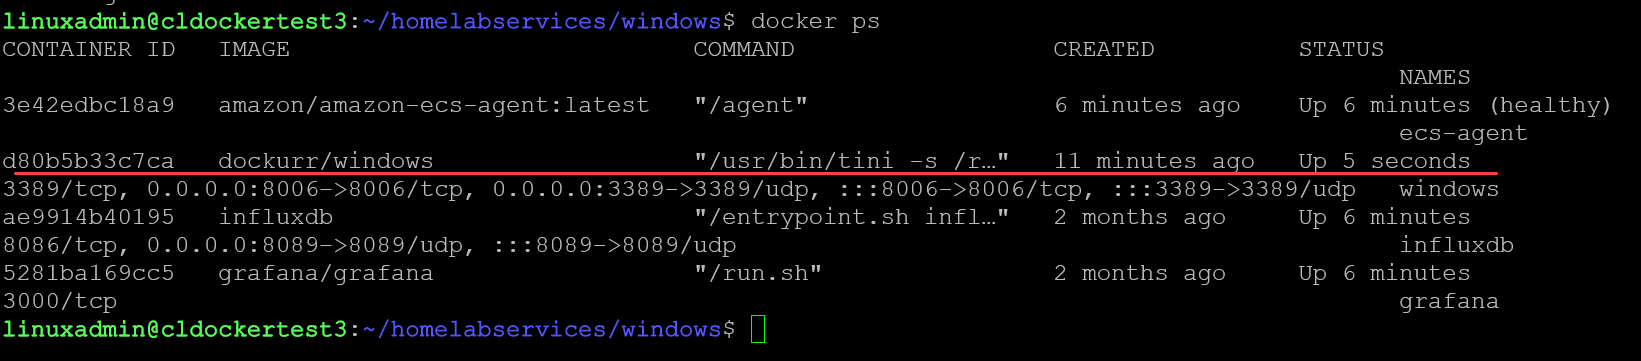
After you use the above commands to pull down the Dockurr solution, you can connect to the container on your container host by connecting to your container host in a browser on port 8006 for UI access.
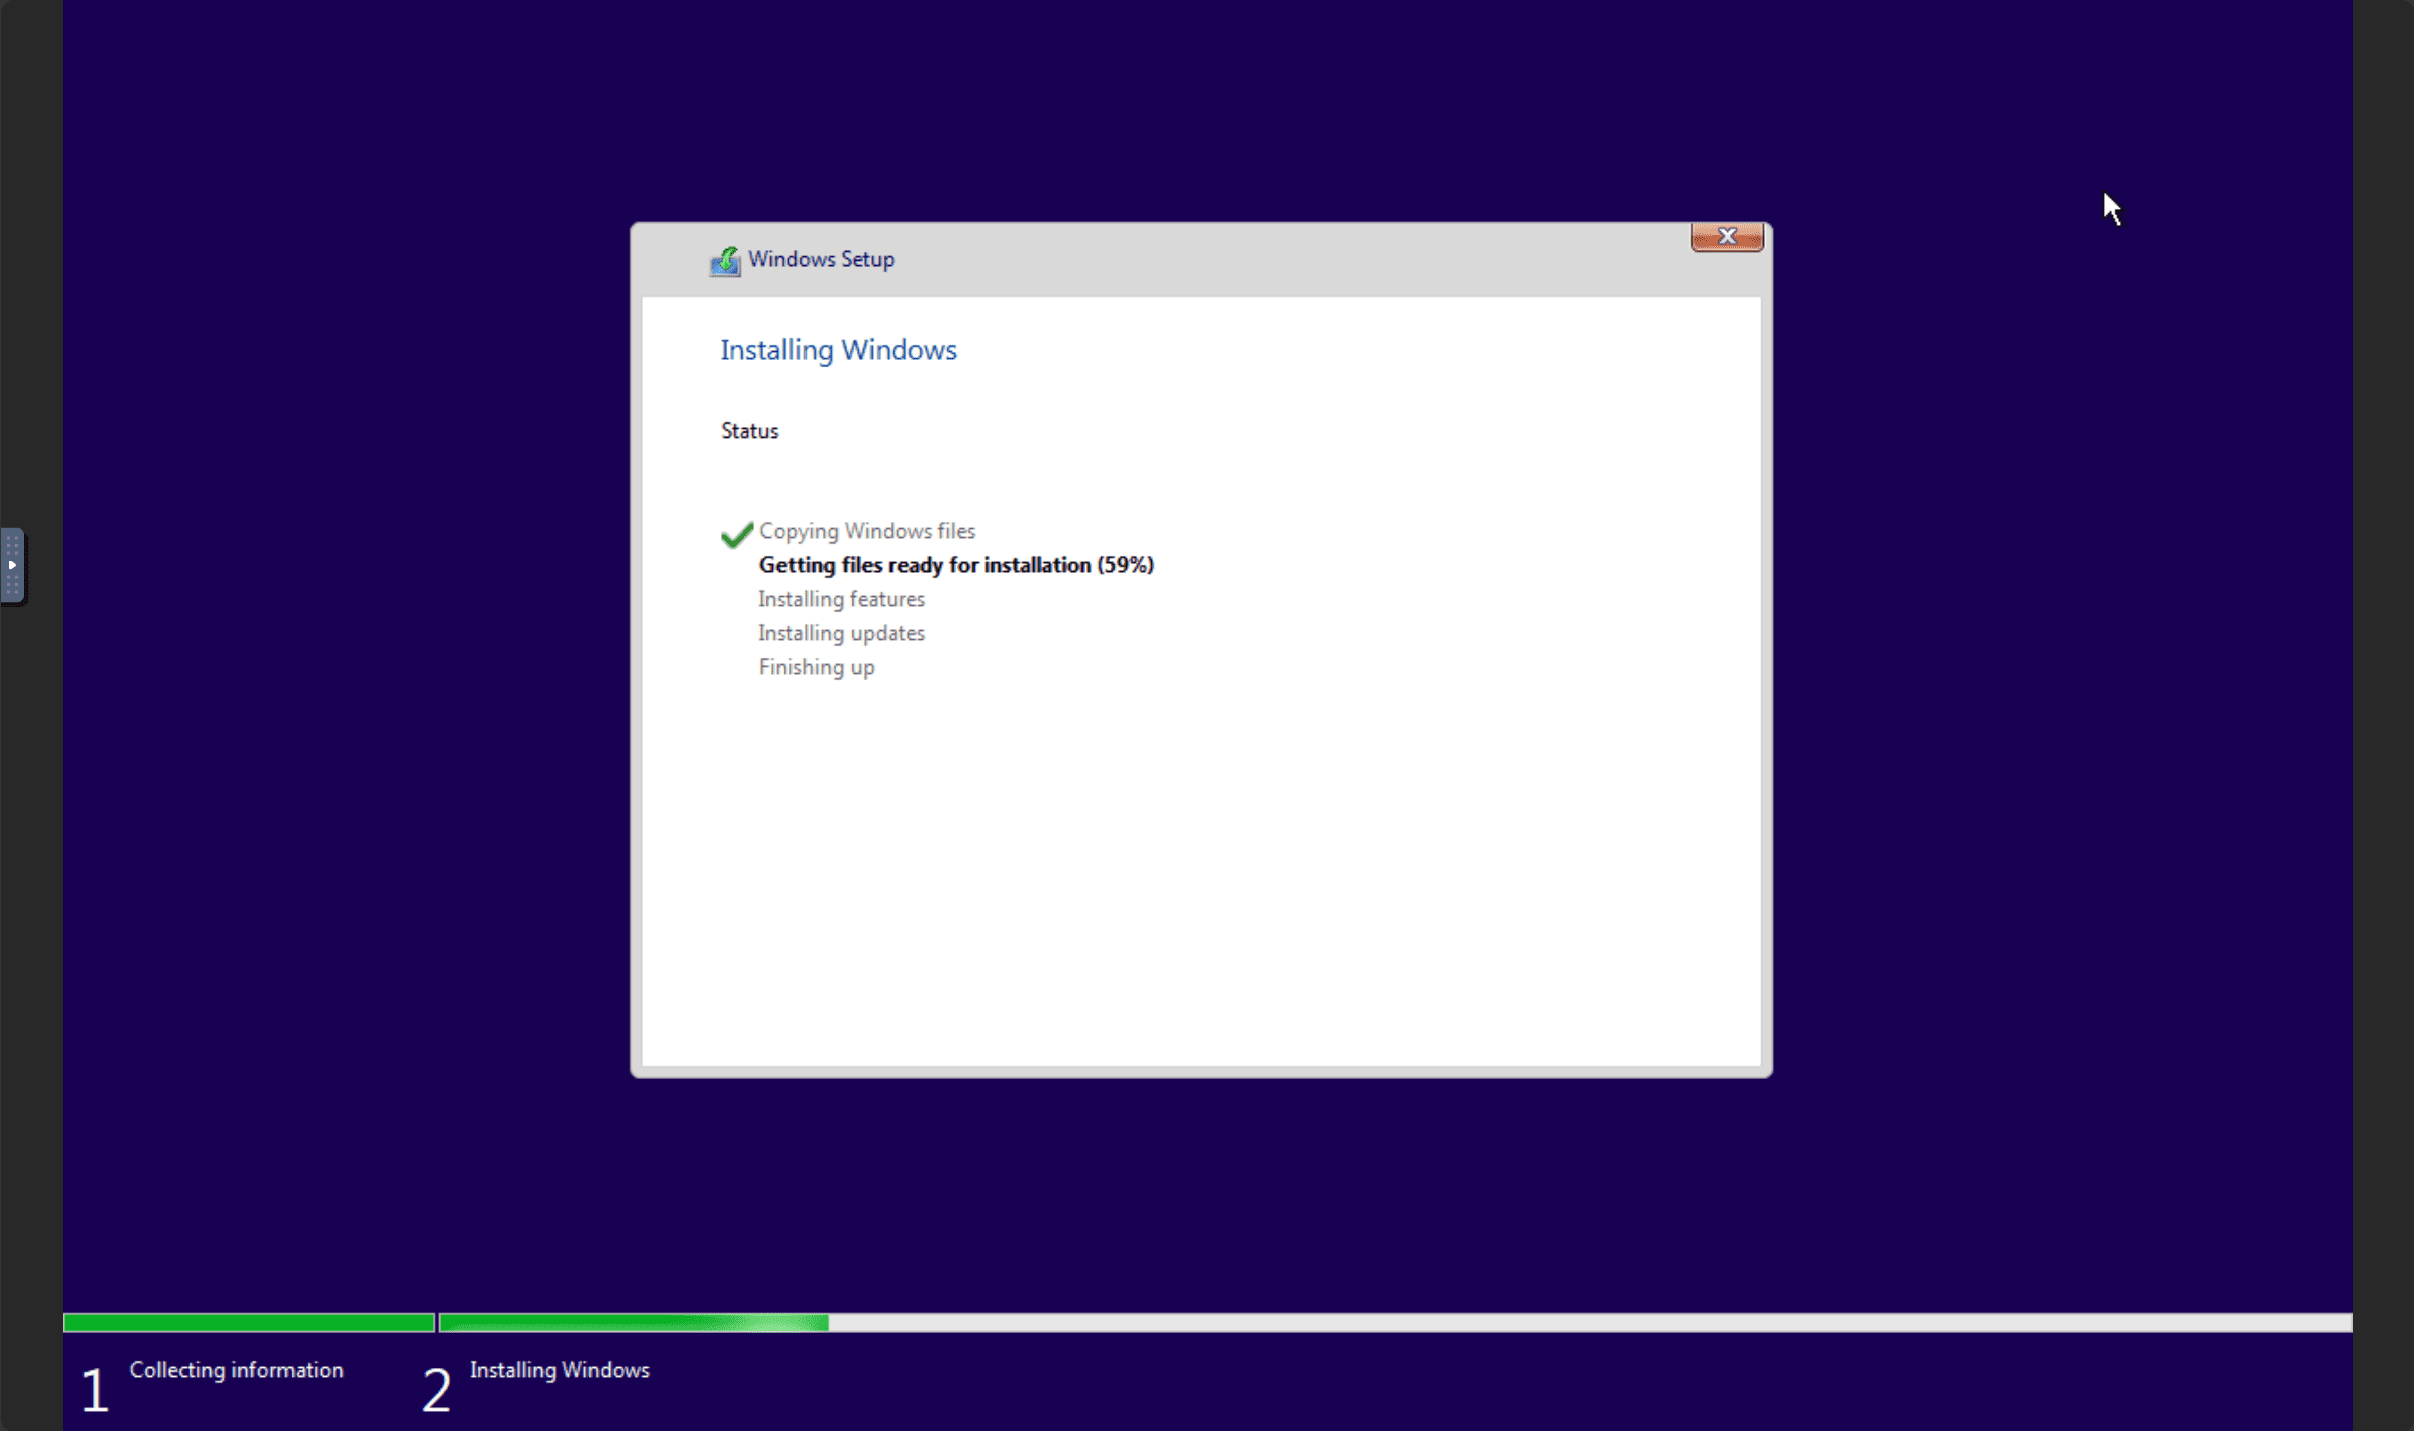
You will see the following screens during the install. It will show that itis downloading the image and a few other things as it gets distracted.
The image will show it is downloading, and then extracting the files it needs for the installation in the background.
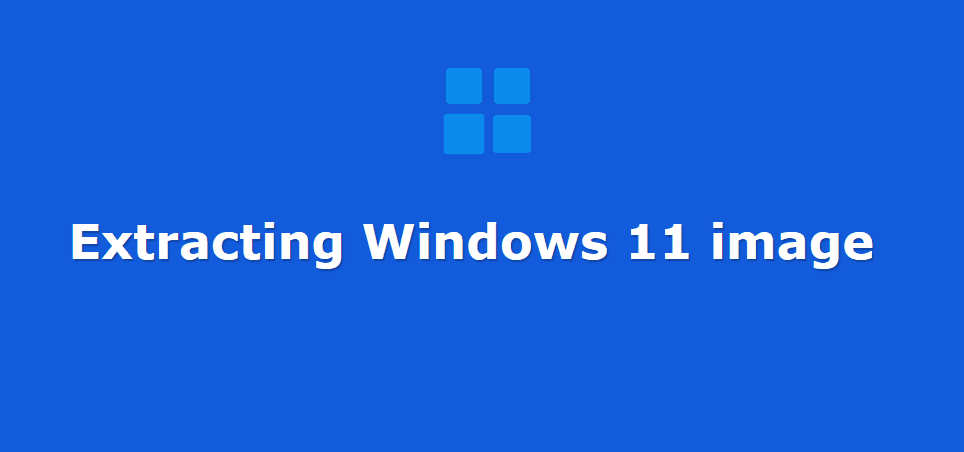
After the extraction is complete, it will show to be building.
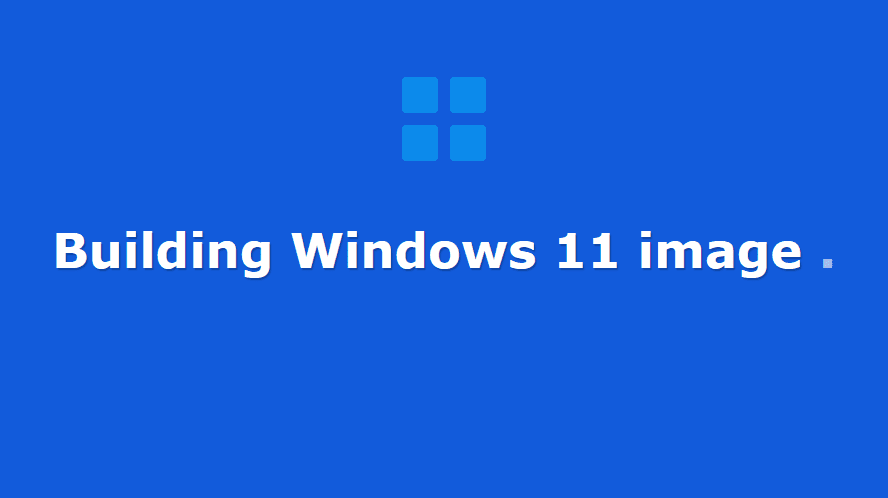
Setup starts with Windows 11 and the order of step configuration below will be familiar.
You will see the normal Windows installation start in the web console.
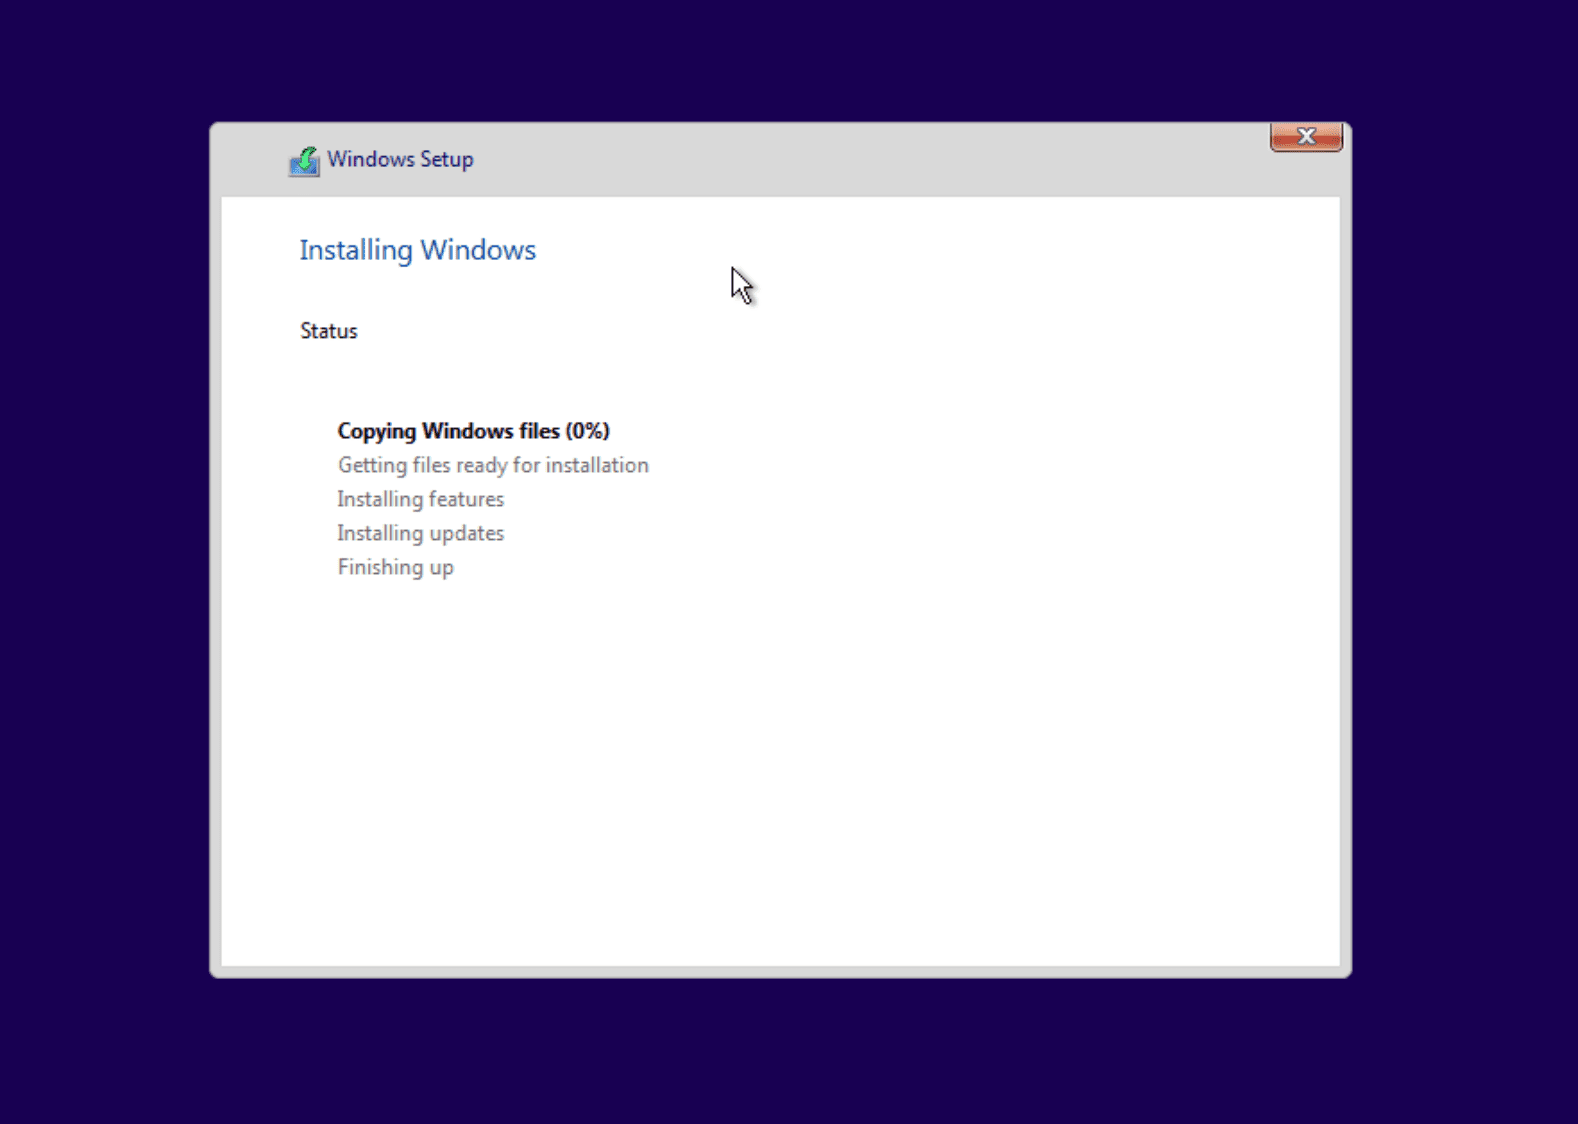
You will see the installation begin automatically as it does when you have an unattend file, which is likely what is happening under the hood.
After the installation completes, it will automatically login using the docker username.

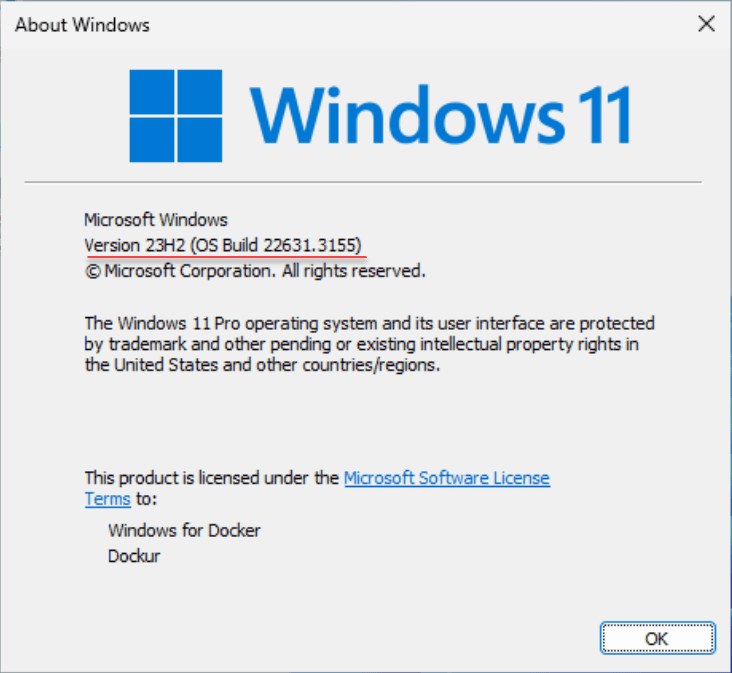
You may wonder which variant of Windows 11 is installed by default. From the Windows command prompt, you can run a winver command using Windows terminal and it looks to install Version 23H2 OS Build 22631.3155.
Connecting RDP to Windows 11 desktop running in the container
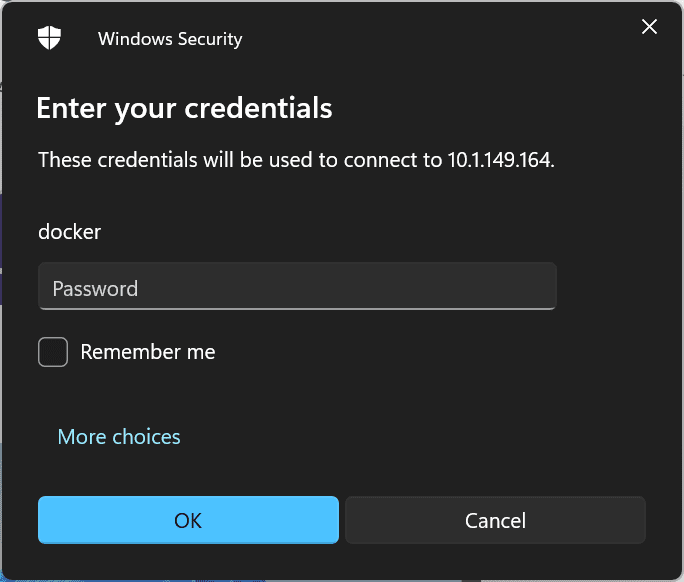
Now, we know we can connect using VNC over port 8006. Let’s see if we can connect using Remote Desktop Protocol (RDP).
Connect to the hostname or IP of your Docker host, port 3389. The login credentials are:
- username: docker
- password: {blank}
Running different Windows OS images in Docker
As mentioned at the outset, you can run a wide range of different Windows operating systems in this tool. How do you specify a different version of Windows to be used instead of the default Windows 11 image?
environment:
  VERSION: "win11"
You can use the following designators in the environment variable to note which version of Windows you want to spin up (win11, win10, ltsc10, win7, etc) in the information list below:
| win11 | Windows 11 Pro | Microsoft | Fast | 6.4 GB |
| win10 | Windows 10 Pro | Microsoft | Fast | 5.8 GB |
| ltsc10 | Windows 10 LTSC | Microsoft | Fast | 4.6 GB |
| win81 | Windows 8.1 Pro | Microsoft | Fast | 4.2 GB |
| win7 | Windows 7 SP1 | Bob Pony | Medium | 3.0 GB |
| vista | Windows Vista SP2 | Bob Pony | Medium | 3.6 GB |
| winxp | Windows XP SP3 | Bob Pony | Medium | 0.6 GB |
| 2022 | Windows Server 2022 | Microsoft | Fast | 4.7 GB |
| 2019 | Windows Server 2019 | Microsoft | Fast | 5.3 GB |
| 2016 | Windows Server 2016 | Microsoft | Fast | 6.5 GB |
| 2012 | Windows Server 2012 R2 | Microsoft | Fast | 4.3 GB |
| 2008 | Windows Server 2008 R2 | Microsoft | Fast | 3.0 GB |
| core11 | Tiny 11 Core | Archive.org | Slow | 2.1 GB |
| tiny11 | Tiny 11 | Archive.org | Slow | 3.8 GB |
| tiny10 | Tiny 10 | Archive.org | Slow | 3.6 GB |
Custom images
In addition to the versions of Windows you can install by default, you can also use custom images for your Windows media. It is as easy as defining the web location of the Windows custom ISO like the following:
environment:
  VERSION: "https://example.com/win.iso"
Networking
If you want to connect your Windows containers to a specific network in production, you can do this with some additional configuration. By default, the containers use bridged networking so that it uses the IP address of the Docker host. However, according to the documentation details, you can manually change this:
docker network create -d macvlan \
    --subnet=192.168.0.0/24 \
    --gateway=192.168.0.1 \
    --ip-range=192.168.0.100/28 \
    -o parent=eth0 vlan
Then, you Docker compose file can use this new network by changing it like the following:
services:
  windows:
    container_name: windows
    ..<snip>..
    networks:
      vlan:
        ipv4_address: 192.168.0.100
networks:
  vlan:
    external: true
CPU and memory
You can also configure the CPU and memory resources, using the following:
environment:
  RAM_SIZE: "8G"
  CPU_CORES: "4"
What use case does this solve?
In case you are wondering, where you would use this type of solution, running Windows inside a Docker container. It is true, we are adding a layer of complexity to the backend instead of just directly running Windows VMs by adding the Docker container layer on top of that.
However, I think this solution would be great for home labs or developers since it allows you to spin up Windows clients and servers very easily in running containers instead of having to provision full virtual machines. Now, granted, you can have a similar experience of easily provisioning Windows virtual machines with something like Packer and Terraform or provisioning using PowerShell.
But, the containers make this even easier. Also, by using Docker containers for the Windows environments, you are saving a considerable amount of disk space for each new virtual machine you spin up, since they are sharing the Windows image.
Different than traditional Windows containers
As noted, we are using a Linux container host, so we are not using a Windows Server to run Windows containers. Windows containers allow you to containerize Windows-based applications in the same way as Linux applications.
Docker provides the following packaged components for your applications: code, runtime, system tools, libraries, and settings. Since it uses traditional Docker technologies, Windows containers must be run on a Windows Docker host.
Keep in mind too, these are not Windows containers that run the Windows desktop. These are generally Windows Server Core images that run Windows applications which can be pulled from the Microsoft repository.
Docker desktop is still a viable solution
Docker Desktop for Windows is an application that leverages Docker’s technology to deploy and manage containers on a Windows 10 or Windows 11 system. It integrates easily with your operating system, allowing you to run both Linux and Windows containers.
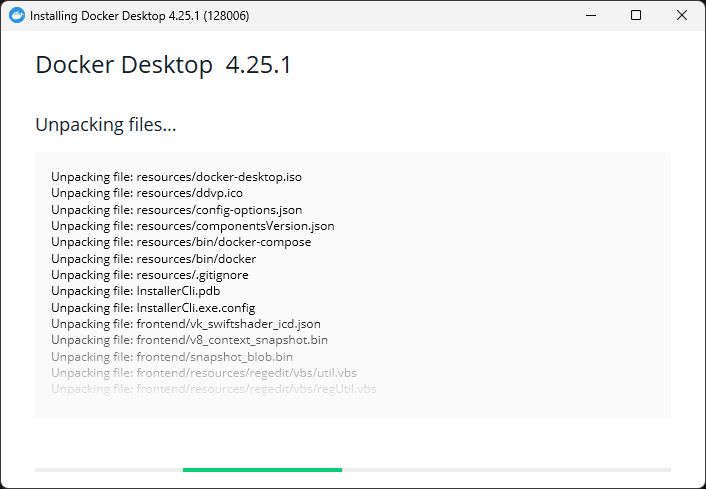
Installing Docker Desktop is straightforward. You just download the installer from the Docker Hub website. Once downloaded, run the installer and follow the on-screen instructions. If you run into issues with installing or running Docker Desktop, check out my blog post guide here on Docker Desktop.
Wrapping up running Windows 11 Desktop in a Docker container
Running Windows inside Docker containers can have enormous benefits for spinning up multiple virtual machines for lab environments, development, training scenarios, or other use cases. Using KVM underneath the hood, the performance is good since it is true virtualization and not just emulation. The benefits of containerization for Windows-based applications can help with increased productivity, easier scalability, and consistent operating environments for software development and deployment.
In this article, we have seen how the Dockurr solution allows running Windows desktop environments using Docker containers. It is easy to get started using and managing Windows desktops in this way. This could be a viable alternative to running Kubevirt on top of Kubernetes as it has many features and is perfectly legal since it makes use of Microsoft’s trial software. Let me know your feedback in the comments, or post a new thread in the VHT forums.
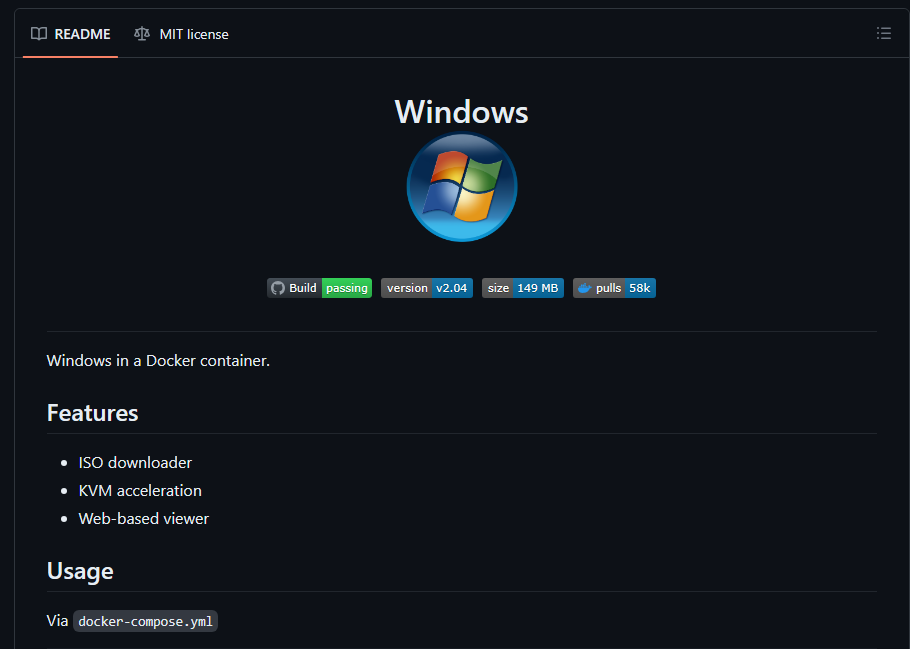
Windows inside a Docker container.
Features ✨
- ISO downloader
- KVM acceleration
- Web-based viewer
Video 📺
Usage 🐳
Via Docker Compose:
services:
  windows:
    image: dockurr/windows
    container_name: windows
    environment:
      VERSION: "11"
    devices:
      - /dev/kvm
      - /dev/net/tun
    cap_add:
      - NET_ADMIN
    ports:
      - 8006:8006
      - 3389:3389/tcp
      - 3389:3389/udp
    volumes:
      - ./windows:/storage
    restart: always
    stop_grace_period: 2m
Via Docker CLI:
docker run -it --rm --name windows -p 8006:8006 --device=/dev/kvm --device=/dev/net/tun --cap-add NET_ADMIN -v "${PWD:-.}/windows:/storage" --stop-timeout 120 dockurr/windows
Via Kubernetes:
kubectl apply -f https://raw.githubusercontent.com/dockur/windows/refs/heads/master/kubernetes.yml
Via Github Codespaces:
FAQ 💬
How do I use it?
Very simple! These are the steps:
-
Start the container and connect to port 8006 using your web browser.
-
Sit back and relax while the magic happens, the whole installation will be performed fully automatic.
-
Once you see the desktop, your Windows installation is ready for use.
Enjoy your brand new machine, and don’t forget to star this repo!
How do I select the Windows version?
By default, Windows 11 Pro will be installed. But you can add the VERSION environment variable to your compose file, in order to specify an alternative Windows version to be downloaded:
environment:
  VERSION: "11"
Select from the values below:
| Value | Version | Size |
|---|---|---|
11 |
Windows 11 Pro | 5.4 GB |
11l |
Windows 11 LTSC | 4.7 GB |
11e |
Windows 11 Enterprise | 4.0 GB |
10 |
Windows 10 Pro | 5.7 GB |
10l |
Windows 10 LTSC | 4.6 GB |
10e |
Windows 10 Enterprise | 5.2 GB |
8e |
Windows 8.1 Enterprise | 3.7 GB |
7u |
Windows 7 Ultimate | 3.1 GB |
vu |
Windows Vista Ultimate | 3.0 GB |
xp |
Windows XP Professional | 0.6 GB |
2k |
Windows 2000 Professional | 0.4 GB |
2025 |
Windows Server 2025 | 5.6 GB |
2022 |
Windows Server 2022 | 4.7 GB |
2019 |
Windows Server 2019 | 5.3 GB |
2016 |
Windows Server 2016 | 6.5 GB |
2012 |
Windows Server 2012 | 4.3 GB |
2008 |
Windows Server 2008 | 3.0 GB |
2003 |
Windows Server 2003 | 0.6 GB |
How do I change the storage location?
To change the storage location, include the following bind mount in your compose file:
volumes:
  - ./windows:/storage
Replace the example path ./windows with the desired storage folder or named volume.
How do I change the size of the disk?
To expand the default size of 64 GB, add the DISK_SIZE setting to your compose file and set it to your preferred capacity:
environment:
  DISK_SIZE: "256G"
Tip
This can also be used to resize the existing disk to a larger capacity without any data loss.
How do I share files with the host?
Open ‘File Explorer’ and click on the ‘Network’ section, you will see a computer called host.lan.
Double-click it and it will show a folder called Data, which can be bound to any folder on your host via the compose file:
volumes:
  -  ./example:/data
The example folder ./example will be available as \\host.lan\Data.
Tip
You can map this path to a drive letter in Windows, for easier access.
How do I change the amount of CPU or RAM?
By default, the container will be allowed to use a maximum of 2 CPU cores and 4 GB of RAM.
If you want to adjust this, you can specify the desired amount using the following environment variables:
environment:
  RAM_SIZE: "8G"
  CPU_CORES: "4"
How do I configure the username and password?
By default, a user called Docker is created during installation and its password is admin.
If you want to use different credentials, you can configure them in your compose file (only before installation):
environment:
  USERNAME: "bill"
  PASSWORD: "gates"
How do I select the Windows language?
By default, the English version of Windows will be downloaded.
But before installation you can add the LANGUAGE environment variable to your compose file, in order to specify an alternative language:
environment:
  LANGUAGE: "French"
You can choose between: 🇦🇪 Arabic, 🇧🇬 Bulgarian, 🇨🇳 Chinese, 🇭🇷 Croatian, 🇨🇿 Czech, 🇩🇰 Danish, 🇳🇱 Dutch, 🇬🇧 English, 🇪🇪 Estonian, 🇫🇮 Finnish, 🇫🇷 French, 🇩🇪 German, 🇬🇷 Greek, 🇮🇱 Hebrew, 🇭🇺 Hungarian, 🇮🇹 Italian, 🇯🇵 Japanese, 🇰🇷 Korean, 🇱🇻 Latvian, 🇱🇹 Lithuanian, 🇳🇴 Norwegian, 🇵🇱 Polish, 🇵🇹 Portuguese, 🇷🇴 Romanian, 🇷🇺 Russian, 🇷🇸 Serbian, 🇸🇰 Slovak, 🇸🇮 Slovenian, 🇪🇸 Spanish, 🇸🇪 Swedish, 🇹🇭 Thai, 🇹🇷 Turkish and 🇺🇦 Ukrainian.
How do I select the keyboard layout?
If you want to use a keyboard layout or locale that is not the default for your selected language, you can add KEYBOARD and REGION variables like this (before installation):
environment:
  REGION: "en-US"
  KEYBOARD: "en-US"
How do I select the edition?
Windows Server offers a minimalistic Core edition without a GUI. To select those non-standard editions, you can add a EDITION variable like this (before installation):
environment:
  EDITION: "core"
How do I install a custom image?
In order to download an unsupported ISO image, specify its URL in the VERSION environment variable:
environment:
  VERSION: "https://example.com/win.iso"
Alternatively, you can also skip the download and use a local file instead, by binding it in your compose file in this way:
volumes:
  - ./example.iso:/boot.iso
Replace the example path ./example.iso with the filename of your desired ISO file. The value of VERSION will be ignored in this case.
How do I run a script after installation?
To run your own script after installation, you can create a file called install.bat and place it in a folder together with any additional files it needs (software to be installed for example).
Then bind that folder in your compose file like this:
volumes:
  -  ./example:/oem
The example folder ./example will be copied to C:\OEM and the containing install.bat will be executed during the last step of the automatic installation.
How do I perform a manual installation?
It’s recommended to stick to the automatic installation, as it adjusts various settings to prevent common issues when running Windows inside a virtual environment.
However, if you insist on performing the installation manually at your own risk, add the following environment variable to your compose file:
How do I connect using RDP?
The web-viewer is mainly meant to be used during installation, as its picture quality is low, and it has no audio or clipboard for example.
So for a better experience you can connect using any Microsoft Remote Desktop client to the IP of the container, using the username Docker and password admin.
There is a RDP client for Android available from the Play Store and one for iOS in the Apple Store. For Linux you can use FreeRDP and on Windows just type mstsc in the search box.
How do I assign an individual IP address to the container?
By default, the container uses bridge networking, which shares the IP address with the host.
If you want to assign an individual IP address to the container, you can create a macvlan network as follows:
docker network create -d macvlan \
    --subnet=192.168.0.0/24 \
    --gateway=192.168.0.1 \
    --ip-range=192.168.0.100/28 \
    -o parent=eth0 vlan
Be sure to modify these values to match your local subnet.
Once you have created the network, change your compose file to look as follows:
services:
  windows:
    container_name: windows
    ..<snip>..
    networks:
      vlan:
        ipv4_address: 192.168.0.100

networks:
  vlan:
    external: true
An added benefit of this approach is that you won’t have to perform any port mapping anymore, since all ports will be exposed by default.
Important
This IP address won’t be accessible from the Docker host due to the design of macvlan, which doesn’t permit communication between the two. If this is a concern, you need to create a second macvlan as a workaround.
How can Windows acquire an IP address from my router?
After configuring the container for macvlan, it is possible for Windows to become part of your home network by requesting an IP from your router, just like a real PC.
To enable this mode, in which the container and Windows will have separate IP addresses, add the following lines to your compose file:
environment:
  DHCP: "Y"
devices:
  - /dev/vhost-net
device_cgroup_rules:
  - 'c *:* rwm'
How do I add multiple disks?
To create additional disks, modify your compose file like this:
environment:
  DISK2_SIZE: "32G"
  DISK3_SIZE: "64G"
volumes:
  - ./example2:/storage2
  - ./example3:/storage3
How do I pass-through a disk?
It is possible to pass-through disk devices or partitions directly by adding them to your compose file in this way:
devices:
  - /dev/sdb:/disk1
  - /dev/sdc1:/disk2
Use /disk1 if you want it to become your main drive (which will be formatted during installation), and use /disk2 and higher to add them as secondary drives (which will stay untouched).
How do I pass-through a USB device?
To pass-through a USB device, first lookup its vendor and product id via the lsusb command, then add them to your compose file like this:
environment:
  ARGUMENTS: "-device usb-host,vendorid=0x1234,productid=0x1234"
devices:
  - /dev/bus/usb
If the device is a USB disk drive, please wait until after the installation is fully completed before connecting it. Otherwise the installation may fail, as the order of the disks can get rearranged.
How do I verify if my system supports KVM?
First check if your software is compatible using this chart:
| Product | Linux | Win11 | Win10 | macOS |
|---|---|---|---|---|
| Docker CLI | ✅ | ✅ | ❌ | ❌ |
| Docker Desktop | ❌ | ✅ | ❌ | ❌ |
| Podman CLI | ✅ | ✅ | ❌ | ❌ |
| Podman Desktop | ✅ | ✅ | ❌ | ❌ |
After that you can run the following commands in Linux to check your system:
sudo apt install cpu-checker
sudo kvm-ok
If you receive an error from kvm-ok indicating that KVM cannot be used, please check whether:
-
the virtualization extensions (
Intel VT-xorAMD SVM) are enabled in your BIOS. -
you enabled «nested virtualization» if you are running the container inside a virtual machine.
-
you are not using a cloud provider, as most of them do not allow nested virtualization for their VPS’s.
If you did not receive any error from kvm-ok but the container still complains about a missing KVM device, it could help to add privileged: true to your compose file (or sudo to your docker command) to rule out any permission issue.
How do I run macOS in a container?
You can use dockur/macos for that. It shares many of the same features, except for the automatic installation.
How do I run a Linux desktop in a container?
You can use qemus/qemu in that case.
Is this project legal?
Yes, this project contains only open-source code and does not distribute any copyrighted material. Any product keys found in the code are just generic placeholders provided by Microsoft for trial purposes. So under all applicable laws, this project will be considered legal.
Stars 🌟
Disclaimer ⚖️
The product names, logos, brands, and other trademarks referred to within this project are the property of their respective trademark holders. This project is not affiliated, sponsored, or endorsed by Microsoft Corporation.

Running Windows in a Docker container might sound like a complex task, but it’s perfectly achievable with the right tools and a clear guide. This blog post will walk you through the entire process, ensuring you have a Windows environment up and running in a Docker container in no time.
Plus, if you’re new to Docker, I’ve got a handy video tutorial covering how to install it on your machine, be it Windows, macOS, or Ubuntu.
Requirements
Before we dive in, ensure Docker is installed and running on your system. If you need help with this, check out my video tutorial or blog post on installing Docker on Ubuntu. If you’re using macOS, the process is slightly different; I’ve covered that in my guide on how to install Docker on macOS, which is essential for this tutorial.
The Project
We’ll utilize a project from GitHub, specifically designed for this purpose. You can find it at https://github.com/dockur/windows. This project uses KVM (a virtual machine) to run Windows inside a Docker container, giving you the full functionality of a Windows environment.
Setting Up Your Environment
First, let’s set up the Docker environment for running Windows. Open your terminal and follow these steps:
- Create a new directory for your project:
   mkdir windows
cd windows- Create a
compose.yamlfile to define your Docker environment:
   version: "3"
   services:
     windows:
       image: dockurr/windows
       container_name: windows
       devices:
         - /dev/kvm
       cap_add:
         - NET_ADMIN
       ports:
         - 8006:8006
         - 3390:3389/tcp
         - 3390:3389/udp
       stop_grace_period: 2m
       restart: on-failure
       environment:
         VERSION: "win11"
         RAM_SIZE: "8G"
         CPU_CORES: "4"
         DISK_SIZE: "256G"
       volumes:
- ./data:/storage- With your
compose.yamlready, bring up your Docker container:
docker compose up -dNow, your Windows environment should be initialized. You can view the installation process by navigating to localhost:8006 your web browser.
Accessing Your Windows Environment
There are a couple of ways to access your new Windows container:
- Remini: A convenient tool for connecting to your Windows Docker container.
- Remote Desktop Protocol (RDP): Use RDP to connect directly using the server IP where your container is running. The default credentials are
user: dockerandpass: "".
Monitoring and Management
- To view the resources being used by your Windows container, simply open the Task Manager.
- Network volumes and mounts can be checked to ensure your data is correctly linked.
- Remember, to stop the virtual machine, use:
docker stop windowsIf you don’t want the container to start with your computer, update its settings with:
docker update --restart=no windowsConfiguration and Usage
- To inspect your container’s configuration:
docker inspect windowsTo start the container:
docker start windows- While you can’t play 3D games, many software applications and simpler games will run smoothly.
Legality
Concerned about the legality of this project? Fear not. This project comprises entirely open-source code and doesn’t distribute any copyrighted material. Any product keys found within are generic placeholders provided by Microsoft for trial purposes, making this project legal under all applicable laws.
Conclusion
Running Windows in a Docker container is an excellent way to leverage the flexibility of Docker with the familiarity of Windows. Whether for development, testing, or running specific Windows-only applications, this setup provides a robust solution. Remember, for those new to Docker, ensure you’re comfortable with the basics – my video tutorial and other blog posts, like application monitoring with Docker or guide to deploy Kubernetes, can help you get started.
Feel free to share your thoughts, questions, or feedback in the comments section below. Happy Docking!