
Introduction
Docker volumes are essential for managing data persistence and sharing it between host systems and containers. Windows users often encounter various approaches to achieving this. In this blog post, we will explore four distinct methods for mounting volumes in Windows using Docker.
Method 1: Using -v Flag with Absolute Path
The -v flag is commonly used to specify volume mounts in Docker. When working in Windows, it’s crucial to employ an absolute path to the directory you wish to mount.
docker run --rm -it -v /$(pwd):/data busybox bin/sh
Explanation:
--rm: Removes the container after it exits.-it: Runs the container interactively.-v /$(pwd):/data: Mounts the current working directory on the host to/datain the container. Note the use of/before$(pwd).
Method 2: Using --mount Flag with bind Type
The --mount flag provides greater flexibility in specifying volume mounts. With the bind type, you can bind a specific directory on your host to a directory in the container.
docker run --rm -it --mount type=bind,src=C:/temp/docker,target=/data busybox bin/sh
Explanation:
--mount type=bind,src=C:/temp/docker,target=/data: Binds theC:/temp/dockerdirectory on the host to/datain the container.
Method 3: Using UNC Path for Windows Shares
In this method, you can utilize a UNC (Universal Naming Convention) path to mount a directory from a Windows network share.
docker run --rm -it -v //server/share:/data:ro busybox bin/sh
Explanation:
-v //server/share:/data:ro: Mounts the\\server\sharenetwork share on the host to/datain the container with read-only permissions (ro).
Method 4: Using --mount Flag with a Named Volume
Named volumes are an effective way to manage persistent data in Docker. You can create a named volume and mount it to a container.
docker volume create codeguru
docker run -it --mount source=codeguru,target=//data busybox sh


Explanation:
docker volume create codeguru: Creates a named volume namedcodeguru.--mount source=codeguru,target=//data: Mounts thecodeguruvolume to/datain the container.
Conclusion
In this blog post, we’ve explored four different methods for mounting volumes in Windows using Docker. Each approach offers unique advantages and suits various use cases. By understanding these techniques, you’ll be better equipped to manage data persistence in your Docker containers on Windows.
Docker volumes are the preferred way of handling persistent data created by and used by Docker containers. Let’s take a look at how this works by covering how to create Docker volumes on Windows. You’ll also learn how to manage them too!
Not a reader? Watch this related video tutorial!
Not seeing the video? Make sure your ad blocker is disabled.
This blog post has a companion video created by TechSnips contributor, Matt McElreath. Feel free to have a watch or, if you prefer text, read on!
Storing Persistent Data
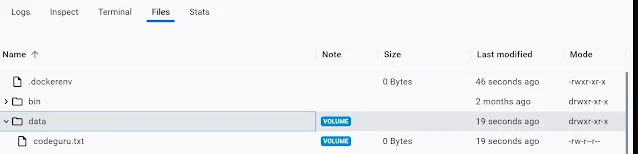
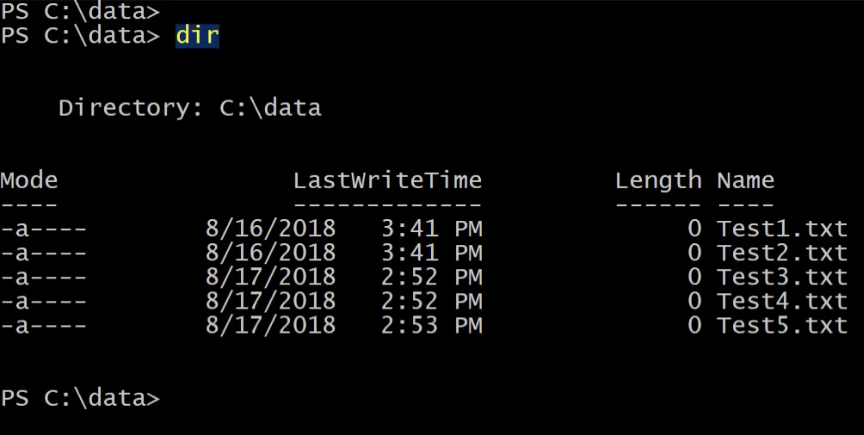
If you want to store persistent data for containers, there are a couple of options. First, I’ll show you how to use a bind mount. I’m currently in a folder called data on my C:\. If I list the contents of this folder, you can see that I have five text files.
If I want to make this folder available to a container, I can mount it when starting the container.
Let’s go ahead and run a container using docker run. I’m going to run this container in interactive mode, then specify -V. Here, I’m going to put the path to my data folder, followed by a colon, then I will specify the path inside the container where I would like this folder to be mounted.
For this, I’m going to specify the C:\shareddata folder. Then I’ll specify the Windows server core image and finally, I’ll specify that I want to run PowerShell once I’m inside the container.
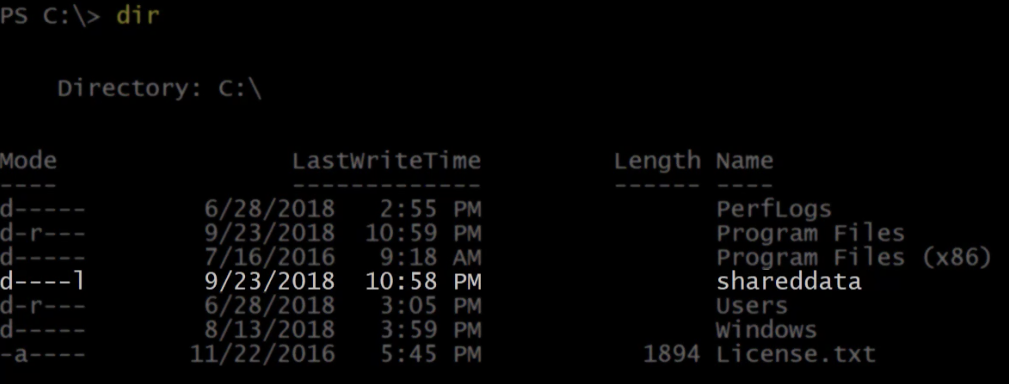
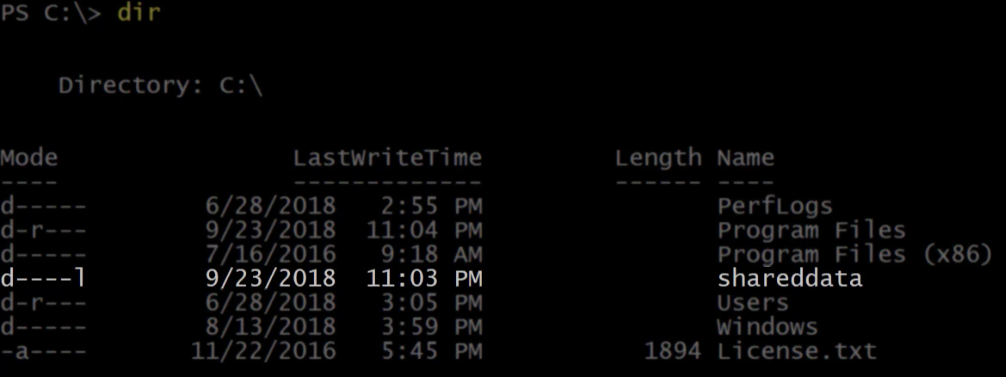
docker run -it -v c:\Data:c:\shareddata microsoft/windowsservercore powershellNow that I’m inside the new container, if I list the contents of C:\, you can see that I have a shareddata folder.
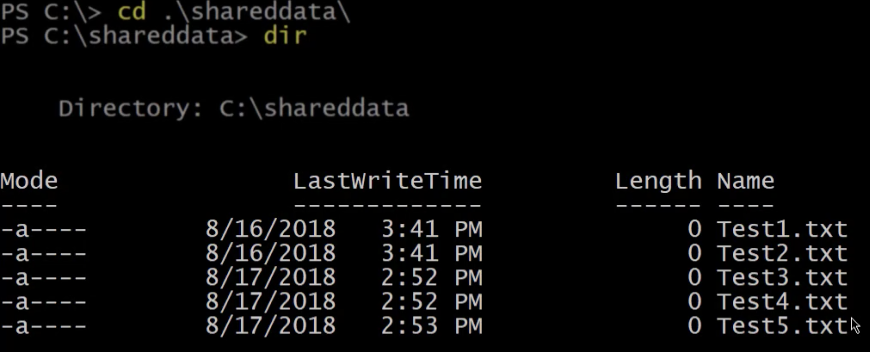
Let’s go into that folder and list the contents. Here are my five test files that are located on my container host.
I can also create files in this folder, which will be available to other containers or my container host. Let’s go ahead and run a new item to create a file called containertest.
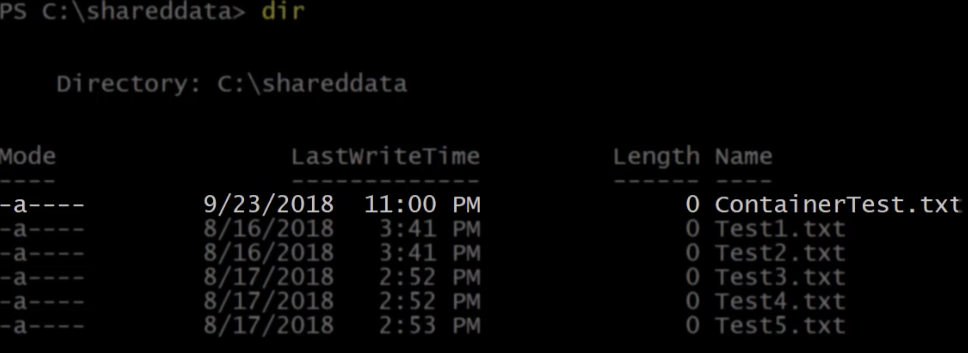
We can see above that the new file has been created from within the container. Now I’ll exit this container which will shut it down by running exit.
If I run docker ps, you can see that there are currently no running containers.

Enumerating Data in Docker Volumes
Now let’s list the contents of the data folder again from my container host.
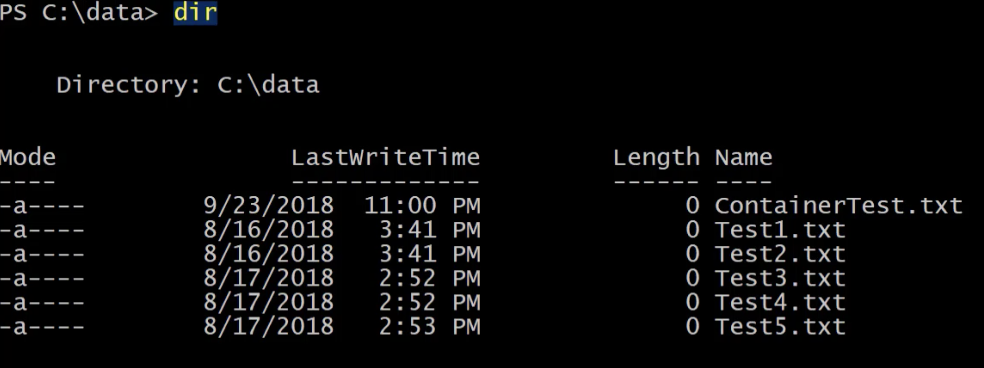
We can see the new file that was created from inside the container called containertest. Bind mounts have some limited functionality, however, so volumes are the preferred way to accomplish what we are trying to do. To get started with volumes, we can run the same command to start up a container, but this time with a couple of small differences. Where we specified the volume, instead of using the path on the container hosts’ file system, I’m going to use the word hostdata as the name of a volume I want to create and use.
From inside the new container, if I list the contents of C:\, you can see again that I have a folder called shareddata.
If I list the contents of that folder, it is currently empty because we created a blank volume. Now let’s run Ctrl-P-Q which will take us out of the running container, but keep it running in the background.
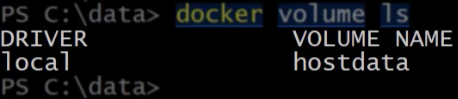
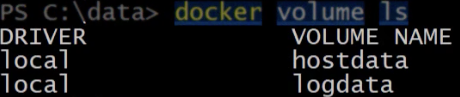
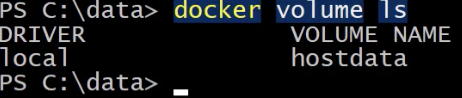
From the container host, run docker volume ls. This will list the current volumes on this container host. I have a volume called hostdata, which was created when I specified it in the docker run command.
If I run docker ps we can see our running container.

Stop that container using docker stop. Now we have no running containers.

Remove the stopped containers by running docker rm. If I list the volumes again, you can see that the hostdata volume is still available and can be mounted to new containers.

Creating Docker Volumes
Another way to create a volume is to use the docker volume create command. If you don’t specify a name, docker will give it a name which is a long list of random characters. Otherwise, you can specify a name here. I’m going to call this volume logdata. Now we can see it is in the list when we list the volumes again.

You’ll now mount that to a new container. Use docker run again and for the volume specify the volume that just created and mount it to c:\logdata.
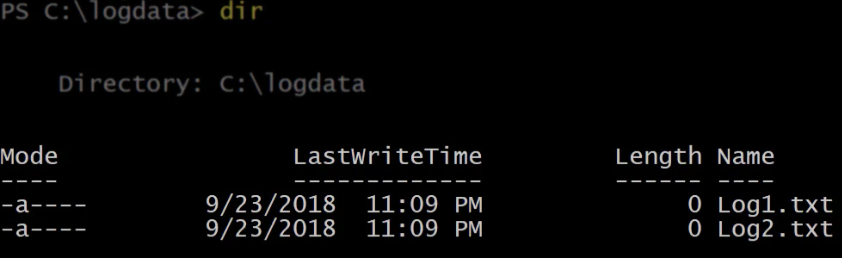
> docker run -it -v logdata:c:\logdata microsoft/windowsservercore powershellFrom inside the container, go into the logdata folder and create a couple of files. Right now, there are no files in this directory, so go ahead and create some.
PS> New-Item -Name Log1.txt -ItemType File
PS> New-Item -Name Log2.txt -ItemType File
Now I have two log files in this directory.
Run Ctrl-P-Q again to exit this container while it is still running. While that container’s running, start up a new container with the same volume mounted.
> docker run -it -v logdata:c:\logdata microsoft/windowsservercore powershellIf we run a listing on the logdata folder in the new container we can see the two log files being shared.

Now, exit this container. You should still have one running container and two exited containers.

Now stop all running containers, then run docker rm to remove all exited containers.

List the volumes again. The logdata volume is still available to be mounted to future containers.
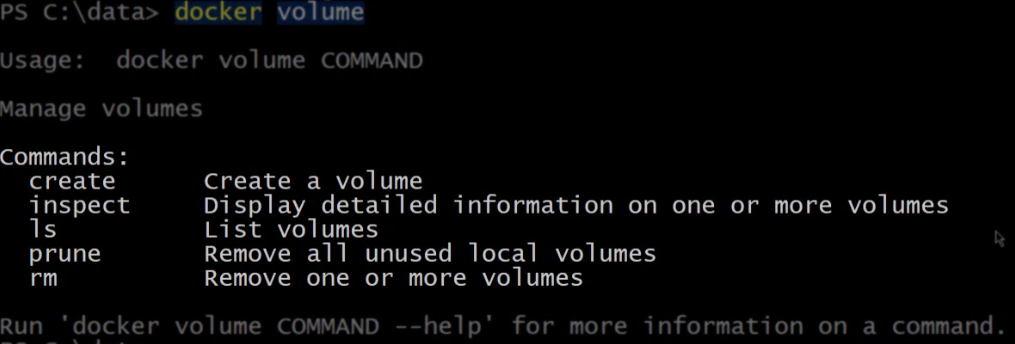
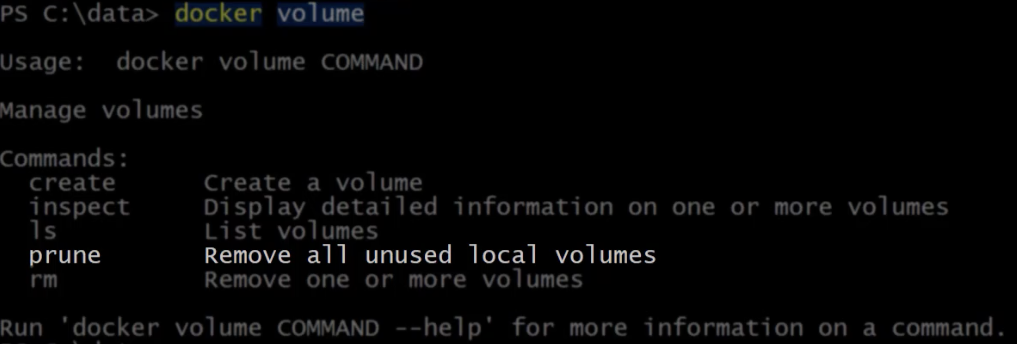
If you run run docker volume, you’ll get some usage help for the command.
Inspecting Docker Volumes
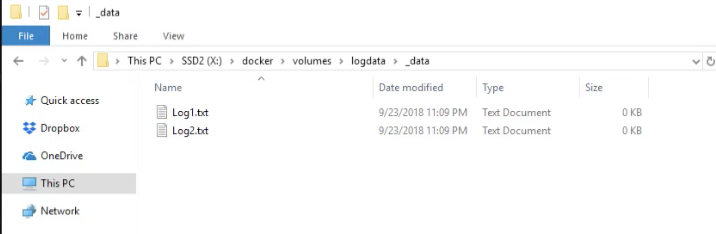
We already looked at create, so let’s move on to inspect. If I run docker volume inspect against the logdata volume, it will return the properties for that volume, including the mount point which is the physical path to the volume on the container host.

Let’s open that folder using Invoke-Item and have a look. Under the logdata folder, there’s a folder called data. If we open that, we can see the files that were created from the container earlier.
Deleting Docker Volumes
To delete a volume, we can run docker volume rm, followed by the name of the volume you want to delete.
> docker volume rm logdataNow if I list the volumes, logdata is no longer there.
Finally, we can use prune to remove all unused local volumes. This will delete all volumes that are not mounted to a running or stopped container.
You want to be careful with this command, so there’s a warning and a prompt to make sure that you are sure that you want to do this. If I type Y and hit enter, it will show me which volumes were deleted.
And if I list my volumes again you can see that they have all been deleted.

Summary
In this blog post, you should have gotten a good overview of managing Docker volumes in Windows. Docker is a great container platform. With its support for Windows and your newfound skills at managing Docker volumes, you will be unstoppable!
Update! From Windows 1809 onwards this is no longer an issue!
See 6 Things You Can Do with Docker in Windows Server 2019 That You Couldn’t Do in Windows Server 2016
You use Docker volumes to store state outside of containers, so your data survives when you replace the container to update your app. Docker uses symbolic links to give the volume a friendly path inside the container, like C:\data. Some application runtimes try to follow the friendly path to the real location — which is actually outside the container — and get themselves into trouble.
This issue may not affect all application runtimes, but I have seen it with Windows Docker containers running Java, Node JS, Go, PHP and .NET Framework apps. So it’s pretty widespread.
You can avoid that issue by using a mapped drive (say G:\) inside the container. Your app writes to the G drive and the runtime happily lets the Windows filesystem take care of actually finding the location, which happens to be a symlink to a directory on the Docker host.
Filesystems in Docker Containers
An application running in a container sees a complete filesystem, and the process can read and write any files it has access to. In a Windows Docker container the filesystem consists of a single C drive, and you’ll see all the usual file paths in there — like C:\Program Files and C:\inetpub. In reality the C drive is composed of many parts, which Docker assembles into a virtual filesystem.
It’s important to understand this. It’s the basis for how images are shared between multiple containers, and it’s the reason why data stored in a container is lost when the container is removed. The virtual filesystem the container sees is built up of many image layers which are read-only and shared, and a final writeable layer which is unique to the container:
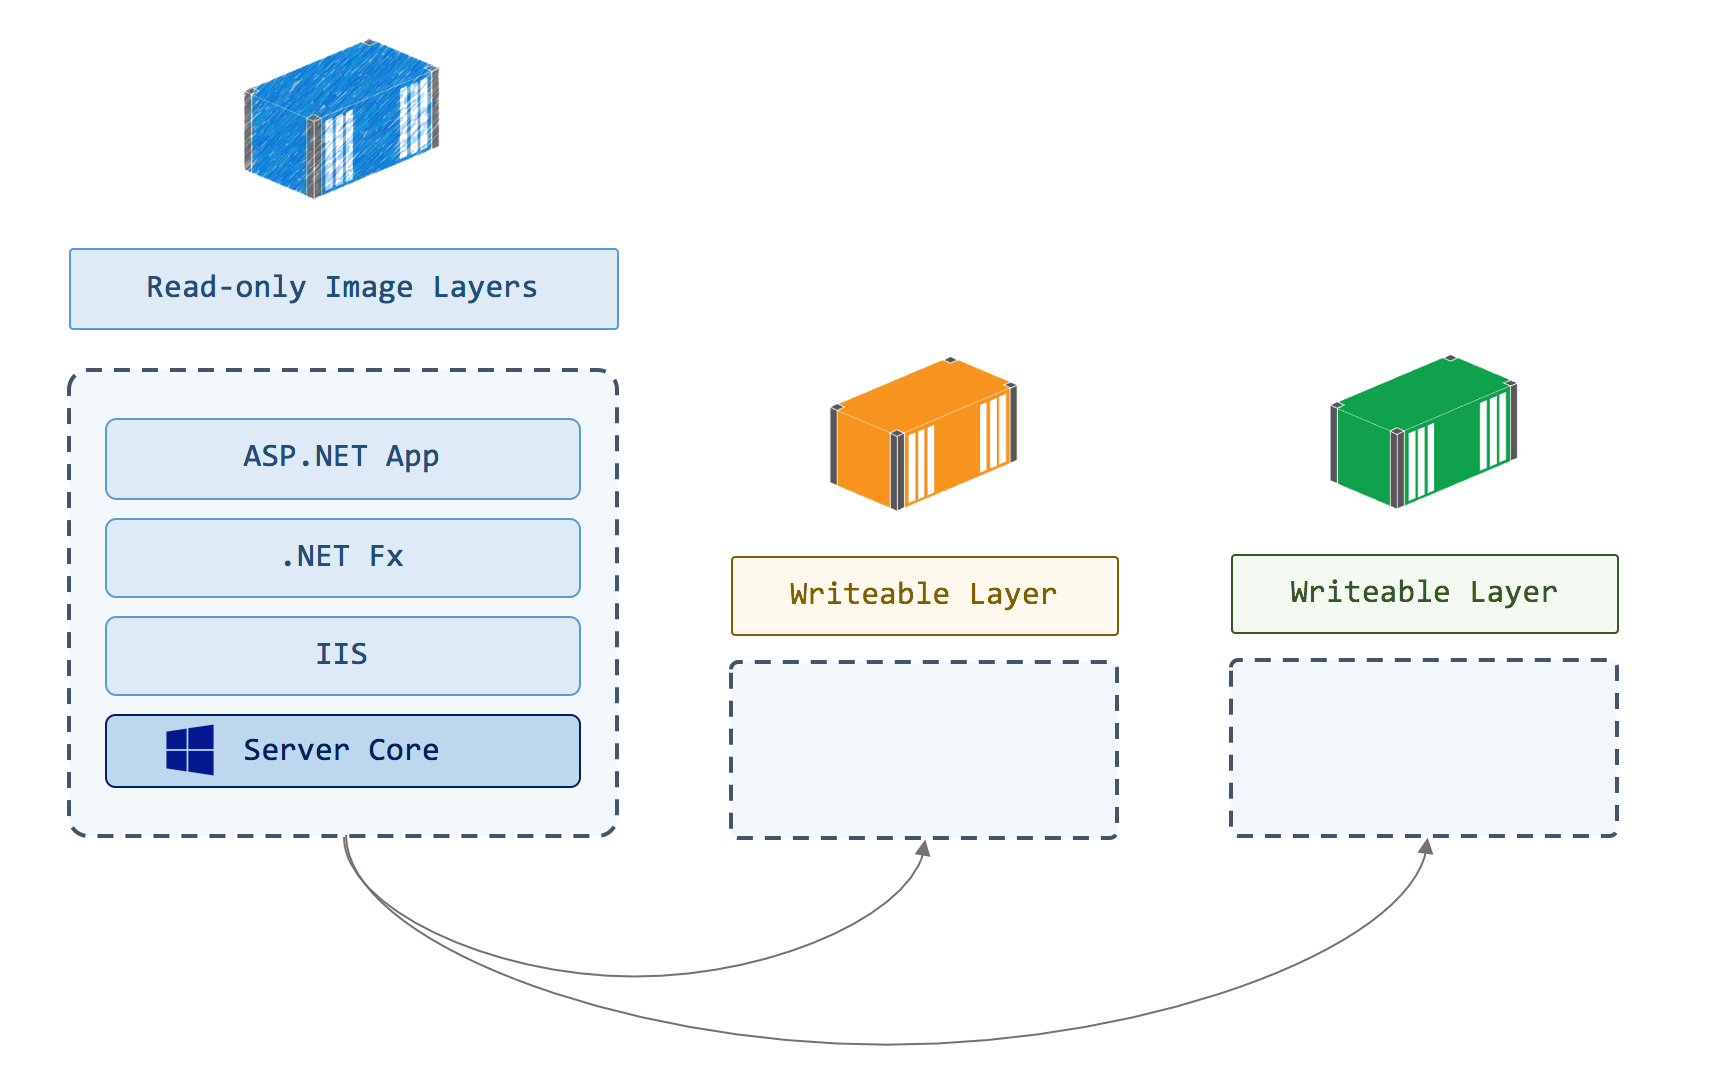
When processes inside the container modify files from read-only layers, they’re actually copied into the writeable layer. That layer stores the modified version and hides the original. The underlying file in the read-only layer is unchanged, so images don’t get modified when containers make changes.
Removing a container removes its writeable layer and all the data in it, so that’s not the place to store data if you run a stateful application in a container. You can store state in a volume, which is a separate storage location that one or more containers can access, and has a separate lifecycle to the container:
Storing State in Docker Volumes
Using volumes is how you store data in a Dockerized application, so it survives beyond the life of a container. You run your database container with a volume for the data files. When you replace your container from a new image (to deploy a Windows update or a schema change), you use the same volume, and the new container has all the data from the original container.
The SQL Server Docker lab on GitHub walks you through an example of this.
You define volumes in the Dockerfile, specifying the destination path where the volume is presented to the container. Here’s a simple example which stores IIS logs in a volume:
#escape=`
FROM microsoft/iis
VOLUME C:\inetpub\logs
You can build an image from that Dockerfile and run it in a container. When you run docker container inspect you will see that there is a mount point listed for the volume:
"Mounts": [
            {
                "Type": "volume",
                "Name": "cfc1ab55dbf6e925a1705673ff9f202d0ee2157dcd199c02111813b05ddddf22",
                "Source": "C:\\ProgramData\\docker\\volumes\\cfc1ab55dbf6e925a1705673ff9f202d0ee2157dcd199c02111813b05ddddf22\\_data",
                "Destination": "C:\\inetpub\\logs",
                "Driver": "local",
                "Mode": "",
                "RW": true,
                "Propagation": ""
            }
        ]
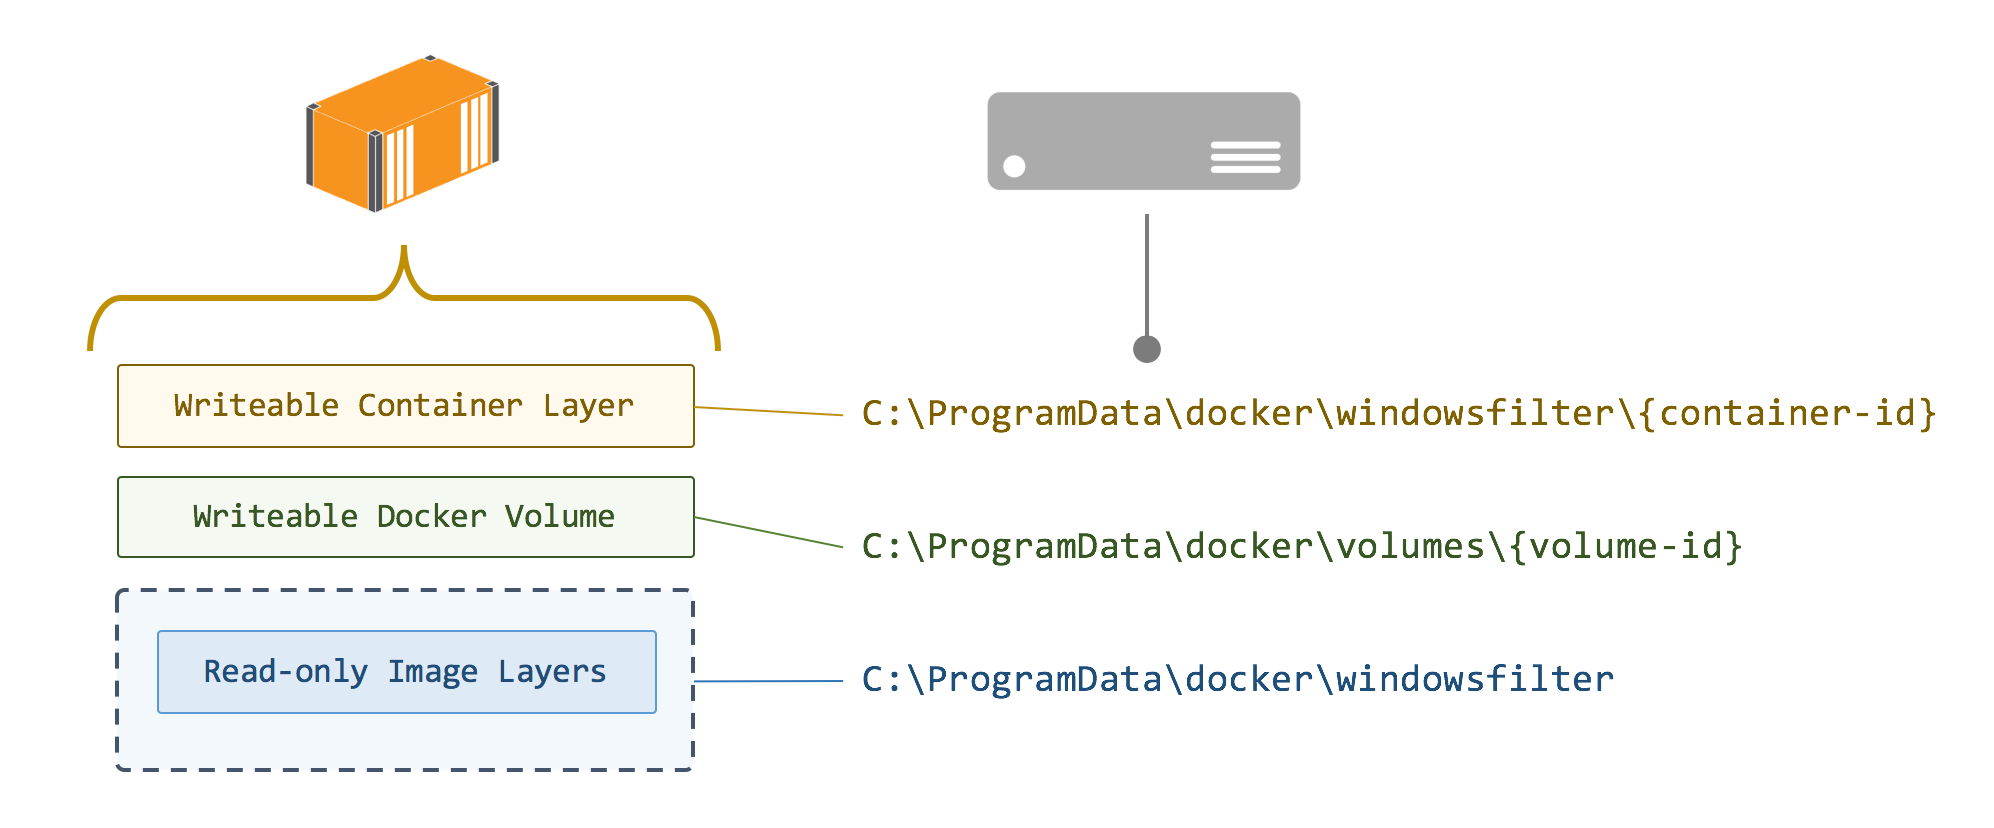
The source location of the mount shows the physical path on the Docker host where the files for the volume are written — in C:\ProgramData\docker\volumes. When IIS writes logs from the container in C:\Inetpub\logs, they’re actually written to the directory in C:\ProgramData\docker\volumes on the host.
The destination path for a volume must be a new folder, or an existing empty folder. Docker on Windows is different from linux in that respect, you can’t use a destination folder which already contains data from the image, and you can’t use a single file as a destination.
Docker surfaces the destination directory for the volume as a symbolic link ( symlink ) inside the container, and that’s where the trouble begins.
Symlink Directories
Symbolic links have been a part of the Windows filesystem for a long time, but they’re nowhere near as popluar as they are in Linux. A symlink is just like an alias, which abstracts the physical location of a file or directory. Like all abstractions, it lets you work at a higher level and ignore the implementation details.
In Linux it’s common to install software to a folder which contains the version name — like /opt/hbase-1.2.3 and then create a sylmink to that directory, with a name that removes the version number — /opt/hbase. In all your scripts and shortcuts you use the symlink. When you upgrade the software, you change the symlink to point to the new version and you don’t need to change anything else. You can also leave the old version in place and rollback by changing the symlink.
You can do the same in Windows, but it’s much less common. The symlink mechanism is how Docker volumes work in Windows. If you docker container exec into a running container and look at the volume directory, you’ll it listed as a symlink directory (SYMLINKD) with a strange path:
c:\>dir C:\inetpub
 Volume in drive C has no label.
 Volume Serial Number is 90D3-C0CE

 Directory of C:\inetpub

06/30/2017 10:08 AM <DIR> .
06/30/2017 10:08 AM <DIR> ..
01/18/2017 07:43 PM <DIR> custerr
01/18/2017 07:43 PM <DIR> history
01/18/2017 07:43 PM <SYMLINKD> logs [\\?\ContainerMappedDirectories\8305589A-2E5D...]
06/30/2017 10:08 AM <DIR> temp
01/18/2017 07:43 PM <DIR> wwwroot
The logs directory is actually a symlink directory, and it points to the path \\?\ContainerMappedDirectories\8305589A-2E5D... The Windows filesystem understands that symlink, so if apps write directly to the logs folder, Windows writes to the symlink directory, which is actually the Docker volume on the host.
The trouble really begins when you configure your app to use a volume, and the application runtime tries to follow the symlink. Runtimes like Go, Java, PHP, NodeJS and even .NET will do this — they resolve the symlink to get the real directory and try to write to the real path. When the “real” path starts with \\?\ContainerMappedDirectories\, the runtime can’t work with it and the write fails. It might raise an exception, or it might just silently fail to write data. Neither of which is much good for your stateful app.
DOS Devices to the Rescue
The solution — as always — is to introduce another layer of abstraction, so the app runtime doesn’t directly use the symlink directory. In the Dockerfile you can create a drive mapping to the volume directory, and configure the app to write to the drive. The runtime just sees a drive as the target and doesn’t try to do anything special — it writes the data, and Windows takes care of putting it in the right place.
I use the G drive in my Dockerfiles, just to distance it from the C drive. Ordinarily you use the subst utility to create a mapped drive, but that doesn’t create a map which persists between sessions. Instead you need to write a registry entry in your Dockerfile to permanently set up the mapped drive:
VOLUME C:\data

RUN Set-ItemProperty -Path 'HKLM:\SYSTEM\CurrentControlSet\Control\Session Manager\DOS Devices' -Name 'G:' -Value "\??\C:\data" -Type String;
This creates a fake G drive which maps to the volume directory C:\data. Then you can configure your app to write to the G drive and it won’t realise the target is a symlink, so it won’t try to resolve the path and it will write correctly.
I use this technique in these Jenkins and Bonobo Dockerfiles, where I also set up the
Gdrive as the target in the app configuration.
How you configure the storage target depends on the app. Jenkins uses an environment variable, which is very easy. Bonobo uses Web.config, which means running some XML updates with PowerShell in the Dockerfile. This technique means you need to mentally map the fake G drive to a real Docker volume, but it works with all the apps I’ve tried, and it also works with volume mounts.
Mounting Volumes
Docker volumes on Windows are always created in the path of the graph driver, which is where Docker stores all image layers, writeable container layers and volumes. By default the root of the graph driver in Windows is C:\ProgramData\docker, but you can mount a volume to a specific directory when you run a container.
I have a server with a single SSD for the C drive, which is where my Docker graph is stored. I get fast access to image layers at the cost of zero redundancy, but that’s fine because I can always pull images again if the disk fails. For my application data, I want to use the E drive which is a RAID array of larger but slower spinning disks.
When I run my local Git server and Jenkins server in Docker containers I use a volume mount, pointing the Docker volume in the container to a location on my RAID array:
docker container run -v E:\bonobo:C:\data sixeyed/bonobo
Actually I use a compose file for my services, but that’s for a different post.
So now there are multiple mappings from the G drive the app uses to the Docker volume, and the underlying storage location:
G:\ -> C:\data -> \\?\ContainerMappedDirectories\xyz -> E:\bonobo
Book Plug
I cover volumes — and everything else to do with Docker on Windows — in my book Docker on Windows, which is out now.
If you’re not into technical books, all the code samples are on GitHub: sixeyed/docker-on-windows and every sample has a Docker image on the Hub: dockeronwindows.
Use the G Drive For Now
I’ve hit this problem with lots of different app runtimes, so I’ve started to do this as the norm with stateful applications. It saves a lot of time to configure the G drive first, and ensure the app is writing state to the G drive, instead of chasing down issues later.
The root of the problem actually seems to be a change in the file descriptor for symlink directories in Windows Server 2016. Issues have been logged with some of the application runtimes to work correctly with the symlink (like in Go and in Java), but until they’re fixed the G drive solution is the most robust that I’ve found.
It would be nice if the image format supported this, so you could write VOLUME G: in the Dockerfile and hide all this away. But this is a Windows-specific issue and Docker is a platform that works in the same way across multiple operating systems. Drive letters don’t mean anything in Linux so I suspect we’ll need to use this workaround for a while.
Docker containers are an excellent way to test your application in a virtualized environment. However, these container runtimes can also be managed using Docker volumes which allow you to share data between two or more of them without the need for copying files back and forth. This tutorial will show how to create and manage Docker Volumes on Windows machines.
The “docker-compose volumes” is a tool that allows users to create and manage Docker volumes on Windows. The process for creating a volume is quite simple and straightforward, but the process for managing volumes can be difficult.
Docker volumes are the primary method of storing and using persistent data generated by Docker containers. Let’s look at how this works on Windows by looking at how to construct Docker volumes. You’ll also learn how to deal with them.
Matt McElreath, a TechSnips contributor, developed a video to accompany this blog article. Feel free to look at your watch or continue reading if you prefer text.
Persistent Data Storage
There are a variety of solutions for storing permanent data for containers. To begin, I’ll demonstrate how to utilize a bind mount. I’m now in the data folder on my C: drive. I have five text files in this folder, as you can see from the contents list.
C:data contains a number of text files.
If I want a container to have access to this folder, I can mount it when the container starts.
Let’s try running a container using docker run. I’m going to run this container interactively, then use the -V option. I’ll enter the path of my data folder here, followed by a colon, and then the location within the container where I’d want this folder to be mounted.
I’m going to use the C:shareddata folder for this. Then I’ll provide the Windows server core image and, once inside the container, I’ll declare that I want to execute PowerShell.
run docker -it -v c: microsoft/windowsservercore powershell data:c:shareddata
If I display the contents of C: now that I’m within the new container, I can see that I have a shareddata folder.
In a Docker container, listing directory contents
Let’s take a look inside that folder and see what’s within. Here are the links to my five test files on my container host.
Files on the server
In this folder, I may also create files that will be accessible to other containers or my container host. Let’s create a file named containertest by running new item.
On the container host, create a file
The new file was generated from inside the container, as seen above. Now I’ll run exit from this container, which will shut it off.
You can check that there are presently no running containers by executing docker ps.
Containers that are currently in use
Data Counting in Docker Volumes
Let’s go through the contents of the data folder from my container host once again.
Files on the container host are listed.
We can view the new containertest file that was produced from inside the container. Bind mounts, on the other hand, have restricted functionality, hence volumes are the ideal method of achieving our goal. We can start using volumes using the same command we used to start a container, but with a few minor variations. Instead of using the path on the container hosts’ file system to provide the volume, I’m going to use the term hostdata as the name of the volume I want to build and utilize.
If I list the contents of C: from inside the new container, I can see that I have a folder named shareddata.
file listing
Because we established a blank disk, the contents of that folder are presently empty. Now press Ctrl-P-Q to exit the currently running container while keeping it running in the background.
Run docker volume ls from the container host. The current volumes on this container host will be listed. I have a volume named hostdata that was created when I used the docker run command to specify it.
Docker volumes are listed.
We can view our operating container if I run docker ps.
List of active containers
Docker stop will stop that container. We don’t have any containers operating right now.
Docker container shutdown
Run docker rm to remove the halted containers. You can see that the hostdata volume is still accessible and may be mounted to new containers if I list the volumes again.
Docker volumes are listed.
Docker Volumes Creation
The docker volume create command is another option for creating a volume. If you don’t give it a name, Docker will choose one for you from a huge list of random characters. If not, you may enter a name here. This volume will be known as logdata. When we list the volumes again, we can see that is now in the list.
New Docker volume creation
That will now be mounted to a new container. Docker run once again, this time specifying the volume you just built and mounting it to c:logdata.
> docker run -it -v logdata:c:logdata microsoft/windowsservercore powershell
Create a handful of files in the logdata folder from inside the container. There are currently no files in this directory, so create some immediately.
PS> New-Item -Name Log1.txt -ItemType File PS> New-Item -Name Log2.txt -ItemType File
In this directory, I now have two log files.
C:logdata contains two files.
To quit this container while it is still running, press Ctrl-P-Q again. Start a new container with the same volume mounted while that one is running.
> docker run -it -v logdata:c:logdata microsoft/windowsservercore powershell
The two log files are shared when we perform a listing on the logdata folder in the new container.
Containers have access to two log files.
Exit this container now. One operating container and two departed containers should still be present.
Two containers are still operational.
Stop all operating containers, then docker rm to delete all exiting ones.
Docker containers being removed
List the volumes once again. The logdata disk is still accessible for future containers to mount.
The quantity is still available.
You’ll see some use assistance with the command if you run docker volume.
Volume syntax in Docker
Docker Volumes Inspection
Let’s move on to inspect now that we’ve looked at create. When I run docker volume inspect on the logdata volume, it returns the volume’s characteristics, including the mount point, which is the container host’s physical path to the volume.
Docker Volumes Inspection
Let’s have a peek at that folder using Invoke-Item. There’s a data folder under the logdata folder. We may view the files that were produced from the container previously if we open that.
Earlier generated files
Docker Volumes Delete
To remove a volume, type docker volume rm followed by the volume name you wish to remove.
> docker volume rm logdata
Logdata is no longer there when I list the volumes.
Docker volumes are listed.
Finally, prune may be used to get rid of any unwanted local volumes. All volumes that are not mounted to a running or stopped container will be deleted.
Examining the prune option
Because you should exercise caution while using this command, there is a warning and a prompt to ensure that you are certain you want to proceed. It will show me which volumes were removed if I write Y and click enter.
You can see that all of my volumes have been removed if I list them again.
There are no Docker volumes.
Summary
You should have a decent understanding of how to manage Docker volumes on Windows after reading this blog article. Docker is an excellent container management system. You’ll be unstoppable with its Windows support and your newly acquired Docker volume management abilities!
The “docker volume create” is a command-line tool that allows users to create and manage Docker volumes on Windows. With this tool, you can also mount new volumes or attach existing ones to your containers. The “docker volume create” is installed by default with the Docker installation package.
Related Tags
- docker-compose volumes example
- docker volume windows
- docker run -v
- docker create volume in specific directory
- dockerfile volume example
Tags:
Windows, Docker, Linux
Это последняя статья в этой серии о контейнерах Windows и Docker. Прежде чем углубиться в тему, мы хотим просто описать различные версии Docker, которые существуют сегодня, если вы не работали в сфере Docker, или если вы только что начали использовать Docker. 2 марта 2017 года Docker изменил формат своей версии, а также изменил название пакета Docker Engine на Docker Community Edition или Docker Enterprise Edition.
Установка Docker Community Edition в Windows 10
Первое издание называется Docker Community Edition (CE). Docker (CE) — новое название для бесплатных продуктов Docker. Docker CE совместим со следующей платформой ОС: Mac OS, Windows 10, Amazon AWS, Azure, CentOS, Debian, Fedora и Ubuntu. Вдобавок к этому, Docker CE поставляется в двух вариантах: Edge и Stable:
- Edge предназначен для пользователей, которые хотят каждый месяц получать последние и самые лучшие функции
- Stable выпускается ежеквартально и предназначен для пользователей, которым требуется более легкая в обслуживании скорость выпуска
Как заявляют Docker, Community Edition отлично подходит для разработчиков и команд ops, которые начинают создавать приложения для контейнеров. Если вы хотите загрузить эту версию, перейдите в Docker Store. После завершения загрузки и установки вы можете запустить пакет под названием Docker For Windows. На момент написания этой статьи был установлен Docker CE v18.03.
|
PS > Enable-WindowsOptionalFeature -Online -FeatureName Microsoft-Hyper-V –All PS > Get-Service *docker* Status Name DisplayName ——— —— —————— Running com.docker.service Docker for Windows Service |
Убедитесь, что вы можете запустить простой контейнер:
|
PS > Docker run —rm -v c:/Users:/data alpine ls /data Unable to find image ‘alpine:latest’ locally latest: Pulling from library/alpine ff3a5c916c92: Pull complete Digest: sha256:7b848083f93822dd21b0a2f14a110bd99f6efb4b838d499df6d04a49d0debf8b Status: Downloaded newer image for alpine:latest All Users Default Default User Nicolas Public defaultuser0 desktop.ini |
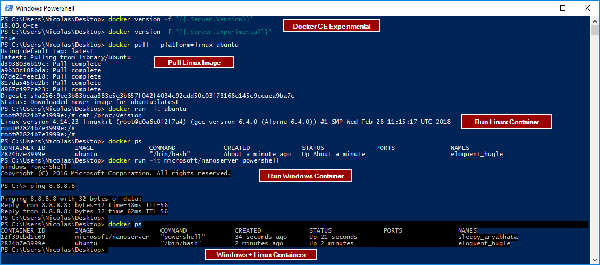
Если вы работаете с Docker v18.03, то одной из основных функций является возможность запуска изображений Windows и Linux бок о бок, вместо того, чтобы переключать Docker из Linux в режим Windows. Давайте подтвердим, что вы запускаете Daemon в экспериментальном режиме:
|
PS > docker version -f ‘{{.Server.Experimental}}’ True |
Или через графический интерфейс:
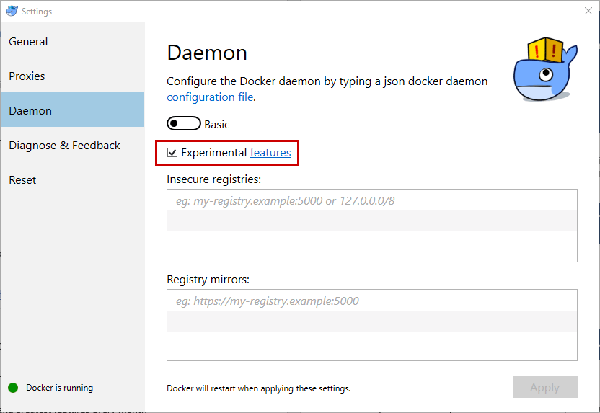
Теперь используйте параметр platform=linux в режиме Windows Container для запуска образов Linux.
Если вы работаете с предыдущей версией Docker, она будет запускать контейнеры Linux по умолчанию. Таким образом, вы должны изменить этот параметр и переключиться в режим Windows Container с помощью меню лотка Docker:
или выполнив следующую команду в приглашении PowerShell
|
& $Env:ProgramFiles\Docker\Docker\DockerCli.exe –SwitchDaemon |
И это все. Docker CE работает и работает на Windows 10!
Теперь вы можете пойти в Docker Hub, чтобы узнать, какие изображения контейнера доступны. Например, вы можете запустить простой контейнер Windows, содержащий PowerShell Core:
|
PS > docker pull microsoft/powershell Using default tag: latest latest: Pulling from microsoft/powershell 1be7f2b886e8: Pull complete 6fbc4a21b806: Pull complete […] 74ebbb198c87: Pull complete Digest: sha256:38ac64ecec7e36b1868458b6b49e9d41332de56da2053c14830ef4915d909813 Status: Downloaded newer image for microsoft/powershell:latest PS > docker run —name PSCore -it microsoft/powershell PowerShell v6.0.1 Copyright (c) Microsoft Corporation. All rights reserved. https://aka.ms/pscore6-docs Type ‘help’ to get help. PS > $PSVersionTable Name Value —— ——— PSVersion 6.0.1 PSEdition Core GitCommitId v6.0.1 OS Linux 4.9.75-linuxkit-aufs #1 SMP Tue Jan 9 10:58:17 UTC 2018 Platform Unix PSCompatibleVersions {1.0, 2.0, 3.0, 4.0...} PSRemotingProtocolVersion 2.3 SerializationVersion 1.1.0.1 WSManStackVersion 3.0 |
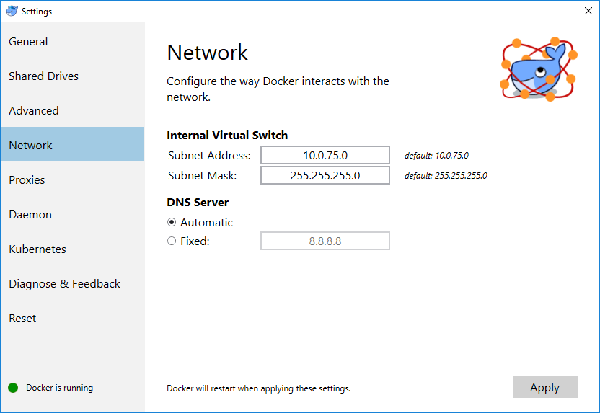
И вы можете легко настроить свой движок Docker с помощью GUI Docker For Windows:
Установка Docker Enterprise Edition на Windows Server 2016
Второе издание называется Docker Enterprise Edition (EE) и является сертифицированной контейнерной платформой для: CentOS, Red Hat Enterprise Linux (RHEL), Ubuntu, SUSE Linux Enterprise Server (SLES), Oracle Linux, Windows Server 2016, IBM Z, Amazon AWS и Azure (Docker EE для Azure). Docker EE доступен в трех уровнях: базовом, стандартном и расширенном. Стандартные и расширенные уровни добавляют расширенное управление контейнерами (Docker Datacenter) и сканирование безопасности Docker. Вы можете найти дополнительную информацию о Docker EE в Docker Store и о том, как установить его в других операционных системах. В этом случае вам просто нужно запустить следующие команды в качестве администратора для установки Docker EE на Windows Server 2016:
|
PS > Install-Module DockerProvider PS > Install-Package Docker -ProviderName DockerProvider -RequiredVersion preview -Force WARNING: A restart is required to enable the one or more features. Please restart your machine. Name Version Source Summary —— ———— ——— ———— Docker 17.10.0-ee-pr... Docker Docker Enterprise Edition for Windows Server... PS > Restart-Computer |
Как вы можете заметить, параметр -Force используется для установки самой последней версии Docker EE. И затем выполняется перезапуск хоста Windows-контейнера Windows. В этой статье будет показано использование Docker EE v17.10 на Windows Server 2016.
Ниже приведен цикл выпуска для Docker в 2017 году. Например, v17.03 означает, что этот выпуск был выпущен в марте 2017 года.
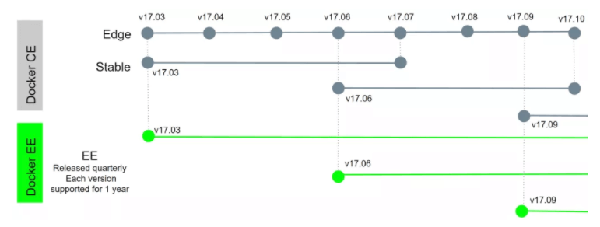
Цикл выпуска Docker с веб-сайта Docker
Подводя итог, Docker CE имеет те же основные функции, что и Docker Enterprise Edition, поэтому не бойтесь, вы можете использовать Docker CE вместо Docker EE. Тем не менее, если вы хотите запустить Docker на производстве, мы рекомендуем установить как минимум Docker EE Basic.
Где мои данные?
Представьте, что вы запускаете Windows Container и имеете некоторые важные данные внутри контейнера. Да, контейнеры эфемерны, но вы можете сохранить эти данные за пределами контейнера по многим причинам. Ну, вы можете легко обмениваться данными между Container Host и Windows Container. Кроме того, вы можете также обмениваться данными между двумя контейнерами Windows, если вам нужно. Эта функция очень полезна для многоконтейнерных приложений. Например, приложения должны предоставлять доступ к данным или сохранять данные после удаления контейнера, например, для баз данных или файлов журналов. Эта функция называется Docker Volumes.
В этом разделе я опишу, как работают Docker Volumes и объясняют четыре разных способа обмена данными с контейнерами:
- Создание независимого Docker Volume
- Совместное использование Docker Volume с несколькими контейнерами
- Копирование данных из Container Host в контейнер
- Создание Docker Volume из Dockerfile
При использовании контейнеров Windows по-прежнему рекомендуется использовать Docker Volumes для хранения данных на контейнерном хосте, а не на контейнере. Вы также можете создать несколько контейнеров, которые будут использовать один и тот же Docker Volume. Docker Volume будет отображаться как на хосте контейнера, так и на контейнере. Первое, что нужно знать, это то, что объемы докеров сохраняются в следующем скрытом пути на хосте контейнера:
Примечание. Учитывая, что мы переключаемся между хосте контейнера и контейнерами, мы добавим комментарий перед каждой командой.
Создание независимого Docker Volume
Чтобы создать Docker Volume, введите следующую команду:
|
#On the container host Docker volume create —name vol01 Vol01 |
Чтобы просмотреть все существующие Docker Volume на узле контейнера, введите:
|
#On the container host PS > Docker volume ls DRIVER VOLUME NAME local vol01 |
Теперь вы можете подключить существующий Docker Volume к новому контейнеру iis01, используя параметр -v. Синтаксис прост, вы должны указать папку на узле контейнера, а затем папку в контейнере:
|
#On the container host PS > Docker run —name iis01 -it -v C:\ProgramData\Docker\Volumes\Vol01:C:\Vol01 nanoserver/iis PowerShell |
Включив ключ -it и указав PowerShell, текущая консоль PowerShell будет использоваться для автоматического подключения к вашему контейнеру после его создания. Если вы хотите выйти из своего контейнера, введите Exit и ваш контейнер будет остановлен. Чтобы оставить контейнер в фоновом режиме, используйте CTRL + P + Q. Чтобы открыть новый сеанс PowerShell, запущенный в контейнере, используйте Docker attach <имя контейнера> и дважды нажмите ENTER. Когда в сеансе PowerShell для существующего контейнера, Exit просто вернется к хосту, но оставит контейнер включенным. Для запуска контейнера используйте Docker start <имя контейнера>.
Теперь создайте простой текстовый файл на хосте контейнера:

Убедитесь, что файл существует и в контейнере:
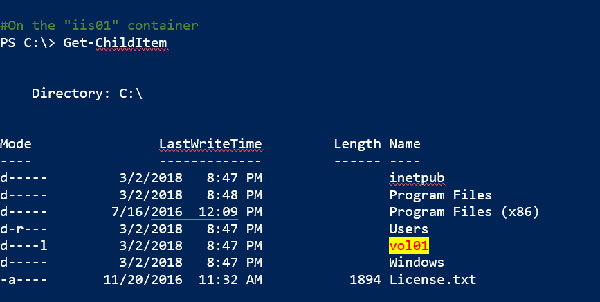
#On the iis01 container
PS C:\> Get-ChildItem .\vol01\_data
Directory: C:\vol01\_data
Mode LastWriteTime Length Name
—- ————- —— —-
-a—- 3/2/2018 8:49 PM 19 TestFile.txt
Чтобы проверить контейнер, выполните следующую команду и проверьте раздел Mounts:
|
#On the container host PS > Docker inspect iis01 |
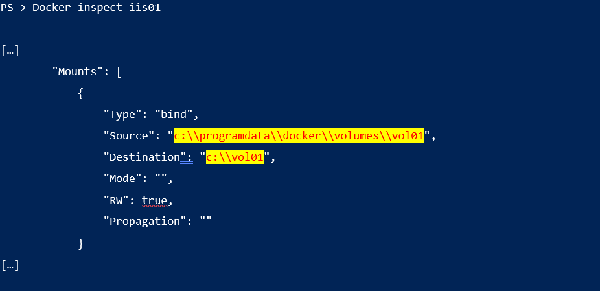
Некоторым из вас, вероятно, интересно, можно ли переместить место хранения? К счастью, да! Чтобы выполнить эту задачу, вам необходимо создать файл конфигурации с именем daemon.json:
|
#On the container host PS > New-Item -Type File -Path «C:\ProgramData\Docker\config» -Name daemon.json Directory: C:\ProgramData\Docker\config Mode LastWriteTime Length Name —- ————- —— —- -a—- 3/2/2018 9:00 PM 0 daemon.json |
Затем укажите новое место хранения, добавив его в файл daemon.json:
|
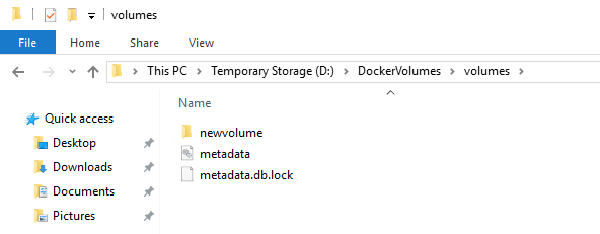
{ «data-root»: «D:\\DockerVolumes» } |
Затем перезапустите службу Docker. Создайте новый том, чтобы подтвердить, что том создается в новой папке Root Data:
|
#On the container host PS > Get-Service *Docker* | Restart-Service PS > Docker volume create —name newvolume |
Папка для новой папки Data Root будет создана автоматически. Будьте осторожны, старые тома не перемещаются автоматически, и существующие контейнеры и тома больше не будут видны Docker. Обратите внимание, что вы можете удалить существующий Docker Volume с помощью Docker volume rm <имя тома>.
Совместное использование Docker Volume с несколькими контейнерами
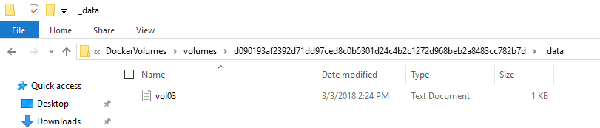
Начните с создания нового контейнера под названием iis02 на основе изображения nanoserver/iis и прикрепите к нему том. Обратите внимание, что вам не нужно указывать папку Data Root, потому что Docker создаст каталог со случайным именем папки. Затем создайте файл на новом томе.
|
#On the container host PS > Docker run -it —name iis02 —volume c:/vol03 nanoserver/iis powershell #On the «iis02» Container PS > «Welcome vol03» > .\vol03\vol03.txt PS > dir .\vol03 Directory: C:\vol03 Mode LastWriteTime Length Name —— ——————— ——— —— -a—— 3/3/2018 2:24 PM 32 vol03.txt |
Убедитесь, что файл существует на хосте контейнера:
Во время последнего шага вы создали новый контейнер и добавили новый Docker Volume. Теперь вы создадите второй контейнер iis03 и присоедините тот же самый Docker Volume C:/vol03, используя параметр -volumes-from:
#On the container host
PS > docker run -it —name iis03 —volumes-from iis02 nanoserver/iis powershell
Убедитесь, чтотом установлен. Создайте новый текстовый файл с именем vol03-from-iis03.txt:
|
#On the iis03 container PS C:\> dir .\vol03 Directory: C:\vol03 Mode LastWriteTime Length Name —- ————- —— —- -a—- 3/3/2018 2:24 PM 32 vol03.txt #The text file created on iis02 is visible on iis03 thanks to the «—volumes-from» parameter #On the «iis03» Container PS C:\> «Hello» > .\vol03\vol03-from-iis03.txt |
На узле контейнера отображаются оба файла:

По умолчанию доступ к Docker Volume осуществляется в режиме чтения / записи. В некоторых случаях вам необходимо ограничить доступ к Docker Volume. Вы можете установить том как только для чтения. Создайте контейнер под названием db01 и добавьте том с доступом только для чтения (RO):
#On the container host
PS > Docker run -it —name db01 —volumes-from iis02:ro nanoserver/iis powershell
Теперь попробуйте создать файл на этом томе, но задача не будет выполнена:
|
#On the db01 container PS C:\> dir .\vol03 Directory: C:\vol03 Mode LastWriteTime Length Name —- ————- —— —- -a—- 3/3/2018 2:36 PM 16 vol03-from-iis03.txt -a—- 3/3/2018 2:24 PM 32 vol03.txt PS C:\> «Welcome» > .\vol03\vol03-from-db01.txt out-file : Access to the path ‘C:\vol03\vol03-from-db01.txt’ is denied. At line:1 char:1 + «Welcome» > .\vol03\vol03-from-db01.txt + ~~~~~~~~~~~~~~~~~~~~~~~~~~~~~~~~~~~~~~~ + CategoryInfo : OpenError: (:) [Out-File], UnauthorizedAccessException + FullyQualifiedErrorId : FileOpenFailure,Microsoft.PowerShell.Commands.OutFileCommand |
Копирование данных из хоста контейнера в контейнер
Вот еще один интересный способ обмена данными между хостом контейнера и контейнером Windows. Утилита docker cp копирует из файловой системы контейнера в хост контейнера или обратно, от хоста контейнера до контейнера. Создайте новый файл MyPackage.zip в папке C:\Packages. Затем скопируйте файл Zip из контейнера в контейнер iis02:
|
#On the container host PS > Docker cp C:\Packages\MyPackage.zip iis02:/inetpub PS > Docker attach iis02 |
Команда Docker Attach будет подключаться к контейнеру iis02. Будьте осторожны, вы должны дважды нажать ENTER, чтобы подключиться к вашему контейнеру. Проверьте, существует ли пакет в контейнере:

Создание Docker Volume из DockerFile
Вы можете установить Docker Volume с помощью DockerFile. В следующем примере вы создадите изображение nanoserver/iis с помощью ключевого слова VOLUME для установки папки. Обязательно создайте каталог C:\Volume на хосте, если он не существует.
|
#On the container host PS > New-Item C:\Volume\Dockerfile -ItemType file PS > Add-Content -Path «C:\Volume\Dockerfile» -Value «FROM nanoserver/iis» PS > Add-Content -Path «C:\Volume\Dockerfile» -Value «VOLUME C:/Vol03» PS > Add-Content -Path «C:\Volume\Dockerfile» -Value «RUN powershell -Command gci» |
Перейдите в каталог, в котором находится этот файл Dockerfile, и выполните следующую команду:
|
#On the container host PS C:\Volume> docker build -t volumeimg . Sending build context to Docker daemon 2.048kB Step 1/3 : FROM nanoserver/iis —-> 234e90a5d146 Step 2/3 : VOLUME C:/Vol03 —-> Using cache —-> 9acd2015fab2 Step 3/3 : RUN powershell -Command gci —-> Running in 98c4a64d54e2 Directory: C:\ Mode LastWriteTime Length Name —— ——————— ——— —— d——— 3/3/2018 4:37 PM inetpub d——— 3/3/2018 4:37 PM Program Files d——— 7/16/2016 12:09 PM Program Files (x86) d-r—— 3/3/2018 4:37 PM Users d——l 3/3/2018 4:37 PM vol03 d——— 3/3/2018 4:37 PM Windows -a—— 11/20/2016 11:32 AM 1894 License.txt […] Successfully tagged vol3:latest |
Создано пользовательское изображение Docker:

Итак, теперь каждый контейнер, созданный с использованием этого изображения, автоматически монтирует том:
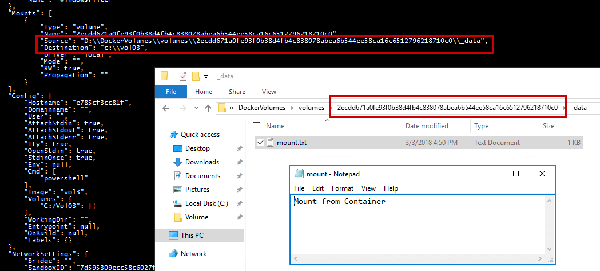
|
#On the container host PS > docker run —rm -it —name srv01 volumeimg powershell #On the «srv01» Container PS > cd vol03 PS C:\vol03> «Mount from Container» > mount.txt |
На хосте контейнера был успешно создан новый файл с именем mount.txt. Вы можете подтвердить путь установки с проверкой Docker:
Этот метод очень полезен в режиме DevOps или когда вы хотите развернуть несколько контейнеров Windows в массовом режиме. Volume будет смонтирован автоматически во время развертывания.
Контейнеры Linux в Windows?
Еще одно большое улучшение — контейнеры Linux. Теперь вы можете запускать контейнеры Linux на хосте контейнера Windows. Однако его можно запустить только в среде dev/test, поскольку он все еще находится в экспериментальной версии. Итак, что это значит? Ну, вы сможете развернуть свой Windows Containers Host, затем установить движок Docker и, наконец, запустить контейнер Linux или контейнер Windows. Благодаря LinuxKit и Moby Project вы можете использовать контейнеры Linux в Windows, используя одну из следующих сборок Windows для поддержки этой функции:
- Windows 10 Fall Creators Update
- Windows Server 2016 1709 (новое основное издание)
Чтобы запустить Linux-контейнеры в Windows, Microsoft использует функцию Linux Containers on Windows (LCOW). LCOW будет использовать изоляцию Hyper-V, поэтому перед использованием Linux-контейнеров необходимо установить Hyper-V:
|
#On the container host PS > Install-WindowsFeature Hyper-V -IncludeManagementTools -Restart |
Затем Docker daemon работает как процесс Windows, и каждый раз, когда вы запускаете контейнер Linux, Docker запускает минимальную виртуальную машину с ядром Linux. Однако «виртуальная машина» не отображается пользователем в консоли Hyper-V! По-прежнему невозможно совместно использовать контейнеры для Windows и Linux Docker. Это означает, что вы должны включить LCOW для запуска контейнеров Linux и отключить LCOW для запуска контейнеров Windows. Если вы работаете в Windows 10, обратите внимание, что поддержка LCOW доступна только на канале Edge.
Начните с включения функции LCOW со следующими командами.
|
#On the container host PS > [Environment]::SetEnvironmentVariable(«LCOW_SUPPORTED», «1», «Machine») PS > Restart-Service Docker |
- Эта функция включена, поэтому вы можете создать контейнер Linux на основе Ubuntu, используя следующую команду:
|
#On the contaner host PS > Docker run –it ubuntu |
На этом этапе вы работаете в контейнере Ubuntu на своем Windows Server:
|
root@58e001fba499:/# pwd / root@58e001fba499:/# mkdir /tmp/Linux root@58e001fba499:/# ls /tmp linux |
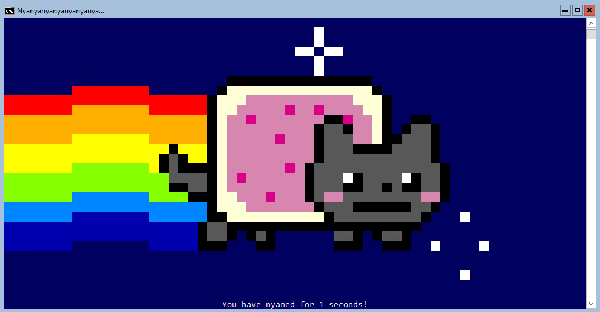
Чтобы закончить с забавным контейнером Linux, вы можете запустить контейнер NyanCat:
|
#On the container host PS > Docker run -it supertest2014/nyan |
Заключение
В этой статье серии обсуждались новые версии Docker, которые вы можете использовать в зависимости от ваших потребностей. Первый — Docker CE, который предназначен для среды разработки и тестирования, а второй — Docker EE, который предназначен для использования в производстве. Затем вы увидели:
- Как обмениваться данными между хостом контейнера и контейнером.
- Как делиться данными между двумя контейнерами.
И в конце вы запускали контейнеры Linux на хосте Windows-контейнера, что является отличным улучшением для sysadmin и разработчиков. В настоящее время LCOW все еще находится в стадии бета-тестирования и не поддерживается. В производственной среде, пожалуйста, используйте его для целей dev.