
Что такое Docker Desktop
Docker Desktop — это инструмент для работы с Docker-контейнерами на локальной машине. Он упрощает процесс разработки, тестирования и развертывания приложений, позволяя взаимодействовать с контейнерами как через консоль, так и через удобный интерфейс.
Ключевые особенности:
- понятный графический интерфейс,
- удобное управление образами и контейнерами,
- встроенные инструменты для мониторинга,
- возможность разработки и тестирования без привязки к серверу,
- поддержка работы с Docker Compose.
Если вы только начинаете изучение Docker и хотите разобраться в основах, рекомендуем ознакомиться с отдельным вводным обзором. В нем разобрали принципы работы Docker, его основные компоненты и решаемые задач. Из текста вы узнаете, как создать и запустить контейнер, а также какую роль играет Kubernetes в связке c Docker.

О системных требованиях
Перед установкой Docker Desktop важно выбрать подходящий бэкенд для работы с контейнерами: WSL 2 или Hyper-V. Оба имеют свои особенности, так что от выбора будут зависеть и системные требования. Далее в тексте разберемся, когда и какой бэкенд подойдет лучше.
Когда нужен WSL
WSL 2 (Windows Subsystem for Linux 2) — это усовершенствованная версия подсистемы Windows для Linux, которая использует виртуальную машину с реальным Linux-ядром. В отличие от первой версии, WSL 2 обеспечивает лучшую совместимость с Linux-инструментами, технологиями и приложениями, а также более высокую производительность.
Преимущества использования WSL 2 с Docker Desktop
Работа с Linux-контейнерами. Docker изначально разрабатывали для работы в Linux-среде, поэтому большинство контейнеров в Docker Hub — это образы, ориентированные на Linux. Использование WSL 2 предоставляет Docker Desktop полноценную Linux-среду на Windows.
Повышенная производительность. WSL 2 значительно ускоряет выполнение контейнеров, что особенно заметно в сравнении с WSL 1 или Hyper-V, о котором мы расскажем дальше. Это преимущество обеспечивает полноценное Linux-ядро, которое позволяет Docker работать гораздо быстрее и с меньшими накладными расходами.
Работа с файловой системой Linux. В WSL 2 можно монтировать файловую систему Linux, что позволяет работать с кодом и данными в нативной Linux-среде. Это особенно важно при разработке приложений, которые будут запускаться в Linux-контейнерах и требуют специфической настройки среды — например, прав доступа или структуры каталогов.
Когда нужен Hyper-V
Рассмотрим ключевые сценарии, в которых предпочтительнее использовать Hyper-V.
Если система не поддерживает WSL 2
Некоторые сборки системы не позволяют включать необходимые компонентов для работы WSL 2 В частности, это касается старых версий Windows, а также устройств, которые не поддерживают Windows 10 Pro или 11 Pro, — WSL 2 для них недоступна, так как требует включенной виртуализации на уровне системы. В таких случаях можно использовать Hyper-V для виртуализации контейнеров и запуска Docker Desktop.
Для работы с Windows-контейнерами
Docker Desktop поддерживает как Linux-, так и Windows-контейнеры. Однако последние требуют прямого взаимодействия с ядром Windows, а WSL 2 предоставляет только Linux-среду. Hyper-V позволяет запускать Windows-контейнеры благодаря виртуализации Windows-системы.
Для изоляции и обеспечения безопасности
Hyper-V создает полноценные виртуальные машины, обеспечивая строгую изоляцию контейнеров друг от друга и от хост-системы. Это может быть важно в корпоративной среде или при работе с чувствительными данными.
Разница между WSL 2 и Hyper-V
Если вам нужны Linux-контейнеры и высокая производительность — выбирайте WSL 2. Если же требуется строгая изоляция или работа с Windows-контейнерами, Hyper-V будет предпочтительнее. Подробнее о разнице по ключевым критериям — в таблице:
| Критерий | WSL 2 | Hyper-V |
| Производительность | Высокая (нативное Linux-ядро) | Низкая (работа через полноценную ВМ) |
| Изоляция | Относительно низкая | Высокая (контейнеры изолированы) |
| Типы контейнеров | Только Linux-контейнеры | Linux- и Windows-контейнеры |
Системные требования Docker Desktop
При использовании WSL 2 в качестве бэкенда
- WSL версии 1.1.3.0 или новее.
- Windows 11 64-bit Home / Pro / Enterprise / Education, версия 22H2 или новее.
- Windows 10 64-bit Home / Pro / Enterprise / Education, версия 22H2 (сборка 19045) или новее.
- Включенная функция WSL 2 в Windows. Подробная инструкция есть в документации Microsoft;
- 4 ГБ ОЗУ.
- Включенная аппаратная виртуализация в BIOS на вашей локальной машине.
При использовании Hyper-V в качестве бэкенда
- Windows 11 64-разрядная Enterprise / Pro / Education, версия 22H2 или новее.
- Windows 10 64-разрядная Enterprise / Pro / Education, версия 22H2 (сборка 19045) или новее.
- Включенная функция Hyper-V. Подробнее об установке — в документации Microsoft;
- 4 ГБ ОЗУ.
- Включенная аппаратная виртуализация в BIOS на вашей локальной машине.
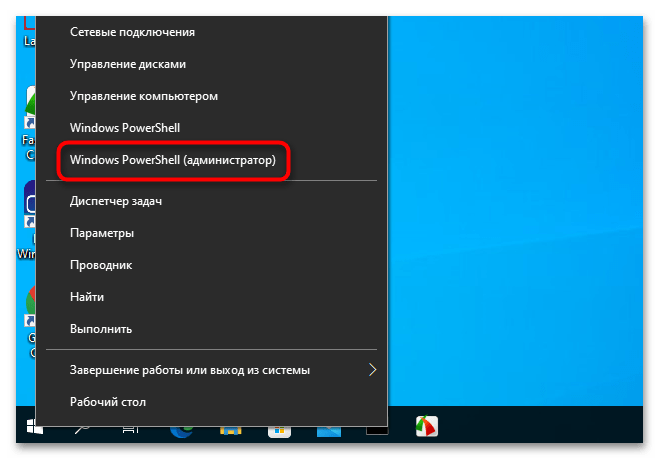
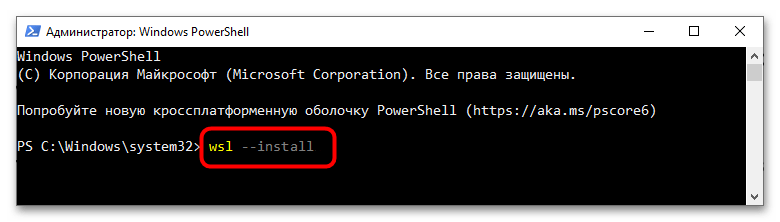
Установка WSL 2
1. Откройте PowerShell от имени администратора и введите команду wsl —install. Она выполняет следующие действия:
- включает дополнительные компоненты WSL и платформы виртуальных машин;
- скачивает и устанавливает последнюю версию ядра Linux;
- задает WSL 2 в качестве среды по умолчанию;
- скачивает и устанавливает дистрибутив Ubuntu Linux.

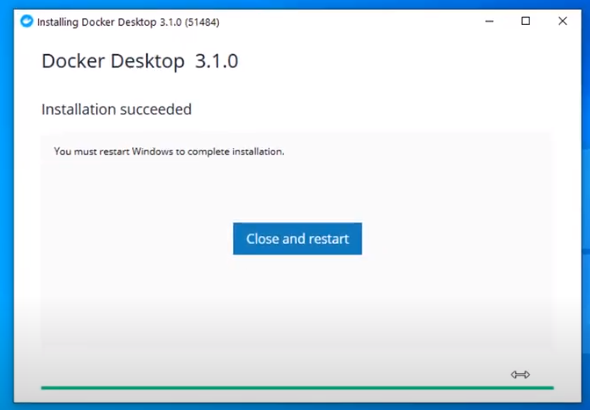
2. После успешной установки всех компонентов перезапустите компьютер.

Первичная настройка
1. Откройте установленный дистрибутив с помощью меню Пуск — найдите установленный дистрибутив (Ubuntu).
2. При первом запуске системы нужно создать имя пользователя и пароль для дистрибутива Linux.

3. Первичная настройка завершена, можно приступать к использованию WSL 2.
Альтернативный вариант — запустить WSL через PowerShell. Для этого введите команду wsl и система предложит произвести первичную настройку.

Установка Hyper-V
Для установки компонентов Hyper-V откройте PowerShell от имени администратора и выполните команду:
Enable-WindowsOptionalFeature -Online -FeatureName Microsoft-Hyper-V -All
Она установит все компоненты для работы Hyper-V, после чего нужно будет перезапустить компьютер.

Проверить корректность установки Hyper-V можно с помощью команды:
Get-WindowsOptionalFeature -Online -FeatureName *hyper*|ft

Установка Docker с бэкендом WSL 2
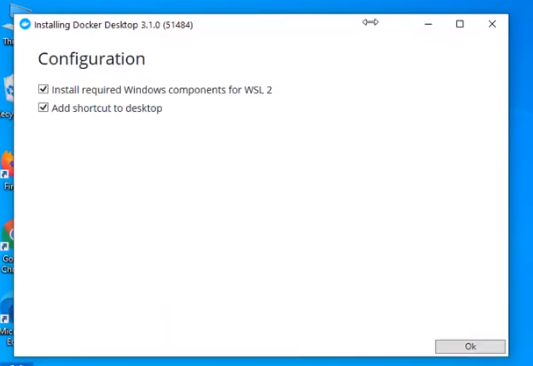
- Скачайте дистрибутив Docker Desktop с официального сайта и запустите установщик. Галочки оставьте на всех пунктах.

- После установки перезайдите в учетную запись и откройте ярлык Docker Desktop.
- Если все прошло успешно, вы увидите интерфейс инструмента:

Установка Docker с бэкендом Hyper-V
1. Скачайте дистрибутив Docker Desktop с официального сайта и запустите установщик. В инсталляционном окне уберите галочку Use WSL 2 instead of Hyper-V.

2. После установки перезайдите в учетную запись и откройте ярлык Docker Desktop.
3. Если установка выполнена корректно, программа запустится без ошибок и вы увидите интерфейс:

Запуск контейнера
Рассмотрим запуск первого контейнера на примере самого популярного образа — hello-world.
Поиск и скачивание образа
Поскольку вы только установили Docker Desktop, в системе нет образов контейнеров, которые можно запустить. Исправим это.
- Перейдите в раздел Images и нажмите кнопку Search images to run.

- Введите hello-world. В текущем окне на выбор есть две кнопки: Pull и Run. Если планируете для начала просто скачать образ, то выбирайте Pull. Если скачать и сразу запустить — Run.

- Оставляем стандартные настройки для запуска.

Проверка работы контейнера
Чтобы посмотреть запущенные контейнеры, перейдите во вкладку Containers и выберите созданный на прошлом этапе. В нашем примере для него было автоматически сгенерировано имя determined_jennings. Открыв контейнер, вы увидите сообщение, если настройка установка прошла успешно.

Как настроить запуск Docker при старте Windows
Для автозапуска Docker Desktop при авторизации на компьютере достаточно поставить галочку в настройках: Settings → General → Start Docker Desktop when you sign in to your computer.

После этого Docker Desktop будет запускаться автоматически при включении устройства.
Запуск Docker в облаке
Docker Desktop — удобный инструмент для локальной работы, но в ряде случаев может потребоваться облачная инфраструктура:
- если мощности вашего ПК не хватает для работы с контейнерами;
- если нужна среда для тестирования без нагрузки на локальную машину;
- если вы работаете с ML/AI и нужны видеокарты для обучения моделей.
1. В панели управления в верхнем меню перейдем в раздел Продукты → Облачные серверы.

2. Нажмем кнопку Создать сервер.

3. Выберем имя, регион и сегмент пула. Важно учесть, что от сегмента зависят доступные конфигурации и стоимость. После создания сервера менять сегмент пула нельзя.

4. В качестве источника выберите готовый образ, приложение, свой образ, сетевой диск или снапшот. В нашем случае — приложение Containers Ready с настроенной Ubuntu 22.04. Оно содержит:
- Docker версии 27.0.3;
- плагины для запуска Docker Compose версии 2.11.1;
- Portainer версии 2.20.3 — графический интерфейс для мониторинга и управления Docker-контейнерами, образами и сетью Docker.

5. Конфигурацию для примера возьмем базовую — 2 vCPU и 2 ГБ RAM, а в поле Диски выберем SSD Быстрый на 20 ГБ. Важно: это минимальные требования. Рекомендуем выбирать параметры серверы, исходя из ваших задач.
Помимо прочего, на этапе создания сервера или позже вы можете добавить GPU. При этом объем ОЗУ, который выделяется серверу, может быть меньше указанного в конфигурации — ядро ОС резервирует ее часть. Выделенный объем на сервере можно посмотреть с помощью команды sudo dmesg | grep Memory.

6. Для работы Containers Ready сервер должен быть доступен из интернета. Для этого создадим приватную подсеть и подключим публичный IP-адрес. В поле Сеть выберем Приватная подсеть и добавим новый публичный адрес. Подробнее о настройке подсети можно узнать в документации.

6. Добавьте SSH-ключ в поле Доступ. Подробнее о его генерации можно узнать в отдельной инструкции.

7. Ознакомьтесь с ценой и нажмите кнопку Создать сервер.

Сервер готов к использованию! Подробности о создании сервера с Сontainers Ready вы можете найти в документации. Если вам нужно запускать контейнеры с ML-моделями на мощных видеокартах, развернуть облачные серверы с GPU можно за несколько минут. Они помогут ускорить обучение нейросетей без закупки дорогого оборудования.
Читайте другие тексты о Docker
Все способы:
- Что нужно знать
- Установка и обновление WSL
- Включение Hyper-V
- Установка Docker
- Вопросы и ответы: 2
Что нужно знать
Среда для сборки и запуска контейнеризированных приложений Docker Desktop в Windows использует виртуализацию Hyper-V, поэтому компьютер, на который планируется устанавливать Docker, должен соответствовать определенным требованиям, а именно:
- Установленная Windows 10 должна быть редакции Pro, Enterprise и Education, 64-bit.
- Иметь 64-битный процессор с поддержкой технологии Second Level Address Translation (SLAT).
- Иметь объем оперативной памяти не меньше 4 ГБ.
- В BIOS должна быть включена аппаратная виртуализация.
Подробнее: Включение виртуализации в BIOS
- В зависимости от используемой технологии виртуализации на компьютере должна быть установлена подсистема Linux или включен гипервизор «Hyper-V».
Docker может использовать две разные встроенные в Windows 10 технологии виртуализации: «WSL» (подсистема Linux) и «Microsoft Hyper-V». Если планируется использование только Docker, можно ограничиться установкой и обновлением «WSL», если помимо Docker нужно запускать и другие виртуальные машины, потребуется включение штатного компонента «Hyper-V».
Установка и обновление WSL
Если предполагается использование только Docker, достаточно установить актуальную версию WSL или обновить уже установленную.
- Запустите от имени администратора консоль «PowerShell» из контекстного меню кнопки «Пуск».
- Выполните команду
wsl --installдля установки подсистемы. Если подсистема уже установлена, команда вернет соответствующее уведомление. - Чтобы проверить наличие обновлений WSL и произвести в случае необходимости их установку, выполните команду
wsl --update.

Включение Hyper-V
В случае необходимости использования других виртуальных машин потребуется включение штатного компонента Hyper-V.
- Откройте нажатием клавиш Win + R диалоговое окошко быстрого запуска, введите в него команду
optionalfeaturesи нажмите «ОК». - В окне апплета «Компоненты Windows» отметьте все элементы компонента «Hyper-V» и нажмите кнопку «ОК».
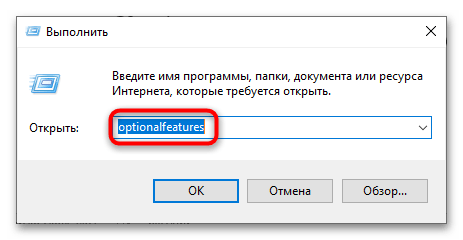
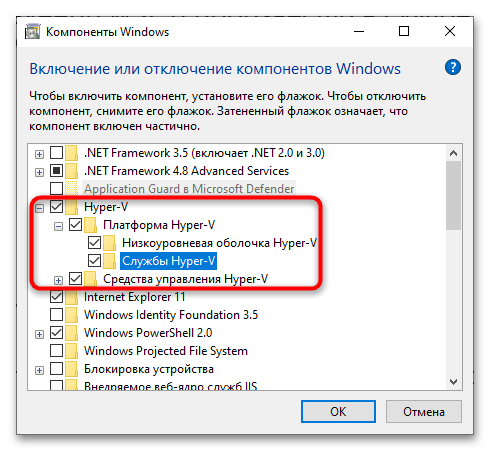
После этого вам будет предложено перезагрузить компьютер.
Читайте также: Что делать, если в Windows 10 отсутствует Hyper-V
Установка Docker
Сама процедура установки Docker сложности не представляет. Платформа устанавливается даже проще, чем большинство десктопных программ.
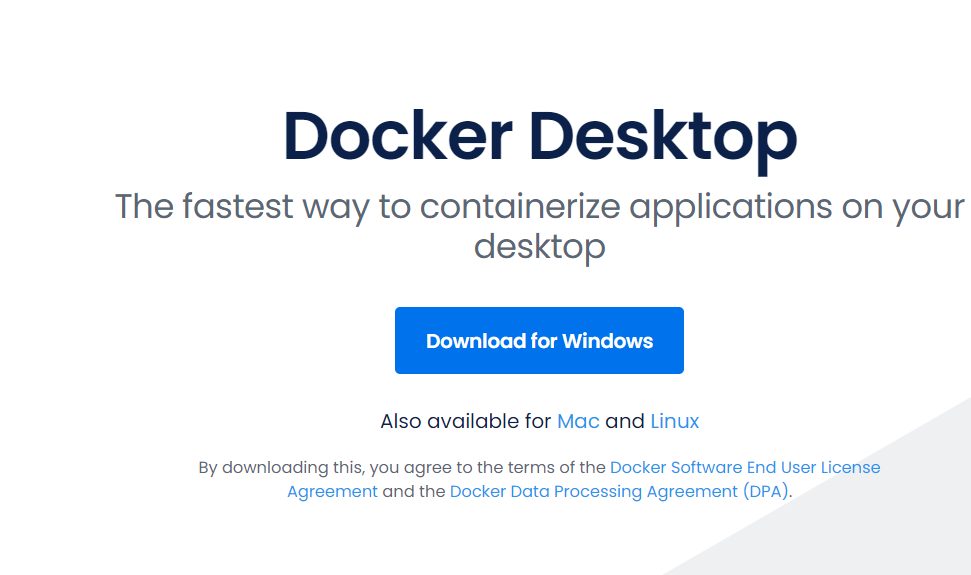
Скачать Docker с официального сайта
Так как Docker функционирует на базе Microsoft Hyper-V, после его активации несовместимый с «Hyper-V» сторонний гипервизор VirtualBox перестанет работать. Это не повредит образам виртуальных машин, но нужно учитывать данный момент.
- Посетите официальный сайта разработчика и скачайте установочный файл платформы.
- Запустите исполняемый файл установщика двойным кликом.
- Если планируется использовать только Docker, можно оставить все настройки по умолчанию — в этом случае Docker будет использовать технологию WSL 2. А если необходимо, чтобы платформа работала на базе компонента «Hyper-V» или на компьютере используются другие виртуальные машины, снимите флажок с чекбокса «Use WSL 2 instead of Hyper-V (recommended)». Нажмите кнопку «OK».


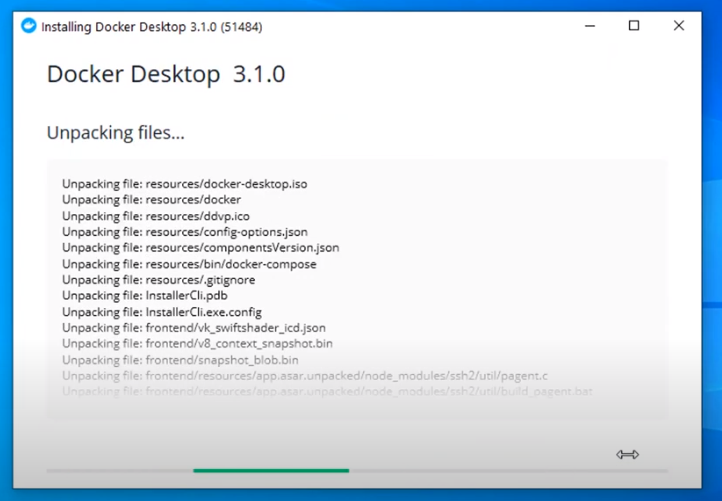
Начнется процедура распаковки пакетов Docker. Она выполняется в автоматическом режиме и не требует никаких подтверждений со стороны пользователя. Все, что требуется, это дождаться завершения инсталляции и закрыть окно мастера нажатием кнопки «Close».
Наша группа в TelegramПолезные советы и помощь
Before understanding the concept of Docker, let’s first discuss the concept of Hypervisors. So in an IT Company, or any cooperation, there is a development team, a testing team, and an operation team for developing the application, testing it, and deploying it. Now suppose the developers are working on a different OS, for example, let’s say macOS, and they used some dependencies or libraries as per the language they are using, so they just won’t hand the software to the testing team, but also the libraries, But now, the application didn’t run the tester’s machine, but it worked on the developer’s machine, maybe because the tester’s machine has different OS features than the developer’s one.
In this article, we will guide you through on firstly discussing what is docker, what are the requirements to docker for installing in Windows, why to install docker on windows, its implementation guide, best practices and troubleshooting issues and much more, The following is the table of content, helping you to give a overview what we going to cover in this article.
Table of Content
- What is Docker?
- Requirements of Windows For Downloading Docker
- Specifications for Docker Desktop Installation
- Why to Install Docker on Windows?
- How to Install Docker Desktop on Windows? A Step-By-Step Guide
- How to Start Docker Desktop?
- How to Install Docker Desktop from the Command Line?
- How to Install Docker on Windows 10?
- How to Install Docker on Windows 11?
- How to Update the Docker in Windows?
- Advantages of Docker In Windows
- How to Uninstall the Docker Desktop Tool? A Step-By-Step Guide
- How to Install and Enable WSL 2 on Windows
- How to Install Docker With WSL 2 Backend on Windows?
- How to Install Docker on Windows Without Docker Desktop? A Step-By-Step Guide
- What’s the difference between Docker for Windows and Docker on Windows?
- Best practices of using Docker on Windows
- Common Troubleshooting Issues Related to Docker on Windows
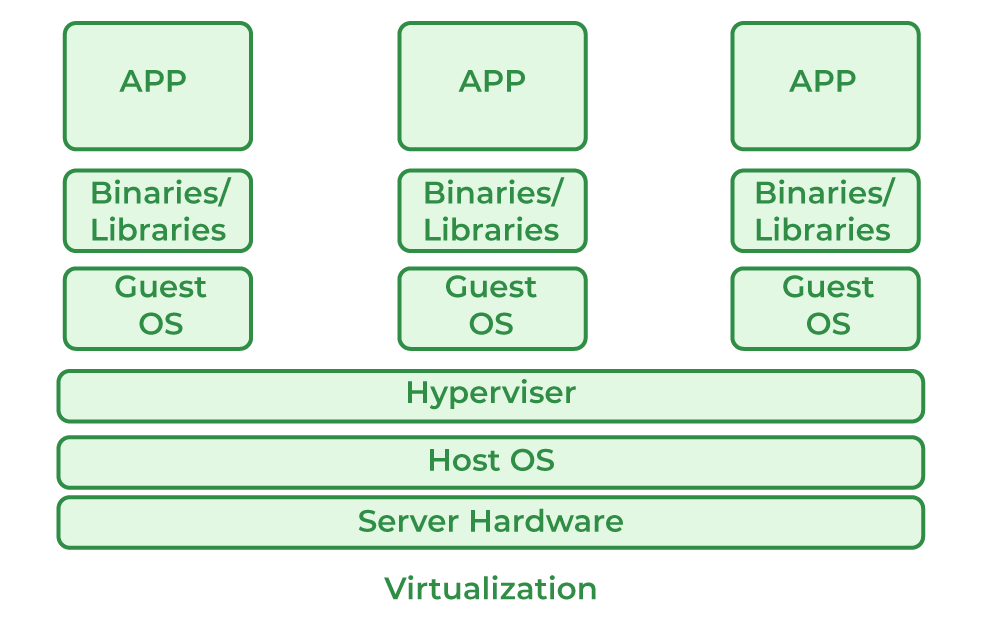
But the problem here is, for every application, one needs a different OS, this will result in a waste of resources as multiple OSs will be running. So for this problem, we have the concept of Containers, the difference between Hypervisors and containers is that we don’t need multiple OS for every application, multiple applications can share the same OS kernel, can’t they? So instead of installing HYPERVISOR, we will be installing Docker.

What is Docker?
Docker is an open-source container platform software tool, where you run your applications in the form of containers. Docker containers comes with light weighted softwares having all the dependencies and configurations so we can run them across different computing environments. It facilitates the developers to package their application with all its dependencies into a single entity in the form of images. These can be portable easily or sharable with other developers without worrying about the underlying OS.
Requirements of Windows For Downloading Docker
The following are the requirements of Windows on Docker:
- Windows 11 64-bit: Home or Pro version 21H2 or higher, or Enterprise or Education version 21H2.
- Windows 10 64-bit: Home or Pro version 21H2 or higher, or Enterprise or Education version 21H2.
- 4GB RAM or Higher.
- Hyper V feature must be enabled in Windows.
Specifications for Docker Desktop Installation
The following are specifications for installing Docker on windows:
- RAM: The minimal amount of Memory needed to run containers smoothly is 4GB, however, if a program has more complicated functions, it will need more than 6 GB RAM.
- Storage: For running the containers and installation of docker the minimum space required is 25GB. If you want to store the container images and data then we need at least more than 35 GB to 40 GB.
- Network: To download, push, and pull the images we need active internet then only we can maintain the container images with the help of docker.
- CPU: At least a 64-bit processor is required for docker.
Docker can be run on a laptop with 4 GB of Memory, a 64-bit processor, and 25 GB of storage. It might change based on our use cases.
Why to Install Docker on Windows?
The following are the some of the reasons and insights specifying the needs and uses of installing the docker on windows:
- Consistent Environments: It ensure the applications to run smoothly across different systems without any compatibility issues.
- Resource Efficiency: It uses less resources compared to virtual machines, which facilitates with allowing for faster startups and better resource utilization.
- Enhanced Collaboration: It facilitates with easy sharing and replication of development setups among teams.
- Seamless Integration: It facilitates to work well with existing Windows development tools and workflows
How to Install Docker Desktop on Windows? A Step-By-Step Guide
The following are the steps to guide for installing the Docker Desktop on Windows:
Step 1: Download Docker Desktop
- Open your preferred web browser (e.g., Chrome).
- Then search in the browser by typing s “Docker download” and press Enter.
- Click on the first link that appears in the search results.

Step 2: Select Software Respective to your OS
- On the Docker download page, select “Windows” as your operating system.
Step 3: Start the Download
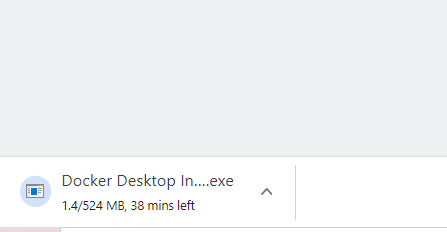
- The download will begin automatically. The duration will depend on your internet speed.
How to Start Docker Desktop?
Step 4: After installation, open Docker Desktop.
- Accept the Docker Subscription Service Agreement window and click “Continue.”
- Docker Desktop will start after accepting the terms and conditions.
Step 5: After clicking “OK,” the installation will start.
Step 6: After installation completes, it will show a confirmation screen.
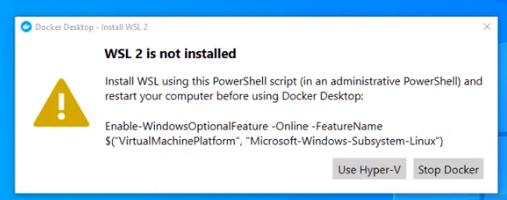
Step 7: Restart your PC to install WSL 2 (Windows Subsystem for Linux), a compatibility layer for running Linux binary executables natively on Windows 10.
Step 8: After restarting, a dialog box will appear. Click the “Stop Docker” button.
Step 9: Enable Hyper-V
- Restart your PC and enter the BIOS setup:
- Navigate to Settings > Update and Security > Recovery > Advanced Setup > Device Configuration.
- Ensure the “Enable Turbo Boost on DC” option is marked. Save and exit.

Step 10: Activate Hyper-V
- Go to Control Panel > Turn Windows Features on or off.
- Check “Hyper-V” and “Windows Hypervisor Platform.”
How to Install Docker Desktop from the Command Line?
To install Docker Desktop, follow these procedures:
Step 1: Run the following command in the Command Prompt:
start /w "" "Docker Desktop Installer.exe" install
Step 2: Add the user account to the Docker user group:
net localgroup docker-users <users>/add
Step 3: Verify Docker Installation and Versions
- Open the Command Prompt.
- Run the following command to check the Docker version:
docker --version
- Upon starting Docker for the first time, you will receive a Beta invitation email.
How to Install Docker on Windows 10?
You must perform the following steps in order to install Docker on Windows 10:
Step 1: Ensure Compatibility
- Verify that your system meets the minimum requirement for Docker: 64-bit Windows 10 Pro.
Step 2: Download Docker
- Download Docker Desktop from the official website.
Step 3: Install Docker Desktop
- Complete the installation process.
- Open Docker Desktop from the Start menu.
- Enable Hyper-V and Windows Subsystem for Linux (WSL) features when prompted.
- Docker Desktop will automatically restart after enabling these features.
Step 4: Verify Installation:
- Open a command prompt or PowerShell window.
- Pull a sample image, such as Nginx, using the following command:
docker pull nginx
- If the image pulls successfully, Docker Desktop has been installed correctly.
How to Install Docker on Windows 11?
First, make sure that your Windows matches Docker’s requirement Docker requires 64-bit Windows 11 Pro, and the rest of all the steps are the same as Windows 10 as follows:
You must perform the following steps in order to install Docker on Windows 10:
Step 1: Ensure Compatibility
- Verify that your system meets the minimum requirement for Docker: 64-bit Windows 10 Pro.
Step 2: Download Docker
- Download Docker Desktop from the official website.
Step 3: Install Docker Desktop
- Complete the installation process.
- Open Docker Desktop from the Start menu.
- Enable Hyper-V and Windows Subsystem for Linux (WSL) features when prompted.
- Docker Desktop will automatically restart after enabling these features.
Step 4: Verify Installation
- Open a command prompt or PowerShell window.
- Pull a sample image, such as Nginx, using the following command:
docker pull nginx
- If the image pulls successfully, Docker Desktop has been installed correctly.
How to Update the Docker in Windows?
By following the steps mentioned below we can update our Docker:
Step 1: Open Docker Desktop from the Start menu
Step 2: Click on Settings and navigate to the “Resources” tab. Click on “Check for Updates.” Docker Desktop will check for any available updates.
Step 3: If an update is available, click “Download and Install.” Docker Desktop will automatically download and install the update. After completion, you can verify the Docker version by using the following command in Command Prompt or PowerShell:
docker version
Advantages of Docker In Windows
The following are the advantages of Docker in Windows:
- Docker for Windows allows developers to their applications easily on any Windows.
- Docker can be installed very easily on Windows.
- Docker containers can be moved in between Windows and Linux without changing the Source code.
- The application is isolated from the underlying OS which makes it more secure.
The following are the steps to uninstall the docker Desktop Tool:
Step 1: Find “Add or Remove Programs” in the start menu and choose it.
Step 2: Click Docker Desktop when you see Docker in the list of installed programs.
Step 3: Click on Uninstall in Docker Desktop and follow the on-screen instructions.
Step 4: After the uninstallation is complete, restart the computer.
How to Install and Enable WSL 2 on Windows
Before installing docker by using WSL 2 make sure your Windows is supported for that and then install and enable WSL2 on your laptop.
Step 1: Enter the following command as an administrator to enable the Windows Subsystem for Linux feature.
dism.exe /online /enable-feature /featurename
:Microsoft-Windows-Subsystem-Linux /all /norestart
Step 2: In this step, you need to enable the virtual machine platform feature to enable it to run the following command in Powershell as an administrator
dism.exe /online /enable-feature /featurename
:VirtualMachinePlatform /all /norestart
Step 3: After running the above command you need to restart your computer by this the virtual machine platform feature will be enabled.
Step 4: Download and install the WSL 2 Linux kernel updated package from the official website of Microsoft
Step 5: Make WSL 2 the standard version. Run the following command when logged in as an administrator in Windows PowerShell. Install a Linux distribution by using the Microsoft Store. You can pick from a variety of Linux distributions, including Kali Linux, Debian, and Ubuntu.
wsl --set-default-version 2
- After completing the above steps we can use execute Linux commands on your Windows using WSL 2.
How to Install Docker With WSL 2 Backend on Windows?
Utilizing dynamic memory allocation will help the WSL 2 backend consume resources more efficiently. which enables us to launch Docker very quickly and improve Docker’s speed. To make this happen please follow the steps mentioned below.
Step 1: Install and enable WSL 2 on Windows by following the steps outlined in the previous answers. And install Docker Desktop as mentioned above for Windows.
Step 2: Once the Docker Desktop installation is completed open the settings in Docker Desktop click on the resources tab and click on WSL 2 integration. Click “Apply & Restart” to apply the changes.
Step 3: Open a terminal in your WSL 2 distribution and use the following command to confirm that Docker is operational after Docker Desktop has restarted.
docker pull ubuntu

- If the image is successfully retrieved, WSL 2 has likely been deployed as a backend for Docker. The WSL 2 backend now allows you to use Docker to construct and manage containers on your Windows computer.
Note: The Docker CLI interacts with the Docker daemon running in the Windows Docker Desktop application when you issue Docker commands in your WSL 2 terminal.
How to Install Docker on Windows Without Docker Desktop? A Step-By-Step Guide
The following are the steps that guide you in installing the Docker on Windows without Docker Desktop:
Step 1: Enable WSL 2
- Open the power shell as administrator and run the following command:
wsl --install

Step 2: Install a Linux Distribution
- Download and install a Linux distributions from the Microsoft Store (e.g., Ubuntu)

Step 3: Set a WSL 2 as Default
- Open the PowerShell and set WSL 3 as the default version
wsl --set-default-version 2

Step 4: Install Docker Engine on WSL 2
- Open your linux distribution and update the packages list:
sudo apt update
- Install the docker using the a shell script as per defining, It looks as follows:
curl -fsSL https://get.docker.com -o get-docker.sh
sudo sh get-docker.sh
Step 5: Start Docker Service
- Start the docker service with the following command:
sudo service docker start
Step 6: Verify Installation
- Using the following command check the docker version for verifying the installation.
docker --version

Step 7: Run Docker Commands from Windows
- Install `wsl` command line tool to run the docker commands from the windows command prompt or PowerShell:
wsl docker run hello-world

What’s the difference between Docker for Windows and Docker on Windows?
The following are the difference between docker for windows and docker on windows:
| Aspect | Docker for Windows | Docker on Windows |
|---|---|---|
| Environment | It will run Docker containers using a lightweight VM (Hyper-V/WSL 2). | It will run the Docker containers natively on Windows Server. |
| Compatibility | It is suitable for development and testing on Windows 10/11. | It is suitable for production environments on Windows Server. |
| Performance | It used as a VM, which might have slight overhead compared to native. | It runs natively with offering better performance and integration. |
Best practices of using Docker on Windows
The following are the some of the best practices of using Docker on Windows:
- Use WSL2 Feature: Try to utilize the features of Windows Subsystem for Linux 2 (WSL2) for experiencing better performance and having compatibility to the applications.
- Optimize Docker Resources: Make adjustments to your resources such as CPU, memory, and disk settings in Docker Desktop for balancing performance and resource usage.
- Keep Docker Updated: Try to update the Docker Desktop software regularly, so that your containers can be ensured with security while acessing the new features.
- Utilize Docker Compose: Make use of Docker Compose for managing multi-container applications efficiently.
The following are the some of the common troubleshooting issues related to docker on windows:
- Hyper-V or WSL2 Not Enabled: Make sure the Hyper-V or WSL2 is enabled in Windows features section for successful installation and work properly with docker.
- Docker Desktop Won’t Start: Try to restart the Docker Desktop or check for updates to resolve startup issues.
- Network Connectivity Problems: Ensure to configure the network settings or to reset Docker to fix connectivity issues.
- Insufficient Disk Space: Try to free up the space or increase disk allocation for Docker.
Conclusion
In this article, we covered a step-by-step procedure to install docker in Windows 11 and Windows 10. We also covered how to install docker in Windows 10 and 11 with the help of the Command line. Refer to Install in Mac and Ubuntu to know more about installation in different Operating Systems.
Before installing docker, you need to find out the type of windows system you have. Whether you have windows 10 HOME or windows 10 PRO will impact how you install docker.
To find out your system type,
- Click on windows icon, search “
system info“, - Click on “
system information“ - Check on your
"OS Name” to see your system type.
Follow the instruction below that matches your system type.
How to install docker on windows 10 Home
Follow the steps below to install docker on windows 10 Home
You can also watch this video that shows you how to install docker on windows 10 home and windows 10 pro or read the blog or even better, use the blog and video together to install docker.
Step 1: System Requirements to Install Docker on Windows Home
These are the computer requirements to install docker on windows home
- Windows 10 64bit, version 1903 or higher.
- 4GB system RAM
In addition to the system requirements above, you also need to install WSL2 and activate virtualization on your computer.
Don’t worry, I got you covered. Follow the Instructions below on Step 2 to enable virtualization and WSL2
Step 2: Enable Virtualization & WSL2 on your windows Home computer
NOTE: You MUST have WSL2 in order to use docker in windows HOME. Follow the Instructions I have laid out on this blog teaching you How to install WSL2 on your windows home computer.
These are the things you need to have enabled on windows home computer in order to install and use docker.
- Virtual Machine Platform
- Windows Subsystem for Linux (WSL2)
- BIOS-level hardware virtualization enabled.
To enable Virtual Machine Platform and WSL,
Click on windows icon —> search for “Turn windows features on or off” —> click on it —> select “Virtual machine platform” and “Windows subsystem for linux“, click OK.

You will need to re-boot your computer after this step.
WARNING: The above instructions installs WSL but NOT WSL2 which is what you need for docker.
NOTE: To upgrade to WSL2, Follow the instructions I have laid out on this blog —> How to install/uprade to WSL2 on your computer
After following the instructions on that blog to upgrade to WSL2, return to this blog.
Then, FOLLOW Steps 3 & 4 Below to install and start Docker on your windows HOME Computer.
How to install docker on windows 10 Pro
Follow the steps below to install docker on windows 10 Pro
Step 1: System Requirements to Install Docker on Windows Pro
These are the computer requirements to install docker on windows 10 Pro, enterprise, or education.
- Windows 10 64-bit processor, Build 17134 or later.
- 4GB system RAM
- BIOS-level hardware virtualization enabled. Follow the instructions on STEP 2 BELOW to enable it.
Step 2: Enable Virtualization & Hyper-V on your computer
These are the virtualization requirements you need in order to use docker on windows 10 pro.
- Make sure your computer meets the requirements above. For more information on computer requirements, check out his page on hyper-v requirements.
- Now, you have to make sure
- Virtualization is enabled in the BIOS, your computer has
- Second Level Address Translation (SLAT), and
- Hypervisor enabled at Windows startup.
- Use this method to verify your system can run hyper-V. Open the command line —> type in “
systeminfo” —> scroll to the bottom and check Hyper-V requirements. Make sure everything says “YES”

If everything is not checked yes, you need to google how to enable BIOS level virtualization for your computer since it varies from device to device.
If everything is checked Yes, then proceed to the next step.
- Click on windows icon —> Type in “
Turn windows feature on or off” —> Click on it —> select “Hyper-V” and make sure both sub-options are selected too.

If you see “Windows Hypervisor Platform” instead of “Hyper-V”, your computer may not be compatible for Hyper-V.
- You could also enable hyper-V using Powershell. Open Powershell as an admin and type
Enable-WindowsOptionalFeature -Online -FeatureName Microsoft-Hyper-V -All
- Alternatively, you can also enable hyper-V using the command prompt. Just open the command prompt tool and type
DISM /Online /Enable-Feature /All /FeatureName:Microsoft-Hyper-V
No matter how enable Hyper-V, re-start your computer before moving onto the next step, if not docker won’t work.
If you run into any problems with getting docker to work because of virtualization problems, I suggest you check out this page.
Now that you have Hyper-V enabled, you are ready to move onto the next step which is installing docker.
Step 3: Install Docker on Windows Home and Windows Pro Computer
These are the steps to install docker on windows pro
- First, download docker for windows using this link
- Double click the installer that you just downloaded to run the docker installer
- When given the option, make sure “
enable Hyper-V Windows Features” option is selected on the Configuration page. - Just follow the installer to finish installing docker.
Step 4: Start Docker on Windows Home and Windows Pro Machine
After installing docker, it doesn’t start automatically, you have to start it manually.
- Search for docker, click on the app
- After clicking on the app, you will see the docker icon on the windows status bar. If you don’t see it, click on the up arrow and you should see it.
- When the docker icon stops blinking, then docker stabilized and is ready to use.
- When you finish using docker, be sure to right-click the docker icon on the status bar, and click on quit, to quit the docker engine.
- If you close docker without stopping the engine, the engine will continue to run in the background until you right-click the icon to quit the docker engine.
After installing docker, you will get some initial instructions of how things work from docker documentation the first time you open docker app. Feel free to liberally use those instructions provided by docker to help you get started.
Step 5: Use Docker for Data Science & Deploy to AWS
If you are a data scientist using docker for the first time, you might be wondering how you could use docker for a data science project. I am one-step ahead of you. In this detailed blog post, I show you how to use docker for data science projects.
If you are working in docker, you might be interested in launching your app online using AWS. Don’t worry, I got you covered. In this detailed blog post –> I cover How to Deploy Data Science APP to AWS ElasticBeanStalk using Docker
If you have any questions or comments, let me know below.
Рассмотрим установку Docker Desktop for Windows — это Community-версия Docker для систем Microsoft Windows.
Системные требования
- Windows 10 64-bit: Pro, Enterprise, Education (Build 16299 или выше).
Для успешного запуска Client Hyper-V в Windows 10 требуются следующие предварительные требования к оборудованию:
- 64 bit процессор c поддержкой Second Level Address Translation (SLAT).
- 4GB системной памяти.
- Поддержка аппаратной виртуализации на уровне BIOS должна быть включена в настройках BIOS.
Подготовка
Включаем функции Hyper-V Containers Window. Для этого переходим в панель управления – установка и удаление программ – включение или отключение компонентов Windows. Активируем пункт Hyper-V, который включает Hyper-V Managment Tools, Hyper-V Platform.
Также это можно выполнить через powershell или dism (все команды необходимо выполнять с правами администратора).
Powershell:
Enable-WindowsOptionalFeature -Online -FeatureName Microsoft-Hyper-V -All
DISM:
DISM /Online /Enable-Feature /All /FeatureName:Microsoft-Hyper-V
Установка
Скачиваем установщик Docker (Docker Desktop Installer) с Docker Hub.
Установка Docker Desktop включает Docker Engine, Docker CLI client, Docker Compose, Notary, Kubernetes и Credential Helper. Контейнеры и образы, созданные с помощью Docker Desktop, используются всеми учетными записями пользователей на компьютерах, на которых он установлен. Это связано с тем, что все учетные записи Windows используют одну и ту же виртуальную машину для создания и запуска контейнеров. При использовании Docker Desktop WSL 2 невозможно обмениваться контейнерами и образами между учетными записями пользователей.
Запускаем установщик Docker Desktop Installer.exe и ожидаем пока он скачает все необходимые компоненты.
После установки система потребует перезагрузки. Перезагружаемся и входим в систему.
После входа может возникнут запрос на установку дополнительного компонента WSL2. Переходим по ссылке и скачиваем необходимый пакет с официального сайта Microsoft.
После скачивания выполняем установку WSL2, после которой снова потребуется перезагрузка.
Настройка и запуск приложения
Входим в систему и ждем запуска всех служб Docker. Когда все службы будут запущены, мы увидим в трее классический значок Docker — это значит что служба установлена и запущена. Далее можно запустить приложение Docker desktop. Далее можно изменить настройки Docker при необходимости:

Рисунок 1 — Изменение параметров Docker desktop
Далее управление Docker выполняется через Powershell. Проверяем версию и выполняем тестовый запуск контейнера:

Рисунок 2 — Проверка версии Docker
После выполнения всех этих действий, Docker готов к использованию.
Нужна помощь? Настройки docker/docker swarm/docker compose мы осуществляем в рамках услуги DevOps-аутсорсинг.