
How to Install and Run Docker on Windows Server 2016, 2019, 2022. In this tutorial we will introduce Docker and how it works with it’s main advantages then move onto installation phase with how to install Docker using PowerShell.
Docker is one of the most widely used containerization platform used by developers. It allows developers to create, deploy, and run applications with the help of containers.
Next in this article How to Install and Run Docker on Windows Server 2016, 2019, 2022 is to introduce Docker.
What Is Docker?

The Docker is an open source platform that allows you to build, deploy, run, update, and manage containers. They are standardized, executable components that integrate application source code with operating system libraries and dependencies they need to run that code in any environment.
With the help of containers, the process of simplifying the development and delivery of distributed applications becomes effortless. The platform is highly popular among organizations transforming themselves to cloud native developments and hybrid multi cloud environments. Therefore, by using Docker, you will tend to acquire the following additional advantages:
Docker Benefits
- Light Weight – The Docker containers do not have to carry the payload of an entire OS instance and hypervisor. They only require the OS processes and dependencies for executing the code. Also, since their sizes are measured in megabytes, you can make better use of hardware capacity and have faster start-up times.
- Greater Resource Efficiency – With the help of Docker containers, you can run several copies of the same application on the hardware as many times as you want, thereby reducing cloud spending.
- Improved Developer Productivity – Write and run only once a time a containerized application anywhere. In comparison to VMs, they will run faster and deploy, provision and restart effortlessly. This way, you can make them ideal for usage in continuous integration and continuous delivery (CI/CD) pipelines. It will also be a better fit for development teams adopting Agile and DevOps practices.
- Improved And Seamless Container Portability – Docker containers tend to run without modification across any desktop, data center, and cloud environment.
- Automated Container Creation – Docker tends to build a container automatically according to the application source code.
- Shared Container Libraries – Docker enables you to access open source libraries, which include numerous user contributed containers.
- Containers Reuse – In Docker, you can use existing containers as base images, especially templates for building new containers.
- Container Versioning – Docker trackers the versions of a computer image, get back to previous versions and then identify who built it and when. They also upload only deltas between an existing version and a new one.
Moreover, if you use containers, you tend to acquire benefits, like improved app quality, faster response to market changes, etc.
How Does Docker Work?

Docker work by packaging, provisioning, and running containers. Its technology is available to the operating system. A container packages the application service or function will every library, configuration files, dependencies, and other necessary parts and parameters to operate. Every container contributes to the service of one underlying operating system.
Moreover, Docker images constitute the dependencies required for executing code inside a container. This way, containers that move between Docker environments with similar OS work with no changes.
Docker also uses resource isolation in the OS Kernel to run several containers on the same OS. It is not as same as Virtual Machines (VMs) that encapsulate an entire OS with executable codes on an abstracted layer of physical hardware resources.
On the other hand, Docker was developed to work on the Linux platform. However, it has extended its offer to provide support to non Linux Operating systems too. It includes Microsoft Windows and Apple OS X. Docker also has the version for Amazon Web Services (AWS) and Microsoft Azure.
Next in this post we will show you how to install and run Docker on Windows server 2016 / 2019 and 2022.
Enable the Containers Feature
By default, the container features are not enabled on Windows server machine. So you will need to enable it first.
Install-Module -Name DockerMsftProvider -Repository PSGallery -Force
The above command will install the Docker-Microsoft PackageManagement Provider from the PowerShell Gallery.
Run Docker Engine on Windows in Azure
Run Docker Engine on Windows in AWS
Run Docker Engine on Windows in GCP
Install Docker Engine
After the Containers feature is enabled on Windows Server, open your powershell windows and install the latest Docker Engine and Client by running the command below:
Install-Package -Name docker -ProviderName DockerMsftProvider
Once the Docker is installed, you will get the following output:
					WARNING: A restart is required to enable the containers feature. Please restart your machine.

Name                           Version          Source           Summary
----                           -------          ------           -------
Docker                         20.10.9          DockerDefault    Contains Docker EE for use with Windows Server.
Next, you will need to restart your system to enable the docker features. You can run the following command to restart the system:
Verify the Docker Installation
You can verify the installed version of Docker using the following command in the powershell window:
Get-Package -Name Docker -ProviderName DockerMsftProvider
You will get the following output:
					Name                           Version          Source                           ProviderName
----                           -------          ------                           ------------
docker                         20.10.9          DockerDefault                    DockerMsftProvider
You can also run the following command to see the Docker version information:
You should see the Docker version information in the following output:
					Client: Mirantis Container Runtime
 Version:           20.10.9
 API version:       1.41
 Go version:        go1.16.12m2
 Git commit:        591094d
 Built:             12/21/2021 21:34:30
 OS/Arch:           windows/amd64
 Context:           default
 Experimental:      true

Server: Mirantis Container Runtime
 Engine:
  Version:          20.10.9
  API version:      1.41 (minimum version 1.24)
  Go version:       go1.16.12m2
  Git commit:       9b96ce992b
  Built:            12/21/2021 21:33:06
  OS/Arch:          windows/amd64
  Experimental:     false
If you want to get detailed information of Docker package, run the following command:
You should see the following output:
					Client:
 Debug Mode: false
 Plugins:
  cluster: Manage Docker clusters (Docker Inc., v1.1.0-8c33de7)

Server:
 Containers: 0
  Running: 0
  Paused: 0
  Stopped: 0
 Images: 0
 Server Version: 19.03.2
 Storage Driver: windowsfilter
  Windows:
 Logging Driver: json-file
 Plugins:
  Volume: local
  Network: ics l2bridge l2tunnel nat null overlay transparent
  Log: awslogs etwlogs fluentd gcplogs gelf json-file local logentries splunk syslog
 Swarm: inactive
 Default Isolation: process
 Kernel Version: 10.0 14393 (14393.3808.amd64fre.rs1_release.200707-2105)
 Operating System: Windows Server 2016 Standard Version 1607 (OS Build 14393.3808)
 OSType: windows
 Architecture: x86_64
 CPUs: 2
 Total Memory: 3.999GiB
 Name: CLOUD-0Q59R832Q
 ID: BTXL:3ZPL:A7MZ:FNCV:UZRU:VG7I:YU7X:DERR:2Q2Y:2YNL:SYGN:AGYT
 Docker Root Dir: C:\ProgramData\docker
 Debug Mode: false
 Registry: https://index.docker.io/v1/
 Labels:
 Experimental: false
 Insecure Registries:
  127.0.0.0/8
 Live Restore Enabled: false
Run the Docker Container
Next, download the Docker dotnet nano server container image using the following command:
docker pull mcr.microsoft.com/dotnet/samples:dotnetapp-nanoserver-2009
Once the image is downloaded, you can run the container from the downloaded image using the following command:
docker run mcr.microsoft.com/dotnet/samples:dotnetapp-nanoserver-2009
Run Linux Container on Windows
By default, Docker on Windows machine can only run Windows container. In order to use Linux containers on Windows Server, you need to use the Docker Enterprise Edition Preview which includes a full LinuxKit system for running Docker Linux containers.
The first thins is to remove your Windows Docker engine using the following command:
Uninstall-Package -Name docker -ProviderName DockerMSFTProvider
Secondly, install Docker for Linux by running the following command:
					Install-Module DockerProvider
Install-Package Docker -ProviderName DockerProvider -RequiredVersion preview
Thirdly, enable LinuxKit system for running Linux containers using the following command:
[Environment]::SetEnvironmentVariable("LCOW_SUPPORTED", "1", "Machine")
The next step is to start the Docker service with the following command:
Then download and run your first Linux container using the following command:
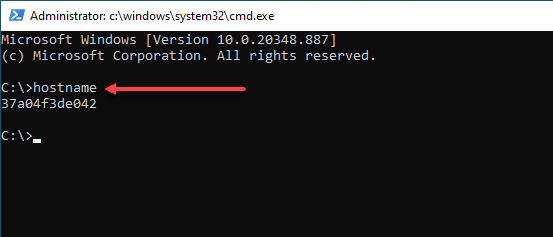
docker run -it --rm ubuntu /bin/bash
This command will download the latest Ubuntu container image, create the container and connect to the container shell as shown below:
You can now run the following command inside the container to verify the Ubuntu version:
					root@21340a2fsf7e2:/# cat /etc/os-release
 NAME="Ubuntu"
 VERSION="22.04.1 LTS (Jammy Jellyfish )"
 ID=ubuntu
 ID_LIKE=debian
 PRETTY_NAME="Ubuntu 22.04.1 LTS"
 VERSION_ID="22.04"
 HOME_URL="https://www.ubuntu.com/"
 SUPPORT_URL="https://help.ubuntu.com/"
 BUG_REPORT_URL="https://bugs.launchpad.net/ubuntu/"
 PRIVACY_POLICY_URL="https://www.ubuntu.com/legal/terms-and-policies/privacy-policy"
 VERSION_CODENAME=Jammy Jellyfish
 UBUNTU_CODENAME=Jammy Jellyfish
To disconnect from the container, run the following command:
root@21340a2fsf7e2:/# exit
How to Use Docker
Docker provides many useful commands that help developers or system administrators to easily manage Docker containers from the command line.
You can use the –name option with Docker to assign a container name when running a new container. For example, to launch a new container from the debian:latest images and assigned a name debian-container, run the following command:
docker.exe container run --name debian-container debian:latest
After starting the container, you can see the status of all container using the following command:
There are two ways of running a container, in attached mode and in detached mode. By default, Docker runs the container in attached mode. In the attached mode, you will be connected to the terminal session, where it displays output and messages.
If you want to run a container in detached mode, use the -d flag:
docker.exe container run -d debian:latest
You can run a container in interactive mode with Docker. In this mode, you can run commands inside the container. You can use the following command to run a container in an interactive mode:
docker container run -it debian:latest /bin/bash
If you want to start, stop or remove the Docker container, run the following commands:
					docker container start container-name
docker container stop container-name
docker container rm container-name
Great! You have read How to Install and Run Docker on Windows Server 2016, 2019, 2022 until the very end. let’s conclude.
How to Install and Run Docker on Windows Server 2016, 2019, 2022 Conclusion
In this post we illustrated how to install Docker CE on Windows server 2016, 2019, and 2022. We also explained how to run dotnet container in Windows server. I hope this guide will help a lot to run and manage the Docker container. Docker’s containers technology makes development highly scalable as it separates your applications from your infrastructure to be able to deliver software quickly. Shipping, testing and deploying the code is made quickly with less delays in applications delivery.
Windows Server provides many great features to run your Docker containers, including Hyper V isolation for additional security and kernel protection. Also, Microsoft Windows Server can run both Windows and Linux containers meaning you can have a mixed environment supporting applications needing both Windows and Linux components.
В нашем справочнике есть мануал по установке Docker на сервере, работающем под управлением Ubuntu 20.04. Настоящая же статья посвящена тому, как запустить хранилище Docker на операционной системе Windows Server 2019.
На виртуальном сервере, работающем под управлением Windows Server 2019, производить установку Docker наиболее оптимально при помощи интегрированной среды PowerShell. Запустить PowerShell можно из командной строки, используя команду powershell, либо из оболочки Server Manager – Tools → Windows PowerShell.
Установка Docker
Первым шагом необходимо будет установить функцию контейнеров. Сделать это можно при помощи следующей команды:
Install-Module -Name DockerMsftProvider -Repository PSGallery -ForceДалее нужно установить сам Docker, для чего используйте следующую инструкцию:
Install-Package -Name docker -ProviderName DockerMsftProviderВо время инсталляции система попросит вашего согласия на установку пакета. Для продолжения установки нужно нажать Y.

Следующей командой необходимо перезагрузить сервер по окончании установки Docker:
Restart-Computer -ForceПроверить версию установленного пакета можно при помощи команды:
Get-Package -Name Docker -ProviderName DockerMsftProvider
Для этого также можно использовать следующую команду:
docker versionТеперь необходимо запустить Docker:
Start-Service DockerЗапуск контейнера
После чего уже можно будет загрузить и установить базовый образ контейнера. Например, следующей командой вы сможете произвести загрузку базового образа Nano Server для Windows Server 2019:
docker pull mcr.microsoft.com/windows/nanoserver:ltsc2019
Список установленных образов можно вывести при помощи команды:
docker imagesТеперь можно приступить к созданию образа. Команды, при помощи которых создаются и запускаются образы, лучше выполнять в командной строке, запущенной от имени администратора. Использование интегрированной среды Windows PowerShell не позволяет работать с контейнерами, так как контейнеры в конечном итоге перестают отвечать на запросы.
Запуск загруженного контейнера Nano Server с интерактивным сеансом производится следующей командой:
docker run -it mcr.microsoft.com/windows/nanoserver:ltsc2019 cmd.exeВ качестве примера на диске C:\ запущенного контейнера создайте каталог TEMP:
mkdir C:\TEMPПерейдите в созданный каталог и создайте файл my_file.txt, содержащий текст My File:
cd C:\TEMP
echo "My File" > my_file.txt
После чего выйдите из контейнера:
exitСледующая команда нужна будет для получения идентификатора контейнера, из которого вы только что вышли:
docker ps -a
В нашем примере идентификатор контейнера выглядит как 722200a246df. Исходя из этого вы можете создать новый образ, в котором будут учитываться изменения, внесённые в изначальный образ. Для этого нужно будет использовать команду docker commit. Новый образ мы назовём my_container, поэтому команда для его создания будет выглядеть следующим образом:
docker commit 722200a246df my_containerПри помощи команды docker images можно вывести список образов, в котором будет присутствовать новый образ:

Теперь вы можете запустить созданный контейнер при помощи команды docker run. Использование параметра --rm позволяет удалить запущенный контейнер после завершения работы оболочки командной строки. В нашем примере мы запустим контейнер my_container и выведем содержимое файла my_file.txt из директории TEMP на диске C:\.
docker run --rm my_container cmd.exe /s /c type C:\TEMP\my_file.txtВ итоге Docker создаст контейнер из образа my_container, запустит экземпляр командной строки, в которой выведет содержимое файла C:\TEMP\my_file.txt, после чего Docker остановит работу контейнера и удалит его.
This guide will assist you in setting up a Docker engine on Windows Server 2025 for running Windows-based containers.
This guide is also compatible with Windows Server 2022 and previous versions.
Things to Know Before Installing Docker on Windows Server
- Docker on Windows Server is designed to run Windows-based containers only.
- You cannot run Linux containers on the Windows Server Docker engine.
If you need to run Linux containers on your Windows Server, the solution is to create an Ubuntu virtual machine and install Docker within that VM.
Also This guide is specific to Windows Server. If you’re using Windows 11, there’s a separate solution called Docker Desktop, which allows you to run both Windows and Linux containers.
How to Install Docker on Windows 11
Demo: Install Docker on Windows Server
Microsoft provides an installation script to install Docker on Windows Server. What you need to do is open a terminal (PowerShell) as an administrator, download the script, and run it in PowerShell.
To download the script, run the following command:
Invoke-WebRequest -UseBasicParsing "https://raw.githubusercontent.com/microsoft/Windows-Containers/Main/helpful_tools/Install-DockerCE/install-docker-ce.ps1" -o install-docker-ce.ps1After downloading the script, run it to install the Docker engine:
.\install-docker-ce.ps1During the installation, Windows Server will reboot once. After the reboot, the installation will continue automatically.
After the installation is finished, you can check the Docker version installed on your server by running the following command:
docker versionTo verify that the Docker engine is working correctly, run a «hello-world» container using the following command:
docker run hello-world If you see the message «Hello from Docker!», that means the Docker engine is working properly.
Running Windows Containers
Remember, you can only run Windows containers on the Docker engine for Windows Server.
You can find Windows-based images in the official Microsoft repository on the Docker Hub page.
What Next?
Now that you have Docker Engine up and running on your Windows Server, check out our video tutorial on how to start containers using the docker run command.
By now, we’ve all seen the posts and tweets from the IT blogosphere, heralding the arrival of Docker for Windows. Now, to be clear: the ecosystem of Docker tools for Windows is nothing new. Tools such as Boot2Docker, Kitematic, and the Docker Client for Windows have been around for a while, and their collective functionality for Windows has recently been rolled up into Docker Toolbox. While these tools don’t really provide the full, native Docker experience on Windows, they do provide:
- a gateway drug Docker experience for Windows/Mac users, inside a Linux VM.
- the ability to manage a Linux Docker host from a Windows/Mac workstations.
- a means by which software developers, operations engineers, QA, and other IT staff can work with Docker containers idempotently using Windows/Mac workstations.
Until very recently, it was not possible to use a Windows Server platform to host the Docker Engine without adding an additional layer of virtualization. That all changed with the recent release of Windows Server 2016 TP3, which provides a bona-fide Docker daemon running natively on an actual Windows Server host. To many, this is the long awaited missing piece that clears the path to using Docker containers, tools, and workflows in production Windows environments.
Docker Engine for Windows Server requires Windows Server 2016, which is currently only in the Technical Preview 3 release stage. Like most bleeding-edge projects, Docker Engine for Windows Server is still very much in the skunkworks phase. The current set of official documentation is sparse, fragmented, and a bit elusive. In this walkthrough, we will outline the end-to-end steps required to quickly get up and running Docker Engine for Windows Server, from host OS install through your first docker run command.
Go ahead and skip to the Walkthrough: section below, but circle back here during progress bar breaks to read these key points about Docker Engine for Windows Server, gleaned from the Windows Server team at DockerCon:
-
There will be no cross platform containerization. Since Docker/libcontainer/LXC/etc are not hypervisors, and containers are not VMs, there is currently no way to present the appropriate kernel to a container from another platform. Windows containers will require a Windows Docker host, and Linux containers will require a Linux Docker host. The Windows Server Containers reuse the host kernel and create a sandboxed environment for the process, exactly like it does on Linux. Unless there is an unlikely fundamental change in one or both platforms (e.g. adopting a common kernel), cross platform containerization will simply never be a thing.

-
There will be two types of containers on Windows. “Windows Containers” work just like Docker containers. “Hyper-V Containers” are something different…
-
There will be two ways to manage containers in Windows. Windows Containers can be created and managed through either Docker or Powershell. Containers created with PowerShell cannot currently be managed with Docker and visa versa.
-
Windows Nano Server. Nano Server is stripped-down version of Windows Server 2016, optimized for running containers. In the Linux Docker world, think CoreOS, RHEL Atomic Host and Ubuntu Snappy. Apparently the Windows Server Technical Preview 2 .iso contained a Nano Server folder in the image, as well a deployment guide. I did not check the TP3 .iso, mostly because the current process to provision a Nano instance looks like a blunderous and buggy PITA. I remain interested in duplicating the process outlined here on Windows Nano Server, perhaps another day…

Walkthrough: Getting Started with Docker Engine for Windows Server
Install Windows Server 2016 TP3 (Core)
-
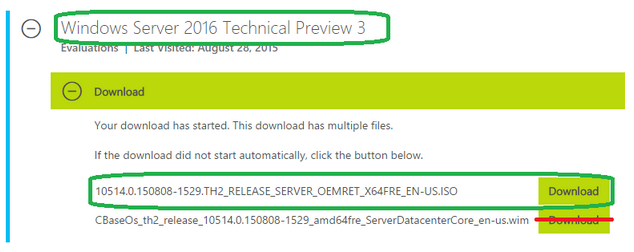
Download the .iso for Windows Server 2016 TP3. This requires registration for a TechNet account as well as additional registration for the evaluation download. Only the .iso is required, you do not need to download the .wim file.
-
Before installing, note the following install options:
Bare metal: create bootable DVD/USB and complete a bare metal install.
VM: create a 64-bit virtual machine in VirtualBox/HyperV/vmWare/etc. For this walkthrough, we will be using vmWare ESXi.
Cloud instance: At this time, AWS EC2 does not offer an AMI for Windows Server 2016 TP3 with Windows Server Containers, however (of course) Azure does. YMMV on other cloud platforms.
-
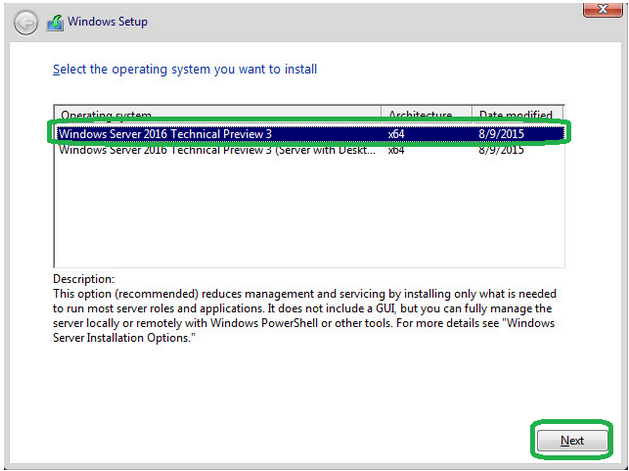
According to Microsoft, the full (GUI) installation of Windows Server does not support containers at this point in time, and they recommend only installing Windows Server Core. However, I have tested this install on both Full /Core, and Docker seemed to work as expected in both versions. For this walkthrough, we will use Windows Server Core.
-
Using the .iso downloaded in step 1 above, proceed to install Windows Server 2016 TP3, click “Install now” when prompted.
-
To install Windows Server Core, choose “Windows Server 2016 Technical Preview 3”, not “Windows Server 2016 Technical Preview 3 (Server with Desktop Experience)”, click «Next».
-
Accept the license agreement, click Next.
-
Choose “Custom”
-
Configure your partitions, accept any dialogues about Windows Partitions, choose the largest partition created, and click “install”.
-
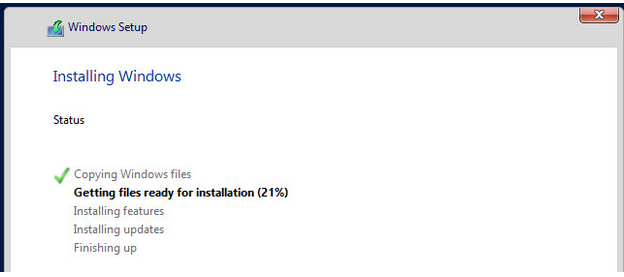
When the install is complete, the system will reboot.
-
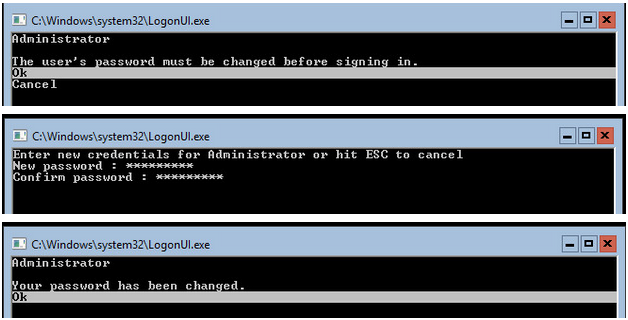
After reboot, you will be prompted to change the Administrator password. Ensure “Ok” is selected, press Enter, provide and confirm a password, press Enter twice.
-
Windows will briefly set up the system for first use, and you will be presented with a command prompt. Installation of Windows Server 2016 TP3 (Core) is complete.
Setup Windows Server host for Containers
- At the command prompt, do
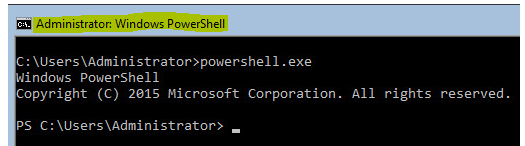
powershell.exe -
Ensure console window looks like this:
-
If it does not (still in the powershell window) do:
start-process powershell -Verb runas -
Do
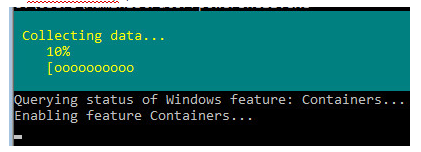
wget -uri http://aka.ms/setupcontainers -OutFile C:\ContainerSetup.ps1
-
Do
C:\ContainerSetup.ps1
-
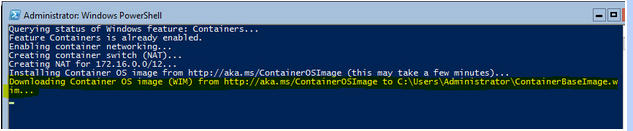
OS will reboot, install some features, and prompt to unlock with credentials.
-
Provide the credentials created earlier. As soon as you login, a PowerShell session will spawn and the setup will continue.
-
During the setup process, a very large .wim file will be downloaded. This takes a long time (~45 minutes for me), and does not provide any console feedback to indicate the progress. Don’t worry, your box is not locked up.
-
At the end of the download, the setup process will resume.
-
The setup will indicate
Installing Docker…followed byScript complete!, and present you with a prompt in the PowerShell console.


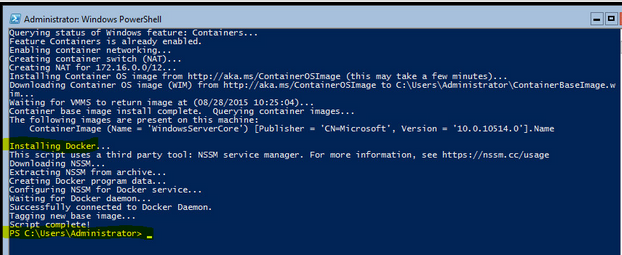
Do Docker stuff
-
Do
docker versionto confirm both the client and server components were installed successfully. -
The Technical Preview of Docker for Windows Server isn’t feature complete yet (and taking into account that the feature sets will never be exactly identical given the differences of the underlying platforms), most of the Docker commands you already know will work as expected on Windows Server. Here’s what it thinks it can do, anyway, I’ve tested a great deal of this without any issues:
-
Let’s kick the tires.
docker imagesThis lists the two default Windows docker images available on the machine:
docker run -it --name dockerdemo windowsservercore cmdNow you are in a Windows Server Core container (specified by windowsservercore), the container is named dockerdemo, and you are using an interactive terminal (specfied by -it and cmd), all running on a real Windows Server Core Docker host!


Where to go from here?
- Manage Windows Server Containers with Docker
- Manage Windows Server Containers with PowerShell
- Docker official documentation
- Docker Training
- @botchagalupe’s kick-ass, 13 part Docker tutorial video series
-
…and, a bunch of Windows Server 2016 TP3 stuff:
Release Notes
TechNet Library: What’s New in Windows Server 2016 Technical Preview 3
MVA Course: What’s new in Windows Server 2016 Preview
Most organizations are looking at running containers in their organization. However, much of what you read about containers revolves around Linux containers. However, what if you want to run containers on Windows Server? Windows Server Containers are a great way to run Windows applications with an extremely small footprint. However, since Windows containers require a Windows container host, we need to use a Windows Server container host to install Docker so we can run Docker containers using Windows Docker images. Windows Server 2022 is the latest Windows Server operating system from Microsoft that enables running Docker containers. Let’s look at how to install Docker on Windows Server 2022 and see the steps involved.
Table of contents
- What is Docker Engine and Docker Desktop?
- What are container images?
- Why run Docker containers on Windows Server?
- Windows Server 2022 containers new features
- Server 2022 Core image size reduction
- Longer support cycle for Windows Server 2022 container images
- Virtualized time zone
- Application compatibility
- IPv6 support
- Improved Kubernetes experience
- Solving docker container image kernel limitations
- Windows Server 2022 supports WSL installed
- Windows Server 2022 – Process isolation mode and Hyper-V isolation
- Install Docker on Windows Server 2022
- Install the Windows Server 2022 containers feature
- Install Hyper-V Role in Windows Server 2022
- Install DockerMsftProvider and install Docker
- Pull Windows Container image for Docker
- Run the Windows Docker Image
- Wrapping Up
Check out the video of the process if you would rather see it in video form:
What is Docker Engine and Docker Desktop?
Both the Docker engine and Docker desktop are widely used in the enterprise to run business-critical container image applications. Docker provides the container runtime that allows the container image applications to run on top of the physical host machine.
The process to install Docker Desktop is performed using the Docker Desktop installer and makes getting up and running with Docker containers very easy using the Docker Desktop application.
You can also interact with Docker using the command prompt or a PowerShell session to run Docker command parameters from the command prompt. Both the Docker Desktop and Docker command prompt environments require a Docker installation on your Windows Server host.
What are container images?
A container image is an image of all the requirements it takes to run an application. A container image are much lighter weight than full virtual machine. Virtual machines are full operating system installations
Why run Docker containers on Windows Server?
You may wonder why you would want to run Docker containers on Windows Server containers. One reason is that to run Windows Containers, you need to run Windows containers on Windows Server. This requirement is because containers share the kernel of the container host. So you can’t run Linux Containers on Windows Server and Windows containers on Linux.
Windows Server 2022 containers new features
Windows Server 2022 offers new container features that provide a great way to run Docker containers with the latest features and enhancements when compared to older Windows Server versions, such as Windows Server 2016. What are some of the new Windows Server 2022 container features?
Server 2022 Core image size reduction
The container image size is extremely important. The smaller the container image, the faster, more agile, and easier it is to run the containers. In Windows Server 2022, the Server Core container image RTM layer at GA is 2.76 GB uncompressed. This is a major improvement over Windows Server 2019 which was 3.47 GB uncompressed container size. It represents a 33% smaller footprint.
Longer support cycle for Windows Server 2022 container images
Five years of support and an additional five years of extended support is now offered for all Windows server 2022 containers.
Virtualized time zone
Windows Server 2022 containers support virtualized time zone configuration separate from the host. This virtualized time zone support is included in the instance for each container.
Application compatibility
You can use Group Managed Service Accounts with Windows containers to use Active Directory authentication.
IPv6 support
IPv6 is now supported with Kubernetes in Windows.
Improved Kubernetes experience
Microsoft is continuing to improve the Kubernetes implementation with Windows containers. Windows Server 2022 provides more restrictive subnets and multiple subnets for each Windows worker node.
Solving docker container image kernel limitations
You can solve some of these limitations by running a container host as a virtual machine. Regardless of whether the physical host is running Windows Server or Linux, you can run a hypervisor such as Hyper-V or Linux with Proxmox, XCP-NG, KVM, etc to run virtual machines of either variety.
You can also use nested virtualization if you want to have the capabilities of a Windows hypervisor or Linux hypervisor, regardless of what operating system your physical host is running. However, you must have enabled nested virtualization to benefit from this capability.
Windows Server 2022 supports WSL installed
Now, with Windows Server 2022, you can have WSL installed in a supported way without any hacks to get it to work. This provides another way to work with Linux containers using your Windows Server 2022 host.
Windows Server 2022 – Process isolation mode and Hyper-V isolation
Running containers with Process Isolation mode is the traditional way that containers run. Even though they share the host operating system kernel, each container is isolated through namespace, resource control, and other process isolation technologies.
One of the cool benefits of running Docker container images on Windows Server 2022 with Hyper-V isolation is the added security benefits from the Hyper-V role. The Hyper-V isolation mode offers enhanced security.
In isolation mode, each container runs inside of a highly optimized virtual machine that effectively gets its own kernel. This isolation enables hardware-level isolation between each container and container host.
The process to install Docker on Windows Server 2022 will include the following steps:
- Install the Windows Server 2022 containers feature
- Install Hyper-V in Windows Server 2022
- Install DockerMsftProvider and Docker
- Pull Windows container image for Docker
- Run the Windows Docker image
Install the Windows Server 2022 containers feature
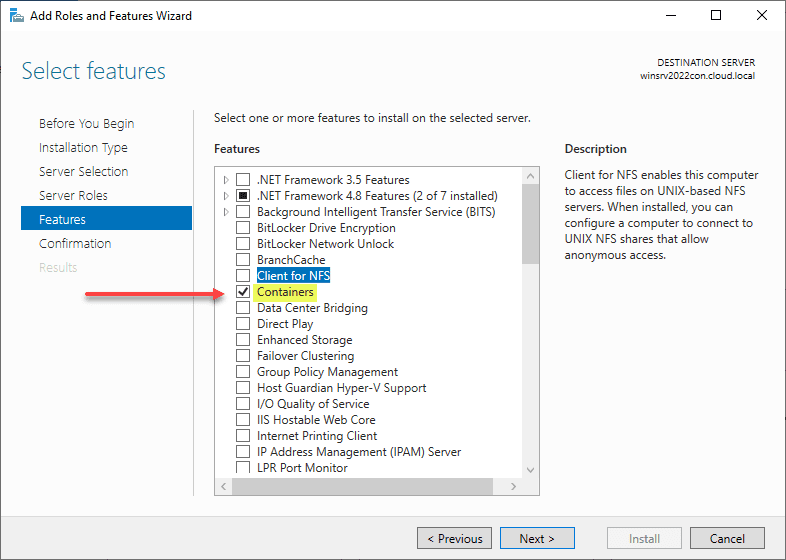
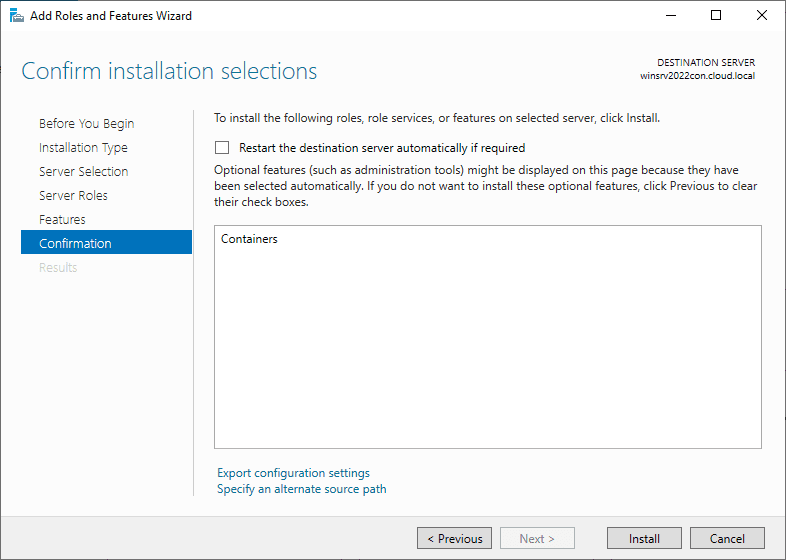
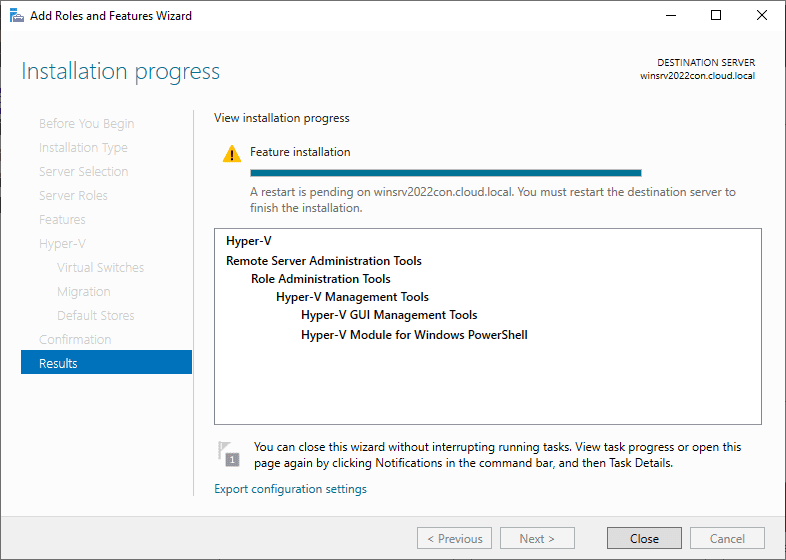
Using the features wizards found in Server Manager, we can install the containers feature in Windows Server 2022 to run containers natively in Windows. The process is fairly straightforward. Run the Add roles and Features Wizard from Windows Server 2022.
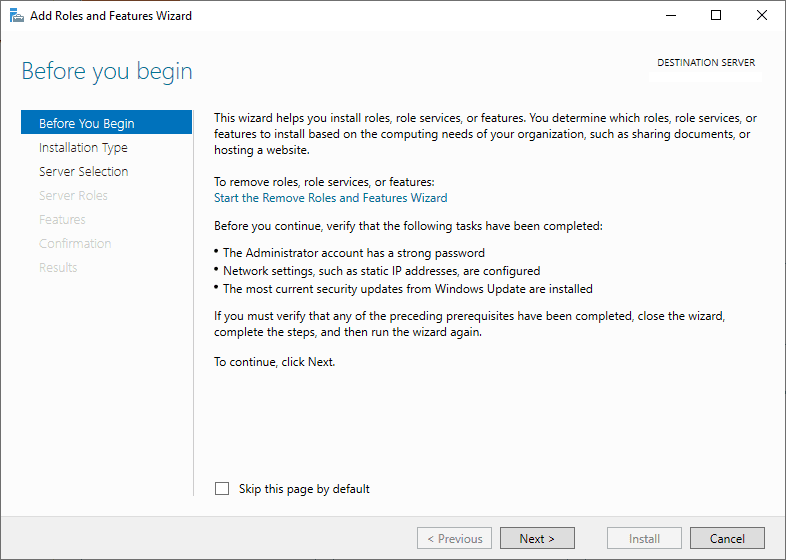
On the Features screen, place a check next to the Containers feature.
Confirm the installation.
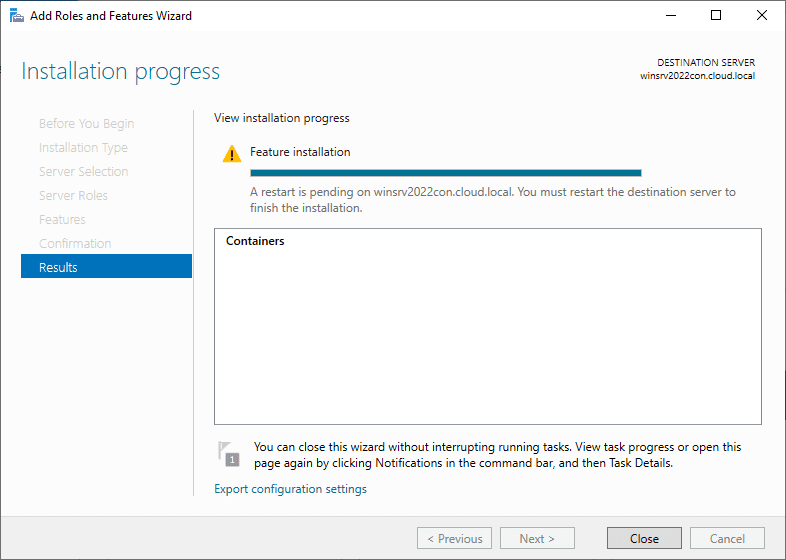
The containers installation is successful. You will be prompted to reboot your Windows Server 2022 host.
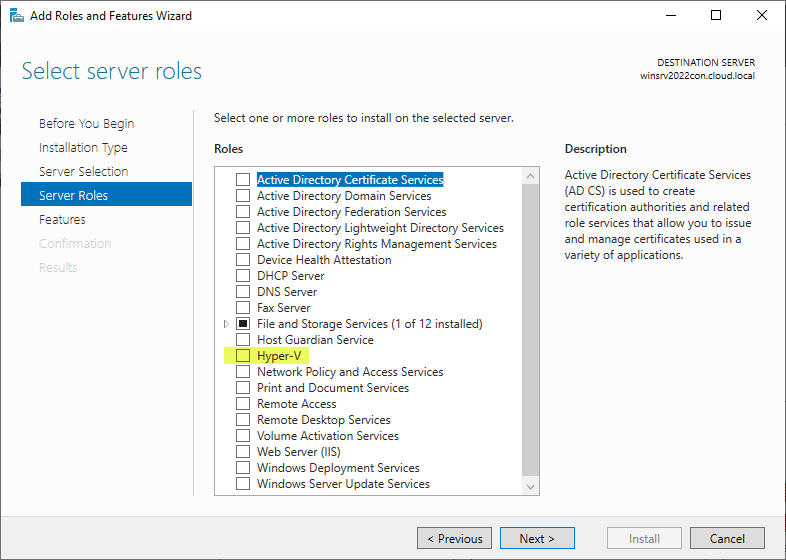
Install Hyper-V Role in Windows Server 2022
Next, for using Hyper-V isolation, we will need to have the Hyper-V role installed. Let’s quickly look at the Hyper-V role installation. On the Server Roles screen in Server Manager, place a check next to the Hyper-V role. Note you can also use the new Windows Admin Center to install roles in your Windows Server 2022 machine.
It will bring up the Add features that are required for Hyper-V.
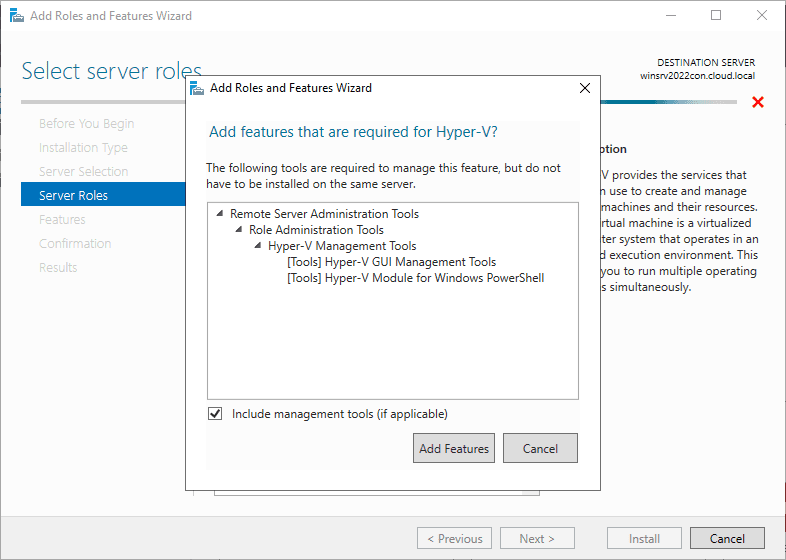
Now we have the check placed next to Hyper-V, click Next.
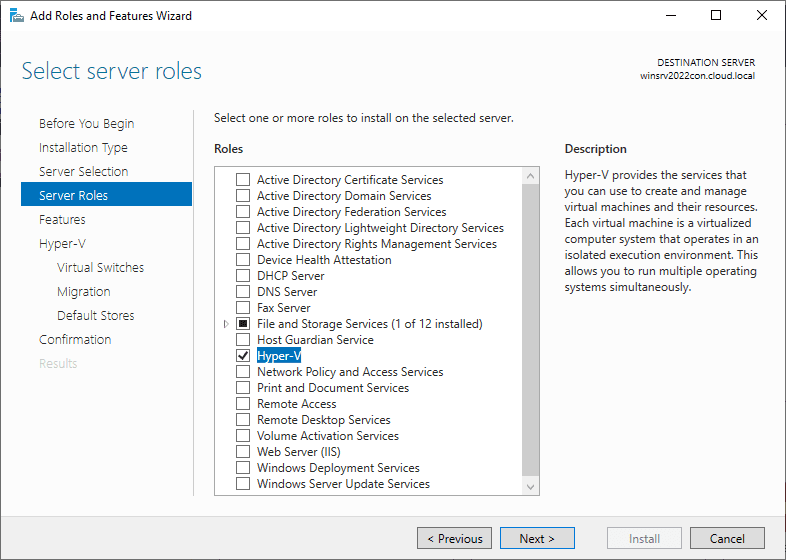
Next, there will be a few screens of Hyper-V specific configuration.
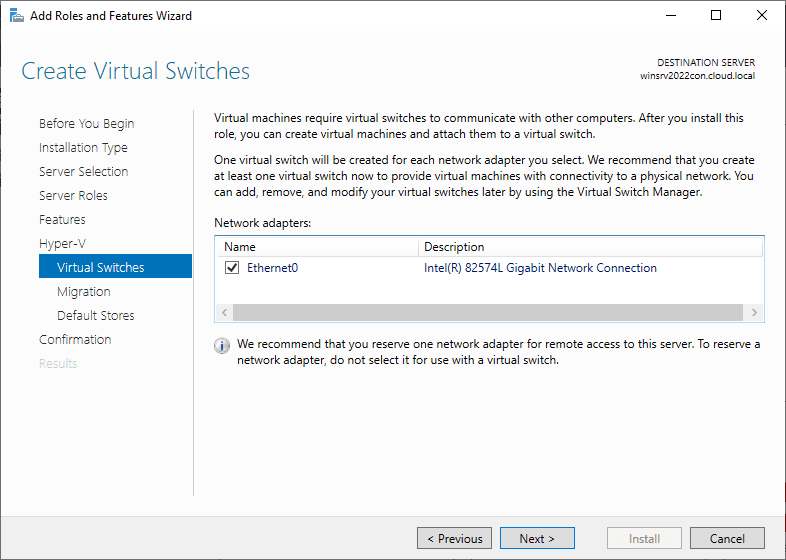
You can go ahead and create the default Hyper-V virtual switch.
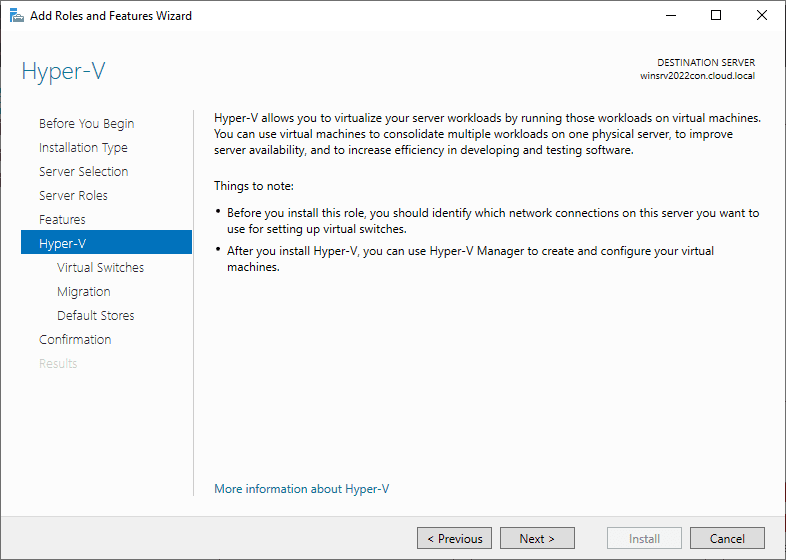
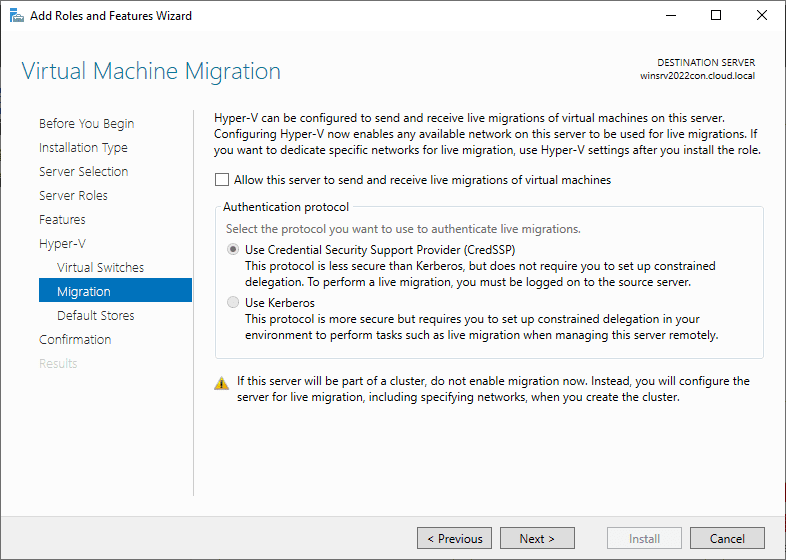
Decide if you want to allow live migration.
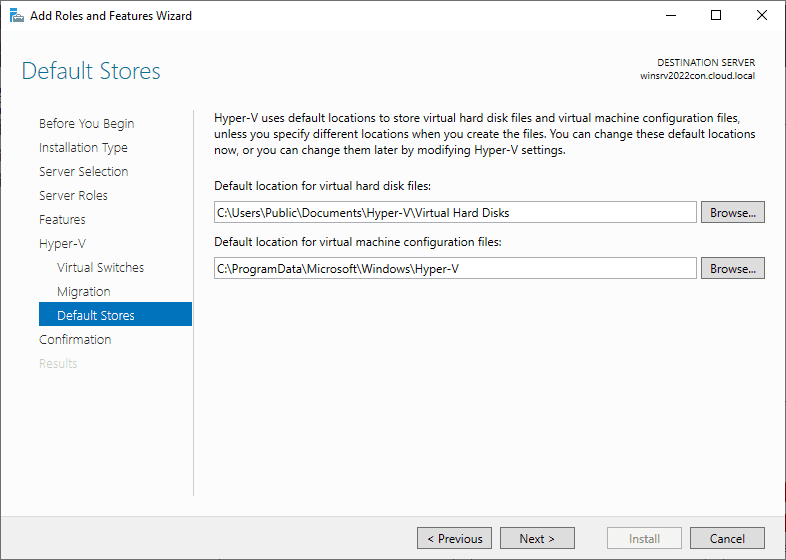
Configure the default storage location for Hyper-V virtual machines. Here, I am accepting the default settings.
Confirm the installation of the Hyper-V role and role features.
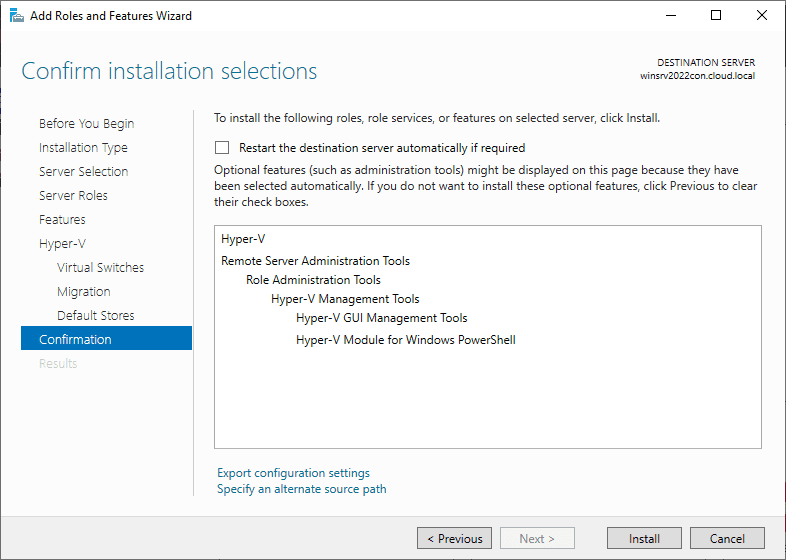
You will be prompted to reboot after the role is successfully installed.
Install DockerMsftProvider and install Docker
***Note*** DockerMsftProvider is now deprecated. However, leaving the below for posterity
Use the command found in the documentation here instead:
Invoke-WebRequest -UseBasicParsing "https://raw.githubusercontent.com/microsoft/Windows-Containers/Main/helpful_tools/Install-DockerCE/install-docker-ce.ps1" -o install-docker-ce.ps1
.\install-docker-ce.ps1
Deprecated steps below:
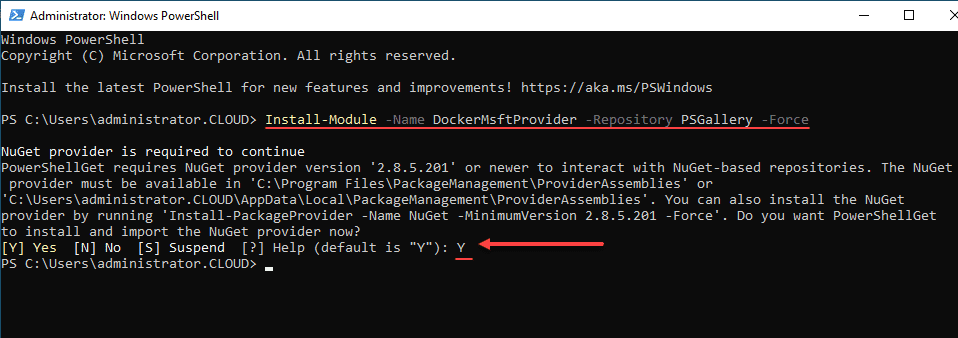
Next, we will install the Docker provider and install Docker itself. We can use just a couple of commands from the Powershell session to install the module and package needed. We need to be in an administrator prompt. The order of operations is we need to first install the Provider and then we can install Docker from the provider.
Install-Module -Name DockerMsftProvider -Repository PSGallery -ForceThis command will prompt you to install the Nuget provider in order to install the module.
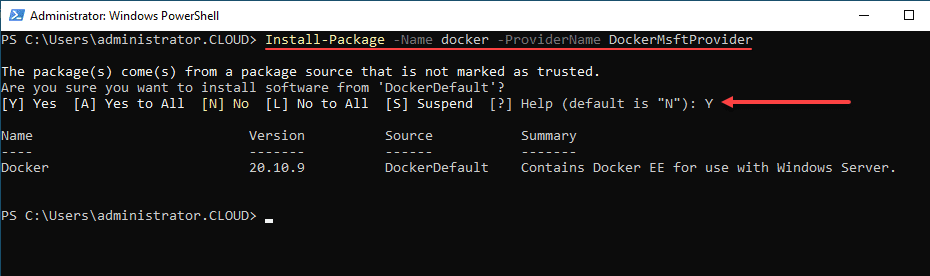
To install Docker, we can use the following command:
Install-Package -Name docker -ProviderName DockerMsftProviderYou will see the message that the package is not marked as trusted. You will need to allow the installation.
Next, we need to restart Windows Server 2022. You can do that from the PowerShell session using the Restart-computer cmdlet.
Pull Windows Container image for Docker
After the Server 2022 host reboots, we can pull the Windows container image in a PowerShell session or Windows Command Prompt:
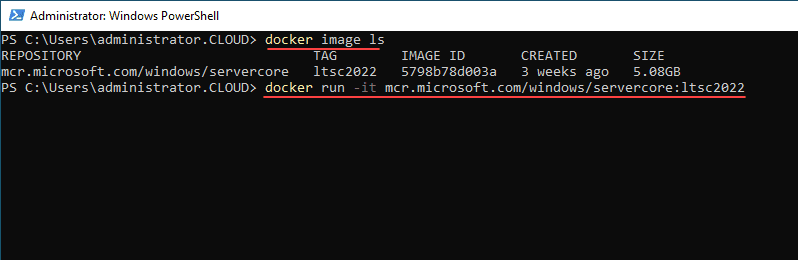
docker pull mcr.microsoft.com/windows/servercore:ltsc2022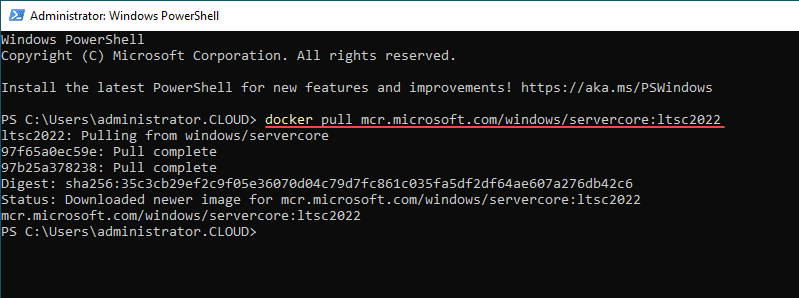
Run the Windows Docker Image
Finally, let’s run the Windows Docker image in Windows Server 2022. This is a simple Docker run command. You can first list out your images using the docker images ls command and then run the container interactively with the following:
Wrapping Up
The process of installing Docker in Windows Server 2022 is straightforward. We just need to install a role and feature and then pull the module and package from the command line. After that, we can successfully pull the latest Docker image for Server Core and then run our container. From this point forward, it is straightforward to run your Docker containers in Windows.