
-
Star
(4)
You must be signed in to star a gist -
Fork
(1)
You must be signed in to fork a gist
-
Clone this repository at <script src="https://gist.github.com/Lukas238/1d8e09199a817c5917399b8a4704d148.js"></script>
- Save Lukas238/1d8e09199a817c5917399b8a4704d148 to your computer and use it in GitHub Desktop.
Clone this repository at <script src="https://gist.github.com/Lukas238/1d8e09199a817c5917399b8a4704d148.js"></script>
How to install Docker Desktop on Windows 10 Home edition and WSL2
This file contains hidden or bidirectional Unicode text that may be interpreted or compiled differently than what appears below. To review, open the file in an editor that reveals hidden Unicode characters.
Learn more about bidirectional Unicode characters
| pushd «%~dp0« | |
| dir /b %SystemRoot%\servicing\Packages\*Hyper-V*.mum >hyper-v.txt | |
| for /f %%i in (‘findstr /i . hyper-v.txt 2^>nul‘) do dism /online /norestart /add-package:«%SystemRoot%\servicing\Packages\%%i« | |
| del hyper-v.txt | |
| Dism /online /enable-feature /featurename:Microsoft-Hyper-V -All /LimitAccess /ALL | |
| pause |
This file contains hidden or bidirectional Unicode text that may be interpreted or compiled differently than what appears below. To review, open the file in an editor that reveals hidden Unicode characters.
Learn more about bidirectional Unicode characters
| pushd «%~dp0« | |
| dir /b %SystemRoot%\servicing\Packages\*containers*.mum >containers.txt | |
| for /f %%i in (‘findstr /i . containers.txt 2^>nul‘) do dism /online /norestart /add-package:«%SystemRoot%\servicing\Packages\%%i« | |
| del containers.txt | |
| Dism /online /enable-feature /featurename:Containers -All /LimitAccess /ALL | |
| pauseREG ADD «HKEY_LOCAL_MACHINE\SOFTWARE\Microsoft\Windows NT\CurrentVersion« /v EditionID /t REG_SZ /d «Professional« | |
| REG ADD «HKEY_LOCAL_MACHINE\SOFTWARE\Microsoft\Windows NT\CurrentVersion« /v ProductName /t REG_SZ /d «Windows 10 Pro« |
This file contains hidden or bidirectional Unicode text that may be interpreted or compiled differently than what appears below. To review, open the file in an editor that reveals hidden Unicode characters.
Learn more about bidirectional Unicode characters
| REG ADD «HKEY_LOCAL_MACHINE\SOFTWARE\Microsoft\Windows NT\CurrentVersion« /v EditionID /t REG_SZ /d «Professional« | |
| REG ADD «HKEY_LOCAL_MACHINE\SOFTWARE\Microsoft\Windows NT\CurrentVersion« /v ProductName /t REG_SZ /d «Windows 10 Pro« |
This file contains hidden or bidirectional Unicode text that may be interpreted or compiled differently than what appears below. To review, open the file in an editor that reveals hidden Unicode characters.
Learn more about bidirectional Unicode characters
| REG ADD «HKEY_LOCAL_MACHINE\SOFTWARE\Microsoft\Windows NT\CurrentVersion« /v EditionID /t REG_SZ /d «Core« | |
| REG ADD «HKEY_LOCAL_MACHINE\SOFTWARE\Microsoft\Windows NT\CurrentVersion« /v ProductName /t REG_SZ /d «Windows 10 Home« |
Requirements
- Windows 10 64-bit Home, Build 15063 or later.
- Hyper-V and Containers Windows features must be enabled.
- BIOS-level hardware virtualization support must be enabled in the BIOS settings. For more information, see Virtualization.
Install Docker Desktop on Windows
Docker Desktop do not have support for Windows Home edition, so you need to install Hyper-V + Docker manualy.
Here’s how:
-
Open command line as administrator.
-
Navigate to your path where you downloaded the batch files.
-
Execute them one by one in this order:
1_hyperv.bat: This will download and install all the Hyper-V dependencies.2_container.bat: This will download and install all the Container dependencies.3_currentversion.bat: This will change the Windows version in the registry to fool the Docker Desktop installer.
To restore the Windows versino on the registry you can run the
4_restore.batbatch file.
If prompted, do not reboot Windows yet.
-
Restart Windows.
-
Download and run Docker Windows installer.
-
Once finished, restart Windows.
Error «Hyper-V was unable to find a virtual switch with name ‘DockerNAT'»
See https://support.microsoft.com/en-us/help/3101106/you-cannot-create-a-hyper-v-virtual-switch-on-64-bit-versions-of-windo
—
Sources
- https://docs.docker.com/docker-for-windows/install/
- https://www.reddit.com/r/docker/comments/blks5g/install_docker_on_windows_10_home_edition/
Что такое Docker Desktop
Docker Desktop — это инструмент для работы с Docker-контейнерами на локальной машине. Он упрощает процесс разработки, тестирования и развертывания приложений, позволяя взаимодействовать с контейнерами как через консоль, так и через удобный интерфейс.
Ключевые особенности:
- понятный графический интерфейс,
- удобное управление образами и контейнерами,
- встроенные инструменты для мониторинга,
- возможность разработки и тестирования без привязки к серверу,
- поддержка работы с Docker Compose.
Если вы только начинаете изучение Docker и хотите разобраться в основах, рекомендуем ознакомиться с отдельным вводным обзором. В нем разобрали принципы работы Docker, его основные компоненты и решаемые задач. Из текста вы узнаете, как создать и запустить контейнер, а также какую роль играет Kubernetes в связке c Docker.

О системных требованиях
Перед установкой Docker Desktop важно выбрать подходящий бэкенд для работы с контейнерами: WSL 2 или Hyper-V. Оба имеют свои особенности, так что от выбора будут зависеть и системные требования. Далее в тексте разберемся, когда и какой бэкенд подойдет лучше.
Когда нужен WSL
WSL 2 (Windows Subsystem for Linux 2) — это усовершенствованная версия подсистемы Windows для Linux, которая использует виртуальную машину с реальным Linux-ядром. В отличие от первой версии, WSL 2 обеспечивает лучшую совместимость с Linux-инструментами, технологиями и приложениями, а также более высокую производительность.
Преимущества использования WSL 2 с Docker Desktop
Работа с Linux-контейнерами. Docker изначально разрабатывали для работы в Linux-среде, поэтому большинство контейнеров в Docker Hub — это образы, ориентированные на Linux. Использование WSL 2 предоставляет Docker Desktop полноценную Linux-среду на Windows.
Повышенная производительность. WSL 2 значительно ускоряет выполнение контейнеров, что особенно заметно в сравнении с WSL 1 или Hyper-V, о котором мы расскажем дальше. Это преимущество обеспечивает полноценное Linux-ядро, которое позволяет Docker работать гораздо быстрее и с меньшими накладными расходами.
Работа с файловой системой Linux. В WSL 2 можно монтировать файловую систему Linux, что позволяет работать с кодом и данными в нативной Linux-среде. Это особенно важно при разработке приложений, которые будут запускаться в Linux-контейнерах и требуют специфической настройки среды — например, прав доступа или структуры каталогов.
Когда нужен Hyper-V
Рассмотрим ключевые сценарии, в которых предпочтительнее использовать Hyper-V.
Если система не поддерживает WSL 2
Некоторые сборки системы не позволяют включать необходимые компонентов для работы WSL 2 В частности, это касается старых версий Windows, а также устройств, которые не поддерживают Windows 10 Pro или 11 Pro, — WSL 2 для них недоступна, так как требует включенной виртуализации на уровне системы. В таких случаях можно использовать Hyper-V для виртуализации контейнеров и запуска Docker Desktop.
Для работы с Windows-контейнерами
Docker Desktop поддерживает как Linux-, так и Windows-контейнеры. Однако последние требуют прямого взаимодействия с ядром Windows, а WSL 2 предоставляет только Linux-среду. Hyper-V позволяет запускать Windows-контейнеры благодаря виртуализации Windows-системы.
Для изоляции и обеспечения безопасности
Hyper-V создает полноценные виртуальные машины, обеспечивая строгую изоляцию контейнеров друг от друга и от хост-системы. Это может быть важно в корпоративной среде или при работе с чувствительными данными.
Разница между WSL 2 и Hyper-V
Если вам нужны Linux-контейнеры и высокая производительность — выбирайте WSL 2. Если же требуется строгая изоляция или работа с Windows-контейнерами, Hyper-V будет предпочтительнее. Подробнее о разнице по ключевым критериям — в таблице:
| Критерий | WSL 2 | Hyper-V |
| Производительность | Высокая (нативное Linux-ядро) | Низкая (работа через полноценную ВМ) |
| Изоляция | Относительно низкая | Высокая (контейнеры изолированы) |
| Типы контейнеров | Только Linux-контейнеры | Linux- и Windows-контейнеры |
Системные требования Docker Desktop
При использовании WSL 2 в качестве бэкенда
- WSL версии 1.1.3.0 или новее.
- Windows 11 64-bit Home / Pro / Enterprise / Education, версия 22H2 или новее.
- Windows 10 64-bit Home / Pro / Enterprise / Education, версия 22H2 (сборка 19045) или новее.
- Включенная функция WSL 2 в Windows. Подробная инструкция есть в документации Microsoft;
- 4 ГБ ОЗУ.
- Включенная аппаратная виртуализация в BIOS на вашей локальной машине.
При использовании Hyper-V в качестве бэкенда
- Windows 11 64-разрядная Enterprise / Pro / Education, версия 22H2 или новее.
- Windows 10 64-разрядная Enterprise / Pro / Education, версия 22H2 (сборка 19045) или новее.
- Включенная функция Hyper-V. Подробнее об установке — в документации Microsoft;
- 4 ГБ ОЗУ.
- Включенная аппаратная виртуализация в BIOS на вашей локальной машине.
Установка WSL 2
1. Откройте PowerShell от имени администратора и введите команду wsl —install. Она выполняет следующие действия:
- включает дополнительные компоненты WSL и платформы виртуальных машин;
- скачивает и устанавливает последнюю версию ядра Linux;
- задает WSL 2 в качестве среды по умолчанию;
- скачивает и устанавливает дистрибутив Ubuntu Linux.

2. После успешной установки всех компонентов перезапустите компьютер.

Первичная настройка
1. Откройте установленный дистрибутив с помощью меню Пуск — найдите установленный дистрибутив (Ubuntu).
2. При первом запуске системы нужно создать имя пользователя и пароль для дистрибутива Linux.

3. Первичная настройка завершена, можно приступать к использованию WSL 2.
Альтернативный вариант — запустить WSL через PowerShell. Для этого введите команду wsl и система предложит произвести первичную настройку.

Установка Hyper-V
Для установки компонентов Hyper-V откройте PowerShell от имени администратора и выполните команду:
Enable-WindowsOptionalFeature -Online -FeatureName Microsoft-Hyper-V -All
Она установит все компоненты для работы Hyper-V, после чего нужно будет перезапустить компьютер.

Проверить корректность установки Hyper-V можно с помощью команды:
Get-WindowsOptionalFeature -Online -FeatureName *hyper*|ft

Установка Docker с бэкендом WSL 2
- Скачайте дистрибутив Docker Desktop с официального сайта и запустите установщик. Галочки оставьте на всех пунктах.

- После установки перезайдите в учетную запись и откройте ярлык Docker Desktop.
- Если все прошло успешно, вы увидите интерфейс инструмента:

Установка Docker с бэкендом Hyper-V
1. Скачайте дистрибутив Docker Desktop с официального сайта и запустите установщик. В инсталляционном окне уберите галочку Use WSL 2 instead of Hyper-V.

2. После установки перезайдите в учетную запись и откройте ярлык Docker Desktop.
3. Если установка выполнена корректно, программа запустится без ошибок и вы увидите интерфейс:

Запуск контейнера
Рассмотрим запуск первого контейнера на примере самого популярного образа — hello-world.
Поиск и скачивание образа
Поскольку вы только установили Docker Desktop, в системе нет образов контейнеров, которые можно запустить. Исправим это.
- Перейдите в раздел Images и нажмите кнопку Search images to run.

- Введите hello-world. В текущем окне на выбор есть две кнопки: Pull и Run. Если планируете для начала просто скачать образ, то выбирайте Pull. Если скачать и сразу запустить — Run.

- Оставляем стандартные настройки для запуска.

Проверка работы контейнера
Чтобы посмотреть запущенные контейнеры, перейдите во вкладку Containers и выберите созданный на прошлом этапе. В нашем примере для него было автоматически сгенерировано имя determined_jennings. Открыв контейнер, вы увидите сообщение, если настройка установка прошла успешно.

Как настроить запуск Docker при старте Windows
Для автозапуска Docker Desktop при авторизации на компьютере достаточно поставить галочку в настройках: Settings → General → Start Docker Desktop when you sign in to your computer.

После этого Docker Desktop будет запускаться автоматически при включении устройства.
Запуск Docker в облаке
Docker Desktop — удобный инструмент для локальной работы, но в ряде случаев может потребоваться облачная инфраструктура:
- если мощности вашего ПК не хватает для работы с контейнерами;
- если нужна среда для тестирования без нагрузки на локальную машину;
- если вы работаете с ML/AI и нужны видеокарты для обучения моделей.
1. В панели управления в верхнем меню перейдем в раздел Продукты → Облачные серверы.

2. Нажмем кнопку Создать сервер.

3. Выберем имя, регион и сегмент пула. Важно учесть, что от сегмента зависят доступные конфигурации и стоимость. После создания сервера менять сегмент пула нельзя.

4. В качестве источника выберите готовый образ, приложение, свой образ, сетевой диск или снапшот. В нашем случае — приложение Containers Ready с настроенной Ubuntu 22.04. Оно содержит:
- Docker версии 27.0.3;
- плагины для запуска Docker Compose версии 2.11.1;
- Portainer версии 2.20.3 — графический интерфейс для мониторинга и управления Docker-контейнерами, образами и сетью Docker.

5. Конфигурацию для примера возьмем базовую — 2 vCPU и 2 ГБ RAM, а в поле Диски выберем SSD Быстрый на 20 ГБ. Важно: это минимальные требования. Рекомендуем выбирать параметры серверы, исходя из ваших задач.
Помимо прочего, на этапе создания сервера или позже вы можете добавить GPU. При этом объем ОЗУ, который выделяется серверу, может быть меньше указанного в конфигурации — ядро ОС резервирует ее часть. Выделенный объем на сервере можно посмотреть с помощью команды sudo dmesg | grep Memory.

6. Для работы Containers Ready сервер должен быть доступен из интернета. Для этого создадим приватную подсеть и подключим публичный IP-адрес. В поле Сеть выберем Приватная подсеть и добавим новый публичный адрес. Подробнее о настройке подсети можно узнать в документации.

6. Добавьте SSH-ключ в поле Доступ. Подробнее о его генерации можно узнать в отдельной инструкции.

7. Ознакомьтесь с ценой и нажмите кнопку Создать сервер.

Сервер готов к использованию! Подробности о создании сервера с Сontainers Ready вы можете найти в документации. Если вам нужно запускать контейнеры с ML-моделями на мощных видеокартах, развернуть облачные серверы с GPU можно за несколько минут. Они помогут ускорить обучение нейросетей без закупки дорогого оборудования.
Читайте другие тексты о Docker
Before installing docker, you need to find out the type of windows system you have. Whether you have windows 10 HOME or windows 10 PRO will impact how you install docker.
To find out your system type,
- Click on windows icon, search “
system info“, - Click on “
system information“ - Check on your
"OS Name” to see your system type.
Follow the instruction below that matches your system type.
How to install docker on windows 10 Home
Follow the steps below to install docker on windows 10 Home
You can also watch this video that shows you how to install docker on windows 10 home and windows 10 pro or read the blog or even better, use the blog and video together to install docker.
Step 1: System Requirements to Install Docker on Windows Home
These are the computer requirements to install docker on windows home
- Windows 10 64bit, version 1903 or higher.
- 4GB system RAM
In addition to the system requirements above, you also need to install WSL2 and activate virtualization on your computer.
Don’t worry, I got you covered. Follow the Instructions below on Step 2 to enable virtualization and WSL2
Step 2: Enable Virtualization & WSL2 on your windows Home computer
NOTE: You MUST have WSL2 in order to use docker in windows HOME. Follow the Instructions I have laid out on this blog teaching you How to install WSL2 on your windows home computer.
These are the things you need to have enabled on windows home computer in order to install and use docker.
- Virtual Machine Platform
- Windows Subsystem for Linux (WSL2)
- BIOS-level hardware virtualization enabled.
To enable Virtual Machine Platform and WSL,
Click on windows icon —> search for “Turn windows features on or off” —> click on it —> select “Virtual machine platform” and “Windows subsystem for linux“, click OK.

You will need to re-boot your computer after this step.
WARNING: The above instructions installs WSL but NOT WSL2 which is what you need for docker.
NOTE: To upgrade to WSL2, Follow the instructions I have laid out on this blog —> How to install/uprade to WSL2 on your computer
After following the instructions on that blog to upgrade to WSL2, return to this blog.
Then, FOLLOW Steps 3 & 4 Below to install and start Docker on your windows HOME Computer.
How to install docker on windows 10 Pro
Follow the steps below to install docker on windows 10 Pro
Step 1: System Requirements to Install Docker on Windows Pro
These are the computer requirements to install docker on windows 10 Pro, enterprise, or education.
- Windows 10 64-bit processor, Build 17134 or later.
- 4GB system RAM
- BIOS-level hardware virtualization enabled. Follow the instructions on STEP 2 BELOW to enable it.
Step 2: Enable Virtualization & Hyper-V on your computer
These are the virtualization requirements you need in order to use docker on windows 10 pro.
- Make sure your computer meets the requirements above. For more information on computer requirements, check out his page on hyper-v requirements.
- Now, you have to make sure
- Virtualization is enabled in the BIOS, your computer has
- Second Level Address Translation (SLAT), and
- Hypervisor enabled at Windows startup.
- Use this method to verify your system can run hyper-V. Open the command line —> type in “
systeminfo” —> scroll to the bottom and check Hyper-V requirements. Make sure everything says “YES”

If everything is not checked yes, you need to google how to enable BIOS level virtualization for your computer since it varies from device to device.
If everything is checked Yes, then proceed to the next step.
- Click on windows icon —> Type in “
Turn windows feature on or off” —> Click on it —> select “Hyper-V” and make sure both sub-options are selected too.

If you see “Windows Hypervisor Platform” instead of “Hyper-V”, your computer may not be compatible for Hyper-V.
- You could also enable hyper-V using Powershell. Open Powershell as an admin and type
Enable-WindowsOptionalFeature -Online -FeatureName Microsoft-Hyper-V -All
- Alternatively, you can also enable hyper-V using the command prompt. Just open the command prompt tool and type
DISM /Online /Enable-Feature /All /FeatureName:Microsoft-Hyper-V
No matter how enable Hyper-V, re-start your computer before moving onto the next step, if not docker won’t work.
If you run into any problems with getting docker to work because of virtualization problems, I suggest you check out this page.
Now that you have Hyper-V enabled, you are ready to move onto the next step which is installing docker.
Step 3: Install Docker on Windows Home and Windows Pro Computer
These are the steps to install docker on windows pro
- First, download docker for windows using this link
- Double click the installer that you just downloaded to run the docker installer
- When given the option, make sure “
enable Hyper-V Windows Features” option is selected on the Configuration page. - Just follow the installer to finish installing docker.
Step 4: Start Docker on Windows Home and Windows Pro Machine
After installing docker, it doesn’t start automatically, you have to start it manually.
- Search for docker, click on the app
- After clicking on the app, you will see the docker icon on the windows status bar. If you don’t see it, click on the up arrow and you should see it.
- When the docker icon stops blinking, then docker stabilized and is ready to use.
- When you finish using docker, be sure to right-click the docker icon on the status bar, and click on quit, to quit the docker engine.
- If you close docker without stopping the engine, the engine will continue to run in the background until you right-click the icon to quit the docker engine.
After installing docker, you will get some initial instructions of how things work from docker documentation the first time you open docker app. Feel free to liberally use those instructions provided by docker to help you get started.
Step 5: Use Docker for Data Science & Deploy to AWS
If you are a data scientist using docker for the first time, you might be wondering how you could use docker for a data science project. I am one-step ahead of you. In this detailed blog post, I show you how to use docker for data science projects.
If you are working in docker, you might be interested in launching your app online using AWS. Don’t worry, I got you covered. In this detailed blog post –> I cover How to Deploy Data Science APP to AWS ElasticBeanStalk using Docker
If you have any questions or comments, let me know below.
Posted on
27 May 2020, updated on 15
November 2022.
Step 1: Make sure your Windows 10 version is 2004 or later
- Select the Start button > Settings > System > About
- Under Windows Specifications, you will see which version of Windows 10 you’re running
- If your version is lower than 2004, go to Windows Update in your settings and update Windows
- If the v2004 update doesn’t show up, you can use the Update Assistant to update Windows 10
Step 2: Getting your machine ready to use WSL 2
- Search for ‘’Turn Windows features on or off’ in your search bar on the bottom left of your screen
- Enable both ‘Virtual Machine Platform’ and ‘Windows Subsystem for Linux’
- Restart your computer
Step 3: Installing a Linux distribution on Windows 10
- You can install a Linux distribution from the Microsoft store, in this tutorial we will be using ‘Ubuntu 18.04 LTS’
-

- Once the Linux distribution has been installed, start it up
- You will be asked to create a username and password when you launch Linux for the first time, these have no bearing on your windows system so choose whatever you want!
-
- You can now close the application


Step 4: Using WSL2 to run your Linux distribution
- Make sure you have the latest version of WSL 2 installed by running the update package found here;
- Open WindowsPowerShell
- Run
wsl -lto list the Ubuntu distributions you currently have installed, you should see ‘Ubuntu-18.04’ in the list - Set the WSL version for Ubuntu 18.04 by running
wsl --set-version Ubuntu-18.04 2(The 2 at the end is very important because it tells your machine you want to use WSL2) - You can check that you successfully switch to wsl 2 by running
wsl -l -v
Additionally, if you want to make WSL 2 your default architecture you can do so with this command:
wsl --set-default-version 2
Step 5: Installing Docker on Windows 10
- Download the latest release of Docker Desktop
- Follow the usual installation instructions to install Docker Desktop
- Start Docker Desktop from the Windows Start menu
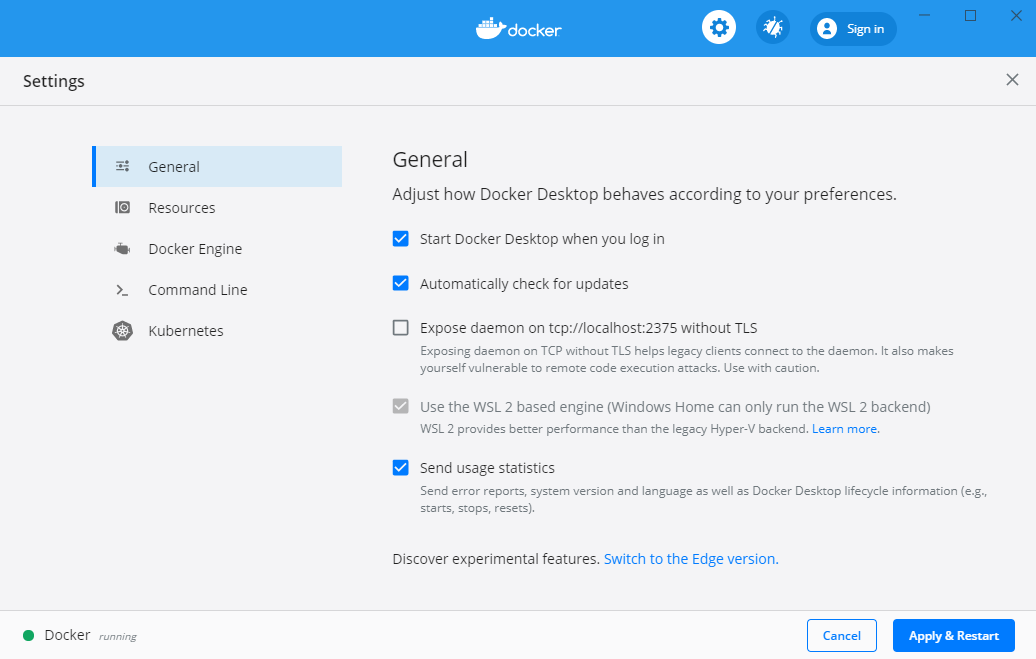
- From the Docker menu, select Settings > General
- Make sure that ‘Use the WSL 2 base engine’ is selected. If it wasn’t, select it and click Apply & Restart
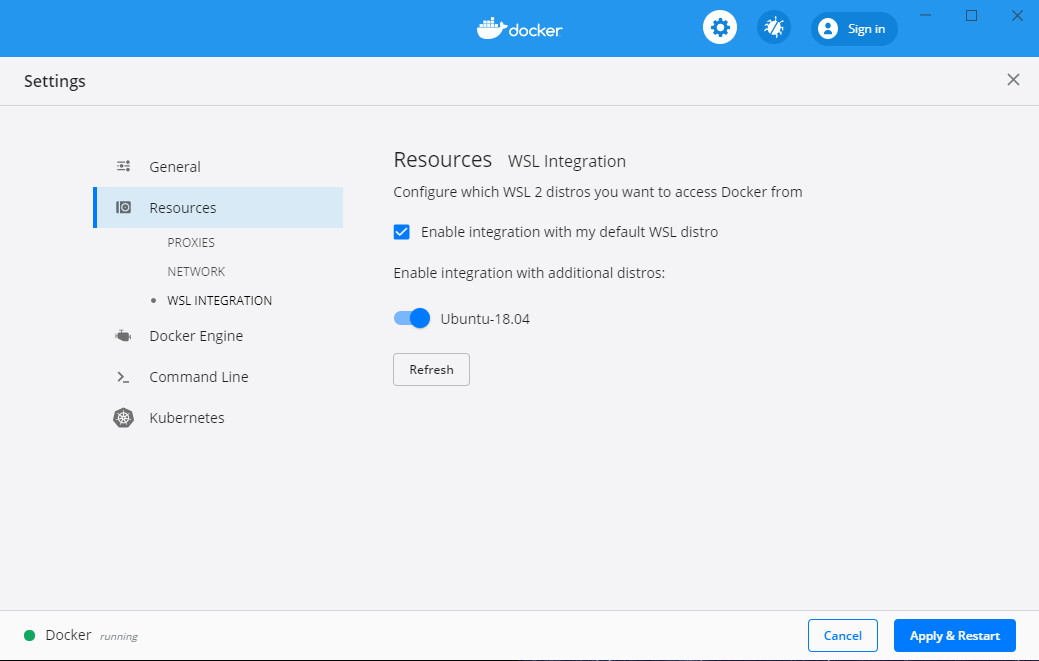
- Now go to go to Settings > Resources > WSL Integration in Docker and select your Linux distribution (Ubuntu 18.04 in this tutorial)
-

- Enable the Docker integration with the kernel you installed (Ubuntu 18.04) and click Apply and restart
Step 6: Using Docker in Windows 10
- To use Docker in your distribution, Docker Desktop has to be running
- Launch your distribution (Ubuntu 18.04 LTS in this tutorial)
- Run ‘docker version’ to check that Docker is running and accessible
You’re all set! If you want to familiarize yourself with Docker this tutorial will help you understand and use all the basic commands in Docker.
Quick tip
The Docker team recommends that you avoid mounting from the Windows 10 file system (even on a WSL distro). For example, avoid docker run -v /mnt/c/users:/users and use docker run -v ~/my-project:/sources <my-image> instead.
This is very important because WSL 2 is fast when working within the Linux filesystem but it gets much slower when working with files located in your Windows filesystem.

By Mihail Gaberov
Recently I have been watching a tutorial where, in order to follow it, you need to have Docker running on your machine. So far, so good.
But it turns out that the latest versions of Docker require Windows 10 Pro, Enterprise, or Education. Which means that if you are like me and have just Windows 10 Home edition on your personal laptop, then you cannot use Docker…or maybe you still can.
Read on below to find out how. ?
Reasoning
First, let’s do a short summary of the situation. What do we want to achieve and what do we currently have?
We have Windows 10 OS Home edition on our machine. We would like to have Docker running on the same machine so that we are able to create docker images, run containers, and learn better and grow faster!
The last one is a bit out of the scope of this article, but we should start from somewhere, no? ?.
Actions
After defining what we want, let’s see how to achieve it. Here are the steps I followed. It worked for me, which make me want to share it with you. And maybe I can save someone a few days of going back and forth to StackOverflow! ?
After some reading, I found this article. It explains that it is possible to use Docker in Windows 10 Home by leveraging a Linux virtual machine and having Docker containers running on it. Let’s see how it works.
Step 1: Installations
First you need to install a software called Oracle VM VirtualBox. It gives you the ability to have multiple virtual machines installed on your physical one. This way we can have a virtual machine which will be running Linux where our Docker will live.
Then use Windows PowerShall and Chocolatey, your Windows package manager, to install a docker-machine by running the following:
choco install docker-machine
Open your favorite bash terminal app and run this:
docker-machine create --driver virtualbox default
This will create a docker virtual machine called ‘default’.
Step 2: Configurations
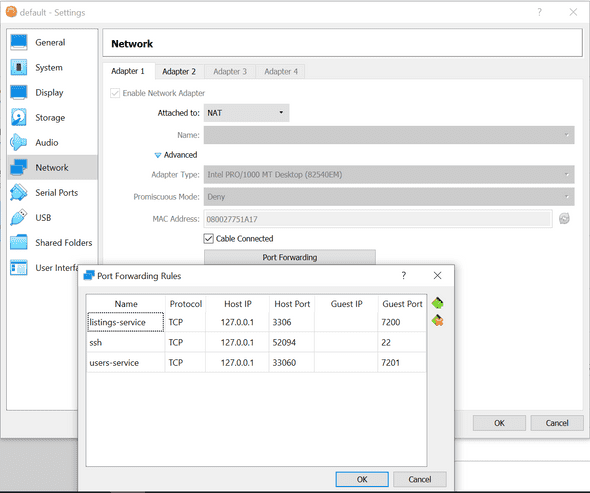
Next, we need to configure which ports are exposed when running Docker containers. You can do that by going to Oracle VM VirtualBox -> default virtual machine -> Settings -> Network -> Adapter 1 -> Port Forwarding.
This was the most critical detail that I forgot . We need to allow Docker to mount volumes located on your hard drive. By default, you can only mount from the C://Users/ directory.
To add a different path, simply go to the Oracle VM VirtualBox GUI. Select default VM and go to Settings > Shared Folders. If you don’t mind to use the default settings, do not forget to put your project under the ‘Users’ directory, e.g. C:\Users\{your project}.
In my case, I forgot about this and had to spend few days of head banging until I figured out why the heck was I getting a «Couldn’t find package.json» error when trying to run the containers, built through this tutorial.
Start the virtual machine by running the following command in your terminal app:
docker-machine start default
Step 3: Setting up Environment Variables
Next, we need to set up Docker environment variables:
docker-machine env default
This allows the Docker client and Docker Compose to communicate with the Docker Engine running in the Linux VM that we named «default».
You may also need to run:
@FOR /f "tokens=*" %i IN ('"C:\ProgramData\chocolatey\lib\docker-machine\bin\docker-machine.exe" env') DO @%i
in order to get Docker working properly. Note: the specified path in the above command may vary depending on your setup.
If you are going to use things such as docker-compose up, you will need to install Docker Tools as well. You may do it by running the following commands in PowerShall:
choco install docker-cli
choco install docker-compose
These will install everything you need to start using Docker on your Windows 10 Home OS.
Conclusion
Now that we have all we need, we may spend our time on actual learning, either by following a docker-related tutorial or reading a book. No matter what you want to do next, you have all the tools you will need.
I personally will try to finish the previously mentioned tutorial and then, who knows, may be I will start using Docker for each project I do.
By the way, during the process of researching, I found a very promising book which is specifically about Docker. It’s called «Docker in Practice» by Ian Miell. If this interests you, you might want to take a look.
? Thanks for reading! ?
References
- https://www.virtualbox.org/
- https://www.sitepoint.com/docker-windows-10-home
- https://www.youtube.com/watch?v=6Yfm5gHQjaQ&list=PLnTRniWXnjf8YC9qJFLSVCrXfS6cyj6x6&index=2
- https://github.com/mihailgaberov/microservices
- http://support.divio.com/en/articles/646695-how-to-use-a-directory-outside-c-users-with-docker-toolbox-docker-for-windows
Learn to code for free. freeCodeCamp’s open source curriculum has helped more than 40,000 people get jobs as developers. Get started