
In Docker, if we have exited a container without stopping it, we need to manually stop it as it has not stopped on exit. Similarly, for images, we need to delete them from top to bottom as some containers or images might be dependent on the base images. We can download the base image at any time. So it is a good idea to delete unwanted or dangling images from the current machine.
Docker Cleanup
Keeping your Docker environment organized and efficient is essential for developers and operations teams. As you work with containers and images, your environment can easily get cluttered. Regular cleanup isn’t just a nice to have; it’s a must for several reasons:
- Freeing Up Disk Space: Docker images and containers can quickly start taking up a lot of space, especially if you’re frequently building new images or testing different applications. Over time, all those unused images add up and start eating into your disk space, which can eventually slow down your system. By routinely deleting anything you no longer need, you help your system run smoothly and avoid storage issues.
- Improving Performance: A cluttered Docker environment can slow things down. When you have a lot of images and containers piling up, simple commands can take longer to run. Regular cleanup clears away unnecessary files, speeding up Docker’s performance and making your workflows more efficient.
- Avoiding Conflicts with Outdated Images: Holding onto old images can lead to compatibility issues and unexpected problems in your applications. If you end up with multiple versions of the same image, managing dependencies and making sure your apps are running the right version becomes much more complicated. Cleaning up helps you keep only the most current, secure versions in use.
- Keeping Development and Production Environments Clean: Whether you’re in a development or production environment, staying organized is essential for stability and reliability. Removing outdated containers and images ensures that your team always has access to the most relevant versions, reducing the risk of errors during deployment.
It’s a good idea to clean up your Docker environment regularly especially after finishing major development phases, switching between projects, or when you notice you’re running low on disk space. Setting up a maintenance schedule for Docker cleanup can help you stay on top of things and avoid any issues before they escalate.
How to Delete Images in Docker?
To delete the image by the ImageId/Name we can use the following command. To know more about how to build a docker image with the help of Dockerfile refer to Concept of Dockerfile .
docker rmi <imageId/Name>
To force remove the docker Images by the ImageID/Name we can use the following command.
docker rmi -f <imageId/Name>
Note: We can’t remove the images by force or normally while the container is running.
Dangling Images are those that don’t map to either the repository or the tag. The command used is to remove the dangling images. To know more about how to tag Docker images by referring to Docker image tags .
docker image prune
We can remove all images in the docker machine to clear unwanted clutter and space in the system. We can anyways fetch the latest version or specific versioned image from the docker registry or from the cache.
docker rmi $(docker images -q)

How to Delete Containers in Docker?
Before deleting the containers we need to stop the container first for that we use the command.
docker stop <containerId/Name>
1. Docker Stop vs Docker Kill
Docker stop will first send a SIGTERM signal before killing the process with a SIGKILL signal and a grace period. When Docker kill sends SIGKILL, it immediately terminates the process.
Stop all running containers: In order to stop the containers which have not exited. This might happen when the command used in the Docker image is left running. The command should be exited and this will in turn stop the container. To stop the container when you have not exited the container by stopping the command, you need to run the following command.
docker stop $(docker ps -aq)
Delete the container: If the container is stopped then we can use the following command to delete the container.
docker rm <containerId/Name>
Force delete the container: We can force remove the containers while they are running without stopping them by using the below command.
docker rm -f <containerId/Name>

2. Remove All Containers
To remove all containers from the docker machine, we need to get the ids of all the containers. We can simply get the ids of the containers with the command docker ps -aq , then by using the docker rm command, we can remove all the containers in the docker-machine.
docker rm $(docker ps -aq)

3. Remove All Stopped Containers
To remove all containers which are stopped/exited, we can use filters in the ps command argument. We can’t directly remove a container if it is not stopped. We can stop containers that are not exited or are running by using the -f argument to the ps command in docker, the -f or –filter option takes in a filter like status=exited or status=running or name and so on. We can filter out to stop the specific containers according to the requirement.
docker rm $(docker ps -aq --filter status="exited")
After filtering out the container which is running, we can use the stop command to stop those containers with the -q to silence the numeric ids associated with those containers.
docker stop $(docker ps --filter status=running -q)
This will stop all the containers and thus we can now remove the containers from the docker machine. We can even filter the containers which are stopped here to remove only those whose status is exited.
docker rm $(docker ps --filter status=exited -q)

The below command removed all the containers which are in the existing state. That means the containers stopped.
docker container prune

To know more about Docker rm command you can refer to this article What is Docker rm command?
Automating Docker Cleanup
Automating Docker cleanup can save you a lot of time and effort, making it much easier to keep your environment organized. Here are some practical strategies to help streamline the cleanup of Docker containers and images:
1. Using docker cli commands
Docker’s command line interface provides several built in commands to remove containers and images easily. You can even automate these by adding them to a script. For example:
To remove all stopped containers, use:
docker container prune -f
To remove all unused images, use:
docker image prune -a -f
By creating a simple shell script with these commands, you can run it regularly or integrate it into your CI/CD pipeline, ensuring your environment stays clean with minimal manual work.
2. Automating with Scheduled Tasks (Cron Jobs)
On Linux based systems, cron jobs are perfect for running scripts on a set schedule. Here’s how to set one up: This simple setup will automatically run your cleanup script, keeping your Docker environment tidy without you needing to remember to do it yourself.
Open the crontab editor by running:
crontab -e
Add a line to schedule your cleanup script to run daily at midnight (adjust as needed):
0 0 * * * /path/to/your/cleanup-script.sh
This simple setup will automatically run your cleanup script, keeping your Docker environment tidy without you needing to remember to do it yourself.
3. Using Third-Party Tools
There are also third-party tools that can simplify Docker cleanup:
- Docker System Prune: This command removes all unused data, including stopped containers, unused networks, dangling images, and the build cache. Run docker system prune -a -f for a full cleanup in one command.
- Docker Compose: If you’re using Docker Compose for multi container applications, you can run
docker-compose down --rmiallto remove all containers and images for a specific service. - Custom Cleanup Scripts: If you want more control over your Docker cleanup, consider writing your own scripts in Python or another programming language. You can create a script that automatically deletes containers and images that haven’t been used for a specified number of days. This tailored approach allows you to manage your resources more effectively based on your specific needs.
- Monitoring and Alerts: It’s also crucial to set up monitoring tools that notify you when your disk usage hits a certain threshold. This proactive strategy helps you catch potential storage issues early, ensuring that your Docker environment remains healthy and efficient. By staying on top of your resources, you can prevent problems before they escalate.
Best Practices for Removing Images in Docker
- Run
docker image pruneRegularly: To keep your system clean, make it a habit to rundocker image pruneoften, which removes dangling images. If you want to clear out all unused images, you can usedocker image prune -a, but be careful not to delete any images you still need. - Stop and Remove Containers First: Before deleting images, always stop and remove any containers that are using them.
- Use Force (
-f) Cautiously: Use the-f(force) option with care when deleting images. Only force delete when you’re sure that no essential containers rely on those images. - Automate with Scheduled Cleanup: Set up a cron job to automate cleanup tasks like
docker container pruneanddocker image prune -a. This keeps your Docker environment free of clutter without needing manual intervention. - Tag Images: Label your images with easy to understand tags, like
project:1.0, so you can quickly identify and remove older versions without risking important ones. - Back Up Important Images: If you have key images, consider pushing them to a Docker registry or private repository. This way, you can delete them locally to save space without losing access to essential versions.
Conclusion
To keep your Docker environment running efficiently, it’s essential to maintain a clean and organized setup on a regular basis. One of the best ways to achieve this is by removing unused images and stopping inactive containers. Not only does this free up valuable disk space, but it also enhances the performance of your Docker containers and helps prevent potential conflicts or errors in your applications. Staying on top of maintenance ensures that your setup runs smoothly and helps you avoid any unexpected issues down the line. Whether you’re working in development or production, maintaining a tidy Docker environment ultimately saves you time and keeps everything operating at its best.
Удалить/очистить все данные Докера (контейнеры, образы, тома и сети)
Одной строкой
docker stop $(docker ps -qa) && docker rm $(docker ps -qa) && docker rmi -f $(docker images -qa) && docker volume rm $(docker volume ls -q) && docker network rm $(docker network ls -q)
Описание команд
👎 Остановка всех контейнеров
docker stop $(docker ps -qa)
✊ Удаление всех контейнеров
docker rm $(docker ps -qa)
✌️ Удаление всех образов
docker rmi -f $(docker images -qa)
👋 Удаление всех томов
docker volume rm $(docker volume ls -q)
✋ Удаление всех сетей
docker network rm $(docker network ls -q)
Ваша инсталяция должна быть чиста 😊
👇 Следующие команды не должны выводить какие-либо элементы:
👉 Следующая команда показывает только сети по умолчанию:
:: Следующая команда удаляет неиспользуемые образы
Docker — один из наиболее востребованных инструментов в сфере разработки и DevOps. Однако порой образуется множество не нужных более образов, а также контейнеров и томов. Их переизбыток может приводить к замедлению работы приложений и загромождению диска, поэтому периодически нужно избавляться от этого мусора.
И надо сказать, что в Докере есть достаточно возможностей, чтобы периодически чистить систему, причем делать это можно непосредственно из командной строки. И когда вы запомните приведенные ниже команды, процесс очистки будет ненамного сложнее, чем использование «корзины» в ОС. И не забудьте заглянуть в «Заключение», которое обычно читают редко, но в данном случае мы решили включить туда полезное предостережение.
cloud
Удаляем все объекты
Сначала приведем команду, которая удаляет всё, включая и так называемые «висячие» объекты:
docker system pruneА для удаления остановленных объектов потребуется флаг -a, вот так:
docker system prune -aНе используемые более образы уничтожаются так:
docker image prune -aЭта команда включает также дочерние образы и метаданные.
Теперь избавляемся от всех контейнеров:
docker container pruneИ, наконец, убираем тома:
docker volume pruneЧтобы убедиться, что вы удаляете правильные объекты, задействуйте флаги --dry-run или -n для просмотра объектов без их фактического уничтожения. Кроме того, эти команды удаляют объекты без возможности восстановления. Поэтому перед выполнением приведенных выше (и ниже) инструкций удостоверьтесь, что вы понимаете, какие объекты будут удалены, и вы не удаляете что-то важное.
Здесь рассмотрим основные инструкции по удалению определенного количества образов с заданными параметрами или без них.
Удаляем определенные образы
Для этого сначала вводим:
docker images -aКоманда позволяет отобразить список всех Docker-образов, которые находятся на локальной машине, включая не используемые в данный момент. Флаг -a указывает Docker на отображение всех имеющихся образов, а не только тех, которые были недавно созданы.
Далее вводим:
docker rmi Img ImgВместо Img подставьте название для удаления. Несколько названий следует указывать через пробел.
Удаляем «висячие» образы
Чтобы получить перечень неиспользуемых образов (такие объекты также называются «висячими»), вводим:
docker images -f dangling=trueТакие образы могут возникать при создании новых на основе старых с тем же именем, но без тега. В этом случае старый образ становится висячим и не используется. -f фильтрует объекты по различным критериям, в данном случае мы выполняем фильтрацию, задав dangling=true.
Теперь для удаления неиспользуемых образов вводим:
docker image pruneЭта инструкция затрагивает висячие образы и те, которые более не используются. При выполнении этой инструкции образы будут удалены без возможности восстановления.
Удаляем по шаблону
Для поиска образов, содержащих некоторый шаблон в их именах, введите:
docker images -a | grep "pattern"-a отображает все образы, в том числе неактивные и промежуточные. grep фильтрует вывод, чтобы отобразить только те образы, в именах которых содержится указанный шаблон (соответственно, введите его вместо "pattern", сохранив кавычки).
А чтобы избавиться от них, введите:
docker images -a | grep "pattern" | awk '{print $3}' | xargs docker rmiawk '{print $3}' отображает только третий столбец вывода, содержащий идентификаторы. xargs docker rmi нужен, чтобы передать идентификаторов в docker rmi, удаляющей данные образы. xargs разбивает список идентификаторов образов на отдельные аргументы. Если вы пытаетесь удалить несколько образов, перечисляя их идентификаторы вручную, вы можете столкнуться с проблемой, если идентификаторы содержат пробелы или другие специальные символы. В этом случае использование xargs более безопасно и удобно.
Для удаления используемых образов введите:
docker rm -f $(docker ps -a -q)Это остановит и уничтожит контейнеры перед удалением образов.
Удаляем все образы
Для отображения списка всех образов, которые находятся на локальной машине, включая не используемые в данный момент, вводим:
docker images -aДалее для удаления всех неактивных образов на локальной машине вводим:
docker rmi $(docker images -a -q)Эта команда выводит список идентификаторов всех образов на локальной машине и передает его в качестве аргумента docker rmi, которая удаляет все Docker-образы без возможности восстановления. А чтобы удалить и активные, используемые контейнерами, вводим:
docker rm -f $(docker ps -a -q)Как удалить контейнеры Docker
В этой части рассмотрим все основные инструкции по удалению определенного количества контейнеров с заданными параметрами или без них.
Удаляем определенные контейнеры
Для начала вводим:
docker ps -aТеперь вводим инструкцию для удаления:
docker rm Name_or_IDДля ее корректного использования замените Name_or_ID соответствующим количеством ID или имен (несколько объектов следует указывать через пробел).
Также для удаления контейнера он должен быть остановлен. Если контейнер запущен, то сначала вводим:
docker stop Name_or_IDА для уничтожения всех объектов этого типа на локальной машине введите:
docker rm $(docker ps -a -q)Удаляем контейнеры при выходе
Для запуска нового контейнера на основе указанного образа введите, заменив имя на нужное:
docker run --rm image_nameФлаг --rm указывает Docker на удаление после остановки.
Теперь небольшое пояснение. По умолчанию созданный контейнер остается на локальной машине после остановки. И если вы не хотите сохранять контейнер, то задействуйте флаг --rm. Это очень удобно при запуске временных контейнеров для выполнения какой-то задачи, например, запуска тестов, когда вы не хотите оставлять за собой «мусор». А для сохранения данных помогут такие флаги, как -v для монтирования томов или -e для передачи переменных среды.
Удаляем все запущенные контейнеры
Сначала вводим:
docker ps -a -f status=exitedФлаг -f status=exited здесь фильтрует вывод.
Теперь для удаления вводим:
docker rm $(docker ps -a -f status=exited -q)Удаляем контейнеры по нескольким фильтрам
Чтобы вывести контейнеры со статусами exited (остановлены) и created (созданы), то есть не запущенные и не работающие в данный момент, введите:
docker ps -a -f status=exited -f status=createdФлаги -a и -f здесь указывают Docker на отображение всех контейнеров и их фильтрацию.
Теперь для удаления всех объектов, которые находятся в состояниях exited или created, введите:
docker rm $(docker ps -a -f status=exited -f status=created -q)Удаляем по шаблону
Для получения перечня контейнеров на локальной машине, а затем фильтрации списка, чтобы отобразить только те объекты, в именах которых есть определенный шаблон, введите, заменив "pattern" на нужный шаблон, сохраняя кавычки:
docker ps -a | grep "pattern"Теперь для удаления объектов, в именах которых есть строка "pattern", вводим:
docker ps -a | grep "pattern" | awk '{print $1}' | xargs docker rmЭта инструкция использует grep для фильтрации списка, awk '{print $1}' для извлечения первого столбца (идентификатора), а затем передает идентификаторы, используя xargs. Добавим, что docker ps -a | grep "pattern" может выводить не только имена, но и другую информацию: статус, ID и т.д. Поэтому для удаления объектов, в указанных параметрах которых есть строка "pattern", задействуйте инструкцию выше.
Останавливаем и удаляем все контейнеры
Для получения перечня контейнеров на локальной машине, включая не запущенные в данный момент, вводим знакомую инструкцию:
docker ps -aОна покажет информацию о каждом объекте: идентификатор, имя, статус, задействованные ресурсы и т.д.
Для остановки всех контейнеров на локальной машине вводим:
docker stop $(docker ps -a -q)И теперь удаляем их, вот так:
docker rm $(docker ps -a -q)Как удалить тома Docker
В завершающей главе рассмотрим основные инструкции по удалению определенного количества томов с заданными параметрами или без них.
Удаляем определенные тома
Для получения перечня томов на локальной машине введите:
docker volume lsКоманда выводит список имеющихся томов, включая информацию о них (ID, имена).
Для удаления определенного числа томов с заданными именами введите, добавив имя нужного тома вместо vlm_name:
docker volume rm vlm_nameЭта команда принимает разное количество аргументов. Для удаления нескольких объектов перечислите их названия через пробел:
docker volume rm my_volume1 my_volume2Если тома используются контейнерами, находящимися в работающем состоянии, их нельзя удалить, пока эти контейнеры не будут остановлены или удалены. Попытки уничтожить такие объекты будут сопровождаться выводом ошибки.
Удаляем висячие тома
Для получения перечня висячих томов на локальной машине введите:
docker volume ls -f dangling=trueИнструкция выводит их перечень, включая их ID и имена. Теперь можно избавиться от них, введя:
docker volume pruneУдалению подвергнутся все объекты данного типа, не ассоциированные ни с одним контейнером и не использующиеся на текущий момент.
Удаляем контейнер и его тома
Чтобы удалить тома, которые были созданы автоматически, вводим:
docker rm -v container_nameФлаг -v здесь указывает Docker на необходимость удаления всех связанных томов. Дело в том, что такие тома сохраняются на локальной машине, если не будут удалены явно. Поэтому такая операция может быть полезна для освобождения занимаемого не используемыми томами места на локальной машине.
Заключение
В завершение отметим, что перед тем, как выполнять инструкции по удалению образов, контейнеров и томов, нужно убедиться, что удаляемые объекты больше не потребуются вам или членам вашей команды. Ведь все эти операции — необратимые. А на этом всё, желаем успехов в работе с Docker!
| Введение | |
| Остановить в Windows | |
| Остановить в Linux | |
| Удалить контейнеры | |
| Удалить образы | |
| Статьи про Docker |
Остановить все контейнеры в Windows
В Windows cmd
FOR /f «tokens=*» %i IN (‘docker ps -q’) DO docker stop %i
В Windows batch файле
FOR /f «tokens=*» %%i IN (‘docker ps -q’) DO docker stop %%i
В
Windows PowerShell
docker ps -q | % { docker stop $_ }
Остановить все контейнеры в Linux
В
Linux
docker stop $(docker ps -aq)
или
sudo docker stop $(sudo docker ps -aq)
docker stop выполняется для всех контейнеров которые выводит команда
docker ps -a
Флаг q нужен для выполнения в фоновом режиме.
Он не является обязательным.
Удалить все контейнеры Docker
Нужно сделать то же самое, но вместо stop выполнить rm
Разберём для
Linux
docker rm $(docker ps -aq)
Альтернативный способ это system prune
docker system prune
WARNING! This will remove:
— all stopped containers
— all networks not used by at least one container
— all dangling images
— all dangling build cache
Are you sure you want to continue? [y/N] y
Deleted Containers:
60136dcc356d794d23aee10d3e6440fd53204ed88ad1c45f9bb70d0f66dd1cc4
85375f0f0e5e3d196ec7b11b4f7834aadee167de6c489ce4bf90b940ddec5ea8
33efc448ad6c67ee7e61336482dd7110a059e0c78d8b0a321f0f192ee26a048e
Deleted Images:
deleted: sha256:409d2b2d3c0b20cfb9556bb1e8c69c6e8e8b6120c3883396a5015f109f3f25cb
deleted: sha256:c26bbf7dc2369c5a9e316dbf6c8c0f79fd81b1dd92d5a4ee343060c96cabebf2
deleted: sha256:fcf59b2324beadaf9fc689bb205bc28915a78da42aee860bbb17bded2c54be13
deleted: sha256:c9952ac8387d7dc94e779d2663120f3e93a61a615b710fd7680f0dde63d0c411
deleted: sha256:7b5a2e67a82fb2512681822bfb4fae0b61c135b55ecc55b8fe0bc41ee7d60b40
deleted: sha256:bbdc7e06675baa525c1a65fbedcc3145f3271d49cf828ecd0f77aed5e31e740d
deleted: sha256:08908b45bd8a5b6340e89d9a401e39a04d4c81c66a75b4fc31528c042632bdf9
deleted: sha256:75ed22a7abbe9c23df78263501d5236b7a1dd9649fba94da3aee59ba277fc2c7
deleted: sha256:30f928cfbca4c67e9c284907b304b73a0804fa19b9d8ff22896c6afb79440638
deleted: sha256:b0573c5f42fec17a41f9633532e4f0c1ce77fc111aaec5fa9293bf3975459396
deleted: sha256:a1b7d51ce64b376af6d3e24f10689f04903f7f6174c07f8515127819c4d464f0
deleted: sha256:28115231ced77eebf1e319aacf77c7373f4845f13aa4fd21864cea5b79b5998f
deleted: sha256:954454106831e933798549935ed4bebb0683ccb0807cb4a0ce69537242418d4f
deleted: sha256:043dfc7ae5ae1671626dc1aa082f66791f8579bdcda25c1ccd9d7938c3a352b1
deleted: sha256:32083ac1bbb41043358d3bdf20d2cf6a2b95ddd583fc5f000e723f9ae508cf46
deleted: sha256:f5578f194936295078b78ff2ba8b14807da8b7df240627f3fb85be07bc69f74d
deleted: sha256:1fb565177c22d167b2f0271608e7c2e5a5868e19b36d30fd707604b4f23f0505
deleted: sha256:a1e12e8d24f2e61e9c73c7c29c23b09130fb119cd9672df7f9a03602c0beac84
deleted: sha256:ea493968f3d604b29a929813490d123a8171f2f8a23c67047866b4ee81d4df0c
deleted: sha256:285e528ab55c765304d41679ae7f9b69265bf954762f51b84379212d532ad6bd
deleted: sha256:b11f4e5c2b7fd12935b558f1c6361def6545574703eda262ca1c812c9e60680c
deleted: sha256:af0157c41f52fcf54e4ca265fb5e121b110b66309cebc8ebab09a44eeca21ad0
deleted: sha256:77a594b76fb550d04d4b5a8c2f82bfb7f3cd5b6ac14ac8ab7550de75eb9b86f1
deleted: sha256:1e11339a7869cee0f3b2dd099dd28e1f1f5f987a01639d3e5866efc1f3879cc5
deleted: sha256:dbfcd0b2c04a3ed04f4d99a2b1e65366b43421207230efb9fc30dac37c677fa8
Total reclaimed space: 177.4MB
Удалить все образы
Нужно сделать то же самое, но вместо rm выполнить rmi
а вместо ps выполнить images
Разберём для
Linux
docker rmi $(docker images -q)
Форсированное удаление выполняется с помощью флага —force
docker rmi —force 8d788d646766
Удалить всё
docker stop $(docker ps -aq)
docker rm $(docker ps -aq)
docker builder prune
docker rmi $(docker images -q)
docker system prune
Автор статьи: Андрей Олегович
Похожие статьи
| Docker | |
| Установка в Linux и Windows | |
| Основы | |
| images: Образы | |
| build: Создание контейнеров + примеры | |
| run: Опции запуска контейнера | |
| Сети | |
| Dockerfile | |
| Остановить/удалить все контейнеры | |
| exec: выполнить команду в контейнере | |
| compose | |
| Видеоуроки | |
| Ошибки | |
| Linux | |
| Windows |
Docker
Learn how to delete all Docker containers and images with simple commands. This guide explains safe practices, automation options, and key differences between docker rm and docker rmi.

It’s time to start sharing some tips I’ve found while using Docker. You may be required to clean up your Docker installation at some point.
If you have used Docker for any length of time, you will start to notice unused containers and images lying around. Sometimes, this can become a burden on your disk space or just an administrative hassle. Either way, it is a quick and easy fix.
Before proceeding, please be aware that these commands will nuke every non-running container and image not associated with a running container. You’ve been warned.
Delete all Docker containers that are not running
root@Docker01:~# docker rm $(docker ps -a -q)
Delete all Docker Images
I’ve provided two different options for deleting images. To correctly understand the difference between Tagged and UnTagged Images, please take a look at the diagram below.
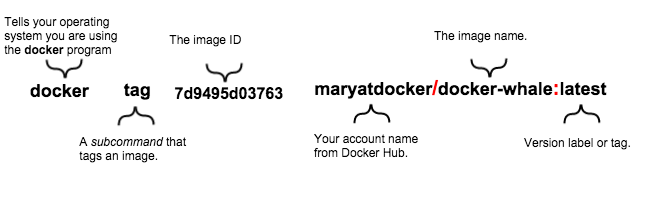
Source Docker.com
Option 1 — Delete all untagged Docker Images.
, which also works quite well. I tested it, and itThis was updated based on Matthew Torres’s comment below as it is much easier to delete with the filtering flag Check out Docker’s Filtering Docs for more information.
docker rmi $(docker images -f "dangling=true" -q)
Option 2 — Delete all Docker Images
docker rmi $(docker images -q)
Updated Options
Jan responded on Twitter with the following proposal, which also works quite well. I tested it, and it works well.
@docker @idomyowntricks use formatting instead of trying to remove all incl. running ones (-qa): docker rm $(docker ps -qf status=exited)— Jan (@KekSfabrik_EU) February 23, 2016
Option 3 — Delete all Docker Containers according to formatting
docker rm $(docker ps -qf status=exited)
FAQ Section: How to Delete All Docker Containers and Images
How can I delete all Docker containers at once?
To delete all Docker containers at once, you can use the command docker rm $(docker ps -a -q). This command first lists all container IDs (docker ps -a -q) and then removes them (docker rm). For containers that are currently running, you must stop them first with docker stop $(docker ps -q) before running the removal command.
What is the command to delete all Docker images?
To delete all Docker images, you can use docker rmi $(docker images -q). This command works similarly to deleting containers: it lists all image IDs (docker images -q) and then removes them (docker rmi). If some images are in use by containers, you need to delete those containers first.
Is it safe to delete all Docker containers and images?
Deleting all Docker containers and images is generally safe if you no longer need them. However, this action is irreversible, so be sure to back up any important data or configurations before proceeding. Once deleted, you’ll need to rebuild or pull the images again if you want to use them in the future.
Can I automate the process of cleaning up Docker containers and images?
Yes, you can automate the cleanup process by creating a shell script that runs the necessary Docker commands. Additionally, Docker provides the docker system prune command, which can be used to clean up unused containers, images, networks, and volumes. Running docker system prune -a will remove all unused images and stopped containers, making it a more comprehensive cleanup option.
What is the difference between docker rm and docker rmi?docker rm is used to delete Docker containers, while docker rmi is used to delete Docker images. Containers are instances of images running as applications, and images are the packaged environments and code used to create containers. It’s important to understand the distinction to avoid accidentally deleting important images when you only intend to remove containers.
Follow me
If you liked this article, Follow Me on Twitter to stay updated!
Sign up for BrianChristner.io
I write Dockerfiles, Build Products, Share Ideas, and crash Mountain Bikes
No spam. Unsubscribe anytime.