
.NET Tools
Connecting to a Running Docker Container Shell
When using Docker in your development workflow, it is sometimes necessary to connect to a running Docker container to perform critical tasks or troubleshoot issues. For example, you may want to explore the file system, look at processes running in the container, tail a log file in the container, and more.
You can connect to a running Docker container in many ways: using the docker attach command, using docker exec, or (surprise!) with the click of a button in JetBrains Rider! Let’s have a look.
Attaching to a running Docker container
One way to attach to a running Docker container is by using the docker attach command. This command will attach the container’s standard input, output, and error streams to your local terminal.
To use this command, you’ll need to find out the container id first, which can be found using the command-line (docker ps, then copy the container id), or by using the context menu in the Rider Services tool window:

You can then run docker attach <container-id> in the terminal and be greeted with a shell prompt, log output, or… nothing!
Unfortunately, attaching to an already-running Docker container will only be valid if it’s running a shell as its entry point. This is because most container images will run a different executable, and attaching to such a container will usually result in being able to see the container’s output – not getting access to an interactive shell.
Start a new shell in a Docker container
Using docker exec is a more successful approach with most container images. With this command, you can start a new process in the container and interact with it. Additionally, docker exec is a bit easier as you can use the container name instead of the container id.
If you know a specific shell, like sh or bash is available in the container, you can connect to it with a one-liner. Note you’ll also need to specify the -it switches to make sure you can interact with the running process in the container:
docker exec -it <container-name> /bin/bash
You can use docker exec to run other commands as well. For example, if you want to run tail to look at the latest entries in a given file – or run any other command for that matter – you don’t need to use an interactive shell. Instead, you can run it with docker exec directly:
docker exec <container-name> tail /var/log/messages
Connect to a running Docker container using Rider
Another way to connect to a running Docker container’s shell is from inside JetBrains Rider. After connecting to Docker, the Services tool window gives you access to all functionality around Docker. You can start/stop containers, explore images, networks, and volumes, inspect a container’s environment variables, expose ports, and much more.
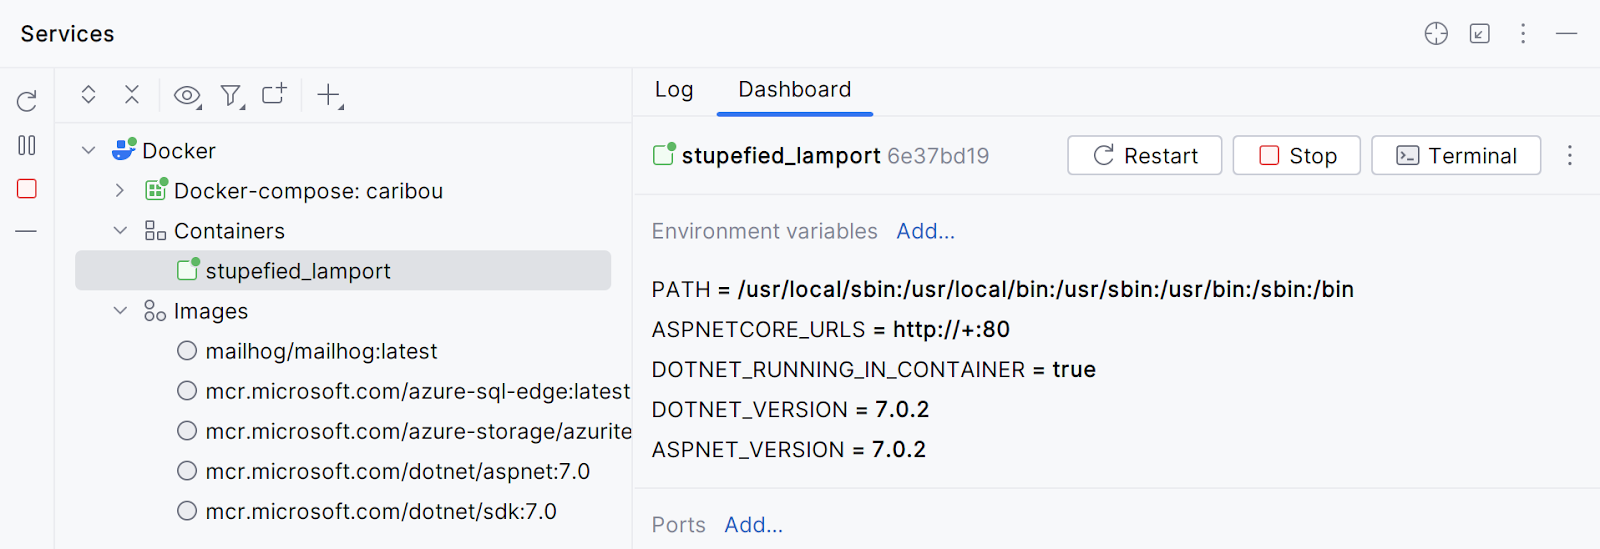
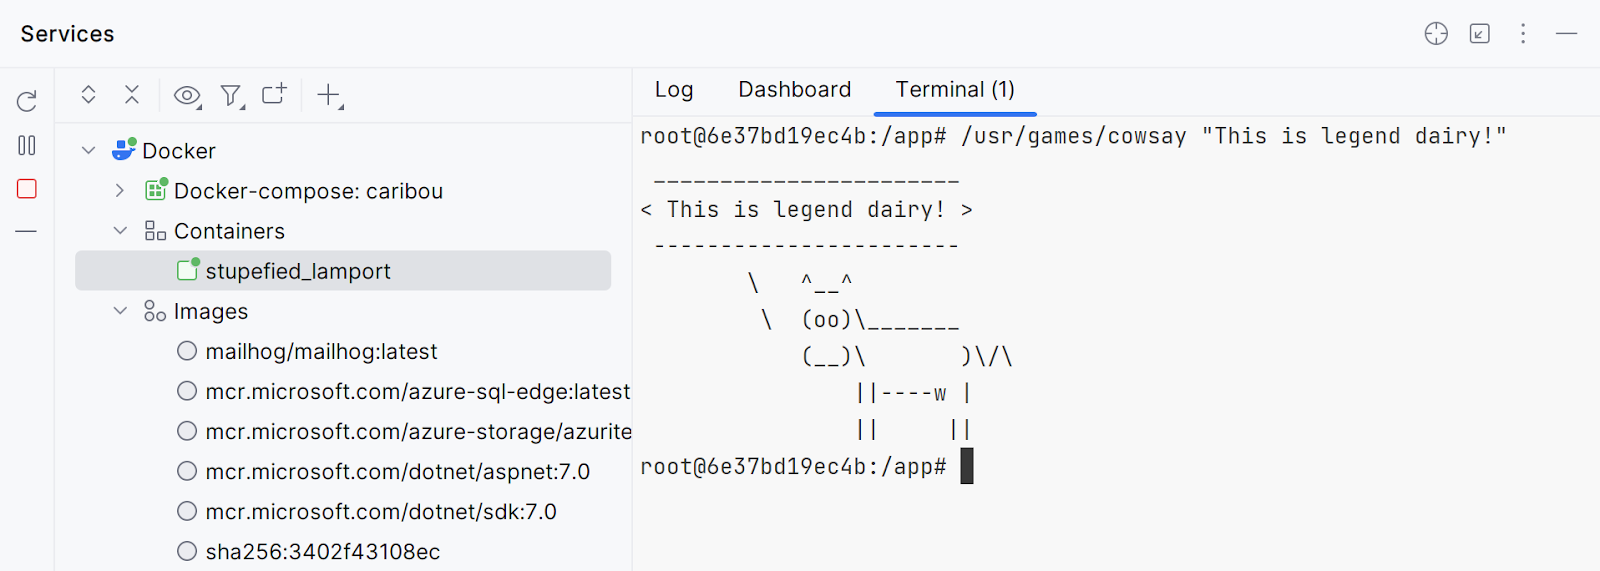
After selecting your container in the tree on the left-hand side, clicking the Terminal button will open a terminal inside the container and lets you work with it interactively. You can now run any command in the Docker container and look at the results.
Summary
Sometimes, you will need to connect to a terminal in a running Docker container and interact with it. Whether it is to try out the commands that will, later on, go in your Dockerfile, or to troubleshoot the environment in which your application will be running, there are several tools you can rely on to do so.
In this post, we’ve seen the docker attach command, the docker exec command, and the Services tool window in JetBrains Rider. Which approach is your favorite? Let us know in the comments!
Subscribe to a monthly digest curated from the .NET Tools blog:
Windows inside a Docker container.
Features ✨
- ISO downloader
- KVM acceleration
- Web-based viewer
Video 📺

Usage 🐳
Via Docker Compose:
services:
  windows:
    image: dockurr/windows
    container_name: windows
    environment:
      VERSION: "11"
    devices:
      - /dev/kvm
      - /dev/net/tun
    cap_add:
      - NET_ADMIN
    ports:
      - 8006:8006
      - 3389:3389/tcp
      - 3389:3389/udp
    volumes:
      - ./windows:/storage
    restart: always
    stop_grace_period: 2m
Via Docker CLI:
docker run -it --rm --name windows -p 8006:8006 --device=/dev/kvm --device=/dev/net/tun --cap-add NET_ADMIN -v "${PWD:-.}/windows:/storage" --stop-timeout 120 dockurr/windows
Via Kubernetes:
kubectl apply -f https://raw.githubusercontent.com/dockur/windows/refs/heads/master/kubernetes.yml
Via Github Codespaces:
FAQ 💬
How do I use it?
Very simple! These are the steps:
-
Start the container and connect to port 8006 using your web browser.
-
Sit back and relax while the magic happens, the whole installation will be performed fully automatic.
-
Once you see the desktop, your Windows installation is ready for use.
Enjoy your brand new machine, and don’t forget to star this repo!
How do I select the Windows version?
By default, Windows 11 Pro will be installed. But you can add the VERSION environment variable to your compose file, in order to specify an alternative Windows version to be downloaded:
environment:
  VERSION: "11"
Select from the values below:
| Value | Version | Size |
|---|---|---|
11 |
Windows 11 Pro | 5.4 GB |
11l |
Windows 11 LTSC | 4.7 GB |
11e |
Windows 11 Enterprise | 4.0 GB |
10 |
Windows 10 Pro | 5.7 GB |
10l |
Windows 10 LTSC | 4.6 GB |
10e |
Windows 10 Enterprise | 5.2 GB |
8e |
Windows 8.1 Enterprise | 3.7 GB |
7u |
Windows 7 Ultimate | 3.1 GB |
vu |
Windows Vista Ultimate | 3.0 GB |
xp |
Windows XP Professional | 0.6 GB |
2k |
Windows 2000 Professional | 0.4 GB |
2025 |
Windows Server 2025 | 5.6 GB |
2022 |
Windows Server 2022 | 4.7 GB |
2019 |
Windows Server 2019 | 5.3 GB |
2016 |
Windows Server 2016 | 6.5 GB |
2012 |
Windows Server 2012 | 4.3 GB |
2008 |
Windows Server 2008 | 3.0 GB |
2003 |
Windows Server 2003 | 0.6 GB |
How do I change the storage location?
To change the storage location, include the following bind mount in your compose file:
volumes:
  - ./windows:/storage
Replace the example path ./windows with the desired storage folder or named volume.
How do I change the size of the disk?
To expand the default size of 64 GB, add the DISK_SIZE setting to your compose file and set it to your preferred capacity:
environment:
  DISK_SIZE: "256G"
Tip
This can also be used to resize the existing disk to a larger capacity without any data loss.
How do I share files with the host?
Open ‘File Explorer’ and click on the ‘Network’ section, you will see a computer called host.lan.
Double-click it and it will show a folder called Data, which can be bound to any folder on your host via the compose file:
volumes:
  -  ./example:/data
The example folder ./example will be available as \\host.lan\Data.
Tip
You can map this path to a drive letter in Windows, for easier access.
How do I change the amount of CPU or RAM?
By default, the container will be allowed to use a maximum of 2 CPU cores and 4 GB of RAM.
If you want to adjust this, you can specify the desired amount using the following environment variables:
environment:
  RAM_SIZE: "8G"
  CPU_CORES: "4"
How do I configure the username and password?
By default, a user called Docker is created during installation and its password is admin.
If you want to use different credentials, you can configure them in your compose file (only before installation):
environment:
  USERNAME: "bill"
  PASSWORD: "gates"
How do I select the Windows language?
By default, the English version of Windows will be downloaded.
But before installation you can add the LANGUAGE environment variable to your compose file, in order to specify an alternative language:
environment:
  LANGUAGE: "French"
You can choose between: 🇦🇪 Arabic, 🇧🇬 Bulgarian, 🇨🇳 Chinese, 🇭🇷 Croatian, 🇨🇿 Czech, 🇩🇰 Danish, 🇳🇱 Dutch, 🇬🇧 English, 🇪🇪 Estonian, 🇫🇮 Finnish, 🇫🇷 French, 🇩🇪 German, 🇬🇷 Greek, 🇮🇱 Hebrew, 🇭🇺 Hungarian, 🇮🇹 Italian, 🇯🇵 Japanese, 🇰🇷 Korean, 🇱🇻 Latvian, 🇱🇹 Lithuanian, 🇳🇴 Norwegian, 🇵🇱 Polish, 🇵🇹 Portuguese, 🇷🇴 Romanian, 🇷🇺 Russian, 🇷🇸 Serbian, 🇸🇰 Slovak, 🇸🇮 Slovenian, 🇪🇸 Spanish, 🇸🇪 Swedish, 🇹🇭 Thai, 🇹🇷 Turkish and 🇺🇦 Ukrainian.
How do I select the keyboard layout?
If you want to use a keyboard layout or locale that is not the default for your selected language, you can add KEYBOARD and REGION variables like this (before installation):
environment:
  REGION: "en-US"
  KEYBOARD: "en-US"
How do I select the edition?
Windows Server offers a minimalistic Core edition without a GUI. To select those non-standard editions, you can add a EDITION variable like this (before installation):
environment:
  EDITION: "core"
How do I install a custom image?
In order to download an unsupported ISO image, specify its URL in the VERSION environment variable:
environment:
  VERSION: "https://example.com/win.iso"
Alternatively, you can also skip the download and use a local file instead, by binding it in your compose file in this way:
volumes:
  - ./example.iso:/boot.iso
Replace the example path ./example.iso with the filename of your desired ISO file. The value of VERSION will be ignored in this case.
How do I run a script after installation?
To run your own script after installation, you can create a file called install.bat and place it in a folder together with any additional files it needs (software to be installed for example).
Then bind that folder in your compose file like this:
volumes:
  -  ./example:/oem
The example folder ./example will be copied to C:\OEM and the containing install.bat will be executed during the last step of the automatic installation.
How do I perform a manual installation?
It’s recommended to stick to the automatic installation, as it adjusts various settings to prevent common issues when running Windows inside a virtual environment.
However, if you insist on performing the installation manually at your own risk, add the following environment variable to your compose file:
How do I connect using RDP?
The web-viewer is mainly meant to be used during installation, as its picture quality is low, and it has no audio or clipboard for example.
So for a better experience you can connect using any Microsoft Remote Desktop client to the IP of the container, using the username Docker and password admin.
There is a RDP client for Android available from the Play Store and one for iOS in the Apple Store. For Linux you can use FreeRDP and on Windows just type mstsc in the search box.
How do I assign an individual IP address to the container?
By default, the container uses bridge networking, which shares the IP address with the host.
If you want to assign an individual IP address to the container, you can create a macvlan network as follows:
docker network create -d macvlan \
    --subnet=192.168.0.0/24 \
    --gateway=192.168.0.1 \
    --ip-range=192.168.0.100/28 \
    -o parent=eth0 vlan
Be sure to modify these values to match your local subnet.
Once you have created the network, change your compose file to look as follows:
services:
  windows:
    container_name: windows
    ..<snip>..
    networks:
      vlan:
        ipv4_address: 192.168.0.100

networks:
  vlan:
    external: true
An added benefit of this approach is that you won’t have to perform any port mapping anymore, since all ports will be exposed by default.
Important
This IP address won’t be accessible from the Docker host due to the design of macvlan, which doesn’t permit communication between the two. If this is a concern, you need to create a second macvlan as a workaround.
How can Windows acquire an IP address from my router?
After configuring the container for macvlan, it is possible for Windows to become part of your home network by requesting an IP from your router, just like a real PC.
To enable this mode, in which the container and Windows will have separate IP addresses, add the following lines to your compose file:
environment:
  DHCP: "Y"
devices:
  - /dev/vhost-net
device_cgroup_rules:
  - 'c *:* rwm'
How do I add multiple disks?
To create additional disks, modify your compose file like this:
environment:
  DISK2_SIZE: "32G"
  DISK3_SIZE: "64G"
volumes:
  - ./example2:/storage2
  - ./example3:/storage3
How do I pass-through a disk?
It is possible to pass-through disk devices or partitions directly by adding them to your compose file in this way:
devices:
  - /dev/sdb:/disk1
  - /dev/sdc1:/disk2
Use /disk1 if you want it to become your main drive (which will be formatted during installation), and use /disk2 and higher to add them as secondary drives (which will stay untouched).
How do I pass-through a USB device?
To pass-through a USB device, first lookup its vendor and product id via the lsusb command, then add them to your compose file like this:
environment:
  ARGUMENTS: "-device usb-host,vendorid=0x1234,productid=0x1234"
devices:
  - /dev/bus/usb
If the device is a USB disk drive, please wait until after the installation is fully completed before connecting it. Otherwise the installation may fail, as the order of the disks can get rearranged.
How do I verify if my system supports KVM?
First check if your software is compatible using this chart:
| Product | Linux | Win11 | Win10 | macOS |
|---|---|---|---|---|
| Docker CLI | ✅ | ✅ | ❌ | ❌ |
| Docker Desktop | ❌ | ✅ | ❌ | ❌ |
| Podman CLI | ✅ | ✅ | ❌ | ❌ |
| Podman Desktop | ✅ | ✅ | ❌ | ❌ |
After that you can run the following commands in Linux to check your system:
sudo apt install cpu-checker
sudo kvm-ok
If you receive an error from kvm-ok indicating that KVM cannot be used, please check whether:
-
the virtualization extensions (
Intel VT-xorAMD SVM) are enabled in your BIOS. -
you enabled «nested virtualization» if you are running the container inside a virtual machine.
-
you are not using a cloud provider, as most of them do not allow nested virtualization for their VPS’s.
If you did not receive any error from kvm-ok but the container still complains about a missing KVM device, it could help to add privileged: true to your compose file (or sudo to your docker command) to rule out any permission issue.
How do I run macOS in a container?
You can use dockur/macos for that. It shares many of the same features, except for the automatic installation.
How do I run a Linux desktop in a container?
You can use qemus/qemu in that case.
Is this project legal?
Yes, this project contains only open-source code and does not distribute any copyrighted material. Any product keys found in the code are just generic placeholders provided by Microsoft for trial purposes. So under all applicable laws, this project will be considered legal.
Stars 🌟
Disclaimer ⚖️
The product names, logos, brands, and other trademarks referred to within this project are the property of their respective trademark holders. This project is not affiliated, sponsored, or endorsed by Microsoft Corporation.
When you run an application inside a Docker container, you may sometimes need to talk to services running on the host machine. This guide explains in a simple way how you can connect from inside a Docker container to the host machine’s localhost. I will show you different methods to solve this problem. The writing style here is plain and uses short sentences to keep things clear and simple.
In this article, we will discuss what Docker containers are, how networking works, and then explore ways to access the host machine’s localhost. This guide is for beginners and those new to Docker. If you are new to Docker, you can start by reading this article on What is Docker and why should you use it? to get a good foundation.
Understanding Docker Containers and Localhost
A Docker container is a lightweight, stand-alone package that contains your application along with its dependencies. It runs isolated from other containers and from the host machine. Inside a container, the term “localhost” always points to the container itself. This means that if you try to access localhost from within the container, you are talking to the container, not the host machine.
The host machine is your computer or server where Docker is installed. It can run many services. For example, you might have a database or a web server running on the host machine. When you run a Docker container, you sometimes need to connect to these services. But since the container has its own network, connecting to the host is not obvious. In Docker, networking is managed by a virtual network bridge. You can learn more about Docker networks and their importance from this article: What are Docker networks and why are they necessary?.
Why Is It Hard to Access the Host’s Localhost?
By default, Docker creates an isolated network for each container. This isolation is great for security and consistency. However, it makes it hard to access services on the host machine. When you type “localhost” inside a container, the container does not see the host machine’s localhost. Instead, it sees its own network interface.
Many people ask, “How do Docker containers communicate with each other?” The answer is that they usually do so through defined networks or by linking containers together. But when you want to reach out to the host, you must use special techniques. One common question on forums is: “From inside of a Docker container, how do I connect to the localhost of the machine?” This article will answer that question in clear steps.
Methods to Connect to the Host Machine’s Localhost
There are a few different ways to make a connection from inside a container to the host machine’s localhost. I will explain some common methods. Choose the method that fits your situation best.
1. Using the Host Network Mode
One simple way is to run the container with the host network. When you do this, the container shares the same network stack as the host machine. This means that “localhost” inside the container is the same as the host’s localhost.
To run a container with the host network, use the following command:
docker run --network=host -d --name mycontainer myimage:latest
Enter fullscreen mode
Exit fullscreen mode
Here, --network=host tells Docker to use the host network. The container now has full access to the host’s network, so you can connect to any service running on the host. This method is simple but comes with some risks. It reduces the network isolation between the container and the host, which can be a security concern in some cases.
If you are interested in how containers communicate with each other in different network modes, check out this guide on How do Docker containers communicate with each other?.
2. Using the Special DNS Name: host.docker.internal
For users of Docker Desktop on Windows and Mac, Docker provides a special DNS name: host.docker.internal. This name resolves to the host machine’s IP address. It is very handy when you want your container to access services on the host.
Inside your container, instead of using “localhost,” you can use:
host.docker.internal
Enter fullscreen mode
Exit fullscreen mode
For example, if a service on your host machine runs on port 8080, you can access it from the container by using the address:
http://host.docker.internal:8080
Enter fullscreen mode
Exit fullscreen mode
This method works out of the box on Docker Desktop for Windows and Mac. However, on Linux, this name might not work by default. Some Linux users must add extra configuration or use other methods, such as creating an alias in the container’s hosts file.
3. Finding the Host’s IP Address on the Docker Bridge
Another method is to use the IP address of the host on the Docker bridge network. When Docker runs, it usually creates a network bridge named docker0 on the host machine. This network often uses an IP range like 172.17.0.0/16. The host machine is usually available at 172.17.0.1 in this network.
Inside your container, you can try to reach the host machine by connecting to 172.17.0.1. For example, if your host runs a web service on port 5000, you can access it from the container using:
http://172.17.0.1:5000
Enter fullscreen mode
Exit fullscreen mode
Keep in mind that this method may change based on your Docker setup and network configuration. It works well on many default Docker installations on Linux. But if you use custom networks or settings, the host IP might be different.
4. Using Docker Compose with Extra Hosts
If you are using Docker Compose, you can add an extra hosts entry in your Compose file to map a hostname to the host machine’s IP address. This gives you a simple name to use from inside the container.
Here is an example of a docker-compose.yml file:
version: '3'
services:
  myservice:
    image: myimage:latest
    extra_hosts:
      - "hostmachine:172.17.0.1"
Enter fullscreen mode
Exit fullscreen mode
In this example, the container will resolve the hostname hostmachine to the IP address 172.17.0.1. Now, in your application code or configuration, you can use hostmachine as the host’s address. This method is flexible and works well when you have multiple containers that need to connect to the host.
For more on working with Docker Compose, you may read How to use Docker Compose for development and testing.
5. Setting Up a Custom Bridge Network
If the above methods do not work for you, you can also set up a custom bridge network. By creating a custom network, you gain better control over IP addressing. You can assign a fixed IP to the host machine in this network. This approach is a bit more advanced but can be useful if you have special requirements.
To create a custom bridge network, run:
docker network create mybridge
Enter fullscreen mode
Exit fullscreen mode
Then run your container on that network:
docker run --network=mybridge -d --name mycontainer myimage:latest
Enter fullscreen mode
Exit fullscreen mode
Once your container is running on the custom bridge, you can configure the network so that the host machine has a known IP. You might need to set this up in your network settings or use a tool to manage the IP addresses. This method is more hands-on and may not be necessary for simple use cases.
Best Practices and Security Considerations
Each method has its own advantages and risks. When you use host network mode, you lose some network isolation. This can be acceptable in local development but might be risky in production. Always think about the security of your container setup.
Using the special DNS name host.docker.internal is a very safe option on Docker Desktop. However, if you are on Linux, you must be careful and check if your Docker version supports this feature. Also, when using static IP addresses like 172.17.0.1, verify that it is correct for your host network. These values might differ if you have changed Docker’s default network settings.
It is also a good idea to review your firewall settings. Some firewall rules might block connections from the container to the host. Double-check your network settings if you have trouble connecting.
For a broader understanding of how to pull images and work with Docker repositories, you can read How do you pull a Docker image from Docker Hub?. This article will help you understand how to set up your environment before you start connecting to your host.
Step-by-Step Example Using Host Networking Mode
Let’s go through a clear example. Suppose you have a web server running on your host machine on port 8080. You want your containerized application to access this web server.
-
Stop the Container (if running):
Make sure no container is already using host network mode. You can stop a container with:
docker stop mycontainer
Enter fullscreen mode
Exit fullscreen mode
-
Run the Container with Host Networking:
Use the following command to run the container:
docker run --network=host -d --name mycontainer myimage:latest
Enter fullscreen mode
Exit fullscreen mode
Here, the container uses the host network. Now, if you try to access http://localhost:8080 from inside the container, it will reach the web server running on your host machine.
-
Test the Connection:
Open a terminal in your container. You can do this by using:
docker exec -it mycontainer bash
Enter fullscreen mode
Exit fullscreen mode
Then run:
curl http://localhost:8080
Enter fullscreen mode
Exit fullscreen mode
If you see the expected response, your container successfully connected to the host machine’s localhost.
This example shows how simple it is when you use host networking. But remember, host networking mode is best used in a controlled environment.
Step-by-Step Example Using host.docker.internal
Now let’s try the method using host.docker.internal. This is useful if you are on Windows or Mac.
-
Run the Container Normally:
Do not use the host network mode. Run your container like this:
docker run -d --name mycontainer myimage:latest
Enter fullscreen mode
Exit fullscreen mode
-
Test the Connection:
Open a terminal in the container:
docker exec -it mycontainer bash
Enter fullscreen mode
Exit fullscreen mode
Now, instead of using localhost, use host.docker.internal. For example, run:
curl http://host.docker.internal:8080
Enter fullscreen mode
Exit fullscreen mode
If you get the correct response from your host’s web server, the connection is successful.
This method keeps the container isolated while still allowing it to connect to the host machine. It is a safe option for development on Docker Desktop.
Troubleshooting Common Issues
Sometimes you may face problems when trying to connect to the host machine. Here are some tips to solve common issues:
-
DNS Resolution Problems:
If you cannot resolve
host.docker.internal, check your Docker version. Some older versions may not support it. On Linux, you might have to manually add an entry in the container’s/etc/hostsfile. -
Firewall Blocks:
Your host’s firewall might block incoming connections from the container. Try to disable the firewall temporarily or add an exception for the Docker network.
-
IP Address Changes:
If you are using the Docker bridge method and the IP 172.17.0.1 does not work, run
ip addr show docker0on the host to check the correct IP address. -
Container Network Isolation:
Ensure your container is not running in a very isolated mode that might block external connections. Check the Docker run options for any extra isolation flags.
If you need further help on troubleshooting container issues, this article on How to use Docker with Kubernetes for orchestration can give you more ideas about managing container networks.
When to Use Each Method
Different projects and environments may require different methods to connect to the host machine.
-
Development and Testing:
During development, you might want quick and easy access to host services. Using
host.docker.internalor static IP addresses is usually sufficient. Host networking mode can work, but use it only if you understand the security implications. -
Production Environments:
In production, it is better to maintain isolation between the container and host. In this case, you may want to expose only specific ports using Docker’s port mapping. This way, the container remains isolated while the host’s services are still accessible through defined ports.
-
Custom Network Setups:
If you have a complex environment or use Docker Compose with multiple services, consider using the extra hosts method or setting up a custom bridge network. This gives you fine control over the network connections and host address mapping.
For more on how containers work in a network, see How do Docker containers communicate with each other?.
Code Examples and Explanations
Here are some code examples that show the different methods in action.
Example 1: Host Network Mode
# Stop the container if it is already running
docker stop mycontainer

# Run the container with host network mode
docker run --network=host -d --name mycontainer myimage:latest

# Inside the container, check the connection to the host service
docker exec -it mycontainer bash
curl http://localhost:8080
Enter fullscreen mode
Exit fullscreen mode
This example uses the host network. It is a fast solution for development but may not be safe for all environments.
Example 2: Using host.docker.internal
# Run the container normally without host networking
docker run -d --name mycontainer myimage:latest

# Enter the container
docker exec -it mycontainer bash

# Use host.docker.internal to connect to the host service
curl http://host.docker.internal:8080
Enter fullscreen mode
Exit fullscreen mode
This example works well on Docker Desktop for Windows and Mac. It keeps the container isolated while allowing host access.
Example 3: Custom Bridge Network with Extra Hosts
If you want to use Docker Compose, you can create a docker-compose.yml file like this:
version: '3'
services:
  myservice:
    image: myimage:latest
    extra_hosts:
      - "hostmachine:172.17.0.1"
Enter fullscreen mode
Exit fullscreen mode
Then run:
docker-compose up -d
Enter fullscreen mode
Exit fullscreen mode
Inside the container, you can now use the hostname hostmachine to reach the host’s services:
docker exec -it myservice bash
curl http://hostmachine:8080
Enter fullscreen mode
Exit fullscreen mode
This method is flexible and works well in multi-container setups.
For more detailed steps on pulling images and working with Docker images, check out How do you pull a Docker image from Docker Hub?.
Final Thoughts
Connecting to the host machine’s localhost from inside a Docker container can be challenging at first. However, with the methods described above, you have several options to choose from. Each method has its own pros and cons, so pick the one that best fits your project needs.
- Host network mode is simple but reduces isolation.
- host.docker.internal is ideal for Docker Desktop users.
- Using the Docker bridge IP is a common solution on Linux.
- Extra hosts in Docker Compose or custom networks provide more control in complex environments.
When you work with Docker, it is important to know how networking works. This helps you troubleshoot issues and build better containerized applications. For more information on container practices and other Docker topics, you might also like this article on How to use Docker Compose for development and testing.
Remember that every project is different. In some cases, you may need to adjust these methods to work with your specific setup. Experiment with these methods and see which one works best for your scenario. Always test your connections and keep an eye on any security issues that may arise.
This guide has walked you through the basic ways to connect to your host machine’s localhost from a Docker container. I hope the steps and examples help you understand the process better. With these tools, you can now confidently work on projects where your containerized application needs to talk to the host.
Keep exploring and practicing with Docker. As you gain more experience, you will find even more advanced techniques for managing container networking. Do not be afraid to experiment and adjust settings to match your needs.
Thank you for reading this guide. If you want to learn more about advanced container topics, you might enjoy reading additional articles like How to use Docker with Kubernetes for orchestration. Happy coding and containerizing!
To connect Docker to localhost, running Docker for Windows or Docker for Mac, you can use the special DNS name host.docker.internal which resolves to the internal IP address used by the host.
Within your container, all you need to do to access the localhost is point your request to http://host.docker.internal:<port>
This will not work in a production environment outside of Docker Desktop. So only use this in your development environment. For Linux users, just use docker run with –network=”host” and use 127.0.0.1 to point to your localhost.
A practical use case to connect docker to localhost
A typical example of using a connection to localhost is connecting to a database you have installed locally. I’ll use a PostgreSQL installation local on my Mac to demonstrate. For the PostgreSQL installation, I have installed the default settings and haven’t edited any configuration files to perform the following tasks.
I have a table Users in database bernieslearnings and I’ll run a container that can retrieve the data in the table. We’ll start by running an Ubuntu docker image in interactive mode and installing the postgres command line tools.
docker run -it ubuntu:latest
apt-get update && apt-get install -y postgresql-client

root@53ddd71e92c3:/# psql --user postgres --host host.docker.internal
Password for user postgres:
psql (12.4 (Ubuntu 12.4-0ubuntu0.20.04.1))
Type "help" for help.

postgres=# \c bernieslearnings
You are now connected to database "bernieslearnings" as user "postgres".
bernieslearnings=# select * from Users;
 pk |  name  | age
----+--------+-----
  1 | Bernie |  38
(1 row)
What about non-Windows/MacOS Docker users?
The above approach is the current way to connect docker to localhost for Docker Desktop For Windows and Docker Desktop for Mac users. But if you’re using a Linux system the approach is a little different.
In order to reach the hosts localhost you need to use –network=”host” in your docker run command. Then, when sending requests to 127.0.0.1 your request will be sent the host machines localhost.
A Linux Example
In this example, I will use a CentOS 7 installation to demonstrate how to connect docker to localhost. You should start by removing any older version of docker that may be installed so that you can use the latest for the following example. Enter the following to remove old docker installations.
sudo yum remove docker \
                  docker-client \
                  docker-client-latest \
                  docker-common \
                  docker-latest \
                  docker-latest-logrotate \
                  docker-logrotate \
                  docker-engine
In order to install docker on CentOS you need to have the yum-utils package installed.
sudo yum install -y yum-utilsNext, we’ll add the stable repository to yum
sudo yum-config-manager \
    --add-repo \
    https://download.docker.com/linux/centos/docker-ce.repo
To install the latest version of Docker Engine and contained
sudo yum install docker-ce docker-ce-cli containerd.ioNext, set your user to be part of the newly created docker group.
usermod -a -G docker usernameNow we need to start the docker engine
sudo systemctl start dockerNow that we have docker setup, we’ll need to run something to check our connection to localhost is working. This server has a MySQL instance running so we’ll use that as our test case.
Connect docker to localhost MySQL instance
Let’s run an Ubuntu docker container in interactive mode and connect that to the host network
docker run --network="host" -it ubuntu:latestNext, we need to update apt-get and then install mysql-client so we can query the database running on localhost outside of the container
apt-get update && apt-get install mysql-clientNow that the command-line client for MySQL is installed, all we need to do is to connect to our localhost MySQL instance
0.0.1 -u <username> -pEnter your password and show the databases available
mysql> show databases;
+--------------------+
| Database           |
+--------------------+
| information_schema |
| mail               |
| mysql              |
| performance_schema |
+--------------------+
4 rows in set (0.00 sec)
A history trying to connect docker to localhost
For previous iterations of Docker Desktop (for Windows and Mac) there was a different special DNS entry for connecting the hosts localhost.
The previous entry for MacOS was docker.for.mac.localhost and the entry for Windows was docker.for.win.localhost
For more information on any of the above topics, check out the following links:
- https://www.postgresqltutorial.com/postgresql-cheat-sheet/
- https://docs.docker.com/engine/install/centos/
- https://www.howtogeek.com/50787/add-a-user-to-a-group-or-second-group-on-linux/
For a quick overview of Docker itself, check out Docker – A concise, quick overview

Running Windows in a Docker container might sound like a complex task, but it’s perfectly achievable with the right tools and a clear guide. This blog post will walk you through the entire process, ensuring you have a Windows environment up and running in a Docker container in no time.
Plus, if you’re new to Docker, I’ve got a handy video tutorial covering how to install it on your machine, be it Windows, macOS, or Ubuntu.
Requirements
Before we dive in, ensure Docker is installed and running on your system. If you need help with this, check out my video tutorial or blog post on installing Docker on Ubuntu. If you’re using macOS, the process is slightly different; I’ve covered that in my guide on how to install Docker on macOS, which is essential for this tutorial.
The Project
We’ll utilize a project from GitHub, specifically designed for this purpose. You can find it at https://github.com/dockur/windows. This project uses KVM (a virtual machine) to run Windows inside a Docker container, giving you the full functionality of a Windows environment.
Setting Up Your Environment
First, let’s set up the Docker environment for running Windows. Open your terminal and follow these steps:
- Create a new directory for your project:
   mkdir windows
cd windows- Create a
compose.yamlfile to define your Docker environment:
   version: "3"
   services:
     windows:
       image: dockurr/windows
       container_name: windows
       devices:
         - /dev/kvm
       cap_add:
         - NET_ADMIN
       ports:
         - 8006:8006
         - 3390:3389/tcp
         - 3390:3389/udp
       stop_grace_period: 2m
       restart: on-failure
       environment:
         VERSION: "win11"
         RAM_SIZE: "8G"
         CPU_CORES: "4"
         DISK_SIZE: "256G"
       volumes:
- ./data:/storage- With your
compose.yamlready, bring up your Docker container:
docker compose up -dNow, your Windows environment should be initialized. You can view the installation process by navigating to localhost:8006 your web browser.
Accessing Your Windows Environment
There are a couple of ways to access your new Windows container:
- Remini: A convenient tool for connecting to your Windows Docker container.
- Remote Desktop Protocol (RDP): Use RDP to connect directly using the server IP where your container is running. The default credentials are
user: dockerandpass: "".
Monitoring and Management
- To view the resources being used by your Windows container, simply open the Task Manager.
- Network volumes and mounts can be checked to ensure your data is correctly linked.
- Remember, to stop the virtual machine, use:
docker stop windowsIf you don’t want the container to start with your computer, update its settings with:
docker update --restart=no windowsConfiguration and Usage
- To inspect your container’s configuration:
docker inspect windowsTo start the container:
docker start windows- While you can’t play 3D games, many software applications and simpler games will run smoothly.
Legality
Concerned about the legality of this project? Fear not. This project comprises entirely open-source code and doesn’t distribute any copyrighted material. Any product keys found within are generic placeholders provided by Microsoft for trial purposes, making this project legal under all applicable laws.
Conclusion
Running Windows in a Docker container is an excellent way to leverage the flexibility of Docker with the familiarity of Windows. Whether for development, testing, or running specific Windows-only applications, this setup provides a robust solution. Remember, for those new to Docker, ensure you’re comfortable with the basics – my video tutorial and other blog posts, like application monitoring with Docker or guide to deploy Kubernetes, can help you get started.
Feel free to share your thoughts, questions, or feedback in the comments section below. Happy Docking!